
Lion Rock Pro - Tripod ROLLEI - Free user manual and instructions
Find the device manual for free Lion Rock Pro ROLLEI in PDF.


| Product Type | Professional Tripod with Ball Head |
| Brand | Rollei |
| Model | Lion Rock Pro |
| Tripod Material | Carbon fiber |
| Head Material | Aluminum |
| Sections | 4 |
| Max Leg Diameter | 32 mm |
| Pack Size (with head) | 61.0 cm |
| Minimum Height (with head) | 19.0 cm |
| Maximum Height (with head) | 147.5 cm |
| Weight (with head) | 2.02 kg |
| Max Load Capacity (tripod + head) | 20 kg |
| Ball Head Diameter | 4.4 cm |
| Quick-Release Plate Type | Arca-Swiss compatible with anti-slip screws |
| Spirit Level | Yes |
| Angle Adjustment | Semi-automatic pull-out lock |
| Accessories Included | Allen key, quick-release plate, spikes |
| Optional Accessories | Levelling adapter, centre column |
| Maintenance | Clean with dry cloth; avoid water and solvents |
Frequently Asked Questions - Lion Rock Pro ROLLEI
User questions about Lion Rock Pro ROLLEI
0 question about this device. Answer the ones you know or ask your own.
Ask a new question about this device
Download the instructions for your Tripod in PDF format for free! Find your manual Lion Rock Pro - ROLLEI and take your electronic device back in hand. On this page are published all the documents necessary for the use of your device. Lion Rock Pro by ROLLEI.
USER MANUAL Lion Rock Pro ROLLEI
natural_image
Technical line drawing of a tripod-mounted device with attached camera module (no text or symbols)Product Overview Ball Head.....14
Using the Quick-Release Plate....15
Setting the Damping 16
Product Overview Tripod 18
Angle Adjustment 19
Using the Accessories. 20
Optionally Available....20
Assembly and Disassembly of Accessories 22
Technical Data 22
on Rock Pro
Produktübersicht
Abb. 1

Optional erhältlich
natural_image
Diagram of a mechanical assembly with a top component and three legs, no text or symbols presentDemontage:
Thank you for choosing our products! Please read carefully before use.
Product Overview Ball Head
1 Base plate
2 Safety mechanism quick-release plate
3 Locking screw of the base plate
4 Anti-slip groove
5 Ball joint
6 Damping button
7 Main locking screw
8 Base
9 1/4 inch screw
10 Spirit level
11 Quick-release plate
Panorama base locking button
13 1/4-inch thread
14 Base locking button

Using the Quick-Release Plate
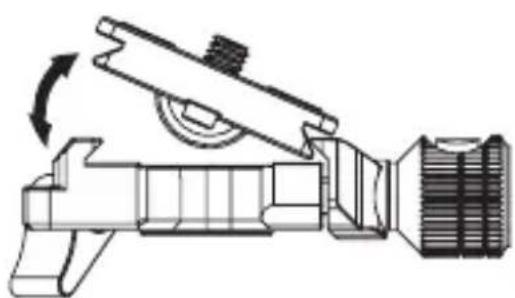
- Loosen the locking screw of the base plate [3]. Also press down the Safety mechanism quick-release plate [2] to be able to open the base plate [1] completely.
- Align the quick-release plate [11] as shown in the picture.
- Insert one side first and then the other.
- Tighten the locking screw of the base plate [3] again as soon as the quick-release plate [11] is correctly inserted.
- If you also want to use the supplied quick-release plate [11] on other Arca-Swiss-compatible heads without anti-slip grooves, unscrew the anti-slip screws using an Allen key.

natural_image
Technical line drawing of a mechanical assembly with no visible text or symbols
Setting the Damping
- Install your camera on the ball head.
- Loosen the main locking screw A [7] (Fig. 1) and carefully swivel the camera platform until you have found the desired movement sensitivity.
- Then pull out the damping knob B [6] (Fig. 1) and turn it clockwise until the two stoppers meet (Fig. 2).
A Main locking screw Blockade
B Damping button Blockade

Fig. 1

Fig. 2:
Detail enlargement of main locking screw A and damping button B
Fig. 3
Setting the Damping
Release the damping
Note: Hold the appliance firmly with one hand and carry out this procedure with the other hand to avoid damaging the appliance.
- Pull out the damping knob [6] (Fig. 1) and release it when it is turned anticlockwise to the corresponding position.
- Turn the main locking screw [7] anti-clockwise (Fig. 1) as far as the stop on the damping knob [6] (Fig. 3) to completely release and move the ball.
Using the panoramic base locking knob


Product Overview Tripod
1 Accessory locking button
2 Angle locking
3 Accessory safety button
4 Tighten
5 Loosen
6 Rubber feet / spikes
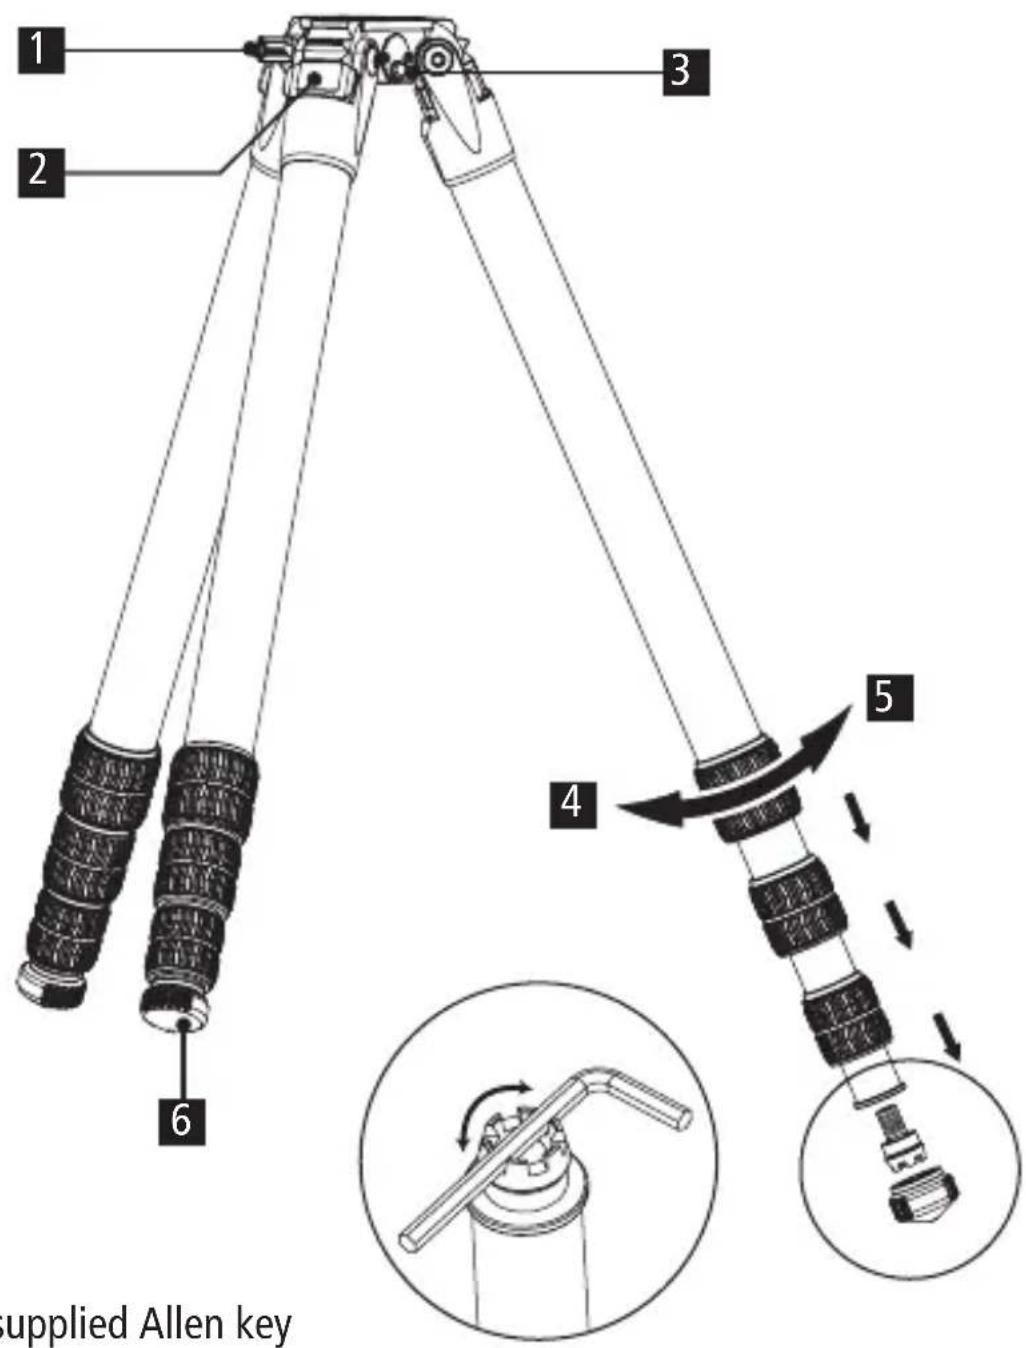
Use the supplied Allen key as shown in the illustration to tighten or loosen the feet.
Angle Adjustment
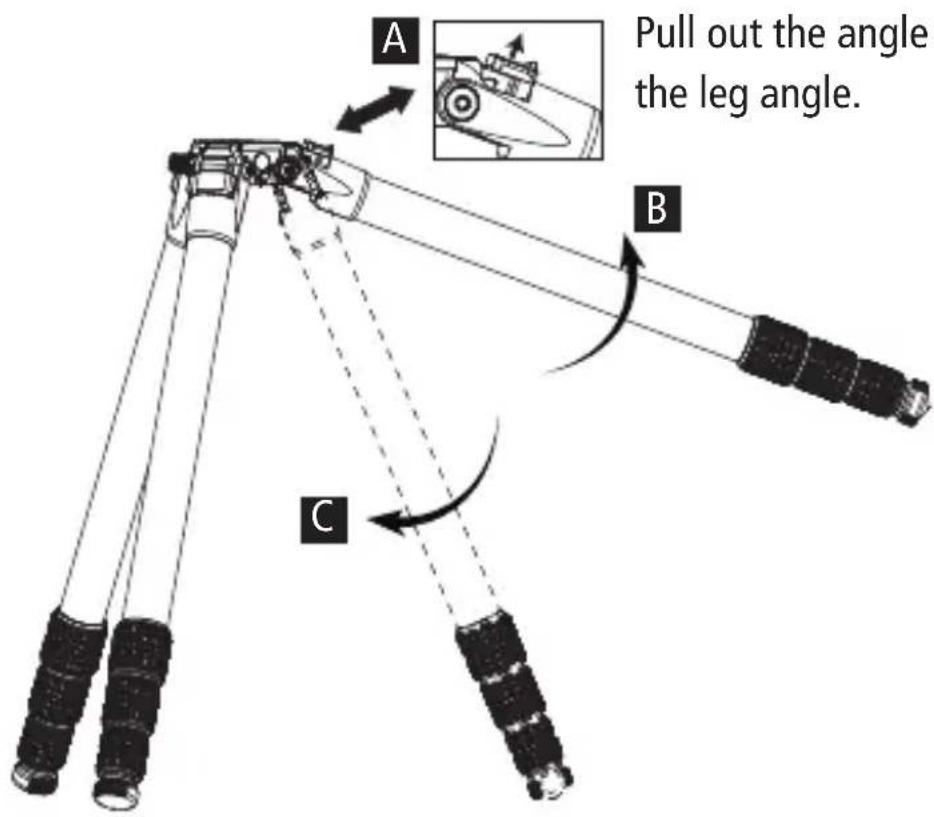
Semi-automatic angle adjustment:
A Pull out the angle locking [2] until it locks into place.
B Set the leg to the maximum angle, the angle locking [2] automatically springs back into the lock.
C Then move the leg to the desired, smaller angle until it engages automatically.
Using the Accessories
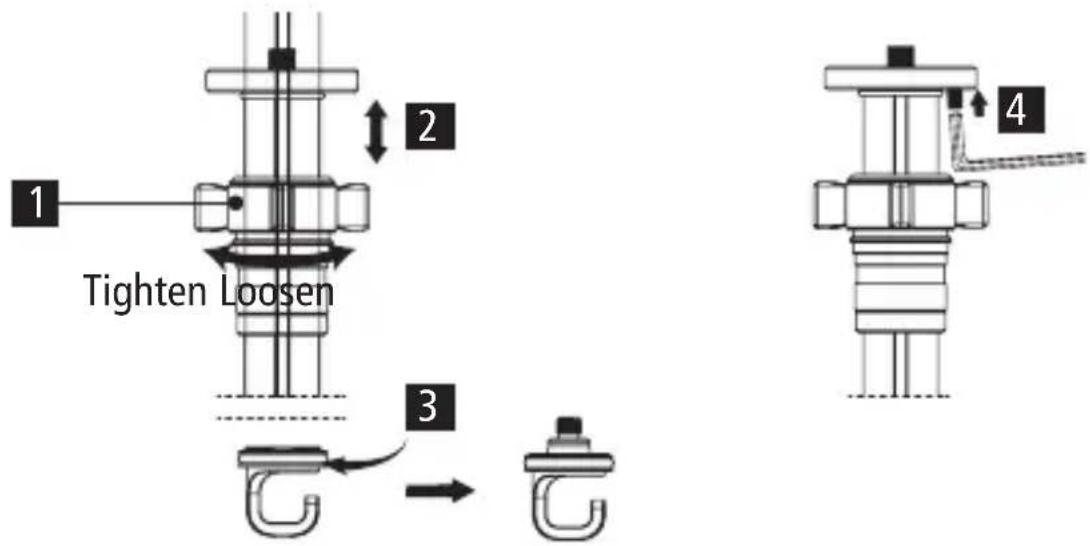
1 Turn the hook to the left to release it.
2 With the head fitted, turn the counter screw upwards using the Allen key to prevent the head from turning.

Optionally Available
Levelling adapter for Lion Rock Pro
1 Levelling locking screw.
2 Loosen the levelling locking screw to freely adjust the angle.
3 Turn the hook to the left to release it.
4 With the head fitted, turn the counter screw upwards using the Allen key to prevent the head from turning.

ENGLISH
Optionally Available
Centre column for Lion Rock Pro
1 Centre column locking screw.
2 Loosen the centre column locking screw to adjust the height of the centre column.
3 Turn the hook to the left to release it.
4 With the head fitted, turn the counter screw upwards using the Allen key to prevent the head from turning.
Assembly and Disassembly of Accessories
Assembly:
Position the accessory over the corresponding point on the stand and press it down until it clicks into place.

natural_image
Diagram of a mechanical assembly with a top component and three legs, showing a downward force (no text or symbols)Disassembly:
A Loosen the accessory locking screw.
B Press and hold the accessory locking button.
C Remove the accessory.

Technical Data
| Lion Rock Pro tripod with / without tripod head |
| Tripod material Carbon |
| Sections 4 |
| Tripod leg diameter Max. ∅ 32 mm |
| Pack size 61.0 cm / 51.9 cm |
| Minimum height 19.0 cm / 9.9 cm |
| Maximum height 147.5 cm / 138.4 cm |
| Weight 2.02 kg / 1.56 kg |
| Maximum load capacity 20 kg / 25 kg |
Technical Data
| Lion Rock Pro tripod head |
| Head material Aluminium |
| Ball diameter 4.4 cm |
| Base width 5.7 cm |
| Base height 9.1 cm |
| Weight 0.46 kg |
| Maximum load capacity 20 kg |
| Lion Rock Pro + levelling |
| Sections 4 |
| Tripod leg diameter Max. ∅ 32 mm |
| Pack size 55 cm |
| Minimum height 13.5 cm |
| Maximum height 143 cm |
| Weight 1.62 kg |
| Maximum load capacity 20 kg |
| Lion Rock Pro + centre column |
| Sections 4 |
| Tripod leg diameter Max. ∅ 32 mm |
| Pack size 54.5 cm |
| Minimum height 38 cm |
| Maximum height 170 cm |
| Weight 1.61 kg |
| Maximum load capacity 20 kg |
The design and specification of the actual product may vary.
Rollei
Optional accessories:
- Produktübersicht
- Optional erhältlich
- Demontage:
- Product Overview Ball Head
- Using the Quick-Release Plate
- Setting the Damping
- Release the damping
- Using the panoramic base locking knob
- Product Overview Tripod
- Angle Adjustment
- Semi-automatic angle adjustment:
- Using the Accessories
- Optionally Available
- Levelling adapter for Lion Rock Pro
- Centre column for Lion Rock Pro
- Assembly and Disassembly of Accessories
- Assembly:
- Disassembly:
- Technical Data
- Rollei
Brand : ROLLEI
Model : Lion Rock Pro
Category : Tripod