
NuMotion Infinity Swing - Baby swing Baby Trend - Free user manual and instructions
Find the device manual for free NuMotion Infinity Swing Baby Trend in PDF.


| Product Type | Baby Swing |
| Brand | Baby Trend |
| Model | NuMotion Infinity Swing |
| Dimensions (L x W x H) | 22 x 18 x 28 inches |
| Weight | 15 lbs |
| Power Source | AC adapter (included) or 4 D batteries (not included) |
| Speed Settings | 6 swing speeds |
| Music & Sounds | Built-in melodies and nature sounds |
| Timer | Auto shut-off timer (30, 45, 60 minutes) |
| Seat Recline | Multiple recline positions |
| Safety Harness | 5-point harness |
| Maximum Weight Capacity | 25 lbs |
| Age Range | Newborn to 6 months |
| Cleaning Instructions | Wipe seat pad with damp cloth and mild soap; machine washable seat cover |
| Assembly Required | Yes, simple assembly with included tools |
| Spare Parts Availability | Contact Baby Trend customer service |
| Warranty | 90 days limited warranty |
Frequently Asked Questions - NuMotion Infinity Swing Baby Trend
User questions about NuMotion Infinity Swing Baby Trend
0 question about this device. Answer the ones you know or ask your own.
Ask a new question about this device
Download the instructions for your Baby swing in PDF format for free! Find your manual NuMotion Infinity Swing - Baby Trend and take your electronic device back in hand. On this page are published all the documents necessary for the use of your device. NuMotion Infinity Swing by Baby Trend.
USER MANUAL NuMotion Infinity Swing Baby Trend
Read all instructions BEFORE assembly and USE of product. KEEP INSTRUCTIONS FOR FUTURE USE.
NuMotion Infinity Swing

babytrend®
Quality • Comfort • Style
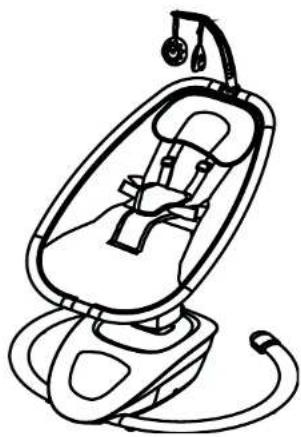
natural_image
Line drawing of a baby car seat with adjustable straps and earphones (no text or symbols)Instruction Manual Manual de Instrucciones
SW03XXXXA
Baby Trend, Inc.
13048 Valley Blvd.
Fontana CA 92335
1-800-328-7363
(8:00 a.m. \~ 4:30 p.m. PST)
www.babytrend.com

babytrend®
Quality·Comfort·Style

babytrend
WARRANTY
DO NOT RETURN YOUR PRODUCT TO THE STORE. PLEASE CONTACT BABY TREND® FOR REPLACEMENT PARTS, SERVICE AND REPAIR.
The Baby Trend® warranty covers workmanship defects within 1 year of purchase. Any product which has been subjected to misuse, abuse, abnormal use, excessive wear and tear, improper assembly, negligence, environmental exposure, alteration or accident, or has had its serial number altered or removed invalidates all claims against the manufacturer. Any damage to property during installation is the sole responsibility of the end user.
Customer Service Department can be contacted at 1 (800) 328-7363 Monday through Friday between 8:00 a.m. and 4:30 p.m. (PST). Return Authorizations are required prior to returning product(s) to Baby Trend®. Please visit http://babytrend.com/pages/limited-warranty for complete warranty details.
GARANTIA
NO DEVUELVA SU PRODUCTO A LA TIENDA, POR FAVOR CONTACTE A BABY TREND® PARA PIEZAS DE REPUESTO, SERVICIO Y REPARACION.
Baby Trend, Inc. 13048 Valley Blvd. Fontana CA 92335
1-800-328-7363 • (8:00am - 4:30pm PST)
www.babytrend.com
WARNING WARNING

⚠ NOT INTENDED FOR SLEEP
Stay near and watch baby during use. This product is not safe for sleep or unsupervised use. If baby falls asleep, remove baby as soon as possible and place baby on a firm, flat sleep surface such as a crib or bassinet.
WARNING: FALL AND STRANGULATION
HAZARD: Infants have suffered head injuries falling from swings and have strangled in straps.
- ALWAYS use restraints. Adjust to fit snugly.
STOP using product when infant attempts to climb out (approximately 9 months) or has reached 25lbs, which ever comes first.
ALWAYS place swing on floor. Never use on any elevated surface.
SUFFOCATION HAZARDS: Young infants have limited head and neck control. If the seat is too upright, infant's head can drop forward and compress the airway, resulting in fatality. - ALWAYS keep swing seat fully reclined until infant is at least 4 months old AND can hold up head without help.
- NEVER add soft bedding or padding.
- NEVER use on a bed, sofa, cushion, or other soft surface.
• Infants have su ffocated:
• on pillows, comforters, and extra padding.
- in gaps between a wrong-size mattress, or extra padding and product sides.
• NEVER leave baby unattended.
• NEVER lift or carry baby in product.
- DO NOT place product near water. Do not use the product near potential wet areas, such as a bathtubshower, sink, laundry tubs, etc.
IMPORTANT! Adult assembly required. Please read all instructions before assembly and use of the product.
Care should be taken in unpacking and assembly. Examine product frequently for damaged, missing, or loose parts.
DO NOT use if any parts are missing, damaged, or broken. Please contact our customer service for replacement parts and instructions if needed.
NEVER substitute parts.
NEVER carry the swing by the toy bar carry the swing by the to
PARTS
HOW TO USE
Check the parts to make sure you have all the parts for this model before assembling the swing.
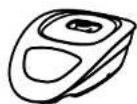
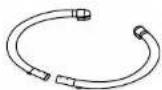
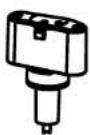
(2) Bottom tubes Main Frame Connection Support
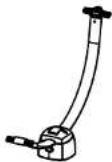
Seat Support Frame
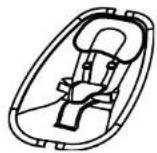
Seat
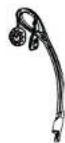
Toy Bar
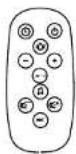
Remote Control
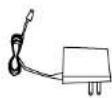
Adapter with Cable
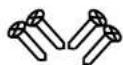
(4) Screws
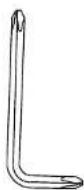
Screwdriver
TO ASSEMBLE BOTTOM TUBES
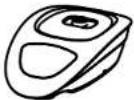
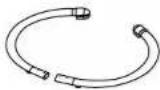
(2) Bottom tubesMain Frame
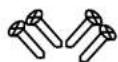
14| Screws
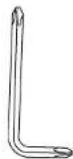
Screwdriver
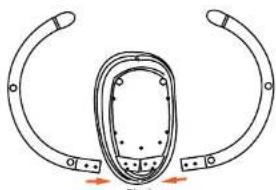
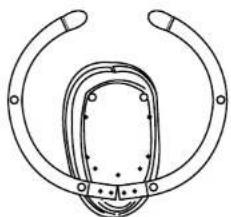
1) • Insert two bottom tubes into the main frame as shown on the direction of the arrows (Fig 1a). Secure it with the 4pcs screws using the included screwdriver (Fig 1b). The whole base should not be wobbly (Fig 1c)
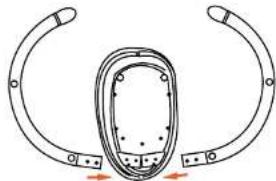
natural_image
Diagram of a mechanical component with curved ends and internal oval structure, no text or symbols presentFig 1a
natural_image
Technical line drawing of a mechanical component with no visible text or symbolsFig 1b
natural_image
Pure diagram of a mechanical or electrical component with no text, numbers, or symbolsFig 1c
HOW TO USE HOW TO USE
TO ASSEMBLE CONNECTION SUPPORT
2) • Press down on the connection support (Fig 2a) until you hear the "click" sound (Fig 2b), that means you have installed it properly. If you don't hear the "click" sound, please press down harder.
natural_image
Diagram of a medical device with a probe inserted, showing internal components and a red arrow indicating direction (no text or symbols)Fig. 2a
TO ASSEMBLE SEAT SUPPORT FRAME
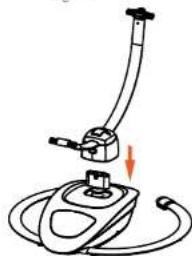
3) • Press down on the seat support frame (Fig 3a) until you hear the "click" sound and the button pops up, that means you have installed it properly (Fig 3b). If you don't hear the "click" sound, you can press down harder until the button pops up.
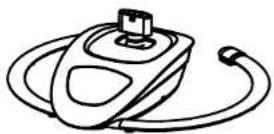
Fig. 2b
natural_image
Simple line drawing of a mechanical device with a lever and base, no text or symbols presentFig. 3a
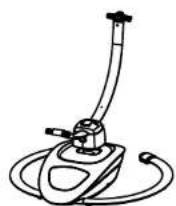
Fig. 3b
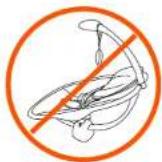
WARNING: FALL HAZARD:
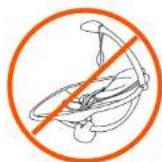
Never use the swing without the base. Babies may suffer skull fractures falling while in and from swing if it tips over.
TO ASSEMBLE SEAT
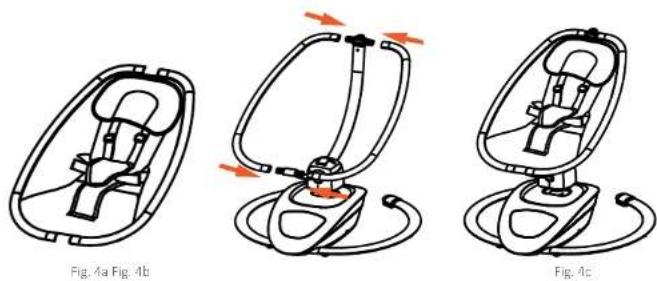
4) Place the assembled base set on the ground (Fig 4a), then gently insert the tubes into the tubes slots on both sides (Fig 4b). Make sure the tubes are fully locked (Fig 4c). Please note the orientation of the seat before installing.
HOW TO USE HOW TO USE

WARNING: The toy bar is not a Carry handle.
TO ATTACH TOYS ON TOY BAR
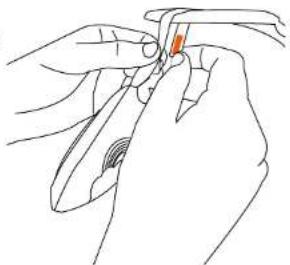
5) •To attach toys on the toybar, wrap the toy strap around the hole on the toybar and secure using the hook and loop (Fig 5)
natural_image
Line drawing of hands using a tool to adjust or install a small orange component (no text or symbols present)Fig. 5
TO ASSEMBLE TOY BAR
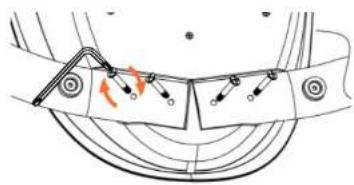
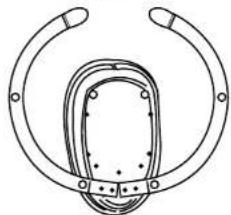
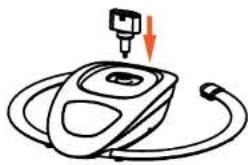
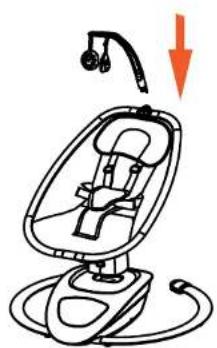
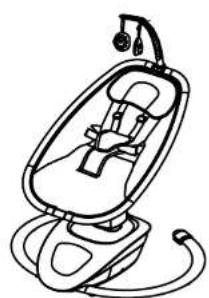
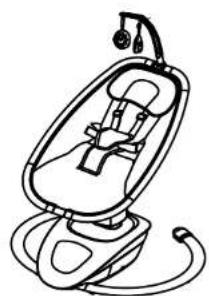
6) Insert the toy bar at the top of the seat (Fig 6a). Please note that the toy bar cannot be taken out easily after assembling. See Fig 6b for fully assembled toy bar.
natural_image
Line drawing of a baby car seat with a hanging device and orange arrow indicating downward motion (no text or symbols)Fig. 6a
natural_image
Line drawing of a baby car seat with straps and headband (no text or symbols)Fig. 6b
Copyright © 2024, Baby Trend® Inc., All Rights Reserved. Todos los derechos reservados. Copyright © 2024, Baby Trend
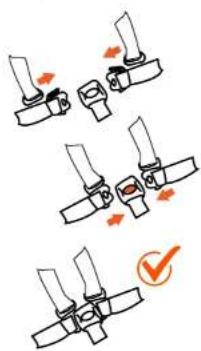
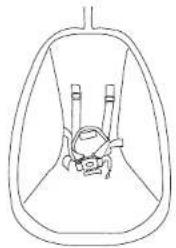
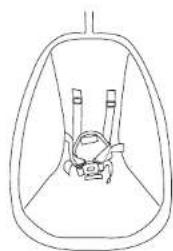
Seat belt installation method:
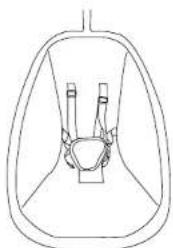
Disassemble the strap in the following sequence: Remove the hook and loop from the strap cover, press the round button in the middle of the buckle to release the belt, slide the left and right upper buckle out as shown.
natural_image
Simple line drawing of a symmetrical mechanical or anatomical component (no text or symbols)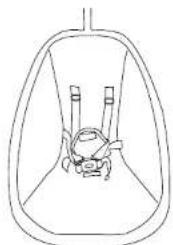
natural_image
Simple line drawing of a mechanical component inside a rounded rectangular frame (no text or symbols)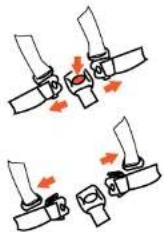
Assemble the strap in the following sequence: Slide in the left and right upper buckle as shown, then insert them into the center buckle, cover the buckle with strap cover.
natural_image
Simple line drawing of a medical device inside a container (no text or symbols)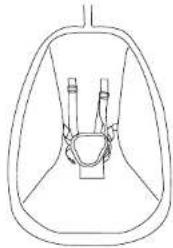
natural_image
Simple line drawing of a symmetrical container with two handles and a central handle (no text or symbols)* Inc., All Rights Reserved. Todos los derechos reservados
HOW TO USE HOW TO USE
WARNING: STRANGULATION HAZARD.
Children have STRANGLED in cords. Keep this cord out of the reach of children (more than 3ft. (0.9m) away).
1) POWER SELECTION SUPPLY
• Power supply selection
It is recommended to use the adapter (DC 5volt, 2ampere) supplied by BabyTrend. Plug the adapter into the household power supply 110-240V directly. And plug the other end into the Type-C dock on the right side of the main frame (Fig 7). It is recommended to use indoors, away from damp places.
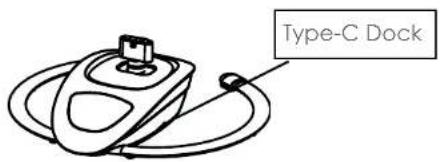
Fig.7
2) TOUCH PANEL BUTTON FUNCTION
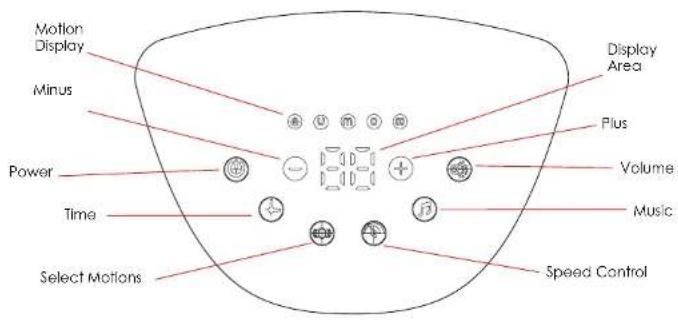
2.1Power
Press the icon to activate/stop the device. If pressed while the swing is on, the music and timer function will stop as well.
2.2 Timer function
You can use the plus(+) and minus(-) icons to control the timing of the swing. The icon will flash when you press it, then you can choose 5/10/20/30/45 minutes. The default startup time is 45 minutes.
2.3 Swing motion
The icon will flash when you press it, then you can use plus(+) and minus(-) icons to choose the swing modes. Up to five motions.
2.3.1 N shape n Simulates the moving trajectory of a parent holding a baby while walking
2.3.2 U shape ⓤ Simulates a rocking motion.
2.3.3 M shape (m) Enhanced simulation holding a baby while walking.
2.3.4 O shape Simulates the curved trajectory of holding a baby in circles.
2.3.5 Infinite shape ① Simulates the wave pattern of the baby's free movement in the womb.
HOW TO USE HOW TO USE
2.4 Swinging speed:

The icon will flash when you press it, then you can use plus(+) and minus(-) icons to choose the swinging speed from levels 0-4.
2.5 Music function (

The icon will flash when you press it, then you can use plus(+) and minus(-) icons to choose the melodies. Contains 10 songs and 3 white noises in loop until timer is over. Repeats exact songs when you power off, but if you disconnect the power, it will start playing from the first track.
2.6 Volume

The icon will flash when you press it, then you can use plus(+) and minus(-) icons to choose the volume from levels 0-5.
Read all instructions before use of the remote control.
Keep instructions for future use.
The remote controller is not a toy, keep it out of reach of children.
⚠ WARNING
- INGESTION HAZARD: This product contains a button cell or coin battery.
• DEATH or serious injury can occur if ingested.
• A swallowed button cell or coin battey can cause Internal Chemical Burns in as little as 2 hours.
- KEEP new and used batteries OUT OF REACH OF CHILDREN.
- Seek immediate medical attention if a battery is suspected to be swallowed or inserted inside any part of the body.
- Remove and immediately recycle or dispose of used batteries according to local regulations and keep away from children. Do NOT dispose of batteries in household trash or incinerate.
• Non-rechargeable batteries are not to be recharged.
- Even used batteries may cause severe injury or death. - Call a local poison control center for treatment information.
- The compatible battery type is CR2025 and the nominal battery voltage is 3V.
- Do not force discharge, recharge, disassemble, heat above 50^ (122F) or incinerale. Doing so may result in injury due to venting, leakage or explosion resulting in chemical burns.
- Ensure the batteries are installed correctly according to polarity (+ and-).
- Remove and immediately recycle or dispose of batteries from
equipment not used for an extended period of time according to local regulations.
- Always completely secure the battery compartment. If the battery compartment does not close securely, stop using the product, remove the batteries, and keep them away from children.

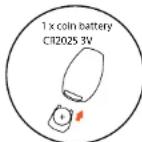
*Back of Remote*
HOW TO USE HOW TO USE
3) HOW TO USE REMOTE
WARNING: This product contains a button or coin cell battery. ALWAYS KEEP new and used batteries OUT OF REACH OF CHILDREN
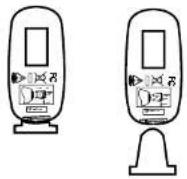
3.1 When using the product remote control for the first time, please pullout the battery isolation film from the bottom of the remote and keep safe. If you don't want to use it, you can insert the film back to the original position to avoid power consumption and extend the life time of the remote.
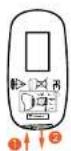
3.2 To change batteries, press the bottom left tab on the back of the remote, then pull the slot on the right.
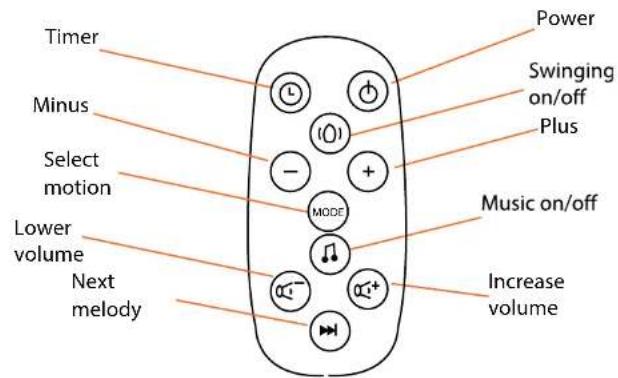
3.3 Power press once, power on and the swing is in standby mode. Press it again to shut down the swing.
3.4 Timer Ⓤ Press it once to show the timer, then press it again to confirm.
3.5 Swinging® press this icon to activate swinging function, default setting is level one speed at N mode.
3.6 Motion selection Ⓜ Press it to choose the motions
3.7 Plus(+) Press it to increase the swinging speed, keep pressing it until the highest level.
3.8 Minus(−) Press it to lower the swinging speed, keep pressing it until swing stops.
3.9 Music Press it to activate the music function, press it again to shut down. The melodies are played in loop.
3.10 Next melody Press it to switch the melodies.
3.11 Volume up Press it to increase the volume, keep pressing it until the highest level.
3.12 Volume down Press it to lower the volume, keep pressing it until the lowest level.
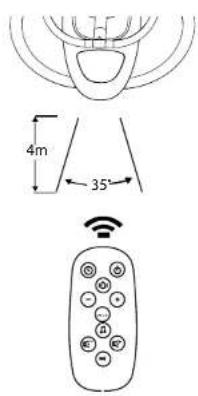
NOTE: Use the remote control correctly: the panel should face upward when using the remote, and the infrared lamp is facing the main base. The effective distance of the remote within 4 meters at the Angle of 35^ as shown below. Remote function may not work if not used properly.
HOW TO USE HOW TO USE
4) SEAT ANGLE ADJUSTMENT:
Pull up the lever on the connection hub as shown (Fig 8), then slide up or down the tube manually. The angle of highest position is 28^ , and the angle of lowest position is 15^ . Please don't adjust the seat angle while the baby is sitting on the swing.
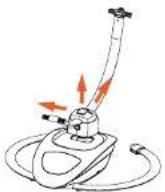
Fig. 8
5) SEAT ROTATION:
Hold the seat as shown with both hands (Fig 9a) to rotate 90 degrees to the left or right only (Fig 9b), the seat cannot be rotated 360 degrees.
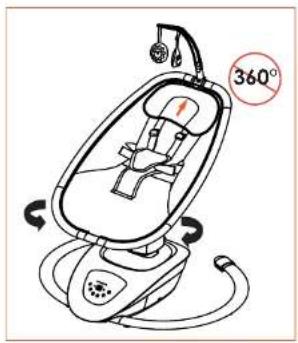
natural_image
Line drawing of a baby seat with 360° angle indicator (no text or symbols on the device itself)Fig. 9a
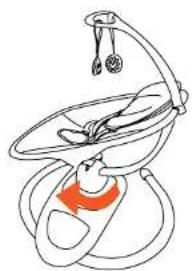
natural_image
Line drawing of a medical device with a red highlighted section (no text or symbols)Fig. 9b
6) PRODUCT DISASSEMBLY INSTRUCTIONS:
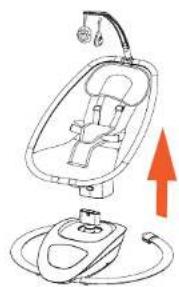
To remove the seat, press the button as shown (Fig 10a), then pull up the seat (Fig 10b)
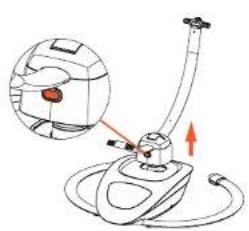
natural_image
Diagram of a vacuum cleaner with attached device and wiring, showing no text or symbolsFig. 10a
natural_image
Illustration of a baby seat with a hanging lamp and cord, showing no text or symbolsFig.10b
7) CARRYING THE SWING:
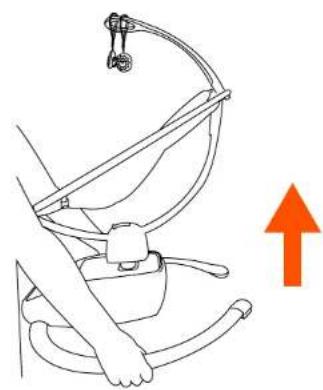
To properly carry the swing, please face the front of the swing, then lift from the metal support tubes, with one hand on each tube.
natural_image
Line drawing of a person using a bicycle seatbelt device with an orange upward arrow indicating motion (no text or symbols)ATTENTION:
- After plugging in the power, you can press the music icon to activate the music function individually without turning on the swing function.
- The motor has a protection mechanism:
When the product is swinging but blocked by an object, the product will detect said object and automatically activate the protection mechanism to stop all functions. You
can turn off and restart the swing to work normally.
- Usage of safe belt:
First, unfasten the safety belt and place it in the suitable position. Then place the baby in the swing. Buckle up the seat belt and the waist belt together. The seat belts must be buckled up correctly to ensure baby's safety.
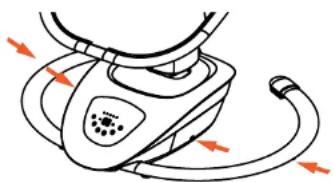
4. The correct way to carry the product is to hold the main electronic part or lift the bottom tubes with both hands.
natural_image
Illustration of a steam iron with attached cable and cord, showing airflow direction (no text or symbols)CARE AND MAINTENANCE
Seat Pad
Do not wash / To clean use only
mild household soap or detergent
and warm water on a clean sponge or
cloth / Do not bleach/ Do not iron / Do not dry clean
Toy bar and toys
Wipe clean with a
damp cloth and
mild soap. Air dry.
Do not immerse in
water.
Frame
Wipe the metal frame with
soft, clean cloth and mild
soap. Disconnect the power
supply before cleaning the
base. Do not immerse the
base in water.

natural_image
Technical diagram of a mechanical component with arrows indicating motion or force direction (no text or symbols)Fig 1a
natural_image
Diagram of a mechanical component with curved ends and mounting holes, showing directional arrows (no text or symbols)Fig 1a
natural_image
Pure mechanical component diagram without any text, numbers, or symbolsFig 1c
CÓMO UTILIZAR CÓMO UTILIZAR
natural_image
Simple line drawing of a device with a plug and cable, no text or symbols presentFig. 2a
PARA MONTAR EL MARCO DE SOPORTE DEL ASIENTO
natural_image
Simple line drawing of a mechanical device with a curved arm and base, no text or symbols present.Fig. 3a
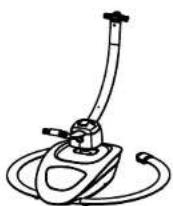
Fig. 3b
natural_image
Three-step diagram of a car seatbelt device with highlighted components and red arrows indicating motion (no text or symbols)CÓMO UTILIZAR CÓMO UTILIZAR
natural_image
Line drawing of hands using a tool to apply a red-orange mark on a mechanical part (no text or symbols present)Fig.5
PARA MONTAR LA BARRA DE JUGUETES
natural_image
Line drawing of a baby car seat with a downward arrow indicating motion (no text or symbols)Fig. 6a
natural_image
Line drawing of a baby seat with adjustable straps and earphones (no text or symbols)Fig. 6b
natural_image
Simple line drawing of a symmetrical mechanical or anatomical component (no text or symbols)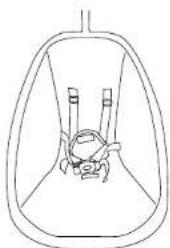
natural_image
Simple line drawing of a symmetrical container with internal components (no text or symbols)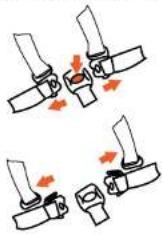
natural_image
Simple line drawing of a vehicle inside a container (no text or symbols)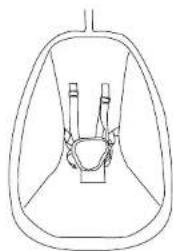
natural_image
Line drawing of a symmetrical mechanical or anatomical component with no visible text or symbolsCÓMO UTILIZAR CÓMO UTILIZAR
natural_image
Line drawing of a baby car seat with 360° angle indicator (no text or symbols on the diagram itself)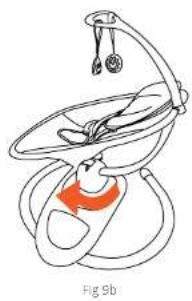
natural_image
Anatomical line drawing of a human heart with a highlighted region, labeled Fig 9b (no text or symbols on the diagram itself)6) INSTRUCCIONES DE DESMONTAJE DEL PRODUCTO:
natural_image
Line drawing of a person using a bicycle seatbelt device with an orange upward arrow indicating motion (no text or symbols)
ATENCIÓN:
natural_image
Illustration of a steam iron with red directional arrows indicating motion (no text or symbols)This device complies with Part 15 of the FCC rules. Operation is subject to the following two conditions:
1 this device may not cause harmful interference, and
2 this device must accept any interference received, including interference that may cause undesired operation.
WARNING: Changes or modification to this unit not expressly approved by the party responsible for compliance could void the user's authority to operate the equipment.
NOTE: This equipment has been tested and found to comply with the limits for a Class B digital device, pursuant to Part 15 of the FCC Rules.
These limits are designed to provide reasonable protection against harmful interference in a residential installation.
This equipment generates, uses and can radiate radio frequency energy and, if not installed nd used in accordance with the instructions, may cause harmful interference to radio communications. However, there is no guarantee that interference will not occur in a particular installation. If this equipment does cause harmful interference to radio or television reception, which can be determined by turning the equipment of and on, the user is encouraged to try to correct the interference by one or more of the following measures:
•Reorient or relocate the receiving antenna.
- Increase the separation between the equipment and receiver.
- Connect the equipment into an outlet on a circuit different from that to which the receiver is connected.
- Consult the dealer or an experienced radio/TV technician for help.
The Customer Service Department can be contacted at 1 (800) 328-7363 Monday through Friday between 8:00 a.m. and 4:30 p.m. (PST). Return Authorizations are required prior to returning product(s) to Baby Trend*.
BABY TREND® SERVICIO AL CLIENTE
- babytrend
- WARRANTY
- GARANTIA
- WARNING WARNING
- ⚠ NOT INTENDED FOR SLEEP
- WARNING: FALL AND STRANGULATION
- PARTS
- HOW TO USE
- HOW TO USE HOW TO USE
- TO ASSEMBLE CONNECTION SUPPORT
- TO ASSEMBLE SEAT SUPPORT FRAME
- WARNING: FALL HAZARD:
- TO ASSEMBLE SEAT
- WARNING: The toy bar is not a Carry handle.
- TO ATTACH TOYS ON TOY BAR
- TO ASSEMBLE TOY BAR
- Seat belt installation method:
- WARNING: STRANGULATION HAZARD.
- 1) POWER SELECTION SUPPLY
- • Power supply selection
- 2) TOUCH PANEL BUTTON FUNCTION
- 2.1Power
- Timer function
- Swing motion
- ⚠ WARNING
- WARNING: This product contains a button or coin cell battery. ALWAYS KEEP new and used batteries OUT OF REACH OF CHILDREN
- 4) SEAT ANGLE ADJUSTMENT:
- 5) SEAT ROTATION:
- 6) PRODUCT DISASSEMBLY INSTRUCTIONS:
- 7) CARRYING THE SWING:
- ATTENTION:
- CARE AND MAINTENANCE
- Seat Pad
- Frame
- CÓMO UTILIZAR CÓMO UTILIZAR
- PARA MONTAR EL MARCO DE SOPORTE DEL ASIENTO
- PARA MONTAR LA BARRA DE JUGUETES
- 6) INSTRUCCIONES DE DESMONTAJE DEL PRODUCTO:
- ATENCIÓN:
- BABY TREND® SERVICIO AL CLIENTE
Brand : Baby Trend
Model : NuMotion Infinity Swing
Category : Baby swing