
HmIPW-SMI55-A - Motion detector Homematic IP - Free user manual and instructions
Find the device manual for free HmIPW-SMI55-A Homematic IP in PDF.


| Product Type | Wired Motion Detector for 55 mm frames |
| Model | HmIPW-SMI55-A |
| Brand | Homematic IP |
| Color | Anthracite |
| Dimensions (without frame) | 71 x 71 x 40 mm |
| Dimensions (with frame) | 86 x 86 x 40 mm |
| Weight | 75 g |
| Supply Voltage | 24 VDC (+5% / -20%), SELV |
| Current Consumption | 5 mA max |
| Standby Power Consumption | 60 mW |
| Detection Range | 12 m |
| Detection Angle (Horizontal) | 120° |
| Detection Angle (Vertical) | -10° to +25° |
| Sensor Type | PIR sensor and integrated brightness sensor |
| Additional Functions | Two push-buttons for controlling other Homematic IP devices |
| Degree of Protection | IP20 |
| Protection Class | III |
| Ambient Temperature | -5 to +40 °C |
| Installation | Flush-mounted box (DIN 49073-1) |
| Cable Type | Rigid cable 0.12-0.50 mm² |
| Compatible Frames | Berker, Busch Jaeger, ELSO, GIRA, merten, JUNG, Kopp (with 55 mm intermediate frames) |
| Communication Protocol | Homematic IP Wired bus (SELV) |
| Configuration | Via Homematic IP app or CCU3 |
| Maintenance | Clean with soft, dry, lint-free cloth; no solvents |
| Safety | Installation only by qualified electricians; observe national standards |
Frequently Asked Questions - HmIPW-SMI55-A Homematic IP
User questions about HmIPW-SMI55-A Homematic IP
0 question about this device. Answer the ones you know or ask your own.
Ask a new question about this device
Download the instructions for your Motion detector in PDF format for free! Find your manual HmIPW-SMI55-A - Homematic IP and take your electronic device back in hand. On this page are published all the documents necessary for the use of your device. HmIPW-SMI55-A by Homematic IP.
USER MANUAL HmIPW-SMI55-A Homematic IP
Installing instruction and operating manual
Wired Bewegungsmelder für S. 2 55er Rahmen – innen, anthrazit Wired Motion Detector for p. 30 55mm frames – indoor, anthracite

natural_image
Line drawing of a wall-mounted electrical outlet with a rectangular opening (no text or symbols)Lieferumfang
Anzahl Bezeichnung
Printed in Hong Kong
2
3

1
4
5

6

7

8

9

10

Inhaltsverzeichnis
1 Homematic IP Wired Motion Detector for 55mm frames – indoor, anthracite
1 Clip-on frame
1 Mounting plate
2 Screws 3.2 x 15 mm
2 Screws 3.2 x 25 mm
2 Operating manuals
1 Additional safety instructions
Documentation © 2023 eQ-3 AG, Germany
All rights reserved. Translation from the original version in German. This manual may not be reproduced in any format, either in whole or in part, nor may it be duplicated or edited by electronic, mechanical or chemical means, without the written consent of the publisher.
Typographical and printing errors cannot be excluded. However, the information contained in this manual is reviewed on a regular basis and any necessary corrections will be implemented in the next edition. We accept no liability for technical or typographical errors or the consequences thereof.
All trademarks and industrial property rights are acknowledged.
Printed in Hong Kong
Changes may be made without prior notice as a result of technical advances.
159917A0A (web)
Version 1.0 (04/2023)
Table of contents
1 Information about this manual....32
2 Hazard information....32
3 Function and device overview ....35
4 General system information ....36
5 Start-up 36
5.1 General installation instructions....36
5.2 Installation.... 39
5.3 Mounting in multiple combinations .....40
5.4 Teaching-in....41
5.4.1 Connecting to the Central Control Unit CCU342
5.4.2 Connecting to the Homematic IP cloud via Wired Access Point....44
6 Function test 46
7 Operation.... 46
8 Error codes and flashing sequences....47
9 Restore factory settings....48
10 Maintenance and cleaning 49
11 Technical specifications....49
1 Information about this manual
Please read this manual carefully before beginning operation with your Homematic IP components. Keep the manual so you can refer to it at a later date if you need to. If you hand over the device to other persons for use, please hand over this manual as well.
Symbols used:

Attention!
This indicates a hazard.

Please note:
This section contains important additional information.
2 Hazard information

Do not open the device. It does not contain any parts that can be maintained by the user. If you have any doubts, have the device checked by an expert.

For safety and licensing reasons (CE), unauthorized change and/or modification of the device is not permitted.

Do not use the device if there are signs of damage to the housing, control elements or connecting sockets, for example. If you have any doubts, have the device checked by an expert.

The device may only be operated indoors and must be protected from the effects of moisture, vibrations, solar or other methods of heat radiation, cold and mechanical loads.

The device is not a toy; do not allow children to play with it. Do not leave packaging material lying around. Plastic films/bags, pieces of polystyrene, etc. can be dangerous in the hands of a child.

We do not assume any liability for damage to property or personal injury caused by improper use or the failure to observe the hazard information. In such cases, any claim under warranty is extinguished! For consequential damages, we assume no liability!

When connecting to the device terminals, take the permissible cables and cable cross sections into account.

The device is part of the building installation. Observe the relevant national standards and directives during planning and set-up. The device is intended for operation within the Homematic IP Wired bus only. The Homematic IP Wired bus is a SELV power circuit. Common cable routing of power supply and the Homematic IP Wired bus in installation or junction boxes is not permitted. The required isolation for power supply of the building installation to the Homematic IP Wired bus must be observed at all times. Non-compliance with the installation instructions can cause fire or introduce other hazards.

The device may only be used for fixed installations. The device must be securely attached within a fixed installation.

Observe the installation instructions for installation in distribution systems (DIN VDE 0100-410).

Using the device for any purpose other than that described in this operating manual does not fall within the scope of intended use and shall invalidate any warranty or liability.

The device may only be operated within domestic environment, in business and trade areas as well as in small enterprises.
3 Function and device overview
The Homematic IP Wired Motion Detector for 55mm frames detects movements as well as light intensity with an integrated brightness sensor. In addition, the device offers two push-buttons for controlling other Homematic IP devices, e.g. to switch lights on or off.
Thanks to the detection distance of up to 12 meters and a detection angle of 120irc (approx.) a large detection range can be monitored.
Brief changes in the level of brightness are filtered out. Thus, unintended response of the motion detector can be avoided. The brightness level for triggering and the level of sensitivity can be flexibly adjusted using the Homematic IP app.
Alternatively to mounting with the supplied removable frame, the Homematic IP Motion Detector can be integrated into existing switch series from other manufacturers.
Device overview (see figure 1):
(A) Mounting plate
(B) Clip-on frame
(C) Electronic unit (motion detector)
(D) Button channel 1
(E) PIR sensor
(F) Push-button channel 2
(G) System button (teach-in button and LED)
4 General system information
This device is part of the Homematic IP smart home system and works with the Homematic IP protocol. All devices of the system can be configured comfortably and individually with the user interface of the Central Control Unit CCU3 or flexibly via the Homematic IP smartphone app in connection with the Homematic IP cloud. All available functions provided by the system in combination with other components are described in the Homematic IP Wired Installation Guide. All current technical documents and updates are provided at www.homematic-ip.com.
5 Start-up
5.1 General installation instructions

Since the bus is powered by the Homematic IP Wired Access Point (HmIPW-DRAP), you must first set-up a Homematic IP Wired Access Point (HmIPW-DRAP) to enable power supply for the device.

Before installation, please note the device number (SGTIN) labelled on the device as well as the exact application purpose in order to make later allocation easier. You can also find the device number on the QR code sticker supplied.

Please note the insulation stripping length of the conductor to be connected, indicated on the device.

Please observe the hazard information in section "2 Hazard information" on page 32 during installation.

Please note! Only to be installed by persons with the relevant electro-technical knowledge and experience!*
Incorrect installation can put
- your own life at risk;
• and the lives of other users of the electrical system.
Incorrect installation also means that you are running the risk of serious damage to property, e.g. because of a fire. You may be personally liable in the event of injuries or damage to property.
Contact an electrical installer!
\*Specialist knowledge required for installation:
The following specialist knowledge is particularly important during installation:
- The "5 safety rules" to be used:
Disconnect from mains; Safeguard from switching on again; Check that system is de-energised; Earth and short circuit; Cover or cordon off neighbouring live parts;
- Select suitable tool, measuring equipment and, if necessary, personal safety equipment;
• Evaluation of measuring results; - Selection of electrical installation material for safeguarding shut-off conditions;
• IP protection types;
• Installation of electrical installation material; - Type of supply network (TN system, IT system, TT system) and the resulting connecting conditions (classical zero balancing, protective earthing, required additional measures etc.).
Permitted cable cross sections for connecting to the device are:
Rigid cable: 0.12-0.50 mm 4

For reasons of electrical safety, only the following cables must be used for connecting to the Home-matic IP wired bus:
- Telephone cable J-Y(ST)Y with 2 x 2 x 0.8 (= 0.5 mm 2 ) or 4 x 2 x 0.8 (= 0.5 mm 2 ), shielded, TP
- Ethernet installation cable S/FUTP, Type Cat5e or higher with 2 x 2 x AWG22 (= 0.34 mm 2 ) or 4 x 2 x AWG22 (= 0.34 mm 2 ), shielded, TP

The shield (continuity wire) must be connected to “-” (=GND) at the bus connection of the Wired Access Point (HmlPW-DRAP). The shield may not be connected to the motion detector.
5.2 Installation

The bus is powered by the Homematic IP Wired Access Point (HmIPW-DRAP). For further information, please refer to the operating manual of the corresponding Wired Access Points.

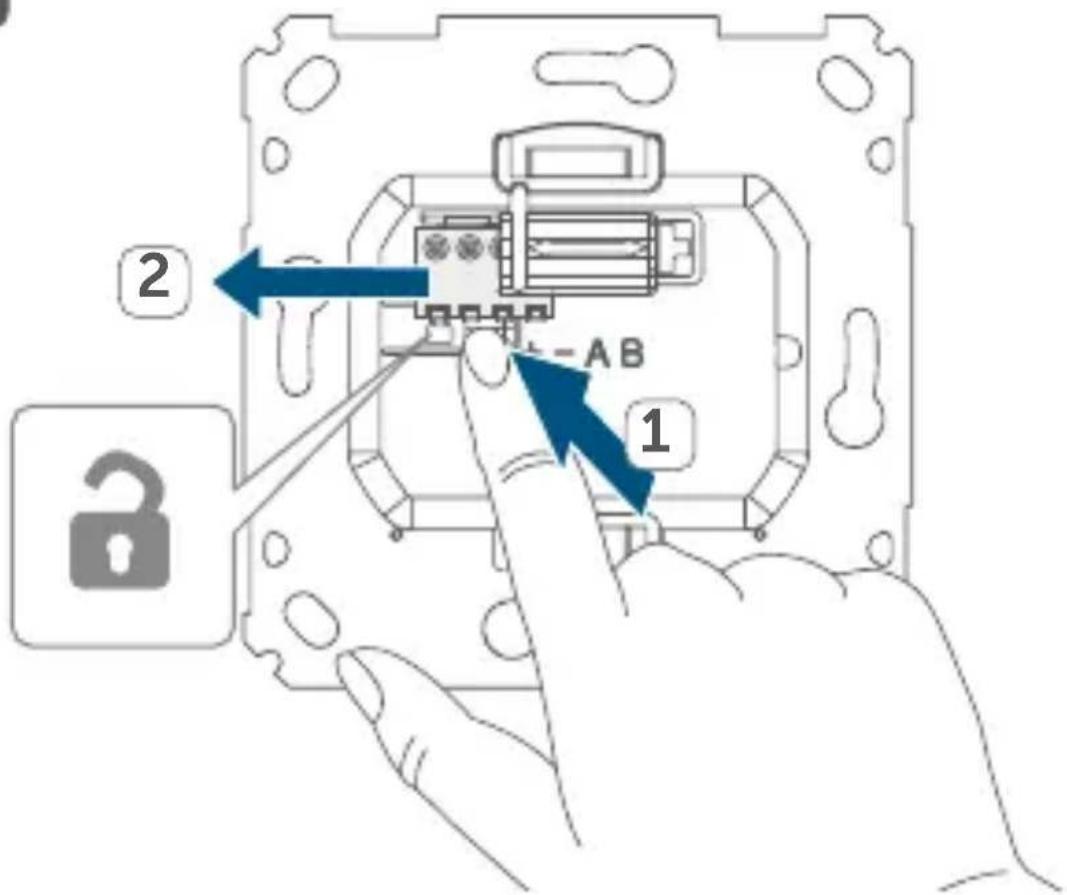
To facilitate connection to the terminals, the green push-in terminal can be removed from the device. To do this, release the mounting plate, press the latch on the back next to the lock symbol and slide the clamp out of the mounting plate to the side (see figure 2).
For the installation, please proceed as follows:
- Disconnect the corresponding line of the incoming Homematic IP wired bus.
- Connect the Homematic IP wired bus to the bus connecting terminals (see figure 3). To connect and loosen the single wires, press the orange clamp using a small screwdriver.
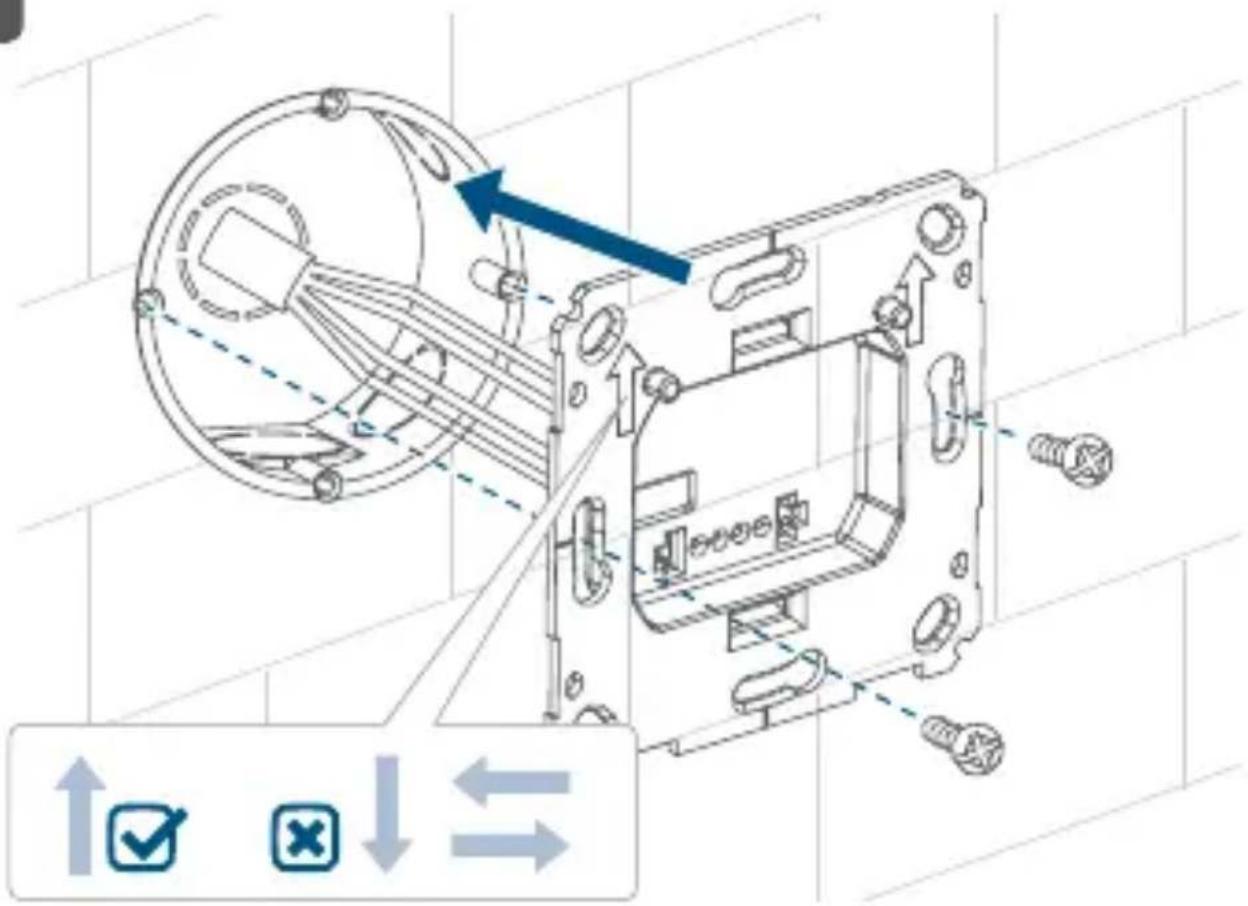
- Place the mounting plate (A) in the flush-mounted box and fasten it to the flush-mounted box using the screws supplied (see figure 4).
- Place the frame of your existing switch series or the supplied clip-on frame (B) to the mounting plate (see figure 5).
- Place the electronic unit (C) of the motion detector into the frame by fully snapping the
connection pins into the appropriate bracket of the mounting plate (see figure 5).
- Switch the Homematic IP wired bus on again to activate the teach-in mode of the device (see „5.4 Teaching-in“ on page 41).
5.3 Mounting in multiple combinations
You can mount the device with the frame (B) provided or use it with frames of other manufacturers. The electronic unit (C) can also be integrated into a multi-gang frame (see figure 6). For mounting with multiple combinations, make sure that the mounting plate of the device is seamlessly aligned to the already fixed mounting plate/ retaining ring. The frames of the following manufacturers can be used:
| Manufacturer Frame | |
| Berker S.1, B.1, B.3, B.7 | |
| Busch Jaeger | carat*, future linear*, solo*, Busch-axcent*, Busch-dynasty*, balance SI |
| ELSO Joy | |
| GIRA Standard 55, E2, E22, Event, Esprit, ClassiX, E3 | |
| merten 1-M, Atelier-M, M-Smart, M-Arc, M-Star, M-Plan, M-Pure, System Antik*, System Fläche*, System Design* | |
| JUNG A 500, AS 500, A plus, A creation | |
| Kopp Athenis | |
*with 55 mm intermediate frames of the manufacturer
5.4 Teaching-in

Please read this entire section before starting the teach-in procedure.

Please refer to the Homematic IP Wired System Manual for detailed information on setup and control options.
To integrate the device into your system and enable it to communicate with other devices, you must teach it in first. You can use the following set-up and control options:
Connecting to the Central Control Unit CCU3
For local, software-based configuration and control via PC, you can connect the presence sensor to a Central Control Unit CCU3 and to use it in comprehensive programs (see „5.4.1 Connecting to the Central Control Unit CCU3“ on page 42).
Connection to the Homematic IP cloud
For a flexible control via free smartphone app, connect the device to the Homematic IP cloud (see „5.4.1 Connecting to the Central Control Unit CCU3“ on page 42). You can
- control the wired system via smartphone app using the Homematic IP Wired Access Point (HmIPW-DRAP) or
- combine wired devices with wireless Homematic IP devices via the Homematic IP Access Point (HmIP-HAP).
5.4.1 Connecting to the Central Control Unit CCU3
To control and configure Homematic IP wired devices software-based and comfortably as well as use it in central control unit programs, you have to connect it to the WebUI. To connect the device to the Central Control Unit CCU3, proceed as follows:
- Set up your Central Control Unit CCU3 as described in the operating manual and connect the Homematic IP Wired Access Point.
- Start the user interface "WebUI" on your computer.
- Click the "Teach-in devices" button on the right-hand side of the screen.

- To activate teach-in mode, click "Teach-in HmIP device" in the next window. The teach-in mode of the Central Control Unit will be activated for 60 seconds. An information box shows how much teach-in time remains.

• After power supply is established, the device will be active for 3 minutes.

You can manually start the teach-in mode for another 3 minutes by pressing the system button (G) shortly (see figure 7).
- Please wait until teach-in is completed.
- If connection of the device was successful, the LED lights up green. The device is now ready for use.
• If the LED lights up red, please try again.
• After a short time, the newly connected device appears in the inbox of your software interface.
Newly connected devices and the corresponding channels are ready for operation and configuration only after they have been configured in the inbox. You will find further information in the Homematic IP Wired Installation Guide, available for download at www.homematic-ip.com.

For operation without Internet connection, please select the option "Teaching-in of Home-matic IP device without Internet connection".
Please enter the SGTIN and key of the device into the corresponding fields. You will find the SGTIN and the key on the supplied sticker. Please keep the sticker in safe place.
5.4.2 Connecting to the Homematic IP cloud via Wired Access Point
If you want to control your Homematic IP Wired devices flexibly via smartphone app, they can be connected to the Homematic IP cloud. To do this, please proceed as follows:
- Open the Homematic IP app on your smartphone.
- Connect the Homematic IP Wired Access Point via the smartphone app to the Homematic IP cloud, as described in the corresponding user manual
- Select the menu item "Teach-in device".
- After power supply is established, the teach-in mode will be active for 3 minutes.

You can manually start the teach-in mode for another 3 minutes by pressing the system button (G) shortly (see figure 8).
- Your device will automatically appear in the Homematic IP app.
- To confirm, please enter the last four digits of the device number (SGTIN) in your app or scan the QR code. Therefore, please see the sticker supplied or attached to the device.
- Please wait until teach-in is completed.
- If connection of the device was successful, the LED lights up green. The device is now ready for use.
- If the LED lights up red, please try again.
- Select the desired solution for your device.
- In the app, give the device a name and allocate it to a room.

If you are already using Homematic IP devices in your smart home system or if you want to combine your Homematic IP Wired devices with wireless Homematic IP components, you can also connect the Homematic IP Wired devices to an (installed) Access Point. Therefore, connect the Homematic IP Wired Access Point to the (installed) Homematic IP Access Point, as described in the user manual. Afterwards, please proceed as described above to connect the motion detector.
6 Function test

The function test is only activated if the motion detector has already been taught-in.
Up to 10 minutes after connecting the device or establishing the power supply (if the device has already been connected), the device LED (G) indicates detected movements. Meanwhile, the device LED flashes green. In this way, the detection range and sensitivity can be checked directly on the device.
7 Operation
The two push-buttons or channels (D + F) are used for wireless control of other Homematic IP devices and functions.
You can define the push-button functions according to your personal needs, e.g. for comfortably switching lights on and off, to activate or deactivate the eco mode or to move shutters up or down.
8 Error codes and flashing sequences
| Flashing code | Meaning Solution | |
| Short orange flashing | Data transfer Wait | t until the transmission is completed. |
| 1x long green lighting | Operation confirmed | You can continue operation. |
| 1x long red lighting | Operation failed | Please try again. |
| Short orange flashing (every 10 seconds) | Teach-in mode active | Please enter the last four numbers of the device serial number for confirmation (see „5.4 Teaching-in“ on page 41). |
| Green flashing (for one second each) | Functional test P | lease wait until the function test has finished after 10 minutes (see sec. „6 Function test“ on page 46). |
| 6x long red flashing | Device defective | Please see your app for error message or contact your retailer. |
| 1x orange and 1x green lighting (after establishing power supply) | Test display After | the test display has stopped, you can continue. |
9 Restore factory settings

The factory settings of the device can be restored. If you do this, you will lose all your settings.
To restore the factory settings of the device, please proceed as follows:
- Press and hold down the system button (G) for 4 seconds until the LED (G) quickly starts flashing orange (see fig. 9).
- Release the system button again.
- Press and hold down the system button again for 4 seconds, until the LED lights up green (see figure 10).
- Release the system button to finish the procedure.
The device will perform a restart. After the restart, you can again integrate your device into your Homematic IP system.
10 Maintenance and cleaning

The product does not require any maintenance. Enlist the help of an expert to carry out any repairs.
Clean the device using a soft, lint-free cloth that is clean and dry. Do not use any detergents containing solvents, as they could corrode the plastic housing and label.
11 Technical specifications
Device short name: HmIPW-SMI55-A
Supply voltage: 24 VDC, +5 % -20 %, SELV
Current consumption: 5 mA max.
Standby power consumption: 60 mW
Cable type and cross section rigid cable
0.12-0.50 mm²
Installation: only in normal
commercial switch boxes (device boxes) in accordance with DIN 49073-1.
Degree of protection: IP20
Protection class: III
Ambient temperature: -5 to +40 °C
Dimensions (W x H x D):
Without frame: 71 x 71 x 40 mm
Including frame: 86 x 86 x 40 mm
Weight: 75 g
Detection range: 12 m
Detection angle horizontal: 120°
Detection angle vertical: -10irc + 25irc
Subject to modifications.
Instructions for disposal

Do not dispose of the device with regular domestic waste! Electronic equipment must be disposed of at local collection points for waste electronic equipment in compliance with the Waste Electrical and Electronic Equipment Directive.
Information about conformity

The CE sign is a free trading sign addressed exclusively to the authorities and does not include any warranty of any properties.

For technical support, please contact your specialist dealer.
Bevollmächtigter des Herstellers: Manufacturer's authorised representative:

eQ-3 AG
Maiburger Straße 29 26789 Leer / GERMANY
www.eQ-3.de


- Installing instruction and operating manual
- Lieferumfang
- Anzahl Bezeichnung
- Inhaltsverzeichnis
- Table of contents
- Information about this manual
- Symbols used:
- Attention!
- Please note:
- Hazard information
- Function and device overview
- Device overview (see figure 1):
- General system information
- Start-up
- General installation instructions
- Contact an electrical installer!
- \*Specialist knowledge required for installation:
- Rigid cable: 0.12-0.50 mm 4
- Installation
- Mounting in multiple combinations
- Teaching-in
- Connecting to the Central Control Unit CCU3
- Connection to the Homematic IP cloud
- Connecting to the Central Control Unit CCU3
- Connecting to the Homematic IP cloud via Wired Access Point
- Function test
- Operation
- Restore factory settings
- Maintenance and cleaning
- Technical specifications
- Subject to modifications.
- Instructions for disposal
- Information about conformity
Brand : Homematic IP
Model : HmIPW-SMI55-A
Category : Motion detector