Vi30001 - Network card / adapter Vigitron - Free user manual and instructions
Find the device manual for free Vi30001 Vigitron in PDF.


| Product Type | Network Adapter / Health Tester |
| Model | Vi30001 |
| Brand | Vigitron |
| Dimensions (approx.) | 150 mm x 80 mm x 30 mm |
| Weight (approx.) | 300 g |
| Power Supply | USB power (5V DC) or internal battery |
| Network Interfaces | 1x RJ45 10/100/1000 Mbps |
| Display | LCD screen (status and results) |
| Key Features | Wired and wireless network scanning, bandwidth measurement, ping test, jumbo frame support, Onvif/UPnP discovery |
| Software Compatibility | NeTester software (included) |
| Operating System Support | Windows 10/11 |
| Reporting Formats | PDF, CSV, TXT |
| Maintenance | Keep device dry and clean; avoid extreme temperatures |
| Safety Precautions | Unplug before cleaning; use only supplied USB cable |
| Spare Parts & Repairability | Contact Vigitron support for service; no user-serviceable parts |
| General Information | Designed for network professionals; includes 7-day free trial license |
Frequently Asked Questions - Vi30001 Vigitron
User questions about Vi30001 Vigitron
0 question about this device. Answer the ones you know or ask your own.
Ask a new question about this device
Download the instructions for your Network card / adapter in PDF format for free! Find your manual Vi30001 - Vigitron and take your electronic device back in hand. On this page are published all the documents necessary for the use of your device. Vi30001 by Vigitron.
USER MANUAL Vi30001 Vigitron
NeTester™ Operational Manual NeTester ™ FreeRun Operation Manual
Network Health Installation, Commissioning Troubleshooting Software Release V1.00
Section 1: About This Manual
Copyright
Copyright ©2021 Vigitron, Inc. All rights reserved. The products and programs described in this User's Manual are licensed products of Vigitron Inc. This User's Manual contains proprietary information protected by copyright. This User's Manual and all accompanying hardware, software, and documentation are copyrighted. No parts of this User's Manual may be copied, photocopied, reproduced, translated, or reduced to any electronic medium or machine-readable from any means by electronic or mechanical. This includes photocopying, recording, or information storage and retrieval systems, for any purpose other than the purchaser's personal use, and without the prior express written permission of Vigitron, Inc.
Purpose
This Manual gives specific information on how to operate and use the management functions of NeTester Vi30001 V1.00.
Audience
The Manual is intended for use by network administrators who are responsible for operating and maintaining network equipment. Consequently, it assumes a basic working knowledge of general network communication, the Internet Protocol (IP), and Simple Network Management Protocol (SNMP).
Conventions
The following conventions are used throughout this guide to show information:

NOTE: Emphasizes important information or calls your attention to related features or instructions.
Warranty
See the Customer Support/Warranty booklet included with the product. A copy of the specific warranty terms applicable to your manufacture products and replacement parts can be obtained from Vigitron, Inc.
Disclaimer
Vigitron, Inc. does not warrant that the software will work properly in all environments and applications, and marks no warranty and representation, either implied or expressed, with respect to the quality, performance, merchantability, or fitness for a particular purpose. Vigitron disclaims liability for any inaccuracies or omissions that may have occurred. Information in this User's Manual is subject to change without notice and does not represent a commitment on the part of Vigitron. Vigitron assumes no responsibility for any inaccuracies that may be contained in this User's Manual. Vigitron makes no commitment to update or keep current the information in this User's Manual, and reserves the rights to make improvements to this User's Manual and/or to the products described in this User's manual at any time without notice.
Software Acceptance Terms and Conditions Release of Liability
Acknowledgment
By installing the software, you acknowledge that you have read and understand the foregoing and that you agree to be bound by its terms and conditions. You also agree that this agreement is the complete and exclusive statement of agreement between the parties and supersedes all proposed or prior agreements, oral or written, and any other communications between the parties relating to the license described herein.
Grant of License
License for software use is hereby granted to user only provided purchase has been made from an authorized Vigitron dealer or authorized hereby authorized by Vigitron. License is not transferable and is limited to usage only. No permission is hereby given or granted to make any change, modifications and is restricted only for its intended usage. Operation or usage other than described will be considered as a violation of intended use.
Disclaimer of Warranty
Software is provided As Is with all faults. To the extent permitted by law, Vigitron, its dealers, distributors and other appointed agencies hereby disclaim all warranties, whether expressed or implied, including and without limitations warranties that the product is free of defects, merchantability and fit for a particular purpose and non-infringing. You agree to bear the entire risk as to selection the proper for your purpose and as to the quality and performance of the product.
Limitation of Liability
Except as required by law, Vigitron and its distributors, directors, licensors, contributors, agents and all associated in with Vigitron in connection with the said software will not be liable for any damages arising out of or in any way relating to this product and/or agreement the inability arising out of or in any way relating to this agreement or the use of the product, and those products associated with said use of products, including limitation damages for loss of physical property, goodwill, work stoppage, lost profits, loss of data and computer failure or malfunction. Even if advised as the potential from such loss or damage regardless of the theory applied of contract, tort or otherwise, which claims are based. Vigitron, its associates and all others collective liability will be limited to the cost of the product itself.
Arbitration
Any disagreement between the parties relating to any interpretation, construction, performance or breach of this Agreement shall be settled by arbitration to be held in San Diego Country, California, in accordance with the laws of the State of California in accordance with the rules then in effect of the American Arbitration Association. The arbitrator may grant injunctions or other relief in such dispute or controversy. The decision of the arbitrator shall be final, conclusive and binding on the parties to the arbitration. Judgment may be entered on the arbitrator's decision in any court having jurisdiction. The party bring arbitration agrees to incur the total costs and expenses of such arbitration and shall pay their counsel fees and expenses.
Miscellaneous
This Agreement constitutes the entire agreement between Vigitron and you, concerning the subject matter hereof, and it may only be modified by a written amendment signed by an authorized executive of Vigitron. You further agree that NeTester is only licensed to be used on one computer/server.
Except to the extent applicable law, if any, provides otherwise, this Agreement will be governed by the laws of the state of California, U.S.A., excluding its conflict of law provisions. It is further agreed that if one or more provision of this agreement is held to be illegal or unenforceable under applicable California law, such illegal or unenforceable portion(s) shall be limited or excluded from this Agreement to the minimum extent required that this Agreement shall otherwise remain in full force and effect and enforceable in accordance with its terms.
This Agreement will not be governed by the United Nations Convention on Contracts for the International Sale of Goods.
If any part of this Agreement is held invalid or unenforceable, that part will be construed to reflect the parties' original intent, and the remaining portions will remain in full force and effect.
A waiver by either party of any term or condition of this agreement or any breach thereof, in any one instance, will not waive such term or condition or any subsequent breach thereof.
Except as required by law, the controlling language of this Agreement is English.
You may assign your rights under this Agreement to any party that consents to, and agrees to be bound by, its terms; Vigitron may assign its rights under this Agreement without condition.
This Agreement will be binding upon and will inure to the benefit of the parties, their successors and permitted assigns.
Important Notice
Prior to downloading and installing or uninstalling NeTester it is suggested that you turn off your virus protection software.
Loading NeTester with active virus protection can result in damaging the file.
On Determining Bandwidth
Bandwidth from connected devices is not consistent. This is particularly true of devices that stream video. The goal of Netester's bandwidth is to provide range. This will apply if in all conditions unless the camera has been programmed to stream at a fixed rate.
In general cameras bandwidth will vary based on the amount of scene activity. The higher the amount of activity the higher the bandwidth.
When testing bandwidth of non-video devices you are accessing that device's web browser which is not transmitting and will normally return a 0 bandwidth reading
Section 2: Introduction
Overview
This user's manual will not only tell you how to install and connect your network system, but how to configure and monitor your computer to receive messages from various network devices
NeTester is designed to
NeTester is designed to:
- Evaluate existing networks to confirm they meet system requirements
- Confirm operation of installed networks
- Provide reports to users and maintain reports of installations
- Help in troubleshooting and repairing networks, reducing down time.
NeTester is a next generation software program for helping to determine the performance of existing networks prior to installation, performance during installation, commissioning systems providing documentation and troubleshooting networks in the event of failures
NeTester recognizes network connected devices with the ability to scan both wired and wireless networks using a range of IP addresses in addition to Onvif, UPnP and manual entry.
Key Features
• Scan wired and wireless networks to find connected devices
- Customize device findings applying missing information and naming conventions
- Maintain commissioned database with ability to compare scans for updates and determine their effect on network performance.
- Include username and password for managed devices to allow for direct access
- Comprehensive network test generator for determining conductivity and real time transmission ability.
- Ability to test with fragmented and defragmented package format for determining Jumbo Frame capacity.
Note: In order to register your program your computer must be connected to the Internet.
Notes on Onvif and UPnP Discover
- The use of Onvif or UPnP requires the connected device be able to respond to requests from either.
- IP Address will be discovered using either Onvif or UPnP.
- Manufacturer - Onvif requires previous device user name and password access/UPnP does not.
- Model Number - Onvif requires previous device user name and password access/UPnP does not.
- Mac Address – Onvif requires user name and password access. UPnP does not recover MAC address.
SECTION 1: ABOUT THIS MANUAL 2
SECTION 2: INTRODUCTION 2
SECTION 3: OPERATION OF SOFTWARE MANAGEMENT AND DEVICE INTERFACE
SECTION 4: INSTALLATION 2
SECTION 5: NETESTER MAIN AND SUB MENUS 2
SECTION 6: LOG ON 2
SECTION 7: WELCOME SCREEN 2
SECTION 8: WELCOME SCREEN 2
SECTION 9: DEVICE LIBRARY 2
SECTION 10: DISCOVERY 2
SECTION 11: TEST GENERATOR PART ONE: SETTING UP THE GENERATOR 2
SECTION 12: TEST GENERATOR PART TWO: OPERATING THE GENERATOR 2
SECTION 13: REPORTING 2
SECTION 14: MANAGED ACCOUNT 2
SECTION 15: NETESTER™ FREERUN 2
SECTION 16: APPENDIX – PACKET SIZE, PACKET OVERHEADS, AND BANDWIDTH
Section 3: Operation of Software Management and Device Interface
When starting your set up, it is important
This chapter instructs you on how to configure and manage NeTester ^™ with your network-connected devices. Once set up you will be able to receive messages using several different means of communication.
- NeTester can evaluate both wired and wireless connections.
- Pease note that due to potential limited bandwidth of wireless networks may result in slow scans, problems in accessing radio buttons. The duration will be dependent on the number of IP addresses to scan.
Important Note:
After loading NeTester right click on the NeTester icon and select "Run as Administrator".
This is required when the program is first loaded.
NeTester must be run with administrator permission. See page 14 section 4.4
In order to operate the bandwidth feature NeTestef must be operated as "Run as Administrator" each time it is operated
When opening NeTester and registering the program you must "Run as Administrator"
There is 3^rd party software available that will allow an administrator to provide administrator rights for specific programs. Vigitron has neither tested, endorses, or recommends the use of such software and advises NeTester users who do not have administer rights to consult with their administrator with regards to the application of such programs.
Note that NeTester operators that are administrators should follow procedures to run NeTester as administrator for both loading to operate the bandwidth feature.
NeTester program must be run as Administer
Viewing Camera Streams
In order to view camera streams other than MJPEG and use the bandwidth function may require the application of decoder application from the manufacturer without applying this application the viewing and bandwidth functions will not work
Section 4: Installation
4.0 Installation Steps
- Download the and extract the file.
- Copy file onto your desktop.

- Extract the file.

- Select the folder to place the program.

- The file.exe will appear along with NeTester Icon Appearing.
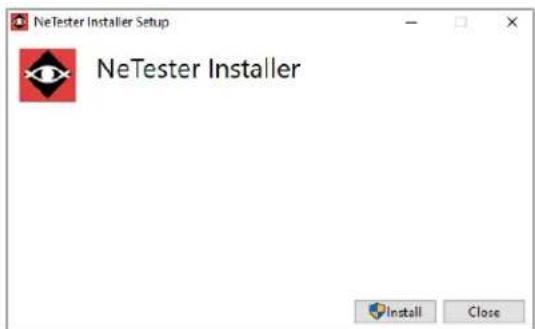
6. Select the NeTester install button

7. The Setup process will start.
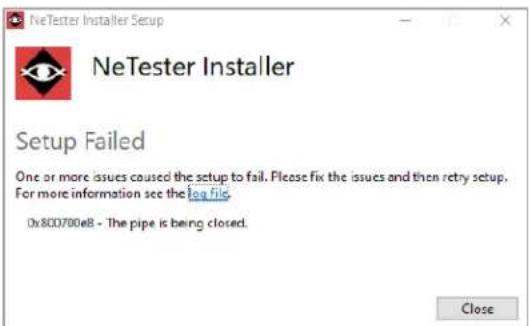
- If your computer is protected, you may see a Setup Failed indicated the Virus Protection as blocked the setup.
4.1 Removing or giving permission to Virus Blocks
When installing using Windows™ the operator will have to give permission for the NeTester to be installed
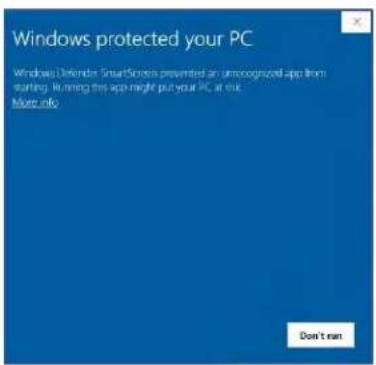

- Select the "Run anyway" function.
Important Note: Depending on your anti-virus software it may also block NeTester from loading. If this is the case follow instructions for your software and grant permission to load.
4.2 If Your Computer Has Virus Protection Software
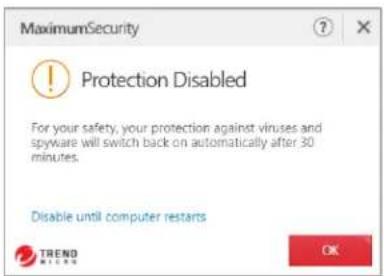
Many computers use virus protection software in addition Windows™ Defender. All of these operate differently and may or may not allow NeTester to be installed. If this is the case refer to your virus protection software and give it permission. In other cases, you may have to temporarily disable your virus protection software, load NeTester and re-enable it. If these problems exist, please refer to the operation of your virus protection software.

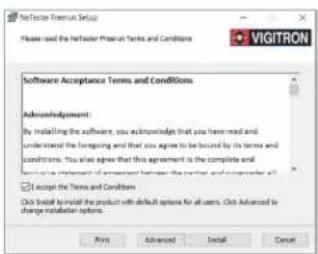
4.3 Accepting Terms and Conditions

Accept Software Terms and Conditions
• Review software terms and conditions.
• You can elect to print out a copy if you wish.
- Click advance if you want to change to the locations of the installation and database directory.
• You must click "I accept the Terms and Conditions" in order to continue
- Click the install button

The System will indicate the Setup Wizard is complete
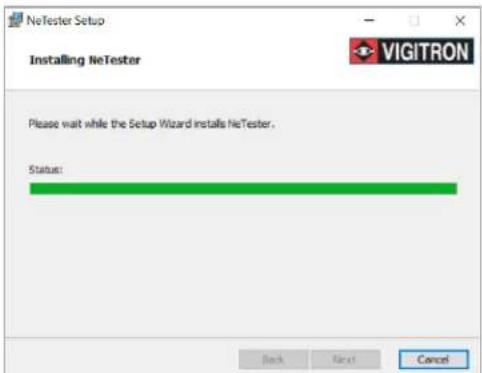
A green bar will indicate the software is loading and the when the installation is complete. Click Finish and the system will indicate when the Installation has been completed

The NeTester icon will then appear on the desktop. Selecting it will start the registration process
4.4 Running NeTester as Administrator
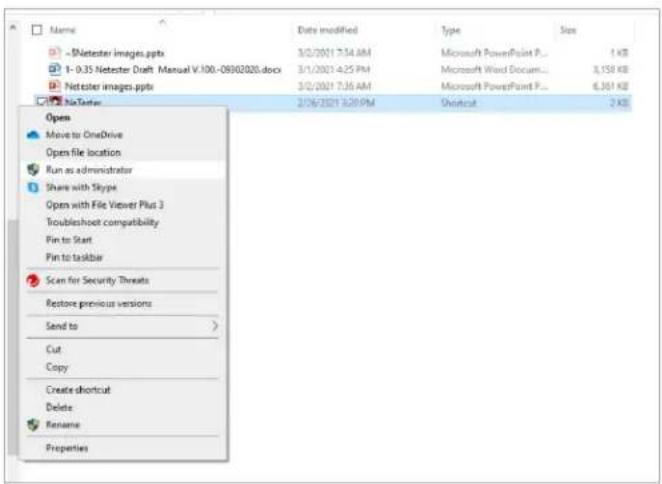
Right click on the NeTester icon Select "Run as Administrator"
Prior to running NeTester for the first time, you must Run as Administrator.
One this is accomplished you will be able to run NeTester with the exception of direct access for bandwidth and taking still.
If you can perform the |Run As The Administrator " function as the operator you can use alternative methods to conduct Bandwidth and Still image functions.
Note 1: In order to operator NeTester some functions require that operator run as an administrator
Note 2: Operating NeTester as the Administrator may require that it be set up by your system administrator
Note 3: Running NeTester with administrator privileges
A shortcut to NeTester will be added to the host computer desktop after installation. Some NeTester features require it to run in Administrative mode. Please follow the steps below to give NeTester administration privileges.
- Right click on the NeTester desktop icon and select "Properties".
- Under the "Shortcut" tab, select "Advanced".
- Check the box labeled "Run as administrator" and then click "OK".
- Click "Apply". If a popup appears, click "Continue", and then "OK" to exit from the Properties window.
Now every time NeTester is opened it will automatically operate in Administrative mode. If you do not have permission to run a program as the administrator please check with your administrator.
Note you may have to discuss with your network administrator to have NeTester assigned to your computer as administrator
4.5 Registration Form
The Registration form will appear
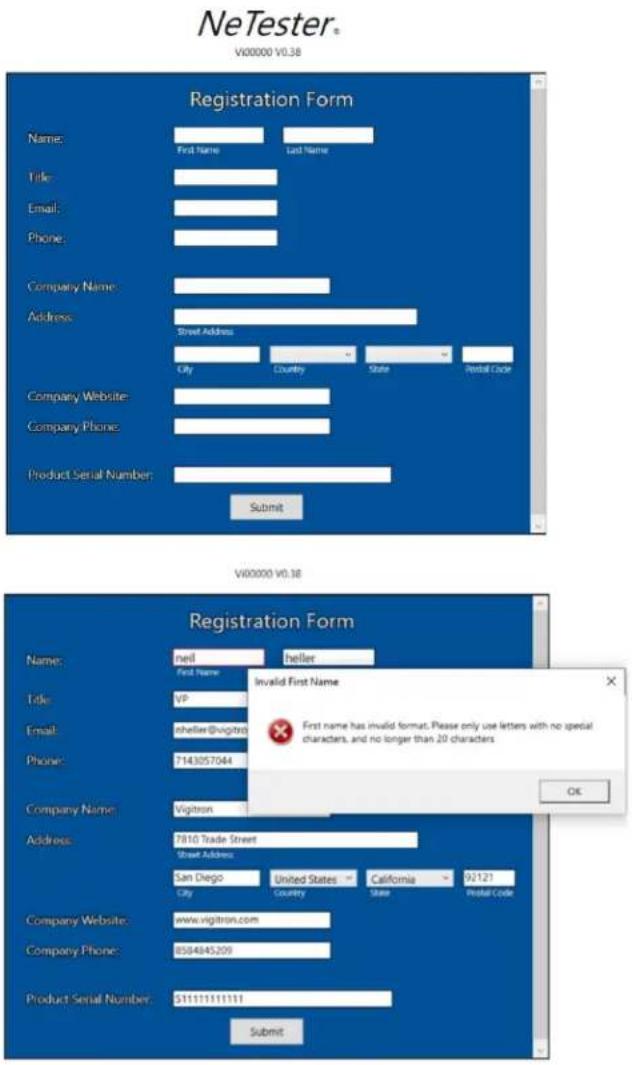
Fill out the form carefully as any spaces or extra characters can result in having to re-enter information. The system will indicate which fields need updating
Select the country using the drop-down menu- once the country is selected the City drop down box will show the cities in that country.
If the United States is selected the city drop down will reflect cities in the United State

Before you get started:
Note 1: Your computer must be connected to the Internet in order to send the registration form. You cannot complete the installation without successfully transmitting the registration form. If you cannot connect when installing you will be able to operate NeTester for 7 calendar days.
Note 2: To communicate with devices contained on your network, they must be properly connected to the same network as the computer operating NeTester
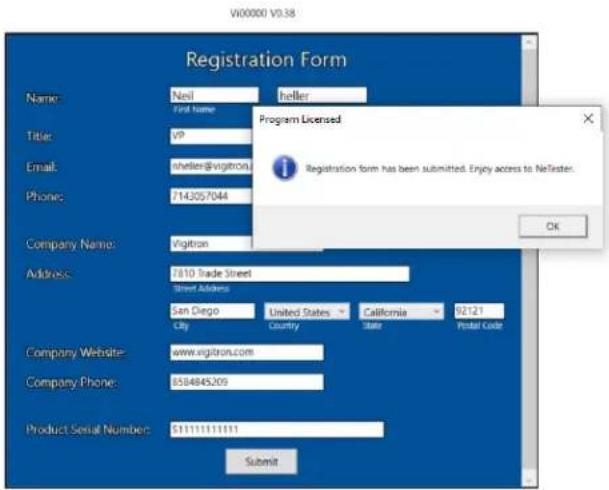
If you have successfully filled out the form and submitted it the above pop up will appear. Note: You must be connected to a network with ability to access the Internet
If you do not have an outside network connection at the time you register NeTester you will be able to operate the software for a period of 7 days. A popup will appear indicating you have not successfully registered. If after 7 days you have not registered NeTester will stop working

Section 5: NeTester Main and Sub Menus
5.0 NeTester provides several main and submenus. Selecting the main menu will show the related submenus.
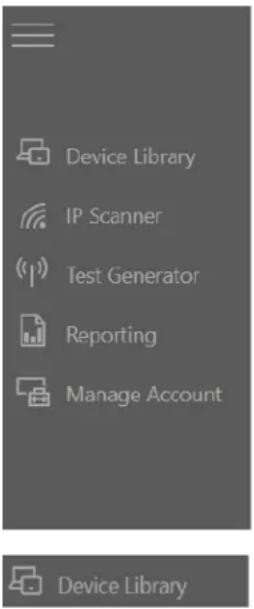
The Device Library allows for manually adding devices using the device's IP address. A device name, type, model number serial number, wattage and voltage can be added. In addition, an external database can be added.

This function allows you to set a range of IP address. The NeTester will scan that range and record all devices on the network found within that range. Once complete the devices found can be sent to the library. If changes are made after the scan a new scan can be conducted and NeTester will show devices missing or added from the first scan

The test generator allows packet size and transmission time adjustment for determining network performance. It displays network transmission limits and allows for direct viewing of video devices and set up screens

Collected information can be exported into .PDF, .TXT, and .CSV. The latter can be used to create excel files. Collected photos can be viewed and included in the report only in the .PDF format.

This area can be used to change the username and password for accessing NeTester
5.1 Changing Menus Selections


To change menu selections:
With the side bar in the expanded mode- just point and click on the selected function With the side bar in the collapsed mode- just point and click on the selected function
To Access the Welcome Screen to manage reports:
Click on the Arrow when it appears next to the side bar
Click on the Arrow when it appears to return to the Welcome (First) Screen
Section 6: Log On
6.0 Changing Menus Selections

Enter the user's name and password. Followed by point and click on the Log button The Default User name is admin The Default Password is system

If an invalid entry is made the above popup will appear
Important Note: The user and password must be no less than 6 characters and no more than 20 characters. Note characters are case sensitive.
Both the Username and Password must be correct. If either one is incorrect both have to be re-entered.
Section 7: Welcome Screen
7.0 Welcome Screen
After a successful sign in the Welcome screen providing access to the Saved Reports will appear

The upper tab controls the compression and expansion of the menu and the return to the Welcome screen
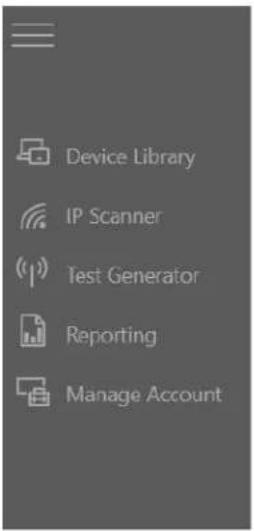
To move between menus, click on the menu you to access

← Use the arrow when it appears to return to the first screen or will operate as a Back button
Section 8: Welcome Screen
8.0 Report Section (This section can be used to create a new report or load a previous report)
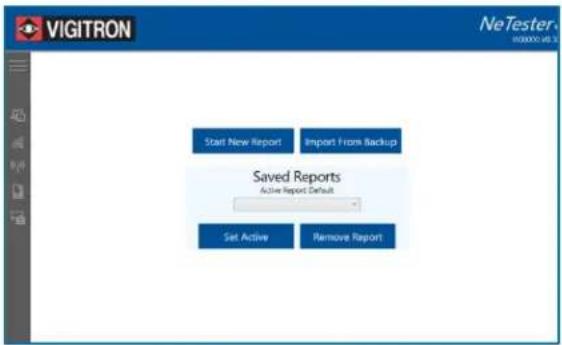
8.1 Creating a new report
The first screen to appear will be Welcome screen allow you to create a new report or recall an existing report.
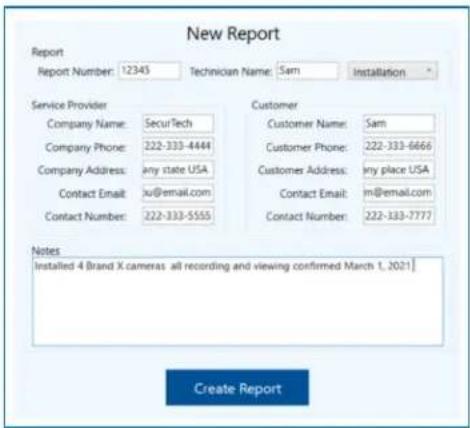
Fill out the information and select "Create Report"
8.2 Exporting and Saving Reports – Refer to Section 13 Reports

To save reports you move to the Reporting screen and export. You can create as many individual reports as you want – Refer to Section 12 – Reports

8.3 First screen-Click the import from Back up Button whenever a new version of NeTester is installed. This function is used to retain access to reports that were created from a previous NeTester version or just a fresh install.

Once the report is imported the above pop-up will appear. The information can be updated
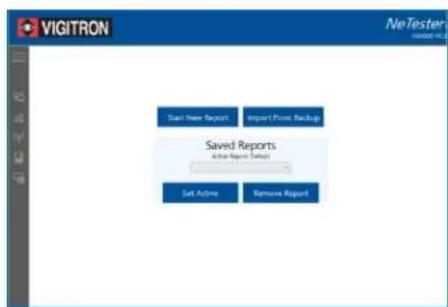
Use the Set active button to make the select report the active report. Once selected as "Active" all entries the followed will be made to the selected report.

If you attempt to start a new report using the same report name, the pop up will indicate it is already in use

8.4 Recalling Reports
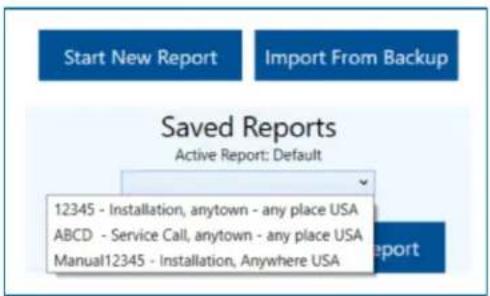
Use the drop-down menu to recall saved Reports
8.5 Updated Reporting.

Select the report you want to be followed by clicking the "Set Active" button
The Selected report will be the active report
Setting a report as Active will reload the report device library data
Report and information can be modified from that point
When exporting a report two or more times, a number will be appended to the file name specifying the number of the copy.
To update an existing report, enter the new information and click Update Infor followed up same Save As New.
Please note this will displace any previous entered information.
If you are conducting an update or service call from a previous installation which is already in the data base it is suggested that you change the report number. I "Transfer all devices?" will appear. Select Yes and the information contained in the previous report will be retained in creatine a new report
Example:
Installation file: Shoe Warehouse
Service File Shoe Warehouse-1

Section 9: Device Library
9.0 Device Library
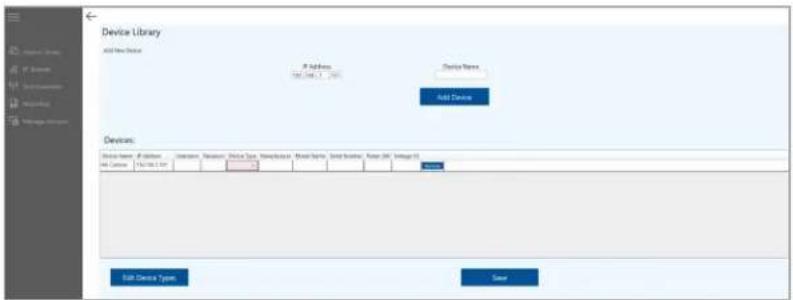
The device library allows you to manually enter information on the devices you want to test Start by entering the connected devices IP address followed by the device name Select "Add Device"
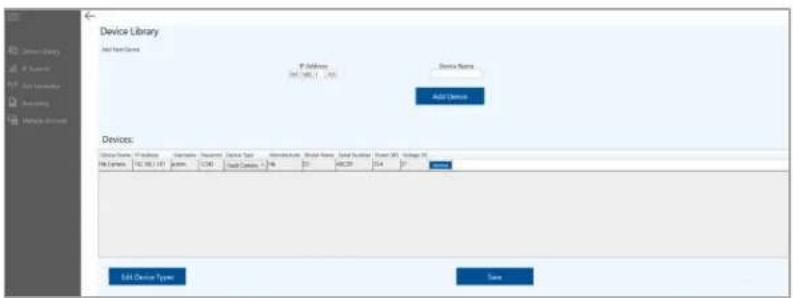
The rest of the connected devices information can be entered
Use the "Save" to save the entered information
Use the Edit Device Types button for adding to, or deleting from the existing types list
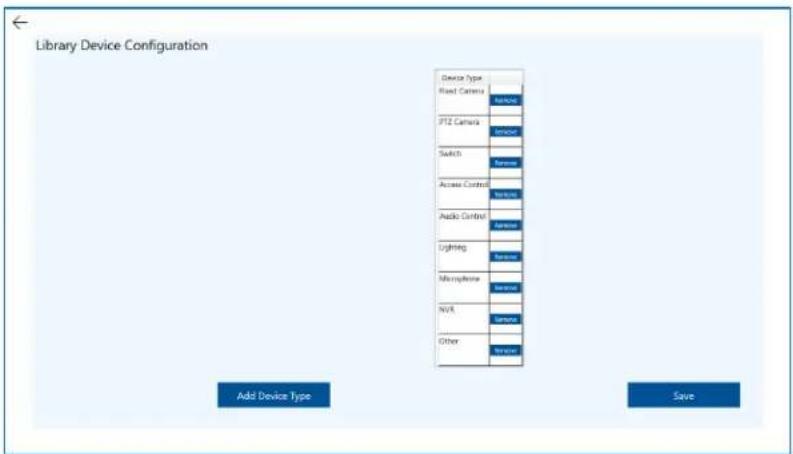
Selecting Edit brings up the Library Device Configuration screen
You can add a Device type by selecting the "Add Device Type"
It is suggested that prior to adding devices to the library that are not included in the library you first add them using the Library Device Configuration and then to the Library
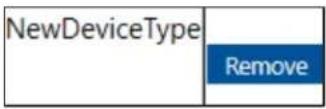
Any name can be edited by moving the cursor over the Device type name, deleting the name, and typing in a new one. The name can be special to a manufacturer, model number, location, or any name you select

Clicking the "remove" button to the right of the devices will delete the device from the library. Once a device is listed you can remove it by highlighting the device and clicking the "Remove" button. Select the "Save button" to save your changes
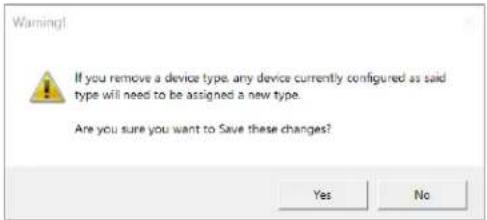
A popup will ask to confirm your changes
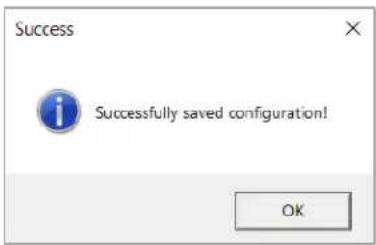
A pop up will confirm the successful completion of the save

The new entry will appear as part of the device library selections
Section 10: Discovery
10.0 Discovery connected devices
10.1 Discovery using IP Scanning
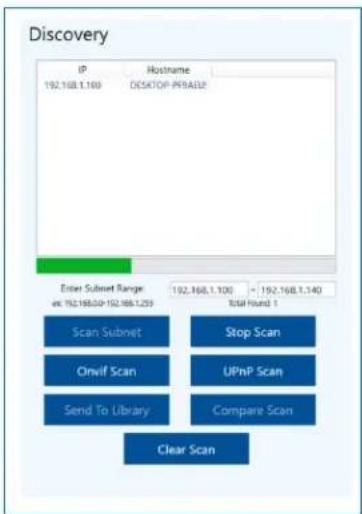
The Discovery feature will automatically scan and register connected devices. Scanning can be accomplished using three different methods
Enter a subnet range:
A. The IP address should remain in the same subnet as the following examples: 192.168.1.1 – 192.168.1.254 255.255.255.0 192.168.0.1 – 192.168.1.254 255.255.254.0
Note: Be aware the greater the range the longer the amount of time it takes to complete the scan.
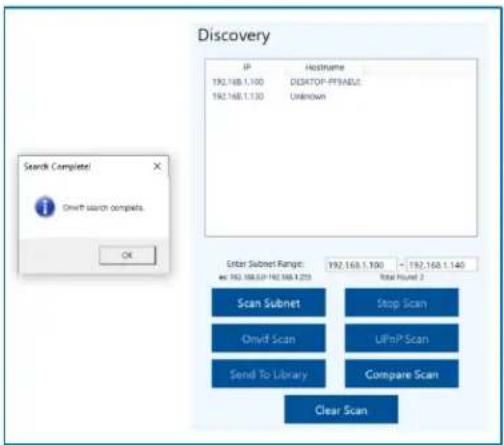
Select Onvif – NeTester will scan all connected devices capable of Onvif communication. Select UPnP – NeTester will scan all connected devices capable of UPnP communication. The progress bar provides an indication of how much of the process remains prior to completion
10.2 Discovery using Onvif and UPnP
10.3 Comparing Scans


10.4 Scanning different IP Classes
IP address can be found in any of three bit classes
| IP address range | Number of Addresses | Class |
| 10.0.0.0-10.255.255.255 | 16,77,216 | Class A |
| 172.16.0.0-172.31.255.255 | 1,048,576 | Class B |
| 1892.168.0.0-192.168.255.255 | 65,536 | Class C |
Each class must be scan individual. Once scanned, additional IP addresses can be added by conducting a new scan and choose "not to clear" the previous scan results in the popup.
Once a search has completed a pop up will be displayed
10.5 Comparing a new scan to a previous scan.

Use the "Compare Scan" to see if new devices were added from the primary scan or previous units are no longer found.
Note: Due to Network traffic, some devices may not always appear in the list. Running a Compare scan can also be used to help verify the scan results are accurate.
10.6 Adding a Device to the library


To add a discovered device to the library, highlight the device and select "Send to Library" A pop up will appear asking you to confirm your selection After confirmation a pop up will verify the device has been added.
Section 11: Test Generator
Part one: Setting up the Generator
11.0 Setting Up the Test Generator
11.1 Devices to be Tested
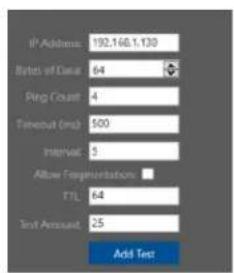
11.2 Inputting the Ping Test Generator Information
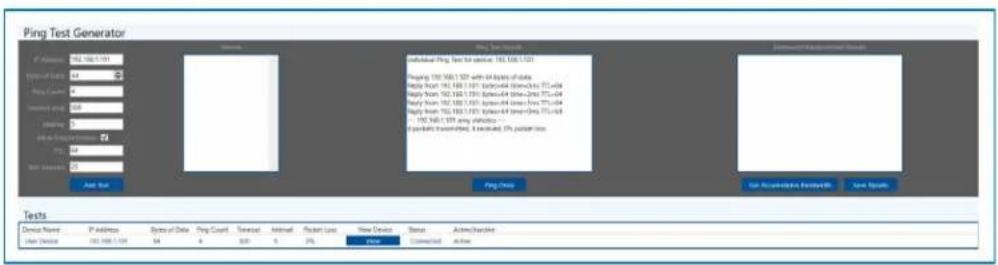
Devices that were entered into the library will appear in the box labeled "Devices" If the device was not included in the library, you can directly enter the IP address


IP Address: After selecting the device under test the IP address will appear. An IP address can also be entered manually.
Bytes of Data:
Input the packet size up to 9600 bytes or use the up/down arrows to change the value
Ping count: Enter the number of pings sent for each test. The total number of pings allocated to a single test
Time out: Enter the maximum time period in milliseconds that the Test Generator will wait to receive a response before the ping test is considered as failed.
Interval: This determines the time in seconds between tests. This test does not apply to "Ping Once" test
TTL (time to Live): This number represents the maximum hops or seconds until the ping is no longer valid.
Test amount: The total number of Tests sent to a device prior to becoming inactive. This test does not apply to the "Ping Once" test
Allow Fragmentation:
Standard networking equipment such as network switches operating at 100Mbps and Windows™ software receives packet sizes limited to 1518bytes. In order to handle larger packet sizes software breaks it up into sizes of 1518bytes. When "Allowing Fragmentation" is not selected the Test Generator will require devices to pass the whole packet without any division. A packet size of 4500 may fail if not fragmented but pass if it is.
Fragmentation can result in problems due to the loss of packets or the inability of the recovery system, such as the NVR or VMS software to properly reconstruct the divided packets into one complete packet.
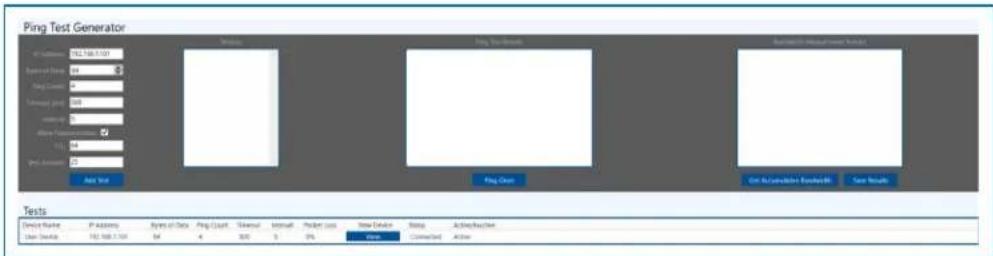
Select the "Add Test" button. The added test will appear under the Test panel. Once the test is added, NeTester will actively ping the devices' IP address according to the programmed parameters until the value in the Test Amount is reached. This data will be averaged and included in the reports
Section 12: Test Generator
Part Two: Operating the Generator
12.0 Operating the Ping Test Generator

12.1 Adding Test

Add Test
After entering the test requirements select the "Add Test" button
The test will appear in the test log
"Status" will indicate if the test passed by indicating Connected or Failed
"Activity/Inactivity" will indicate the status of the test
Adding Test will also display a "View" button which will allow the operator to view screens from the connected device

12.2 Ping Once

Selecting the "Ping Once" button will activate a single test containing the number of pings programmed in the Ping Count and display the results

12.3 Pinging with no Fragmentation (Fragmentation unchecked)
Ping Test Generator

With the Allow Fragmentation left unchecked NeTester will not indicate loss packets if the connection is valid but will indicate Fragmentation was required and as such the Jumbo frame could not be passed as whole.
12.4 Bandwidth Functions
Note: In order to run bandwidth test:
You must be running NeTester as the administrator (refer to section 4.4 Running NeTester as administrator)
You must create a test for the connected device and use the "View Function"
The bandwidth test will not work if you use the Browser function.

Save Results
After running a Bandwidth test, clicking the "Save Results" button opens a window that will allow a name to be given to the test. This name along with the individual device bandwidth and total accumulated bandwidth will all be added to the report.
Typically, the Name will indicate a specific group of devices. For example, A test of all cameras connected to a specific Ethernet Switch might be named after the Switch model or general area of the devices.
12.5 Bandwidth Testing

12.6 Programming the View Function
Note: If you see this warning you are not operating NeTester in the Administrative mode and will not be able to perform Bandwidth testing

Select the "View" button in the "Test" bar
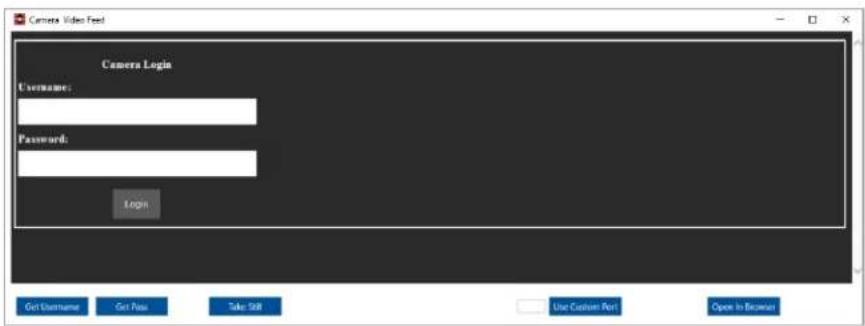
The log in screen of the selected device will appear

Functions of the operating buttons
Get User name: If the user name has been entered in the library, left-click the button, move the cursor over the User name in the device log in screen, and Right-click to paste it into the User Name. If it has not been entered in the library it can be manually entered
Get Pass (word): If the password has been entered in the library, left-click the button, move the cursor over the Password in the device log-in screen, and Right-click to paste it into the Password. If it has not been entered in the library it can be manually entered.
Important Note: If either the User name or Password is entered incorrectly in the library you cannot copy and paste into the view function. Your windows programs and set up may prevent this function for some connected devices. If so, you can enter the user's name and password manually.
In some cases, access to individual devices may not allow the User Name and Password to be copied and pasted into their appropriate areas. In these cases, User names and passwords can be entered manually.
Viewing the video stream in other than MJPEG may require downloading the specific application for that camera to recover H.264 and related stream. Viewing the video stream if required for measuring bandwidth.
Use Custom Port: While most devices will transmit on Port 80, in some cases it may be necessary to use another port. Enter the port number and click the "Use Custom Port" to activate.
Open in Browser:
This function will direct NeTester to open a Web Browser outside NeTester to view the device's internal web page
Take Still: This will record the image and allow it to be included in the report
Note: It you are not operating NeTester as the administrator you will not be able to perform the bandwidth test or directly stream video. Under these conditions if you want to include a image in the report, access the camera using the Browser function and take a still image
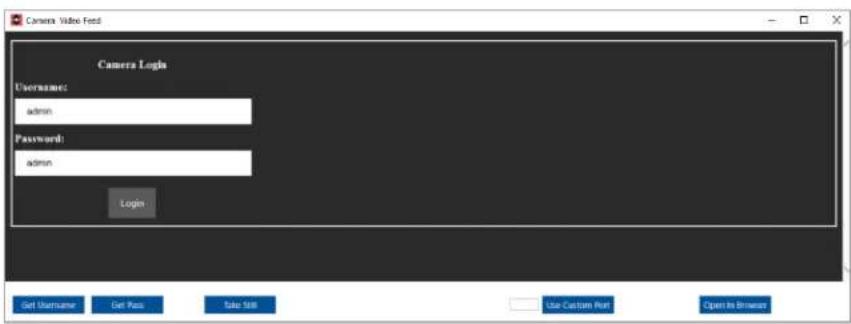
Once the device's User name and Password are entered select the "Login" Button

12.7 Operating the Bandwidth function.
Note prior to operating the bandwidth function, the device under test must be selected and streaming video
Note: The bandwidth function tests the bandwidth from the point of the connected device to the point where the computer operating NeTester is connected. The displays show the actual transmitted bandwidth. If the test is conducted for an individual camera connected to a network switch and the measurement taken from the switch uplink will reflect the bandwidth from the camera through the switch.

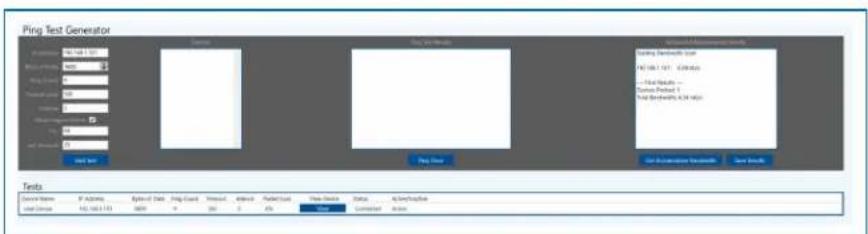
Note 1: The Ping Test Generator test is separate from the Bandwidth Test and only shows the ability to the computer operating NeTester to ping the connected device resulting in a valid connection for all devices in the connection path.
Note 2: The bandwidth displayed is the bandwidth receive at the time of the test
12.8 Measuring System Bandwidth (Method 1: Operating as Administrator

natural_image
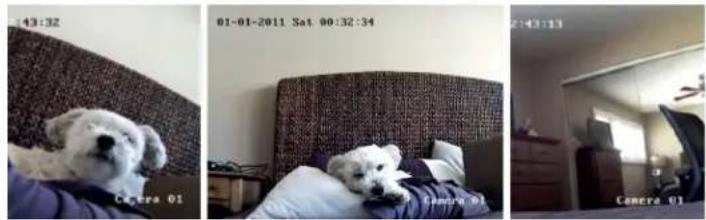
Interior view of a bedroom with bed and wall-mounted windows (no visible text or symbols)By clicking on the Browser button, NeTester will create a direct connection that device's browser
To measure multiple devices such as cameras connected to a network switch you need to open multiple screens
Important note: In order for bandwidth to be measure it must be displayed in order for streaming to be active. (Method 1 Only)

12.9 Cumulative Bandwidth
Note: the displayed bandwidth will reflect the main stream used without the need for the camera decoder code plug in. In most cases the displayed bandwidth using MJPEG will be greater than streams at H.264 or similar codecs
Bandwidth from a device will change based on the time it is taken. For cameras this is due to the amount of activity within the camera frame. The greater the activity the higher the bandwidth
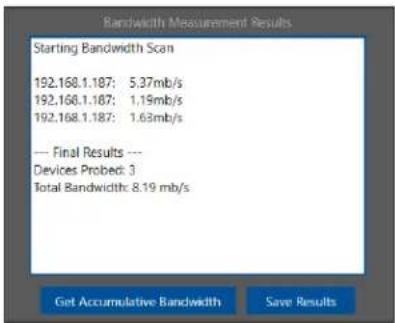
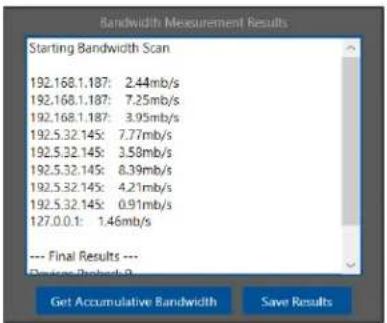
Clicking the "Get Cumulative Bandwidth" will display the individual bandwidth for each device and the total bandwidth for all the displayed devices.
Bandwidth scan measure the instantaneous bandwidth at the time the test is taken. Bandwidth from connected devices will vary depending upon what they are transmitting at the time the test is taken. A camera with a lot of activity will show a higher bandwidth then the same camera with no activity
To determine the total bandwidth that is going through a particular Switch, open a NeTester "View" to stream video for all devices connected to Switch ports, and then run the Bandwidth test." A network switch or other connected devices that are not streaming will exhibit a low or no bandwidth.
Clicking the "Get Cumulative Bandwidth" will display the individual bandwidth for each device and the total bandwidth for all the displayed devices.
12.10 Measuring System Bandwidth (Method 2: Operating Not as Administrator

| Device Name | IP Address | Bytes of Data | Ping Count | Timerout | Interval | Packet Loss | View Device | Status | Active/Inactive |
| HP Printer | 192.168.1.60 | 64 | 4 | 500 | 5 | 0% | View | Connected | Inactive |
| 192.168.1.91 | 192.168.1.91 | 64 | 4 | 300 | 5 | 0% | View | Connected | Inactive |
| 192.168.1.101 | 192.168.1.101 | 64 | 4 | 500 | 5 | 0% | View | Connected | Inactive |
| 192.168.1.130 | 192.168.1.130 | 64 | 4 | 500 | 5 | 0% | View | Connected | Inactive |
If you are not operating NeTester as the Administrator, you can still perform the bandwidth test. The test will use the ping functions. Select the "Get Accumulative Bandwidth" button as you would using Method One.
Using this method does not require opening a browser or streaming video
12.11 Saving images to reports (Method 1) Operating as Administrator
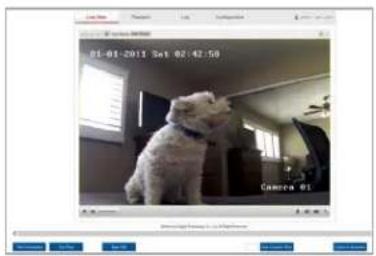

To save an image for use in reports or in the NeTester database click the "Take Still" button. Please note the image will be saved as shown on the screen. Prior to selecting "Take Still" make certain the image is what you want saved.- If you are operating NeTester as the administrator use the Browser function and take a image for use in the reports
Clicking the "Get Cumulative Bandwidth" will display the individual bandwidth for each device and the total bandwidth for all the displayed devices.
12.11 Saving images to reports (Method 2) Not Operating as Administrator

natural_image
Interior view of a room with a bed and wall-mounted equipment, displayed within a software interface (no readable text or symbols on the main image)If you are not running Netester you can open the browser and still take a still to be included in the report. However position the image to reflect what you want to see the image you want to see in the report.

In some cases even accessing a camera's browser directly will require a plug in
12.10 Naming and Saving Bandwidth reports:
Individual bandwidth tests can be separately named and saved

Clicking the "Save" building will allow you to name and save the display
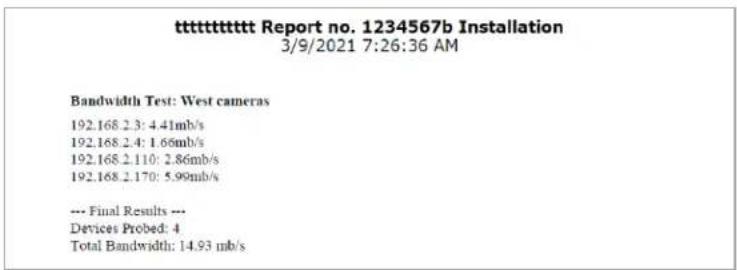
The save information will be included in the reporting
12.12. When a Browser cannot be reached
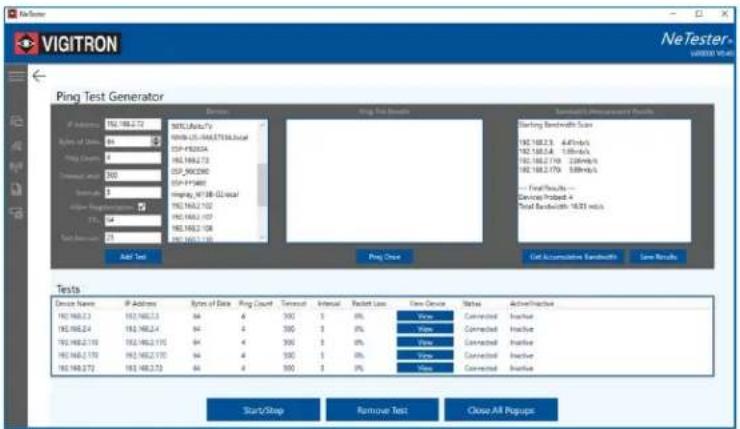
Device Tests can be deleted by selecting the device followed by "Remove Test"
Clicking the "Close All Popups" button will close all the opened video windows running inside NeTester. This will avoid the need to close them individually.
By selecting a specific device in the Tests box, the Start/Stop button will either stop a test in progress or start another test cycle.
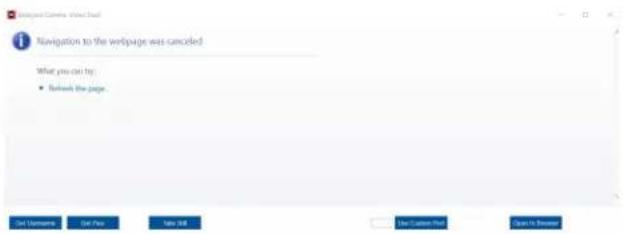
In any case where the connected devices web page cannot be reached or the connected device does not have a browser the above image will be displayed
Section 13: Reporting
13.0 Reporting
13.1 Exporting and Saving Reports
![Save Import to 2007. Microsoft Word USE CNTS - Microsoft Word Save Path: 1.1.1.1.1.1.1.1.1.1.1.1.1.1.1.1.1.1.1.1.1.1.1.1.1.1.1.1.1.1.1.1.1.1.1.1.1.1.1.1.1.1.1.1.1.1.1.1.1.1.1. Customs: New Customs: New Customs: New Customs: New Customs: New Customs: New Customs: New Customs: New Customs: New Customs: New Customs: New Customs: New Customs: New Customs: New Customs: New Customs: New Customs: New Customs: New Customs: New Customs: New Customs: New Save Asfile [ ] Save Asfile [ ] Save Asfile [ ] Save Asfile [ ] Save Asfile [ ] Save Asfile [ ] Save Asfile [ ] Save Asfile [ ] Save Asfile [ ] Save Asfile [ ] Save Asfile [ ] Save Asfile [ ] Save Asfile [ ] Save Asfile [ ] Save Asfile [ ] Save Asfile [ ] Save Asfile [ ] Save Asfile Current Substr Current Substr Current Substr Current Substr Current Substr Current Substr Current Substr Current Substr Current Substr Current Substr Current Substr Current Substr Current Substr Current Substr Current Substr Current Substr Current Substr Current Substr Current Substr Current Substr Current Substr Current Substr Current Substr Current Substr Current Substr Current Substr](/content/2026/05/912355/images/ff654c1c0f7304422443e4638715ac145ffaa1409014122bcb0ec1e4f4c57e95.jpg)
To save reports you move to the Reporting screen and export. You can create as many individual reports as you want. When creating multiple reports under the same report number and format, NeTester will automatically append the copy number. For Example, Report(1), Report(2), Report(3).

13.2 First screen

13.3 Recalling the Active Report
Once the report is added to the list the above icon will appear (refer to Section 8).
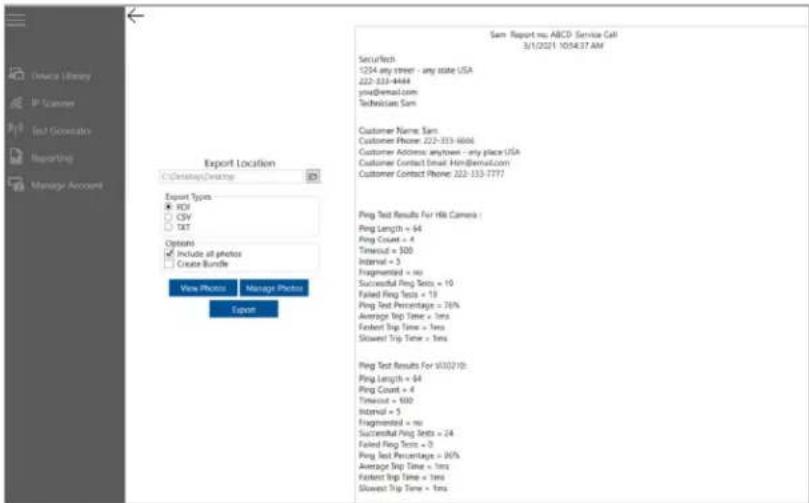
Selecting the "Reporting" tab will bring up the reporting screen and will display the active report

You can select the report to include all the capture photos in the report

If you select all photos a pop up will ask you to confirm As an alternative you can include only selected photos in your report
View Photos: Will allow you to View the photos that you have saved.
13.3 Viewing and Selecting Photos for the Report

Managed Photos:
Selecting "Include in Report" will result in the selected images being included in the report
Export
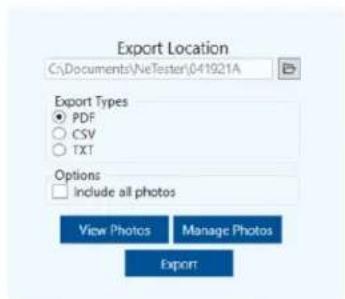
Report files can be exported as:
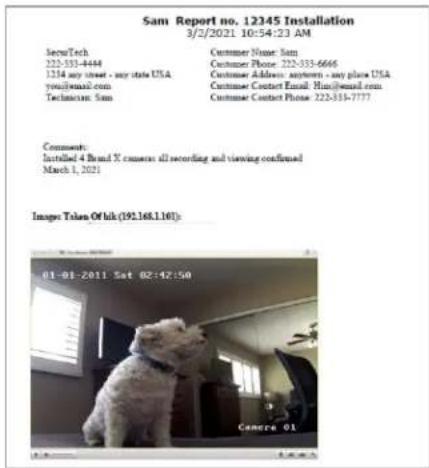
.PDF- presentation format which cannot be edited – Note only .PDF reports will contain saved image .CVS- this format can be used to create Excel documents .TXT- this format can be used to create Word documents and for use in other formats
The resulting report can be viewed
13.4 Exporting Reports
13.5 Analyzing Reports
| Ping Test Results For HP Printer: |
| Ping Length = 64 |
| Ping Count = 4 |
| Timeout = 500 |
| Interval = 5 |
| Fragmented = no |
| Bandwidth = 0.00mb/s |
| Successful Ping Tests = 25 |
| Failed Pings = 2 |
| Ping Test Percentage = 100% |
| Average Trip Time = 21ms |
| Fastest Trip Time = 3ms |
| Slowest Trip Time = 102ms |
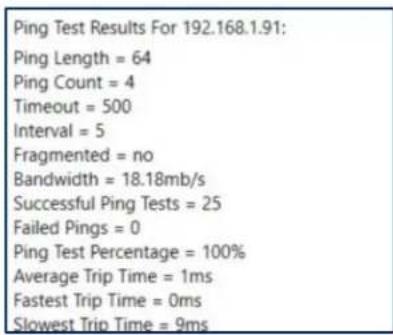
Example 1: Successful ping test with failed pings.
Example 2: Successful ping test with failed pings
Reports are a valuable tool for record keeping and to provide to customers for commissioning the system. Reports also provide a summary of connected device performance. Test results are dependent upon ping settings. With regards to the two of these results please note the following: Ping Tests and Failed Pings
The number of Pings within a test and number of Ping Tests is determined by the operator. NeTester will validate success if one ping is valid. As such if the number of pings is set to 4 and 1 is valid but 3 fails the test is valid. This is a standard method of judgement.
NeTester will also display the number of individual failed pings. In Example 1 above 25 ping tests were conducted each with 4 individual pings for a total of 100 pings. Of these 2 pings or 2% failure. Example 2 shows no failures.
Average/Fastest/Slowest Trip Time
Receiving units such as VMS servers NVRs have their own specific requirements for delay to determine if the transmission from the connected device is received. These three figures provide a total picture. The Timeout and Interval Ping settings can determine failure or success of pings and determine the time required by the connected devices
13.6 Saving and recovering previous reports
To save reports perform Save or Save As functions as with any Windows™ based file.
Once a report is created if problems exist in recovering the file and it has been saved you can recover the file:
This PC> Documents> NeTester
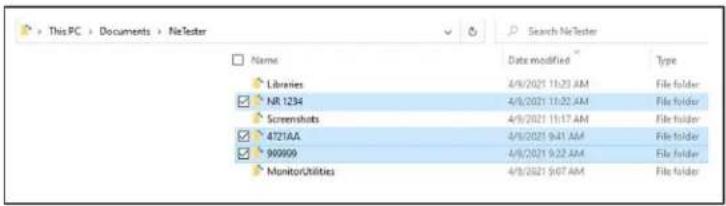
Once a file is opened in .PDF/.TXT/.CAV it can be saved as a folder you want to create

Section 14: Managed Account
14.0 Managing Accounts


To change NeTester's password
- Enter the previous password
- Enter new password
- Confirm the New Password
- Enter and username
- Select Save Changes
To change the User Name, enter the name and select "Save Changes"
Note if you close NeTester a pop-up will be indicated test results will be lost. Please consider saving test result reports prior to exit
Section 15: NeTester™ FreeRun
15.0 – What is a FreeRun
Netester FreeRun is a demonstration program that does not require network connections to operate. It uses a built-in database allowing most of the features to be operational. FreeRun does not require and will not work with any network connected devices.
15.1 Operating FreeRun
For specific operations for each section please review the main manual for operation. This section only contains major operational differences between NeTester and NeTester FreeRun. Important Note: FreeRun contains preloaded databases. In order to operate available functions such as bandwidth reports you must use one of the preloaded reports.
You can create your own reports but bandwidth and image functions will not work. You can make custom entries in the library and program specifics IF you are connected to a network you can ping a device on the same network
15.2 Loading FreeRun
This section only includes operations that differ from the complete NeTester program. For operation of all functions refer to the previous sections in this manual
15.3 FreeRun Registration

15.3 Login
Load FreeRun in the same manner as NeTester. In some cases, you may have to disable your virus protection refer to selection four.
Note NeTester FreeRun must be run as Administrator the first time it is operated
When using NeTester FreeRun the registration page will appear. You do not have to fill in the page just use the submit button and the program will act as if registration has been completed.
User the default user name and login -Username admin/Password system
15.4 Saved Reports
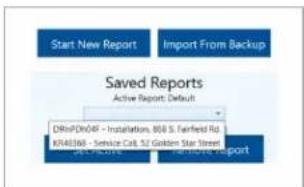
Note: In order to operate bandwidth and other functions you must selected one of the preloaded reports and set as "Active"

NeTester FreeRun – create your own reports and select one as Set Active

Once you select one of the preloaded reports and set as active the report will automatically be loaded
15.5 – Discovery

You can enter any range you want. The suggest range for demo is 192.168.0.100 to 192.268.1.254
The results will be taken from the embedded database with FreeRun
FreeRun will also allow Onvif and UPnP scans
The scanned camera can be added to library but you will not be able see them or add them to any test as they don't exist
Note: The preload devices that exist in the library help to show NeTester is capable of scanning and entering devices on different networks
The Compare Scan can also be operated
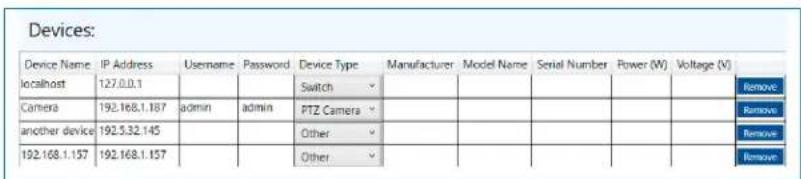
15.6 Operating The Ping Test Generator
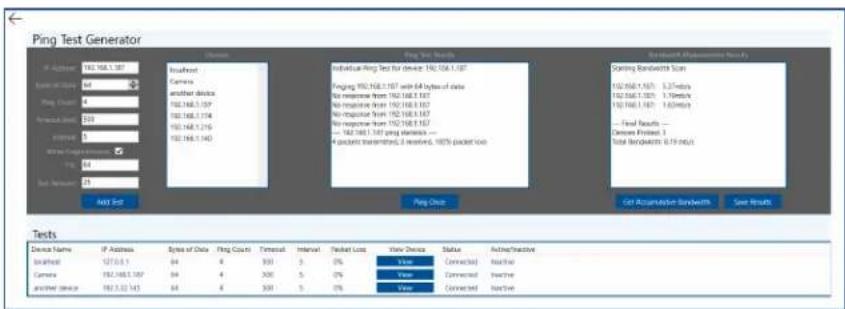
The Ping Test Generator will display the preload devices and any other devices you may have added. Please note only the preloaded devices can be used for bandwidth and image display functions.

Other functions such an adding test or Ping Once will operate normally
The Defragmentation function can also be show. De-select the "Allow Fragmentation" and set "Bytes of Data" to 9600 bytes and "Ping Once" the display will show 100% packet loss
15.7 Operating Bandwidth – Logging into the Camera
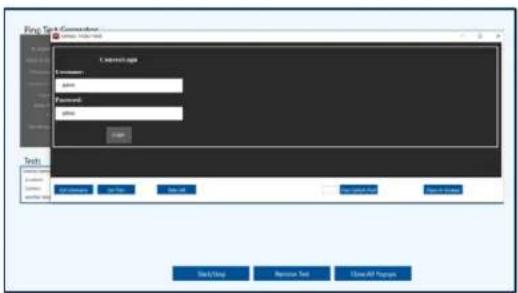
In order to view camera video and show the bandwidth function you must log into the camera -follow the copy and paste procedure or enter admin, admin for user name and password

After logging into the camera, a still image will be displayed
15.8 Operating Bandwidth function.

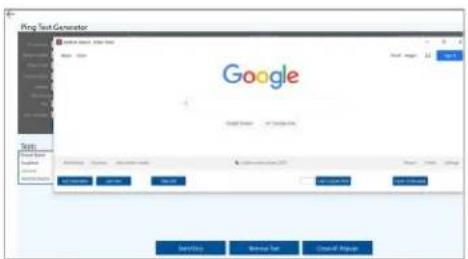
Selecting the other two devices will show a still image of Google and Vigitron screens.
Note as this is a demo program and you are not connected to a network – will not be able to stream video which is the case when operating the NeTester program.

Bandwidth requirements can be measured from all devices connected to an individual point such as a network switch.
Measurement is restricted to only those devices that are accessed and streaming.
The requirement for a connected device to be included in the bandwidth test it must be:
- Selected in the "Add Test"
- Logged into to using its user name and password
- "Viewed" and remain opened when testing bandwidth
15.9 Including a Still image as part of the report.

To include an image as part of the report – select the "Save Still" button. This can be done even when video is streaming
NeTester FreeRun will allow you to export reports, but note only the .PDF format will include photos.
You can select all the photos or specific ones.

Section 16: Appendix – Packet Size, Packet Overheads, and Bandwidth
16.0 Appendix – What is a Packet
In IP transmission information is transmitted as packets which can vary in size over a wide range. In general packet, sizes can be divided into two segments. The first was established by RFC 2544 from 64 to 1518 bytes. Sizes over 1518 bytes are re-referred to as Jumbo Frames. There is no commonly accepted limit. Two figures are used are 9600 and 14,000 bytes but there is no standard or single accepted figure.
A packet can be divided into two parts. The first part is the payload which is the data generated by the connected devices within the network. The second part is the packet overhead which contains information that is required to transmit the payload. Overheads will vary greatly based on the type of transmission. TCP's overhead is larger than UDP, IvP6 higher than IvP4. There is no general standard value. The ability of a network to transmit information without distortion or packet loss is based on the network handling the complete packet consisting of the payload and overhead.
Do not confuse port bandwidth with transmission bandwidth. Many security devices have a port bandwidth of 100Mbps. Typical uplinks are generally 1000Mbps. Is this only what the ports are capable of and not the actual bandwidth limitation of the system itself which is what NeTester measures.
16.1 Packet Size and IP Video
The RFC 2544 was established as a performance criterion when the majority of transmission was data files such as Excel™ and Word™ files. Video packet sizes are much larger. Their size depends on many factors such as the cameras megapixel size and compression ratio. In general, the lowest range of MP cameras will require a packet size of 1024 bytes.
16.2 NeTester and Ping Test Generator
NeTester's Ping Test Generator tests the actual pixel transmission ability between the host computer and the connected device. as bidirectional communications so the value you receive reflects transmission and reception.
16.3 Fragmentation and Defragmentation
NeTester will issue a packet size as entered. This packet will be sent out over the network. If Fragmentation is allowed the packet will be broken up into segments of 1518 bytes plus overheads. In this case, packets over 1518 bytes will still indicate successful pings as in reality it passing the packet (Video frame) in segments As an example, if a packet is 4,554 bytes it will break it up into three segments of 1518 bytes. When pings over 1518 bytes plus the overheads are issued, they can be viewed as being successfully transmitted but as fragmented. When this process is applied to Jumbo Video frames, they can result in distortions in the form of pixelization.
If Fragmentation is not allowed the transmission system and its components must be able to pass the entire packet without breaking it up. If this is not possible the packet will be lost and NeTester will return a message that fragmentation is required.
16.4 Packets and Bandwidth
There is a direct relationship between packet size, packets per second, and bandwidth. To begin if a transmission system cannot pass the packet then bandwidth doesn't matter. If a packet must be fragmented in order to pass a packet the number of packets required to pass a packet is decreased while the amount of network traffic due to the increased number of packets per second is increased requiring an increase in bandwidth.
Example: A connected device generates a packet size of 4500 bytes and bandwidth has a capacity of 1,000 packets per second (PPS). The components in the network are only capable of passing a packet size of 1500 bytes requiring fragmentation
Due to the inaccuracy of the Ping time measurement, NeTester does not use this process when reading bandwidth. However, this formula can be used to get a rough estimate of bandwidth when NeTester is not operating in Administrative mode.
Packet size limits can also be used to determine the actual network bandwidth performance. Using NeTester you determine the transmitting bandwidth
Individual Ping Test for device: ptz
Pinging 192.168.2.110 with 1472 bytes of data:
Reply from 192.168.2.110: bytes=1472 time=2ms TTL=64
Reply from 192.168.2.110: bytes=1472 time=1ms TTL=64
Reply from 192.168.2.110: bytes=1472 time=1ms TTL=64
Reply from 192.168.2.110: bytes=1472 time=1ms TTL=64
--- 192.168.2.110 ping statistics ---
4 packets transmitted, 4 received, 0% packet loss
For the following complete procedures refer to Section (X) Pages (YY)
In the above example Using NeTester's Max Packet Size, it was determined 1472 was the maximum packet size the system is capable of passing with fragmentation. The actual value was 1472 + 20 or 1492 bytes.
The value of 1472 was then entered in as the Bytes of Data with an interval of 4. Any internal can be use even 1. If an internal of greater than 1 is used the duration results should be averaged.
In this, the average is 1.25ms per packet.
To learn Packets Per Second 1472/.00125 = 1,177,600 x 8 = 9,420,800 = a bandwidth of approximately 9.4Mbps.

- NeTester™ Operational Manual NeTester ™ FreeRun Operation Manual
- Section 1: About This Manual
- Copyright
- Purpose
- Audience
- Conventions
- Warranty
- Disclaimer
- Software Acceptance Terms and Conditions Release of Liability
- Acknowledgment
- Grant of License
- Disclaimer of Warranty
- Limitation of Liability
- Arbitration
- Miscellaneous
- Important Notice
- On Determining Bandwidth
- Section 2: Introduction
- Overview
- NeTester is designed to
- NeTester is designed to:
- Key Features
- Notes on Onvif and UPnP Discover
- Section 3: Operation of Software Management and Device Interface
- Section 4: Installation
- Installation Steps
- Select the NeTester install button
- The Setup process will start.
- Removing or giving permission to Virus Blocks
- If Your Computer Has Virus Protection Software
- Accepting Terms and Conditions
- Accept Software Terms and Conditions
- Running NeTester as Administrator
- Registration Form
- Section 5: NeTester Main and Sub Menus
- Changing Menus Selections
- Section 6: Log On
- Changing Menus Selections
- Section 7: Welcome Screen
- Welcome Screen
- Section 8: Welcome Screen
- Recalling Reports
- Updated Reporting.
- Section 9: Device Library
- Device Library
- Section 10: Discovery
- Enter a subnet range:
- Comparing Scans
- Scanning different IP Classes
- Adding a Device to the library
- Section 11: Test Generator
- Part one: Setting up the Generator
- Allow Fragmentation:
- Section 12: Test Generator
- Part Two: Operating the Generator
- Operating the Ping Test Generator
- Adding Test
- Add Test
- Ping Once
- Pinging with no Fragmentation (Fragmentation unchecked)
- Bandwidth Functions
- Save Results
- Bandwidth Testing
- Programming the View Function
- Open in Browser:
- Operating the Bandwidth function.
- Naming and Saving Bandwidth reports:
- When a Browser cannot be reached
- Section 13: Reporting
- Reporting
- Exporting and Saving Reports
- First screen
- Recalling the Active Report
- Viewing and Selecting Photos for the Report
- Managed Photos:
- Export
- Exporting Reports
- Analyzing Reports
- Saving and recovering previous reports
- Section 14: Managed Account
- Managing Accounts
- Section 15: NeTester™ FreeRun
- Saved Reports
- – Discovery
- Operating The Ping Test Generator
- Operating Bandwidth – Logging into the Camera
- Operating Bandwidth function.
- Section 16: Appendix – Packet Size, Packet Overheads, and Bandwidth
- Appendix – What is a Packet
- Packet Size and IP Video
- NeTester and Ping Test Generator
- Fragmentation and Defragmentation
- Packets and Bandwidth
Brand : Vigitron
Model : Vi30001
Category : Network card / adapter