
EDWA14901AW - Washing machine Edy - Free user manual and instructions
Find the device manual for free EDWA14901AW Edy in PDF.


| Product Type | Front-loading washing machine |
| Brand | Edy |
| Model | EDWA14901AW |
| Washing Capacity | 8 kg |
| Maximum Spin Speed | 1400 rpm |
| Energy Class | D |
| Power Supply | 220-240 V, 50 Hz |
| Dimensions (H x W x D) | 85 x 60 x 60 cm |
| Net Weight | 70 kg |
| Number of Programs | 15 programs |
| Main Functions | Delayed start, quick wash, anti-allergy, prewash |
| Maintenance and Cleaning | Regular cleaning of the filter and door seal recommended |
| Safety | Child safety, automatic shutdown in case of malfunction |
| Spare Parts and Repairability | Parts available via after-sales service |
| General Information | Edy front-loading washing machine, model EDWA14901AW, white |
Frequently Asked Questions - EDWA14901AW Edy
User questions about EDWA14901AW Edy
0 question about this device. Answer the ones you know or ask your own.
Ask a new question about this device
Download the instructions for your Washing machine in PDF format for free! Find your manual EDWA14901AW - Edy and take your electronic device back in hand. On this page are published all the documents necessary for the use of your device. EDWA14901AW by Edy.
USER MANUAL EDWA14901AW Edy
natural_image
Front view of a white ECY washing machine with a black circular lid and digital display (no visible text or symbols on the device body)
Gebruiksaanwijzing

User Manual

natural_image
Front view of a black washing machine with a circular vent and digital display (no visible text or symbols)
Gebrauchsanleitung

Mode dé Emploi
| 1 - 3 Dutch | ||
| German | 31 - 60 | |
| French | 61 - 90 | |
| English | 91 - 120 | |
NL
GEBRUIKERSIINSTRUCTIES
VEILIGHEIDSINFORMATIE
ALVORENS DE WASMACHINE
INGEBRUIK TE NEMEN
VOORZORGSMAATREGELEN EN AANBEVELINGEN
BESCHRIJVING VAN DE WASMACHINE
NOODDEUR OPENEN
ALVORENS HE EERSTE WAS PROGRAMMA
VOORBEREIDING VAN HETWAS SEN
WASMIDDELEN EN NABEHANDELINGSMIDDELEN
AFVRESTWATER
REINIGING EN ONDERHOUD
PROBLEEMOPLOSSINGGIDS
TRANSPORT/HANTERING
ELETRISCHE AANSLUITING
INSTALLATIEHANDLEIDING
SNELLE GEBRUIKERSHANDLEIDING
VEILIGHEIDSINFORMATIE
natural_image
Symbol of a trash bin with crossed lines indicating no waste or discharge, and a solid black rectangle below (no text or labels)natural_image
Illustration of two white cylindrical water heaters with labeled components, mounted on a base (no text or symbols present)A
Opmerkingen:
natural_image
Illustration of hands using a tool to adjust or install a component, with no visible text or symbols.REINIGING EN ONDERHOUD
natural_image
Illustration of a hand interacting with a device, showing a button and directional arrows (no text or symbols)B

natural_image
Diagram of a laboratory apparatus with a cylindrical container and a U-shaped tube, showing an arrow indicating direction (no text or symbols present)C
Filter
natural_image
Illustration of a hand pressing a button on a curved surface, with an arrow indicating direction (no text or symbols)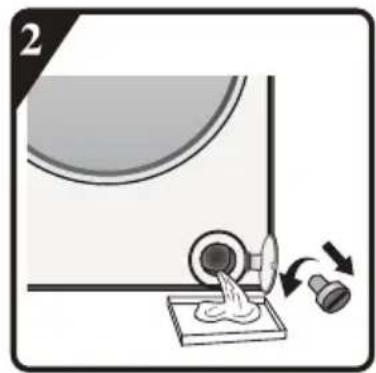
natural_image
Illustration of a mechanical device with a curved component and two directional arrows indicating motion (no text or symbols)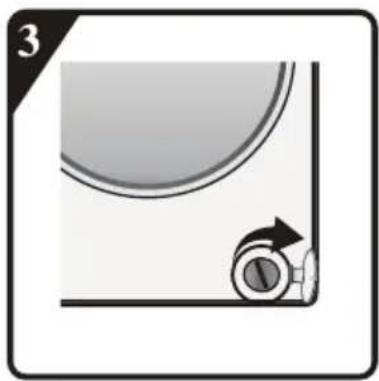
natural_image
Simple diagram showing a curved line and a circular arrow with a pointer, no text or symbols present.
natural_image
Illustration of a hand pressing a circular object on a curved surface, with an arrow indicating direction (no text or symbols)Watertoevoerslang
INSTALLATIEHANDLEIDING

RUIS, EXCESSIEVE TRILLINGEN EN WATERLEKKAGES KUNNEN WORDEN VEROORZAAKT DOOR EEN ONJUISTE INSTALLATIE.
NOOIT HET APPARAAT VERPLAATSEN DOOR HET OP TE TILLEN AAN HET BESTURINGSPANEEL.
natural_image
Simple line drawing of a hand holding a transparent container with liquid, no text or symbols presentA

B
natural_image
Four identical gray spherical objects with black rectangular cutouts, arranged in a 2x2 grid (no text or symbols)©
D
natural_image
U-shaped pipe fitting with two connectors (no text or symbols visible)E

F

ALVORENS DE MACHINE IN GEBRUIK TE NEMEN DIENT U DE TRANSPORTBOUTEN TE VERWIJDEREN!
natural_image
Technical line drawing of a mechanical component with numbered parts (no text or symbols)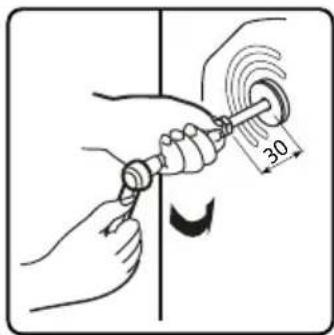
natural_image
Illustration of a hand using a screwdriver to adjust a mechanical component (no text or symbols present)natural_image
Illustration of a hand using a screwdriver to press or install a device with a circular sensor (no text or symbols)natural_image
Illustration of a hand holding a ball with an arrow indicating motion (no text or symbols)natural_image
Diagram of a wrench being inserted into a computer monitor (no text or symbols present)natural_image
Diagram of a device interior with labeled ports and an arrow indicating direction (no text or symbols present)natural_image
Illustration of a hand holding a flexible hose with a handle, labeled 'E' (no text or symbols on the diagram itself)Opmerkingen:
natural_image
Illustration of two white cylindrical containers with internal compartments and a base, no text or symbols visibleA
Hinweise:
natural_image
Illustration of hands using a tool to apply material to a curved surface, with no visible text or symbols.PFLEGE UND WARTUNG
natural_image
Illustration of a hand interacting with a device, showing directional arrows (no text or symbols)B

natural_image
Diagram of a laboratory apparatus with a cylinder and container, showing an arrow indicating motion (no text or symbols present)C
Filter
natural_image
Illustration of a hand pressing down on a curved surface with an arrow indicating direction (no text or symbols)
natural_image
Diagram showing a mechanical setup with a rotating component and two curved arrows indicating motion (no text or symbols)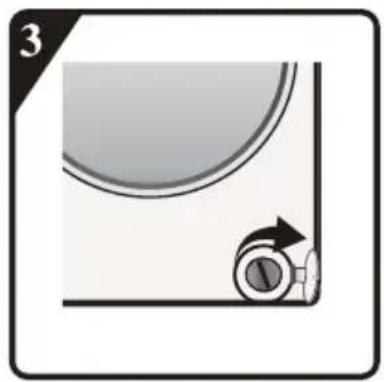
natural_image
Simple diagram showing a curved line and a circular arrow with an arrow, no text or symbols present.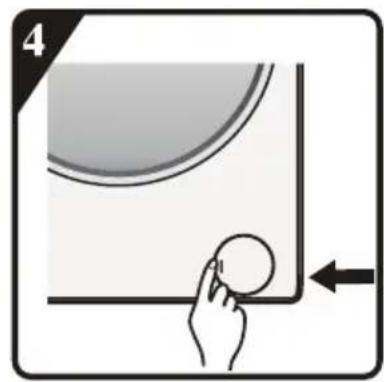
natural_image
Illustration of a hand pressing a circular object on a rectangular surface, with an arrow indicating direction (no text or symbols)Wasserschlauch
natural_image
Close-up of a metallic cylindrical object with a flanged top and stem (no visible text or symbols)
natural_image
Close-up of a metallic mechanical connector or fitting (no visible text or symbols)
natural_image
Close-up of a metallic cylindrical object with a pointed tip, possibly a tool or component (no visible text or symbols)D
MONTAGEANLEITUNG

natural_image
Simple line drawing of two hands holding a rectangular container with liquid (no text or symbols)A

B
natural_image
Four identical gray spherical objects with internal segmented patterns, arranged in a 2x2 grid (no text or symbols)C

D

natural_image
Pure diagram of a U-shaped pipe with two connectors (no text or symbols)E

F

natural_image
Technical line drawing of a mechanical component with numbered parts (no text or symbols)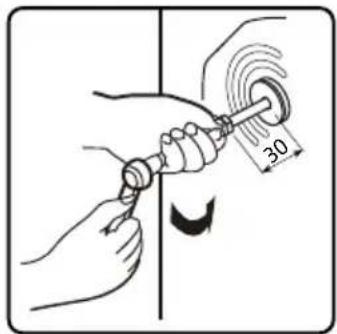
natural_image
Illustration of a hand using a screwdriver to adjust a screwdriver into a socket (no text or symbols present)natural_image
Illustration of hands using a screwdriver to adjust a component with motion arrows (no text or symbols)natural_image
Illustration of a hand holding a ball with an arrow indicating motion (no text or symbols)natural_image
Diagram of a computer monitor with a wrench inserted, showing mechanical assembly (no text or symbols)natural_image
Simple line drawing of a hand pressing a block on a surface with a ruler (no text or symbols)natural_image
Pure diagram of two pipe fittings with arrows indicating direction (no text or symbols)
natural_image
Diagram of a device interior with labeled ports and an arrow indicating direction (no text or symbols present)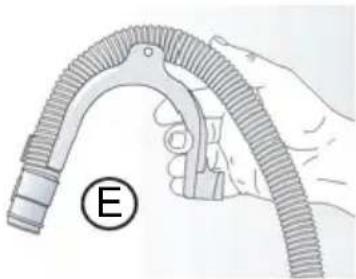
natural_image
Illustration of a hand holding a flexible hose with a handle, labeled with circled number E (no text or symbols on the diagram itself)Hinweise:
TRANSPORT / MANUTENTION
CONNEXION ÉLECTRIQUE
GUIDE D'INSTALLATION
MANUEL D'UTILISATION RAPIDE
INFORMATION DE SÉCURITÉ
natural_image
Exterior view of a modern office building (no signage)A
Remarques:
natural_image
Illustration of hands using a tool to adjust or install a component on a device (no text or symbols visible)ENTRETIEN ET MAINTENANCE
natural_image
Illustration of a hand pressing down on a cylindrical device with arrows indicating motion (no text or symbols)B

natural_image
Diagram of a laboratory apparatus with a cylinder and a U-shaped tube, showing an arrow indicating direction (no text or symbols present)C
Filtre
natural_image
Illustration of a hand pressing down on a curved surface with an arrow indicating direction (no text or symbols)
natural_image
Illustration of a mechanical device with a rotating knob and base, showing motion arrows (no text or symbols)
natural_image
Simple diagram showing a curved line and a circular arrow with an arrow, no text or symbols present.
natural_image
Illustration of a hand pressing a circular object on a surface, with an arrow indicating direction (no text or symbols)natural_image
Close-up of a metallic cylindrical object with a flanged tip, against a plain gray background (no text or symbols visible)
natural_image
Close-up of a metallic industrial valve or connector with a threaded end (no visible text or symbols)
natural_image
Close-up of a white plastic pipe fitting with a metallic tip (no text or symbols visible)D
AIDE AU DÉPANNAGE
TRANSPORT / MANUTENTION
GUIDE D'INSTALLATION

DU BRUIT, DES VIBRATIONS EXCESSIVES ET DES FUITES D'EAU PEUVENT ÊTRE CAUSÉS PAR UNE INSTALLATION INCORRECTE.
NE DÉPLACEZ JAMAIS L'APPAREIL EN LE SOULEVANT PAR LE PLAN DE TRAVAIL.
natural_image
Technical line drawing of a mobile phone casing with buttons and ventilation slots (no text or symbols)

natural_image
Illustration of a hand using a screwdriver to adjust a screw with an arrow indicating direction (no text or symbols)
natural_image
Illustration of hands using a screwdriver to adjust a component with motion arrows (no text or symbols)
natural_image
Illustration of a hand holding a ball with an arrow indicating motion (no text or symbols)natural_image
Diagram of a wrench being inserted into a computer monitor (no text or symbols present)
INSTALLER LE COUVERCLE INFÉRIEUR
B:
natural_image
Simple line drawing of two pipe fittings attached to a support structure (no text or symbols)natural_image
Technical diagram of a device interior with labeled components and an arrow indicating direction (no text or symbols present)
natural_image
Illustration of a hand holding a flexible hose with threaded ends, labeled with circled number E (no text or symbols on the hose itself)Remarques:
Consignes relatives aux programmes
PRECAUTIONS AND GENERAL
RECOMMENDATIONS
DESCRIPTION OF THE WASHING MACHINE
EMERGENCY DOOR OPENING
BEFORE THE FIRST WASH CYCLE
PREPARATION OF THE WASHING
DETERGENTS AND ADDITIVES
DRAINING RESIDUAL WATER
CARE AND MAINTENANCE
TROUBLESHOOTING GUIDE
TRANSPORT / HANDLING
ELECTRICAL CONNECTION
INSTALLATION GUIDE
QUICK USER MANUAL
SAFETY INFORMATION
- The manufacturer reserves the right for any modifications on the product which might be deemed necessary or useful without informing about it in this IFU.
- Before operating your new washing machine, please read this instruction carefully, and keep it for future reference. If you have lost it accidentally, ask customer service for e-copy or hard copy.
- Please make sure the socket is grounded securely, the water source connection is reliable.
- This appliance is not to be used by persons (including children) with reduced physical, sensory or mental capabilities, or lack of experience and knowledge, unless they have been given supervision or instruction concerning use of the appliance by a person responsible for their safety.
- This appliance can be used by children aged from 8 years and above and persons with reduced physical, sensory or mental capabilities or lack of experience and knowledge if they have been given supervision or instruction concerning use of the appliance in a safe way and understand the hazards involved. Children shall not play with the appliance. Cleaning and user maintenance shall not be made by children without supervision.
- Children should be supervised to ensure that they do not play with the appliance.
- If the supply cord is damaged, it must be replaced by the manufacturer, its service agent or similarly qualified persons in order to avoid a hazard.
-
The new hose-sets supplied with the appliance are to be used and that old hose-sets should not be reused.
-
For appliances with ventilation openings in the base, that a carpet must not obstruct the openings.
- Children of less than 3 years should be kept away unless continuously supervised.
- The maximum permissible inlet water pressure, 1 MPa, for appliances intended to be connected to the water mains. The minimum permissible inlet water pressure, 0.1 MPa, if this is necessary for the correct operation of the appliance.
- The maximum washing capacity is 9kg.
- For private domestic use only.
-
This appliance is intended to be used in household and similar applications such as:
-
staff kitchen areas in shops, offices and other working environments;
- farm houses;
- by clients in hotels, motels and other residential type environments;
- bed and breakfast type environments;
- areas for communal use in blocks of flats or in launderettes.
BEFORE USING THE WASHING MACHINE
1. Removing the packaging and inspection
- After unpacking, ensure that the washing machine is undamaged. If in doubt, do not use the washing machine. Contact After-Sales Service or your local retailer.
- Check that the accessories and supplied parts are all present.
- Keep the packaging materials (plastic bags, polystyrene parts, etc.) out of reach of children, as they are potentially dangerous.
2. Remove the transport bolts
- The washing machine is fitted with transport bolts to avoid any possible damage to the interior during transport. Before using the machine, it is imperative that the transport bolts are removed.
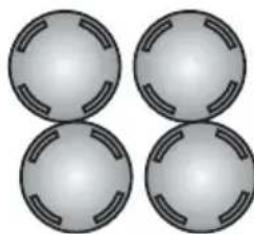
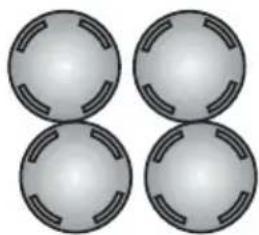
• After their removal, cover the openings with the 4 enclosed plastic caps.
3. Install the washing machine
- Move the appliance without lifting it by the worktop.
- Install the appliance on a solid and level floor surface, preferably in a corner of the room.
- Ensure that all four feet are stable and resting on the floor and then check that the washing machine is perfectly level (use a spirit level).
- Ensure that the ventilation openings in the base of the washing machine (if available on your model) are not obstructed by a carpet or other material.
4. Water inlet
- Connect the water supply inlet hose in accordance with the regulations of your local water company.
• Water inlet - Depending on models:
Single inlet - Cold water only
Dual inlet - Hot and cold water
• Water tap: 3/4 threaded hose connector
5. Drain
- Connect the drain hose to the siphon or hook it over the edge of a sink by means of the "U" bend supplied.
- If the washing machine is connected to an integrated drainage system, ensure that the latter is equipped with a vent to avoid simultaneous loading and draining of water (siphoning effect).
• Fix the drain hose securely to prevent scalding during machine drainage.
6. Electrical connection
- Electrical connections must be carried out by a qualified technician in compliance with the manufacturer's instructions and current standard safety regulations.
- Data regarding voltage, power consumption and protection requirements is given on the inside of the door.
- The appliance must be connected to the mains by means of a socket with an earth connection in accordance with current regulations. The washing machine must be earthed by law. The manufacturer declines all liability for damage to property or injury to persons or animals due to non-compliance with the directions given above.
- Do not use extension leads or multiple sockets. Make sure the capacity of the socket is powerful enough to drive the machine during heating.
- Before any maintenance on the washing machine disconnect it from the mains supply.
- After installation, access to the mains plug or to disconnection from the mains supply must be ensured at all times via a double-pole switch.
- Do not operate the washing machine if it has been damaged during transport. Inform After-Sales Service.
- Mains cable replacement is only to be carried out by After-Sales Service.
- The appliance must only be used in the household for the prescribed uses.
Minimum housing dimensions:
Width: 615 mm
Height: 855 mm
Depth: refer to programme chart
PRECAUTIONS AND GENERAL RECOMMENDATIONS
1. Packaging
- The packaging material is entirely recyclable, and marked with the recycling symbol. Adhere to current local regulations when disposing of packaging material.
2. Disposing of packaging and scrapping old washing machines
- The washing machine is built from reusable materials. It must be disposed of in compliance with current local waste disposal regulations.
- Before scrapping, remove all detergent residues, break the door hook, and cut off the power cable so that the washing machine is made unusable.

natural_image
Symbol of a trash bin crossed with a diagonal line, no text or numbers presentThis appliance is marked according to the European directive on Waste is Electrical and Electronic Equipment (WEEE). By ensuring that this product disposed of correctly, you will help prevent potential negative consequences for the environment and human health, which could otherwise be caused by inappropriate waste handling of this product.
The symbol on the product, or on the documents accompanying the product, indicates that this appliance may not be treated as household waste. Instead it shall be handed over to the applicable collection point for there cycling of electrical and electronic equipment. Disposal must be carried out in accordance with local environmental regulations for waste disposal. For more detailed information about treatment, recovery and recycling of this product, please contact your local city office, your household waste disposal service or the shop where you purchased the product.
3. Location and surroundings
- The washing machine must only be installed in enclosed spaces. Installation in the bathroom or other places where air is humid is not recommended.
- Do not store flammable fluids near the appliance.
4. Safety
- Do not leave the appliance plugged in when not in use. Never plug or unplug the power from the mains supply, if your hands are wet.
- Turn off the tap.
-
Before any cleaning and maintenance, switch off the machine or disconnect it from the mains.
-
Clean the outside of the washing machine with a damp cloth. Do not use abrasive detergents.
- Never open the door forcibly or use it as a step.
DESCRIPTION OF THE WASHING MACHINE
1 Worktop
2 Control panel
3 Detergent dispenser
4 Door
5 Plinth covering pump access
6 Adjustable feet
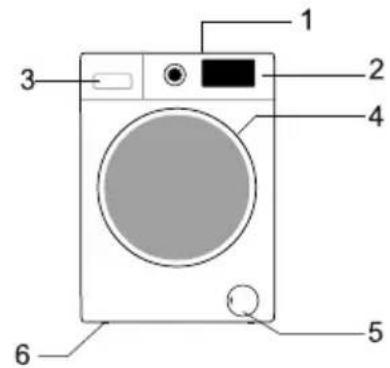
Control panel layout and
appearance will depend on the model.
EMERGENCY DOOR OPENING
In case of failure to open the door due to power outage or other special circumstances, the door lock lever at the drainage pump door can be used for emergency opening.
Note:
- Do not operate when the machine is working normally;
- Before operation, please make sure that the inner barrel has stopped turning, without high temperature, and the water level is lower than the clothing inlet. If the water level is higher than the clothing inlet, drain off water through the drain-away pipe (if available) or by slowly unscrewing the filter.
- Operation method: Open the cover of drainage pump door, pull down the lock lever with the help of a tool, and then the door can be opened(indicated in the figure).

BEFORE THE FIRST WASH CYCLE
To remove any residual water used during testing by the manufacturer, we recommend that you carry out a short wash cycle without laundry.
1 Open the tap.
2 Close the door.
3 Pour a little detergent (about 30 ml) into the main wash chamber of the detergent dispenser.
4 Select and start a short programme (see separate quick reference guide).
PREPARATION OF THE WASHING
- Sort the laundry according to...
• Type of fabric / care label symbol
Cottons, mixed fibres, easy care/synthetics, wool, handwash items.
The wool wash cycle of this machine has been tested and approved by The Woolmark Company for the washing of Woolmark garments labelled as "machine wash" provided that the garments are washed according to the instructions on the garment label and those issued by the manufacturer of this washing machine.
- Colour
Separate coloured and white items. Wash new coloured articles separately.
- Loading
Wash items of different sizes in the same load to improve washing efficiency and distribution in the drum.
- Delicates
Wash small items (e.g. nylon stockings, belts etc.) and items with hooks (e.g. bras) in a cloth bag or pillow case with zip. Always remove curtain rings or wash curtains with the rings inside a cotton bag.
- Empty all pockets
Coins, safety pins etc. can damage your laundry as well as the appliance drum and tub.
- Fasteners
Close zips and fasten buttons or hooks; loose belts or ribbons should be tied together.
Stain removal
Blood, milk, eggs etc. are generally removed by the automatic enzyme phase of the programme.
- To remove red wine, coffee, tea, grass and fruit stains etc. add a stain remover to the main wash chamber [Ⅲ] of the detergent dispenser.
- Pre-treat heavily-soiled areas with stain remover if necessary.
Dyeing
- Only use dyes that are suitable for washing machines.
- Follow the Manufacturer's instructions.
- Plastic and rubber parts of the washing machine can be stained by dyes.
Loading the laundry
1 Open the door.
2 Load the articles one at a time loosely into the drum, without overfilling.
Observe the load sizes given in the quick reference guide.
Note: Overloading the machine will result in unsatisfactory washing results and creased laundry.
3 Close the door.
DETERGENTS AND ADDITIVES
Always use high efficiency, low foam detergent for a front load machine.
The choice of detergent depends on:
• type of fabric (cottons, easy care/synthetics, delicate items, wool).
Note: Use only specific detergents for washing wool
- colour
• the wash temperature
• degree and type of soiling
Remarks:
Any whitish residues on dark fabrics are caused by insoluble compounds used in modern phosphate-free powder detergents. If this occurs, shake or brush out the fabric or use liquid detergents. Use only detergents and additives specifically produced for domestic washing machines. When using descaling agents, dyes or bleaches for the pre-wash, make sure that they are suitable for use in domestic washing machines. Descalers could contain products which could damage your washing machine. Do not use any solvents (e.g. turpentine, benzine). Do not wash fabrics that have been treated with solvents or flammable liquids.
Dosage
Follow the dosage recommendations on the detergent pack. They depend on:
• degree and type of soiling
- size of wash
follow the detergent manufacturer's instructions for a full load;
half load: 3/4 the amount used for a full load;
minimum load (about 1 kg): 1/2 the amount used for a full load;
• water hardness in your area (ask for information from your water company).
Soft water requires less detergent than hard water.
Notes:
Too much detergent can result in excess foam formation, which reduces washing efficiency. If the washing machine detects too much foam, it may prevent spinning. Insufficient detergent may result in grey laundry in time and also calcifies the heating system, drum and hoses.
Where to put detergent and additives
The detergent drawer has three chambers (fig. "A")
Prewash chamber
• Detergent for the prewash / soak
Mainwash chamber
• Detergent for the main wash
- Stain remover
• Water softener (water hardness class 4)
Softener chamber
- Fabric softener

natural_image
Exterior view of a modern office building (no signage)A
Notes:
- Keep detergents and additives in a safe, dry place out of the reach of children.
- Liquid detergents can be used for programmes with prewash. However, in this case a powder detergent must be used for the main wash.
-
Do not use liquid detergents when activating the "Start Delay" function (if available on your washing machine).
-
To prevent dispensing problems when using highly concentrated powder and liquid detergents, use the special detergent ball or bag supplied with the detergent and place it directly inside the drum.
- When using descaling agents, bleaches or dyes, make sure that they are suitable for washing machines. Descalers could contain compounds that can damage parts of your washing machine.
- Do not use any solvents in the washing machine (e.g. turpentine, benzine).
DRAINING RESIDUAL WATER(depends on model)
Before emptying the residual water, switch the appliance off and unplug it from the mains socket. Remove the plinth, place a container beneath it.
1 Pull out emergency drain pipe of machine.
2 Put end of emergency drain pipe into a container.
3 Rotate emergency drain pipe plug and remove it after it becomes loose.
4 Until water runs off naturally.
5 Reinstall emergency drain pipe plug.
6 Fill detergent box with 1L water to check emergency drain pipe. Check if there is any leakage at connection of pipe plug.
7 Put emergency drain pipe back.

natural_image
Illustration of hands using a tool to apply material to a surface, with no visible text or symbolsCARE AND MAINTENANCE
Appliance exterior and control panel
- Can be washed down with a soft, damp cloth.
• A little neutral detergent (non abrasive) can also be used.
• Dry with a soft cloth.
Door seal
- Clean with a damp cloth when necessary.
- Check the condition of the door seal periodically.
Detergent dispenser
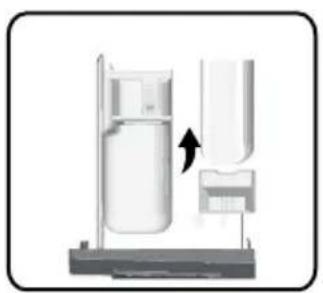
1 Press the release lever in the main wash compartment downward and remove the drawer(fig."B").
2 Remove siphon in softener slot. (fig."C").
3 Wash all the parts under running water.
4 Refit the siphon in the detergent drawer and fit the drawer back inside its housing.

natural_image
Illustration of a hand pressing down on a device component with arrows indicating motion (no text or symbols)B
natural_image
Diagram of a laboratory apparatus with a container and a side arm, showing an arrow indicating direction (no text or symbols present)C
Filter
We recommend that you check and clean the filter regularly, at least two or three times a year.
Especially:
• If the appliance is not draining properly or if it fails to perform spin cycles.
• If the pump is blocked by a foreign body (e.g. buttons, coins or safety pins).
IMPORTANT: Ensure that the water has cooled before draining the appliance.
1 Stop the appliance and unplug it.
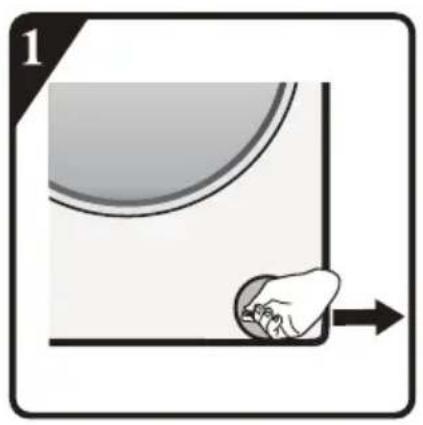
2 Insert removal tool like slotted screwdriver into the small opening of bottom baffle, press the bottom baffle downward with much strength and open it.
3 Put a flat container under filter door and then drain with emergency drain pipe (see [draining residual water] for specific operation methods). Then, loosen filter anticlockwise and completely unscrew and remove the filter.
4 Clean the filter and the filter chamber.
5 Check that the pump rotor moves freely.
6 Re-insert the filter and screwit in clockwise as far as it will go.
7 Reinstall the plinth.
natural_image
Illustration of a hand pressing a button on a curved surface, with an arrow indicating direction (no text or symbols)
natural_image
Illustration of a mechanical device with a curved tool and two directional arrows indicating motion (no text or symbols)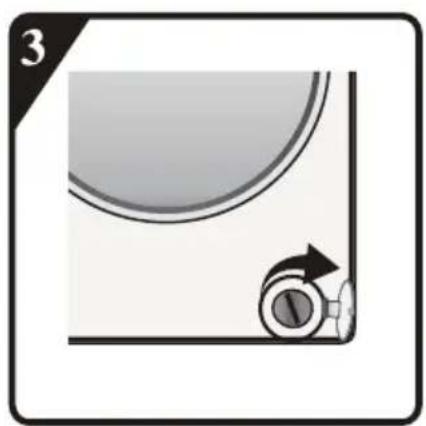
natural_image
Diagram showing a curved surface with an arrow pointing to a circular object, labeled with number 3 (no text or symbols on the diagram itself)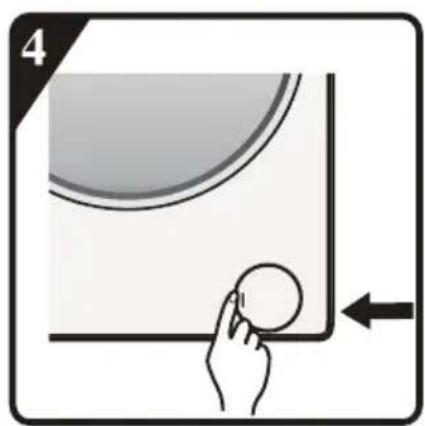
natural_image
Illustration of a hand holding a ball near a curved surface, with an arrow indicating direction (no text or symbols)Water supply hose
Check the supply hose regularly for brittleness and cracks and replace it if necessary using a new hose of the same type(available from After-Sales Service or specialist dealer).
Mesh filter for water connection
Check and clean regularly.
For washing machines with an inlet hose as shown on pictures "D",
1 Close the tap and loosen the inlet hose on the tap.
2 Clean the internal mesh filter and screw the water inlet hose back onto the tap.
3 Now unscrew the inlet hose on the rear of the washing machine.
4 Pull off the mesh filter from the washing machine connection with universal pliers and clean it.
5 Refit the mesh filter and screw the inlet hose on again.
6 Turn on the tap and ensure that the connections are completely water-tight.

natural_image
Close-up of a metallic cylindrical object with a flanged top and stem (no visible text or symbols)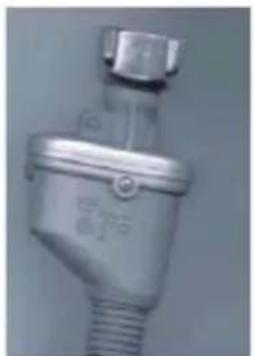
natural_image
Close-up of a metallic electrical plug with threaded end (no visible text or symbols)
natural_image
Close-up of a metallic cylindrical object with a flanged tip, possibly a tool or connector (no visible text or symbols)D
TROUBLESHOOTING GUIDE
Depending on the model, your washing machine is equipped with various automatic safety functions. This enables faults to be detected in good time and the safety system can then react appropriately. These faults are frequently so minor that they can be resolved within a few minutes.
The washing machine will not start, no indicator lamps are on.
Check whether:
• the mains plug is inserted into the socket
- the wall socket is functioning correctly (use a table lamp or similar appliance to test it).
The washing machine will not start... and the "Start/Pause" indicator lamp flashes.
Check whether:
• the door is properly closed (child safety);
• the "Start/Pause" button has been pressed;
- the "Water tap closed" indication lights up. Open the water tap and press the "Start/Pause" button.
The appliance stops during the programme (varies depending on model)
Check whether:
- the door has been opened and the "Start/Pause" indicator lamp is flashing. Close the door and press the "Start/Pause" button again.
- Check if there is too much foam inside, machine enters kill-foam routine. The machine will run again automatically after a period.
- the washing machine's safety system has been activated (see "Fault description table").
Residue from detergent and additives left in the detergent drawer at end of wash.
Check whether:
- the cover grid of the softener chamber and the separator of the main wash chamber are correctly installed in the detergent dispenser and all parts are
clean (see "Care And Maintenance");
- sufficient water is entering. The mesh filters of the water supply could be blocked (see "Care and Maintenance");
- the position of the separator in the main wash chamber is adapted to the use of powder or liquid detergent (see "Detergent and Additives").
Machine vibrates during spin cycle.
Check whether:
• the washing machine is level and standing firmly on all four feet;
- the transport bolts have been removed. Before using the machine, it is imperative that the transport bolts are removed.
Final spin results are poor.
The washing machine has an imbalance detection and correction system. If individual heavy items are loaded (e.g. bathrobes), this system may reduce the spin speed automatically or even interrupt the spin completely if it detects too great an imbalance even after several spin starts, in order to protect the washing machine.
- If the laundry is still too wet at the end of the cycle, remove some articles of laundry and repeat the spin cycle.
- Excessive foam formation may prevent spinning. Use the correct amount of detergent.
- Check that the spin speed selector has not been set to "0".
If your washing machine has a time display: the programme time initially displayed is lengthened / shortened by a period of time:
This is a normal capacity of the washing machine to adapt to factors that can have an effect on the wash programme time, e.g.:
• excess foam formation;
- load imbalance due to heavy items of laundry;
• prolonged heating time due to reduced inlet water temperature;
Because of influences like these, the time remaining in the programme run is recalculated, and updated if necessary. In addition, during the filling phase, the washing machine determines the load and if necessary adjusts the initial programme time displayed accordingly. During such update periods, an animation appears on the time display.
Hot / Cold fill fault - For Models with Dual Inlets
If you wish to connect hot and cold water supply (Fig.1):
- Fix the red marked inlet hose to the hot water tap and to the inlet valve with the red filter on the rear side of machine.
- Fix the other inlet hose to the cold water tap and to the inlet valve with the blue filter on the rear side of the machine.
Make sure:
a) The connections are tightly fixed
b) Do not invert their position (for example: cold fill into hot inlet valve and vice versa).
If you wish to connect only the cold fill follow the below instructions (Fig. 2):
- You will need a Y-piece connector. This can be purchased from local hardware or plumbing supplier.
- Fix the Y-piece connector to the cold fill tap.
- Connect the two inlet valves present on the rear part of the machine to the Y-piece connector using the hoses provided.
For Models with Single Inlet
Fix the inlet hose to the cold water tap and to the inlet valve on the rear side of the machine as (Fig. 3).
Ensure that:
All connections are tightly fixed.
Do not allow children to operate, crawl on, be near or inside your washer.
Note that during the wash cycles, the surface temperature of the porthole door may increase.
Close supervision of children is necessary when the appliance is used near children.

Fig.1

Fig.2

Fig.3
| Fault Code List | |
| Displayed on Display Window | Fault Description |
| “F01” | Water inflow fault |
| “F03” | Drainage fault |
| “F13” | Door lock fault |
| “F14” | Door unlock fault |
| “F24” | Overflow or too much foam. |
| else fault code, “F04-F98” | Electronic module fault. |
| “Unb” | Unbalance alarm |
a. "F01" displayed on screen
The machine is not fed with water or insufficient water. Check:
- Faucet is fully open and has enough water pressure.
• Water inlet pipe is knotted or not. - Filtering net of water inlet pipe is blocked or not (refer to maintenance and repair).
• Water pipe is frozen or not.
Press "Start/Pause" key after fault is removed.
If fault occurs again, please contact with after-sale service (refer to after-sale service.).
b. "F03" displayed on screen
The washer is not emptied. The washer stops the program being executed. Shut down the machine and disconnect power supply. Check:
- Drain pipe is knotted or not.
• Filter in drain pump is blocked or not (refer to the cleaning of filter in drain pump)
IMPORTANT: Ensure that the water has cooled before draining the appliance.
• the drain hose is frozen up.
Plug in the appliance again.
Select and start the "Spin" programme or push the "Start/Pause" button for at least 3 seconds and restart the desired programme.
If the fault occurs again, please contact After-Sales Service (see "After-Sales Service").
C. Fault code
The washer stops when the program is running. The display window shows fault code "F13", "F14", "F24", else fault codes from "F04" to "F98" or "Unb".
If fault code "F13" is shown
Door lock is abnormal. Start program for 20 sec and unlock the washer door (PTC) to check whether the door is closed.
Open or close it again.
After fault is removed, press "Start/Pause" key. If fault occurs again, disconnect power supply and contact with after-sale service.
If fault code "F14" is shown
Door open fault.
Action: Press "Start/Pause" button. The washing machine will try to open the door. The alarm will not be removed until the door is unlocked. Or, turn the nub to Off for 3 seconds to turn off the machine. Choose the desired programme to start the machine. The alarm will be removed.
If fault code "F24" is shown
Water level reaches overflow level.
Remove it by pressing "Start/Pause" key and feed water.
Select and start required program. If fault occurs again, disconnect power supply and contact with after-sale service.
If else fault code "F04" to "F98" is shown
Electronic module fails.
Turn the nub to Off for 3 seconds to turn off the machine.
After fault is removed, press "Start/Pause" key. If fault occurs again, disconnect power supply and contact with after-sale service.
If fault code "Unb" is shown
Unbalance alarm shall be solved by the following methods
- Laundry winding
Turn the knob to "off" for 3 seconds for shutdown, open the door, shake the clothes and put them back into the washing machine, then select the single dewatering program to dry again.
- Too light-weighted laundry
Turn the knob to "off" for 3 seconds for shutdown, open the door, put in one or two towels, and then select the single dewatering program to dry again.
Before contacting After-Sales Service:
1 Try to remedy the problem yourself (see "Troubleshooting Guide").
2 Restart the programme to check whether the problem has solved itself.
3 If the washing machine continues to function incorrectly, call After-Sales Service.
TRANSPORT/HANDING
Never lift the appliance by the worktop when transporting.
1 Pull out the mains plug.
2 Turn off the tap.
3 Disconnect the inlet and drain hoses.
4 Eliminate all water from the hoses and from the appliance (see
"Removing the Filter", "Draining Residual Water")
5 Fit the transport bolts (obligatory)
6 The machine is over 55 kg in weight, two persons are needed to move it.
ELECTRICAL CONNECTION
Only use a socket with an earth connection.
- Do not use extension leads or multi sockets.
• Electric supply must be adequate for the machine's 10 A Current Rating. - Electrical connections must be made in accordance with local regulations.
- The electrical power cable must be replaced exclusively by a licensed electrician.
ELECTRICAL CONNECTION

INSTALLATION GUIDE

NOISE, EXCESSIVE VIBRATIONS AND WATER LEAKAGES CAN BE CAUSED BY INCORRECT INSTALLATION.
NEVER MOVE THE APPLIANCE BY LIFTING IT BY THE WORKTOP.
- Read this "INSTALLATION GUIDE" before operating.
- Keep this "INSTALLATION GUIDE" for future reference.
- Read the general recommendations about disposing of packaging in the INSTRUCTION FOR USE.
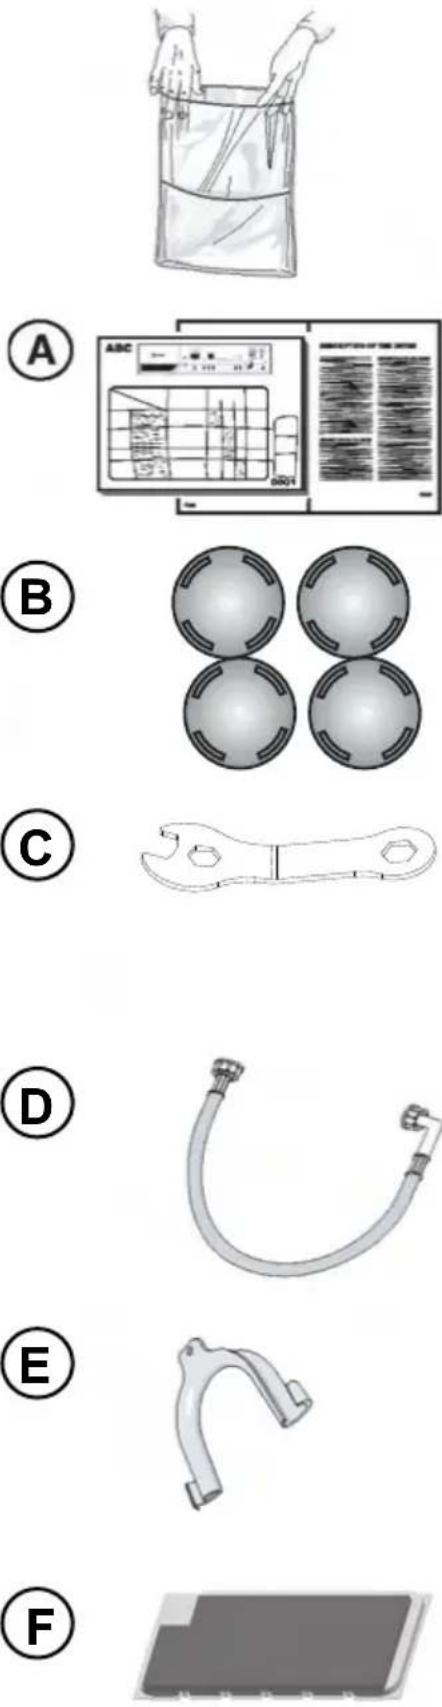
PARTS SUPPLIED
• Package with small items
Instruction for use, installation guide, warranty card (depends on model)
4 plastic caps
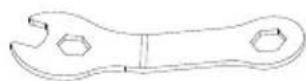
Wrench
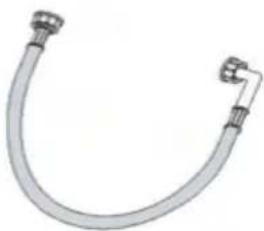
- Inlet hose (inside the machine or already installed) Cold inlet hose Hot inlet hose (if available, depending on models)
- "U"-bend (inside the machine or already installed)
• Bottom cover(depends on model)
BEFORE USING THE WASHER, PLEASE REMOVE TRANSPORT BOLTS!
Important: Transport bolts which are not removed can cause damage to the appliance.
①
Screw off all transportation bolts for approx. 30mm with wrench following the direction of arrow shown (not fully screw it off).

natural_image
Technical line drawing of a mechanical component with no visible text or symbols
②
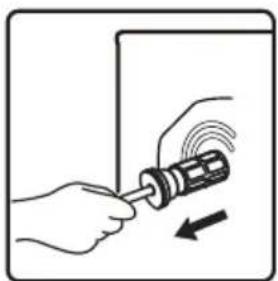
② Push four transportation bolts on horizontal direction inward and loose transportation bolt.

natural_image
Illustration of a hand using a screwdriver to adjust a screwdriver into a cylindrical component (no text or symbols present)③
Pull out transportation bolt together with rubber part and plastic part.
natural_image
Illustration of hands using a screwdriver to adjust a component with a circular motion arrow (no text or symbols)④
To ensure safety and reduce noise, you should install the transportation bolt cover supplied with the unit (see the annex accompanying the unit). Lean and place the transportation bolt into hole and press it following the shown direction until it clicks.

natural_image
Illustration of a hand holding a ball with an arrow indicating motion (no text or symbols)Important: Keep the transport bolts and the wrench for future transporting of the appliance and in this case refit the transport bolts in reverse order.
ADJUSTMENT OF THE FEET
The appliance must be installed on a solid and level floor surface (if necessary use a spirit level). If the appliance is to be installed on a wooden floor, distribute the weight by placing it on a 60x60cm sheet of plywood at least 3cm in thickness and secure it to the floor. If the floor is uneven, adjust the 4 leveling feet as required; do not insert pieces of wood etc. under the feet.

Slacken the locknut clockwise (see arrow) using the wrench.

natural_image
Diagram of a computer monitor with a wrench inserted, showing mechanical assembly (no text or symbols)
Lift the machine slightly and adjust the height of the foot by revolving it.


Important: tighten the locknut by turning it anti-clockwise towards the appliance casing.

INSTALL BOTTOM COVER
To realize quieter operation, a bottom cover is supplied with the unit (only applies to some of the washers). After installing the cover at the bottom of the washer, the noise level will be greatly reduced. Please ask for advice from specialists before installing the cover, nevertheless, the machine can be used without the bottom cover.
⑧ Noise-Reduction Bottom Plate Installation Instructions
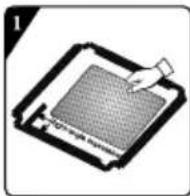
A: Stick acoustic wool to the side of bottom cover plate with the letter of "PUMP". Tilt the washer by 30irc - 40irc , when installing the bottom cover, please face the side with sound insulation upwards and attach 'PUMP' at the corner of the cover to the position of the pump in the washer.

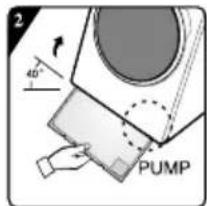
B:

Before installing the noise-reduction bottom plate, align and paste the acoustic absorption wool with and along the right-angle impression on bottom plate (this procedure is unnecessary for some of the models without acoustic absorption wool).
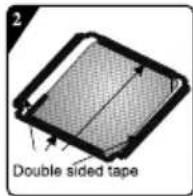
Remove surface paper on double sided tape at four sides of the bottom plate.

Incline the machine to an angle of 40irc and let the side with right-angle notch face towards front of the washing machine, as shown in the figure. Insert the side with oblique-angle notch between two foot screws at back of the washing machine completely in place. Then, install the bottom plate and ensure that it contacts with bottom of the washing machine closely.

Press the double sided tape on four sides manually to secure the noise-reduction palte to the machine body firmly.
CONNECT THE WATER SUPPLY INLET HOSE
⑨
Hot (Depending on models)
Cold
If the water inlet hose is not already installed, it must be screwed to the appliance. The blue marked hose is only for cold water. Depending on the model, the hot waterhose marked with red should also be connected, for models having dual inlets.
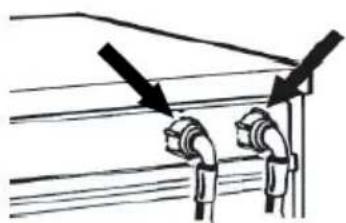
natural_image
Diagram of two pipe connections with arrows indicating direction (no text or symbols)⑩ Screw by hand the inlet hose onto the tap, tightening the nut.
Attention:
• no kinks in the hose!
- The appliance must not be connected to the mixing tap of an un-pressurized water heater.
- Check water-tightness of connections by turning the tap completely on.
- If the hose is too short, replace it with a suitable length of pressure resistant hose (1000 kPa min)
- Check the inlet hose regularly for brittleness and cracks and replace if necessary.
• The washing machine can be connected without a non-return valve.
CONNECT THE DRAIN HOSE
⑪
In case the drain hose is installed as shown below:
Unhook it only from the right clip (see arrow)
⑫
Connect the drain hose to the Drain or hook it over the edge of a sink by means of the "U" bend.
Fit the "U" bend E, if not already installed, at the end of the drain hose.

natural_image
Diagram of a device interior with labeled ports and an arrow indicating direction (no text or symbols present)
natural_image
Illustration of a hand holding a flexible hose with a handle, labeled with the letter E (no text or symbols on the hose itself)Notes:
- Ensure that there are no kinks in the drain hose.
- Secure the hose so that it cannot fall down. After wash phase, machine will drain out hot water.
- Small hand basins are not suitable.
- To make an extension use a hose of the same type and secure the connections with clips.
• Max. Overall drain hose length: 2.50 m.

Quick User Manual
This washing machine is equipped with automatic safety functions which detect and diagnose at an early stage and react appropriately.
A. Program selector
B. Program and function status display window
C. "Temp." button
D. "Spin" button
E. "Favourite" button

A
| Program | Care Label | Material / Level of SoilingWashing temperature selected as per the Care Label instruction. |
| Cotton--,20°C, 30°C, 40°C,60°C, 95°C |  | Heavily and moderately soiled cotton, or linen.For very heavily soiled items select the "Prewash" function. |
| Cotton Color--,20°C, 30°C,40°C,60°C |  | Programme for lightly to moderately dirty laundry. The temperature can be set separately; therefore, observe the instructions indicated on the clothing. Wash the clothes worn directly on the skin at 60°C. Less heavily soiled laundry will be thoroughly cleaned at 40°C. Spinning speed can also be freely selected. Default setting is maximum spinning speed. |
| Allergy Steam (2)40°C, 60°C |  | It is suitable for high temperature resistant and less fading fabrics, which removes allergens such as pollens, mites and parasites through high temperature steam. |
| Eco40-60 (1) | — | Normally soiled cotton laundry. |
| Wool--,20°C, 30°C, 40°C |  | Machine washable wool. (Refer to the washing label attached to the clothing). |
| Baby Steam Care(2)40°C, 60°C, 95°C |  | It is suitable for baby clothes and underwear, etc., which sterilizes and disinfects through high temperature steam. |
| Dark Wash--,20°C, 30°C, 40°C,60°C | — | Dark textiles made of cotton and dark easy-care textiles |
| Quick 15'--,20°C, 30°C, 40°C |  | Cotton, mixed fabrics. Items worn for a short time or newly bought. |
| Mix--,20°C, 30°C, 40°C |  | Mixed loads of moderately soiled cotton and synthetic fabrics. |
| Sportswear--,20°C, 30°C, 40°C |  | Sportswear and leisure wear made from microfibre fabrics. |
| Down--,20°C, 30°C, 40°C |  | Machine-washable items stuffed with synthetic fibres, such as pillows, quilts and bedspreads; also suitable for items stuffed with down. |
| 20°C | — | This program is suitable for cotton clothes with light stains,energy saving. |
| Drum Clean95°C | — | Program to remove dirt and bacterial residue that can breed in the machine after it has been used for a period, especially when low temperature washes are used regularly. |
| Rinse +Spin | — | This program is defaulted to two rinses and spin. |
| Spin | — | Select the length, and speed, of the spin manually. |
* : Optional Functions
Yes : Detergent Required
—: Cannot be selected
-- : Temperature of unheated water
(1) Wash performance test programs are: Eco 40-60.
(2) Allergy Steam and Baby Steam Care both washing are suitable to sterilize the colorfast clothes. When you see the door glass with water mist, please don't put your hand on the door glass or open the dispenser to prevent burns.
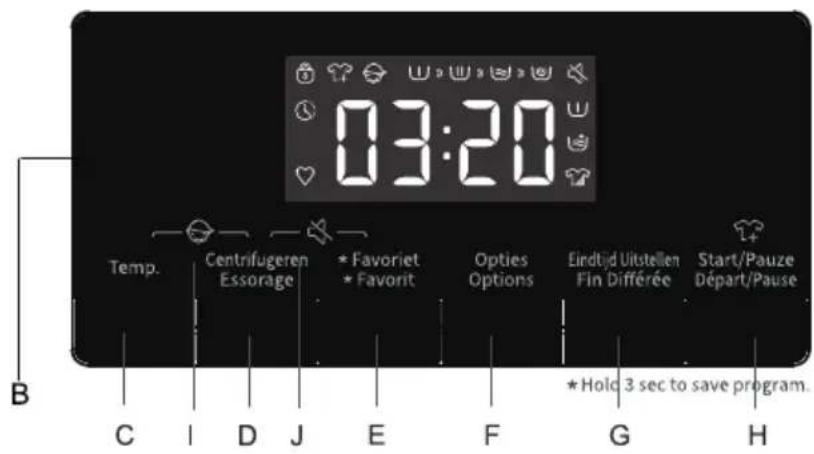
F. "Options" button
G. "Delay End" button
H. "Start/Pause" button
I. Child Lock Function
J. Mute Function

| Maximum Wash Load kg | Detergent Compartment | Wash Program Functions | Maximum spin speed rpm | |||||||||
| Prewash | Main wash | Softener | Delay End | Prewash | Extra rinse | Default rinse times | Intensive | Spin | Temp. | |||
| 9.0 | * | Yes | * | * | * | * | 2 | * | * | * | 1400 | |
| 9.0 | * | Yes | * | * | * | * | 2 | — | * | * | 1400 | |
| 2.0 | * | Yes | * | * | * | * | 4 | * | * | * | 1400 | |
| 9.0 | — | Yes | — | * | — | — | 2 | — | * | — | 1400 | |
| 2.0 | — | Yes | * | * | — | * | 2 | — | * | * | 600 | |
| 2.0 | * | Yes | * | * | * | * | 3 | * | * | * | 1400 | |
| 4.0 | * | Yes | * | * | * | * | 2 | * | * | * | 1000 | |
| 1.0 | — | Yes | * | * | — | * | 1 | — | * | * | 800 | |
| 4.0 | * | Yes | * | * | * | * | 2 | * | * | * | 1400 | |
| 2.0 | * | Yes | * | * | * | * | 2 | * | * | * | 1000 | |
| 2.0 | — | Yes | * | * | — | * | 2 | — | * | * | 600 | |
| 9.0 | * | Yes | * | * | * | * | 2 | * | * | — | 1400 | |
| — | — | Yes | — | * | — | — | 1 | — | — | — | 800 | |
| 9.0 | — | — | * | * | — | * | 2 | — | * | — | 1400 | |
| 9.0 | — | — | — | * | — | — | 0 | — | * | — | 1400 | |
| PARAMETER | |
| Model | EDWA14901AW/EDWA14902AG |
| Washing Capacity | 9.0kg |
| Max.spin speed | 1400rpm |
| Net Weight | 67kg |
| Dimension(WDXH) | 595×610×845mm |
| Rated Voltage | 220-240V~ |
| Heating Power | 1500W |
| Washing Power | 250W |
Add Detergent, Close the Door and Set the Program
Load the clothes to be washed in the drum and close the door. Add the detergent into the relevant compartments for the type of program you are going to select, Add detergent as described in Detergent and Additives section of User's Operation Manual.
- Turn on the power.
- Spin program selection button to required program, "off" must be passed through if pointer's initial position is not "off", start up.
- Select washing temperature, spin speed by pressing "Temp", "Spin" buttons.
- Press "Options" button to select additional functions.
- After starting the program, display window displays program length (hours: minutes) and additional function options in sequence.
Addition function selection
At standby state, press "Options" button to select additional function for current program. Select only one function for each press, and then corresponding icon flashes. After starting up, program cannot be changed.
Pre-wash
- Select the function to conduct pre-wash so as to enhance washing effects and better remove stains. This function is suitable for heavy dirt clothes.
Before inflowing, laundry detergent/ washing powder can be added to pre-wash box, and washing powder must be added to main wash box.
Extra Rinse
After set the function of rinsing adding, the program runs the rinsing process once again before running the softening, and the total running time of the program increases accordingly.
Intensive
The function can be selected to prolong washing time, strengthen washing effects and better remove stain.
Inlet water warning
If tap is not opened, or water pressure is over low, display screen will prompt "F01" to give alarm.
Drainage warning
If the pipe is squeezed, drainage will not be smooth. In case of failing to completely drain for long time, display screen will prompt "F03" to give alarm.
Door Lock Icon
After the program starts the Door Lock icon will light up and the door will be locked.
·After completing program, door lock unlocks automatically. During pause, if door opening condition can be met halfway, the door lock will unlock and its indicator light will go out. ·When door lock indicator light flashes, door shall not be opened forcibly so as to avoid personal injury.
Delay End Function

Delay end function allows to run the machine at the consumers' convenience, for example, at night when electricity is cheaper.
- Only under the standby mode, this button is valid for selecting the reservation time.
• After the reservation function is selected, the time will increase 1h when each time the reservation button is pressed. Before reservation, if the program time does not satisfy the integral multiple of 1h, it shall be completed by pressing the reservation key for the first time, and then the time increases 1h when each time the reservation button is pressed. If the reservation is selected, before the program runs, the current reservation can be canceled by turning the button to select other programs.
•The delay time must be longer than the wash program length as the delay time is the time program will finish. For example: if the selected program time is 02:28, the delay time selected must be between 03:00 and 24:00. - When the reservation process is operated, the icon of 'reservation time' will be on. When the reservation process is finished, the icon of 'reservation time' will be off.
Favourite
After selecting the program and setting each parameter and starting, long press the Favorite key for 3s to memorize the selected program, temperature, rotational speed and other related settings, and then the Favorite symbol lamp will be on.
Under the circumstance that the Favorite lamp is not on, short press the Favorite key, then the program will be switched to the program memorized last time; and meantime, the temperature, rotational speed and other parameters will automatically change into the parameters memorized last time.
At this moment, if switching the program or pressing other keys, the panel will display a new program and parameters, and the Favorite symbol lamp will be off.
When the user uses it for the first time, if he/she has never long pressed the Favorite key to collect programs, he/she can short press the Favorite key and then the cotton linen program and its default settings will be collected by default.
Mute Function

When the machine is in the state of holding, pause or operation, press "Spin+ Favourite" buttons for 2 seconds. The display will show mute function fault icon. All the buzzing will be turned off except the alarms.
When the machine is in the mute state, press "Spin+ Favourite" buttons for 2 seconds until mute function fault icon light off. All the buzzing will be activated.
Automatic weighting
Washing machine displays “----” after startup, indicating that it is weighing automatically. It will adjust program length (hours: minutes) automatically according to weight of clothes.
Child Lock

To strengthen the safety of children, this machine is equipped with Child Lock function.
When the programme starts, press "Temp. +Spin" button for 2 seconds. Child Lock icon will light up, and then Child Lock is set up. Repeat the same operation, the Child Lock will be released.
- When the Child Lock is set, all function buttons will be shielded.
- When you turn the machine off by rotating the program selection button "Off", child lock is released.
•After completing program, child lock will automatically unlock.
To Start the Program
After you have selected your options and placed detergent within the detergent dispenser, turn on the water tap and press the "Start / Pause" button. The screen will display the current program progression with icons from left to right. It also displays the remaining program time.
To Cancel the Program or Reselect the Options
- Rotate the program to "Off" for 3 seconds to turn off the machine.
- Select the new program and options.
- Press "Start / Pause" button to turn on the machine without adding any extra detergent.
End of the Program
The washing machine shows "END" at the end of the program, when the door is unlocked. If the knob is turned to "Off", the power will be cut off. If there is no button or knob operation within 2 minutes, the program will automatically power off.
Reload in Process
If you want to reload clothes in the process of washing, please press "Start/Pause" button.
- If reload icon 📋 light up, the door can be opened in the process, remaining time and the Door Lock icon in display will flash. Then the Door Lock icon will go out, and the door can be opened.
- If reload icon ☎ doesn't light up, the Door Lock icon doesn't flash, it indicates that current temperature is over 50°C or you have passed the time for reloading in the process, namely no clothes allowed to load into the machine.
Programme Instructions
- The eco 40-60 programme is able to clean normally soiled cotton laundry declared to be washable about 40ircC to 60ircC , together in the same cycle, and that this programme is used to assess the compliance with the EU ecodesign legislation.
- The power consumption of the off-mode is 0.49W.
- The most efficient programmes in terms of energy consumption are generally those that perform at lower temperatures and longer duration.
- Loading the household washing machine up to the capacity indicated by the manufacturer for the respective programmes will contribute to energy and water savings.
- Correct use of detergent, softeners and other additives. Do not apply excessive detergent. This may affect the washing results adversely.
- Periodic cleaning, including optimal frequency, and limescale prevention and procedure.
- Noise and remaining moisture content are influenced by the spinning speed: the higher the spinning speed in the spinning phase, the higher the noise and the lower the remaining moisture content.
- The product information and QR code are reflected in the energy consumption label, the product registration information can be obtained by scanning the QR code.
- The information of standard programmes.
| Program | Selected Temperature(°C) | Rated Capacity(kg) | Maximum temperature in drum(°C) | Program duration(h:min) | Energy consumption kWh/cycle | Water consumption litres/cycle | Remaining moisture content (%) | Maximum speed reached rpm |
| Eco40-60 full load | — | 9.0 | 38 | 3:48 | 0.840 | 72.0 | 50.00 | 1400 |
| Eco40-60 half load | — | 4.5 | 31 | 2:54 | 0.460 | 53.0 | 52.00 | 1400 |
| Eco40-60 1/4 load | — | 2.5 | 26 | 2:54 | 0.220 | 28.0 | 52.00 | 1400 |
| 20°C | 20 | 9.0 | 21 1:50 | 0.190 | 78.0 | 53.00 | 1400 | |
| Cotton | 60 | 9.0 | 55 | 3:29 | 1.560 | 108.0 | 53.00 | 1400 |
| Mix | 40 | 4.5 | 45 | 2:18 | 0.850 | 66.0 | 45.00 | 1400 |
| Quick 15' | 40 | 1.0 | 38 | 0:30 | 0.330 | 22.0 | 55.00 | 800 |
The values given for programmes other than the eco 40-60 programme are indicative only.
-
The products of EDY come with a full 5-year factory warranty after purchase. This warranty can never be transferred and only applies within the Netherlands. Local warranty rules will apply in other countries. Visits by a technician are only possible in the BeNeLux.
-
A copy of the purchase receipt must always be supplied when reporting a repair. Cover under the warranty will not be available if this receipt is not present.
-
The warranty does not apply to:
- Easily breakable components such as glass, plastic, seals, lights, etc. - Normal wear and tear, such as strings, hinges, buttons, other moving parts, etc.
- Situations where the device has been in contact with chemical and/or electro-chemical products or other unsuitable products.
- If faults in the device can be attributed to transport damage beyond our control, or to improper installation and assembly.
- Incorrect use, sub-standard maintenance and failure to comply with instructions concerning operation and assembly.
• Non-household use, like in hair salons, hospitality settings, etc.
- Claims against the warranty will become void if repairs or procedures on the device are carried out by persons other than our service team, and if the device is fitted with components or accessories that are classed as non-original components and can thus cause defects.
-
Under the warranty, faulty components will, as the service team sees fit, be repaired free of charge or replaced by appropriate components. It will be up to the service team to determine whether a repair must be carried out by a technician or whether the fault must be resolved by sending the concerned component to the consumer. Devices that can be transported normally (e.g. in a car) must be returned to the point of purchase for further service. Devices that cannot be transported normally will be repaired on site. Repairs under the warranty always require a valid purchase receipt to be presented. Replaced components will become our property.
-
If a complaint is unfounded, all accompanying costs must be paid by the consumer.
-
If you believe that a planned service visit does not need to take place, this must be reported by the previous working day otherwise costs will be charged.
-
The faulty device must be clean, empty and easily accessible during service visits. If this is not the case, the technician can refuse to perform repairs and the cost of the visit will be charged.
-
Repair or replacement during the warranty period will not result in the warranty period being extended.
-
Damage that has been caused by a faulty device must be personally reported by the consumer to his or her insurance.
-
Additional or alternative claims, particularly to compensate for damage caused outside the device, are excluded unless such liability has been prescribed by law.
-
In addition, in accordance with legal provisions, we bear unrestricted liability for damage that falls under the Product liability Act and all damage that can be attributed to deliberate contractual breaches, gross negligence or deliberate intent on our part, or on the part of our legal representatives or persons appointed by us.
-
The warranty conditions of EDY are subject to Dutch law.
Service number for the Netherlands: 0900-0404040 www.edy.nl
Service number for Belgium: 0032-(0)38080919



- NL
- GEBRUIKERSIINSTRUCTIES
- VEILIGHEIDSINFORMATIE
- Opmerkingen:
- REINIGING EN ONDERHOUD
- Filter
- Watertoevoerslang
- INSTALLATIEHANDLEIDING
- ALVORENS DE MACHINE IN GEBRUIK TE NEMEN DIENT U DE TRANSPORTBOUTEN TE VERWIJDEREN!
- Hinweise:
- PFLEGE UND WARTUNG
- Wasserschlauch
- MONTAGEANLEITUNG
- INFORMATION DE SÉCURITÉ
- Remarques:
- ENTRETIEN ET MAINTENANCE
- Filtre
- AIDE AU DÉPANNAGE
- TRANSPORT / MANUTENTION
- GUIDE D'INSTALLATION
- INSTALLER LE COUVERCLE INFÉRIEUR
- Consignes relatives aux programmes
- SAFETY INFORMATION
- BEFORE USING THE WASHING MACHINE
- Removing the packaging and inspection
- Remove the transport bolts
- Install the washing machine
- Water inlet
- Drain
- Electrical connection
- Minimum housing dimensions:
- PRECAUTIONS AND GENERAL RECOMMENDATIONS
- Packaging
- Disposing of packaging and scrapping old washing machines
- Location and surroundings
- Safety
- DESCRIPTION OF THE WASHING MACHINE
- EMERGENCY DOOR OPENING
- Note:
- BEFORE THE FIRST WASH CYCLE
- PREPARATION OF THE WASHING
- Dyeing
- Loading the laundry
- DETERGENTS AND ADDITIVES
- The choice of detergent depends on:
- Remarks:
- Dosage
- Notes:
- Where to put detergent and additives
- Prewash chamber
- Mainwash chamber
- Softener chamber
- DRAINING RESIDUAL WATER(depends on model)
- CARE AND MAINTENANCE
- Appliance exterior and control panel
- Door seal
- Detergent dispenser
- Especially:
- IMPORTANT: Ensure that the water has cooled before draining the appliance.
- Water supply hose
- Mesh filter for water connection
- TROUBLESHOOTING GUIDE
- Machine vibrates during spin cycle.
- Final spin results are poor.
- If your washing machine has a time display: the programme time initially displayed is lengthened / shortened by a period of time:
- Hot / Cold fill fault - For Models with Dual Inlets
- If you wish to connect hot and cold water supply (Fig.1):
- Make sure:
- If you wish to connect only the cold fill follow the below instructions (Fig. 2):
- For Models with Single Inlet
- Ensure that:
- a. "F01" displayed on screen
- b. "F03" displayed on screen
- Fault code
- If fault code "F13" is shown
- If fault code "F14" is shown
- If fault code "F24" is shown
- If else fault code "F04" to "F98" is shown
- If fault code "Unb" is shown
- Before contacting After-Sales Service:
- TRANSPORT/HANDING
- ELECTRICAL CONNECTION
- INSTALLATION GUIDE
- PARTS SUPPLIED
- BEFORE USING THE WASHER, PLEASE REMOVE TRANSPORT BOLTS!
- ADJUSTMENT OF THE FEET
- INSTALL BOTTOM COVER
- ⑧ Noise-Reduction Bottom Plate Installation Instructions
- CONNECT THE WATER SUPPLY INLET HOSE
- ⑩ Screw by hand the inlet hose onto the tap, tightening the nut.
- Attention:
- CONNECT THE DRAIN HOSE
- Quick User Manual
- Add Detergent, Close the Door and Set the Program
- Addition function selection
- Pre-wash
- Extra Rinse
- Intensive
- Inlet water warning
- Drainage warning
- Door Lock Icon
- Delay End Function
- Favourite
- Mute Function
- Automatic weighting
- Child Lock
- To Start the Program
- To Cancel the Program or Reselect the Options
- End of the Program
- Reload in Process
- Programme Instructions
Brand : Edy
Model : EDWA14901AW
Category : Washing machine