
Pro Touch 30 42644 - Sharpener Gastroback - Free user manual and instructions
Find the device manual for free Pro Touch 30 42644 Gastroback in PDF.


| Product Type | Coffee Grinder |
| Brand | Gastroback |
| Model | Pro Touch 30 42644 (Design Coffee Grinder Digital) |
| Power Supply | 220-240 V AC, 50-60 Hz |
| Power Consumption | 180 W |
| Dimensions (W x D x H) | 128 x 200 x 340 mm |
| Weight | 2.2 kg |
| Bean Hopper Capacity | 320 g |
| Storage Container Capacity | 130 g |
| Grind Size Settings | 31 levels (from Turkish to French Press) |
| Continuous Operating Time | 1.5 minutes (90 seconds) |
| Required Break | 30 minutes |
| Grinding Tools Material | Stainless steel (cone and sleeve) |
| Safety Features | Safety interlocks, overheat protection |
| Display Type | LCD |
| Modes of Operation | Cup mode (1-10 cups) and Espresso mode (5-20 seconds) |
| Included Portafilter Cradles | 51 mm and 58 mm |
| Included Accessories | Storage container, cleaning brush, 2 portafilter cradles |
| Cord Length | 80 cm |
| Certification | CE |
| Intended Use | Household, grinding whole coffee beans |
| Cleaning Method | Dry brush for grinder; damp cloth for exterior; hand wash removable parts |
| Warranty | 2 years |
Frequently Asked Questions - Pro Touch 30 42644 Gastroback
User questions about Pro Touch 30 42644 Gastroback
0 question about this device. Answer the ones you know or ask your own.
Ask a new question about this device
Download the instructions for your Sharpener in PDF format for free! Find your manual Pro Touch 30 42644 - Gastroback and take your electronic device back in hand. On this page are published all the documents necessary for the use of your device. Pro Touch 30 42644 by Gastroback.
USER MANUAL Pro Touch 30 42644 Gastroback
natural_image
Exterior view of a modern GASTROBACK brand coffee maker with digital display and control buttons (no readable text beyond branding)BEDIENUNGSANLEITUNG
natural_image
Product photo of a spray gun with labeled parts (no text or symbols visible)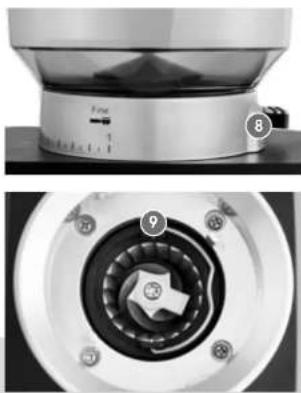
natural_image
Close-up of a kitchen grater with labeled parts (no text or symbols visible)natural_image
Exterior view of a modern GASTROBACK brand coffee maker with digital display and control buttons (no readable text beyond branding)OPERATING INSTRUCTIONS
Item - No. 42643 » Design Coffee Grinder Digital «

READ AND OBSERVE INSTRUCTIONS FOR USE! FOLLOW INSTRUCTIONS!
Model and attachments are subject to change!
Deutsch
English
www.gastroback.de

We attach a certain importance to your safety. Thus, we ask you to read all provided instructions and information in this booklet carefully and completely, before you start running the appliance. This will help you to know all functions and properties of your new appliance. We especially ask you to adhere strictly to the safety information mentioned in these instructions.
Storage 54
Notes for Disposal 54
Information and Service 54
Warranty 55
TABLE OF CONTENTS
Important Safeguards 34
General Safety Instructions 34
Important Safeguards for Electrical Appliances 36
Moving Parts – Risk of Injuries 37
Technical Specifications....38
Knowing Your Design Coffee Grinder Digital 39
Properties of Your Design Coffee Grinder Digital....40
Cup Mode and Espresso Mode 42
Tips for Best Results 42
Before First Use 44
Operation 44
Selecting the Grind Size 45
Filling the Bean Hopper 45
Grinding into the Storage Container 46
Grinding into a Portafilter 47
Removing Blockages 48
Solving Problems 48
Error Messages on the Display 51
Care and Cleaning 51
Removing the Grinder Sleeve 52
Cleaning the Appliance 52
Assembling the Grinder 53
IMPORTANT NOTE - PLEASE READ CAREFULLY - BEFORE YOU USE THE DEVICE!
All GASTROBACK® products are intended for food processing of food products and groceries. For reasons of health protection and hygiene, products that are used on a daily basis or used only once, are not allowed to be returned. Check the goods just as you would do in a retail store.
You only have to pay for a possible loss in value of the goods, if this loss of value is due to a non-necessary for the examination of the nature, characteristics and function of the goods handling.
An unnecessary way to check the nature, characteristics and function of the goods is the processing of food products or groceries into food and drinks.
If you have any questions about GASTROBACK® products, if your unit is not working properly straight away or if you need any accessories or spare parts for your GASTROBACK® product please contact our customer service before returning.
Monday to friday (except on holidays) from 8am to 4pm
E-Mail: info@gastroback.de
DEAR CUSTOMER!
Your new »Design Coffee Grinder Digital« does not only grind whole coffee beans somehow, but provides a coffee powder with even particle size, that fits perfectly to your preferred brewing method and individual liking. The heat-conducting grinding tools reduce the effect of warming up the coffee beans during grinding, therefore preserving the flavours of your coffee.
The ground amount is set via an electronic timer and can be adjusted to the amount required for your daily need, thus avoiding the use of a measuring spoon. You can grind directly into the portafilter (filter holder) of an espresso machine or fill the provided storage container.
The instructions in this booklet will inform you on the features of the machine, thus making it easy to take pleasure in your new coffee grinder.
We hope that you will enjoy your new »Design Coffee Grinder Digital«.
Carefully read all instructions given in this booklet before operating this appliance. These instructions are an essential part of the appliance. Do not pass the appliance without this booklet to third parties. Save all instructions for further reference.
Do not attempt to use or treat this appliance or any parts or accessories in any other way or for any other than the intended use, described in this booklet. Unintended use and especially misuse may cause severe injuries and damage due to electric shock, moving parts, fire, and heat. Do not use the parts of the appliance with any other device. There is no warranty claim of the purchaser or liability to recourse of the manufacturer, if any damage and injuries are caused by unintended use or improper treatment.
Do not attempt to repair the appliance or any parts of it on your own (e.g. power cord). Even removable parts (e.g. bean hopper) may not be repaired, but must be replaced via spare parts that are recommended by the manufacturer. Please contact your vendor. If there are any uncertainties or additional information is required, please feel free to contact the GASTROBACK Customer Care Center (phone: +49 10)4165/22 25-0 / e-mail: info@gastroback.de).

GENERAL SAFETY INSTRUCTIONS
- This appliance is for household use only and NOT intended for use in moving vehicles. Do not operate or store the appliance in humid or wet areas or outdoors. Always keep the appliance where it is dry, frost-free, and clean, and ensure that children younger than 8 years and animals cannot reach it.
- Any use of accessories, attachments or spare parts that are not recommended by the manufacturer or damaged in any way may result in injuries to persons and/or damage.
- Check the entire appliance regularly for proper operation (e.g. check for distortion, discolouration, cracks, excessively worn parts). Do not operate the appliance, when the appliance or any part is not working properly or if it is likely to be damaged or has been subject to inadmissible strain (e.g. overheating, mechanical or electric shock, moisture), to avoid risk of fire, electric shock, or any other injuries to
persons and/or damage. If any malfunction occurs during operation, immediately unplug the appliance. Get in contact with an authorized service centre for examination and/or repair.
- Operate the appliance on a well accessible, stable, level, dry, and suitable large table or counter, where it will not slip. Always keep the appliance and the table or counter clean and dry. Do not place the appliance on the edge of the table or counter. Do not place the appliance or any part of it on or near hot surfaces (e.g. burner, heater, or oven).
- During operation, ensure unhindered access to the front of the appliance and the used power outlet. Keep the appliance in an appropriate distance to other objects of at least 10 cm on each side. Leave at least 50 cm of free space above the appliance to get free access to the bean hopper. Do not leave the appliance operate without supervision.
- This appliance can be used by persons with reduced physical, sensory or mental capabilities or lack of experience and knowledge, including children aged from 8 years on, if they have been given supervision or instruction concerning the use of the appliance in a safe way and understand and consider the hazards involved. Even cleaning shall not be performed by children without supervision. Children younger than 8 years must always be supervised to ensure that they do not play with the appliance or any parts of the appliance or the packaging.
- Before operating the appliance, always ensure that the appliance is assembled completely and correctly according to the instructions in this booklet. Do not use violence to avoid damage.
- Do not place any clothes or tissues or similar materials on or under the appliance during operation, to avoid overheating, fire and electric shock. Do not place any heavy and/or sharpedged objects on or in the appliance or any of its parts (e.g. bean hopper), to avoid damage.
-
To avoid damage to the grinder: Only fill the bean hopper with dry, whole, freshly roasted coffee beans that are fit for consumption. Do not fill in any other types of food or materials (e.g. pre-ground coffee powder, nuts, seeds). Always keep the grinder mill completely dry.
-
Always unplug the appliance, before cleaning the appliance, or when the appliance is not in use. Additionally, clean the bean hopper and interior of the grinder, when the appliance is not in use for a prolonged time (see: 'Care and Cleaning'). For moving the appliance: Always hold the machine at the housing; do not hold the appliance at the bean hopper or power cord.
- Keep the appliance and its parts and accessories clean (see: 'Care and Cleaning'). Do not use any abrasive or corrosive cleaners, or any hard or sharpedged tools for cleaning (e.g. scouring pads, disinfectants).
- Do not place the appliance in an automatic dishwasher.

IMPORTANT SAFEGUARDS FOR ELECTRICAL APPLIANCES
- Place the appliance near a suitable wall power outlet to connect the appliance directly to a protected mains power supply with protective conductor (earth/ground) connected properly. Ensure that the voltage rating of your mains power supply corresponds to the voltage requirements of the appliance (230 V, 50 Hz, AC, rated for at least 8 A). The installation of a residual current operated circuit breaker (r.c.c.d.) with a maximum rated residual operating current of 30 mA in the supplying electrical circuit is strongly recommended. If in doubt, contact your electrician for further information.
- In various foreign countries, the specifications for power supplies are subject to incompatible norms. Therefore it is possible that power supplies in foreign countries do not meet the requirements for safe operation of the appliance. Thus, before operating the appliance abroad, ensure that safe operation is possible.
- Do not use any desk top multi socket outlet, external switching device, remote control systems, or extension cord to avoid risk of fire or electric shock. Ensure that the used power outlet socket is always accessible for unplugging the appliance immediately in case of malfunction or danger.
-
Do not touch the power plug, power cord, or appliance with wet hands, when the appliance is connected to the power supply.
-
DO NOT pour or spill any liquids on or in the appliance or power cord. Do not place or immerse the appliance, power cord, or power plug in water or other liquids. Protect the appliance from splashing water. If liquids are spilled on or into the appliance, immediately unplug and dry the appliance and let it dry naturally for at least 1 day (see: 'Care and Cleaning').
- Keep the power cord away from hot surfaces, sharp edges, and moving parts. Power cords may never be knotted, twisted, strained or squeezed. Do not let the power plug or power cord hang over the edge of the table or counter. Ensure that no one will pull the appliance by the power cord. Take care not to entangle in the power cord. Always grasp the power plug, when disconnecting the power cord.

MOVING PARTS - RISK OF INJURIES
- Your new »Design Coffee Grinder Digital« is designed for grinding coffee beans. For this purpose, the sharp-edged grinding cone is rotating in the grinder chute. Improper handling could cause severe injuries and damage.
- Do not insert your hands or any foreign objects (e.g. clothes, brushes, cooking utensils) in the grinder chute, bean hopper, or the grinder outlet, while the appliance is connected to the power supply. Always unplug the appliance before moving the appliance, and before assembling, disassembling, or cleaning the appliance.
- Do not attempt to operate the appliance, if any parts of it are damaged, or if the grinder is blocked (does not start, when switched on), or when the grinder mill, or bean hopper are not assembled completely and correctly.
TECHNICAL SPECIFICATIONS
| Model: | 42643 Design Coffee Grinder Digital |
| Power supply: | 220-240V AV, 50-60 Hz, 8A |
| Maximum power consumption: | 180W |
| Length of power cord: | approx. 80 cm |
| Weight: | approx. 2,2 kg |
| Dimensions: | approx. 128 x 200 x 340 mm (width x depth x height) |
| Capacity: | bean hopper: max. 320 gstorage container: max. 130 g |
| Operating time: | continuous operation: max. 1 1/2 minutes (90 seconds);thereafter required break: approx. 1/2 hour (30 minutes) |
| Certification: | CE |
These specifications may change without notice.
KNOWING YOUR DESIGN COFFEE GRINDER DIGITAL
natural_image
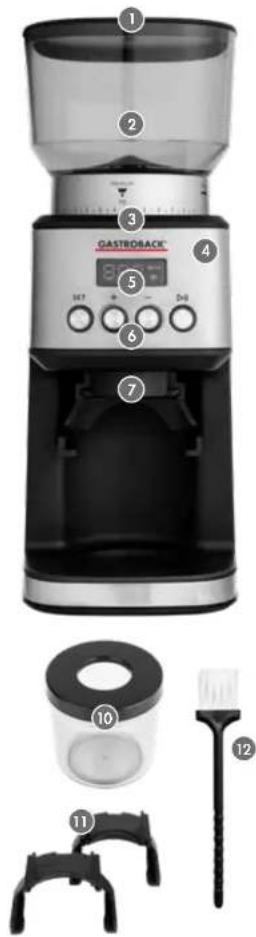
Close-up of a kitchen grater with labeled parts (no text or symbols beyond numbers)1 HOPPER LID
2 BEAN HOPPER with SHUTTER at the bottom
3 GRIND SIZE SCALE for selecting the required grind size
4 Durable HOUSING
5 LCD-DISPLAY
6 CONSOLE with operating elements:
SET BUTTON: for selecting the desired value
ADJUSTING BUTTONS, "+" and "-", for adjusting the selected value
ON/OFF BUTTON: press here for starting or cancelling a grinding cycle
7 GRINDER OUTLET: the coffee powder is given off via this chute
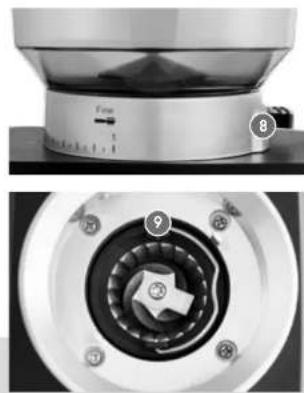
8 LOCKING LEVER: press this lever for unlocking the been hopper
9 High-grade GRINDER MILL with removable GRINDER SLEEVE and fixed GRINDER CONE
ACCESSORIES
10 STORAGE CONTAINER for storing up to 130g coffee powder
11 2 PORTAFILTER CRADLES (51mm or 50mm)
12 CLEANING BRUSH
PROPERTIES OF YOUR DESIGN COFFEE GRINDER DIGITAL
CAUTION - This appliance is only suited for grinding whole, freshly roasted coffee beans. Do not use the appliance for any other types of material or pre-ground coffee to avoid damage. The appliance is designed for short-term operation. Do NOT use it for grinding large stocks.
Via your new coffee grinder, you can grind the coffee beans directly before brewing. This way, any loss of flavour due to storing the coffee powder is avoided.
- Stringent Quality Control: During production, every appliance is inspected and tested strictly with coffee beans. Additionally token random samples of the machines are used for special practical tests.
NOTE
The test procedures performed with every machine may cause slight traces of use or residual coffee grounds. Please, clean the appliance before first use.
- Large range of possible grind sizes: The grind size can be set to 31 levels for adapting the coffee powder to your brewing method and preferred taste beginning with the finest coffee powder for Turkish mocha (Cezve) up to the very coarse grind size for plunger coffee machines (30-31). The setting is conveniently and easily achieved via turning the bean hopper.
- Even grind size: As far as possible, this high-grade grinder generates particles with an even size. This is a crucial criterion for getting the perfect extraction of your coffee and an essential requirement of the barista (coffee experts).
- Solid stainless steel grinding tools: The highly heat-conducting material minimizes the grinding heat, achieving the maximum protection for the essential oils and flavours in the coffee beans during grinding.
- Tightly closing hopper lid for preserving the flavours. You may fill in up to 320g coffee beans into the bean hopper.
- Removable bean hopper with automatically closing shutter: When removing the bean hopper from the grinder intake, the bottom of the bean hopper is closed automatically. Therefore, any still remaining coffee beans do not fall out.
- Controlled Amount: Adjust the number of cups and/or grinding time for getting the desired amount with each grinding cycle. The appliance stops automatically, when the total grinding time is reached (see: 'Cup Mode and Espresso Mode'). Using a measuring spoon is not required.
-
Two modes of operation: The appliance recognizes the portafilter cradle automatically and switches from cup mode (selecting the number of cups) to the espresso mode (selling the grinding time directly; see: 'Cup Mode and Espresso Mode').
-
Storage container: The dedicated storage container has a capacity of 130g coffee powder. A separate filling opening in the screw-top fits perfectly to the grinder outlet. This way, you can grind directly into the container (see: 'Operation / Grinding into the Storage Container'). Thereafter, close the container via the flap for keeping the flavours.
- Two cradles for portafilters (espresso filter holder): Install the lifting cradle for your portafilter [51 mm or 58 mm] for grinding directly into the filter basket of your espresso machine. The appliance automatically detects the cradle, when it is installed. The usage is really simple: Push the prepared portafilter into the cradle and start the grinding cycle (see 'Operation / Grinding into a Portafilter').
- Energy saving mode: When the appliance is idle for approx. 3 minutes, the appliance switches off automatically. Simply press the on/off button for switching on the appliance again.
- Self-resetting overheat protection: When the motor gets overheated, the grinder stops automatically. In this case, unplug the appliance and leave it cool down for approx. 30 minutes. Thereafter, you may resume operation quite as normal.
CAUTION - The appliance grinds the required amount of coffee powder for all usual brewing methods in some seconds. It is NOT designed for long-term operation. Therefore, do not operate the appliance continuously for more than 1 1/2 minutes (90 seconds) for preserving a long lifetime of the appliance. Additionally, prolonged operation influences the flavour of your coffee unpleasantly, due to the increasing temperature of the grinding tools.
- Safety interlocks: To avoid injuries and damage caused by the sharp edges of the grinder tools, safety interlocks switch off the motor, if the appliance is not assembled correctly.
⚠ WARNING – Do not attempt to corrupt the safety interlock! Solve the reason, if the appliance does not work [see: 'Solving Problems']. Always unplug the appliance, before disassembling or assembling parts of the appliance.
CUP MODE AND ESPRESSO MODE
The ground amount is determined via the grinding time. The appliance stops automatically, when the set total grinding time elapsed. You can adapt the grinding time to your requirements. For this, the appliance offers two modes of operation.
- Cup mode: Without portofilter cradle installed, the cup mode is active and the cup icon illuminates. Use this mode for grinding into the storage container or any other fitting vessel. For getting the desired amount, select the number of cups (1 to 10) and the grinding time pro cup (3 to 5 seconds; see: 'Operation / Grinding into the Storage Container'). Defaults: 1 cup and 3 seconds pro cup.
NOTE
In cup mode, the total grinding time until automatic shut-off is determined via the number of cups multiplied by the grinding time pro cup. For example: when setting 5 seconds grinding time pro cup and 6 cups, the total grinding time is 30 seconds. We recommend to avoid longer total grinding times, because the grinder warms up during grinding and, therefore, prolonged grinding times cause loss of flavours.
- Espresso mode: You may install a provided portafilter cradle and grind directly into the portafilter. With the cradle installed, the espresso mode is active automatically and the espresso icon illuminates. You select the total grinding time (5 to 20 seconds until shut-off) for getting the desired amount (see: 'Operation / Grinding into a Portafilter'). Default: 8 seconds.
TIPS FOR BEST RESULTS
Taste and flavour of your coffee depend on a lot of essential constituents. Apart from the brewing method, type of coffee beans, roast and freshness, an even grind and perfectly suited grind size of the coffee beans are crucial. Therefore, this high-quality grinder is the first step on the way to your perfect coffee delight.
- The optimum flavour of your coffee is achieved, when grinding the coffee beans directly before brewing. Surplus coffee powder should be stored on a cool and dark place in an air-tight container.
- The grind size has a great influence on the flow of water through the coffee powder, thus determining the taste and flavour of your coffee. When adjusting the grind size, the used brewing method must be taken into consideration, because each method of coffee making requires a special grind size, icons indicating the 3 most frequently used brewing methods are shown on the grind size graduation.
The following table gives some rules of thumb. Your preferred setting may differ noticeably.
| Setting | Grind Size | Used for ... | |
| 1-2 | extra fine Turkish macha (Cesve) | ||
| 3-5 | fine espresso machines | ||
| 6-10 | medium siphon coffee makers | ||
| 11-20 | coarse drip coffee makers | ||
| 17-25 | very coarse manual filtering | ||
| 26-31 | extra coarse plunger coffee makers (French Press) | ||
- It is normal that a few attempts are needed for finding the optimum grind size. Begin with a medium grind size in the range, suited for your preferred brewing method (refer to the table above). Make the required fine tuning of the grind size in small steps (1-2 grading lines) for getting the desired results.
- After grinding, some coffee powder will stay in the grinder. Therefore, after making your changes let the grinder give off 2-3 portions, before reviewing the result.
- It is best to grind coffee beans directly before brewing. When you need the same amount of coffee powder for each brewing cycle, we recommend to adjust the grinding time accordingly. The appliance will give off the allocated amount and stop automatically.
- When using an espresso machine you should grind directly into the portafilter. Use the appropriate cradle: 51mm cradle for 50.54mm portafilters or 58mm cradle for 56-58mm portafilters.
- Aroma and taste fade quickly, when storing coffee powder for more than a week. Store coffee beans or coffee powder on a cool, dark place in a dry, air light container. For this, you may use the storage container of the appliance.
- Grinding small stocks for some days: We recommend to stop grinding after max. 30 seconds and make a break of at least 10 minutes, before starting operation again. This will avoid that the grinder tools heat up excessively and therefore, helps to preserve the flavour of your coffee.
- You may grind in any type of vessel that fits under the grinder outlet. However, ensure that your vessel stands stably within the grinder and will not fall out. For example: some re-usable filter baskets for drip coffee machines may fit into the grinder.
BEFORE FIRST USE
⚠ WARNING – Do not leave children younger than 8 years or animals without supervision, while the appliance, any part of it, or the packaging are in their reach. Before operation, always ensure to assemble the appliance completely and correctly. Always unplug the appliance, before assembling or removing any parts and/or before moving or cleaning the appliance.
⚠️ CAUTION – Only use soft clothes and lukewarm dishwater for cleaning the exterior. Only use a DRY small brush for cleaning the grinder mill. Do not place the appliance or any part of it in an automatic dishwasher.
- Pull the appliance out of the shipping box. Remove and discard all promotional labels, stickers, and packaging materials attached to the appliance, but do not remove the model label. Always ensure that children do not play with any parts or accessories or the packaging!
- Before discarding the packaging, ensure that you have found all parts and accessories [see: 'Knowing Your Design Coffee Grinder Digital'].
- Before first use and after a prolonged time of storage, clean all parts and accessories according to the instructions given in this booklet (see: 'Care and Cleaning').
OPERATION
⚠ WARNING – Do not leave children younger than 8 years without supervision, if the grinder or any part of it is in their reach.
CAUTION - The »Design Coffee Grinder Digital« is intended for short-term operation only. Do not operate the appliance continuously for more than 1 1/2 minutes. Turn off the appliance after this time of continuous use and allow to cool down for approx. 30 minutes before next use. Avoiding overheating will preserve the quality of the ground coffee powder as well as protect the appliance and ensure a long-lasting lifetime.
IMPORTANT - When the grinder will not be used for more than a week, we recommend to empty the grinder (bean hopper and grinder mill) and clean the appliance thoroughly (see: 'Care and Cleaning'). This will prevent residues of coffee beans and coffee powder from going bad within the grinder, causing an unpleasant, stale taste and flavour of your coffee.
For various useful tips concerning the use of the grinder, please refer to 'Tips for Best Results'.
SELECTING THE GRIND SIZE
CAUTION - Directly after purchase, you should set a medium setting for your brewing method as a pre-selection, before filling in any coffee beans, because the grind size may be set without running motor only, if the grinder mill are empty. With coffee beans in the grinder mill already, always let the motor run, while setting the grind size. Otherwise, coffee beans may get wedged between the grinding tools and block the motor (see: 'Removing Blockages').
NOTE
Small numbers indicate finer grind sizes with small particles.
- With the grinder mill empty: Simply turn the bean hopper until the desired grading line levels up with the white line at the top of the grinder housing.
- When coffee beans are in the grinder mill: Start the grinder and turn the bean hopper slowly to the desired grind size with the grinder running [see: 'Grinding into the Storage Container'.
- Let the appliance grind 1-2 portions, before checking the result
NOTE
Changes of the grind size affect the amount of coffee powder, which is given off within a fixed grinding time. If required, adopt the setting for the grinding time accordingly.
FILLING THE BEAN HOPPER
IMPORTANT - Only use freshly roasted, whole, dry coffee beans that are fit for consumption. Do not fill in any other material. Do not overfill the bean hopper. The hopper lid must be closed completely during operation. The bean hopper may be filled with max. 320g coffee beans.
For removing the hopper lid, simply pull it upwards. After filling the bean hopper, gently press the hopper lid onto the bean hopper.
GRINDING INTO THE STORAGE CONTAINER
NOTE
For grinding into the storage container, you need to remove the portafilter cradle. The appliance switches automatically to the cup mode (see: 'Properties of Your Design Coffee Grinder Digital'). Instead of the storage container of the grinder, you may use any other container that fits under the grinder outlet. In cup mode, the default is "1" (1 cup): The appliance grinds the preselected portion for 1 cup of coffee. The amount for each cup may be set via the grinding time
- If required, fill the bean hopper with a sufficient amount of whole coffee beans.
- Selecting the cup mode: If required, pull out the portafilter cradle. With the portafilter cradle removed the appliance switches automatically to cup mode.
- Empty the storage container and close it via the screw-top. Open the black flap at the screw-top and turn the flap outwards. Place the storage container under the grinder outlet.
IMPORTANT - The storage container of the appliance is designed for max. 130 g coffee powder. When overfilling the storage container, the grinder may get blocked via coffee powder tailing back in the powder outlet.
- Connect the appliance to a suited power supply (see: 'Important Safeguards for Electrical Appliances'). The display illuminates.
- Selecting the number of cups: Press the adjusting buttons "+" or "-" for setting the desired number of cups. Possible range: 1-10 cups.
- Selecting the grinding time pro cup: Hold the SET button pressed for approx. 1 second until the grinding time pro cup flashes on the display. Press the adjusting buttons "+" or "-" for selecting the desired grinding time pro cup. Possible range: 3.0 to 5.0 seconds in steps of 1/10 second. If required, switch back to the number of cups via the SET button.
- Starting / stopping the grinding cycle: Press the on/off button for starting the grinder. Usually, the grinder stops automatically, after the total grinding time (grinding time pro cup x number of cups) elapsed. Nevertheless, you can stop the grinder manually by pressing the on/off button, while the grinder is still running.
- When the motor stops, unplug the appliance. Remove the storage container
GRINDING INTO A PORTAFILTER
The appliance comes with 2 different portalfilter cradles: 51mm for small portalifters (50-54mm) and 58mm for the large portafilters (56-58mm). When a portafilter cradle is installed, the appliance switches to espresso mode automatically.
- If required, fill the bean hopper with a sufficient amount of whole coffee beans.
- Selecting the appropriate portafilter cradle: Check, in which portafilter cradle your portafilter may fit. The portafilter must stick stably and horizontally in the cradle.
- Installing the portafilter cradle: With the large opening facing to you, insert the appropriate portafilter cradle in the runners under the grinder outlet and push the portafilter cradle in to the stop. The appliance recognizes the portafilter and switches to espresso mode automatically.
- Installing the portafilter: Prepare the portafilter and filter basket for extraction. Then push the portafilter into the portafilter cracle below the grinder outlet.
- Connect the appliance to a suited power supply (see: 'Important Safeguards for Electrical Appliances'). On the display, the espresso icon and the default grinding time illuminate: "8.0" (8 seconds).
- Setting the grinding time: Press the adjusting buttons "+" or "-" for selecting the desired total grinding time. Possible range: 5 to 20 seconds in steps of 1/10 second.
HINWEIS
When the correct grinding time is not known, close supervision may prevent overflow. Press the on/off button, when the correct amount is given off.
- Starting / cancelling the grinding cycle: Press the on/off button for starting the grinding cycle. While the grinder is operating, the grinding time will be displayed in a countdown. When the set grinding time is reached, the grinder stops automatically. Keep an eye on the procedure to avoid overflow, and stop the grinder in time via pressing the on/off button again, while the grinder is running.
- Carefully pull the portaliter out of the appliance and lamp the coffee powder according to the instructions of your espresso machine.
- Unplug the appliance, when you do not wish to use it once more.
REMOVING BLOCKAGES
Rarely, stalks or other foreign objects could be merged with the coffee beans and block the grinder. Additionally, coffee beans could get wedged within the grinder intake. You may try the following procedure for solving the problem.
CAUTION - Do not poke in the openings of the grinder (in the bean hopper base and/or grinder outlet). You cannot remove any blockages this way. If the grinder does not start working when pressing the on/off button, always immediately switch off the grinder (press the on/off button).
NOTE
- Carefully try to turn the bean hopper to the coarsest grind size (31). Place the storage container under the grinder outlet and, with the appliance live, press the on/off button.
- If the grinder does not work, immediately switch off the grinder (press the on/off button again).
- If the grinder works: leave the grinder run for approx. 2-3 seconds with the coarsest grind size (31). Thereafter, with the grinder still running, slowly turn the bean hopper back to your preferred setting.
- If the grinder does not work and/or the bean hopper is blocked too: Remove the bean hopper and grinder sleeve for getting the obstacle out (see: 'Care and Cleaning / Removing the Grinder Sleeve').
SOLVING PROBLEMS
If any problems occur during operation, you will find the solution in this chapter.
| Problem Possible Reason The Easy Solution | |
| Emergency stop required? | Unplug the appliance. |
| The motor does not start. | The appliance is not live. Check the connection to the power outlet and the ratings of the power supply. Is the power outlet live? Connect a lamp. |
| Problem Possible Reason The Easy Solution | ||
| The grinder is blocked. Immediately switch off and unplug the appliance.Remove the obstacle (see: 'Operation / Removing Blockages').CAUTION: Do not poke in the openings of the grinder (bean hopper base or grinder outlet). You cannot remove any blockage this way! | ||
| The bean hopper is missing or not locked correctly. | Install and lock the bean hopper (see: 'Care and Cleaning / Assembling the Grinder'). | |
| The overheat protection has been triggered. | Unplug the appliance and leave the appliance cool down for approx. 30 minutes. Thereafter try again. Do not use the appliance continuously for more than 1 1/2 minutes to preserve a long lifetime and avoid overheating. | |
| A severe problem occurred. | Immediately unplug the appliance and get in contact with an authorized service centre for examination and repair. | |
| The appliance does not switch to espresso mode. | The portafilter cradle of the appliance is not installed or not installed correctly. | For filling a portafilter an appropriate cradle provided with the appliance must be installed. Insert the portafilter cradle in the runners at the grinder outlet and push the portafilter cradle into the grinder until it clicks audibly into place. |
| The storage container does not fit under the grinder outlet. | A portafilter cradle is installed. | Remove the portafilter cradle. Then try again. |
| The screw-top is not closed correctly. | Ensure that the screw-top is not tilted but closed completely. | |
| The flap at the screw-top is not opened completely or not closed correctly. | For filling: Open the block flap and turn it outwards.For storing the appliance: Close the flap and push it down at its rim. | |
| Ground coffee spills from the storage container. | The storage container is overfilled. | Before operation, always ensure that there is sufficient free space left in the storage container. The build-up of heaps in the storage container may cause overflow, even when the container is not filled completely.Grind in small portions and distribute the coffee powder in the storage container between the grinding cycles. |
| The storage container is not placed correctly under the grinder outlet. | Push the storage container completely into the grinder. | |
| The flap on the screw-top of the storage container is still closed. | Pull the flap open and turn it outwards. Then try again. | |
| Problem Possible Reason The Easy Solution | ||
| The usual amount is not given off,and/or the grinder makes an unusual noise,and/or the grinder stops unexpectedly. | You changed the grind size. | After changing the grind size, it may be necessary to adapt the grind time accordingly (see: 'Operation'). |
| The bean hopper is empty. Fill the bean hopper. | ||
| The bean hopper is not installed correctly. | While locking the bean hopper to the grinder intake, the locking lever must be pressed down. Otherwise, the shutter at the bottom of the bean hopper will not open. | |
| The grinder has got blocked during operation. | Unplug the appliance and remove the obstacle (see: 'Operation / Removing Blockages').CAUTION: Do not poke in the openings of the grinder (Bean hopper base or grinder outlet). You can not remove the blockage this way | |
| The grinder sleeve is missing or not installed correctly. | Install the grinder sleeve and lock it within the grinder chute (see: 'Care and Cleaning / Assembling the Grinder'). | |
| The overheat protection has been triggered. | Unplug the appliance and wait for approx. 30 minutes. Thereafter try again.Do not operate the appliance continuously for more than 1 1/2 minutes to avoid overheating and preserve a long life-time of the appliance | |
| You cannot lock the grinder sleeve or bean hopper. | Coffee beans are wedged in the grinder cone. | Clean the grinder cone via a dry, small brush (e.g. the cleaning brush of the appliance).When coffee beans stick within the grinder cone, turn the appliance upside down for letting the coffee beans fall out. |
| Pieces of coffee beans lie on the upper rim of the grinder sleeve. | Clean the rim of the grinder sleeve and the grinder cone via a dry brush.Then try again | |
| The wire handle of the grinder sleeve is not folded down completely or damaged. | After locking the grinder sleeve in place, fold the wire handle down. It must lie flat on the rim of the grinder sleeve. If the problem persists, contact your vendor for examination and repair. | |
ERROR MESSAGES ON THE DISPLAY
If an error occurred during operation, the motor switches off and an error message is displayed. In this case, check the reason and required method for solving the problem here.
| Error Message Reason Solving the Problem | ||
| „E1“ | The bean hopper is missing or not installed correctly. | Ensure that the bean hopper is installed and locked in place correctly, before connecting the appliance to the power supply (see: ‘Care and Cleaning / Assembling the Grinder’). |
| „E2“ | After 5 grinding cycles, the appliance switches off automaticallyORthe overheat protection has been triggered. | Unplug the appliance and wait for approx. 30 minutes.Thereafter try again.Do not operate the appliance continuously for more than 5 grinding cycles or 1 1/2 minutes to avoid overheating. |
CARE AND CLEANING
⚠ WARNING – Always ensure that the appliance and all its parts and accessories are out of reach of children younger than 8 years and animals. Always unplug the appliance, before moving and/or cleaning the appliance. Do not disassemble or assemble any parts, while the appliance is connected to the power supply.
To avoid hazards due to electric shock and damage: Do not clean the appliance in an automatic dishwasher! Do not immerse the housing, grinder sleeve, power plug, or power cord in any liquid. Do not spill or drip any liquids on the housing, power cord, or in the grinder chute or in the mounted bean hopper. Always keep the interior of the grinder completely dry.
CAUTION - Do not use any abrasive or corrosive cleaners, chemicals or any hard or sharpedged objects (e.g. disinfectants, bleach, metal scouring pads) for cleaning the appliance or any part of it.
We recommend to clean the appliance regularly. For this, you should empty the bean hopper completely to avoid that stole residues of coffee beans accumulate within the bean hopper and grinder mill. This is crucial, if you wish to prepare the appliance for several days without usage (e.g. during holidays). Hygienic cleaning is performed according to the following instructions.
REMOVING THE GRINDER SLEEVE
NOTE
The bean hopper base is closed automatically, when unlocking the bean hopper. Therefore, remaining coffee beans will not fall out, when removing the bean hopper.
- Unplug the appliance. If required, remove the portafilter cradle.
- Press the black locking lever at the bottom of the bean hopper down for unlocking the bean hopper. Then, pull the bean hopper upwards. Perhaps, you need to turn the bean hopper counterclockwise for removing it.
- Remove the hopper lid and empty the bean hopper completely.
- Thereafter, replace the bean hopper and hopper lid. While holding the locking lever pressed down, turn the bean hopper clockwise to the stop. Position the storage container with the flap open below the grinder outlet.
- Plug in the appliance and start the motor via the on/off button. Let the appliance operate, until all remaining coffee beans are ground and the grinder noise changes noticeably.
- Unplug the appliance and remove the bean hopper again, as described in step 2.
CAUTION - There may be some harsh resistance, when attempting to unlock the grinder sleeve. In this case, grasp the wire handle at both sides just above the rim of the grinder sleeve. Avoid bending the wire handle. Otherwise, the wire handle may no longer fit into the groove at the rim of the grinder sleeve, making it impossible to re-assemble the bean hopper.
- Pull up the wire handle at the rim of the grinder sleeve. For unlocking the grinder sleeve, turn the grinder sleeve counterclockwise via the wire handle. Then, pull the grinder sleeve out. The grinder cone cannot be removed.
NOTE
With the grinder sleeve removed, in most cases, obstacles are released and fall into the grinder outlet or can be removed by turning the complete appliance upside down. Before this, remove the storage container.
CLEANING THE APPLIANCE
CAUTION - Do not immerse the grinder sleeve in water or any other liquid to avoid damage. Do not pour or drip any liquids into the grinder chute. Always keep the inner parts of the grinder mill completely dry (grinder cone, grinder sleeve, grinder outlet). Moisture on the surfaces will make the coffee powder stick to the surfaces and cause blockage.
- Disassemble the grinder mill (see above: 'Removing the Grinder Sleeve').
- Via a small, DRY nylon brush, remove any residues of coffee powder from the grinder sleeve and from the grinder cone (in the grinder chute). For this, you may use the provided cleaning brush.
- Brush the powder outlet, removing any residues of coffee powder sticking to the surfaces.
- You may clean the portaliter cracles, storage container, and hopper lid via warm dishwater. Thereafter rinse thoroughly and wipe dry. Wipe the bean hopper, housing and the power cord with a slightly moistened cloth. Polish via a dry, soft cloth.
- Let all parts dry naturally for at least 1/2 hour. For this, leave the hopper lid and screw top of the storage container open.
ASSEMBLING THE GRINDER
CAUTION – Ensure that all parts of the grinder are absolutely dry, before re-assembling the grinder. Moisture in the grinder mill may lead to blockage of the grinder mill, a stale taste of your coffee, and even mould building up in the grinder mill.
- Via the wire handle, place the grinder sleeve into the grinder chute. Turn the grinder sleeve, until it slides down within the grinder chute. Then turn the grinder sleeve clockwise until it clicks tangibly into position. Fold the wire handle down.
NOTE
Read and remember the setting of the grind size, before assembling the bean hopper, because the grind size setting may slip away from its position when locking the bean hopper to the grinder intake.
- Place the bean hopper onto the grinder intake. While pressing the locking lever down, turn the bean hopper clockwise to the stop. Release the locking lever and, if required, turn the bean hopper to the appropriate grind size.
- If you wish to use the appliance after cleaning, fill the bean hopper with fresh coffee beans.
- Replace the hopper lid and gently push it down. Thereafter, the appliance is ready for use again.
STORAGE
⚠ WARNING – Always ensure that the appliance and all its parts are out of reach of children young than 8 years and animals.
CAUTION - Do not place any hard or heavy objects on or in the appliance or its parts. It is good advice to store all accessories with the appliance. Do not grasp the appliance at the bean hopper, or power cord for moving it.
IMPORTANT - Do not use any parts or accessories of the appliance for any other purpose than operating the appliance. It is good advice to store the parts and accessories of the appliance with the appliance.
- Empty the bean hopper and grinder mill. Thoroughly clean the appliance. Thereafter, dry and completely re-assemble the appliance (see: 'Care and Cleaning').
- You may place the portafilter cradles and cleaning tool into the storage container or bean hopper. With the flap closed, carefully push the storage container into its place below the grinder outlet.
- Grasp the appliance at both sides of the housing and place the appliance in upright position on a stable and clean surface, where it cannot fall. Store the appliance, where it is protected against inadmissible strain. Lay the power cord loosely around the appliance. The power cord may not be knotted, squeezed, or bent.
NOTES FOR DISPOSAL

Disposition of the appliance and packaging must be effected in accordance with the corresponding local regulations and requirements for electrical appliances and packaging. Please contact your local disposal company.
Do not dispose of electrical appliances as unsorted municipal waste, use separate collection facilities. Contact your local government for information regarding the collection systems available. If electrical appliances are disposed of in landfills, dumps, or refuse incineration, hazardous substances can leak into the groundwater or can be emitted into air, thus getting into the food chain, and damaging your health and well-being. When replacing old appliances with new once, the retailer is legally obligated to take back your old appliance for disposal at least for free of charge.
INFORMATION AND SERVICE
Please check www.gastroback.de for further information. For technical support, please contact GASTROBACK Customer Care Center by phone: +49 (0)4165/22 25-0 or email info@gastroback.de.
Please refer to our home page for a copy of these operating instructions in pdf format.
WARRANTY
We guarantee that all our products are free of defects at the time of purchase. Any demonstrable manufacturing or material defects will be to the exclusion of any further claim and within 2 years after purchasing the appliance free of charge repaired or substituted. There is no Warranty claim of the purchaser if the damage or defect of the appliance is caused by inappropriate treatment, over loading or installation mistakes. The Warranty claim expires if there is any technical interference of a third party without a written agreement. The purchaser has to present the sales slip in assertion-of-claim and has to bear all charges of costs and risk of the transport.
Note
Customers from Germany and Austria: For repair and service, please send Gastroback products to the following address:
Gastroback GmbH, Gewerbestr. 20, D-21279 Hollenstedt, Germany.
Please agree that we cannot bear the charge of receipt.
Submission of appliances: Please ensure packing the appliance ready for shipment without accessories. Add the sales slip and a short fault description. The processing time after receipt of the defective appliance will be approx. 2 weeks; we will inform you automatically. After the warranty period, please send defective appliances to the given address. You will get a free quotation and, thereafter, can decide, whether we shall repair the appliance to the costs possibly accrued, send back the defective appliance for free of charge, or dispose of the appliance for free of charge.
The appliance is intended for household use only and NOT suited for commercial, industrial or trade usage. Do not attempt to use this appliance in any other way or for any other purpose than the intended use, described in these instructions. Any other use is regarded as unintended use or misuse, and can cause severe injuries or damage. There is no warranty claim of the purchaser if any injuries or damages are caused by unintended use.
GASTROBACK®
GASTROBACK GmbH
Gewerbestraße 20 • 21279 Hollenstedt / Germany Telefon +49(0)4165/2225-0 • Telefax +49(0)4165/2225-29 info@gastroback.de • www.gastroback.de
- BEDIENUNGSANLEITUNG
- OPERATING INSTRUCTIONS
- TABLE OF CONTENTS
- IMPORTANT NOTE - PLEASE READ CAREFULLY - BEFORE YOU USE THE DEVICE!
- DEAR CUSTOMER!
- GENERAL SAFETY INSTRUCTIONS
- IMPORTANT SAFEGUARDS FOR ELECTRICAL APPLIANCES
- MOVING PARTS - RISK OF INJURIES
- PROPERTIES OF YOUR DESIGN COFFEE GRINDER DIGITAL
- NOTE
- CUP MODE AND ESPRESSO MODE
- TIPS FOR BEST RESULTS
- BEFORE FIRST USE
- OPERATION
- SELECTING THE GRIND SIZE
- FILLING THE BEAN HOPPER
- GRINDING INTO THE STORAGE CONTAINER
- GRINDING INTO A PORTAFILTER
- HINWEIS
- REMOVING BLOCKAGES
- SOLVING PROBLEMS
- ERROR MESSAGES ON THE DISPLAY
- CARE AND CLEANING
- REMOVING THE GRINDER SLEEVE
- CLEANING THE APPLIANCE
- ASSEMBLING THE GRINDER
- STORAGE
- NOTES FOR DISPOSAL
- INFORMATION AND SERVICE
- WARRANTY
- GASTROBACK®
- GASTROBACK GmbH
Brand : Gastroback
Model : Pro Touch 30 42644
Category : Sharpener