
Smart Frame WiFi 104 Atmosphere Light - Digital photo frame ROLLEI - Free user manual and instructions
Find the device manual for free Smart Frame WiFi 104 Atmosphere Light ROLLEI in PDF.


| Product Type | Digital Photo Frame |
| Model | Smart Frame WiFi 104 Atmosphere Light |
| Brand | Rollei |
| Display Size | 10.4 inches |
| Display Resolution | 1024 x 768 pixels |
| Aspect Ratio | 4:3 |
| Connectivity | Wi-Fi IEEE 802.11 b/g/n |
| Internal Memory | 2 GB (expandable via SD card up to 32 GB) |
| Photo Support | JPEG, BMP, PNG |
| Video Playback | AVI, MP4, MOV (H.264) |
| Audio Playback | MP3, WMA |
| Power Supply | 5V DC, 2A (USB power adapter included) |
| Power Consumption | 6W (typical) |
| Dimensions (W x H x D) | 280 x 200 x 25 mm |
| Weight | 650 g |
| Ambient Light Sensor | Yes (automatic brightness adjustment) |
| Calendar / Clock | Yes |
| Mounting | Desktop stand or wall mountable (VESA 75x75) |
| Remote Control | Included (infrared) |
| Languages | English, German, French, Spanish, Italian, Dutch |
| Cleaning Instructions | Wipe with a soft, dry cloth. Do not use liquid cleaners. |
| Repairability | Battery not user-replaceable. For other repairs, contact Rollei support. |
| Safety | Use only the supplied adapter. Keep away from water and heat sources. |
Frequently Asked Questions - Smart Frame WiFi 104 Atmosphere Light ROLLEI
User questions about Smart Frame WiFi 104 Atmosphere Light ROLLEI
0 question about this device. Answer the ones you know or ask your own.
Ask a new question about this device
Download the instructions for your Digital photo frame in PDF format for free! Find your manual Smart Frame WiFi 104 Atmosphere Light - ROLLEI and take your electronic device back in hand. On this page are published all the documents necessary for the use of your device. Smart Frame WiFi 104 Atmosphere Light by ROLLEI.
USER MANUAL Smart Frame WiFi 104 Atmosphere Light ROLLEI
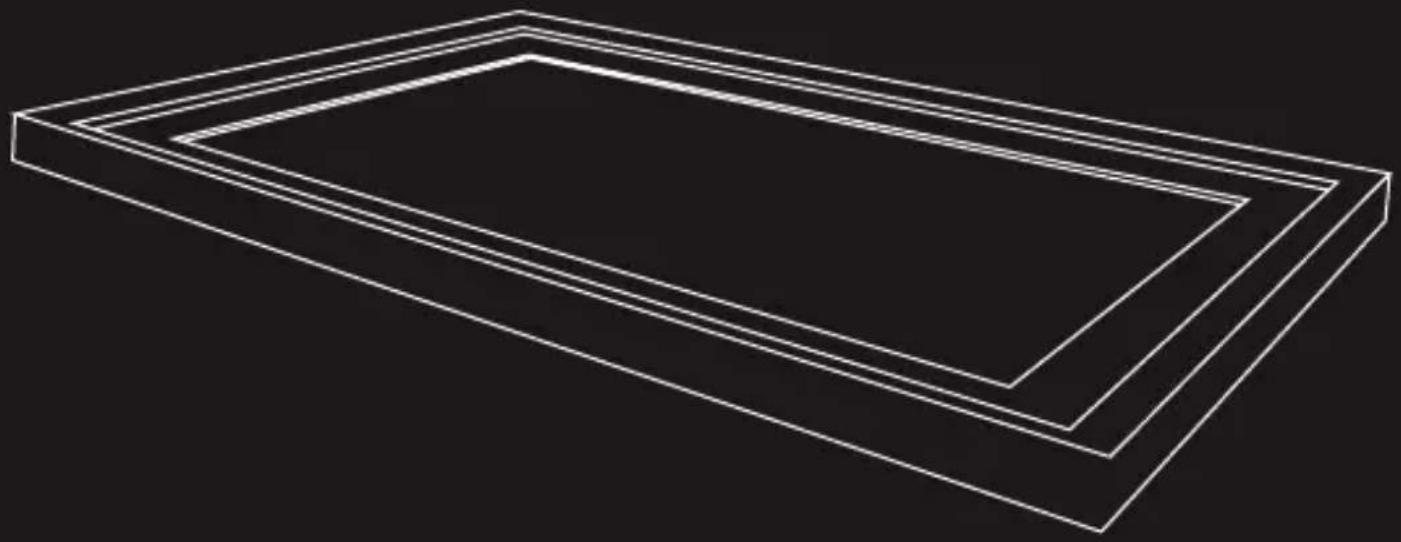
Smart Frame WiFi 104 Atmosphere Light
Digitaler Bilderrahmen Digital Photo Frame

frameo
Before First Use ....28
Explanation of Symbols....28
Safety Instructions 29
What's in the Box 31
Product Overview 31
Mounting 32
Operation 33
- Setup of the Digital Photo Frame ....33
- Setup of the App 38
- Connection of the Digital Photo Frame with the Frameo App on the Smartphone or Tablet . . . . . . . . . . . . . . . . . . . . . . . . . . . . . . . . . . . . . . . . . . . 39
- Sending of Photos and Videos from the Smartphone or Tablet to the Digital Photo Frame....40
- Transferring Photos and Videos from the Computer to the Digital Photo Frame .....41
- Additional Options. 41
- Settings 42
Technical Data....48
Data Protection....50
Disposal 50
Conformity 21
Produktübersicht
Bedienung
frameo
Datum und Zeit

Zuizono
Amsterdam, Berlin, Bern, Rome, Stockholm, Vienna GMT+02.00

Datum
21 Mai 2001

Zeit
C2:08


JETZT BEI
Google Play
Receive wonderful photos and videos from friends and family with the Rollei Smart Frame WiFi 104 Atmosphere Light with built-in Frameo software. Use the free Frameo app to send photos and videos directly from your smartphone or tablet to the Rollei Smart Frame WiFi 104 Atmosphere Light – wherever you are in the world. The photos or videos will appear on the digital photo frame within seconds, so you can enjoy the moments right as they happen.
Before the First Use
Please read the operating instructions and safety instructions carefully before using the device for the first time.
Keep the operating instructions together with the device for later use. If other persons use this device, make this user manual available to them. If you sell the device, this manual belongs to the device and must be supplied with it.
Explanation of Symbols
The following symbols are used in these operating instructions, on the Rollei Smart Frame WiFi 104 Atmosphere Light or on the packaging.

Products marked with this symbol comply with all relevant community regulations of the European Economic Area.
Products marked with this symbol are operated with direct current.
Products marked with this symbol are operated with alternating current.

Products with this symbol have additional or reinforced insulation and comply with protection class II.
For indoor use only. Devices with this symbol may only be operated indoors (dry environment).

Products marked with this symbol have a positive polarity. They may only be connected to products that also have a positive polarity.
Safety Instructions
- Only connect the product if the mains voltage of the input or power supply matches the specifications on the type plate on the back of the product.
- Do not use the product if it is visibly damaged or if the power cable is defective.
- Use only the supplied power cable.
- If the product or the accessories are damaged, they must be replaced or repaired by the manufacturer, its customer service, or a similarly qualified person in order to prevent hazards.
- The housing must not be opened and repairs must only be carried out by a specialist. Contact a specialist workshop for this purpose. All liability and warranty claims are excluded in the event of repairs by the user, improper connection or incorrect operation.
- Do not insert any objects into the product.
- Do not leave the product unattended during operation.
- Protect the product from moisture. Do not touch it with wet / damp hands and do not immerse it in water.
- This product is not waterproof! Do not use this product in the rain or in wet environments.
-
Do not use or store the product in high temperatures or in enclosed spaces with direct sunlight. Do not use the product at ambient temperatures above 40° C.
-
Ensure adequate ventilation during operation. Never cover the product.
- If the product is used in ambient temperatures that are too cold or too hot, the product will switch off automatically.
- Do not use the product in the vicinity of flammable gases or liquids, as this can lead to explosions.
- The product is not a toy. Keep the product, accessories and packaging materials away from children and pets to prevent accidents and suffocation.
- Please have the product inspected by an authorized service center if a problem occurs. You are not allowed to disassemble the product in case of malfunction. Doing so will void your warranty.
- Turn off the power before connecting or disconnecting a memory card or USB storage device. Failure to do so may result in damage to the memory card, USB storage device and the device.
- The display is made of glass and is therefore fragile and can be scratched.
- Handle the display with care.
- You can remove fingerprints and dust on the display with a soft cleaning cloth.
- If you sell the product to another person, also pass on these operating instructions to that person.
Note: The product is intended for private use only and not for commercial use.
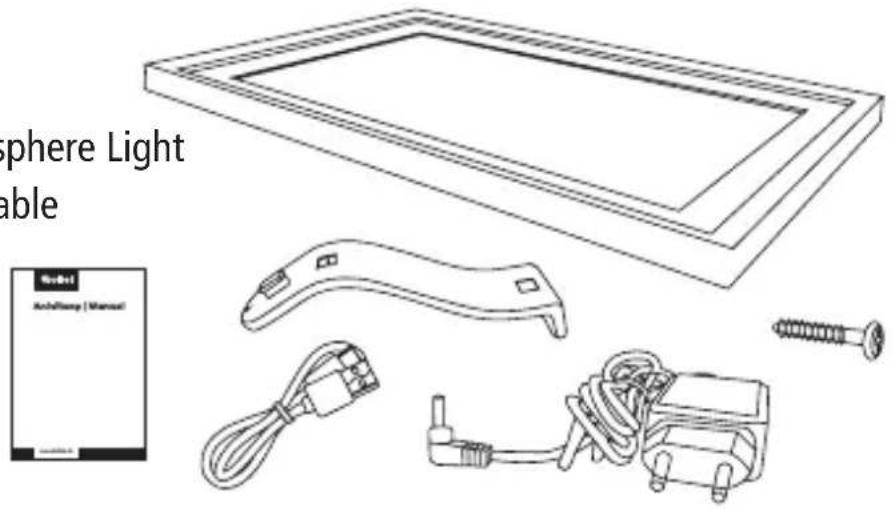
What's in the Box
- Smart Frame WiFi 104 Atmosphere Light
- Power adapter with power cable
- USB-C cable
- Holder stand
- Screw
- User manual
Product Overview
1 Display
2 Holder stand connection
3 Speaker
4 Power connection
5 USB-C connection
6 microSD memory card slot
7 Power on / off button
8 Wall mount connection
9 Emergency stop button


Standing Mounting
- To place the digital photo frame on a flat surface, place the holder stand in the wider opening of the holder stand connection for the horizontal or vertical position, and slide the holder stand towards the narrow opening of the holder stand connection.
Hanging Mounting
- To mount the digital photo frame on a wall, fasten the supplied screw with a suitable dowel to the desired wall and hook the digital photo frame onto the screw with the wall mount connection for the horizontal or vertical position.
Note: Electrical, gas or water lines damaged during drilling pose a significant hazard. Before attaching the digital photo frame to the wall, make sure that there are no electrical, gas or water lines behind the planned drilling points. If necessary, check this with a line detector or consult specialists.
Setup of the Digital Photo Frame
- Connect the power cable to the power connection of the digital photo frame and to a suitable power socket.
- The digital photo frame will then turn on automatically.
- To set the language, tap on the desired language.
- To move to the next step, tap on >.

Operation
- To set the WiFi network, tap on the desired WiFi network, enter the password for it and tap on "Ok".
- To move to the next step, tap on >.

Operation
- To set the time zone, tap on "Time zone" and on the desired time zone.
- To set the date, tap on "Date" and on the desired date.
- To set the time, tap on "Time", set the desired time, and tap on "Ok".
- To turn the 24-hour time format on or off, tap on "Use 24-hour format".
- To move to the next step, tap on >.

frameo
Date and time

Time 10:00
Amsterdam, Berlin, Bern, Rome, Stockholm, Vienna GMT+02:00

Dene
21 May 2021

Time
0203

Use 24 hour format


Operation
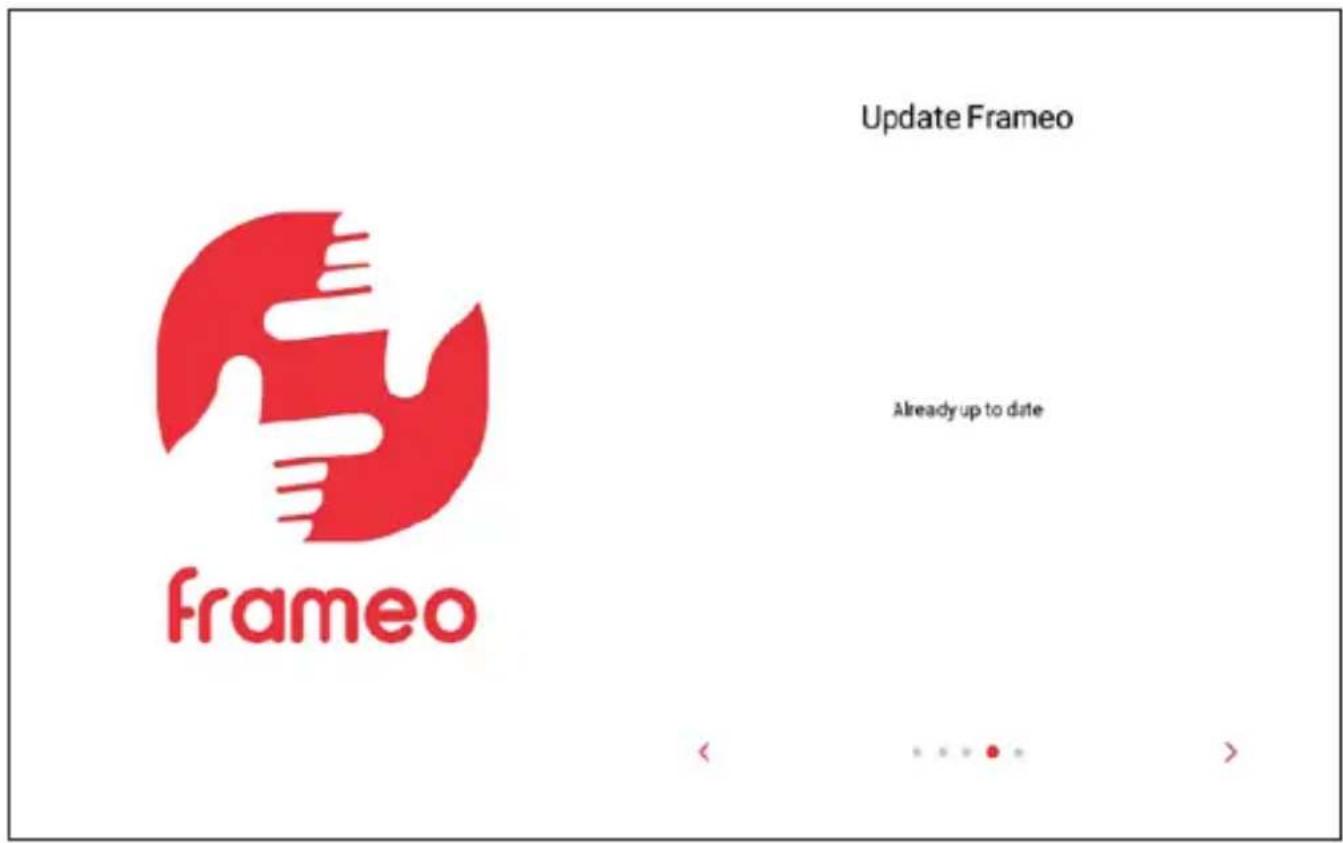
- To install a new firmware on the digital photo frame, tap on "Update". If no update is required, "Already up to date" will be displayed.
- To move to the next step, tap on >.
Operation
- To set your name, tap on "Your full name" and enter your name.
- To set the location of the digital photo frame, tap on "Frame location" and enter the location.
- To finish the setup of the digital photo frame, tap on >.

Setup of the App
- To install the free Frameo app, scan the appropriate QR code or search for "Frameo" in the Apple App Store or Google Play Store, download the Frameo app to your smartphone or tablet, and start the Frameo app.

frameo


Download on the App Store


GET IT ON
Google Play
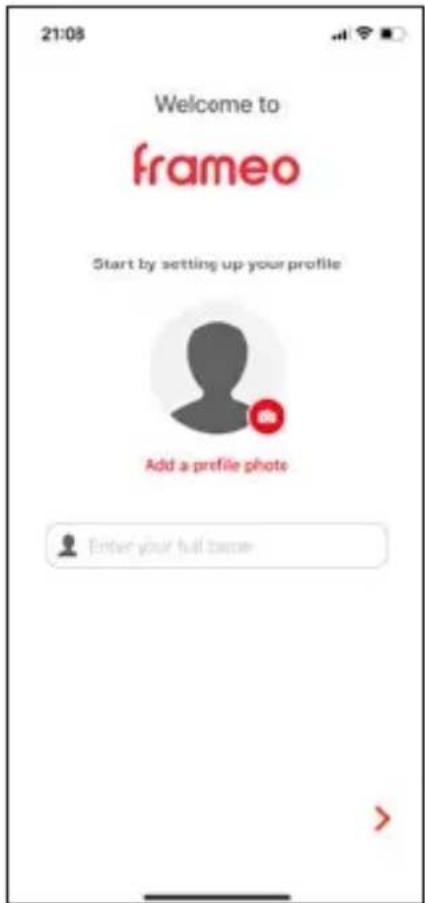
- To set a profile photo, tap on "Add a profile photo" and on the desired photo.
- To set your name, tap on the input field and enter your name.
- To finish setup of the Frameo app, tap on >.
Connection of the Digital Photo Frame with the Frameo App on the Smartphone or Tablet
- To view the ten-digit numeric code to connect the digital photo frame to the Frameo app, tap on "Add Friend" on the digital photo frame.

You have not received any photos yet. Tap the "friend icon" to add more friends.


- To enter the ten-digit numerical code in the Frameo app, tap on ... and on in the Frameo app, enter the ten-digit numerical code and tap on "Ok".
- To subsequently set up the digital photo frame with the Frameo app on another smartphone or tablet, repeat the process (see above). This way, multiple smartphones or tablets can be connected to the digital photo frame.

Sending of Photos and Videos from the Smartphone or Tablet to the Digital Photo Frame
- To select photos or videos from the smartphone or tablet, tap on ☐on , ☑the desired photos or videos you want to send to the digital photo frame, and on "Next" in the Frameo app [1].
- To select one or more digital photo frames as recipients, tap on the desired digital photo frame(s) and on "Next" [2].
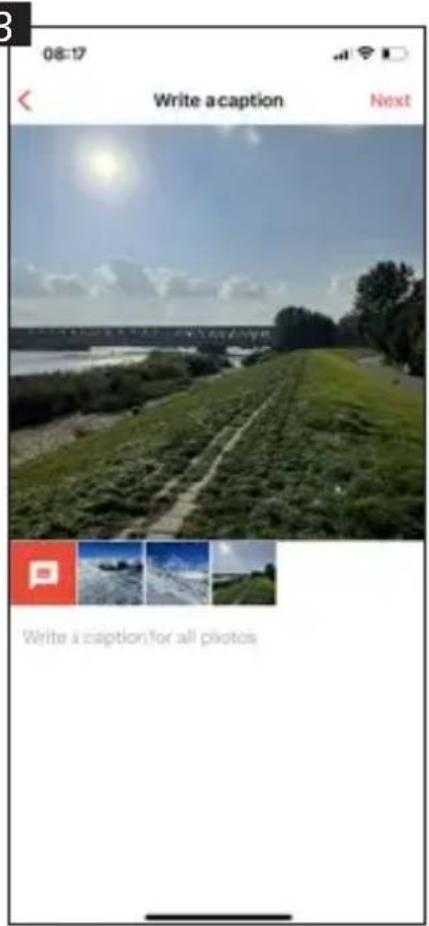
- To enter a caption for the photos or videos, tap on the input field, enter the desired caption and tap on "Next" [3].
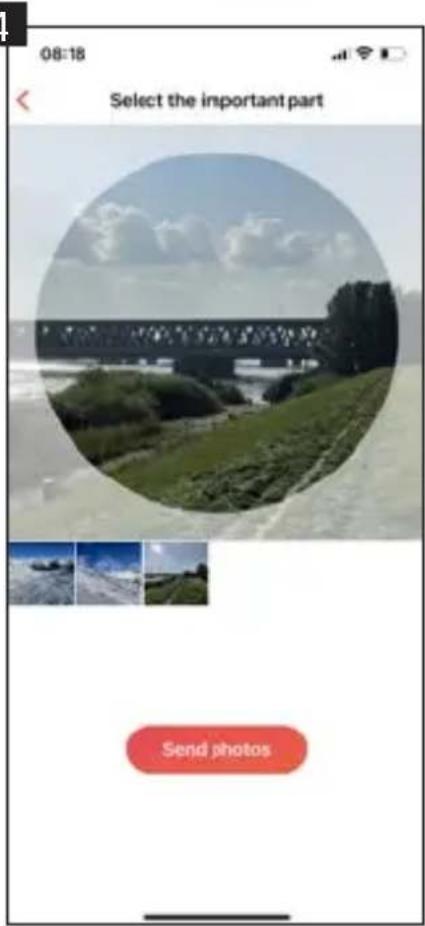
- To set a picture / video crop for the photos or videos, move the crop to the desired setting and tap on "Send photos" / "Send videos" [4].
1

2

3
4
Transferring Photos and Videos
from the Computer to the Digital Photo Frame
- To connect the digital photo frame to the computer, connect the USB-C cable to the USB-C connection of the digital photo frame and to the USB connection of the computer.
- To open the digital photo frame on your computer, click on the folder of the digital photo frame that is shown on the computer.
- To transfer photos and videos from the computer to the digital photo frame, mark all the desired photos and videos on the computer you want to transfer to the digital photo frame, copy them, and paste them into the folder of the digital photo frame on the computer.
- To delete photos and videos that are on the digital photo frame via the computer, mark all the desired photos and videos and delete them in the folder of the digital photo frame on the computer.
Additional Options
- To view the previous or next photo or video, swipe left or right on the digital photo frame display.
To get to the window for additional options, tap on the digital photo frame display.

- To connect the digital photo frame with the Frameo app, tap on 📁(see page 37).
- To respond to the displayed photo or video with emojis, tap on "React," and on the desired reaction. The reaction is then displayed in the Frameo app on the smartphone or tablet.
Operation
- To hide the displayed photo or video in the gallery, tap on "Hide photo".
- To display the gallery of all photos or videos, tap on "Gallery".
- To fit the displayed photo or video to the frame or fill the frame, tap on "Fit to frame" / "Fill frame".
- To rotate the displayed photo or video, tap on "Adjust Photo", on and on.
- To enter the settings menu, tap on ⚙
Settings
To adjust settings of the digital photo frame, tap on one of the desired sub-items "My frame", "Manage photos", "My friends", "Display", "Slideshow", "Wi-Fi", "Notifications", "Backup and restore", "Help" or "About".

"My frame"
- To set the name, tap on "Name of the frame", enter the desired name and tap on "Ok".
- To set the location, tap on "Location of the frame", enter the desired location and tap on "Ok".
- To set the language, tap on "Set language" and on the desired language.
- To set the weather location, tap „Weather location“, enter the desired location and tap on „Search“.
- To set the temperature unit, tap on „Temperature unit“ and on „Celsius“ or „Fahrenheit“.
- To set the date, tap on "Date", set the desired date and tap on "Ok".
- To set the time, tap on "Time", set the desired time and tap on "Ok".
- To set the time zone, tap on "Time zone" and on the desired time zone.
- To set the first day of the week, tap on „Set first day of the week“ and tap on „Monday“, „Friday“, „Saturday“ or „Sunday“.
- To set the 24-hour time format on or off, tap on "Use 24-hour format".
"Manage photos"
- Here you can see the occupancy of the internal memory.
- To show or hide photos or videos, tap on "Show / hide photos" and on the desired photos and videos to show or hide.
- To delete photos or videos, tap on "Delete photos", on the desired photos and videos to be deleted, on hand on "Delete photo".
- To import photos or videos, insert a microSD memory card into the microSD memory card slot or connect an external storage to the USB-C connection of the digital photo frame when it is turned off, tap on „Import photos“, on the photos or videos you want to import, on ↓ and on "Ok".
- To turn the transfer function of photos or videos from computer to the digital photo frame on or off, tap on „Transfer from computer“ and tap on „Enable transfer from computer“.
- To export photos or videos, insert a microSD memory card into the microSD memory card slot or connect an external storage to the USB-C connection of the digital photo frame when it is turned off, and tap on "Export photos".
- To turn playback from external memory on or off, tap on „Play from external storage“.
"My friends"
- To approve friends to share the code of the digital photo frame or to delete friends, tap on the respective friend and on "Allow friend to share the code to this frame" or tap on "Delete friend" and on "Delete".
"Display"
- To adjust the brightness of the display, move the slider at "Brightness level" to the desired brightness.
- To set the sleep mode, tap on "Sleep mode", set the desired start time, tap on "Ok", set the desired end time, and tap on "Ok".
- To set the lights mode of the LED light on the back of the digital photo frame, tap on "Lights mode" and on "Adaptive", "Fixed color" or "Off".
- To set the lights brightness of the LED light on the back of the digital photo frame, move the slider at "Lights brightness" to the desired brightness.
- To set the lights color of the LED light on the back of the digital photo frame, tap on "Lights color", on the desired color in the color wheel and on "Ok".
"Slideshow"
- To set the display duration of photos or videos, tap on "Timer", move the slider to the desired display duration and tap on "Ok".
- To adjust the scaling of photos or videos, tap on „Fill frame“ and on „Change for all photos“.
- To set the background, tap on „Frame background“ and on „Blurred“, „Black“, or „Colored gradient“.
- To set the order of photos and videos, tap on „Photo display order“ and on „By date received,” „By date taken,” or „Shuffle.“
- To turn reverse display order on or off, tap on „Reverse photo display order“.
Operation
- To turn the display of the caption on or off for photos or videos, tap on „Show caption“.
- To turn the display of the time on or off for photos or videos, tap on „Show clock“.
- To turn the display of weather on or off for photos or videos, tap on „Show weather“.
- To turn auto play on or off for videos, tap on "Auto Play".
- To set video playback for videos, tap on "Video playback" and on "Loop videos", "Play once", or "Play once and continue".
- To turn auto mute on or off after 10 minutes for videos, tap on „Auto mute“.
- To adjust the volume for videos, move the slider at "Video volume" to the desired volume.
"Wi-Fi"
- To view the current network details, tap on your current WiFi network, on "Signal strength" or on "Connection status".
- To set another WiFi network, tap on the desired WiFi network, enter the password, and tap on "Ok".
"Notifications"
- To turn notifications on or off, tap on "Show notifications".
- To adjust the notification volume, move the slider at "Notification volume" to the desired volume.
- To turn notifications for various events on or off, tap on "Storage space", "Backup", "Network connection", "New photos", "Transfer from computer", "New friend", "Software update", "Feature news", or "Date and time".
"Backup and restore"
- To back up photos and videos of the digital photo frame to an external storage, insert a microSD memory card into the microSD memory card slot or connect an external storage to the USB-C connection of the digital photo frame when it is turned off, and tap on "Backup frame to external storage".
- To turn an automatic backup on or off, tap on "Automatic backup".
- To restore from backup to external storage, tap on "Reset frame", follow the instructions, insert a microSD memory card into the microSD memory card slot or connect external storage to the USB-C connection on the digital photo frame when it is turned off, and tap on "Restore from backup".
- To reset the digital photo frame, tap on "Reset frame" and on "Ok".
"Help"
- To view a quick setup guide, tap on "Guide".
- To get help and data about the digital photo frame, tap on „Support“.
"About"
- To check the digital photo frame for updates, tap on „Check for update“.
- To join or leave the beta program, tap on „Beta program“ and on „Accept“.
- To see third-party attributions, tap on „Third party attributions“ and on „Open source libraries“ or „OpenWeather Ltd.“.
- To turn sharing of anonymous analytics data on or off, tap on "Share anonymous analytics data".
Switching On and Off
- To turn on the digital photo frame, press the power on / off button on the back of the digital photo frame long.
- To turn off the digital photo frame, tap on the display, on and on "Power Off", or press the power on / off button on the back of the digital photo frame long and tap on "Power Off".
- To turn off only the display, but not the digital photo frame, tap on the display, on ⏻ and on "Sleep", or briefly press the power on / off button on the back of the digital photo frame.
Restart
- To restart the digital photo frame, tap on the display and on "Restart".
| Processor Quad Core Rockchip 3126 | |
| Operation system Android 6.0 | |
| Power demand in standard dynamic range (SDR) | 6.0 W |
| EU energy efficiency class (EU 2017/1369) | C |
| EU energy efficiency class spectrum (EU 2017/1369) | A – G |
| Display type LCD display with touchscreen | |
| Display panel type IPS panel | |
| Display size 10.1" / 25.53 cm | |
| Display resolution 800 x 1280p | |
| Display format 16:9 | |
| Display brightness 200 – 220 cd/m | 2 , adjustable from 0 – 100 % |
| Viewing angle 0 – 180 ° | |
| Speaker 2 | 1 W per speaker | |
| Volume 96 ± 3 dB per speaker, adjustable in 15 levels | |
| File format JPEG, PNG, MP4 | |
| Max. video length Up to 15 sec. | |
| Internal memory 8 GB | |
| External memory | External microSD memory card of memory class 10 with up to 32 GB or external memory with USB-C connection |
| Frequency band | 2.4 GHz |
| Frequency range 2.412 – 2.472 GHz | |
| Max. transmission power | 17 dBm |
| App compatibility | Frameo app |
| Power supply Smart Frame WiFi 104 Atmosphere LightInput: DC 5.0 V / 3.0 APower adapter for Smart Frame WiFi 104 AtmosphereLight: Input: 100 – 240 V / 50 – 60 Hz / 0.5 AOutput: AC 5.0 V / 3.0 A / 15.0 W |
| Connection Power connection, USB-C connection, microSDmemory card slot, holder stand connection, 2x wallmount connection |
| Operating temperature 0 – 40 °C |
| Mounting Standing horizontally or verticallyHanging horizontally or vertically |
| Additional features Transfer function of photos and videos from computerto the photo frame via USB-C cable, import andexport function of photos and videos from and tostorage medium, automatic and manual rotation func-tion, frame adjustment function, reaction function,caption function, time function, weather function,hiding function, sleep mode function, LED function |
| Dimensions 26.9 x 18.7 x 2.9 cm |
| Weight 529 g |
| What's in the box Digital photo frame, power adapter with power cable,USB-C cable, holder stand, screw, user manual |
Technical data are subject to change without notice.
The presented contents and representations may differ from the real contents and representations on the digital photo frame and in the Frameo app due to updates.
Information regarding the data protection of the Frameo app can be found at https://privacy.frameo.net/
Disposal

Dispose of the packaging according to its type. Use the local possibilities for collecting paper, cardboard and other materials (applicable in the European Union and other European countries with systems for the separate collection of recyclable materials).
Devices that are marked with this symbol must not be disposed of with household waste! You are legally obliged to dispose of old devices separately from to dispose of household waste. Information on collection points that accept old appliances free of charge can be obtained from your local authority or town council.
Conformity
Rollei GmbH & Co. KG herewith declares that the radio system type “Rollei Smart Frame WiFi 104 Atmosphere Light” complies with the Directive 2014/53/EU.
The full text of the EU declaration of conformity is available at the following Internet address: www.rollei.com/egk/smartframewifi104atmospherelight

Rollei GmbH & Co. KG In de Tarpen 42 D-22848 Norderstedt Germany


- SMART FRAME WIFI 104 ATMOSPHERE LIGHT
- PRODUKTÜBERSICHT
- BEDIENUNG
- DATUM UND ZEIT
- BEFORE THE FIRST USE
- EXPLANATION OF SYMBOLS
- SAFETY INSTRUCTIONS
- WHAT'S IN THE BOX
- PRODUCT OVERVIEW
- STANDING MOUNTING
- HANGING MOUNTING
- SETUP OF THE DIGITAL PHOTO FRAME
- OPERATION
- DATE AND TIME
- SETUP OF THE APP
- CONNECTION OF THE DIGITAL PHOTO FRAME WITH THE FRAMEO APP ON THE SMARTPHONE OR TABLET
- SENDING OF PHOTOS AND VIDEOS FROM THE SMARTPHONE OR TABLET TO THE DIGITAL PHOTO FRAME
- TRANSFERRING PHOTOS AND VIDEOS
- FROM THE COMPUTER TO THE DIGITAL PHOTO FRAME
- ADDITIONAL OPTIONS
- SETTINGS
- MY FRAME
- MANAGE PHOTOS
- MY FRIENDS
- DISPLAY
- SLIDESHOW
- WI-FI
- NOTIFICATIONS
- BACKUP AND RESTORE
- HELP
- ABOUT
- SWITCHING ON AND OFF
- RESTART
- DISPOSAL
- CONFORMITY
Brand : ROLLEI
Model : Smart Frame WiFi 104 Atmosphere Light
Category : Digital photo frame