WA56110-020A - Washing machine Exquisit - Free user manual and instructions
Find the device manual for free WA56110-020A Exquisit in PDF.


| Brand | Exquisit |
| Model | WA56110-020A |
| Product type | Washing machine |
| Capacity | 6 kg |
| Maximum spin speed | 1000 rpm |
| Programmes | Cotton, Eco 40-60, Synthetic, Mix, Easy care, Shorts, Spin, Rinse & Spin, Drum cleaning |
| Additional functions | Prewash, Start time delay (3/6/9/12/15/18 h), Child lock |
| Water connection | Cold water only, 3/4" hose connection |
| Drain hose length | Approx. 160 cm |
| Installation clearance | Min. 2 cm sides, 10 cm rear |
| Detergent compartments | 3 (main wash, prewash, fabric softener) |
| Lint filter | Located at bottom front; clean every 10 washes |
| Drum cleaning programme | Yes, use regularly with descaler |
| Water inlet strainer cleaning | Every 6 months |
| Safety features | Child lock, automatic door lock, overheating protection (by design) |
| Spare parts availability | 10 years after last model placed on market |
| Warranty | 24 months (12 months for commercial use) |
| Manual languages | DE, EN (others available via email) |
Frequently Asked Questions - WA56110-020A Exquisit
User questions about WA56110-020A Exquisit
0 question about this device. Answer the ones you know or ask your own.
Ask a new question about this device
Download the instructions for your Washing machine in PDF format for free! Find your manual WA56110-020A - Exquisit and take your electronic device back in hand. On this page are published all the documents necessary for the use of your device. WA56110-020A by Exquisit.
USER MANUAL WA56110-020A Exquisit
11.1 Intended use....34
11.2 Misuse....34
11.3 Safety to certain groups of people.... 34
11.4 Residual risks....34
11.5 Safety and warnings 35
11.6 General safety instructions....35
12 Assembly and installation....36
12.1 Align machine 37
12.2 Water inlet and outlet....37
13 Commissioning....38
14 Washing programmes 41
14.1 Programme selection....42
14.2 Washing symbols....44
14.3 Tips for stain treatment 45
16 Cleaning and care....48
17 Troubleshooting / fault rectification....50
18 Customer service....51
19 Warranty conditions....52
20 Disposal 54
21 Customer Service 55
natural_image
Diagram of a washing machine connected to a 30cm pipe with a hose (no text or symbols)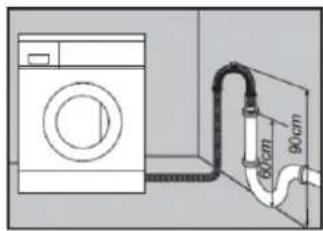
natural_image
Line drawing of a kitchen sink with faucet and sink (no text or symbols)natural_image
Line drawing of a hand holding a circular object with a striped pattern (no text or symbols)natural_image
Diagram of a printer or printer with an arrow indicating left motion (no text or symbols present)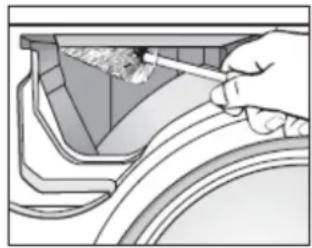
natural_image
Illustration of a hand using a tool to adjust or install a component inside a container (no text or symbols visible)natural_image
Illustration of a hand holding a dial with a faucet and a curved arrow indicating rotation (no text or symbols)Flusensieb reinigen
Be sure to read the operating instructions carefully before using the appliance. The operating instructions contain important safety instructions for the installation, operation and maintenance of the appliance. Correct operation contributes significantly to efficient energy use and minimises energy consumption during operation.
Improper use of the appliance can be dangerous, especially for children.
Keep the instruction manual for future reference and pass it on to any subsequent owners.
The manufacturer is constantly working on the further development of all types and models. Therefore, we reserve the right to make changes in form, equipment and technology.
CE conformity
At the time of its market launch, this device complies with the requirements laid down in the Council Directives on the approximation of the laws of the Member States relating to electromagnetic compatibility RL 2014/30/EU and on the use of electrical equipment within certain voltage limits RL 2014/35/EU.
This appliance is marked with the CE symbol and has a
Declaration of conformity for inspection by the responsible market surveillance authorities.
Get to know the unit Scope of delivery
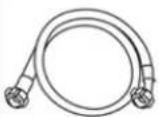 | 1x water inlet hose | 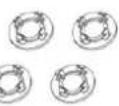 | 4x cover caps |
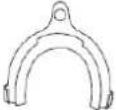 | 1x manifold | 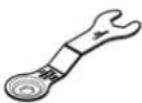 | 1x mounting key |
| 1x instructions for use/assembly | |||
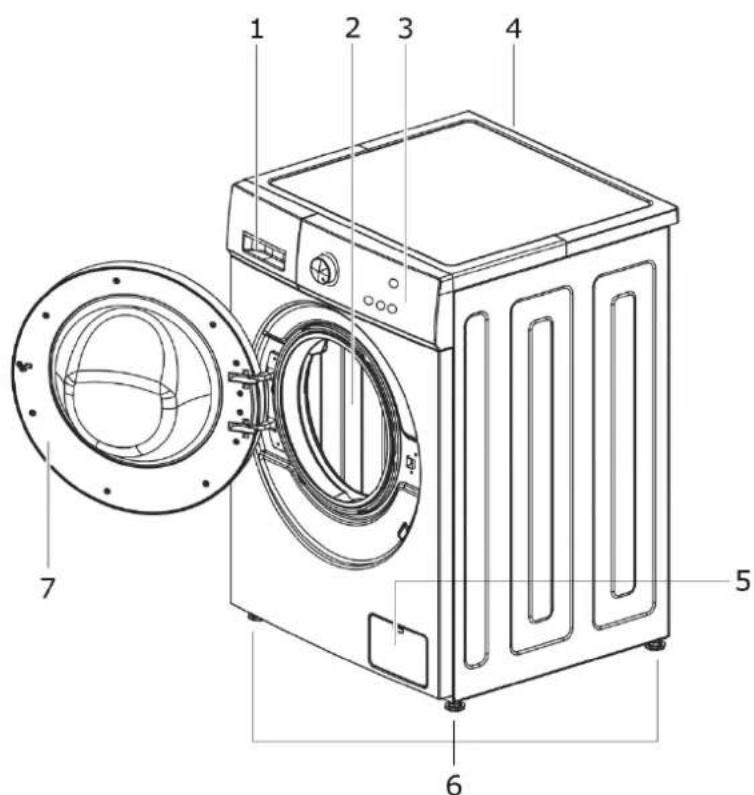
1) Detergent compartment
2) Washing drum
3) Control panel
4) Water connection
5) Flap lint filter
6) adjustable feet
7) Appliance door
Control panel
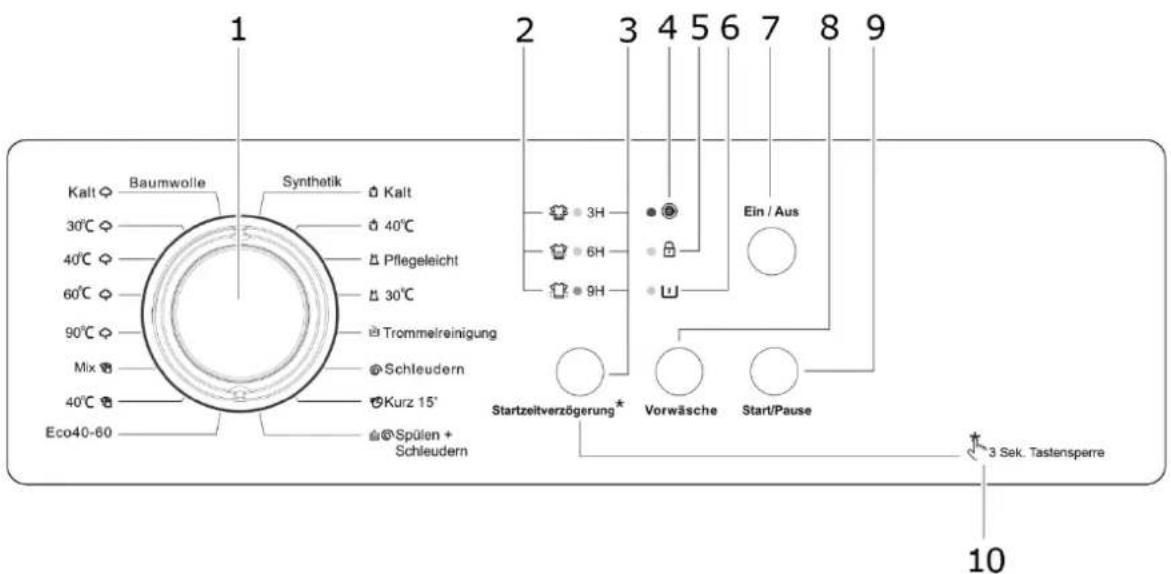
3) LEDs and key Additional function: Start time delay
3H / 6 H / 9H / 12 (3+9) H / 15 (6+9) H / 18 (3+6+9) H
4)

LED door lock
5)

LED child lock
6)

LED prewash
7) On/Off button
8) Additional function: Prewash
9) Start/Pause
10) Additional function: Child lock
| Symbol | Description | Symbol | Description |
| [80YD] | Cotton | [GCW0] | Drum cleaning |
 | Mix |  | Spin |
| Eco40-60 | Cotton | [2367] | Shorts |
 | Synthetic |  | Rinse & Spin |
 | Easy care |
11 Security
All safety instructions in these operating instructions are marked with a warning symbol. They indicate possible dangers at an early stage. Be sure to read and follow this information.
Explanation of the safety instructions

DANGER
Indicates a hazardous situation which, if not avoided, will result in death or serious injury!

WARNING
Indicates a hazardous situation which, if not avoided, may result in death or serious injury!

CAUTION
Indicates a hazardous situation which, if not avoided, may result in minor or moderate injury!
ATTENTION
Indicates a situation which, if not avoided, will result in property damage.

RISK OF ELECTRIC SHOCK!

DANGER OF SCALDING!

FIRE HAZARD!

Information and notes to be observed.
- Marks an enumeration
Marks examination steps in sequence
- Marks work steps in sequence
→ Describes the reaction of the unit to the work step
11.1 Intended use
• Appliance is intended for household use.
- The appliance is suitable for cleaning textiles. Any other use is considered improper.
- Do not operate the appliance in any way other than as described in these operating instructions, otherwise the warranty will not apply in the event of damage.
- Unit is not intended for outdoor use.
- Intended use also includes compliance with the cleaning and care conditions prescribed by the manufacturer. Conversions or modifications to the unit are not permitted for safety reasons.
11.2 Misuse
The following activities are considered misuse and are therefore prohibited:
• The unit is not suitable for commercial use.
- Do not connect the unit to the mains with multiple sockets.
- Do not lay mains cables and hoses under tension.
- Do not bend the mains cable.
- Set up the unit so that the mains plug is accessible.
- Do not pull the mains plug out of the socket by the cable.
• Never pour solvent into the appliance.
- Do not place flammable products or objects wetted with flammable products in or near the appliance.
11.3 Safety to certain groups of people

DANGER
DANGER OF SUFFOCATION!
Packaging parts (e.g. foils, polystyrene) can be dangerous for children. Keep packaging material away from children.

WARNING

Detergent is corrosive! Keep children away.
11.4 Residual risks

DANGER

RISK OF ELECTRIC SHOCK!
- Never touch the mains plug on the electric cable with wet or damp hands when plugging it in or unplugging it.
- In an emergency, immediately pull the mains plug out of the socket.
• Always unplug the appliance from the mains before cleaning or maintenance. - If the mains cable is damaged, have it replaced immediately by the supplier, specialist dealer or customer service. If the cable or mains plug is damaged, do not use the appliance.
- Do not carry out any work on the appliance other than the cleaning and maintenance described in these instructions for use.
11.5 Safety and warnings

DANGER

RISK OF ELECTRIC SHOCK!
Never touch the plug on the electric cable with wet or damp hands when plugging it in or unplugging it.
- Only install and connect the unit according to the instructions for use.
• In an emergency, pull the plug out of the socket immediately. - Do not pull the plug out of the socket by the cable.
• Always unplug the appliance before cleaning or maintenance.
• Have a damaged mains cable replaced immediately by our customer service. - If the cable or plug is damaged, do not use the appliance.
- Do not interfere with the appliance except for the cleaning and maintenance operations described in this manual.
- Do not operate any electrical equipment inside the storage room that has not been approved by the manufacturer.
11.6 General safety instructions
- Before any cleaning or maintenance operation, disconnect the mains plug from the socket or switch off the power supply.
- Have a damaged mains cable replaced immediately by the supplier, specialist dealer or customer service. If the cable or plug is damaged, do not use the appliance.
- Do not interfere with the appliance except for the cleaning and maintenance operations described in this manual.
• Never leave the unit switched on unnecessarily. - Close the water tap when the appliance is not in use.
- Clean the outside of the unit with a damp cloth, do not use abrasive cleaners.
- The appliance door is equipped with an automatic locking system. The appliance door can only be opened approx. 2-3 minutes after the end of the washing process.
- Never open the door by force or when there is still water in the appliance.
- If necessary, the mains cable can be replaced by the customer service.
- Do not reach into the rotating drum. Risk of injury!
ATTENTION
Do not climb on the unit.
12 Assembly and installation
Unpack the unit
The packaging must be undamaged. Check the unit for transport damage. Do not connect a damaged unit under any circumstances. In case of damage, contact the supplier.

WARNING
DANGER OF SUFFOCATION!
Packaging parts (e.g. foils, polystyrene) can be dangerous for children. Keep packaging material away from children!
Remove transport protection
The unit and parts of the interior fittings are protected for transport. Remove all adhesive tapes and transport bolts.
ATTENTION
SURFACE!
There is a risk that the washing machine will fall off the plinth during spinning. When placing the washing machine on an existing plinth (concrete plinth or brick plinth), secure the washing machine by tightening straps.
-
Loosen the four transport bolts with the spanner. Do not dismantle the fixed device of the drain pipe (see fig.).
-
Turn the bolt rubber slightly and then pull it out.
-
Seal the screw holes with the supplied bolt caps.
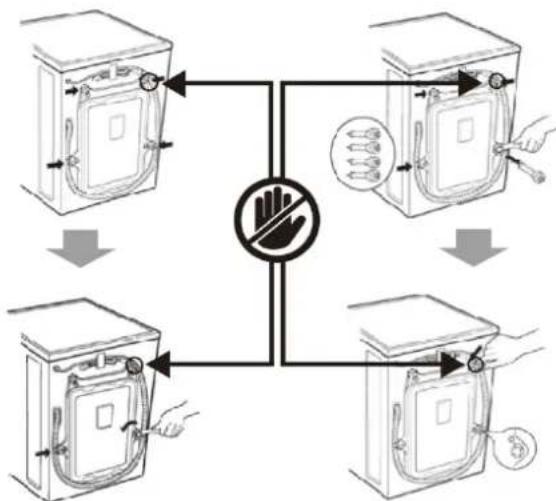
flowchart
graph TD
    A["Top Setup"] --> B["Hand Signal"]
    C["Top Setup"] --> D["Hand Signal"]
    E["Bottom Setup"] --> F["Hand Signal"]
    G["Bottom Setup"] --> H["Hand Signal"]
    I["Bottom Setup"] --> J["Hand Signal"]
    style A fill:#f9f,stroke:#333
    style C fill:#f9f,stroke:#333
    style E fill:#f9f,stroke:#333
    style G fill:#f9f,stroke:#333
    style I fill:#f9f,stroke:#333
    style B fill:#ccf,stroke:#333
    style D fill:#ccf,stroke:#333
    style F fill:#ccf,stroke:#333
    style H fill:#ccf,stroke:#333
    style J fill:#ccf,stroke:#333

➢ Non-disassembled transport bolts cause violent vibrations and noise.
Keep the transport lock for further transport of the unit.
Location of the washing machine
- Check the place where the washing machine is to be installed. Make sure that everything necessary for the correct installation is available.
-
Place the washing machine on a horizontal, solid floor. If the washing machine is placed on an unsuitable floor, strong vibrations, considerable noise and malfunction could result.
-
Leave sufficient free space:
- right and left 2 cm
- rear 10 cm
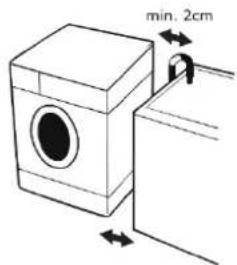

The washing machine must not wobble.
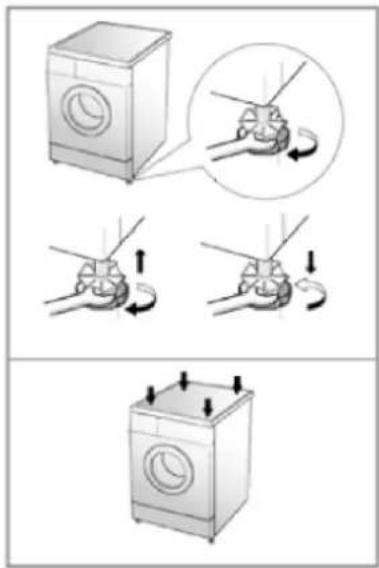
All adjustable feet must be in firm contact with the floor.
Do not place pieces of wood or similar underneath.
12.1 Align machine
It is important to align the machine, otherwise it will vibrate during spinning and the bearings may wear out prematurely. If the floor is slightly uneven, level the machine with the front feet.
Adjust the feet so that the washing machine is balanced and stable on the floor.
- Loosen the lock nut of one foot with the supplied assembly spanner.
- Adjust the height (see fig.).
- Check the horizontal position.
- Adjust another stand.
- Tighten the lock nuts with the assembly spanner.
12.2 Water inlet and outlet
Connect the water inlet hose to the back of the machine.
- Water supply: Cold water only
- Water tap: 34 hose screw connection
There are two seals in the connections of both pipe ends to prevent water from escaping.


Connection diagram - cold water connection
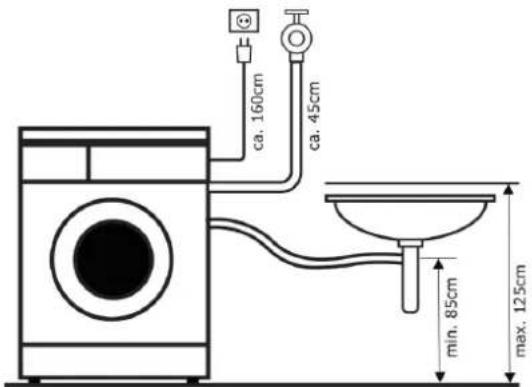
Connect to the water tap using the hose supplied by the manufacturer. Connect the bent end to the back of the appliance and the straight part to the tap.
Use of a manifold
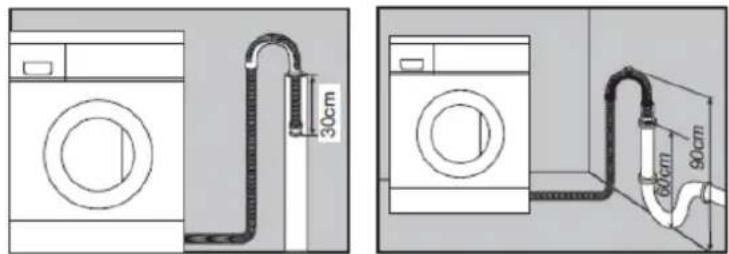
Place the drain hose in position with the elbow.
- Mount the manifold approx. 80 - 100 cm above the floor.
- Ensure that the hose cannot fall to the floor and the escaping water flows off safely.
To prevent water leakage:
Fit a seal to both union nuts and screw them tightly into place. (Seal may already be fitted, please check).
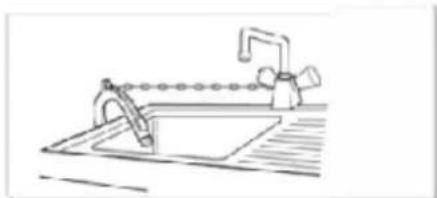
Water drainage
Secure the water drainage hose with a lifting rope (not included in the scope of delivery) if this is directed into a washbasin, for example.
natural_image
Line drawing of a kitchen sink with faucet and sink (no text or symbols)If the washing machine is connected to a built-in pump-out system, check that the latter is
equipped with a vent hole to avoid simultaneous water inflow and pump-out (siphon effect).
13 Commissioning
Electrical connection
Have all electrical connections made by a specialist and in compliance with the manufacturer's instructions and local safety regulations.
- For information on voltage, power consumption and fuse protection, see technical data.
- The connection may only be made via a properly installed and earthed protective contact socket.
- Earthing is required by law.
- The manufacturer declines all responsibility for any damage to persons, pets or property resulting from failure to comply with the above instructions.
- Do not use multiple plugs or extension cables.
- Access to the mains plug must be guaranteed at all times after installation or it must be possible to disconnect from the mains via a two-pole switch.
- Do not operate the washing machine if it has been damaged during transport. In this case, notify the after-sales service.
- Have the mains cable replaced only by the customer service.
- Use the washing machine only in the household and for the specified purpose.
- Switch on the unit by plugging the mains plug into the socket.
First wash
To remove the factory dirt and grease residues from the drum and to avoid soiling the laundry, start a wash cycle with a little detergent, without laundry.
Prepare laundry
- Close zips, press studs and hooks so that they do not get caught in other textiles.
- Remove needles, buckles and other hard objects so that they do not scratch the interior of the washing machine.
- Empty pockets. Roll down cuffs and turn synthetic laundry inside out to avoid linting.
- Tie ribbons and sashes so that they do not get tangled.
• Pre-treat stains. - Separate heavily soiled textiles from lightly soiled ones.
- Separate dark and light colours as well as colour-fast and non-colour-fast textiles.
Load washing drum
- Place laundry loosely in the washing machine so that the textiles are cleaned optimally and remain crease-free.
- Load the washing machine correctly and select the appropriate setting for the amount of laundry.
- Overloading and a setting that is too low for the laundry quantity can occur:
- reduce the washing result,
- promote the formation of creases,
- produce an excessive amount of lint.
- Mix large and small textiles with each load. Distribute everything evenly to maintain balance in the machine. An uneven load can cause the washing machine to vibrate during the spin cycle.
- Shorten the washing time by using a setting for a small laundry load. For a load with only a few small textiles, a shorter wash time is sufficient.
- Never put laundry in the machine that has been sprayed with petrol. Wait until the flammable solvents have evaporated, otherwise the machine could be damaged.
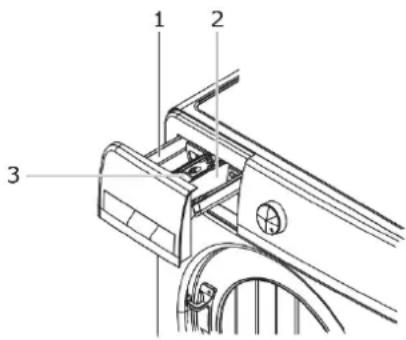
Detergent filling chambers
Use the three detergent dispensing chambers as follows:
1 Detergent for main wash cycle
2 Detergent for prewash
3 Fabric softener
It is important to use the right amount of detergent depending on the type of laundry. This depends on the following factors:
Water hardness
What is the PH value of the water in your region (possibly ask water werk)?
Pollution level
For heavily soiled laundry, use more detergent.
Laundry quantity
The smaller the amount of washing, the smaller the amount of detergent should be.

Do not use detergents containing chlorine and sulphur.
- Follow the dosage recommendation on the detergent pack.
➢ Overdosage leads to extreme foaming.
Underdosing can cause the laundry to turn grey over time.
- Add liquid softener to the softener compartment.
Do not exceed the maximum fill level line. Overfilling can cause the fabric softener to be dispensed too early and stains to appear on the garments.
Do not open the detergent compartment while the water is running.
14 Washing programmes
| Wash Temperatuer optional | Drawer Compartments | Optional function | Maximum load kg | Spin 1/min default | energy consumption kwh/cycle | water consumption litres/cycle | max. temperature | ||
| Prewash (1) | Mainwash (2) | Softner | |||||||
| Cold, 20, 40, 60, 90 | √ | √ | √ | 6 | 1000 | 1/5 | 55 | 82 | |
| Cold, 20, 40, 60 | √ | √ | √ | 6 | 1000 | 3/7 | 35 | 60 | |
| Cold, 20, 40 | × | √ | √ | 4 | 1000 | 1/5 | 55 | 40 | |
| Cold, 20, 40, 60, 90 | × | √ | √ | 5 | 1000 | 1 1/9 | 65 | 82 | |
| 40, 60, 90 | √ | √ | √ | 4 | 1000 | 1 1/9 | 65 | 82 | |
| Cold, 20, 40, 60, 90 | × | √ | √ | 5 | 1000 | 1/5 | 55 | 82 | |
| Cold, 20, 40 | √ | √ | √ | 4 | 1000 | 1/4 | 45 | 40 | |
| Cold, 20, 40 | × | √ | √ | 2 | 800 | 0 | 30 | 40 | |
| 20 | × | √ | √ | 6 | 1000 | 1/2 | 40 | 20 | |
| Cold, 20, 40 | × | √ | √ | 2 | 800 | 0 | 30 | 40 | |
| / | × | × | √ | 6 | 1000 | 0 | 30 | / | |
| / | × | × | × | 6 | 1000 | 0 | / | / | |
| / | × | √ | √ | / | 800 | 0 | 20 | / | |
| Cold,40 | × | √ | √ | 4 | 800 | 2/7 | 35 | 40 | |
| Cold,40 | × | √ | √ | 2 | 800 | 0 | 30 | 40 | |
| Cold,40 | × | √ | √ | 4 | 800 | 1/7 | 35 | 40 | |
14.1 Programme selection
Select the appropriate programme according to the type, quantity and degree of soiling of the laundry to be washed:
| 90 °C | Heavily soiled boiled laundry white, cotton or linen (e.g. cloths, bed linen, aprons) |
| 60 °C | Moderately soiled coloureds, synthetics (e.g. pyjamas)Lightly soiled boiled laundry (e.g. underwear) |
| 40 °C, 30 °C,Cold | Lightly to normally soiled coloureds, synthetics, wool.It is recommended to wash wool cold or at 30 °C. |
Start washing programme
- Put the laundry in the drum.
- Close door.
- Switch on the unit with the On/Off button (7).
- Add detergent to the main wash and prewash compartment. (Only add prewash detergent if a prewash is also selected).
- Set the washing programme with the programme selector (1).
- Press Start/Pause (9) to start the washing process.
- Current programme status lights up (2) and signals wash, rinse or spin.
- When the washing programme has finished, a beep sounds.
| PROGRAMME | CAPACITY | HIGHEST TEMPERATURE WITHIN THE TREATED TEXTILES (°C) | SPIN SPEED | RUNNING TIME MIN. | RESIDUAL MOISTURE % |
| eco 40-60 °C | Nominal capacity | 45 | 1000 | 198 | 60 |
| Half nominal capacity | 40 | 1000 | 156 | 60 | |
| Quarter nominal capacity | 40 | 1000 | 156 | 64 |

➢ Turn on the water connection before starting the washing machine.
While the washing programme is active, there is no possibility to select an additional function.
Prewash
For particularly heavily soiled laundry with strong stains (blood, protein stains, etc.), select a prewash before the wash programme.
- Set the washing programme with the programme selector (1).
- Press the Prewash button (8).
- Press Start/Pause (9) to start the pre-wash process.

The Prewash function can be selected with all programmes except Drum cleaning, Spin, Short and Rinse+Spin.
Start time delay
Select this function to start the washing programme at a later time.
Activate
- Select the wash programme (1).
- Press the Start time delay key (3) to set the desired start time in hours.
Press 1x 3H / press 2x 6 H / press 3x 9H / Press 4 times 12 (3+9) H / Press 5 times 15 (6+9) H / Press 6 times 18 (3+6+9) H - Press the Start/Pause key (9).
- Washing programme with start time delay is activated.
Pick up
If you want to cancel the start time delay function, press one cycle of the Start time delay button.

When the start time delay is activated, the drum can be accessed during the phase before the start of the wash cycle.
Child lock
Set child lock to prevent children from using the washing machine or reprogramming settings.
Activate/deactivate
- When the machine has started a washing programme, press the Delay start time button (3) for at least 3 sec.
- All buttons except the On/Off button (6) are locked.
- Press the Start time delay key (3) for at least 3 sec. to cancel the child lock again.
When the machine has finished the washing programme, all buttons except the On/Off button (6) are locked if the child lock is active.
- Therefore, switch off the machine with the On/Off button (6) and then switch it on again.
- Now press the Start time delay button (3) for at least 3 sec. to release the child lock.
Drum cleaning
Drum cleaning is a special wash cycle for cleaning the inside of the washing machine. This wash cycle uses a higher water level and a higher spin speed. Perform this wash cycle regularly.
- Start wash cycle
- Empty drum
-
Open the detergent compartment and fill in descaler in the main detergent compartment I.
-
Switch on the washing machine with the On/Off button (7).
- Select programme Drum cleaning
- Press the Start/Pause button (9) and start the programme.
7.

Do not add extra detergent to the detergent drawer. This could cause the appliance to overflow.
14.2 Washing symbols
The textile care symbols commonly used in Europe today were introduced by the International Organisation for Textile Care Marks HGINETEXH (Groupement International d'Etiquetage pour l'Entretien des Textiles) based in Paris in 1975. They are laid down in an ISO standard (ISO 3758) of 1991 and the Euro standard EN 23758 of 1994. This standard is binding for all European countries (EU) and also applies in Switzerland and Israel.
Washing
| 60 | Machine wash. The number indicates the highest possible washing temperature. |
| 40 | Machine wash. The bar under the container means gentle spin. |
| 30 | Machine wash. Interrupted bar (sometimes also double bar):Particularly gentle washing - only delicate wash cycle or wool wash cycle (at 30 degrees, other temperatures accordingly). |
 | Hand wash. (cold or lukewarm, max. 40 °C, better 30 °C). |
 | Cold wash(No symbol according to ISO 3758; however, often used) |
 | Do not wash (this usually means: clean) - sometimes the St. Andrew's cross is replaced by an x or xx. |
 | No hand wash |
 | Do not wring, this symbol is not common in Europe, but is mainly used in Japan. |
Bleaching
Bleaching with chlorine is no longer common. If bleaching is explicitly prohibited, however, you should also use stain salts and bleaching stain removers with caution.

Bleaching allowed

Chlorine bleach possible

Chlorine bleaching not possible (Bleaching with chlorine is no longer common).
Ironing

Hot ironing - maximum temperature: 200 °C

Warm ironing - maximum temperature: 150 °C

Ironing lukewarm - maximum temperature: 110 °C
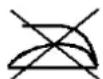
Do not iron
Dry cleaning

Gentle cleaning (two bars: extremely gentle cleaning)

Cleaning with all commonly used solvents (obsolete, no longer permitted)

Cleaning with hydrocarbon solvent

Cleaning with perchloroethylene

Professional wet cleaning

No dry cleaning
Drying laundry

Drum drying possible

Drum drying at high temperatures

Drum drying at low temperature

Do not tumble dry
14.3 Tips for stain treatment
- Stained, heavily soiled or oily textiles must be pre-treated or soaked if necessary.
- Soaking helps remove protein-based stains such as blood, milk or grass.
• Pre-treatment helps to loosen soiling before washing. - Use warm water to soak or pre-treat laundry with stains. Hot water can fix stains.
- Most stains are easier to remove when they are still fresh.
- Before treating the stain, clarify what kind of stain it is, how old the stain is, what fabric it is and whether this fabric is colourfast. (Check the care label).
- Washing and drying can fix certain stains.
- Start with cold or warm water.
- If bleach is recommended, use an agent that does not affect the fabric.
- Place the affected area with the stain facing downwards on a paper towel or white cloth.
- Apply stain remover to the stain from behind. This way the stain is pressed out of the fabric instead of through it.
| Blood | Rinse immediately in COLD water. If the stain remains stubborn, soak in cold water with gall soap |
| Chewing gum | Let the chewing gum harden with ice in a plastic bag. Scrape off as much as possible and dab with benzine. |
| Cocoa, chocolate | Dab with COLD water and soak with bile soap. If the stain remains stubborn, rub in a little detergent and rinse in cold water. |
| Coffee | Wipe quickly and rinse in COLD water. Rub in a little detergent and wash at the maximum temperature allowed for the fabric. |
| Cream/Milk | Wipe quickly and rinse in COLD water. Rub in a little detergent and wash at the maximum temperature allowed for the fabric. |
| Ice cream | If the stain is still visible, dab with benzine. |
| Deodorant | Rub affected area with vinegar and then rinse in COLD water. Dab with benzine. Treat stiff areas with bile soap. |
| Egg | Soak with COLD bile soap, rinse and wash normally. |
| Fabric softener | Rub affected area with a bar of soap and wash normally. |
| Fruit stains | Treat as soon as possible by dabbing with COLD water. Rub a little detergent into the stain and wash normally. |
| Grass | Dab the spot with benzine. Rub in bile soap and wash normally. |
| Grease and oil | Place the affected area with the stain facing downwards on an absorbent cloth and treat from the back. Dab with petroleum ether or dry cleaning agent . Wash normally. |
| Iron or rust | Apply lemon juice and salt and place in the sun. Wash normally. |
| Lipstick | Dab with denatured alcohol and wash normally. Wash in WARM water with detergent. Dampen spot with lemon juice, let dry in the sun and wash normally. If the stain remains stubborn and the fabric allows it, use bleach. |
| Mud | Brush off dried mud. Rinse in cold water. If the stain remains stubborn, rub in some detergent and wash normally. |
| Oil paints | Scrape off fresh paint, dab with a non-flammable dry cleaning agent and wash normally. |
| Watercolours | Treat garment while still damp, rinse in WARM water and wash normally. |
| Burn marks | Dampen cloth with hydrogen peroxide, place on affected area and iron hot over it. |

DANGER
RISK OF ELECTRIC SHOCK!
Always unplug the appliance from the mains before cleaning or maintenance.
Do not place heavy objects or heat sources on the top plate of the washing machine to avoid deformation of the top plate.
- Use a soft cloth and a little detergent to wash the outside of the housing. Do not use petrol or other organic solvents for cleaning so as not to damage the surface.
- The porthole becomes very hot at high washing temperatures. Keep babies and children in general away from the machine.
- Never use the appliance near flammable and explosive gases.
- A damaged mains cable must be replaced by the manufacturer or its approved technical service.
Clean housing
- Proper care of the appliance can increase its lifespan.
- Clean the housing with a soft cloth and, if necessary, with a little mild detergent solution and then rub dry.
- Wipe away excess water immediately.
Clean drum
- If rust appears inside the drum due to metal parts, remove it immediately with chlorine-free cleaning agents.
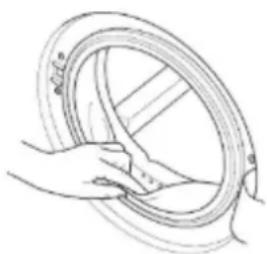
Clean the door sealing ring
After washing, check the door seal ring and remove paper and foreign objects if necessary.
natural_image
Line drawing of a hand holding a circular tire with a ring (no text or symbols)Clean detergent filling chambers
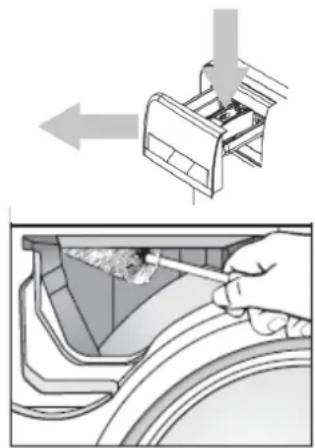
After a certain time, detergent and fabric softener leave behind residues in the detergent filling chambers.
- Pull out the detergent compartment.
- Remove the insert of the fabric softener compartment. To do this, press the latch of the insert downwards, see arrow.
- Lift the insert upwards and remove it.
- Clean all chambers of the detergent compartment under running water.
- Detergent may also accumulate in the rear opening of the detergent compartment. Clean off detergent residues with a brush as needed.
- Replace the insert for the fabric softener chamber
- Insert the detergent compartment into the washing machine and close it.
natural_image
Diagram showing a hand using a tool to clean or remove a material inside a waste bin (no text or symbols present)Clean water inlet strainer
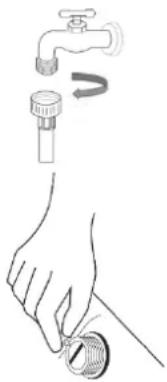
After a certain time, detergents and fabric softeners leave behind residues. It is therefore recommended that the following cleaning is carried out every six months/year.
- Pull out the mains plug.
- Remove the inlet hose from the water tap.
- Clean the water inlet strainer under running water.
- Reconnect the strainer.
- Unscrew the water inlet from the back of the unit.
- Remove the filter net from the water valve.
- Clean the sieve under running water.
- Replace the sieve.
- Screw the water inlet back in.
- Open the water supply and make sure that the connection is tight.
natural_image
Illustration of a hand holding a dial indicator with a faucet and scroll (no text or symbols)Clean the lint filter
The lint filter is used to catch foreign objects such as threads, coins, needles, buttons, etc. If the lint filter is not cleaned in time (every 10 washes), a drainage problem could occur.
- Pull out the mains plug.
- Open the flap (5) at the bottom right of the front of the unit.
- Pull out the drain hose and let the water drain into a container provided.
- Unscrew the lint filter counterclockwise.
- Remove all foreign bodies from the strainer.
- Replace the lint filter after cleaning and turn it clockwise until it is tightly closed again.
- Close the flap (5) again.
17 Troubleshooting / fault rectification
| PROBLEM | CAUSE/REMEDY |
| Door cannot be opened | A washing programme is running.Clothes are caught between the door and the door seal. |
| Washing machine does not start | Is there a power failure?Is the mains cable correctly plugged into a socket?Have you switched on the machine?Did you press the Start/Pause button?Is a start time delay programmed? |
| Laundry is not spun at all or not spun sufficiently | A programme without spinning or with reduced spinning speed is programmed.The spin safety device has detected poor distribution of laundry in the drum: Re-load the laundry and programme a new spin cycle. |
| Washing machine vibrates and is too loud | Is the drain hose placed higher than 1 m above the floor?Have the transport locks been removed? |
| Washing machine does not pump out the water | Has a flush stop been programmed?Is the drain hose frozen or blocked by dirt?Is the drain hose kinked or deformed?Is the end of the drain hose immersed in water?Is there excessive dirt in the lint filter? |
| Drum is blocked | Check if a piece of laundry is trapped. |
| PROBLEM | LED | CAUSE/REMEDY | |||
 |  |  |  | ||
| Water inlet |  | ● | ○ | ○ | Is the inlet hose connected and the water tap turned on?Is the inlet hose kinked or frozen?Has the water supply been turned off?Is the strainer of the inlet hose clogged by foreign objects? |
| Water on the floor |  | ○ | ● | ○ | Pull out the mains plug and close the water supply.Check seals and screw connections of the water supply hose |
| Appliance door |  | ○ | ○ | ● | Check that the door is closed correctly. |
| Slingshot problem |  | ● | ○ | ● | Have the transport locks been removed?Is the machine set up stably?Are the lock nuts of the adjustable feet tightened? |
| Water runs out continuously |  | ● | ● | ○ | Close the stopcock, disconnect the mains plug and contact customer service. |
| No heating up |  | ● | ● | ● | Pull out the mains plug and contact customer service |
| No skidding |  | ○ | ○ | ○ | |
18 Customer service
The visit of the service technician in case of incorrect operation or one of the described malfunctions is not free of charge even during the warranty period.
Responsible customer service:
Customer telephone
Enter repair orders online.
Have the following information ready for a quick processing of the repair order:
1) Model
2) Batch
as well as the complete address, telephone number and the error description.
Unit-specific information can be found on the type plate inside or on the back of the unit.
(3) Motor and motor carbons; power transmission between motor and drum;
pumps;shock absorbers and springs; washing drum, bearing cross with ball bearings (individually or as a repair kit);
Radiators and heating elements, including heat pumps (individually or as a repair kit); Piping and associated equipment, including all hoses, valves, filters and aquastops (individually or as a repair kit); Circuit boards
Electronic displays; pressure switches; thermostats and sensors
Software and firmware, including reset software.
(4) Door, door hinge and door seals, other seals, door latch assembly and plastic accessories such as detergent dispenser.
19 Warranty conditions
As the purchaser of an Exquisit appliance, you are entitled to the statutory warranty from the purchase contract with your dealer. In addition, we grant you a warranty under the following conditions:
Duration of benefits
The guarantee runs for 24 months from the date of purchase (proof of purchase must be presented). During the first 6 months, the customer service will repair defects in the unit free of charge. The prerequisite is that the unit is accessible for repairs without special effort. In the further 18 months, the purchaser is obliged to prove that the defect already existed at the time of delivery.
In the case of commercial use (e.g. in hotels, canteens) or shared use by several households, the guarantee is 12 months from the date of purchase (proof of purchase must be presented). During the first 6 months, the customer service will repair any defects in the appliance free of charge. The condition is that the appliance is accessible for repairs without special effort. In the further 6 months, the purchaser is obliged to prove that the defect already existed at the time of delivery.
Making a claim under the guarantee does not extend the guarantee for either the appliance or the newly installed parts.
Scope of the rectification of defects
Within the aforementioned periods, we shall remedy all defects in the unit that are demonstrably due to defective workmanship or material defects. Replaced parts become our property.
Excluded are:
Normal wear and tear, deliberate or negligent damage, damage caused by non-observance of the operating instructions, improper set-up or installation or by connection to the wrong mains voltage, damage due to chemical or electrothermal effects or due to other abnormal environmental conditions, glass, paint or enamel damage and possible colour differences as well as defective light bulbs.
Defects to the appliance which are due to transport damage are also excluded. We will also not provide any services if - without our special written approval - work has been
carried out on the Exquisit device by unauthorised persons or if parts of foreign origin have been used. This restriction does not apply to defect-free work carried out by a qualified specialist using our original parts to adapt the appliance to the technical protection regulations of another EU country.
Scope
Our guarantee applies to appliances purchased and in operation in the Federal Republic of Germany or Austria.
In the case of complaints about defective devices, the sender and recipient addresses must be in the Federal Republic of Germany or Austria.
For units purchased and operated in other European countries, the warranty conditions of the seller apply.
The following applies to repair orders outside the warranty period:
If a unit is repaired, the repair invoices are due immediately and payable without deduction.
If a unit is checked or a repair that has been started is not completed, travel and labour charges will be invoiced.
Advice from our Customer Advisory Centre is free of charge (see chapter Customer Service).
Dispose of packaging
Dispose of the packaging according to type. Put cardboard and carton in the waste paper collection and foil in the recyclables collection.
Dispose of old appliance (EN)
Old appliances must not be disposed of with household waste
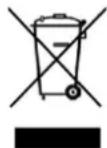
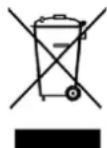
The symbol of the crossed-out wheeled bin on the product or its packaging means that the appliance must not be disposed of with household waste but requires separate disposal. You can take the old appliance free of charge to a suitable municipal collection point for waste electrical and electronic equipment, e.g. a recycling centre.
You can obtain the addresses from your city or local government.

Alternatively, you can return small WEEE with an edge length of up to 25 cm free of charge to retailers with a sales area for electrical and electronic equipment of at least 400 m2 or food retailers with a total sales area of at least 800 m2 who offer electrical and electronic equipment at least several times a year.
Larger old appliances can be returned free of charge to an appropriate dealer when a new appliance of the same type is purchased that performs substantially the same functions as the new appliance. For the modalities of returning an old appliance in case of delivery of the new appliance, please contact your dealer.
Please remove - if possible - all batteries and accumulators as well as all lamps that can be removed without destroying them before disposing of the product.
We would like to point out that you are responsible for deleting personal data on the device to be disposed of.
Children are often unable to recognise the dangers inherent in handling household appliances.
Provide the necessary supervision and do not let children play with the appliance.
Dispose of old appliances (AT)
The symbol of the crossed-out wheeled bin on the product or its packaging means that the appliance must not be disposed of with household waste but requires separate disposal. You can take the old appliance free of charge to a suitable municipal collection point for waste electrical and electronic equipment, e.g. a recycling centre. You can obtain the addresses from your city or municipal administration. Alternatively, you can
return WEEE free of charge when buying a new appliance of the same type and with the same function from a stationary retailer. Please contact your dealer regarding the modalities of returning an old appliance in case of delivery of the new appliance.
Please remove - if possible - all batteries and accumulators as well as all lamps that can be removed without destroying them before disposing of the product.
We would like to point out that you are responsible for deleting personal data on the device to be disposed of.
The appliance may contain substances that can endanger the environment and human health if disposed of incorrectly. Material recycling helps to reduce waste and conserve resources. By collecting old appliances separately and recycling them, you help prevent negative impacts on the environment and human health.
21 Customer Service
If the fault has not been rectified using the above instructions, contact After Sales Service. On no account should you carry out any further work, particularly not on the electrical parts of the appliance.

- A visit by an After Sales Service technician is not free of charge even during the warranty period in the event of incorrect operation or one of the faults described above.
Responsible After Sales Service:
EGS GmbH
Dieselstraße 1
33397 Rietberg / GERMANY
Service telephone
for Germany 02944 9716-791
for Austria 0820 200 170
for Belgium, Netherlands, Luxembourg +49 2944 9716-791
E-mail: kontakt@egs-gmbh.de
Internet: www.egs-gmbh.de
Enter repair orders online
Keep the following information ready for quick processing of the repair order:
- Model
- Batch
together with your full address, telephone number and a description of the fault.
The appliance-specific data can be found on the type plate inside the appliance or on the rear of the appliance.
Spare parts
The following spare parts are available from After Sales Service (depending on the appliance):
- Motor and motor carbons; power transmission between motor and drum; pumps; shock absorbers and springs; washing drum, bearing cross with ball bearings (individually or as a repair kit);
- Radiators and heating elements, including heat pumps (individually or as a repair kit); piping and associated equipment, including all hoses, valves, filters and aquastops (individually or as a repair kit); circuit boards
- Electronic displays; pressure switches; thermostats and sensors
- Software and firmware, including reset software
- Door, door hinge and door seals, other seals, door lock assembly and plastic accessories such as detergent dispenser
Spare parts are available 10 years after the last appliance of a model has been placed on the market.
exquisit
GGV HANDELSGES. MBH & CO. KG
AUGUST-THYSSEN-STR. 8
D-41564 KAARST
GERMANY
WA56110-020E_BDA_DE-EN_E1-1_REV1_2024-02-M.DOCX
- Assembly and installation....36
- Commissioning....38
- Washing programmes 41
- Flusensieb reinigen
- CE conformity
- Get to know the unit Scope of delivery
- Security
- Explanation of the safety instructions
- DANGER
- WARNING
- CAUTION
- ATTENTION
- Intended use
- Misuse
- Safety to certain groups of people
- DANGER OF SUFFOCATION!
- Residual risks
- RISK OF ELECTRIC SHOCK!
- Safety and warnings
- General safety instructions
- Assembly and installation
- Unpack the unit
- Remove transport protection
- SURFACE!
- Location of the washing machine
- Align machine
- Water inlet and outlet
- Connection diagram - cold water connection
- Use of a manifold
- Water drainage
- Commissioning
- Electrical connection
- First wash
- Prepare laundry
- Load washing drum
- Detergent filling chambers
- Water hardness
- Pollution level
- Laundry quantity
- Programme selection
- Start washing programme
- Prewash
- Start time delay
- Activate
- Pick up
- Child lock
- Activate/deactivate
- Drum cleaning
- Washing symbols
- Bleaching
- Ironing
- Dry cleaning
- Drying laundry
- Tips for stain treatment
- Do not place heavy objects or heat sources on the top plate of the washing machine to avoid deformation of the top plate.
- Clean housing
- Clean drum
- Clean the door sealing ring
- Clean detergent filling chambers
- Clean water inlet strainer
- Clean the lint filter
- Customer service
- Responsible customer service:
- Customer telephone
- Warranty conditions
- Duration of benefits
- Scope of the rectification of defects
- Excluded are:
- Scope
- Dispose of packaging
- Dispose of old appliance (EN)
- Dispose of old appliances (AT)
- Customer Service
- Responsible After Sales Service:
- Enter repair orders online
- Spare parts
- exquisit
Brand : Exquisit
Model : WA56110-020A
Category : Washing machine