
KAC-TCH-10 - Meeting room controller Kramer - Free user manual and instructions
Find the device manual for free KAC-TCH-10 Kramer in PDF.


| Product Type | Meeting Room Controller |
| Model | Kramer KAC-TCH-10 (also known as AudioCodes RX-PAD) |
| Display | 8-inch high-resolution touch LCD |
| Power Supply | Power over Ethernet (PoE) or external power adapter |
| Connectivity | Ethernet, Bluetooth, Dual-band Wi-Fi |
| Operating System | Android 12 (customized for Teams) |
| Compatibility | Microsoft Teams Rooms on Android (e.g., RXV81, RXV200) |
| Main Functions | One-click join meeting, integrated calendar, camera control (PTZ and Auto-Framing), remote keyboard, pop-up message mirroring, proximity sensor wake-up |
| Dimensions (approx.) | 200 mm x 140 mm x 20 mm (estimated based on 8-inch tablet) |
| Weight (approx.) | 400 g (estimated) |
| Security Features | Kiosk mode, screen lock, disabled ADB, no web browser, encrypted file system, certificate-based authentication, remote management via Teams Admin Center or AudioCodes Device Manager |
| Maintenance & Cleaning | Clean with a soft, dry cloth. Do not use harsh chemicals or abrasive materials. |
| Spare Parts & Repairability | Not user-serviceable. Contact AudioCodes support for repairs or replacement. |
| Environmental Compliance | WEEE EU Directive compliant. Dispose of electronic waste at local recycling centers. |
| Manufacturer | Distributed by Kramer under license from AudioCodes Ltd. |
| Warranty | Standard limited warranty. Check with your reseller for details. |
Frequently Asked Questions - KAC-TCH-10 Kramer
User questions about KAC-TCH-10 Kramer
0 question about this device. Answer the ones you know or ask your own.
Ask a new question about this device
Download the instructions for your Meeting room controller in PDF format for free! Find your manual KAC-TCH-10 - Kramer and take your electronic device back in hand. On this page are published all the documents necessary for the use of your device. KAC-TCH-10 by Kramer.
USER MANUAL KAC-TCH-10 Kramer
User's and Administrator's Manual
KAC-TCH-10 Meeting Room Controller
Version 2.2
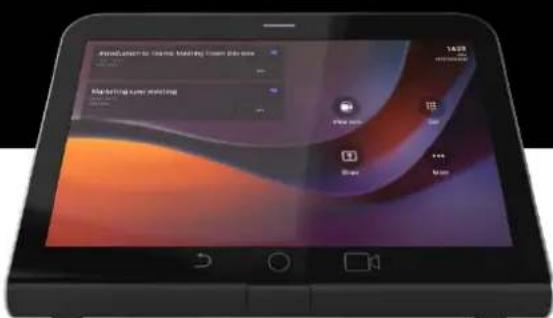

natural_image
Black laptop with 'AudioCodes' and 'Lromer' branding on front panel (no visible text beyond logos)In this Manual, the following marketing names are interchangeable:
| KAC-TCH-10 | RX-PAD |
| KAC-CU-200 | RXV-200 |
| KAC-BAR-81 | RXV-81 |
| KAC-CAM-50M | RXVCam50M |
| KAC-CAM-CC-10 | RXVCam10CC |
| KAC-SPK-15 | RX-15 |
| KAC-SPK-40 | RX-40 |
| KAC-SCD-10 | RX-PANEL |
Table of Contents
1 Introduction......7
1.1 Highlights....7
1.2 Specifications....8
1.3 Connectivity 8
1.4 Managing RX-PAD......8
1.5 Security Guidelines 9
1.5.1 Microsoft Teams Security Guidelines ......9
1.5.2 Android Level Security Hardening 9
1.5.2.1 Google Play Services 9
1.5.2.2 Running Android in Kiosk Mode 9
1.5.2.3 Screen Lock....10
1.5.2.4 AudioCodes Private Key....10
1.5.2.5 Android Debug Bridge (ADB) 10
1.5.2.6 App Signing 10
1.5.2.7 Web Browser 10
1.5.2.8 Remote Configuration Management 10
1.5.2.9 AudioCodes Device Manager Validation....10
1.5.2.10 Sandboxing....11
1.5.2.11 Keystore 11
1.5.2.12 Device Certificate 11
1.5.2.13 Data Protection....11
1.5.2.14 Device File System....11
1.5.2.15 Debugging Interface 11
1.5.3 Android Security Updates....11
1.5.4 AudioCodes Root CA Certificate 12
2 Getting Started....13
2.1 Setting up RX-PAD 13
2.2 Signing in to RX-PAD....13
2.3 Pairing RX-PAD with MTR 13
2.4 After Pairing....13
3 Operating RX-PAD....15
3.1 Operating with the Remote Keyboard 15
3.2 Managing Popup Messages.... 16
3.3 Adjusting MTR Camera Settings 17
3.4 Configuring a Bundle....20
3.5 Configuring Ad Hoc Mode on RXV81 21
4 Configuring User Settings 23
4.1 Accessibility 23
4.2 Setting Live Captions 23
4.3 Hiding Names and Meeting Titles....23
4.4 Reboot 24
4.5 About 24
5 Debugging....25
5.1 Log Settings | Collecting Logs 26
5.2 Remote Logging....28
5.3 Diagnostic Data....29
5.4 Reset configuration....30
5.5 Restart Teams app .... 30
5.6 Company Portal Login....30
5.7 Getting Company Portal Logs 30
5.8 Launch Mobile Teams....31
5.9 Debug Recording 31
5.10 Restoring to Defaults....32
5.11 Erase all data (factory reset) 32
5.12 Screen Capture 33
5.13 Performing Recovery Operations 33
5.14 Restoring Device Firmware via USB Disk 34
6 Updating Microsoft Teams Devices Remotely 35
Notice
Information contained in this document is believed to be accurate and reliable at the time of printing. However, due to ongoing product improvements and revisions, AudioCodes cannot guarantee accuracy of printed material after the Date Published nor can it accept responsibility for errors or omissions. Updates to this document can be downloaded from https://www.audiocodes.com/library/technical-documents.
This document is subject to change without notice.
Date Published: Oct-18-2023
WEEE EU Directive
Pursuant to the WEEE EU Directive, electronic and electrical waste must not be disposed of with unsorted waste. Please contact your local recycling authority for disposal of this product.
Customer Support
Customer technical support and services are provided by AudioCodes or by an authorized AudioCodes Service Partner. For more information on how to buy technical support for AudioCodes products and for contact information, please visit our website at https://www.audiocodes.com/services-support/maintenance-and-support.
Stay in the Loop with AudioCodes


Abbreviations and Terminology
Each abbreviation, unless widely used, is spelled out in full when first used.
Documentation Feedback
AudioCodes continually strives to produce high quality documentation. If you have any comments (suggestions or errors) regarding this document, please fill out the Documentation Feedback form on our Web site at http://online.audiocodes.com/documentation-feedback.
Related Documentation
| Document Name |
| RXV81 RXV200 RX-PAD RX-PANEL Release Notes |
| RX-PAD Meeting Room Controller Quick Guide |
| Pairing RX-PAD with Teams Rooms on Android AudioCodes Devices |
| RXV81 MTR User & Admin Manual |
| RXV200 MTRA Compute User & Admin Manual |
| RXV200 Microsoft Teams Rooms Bundles Quick Guide |
| Device Manager User & Admin Manual |
Document Revision Record
LTRT Description
18320 Initial document release.
18321 Reset pinhole button
1 Introduction
The AudioCodes RX-PAD Meeting Room Controller is a center-of-room intuitive touch controller that provides complete and straightforward access to AudioCodes meeting room solutions.
With its proximity sensor, ergonomic design and 8-inch high-resolution display, this high-quality controller enables simple and intuitive operation with extensive customization options.
RX-PAD Meeting Room Controller offers innovative features such as one-click-to join with an integrated calendar for simple collaboration initiation, smooth content sharing and easy camera adjustments, among others.
Part number: TEAMS-RX-PAD – MSRP
1.1 Highlights
Leverages plug-and-play simplicity to deliver a productive and familiar Microsoft Teams meeting experience requiring connection with just a PoE cable.
Features functions that are readily accessible to all participants with easy access to camera settings via onscreen navigation buttons that put all AudioCodes meeting room solutions at your fingertips.
■ Paired with the main MTR unit which runs the Teams Room application on Android
■ Compatible with the AudioCodes RXV81 MTR on Android and RXV200 MTR on Android.
■ High-resolution 8-inch touch LCD
■ Supported by OVOC Device Manager, enabling monitoring/upgrading from anywhere.

| Speedy collaboration initiation. One-click-to-join for easy collaboration. | |
| An inbuilt calendar to quickly set or join meetings | |
| A single cable connection keeps your desk clean and tidy | |
| Innovative ergonomic design for seamless operation | |
 | High-resolution, eight-inch touch LCD |
 | Human sensor |
 | Cable compartment |
 | POE or power enabled |
 | Dual-band Wi-Fi and Bluetooth support |
 | Android 12 |
1.2 Specifications
See the RX-PAD Datasheet for more information.
1.3 Connectivity
RX-PAD must be paired with the 'main MTR unit', for example, RXV81 or RXV200, to be active. RXV81 | RXV200 is the Front of the Room MTR main unit.
RX-PAD runs the main client and MTR processing (audio, video, sharing)
The main unit (RXV81 | RXV200) can run as a standalone (using remote / keyboard / mouse) or paired with the controller
■ Both RX-PAD and RXV81 | RXV200 share the same MTR license and account
The user signs in on both RX-PAD and RXV81 | RXV200, to the same account
Configuration is 'shared' between the Room Controller and the main unit

1.4 Managing RX-PAD
Admins can use AudioCodes Device Manager to manage RX-PAD. Management includes (but is not limited to):
Monitoring
■ Firmware management / upgrade
- Alarm management

Note: For more information, see the Device Manager User & Admin Manual.
1.5 Security Guidelines
The RX-PAD is an AudioCodes Native Teams Android-based device purpose-built and customized for Teams calling and meeting and designed to enhance security as part of the default use.
Though customers might see Android-based systems as prone to security issues, security is much less a concern on devices that are purpose-built for Teams meeting and calling.
When analyzing the security of the device there are two levels that should be addressed:
■ Authentication and security with regards to Teams connectivity and use
■ Android level / system of the device
1.5.1 Microsoft Teams Security Guidelines
Following are AudioCodes' recommendations with regards to device security:
- Use “sign-in with other device option” – using this mode the user does not type the password on the device, instead obtains a code to be used to sign-in on his PC/laptop; the device obtains a private token that enables it to access Teams cloud; this token, unlike a password, allows only that device which obtained it to reuse it. The token is stored on the secured file system.
- Leverage Multi-Factor-authentication (MFA) to improve the security of the sign in.
- IT can consider reducing the expiration time of the sign in for devices which are connected remotely (outside the organization network) vs devices in the organization premise.
- Visit Microsoft technical pages and learn more on security guidelines and policies for Microsoft Teams adoption:
• Overview of security and compliance - Microsoft Teams | Microsoft Docs
• Identity models and authentication for Microsoft Teams - Microsoft Teams | Microsoft Docs
• Sign in to Microsoft Teams - Microsoft Teams | Microsoft Docs
1.5.2 Android Level Security Hardening
This section describes the major changes performed on the system/Android level that were incorporated into the device to improve its security.
1.5.2.1 Google Play Services
Goggle Play services were removed from the device software – no access is allowed to any Google store or Play services.
The device update of the Android software and application is done via special software components that either connect into Teams Admin Center or to AudioCodes Device Manager over secured channel.
1.5.2.2 Running Android in Kiosk Mode
Android Kiosk Lockdown software is the software that locks down the Android devices to just allow the essential apps by disabling access to the Home/Launcher. Using Android Kiosk Lockdown software, the Android devices can be converted into public kiosk terminals or secured work devices.
Only specific Microsoft apps and AudioCodes signed apps that were certified and approved in the certification process can run under the Kiosk mode; even if a malicious user managed to install a new un-authorized app on the file system – the launcher on the device will only run those specific approved apps and this cannot be changed in run time (only with new software code that is provided by AudioCodes).
1.5.2.3 Screen Lock
AudioCodes Native Teams devices use a screen lock mechanism to prevent any malicious user/users from gaining access to Calendar information and / or Active Directory list of employees and / or triggering unauthorized Teams calls from the device. After enabling screen lock, the device automatically locks after a preconfigured period; a code is required to unlock the device and resume full operation.
1.5.2.4 AudioCodes Private Key
The system software on the device is signed with AudioCodes private key – users can replace the complete software only with new software that is also signed by the AudioCodes private key. This prevents the user from replacing the complete OTA package of the device with any new system software unless this software has been fully signed by AudioCodes.
1.5.2.5 Android Debug Bridge (ADB)
AudioCodes disables the Android Debug Bridge (ADB) application and keeps the Teams app running in the front all the time, which means there is no way to install other Apps from unknown sources and sideloading.
1.5.2.6 App Signing
Android requires that all apps are digitally-signed with a developer key before installation; currently the device verifies that the apps are signed by Microsoft. App signing prevents malicious user/users from replacing a Microsoft-signed app with an app that "pretends" to be Microsoft but which lacks the private key that is known only to Microsoft.
1.5.2.7 Web Browser
The device does not include a Web browser – users cannot browse to the public internet or internal intranet– all Web services are customized to connect to O365 services and AudioCodes managed services such as One Voice Operations Center (OVOC).
Without a web browser, malicious user/users will not be able to access the device and browse from it as a trusted device into the customer network.
1.5.2.8 Remote Configuration Management
The Native Teams device does not have an embedded WEB server – configuration and management is performed using one of the following remote interfaces:
■ Microsoft Teams Admin Center (for Native Teams devices) over HTTPS protocols – this is enabled after successful sign-in authentication process.
■ AudioCodes Device Manager (part of AudioCodes OVOC suite) over HTTPS.
■ Debugging interface over SSH. Note that SSH MUST be disabled by default and enabled only per specific case for debugging-purposes only.
1.5.2.9 AudioCodes Device Manager Validation
The device validates the AudioCodes Device Manager identity using known root CA:
The device is shipped with known Root CAs installed. See here.
For the initial connection phase, the AudioCodes Device Manager should access the device using a known CA.
Once a successful secured connection has been established between the device and the Device Manager, the user can replace the root CA on the Device Manager and on the device and re-establish the connection leveraging any private root CA.
1.5.2.10 Sandboxing
AudioCodes Native Teams devices use Android Application Sandbox so that each application can access its own data and is isolated from other applications. This prevents a malicious app from accessing the code or the data of other applications in the system.
1.5.2.11 Keystore
With AudioCodes Native Teams devices, the certificate keys are encrypted on the device file system.
1.5.2.12 Device Certificate
AudioCodes Native Teams devices are shipped with a unique certificate which is signed by AudioCodes Root CA.
1.5.2.13 Data Protection
AudioCodes Native Teams devices run Android which has integral procedures for protecting and securing user data.
1.5.2.14 Device File System
The device file system is encrypted on the device – customers may enforce a policy of device encryption via Microsoft Intune.
1.5.2.15 Debugging Interface
The device leverages SSH as a debugging interface.
■ AudioCodes recommends that customers disable SSH on the device – this can be done via the AudioCodes Device Manager (OVOC).
■ AudioCodes recommends changing the Admin password from the default, which can be done via Teams Admin Center or AudioCodes Device Manager (OVOC).
When debugging of a specific device is required, the user can enable SSH on specific device/s, access SSH with the new Admin password for debugging phase and disable SSH once debugging has been completed.
1.5.3 Android Security Updates
In addition to all the above, AudioCodes regularly adopts and integrates the Android security updates. For reference see here.
1.5.4 AudioCodes Root CA Certificate
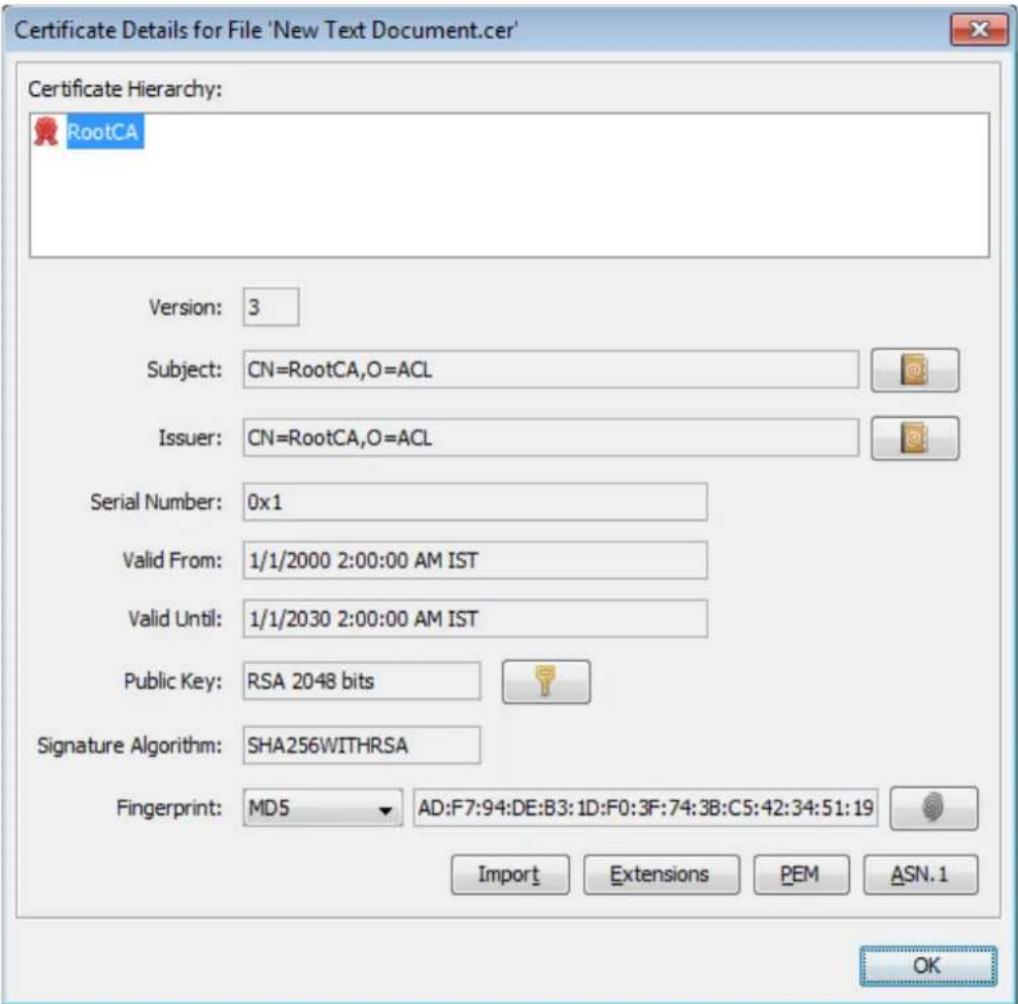
----BEGIN CERTIFICATE---- MIIDMTCCAhmgAwIBAgIBATANBgkqhkiG9w0BAQsFADAfMQwwCgYDVQQKEwNBQ0wxDzANBgNVBAMTBlJvb3RDQTAeFw0wMDAxMDEwMDAwMDBaFw0zMDAxMDEwMDAwMDBaMB8xDDAKBgNVBAoTA0FDTDEPMA0GA1UEAxMGUm9vdENBMIIBIjANBgkqhkiG9w0BAQEFAAOCAQ8AMIIBCgKCAQEA6GK495KUCXAm/UE17G4/cjnZN4LNaxYEYzbfZL0aEhgSKYt/LQ+iUcDhojsneusNgrcGkpwKklKsGsvGWmSRNULV01CW+TX2VJN73+hhV0uzhyOIIYAUhbDaoqNM6Kp5b7sJ1ew4Ig9kfd/ma9Cz15koESLLw/inLj/r+rD96mUcPElWrKspv7Qy4I14fsK/yMArixRopTLlmunVVPpSFM9Jh8IY3JHyr5CQJXKKsEhGAJsnHaRqsR2Su3X/WtslgEF+cvP34pxhlhFL29nMfnaFATSS3rgGaFlSvl1ZSesLMqkWjp9cqGYrvt7K61sYnvMMb+o/KbWqVokXb+Fr7bwIDAQABo3gwdjAMBgNVHRMEBTADAQH/MB0GA1UdDgQWBBQDXySn9hz15lDraZ+iXddZGReB+zBHBgNVHSMEQDA+gBQDXySn9hz15lDraZ+iXddZGReB+6EjpCEwHzEMMAoGA1UEChMDQUNMMQ8wDQYDVQQDEwZSb290Q0GCAQEwDQYJKoZIhvcNAQELBQADggEBAI0rUywommWWJnH3JOfKiS3+VnX5hJITZymvWanMXUz/6FonHccPXEBYTrUYwhiWx3dwELAFXDFKkxMp0KKWZ4F39cAOLRjqhzya+xUeeJ9HQZCXYAJ6XgvTfN2BtyZk9Ma8WG+H1hNvvTZYQLbWsjQdu4eFniEufeYDkeljQ6800LwMlFlc59hMQCeJTenRx4HdJbJV86klgBUEA7fJTlePrRnXNDRz6QtADWoX3OmN7Meqen/roTwvLpEP22nYwvB28dq3JetlQKwuXC4gwI/o8K2wo3pySLU9Y/vanxXCr0/en5l3RDz1YpYWmQwHA8jJIu8rxdhr+VNQZv6R/Ys= ----END CERTIFICATE----
2 Getting Started
2.1 Setting up RX-PAD

Note: See RX-PAD Meeting Room Controller Quick Guide for information about shipped RX-PAD items, positioning, cabling, and powering up.
2.2 Signing in to RX-PAD

Note: See the Pairing RX-PAD with Teams Rooms on Android AudioCodes Devices for information about how to sign in to your Microsoft Teams Account.
2.3 Pairing RX-PAD with MTR
RX-PAD must be paired with the Microsoft Teams Room (MTR) on Android device (RXV81 | RXV200).

Note: See the Pairing RX-PAD with Teams Rooms on Android AudioCodes Devices for information about how to pair RX-PAD with RXV81 | RXV200.
2.4 After Pairing
After pairing RX-PAD with the MTR, scroll down in RX-PAD to this:

From left to right:
■ Teams (tap to refresh RX-PAD's UI)
Settings (tap to enter RX-PAD's Device Settings)
■ Camera settings (tap to open the MTR's 'Camera Settings')
■ Remote keyboard (tap to control the MTR)
This page is intentionally left blank.
3 Operating RX-PAD
The following summarizes how to operate RX-PAD.

| L-R Description | |
| 1 | Touch the back button to return to the previous screen. |
| 2 | Touch to return to the home screen or long-press to open the Device Settings page. |
| 3 | Touch to access the MTR's Camera Settings page. |
| 4 | Touch to open Microsoft Teams and the Device Settings menu. |
| 5 Click to join a scheduled meeting. | |
| 6 | Passive Infrared (PIR) motion sensor (hidden). When sensing motion, it wakes up RX-PAD from screensaver mode, automatically lighting up the screen to greet the user. |
| 7 LED:Solid red indicates in a meetingSolid green indicates the RX-PAD is online and signed inFlashing red indicates incoming invite to join a meeting | |
3.1 Operating with the Remote Keyboard
After pairing RX-PAD with the MTR, scroll down in RX-PAD to the Remote Keyboard menu:

To operate with the remote keyboard:
- Tap the menu indicated in the figure above.

- Use RX-PAD's remote keyboard to:
• Sign in to an MTR (RXV81 | RXV200)
- Toggle between the MTR's Teams menus and device menus
-
Tap the right arrow indicated in the figure above to go back to the previous menu in the MTR.
-
Tap the uppermost left arrow indicated in the figure above to exit Remote Keyboard mode.
3.2 Managing Popup Messages
Popup messages displayed on the MTR device (RXV81 | RXV200) are seamlessly mirrored in the bundled RX-PAD to enhance user interaction.
When a message pops up in the MTR GUI, the same is displayed in RX-PAD.
The feature streamlines user experience, allowing users to conveniently confirm messages directly from RX-PAD and manage notifications intuitively and efficiently.
The figure below shows the popup message Device is updating on RX-PAD.

If the alert is an action, you can perform the action using RX-PAD, for example, REBOOT / DO IT LATER / COLLAPSE, as shown in the figure below.

3.3 Adjusting MTR Camera Settings
After pairing RX-PAD with the MTR device (RXV81 | RXV200), scroll down in RX-PAD to this:

To adjust MTR camera settings:
- Tap the menu indicated in the figure above to enter the MTR's Camera Settings page -or- use the camera hard key to access the Camera Settings page.

- In the Camera Settings page shown in the figure above, view an Auto Framing switch available when RX-PAD is used to control RXV81 MTR. In addition to RXV81, the feature is also available on RXVCam50L/M connected to RXV200.

Note:
- Admin users can create a permanent camera settings preset including enable / disable of Auto Framing.
-
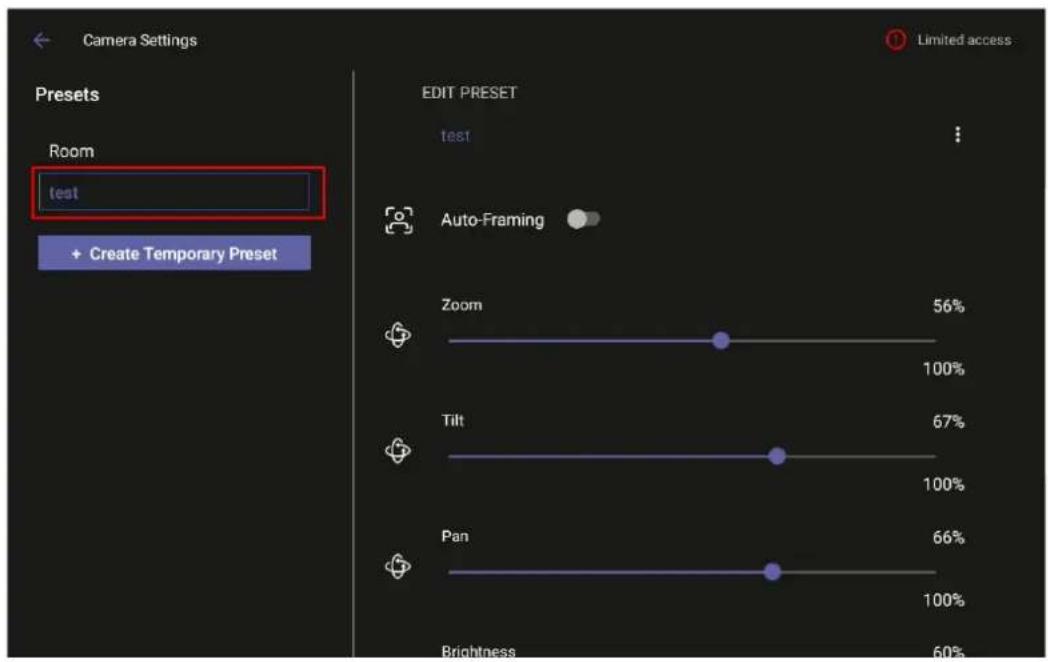
End users can either select a preconfigured preset which includes enable / disable of Auto Framing or create a temporary preset during a meeting (which will be deleted at the end of the meeting) and can enable / disable Auto Framing.
-
Enable Auto Framing if required; PTZ (Pan Tilt Zoom) functions are then disabled; temporary presets are available for users without admin permissions; users without administrator permissions can create temporary presets.
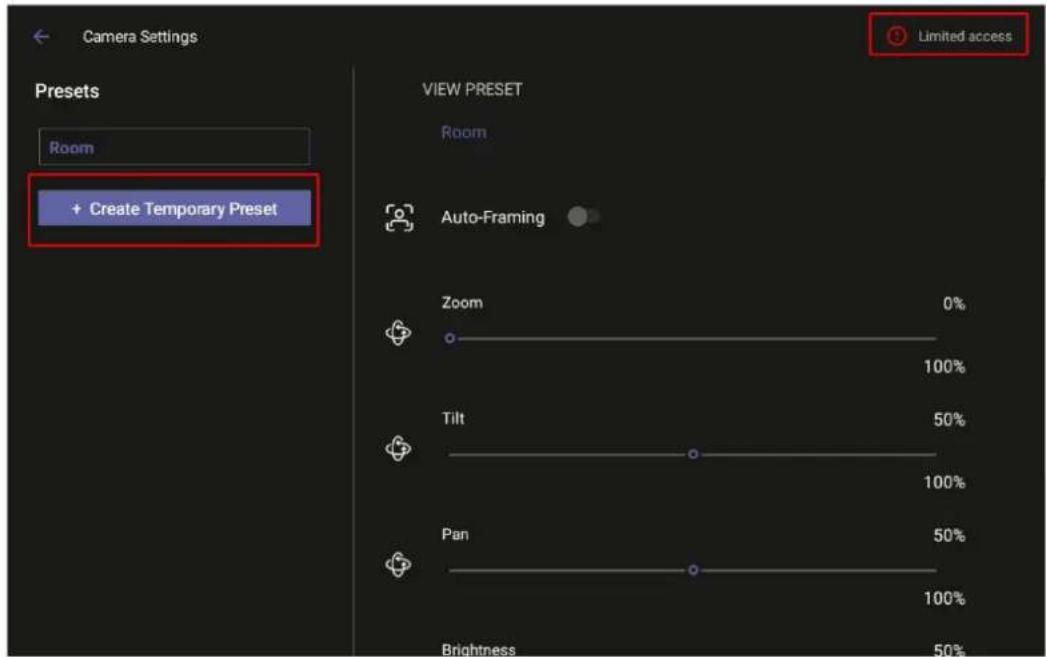

Note: If that user leaves the meeting, the temporary presets will be erased when they later reenter Camera Settings (or another user later enters); temporary presets are only for that meeting they were configured for; new presets can be configured for the new meeting.

3.4 Configuring a Bundle
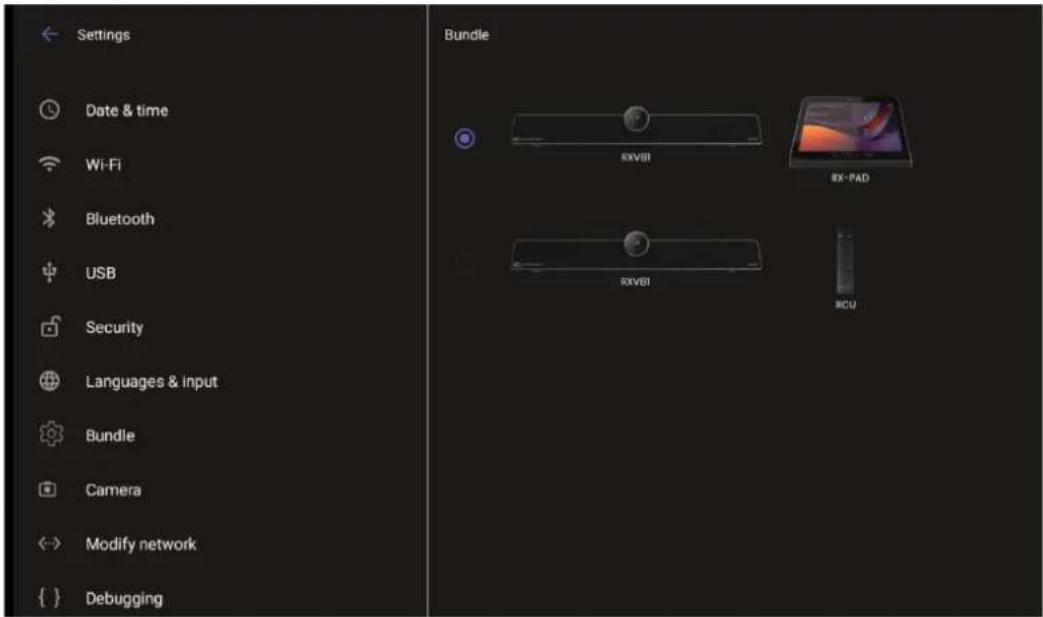
Admins can configure an MTR bundle in the MTR device's GUI (RXV81 | RXV200).
- Navigate to the Bundle setting using RX-PAD's Remote Keyboard that controls the MTR (see also the next section).
■ You must be logged in to access the Bundle page.
The figures below respectively show the RXV81 and RXV200 Bundle pages.

3.5 Configuring Ad Hoc Mode on RXV81
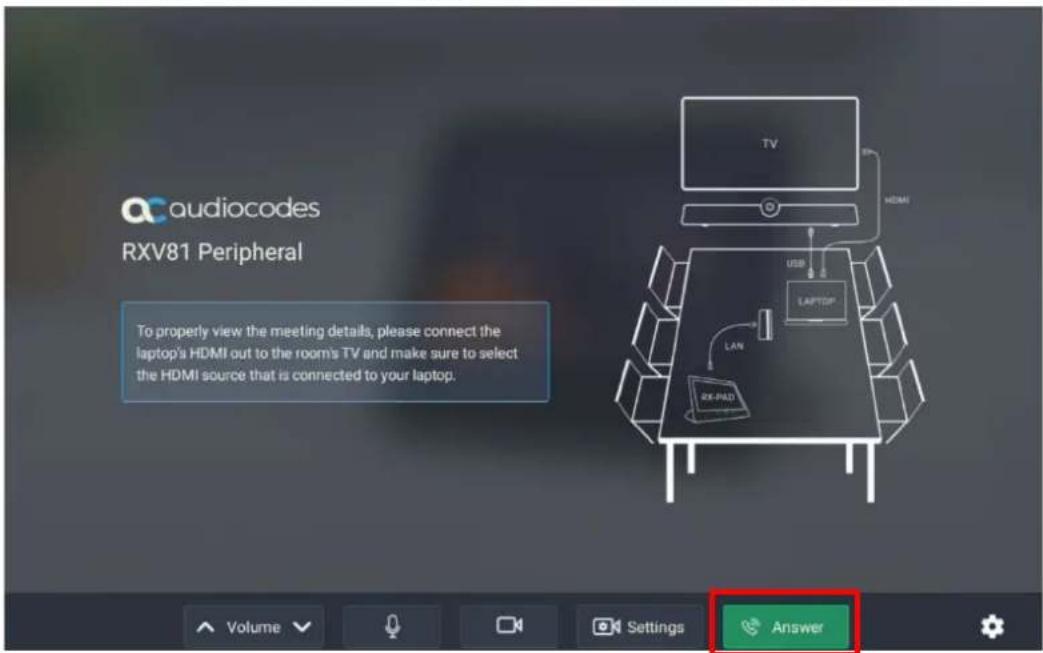
RXV81 MTR and RX-PAD Controller support ad hoc peripheral mode. When RXV81 is connected via USB to a PC/laptop, it automatically moves to ad hoc peripheral mode and the following is displayed on RX-PAD:
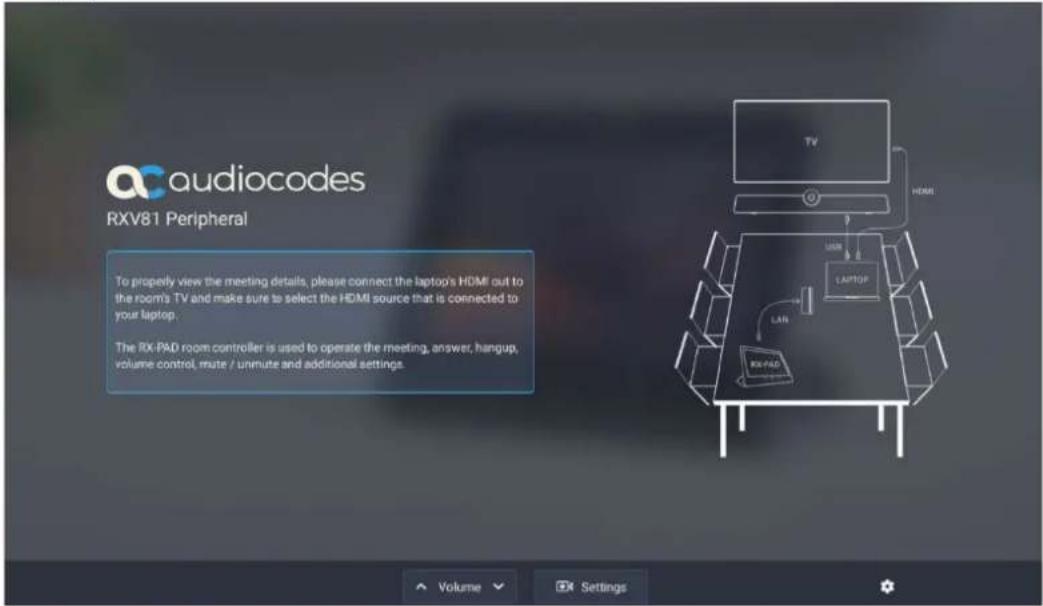
When a call comes in, RX-PAD displays the incoming call's functions as follows:
This page is intentionally left blank.
4 Configuring User Settings
In the 'Settings' screen you can optionally configure the following User settings: Sound, Accessibility, Reboot and About (read-only).
4.1 Accessibility
This option allows users to customize the screen to be reader-friendlier.
To configure the Accessibility setting:
- Under 'User', navigate to and select Accessibility.

- Adjust the settings to suit personal requirements.
4.2 Setting Live Captions
Live Captions can be set in regular one-on-one calls as well as in Teams meetings.
4.3 Hiding Names and Meeting Titles
Users can hide information such as names and meeting titles for individual devices via the Meetings page (More > Settings > Meetings):

4.4 Reboot
Rebooting allows you to exit from and reconnect without needing to sign in again.
To reboot:
■ Under 'User', navigate to and select Reboot.

4.5 About
The 'About' screen gives you quick access to information about the deployment.
To access the About screen:
- Under 'User', navigate to and select About.

- Navigate to and select Status.
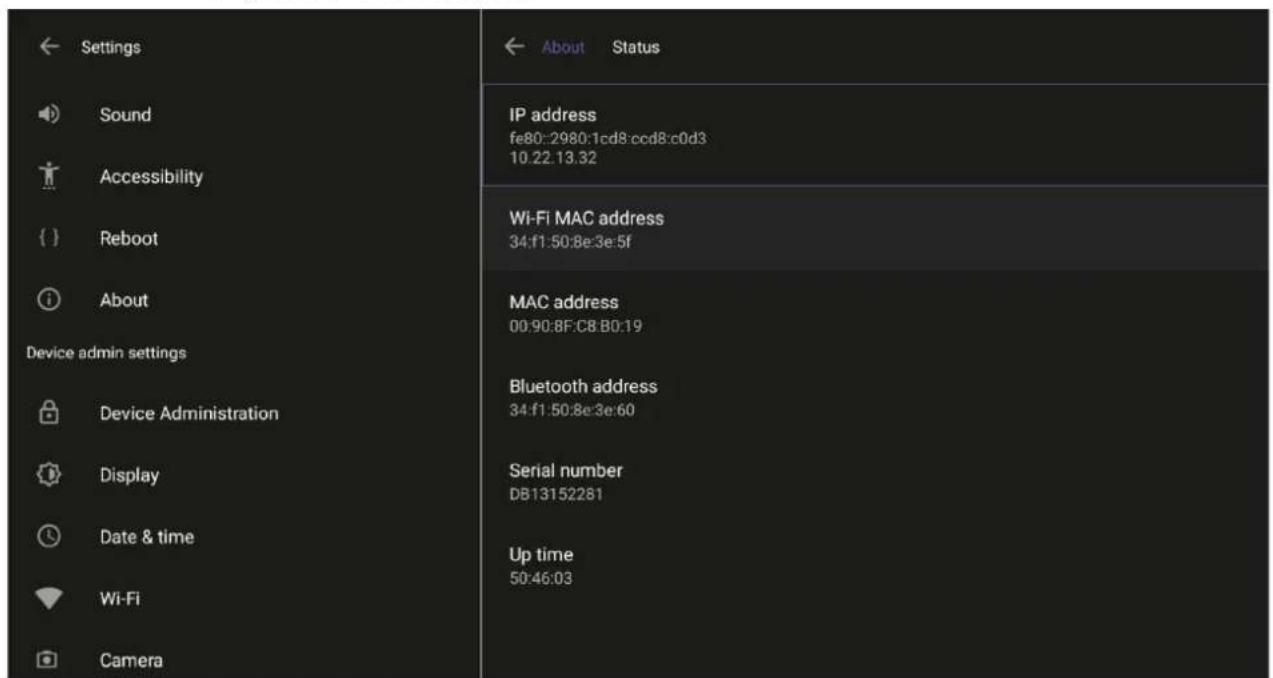
- View the firmware information.
5 Debugging
Admin users can perform debugging for troubleshooting purposes.
To perform Debugging:
- In the Settings screen under 'Device administration', select Debugging.

- Use the following debugging features available to Admin users:
• Log settings (see Log Settings)
• Remote Logging (see under Remote Logging)
• Diagnostic Data (see under Diagnostic Data)
- Reset configuration (see under Reset configuration)
- Restart Teams app (see under Restart Teams app)
• Company portal login (see under Company Portal Login)
- Launch mobile teams (see under Launch Mobile Teams)
- Debug Recording (see under Debug Recording)
- Erase all data (see under Erase all data (factory reset))
• Screen Capture (see under Screen Capture)
• Performing Recovery Operations (see under Performing Recovery Operations)
- Restoring Device Firmware via USB Disk (see under Restoring Device Firmware via USB Disk)

Note:
- An enhanced bug report is available for efficient debugging.
- Information such as pack up time, ps, top, meminfo and df commands (information about file system disk space usage) is reflected in it.
5.1 Log Settings | Collecting Logs
Device diagnostics (Logcat) can be collected using the Microsoft Admin Portal. For support purposes, general logs can be collected also using the Microsoft Admin Portal. The logs can help debug Teams application issues and also for issues related to the device.
To configure log settings:
- In the Debugging screen, select Log settings.

- Navigate to and select Log Level and then select either
- Verbose, Debug, Info, Warning, Error, Assert -or-None
- Navigate to and select Log Package Filter and enter the filter.
- Navigate to and select Log Tag Filter and enter the filter.
- Navigate to and select Log Buffer Filter.
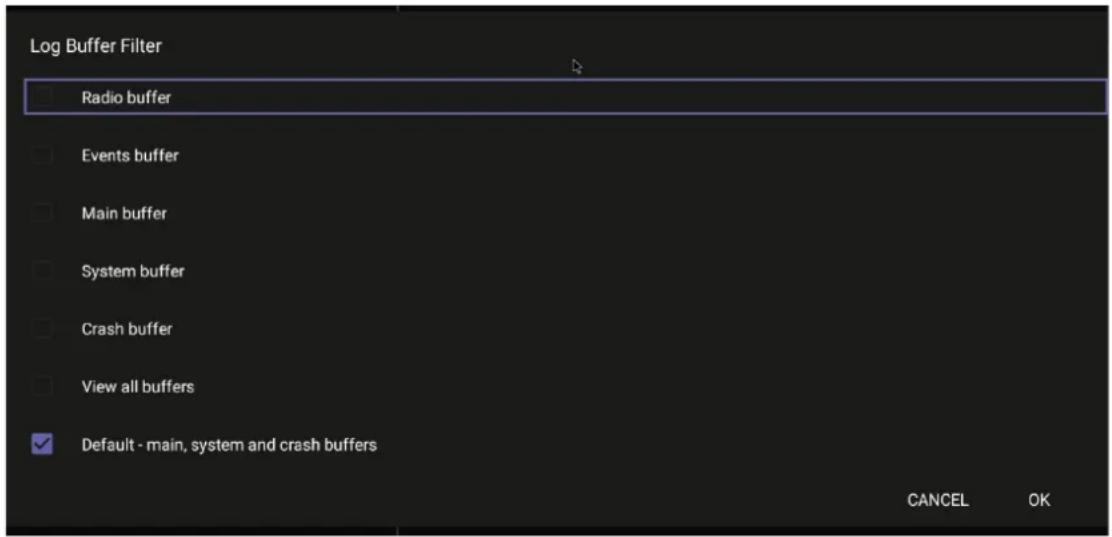
- Navigate to and select Current filter for logs.
To collect logs:
- Reproduce the issue
- Access Microsoft Admin Portal and under the Devices tab click the Diagnostics icon.
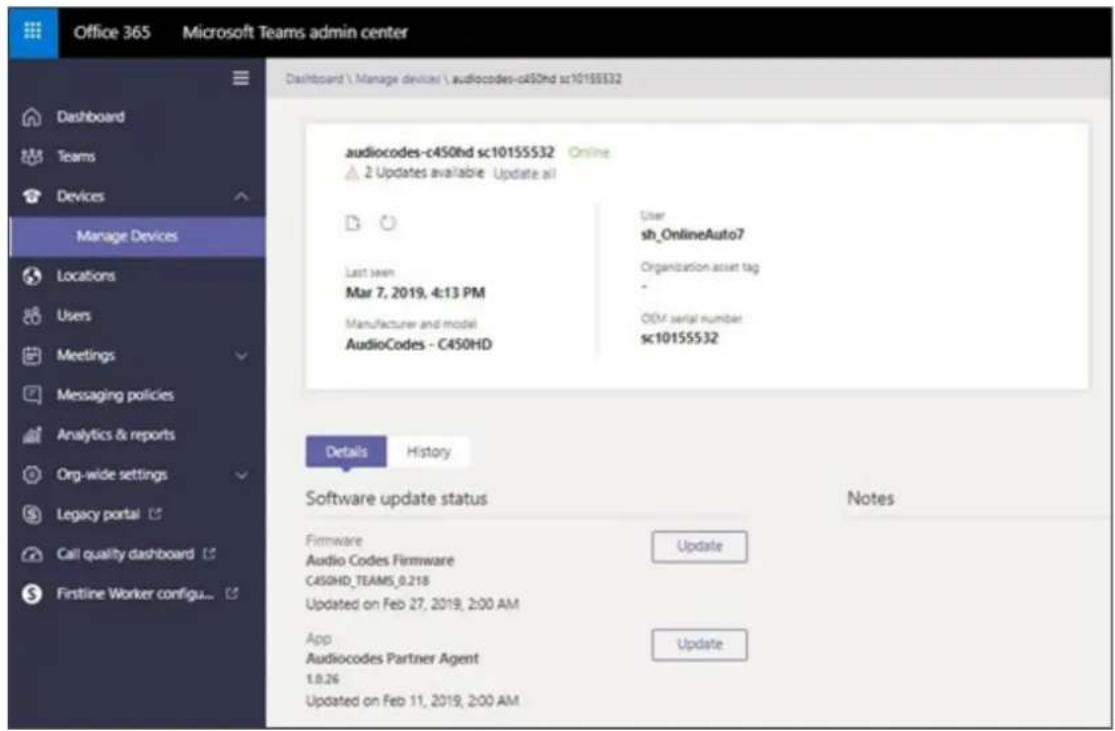

Note: The preceding figure is for illustrative purposes. It shows an AudioCodes phone. The same screen is displayed for the MTR.
- Click the Diagnostics icon.

4. Click Proceed; the logs are uploaded to the server.
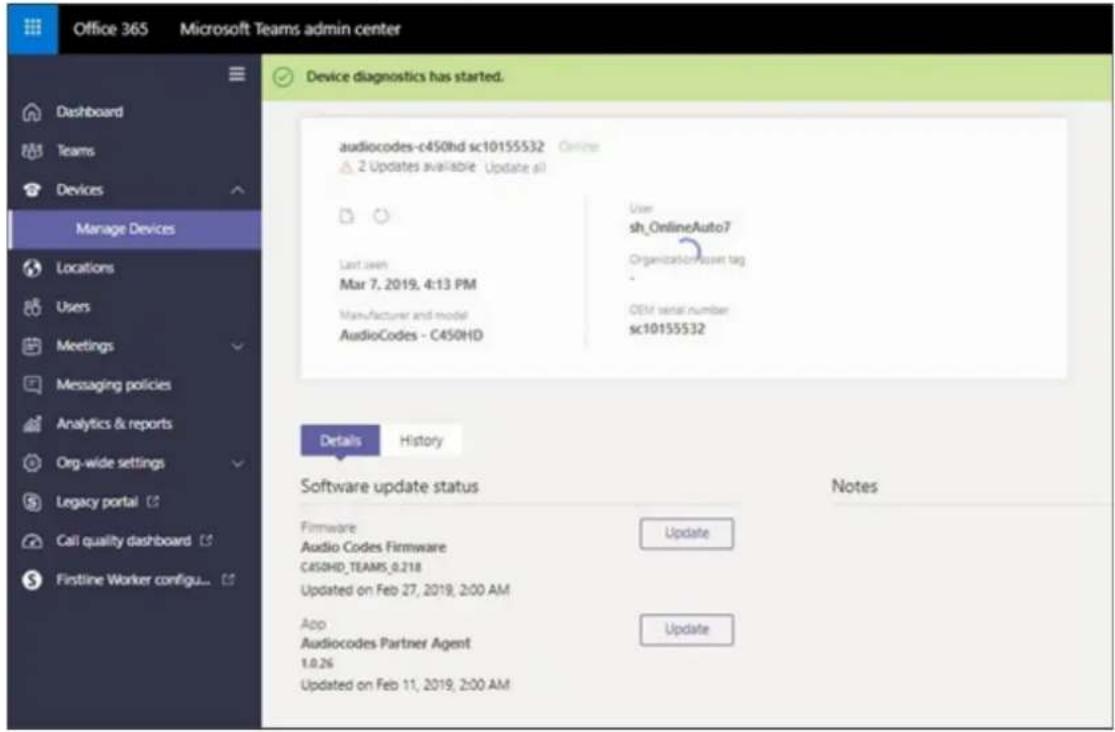
5. Click the History tab.
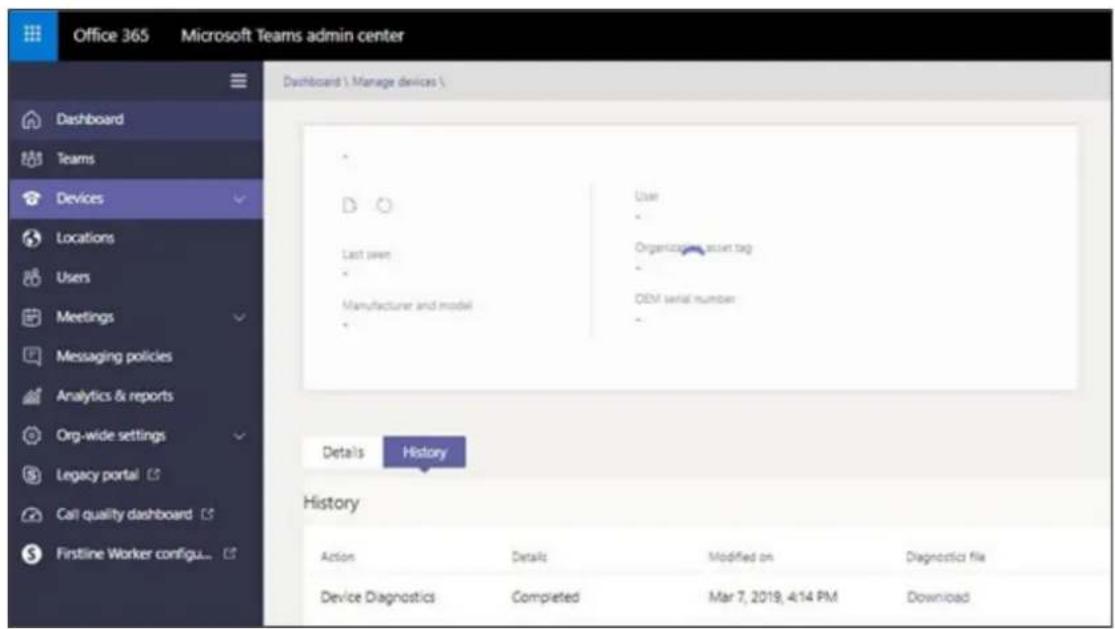
6. Click Download to download the logs.
5.2 Remote Logging
Remote Logging via Syslog provides the same log level as Device Diagnostics (performed via the Microsoft Admin Portal) with some additional information that may be relevant to device issues (not Teams application issues).
Diagnostics via the Microsoft Admin Portal are saved to the device sdcard and collected after the event. Remote Logging via Syslog is different. The logs are collected in real time.
To enable Remote Logging via Syslog:
- Navigate to and select Remote logging.
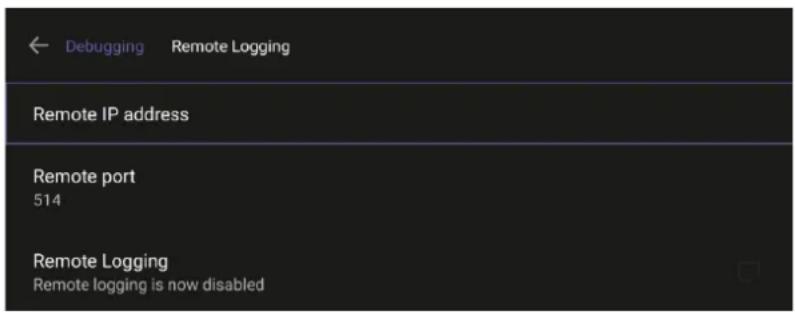
- Configure the 'Remote IP address' and 'Remote port' and enable 'Remote Logging'; the device starts sending logs to the Syslog server.

Note: Network administrators can also enable Syslog using Secure Shell (SSH) protocol.
To enable Syslog using SSH protocol, type the following command at the shell prompt:
To disable Syslog using SSH, type the following command at the shell prompt:
setprop persist.ac.rl_address <syslog_server_ip>:<port>.
setprop persist.ac.rl_address ""
5.3 Diagnostic Data
Admin users who need to get logs from the device can dump the logs to the device's Secure Digital (SD) Card and then later collect them using Secure Copy Protocol (SCP) based on Secure Shell (SSH) protocol. Whenever an issue occurs, the Admin can dump the logs into the SD Card.
To use the tool:
- Navigate to and select Diagnostic Data.

- Navigate to and select OK to confirm 'Copy logs to sdcard'; the MTR creates all necessary logs and copies them to the its SD Card / Logs folder.
- Get the logs using SCP notation as follows:
scp -r admin@host_IP:/sdcard/logs/.
Following are the relevant logs (version and ID may be different to those shown here):
■ dmesg.log
dumpstate-TEAMS_1.3.16-undated.txt
dumpstate_log-undated-2569.txt
logcat.log
5.4 Reset configuration
Admin users can opt to 'clean up' their configuration history and return the MTR to an Out of Box Experience (OOBE). If the Teams app isn't running well, this might help.
To reset the configuration:
- Navigate to and select Reset configuration.

- Navigate to and select OK; all data is erased and default factory settings are restored but sign-in is retained.
See also here.
5.5 Restart Teams app
If the Teams application freezes or malfunctions, a good way to resolve this is to restart the app.
To restart the Teams app:
- Navigate to and select Restart Teams app; only the Teams app is restarted.
5.6 Company Portal Login

5.7 Getting Company Portal Logs
Company Portal logs can be helpful to network administrators when there are issues with signing in to Teams from the device.
To get Company Portal logs:
- Reproduce the issue (logs are saved to the device so you first need to reproduce the issue and then get the logs).
- Log in to the device as Administrator and then go back.
- Navigate to and select the Debugging option.
- Navigate to and select Company Portal login.
- In the Device Details screen that opens, navigate to and select Settings:


6. Navigate to and select Copy Logs.
Company portal logs are copied to:
sdcard/Android/data/com.microsoft.windowsintune.companyportal/files/
7. To pull the logs, use ssh:
scp -r admin@hosp_ip:/sdcard/android/data/com.microsoft.windowsintune.companyportal/files/
Files are quite heavy so you may need to pull them one by one.
5.8 Launch Mobile Teams
'App not found'. N/A in this release.
5.9 Debug Recording
This feature enables Admin users to perform media/DSP debugging.

Note: DSP recording can be activated on the fly without requiring the network administrator to reset the device.
To reset the configuration:
- Navigate to and select Debug Recording.

- Navigate to and select Voice record to enable the feature.
- Navigate to and select Remote IP address to input the IP address of the device whose traffic you want to record.
- Navigate to and select Remote port and input it (Default: 5000).
- Start Wireshark on your PC to capture audio traffic.
5.10 Restoring to Defaults
RX-PAD can be restored to defaults by pressing 15 seconds on the bottom key (dedicated button on RX-PAD).
5.11 Erase all data (factory reset)
This option is the equivalent of restoring to defaults shown in the preceding section; including logout and device reboot.
To erase all data (factory reset):
- Navigate to and select Erase all data (factory reset).

- Navigate to and select RESET PHONE.
5.12 Screen Capture
By default, this setting is enabled. If disabled, the device won't allow its screens to be captured.
5.13 Performing Recovery Operations
While RX-PAD is powering up, admin can perform recovery operations by inserting a sharp pointed object, for example, a paper clip or pin, into the pinhole button shown below and pressing for the length of time shown in the table below.
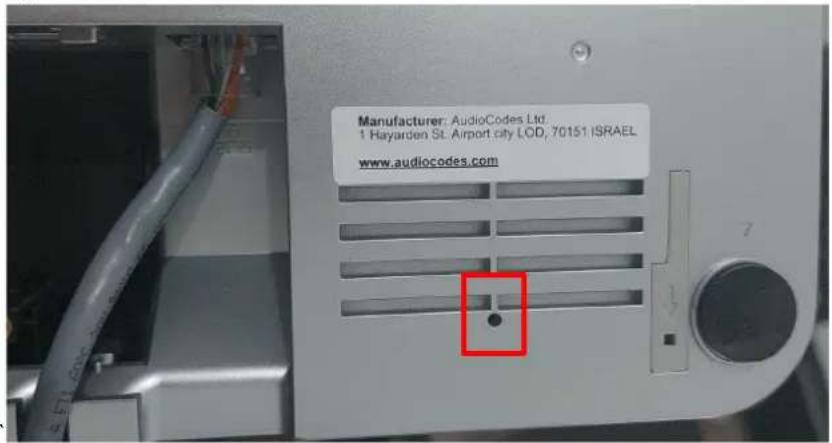
When pressing the pinhole button, the device's main LED changes color after every n seconds; each color is aligned with a recovery operation option.
Note:
- Besides manual recovery options, Android devices also feature an independent, automatic problem detection and recovery attempt capability that can culminate in recovery mode or in switching image slots.
- Android devices also feature a 'hardware watchdog'. This feature resets the device if Android is stacked and doesn't respond (though Android stacking is unlikely); there's no recovery process; the device is only reset.
Use this table as reference as to how to use the pinhole button to perform recovery operations.
| When? | Action | Press for how long? | LED flashes 3x after release |
| Start pressing immediately after power up (on U-Boot / Universal Boot Loader) | Recovery mode (you can restore defaults from there) | ~ 4 seconds Red | |
| Switch slots A / B | ~ 10 seconds | Green | |
| Loader | ~ 15 seconds | Blue / Yellow | |
| Restore defaults ~25 seconds | Green + blue / Green + yellow | ||
| When successfully booted (on Android) | Reboot | From the Recovery menu | - |
| Restore defaults | Long-press the Hold key for ~15 seconds | Flashes yellow once after release | |
5.14 Restoring Device Firmware via USB Disk
For recovery purposes, firmware can be applied to RX-PAD from a USB disk.
To apply the firmware from the USB disk:
- Enter recovery mode by pressing for 2-4 seconds the power button as shown in the preceding table (Action: ENTER_RECOVERY); the device's LED lights up red.
- Short-press the power button to move down the menu options, and long-press to select an option.
- Insert the USB disk with the target firmware.
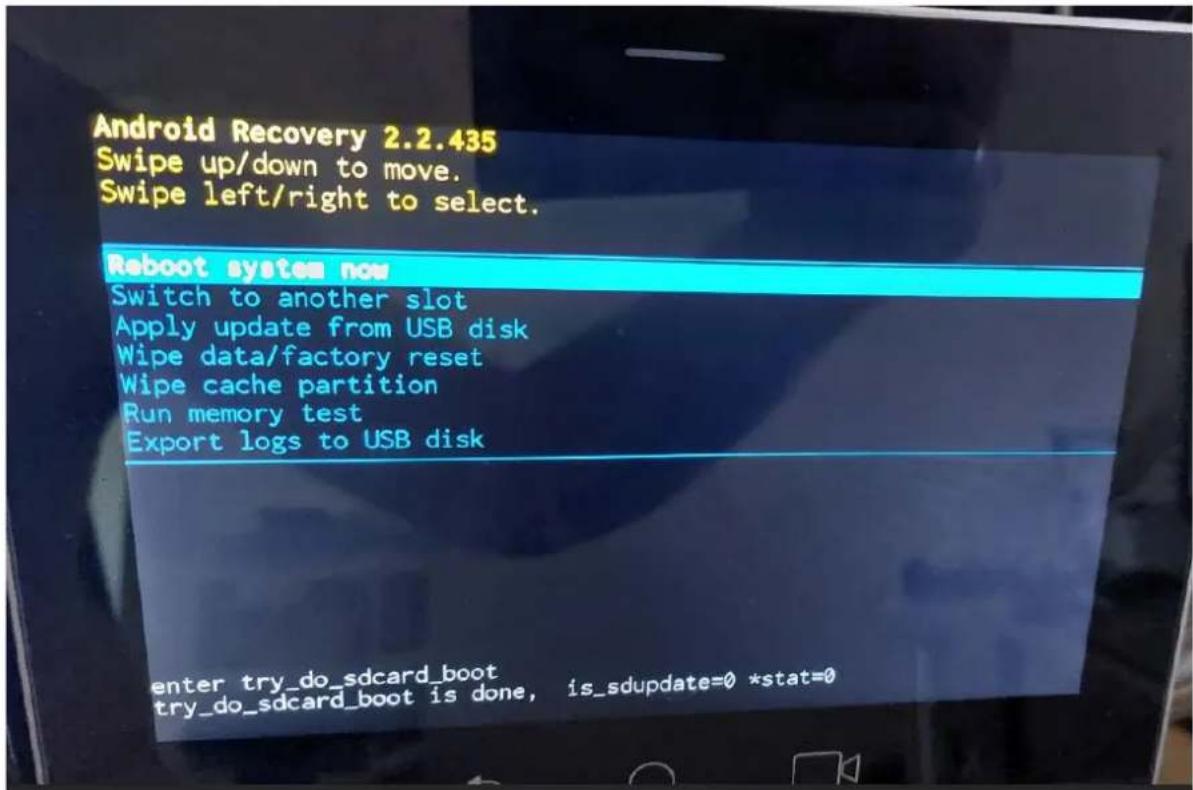
- Select the Apply update from USB disk option and then choose the correct firmware image from the disk.
6 Updating Microsoft Teams Devices Remotely
For instructions on how to update Microsoft Teams devices remotely, see here.

Note: Before an update is pushed to a device, the firmware detects whether the user is using the device or not. If they are, the user is notified and given an option to delay the update or apply it, nonetheless. The feature avoids disrupting users' ongoing activities on their devices, such as calls.
This page is intentionally left blank.
International Headquarters
1 Hayarden Street,
Airport City
Lod 7019900, Israel
Tel: +972-3-976-4000
Fax: +972-3-976-4040
AudioCodes Inc.
80 Kingsbridge Rd.,
Piscataway, NJ 08854, USA
Tel: +1-732-469-0880
Fax: +1-732-469-2298
Contact us: https://www.audiocodes.com/corporate/offices-worldwide
Website: https://www.audiocodes.com/
©2023 AudioCodes Ltd. All rights reserved. AudioCodes, AC, HD VoIP, HD VoIP Sounds Better, IPmedia, Mediant, MediaPack, What's Inside Matters, OSN, SmartTAP, User Management Pack, VMAS, VoIPerfect, VoIPerfectHD, Your Gateway To VoIP, 3GX, VocaNom, AudioCodes One Voice, AudioCodes Meeting Insights, AudioCodes Room Experience are trademarks or registered trademarks of AudioCodes Limited. All other products or trademarks are property of their respective owners. Product specifications are subject to change without notice.
Document #: LTRT-18321

- KAC-TCH-10 Meeting Room Controller
- Table of Contents
- Introduction......7
- Getting Started....13
- Operating RX-PAD....15
- Configuring User Settings 23
- Debugging....25
- Updating Microsoft Teams Devices Remotely 35
- Notice
- WEEE EU Directive
- Customer Support
- Stay in the Loop with AudioCodes
- Abbreviations and Terminology
- Documentation Feedback
- Related Documentation
- Document Revision Record
- Introduction
- Highlights
- Specifications
- Connectivity
- Managing RX-PAD
- Security Guidelines
- Microsoft Teams Security Guidelines
- Android Level Security Hardening
- Google Play Services
- Running Android in Kiosk Mode
- Screen Lock
- AudioCodes Private Key
- Android Debug Bridge (ADB)
- App Signing
- Web Browser
- Remote Configuration Management
- AudioCodes Device Manager Validation
- Sandboxing
- Keystore
- Device Certificate
- Data Protection
- Device File System
- Debugging Interface
- Android Security Updates
- AudioCodes Root CA Certificate
- Getting Started
- Setting up RX-PAD
- Signing in to RX-PAD
- Pairing RX-PAD with MTR
- After Pairing
- Operating RX-PAD
- Operating with the Remote Keyboard
- Managing Popup Messages
- Adjusting MTR Camera Settings
- To adjust MTR camera settings:
- Note:
- Configuring a Bundle
- Configuring Ad Hoc Mode on RXV81
- Configuring User Settings
- Accessibility
- Setting Live Captions
- Hiding Names and Meeting Titles
- Reboot
- About
- Debugging
- To perform Debugging:
- Log Settings | Collecting Logs
- To configure log settings:
- To collect logs:
- Click Proceed; the logs are uploaded to the server.
- Click the History tab.
- Click Download to download the logs.
- Remote Logging
- Diagnostic Data
- Reset configuration
- Restart Teams app
- Company Portal Login
- Getting Company Portal Logs
- Navigate to and select Copy Logs.
- To pull the logs, use ssh:
- Launch Mobile Teams
- Debug Recording
- To reset the configuration:
- Restoring to Defaults
- Erase all data (factory reset)
- Screen Capture
- Performing Recovery Operations
- Restoring Device Firmware via USB Disk
- To apply the firmware from the USB disk:
- Updating Microsoft Teams Devices Remotely
- International Headquarters
- AudioCodes Inc.
Brand : Kramer
Model : KAC-TCH-10
Category : Meeting room controller