
KAC-CU-200 - Meeting room controller Kramer - Free user manual and instructions
Find the device manual for free KAC-CU-200 Kramer in PDF.


| Product Type | Microsoft Teams Rooms on Android Compute Unit |
| Brand | Kramer |
| Model | KAC-CU-200 |
| Dimensions (W x D x H) | 170 x 170 x 41.4 mm |
| Weight | 0.987 kg |
| Power Supply | 12V DC, 3A |
| Processor | Qualcomm Snapdragon QCS8250 |
| Memory | 8 GB LPDDR5 |
| Storage | 128 GB UFS 3.1 |
| Operating System | Android 10 |
| Video Output | 2 x HDMI 2.0 (4K) |
| Video Input | 1 x HDMI 2.0 |
| USB Ports | 2 x USB 3.0 Type A, 1 x USB 3.0 Type C |
| Network | Ethernet 10/100/1000 Mbps, Wi-Fi dual-band (802.11 a/b/g/n/ac/ax), Bluetooth 5.1 |
| Camera Support | Multiple USB cameras, e.g., RXVCam50M (4K, auto-framing) |
| Audio Support | RX15 speakerphone or RX40 sound bar via USB |
| Management | AudioCodes OVOC Device Manager or Microsoft Teams Admin Center |
| Security | TLS, SRTP, AES-256, IEEE 802.1x, Kensington lock |
| Operating Temperature | 0°C to 40°C (estimated) |
| LED Indicators | Blue (booting), Green (idle), Flashing red (incoming call), Red (in call/mute) |
| Compatible Bundles | RXV200-B20 (small room), RXV200-B40 (large room) |
| Cleaning | Clean with a soft, dry cloth. Do not use liquids or abrasive cleaners. |
| Mounting | Designed for desktop or under-desk placement; no rack mount included |
Frequently Asked Questions - KAC-CU-200 Kramer
User questions about KAC-CU-200 Kramer
0 question about this device. Answer the ones you know or ask your own.
Ask a new question about this device
Download the instructions for your Meeting room controller in PDF format for free! Find your manual KAC-CU-200 - Kramer and take your electronic device back in hand. On this page are published all the documents necessary for the use of your device. KAC-CU-200 by Kramer.
USER MANUAL KAC-CU-200 Kramer
User's and Administrator's Manual
Room Experience (RX) Suite
RXV200 MTR on Android™ Compute with RX-PAD Meeting Room Controller
Version 2.6
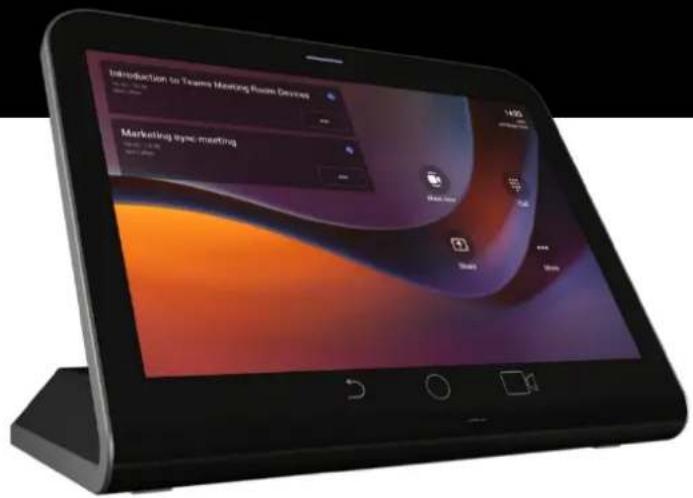
In this Manual, the following marketing names are interchangeable:
| KAC-TCH-10 | RX-PAD |
| KAC-CU-200 | RXV-200 |
| KAC-BAR-81 | RXV-81 |
| KAC-CAM-50M | RXVCam50M |
| KAC-CAM-CC-10 | RXVCam10CC |
| KAC-SPK-15 | RX-15 |
| KAC-SPK-40 | RX-40 |
| KAC-SCD-10 | RX-PANEL |
| KAC-CAM-70 | RXVCam70 |
Table of Contents
1 Introduction....7
1.1 Highlights ....7
1.2 Benefits....8
1.3 Bundles 8
1.3.1 RXV200-B40 Bundle....9
1.3.2 RXV200-B20 Bundle....9
1.4 Hardware....10
1.5 Management 10
1.6 Specifications 10
1.6.1 RXV200....11
1.6.2 RX-PAD 12
1.6.3 RX15....13
1.6.4 RXVCAM50M 14
2 Getting Started 15
3 Connecting to RXV200....17
3.1 Signing in 17
3.1.1 Multi-Cloud Sign-in ....17
3.1.2 Remote Provisioning and Sign in from Teams Admin Center 17
4 Using General RXV200 Functions....21
4.1 Configuring a Bundle....21
4.2 Managing Camera Presets....22
4.2.1 Configuring a Color Mode Preset on the RXVCAM50M/L Camera....24
4.3 Selecting the Default Audio Device....25
4.4 Starting a New Meeting....26
4.5 Dialing a Number....29
4.6 Enabling Proximity Join 30
4.7 Sharing a Whiteboard....30
4.8 Screen Sharing....34
4.9 Updating RXV200 Audio and Camera Peripherals Firmware 35
4.10 About Microsoft Teams....36
4.11 Signing out 37
4.12 Enrolling a Device with Intune Policies 37
4.12.1 Creating a Dynamic Group 37
4.12.2 Creating an Exclusion Group....37
4.13 Removing Devices from Intune admin center 38
5 Getting Familiar with RXV200 Settings ....43
5.1 Device Admin Settings 46
5.1.1 Configuring Admin Login Timeout 46
5.1.2 Configuring Display....46
5.1.3 Configuring Date & Time 48
5.1.4 Configuring Wi-Fi 49
5.1.4.1 Connecting to an Available Wi-Fi Network....49
5.1.4.2 Manually Connecting to a Wi-Fi Network....50
5.1.5 Configuring Camera Settings 53
5.1.6 Selecting RXVCam70 PTZ Camera Tracking Mode 54
5.1.7 Selecting RXVCam360 Camera Tracking Mode 57
5.1.8 Limiting Resolution 61
5.1.9 Configuring Teams Admin Settings 62
5.1.10 Configuring Camera Frequency 63
5.1.11 Dual Camera Support....63
5.1.12 Configuring UI Language & Input 64
5.1.13 Modifying IP Network Settings....65
5.1.14 Configuring Call Settings 68
5.2 User Settings....70
5.2.1 Setting the Volume 70
5.2.2 Configuring Accessibility Settings....70
5.2.3 Setting Live Captions....70
5.2.4 Enabling Display of Meeting Name using Exchange Online PowerShell......71
5.2.5 Hiding Names and Meeting Titles....72
5.2.6 Rebooting RXV200....72
5.2.7 Viewing About RXV200 72
6 Monitoring Modules Operational States....75
7 Debugging ....77
7.1.1.1 Log Settings | Collecting Logs....78
7.1.1.2 Remote Logging 80
7.1.1.3 Diagnostic Data 81
7.1.1.4 Reset configuration 82
7.1.1.5 Restart Teams app....82
7.1.1.6 Company Portal Login....82
7.1.1.7 Getting Company Portal Logs 82
7.1.1.8 Launch Mobile Teams 83
7.1.1.9 Debug Recording 83
7.1.1.10 Erase all data (factory reset) 84
7.1.1.11 Screen Capture 84
7.2 Determining Device Status from LED Color Indications 85
7.3 Performing Recovery Operations using Power Button 86
7.4 Saving Logs while Device is in Recovery Mode....87
7.5 Restoring RXV200 Firmware via USB Disk 87
List of Tables
Table 1-1: RXV200 Bundles....8
Table 1-2: RXV200 Specifications....11
Table 1-3: RX-PAD Specifications ....12
Table 1-4: RX15 Specifications....13
Table 5-1: Configuration File Wi-Fi Parameters ....51
Table 7-1: RXV200 Status....85
Table 7-2: Recovery Operations ....86
Notice
Information contained in this document is believed to be accurate and reliable at the time of printing. However, due to ongoing product improvements and revisions, AudioCodes cannot guarantee accuracy of printed material after the Date Published nor can it accept responsibility for errors or omissions. Updates to this document can be downloaded from https://www.audiocodes.com/library/technical-documents.
This document is subject to change without notice.
Date Published: August-18-2024
Security Vulnerabilities
All security vulnerabilities should be reported to vulnerability@audiocodes.com.
WEEE EU Directive
Pursuant to the WEEE EU Directive, electronic and electrical waste must not be disposed of with unsorted waste. Please contact your local recycling authority for disposal of this product.
Customer Support
Customer technical support and services are provided by AudioCodes or by an authorized AudioCodes Service Partner. For more information on how to buy technical support for AudioCodes products and for contact information, please visit our website at https://www.audiocodes.com/services-support/maintenance-and-support.
Stay in the Loop with AudioCodes


Abbreviations and Conventions
Each abbreviation, unless widely used, is spelled out in full when first used.
Related Documentation
Document Name
| RXV81 RXV200 RX-PAD RX-PANEL Release Notes |
| RXV200 Microsoft Teams Rooms on Android Compute Unit Quick Installation Guide |
| RX-PAD Meeting Room Controller Quick Guide |
| RXVCAM70 PTZ Camera Quick Guide |
| RXVCam360 Video Conferencing Camera Quick Guide |
| One Voice Operation Center (OVOC) User's Manual |
| Device Manager Administrator's Guide |
Documentation Feedback
AudioCodes continually strives to produce high quality documentation. If you have any comments (suggestions or errors) regarding this document, please fill out the Documentation Feedback form on our website at https://online.audiocodes.com/documentation-feedback.
This page is intentionally left blank.
1 Introduction
The enterprise workspace and meeting space have changed dramatically over the past decade. Virtually all our communication today is hybrid, involving both on-site participants gathered in one or more meeting rooms and online participants located in their home offices or on the go. Modern meeting devices must be adaptable enough to accommodate any room size or shape, while minimizing the number of table-mounted accessories and devices apart from a microphone and a meeting room controller like the AudioCodes RX-PAD.
To meet this specific need, AudioCodes has created a range of RXV200 bundles which function as Microsoft Teams Rooms on Android devices.
The AudioCodes RXV200 MTR on Android Compute is a robust, dependable and adaptable solution that enables an easy upgrade of any component within the meeting room, thereby facilitating the adoption of new and advanced devices to keep up with latest technology trends without excessive expenditure. Together with the RX-PAD Meeting Room Controller, it provides an easy meeting room experience that significantly boosts productivity.
This Android compute MTR unit serves as the meeting room's nerve center and sits at the heart of the RXV200-B20 and RXV200-B40 bundles. It can be connected to a variety of cameras, audio sources and advanced AI applications.
Controlled by AudioCodes' RX-PAD Meeting Room Controller, the RXV200 offers innovative features such as one-click-to-join with an integrated calendar for easy collaboration initiation, smooth content sharing and simple camera adjustments for a complete hybrid experience.
See also AudioCodes website here for additional information.
1.1 Highlights
RXV200 feature highlights are:
■ Multiple device support for mix-and-match adaptability
- Reliable Android compute unit for every room configuration
■ Simple deployment and management
■ Cost-effective and value for money
- Allows future addition and upgrade of peripherals (mix-and-match of video and audio devices)
■ Comprehensive support for Microsoft Teams features is provided for a complete hybrid collaboration
Intuitive meeting experience with calendar integration and click-to-join or proximity-join experience
■ Users can hear audio notifications triggered by RX-PAD through the RXV200 speaker, including Talkback accessibility, ensuring a streamlined and accessible communication experience during meetings and collaboration sessions.
HDMI Out CEC (Consumer Electronics Control) One-Touch-Play command, triggered by RX-PAD's human sensor, turns on/off the TV screen. See also here for more information.
- When RX-PAD (pre-set to 'Screen timeout') enters sleep mode, it automatically triggers RXV200 to enter sleep mode as well, activating the CEC One-Touch-Play command to turn the TV off.
- When RX-PAD's human sensor wakes up RX-PAD, RXV200 wakes up as well and turns the TV on.
1.2 Benefits
Superb video quality provided by AudioCodes's RXVCam50 AI camera (4K, auto framing, EPTZ)
■ Hear and be heard with crystal-clear sound
■ Human sensor for activating the system and welcoming the user upon proximity
An optimal solution for small to large meeting spaces
■ Optional centralized management with AudioCodes' OVOC
■ Fully controllable by the RX-PAD Meeting Room Controller center-of-room intelligent touch controller
1.3 Bundles
The RXV200 supports multiple devices for mix-and-match adaptability and simplified deployment and management.
RXV200 bundles provide a reliable solution for every room layout and allow easy meeting room component upgrades.
The RXV200 is available in three main bundles.
Table 1-1: RXV200 Bundles
| Name of Bundle | Details Peripherals | |
| RXV200-B05 | Connects to an existing audio-video conference system; enables the integration of existing conference room AV systems with Microsoft Teams by leveraging the functionality of RX-PAD Room ControllerAny room sizeAny number of users | Bring Your Own Audio-Video peripherals (interop may be required for best co-experience) |
| RXV200-B20 | With its 4K wide-angle camera and table-mounted speaker, this bundle is ideal for small rooms of up to 10 usersRX-PAD Room ControllerRXVCam50M (4K Camera, x10 digital zoom, Auto Framing, 100^ field of view)RX15 (2.5m pick-up radius)See schematic diagram below |   |
| RXV200-B40 | With its 4K wide-angle camera and a powerful Audio Bar with two satellite microphones, this bundle is targeted at large rooms of up to 16 usersRX-PAD Room ControllerRXVCam50M (4K Camera, x10 digital zoom, Auto Framing, 100^ field of view)RX40 audio bar (with 2 satellite mics covering a pickup radius of up to 8m pickup)See schematic diagram below |   |
1.3.1 RXV200-B40 Bundle
The figure below illustrates the RXV200-B40 bundle.
Figure 1-1: RXV200-B40

flowchart
graph TD
    A["RXVCm50M"] --> B["RX40"]
    B --> C["Power"]
    B --> D["Ethernet"]
    C --> E["USB 2.0"]
    D --> E
    E --> F["HDMI OUT"]
    F --> G["RXV200"]
    G --> H["MIC cable"]
    H --> I["RX-PAD"]
    I --> J["HDMI IN"]
    J --> K["PoE"]
    K --> L["Ethernet"]
    L --> M["MIC cable"]
    M --> N["Laptop"]
    N --> O["Other Device"]
    style A fill:#f9f,stroke:#333
    style B fill:#ccf,stroke:#333
    style C fill:#cfc,stroke:#333
    style D fill:#cfc,stroke:#333
    style E fill:#fcc,stroke:#333
    style F fill:#cff,stroke:#333
    style G fill:#ffc,stroke:#333
    style H fill:#cfc,stroke:#333
    style I fill:#fcc,stroke:#333
    style J fill:#cfc,stroke:#333
    style K fill:#fcc,stroke:#333
    style L fill:#cfc,stroke:#333
    style M fill:#cfc,stroke:#333
1.3.2 RXV200-B20 Bundle
The figure below illustrates the RXV200-B20 bundle.
Figure 1-2: RXV200-B20

flowchart
graph TD
    A["RXVcomSOM"] --> B["HDMI OUT"]
    C["Power"] --> B
    D["Ethernet"] --> B
    E["RXV200"] --> B
    F["RX15"] --> G["USB 2.0"]
    H["RX-PAD"] --> I["HDMI IN"]
    J["PoE"] --> I
    K["Ethernet"] --> I
    L["USB 3.0"] --> B
    M["Computer"] --> N["Device"]
1.4 Hardware
The RXV200's plug-and-play simplicity makes it easy to connect a screen, sound system, AI camera with auto-framing to simplify Microsoft Teams physical whiteboard sharing, all controlled by a meeting room controller.
HDMI In enables participants to share their desktop during a meeting via a simple cable connection
4K HDMI Out enables users to seamlessly connect and display ultra-high-definition visuals in compatible external displays during Teams meetings, ensuring a visually immersive and crystal-clear collaboration experience. Whether you're presenting a slideshow, streaming content, or simply extending your display, 4K HDMI Out enhances the overall viewing experience.
1x USB C and 2x USB A to connect camera and audio peripherals
Note: RXV200 supports a single display irrespective of whether it's connected to HDMI1 or HDMI2:
- When RXV200 boots up, if a single TV screen is connected to RXV200, it can be connected to either HDMI1 or to HDMI2. This TV screen will function as the primary screen irrespective of whether it is connected to HDMI1 or HDMI2.
- If after that another TV screen is connected to the available HDMI port on RXV200, this TV screen will become the secondary screen.
- If two TV screens are connected to RXV200 prior to boot up, the TV screen connected to HDMI1 will be used as the primary screen while the other TV screen will be used as the secondary screen.

1.5 Management
RXV200 bundles are managed using AudioCodes' One Voice Operations Center (OVOC) Device Manager or Microsoft's Teams admin center (TAC), enabling IT admins to monitor and upgrade the devices from anywhere. Using OVOC, IT admins can easily monitor and manage all bundled devices from a centralized location. Management includes:
■ Firmware management / upgrade
- Alarm management
■ Upgrade the MTR APK
Admins can monitor the status of the device's software modules from the System State page as shown here.
1.6 Specifications
The powerful RXV200 Android compute unit is suited to every room configuration. The device supports:
■ Multiple cameras
- Modular design allows connecting any current and future peripherals
• AudioCodes's RXVCam50M camera (4K, auto framing, EPTZ)
■ Dual screen support
■ Audio: RX40 sound bar or RX15 speakerphone
■ Advanced AI capabilities
■ Fully controllable by RX-PAD center-of-room intelligent touch controller
RX-PAD includes proximity sensor for activating the system and welcoming users
HDMI In enables participants to share their desktop content during a meeting via a simple cable connection
4K HDMI Out support
1.6.1 RXV200
The table shows RXV200 specifications.
Table 1-2: RXV200 Specifications
| Feature Description | |
| HDMI Outputs | 2 x 4K HDMI Outputs to external screens |
| HDMI Input type | HDMI 2.0 Input (including audio) |
| Network provisioning | TCP/IP (IPv4), DHCP/ static IP; Time and date synchronization via SNTP; VLAN support; QoS support: IEEE 802.1p/Q tagging (VLAN)Layer 3 TOS and DSCP RTCP support: (RFC 1889)IP address configuration: TCP/IP (IPv4), DHCP/static IP; Time and date synchronization: SNTPQoS support: IEEE 802.1p/Q tagging (VLAN), Layer 3 TOS and DSCP RTCP support: (RFC 1889) |
| Performance | PROCESSORSnapdragonTM QCS8250MEMORYLPDDR5, 8GSTORAGEUFS3.1, 128GGRAPHICSAdrenoTM 650 |
| Device interfaces | Ethernet: 10/100/1000 Mbps (RJ-45) network interfaceWi-Fi (dual band support)Support 802.11 a/b/g/n/ac/axBluetooth 5.1Proximity join and casting via BluetoothInterfaces: USB 3.0 for audio and video peripherals. Two are Type A, one is Type C12V/3A DC power input |
| Wi-Fi type | Dual band Wi-Fi |
| Chipset type | Latest chipset from QUALCOMM for video/conf applications |
| OS | Android 10 |
| UC platform support highlights | Microsoft Teams Room for Android application with:Intuitive meeting experience with calendar integration and click-to-join or proximity-join experience |
| Security | Encryption: TLS (Transport Layer Security), SRTP encryption for media, AES256 Network Access Control: IEEE 802.1xBuilt-in certificateKensington Lock for security measures |
| Design | DIMENSIONS (W X D X H) 170 x 170 x 41.4 mmWEIGHT 0.987 kg |
| Manageability | AudioCodes One Voice Operation Center (OVOC) | Device Manager |
1.6.2 RX-PAD
Following are the RX-PAD specifications.
Table 1-3: RX-PAD Specifications
| Feature | Description |
| Display | Landscape Touch 8" LCD (1280 x 800 resolution) |
| Device interfaces | Ethernet: 10/100/1000 Mbps (RJ-45) network interface (PoE)Wi-Fi (dual band support)Bluetooth 5.012V/3A DC power inputProximity Sensor |
| Network provisioning | TCP/IP (IPv4), DHCP/ static IP; Time and date synchronization via SNTP; VLAN support; QoS support: IEEE 802.1p/Q tagging (VLAN)Layer 3 TOS and DSCP RTCP support: (RFC 1889)IP address configuration: TCP/IP (Ipv4), DHCP/static IP; Time and date synchronization: SNTP |
| OS Android 12 |
1.6.3 RX15
Following are the RX15 specifications.
Table 1-4: RX15 Specifications
| Feature | Description |
| Connectivity | |
| USB | USB 2.0 |
| Microphone | |
| Pickup distance | 2.5 meters radius |
| Microphone | 6 element microphone array |
| Frequency | 150Hz~8kHz |
| Sensitivity | 38dBV |
| Signal-to-noise ratio | 65dB |
| Speaker | |
| Maximum sound pressure level | 80dB SPL at 1m |
| Distortion | ≤4% @150Hz~16kHz |
| Signal-to-noise ratio | ≥75dB at 1m |
| Frequency response | 150Hz~16kHz |
| Interfaces | |
| Buttons | 6 (Power, Answer/Hang Up, Mute, Bluetooth, Volume +, Volume -) |
| Indicator light | Power, Volume, Bluetooth, Mute, Answer/Hang Up |
| Other parameters | |
| Device weight | 395gr |
| Dimensions | 120mm x 35.2mm |
| Storage temperature | -20°C to 65°C |
1.6.4 RXVCAM50M
Following are the RXVCAM50M specifications.
| Feature Description | |
| Camera | |
| Image Sensor 1/2.5 inch high quality 4K CMOS sensor | |
| Effective Pixels 8.28MP, 16:9 | |
| Video Output USB3.0, Type B. | |
| Video Resolution | 3840×2160 @30fps, 1920×1080P @30fps/25fps, 1280×720P@30fps/25fps Sub stream: 1280×720P @30fps/25fps, 640×480P@30fps/25fps, 320×172P @30fps/25fps |
| Angle of View | 102°(D) / 100°(H) / 64°(V) |
| Focal Length | f=2.26mm |
| Aperture | F1.8 |
| Minimum Illumination 0.1Lux (F1.8, AGC ON) | |
| Digital Zoom 10x | |
| DNR 2D & 3D DNR | |
| PTZ Control Supports ePTZ | |
| Input Voltage DC 5V | |
| Input Current 1A (Max) | |
| Power Consumption | 5W (Max) |
| Store Temperature | -10°C~+60°C |
| Store Humidity | 20%~90% |
| Working Temperature | -10C°~+50°C |
| Working Humidity | 20%~80% |
| Dimensions | 220mm x 93.75mm x 56.5mm |
2 Getting Started

Note: See the RXV200 Microsoft Teams Rooms on Android Compute Unit Quick Installation Guide shipped with the product or available from AudioCodes for how to get started, including:
• Package contents checklist
- Positioning
- Mounting
• Cabling
- Powering up

This page is intentionally left blank.
3 Connecting to RXV200

Note: See the RXV200 Microsoft Teams Rooms on Android Compute Unit Quick Installation Guide shipped with the product or available from AudioCodes for information about connecting the RXV200.
After mounting and cabling RXV200, pair it with RX-PAD (see the guide Pairing RX-PAD with Teams Rooms on Android AudioCodes Devices).
3.1 Signing in
Users are provided by default with the option to sign in from any browser or smartphone with a prominent device code. If you choose to sign in from the device, you can enter your username and password on-screen via the device keyboard.

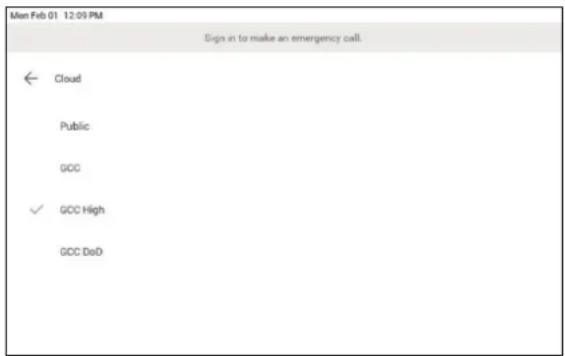
3.1.1 Multi-Cloud Sign-in
For authentication into specialized clouds, the network administrator can choose the Settings gear on the sign-in page to see the options that are applicable to their tenant.

3.1.2 Remote Provisioning and Sign in from Teams Admin Center
See Remote provisioning and sign in for Teams Android devices - Microsoft Teams | Microsoft Docs for more information.
IT admins can remotely provision and sign in to a Teams device.
To provision a device remotely, the network administrator needs to upload the MAC IDs of the devices being provisioned and create a verification code. The entire process can be completed remotely from the Teams admin center.
Step 1: Add a device MAC address
Provision the device by imprinting a MAC address on it.
- Sign in to the Teams admin center.
- Expand Devices.
- Select Provision new device from the Actions tab.

In the 'Provision new devices' window, you can either add the MAC address manually or upload a file.
Manually add a device MAC address
- From the Awaiting Activation tab, select Add MAC ID.
- Enter the MAC ID.
-
Enter a location, which helps technicians identify where to install the devices.
-
Select Apply when finished.
Upload a file to add a device MAC address
- From the Awaiting Activation tab, select Upload MAC IDs.
- Download the file template.
- Enter the MAC ID and location, and then save the file.
- Select the file, and then select Upload.
Step 2: Generate a verification code
You need to generate a verification code for the devices. The verification code is generated in bulk or at the device level and is valid for 24 hours.
From the Awaiting Activation tab, select an existing MAC ID. A password is created for the MAC address and is shown in the Verification Code column.
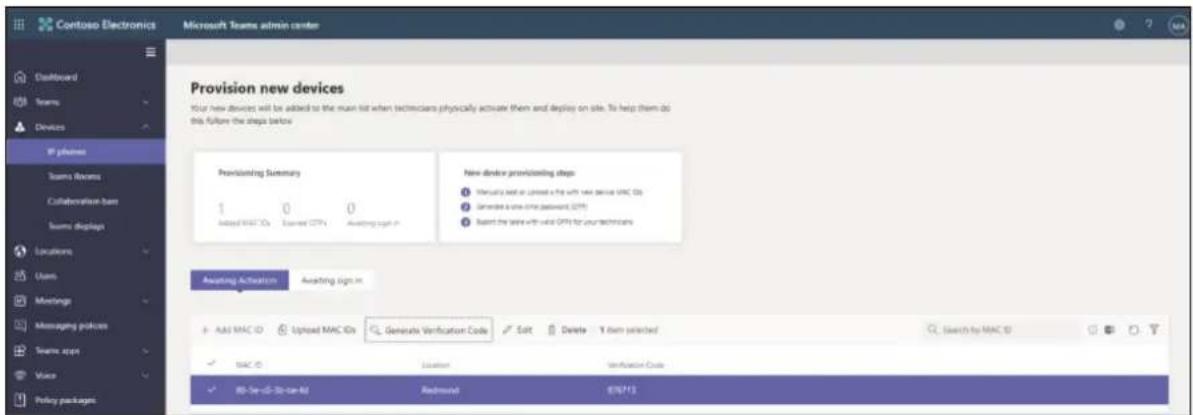
You'll need to provide the list of MAC IDs and verification codes to the field technicians. You can export the detail directly in a file and share the file with the technician who is doing the actual installation work.
Step 3: Provisioning on the device
Once the device is powered up and connected to the network, the technician provisions the device by choosing the 'Settings' gear on the top right of the new 'Sign in' page and selecting Provision phone.
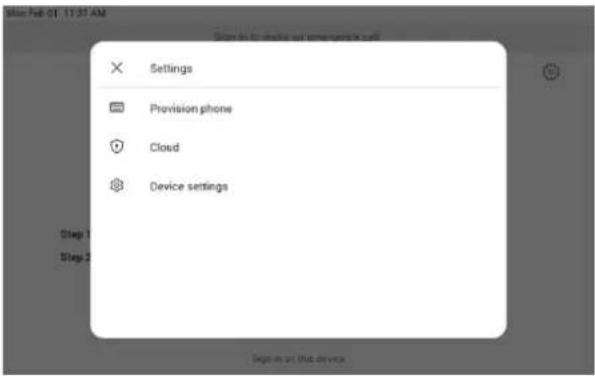
The technician is then expected to enter the device-specific Verification code that was provided in the Teams admin center on the phone's user interface. Once the device is provisioned successfully, the tenant name will be available on the sign in page.

Step 4: Sign in remotely
The provisioned device appears in the Awaiting sign in tab. Initiate the remote sign-in process by selecting the individual device.
- Select a device from the Awaiting sign in tab.
- Follow the instructions in Sign in a user, and then select Close.

The tenant admin is expected to complete authentication on the device from any browser or smartphone.
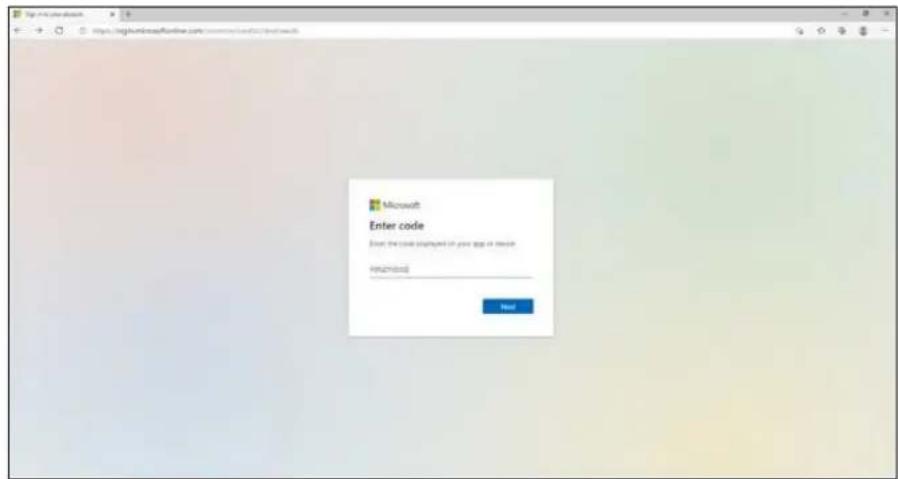

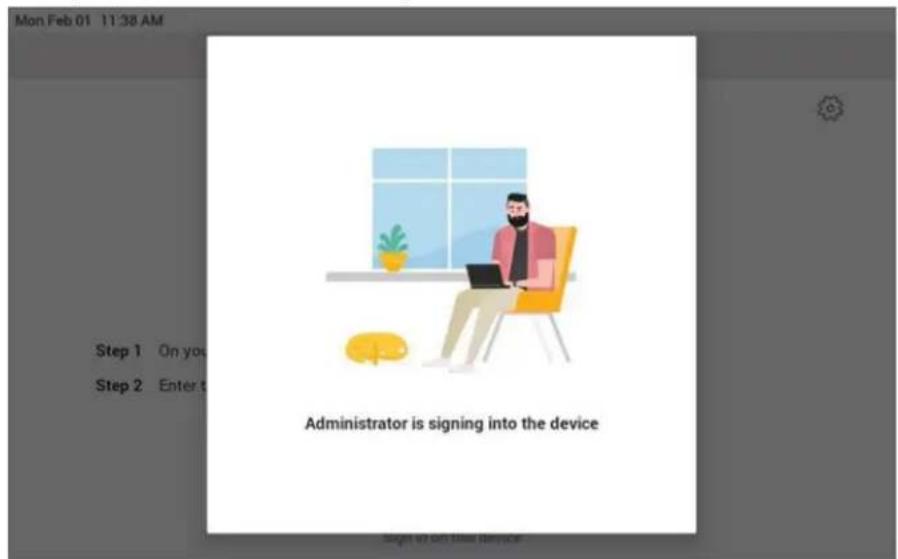
When the tenant admin is signing in from Teams Admin Center, the user interface on the device is blocked to prevent other actions on the phone.
4 Using General RXV200 Functions
This section shows how to use general RXV200 functions.
To get started:
- After signing in, view the RXV200 home page.
Figure 4-1: Home Page

4.1 Configuring a Bundle
Admin can configure one of three bundles depending on the solution the enterprise acquired.
To configure a bundle:
- Open the Bundle page (Settings > Bundle).

- Select the bundle the enterprise acquired. The preceding figure shows RXV200 + RX-PAD as the selected bundle. See here for more information about available bundles.
4.2 Managing Camera Presets
You can adjust RXV200 camera presets to suit your preferences.
To access RXV200 camera presets:
- On the RX-PAD device, touch the camera button.
Figure 4-2: Camera Settings


Note: The default Room preset enables you to capture all participants and actions in a meeting room.
- Touch the Create New Preset option and configure the PTZ settings you want.

Note:
- If you configure a preset (for example) to zoom in and focus on a whiteboard in the meeting room, users in a video call-meeting can switch to it and later switch back to the default Room preset or any other defined preset.
-
Users can easily toggle between presets according to their requirements per call.
-
[Optionally] Edit a preset.
Figure 4-3: Camera Settings – Edit Preset

- [Optionally] Click the vertical ellipsis and then from the pop-up menu select the Restore option to return camera settings to their defaults.
Figure 4-4: Restore


Note:
- During a meeting, any user can create a temporary preset; when the meeting ends, that preset is automatically deleted.
- Camera Settings can be changed during a meeting without turning off the video to remote parties.
- Camera Settings can optionally be accessed from RXV200's Device Settings though admin permissions are necessary.
4.2.1 Configuring a Color Mode Preset on the RXVCAM50M/L Camera
When RXV200 is connected to the AudioCodes RXVCAM50M/L camera, users can configure a Color Mode preset from RX-PAD.
Users can configure either:
Default
Normal
Clarity
Bright
Soft

Each Color Mode preset incorporates the following attributes:
Default: Brightness - 50, Contrast - 50, Saturation - 70
Normal: Brightness - 50, Contrast - 50, Saturation - 70
■ Clarity: Brightness - 60, Contrast - 50, Saturation - 60
Bright: Brightness - 50, Contrast - 50, Saturation - 70
■ Soft: Brightness - 50, Contrast - 50, Saturation - 60

Note:
• RXV200 supports YUYV format.
• Some PTZ cameras such as ClearOne only support YUYV format.
4.3 Selecting the Default Audio Device
Admin can select the default audio device if there's more than one audio device option available.
To select the default audio device:
- Open the Sound page (Device settings > Sounds).

- From the 'Default audio device' drop-down, select the default device.
4.4 Starting a New Meeting
To start a new meeting:
- In the home screen, navigate to and select the Meet Now option.
Figure 4-5: New meeting – Invite someone
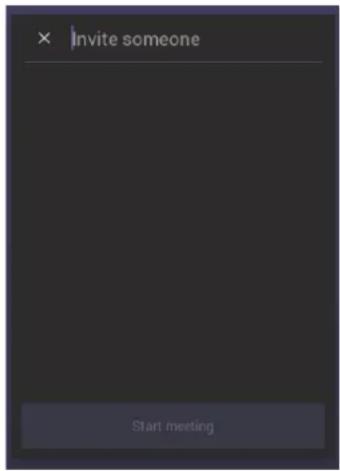
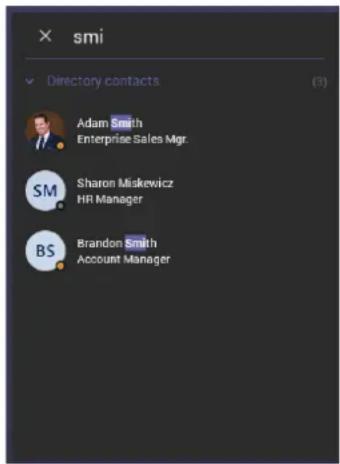
- In the 'Invite someone' field, enter the name of a person to invite; after entering the first letters in the name, matching contacts from directory are displayed.
Figure 4-6: New meeting – Enter the name of a person
- Select the name of the person to invite.
Figure 4-7: New meeting – Select the name of a person

- Invite someone else – or others – and then select Start meeting.

Note: The server allocates a meeting ID number and sends an invite message to all participant devices. All devices simultaneously indicate an incoming call (the 'Calling' screen is displayed). The server manages every aspect of the call.
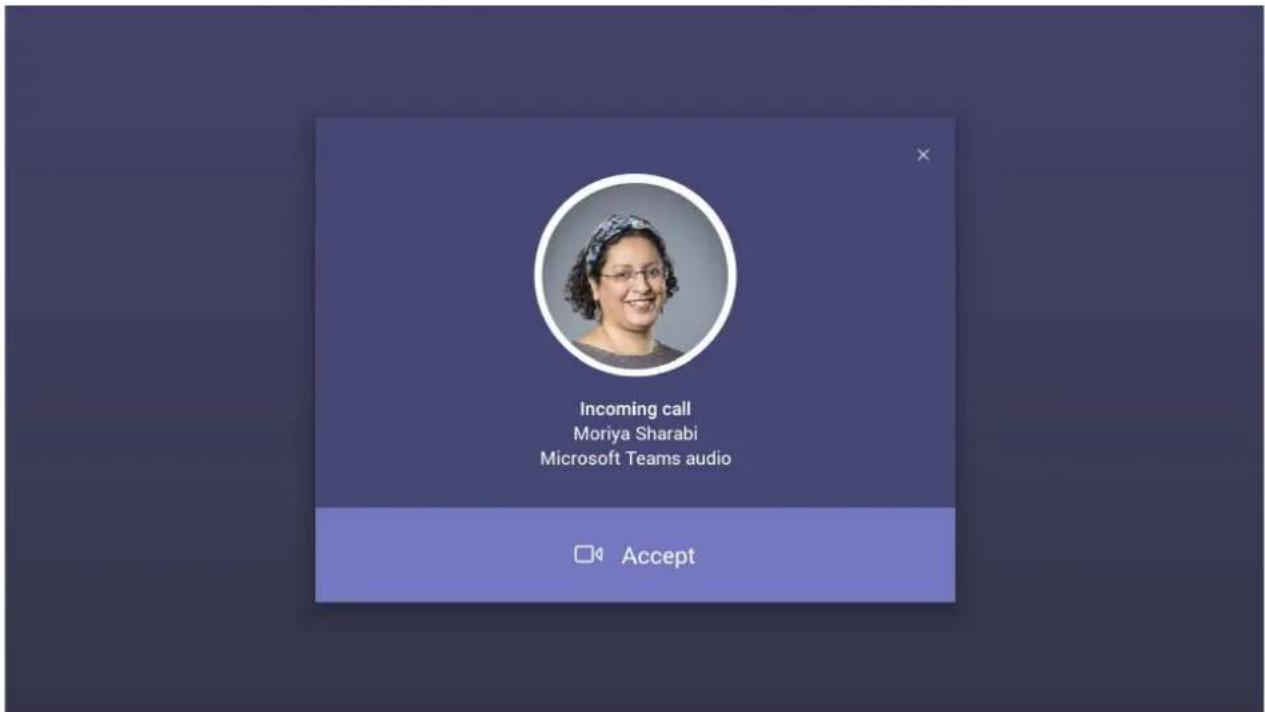
- Select Accept. Note that according to the icon in the 'Incoming call' screen shown in the preceding figure, the caller has video capability.

natural_image
Circular portrait of a smiling woman with glasses, set against a dark background with a small inset image of another person (no text or symbols visible)
natural_image
Circular portrait of a smiling woman with curly hair, set against a dark background (no text or symbols visible)4.5 Dialing a Number
You can manually dial someone's phone number.
To dial a phone number:
- In the home screen, navigate to and select the Dial pad option.
Figure 4-8: Dial pad

- Enter the digits of the destination to call and select Call.
4.6 Enabling Proximity Join
'Proximity Join' allows you to discover and add a nearby, available Microsoft Teams Room, i.e., the RXV200, in this case, to any meeting. It's also possible to accept the incoming meeting on the console of the room.
The feature functions in combination with Bluetooth and 'Bluetooth Beaconing', an integral feature in Microsoft Teams Rooms (MTRs). The MTR device is RXV200. If you bring a laptop or a Teams Mobile Client near the RXV200, it'll offer the RXV200 as the room audio device. The figure below shows how to select the room audio device.

After you select the room audio device, the meeting is opened without any audio device on your PC client, and then the room meeting device (RXV200) gets a request to join the meeting.
To enable 'Proximity join':
In the Settings screen, navigate to and select Proximity join. If it's disabled, it'll become enabled and vice versa.

4.7 Sharing a Whiteboard
Teams meetings on the RXV200 allow participants to open a virtual whiteboard – a digital canvas - on which they can sketch, illustrate, collaborate, brainstorm, plan, and share perspectives with one another in real time. The focus switches away from the presenting participant to the whiteboard. For more information about this Microsoft feature, see here.
To share the Whiteboard:
- From the Settings menu, select Share Whiteboard.
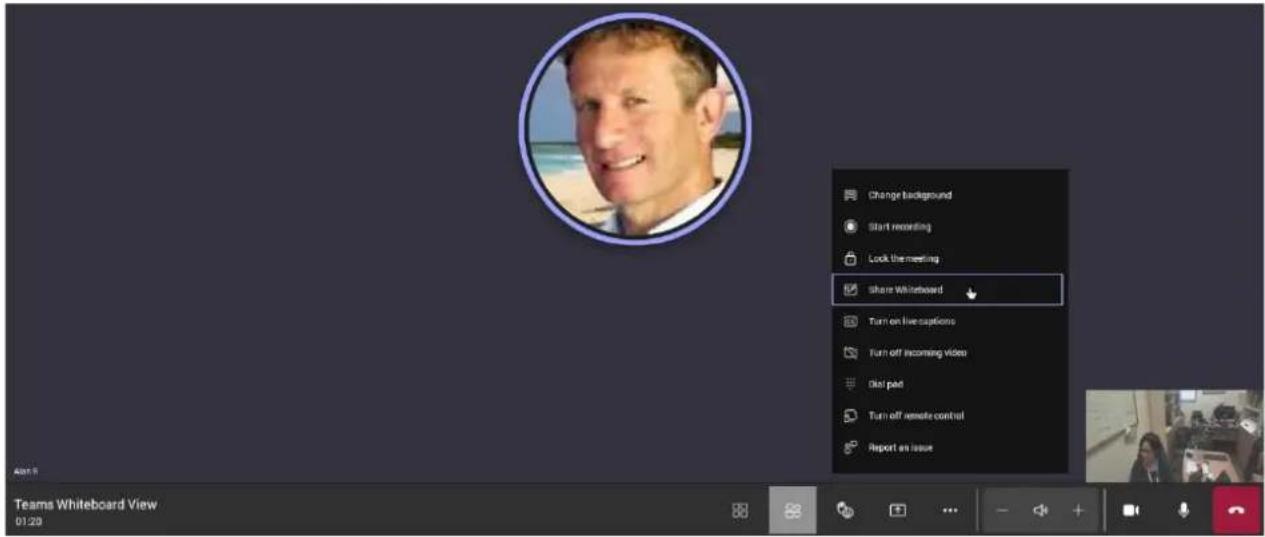
- Alternatively, access the Whiteboard from Share content:

- View the following Microsoft Whiteboard initializing indication:

- View the Whiteboard in the Teams desktop application or in Teams client:

- Edit the Whiteboard; every participant with privileges can edit it.

4.8 Screen Sharing
RXV200 enables users to share their PC/laptop screen via the RX-PAD HDMI In port, to be shared on the screen in IDLE mode and peripheral mode.

Note:
- A short HDMI cable connects the PC/laptop to the RX-PAD HDMI In port.
- The connection between RX-PAD and RXV200 is thus 'cableless'.
The feature offers added flexibility by enabling the use of a shorter HDMI cable connected to the center of the meeting room desk, in contrast to a longer (more expensive) cable connected to the RXV200 positioned in the front of the room.
- Teams Meeting Mode: When the MTR is in a meeting, the presenter can use the Teams app 'Share' key to share their PC screen (when their PC is connected to RX-PAD's HDMI In port) with in-person attendees who are physically present in the same meeting room, as well as with remote attendees. [Audio sharing is currently unsupported].
- Standby Mode: When the MTR is not in a meeting, the presenter can use the Teams app 'Share' key to share their PC screen (when their PC is connected to RX-PAD's HDMI In port) only with in-person attendees who are physically present in the same meeting room.

flowchart
graph LR
    A["Laptop"] --> B["Smartphone"]
    B --> C["Screen Sharing"]
    C --> D["Monitor"]
    D --> E["Video Call Interface"]
To enable utilization of this feature, make sure the following is permitted in the organization's firewall settings:
- Hostname: jitsi-meet-ipp.eastus.cloudapp.azure.com
IP Address: 20.115.49.175 - Allow incoming connections on the following ports:
• 80/tcp
• 443/tcp
• 3478/udp
5349/tcp
• 10000/udp
4.9 Updating RXV200 Audio and Camera Peripherals Firmware

Note:
- RXV200 firmware update includes RXVCam360 camera and speaker firmware upgrade.
• RXV200 firmware update includes RXVCam70 camera firmware upgrade.
• RXV200 firmware update includes RXVCam50 camera firmware upgrade.
• RXV200 firmware update includes RX15 speaker firmware upgrade.
Updating RXV200 audio and camera peripherals firmware is a safe and streamlined process. Peripherals' update packages are included in the RXV200 firmware update and executed according to the currently connected peripheral. Here's the user experience:
- View 'Device is updating...'
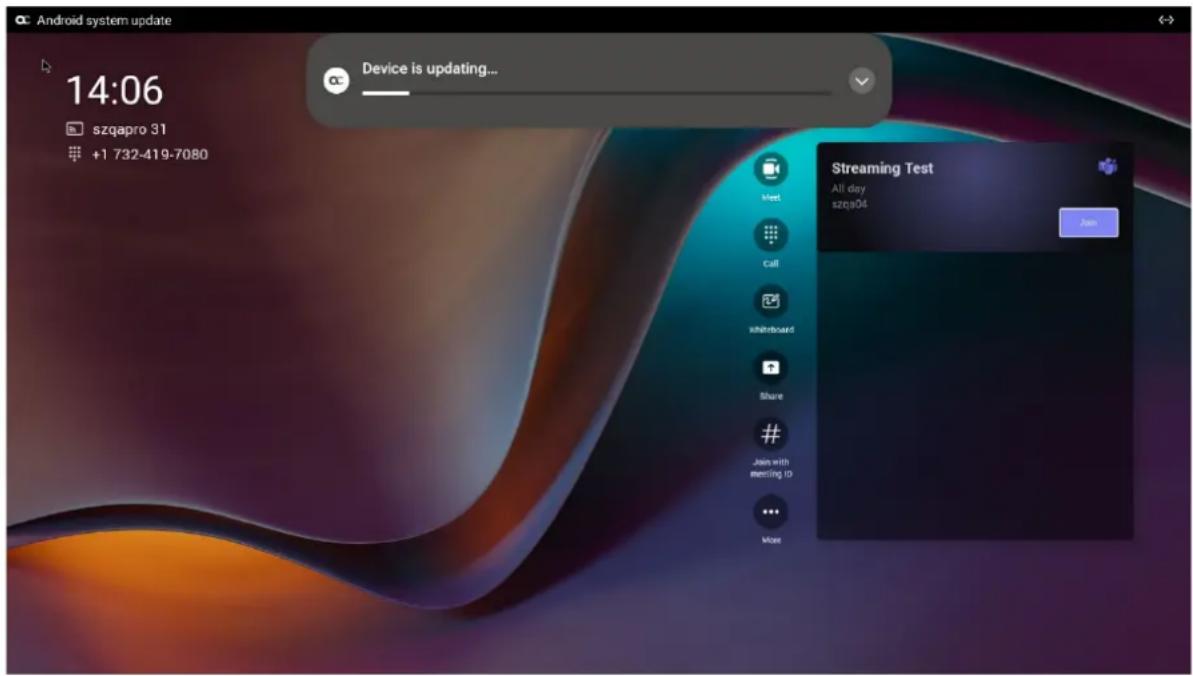
- View the notification 'AudioCodes RXV200 RXVCam70 / RXVCam360 / RXVCam50 firmware is being updated, do not reboot the device'.
- Click OK.
- If RX15 is connected, you'll view the notification: 'AudioCodes RX15 firmware is being updated, do not reboot the device'
- Click OK.
- After a peripheral firmware upgrade is completed, the connected device will perform a reboot and an associated notification will appear at the bottom of the screen.
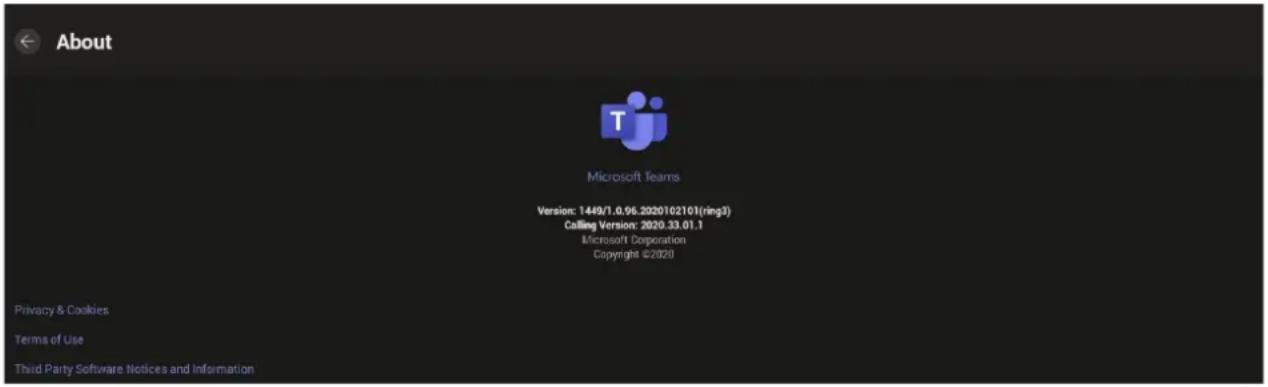
4.10 About Microsoft Teams
Information about the Microsoft Teams application can be viewed by navigating to and selecting the Settings screen's About option shown in the preceding figure.
4.11 Signing out
You can sign out of the application as one user and optionally sign in again as another.
To sign out:
- Navigate to and select Sign out in the Settings screen shown in the preceding figure.

Optionally, remote sign-out can be performed from Microsoft Teams admin center (TAC). Network administrators can provision the RXV200 from the TAC, remotely sign in, and also sign out.
To sign out of the RXV200 using Microsoft TAC:
- Navigate to the TAC screen shown in the figure below and from the … menu located in the uppermost right corner of the screen, select Actions and then Sign out.

4.12 Enrolling a Device with Intune Policies
Two ways are available to enroll an AudioCodes Teams Android-based device in Intune:
■ Create a dynamic group - see here
■ Create an exclusion group - see here
4.12.1 Creating a Dynamic Group
See here how to create dynamic groups in Intune for enrolling AudioCodes Android-based Teams devices.
4.12.2 Creating an Exclusion Group
The information presented here shows how to exclude AudioCodes Android-based Teams devices from the organization's Intune policies.
To exclude devices from the organization's Intune policies:
■ Remove all conditions that were previous configured:
- Access Microsoft Azure Government Portal Home > Conditional Access Policies > Require Hybrid Joined or Intune to Access Cloud Resources Conditional Access policy as shown in the figure below.
- Exclude the device from Intune policies and replace displayName -contains RXVxx
where RXVxx is the name of the device model (device.model).

4.13 Removing Devices from Intune admin center
You can remove devices from Intune admin center when the maximum capacity of signed-in devices is reached.
To remove devices from Intune admin center:
- Go to Microsoft 365 admin center [portal.office.com] and log in with an Administration account.
- Navigate to Devices > Android devices.


Note: The Intune admin center service is licensed according to the terms of individual licenses so not all network admins will be able to navigate to it. Check if the license you're using includes the service or not.
- Click Bulk device actions.

- From the 'OS' drop-down under the Basics tab, select Android (device administrator). From the 'Device action' drop-down, select Delete. Click Next.
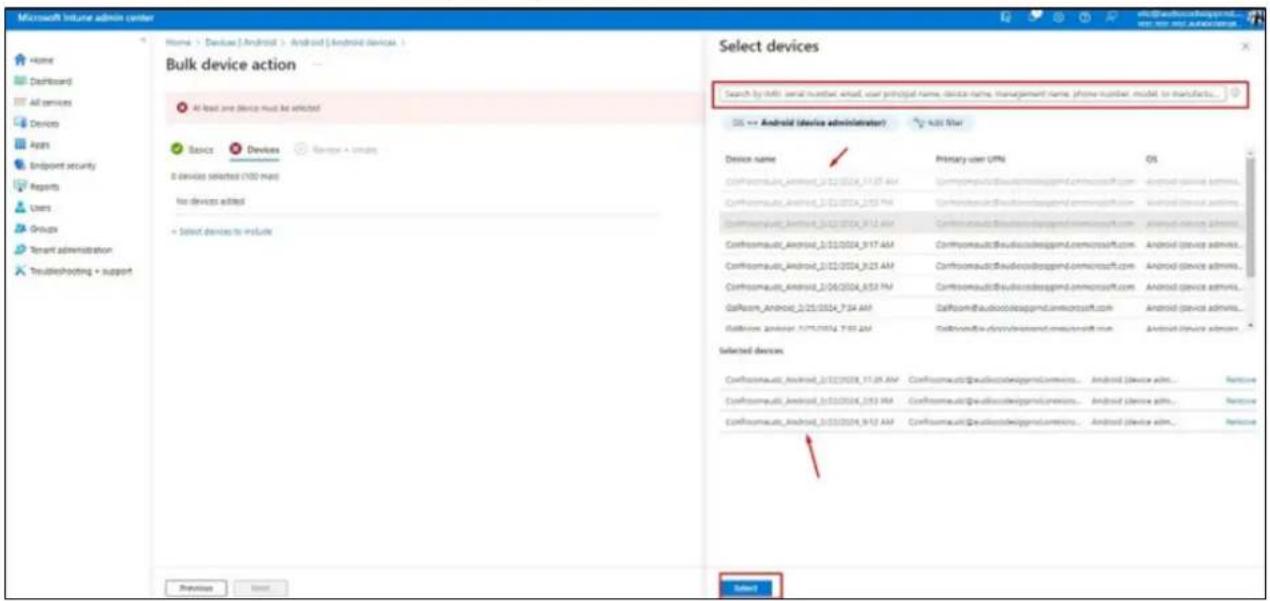
- Select the devices to delete (i.e., to remove from Intune admin center), and then click Select.

6. Under the Devices tab, click Next.

- Under the Review + Create tab, make sure your definitions are correct and then click Create; admin receives a notification that a delete action from Intune was successfully initiated on all devices and that n devices were removed.

Note: It may take some time to completely sync the devices with the account so after deleting the devices wait for 30 minutes before signing in.
This page is intentionally left blank.
5 Getting Familiar with RXV200 Settings
The section familiarizes you with the RXV200's settings. RXV200s are delivered configured with their default settings. Customers can customize them to suit enterprise requirements.
To access device settings:
- In the home screen, navigate to and select the More option.

- Navigate to and select Settings.

- Navigate to and select Device settings.

- Navigate to and select Device Administration.

- Log in as administrator.

Note: Logging in as Administrator is required for debugging options. It's password protected. Default: 1234. After logging in as Admin, you can log out | change password.
- Select Login.

- Enter the password (1234) in the 'Enter password' field; use the virtual keyboard to enter the password.

Note: The virtual keyboard pops up for all 'Settings' fields to allow inputting characters and / or numbers. Two virtual keyboard types can be displayed: Numeric or QWERTY.
- Select OK; you're prompted to change password.

Note:
- The default password must be changed before access to the device via SSH is allowed.
-
The default password can be changed per device from the GUI, or via bulk configuration of multiple devices using Microsoft's TAC or AudioCodes' Device Manager.
-
Enter a password; you're prompted to verify the password you entered. Criteria required for a strong password are provided (for strengthened security) in order to Log in as Administrator:
• The password length must be greater than or equal to 8.
• The password must contain one or more uppercase characters.
• The password must contain one or more lowercase characters.
• The password must contain one or more numeric values.
• The password must contain one or more special characters.

Note: These virtual keyboards are also displayed when the admin needs to enter an IP address to debug, or when they need to enter their PIN lock for the security setting.
After logging in, the Settings screen now also displays the settings under the section 'Device admin settings'.
- Click OK; the Settings screen now also displays 'Device admin settings', in addition to the 'User' settings.

5.1 Device Admin Settings
After logging in as Device Administration as shown in the previous section, you can configure Device Administration settings: Display, Date & Time, Wi-Fi, Camera.
5.1.1 Configuring Admin Login Timeout
Admin login timeout can be configured using the following cfg configuration file parameter: settings/admin_logout_timeout, values=3
■ Default: 3 (minutes)
■ Valid values: 1-10 (minutes)

Note:
- Timing begins when exiting the 'Device Settings' menu.
- When the timeout expires, the device logs out automatically.
• The functionality works for both registered and unregistered devices.
5.1.2 Configuring Display
Modify these settings to suit your preferences related to the look and feel of the user interface.
To configure Display settings:
- Under 'Device admin settings', navigate to and select Display.

- Under 'Display', navigate to and select Sleep.

- Navigate to and select the time to lapse before the interface 'goes to sleep'. Default: 10 minutes.
- Navigate to and select Font size.

- Navigate to and select Screen saver.
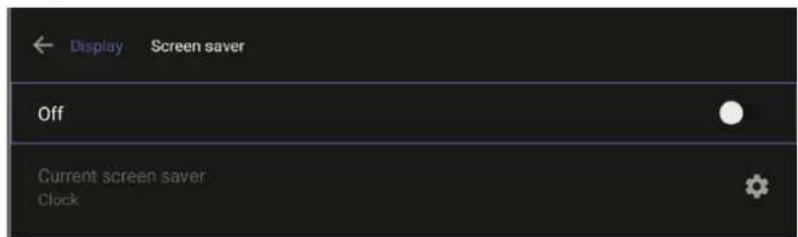
- Navigate to and select Off to switch it on and then choose the screen saver.
5.1.3 Configuring Date & Time
Date and time are automatically retrieved from the deployed Network Time Protocol (NTP) server.
To configure Date & Time:
- Under 'Device admin settings', navigate to and select Date & Time.
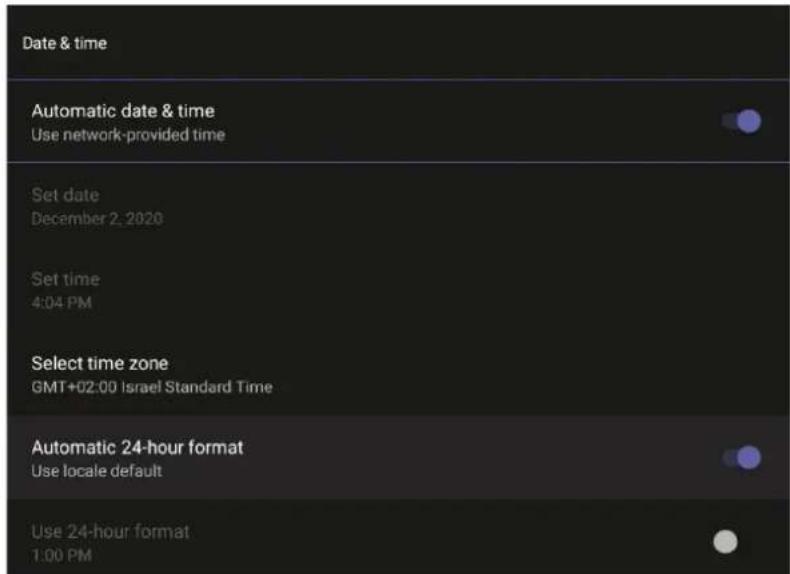
- Navigate to and select Use 24-hour format [Allows you to select the Time format].

Note: The device automatically detects time zone via geographical location (Automatic Time Zone Detection).
5.1.4 Configuring Wi-Fi
The RXV200 can connect to an Access Point via Wi-Fi.
Network administrators can configure Wi-Fi parameters for the RXV200. The parameters are concealed from the user's view. Users can enable | disable Wi-Fi in the device's user interface.

Note: Wi-Fi cannot be enabled | disabled using SSH command.
The Wi-Fi connection is transparent to users; which frequency is used, 2.4 GHz or 5 GHz, is made for users by the device; users cannot disable one or the other.
5.1.4.1 Connecting to an Available Wi-Fi Network
To connect to an available Wi-Fi network:

Note: Make sure to first disconnect your Ethernet cable. If it's connected, the device will not be able to connect to a Wi-Fi network.
- Under 'Settings', navigate to Wi-Fi and enable Use Wi-Fi.

- View a list of available connections.
- Select the Wi-Fi network you want and enter the password.
- View the network you selected 'Connected'.
5.1.4.2 Manually Connecting to a Wi-Fi Network
To manually connect to a Wi-Fi network:

Note: Make sure to first disconnect your Ethernet cable. If it's connected, the device will not be able to connect to a Wi-Fi network.
- Under Wi-Fi, select Add network and then enter the SSID of the network to add manually.

- From the 'Security' drop-down, select a security key strength (encryption method).

- Optionally meter the selected network. Leave the setting at its default value of Detect automatically if you don't want to meter the network. Select a Metered option to meter it.
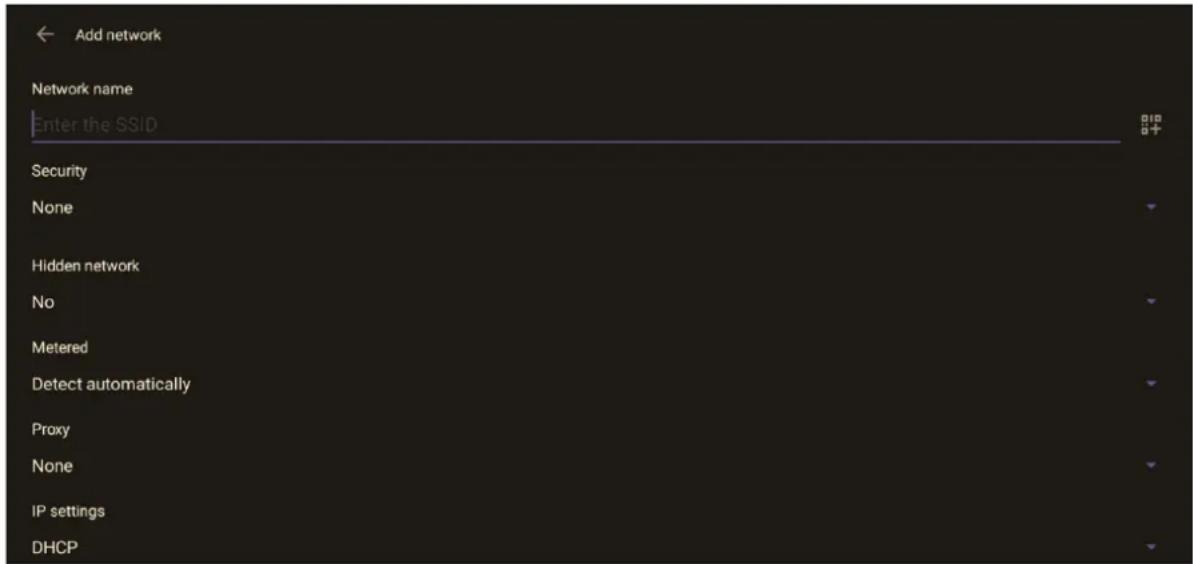

Note:
- 'Proxy' and 'DHCP' will automatically be configured by the network.
- Enabling the setting Turn on Wi-Fi automatically allows the device to automatically connect in the future to the highest signal-quality network remembered by the device.
- As an alternative to manually configuring Wi-Fi settings via the device's user interface, you can configure the Wi-Fi settings described in Table 5-1, using the Configuration File.
Table 5-1: Configuration File Wi-Fi Parameters
| Parameter Description | |
| network/wireless/advanced_options/dns1 | Defines the IP of the wireless DNS1. |
| network/wireless/advanced_options/dns2 | Defines the IP of the wireless DNS2. |
| network/wireless/advanced_options/gateway | Defines the IP address of the wireless gateway |
| network/wireless/advanced_options/hidden_network | Defines the name of the wireless hidden network. |
| network/wireless/advanced_options/ip_addr | Defines the IP address of the static Wi-Fi network if you're operating with a static Wi-Fi network. |
| network/wireless/advanced_options/ip_settings | Used to define DHCP. |
| network/wireless/advanced_options/network_prefix_length | Defines the network prefix length to be used. |
| network/wireless/advanced_options/proxy | Defines the proxy wireless server source. |
| network/wireless/advanced_options/proxy/auto_config/pac_url | Defines the URL of the PAC file. |
| network/wireless/advanced_options/proxy/manual/exclusion_list | Defines the list of IP addresses that will be blocked. |
| network/wireless/advanced_options/proxy/manual/proxy_hostname | Defines the name of the proxy host. |
| network/wireless/advanced_options/proxy/manual/proxy_port | Defines the proxy port. |
| network/wireless/anon_identity | Defines the anonymous wireless users who won't be seen. |
| network/wireless/ca_cert | Defines which CA certificate to use. |
| network/wireless/client_cert | Defines which client certificate to use. |
| network/wireless/domain | Defines the domain name. |
| network/wireless/eap_method | Defines the EAP method. |
| network/wireless/identity | Defines the identity of the user. |
| network/wireless/password | Defines the password of the network. |
| network/wireless/phase2_methodNONE,MSCHAPV2,GTC,PAP,MSCHAP | Defines the encryption method. Phase 2 applies only to the 802.1x EAP method. |
| network/wireless/security | Defines the security method (encryption protocol). |
5.1.5 Configuring Camera Settings
Settings controlling the look and feel of the video UI can be set to suit individual preferences.
To configure Camera settings:
- Under 'Device admin settings', navigate to and select Camera.

- Navigate to and select Camera settings; the video stream is played and the following is displayed on the right side of the screen:

- Create and edit presets using PTZ control. For more information, see here.
5.1.6 Selecting RXVCam70 PTZ Camera Tracking Mode

Note: Applies exclusively to RX-PAD bundled with RXV200.
To select a Tracking Mode:
- Open the Edit Preset page (Camera Settings > Room > Edit Preset).

-
Select one of the following RXVCam70 camera tracking mode options:
-
Manual
- Auto framing
- Speaker tracking
- Smart Gallery
3. Use the following as reference:
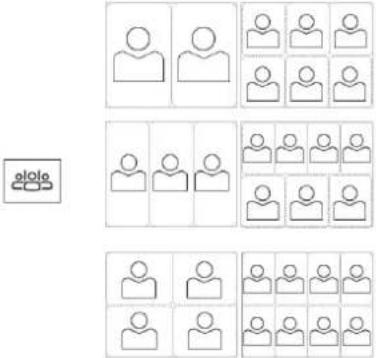
 Smart Gallery Smart Gallery | Automatically identifies 1-8 peopleAutomatically lays out the displayWhen a person moves, the camera automatically tracks them and keeps them centeredSwitching from one person to another is accompanied by dynamic effects of entry and exit |
 | |
 PresenterTracking PresenterTracking | Currently supported by the RC only)Automatically identifies and tracks the position of the presenter to ensure that that person remains centered.Press the left and right keys to select the target to track.Press OKto choose the target. |
 | |
 Manual Manual | Select this option to manually adjust the Zoom, Tilt or Pan.In RX-PAD's ‘Camera Settings’ page, use the sliders to set Zoom, Tilt or Pan.Using the RC, after selecting an area to display, zoom in | out, move up | down, and move left | right.This mode does not have AI functions. |
 | |

Speaker Tracking
■ Automatically tracks speakers who speak continuously for 3-5 seconds
- Focuses on the speaker (displays them close-up allowing participants to focus more)
■ Effective distance: 6m
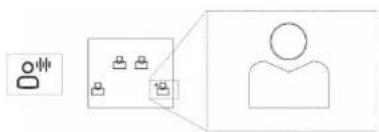
flowchart
graph TD
    A["Person"] --> B["Group 1"]
    A --> C["Group 2"]
    B --> D["User Icon"]
    C --> D

Group Framing
- Automatically detects and frames all the participants in the room.
■ Effective distance: 8m

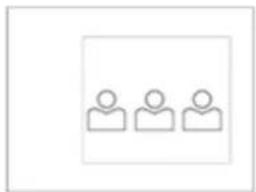
natural_image
Simple icon of three stylized human figures inside a rounded rectangle (no text or symbols)5.1.7 Selecting RXVCam360 Camera Tracking Mode

Note: Applies exclusively to RX-PAD bundled with RXV200.
To select a Tracking Mode:
- Open the Edit Preset page (Camera Settings > Presets > Room > Edit Preset).

-
Select one of the following RXVCam360 camera tracking mode options:
-
Manual
- Speaker tracking
- Smart Gallery
- Discussion
- Panoramic
3. Use the following as reference:
 Smart Gallery Mode Smart Gallery Mode | RecommendedAutomatically identifies 1-8 peoplePuts each in a dedicated frameMaximum: 8 framesWhen a person moves, the camera automatically tracks and keeps their head centered | |
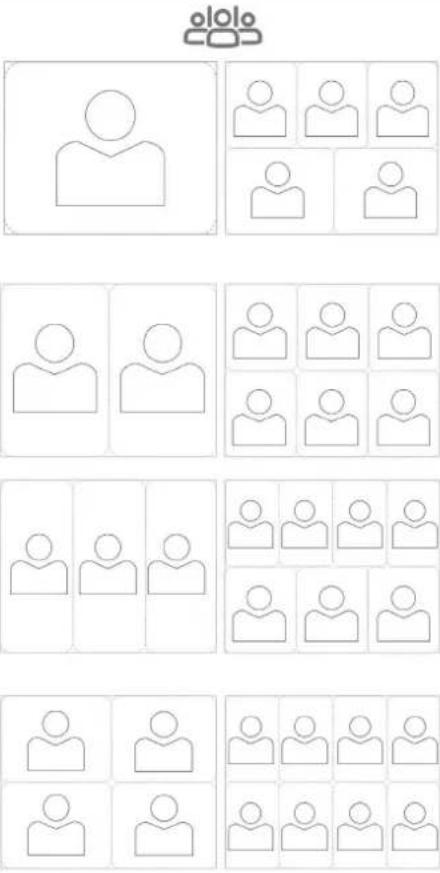 | ||
 Panoramic Mode Panoramic Mode | 360° panoramic high-definition viewThis mode does not have AI functions | |
 | ||
 SpeakerTrackingMode SpeakerTrackingMode | RXVCam360 follows the active speaker and automatically switches from the previous speaker to the next speaker within three seconds. | |
 | ||
 VoiceTrackingMode VoiceTrackingMode | This function is available due to direction-of-arrival (DOA) sound sourcing positioning recognition and displays the person speaking in full screen. The speaker will be changed with the current speaker within three seconds automatically. | |
 | ||
 DiscussionMode DiscussionMode | The lowermost panel displays a 360° panoramic view.The second level displays an automatic layout of 1-3 speakers.Only the person speaking is displayed.Those not speaking are not displayed. | |
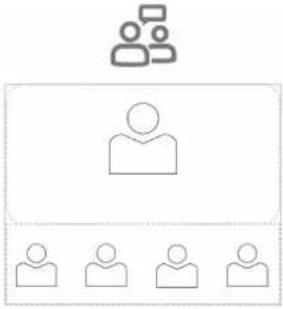 |  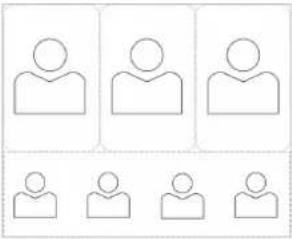 | |
| Manual Mode* | Select an area to focus on Use the RC to zoom in and out (five levels) and move up, down, left and right to select a focused area. The selected area has a fixed 16:9 aspect ratio. This mode does not have AI functions. | |
* Currently available only when using the RC
5.1.8 Limiting Resolution
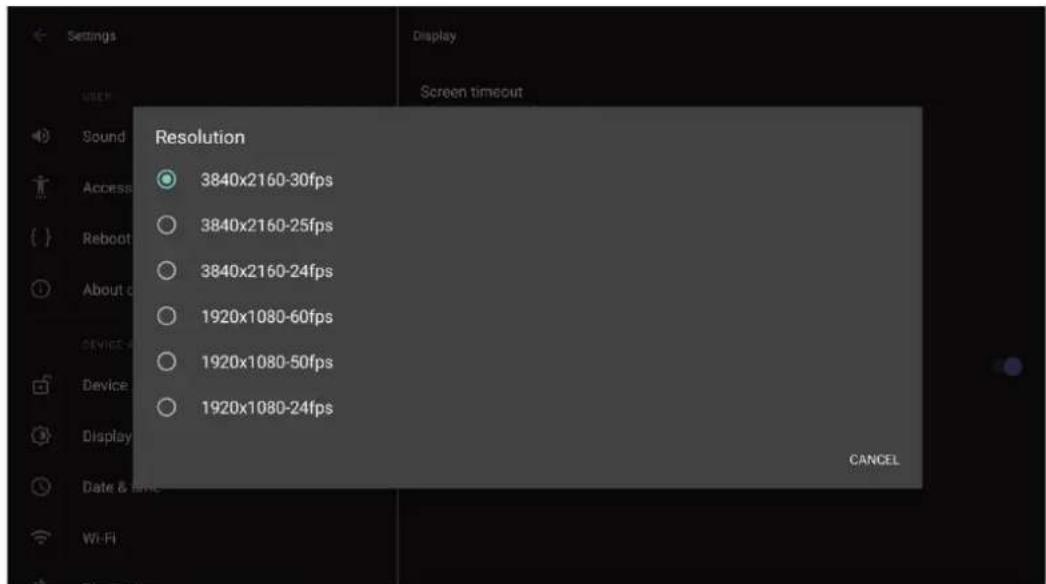
Admin can limit HDMI resolution and Frames per Second (FPS) for debugging purposes.
To limit HDMI resolution and FPS:
■ Open the Display page as shown in the figure below and perform the configuration:

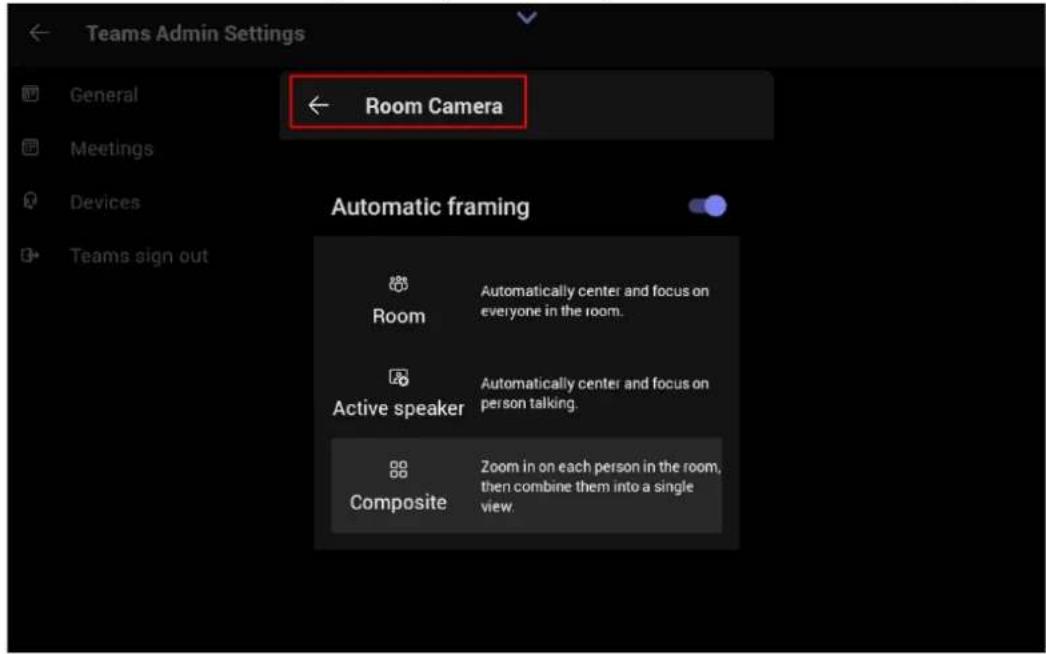
5.1.9 Configuring Teams Admin Settings
Smart camera settings (AudioCodes side) are now supported via Device Settings > Teams Admin Settings.
All smart camera settings tracking modes are synchronized with the Teams app side.
5.1.10 Configuring Camera Frequency
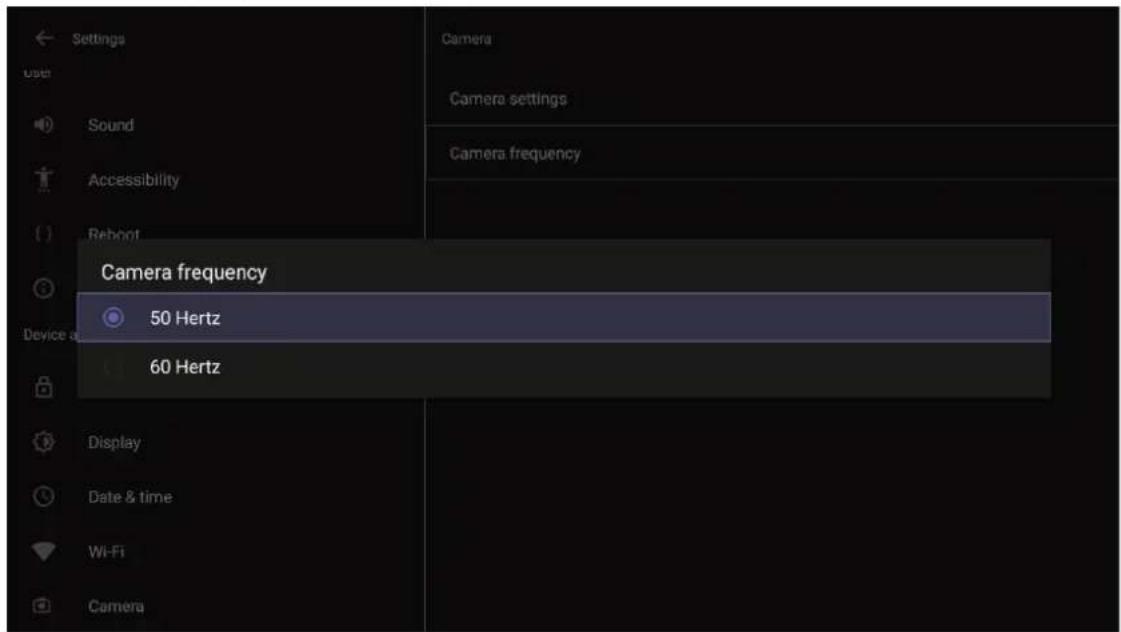
The Camera frequency (under Device settings) must be set per the power supply as follows:
110V - 60Hz
220V - 50Hz
5.1.11 Dual Camera Support

Note:
• This is a preview feature.
• The feature is for demo purposes.
■ RXV200 supports dual camera capability.
■ Two USB camera streams are merged into one player.
For more info about how to demonstrate this feature, please contact AudioCodes' R&D Support Team.
5.1.12 Configuring UI Language & Input
This setting allows users to customize inputting to suit personal requirements.
To set language and input:
- Under 'Device admin settings', navigate to and select Languages & input

- Navigate to and select Physical keyboard.

- Navigate to and select Show virtual keyboard.
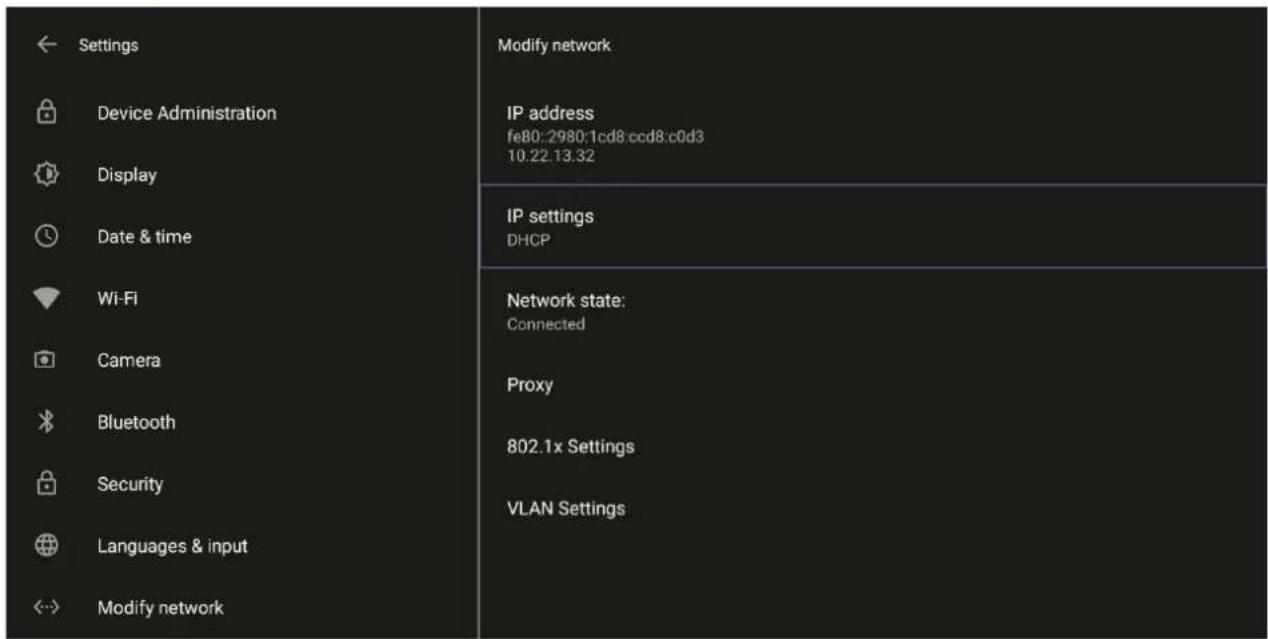
5.1.13 Modifying IP Network Settings
This setting enables the Admin user to determine IP network information and to modify IP network settings.
To modify network settings:
- Under 'Device admin settings', navigate to and select Modify network.
- Navigate to and select:
IP Address [Read Only]
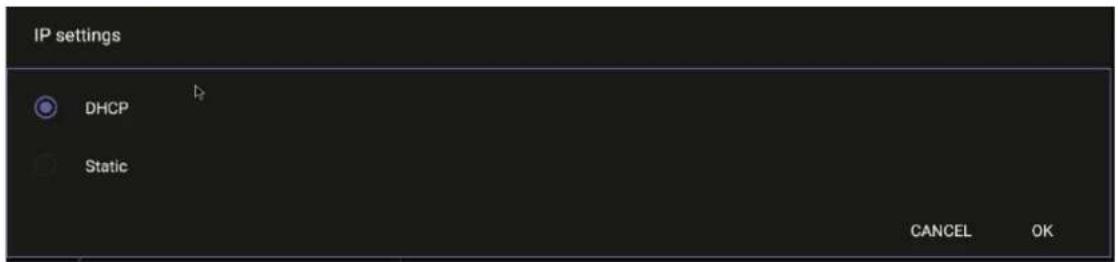
• IP Settings [DHCP or Static IP]
• Network state [Read Only]
Proxy

Manually (from the screen shown in the preceding figure). Allows you to configure the RXV200 with an HTTP proxy server. Configure the proxy hostname and proxy port and then navigate to and select Done.
DHCP Option 252 (recommended). Option 252 provides a DHCP client with a URL to use to configure its proxy settings:

The proxy setting is provided in a Proxy Auto-Configuration (PAC) file that contains a set of rules coded in JavaScript which allows a web browser to determine whether to send web traffic directly to the Internet or to be sent via a proxy server. PAC files control how the phone handles HTTP, HTTPS, and FTP traffic. Example of a basic PAC file:
function FindProxyForURL(url, host)
{
return "PROXY 10.13.2.40:3128";
}
• 802.1x Settings [Allows enabling 802.1x]
802.1X Authentication is the IEEE Standard for Port-based Network Access Control (PNAC). See https://1.ieee802.org/security/802-1x/ for more information.
• VLAN Settings
- Allows you to configure 'VLAN Discovery mode' to Manual configuration, Automatic configuration (CDP), Automatic configuration (LLDP) or Automatic configuration (CDP+LLDP)]

Cisco Discovery Protocol (CDP) is a Cisco proprietary Data Link Layer protocol Link Layer Discovery Protocol (LLDP) is a standard, layer two discovery protocol

Note: The VLAN configuration is by default data VLAN rather than voice VLAN, in compliance with the requirement specified here for the device not to advertise itself as a voice device. The default CDP/LLDP configuration is data VLAN.
- Allows you to configure 'VLAN Interval'.

'VLAN interval' refers to CDP/LLDP advertisements' periodic interval. Default: 30 seconds. You can increase or decrease the intervals between the CDP/LLDP packets that are sent, based on network traffic and topology.

Note:
- In versions before 1.19, if network VLAN mode '/network/lan/vlan/mode' was set to LLDP, the device retrieved the VLAN and LLDP switch information (for location purposes) from LLDP.
- From version 1.19, LLDP switch information (for location purposes) is retrieved when parameter network/lan/lldp/enabled=1 (even when VLAN is retrieved from CDP or VLAN is disabled or VLAN is Manual).
5.1.14 Configuring Call Settings
This setting enables the user to configure call-associated functionalities to suit personal preferences.
To configure call settings:
- From the home page, navigate to and select More and then navigate to and select Settings.
| Calling |
| Calling |
- Navigate to and select Calling.

• In the Calls screen, navigate to and select:
- Call forwarding to enable automatically redirecting incoming calls to another destination.
Also ring to configure other phones to ring on incoming calls; only displayed if Call forwarding is disabled.
If unanswered to configure the destination to which unanswered calls will be sent; only displayed if Call forwarding is disabled. Select either Off, Voicemail, Contact or number. - Calls for you to configure the ringtone played on your phone when calls come in.
- Forwarded calls
♦ Delegated calls to configure the ringtone played to delegates.
Block calls with no caller ID to block calls that do not have a Caller ID.
This page is intentionally left blank.
5.2 User Settings
In the 'Settings' screen you can optionally configure the following User settings: Sound, Accessibility, Reboot and About (read-only).
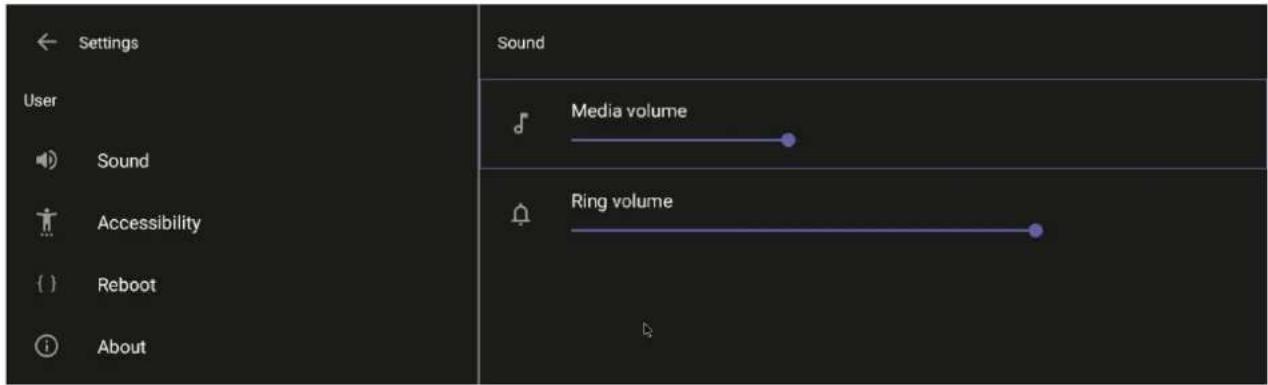
5.2.1 Setting the Volume
You can customize phone volume for a friendlier user experience.
To configure sound settings:
■ Under 'User', navigate to and select Sound.
5.2.2 Configuring Accessibility Settings
This option allows users to customize the screen to be reader-friendlier.
To configure the Accessibility setting:
- Under 'User', navigate to and select Accessibility.

- Adjust the settings to suit personal requirements.
5.2.3 Setting Live Captions
Live Captions can be set in regular one-on-one calls as well as in Teams meetings.
5.2.4 Enabling Display of Meeting Name using Exchange Online PowerShell
See here for information about how to access the exchange instance (the tenant). Admin must set the two parameters indicated in the figure below to 'False':

'Identity' is the name of the account to which admin wants to apply these two settings:
Set-CalendarProcessing -Identity "Maxim_MTR" -DeleteSubject \$false
Set-CalendarProcessing -Identity "Maxim_MTR" -AddOrganizerSubject \$false
5.2.5 Hiding Names and Meeting Titles
You can hide information such as names and meeting titles for individual devices via the Meetings page (More > Settings > Meetings):

5.2.6 Rebooting RXV200
Rebooting allows you to exit from and reconnect without needing to sign in again.
To reboot:
■ Under 'User', navigate to and select Reboot.

5.2.7 Viewing About RXV200
The 'About' screen gives you quick access to information about the RXV200 deployment.
To access the About screen:
- Navigate to and select About device.

- Navigate to and select Status.

- View the RXV200's firmware information.
- Admins can monitor the status of the device's software modules from the System State page.
This page is intentionally left blank.
6 Monitoring Modules Operational States
AudioCodes provides out-of-the-box troubleshooting capability: Admins can monitor the state of the device's modules from the System State page. If initial provisioning is unsuccessful or if admin encounters an issue related to the network / connection to Device Manager, the feature gives admin an indication as to why.
The feature enables debugging via the device's screen without requiring external systems. Admin can check connectivity independently of external apps.
To monitor the device's modules states:
■ Open the System State page (Settings > Debugging > System State).
![Settings Device Administration Display Date & time Wi-Fi Bluetooth USB Power saving Security Languages & input Modify network LLDP CDP Didn't run IEEE 802 1x Didn't run Network Ran with success result DHCP Option Ran with success result, IP : 192.168.33.4 DNS Ran once with success result, Server: [192.168.33.1] NTP Ran with success result, Server: time.android.com/216.239.35.4 Switch To Voice Vlan Didn't run Proxy Configuration](/content/2026/05/943170/images/b5af1863eb4c78649cd771c868a544fb14bfbf6a8746c769b1172d8aa31a4ea5.jpg)

Note:
• Each state displays its operational result: Successful or Failed
- For some states, the reason of failure will be displayed as well.
| Settings | Debugging System State |
| Device Administration | Connect To Device ManagerRunning, connected to https://ippdm.audiocodes.com:443/ |
| Display | Get Certificate By SCEPDidn't run |
| Date & time | Get Certificate By HTTPRan once with fail result, Reject response. Return code: 600 |
| Wi-Fi | |
| Bluetooth | Firmware UpdateDidn't run |
| USB | Configuration UpdateDidn't run |
| Power saving | RedirectDidn't run |
| Security | Apps UpdateDidn't run |
| Languages & input | Peripheral Devices Firmware Update |
| Modify network |

Note:
• Each state displays its operational result - successful or failed.
- For some states, the reason of failure will be displayed as well.
7 Debugging
Admin users can perform debugging for troubleshooting purposes.
To perform debugging:
- In the Settings screen under 'Device administration', select Debugging.

- Use the following debugging features available to Admin users:
• Log settings (see Log Settings)
• Remote Logging (see under Remote Logging)
• Diagnostic Data (see under Diagnostic Data)
- Reset configuration (see under Reset configuration)
- Restart Teams app (see under Restart Teams app)
• Company portal login (see under Company Portal Login)
• Launch mobile teams (see under Launch Mobile Teams)
- Debug Recording (see under Debug Recording)
- Erase all data (see under Erase all data (factory reset))
• Screen Capture (see under Screen Capture)
7.1.1.1 Log Settings | Collecting Logs
Device diagnostics (Logcat) can be collected using the Microsoft Admin Portal. For support purposes, general logs can be collected also using the Microsoft Admin Portal. The logs can help debug Teams application issues and also for issues related to the device.
To configure log settings:
- In the Debugging screen, select Log settings.
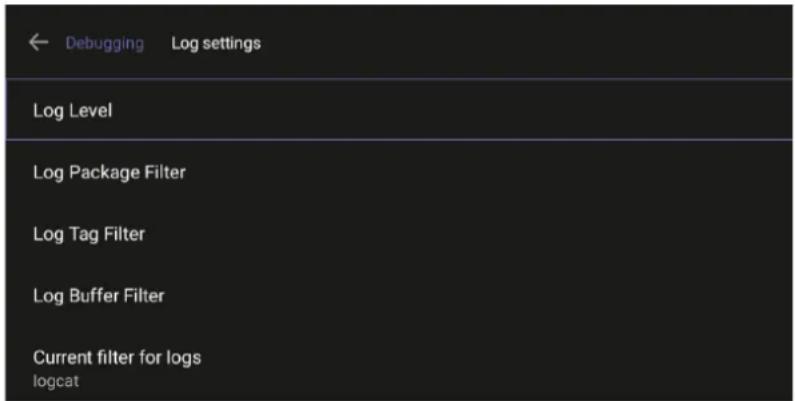
- Navigate to and select Log Level and then select either • Verbose, Debug, Info, Warning, Error, Assert -or-None
- Navigate to and select Log Package Filter and enter the filter.
- Navigate to and select Log Tag Filter and enter the filter.
- Navigate to and select Log Buffer Filter.

- Navigate to and select Current filter for logs.
To collect logs: - Reproduce the issue
- Access Microsoft Admin Portal and under the Devices tab click the Diagnostics icon.


Note: The preceding figure is for illustrative purposes. It shows an AudioCodes phone. The same screen is displayed for the RXV200.
- Click the Diagnostics icon.

10. Click Proceed; the logs are uploaded to the server.
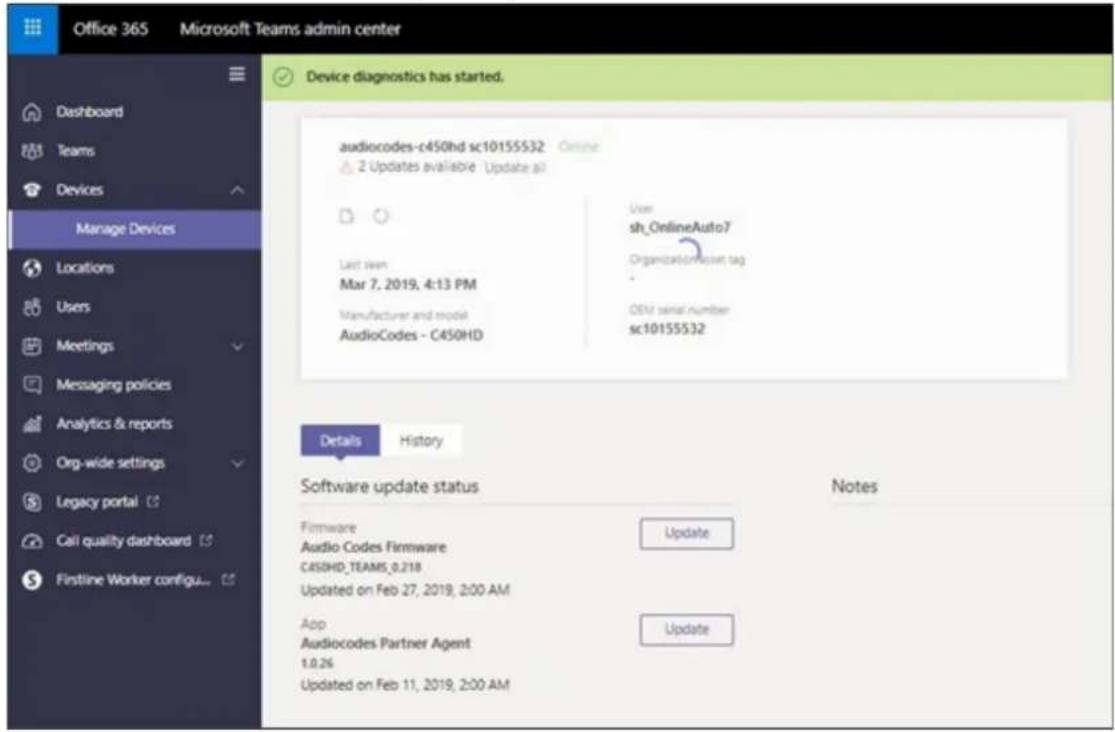
11. Click the History tab.

12. Click Download to download the logs.
7.1.1.2 Remote Logging
Remote Logging via Syslog provides the same log level as Device Diagnostics (performed via the Microsoft Admin Portal) with some additional information that may be relevant to device issues (not Teams application issues).
Diagnostics via the Microsoft Admin Portal are saved to the device sdcard and collected after the event. Remote Logging via Syslog is different. The logs are collected in real time.
To enable Remote Logging via Syslog:
- Navigate to and select Remote logging.
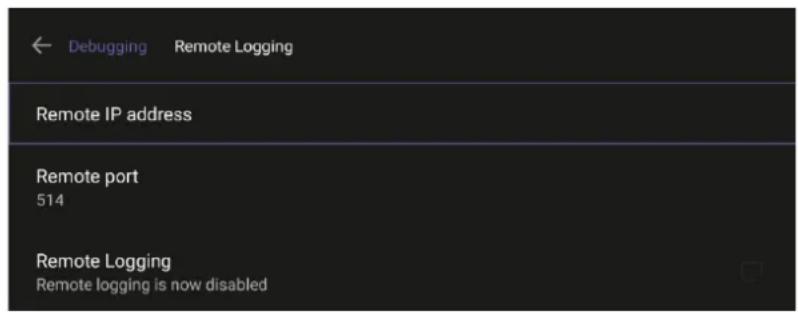
- Configure the 'Remote IP address' and 'Remote port' and enable 'Remote Logging'; the device starts sending logs to the Syslog server.

Note: Network administrators can also enable Syslog using Secure Shell (SSH) protocol.
To enable Syslog using SSH protocol, type the following command at the shell prompt:
setprop persist.ac.rl_address <syslog_server_ip>:<port>.
To disable Syslog using SSH, type the following command at the shell prompt:
setprop persist.ac.rl_address ""
7.1.1.3 Diagnostic Data
Admin users who need to get logs from the device can dump the logs to the phone's Secure Digital (SD) Card and then later collect them using Secure Copy Protocol (SCP) based on Secure Shell (SSH) protocol. Whenever an issue occurs, the Admin can dump the logs into the SD Card.
To use the tool:
- Navigate to and select Diagnostic Data.

-
Navigate to and select OK to confirm 'Copy logs to sdcard'; the RXV200 creates all necessary logs and copies them to the its SD Card / Logs folder.
-
Get the logs using SCP notation as follows:
scp -r admin@host_IP:/sdcard/logs/.
Following are the relevant logs (version and ID may be different to those shown here):
■ dmesg.log
- dumpstate-TEAMS_1.3.16-undated.txt
dumpstate_log-undated-2569.txt
logcat.log
7.1.1.4 Reset configuration
Admin users can opt to 'clean up' their configuration history and return the RXV200 to an Out of Box Experience (OOBE). If the Teams app isn't running well, this might help.
To reset the configuration:
- Navigate to and select Reset configuration.

- Navigate to and select OK; all data is erased and default factory settings are restored but sign-in is retained.
See also here.
7.1.1.5 Restart Teams app
If the Teams application freezes or malfunctions, a good way to resolve this is to restart the app.
To restart the Teams app:
- Navigate to and select Restart Teams app; only the Teams app is restarted.
7.1.1.6 Company Portal Login

7.1.1.7 Getting Company Portal Logs
Company Portal logs can be helpful to network administrators when there are issues with signing in to Teams from the phone.
To get Company Portal logs:
- Reproduce the issue (logs are saved to the device so you first need to reproduce the issue and then get the logs).
- Log in to the RXV200 as Administrator and then go back.
- Navigate to and select the Debugging option.
- Navigate to and select Company Portal login.
- In the Device Details screen that opens, navigate to and select Settings:


- Navigate to and select Copy Logs.
Company portal logs are copied to:
sdcard/Android/data/com.microsoft.windowsintune.companyportal/files/
- To pull the logs, use ssh:
scp -r admin@hosp_ip:/sdcard/android/data/com.microsoft.windowsintune.companyportal/files/
Files are quite heavy so you may need to pull them one by one.
7.1.1.8 Launch Mobile Teams
'App not found'. N/A in this release.
7.1.1.9 Debug Recording
This feature enables Admin users to perform media/DSP debugging.

Note: DSP recording can be activated on the fly without requiring the network administrator to reset the phone.
To reset the configuration:
- Navigate to and select Debug Recording.

- Navigate to and select Voice record to enable the feature.
- Navigate to and select Remote IP address to input the IP address of the device whose traffic you want to record.
- Navigate to and select Remote port and input it (Default: 5000).
- Start Wireshark on your PC to capture audio traffic.
7.1.1.10 Erase all data (factory reset)
This option is the equivalent of restore to defaults, including logout and device reboot.
To erase all data (factory reset):
- Navigate to and select Erase all data (factory reset).

- Navigate to and select RESET PHONE.
7.1.1.11 Screen Capture
By default, this setting is enabled. If disabled, the phone won't allow its screens to be captured.
7.2 Determining Device Status from LED Color Indications
Users and admins can determine the status of the RXV200 from its LED color indications. Use the following table as reference to determine status.
Table 7-1: RXV200 Status
| Color Indication Status | |
| Blue Indicates the RXV200 is currently booting up | |
| Green | Indicates the RXV200 is currently idle |
| Flashing red | Indicates the RXV200 is currently receiving an incoming call/meeting |
| Red | Indicates the RXV200 is currently in a call/ meeting/mute |
7.3 Performing Recovery Operations using Power Button
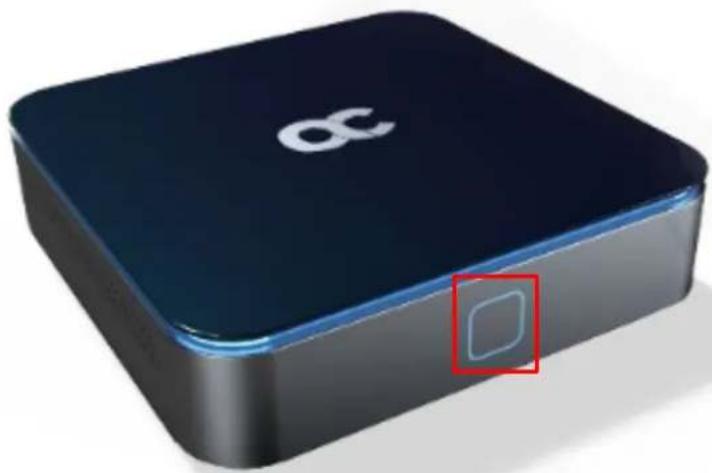
Network administrators can perform recovery operations using the power button on the front panel of the RXV200.

Note: Besides this recovery option, Android devices also feature an independent, automatic problem detection and recovery attempt capability that can culminate in recovery mode or in switching image slots.
The following figure shows the power button.
natural_image
Close-up of a dark blue square electronic device with a white 'c' logo and a red square button highlighting a small square (no text or symbols on the device itself)To perform recovery operations:
- Disconnect the power cord from the RXV200 while long-pressing the power button shown in the preceding figure.
- Reconnect the power cord and continue pressing the power button.
Table 7-2: Recovery Operations
| Press button | Action | Press button for | LED indication after releasing the button |
| On Uboot | Nothing <= 4 seconds | ||
| ENTER_RECOVERY | 4 ~ 6 seconds | Red | |
| SWITCH_AB_SLOT | 6 ~ 8 seconds | Green | |
| ENTER_loader | 8 ~ 10 seconds | Blue | |
| RESTORE_DEFAULTS | >= 10 seconds | Yellow |
- Short-press the power button to move down the menu options and long-press it to select an action.
To perform a factory reset (for example): - Short-press the power button to move down the menu options and long-press it to select
RESTORE_DEFAULTS; wait for the button's LED to light up red and then release it; the device enters recovery mode.
- Long-press the button again to perform a required device reboot.
- After the device is rebooted, it loads as an out-of-band management (OOB) device.
7.4 Saving Logs while Device is in Recovery Mode
The device features USB log export while in recovery mode. This feature enables users to seamlessly save logs while their device is in recovery mode.
In Android recovery mode, the system automatically mounts a partition, enabling users to connect a USB stick.
By simply clicking the Export logs to USB disk option, all logs are efficiently copied to the USB stick, providing a convenient and reliable method for log management during recovery procedures.
7.5 Restoring RXV200 Firmware via USB Disk
For recovery purposes, firmware can be applied to the RXV200 from a USB disk.
To apply the firmware from the USB disk:
- Enter recovery mode by pressing for 2-4 seconds the power button (Action: ENTER RECOVERY); the device's LED lights up red.
- Short-press the power button to move down the menu options, and long-press to select an option.
- Insert the USB disk with the target firmware.

- Select the Apply update from USB disk option and then choose the correct firmware image from the disk.
International Headquarters
6 Ofra Haza Street
Naimi Park
Or Yehuda, 6032303, Israel
Tel: +972-3-976-4000
Fax: +972-3-976-4040
AudioCodes Inc.
80 Kingsbridge Rd.,
Piscataway, NJ 08854, USA
Tel: +1-732-469-0880
Fax: +1-732-469-2298
Contact us: https://www.audiocodes.com/corporate/offices-worldwide
Website: https://www.audiocodes.com/
©2024 AudioCodes Ltd. All rights reserved. AudioCodes, AC, HD VoIP, HD VoIP Sounds Better, IPmedia, Mediant, MediaPack, What's Inside Matters, OSN, SmartTAP, User Management Pack, VMAS, VoIPerfect, VoIPerfectHD, Your Gateway To VoIP, 3GX, VocaNom, AudioCodes One Voice, AudioCodes Meeting Insights, and AudioCodes Room Experience are trademarks or registered trademarks of AudioCodes Limited. All other products or trademarks are property of their respective owners. Product specifications are subject to change without notice.
Document #: LTRT-09981

- RXV200 MTR on Android™ Compute with RX-PAD Meeting Room Controller
- Table of Contents
- Introduction....7
- Getting Started 15
- Connecting to RXV200....17
- Using General RXV200 Functions....21
- Getting Familiar with RXV200 Settings ....43
- User Settings....70
- Monitoring Modules Operational States....75
- Debugging ....77
- List of Tables
- Notice
- Security Vulnerabilities
- WEEE EU Directive
- Customer Support
- Stay in the Loop with AudioCodes
- Abbreviations and Conventions
- Related Documentation
- Documentation Feedback
- Introduction
- Highlights
- Benefits
- Bundles
- RXV200-B40 Bundle
- RXV200-B20 Bundle
- Hardware
- Management
- Specifications
- RXV200
- RX-PAD
- RX15
- RXVCAM50M
- Getting Started
- Connecting to RXV200
- Signing in
- Multi-Cloud Sign-in
- Remote Provisioning and Sign in from Teams Admin Center
- Step 4: Sign in remotely
- Using General RXV200 Functions
- To get started:
- Configuring a Bundle
- To configure a bundle:
- Managing Camera Presets
- To access RXV200 camera presets:
- Note:
- Configuring a Color Mode Preset on the RXVCAM50M/L Camera
- Selecting the Default Audio Device
- Starting a New Meeting
- Dialing a Number
- To dial a phone number:
- Enabling Proximity Join
- Sharing a Whiteboard
- To share the Whiteboard:
- Screen Sharing
- Updating RXV200 Audio and Camera Peripherals Firmware
- About Microsoft Teams
- Signing out
- Enrolling a Device with Intune Policies
- Creating a Dynamic Group
- Creating an Exclusion Group
- Removing Devices from Intune admin center
- Under the Devices tab, click Next.
- Getting Familiar with RXV200 Settings
- To access device settings:
- Device Admin Settings
- Configuring Admin Login Timeout
- Configuring Display
- To configure Display settings:
- Configuring Date & Time
- To configure Date & Time:
- Configuring Wi-Fi
- Connecting to an Available Wi-Fi Network
- Manually Connecting to a Wi-Fi Network
- Configuring Camera Settings
- To configure Camera settings:
- Selecting RXVCam70 PTZ Camera Tracking Mode
- To select a Tracking Mode:
- Use the following as reference:
- Speaker Tracking
- Group Framing
- Selecting RXVCam360 Camera Tracking Mode
- Limiting Resolution
- Configuring Teams Admin Settings
- Configuring Camera Frequency
- Dual Camera Support
- Configuring UI Language & Input
- Modifying IP Network Settings
- To modify network settings:
- Configuring Call Settings
- To configure call settings:
- User Settings
- Setting the Volume
- Configuring Accessibility Settings
- Setting Live Captions
- Enabling Display of Meeting Name using Exchange Online PowerShell
- Hiding Names and Meeting Titles
- Rebooting RXV200
- Viewing About RXV200
- Monitoring Modules Operational States
- Debugging
- To perform debugging:
- Log Settings | Collecting Logs
- To configure log settings:
- Click Proceed; the logs are uploaded to the server.
- Click the History tab.
- Click Download to download the logs.
- Remote Logging
- Diagnostic Data
- Reset configuration
- Restart Teams app
- Company Portal Login
- Getting Company Portal Logs
- Launch Mobile Teams
- Debug Recording
- Erase all data (factory reset)
- To erase all data (factory reset):
- Screen Capture
- Determining Device Status from LED Color Indications
- Performing Recovery Operations using Power Button
- Saving Logs while Device is in Recovery Mode
- Restoring RXV200 Firmware via USB Disk
- To apply the firmware from the USB disk:
- International Headquarters
- AudioCodes Inc.
Brand : Kramer
Model : KAC-CU-200
Category : Meeting room controller