
NVR-9100-32RD2S-SMAN - Television NEVIR - Free user manual and instructions
Find the device manual for free NVR-9100-32RD2S-SMAN NEVIR in PDF.


| Product Type | LED TV |
| Model | NVR-9100-32RD2S-SMAN |
| Screen Size | 32 inches (diagonal) |
| Aspect Ratio | 16:9 |
| Resolution | 1366 x 768 (HD Ready) |
| Power Supply | AC 100-240V~, 50/60Hz |
| Power Consumption | 60W |
| Audio Output Power | 8W x 2 |
| TV System | PAL B/G/D/K, SECAM B/G/D/K, DVB-T/T2/C/S/S2 |
| Input Terminals | HDMI (x3), USB (x2), RF In (x2), CI Card, RJ45, AV In (Video L/R) |
| Output Terminals | Earphone (x1), Coaxial Out (x1) |
| Remote Control | Infrared, batteries (AAA x2) |
| Dimensions (W x H x D) approx | 730 x 480 x 80 mm (without stand) |
| Weight approx | 5.5 kg (without stand) |
| Working Temperature | 0°C - 40°C |
| Working Humidity | 20% - 80% (non-condensing) |
| Ventilation Clearance | At least 10 cm on all sides, 30 cm from top |
| Safety Class | Class II construction |
| Cleaning Instructions | Clean only with dry cloth |
| Spare Parts and Repairability | No user-serviceable parts. Refer to qualified personnel for servicing. |
Frequently Asked Questions - NVR-9100-32RD2S-SMAN NEVIR
User questions about NVR-9100-32RD2S-SMAN NEVIR
0 question about this device. Answer the ones you know or ask your own.
Ask a new question about this device
Download the instructions for your Television in PDF format for free! Find your manual NVR-9100-32RD2S-SMAN - NEVIR and take your electronic device back in hand. On this page are published all the documents necessary for the use of your device. NVR-9100-32RD2S-SMAN by NEVIR.
USER MANUAL NVR-9100-32RD2S-SMAN NEVIR
Please read these instructions before operating your set and retain them for future reference.
PRECAUCIÓN
natural_image
Illustration of a hand interacting with a monitor and a cross symbol (no text or labels)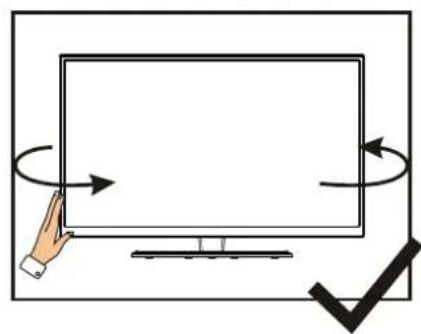
natural_image
Illustration of a hand holding a blank screen with arrows indicating rotation, next to a checkmark (no text or symbols)natural_image
Illustration of a flat-screen monitor with a hand pointing at it and a black X symbol below (no text or symbols on the monitor itself)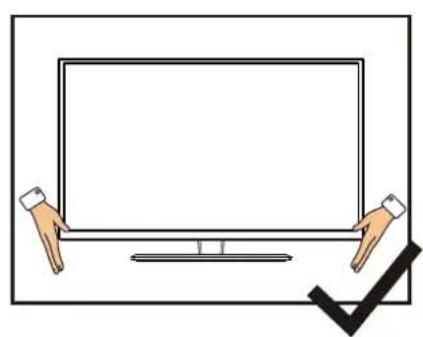
natural_image
Illustration of two hands holding a blank screen with a checkmark below (no text or symbols)CONTENIDOS
natural_image
Technical line drawing of a rectangular electronic device with internal components and mounting holes (no text or symbols)
1.4 Control remoto
(Es solo un boceto)
natural_image
Three technical line drawings of a rectangular electronic component or tray, showing different mounting points and internal structures (no text or symbols)INICIO
2.5 Ajustes de la TV
Contraste/Brillo/Color/Nitidez
Modo de Sonido
Tipo de Antena
Press ▼ /▲ button to select Subtitle .Press ENTER& ◀ / ▶ button to select.
Lista de Canales
Press ▼ / ▲ button to select CI Card to view and set the information of CI card.
Bloqueo
Ajuste PVR
Pulse ▼ / ▲ para seleccionar Ajuste PVR.
Operating Instruction
Model: NVR-9100-32RD2S-SMAN
Please read these instructions before operating your set and retain them for future reference.
PRECAUTION
-
Read these instructions.
-
Keep these instructions.
-
Heed all warnings.
-
Follow all instructions.
-
This apparatus with CLASS II construction
-
The ventilation should not be impeded by covering the ventilation openings with items, such as newspapers, table-cloths, curtains, etc.
-
No naked flame source, such as lighted candles, should be placed on the apparatus.
-
The apparatus shall not be exposed to dripping or splashing and that no objects filled with liquids, such as vases, shall be placed on the apparatus.
-
The batteries of remote controller shall not be exposed to excessive heat such as sunshine, fire or the like.
-
The plug or appliance coupler is used as the disconnect device, it shall remain readily operable.
-
To prevent the spread of fire, keep candles or other open flames away from this product.

-
Clean only with dry cloth.
-
Do not install this apparatus in windtight places such as the wall-unit. Do not block any ventilation openings.
-
Do not install near any heat sources such as radiators, heat registers, stoves, or other apparatus (including amplifiers) that produce heat.
-
Do not defeat the safety purpose of the polarized or grounding-type plug. A polarized plug has two blades with one wider than the other. A grounding type plug has two blades and a third grounding prong. The wide blade or the third prong are provided for your safety. If the provided plug does not fit into your outlet, consult an electrician for replacement of the obsolete outlet.
-
Only use attachments/accessories specified by the manufacturer.
-
Use only with the cart, stand, tripod, bracket, or table specified by the manufacturer, or sold with the apparatus. When a cart is used, use caution when moving the cart/apparatus combination to avoid injury from tip-over.
-
Unplug this apparatus during lightning storms or when unused for long periods of time.
-
Refer all servicing to qualified service personnel. Servicing is required when the apparatus has been damaged in any way, such as power-supply cord or plug is damaged, liquid has been spilled or objects have fallen into the apparatus, the apparatus has been exposed to rain or moisture, does not operate normally, or has been dropped.
-
The each USB terminal should be loaded with 0.5 A under normal operation:
-
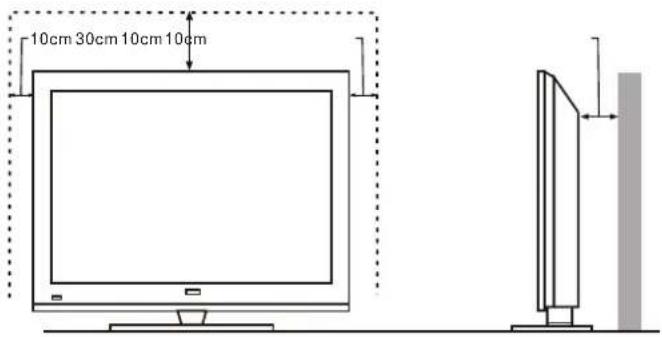
Minimum distances around the apparatus for sufficient ventilation:
-
The use of apparatus in tropical and/or moderate climates.
-
Put the TV in the environment of moderate temperature, not to lay aside the Air Conditioner outlet or stove to avoid damage.
-
Use both hands when carrying TV, make TV suffer stable outside force.
Note: If the manual is inconsistent with the product, please refer to the actual product.
WARNING
Never place a television set in an unstable location. A television set may fall, causing serious personal injury or death. Many injuries, particularly to children, can be avoided by taking simple precautions such as:
• Using cabinets or stands recommended by the manufacturer of the television set.
- Only using furniture that can safely support the television set.
- Ensuring the television set is not overhanging the edge of the supporting furniture.
- Not placing the television set on tall furniture (for example, cupboards or bookcases) without anchoring both the furniture and the television set to a suitable support.
- Not placing the televisions set on cloth or other materials that may be located between the television set and supporting furniture.
- Educating children about the dangers of climbing on furniture to reach the Television set or its controls.
If your existing television set is being retained and relocated, the same considerations as above should be applied.
IMPORTANT INFORMATION
If a television is not positioned in a sufficiently stable location, it can be potentially hazardous due to falling. Many injuries, particularly to children, can be avoided by taking simple precautions such as:
- Using cabinets or stands recommended by the manufacturer of the television.
- Only using furniture that can safely support the television.
- Ensuring the television is not overhanging the edge of the supporting furniture.
- Not placing the television on tall furniture (for example, cupboards or Bookcases) without anchoring both the furniture and the television to a Suitable Support.
- Not standing the televisions on cloth or other materials placed between the television and supporting furniture.
- Educating children about the dangers of climbing on furniture to reach the television or its controls.

CAUTION
Danger of explosion if battery is incorrectly replaced.
Replace only with the same or equivalent type.
Batteries shall not be exposed to excessive heat such as sunshine, fire or the like.
Used batteries should not be thrown into the garbage can, please leave them at an appropriate depot.

CAUTION
Where the MAINS plug or an appliance coupler is used as the disconnect device, the disconnect device shall remain readily operable.

CAUTION
These servicing instructions are for use by qualified service personnel only. To reduce the risk of electric shock, do not perform any servicing other than that contained in the operating instructions unless you are qualified to do so.
Attention:
Motionless picture might cause permanent destruction to the display.
- Be sure not to display motionless picture on the LED TV for more than 2 hours, because it would cause picture remnants to appear, which is called "screen burns". To avoid such picture remnants, please decrease the "contrast" and "brightness" of the display when displaying motionless picture.
- While watching TV program in 4:3 size mode for a long time, there would be traces on the edge of the screen's left, right and center parts because of different transmission of the light on the screen. Similar impact on the screen will occur when playing DVD or connecting games control. Products destroyed by these reasons can't be guaranteed for maintenance.
- It might cause picture remnants to display electronic games and motionless picture of PC more than a period of time. To avoid such effect, please decrease the "contrast" and "brightness" when displaying motionless picture.
- Place the TV on a firm and flat surface, leaving a space of at least 10cm around the set and 30cm from the top of the set to the wall or cabinet. Ensure the TV is positioned close to the wall to avoid it falling when pushed.
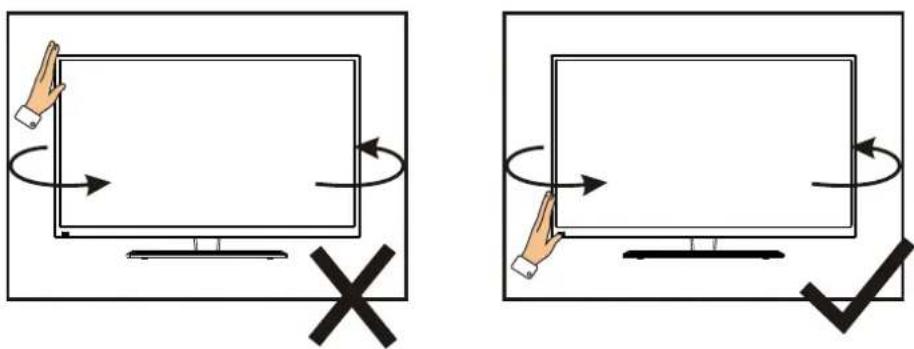
- When you turning the TV set, do not hold the top side of the TV set, you should hold the bottom side.
natural_image
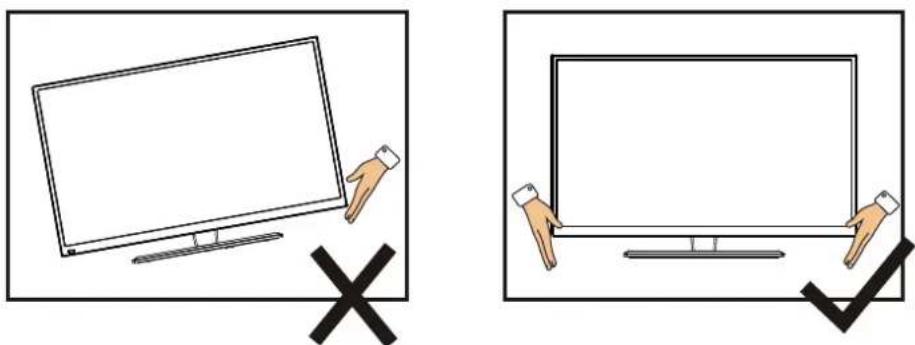
Two identical diagrams showing a hand holding a monitor with arrows indicating rotation, and a checkmark with an X mark (no text or symbols)- When you lifting the TV set, do not use one hand to handle it, you should lift the TV set by two hands.
natural_image
Two identical illustrations of a flat-screen monitor with a hand holding its screen, each marked with a black X and a checkmark (no text or symbols)CONTENTS
1. Connection and Preparation of TV....2
1.1 Accessories ......2
1.2 Installation of Stand....2
1.3 Keysand Interfaces.... 3
1.4 Remote Control....4
1.5 Installation of Batteries....5
2. Basic Operation....5
2.1 Power ON/OFF(Optional)......5..
2.2 Setting of Standby Mode....5
2.3 Input Source 6
2.4 Home page 6
2.5 TV Setting 8
2.6 Media 14
3. Technical Specification....16
4. Supported Signal Modes....17
5. Simple Troubleshooting .....18
1.Connection and Preparation of TV
1.1 Accessories
★ User Manual
★ Remote Control
★ Battery(UM-4/R03P/AAA)
★ Wall Mount Kit (Pre-assembled)(Optional)
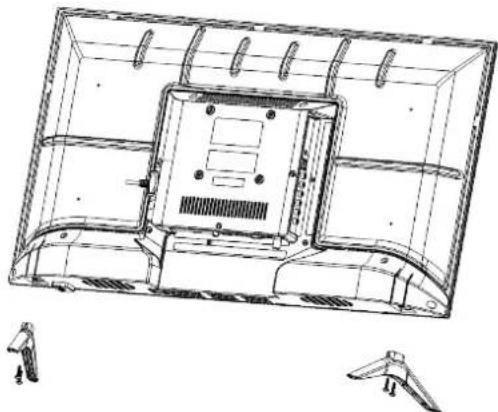
1.2 Installation of Stand
(For the physical structure, please refer to the real object)
natural_image
Technical line drawing of a mechanical component with internal channels and mounting holes (no text or symbols)① Place the TV with the front panel facing downwards on the soft cloth or soft pads on a desk.
② Insert the stand into the bottom socket of the TV.
③ Insert the screws into the sockets and tighten them.
1.3 Keys and Interfaces
The design and specification takes actual products as the standard
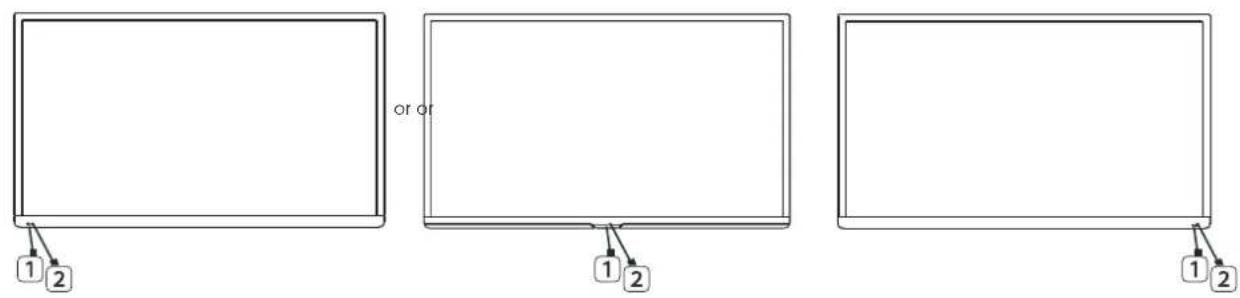
(7keys)(1key)(5keys)
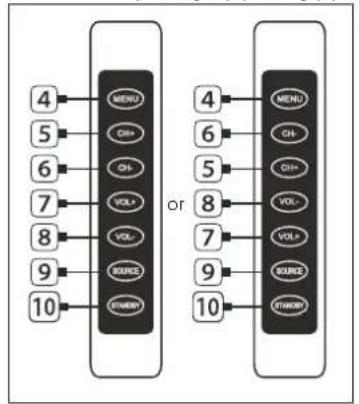
flowchart
graph TD
    A["4"] --> B["MENU"]
    C["5"] --> D["CH+"]
    E["6"] --> F["CH-"]
    G["7"] --> H["VOL+"]
    I["8"] --> J["VOL-"]
    K["9"] --> L["SOURCE"]
    M["10"] --> N["STRAWY"]
    O["4"] --> P["MENU"]
    Q["6"] --> R["CH-"]
    S["5"] --> T["CH+"]
    U["8"] --> V["VOL-"]
    W["7"] --> X["VOL+"]
    Y["9"] --> Z["SOURCE"]
    AA["10"] --> AB["STRAWY"]
or
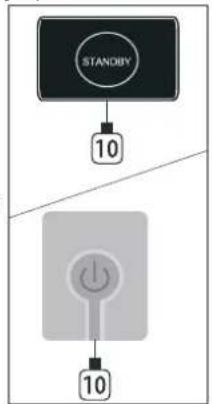
flowchart
graph TD
    A["STANDBY"] --> B["10"]
    B --> C["Power Icon"]
    C --> D["10"]
or
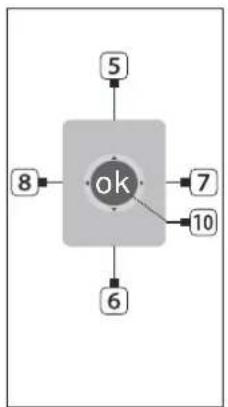
flowchart
graph TD
    A["ok"] --> B["5"]
    A --> C["8"]
    A --> D["7"]
    A --> E["10"]
    A --> F["6"]
- REMOTE SENSOR WINDOW
- POWER INDICATOR
- SPEAKER
- MENU KEY
- PROGRAM ≠ KEY
- PROGRAM -"KEY
- VOLUME # KEY
- VOLUME -"KEY
- SOURCE KEY
- STANDBY KEY
- POWER PLUG INPUT
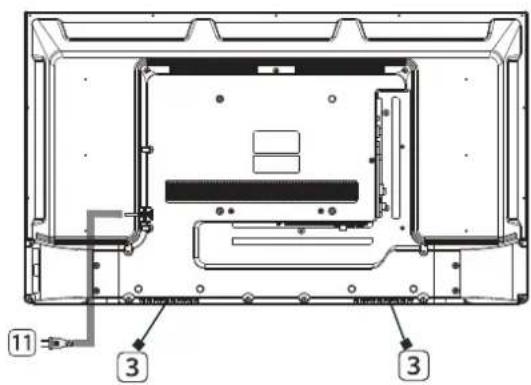

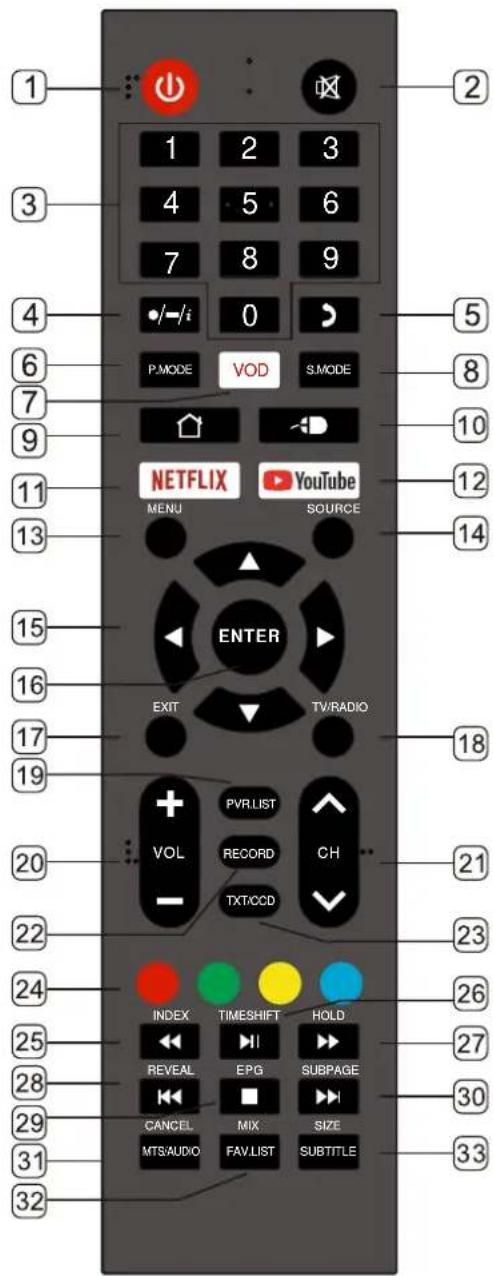
1.4 Remote Control
(Here is only the sketch, please in kind prevail)
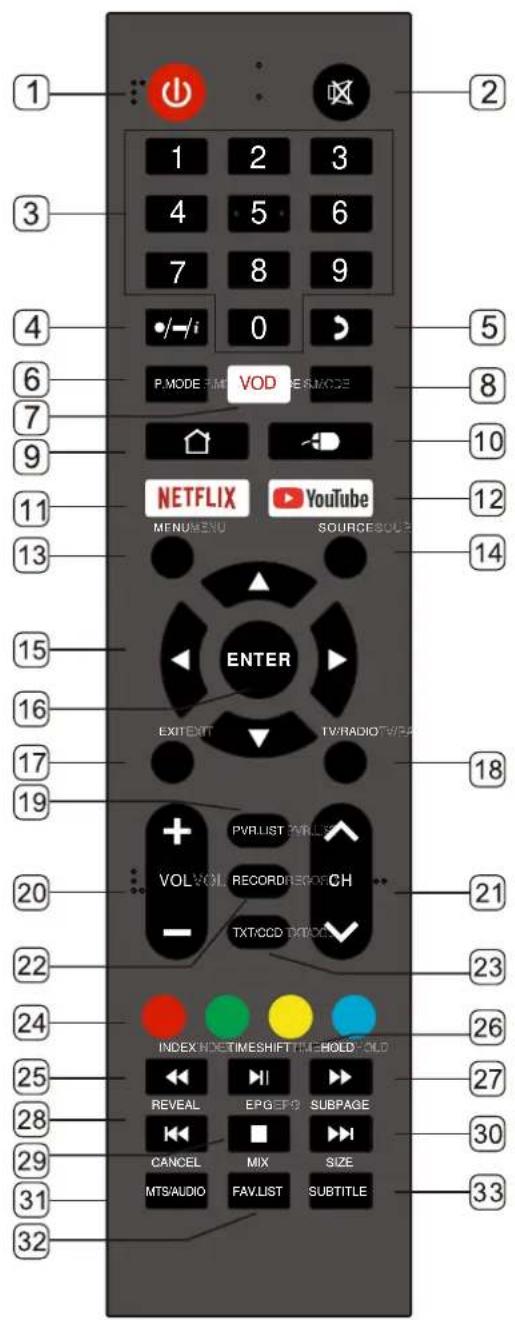
- STANDBY( ⏻ ): Standby turn on and off.
- MUTE: Mute sound.
- 0\~9 : Continue to press the keys to select a channel.
-
•/-/i
-
:Press this button to enter a program number with different digits.eg.10.1,10.2.
-:Dot button and minor channel number.
i: Display the information of current video and audio. -
RECALL: Return to previous channel.
- P.MODE: Select the picture mode.
7.VOD: Open the VOD APP with shortcut key. (Note: If the VOD APP is not pre-installed, this shortcut key is invalid) - S.MODE: Select the sound mode.
- HOME: Enter to homepage.
- MOUSE: Turn on theremote control mouse or turn it off.
- NETFLIX: Enter Netflix APP
- YouTube: Enter YouTube APP.
- MENU: Enter or exit menu.
- SOURCE: Select the signal source.
- ▲,▼,◀ Key:The menu item selection.
- ENTER: Confirm or enter.
- EXIT: Exit menu or operation.
- TV/RADIO: Select the TV or Radio mode.
- PVR.LIST: PVR list.
- VOL+: Increase the volume. VOL-: Decrease the volume.
- CH^: Select the channel forward. CHv: Select the channel backward.
- RECORD:DTV mode recorddata USB disk.
- TXT: Enter or exit teletext. orCCD: Change the CCD mode.
- RED: Access the red item or page. GREEN: Access the green item or page. YELLOW: Access the yellow item or page. BLUE: Access the blue item or page.
- INDEX: Display the index page. MEDIA mode: ← Fast Backward.
- TIMESHIFT:DTV mode time shift. MEDIA mode: ▶▶▶ Press one time to pause, press again to playback.
- HOLD: Hold the current page. MEDIA mode: ▶ Fast Forward.
- REVEAL:Reveal the hidden information. MEDIA Mode: Previous.
- EPG:Enter or exit EPG(Electronic Program .Guide). MEDIA mode: ■ Stop the playback and return to file list.
- SUBPAGE: Enter the sub page mode. MEDIA mode: ▶ Next.
- CANCEL(under TXT):cancel the TXT on screen. MTS/AUDIO:MTS:Change the MTS mode. or AUDIO:Select TV audio mode.
- MIX(under TXT): setting transparency. FAV.LIST: Favorite channel list.
- SIZE(under TXT): setting sizes of the charcater. SUBTITLE: DTV mode select subtitle mode.
1.5 Installation of Batteries
(Here is only the sketch, please in kind prevail)
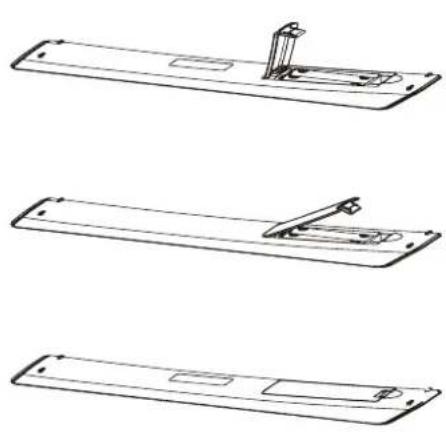
① Open the back lid of the remote control.
② Install two 7#(AAA)1.5V batteries.
Ensure the correct polarity of the batteries.
③ Cover the back lid.
Please take out of the batteries from the remote control for long time of no use.
If the remote control doesn't work properly, please carry out the following checks.
- Check the TV is turned on.
- Check the polarity of the batteries are correct.
- Check the batteries are not drained.
- Check the power supply is normal or the power cord is correctly connected.
- Check there are no special fluorescent light or neon light around.
2. Basic Operation
2.1 Power ON/OFF(Optional)
- Connect the power cord to the AC input. Insert the power cord into the appropriate socket.
- Press the Power switch to switch on the TV, then press Power button to turn on the unit.
- Press the Power switch again to switch off the TV.
Note: After switch off the TV, please don't immediately re-open the power switch, should be delayed one minute more to re-open the power switch.
2.2 Setting of Standby Mode
- Press ( ⏻ ) button to turn on the unit.
- Press ( ⏻ button again to return the display to standby mode. The power indicator turns red.
- Be sure not to set your TV in standby mode for a long period of time.
2.3 Input Source
Press SOURCE button to to enter Input Source menu.
Press ▼ ▲/ [button to select
Press ENTER to select source.
2.4 Home page
Press MENU button to enter main menu.
HOME
Press ▼ / ▲ button to select Home page in Setup Wizard or press ◀ / ▶ button to select Home in the menu.
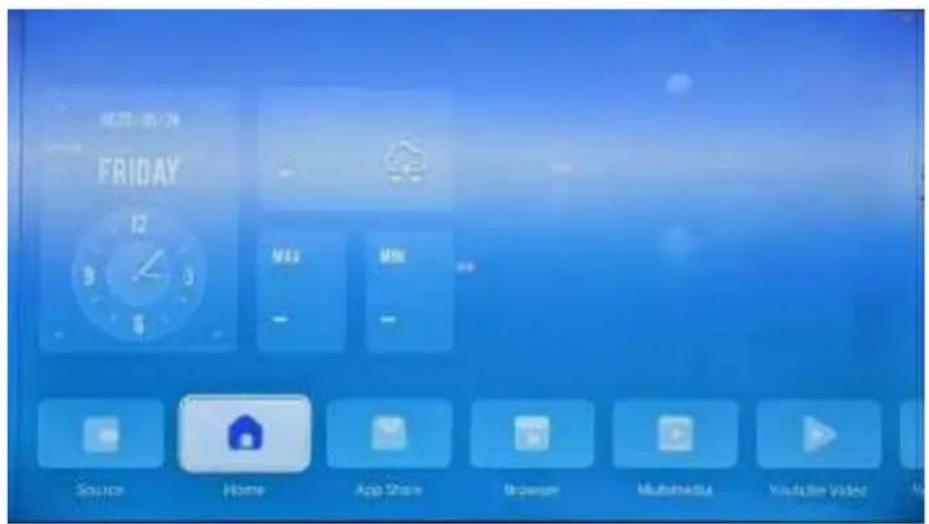
Press ▼ / ▲ / ◀ / ▶ button to select.
You can choose the program you want on the home page.
Note: Apps link and input source are subject to detail order, above photo just for your reference.
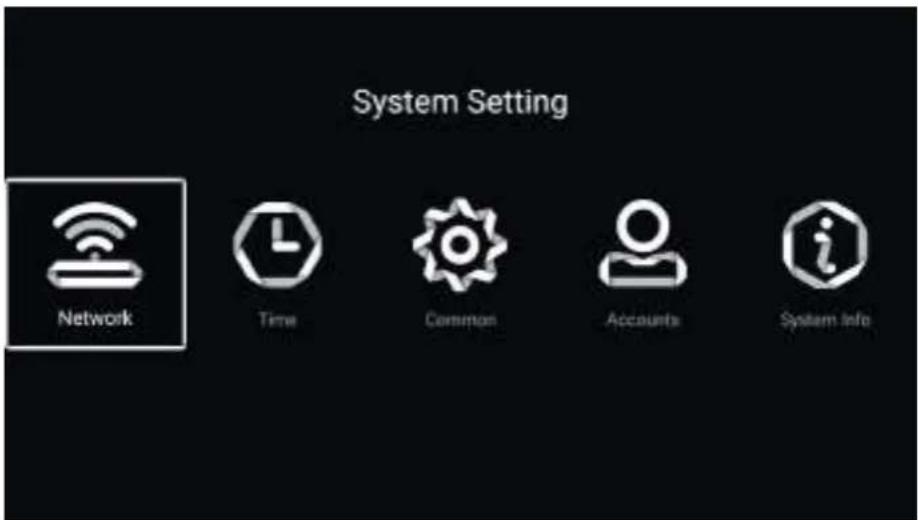
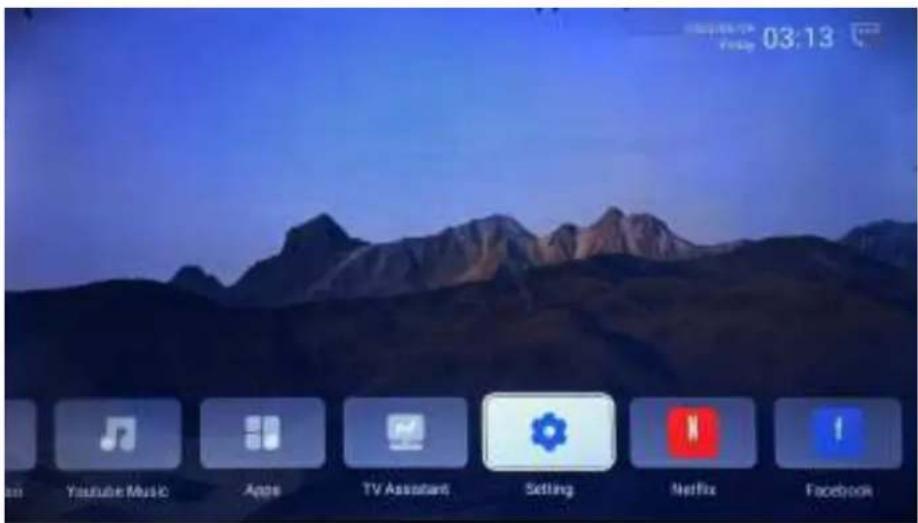
Settings
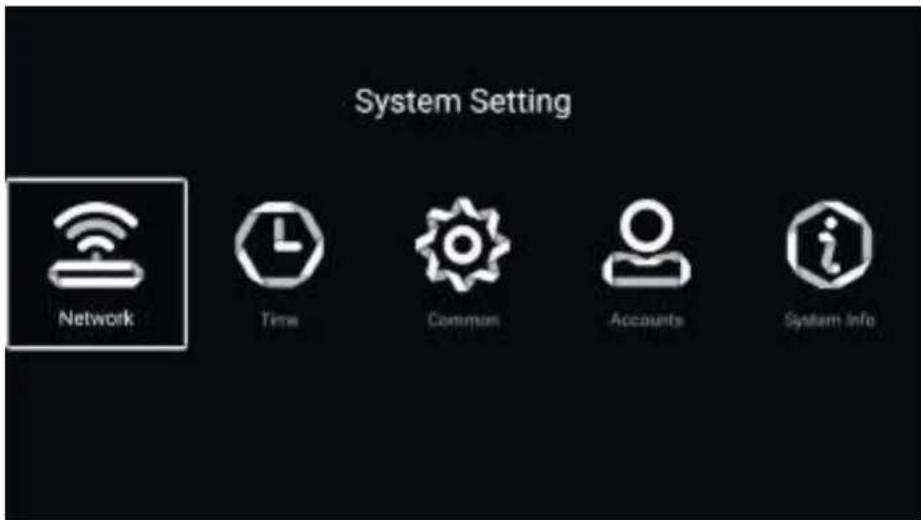
Press ◀ /▶ to select Setting and press ENTER button to enter the System Setting.
Press ◀ / ▶ button to select Network/Time/Commen / Accounts/System Info.
2.5 TV Setting
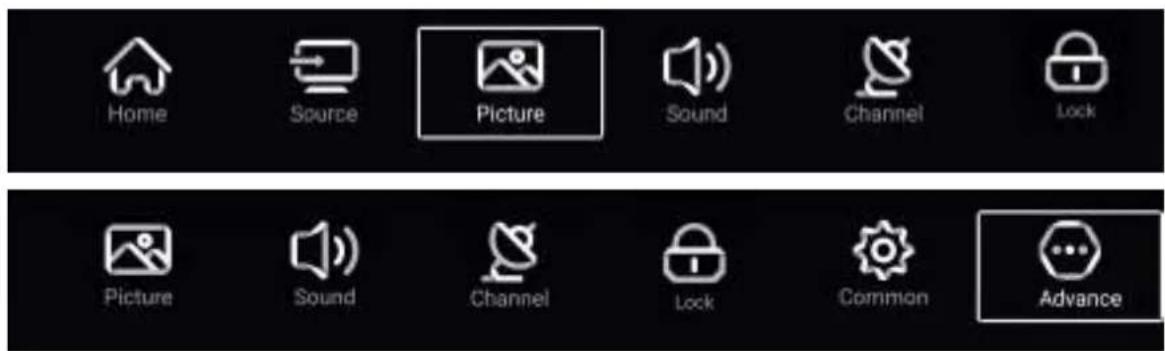
Press MENU button to enter the TV Setting.
Press ◀ / ▶ button to highlight the desired menu icon, and press ENTER button to select.
Picture
Press MENU button to enter the main menu.
Press ◀ / ▶ button to select the Picture.
Press ENTER button to enter the sub-menu.
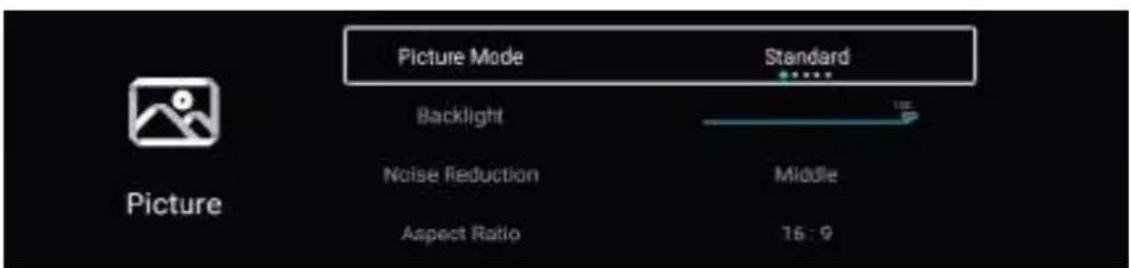
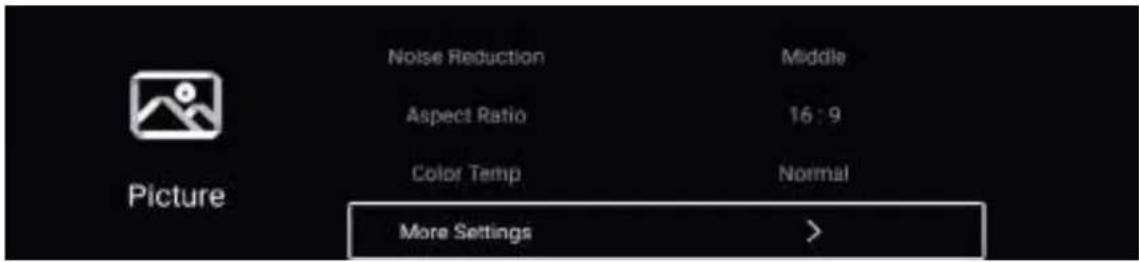
Press ▼ / ▲ button to select Picture Mode.
Press MENU or EXIT button to quit.
Picture Mode
Highlight the item and press ENTERbutton to enter the sub-menu, that shows the picture mode you can choose.
Press ◀ / ▶ button to select Standard/Dynamic/Soft/Vivid/User.
Standard Produces a standard image.
Dynamic Enhance the contrast, color and clarity of the screen, so that the picture in the dynamic will balance the color.
Soft Reduce the screen contrast, color and clarity to make the screen looks soft.
User Select to customize picture settings.
Contrast/Brightness/Color/Sharpness
These terms PictureAvailable only when "User" is selected in .
Press ▼ / ▲ button to select Contrast/Brightness/Color/Sharpness.
Press ◀ / ▶ button to adjust.
Contrast Adjust the contrast of the image.
Brightness Adjust the brightness of the image.
Color Adjust the color intensity of the image.
Sharpness Adjust the edge sharpness of the image
Backlight
Press ▼ / ▲ button to select Backlight.
Press ◀ / ▶ button to adjust.
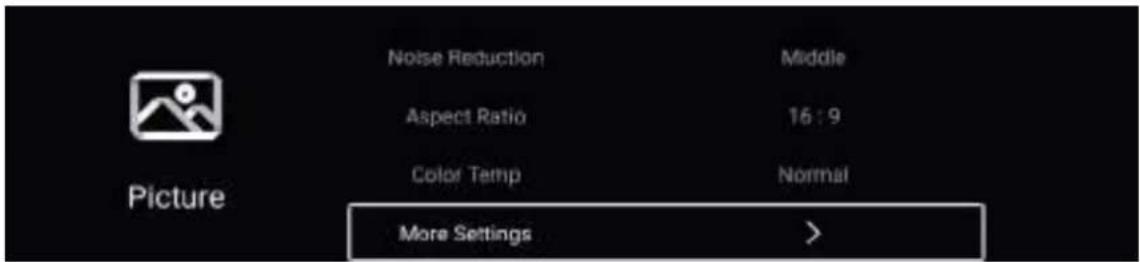
Noise Reduction
Set up options to eliminate the image noise intensity.
Press ▼ / ▲ button to select Noise Reduction.
Press ◀ / ▶ button toselect.
Aspect Ratio
Press ▼ / ▲ button to select Aspect Ratio.
Press ◀ / ▶ button to select.
Color Temp
Adjust the overall color of the image.
Press ▼ / ▲ button to select Color Temp.
Press ◀ / ▶ button to select.
Cool The picture is in favor of green-blue and less red. The whole color is in favor of light. The picture is more fresh and elegant.
Normal The picture does not in favor of any color. The color is moderate.
Warm The picture is in favor of red-green and less blue to make the color more vivid and soft.
More Settings
Press ▼ / ▲ button to select More Settings.
Press ENTER /【▶】 button to enter the sub-menu.
DLC
Press ▼ / ▲ button to select DLC.
Press ◀ / ▶ button to select On/Off.
Sound
Press MENU button to enter the main menu.
Press ◀ / ▶ button to select the Sound.
Press ENTER button to enter the sub-menu.
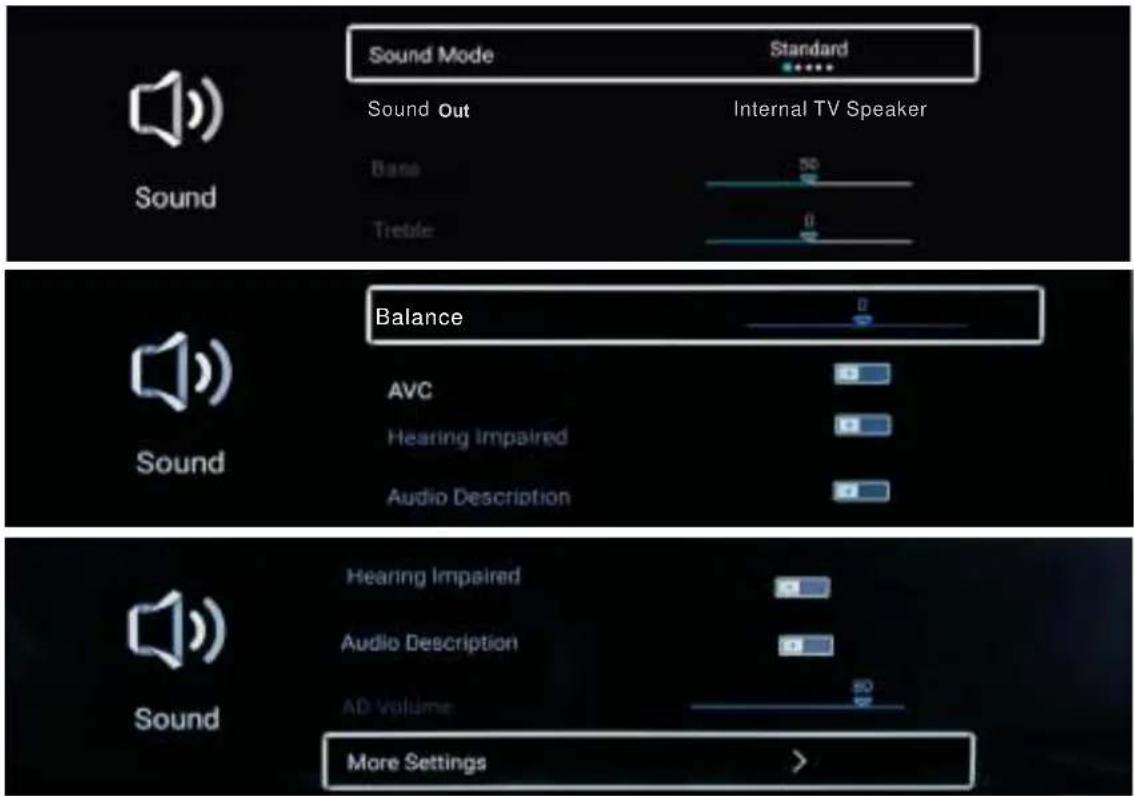
Sound Mode
Press 【▼ / 【】▲【button】o select Sound Mode, then press ◀ ▶ button to select.
Standard Produces a balanced sound in all environments.
Music Preserves the original sound.Good for musical programs.
Movie Enhances treble and bass for a rich sound experience.
News Enhanced voice.
User Select to customize picture settings.
Sound Out
Press▼ / ▲ button to select Sound Out.
Press ◀ / ▶ button to select.
Bass Adjust the bass.
Treble Adjust the treble.
Balance Adjust the left and right outspebalsound
Press ▼/【button to select, then pBalance▶ button to adjust.】
AVC
Press 【▼ / 【】▲ button to select AVC, then press】/◀ 】 ▶ button to choose ON/OFF.
After opening the AVC, Once the volume is set, regardless of any difference TV Version printed on each channel, it can make the speaker volume remained stable.
Hearing Impaired
Press ▼ button to select Hearing Impaired. Press ◀ / ▶ button to select On/Off.
Audio Description
Press ▼ / ▲ button to select Audio description. Press ◀ / ▶ button to select On/Off.
AD Volume
Press ▼ button to select AD Volume. Press ◀/▶ button to select.
More Settings
Digital Audio Output
Press 【▼】/【▲】button to select Digital Audio Output, then press ENTER /【▶】button to choose.
SPDIF Delay
Press 【▼】/【▲】button to select SPDIF Delay, then press 【◀】/【▶】button to choose.
Surround
Press 【▼】/【▲】button to select Surround, then press 【◀】/【▶】button to choose.
Audio Only
After the opening screen is not displayed only plays sound
Press 【▼】/【▲】button to select Audio Only, then press ENTER /【▶】b utton to choose.
Channel
Press MENU button to enter the main menu. Press ◀ / ▶ button to select Channel.
Press ENTER button to enter the sub-menu.
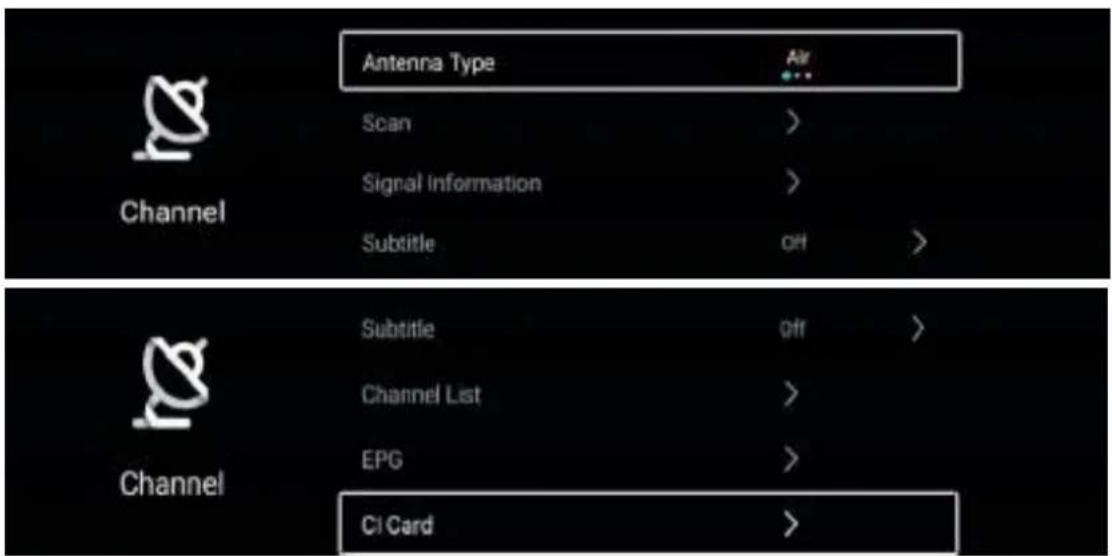
Antenna Type
Press ▼ / ▲ button to select Antenna Type. Press ◀ / ▶ button to select .
Scan
Press ▼ / ▲ button to select Scan. Press ENTER button to enter the sub-menu.
Press ▼ / ▲ button to select.
Signal Information
Press ▼/▲button to select Signal Information .Press ENTER ◀/▶ button to select view.
Subtitle
Press ▼/▲ button to select Subtitle .Press ENTER& ◀/▶ button to select.
C h an n e I L ist
Press / button to select Channel List. Press ENTER/【▶】button to enter the sub-menu. ▼ ▲ Press ▼ / ▲ button to select All/Favorite.
All
Press ▼ / ▲ button to select All. Press MENU button to edit the program.
Favorite
Press ▼ /▲ button to select Favorite. Press MENU button to edit the Favorite Channel.
EPG
Press ▼ / ▲ button to select EPG. Press MENU button to enter the sub-menu.
CI Card
Press ▼ / ▲ button to select CI Card to view and set the information of CI card.
Lock
Press MENU button to display the naitone select Lock【】/【】
ssword is [a000].
Press 【▼ / 【】▲【button】o select. Press ENTER/ ▶ to enter.
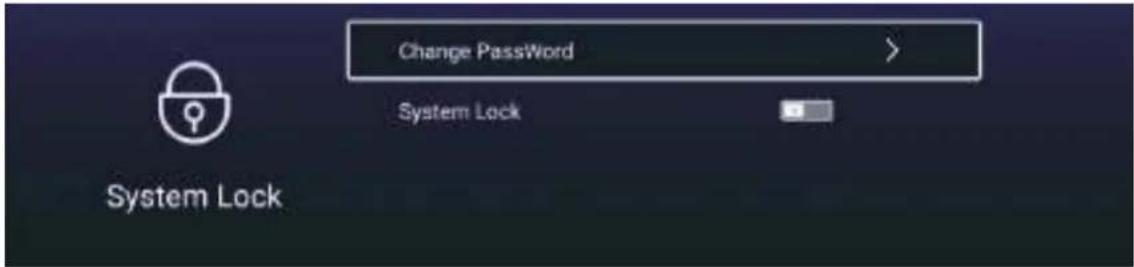
Change Password
Press ▼ ▲/ [button to select Change Password
System Lock
Press ▼ ▲/ [b]utton to select System Lock.
Key Lock
Press ▼ / ▲ button to select Key Lock. Press ◀ / ▶ button to select On/Off.
Common
Press MENU button to enter the main menu. Press ◀ / ▶ button to select Common.
Press ENTERbutton to enter the sub-menu.
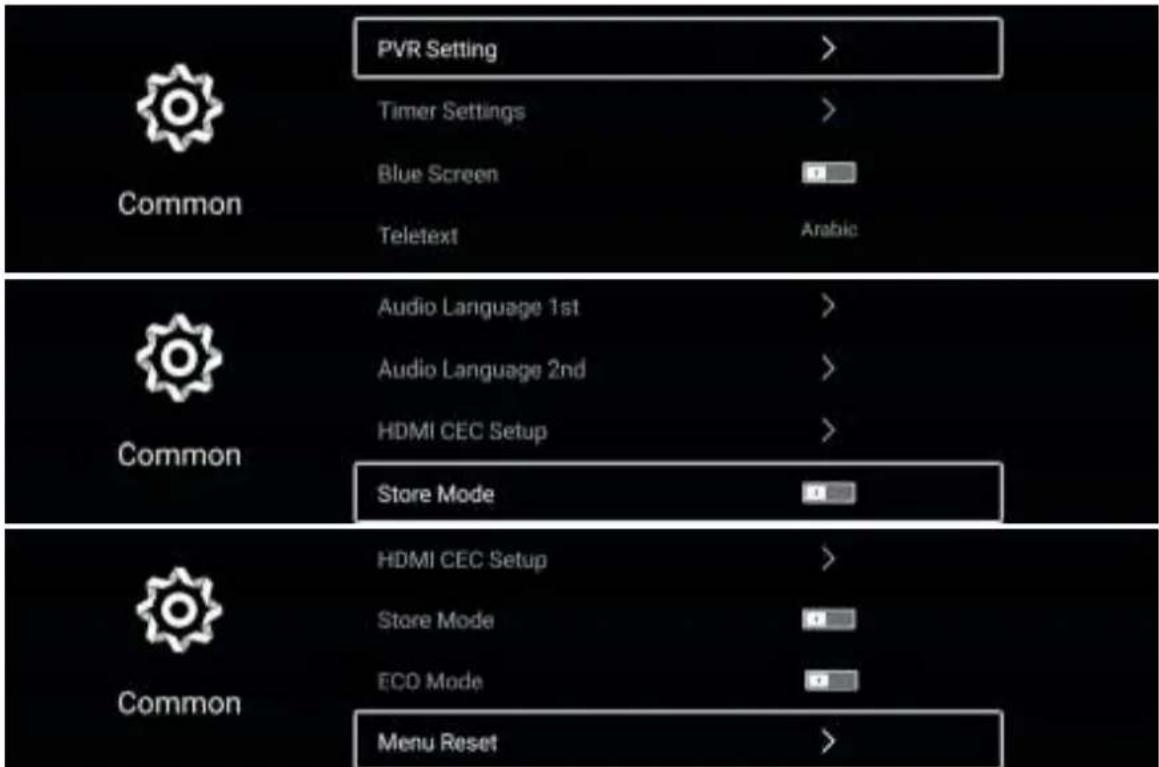
PVR Setting
Press ▼/▲ button to select PVR Setting.
Press ▼ / ▲ button to select Select Disk/Format/Speed/Record List/Schedule List.
Press ENTER button to enter sub-mune.
Timer Setting
Press ▼ / ▲ button to select Timer Setting.
Press ▼ / ▲button to select Select.
OSD Timer
Press ▼ / ▲ button to select OSD Timer.
Press ◀ / ▶ button to select.
Autostandby Timer
Press ▼ / ▲ button to select Autostandby Timer.
Press ◀ / ▶ button to select Off/3hour/4hour/5hour.
Sleep Timer
Press ▼ / ▲ button to select Sleep Timer.
Press / button to select.
Blue Screen
Set the background color to blue when there is no input signal.
Press ▼ / ▲ button to select Blue Screen.
Press ◀ / ▶ button to select On/Off.
Teletext
Press ▼ /▲ button to select Teletext.
Press ◀ / ▶ button to select Arabic/East/West Euro/Farsi/Russian.
Audio Language 1st
Press ◀/▶ button to select Audio Language 1st. Press ENTER&◀/▶ button to select audio language.
Audio Language 2nd
Press ◀ /▶ button to select Audio Language 2nd. Press ENTER& ◀ /▶ button to select audio language.
HDMI CEC Setup
Press ▼ / ▲ button to select HDMI CEC Setup.
Press ENTER button to enter the sub-menu.
Store mode
Press ▼ / ▲button to select Store mode.Press ◀ / ▶ to select On/Off.
ECO mode
Press ▼ / ▲ button to select ECO mode. Press ◀ / ▶ to select On/Off.
Menu Reset
Recall the default setting.
Press ▼ / ▲ button to select Menu Reset.
Press ENTER button to enter the sub-menu.
Advanc e
Press MENU button to enter the main menu.
Press ◀ / ▶ button to select Advance.
Press ENTER button to enter the System Setting.
2.6 Media
Press ▼ / ▲ / ◀ / ▶ button to select Media in Apps on the Home page, and press ENTER button to enter the Media Center.
Press ◀ / ▶ / / button to select All/Video/Audio/Image. ▼ ▲
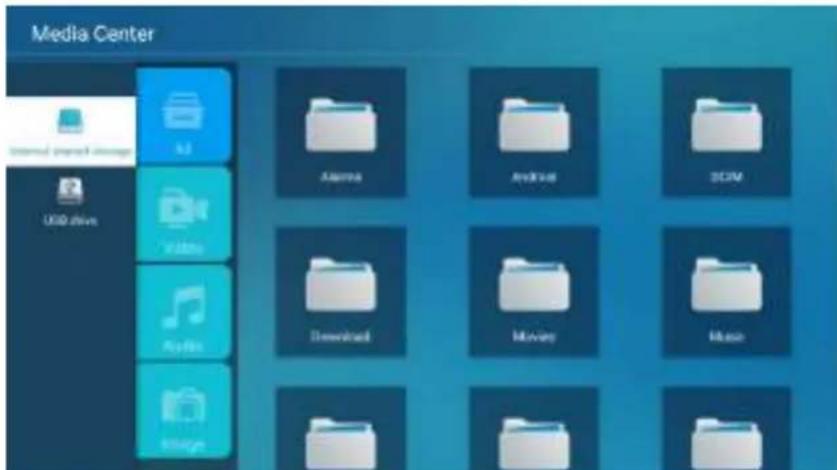
Video
Press ▼ / ▲ button to select Video or All, and press ▼ / ▲ / ◀ / ▶ button to select your desired movie.
Press Menu button to display the setting options on the left side.
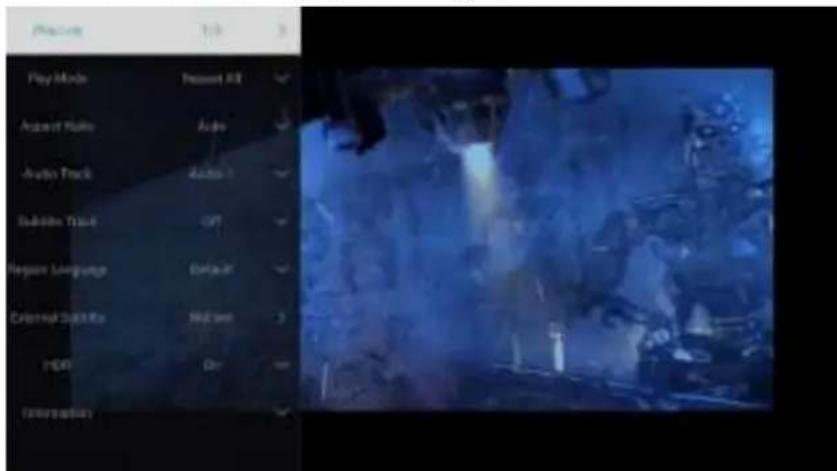
Play List
Press ▼ / ▲ button to select Play List and press ENTER button to display all available videos.
Play Mode
Press ▼ / ▲ button to select Play Mode and press ENTER button to select.
Aspect Ratio
Press ▼ / ▲ button to select Player Ratio and press ENTER button to select.
Audio Track
Press ▼ / ▲ button to select Audio Track and press ENTER button to select.
Subtitle Track
Press ▼ / ▲ button to select Subtitle Track and press ENTER button to select.
Region Language
Press ▼ / ▲ button to select Region Language and press ENTER button to select.
External Subtitles
Press ▼ / ▲ button to select External Subtitles and press ENTER button to select.
HDR
Press / button to select to select Progress Jump and press ENTER button to select.
Audio
Press ▼ / ▲ button to select Audio or All, and press ▼ / ▲ / ◀ / ▶ button to select your desired audios.
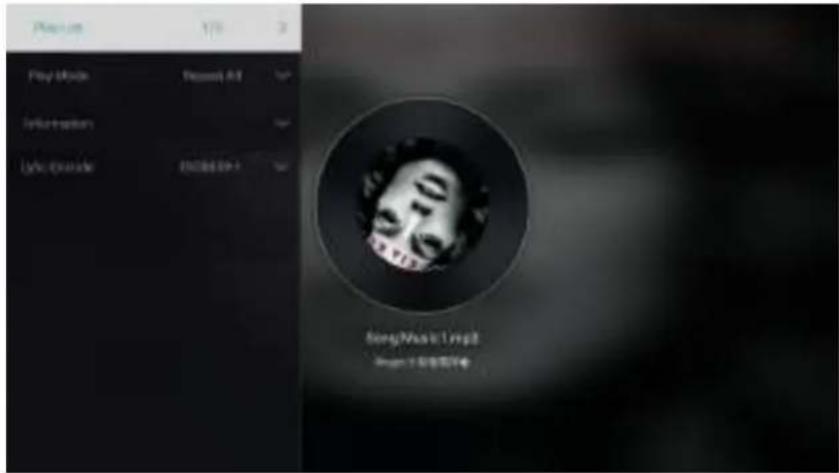
Play List
Press ▼ / ▲ button to select Play List and press ENTER button to display all available audios.
Play Mode
Press ▼ / ▲ button to select Play Mode, and press ENTER button to select.
Information
Press ▼ / ▲ button to select Information and press ENTER utton to view.
Lyric Encode
Press ▼ / ▲ button to select Lyric Encode and pres s ENTER button to select.
Image
Press ▼ / ▲ button to select Image or All, and press ▼ / ▲ / ◀ / ▶ button to select Pictures.
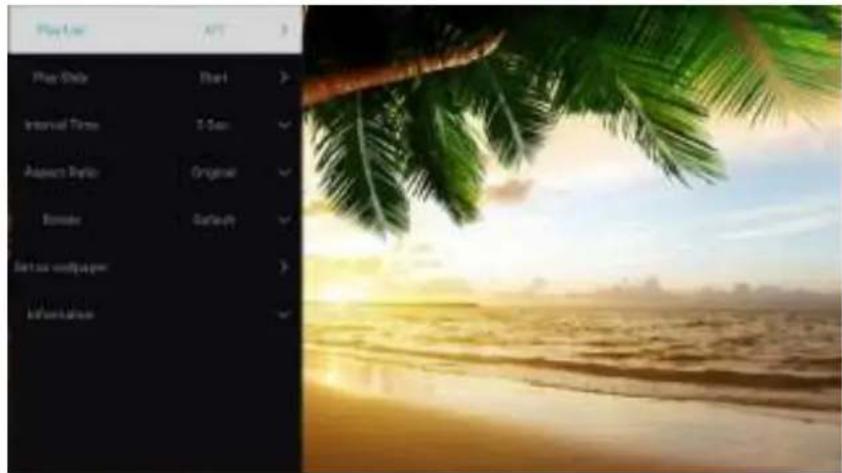
Play List
playable picture list display.
Play Slide
You can choose to start the slide show.
Interval Time
Select slide show interval.
Aspect ratio
Set the aspect ratio.
Rotate elect the rotate
of the image.
Set as wallpaper
Set the current play picture as wallpaper.
3. Technical Specification
| Product Model | NVR-9100-32RD2S-SMAN | |
| Screen Size | 32” diagonal | |
| Aspect Ratio | 16:9 | |
| Power Supply | AC 100-240V~,50/60Hz | |
| Power Consumption | 60W | |
| TV System | PAL B/GD/K I,SECAM B/G D/K DVB-T/T2/C/S/S2(s/s2 option)(There is no DVB-C signal in some Countries or Areas.) | |
| Audio Output Power(Internal) | 8Wx2 | |
| Input Terminal | Antenna Input | x 2(S2 Option) |
| USB Input | x 2 | |
| HDMI Input | x 3 | |
| VGA Input | NO | |
| PC AUDIO Input | NO | |
| Audio Input (L/R) | x 1 | |
| Video Input | x 1 | |
| YPbPr Input | NO | |
| RJ45 Input | x 1 | |
| CI card In | x 1 | |
| SCART In/Output | NO | |
| DC In (12V) | NO | |
| CARD SLOT | NO | |
| Output Terminal | Earphone | x 1 |
| Audio Line Out(L/R) | NO | |
| Video Output | NO | |
| Optical | NO | |
| Coaxial out | x 1 | |
| Working Temperature | 0°C~40°C | |
| Working Humidity | 20% ~ 80% Non-condensing | |
Note: the specification shown above may change without notice for quality improvement.
4. Supported Signal Modes
A.HDMI Mode
| Resolution | Horizontal Frequency (Khz) | Vertical Frequency (Hz) |
| 480p | 31.468 | 59.94 |
| 576p | 31.25 | 50.00 |
| 720p | 45.00 | 60.00 |
| 1080i | 33.75 | 60.00 |
| 1080p(1920x1080) | 67.50 | 60.00 |
-When the signal received by the Display exceeds the allowed range, a warning message will appear on the screen.
- You can confirm the input signal format onscreen.

HIGH-DEFINITION MULTIMEDIA INTERFACE
The terms HDMI, HDMI High-Definition Multimedia Interface, HDMI trade dress and the HDMI Logos are trademarks or registered trademarks of HDMI Licensing Administrator, Inc.
5. Simple Troubleshooting
If the display fails or the performance changes dramatically, check the display in accordance with the following instructions. Remember to check the peripherals to pinpoint the source of the failure.
| Symptom | Solution |
| Power cannot be turned on.(Power indicator does not light.) | -Check that both ends of the power cable are plugged into the socket appropriately and the wall socket is operational |
| No Input Signal message appears. | -Check that the signal line is connected properly.-Check that the power of the relevant peripherals is turned on.-Check that the Input option that has been selected matches with the input signal. |
| The remote control does not function properly. | -Check the batteries are not drained.(Use new batteries.)-Check that the remote control is within the operating range.-Check that the remote control is pointed to the remote control window on the display.-Check that there are no obstacles between the remote control and the remote control window. |
| Flashing spots or stripes appear on the screen. | -Check that there are no emission (Car, HV cable or Neon lamp) or other possible interference sources. |
| Image colour or quality deteriorates. | -Check that all the video settings are adjusted appropriately, such as brightness, contrast, colour etc.-For more information about video settings, refer to OSD Functions in Chapter 2. |
| Screen position and size are incorrect. | -Check that the screen position and size is adjusted appropriately. |
| Image or colour is incorrect. | -Check that the signal line is connected properly.-When connecting to a PC, you can change the resolution of the PC to acquire the correct image. The discrepancy of the PC output signal may affect the display of the image. |
| Display warning message. | -Check that the input signal line is properly fixed.-Select the correct input signal.-For more information, refer to Supported Signal Modes in Chapter 4. |
- PRECAUCIÓN
- CONTENIDOS
- Control remoto
- INICIO
- Ajustes de la TV
- Contraste/Brillo/Color/Nitidez
- Modo de Sonido
- Tipo de Antena
- Lista de Canales
- Bloqueo
- Ajuste PVR
- Operating Instruction
- PRECAUTION
- WARNING
- IMPORTANT INFORMATION
- CAUTION
- Attention:
- CONTENTS
- Connection and Preparation of TV....2
- Basic Operation....5
- Technical Specification....16
- Supported Signal Modes....17
- Simple Troubleshooting .....18
- 1.Connection and Preparation of TV
- Accessories
- Installation of Stand
- Keys and Interfaces
- Remote Control
- Installation of Batteries
- Basic Operation
- Power ON/OFF(Optional)
- Setting of Standby Mode
- Input Source
- Home page
- HOME
- Settings
- TV Setting
- Picture
- Picture Mode
- Contrast/Brightness/Color/Sharpness
- Backlight
- Noise Reduction
- Aspect Ratio
- Color Temp
- More Settings
- Sound
- Sound Mode
- Sound Out
- AVC
- Hearing Impaired
- Audio Description
- AD Volume
- Digital Audio Output
- SPDIF Delay
- Surround
- Audio Only
- Channel
- Antenna Type
- Scan
- Signal Information
- Subtitle
- C h an n e I L ist
- All
- Favorite
- Lock
- Change Password
- Common
- PVR Setting
- Timer Setting
- OSD Timer
- Autostandby Timer
- Sleep Timer
- Blue Screen
- Teletext
- Audio Language 1st
- Audio Language 2nd
- HDMI CEC Setup
- Store mode
- ECO mode
- Menu Reset
- Advanc e
- Media
- Video
- Play List
- Play Mode
- Audio Track
- Subtitle Track
- Region Language
- External Subtitles
- Audio
- Image
- Technical Specification
- Supported Signal Modes
- Simple Troubleshooting
Brand : NEVIR
Model : NVR-9100-32RD2S-SMAN
Category : Television