LED24IBT - TV Reflexion - Free user manual and instructions
Find the device manual for free LED24IBT Reflexion in PDF.


| Product Type | 24-inch LED Smart TV |
| Model | LED24IBT (Reflexion) |
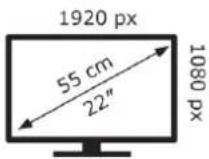
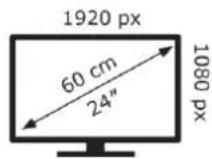
| Screen Diagonal | 60 cm / 24 inches |
| Resolution | 1920 x 1080 (Full HD) |
| Display Type | DLED |
| Aspect Ratio | 16:9 |
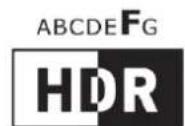
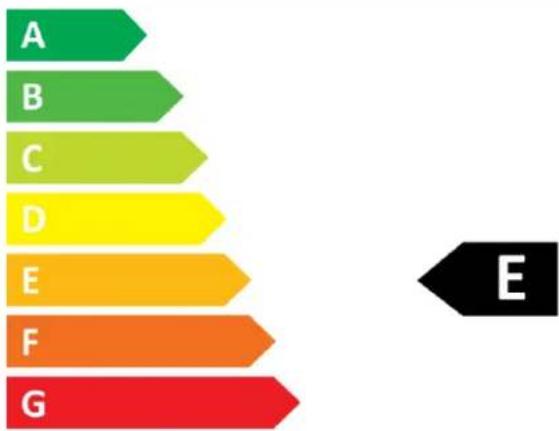
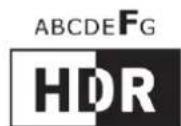
| Energy Efficiency Class (SDR / HDR) | E / F |
| Power Consumption (SDR / HDR) | 17.1 W / 22 W |
| Standby Power Consumption | < 0.5 W |
| Input Voltage | DC 12V / 3A |
| Tuners | DVB-S/S2, DVB-T2HD, DVB-C |
| Smart TV Platform | webOS 2.0s (version 8.1.0+) |
| Wireless Connectivity | WiFi 802.11b/g/n/ac (2.4 & 5 GHz), Bluetooth 5.0 |
| Connections | 2x HDMI (1 ARC), 2x USB (5V/500mA), Optical Out, Headphone, AV/L/R, RJ45, CI+ Slot, Antenna (TV1/TV2) |
| Audio Output | 2 x 3W speakers |
| Dimensions with Stand (WxDxH) | 550 x 142 x 369 mm |
| Weight with Stand | 3.40 kg |
| VESA Mount | 100 x 100 mm |
| Recording & Time Shift | USB recording (FAT32/NTFS, max 1TB), TimeShift |
| CI+ Slot | For pay-TV CAM modules and smart cards |
| Remote Control | IR remote with dedicated app shortcut keys |
| Child Lock / Safety | Parental controls, auto power off, energy saving mode |
| Cleaning Instructions | Soft dry cloth; no solvents or abrasive cleaners; LCD cleaner recommended |
| Warranty | 36 months (subject to conditions) |
| Package Contents | TV, remote with battery, power adapter, car cable, stand parts, VESA screws, manual |
Frequently Asked Questions - LED24IBT Reflexion
User questions about LED24IBT Reflexion
0 question about this device. Answer the ones you know or ask your own.
Ask a new question about this device
Download the instructions for your TV in PDF format for free! Find your manual LED24IBT - Reflexion and take your electronic device back in hand. On this page are published all the documents necessary for the use of your device. LED24IBT by Reflexion.
USER MANUAL LED24IBT Reflexion
natural_image
Line drawing of a flat-screen monitor with no text or symbols on the screen or sidewebOS Smart-TV mit DVB-S2 / DVB-T2HD / DVB-C / CI+Slot / Bluetooth
English user manual: Page 50
KOPFHÖRER-WARNHINWEIS
natural_image
Diagram of a refrigerator with two different sizes and a downward arrow indicating size reduction (no text or symbols)natural_image
Diagram of a cylindrical device with internal components and two separate rectangular blocks (no text or symbols)natural_image
Diagram of a cylindrical device with internal components and an ascending arrow, no text or symbols presentnatural_image
Pure diagram of a vertical panel with six circular components, no text or symbols presentVOI+: Lauter
Vol-: Leiser
| English | German |
| CI+ Slot | CI+ Steckplatz |
| CAM | CAM |
| Smart Card | Smart Card |
GRUNDBEDIENUNG
bar
| Category | Value | |---|---| | A | 1 | | B | 2 | | C | 3 | | D | 4 | | E | 5 | | F | 6 | | G | 7 | The label 'E' is in the bottom-right corner, not directly corresponding to the bars. The color gradient from green to red corresponds to each category.15 kWh/1000h
20 kWh/1000h
2019/2013

ENERG
LED24IBT
Reflexion
bar
| Category | Value | |---|---| | A | 1 | | B | 2 | | C | 3 | | D | 4 | | E | 5 | | F | 6 | | G | 7 |17 kWh/1000h
22 kWh/1000h
2019/2013

natural_image
Line drawing of a flat-screen monitor with no text or symbols on the screen or sidewebOS Smart-TV mit DVB-S2 / DVB-T2HD / DVB-C / CI+Slot / Bluetooth
English user manual: Page 50
Read the operating instructions carefully before using the appliance for the first time and keep them in a safe place for future reference.

 | The operating and maintenance instructions (service) in this manual must be followed. Use of the appliance other than as described in this manual may result in damage to health, a defect in the appliance and invalidation of the warranty. |
 | To eliminate the risk of electric shock, do not open the unit. Opening the appliance will invalidate the warranty. Repairs may only be carried out by an authorised specialist workshop and qualified persons. There are no parts inside that can be repaired by the user. |
 | This device is designed for DC 12V mains voltage. If the appliance is not to be used for a longer period of time, disconnect the mains adapter from the appliance. |
 | The device is operated with an external power supply unit. To prevent damage to the device, only use original accessories that comply with the specifications in these instructions. |
 | Do not expose the appliance to splashing water or high humidity and do not place objects filled with liquids, such as vases, on the appliance. |
 | Position the unit so that an undisturbed supply of fresh air is always ensured. Do not place the unit on carpets or near curtains and do not install the unit in bookshelves. |
 | Do not expose the appliance to direct sunlight or heat sources such as heaters or stoves, and do not place naked flames such as candles on the appliance. |
IMPORTANT SAFETY INSTRUCTIONS
PLEASE READ CAREFULLY BEFORE USE.
Observe the safety instructions on the back of the TV.

Electrical Shock Prevention Warning. Do not remove any of the covers. No user-serviceable parts inside the unit. Have the appliance serviced by qualified personnel.

This symbol indicates important operating/maintenance instructions from this unit in the operating instructions.

This symbol indicates the risk of electric shock due to life-threatening voltage in this appliance.
Follow the instructions below:
- Do not use this television near water.
- Use only a slightly damp cloth for cleaning.
-
Do not cover any of the ventilation openings.
-
Set up the unit in accordance with the Quick Start Guide supplied and these operating instructions.
- Note that the power supply cable must not be crushed or kinked and avoid running the power cable over sharp edges.
- Unplug the TV during lightning storms or when it will not be used for long periods of time.

Keep the appliance away from splashing and dripping water. Do not place any objects filled with liquids on the appliance.
NOTE:
- Do not place any open heat sources (stoves, candles, etc.) near or on the TV set.
IMPORTANT SAFETY INSTRUCTIONS
This appliance complies with all current safety regulations. The following safety tips are intended to protect the user from careless use and the dangers that may develop as a result.
- This appliance has been manufactured with the utmost care and has undergone a rigorous final inspection. However, as with any other electrical appliance, there is a possibility that problems may arise. In the event of smoke, intense heat or any other unnatural phenomenon, disconnect the appliance from the mains immediately.
- The mains plug or appliance plug is used to disconnect the appliance from the mains and should be easily accessible at all times.
- Only connect the appliance to power sources that comply with the specifications of the appliance. These can be found on the back of the unit and in the operating instructions.
- The mains socket should be close to the unit and easy to reach.
- Pull the mains cable out of the socket by the plug. Never pull on the mains cable itself, it could be damaged and cause a short circuit.
- When using a multiple socket, do not connect too many appliances to the multiple socket to avoid overloading.
-
Keep rodents away from the appliance to avoid damaging the cables.
-
To prevent injury, make sure that the power cord cannot be reached or unplugged by small children.
- Do not place the appliance near heat sources. The casing and the power cable could be damaged by the influence of heat.
- The screen is made of plastic that may chip if damaged. To prevent injury, carefully pick up any sharp-edged plastic fragments.
- When setting up the unit, make sure it is on a firm and level surface.
- To protect the unit from lightning, disconnect the unit from the mains and unplug the antenna. Warning: Do not touch the RF antenna connector.
- Disconnect the unit from the mains if you are not going to use it for a long period of time or if you leave it unattended.
- When setting up the unit, make sure that there is sufficient ventilation. Never place the unit near heat sources and do not cover any of the ventilation openings.
- Avoid direct sunlight on the unit. Keep a clearance of 5 cm (2") from the surroundings when placing on a shelf.
- Keep water or moisture away from the unit. Do not use the unit in wet or humid environments such as the bathroom, a steam kitchen or near a swimming pool.
- Do not use the appliance if moisture condensation may occur.
- Any repairs must only be carried out by qualified personnel.
- Never open the appliance. Repairs that are not carried out by qualified personnel can be a possible cause of fire.
- Liquids spilled into the appliance may be a cause of serious damage. Switch the appliance OFF and disconnect it from the mains. Contact your dealer or customer service.
- Never remove the safety covers. There are no usable or serviceable components inside the unit. You would lose your warranty claim. The appliance may only be repaired by the manufacturer's service department.
- Never hit or shake the screen as this may damage the internal circuitry. Be careful with the remote control and do not drop it.
- Clean the unit with a soft cloth. Never use solvents or oil-based liquids. For stubborn stains, you can use a damp cloth with diluted detergent.
- Teach your children how to use the Internet and do not let them play with the device unsupervised. The company TV Grawe Service GmbH is not responsible for the Internet content shown.
- All illustrations in these operating instructions are intended solely as examples and do not necessarily correspond to the actual device.
- Please note that not all settings are available for all units.
HEADPHONE WARNING
Set the volume of the unit to a minimum before using headphones. A volume that is set too high can lead to hearing impairment / damage over a long period of time. Therefore, to protect your hearing, use a comfortable medium volume.
INSTALLATION SITE
Place the TV set on a stable and level surface (stand not included) or mount it on the wall in accordance with the operating instructions for the wall bracket. Avoid locations with direct sunlight. Soft, indirect light is recommended for pleasant TV viewing. To avoid damage to the set, place the TV set so that no objects can swing into the set. Make sure that you do not place any objects in front of the remote control receiver of the TV set. This will make it impossible to operate the unit with the remote control.
What's in the box?
- webOS TV
- Remote control incl. battery
• Power supply (12V / 3A)
- User manual
• TV stand (left / right)
- 12V car cable
- Vesa screws
Note:
- The feet of the 24 inch model are plugged in.
- Screws are only included with the 22 inch model.
UNPACKING AND SETTING UP
-
Carefully remove the appliance and accessories from the carton and remove all packing material from the appliance. Check that the accessories are complete.
-
Check that the toggle switch on the device is set to On (I).
-
Connect the power adapter or car cable included in the scope of delivery to the appropriate power source and the device.
-
Insert the batteries into the remote control. Make sure that the polarity is correct.
-
Connect your satellite system, cable system or DVB antenna to the TV1 (satellite) or TV2 (DVB-C / DVB-T) connections.
-
Connect all other external devices (e.g. Blu-ray player, etc.) to the appropriate connections on the TV set.
-
The unit is now ready for use. The functions are explained on the next pages.
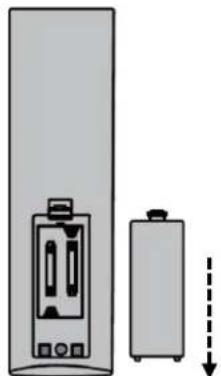
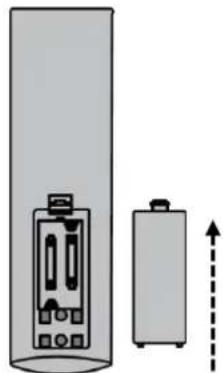
REMOTE CONTROL REPLACE BATTERY
TV remote control
1.
natural_image
Diagram showing a vertical container with internal components and a smaller cylindrical device, both without any text or symbols.Open the battery compartment on the back of the remote control by sliding the cover off the remote control in the direction of the arrow.
Note:
- For the disposal of the removed batteries, please observe the disposal instructions in this manual.
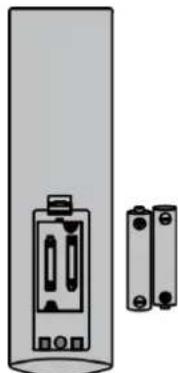
2.
natural_image
Diagram of a cylindrical device with internal components and two separate rectangular blocks (no text or symbols)Remove the batteries already inserted and insert the new batteries into the remote control. When inserting the batteries, pay attention to the polarity (+/-) in the battery compartment.
Note:
• Always use only batteries of the same type and manufacturer.
3.
natural_image
Diagram of a cylindrical device with internal components and an upward arrow indicating direction (no text or symbols)Close the battery compartment on the back of the remote control by sliding the cover onto the remote control in the direction of the arrow.
Note:
- If the unit is not going to be used for a long period of time, remove the batteries from the remote control to prevent them from leaking and damaging the remote control.
To clean the unit, do not use any liquids or cleaning agents containing alcohol or thinner. For the display, we recommend LCD cleaner. Never spray the cleaner directly on the display, but first on a cleaning cloth and then clean the display. If the unit becomes dusty, wipe it with a soft, non-abrasive dust cloth.
MOUNTING TV STAND
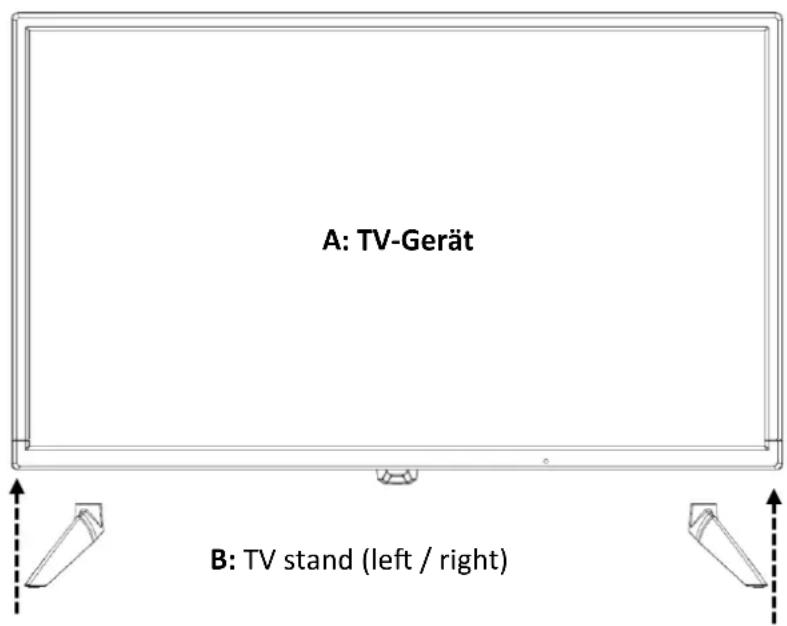
Bild 1:
- Place the TV set (A) on a level and lightly padded surface with the display facing downwards.
-
Insert the two feet into the device as shown in the illustration.
-
LED22iBT: The feet are attached to the TV set using the screws supplied.
- LED24iBT: The feet are plugged in. No screws are included in the accessories.
Note:
- Do not overtighten the screws. You could damage the screws or the thread.
View from behind: LED22iBT
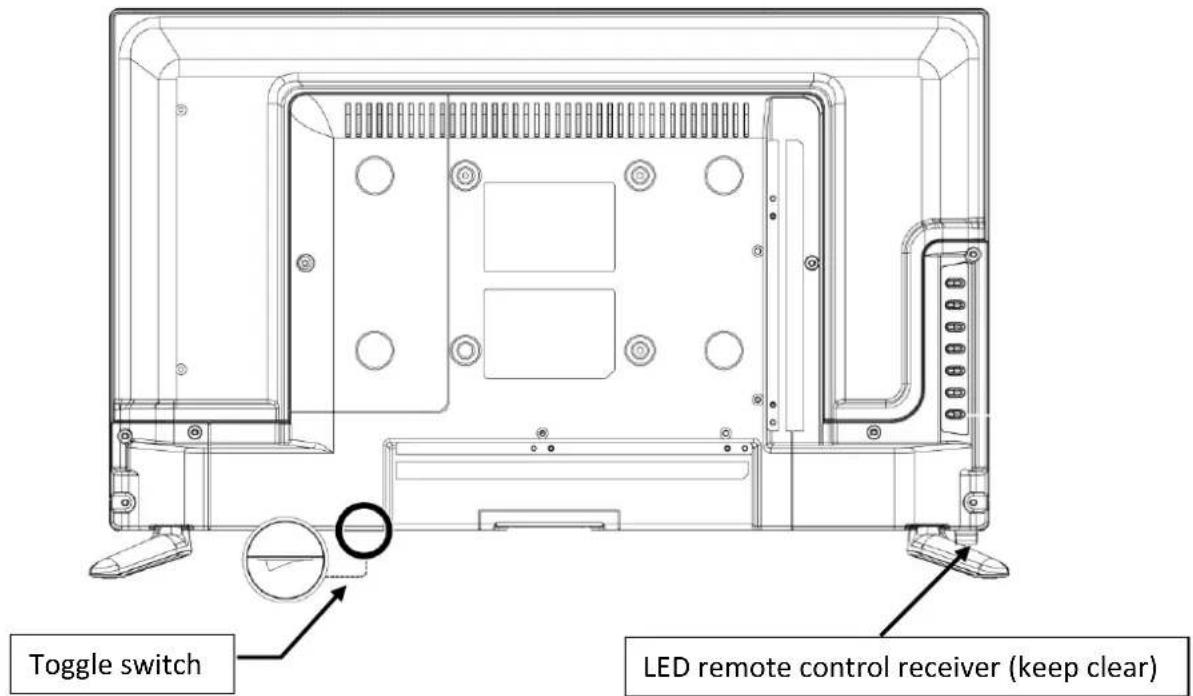
Notes:
- Please note that some functions can only be carried out using the remote control.
- Keep the remote control receiver free, otherwise the remote control will not work.
• Make sure that the toggle switch is set to On (I). Otherwise the television will not work.
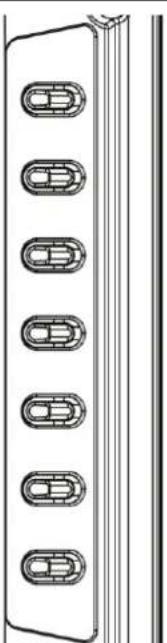
natural_image
Pure diagram of a vertical panel with six identical oval-shaped cutouts, no text or symbols present.VOL+: Louder
Vol-: Quieter
CH+: Switch channel up
CH-: Switch channel down
Menü: Open / close device menu
Input: Open / close input menu
Power: Switch on device / Standby
View from front: LED24iBT
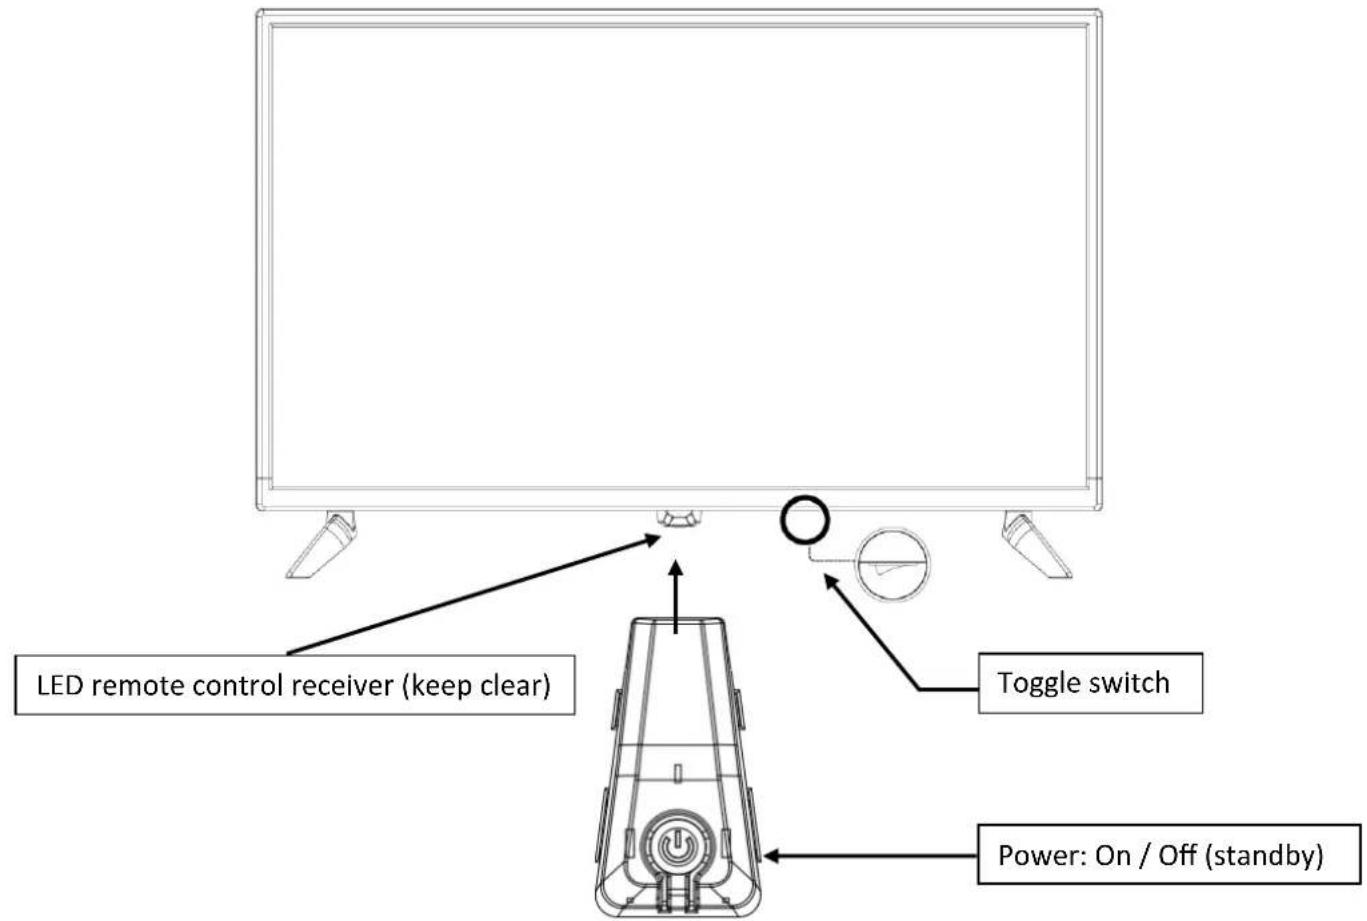
Notes:
- Please note that all functions except Power On/Standby can only be controlled with the remote control.
- Keep the remote control receiver free, otherwise the remote control will not work.
• Make sure that the toggle switch is set to 'On' (I). Otherwise the television will not work.
| Toogle switch | The toggle switch is located on the underside of the appliance. Check that the toggle switch is set to ‘On’ (I). The toggle switch can be used to switch off the appliance completely (set to (O)). |
| Power | Switch on device / Standby |
CONNECTIONS
UK
| POWER INPUT DC 12V | Input socket for the power supply unit and the vehicle cable. |
| RJ45 | LAN connection for a network cable. |
| AV / L / R | AV input for connecting external AV devices such as video recorders or similar (AV adapter is not included). |
| HDMI 1 / HDMI 2 | 2x HDMI input for connecting external devices such as games consoles, BluRay players or soundbars (HDMI 2 is ARC compatible). |
| USB 1 / USB 2 (5V / 500mA) | 2x USB connection for USB sticks and hard drives (max. 1TB) for media playback. |
| OPTICAL (out) | Optical audio output for outputting the audio signal to sound receivers or soundbars. |
| TV1 (DVB-S / S2) | Connect your satellite aerial here. |
| TV2 (DVB-C / T2) | Connect your cable system or DVB-T aerial here. |
| CI+SLOT | Slot for CI+ modules for decrypting encrypted TV programmes (module and card are not included in the scope of delivery and must be obtained from the relevant provider). |
| Headphones | 3.5mm headphone connection. When used, the internal speakers are muted. |
REMOTE CONTROL
The remote control uses infrared waves (IR). Hold the remote control in the direction of the TV set. The remote control must be within range and at the correct angle to the TV set (8 metres / 60°). The following buttons are available on the remote control.
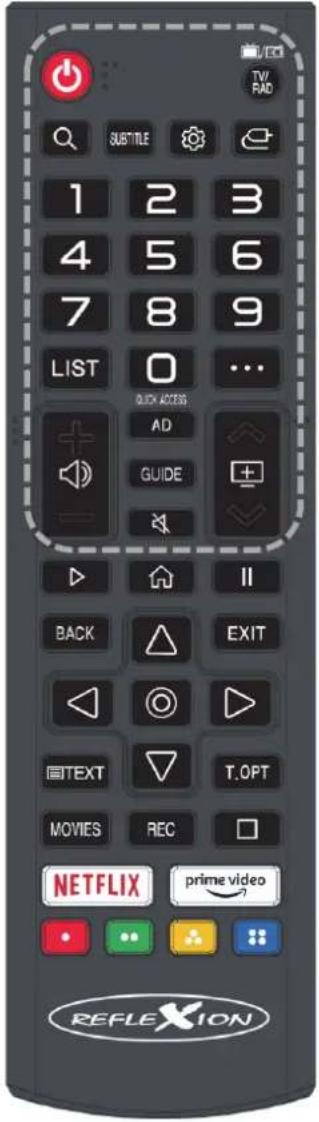 |  | Power button: Switch the unit on or off. | |
 | TV/Radio key: Switch between the TV and radio programmes. | ||
 | Search button: Search for specific content. | ||
 | Subtitle button: Select the subtitle. | ||
 | Configuration key: Opens or closes the configuration menu. | ||
 | Input key: Open input source menu. | ||
  | Number keys: For programme selection. | ||
 | List button: Opens the programme list. | ||
 | Menu selection keys: Opens or closes the input field for e.g. number field, teletext and other functions. | ||
 | +/-: | Volume button: Adjust volume. | |
| ▲▼ | Channel key: Next channel / Previous channel. | ||
 | AD key: Activates the audio description when transmitting from the channel. | ||
 | Mute button: Mute sound (On / Off). | ||
 | Programme guide button: Opens or closes the programme guide menu. | ||
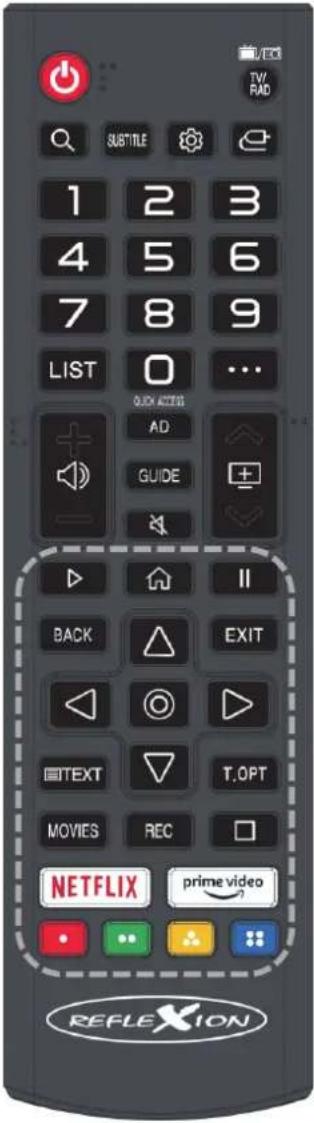 |  | Playback button: Start USB playback. | |
 | Home button: Open the WEB OS user interface. | ||
 | Pause button: Pause USB playback. | ||
 | Back button: Return to the last menu item. | ||
 | Exit key: Exit / close menu. | ||
   | Navigation keys: up / down / left / right | ||
 | Enter key: Confirm. | ||
 | Text key: Open / close the teletext. | ||
 | Text option key: Open menu for teletext options. | ||
 | Record key: Starts a recording on USB. Note: Only if supported by the TV set. | ||
 | Movies button: Opens the search function for video content in apps. | ||
 | Stop button: Stop USB playback. | ||
  | App shortcut keys: Opens corresponding apps. | ||
  | Menu quick selection keys: Quick selection keys for menu and teletext. | ||
This TV is equipped with a CI+ slot and supports the following digital standards: DVB-T/T2HD, DVB-S/S2 and DVB-C
Common Interface / Slot
The CI slot (CI+) is designed to accept conditional access modules (CAM) and smart cards to access pay TV and other services. Contact your pay TV service provider for more information about modules and subscriptions.
Note:
- Conditional Access Modules and Smart Cards are sold separately.
- Switch off your TV before inserting CI+ modules into the CI slot.
- Then insert the Smart Card into the Cl+ module.
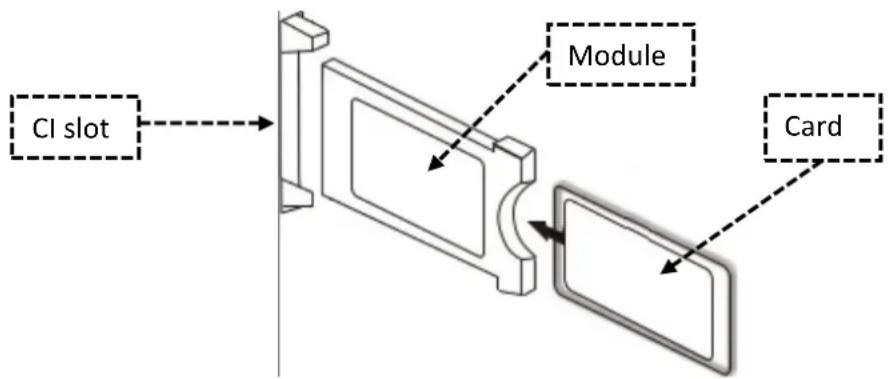
- Switch on the TV and make sure that "Live TV" is selected as the source.
-
When the CAM is detected, the following message appears on the screen: "CI module has been detected". Wait a few seconds until the card is activated.
-
Now select the desired pay-TV programme.
-
Detailed information about the Smart Card used is displayed in the configuration menu under the following menu item: All settings > General > Transmitter > CI information.
-
Press the OK key to OK the CI menu. Refer to the manual of the module for details on the settings.
-
When the module is removed, the following text is displayed on the screen: "CI module has been removed".
| English | German |
| CI+ Slot | CI+ Steckplatz |
| CAM | CAM |
| Smart Card | Smart Card |
BASIC OPERATION
The unit is operated with the following keys. You will find a description of how to access the menu items on the following pages. In addition to this manual, an electronic manual for the menu items is integrated in the software of the unit. During operation, important notes or descriptions are shown on the display. These explain what is being changed or help to set up the unit.
 | Power button: Switch the unit on or off. |
 | Input key: Open input source menu. |
 | Mute button: Mute sound (On / Off) |
  | Navigation keys: up / down / left / right |
 | Enter key: Confirm |
 | Configuration key: Opens or closes the configuration menu. |
  | Back key: Closes the menu or returns to the previous menu item.Exit key: Exit / close menu. |
 | Home button: Open the WEB OS user interface. |
 | Programme guide button: Opens or closes the programme guide menu. |
 | Transmitter functions: Numeric keys for programme selection.Scheduler: Displays the scheduling list for created reminders that have been set in the programme guide menu.Channel List: Displays the channel list.Programme Guide: Opens the electronic programme guide and displays programme information.Magic Explorer: Opens suggestions related to the current TV content that you can search for.User Guide: Opens the user guide in the unit.Information: Displays programme information about the current programme.Sport: Activates the sport mode. Note that the sport mode leads to increased energy consumption.TV/Radio: Switch between the TV and radio channel list.Audio Description: Activates / deactivates the audio description. Only if transmitted by the TV station.Teletext: Opens / closes the teletext.Teletext options: Switch various options in the teletext such as index, time, hold, show and many more.Audio Language: Select the audio track available from the broadcaster.Subtitle: Select the subtitle available from the broadcaster.Change Banner Placement: Change the position for menu overlays.Coloured buttons (red, green, yellow, blue): Quick buttons for menu settings and teletext. |
Once you have connected the device and connected it to all devices, follow the next steps to carry out the initial installation of the device. Please note that a voice assistant for people with visual impairments is switched on in the first steps of the initial installation. However, this can be switched off during the initial installation. After you have switched on the TV set, you will be prompted to press the OK button.
1. Switch on the device
Press the toggle switch on the device and the power LED lights up red. Then press the power button on the remote control to switch the device on. The power LED flashes red and green alternately. When the device is switched on, the power LED lights up green.
2. Start initial installation
The display shows "Press the OK button on your remote". Press the OK button on the remote control to start the initial installation.
3. Language
Select the language and press the OK button. Then press the ▶ button to go to the "Next" menu item. Now press the OK button to move to the next menu item.
4. Country
Select the country and press the OK button. Then press the ▶ button to go to the "Next" menu item. Now press the OK button to move to the next menu item.
5. Audio instructions
After you have confirmed the country, a screen for the "Audio instructions" appears on the display. Select "Yes" if the menu items and entries should continue to be read aloud. Select "No" if you no longer want the menu items and entries to be read out. Now press the OK button to move to the next menu item. For the next item, follow either the instructions "Initial installation: Setting up on the TV" or "Initial installation: Setting up via app".
FIRST INSTALLATION: Set up on the TV
6. How to set up the TV
Select whether you want to set up the device using an app or on the TV set. Then navigate to "Next" and press the OK button to move to the next menu item.
• TV: The initial installation is carried out on the TV.
7. Internet connection
Now continue with the WLAN setting.
Note:
- If you have connected the device using a network cable or you do not want to connect the device to the network or want to connect it at a later time, navigate to "Skip" and press the OK button. Now select the WLAN connection to which you want to connect the device. Navigate to the network name and press the OK button. A keypad opens on the display. Enter the password and navigate to "Enter/OK" and press the OK button. The device is now connected to the network and you are taken to the next menu item.
Note:
- The keyboard is set to English by default. Navigate to the "ENG" field when the keyboard is open and press the OK button. The following settings are available for selection:
ENG: English keyboard (QWERTY)
DEU: German keyboard (QWERTZ)
8. Terms and conditions
Read through the General Terms and Conditions and press the OK button to move to the next point. "Select all" is highlighted. Press the OK button to select all. Navigate down to "More" and press the OK button again. The input field now changes to the "Agree" item. Press the OK button again to agree to the selected terms and conditions.
Note:
• If the general terms and conditions are not confirmed, the Internet content cannot be used.
9. User environment analysis
Now select how you want to use the TV set. "Select" is highlighted. Press the OK button to proceed to the selection. The following points are available for selection:
- TV only: A scan is performed during the initial installation. Follow the next points to carry out the search.
- None: The channel search function is skipped during the initial installation. A channel scan can be performed at a later time.
Once you have selected the usage type, press the ▼ button to go to the "Next" item. Press the OK button to move to the next menu item.
10. TV installation type for optimal sound settings
Select the way you have installed the TV set. Depending on the model, the audio settings may be set differently depending on the selection.
- Stand: You have installed the device using the optional stand.
• Wall-mounted: You have mounted the device on an optionally available wall bracket.
11. SW Automatic update
Deactivate or activate with the OK button to allow software updates to be downloaded automatically via the connected network / WLAN. The menu item is "Activated" in the initial installation. Then use the
▼ button to navigate to "Next" and press the OK button to move to the next menu item. If you have selected "None" at point 9, continue with point 13.
12. Programme Tuning
If you have selected "None" for point 9 "User environment analysis", skip this point and continue directly with point 13 "LG account". Select the connection how you want to receive the TV programme and press the OK button. The following options are available and recommended
• Antenna: Digital search only
You have connected a terrestrial indoor aerial, roof aerial or outdoor aerial to the "TV2" connection of the appliance. 5V voltage for active antennas is always switched on.
Cable: Other Operators >>> Full search >>> Blind search
You have connected your cable system to the "TV2" connection on the device.
Satellite: Other Operators >>> Blind search
You have connected your satellite system to the "TV1" connection on the device.
Then use the ▼ button to navigate to "Next" and press the OK button to move to the next menu item. The following setting options are available.
Note:
- For more information, see "Start channel scan" in this manual.
- A sorted channel list for satellite mode can be requested by e-mail and is available on our homepage.
- The 5V voltage for active DVB-T antennas is always activated and cannot be switched off.
- The channel list may vary depending on the settings selected.
| ANTENNA (DVB-T) | 1. The following setting options are available in the Antenna (DVB-T/T2 HD) menu item.• Search digital only2. Once you have made the setting, navigate to "Next" and press the OK button to start the search.3. Once the search is complete, a display will open showing which programme mode has been set.4. Press the OK button to confirm. The number of channels found is now displayed.5. Navigate to "Next" and press the OK button to move to the next menu item. |
| CABLE (DVB-C) | 1. The following setting options are available in the cable (DVB-C) menu item.Vodafone (other federal states): Network search / Complete searchVodafone (NRW, Hessen, BW): Quick search / Complete searchOther providers: Network search / Complete search2. Once you have made the settings, navigate to "Next" and press the OK button to start the search.3. Once the search is complete, a display will open showing which programme mode has been set.4. Press the OK button to confirm. The number of channels found is now displayed.5. Navigate to "Next" and press the OK button to move to the next menu item. |
| Satellite / ASTRA | 1. The following setting options are available in the Satellite / Astra menu item.Change satellite settings:The LNB settings can be adjusted here. Caution!Adjusting the values is only recommended for experienced users. Normally, nothing needs to be changed.Edit transponder:The transponders of the set satellite can be viewed, edited and added here.2. Navigate to "Next" and press the OK button to move to the next menu item.The following settings are available.Quick search:A preset list with set favourites is loaded. Only the first 99 programme positions can be edited. Navigate to "Next" and press the OK button to start the search.Complete search:A complete search is performed. The channel list is not sorted and channels 1-99 can be used as favourites. Only the first 99 programme positions can be edited. The following items can be selected: Skip encrypted programmes, network search, blind search.3. Once you have made the settings, navigate to "Next" and press the OK button to start the search.4. Once the search is complete, a display will open showing which programme mode has been set.5. Press the OK button to confirm. The number of channels found is displayed.6. Navigate to "Next" and press the OK button to move to the next menu item. |
| Satellite / Other Providers | 1. The following setting options are available in the Satellite / Other providers menu item.Change satellite settings:The LNB settings can be adjusted here. Attention!Adjusting the values is only recommended for experienced users. Normally, nothing needs to be changed.Edit transponder:The transponders of the set satellite can be viewed, edited and added here.2. Navigate to "Next" and press the OK button to move to the next menu item.3. The following items can be selected.Skip encrypted programmesNetwork searchBlind search.4. Once you have made the setting, navigate to "Next" and press the OK button to start the search. |
| Satellite / Other Providers | 5. Once the search is complete, a display will open showing which programme mode has been set.6. Press the OK button to confirm. The number of channels found is now displayed.7. Navigate to "Next" and press the OK button to go to the next menu item. |
13. LG Account
You have three options for connecting to an LG account or creating an LG account.
- Log in with the Mobile-LG ThinQ app: Scan the QR code from the display with your smartphone to install or open the app. Follow the instructions in the app to create a user account or log in.
- Log in with Mobile Web: A QR code and a URL link are displayed. Open the browser on your mobile device or PC/notebook and enter the URL. Follow the instructions in the browser and enter the code displayed on the TV.
- Log in to the TV: Follow the instructions on the TV to create a user account on the TV set or to log in.
Log in:
- Enter the e-mail ID and password.
- Navigate to "Log in" and press the OK button.
• You can now assign a nickname for how the device should be displayed in the user account.
Create:
- Accept the General Terms of Use by navigating to "Select all" and pressing the OK button.
- Navigate to "More" and press the OK button. The button will change to "Agree".
- Press the OK button again to confirm and move on to the next item.
- Enter your e-mail address, a password and your date of birth. Follow the instructions on the TV set for the next steps.
14. Installation the apps recommended by webOS TV
Select the apps that you would prefer to update / install for the initial installation. You can choose from the following: LG Channels, Joyne, Prime Video, Youtube
Navigate to the app and press the OK button. Then navigate to "Done" and press the OK button.
15. Initial installation completed
Once you have confirmed the previous menu item, the device switches to the Home screen. A message appears on the display asking whether you want to use the recommended app list or rearrange it. This can also be set at a later time. On the Home screen, you can install or open the apps, start LiveTV, select external devices and much more. You can find more information under "Home screen" in the instructions.
FIRST INSTALLATION: Setup via app
6. Setting up the television
Select whether you want to set the device using an app or on the TV set. Then navigate to "Next" and press the OK button to move to the next menu item.
• Mobile device: The device is set using a smartphone app.
A QR code is shown on the display. Scan this with your smartphone to install the app.
Once you have installed the app, open the app and create an account or log in with an existing account. Then click on the + symbol in the app. Now select "Add product".
You have the following options to add a device.
- QR scanning: Scan the QR code on the TV display with your smartphone. Now wait until the TV webOS name is displayed in the app and then click on "Add". A sequence of numbers is now displayed on the TV screen. Enter this on the smartphone.
- Select manually: Follow the instructions in the app.
7. Network connection
Select the network to which the TV set is to be connected, enter the password and press "OK".
8. Legal information
Read the legal information and then click on "Next".
9. User agreements
Read the user agreements and click on "Select all". Then click on "Agree". If you have not accepted the settings, the Internet content cannot be used.
10. Log in to the TV with your account
Select the user account to which you want to connect the device. Then click on "Log in".
11. Switch on the TV set via Wi-Fi
Activate or deactivate whether or not you can switch on the TV set via the app. This can lead to increased power consumption. The setting can also be made at a later time.
12. User analysis
You will now be asked to connect all external devices, your cable system, DVB-T aerial or satellite system to the device if you have not already done so. Click on "Next" to proceed to the next point.
13. The right way to watch TV:
Select how you want to use the TV set. The following options are available. Then click on "Next".
• TV only:
• I do not have a TV service: The search run is not executed.
The next points can be controlled using the remote control or the control panels in the smartphone app.
14. Television installation type for optimum sound settings
Select the way you have installed the TV set. Depending on the model, the audio settings may be set differently depending on the selection.
- Stand: You have mounted the appliance using the optional stand.
• Wall mounted: You have mounted the device on an optionally available wall bracket.
15. Auto-Update
Deactivate or activate with the OK button to allow software updates to be downloaded automatically via the connected network / WLAN. The menu item is "Enabled" in the initial installation. Then use the ▼ button to navigate to "Next" and press the OK button to go to the next menu item.
16. Channel setting
For channel settings, see "Starting the channel scan" on page 23 to page 26.
17. Installation of the apps recommended by webOS TV
Select the apps that you would prefer to update / install for the initial installation. You can choose from the following: LG Channels, Joyne, Prime Video, Youtube Navigate to the app and press the OK button. Then navigate to "Done" and press the OK button.
18. Initial installation completed
Once you have confirmed the previous menu item, the device switches to the Home screen. A message appears on the display asking whether you want to use the recommended app list or rearrange it. This can also be set at a later time. On the Home screen, you can install or open the apps, start LiveTV, select external devices and much more. You can find more information under "Home screen" in the instructions.
SMART-TV HOME SCREEN
The Home screen is displayed every time the device is switched on or you close an app or press the Home button. The following settings are available on the Home screen:
| Programme guide (magazine symbol) | Displays programme information on the set channels. Only available if channels are in the channel list and information is being sent. |
| Search (Search-Symbol) | Search for smart content and content from installed apps. |
| Settings (gear symbol) | Open the device settings. For more information, see the "Settings" section in the instructions. |
| Notifications (bell symbol) | Displays information when an action has been performed or an action needs to be performed. |
| User account | Displays the user account to which the TV set is connected or log in with your user account. |
| Recently submitted | Displays the last source used. Example: LiveTV, HDMI and much more. |
| Edit home page | Edit the order of the app list or delete apps. Please note that not all apps can be deleted. |
| User guide | Displays information on the various menu items. |
| LG Channels | Displays Internet-based programmes. Additional user accounts from other app providers may be required for this. |
| Apps | Apps from many providers can be downloaded here. To install apps, the TV set must be connected to an LG account. Additional user accounts from the app providers may be required to use the apps. |
| Home Hub | All connection options offered by the TV set are displayed here. Connections that are not connected are greyed out and cannot be selected. |
| Music | Play music on the TV set. USB and Bluetooth (Soundshare) are available as sources. |
| Web browser | Use the web browser to search for Internet content. |
| Media Player | Play video, picture and music files on the TV set via USB. |
| Edit app list | Edit the order of the app list or delete apps. Please note that not all apps can be deleted. |
INPUT SOURCES
- Press the INPUT button to open the "Input source menu". Only connections where something is connected are displayed.
- Select the source with the navigation buttons (left / right) and press the OK button to confirm the selection.
- Navigate to "Home hub" and press the OK button to access all input sources.
- The following input sources are available for selection in the "Home hub":
| Live TV | Select Live TV to access the TV area. |
| HDMI 1 / HDMI 2 | Select one of the HDMI connections to gain access to the externally connected devices. HDMI 2 is ARC compatible for connecting soundbars. |
| AV | Select AV to gain access to the externally connected AV devices. |
| Mobile Gerät anschließen | Connect your mobile device to the TV set for screen transmission via the app. |
| Air-Play | Connect your IPhone/IPad to the TV set for screen transmission. |
| LG Channels | Displays Internet-based programmes. Additional user accounts from other app providers may be required for this. |
| USB | You have several options for the connected USB device:Display media files: Displays content that is on the USB stick.Show recordings: Displays the recorded programmes.Eject: Use this option to remove a USB device from the USB slot.Format: Format the connected USB device to prepare it for recording. Please note that all data on the USB stick will be deleted. |
| Audio output | Opens the Audio output menu to set the connected audio source. |
START CHANNEL SEARCH
- Press the Input button and select "Live TV" and press the OK button.
- Now press the Configuration button to open the quick settings. The "Gear symbol" is selected. Press the OK button to open "All settings".
- Navigate to "General" and press the ▶ button. Now select "Programmes" and press the OK button.
- Now select the menu item "Programme Tuning & Settings" and press the OK button.
- You are now in the "Programme Tuning" menu. In this menu, you have the following selection options for the three reception types satellite, cable and terrestrial.
| Antenna | Auto Tuning: Set and save available channels automatically.Manual Tuning: Set and save channels manually.Channel mode: Select the programme mode from terrestrial, Cable and Satellite.Programme mode: Select the programme mode from Antenna, Cable and Satellite.Signal test: Check the signal strength and quality of the receiver frequency. |
| Cable | Auto Tuning: Set and save available channels automatically.Manual Tuning: Set and save channels manually.Channel mode: Select the programme mode from terrestrial, Cable and Satellite.Programme mode: Select the programme mode from Antenna, Cable and Satellite.Programme List Update: Set and save updated channels automatically.Signal test: Check the signal strength and quality of the receiver frequency. |
| Satellite | Auto Tuning: Set and save available channels automatically.Manual Tuning: Set and save channels manually.Satellite settings: Customise the satellite settings. You can find more information in the instructions under "Satellite settings".Transponder Edit: Edit, delete or add a new satellite transponder.Programme mode: Select the programme mode from Antenna, Cable and Satellite.Update the channel list: Set and save updated channels automatically. |
-
Select "Auto Tuning" and press the OK button.
-
Now select one of the options according to your reception type and press the OK button.
-
Terrestrial
- Cable
-
Satellite
-
Then navigate to "Next" and press the OK button.
-
The following setting options are available for aerial, cable and satellite. Follow the points to start the search.
Terrestrial
| Digital search only | Once you have made the setting, navigate to "Next" and press the OK button to start the search. Once the search is complete, a display will open showing which programme mode has been set. Press the OK button to confirm. The number of channels found is now displayed. Navigate to "Done" and press the OK button and the device switches to programme playback. |
Cable
| Vodafone(other federal states)Once you have selected this menu item and confirmed with the OK button, navigate to "Next" and press the OK button to move to the next menu item. | Network Search• Start frequency• End frequency• Network ID Navigate to "Next" and press the OK button to move to the next menu item. | • Digital Only Search• Skip Scramble Programmes | Once you have made the setting, navigate to "Next" and press the OK button to start the search. Once the search is complete, a display will open showing which programme mode has been set. Press the OK button to confirm. The number of channels found is now displayed. Navigate to "Done" and press the OK button and the device switches to programme playback. |
| Full Search• Blind search Navigate to "Next" and press the OK button to move to the next menu item. | • Search digital only• Skip encrypted programmes | ||
| Vodafone(NRW, Hesse, BW)Once you have selected this menu item and confirmed with the OK button, navigate to "Next" and press the OK button to move to the next menu item. | Quick Search:• Frequency• Symbol Rate• Modulation• Network ID Navigate to "Next" and press the OK button to move to the next menu item. | • Digital Only Search | Once you have made the setting, navigate to "Next" and press the OK button to start the search. Once the search is complete, a display will open showing which programme mode has been set. Press the OK button to confirm. The number of channels found is now displayed. Navigate to "Done" and press the OK button and the device switches to programme playback. |
| Full Search• Blind Search Navigate to "Next" and press the OK button to move to the next menu item. | • Digital Only Search | ||
| Other OperatorsOnce you have selected this menu item and confirmed with the OK button, navigate to "Next" and press the OK button to go to the next menu item. | Network Search• Start Frequency• End Frequency• Network IDNavigate to "Next" and press the OK button to move to the next menu item. | • Digital Only Search• Skip Scramble Programmes | Once you have made the setting, navigate to "Next" and press the OK button to start the search. Once the search is complete, a display will open showing which programme mode has been set. Press the OK button to confirm. The number of channels found is now displayed. Navigate to "Done" and press the OK button and the device switches to programme playback. |
| Full Search• Blind searchNavigate to "Next" and press the OK button to move to the next menu item. | • Digital Only Search• Skip Scramble Programmes |
Satellite: ASTRA
| · Change Satellite Settings· Transponder Edit Normally, no values need to be adjusted in the settings. Navigate to "Next" and press the OK button to move to the next menu item. | · Fast Scan Navigate to "Next" and press the OK button to move to the next menu item. | · Channel list Germany | Once you have made the setting, navigate to "Next" and press the OK button to start the search. Once the search is complete, a display will open showing which programme mode has been set. Press the OK button to confirm. The number of channels found is now displayed. Navigate to "Done" and press the OK button and the device switches to programme playback. |
| · Full Scan Navigate to "Next" and press the OK button to move to the next menu item. | · Network Search· Blind Search |
Satellite: Other Operators
| · Change Satellite Settings· Transponder Edit Normally, no values need to be adjusted in the settings. Navigate to "Next" and press the OK button to move to the next menu item. | · Skip encrypted programmes· Network search· Blind search | Once you have made the setting, navigate to "Next" and press the OK button to start the search. Once the search is complete, a display will open showing which programme mode has been set. Press the OK button to confirm. The number of channels found is now displayed. Navigate to "Done" and press the OK button and the device switches to programme playback. |
SATELLITE SETTINGS
In the satellite settings, you can select the satellite and make LNB settings.
Note:
- The satellite settings do not normally need to be changed and should only be changed by experienced users.
-
Press the configuration button to open the quick settings. The "gear symbol" is selected. Press the OK button to open "All settings".
-
Navigate to "General" and press the ▶ button. Now select "Programmes" and press the OK button.
- Now select the "Programme Tuning & Settings" menu item and press the OK button.
- You are now in the "Programme Tuning" menu. Select "Satellite settings" and press the OK button.
- You can now add another satellite or adjust the settings for the current satellite.
- Navigate to the satellite you want to set or to Add satellite and press the OK button.
- The following setting options are available.
- Note that if a new satellite has been added or the settings have been changed, a new search must be performed.
| Add Satellite | Navigate to "Add satellite" and press the OK button. Select the satellite you want to add and press the OK button. Please note that this setting can only be used if you have a multi-switch that combines the satellites on one satellite line. The TV set only has one satellite connection. Note the settings for the multi-switch that must be made in the satellite settings. |
| Customise satellite settings | Satellite: Select the satellite. The default is Astra 19.2ELNB frequency: Select the LNB frequency based on your LNB. The default is 9750/10600.Transponder: The transponder frequencies for the corresponding satellite are displayed here.22 kHz Tone: This option is related to the "LNB frequency" and cannot be changed for all LNB frequencies.LNB Power: Activate or deactivate the LNB power depending on the selection of the multiswitch or LNB. The option is switched on by default.DiSEqC: Set the DiSEqC setting using the multiswitch. The option is switched off by default.Unicable: Activate or deactivate the "Unicable" menu item depending on the selection of the LNB or multi-switch. The setting is switched off in the default setting. If the option is switched on, you have access to the "Unicable settings".Unicable Settings: Select the Unicable settings based on the LNB or multiswitch. The following options are available: Unicable type, satellite position, range number and range frequency.Motor Type: Set the setting based on the motor. For self-aligning antennas, please set this option to "Off".Motor Settings: In this menu item, you set parameters for the alignment of the motor. The following options are available: Test transponder, Direction of movement, Movement mode, Set limit and Restrict direction. |
QUICK MENU
- Press the configuration button to open the "Quick menu".
- Here you have access to the following menu items.
| Main menu(gear symbol)Select this menu item and press the OK button to access the "Main menu". | Accessibility(human symbol)Select this menu item and press the OK button to go directly to the "Accessibility menu". | Internet connection(receive symbol)Select this menu item and press the OK button to go directly to the "Internet connection menu". | Edit mode(pencil symbol)Select this menu item and press the OK button to customise the layout of the quick selection menu. |
| Picture ModeSelect the "Picture mode". | Panel BrightnessSet the "Panel brightness". |
| Sound ModeSelect the "Sound mode". | Audio OutSet the type of "Audio output".Example: TV loudspeaker. |
| Sleep TimerSet the time for the "Snooze function" after which the TV set should switch to standby mode. | Screen OffSwitch off the screen for audio content to save power. The sound continues to play. Press any button (except the volume button) to reactivate the picture. |
ALL SETTINGS
- Press the configuration button to open the quick settings. The "gear symbol" is selected. Press the OK button to open "All settings".
- Here you have access to the following settings.
| Picture | Here you can change the picture settings to customise the picture to your needs. For more information, see the menu item "Picture settings" in these instructions. |
| Sound | Here you can change the sound settings to customise the sound to your needs. For more information, see the menu item "Sound settings" in these instructions. |
| General | Here you can customise various settings such as transmitter settings, device settings and much more. to suit your needs. For more information, see the menu item "General settings" in these instructions. |
| Support | Here you can view the electronic user manual, data protection and general terms and conditions and carry out software updates when these are available. |
PICTURE SETTING
- Press the configuration button to open the quick settings. The "gear symbol" is selected. Press the OK button to open "All settings".
- Now select the "Picture" menu item and press the ▶ button to switch to the menu.
- You now have access to the following menu items.
| Select mode | Select the appropriate picture mode according to the surroundings or content.· Vivid· Standard· Basic· Cinema· Sports |
| Aspect Ratio | You can select a suitable aspect ratio. You can view the video in its original size or with zoom. |
| User SelectionSet the screen size and the screen format.· 16:9· Original· 4:3· Vertical zoom· 4-way zoom | |
| Aspect Ratio | Just ScanDisplay the original screen without trimming the pages. If the line appears at the edge, please switch off the function.AutomaticOnOff |
| Advanced Settings | You can adjust the TV screen in as much detail as you like. For more information, see the "Advanced settings" section in these instructions.BrightnessColourClarityApply to all inputsReset |
ADVANCED PICTURE SETTINGS
The Advanced settings menu item gives you access to the following menu items.
| Brightness | Adjust the brightness and contrast of the screen and set additional details accordingly. |
| Panel BrightnessAdjust the brightness of the TV panel backlight to make the screen brighter or darker. Higher values increase the brightness. To use this function, go to "Energy saving" and change the "Energy saving step" to a setting other than "Automatic". | |
| Adjust ContrastAdjust the contrast between light and dark areas on the screen. Higher values increase the difference. | |
| Black LevelAdjusts the brightness of the dark areas of the screen. The closer the value is to 100, the brighter it is; the closer it is to 0, the darker it is. | |
| Auto Dynamic ContrastOptimize the contrast settings based on the image brightness. | |
| Gamma (Adjust Brightness)The lower the gamma value, the brighter the mid-tones; the higher the gamma value, the darker. | |
| Video RangeAdjust the video signal range according to the color range set in the external device. Adjust the darkness of the screen to achieve a perfect black. | |
| Colour | You can adjust the color, depth and range as desired and make precise settings. |
| Color DepthAdjust the color depth of the screen to make it lighter or darker. Higher values increase the saturation. | |
| TintAdjust the ratio of red and green colors in the picture. | |
| Fine TuneAdjust the color as desired to fine-tune the picture. This function is not available when connected to a PC.Color Adjustment: Adjust the color and saturation automatically to make the picture brighter and more vivid.Reset: Reset the fine adjustment to the default setting. | |
| Colour | White BalanceAdjust the color temperature and color balance to display the white according to your preferences. To use this function, set "Less blue light" to "Off" in the menu.Color temperature: Adjust the color temperature from warm to cold.Reset: Reset the color temperature to the default setting. |
| Clarity | Adjust the clarity to your liking and remove noise from the screen. The clarity can be adjusted according to the content to provide a clearer picture. |
| Adjust SharpnessIncrease the edge sharpness to achieve a clearer picture. Higher values increase the sharpness of the image. | |
| Noise ReductionRemove irregular and faulty pixels for a clearer picture. This function is not available when connected to a PC.OffLowMediumHighAuto | |
| Real Cinema:Set the aspect ratio as for movies, which enhances the cinematic feeling. This function is not available when connected to a PC. | |
| Apply to all inputs | The user-defined screen settings apply to all devices and apps that are connected via external inputs. |
| Reset | Deletes all settings for all screen modes and resets them to the factory settings. Select the desired screen mode and reset it. |
SOUND SETTING
- Press the configuration button to open the "Quick menu".
- Navigate to the gear symbol and press the OK button.
- Now select the "Sound" menu item and press the ▶ button to switch to the menu.
- You now have access to the following menu items.
| Select Mode | You can set the best sound mode for each type of content you want to watch.·Standard·Cinema·Clear Voice·Sports·Music |
| Sound Out | Select the loudspeaker or audio device with which the TV sound is to be played back. |
| Use TV SpeakerPlays the sound via the TV loudspeaker. | |
| Use Wired SpeakerWired speakers must be connected to the TV before you can play sound. Connect to HDMI or Optical Out.·Optical Out Device·HDMI (ARC) Device·Wired Headphones | |
| Sound Out | Use Wireless SpeakerEnjoy the sound by connecting wireless speakers such as a Bluetooth device to the TV.Bluetooth Device: Enjoy the sound with a Bluetooth connected wireless speaker or audio device.Mobile Device: Connect your mobile device to the ThinQ app and use it to play the TV sound. |
| Use External Speakers with TV SpeakerThe TV speaker and the connected external speakers can output sound simultaneously.Bluetooth Device + TV Speaker: The TV loudspeaker and the Bluetooth loudspeaker can output sound simultaneously. You can connect up to two Bluetooth devices of the same model.Optical Out Device + TV Speaker: The TV speaker and optical output can output sound at the same time.Wired Headphones + TV Speaker: The TV speaker and the wired headphones can output sound at the same time. For wired headphones used by people with poor hearing, the volume can be adjusted separately from the TV speaker. | |
| Advanced Settings | Adjust the TV sound as desired. For more information, see "Advanced settings" in these instructions.BalanceEqualizerApply to All InputsResetand much more |
ADVANCED SOUND SETTINGS
The Advanced settings menu item gives you access to the following menu items.
| Balance | Set the sound balance of the right and left TV speakers. If you set this to 0, both speakers will have the same level. |
| Equalizer | Optimize the sound by adjusting the TV speakers. This function is only available if the sound mode is set as standard. |
| Apply to All Inputs | Transfer the sound settings set by the user to all devices and apps that are connected externally. |
| Reset | Reset all settings of the standard sound mode to the factory settings. |
| Installation Type | Optimize the sound based on the installation type of the TV set. This only applies if you are playing the sound via a TV speaker and works differently depending on the TV model.Stand: Adjust the sound for a TV with a stand (stand is not included)Wall-mounted: Adjust the sound for a TV with a wall mount. |
| Automatic Volume Adjustment | Automatically adjust the sound for each program when you change channels so that the volume is constant. |
| DTV Audio Setting | Select the digital audio output format. If the program does not support the selected output format, the standard output of the source is used.MPEGDolby DigitalDolby Digital PlusHE-AACAuto |
| Match Screen and Sound | Adjust the audio timing manually to synchronize picture and sound.TV Speaker DelayBypass |
| Select HDMI Input Audio Format | Select the audio format according to the HDMI input method.BitstreamPCM |
| Digital Sound Output | Select the format in which the digital sound from the TV is to be transmitted to an external device. If you select "Pass through", you can retain the original sound quality, but the sound will not be output to other devices that do not support this option. Select another output from the menu, for example "Auto" or "PCM", if no sound should be heard after you have selected "Pass through". Some sound effects are not implemented even if the sound is output. |
| eARC Support | Extend the reception frequency if the HDMI (ARC) audio device supports eARC. This will give you a fuller and more vivid sound. |
GENERAL SETTINGS
- Press the configuration button to open the "Quick menu".
- Navigate to the gear symbol and press the OK button.
- Now select the "General" menu item and press the ▶ button to switch to the menu.
- You now have access to the following menu items.
| Accessibility | Set up the TV so that it meets your individual requirements and gives you a better experience. |
| Audio GuidanceViewers with impaired vision can operate the TV's menus and functions using their voice. Once you have switched this function on, you can set the exact voice assistance. Only for devices with Magic Remote. | |
| Audio DescriptionDescribes the content on the screen so that viewers with impaired vision can use the TV. This function is only active if it is supported by the program being broadcast. | |
| Audio Description VolumeVolume setting for the audio description. Only active if "Audio description" is active. | |
| Learn Remote ControlThis describes the function with speech when you press buttons on the remote control. | |
| Enjoy TV Sound TogetherThis function allows audio to be output simultaneously via the TV speaker and the audio device so that people with varying degrees of hearing impairment can watch TV together. For HDMI (ARC) devices, a hearing aid transmitter is recommended. | |
| Accessibility | Hard if HearingDisplays subtitles for viewers with impaired hearing so that they can use the TV. It only works if the broadcast program supports subtitles. |
| SubtitlesSet advanced subtitle options. It only works if the broadcast program supports subtitles.Subtitles: Activates the options listed below.Primary/Secondary language for subtitles: Set a second language for subtitles. Note: Subtitles are only displayed if they are broadcast with the program | |
| High ContrastIncrease the contrast between light and dark areas of some menus (e.g. background and text) so that it can be easily seen by viewers with impaired vision. | |
| GrayscaleSet the menu colors of the screen to black and white to make it easier to see. | |
| Invert ColoursYou can invert or compensate the colors in certain menus to make the displayed elements clearer. | |
| AI Service | Set the exact options for the AI functions. |
| Voice Recognition Help(Only for TV sets with compatible remote control or when used with the app).Guide for voice commands that can be used in voice recognition. You can use voice commands such as "Switch TV on/off" and "Volume up/down" to control the TV. | |
| Voice Recognition SettingsSet up voice recognition details. | |
| AI RecommendationsThe AI recommends several content and useful functions according to the user's viewing patterns.Smart tips:Receive recommendations for convenient features to use when watching TV or using an app.Reset Usage Data:You can delete the viewing and usage data that the TV has collected to provide you with customized services. (If this TV is logged in with an account, the viewing and usage data of this account will also be deleted). | |
| Game Optimiser | Set up multiple functions to make the game even more realistic. Only works with HDMI inputs. |
| Game OptimiserSwitches all game-related settings on/off at once. If you switch on Instant Game Optimizer, Dynamic Action Sync and HDMI Deep Color are automatically switched on. * If the screen is not set to Game Optimizer, some settings may not be available. | |
| Game GenreYou can select the most suitable picture mode for this game genre. | |
| Less Blue LightAutomatically adjusts the color temperature to reduce eye strain from blue light. | |
| Dark Room ModeAdjust the screen brightness for dark rooms so that you can see better. | |
| Game Optimiser | Game DashboardYou can switch the game dashboard on and off to change the settings and check the status in real time while you are playing. Switch the function on and press the configuration button on the remote control to use the function. |
| Menu ColorThe menu color of the game optimizer and the game dashboard can be changed. | |
| Family Settings | The following functions are available to ensure a safe and healthy viewing environment: |
| Usage Limit SettingPassword request required for the setting. Set a start time and an end time for using the TV set. | |
| Eye Care ModeAdjust the blue light automatically to minimize eye strain. Correct your children's posture and make sure they keep a sufficient distance when watching TV. | |
| Volume Limit ModeWatching TV at a high volume for a long time can damage your hearing. If you switch this function on, the volume is limited to a maximum of 60 to protect your hearing. | |
| Screen Time ReportThis allows you to monitor your family's TV viewing behavior. Check how often you watch TV and which apps you use most often. | |
| Programmes | Set up and manage settings for similar channels. |
| Programme Tuning & SettingsSet and save the available channels. You can set the satellite channel options. You can find more information under the menu item "Start channel search" and "Satellite settings" in these instructions. | |
| Programme ManagerManage channels that are stored on your TV. You can find more information under the menu item "Channel manager" in this manual. | |
| Dual MonoYou can select the left and right audio settings for broadcast signals.L+LR+RL+R | |
| CI InformationDisplay the current CI (Common Interface) information. | |
| Copy ProgrammesImport/export the channel list information of your TV set from/to a connected USB device.USB storage for Copy Programmes: Select the USB device connected to USB port 1 or USB port 2 to import or export programme list data.TV to USB: Export the programme list data of your TV set to a connected USB device.USB to TV: Import your TV programme list data from a connected USB device. | |
| Programmes | HbbTVThe service provides additional information and relevant content about the current programme.Auto Start:View more information about the current programme and enjoy similar content.Do Not Track:The HbbTV applications or the HbbTV service deactivates the tracking of an individual user.Provide HbbTV Distinctive ID:Provides an "HbbTV Distinctive ID" for programmes via the HbbTV service. HbbTV Distinctive ID is a unique value that can only be used with HbbTV and has nothing to do with the user's personal data. Please note that webOS does not use or manage these values.Reset HbbTV Distinctive ID:The HbbTV Distinctive ID is reset.Delete Connection History:Reset the app list that was confirmed when the HbbTV mobile app was connected.Multi Programme Audio:Content with multi-channel audio is played if multi-channel audio is supported by the HbbTV service. |
| Network | Set up the settings according to your wired/wireless network.Wired Connection (Ethernet)Connect the LAN cable from your router to the RJ45 port on the TV set to connect the device to the Internet and gain access to Smart TV content. This menu item gives you an overview of the Ethernet connection (IP address, subnet mask, MAC address and much more).Wi-Fi ConnectionEstablish the Wi-Fi connection to a wireless network to connect the device to the Internet and gain access to the Smart TV options.Wi-Fi connection:Activate or deactivate the Wi-Fi interface. If the Wi-Fi connection is deactivated, the Wi-Fi options cannot be managed.Other network settings:This menu item can be used to set other Wi-Fi settings such as a "Add Hidden Wi-Fi, Connect via WPS-PBC, Connect via WPS-PIN and advanced Wi-Fi settings (IP address, subnet mask, MAC address and more).Wi-Fi listDisplays the available wireless networks. |
| External Devices | Configure multiple external devices that can be used after connection to the TV. You can also delete the connection history between external devices and the TV.Connect Bluetooth controllersYou can connect and manage input devices that support Bluetooth (keyboard, game pad and mouse). Up to 4 input devices can be connected, and for game pads the number may be less than 4. Bluetooth game pads supported by the TV are Sony Dualshock4, Xbox BT Gamepad, Nvidia Shield Wireless Gamepad. |
| External Devices | HDMI SettingsChanges to the settings of external input devices connected via HDMI. The Magic/Simple remote control can also be used to operate external devices.4:4:4 Pass Through:When HDMI PC signals are present, it is possible that picture quality functions such as "Noise Reduction" or "TruMotion" cannot be applied. This function is recommended for content creators who require uncompressed videos.SIMPLINK (HDMI-CEC):SIMPLINK allows you to control other SIMPLINK-compatible devices with your remote control. This can be, for example, a DVB player or home sound system that is connected to your Smart TV via HDMI. Note: The behaviour of the device may differ if it is not an LG device. |
| Universal Control Settings:Connect external devices such as set-top boxes, players, recorders, soundbars and so on to your TV according to the instructions. If the universal remote control of set-top boxes or OTT services has been set up, you can operate connected set-top boxes with your remote control. | |
| TV On With MobileSwitch on the TV with a mobile device such as a smartphone. This function can increase energy consumption.Turn on via Wi-Fi (Networked Standby Mode):Switch on the TV with your mobile device via Wi-Fi. * You can check the app that supports this function on your mobile device.Turn on via Bluetooth (Networked Standby Mode):Switch on the TV with your mobile device via Bluetooth.Delete Connection History:Delete the connection history of external devices that were connected wirelessly to your TV. | |
| System | LanguageSelect the language settings of the TV set. |
| LocationSet the region and country for broadcasts and special services. | |
| Time & TimerYou can set the time and the scheduled switch-on/switch-off time of the TV. If the time you set is different, some Smart functions may not be displayed.Set Automatically:The time and date are set automatically.Time:Set the time manually. Can only be set if "Set automatically" is not active.Date:Set the date manually. Can only be set if "Set automatically" is not active.Time Zone:The time zone is set automatically. If you want to set the time zone manually, select "Custom".Custom Time Zone:Set the time zone manually. Can only be set if the "Time zone" is set to "Custom".Timers:Gives you access to the following menu items.Sleept Timer:Set your TV to switch off automatically after a certain period of time.Power On Timer:Set your TV to switch on automatically at a specific time. The TV can be used as an alarm clock.Power Off Timer:Set the TV to switch off automatically at a specific time. The TV is switched off at a time of your choice on days of your choice. | |
| System | Auto Power Off after 4 hours: Set the TV to turn off automatically if there is no user input for 4 hours after the TV automatically turns off. |
| SafetySet locks for certain channels, apps, inputs, etc. to protect children.Enable the function: When activated, the menu item gives you access to the following settings.TV Rating Locks: Restrict access to programmes according to the rating of the content (only if supported by the broadcaster).Programme Locks: Restrict access to certain channels by setting a password.Application Locks: Restrict access to certain apps by setting a password.Input locks: Restrict access to certain inputs by setting a password.Reset password: Assign a new password. The default password is: 0000. Please make a good note of the new password. | |
| Additional SettingsSet the additional functions of your TV.Quick Start+: Standby mode remains active to shorten the wake-up time and speed up the execution of functions such as apps and search. Energy consumption may increase when this function is active.Home Settings: Set up the exact options for the Home function.Standby Light: Switch standby light on/off.Pointer Options: Customise the appearance and speed of the pointer on your Magic Remote. Only for devices with Magic Remote.Advertisement: Check the advertising settings and adjust them accordingly.Settings Help: Activate/deactivate the description field in the settings.Set ID: Set the ID for your remote control if there are several devices in the household. | |
| Reset to Initial SettingsResets the TV to the original factory settings. This will reset all of the TV's options to the default settings. | |
| Energy Saving | Adjusts the brightness of the screen or you can switch off the automatic function to reduce power consumption. The brightness of your TV is affected when you use the energy-saving function. |
| Energy Saving StepThe screen brightness is controlled according to the energy-saving step.OffMinimumMediumMaximum | |
| Auto Power OffThe TV switches off automatically if the user does not use the TV or remote control for a longer period of time.Off2 Hours4 Hours (standard)6 Hours8 Hours | |
| Screen OffYou can temporarily switch off the screen while the TV remains switched on. Press any button except the volume button to reactivate the picture. |
- Press the configuration button to open the "Quick menu".
- Navigate to the gear symbol and press the OK button.
- Now select the "General" menu item and press the ▶ button to switch to the menu.
- Select the "Programmes" menu item and press the OK button
- Navigate to "Programme Manager" and press the OK button.
- The menu item gives you access to the following menu items.
| Edit All Programmes | Lock / Unlock (red)1. Select a channel and press the OK button.2. Now select "Lock / Unlock" and press the OK button.3. A password prompt appears. Enter the password and the transmitter is locked.4. Repeat the step to no longer lock the transmitter.5. Locked transmitters are locked with a password. |
| Skip / Restore (green)1. Select a channel and press the OK button.2. Now select "Skip / Restore" and press the OK button.3. The channel is greyed out in the channel list and skipped when you switch through.4. Repeat the step to stop skipping the channel. | |
| Move (yellow)1. Select a channel and press the OK button.2. Now select "Move" and press the OK button.3. Move the channel to the desired position and press the OK button to confirm.4. Repeat steps 1-3 until the desired channel sequence is achieved. | |
| Edit Programme Numbers (blue)1. Select a channel and press the OK button.2. Now select "Edit channel numbers" and press the OK button.3. Enter the programme number to which the channel is to be moved. The two programme positions will swap places. | |
| Edit Favourites | All Pogrammes1. Navigate to the channels you want to save as favourites and press the OK button.2. Navigate to the ◀▶ symbol between the two lists to add or remove channels from the favourites list. |
| Move (red)1. Navigate to a channel in the Favourites list and press the OK button.2. Now select "Move" and move the channel up or down in the list.3. Confirm the entry with the OK button.4. Only the channel in the list is moved. The programme number is not adjusted. | |
| Change Group Name (green)1. Navigate to "Change name of favourites group" and press the OK button.2. A keypad appears on the display.3. Enter the desired name for the favourites list and navigate to "Enter/OK" to save the entry. | |
| Sort by Programme (yellow)1. Navigate to "Sort by channel" and press the OK button.2. The channels are sorted by programme number. | |
| Lock / Unlock (Edit satellite channels) | If you have selected the "Lock / Unlock" menu item, a password prompt appears. Enter your password. You can lock or unlock individual or all channels in this menu. This menu item only applies to the satellite channel list. |
| Skip / Restore (Edit satellite channels) | Select the "Skip / Restore" menu item to select or restore individual or all channels for skipping. The menu item only applies to the satellite channel list. |
SUPPORT
- Press the configuration button to open the "Quick menu".
- Navigate to the gear symbol and press the OK button.
- Now select the "Support" menu item and press the ▶ button to switch to the menu.
- The menu item gives you access to the following menu items.
| Software Update | Update the device to the latest software. |
| Software VersionDisplays the current software version installed on the device.Automatic updateYour TV is updated with the latest software when it is connected to the Internet.Your TV can also be updated via an external storage device such as a USB storage medium. | |
| Auto UpdateThe name of the TV model, MAC address, country code, language and currently installed software version are recorded to ensure that the latest software can be installed on your TV. | |
| User Guide | Check the description of the individual webOS TV functions. |
| Home/Store Mode | Select the location where you use the TV.Home ModeStore ModeIf you use demo mode, the TV is operated with values and settings designed for brightly lit sales areas. |
| Privacy & Terms | Please read the General Terms of Use and the legal information. |
GUIDE
Guide
Press the Programme Guide button to open or close the Guide menu. You will be shown channels and programme information (if broadcast by the channel).
The following menu items are available.
• Guide: Shows you the programme and programme information.
- Programmes: Shows the programme list with minimised programme information.
• TV cheduler: Shows the set programmes where a "reminder" or "recording" has been scheduled.
- Schedule reminder: The device will switch to the programme at the set time.
- Recordings: The recorded programmes are displayed here.
HbbTV
When you switch to a channel, the display will show messages such as "Restart programme (blue)", "Watch now (yellow)" and so on. You can press the corresponding coloured buttons to carry out the action.
Note:
- The type of insertion depends on the broadcaster and the programme.
- An Internet connection is required.
To start a recording, a hard drive with a maximum capacity of 1 TB must be connected to the device via USB. Please pay attention to the correct formatting. 1TB hard drives must be formatted NTFS. USB sticks cannot be used for recording due to their lower speed. The following options are available for recording.
| Instant recording | 1. Press the Record button to record the current programme.2. A pop-up appears on the display.3. Select the USB device on which you want to record and how long you want to record (until the end of the programme or 30 minutes - 12 hours in 30 minute increments).4. Navigate to "Done" and press the OK button. 5.5. "Recording has started" appears on the display.6. Press the Record button to end the recording manually.7. A dialogue box appears on the display.8. Now select from the following options and press the OK button. Stop and saveDo not saveChange end timeCancelNotes:You cannot switch channels in the Live TV channel list during a recording.If you have pressed the Channel button during recording, the device switches to the "LG Channel" list. Press the Input button and select "Live TV" to return to the Live TV channel list. | ||
| Recording Programming | 1. Press the Programme Guide button to open the programme guide.2. Select a programme to be recorded and press the OK button.Note:A programme that has already started can only be recorded using instant recording.3. A new menu screen opens. A short description (if available) is displayed here. You can select the following options.ReminderPlanned recording4. Select "Scheduled recording" to programme a recording or "Reminder" to programme a reminder and press the OK button.5. A new dialogue box appears on the display.6. Now select the "Storage device", "Start pre-run time", "End post-run time" and navigate to "Done" and press the OK button to save the recording timer.7. The programme is now marked with a timer symbol.8. To edit the timer, press the Guide button and navigate to "TV Scheduler" and press the OK button.9. All programme timers are displayed. Select the timer you want to edit and press the OK button.10. Use the▼button to navigate downwards until you reach "Edit" or "Delete" and press the OK button.Edit: Change the storage device, the repetition, the date, the start time or the end time. Then navigate to "Done" and press the OK button.Delete: If you have selected this menu item, you will be asked whether you really want to delete the timer. Yes: Timer will be deleted, No: Timer will not be deleted. | ||
| Recording Programming | Note:You cannot switch channels in the Live TV channel list during a recording.If you have pressed the Channel button during recording, the device switches to the "LG Channel" list. Press the Input button and select "Live TV" to return to the Live TV channel list. | ||
| TimeShift (Live Playback) | 1. Press the Play or Pause button to start the TimeShift function.2. The programme is recorded while you are watching a programme and you can pause or rewind the programme.3. Press the OK button to open the menu bar. You have the following options.Start recording:Live Playback is ended and a recording is started.Stop Live Playback:The Live Playback function is ended.Rewind 15 seconds:Rewinding 15 seconds is only possible if the playback progress allows this.Rewind:Rewind to the desired playback point.Pause / Play:Pause or resume playback.Fast forward:Fast forward to the desired playback point.Fast forward 15 seconds:Fast forward 15 seconds is only possible if the playback progress allows this.Note:If you change the programme position while a TimeShift is running, Timeshift will start from and the existing TimeShift data will be lost. | ||
| Play recording | You have two options for playing back recordings. | ||
| Input source menu1. Press the Input button and select the USB device and press the OK button.2. A menu screen appears. Select "Recordings" and press the OK button again.3. Select the recording and press the OK button to start playback.4. You have the following options to stop playback.Exit button:Press the Exit button to end playback and return to "Live TV".Stop button:Press the stop button to end playback and return to the recording selection. | |||
| Guide menu1. Press the Guide button, select "Recordings" and press the OK button.2. Select the desired recording and press the OK button to start playback.3. You have the following options to stop playback.Exit button:Press the exit button to end playback and return to "Live TV"5. Stop button:Press the stop button to end playback and return to the recording selection.Control playback with the following buttons. | |||
 | Play button:Start USB playback. | ||
 | Pause button:Pause USB playback. Hold the button for Stop USB playback. | ||
 | OK button:Press the button to open the menu bar and gain access to various playback items. | ||
- Insert a USB stick or a hard drive (max. 1TB) into one of the USB sockets.
-
A message appears on the display asking whether you want to switch to the USB memory device.
-
Media data: The device switches to the "Media Player". To switch manually, press the Home button and select "Media Player" in the "App list" and press the OK button. Alternatively, you can also press the Input button, select the USB device and select "Media data".
• Recordings: The TV set switches to the recording list. -
Cancel: No action is performed.
-
If you have selected "Media data" and pressed the OK button, you have access to the media files on your USB storage device.
-
Select the image, sound or music file you want to play and press the OK button.
- Control playback with the following buttons on the remote control or via the menu bar.
 | Play button: Start USB playback. | ||
| Pause button: Pause USB playback. Hold the button for Stop USB playback. | |||
| OK button: Press the button to open the menu bar and gain access to various playback items. |
PAIRING THE SMARTPHONE WITH THE TV
Download ThinQ App
- Press the INPUT button.
- Select "Home hub" and press the OK button.
- Now select "Connect mobile device" and press the OK button.
- Now select "How to use content on mobile devices on your ThinQ" and press the OK button
- Scan the QR code with the camera app on your smartphone and download the app.
Register app / create account
- Open the app and create an account or log in with an existing account.
Pairing the app with the TV set
-
Once you have opened the app, click on "Add a device". You have two options for adding a device.
-
QR Scan: Click on "Scan QR" and scan the QR Code screen with the app and click on "Add". A sequence of numbers is displayed on the screen. Enter this into the app. Follow the instructions on the smartphone to complete the registration. The smartphone can now be used as a remote control and you can transfer content from the smartphone to the TV.
- Select device: Click on "Select device" and click on "Next". Nearby devices are displayed at the top of the app. Click on "TV". A sequence of numbers is displayed on the screen. Enter this into the app. Follow the instructions on the smartphone to complete the registration. The smartphone can now be used as a remote control and you can transfer content from the smartphone to the TV.
Smartphone mirroring
Open the ThinQ app and select the TV device. The previous steps must already be completed.
- Select "Show the phone screen on the larger TV".
- Click on "Start transmission" on the TV, you can now select "Yes" or "No".
- Select "Yes" and press the OK button.
- The smartphone will now be transferred to the TV.
AirPlay
- Press the INPUT button.
- Select "Home hub" and press the OK button.
- Now select "AirPlay" and press the OK button.
-
Open "Screen synchronisation" on your iPhone or iPad and select the TV set.
-
A numerical code is now displayed on the TV. Enter this in the input field of your Apple device and click on "OK".
-
The devices are now paired and the picture from your Apple device is displayed on the TV set.
SIMPLE TROUBLESHOOTING
If the screen fails or there is a sharp drop in performance, check the TV using the following instructions: Also check connected devices to find the source of the fault. If the screen still does not work as expected, contact customer support.
1. No power
- Check that the mains adapter or the car adapter is connected to the TV set.
- Check that the toggle switch is in the on position.
2. No picture or no sound
- Check whether the mains adapter or the car adapter is connected to the TV set.
- Check the picture and sound settings.
- Check whether the antenna / cable system / satellite antenna is connected correctly.
- Change to another programme.
- Check that the connected devices (e.g. receiver) are connected correctly.
3. Poor picture quality
- Check that the antenna cable is connected correctly.
- Check the manual TV tuning of the TV channel.
- Change the picture settings: Brightness, colour, sharpness, contrast and hue. Make sure that the TV is not located near other electrical appliances that could cause radio frequency interference.
4. No colour
- Adjust the colour settings.
- Check that the selected programme is broadcast in colour.
• Make sure that the channel is tuned correctly.
5. The TV does not respond to the remote control
• Make sure there are no obstacles between the remote control and the TV.
• Make sure the remote control is within reach.
- Make sure that the batteries in the remote control are not dead.
6. No voice input and no motion control possible with the Magic remote control (only when used with the Magic remote control).
To pair the Magic remote control again if the motion control or voice input does not work, follow the steps below.
- Press and hold the Home button and Back button for approx. 5 seconds until the Power button on the remote control flashes three times. A message appears on the TV screen that the connection has been disconnected.
- Now press the OK button to pair the remote control with the TV set. A message appears on the TV screen indicating that the remote control is connected to the TV set again.
7. No Internet content will be played back
- Check in the network settings whether the TV set is connected to your router.
- Check the settings of your router.
This TV is intended for household use and is classified as harmless with regard to electromagnetic waves. Therefore, you can use the unit in any location, including residential areas.
| Device type | LED22iBT | LED24iBT | |
| Manufacturer | Reflexion | Reflexion | |
| Energy efficiency class (standard SDR / HDR) | E (SDR) / F (HDR) | E (SDR) / F (HDR) | |
| Power consumption "On" (standard SDR) | 15W | 17,1W | |
| Power consumption "On" (HDR) | 20W | 22W | |
| Power consumption standby / off | < 0,5W / < 0,3W | < 0,5W / < 0,3W | |
| Power consumption "networked standby" | < 0,5W | < 0,5W | |
| Type of electric display | DLED | DLED | |
| Aspect ratio | 16:9 | 16:9 | |
| Screen resolution (pixels) | 1920 x 1080 | 1920 x 1080 | |
| Screen diagonal (cm / inch) | 55cm / 22 inch | 60cm / 24 inch | |
| Visible screen area | 12,7dm^2 | 15,3dm^2 | |
| Refresh rate / response time | 60Hz / 18ms | 60Hz / 20ms | |
| Input voltage device | DC 12V / 3A | DC 12V / 3A | |
| Average annual consumption (kWh/1000h) Standard SDR | 15kWh / 1000h | 17,1kWh / 1000h | |
| Average annual consumption (kWh/1000h) HDR | 20kWh / 1000h | 22kWh / 1000h | |
| Contrast | 3000:1 | 3000:1 | |
| Brightness ( cd/m^2 ) | 180cd/m^2 | 180cd/m^2 | |
| Colours | 16.7M Colours | 16.7M Colours | |
| Viewing angle | Horizontal: 178° / Vertical: 178°. | Horizontal: 178° / Vertical: 178°. | |
| TV function | DVB-S/S2: 6000ATX + DVB-T/C: 3000 | DVB-S/S2: 6000ATX + DVB-T/C: 3000 | DVB-S/S2: 6000ATX + DVB-T/C: 3000 |
| Teletext (ATV / DTV) | 1000 / 1000 | 1000 / 1000 | |
| Connections | Power Input DC 12V | 1x | 1x |
| RJ45 | 1x | 1x | |
| AV / L / R | 1x | 1x | |
| HDMI | 2x | 2x | |
| USB 5V/500mA | 2x | 2x | |
| Optical Out | 1x | 1x | |
| TV1 DVB-S/S2 | 1x | 1x | |
| TV2 DVB-C/T2 | 1x | 1x | |
| CI+ Slot | 1x | 1x | |
| Earphones | 1x | 1x | |
| Bluetooth / WLAN | Antennas are integrated | Antennas are integrated | |
| WLAN | WLAN: 802.11b/g/n/ac, 2,4GHz & 5GHz2,4GHz: max. 17dBm / 5GHz: max. 14dBm | ||
| Bluetooth | Bluetooth: V.5.0 / max. 6dBm | Bluetooth: V.5.0 / max. 6dBm | |
| USB formats | FAT32 / Max. 1TB: AVI /MP4 / MPEG / MPG / MOV/ MKV / VOB/JPG / JPEG / BMP / PNG / MP3 / AAC | ||
| Smart TV interface | webOS 2.0s (version 8.1.0 or higher) - automatic updates | ||
| OSD language | German, English etc. | German, English etc. | |
| AUDIO output | 2x 3W | 2x 3W | |
| Weight (incl. stand) | 2,15Kg | 2,15Kg | |
| Complete weight | 3,20Kg | 3,40Kg | |
| MAXIMUM power consumption | <36W | <36W | |
| Mercury content in mg / lead contained | 0mg / No | 0mg / No | |
| VESA | 100 x 100mm | 100 x 100mm | |
| Dimensions without base: (W/D/H) in mm | 504 x 81 x 306 mm | 550 x 88 x 336 mm | |
| Dimensions with base: (W/D/H) in mm | 526 x 153 x 327 mm | 550 x 142 x 369 mm | |
Design and specifications are subject to change without notice.
Hereby, UltraMedia GmbH & Co. Handels KG hereby declares that the radio equipment type LED22iBT and LED24iBT is in compliance with Directive 2014/53/EU.
The full text of the EU Declaration of Conformity is available at the following internet address.
We hope you enjoy using the device.
Your UltraMedia Team

DISPOSAL INSTRUCTIONS
This symbol on the product or in the instructions means that the appliance, electrical and electronic equipment and batteries must be disposed of separately from your household waste at the end of their working life. There are separate collection systems for recycling in the EU. For more information, please contact your local authority or your dealer.
BATTERY DISPOSAL INSTRUCTIONS
BATTERIES AND RECHARGEABLE BATTERIES MUST NOT BE DISPOSED OF WITH HOUSEHOLD WASTE! NON-PROFESSIONAL DISPOSAL OF BATTERIES AND RECHARGEABLE BATTERIES CAUSES ENVIRONMENTAL POLLUTION / DAMAGE.
EVERY CONSUMER IS LEGALLY OBLIGED TO RETURN BATTERIES AND ACCUMULATORS AT THE END OF THEIR LIFE CYCLE TO SUITABLE COLLECTION POINTS SUCH AS THEIR LOCAL AUTHORITY/BOROUGH OR TO RETAILERS. DROP-OFF AT COLLECTION POINTS IS FREE OF CHARGE. BY HANDING THEM IN AT COLLECTION POINTS, BATTERIES AND ACCUMULATORS ARE RECYCLED AND THUS DISPOSED OF IN AN ENVIRONMENTALLY FRIENDLY WAY.
DISPOSING OF BATTERIES AND ACCUMULATORS IN HOUSEHOLD WASTE DOES NOT ENSURE ENVIRONMENTALLY FRIENDLY DISPOSAL AND MAY CAUSE ENVIRONMENTAL DAMAGE.
BATTERIES AND ACCUMULATORS MUST BE REMOVED FROM THE APPLIANCE BEFORE DISPOSAL. PLEASE RETURN ONLY IN DISCHARGED CONDITION!
*) MARKED WITH:
CD = CADMIUM,
HG = MERCURY,
PB = LEAD
HDMI INFORMATION
The terms HDMI and HDMI High-Definition Multimedia Interface and the HDMI Logo are trademarks or registered trademarks of HDMI Licensing LLC in the United States and other countries.

ENERG
LED22IBT
Reflexion
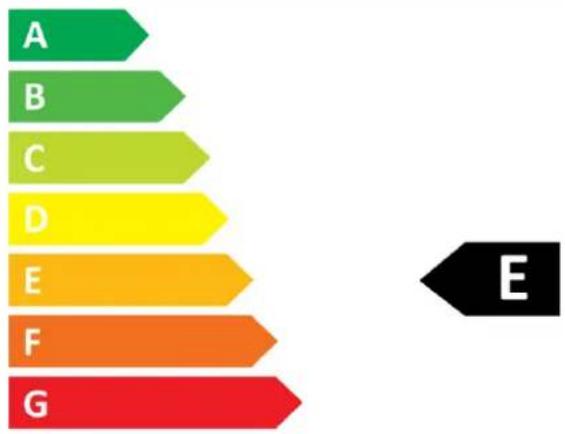
bar
| Category | Value | |---|---| | A | 1 | | B | 2 | | C | 3 | | D | 4 | | E | 5 | | F | 6 | | G | 7 | The label 'E' is in the bottom-right corner, not directly corresponding to the bars. The color gradient from green to red corresponds to each category.15 kWh/1000h
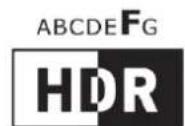
20 kWh/1000h
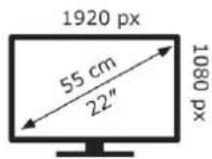
2019/2013

ENERG
LED24IBT
Reflexion
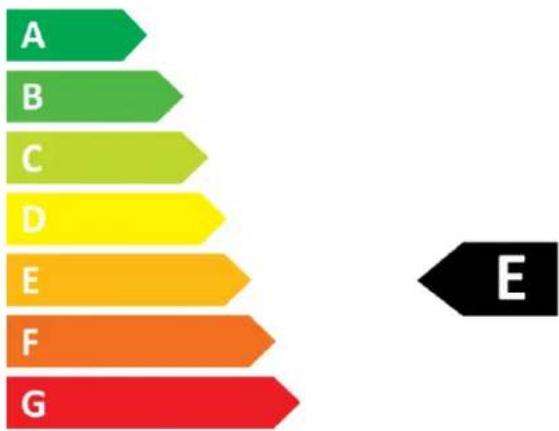
bar
| Category | Value | |---|---| | A | 1 | | B | 2 | | C | 3 | | D | 4 | | E | 5 | | F | 6 | | G | 7 |17 kWh/1000h
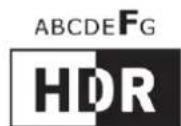
22 kWh/1000h
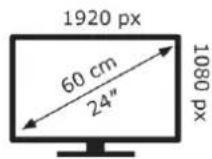
2019/2013

Dear Customer,
Thank you for choosing one of our products. Our products undergo precise quality control in the course of production. If one of our devices gives you cause for complaint, or you have questions about one of our devices, please call our customer support.
We give a 36 month warranty on TV and SAT devices, and a 24 month warranty on portable DVD and audio devices from the date of purchase. Outside of the warranty, we offer you a paid repair based on a cost estimate. Please contact our customer support before submitting.
The warranty relates to material and production defects. Your device will be repaired or replaced during the warranty period. Unfortunately, UltraMedia cannot reimburse the purchase price. Damage caused by improper use, the use of third-party accessories, falls, dust, water damage and signs of wear (e.g. scratches, optical wear and tear) caused by the customer or external influences are excluded from the guarantee.
In order to assert the warranty claims, send the device with all accessories, a copy of the invoice and the description of the fault to the address given below. Devices that do not have a proof of purchase cannot be guaranteed. Please do not forget to include your full address and a telephone number / email address for any queries.
Shipping to us takes place at your own expense. Unpaid parcels cannot be accepted and are returned to the sender.
Please pack the device securely for transport. UltraMedia assumes no liability for damage in transit that occurs on the way to us. After receiving your submission, we will process your device as soon as possible and send it back to you.
Before sending your device in, please contact our customer support or your specialist dealer, as many problems can also be solved over the phone.
- English user manual: Page 50
- KOPFHÖRER-WARNHINWEIS
- GRUNDBEDIENUNG
- IMPORTANT SAFETY INSTRUCTIONS
- PLEASE READ CAREFULLY BEFORE USE.
- NOTE:
- HEADPHONE WARNING
- INSTALLATION SITE
- What's in the box?
- UNPACKING AND SETTING UP
- REMOTE CONTROL REPLACE BATTERY
- TV remote control
- MOUNTING TV STAND
- Bild 1:
- Notes:
- REMOTE CONTROL
- Common Interface / Slot
- BASIC OPERATION
- Switch on the device
- Start initial installation
- Language
- Country
- Audio instructions
- FIRST INSTALLATION: Set up on the TV
- How to set up the TV
- Internet connection
- Terms and conditions
- User environment analysis
- TV installation type for optimal sound settings
- SW Automatic update
- Programme Tuning
- LG Account
- Log in:
- Create:
- Installation the apps recommended by webOS TV
- Initial installation completed
- FIRST INSTALLATION: Setup via app
- Setting up the television
- Network connection
- Legal information
- User agreements
- Log in to the TV with your account
- Switch on the TV set via Wi-Fi
- User analysis
- The right way to watch TV:
- Television installation type for optimum sound settings
- Auto-Update
- Channel setting
- Installation of the apps recommended by webOS TV
- Initial installation completed
- SMART-TV HOME SCREEN
- INPUT SOURCES
- START CHANNEL SEARCH
- SATELLITE SETTINGS
- QUICK MENU
- ALL SETTINGS
- PICTURE SETTING
- ADVANCED PICTURE SETTINGS
- SOUND SETTING
- ADVANCED SOUND SETTINGS
- GENERAL SETTINGS
- SUPPORT
- GUIDE
- HbbTV
- PAIRING THE SMARTPHONE WITH THE TV
- Download ThinQ App
- Register app / create account
- Pairing the app with the TV set
- Smartphone mirroring
- AirPlay
- SIMPLE TROUBLESHOOTING
- No power
- No picture or no sound
- Poor picture quality
- No colour
- The TV does not respond to the remote control
- No voice input and no motion control possible with the Magic remote control (only when used with the Magic remote control).
- No Internet content will be played back
- DISPOSAL INSTRUCTIONS
- BATTERY DISPOSAL INSTRUCTIONS
- HDMI INFORMATION
Brand : Reflexion
Model : LED24IBT
Category : TV