Foodi ST200UK - Toaster NINJA - Free user manual and instructions
Find the device manual for free Foodi ST200UK NINJA in PDF.


| Product Type | 4-Slice Toaster |
| Brand | Ninja |
| Model | Foodi ST200UK |
| Colour | Stainless Steel / Black |
| Dimensions (H x W x D) | Approx. 22.5 x 33.5 x 33.0 cm |
| Weight | Approx. 2.5 kg |
| Power Rating | 1400 W |
| Voltage | 220-240 V ~ 50/60 Hz |
| Functions | Toast, Bagel, Defrost, Reheat, Keep Warm, Convection |
| Shade Settings | 7 browning levels |
| Extra-Wide Slots | Yes (1.5 inches) |
| Centering Guides | Yes |
| LCD Display | Yes, with countdown timer |
| Cancel Button | Yes |
| Auto Shutoff | Yes |
| Crumb Tray | Removable, easy-clean |
| Cord Length | Approx. 0.9 m |
| Warranty | 2 years limited |
| What's Included | Toaster, crumb tray, user manual |
Frequently Asked Questions - Foodi ST200UK NINJA
User questions about Foodi ST200UK NINJA
0 question about this device. Answer the ones you know or ask your own.
Ask a new question about this device
Download the instructions for your Toaster in PDF format for free! Find your manual Foodi ST200UK - NINJA and take your electronic device back in hand. On this page are published all the documents necessary for the use of your device. Foodi ST200UK by NINJA.
USER MANUAL Foodi ST200UK NINJA
natural_image
Exterior view of a Ninja 1998 instant cooktop oven with digital display and control buttons (no text or symbols on main body)THANK YOU
for purchasing the Ninja* Foodi* 3-in-1 Toaster, Grill and Panini Press

REGISTER YOUR PURCHASE

ninjakitchen.co.uk/registerguarantee/

an QR code using mobile device
THIS BOOK COVERS MODEL NUMBERS ST200UK/ST202UK
RECORD THIS INFORMATION
Model Number: ____
Serial Number: ____
Date of Purchase: ____
(Keep receipt)
Store of Purchase: ____
TECHNICAL SPECIFICATIONS
Voltage: 220-240V-, 50-60Hz
Watts: 2000-2400W
PLEASE READ CAREFULLY AND KEEP FOR FUTURE REFERENCE.
TIP: You can find the model and serial numbers on the QR code label located on the base of the unit.
PRODUCT REGISTRATION:
Please visit ninjakitchen.co.uk or call 0800 862 0453 to register your new Ninja® product within 28 days of purchase. You will be asked to provide the store name, date of purchase, and model number along with your name and address. The registration will enable us to contact you in the unlikely event of a product safety notification.
CONTENTS
Important Safeguards....2
Parts....4
Before First Use .... 5
Flipping to the Grill Position....5
Using the Control Panel....6
Functions 7
Other Operating Buttons 7
Using The Toaster Modes (Vertical)....8
Toast....8
Bagel 8
Defrost....9
Tips For Choosing Your Shade Selection ..... 9
Using the Grill Modes (Horizontal)....10
Grill 10
Panini 10
Bake 11
Reheat 11
Maintenance 12
Cleaning 12
Power Cord Management....12
Error Messages & FAQ....13
IMPORTANT SAFEGUARDS
HOUSEHOLD USE ONLY • READ ALL INSTRUCTIONS BEFORE USE
When using electrical appliances, basic safety precautions should always be followed, including the following:
⚠ WARNING
1 Read all instructions prior to use.
2 Remove and discard all packaging materials and labeling before use.
3 This appliance can be used by persons with reduced physical, sensory or mental capabilities or lack of experience and knowledge if they have been given supervision or instruction concerning use of the appliance in a safe way and understand the hazards involved.
4 Take inventory of all contents to ensure you have all parts needed to properly and safely operate.
5 DO NOT run the unit without the crumb tray installed.
6DONOT run the unit in grill position without the grill tray fully inserted. DO NOT override the grill tray detect switch.
7 Keep the appliance and its cord out of reach of children. Do not allow the appliance to be used by children. Close supervision is necessary when used near children.
8DONOT use an extension cord. A short power-supply cord is used to reduce the risk of children grabbing the cord or becoming entangled and to reduce the risk of people tripping over a longer cord.
9 DO NOT let cord hang over edges of tables or worktops or touch hot surfaces, including hobs and other heating ovens.
10NEVER use electrical socket below worktop.
11 NEVER leave the toaster unattended while in use.
12 DO NOT cover crumb tray or grill tray or any part of the unit with metal foil or baking parchment. This may cause the unit to overheat or cause a fire.
13 To protect against electrical shock DO NOT immerse cord, plugs or main unit housing in water or other liquid.
14 DO NOT use the unit with damage to the power cord or plug. Regularly inspect the unit and power cord if the unit malfunctions or has been damaged in any way, immediately stop use and call Customer Service.
15 Prevent food contact with heating elements. Excessive or oversized food loads, metal foil packages, or utensils must NOT be inserted as they may cause risk of fire or electric shock.
16 Extreme caution must be used when the toaster contains hot food. Improper use may result in personal injury.
17 ALWAYS use the lightest toast setting when heating toaster pastries.
18 DO NOT cover the air intake vents or air electrical socket vents while unit is operating. Doing so will prevent even cooking and may damage the unit or cause it to overheat.
19 DO NOT insert anything in the ventilation slots and do not obstruct them.
20 DONOT use accessory and attachments not recommended or sold by SharkNinja.
21 DO NOT place items on top of the unit, including food, while unit is operating except for authorised recommended Ninja accessories.
22 Before placing any accessories into the toaster ensure they are clean and dry.
23 Intended for worktop use only. DO NOT place the oven near the edge of a worktop. Ensure the surface is level, clean and dry.
24 This oven is for household use only. DO NOT use this unit for anything other than its intended use. Misuse may cause injury.
25 DO NOT use outdoors. DO NOT use in moving vehicles or boats.
26DONOT operate in enclosed space or under cabinets.
27 Provide adequate space above (minimum 10"/254mm) and on all sides (minimum 4"/102mm) for air circulation.
28 DO NOT place anything on the toaster during operation. A fire may occur if the unit is covered or touching flammable material, including curtains, draperies, walls or the like when in operation.
29 DO NOT spray any type of aerosol spray or flavouring inside the unit while cooking.
30 Use caution when inserting and removing anything from the unit, especially when hot.
31 Electrical socket voltages can vary, affecting the performance of your product. To prevent possible illness, use a thermometer to check that your food is cooked to the temperatures recommended.
32 DO NOT insert metal utensils such as a knife into the unit to remove jammed toast, bagels or any other items. This can damage the heating elements or cause electric shock.
33 Unplug the unit before cleaning any food that becomes stuck or is spilled into cavity.
34 DO NOT place any of the following materials in the unit: paper, cardboard, plastic, roasting bags and the like. They may cause fire.
35 Extreme caution should be exercised when using containers constructed of any materials other than metal or glass.
36DONOT touch hot surfaces. The unit's surfaces are hot during and after operation. To prevent burns or personal injury, ALWAYS use protective hot pads or insulated oven gloves and use available handles and knobs.
37 Please refer to the Cleaning & Maintenance section for regular maintenance of the unit.
38 Cleaning and user maintenance must not be done by children.
39 Press the power button to turn unit off and allow to cool completely before cleaning, moving and flipping for storage.
40 Unplug from electrical socket when not in use. To unplug, grasp the plug by the body and pull from the electrical socket. Never unplug by grasping and pulling the flexible cord.
41 DONOT clean with metal scouring pads. Pieces can break off the pad and touch electrical parts, causing a risk of electrical shock.
42 DO NOT store any materials, other than supplied accessories, in this unit when not in use.
43 DO NOT use the unit as a source of heat or for drying.
44 NEVER connect this appliance to an external timer switch or separate remote-control system.

Indicates to read and review instructions to understand operation and use of product.

Indicates the presence of a hazard that can cause personal injury, death or substantial property damage if the warning included with this symbol is ignored.

Take care to avoid contact with hot surface. Always use hand protection to avoid burns.

For indoor and household use only.
SAVE THESE INSTRUCTIONS
PARTS
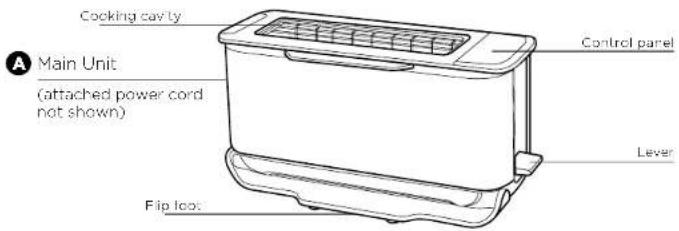
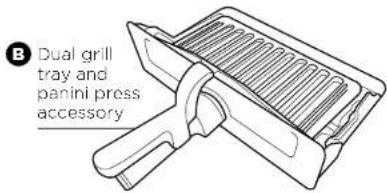
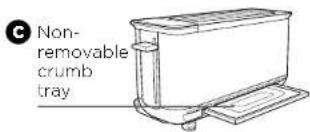
To order replacement parts or additional accessories, visit ninjakitchen.co.uk or contact customer service at 0800 862 0453
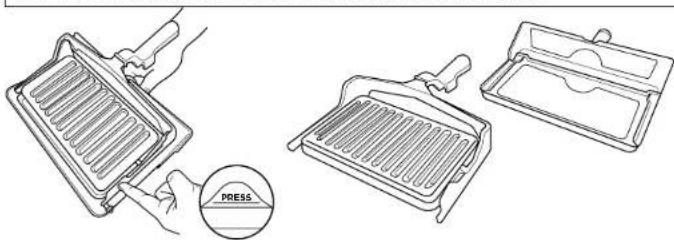
Converting the Panini Press into a Grill tray
1 Lift up top handle to separate the plates.
2 Push the PRESS lab on the left panini arm inward, sliding it off the grill tray pin.
3 Slide the right panini press arm off the grill tray pin.
4 Use as a grill tray for Grill, Bake and Reheat functions.
5 Re-attach top plate for Panini function.
NOTE: To re-attach the panini press, align right panini arm hole with right grill tray pin. Push the PRESS tab and align the panini hole with the bake pin to slot in place.
BEFORE FIRST USE
1 Remove and discard any packaging material and tape from the unit. Some stickers are to be permanently kept on the unit, ONLY remove stickers with 'peel here'.
2 Remove all accessories from the box and read this manual carefully. Please pay particular attention to operational instructions, warnings and important safeguards to avoid any injury or property damage.
3 Separate the panini press from the grill tray following the instructions listed in the Converting the Panini Press into a Grill tray section. Then wash the panini press and grill tray in warm, soapy water. Rinse and dry thoroughly. NEVER submerge the main unit in water.
4 We recommend placing the grill tray inside the toaster and running it on GRILL HIGH for 10 minutes without adding food. Refer to section below FLIPPING TO GRILL POSITION for how to use the toaster on GRILL mode. Make sure the area is well ventilated. This removes any packaging residue and odour traces that may be present. This is completely safe and not detrimental to the performance of the toaster.
NOTE: For longest life, we recommend hand-washing the accessories. For best results, remove the panini press from the grill tray and wash separately.
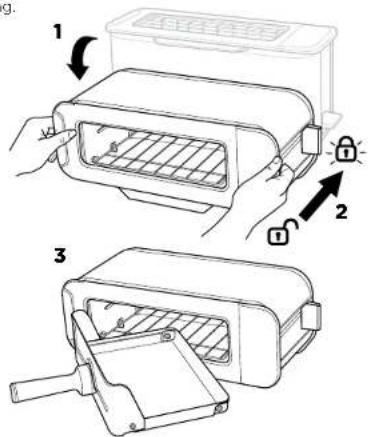
FLIPPING TO THE GRILL POSITION
1 Flip the unit down.
2 Push the toast lever back to open the cooking cavity. Lock icon: Lever must be pushed all the way back to lock position. The lock icon will illuminate if the lever is locked and flash if not locked.
3 Insert the grill tray to begin grilling.
"LOC"
Appears on the display when the unit is in the horizontal mode but the lever has not been pushed back and locked into place. There will be an audible click when lever is locked and LOC will disappear.
"NO PAN"
Appears on the display if the grill tray is not inserted and START/STOP has been pressed to start cooking. Insert can correctly to begin cooking.
The unit will auto shut off if the grill tray has been removed for 5 minutes.
USING THE CONTROL PANEL
When the unit is flipped from toaster position to grill position the control panel will change to show all functions and the buttons you are able to select in that mode.
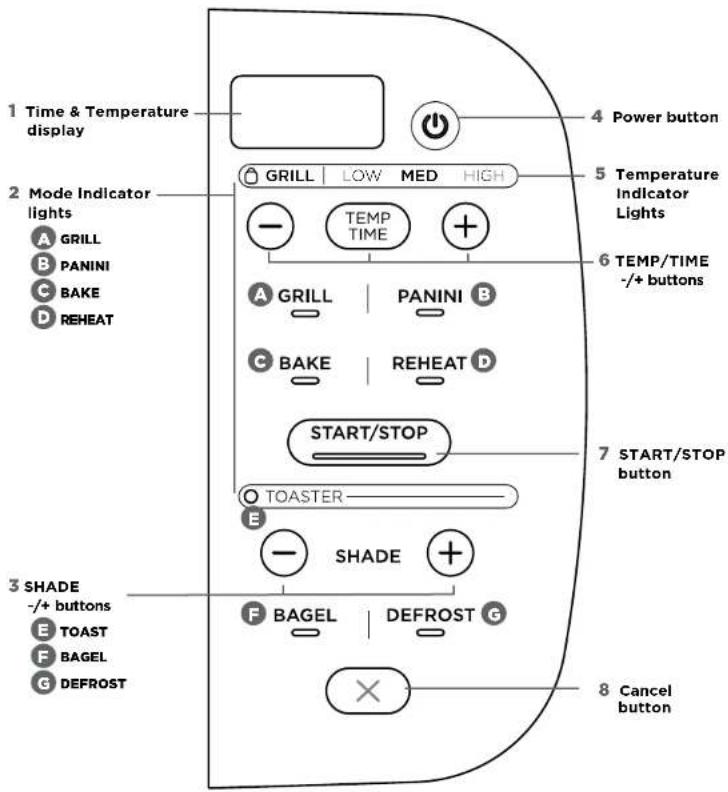
HORIZONTAL FUNCTIONS
VERTICAL FUNCTIONS
A GRILL: Ideal for melted cheese on toast, toasted sandwiches or for crisping foods.
B PANINI: Make cafe style pressed panini and toasted sandwiches.
C BAKE: Evenly bakes breakfast pastries and even small quiches.
D REHEAT: Quickly reheat cooked foods like a slice of pizza.
E TOAST: Everly toasts up to 2 slices of bread to your perfect level of darkness.
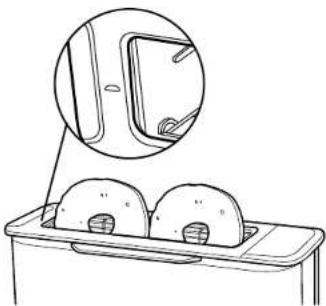
F BAGEL: Perfectly toast up to 2 bagel halves when they're placed cut-side forward in the toaster. The icon on your unit will show instructed direction.
natural_image
Line drawing of a kitchen appliance with three round cavities and a magnified inset showing a door handle (no text or symbols)G DEFROST: Press for added time when toasting bread and bagels from frozen.
1Timedisplay: Shows the cook time and will count down when cooking is in progress.
NOTE: Cook time and temperature will revert to the same settings from the last time the oven was in use.
2 Mode Indicator lights: Signify horizontal or vertical orientation. Flip unit down and press down lever to engage horizontal functions.
3 SHADE -/+ buttons: Adjust the toast shade for TOAST and BAGEL functions.
4 Power button: Press to turn unit on or off.
5 Temperature Indicator Lights: LOW/MED/HIGH for temperature control in GRILL, PANINI, BAKE and REHEAT functions.
6 TEMP/TIME -/+ buttons: Press TEMP/TIME to toggle between selections, then use -/+ buttons to adjust.
| LOW MED HIGH | |||
| Grill 120°C | 160°C 205°C | ||
| Panini 120°C | 160°C 205°C | ||
| Bake | 120°C | 175°C | 205°C |
| Reheat | 150°C | 160°C | 175°C |
Approx mate temperature guide
NOTE: The cook time and temperature can be adjusted at any time during the cooking cycle.
7 START/STOP button: Press to start or stop cooking. Cooking will begin shortly thereafter.
8 CancelButton: Press to cancel and eject your food load when in toaster mode.
USING THE TOASTER MODES (VERTICAL)
To turn on the unit, plug the power cord into a wall socket and press the button.
Toast
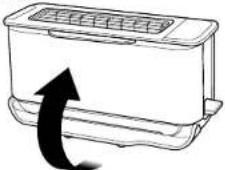
1 Flip the unit up to the Toaster position and make sure the lever is pulled up. Check the flip foot is at the bottom of the unit.
2 Use the +/- SHADE buttons to select the desired shade level from 1-7.
NOTE: There is no temperature or time adjustment available for the TOAST function. These are automated within the shade selection.
3 Place your sliced bread into the toaster slot. Push the lever down to start the loafing cycle.
NOTE: Check on progress during cooking by lifting lever to raise toast. The cooking cycle will continue so push lever back down once done.
NOTE: Select CANCFI during a cooking cycle. This will pop the toast up.
4 When toasting is finished, the unit will beep and the lever and the toast will pop up.
NOTE: The unit uses an algorithm to ensure consistent shade results whether toasting from a cold or pre-warmed unit. As a result the total toast time may change - to add more or less time adjust the shade setting on the dial.
Bagel
1 Flip the unit up to the Toaster position and make sure the lever is pulled up.
2 Select the BAGFL button. The button will illuminate.
3 Select your desired shade level by rotating the shade dial.
NOTE: There is no temperature or time adjustment available for the BAGFI function. These are automated within the shade selection.
4 Place bagel halves, cut-side facing you, in the toaster. There is a small icon on the unit to indicate. Push the lever down to start toasting.
NOTE: Check on progress during cooking by lifting lever to raise toast. The cooking cycle will continue so push lever back down once done.
NOTE: Select CANCEL during a cooking cycle. This will pop the bagel up.
5 When toasting is finished, the unit will beep and the lever and the bagel will pop up.
NOTE: The unit uses an algorithm to ensure consistent shade results whether toasting from a cold or pre-warmed unit. As a result the total toast time may change - to add more or less time adjust the shade setting on the dial.
Defrost
1 Defrost can ONLY be used with either the TOAST or BAGEL function.
2 Select the DFFROST button to add extra time for defrosting your food before toasting.
| Shade Pre-Set Toasting Times | Additional Time when DEFROST is selected | Pre-Set Defrost Times | |
| 1 | 1:43 mins | + 0.20 seconds | 2:03 mins |
| 2 | 2:04 mins | + 0.22 seconds | 2:26 mins |
| 3 | 2:10 mins | + 0.23 seconds | 2:33 mins |
| 4 | 2:22 mins | + 0.24 seconds | 2:46 mins |
| 5 | 2:45 mins | + 0.26 seconds | 3:11 mins |
| 6 | 3:04 mins | + 0.29 seconds | 3:33 mins |
| 7 | 3:30 mins | + 0.31 seconds | 4:01 mins |
NOTE: These are default times on first use when the unit is cold. Times will vary when the unit has heated up.
TIPS FOR CHOOSING YOUR SHADE SELECTION
- With multiple slices, place next to each other. Make sure there is no overlap of the slices so they can toast consistently. If bread slices do not fit next to each other, try rotating them sideways for a better fit.
- For drier or stale breads, adjust the shade lower than your standard setting.
- For freshly baked or whole wheat breads, adjust the shade higher than your standard setting.
- Sweet or fruit bread (fruit loaf, tea cakes) toast much quicker, adjust the shade setting lower.
- For breads with an uneven surface (like English muffins), adjust the shade higher than your standard setting. Be sure to slice bread evenly for consistent toasting
- For thick-cut pieces, adjust the shade higher than your standard setting. Be sure to slice bread evenly for consistent loasting.
- Split bagels in half before toasting. Place the cut side facing you.
- For frozen waffles, frozen French toast or frozen bagel's ensure you also press the Defrost button to add extra time.
- Be aware that very thin slices may burn. Use the lowest shade selection and monitor while toasting.
| SETTING COLOUR | |
| 1-2 Light | |
| 3-5 Medium | |
| 6-7 Dark | |
USING THE GRILL MODES (HORIZONTAL)
Grill
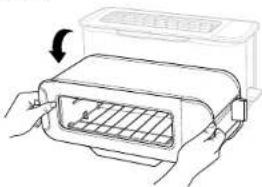
1 From the toaster position, flip the unit down so it is horizontal. Push the lever back until it clicks into place. Select GRILL.
natural_image
Illustration of hands installing a grating device into a container (no text or symbols visible)2 Set the time. Press the TEMP/TIME button to see the time display. Then use the +/- buttons to select a time between 1 minute and 10 minutes.
3 Set the temperature. Press the TEMP/TIME button then use the +/- buttons to select LOW/MED/HIGH.
4 Place Ingredients on the grill tray and insert tray into the unit.
5 Press START/STOP to begin the cooking cycle. Cooking will only begin if the tray is correctly inserted.
6 During cooking, you can remove the grill tray to check on food. The timer will pause until the grill tray has been reinserted in the unit.
7 When cooking time reaches zero, the unit will beep to signal the cooking cycle is complete.
NOTE: If cooking for less than 10 minutes, the clock will count down by minutes and seconds. If cooking for 10 minutes or more, the clock will count down by minutes only until the times reaches below 10 minutes.
Panini
1 Flip unit down to the horizontal position and push the lever back. Select PANINI.
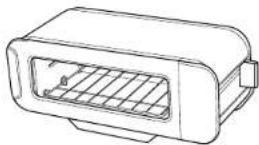
2 Set the time. Press the TEMP/TIME button to see the time display. Then use the +/- buttons to select a time between 1 minute and 20 minutes.
3 Set the temperature. Press the TEMP/TIME button then use the +/- buttons to select LOW/MED/HIGH.
4 Place ingredients in the panin press and insert into the unit. Cooking will begin when the press is correctly inserted.
5 Press START/STOP to begin the cooking cycle. Cooking will only begin if the tray is correctly inserted.
6 During cooking, you can remove the panini press to check on food. The timer will pause until the grill tray has been reinserted in the unit.
7 When cooking time reaches zero, the unit will beep to signal the cooking cycle is complete.
Bake
1 Flip unit down to the horizontal position and push the lever back. Select BAKE.
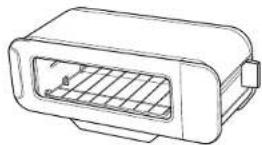
2 Set the time. Press the TEMP/TIME button to see the time display. Then use the +/- buttons to select a time between 1 minute and 20 minutes.
3 Set the temperature. Press the TEMP/TIME button then use the -/- buttons to select LOW/MED/HIGH.
4 Place ingredients on the grill tray and insert tray into the unit.
5 Press START/STOP to begin the cooking cycle. Cooking will only begin if the tray is correctly inserted.
6 During cooking, you can remove the grill tray to check on food. The timer will pause until the grill tray has been reinserted in the unit.
7 When cooking time reaches zero, the unit will beep to signal the cooking cycle is complete.
Reheat
1 Flip unit down to the horizontal position and push the lever back. Select REHEAT.
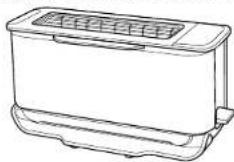
2 Set the time. Press the TEMP/TIME button to see the time display. Then use the +/- buttons to select a time between 1 minute and 20 minutes.
3 Set the temperature. Press the TEMP/TIME button then use the +/- buttons to select LOW/MED/HIGH.
4 Place ingredients on the grill tray and insert tray into the unit.
5 Press START/STOP to begin the cooking cycle. Cooking will only begin if the tray is correctly inserted.
6 During cooking, you can remove the panini press to check on food. The timer will pause until the grill tray has been reinserted in the unit.
NOTE: For all functions heating elements will cycle on and off during a given cook to maintain the set temperature precisely.
7 When cooking time reaches zero, the unit will beep to signal the cooking cycle is complete.
CLEANING
The unit should be cleaned thoroughly after every use.
1 Unplug the unit and allow it to cool down before cleaning.
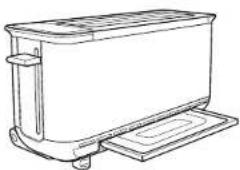
2 Empty the crumb tray by partly sliding it out of the unit when the unit is in the vertical position. Wipe crumbs off and fully insert back into the unit.
NOTE: Empty crumb tray frequently. Always ensure the crumb tray is fully inserted before cooking.
NOTE: Crumb tray is not removable from the unit.
natural_image
Line drawing of a rectangular toaster with side grilles and base tray (no text or symbols)3 Use a damo cloth to clean the exterior of the main unit and the control panel. A non-abrasive liquid cleanser or mild spray solution may be used. Apply the cleanser to the cloth, not the unit surface, before cleaning.
POWER CORD MANAGEMENT
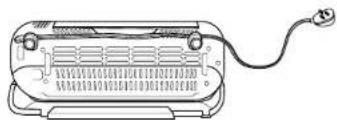
Our cord management system is designed so it will not interfere with the toaster's flip functionality.
Option 1: Socket on the right. Place the cord in the left hook on the back of the toaster. Twist the cord so the wide side is horizontal in order to securely fasten the cord in the hook.
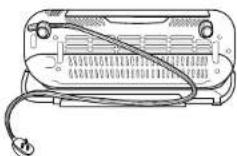
Option 2: Socket on the left or behind the toaster. Place the cord in both hooks on the back of the toaster. Twist the cord so the wide side is horizontal in order to securely fasten the cord in the hooks.
natural_image
Line drawing of a portable electronic device with a cable and indicator lights (no text or symbols)ERROR MESSAGES & FAQMAINTENANCE
ERROR MESSAGES
"CALL CUSt SrVC" followed by "Er1," "Er2," "Er3," "Er4," "Er5," "Er6," or "Er7". Power off the unit and call Customer Service at 0800 862 0453. So we may better assist you, please register your product online at ninjakitchen.co.uk/registerguarantee and have the product on hand when you call.
FAQ
Why won't the unit turn on?
• Make sure the power cord is securely plugged into the electrical socket.
- Try plugging the cord into a different electrical socket.
- Press the Power ⏻ button.
- If the issue persists after following the steps above, contact customer service.
Why aren't the Grill functions illuminated when the unit is in the horizontal position?
- Make sure the toast lever is pushed all the way back to open the cooking cavity. You will hear a click when the lever is fully pushed back.
• Make sure the flip foot is on the bottom of the unit.
Can I look at my food while the unit is cooking?
- Yes, in horizontal mode you can remove the grill tray at any time to check on your food. The cook time will pause until you reinsert the tray.
- In the vertical position, you can lift the toast lever at any point to check on progress without cancelling toasting.
Why do the heating elements appear to be turning on and off?
- This is normal. The toaster is designed to control temperature precisely for every function by automatically adjusting the power levels of the heating elements.
Why Is It only toasting on one side?
- Bagel function likely to be selected. If wanting to use the toast function for toasting both sides evenly, ensure the BAGEL button is NOT illuminated. If it is, the side facing forwards will be more toasted than the reverse. To deselect Bagel, press the Bagel button once so it is not illuminated.
What coating is used on the grill tray?
- The tray has a PTFE non-stick coating. We advise to hand-wash and to avoid using metal utensils to maintain the non-stick coating.
Can I use baking paper or aluminium foil?
• We would advise against this due to the proximity of the tray to the heating elements.
NOTE: Save these instructions. Keep for future reference.
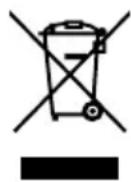
This marking indicates this product should not be disposed of with other household waste. To prevent possible harm to the environment or human health from uncontrolled waste disposal, recycle it responsibly to promote the sustainable reuse of material resources. To return your used device, please use the return and collection
systems or contact the retailer where this product was purchased. They can take this product for environmentally safe recycling.
SharkNinja Europe Limited
3150 Century Way,
Thorpe Park, Leeds, LS15 8ZB, UK
0800 862 0453
ninjakitchen.co.uk
SharkNinja Germany GmbH, c/o Regus Management GmbH
Excellent Business Center 10. + 11/ Stock
Illustrations may differ from actual product. We are constantly striving to improve our products, therefore the specifications contained herein are subject to change without notice.
FOODI and NINJA are registered trademarks in the United Kingdom of SharkNinja Operating LLC.
© 2022 SharkNinja Operating LLC
PRINTED IN CHINA
- THANK YOU
- REGISTER YOUR PURCHASE
- THIS BOOK COVERS MODEL NUMBERS ST200UK/ST202UK
- RECORD THIS INFORMATION
- TECHNICAL SPECIFICATIONS
- PLEASE READ CAREFULLY AND KEEP FOR FUTURE REFERENCE.
- PRODUCT REGISTRATION:
- CONTENTS
- IMPORTANT SAFEGUARDS
- ⚠ WARNING
- SAVE THESE INSTRUCTIONS
- PARTS
- Converting the Panini Press into a Grill tray
- BEFORE FIRST USE
- FLIPPING TO THE GRILL POSITION
- "LOC"
- "NO PAN"
- USING THE CONTROL PANEL
- HORIZONTAL FUNCTIONS
- VERTICAL FUNCTIONS
- USING THE TOASTER MODES (VERTICAL)
- Toast
- Bagel
- Defrost
- TIPS FOR CHOOSING YOUR SHADE SELECTION
- USING THE GRILL MODES (HORIZONTAL)
- Grill
- Panini
- Bake
- Reheat
- CLEANING
- POWER CORD MANAGEMENT
- ERROR MESSAGES & FAQMAINTENANCE
- ERROR MESSAGES
- FAQ
- Why won't the unit turn on?
- Why aren't the Grill functions illuminated when the unit is in the horizontal position?
- Can I look at my food while the unit is cooking?
- Why do the heating elements appear to be turning on and off?
- Why Is It only toasting on one side?
- What coating is used on the grill tray?
- Can I use baking paper or aluminium foil?
Brand : NINJA
Model : Foodi ST200UK
Category : Toaster