LEDW240+ - TV Reflexion - Free user manual and instructions
Find the device manual for free LEDW240+ Reflexion in PDF.


| Product Type | LED TV |
| Screen Size (Diagonal) | 24 inches (61 cm) |
| Resolution | 1366 x 768 (HD) |
| Aspect Ratio | 16:9 |
| Refresh Rate | 60 Hz |
| Brightness | 200 cd/m² |
| Contrast Ratio | 3000:1 (Dynamic) |
| Viewing Angle | 178° / 178° |
| Audio Output Power | 2 x 3W |
| Input Ports | 1 x HDMI, 1 x VGA, 1 x USB, 1 x AV, 1 x RF, 1 x Headphone |
| Power Consumption (Typical) | 30 W |
| Standby Power | < 0.5 W |
| Power Supply | AC 100-240V, 50/60Hz |
| Dimensions (without stand) | 55.6 x 33.5 x 5.2 cm |
| Dimensions (with stand) | 55.6 x 38.2 x 17.5 cm |
| Weight (without stand) | 3.2 kg |
| Weight (with stand) | 3.5 kg |
| VESA Mount Standard | 100 x 100 mm |
| Energy Efficiency Class | E (EU 2017/1369) |
| Remote Control Included | Yes |
| Operating Temperature | 0°C to 40°C |
| Cleaning Instructions | Wipe with a soft, dry cloth. Do not use abrasive cleaners. |
| Safety Features | Anti-tip strap, auto power-off (if no signal) |
Frequently Asked Questions - LEDW240+ Reflexion
User questions about LEDW240+ Reflexion
0 question about this device. Answer the ones you know or ask your own.
Ask a new question about this device
Download the instructions for your TV in PDF format for free! Find your manual LEDW240+ - Reflexion and take your electronic device back in hand. On this page are published all the documents necessary for the use of your device. LEDW240+ by Reflexion.
USER MANUAL LEDW240+ Reflexion
19" (47cm) 24" (60cm)
TFT-LED-TV mit DVB-T/T2HD, DVB-S/S2, DVB-C,
CI+ Slot & Bluetooth
Model No: LEDW190+ / LEDW240+
natural_image
Line drawing of a flat-screen monitor with a stand (no text or symbols)| English | German |
| CI+ Slot | CI+ Steckplatz |
| CAM | CAM |
| Smart Card | Smart Card |
GERÄT VORBEREITEN
19" (47cm) 24" (60cm)
TFT-LED-TV with DVB-T/T2HD, DVB-S/S2, DVB-C,
CI+ Slot & Bluetooth
Model No.: LEDW190+ / LEDW240+
natural_image
Line drawing of a flat-screen monitor with a stand at the bottom (no text or symbols)Read the entire manual for the TV carefully before using the unit. Keep the instructions in a safe place for future reference.
SAFETY INFORMATION
IMPORTANT SAFETY INSTRUCTIONS - PLEASE READ CAREFULLY BEFORE USE.
Follow the safety instructions on the back of the television.

Warning to prevent electrical shock. Do not remove any of the covers. No user serviceable parts in the device. Have the device serviced by qualified personnel.
This symbol indicates important operating / maintenance instructions for this device in the operating instructions.
This symbol indicates the risk of an electric shock due to lethal voltage in this device.
Follow the instructions below:
- Do not use this TV near water.
- Use a slightly damp cloth for cleaning.
- Do not cover any of the ventilation openings.
- Set up the device according to the supplied quick start guide and these operating instructions.
• Make sure that the cable of the power supply unit must not be crushed or kinked and avoid running the power cable over sharp edges. - Disconnect the television from the mains during thunderstorms or if it is not going to be used for a longer period of time.

Keep the device away from splashing water and dripping water. No objects filled with liquids may be placed on the device.
Note:
- Do not place any open sources of heat (stoves, candles, etc.) near or on top of the TV set.
IMPORTANT SAFETY INSTRUCTIONS
This device complies with all current safety regulations. The following safety tips are intended to protect the user from careless use and the dangers that arise as a result.
- This device was manufactured with the greatest care and subjected to a strict final inspection. However, as with any other electrical device, there is a possibility that problems can arise. In the event of smoke development, excessive heat development or any other unnatural phenomenon, immediately disconnect the device from the mains.
- The power plug or device plug is used to separate the device from the power supply and should be easily accessible at all times.
- Only connect the device to power sources that meet the specifications of the device. You can find these on the back of the device and in the operating instructions.
• The mains socket should be close to the device and must be easy to reach.
EN
- Pull the power cord out of the socket by the plug. Never pull on the power cord itself, it could be damaged and cause a short circuit.
- When using a multiple socket, do not connect too many devices to the multiple socket to avoid overloading.
- Keep rodents away from the device to avoid damaging the cables.
- To avoid injury, make sure that young children cannot reach or unplug the power cord from the wall socket.
- Do not place the device near heat sources. The housing and the power cord could be damaged by the influence of heat.
- The screen is made of plastic that can flake off if damaged. To prevent injuries, carefully collect sharp-edged plastic splinters.
- When setting up the device, make sure that the surface is firm and level.
- To protect the device from lightning strikes, disconnect the device from the mains and pull out the antenna. Warning: Do not touch the RF antenna connector.
- Disconnect the device from the power supply if you are not going to use the device for a long period of time or if you leave it unattended.
- When setting up the device, make sure that there is sufficient ventilation. Never place the device near heat sources and do not cover any of the ventilation openings.
- Avoid direct sunlight on the device. Leave a space of 5 cm (2") from the surroundings when placing it on a shelf.
- Keep water and moisture away from the device. Do not use the device in a wet or damp environment such as the bathroom, steam room or near a swimming pool.
- Do not use the device if moisture condensation can occur.
- Any repairs may only be carried out by qualified specialists.
- Never open the device. Repairs that have not been carried out by qualified personnel can be a possible cause of fires.
- Liquids spilled into the device can cause serious damage. Switch the device OFF and disconnect it from the mains. Contact your dealer or customer service.
- Never remove the safety covers. There are neither usable nor serviceable components inside the device. You would lose your warranty. The device may only be repaired by the manufacturer's service.
- Never hit or shake the screen as this could damage the internal circuitry. Handle the remote control carefully and do not drop it.
- Clean the device with a soft cloth. Never use solvents or oil-based liquids. For stubborn stains, you can use a damp cloth with diluted detergent.
- All illustrations in these operating instructions are for example purposes only and do not necessarily correspond to the actual unit.
Headphone warning notice:
Listening to music loudly can lead to hearing impairment or complete hearing loss. Avoid listening to music with volume levels that are too high.
Installation site:
Place the TV set on a stable and level surface. Avoid parking spaces with direct sunlight. Soft, indirect light is recommended for pleasant TV viewing. To avoid damaging the device, set up the television in such a way that no objects can swivel into the device. Make sure that no objects are
placed in front of the remote control receiver of the TV set. This can mean that the device can no longer be operated with the remote control.
DISPOSAL INSTRUCTIONS
This symbol on the product or in the instructions means that the device as well as electrical and electronic devices and batteries must be disposed of separately from your household waste at the end of its service life. There are separate collection systems for recycling in the EU. For more information, please contact your local authority or your dealer.
SCOPE OF DELIVERY
- Device
- Power supply
• Middle piece (TV stand) - User manual
- Remote control
• Active DVB-T indoor antenna
• 4x screws for (TV stand)
- 2x AAA batteries
- 12V car adapter
- TV stand
• 3x screws for (middle piece)
- 4x M4 Vesa screws
MOUNTING WALL BRACKET & STAND
Wall bracket:
The TV set is equipped with mounting points (M4) for a wall bracket (wall bracket not included). The VESA hole spacing is 100x100 (Vesa100). Do not use screws that are too long as you could damage components inside the device.
Note:
• Follow the instructions for the wall bracket during installation.
- Consult a professional for the installation of the wall bracket if you have any questions.
Assembly TV stand:
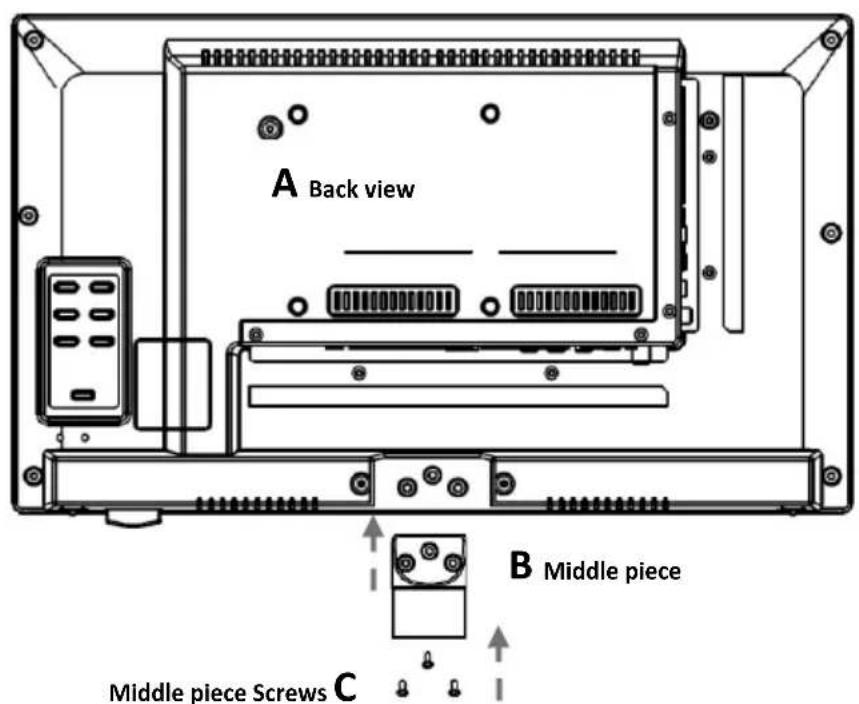
PICTURE 1
PICTURE 2
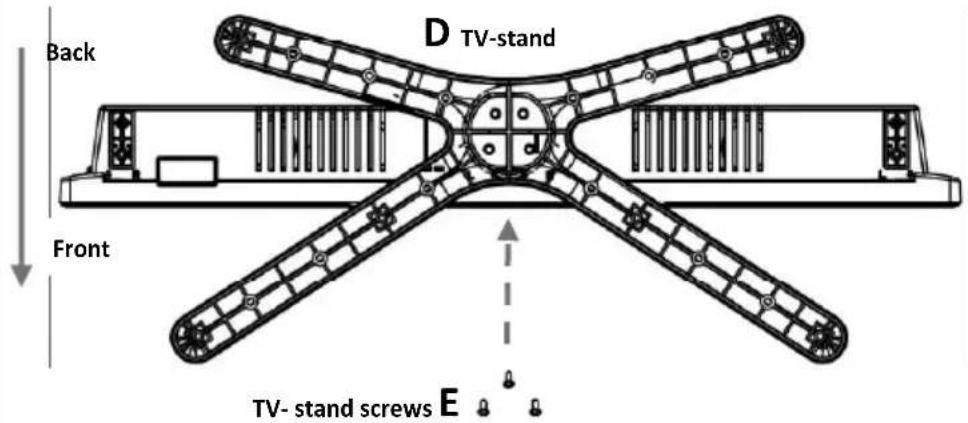
- Place the TV set (A) on a flat and lightly padded surface with the display facing downwards.
- Screw the centre piece (B) to the TV set using the screws (C) supplied and a screwdriver (not included).
- Hold the stand foot (D) against the underside of the centre piece (C) and ensure that it is correctly aligned (see PICTURE 2).
- Screw the stand (D) to the TV with the screws (E).
CONTROL BUTTONS ON THE DEVICE
The buttons for the local control are on the back of the device.
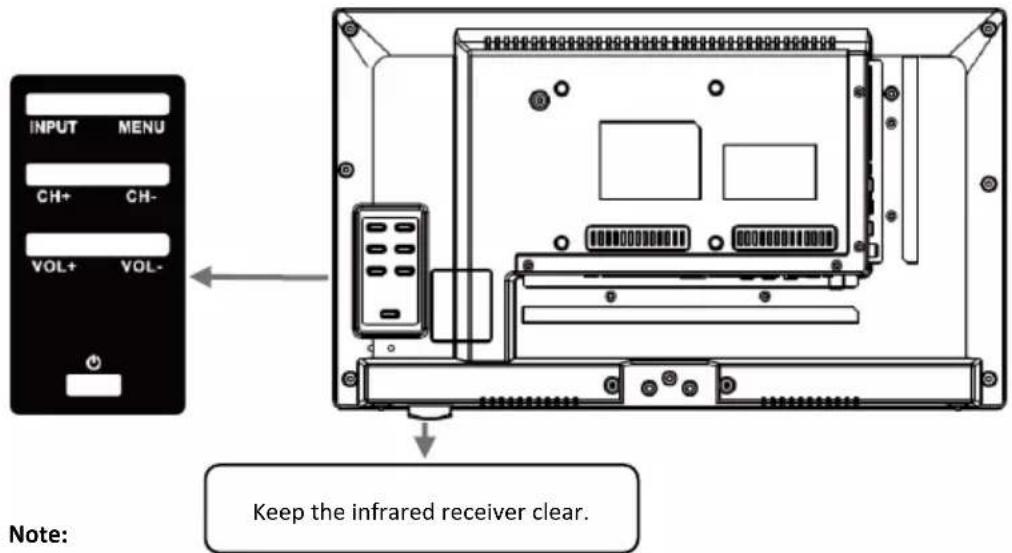
- Please keep the infrared receiver on the device free. Blocking the infrared receiver can lead to connection problems with the remote control.
 | Open the input sources menu |
 | Device menu: Open / Close |
 | CH+: Next program |
 | CH-: Previous program |
 | VOL+: Volume up |
 | VOL-: Volume down |
 | Power: On / Off (Standby) |
ANSCHLÜSSE AM GERÄT

 | Mains connection for the power supply unit or the 12V car adapter. |
 | Digital audio output for external audio devices (e.g. amplifiers or soundbars). |
 | Connection for an external HDMI device. e.g. Blu Ray player / soundbar. HDMI 1 is ARC capable. |
 | Only reflects the TV picture (no sound) from the AV input. |
 | Cinch audio output. For connecting external audio devices. |
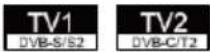 | TV1: Connection of the satellite antenna.TV2: Connection of the DVB-T antenna or the cable system. |
 | 3.5mm headphone jack. The internal speakers are muted when in use. |
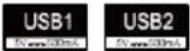 | 2x USB connection for USB sticks and hard drives (max. 1TB). |
 | Connection of external AV devices via adapter (not included) e.g. video recorder |
 | Connection of external AV devices via adapter (not included) e.g. video recorder. |
 | Slot for CI + modules for decrypting encrypted TV programs. |
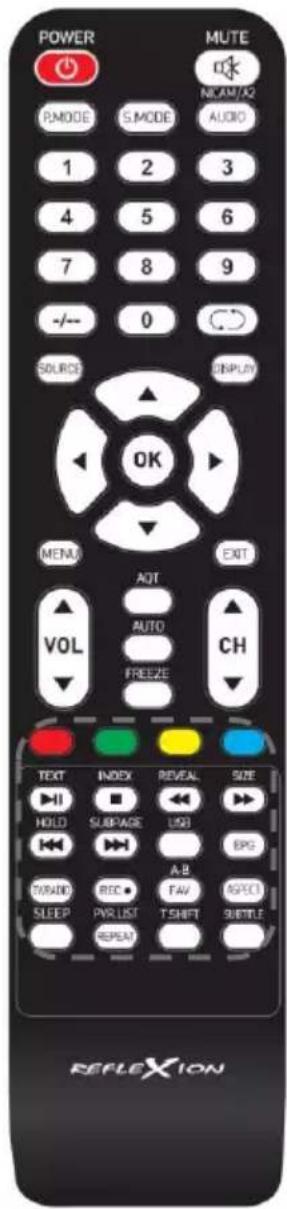
REMOTE CONTROL
The remote control uses infrared waves (IR). Point the remote control in the direction of the TV set. If the remote control is out of range or out of angle, the remote control may not work properly.
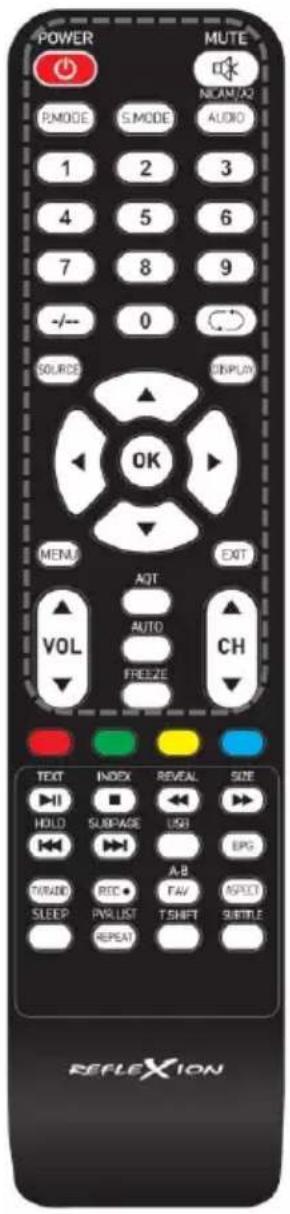
 | On / Off (Standby) |
 | Mute (On / Off) |
 | Set picture mode |
 | Set sound mode |
  | Select audio |
  | Numeric keys |
 | Determine number of digits |
 | Switch between the last two programs |
 | Select the input source |
 | Information display in TV mode |
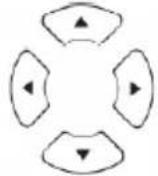 | Navigation buttons |
 | Confirm selection |
 | Open menu |
 | Close menu |
 | Open the station search menu |
 | When the TV is used as a PC monitor to calibrate the picture |
 | Freeze the picture |
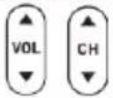 | VOL: Volume up / downCH: Next program / previous program |
 | Play / Pause |
 | Open / close teletext |
 | Stop playback |
 | Teletext index page |
  | Rewind / Fast forward |
 | Teletext: Show hidden characters |
 | Adjust the size of the teletext |
  | Next Title / Previous Title |
 | Teletext page hold |
 | Teletext: Switch through quick selection bar |
 | Open USB mode |
 | Open / close EPG menu |
 | Switch between TV / Radio station list |
 | Start recording |
 | Open favourites list |
 | USB: Set A-B playback points |
 | Set aspect ratio |
 | Set sleep timer |
 | USB: Set playback mode |
 | Open recording list |
 | Start T.Shift |
 | Select subtitles |
COMMON INTERFACE / CI - SLOT
This television is equipped with a CI + slot and supports the following digital standards: DVB-T / T2HD, DVB-S / S2 and DVB-C
Common interface / slot
The CI slot (CI +) was designed to accept conditional access modules (CAM) and smart cards and thus to be able to access Pay TV and other services. Contact your Pay TV service provider for more information about modules and subscriptions.
Note:
• Conditional Access Modules and Smart Cards are sold separately.
- Switch your television off before you insert the CI + module into the CI slot.
• Then slide the smart card into the CI + module.
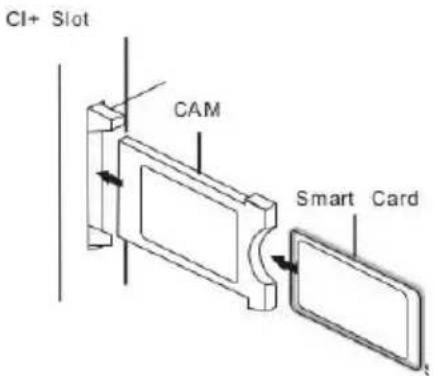
Then slide the smart card into the module.
-
Turn on the TV and make sure the source is DTV.
-
When the CAM is recognized, the following text is displayed on the screen: "CI module inserted". Wait a few seconds for the card to activate.
-
Now select the pay TV program you want.
-
Detailed information about the smart card used is displayed.
-
Press the ⏻ button to call up the CI menu. Refer to the module manual for details on the settings.
-
If the module is removed, the following text is displayed on the screen: "CI module removed".
| English | German |
| CI+ Slot | CI+ Steckplatz |
| CAM | CAM |
| Smart Card | Smart Card |
PREPARE THE DEVICE
Check that all required cables and connections are available.
1) Connect the car adapter included in the scope of delivery to the TV set. Connect the other side of the car adapter to the appropriate voltage source.
2) Insert two AAA batteries into the supplied remote control.
3) Connect your satellite antenna or cable system / DVB antenna to the connection of the TV set.


4) Connect all other external devices (e.g. Blu Ray player etc.) to the appropriate connections on the TV set.
Note:
- Place the TV set on a level and stable surface.
BASIC OPERATION
 | Device on / off (standby) |
 | Input source menu open / close. |
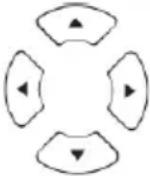 | Menu navigation (up / down / left / right). |
| [AZZ0] | Select or confirm a menu item. Open station list. |
| [Z402] | Open or close the main menu. |
| [KY60] | Menu item back. |
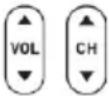 | VOL: Adjust the volume (louder / quieter).CH: Switch programs (up / down). |
 | Mute the sound (On / Off). |
FIRST INSTALLATION
Once you have connected the device and all devices, follow the next steps to carry out the initial installation of the device.
- Press the toggle switch on the device so that it is on.
- Press the ⏻ button to switch on the device.
- A setup menu will appear on the screen.
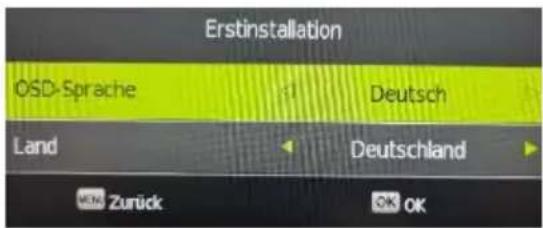
- Use the 🎨 button to set the menu language (OSD language) and the installation location (country).
- Press the OK button to confirm the entry.
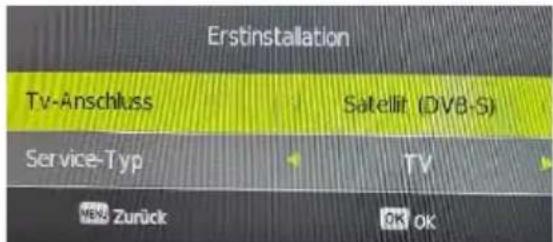
-
Now select the TV connection. The following settings are available: TV connection
-
DTV (DVB-T)
- Cable (DVB-C)
• Satellite (DVB-S)
First installation of DVB-T
| First Time Installation | |
| TV-Connection | DTV |
| Tune Type | TV, DTV+ATV, TV |
| Once you have made all the settings, press the button to start the search. | |
First installation of DVB-S
| First Time Installation | |
| TV-Connection | Satellit (DVB-S) |
| Tune Type | TV |
1) Select the TV connection and the satellite (DVB-S) and press the OK button.
| Satellite Auto Tuning Setting | |
| Scan Mode | Normal Scan:Perform a normal scan.Fast Scan:Perform a Fast Scan search. |
2) Press the OK button to go to the next menu.
| Satellite Auto Tuning Setting | |
| Satellite | Select thesatellite. Astra 19.2 is preset. |
| Channel Type | All / Free / Scramble |
| Service Type | All / TV / Radio |
| Provider | Select the provider for the Fast Scan function. Can only selected in theFastScan search mode. |
| Scan Mode | Auto / Blind Scan / Preset |
| Unicable | Unicable-Setting:Off / OnUserband / SRC Addr.:Select the user band that matches the multiswitch, LNB.Frequency:Enter the frequency suitable for the multiswitch, LNB.Position:A / B |
| Search | Starts the search. |
First installation of DVB-C
| TV-Connection | Cable |
| Tune Type | DTV+ATV, TV, ATV |
| Scan Mode | Full / Network Scan |
| Frequency (KHz) | Only available if the search mode is set to network scan. • Auto • Manually |
| Network ID | Only available if the search mode is set to network scan. • Auto • Manually |
| Symbol (ks/s) | • Auto • Manually |
| Once you have made all the settings, press the button to start the search. | |
- While the search is running, the number of programs found is displayed.
• TV
• RADIO
- Data
EN
-
Once the search is complete, you have finished the initial installation.
-
TV playback starts with the first TV channel.
INPUT SOURCES
- Press the SOURCE button to display the signal sources.
- Use the ▲ ▼ buttons to select the various signal sources.
- Press the OK button to confirm the selection.
- The following connections are available:
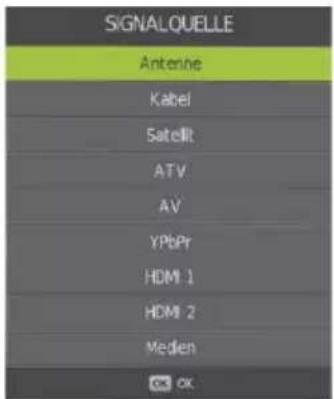
| DTV (T2HD) | Select this menu item if you have connected a digital DVB-T antenna tothe connection. |
| Cable (DVB-C) | Select this menu item if you have connected a digital DVB-C cable systemto the connection. |
| Satellite | Select this menu item if you have connected a digital DVB-S antenna tothe connection. |
| ATV | Select this menu item if you have connected an analog cable system orDVB-T antenna to the connection. |
| AV | Select this menu item if you have connected an external device (e.g.video recorder) to the connection. (Mini AV adapter notincluded). |
| YPbPr | Select this menu item if you have connected an external device (e.g. Blu-Ray player) to the connection. (YPbPr adapter not included). |
| HDMI 1 | Select this menu item if you have connected an external HDMI device(e.g. Blu Ray player, soundbar) to the connection. ARC capable |
| HDMI 2 | Select this menu item if you have connected an external HDMI device(e.g. Blu Ray player) to the port. |
| Media | Select this menu item if you have connected a USB mass storage device(USB stick / USB hard disk) to theUSB1USB2 connection. |
TV MENU
In the TV menu you can make various settings for picture / sound and program settings.
- Press the MENU button to open the TV menu.
- The following setting options are available in the TV menu.
Channel / Picture / Sound / Time / Option / Lock
CHANNE
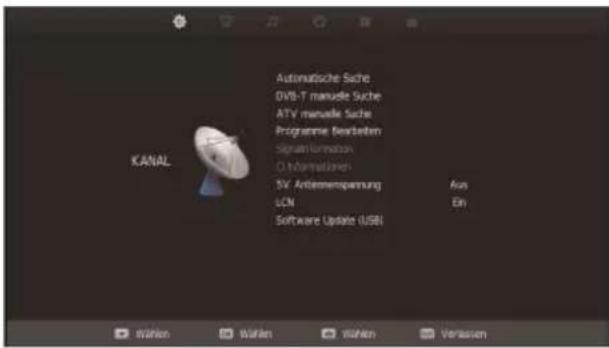
In the channel menu you can adapt the program settings to your needs and save them.
- Press the INPUT button and choose between:
• DVB-S
• DVB-C
• DVB-T
-
Press the button to open the TV menu.
-
Use the 🔊 buttons to select the Channel menu item.
- Press the ☑ button to enter the Channel menu.
- The following menu items are available in the channel menu:
| DVB-S | |
| Auto Tuning | The following options are available in the menu itemAutomatic station search.Scan Mode:Normal ScanFast ScanPress the button to confirm the selection and to move to the next menu item.Satellite:Select the satellite you want. Astra 19.2E is preset.Channel Type:AllFreeScrambleService-Type:AllTVRadioScan Mode:AutoPreset(recommended)Provider:Select the provider for the Fast Scan function. The menu item is only available for Fast Scan.Unicable:Unicable-Setting:Off / OnUserband / SRC Addr.:Select the user band that matches the multiswitch, LNB.Frequency:Enter the frequency suitable for the multiswitch, LNB.Position:A / BPress thebuttonwhen you have set all menu items.Search:Starts the channel search. |
| DVB-S Manual Tuning | The following options are available in the Manual station search menu item.Satellite:Select the satellite.Transponder:Select the transponder.Unicable:Unicable-Setting:Off / OnUserband / SRC Addr.:Select the user band that matches the multiswitch, LNB.Frequency:Enter the frequency suitable for the multiswitch, LNB.Position: A / BPress thebuttonwhen you have set all menu items.Network Scan:OnOffChannel Type:AllFreeScrambleService Type:AllTVRadioSearch:Start the search. The stations found are added to the station list.Quality:Indicates the signal quality.Strength:Indicates the signal strength. |
| ATV Manual Tuning | The following options are available in the menu item Analogue manual station search.Storage to:Select the program number on which the station should be saved.Sound System:BGIDKLColor System:AutoPALSECAMCurrent:Select the current station to be changed.Search:Press the or button to start the search.Fine-Tune:Press the or button to fine tune the frequency. |
| Programme Edit | Red button:Delete selected station.Yellow button:Move a selected channel to the desired position. LCN must be set to Off.Blue button:Lets you skip the marked station when switching through.FAV:Marks the selected station with a heart.Press the button when the menu is closed to open the favorites list.Button 0:Delete the complete channel list. |
| Satellite Edit | Satellite:Normally, no setting needs to be made in this menu.Adjusting the settings is only recommended for experienced users.Red button:Delete selected satellite.Yellow button:Add a satellite.OK button:Opens the settings of the selected satellite. The following settings can be viewed and edited in the menu.Satellite NameOrbit PositionLNB TypeDiSEqC1.0DiSEqC1.1Tone 22KHzTransponderUnicable settingsMotorBand |
| Signal Information | Shows reception information of the selected station. Only active if a station has been found. |
| CI Information | Displays information about the inserted CI module and the card. Only active when a CI module is inserted. The module and card are not included in the scope of delivery and must be purchased separately from the reception provider. |
| LCN | LCN:Set the LCN On or Off. If LCN is set to On, the yellow button is not displayed in the edit channel menu. |
| Software Update (USB) | Start the software update. |
| DVB-T | |
| Auto Tuning | Tune Type:DTV + ATV / TV / ATVSelect country:Select the country according to the installation site.Press the button to start the search. |
| DVB-T Manual Tuning | Channel:Select the channel. The frequency above the signal bar changes depending on the selection of the channel.Signal bar:Indicates the signal strength.Press the button to start the search. |
| ATV Manual Tuning | The following options are available in the menu item ATV Manual Tuning.Storage to:Select the program number on which the station should be saved.Sound system:BGIDKLColor system:AutomobilePALSECAMCurrent:Select the current station to be changed.Search:Press the or button to start the search.Fine tune:Press the or button to fine tune the frequency. |
| Programm Edit | Red button:Delete selected station.Yellow button:Move a selected channel to the desired position.Blue button:Lets you skip the marked station when switching through.FAV:Marks the selected station with a heart.Press the button when the menu is closed to open the favorites list.Button 0:Delete the complete channel list. |
| Signal Information | Shows reception information of the selected station. Only active if a station has been found. |
| CI-Information | Displays information about the inserted CI module and the card.Only active when a CI module is inserted. The module and cardare not included in the scope of delivery and must be purchased separately from the reception provider. |
| 5V antenna power | Set the 5V antenna power for external antennas at the connection "TV2 DVB-C / T2HD)" On or Off. |
| LCN | LCN: Set the LCN On or Off. If LCN is set to On, the yellow button is not displayed in the Program edit menu. |
| Software Update (USB) | Start the software update. |
| DVB-C | |
| Auto Tuning | Starts the automatic station search.Scan Mode:FullNetwork scanFrequency (KHz):Only available if the search mode is set to Network Scan.AutoManuallyNetwork ID:Only available if the search mode is set to network scan.AutoManuallySymbol (ks / s):AutoManuallyPress the button to start the search. |
| DVB-C Manual Tuning | Starts the manual station search. The stations are added to the station list.Frequency (KHz):Set the frequency.Symbol (ks / s):AutoManuallyQAM Type:AutoManuallySearch:Starts the station search.Signal bar:Indicates the signal strength. |
| ATV Manual Tuning | Starts a manual analog channel search. The following settings are available.Storage to:Select the program number on which the station should be saved.Sound System:BGILDKLColor System:AutomobilePALSECAMCurrent:Select the current station to be changed.Search:To start the search, select Search and press the or button.Fine Tune:Press the / buttons to fine tune the frequency. |
| Programm Edit | Red button:Delete selected station.Yellow button:Move a selected channel to the desired position. LCN must be set to Off.Blue button:Lets you skip the marked station when switching through.FAV:Marks the selected station with a heart.Press the button when the menu is closed to open the favorites list.Button 0:Delete the complete channel list. |
| Signal Information | Shows reception information of the selected station. Only active if a station has been found. |
| CI- Information | Displays information about the inserted CI module and the card. Only active when a CI module is inserted. The module and card are not included in the scope of delivery and must be purchased separately from the reception provider. |
| 5V antenna power | Set the 5V antenna power for external antennas at the connection "TV2 DVB-C / T2HD)" On or Off. |
| LCN | LCN:Set the LCN On or Off. If LCN is set to On, the yellow button is not displayed in the Programm edit menu. |
| Software Update (USB) | Start the software update. |
PICTURE
In the picture menu you can adjust and save the picture settings according to your needs.
- Press the MENU button to open the TV menu.
- Use the 🔊 buttons to select the Picture menu item.
- Press the OK button to enter the Picture menu.
- The following menu items are available in the Picture menu:
| Picture Mode | The following preset picture modes are available in Picture Mode.Standard (Fixed picture settings.)Dynamic (Fixed picture settings.)Mild (Fixed picture settings.)User (brightness and contrast can be adjusted). |
| Contrast | Set the contrast (only available in Picture mode: User). |
| Brightness | Set the brightness (only available in Picture mode: User). |
| Saturation | Adjust the color saturation. |
| Sharpness | Adjust the Sharpness. |
| Color Temperature | Set the color temperature.Cool: The picture is bluish.Normal: The picture is adjusted to neutral.Warm: The picture is set reddish. |
| Aspect Ratio | Set the aspect ratio based on the content of the picture.16: 9Zoom 1Zoom 2Auto4: 3 |
| Noise Reduction | Set the level of noise reduction.Off: Noise reduction is deactivated.Low: Smallest noise reduction setting.Middle: Medium noise reduction setting.High: Highest noise reduction setting. |
SOUND
In the Sound menu you can adjust and save the sound settings to suit your needs.
- Press the MENU button to open the TV menu.
- Use the △▽▽▽ buttons to select the Sound menu item.
- Press the OK button to enter the Sound menu.
- The following menu items are available in the Sound menu:
| Sound Mode | The following preset sound modes are available in Sound mode.Standard (fixed sound mode)Music (fixed sound mode)Movie (Fixed sound mode)Sports (fixed sound mode)User (equalizer can be adjusted manually). |
| Equalizer | Adjust the 5 band equalizer to your needs. The equalizer is only available in the Personal sound mode. |
| Balance | Changes the balance between the left / right speaker.Balancae 0:Neutral setting.Balance -1 to -50:Shifts the sound to the left loudspeaker until the right loudspeaker is completely deactivated at -50.Balance 1 to 50:Shifts the sound to the right loudspeaker until the left loudspeaker is completely deactivated at 50. |
| Auto Volume | If the setting is set to On, the TV set automatically regulates different volume outputs to the same level.OnOff |
| Surround Sound | If the setting is set to On, the device automatically emits virtual surround sound.Surround (On)Off |
| Bluetooth | Connect the device wirelessly to an external speaker. The following menu items are available. Only playback devices can be connected. Smartphones etc. cannot find the TV set as a playback device.Bluetooth:Turn Bluetooth setting on / off.Bluetooth Pair:Search for available Bluetooth devices and connect the devices.Disconnect:Disconnect the TV and the Bluetooth device.Bluetooth Reset:Resets the Bluetooth settings to the default values.Status:Displays the current Bluetooth status. |
| AD Switch | Activate the AD (audio description) function for people with a visual impairment to automatically select the audio description sound track if the broadcaster / broadcast is offered.On / Off |
| AD Volume | Adjust the AD (audio description) level. |
| Main Speaker | Switches the integrated loudspeaker on or off when the device is connected to a Bluetooth device. |
| SPDIF Mode | Set the output format for the digital audio output.AutoPCMOff |
TIME
In the time menu you can adjust and save time settings to suit your needs.
- Press the MENU button to open the TV menu.
- Use the △ ▼ ▶ buttons to select the Time menu item.
- Press the OK button to enter the Time menu.
- The following menu items are available in the Time menu:
| Clock | The date and time are set automatically by the reception information (DVB-S / C / T). |
| Off Time | In this menu you can set an automatic switch-off time. |
| On Time | In this menu you can set an automatic switch-on time and the following items.Start source / start program / start volume |
| Sleep-Timer | Set a time after which the device should automatically switch to standby mode. Can also be set using the button. |
| Auto Standby | Set the time after which the device automatically switches to standby mode if no operation takes place. |
| Time Zone | Set the time zone based on the installation location. |
| OSD Timer | Set the time after which the device menu is automatically closed. |
OPTION
In the Option menu you can adapt and save various general settings to suit your needs.
-
Press the button to open the TV menu.
-
Use the ▲ ▼ ▶ buttons to select the Option menu item.
-
Press the OK button to enter the Option menu.
- The following menu items are available in the Option menu:
| OSD Language | Set the menu language. |
| TT Language | Select the teletext language. |
| Audio Language | Set the Preferred Audio Language to be selected automatically. |
| Subtitle Language | Set the preferred subtitle language to be selected automatically. |
| Hearing Impaired | This option is for people with a hearing loss. The subtitle is activated automatically. |
| PVR File System | The following settings are available for PVR recording.Select Disk:Select the recording medium.Check PVR File System:Check whether the connected storage medium is suitable for the recording.Format:Prepare the USB storage medium for the recordings.Please note that all saved files will be deleted when formatting the USB storage medium.Time Shift Size:Set the maximum size of the timeshift file.Free Record Limit:Set the maximum time for a recording. |
| Reset | This menu item resets all the settings made (channel / picture / sound) to the delivery status. The device is then in the delivery state. |
| HDMI CEC | Set the HDMICEC settings. The option only applies to devices connected to the HDMI 1 and HDMI 2 ports.HDMI CEC:Activates the CEC setting.HDMI ARC:Transmits the audio signal via HDMI 1 to externally connected devices (e.g. soundbars).Auto Standby:Switches connected devices off when the TV set is switched off.Auto TV On:Switches connected devices on when the TV set is switched on.Device control:Control the externally connected device with the buttons on the TV remote control. Only if supported by the external device.Device list:Shows the devices connected to and   |
| First Time Installation | Starts the initial installation menu. |
| Home Mode | Set the site.HomeShop |
| Blue Screen | Set the background image for the signal sources when there is no signal.On: Blue screenOff: Black screen. |
LOCK
In the lock menu you can adapt and save various general settings to suit your needs.
-
Press the MENU button to open the TV menu.
-
Use the ▲ ▼ ▶ buttons to select the Lock menu item.
-
Press the OK button to enter the lock menu. The following menu items are available in the Lock menu:
| Lock System | Set the system lock to On to access the following menu items. A password query appears. Enter the default password 0000 or the customized password. |
| Set Passwort | Here you can set a new password. Please make a note of the new password. The standard password is: 0000 |
| Block Program | In this menu you can block individual TV channels. The transmitters are secured with a password entry. |
| Parental Guidance | Define a value for the protection of minors in order to protect TV content that is harmful to minors with a password. |
| Key Lock | Set the lock for the buttons on the device On or Off. The button always works. |
| Hotel Mode | Hotel Mode: Various standard settings can be made here.Hotel Mode:Set the hotel mode On or Off and get access to the following menu items.Source Lock:You can block the signal sources in this menu.Default Source:Select an input source with which the TV set should start.DTV Channel Type:Select the service type. Only active if ATV, DVB-T, DVB-C or DVB-S is selected as the standard source and there are stations in the station list.Default Prog:Select the station with which the device should start.Only active if ATV, DVB-T, DVB-C or DVB-S is selected as the standard source and stations are available in the station list.Max. Volume:Set the maximum volume level that the user can set.Default Volume:Set the volume at which the device should start.Copy Data To USB:Export the set hotel mode settings and the channel list.Copy Data From USB:Import the exported hotel mode settings and channel list.Menu lock:Set the menu lock On or Off. If the menu lock is activated, a password request appears when the button is pressed.Clear Lock:Resets the hotel mode to the default setting. |
EPG
- Press the EPG button to open or close the EPG menu.
- You can operate the EPG menu with the following buttons.
| EPG | Open / close EPG menu. |
 | Navigate in the menu. |
| Red button | Programming a USB recording. It is not possible to program several TV recordings that take place at the same time. |
| Green button | Shows a detailed description / program information of the selected TV program. |
| Yellow button | Shows the programmed recordings. |
| Blue button | Set up a reminder for a program. The TV set automatically changes the program when the TV broadcast starts. |
USB RECORDING
- Insert an empty USB stick or a hard drive into the USB port of the device.
- Press the MENU button and navigate to Options.
- Press the OK button and select the menu item PVR File System.
- Press the button to open the menu.
- Under Select Disk, select the USB storage device on which the recordings are to be saved.
- Then go to Format so that the USB storage device is brought into the correct format.
Note:
- Formatting erases all data from the USB memory.
- The USB storage device is now prepared for recording.
Instant recording
- Press the REC button on the remote control and the recording will start.
- Press the button ☐ to end the recording. A query appears.

• Yes: Press the √ button to stop recording.

EPG recording
- Press the EPG button to open the EPG menu.
- Use the ▲ ▼ ▽ buttons to navigate in the menu.
- Select the program you want to record and press the red button.
- Press the yellow button in the EPG menu to display the programmed recordings.
Note:
- Multiple TV programs cannot be programmed for recording that are broadcast at the same time or that overlap.
Playback recording
- Press the SOURCE button, navigate to Media and confirm with the OK button.
- Navigate to Movie and press the OK button.
- Select the storage medium and press the button.
C:

• D:
-
The recordings are saved in the MSTPVR folder.
-
Select the file you want to play.
- A preview playback starts on the right side.
- To view the playback in full screen, press the button.
MEDIA
To switch to media mode, proceed as follows:
- Press the Input button and select Media. Alternatively, you can also press the USB button on the remote control.
-
The device switches to media mode and displays the following information.
-
Photo
- Music
- Movie
- Text
EN
-
Insert a USB memory device into the USB socket or and select the appropriate function.
-
Use the following buttons to control USB playback:
 | Navigate in the USB media menu. |
 | Select / confirm menu item |
 | Rewind / Fast forward |
 | Previous chapter / Next chapter |
| [2KDC] | Play / pause |
 | Stop playback |
 | Switch to media mode. |
Note:
- To switch back to TV mode, press the SOURCE button and select DVB-T, DVB-C or DVB-S.
Start USB playback:
- Select a USB file that you want to play.
- A preview playback starts.
- To start full screen playback, press the button.
- When a USB playback has started, press the OK button to open the control bar.
| Control bar: MOVIE | |
 | Play / pause |
 | Rewind |
| [T03Y] | Fast forward |
| [0DY4] | Previous chapter |
 | Next chapter |
 | Stop playback. |
| Charset | Customize subtitle design. |
| [TC08] | Repeat allRepeat OneRepeat None |
 | Random On: Random playback (On) |
| Random Off: Random playback (Off) | |
| (HK3D) | Set a loop for A B playback.Set A: set the starting point.Set B: set the end point. |
| Playlist | Displays the playlist. |
| Info | Displays information about the playback file. |
| (KTWW) | Slow motion playback:SF2XSF4XSF8XSF16XNormal playback |
| Step Forward | Frame-by-frame playback. |
| Goto Time | Jump to a specific playback point. |
| Zoom IN | Zoom into the pictureZoom 1 (normal)Zoom 2Zoom 4Zoom 8 |
| Zoom OUT | Zoom out of the picture.Zoom 1/2Zoom 1/4 |
| Aspect Ratio | Set the picture format.Auto16: 94: 3 |
| Move View | When you have zoomed in on the image, press the [SA4A] tton to control the image section. tton to control the image section. |
| Control bar: MUSIC | |
| ▶II | • Play / pause |
| ◀◀ | • Rewind |
| ▶▶ | • Fast forward |
| ◀◀ | • Previous track |
| ▶▶ | • Next track |
| ■ | • Stop playback |
| [XXX7] | Repeat allRepeat OneRepeat None |
| [TH2X] | Set a loop for A B playback.Set A: set the starting point.Set B: set the end point. |
 | Random On: Random playback (On)Random Off: Random playback (Off) |
| Mute | Turn the sound on or off. |
| Playlist | Displays the playlist. |
| Info | Displays information about the playback file. |
| Goto Time | Jump to a specific playback point. |
| Control bar: PHOTO | |
| (ZZX) | Play / pause |
| (3ZX5) | Previous picture |
| (HT3Y) | Next picture |
| (ZD86) | Stop playback. |
| (G056) | Repeat AllRepeat OneRepeat None |
| (A42D) | Random On: Random playback (On)Random Off: Random playback (Off) |
| Music | Mark music files with the button to switch music on or off during picture playback. |
| Playlist | Displays the playlist. |
| Info | Displays information about the playback file. |
| Rotate 90° right | Rotates the image file by 90° to the right. |
| Rotate 90° left | Rotates the image file by 90° to the left. |
| Zoom IN | Zoom into the pictureZoom 1 (normal)Zoom 2Zoom 4Zoom 8 |
| Zoom OUT | Zoom out of the picture.Zoom 1/2• Zoom 1/4 |
| Slide Show | Set the image transition when changing images. |
| Move View | When you have zoomed in on the image, press thebutton to control the image section. |
TECHNICAL DATA USB CONNECTION
USB output voltage: 5V / 500mA (not suitable for charging external devices)
USB Stick size: Max. 1TB
USB Fhard drive: Max 1TB
Format: FAT / FAT32 and NTSF (NTSF not for USB record)
| Media | Format | Codec | Remark | |
| Video | Audio | |||
| Movie | .avi | MJPEG | MP3, , AAC, PCM | Max. Resolution: 1280x720Max. Frame rate: 60fpsMax. data rate: 20Mbps |
| Xvid, MPEG-4, H-265, WMV9/VC-1 | Max. Resolution:1920x1080Max. Frame rate: 60fpsMax. data rate: 150Mbps | |||
| .mp4MEPG | MPEG-2, MPEG-4, H265, Xvid, MJPEG | MP3, AAC, PCM | ||
| .ts.trp | MPEG-1, MPEG-2, H.265, VC-1 | MP1, MP2, MP3, AAC | ||
| .mpg.mpeg | MPEG-1, MPEG-2 | MP1, MP2, MP3, AAC, PCM | ||
| .mkv | MPEG-2/4, H.265, VC-1, Xvid, RV30, RV40 | MP3, AAC, PCM, COOK | ||
| .mov | MPEG-4, H.265, MJPEG | AAC, PCM | ||
| .dat | MPEG-1 | MP2, MPEG | ||
| .vob | MPEG-2 | MP1, MP2, MP3, PCM | ||
| .rm.rmvb | RV30, RV40 | AAC, COOK | Max. Resolution: 1920x1080 | |
| Photo | .jpg | Max. Resolution: 13986x4000 | ||
| .jpeg | ||||
| .bmp | Max. Resolution: 3648x2736Pixel depth: 8 / 24 / 32 Bit | |||
| .png | Max. Resolution: 3648x2736 | |||
| Music | MP3 | MP3 | ||
| AAC | MPEG2 AAC (LC)MPEG4 AAC LC | |||
| M4A | ||||
Errors and technical changes reserved.
EASY TROUBLESHOOTING
If the screen fails or the performance drops significantly, check the TV set using the following instructions: Also check connected devices to find the source of the problem. If the screen still does not work as expected, contact customer support.
No function
- Check whether the power supply unit or the car adapter is connected to the TV set.
- Check that the toggle switch is on.
No picture or no sound
- Check whether the power supply unit or the car adapter is connected to the TV set.
- Check the picture and sound settings.
- Check whether the antenna / cable system / satellite antenna is correctly connected.
- Switch to another program.
- Check that the connected devices (e.g. receiver) are correctly connected.
Bad picture quality
- Check that the antenna cable is properly connected.
- Check the manual TV tuning of the TV channel.
- Change the picture settings: brightness, color, sharpness, contrast and hue. Make sure the TV is not in the vicinity of other electrical appliances that may cause radio frequency interference.
No colour
- Adjust the color settings.
- Check that the selected program is broadcast in color.
- Make sure the channel is tuned properly.
The TV does not respond to the remote control
• Make sure there are no obstacles between the remote control and the TV.
• Make sure the remote control is within easy reach.
• Make sure the batteries in the remote control are not empty.
This television is intended for household use and is classified as harmless from the point of view of electromagnetic waves. Therefore, you can use the device anywhere, including residential areas.
| DATA SHEET LEDW190+ / LEDW240+ | |||
| Device type | LEDW190+ | LEDW240+ | |
| Manufacturer | Reflexion | ||
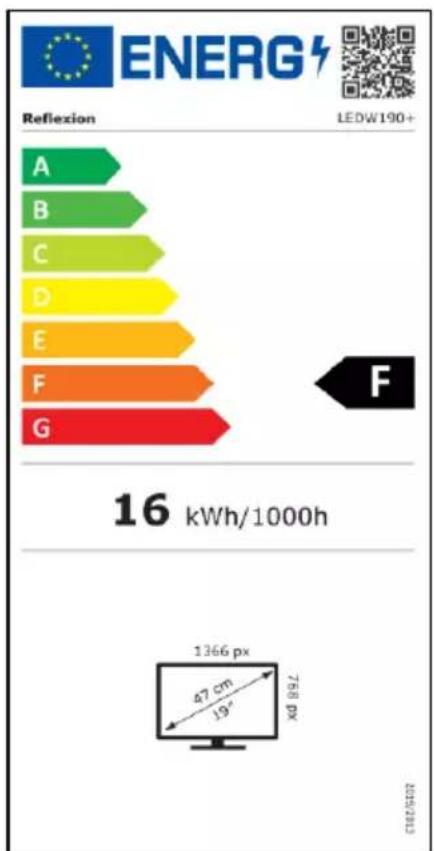
| Energy efficiency class (standard SD) | F | ||
| Power consumption "On" (standard SD) | 16W | 21W | |
| Power consumption "off" / standby | 0W / <0,5W | ||
| Type of electrical display | LCD /LED (Class1) | ||
| Aspect ratio | 16:9 | ||
| Screen resolution (Pixel) | 1366 x 768 | 1920 x 1080 | |
| Screen diagonal (cm / inch) | 47cm / 19 inch | 60cm / 24 inch | |
| Visible screen area | 9,4dm^2 | 15,3dm^2 | |
| Refresh rate / response time | 60Hz / 14ms | 60Hz / 8,5ms | |
| Power supply type | Input voltage | AC: 100-240V~50/60Hz | |
| Output voltage | DC: 12V 3A | ||
| Input voltage device | 12V 3A / 24V 1,5A | ||
| Average annual consumption (kWh / 1000h) | 16kWh/1000h | 21kWh/1000h | |
| Contrast | 3000:1 | 3000:1 | |
| Brightness (cd / m^2 ) | 200 cd/ m^2 | 220 cd/ m^2 | |
| Colours | 16,7M colours | ||
| Viewing angle | V: 178° / H: 178° | ||
| TV function | TV Standard | BG, DK, I, L | |
| Channels (ATV / DVB-T/C/S) | 100 / 1000 / 5000 | ||
| Teletext (ATV / DTV) | 1000 / 1000 | ||
| Connections | POWER INPUT (DC: 12V / 24V) | 1 | |
| COXIAL OUT (Cinch) | 1 | ||
| HDMI 1 (ARC) | 1 | ||
| HDMI 2 | 1 | ||
| CVBS OUT | 1 | ||
| L/R LINE OUT | 1 | ||
| TV 1 (DVB-S/S2) | 1 | ||
| TV 2 (DVB-C/T2) | 1 | ||
| Earphone (CJ5mm) | 1 | ||
| USB (5V / 500mA) | 2 | ||
| CI+ SLOT | 1 | ||
| MINI AV (IN) | 1 | ||
| MINI YPbPr (IN) | 1 | ||
| Bluetooth | V5.1 / 2,4GHz | ||
| OSD language | English / German / France etc.. | ||
| Audio output | 2x 3 Watt | ||
| Weight (only device) | 2,0 Kg | 2,9 Kg | |
| Weight complete | 3,2 Kg | 4,3 Kg | |
| MAXIMUM power consumption | 36W | ||
| Peak luminance ratio in% | 80% | ||
| Mercury content contained in mg / lead | 0,0mg / No | ||
| VESA | 100 x 100mm | ||
| Dimensions without TV stand: (W / D / H) mm | 436 x 45 x 258 | 551 x 45 x 326 | |
| Dimensions with TV stand (W/D/H) mm | 436 x 169 x 313 | 551 x 169 x 379 | |
Design and specifications are subject to change without notice
INFORMATION ON STORAGE AND OPERATION
| Humidity storage and operation | < 80% |
| Storage temperature | -10°C to +60°C |
| Usage temperature | 0°C to 40°C |
SIMPLIFIED EU DECLARATION OF CONFORMITY
Hereby, UltraMedia GmbH & Co. Handels KG declares that the radio equipment type LEDW190+ and LEDW240+ is in compliance with Directive 2014/53 / EU.
The full text of the EU Declaration of Conformity can be requested at the following email address.
We hope you enjoy using the device.
Your UltraMedia team

LEDW190+
LEDW240+
bar
| Level | Energy Consumption (kWh/1000h) | |---|---| | A | 47 cm | | B | 47 cm | | C | 47 cm | | D | 47 cm | | E | 47 cm | | F | 47 cm | | G | 47 cm |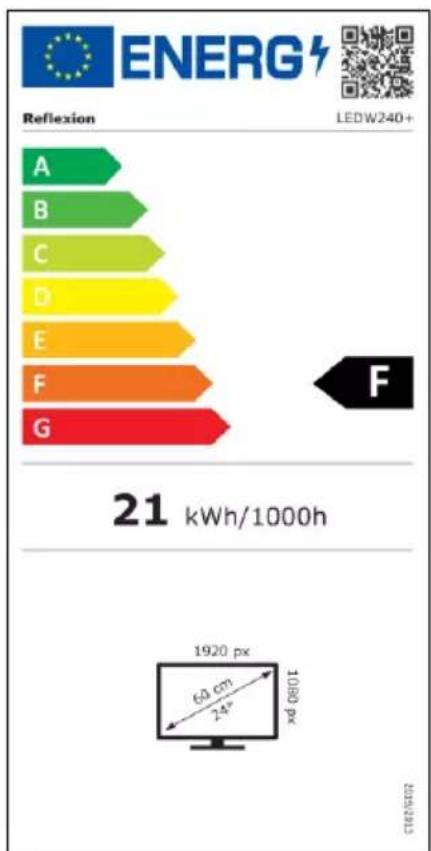
bar
| Category | Energy Consumption (kWh/1000h) | |---|---| | A | 60 | | B | 75 | | C | 90 | | D | 105 | | E | 120 | | F | 135 | | G | 150 | The chart includes a legend for 'Reflection' and a small diagram showing a monitor with dimensions: 1920 px, 60 cm, 24" width, and 1080 px diameter. The label '21 kWh/1000h' is displayed below the chart.WARRANTY
Dear Customer,
Thank you for choosing one of our products. Our products undergo precise quality control in the course of production. If one of our devices gives you cause for complaint, or you have questions about one of our devices, please call our customer support.
We give a 36 month warranty on TV and SAT devices, and a 24 month warranty on portable DVD and audio devices from the date of purchase. Outside of the warranty, we offer you a paid repair based on a cost estimate. Please contact our customer support before submitting.
The warranty relates to material and production defects. Your device will be repaired or replaced during the warranty period. Unfortunately, UltraMedia cannot reimburse the purchase price. Damage caused by improper use, the use of third-party accessories, falls, dust, water damage and signs of wear (e.g. scratches, optical wear and tear) caused by the customer or external influences are excluded from the guarantee.
In order to assert the warranty claims, send the device with all accessories, a copy of the invoice and the description of the fault to the address given below. Devices that do not have a proof of purchase cannot be guaranteed. Please do not forget to include your full address and a telephone number / email address for any queries.
Shipping to us takes place at your own expense. Unpaid parcels cannot be accepted and are returned to the sender.
Please pack the device securely for transport. UltraMedia assumes no liability for damage in transit that occurs on the way to us. After receiving your submission, we will process your device as soon as possible and send it back to you.
Before sending your device in, please contact our customer support or your specialist dealer, as many problems can also be solved over the phone.
- GERÄT VORBEREITEN
- SAFETY INFORMATION
- Note:
- IMPORTANT SAFETY INSTRUCTIONS
- EN
- Headphone warning notice:
- Installation site:
- DISPOSAL INSTRUCTIONS
- SCOPE OF DELIVERY
- MOUNTING WALL BRACKET & STAND
- Wall bracket:
- CONTROL BUTTONS ON THE DEVICE
- ANSCHLÜSSE AM GERÄT
- REMOTE CONTROL
- COMMON INTERFACE / CI - SLOT
- Common interface / slot
- PREPARE THE DEVICE
- FIRST INSTALLATION
- INPUT SOURCES
- TV MENU
- CHANNE
- PICTURE
- SOUND
- TIME
- OPTION
- LOCK
- EPG
- USB RECORDING
- Instant recording
- EPG recording
- Playback recording
- MEDIA
- Start USB playback:
- TECHNICAL DATA USB CONNECTION
- EASY TROUBLESHOOTING
- No function
- No picture or no sound
- Bad picture quality
- No colour
- The TV does not respond to the remote control
- INFORMATION ON STORAGE AND OPERATION
- SIMPLIFIED EU DECLARATION OF CONFORMITY
- WARRANTY
Brand : Reflexion
Model : LEDW240+
Category : TV