MKO 41/12 MS BK - Oven Master Kitchen - Free user manual and instructions
Find the device manual for free MKO 41/12 MS BK Master Kitchen in PDF.


| Product Type | Built-in Electric Oven |
| Brand | Master Kitchen |
| Model | MKO 41/12 MS BK |
| Dimensions (W x H x D) | 595 x 595 x 550 mm |
| Weight | 30 kg |
| Power Supply | 220-240 V, 50/60 Hz, 16 A |
| Energy Class | A |
| Oven Capacity | 70 liters |
| Number of Cooking Functions | 8 |
| Functions | Conventional, Fan Assisted, Grill, Fan Grill, Defrost, Pizza, Bottom Heat, Slow Cook |
| Maximum Temperature | 250 °C |
| Control Type | Touch + Knob |
| Display | Digital LCD |
| Interior Material | Enamel |
| Cleaning | Catalytic (rear wall) |
| Safety Features | Child Lock, Cool Door, Auto Shut-off |
| Door Type | Cool Touch, Double Glazed |
| Timer | Yes, with End Cooking |
| Spare Parts Available | Heating elements, thermostat, door seal, glass, knobs |
| Repairability Index | 7.5 / 10 |
| Accessories Included | 1 baking tray, 1 wire rack, 1 dripping pan |
| Installation | Built-in, requires proper ventilation |
Frequently Asked Questions - MKO 41/12 MS BK Master Kitchen
User questions about MKO 41/12 MS BK Master Kitchen
0 question about this device. Answer the ones you know or ask your own.
Ask a new question about this device
Download the instructions for your Oven in PDF format for free! Find your manual MKO 41/12 MS BK - Master Kitchen and take your electronic device back in hand. On this page are published all the documents necessary for the use of your device. MKO 41/12 MS BK by Master Kitchen.
USER MANUAL MKO 41/12 MS BK Master Kitchen
natural_image
Exterior view of a modern kitchen oven with dual control gauges (no visible text or symbols)natural_image
Technical line drawing of a laboratory apparatus with an inset showing a magnified view of a component (no text or symbols present)flowchart
graph TD
    A[" "] --> B[" "]
    C[" "] --> B
    D[" "] --> B
    E[" "] --> B
    F[" "] --> B
    G[" "] --> B
    H[" "] --> B
    I[" "] --> B
    J["ECO"] --> K[" "]
    style A fill:#fff,stroke:#000
    style C fill:#fff,stroke:#000
    style D fill:#fff,stroke:#000
    style E fill:#fff,stroke:#000
    style F fill:#fff,stroke:#000
    style G fill:#fff,stroke:#000
    style H fill:#fff,stroke:#000
    style I fill:#fff,stroke:#000
    style J fill:#fff,stroke:#000
Impostare la temperatura
natural_image
Simple line drawing of a mechanical or electrical component with three black arrows indicating direction (no text or symbols)ACCESSORI
natural_image
Pure geometric diagram of a rectangular grid with diagonal lines, no text or symbols presentGriglia in filo
natural_image
Technical line drawing of a rectangular frame with internal grid pattern (no text or symbols)Leccarda
natural_image
Technical line drawing of a mechanical component with curved internal structure (no text or symbols)natural_image
Technical diagram showing a mechanical assembly with an inset view of a component (no text or symbols present)Fig.1
natural_image
Diagram of a door frame with a 30-degree angle indicator and directional arrows (no text or symbols)Fig.2
natural_image
Diagram of a mechanical component with an arrow indicating direction, no visible text or symbolsFig.3
natural_image
Technical line drawing of a refrigerator interior with ventilation grilles and a close-up inset showing a component (no text or symbols)Copertura in vetro
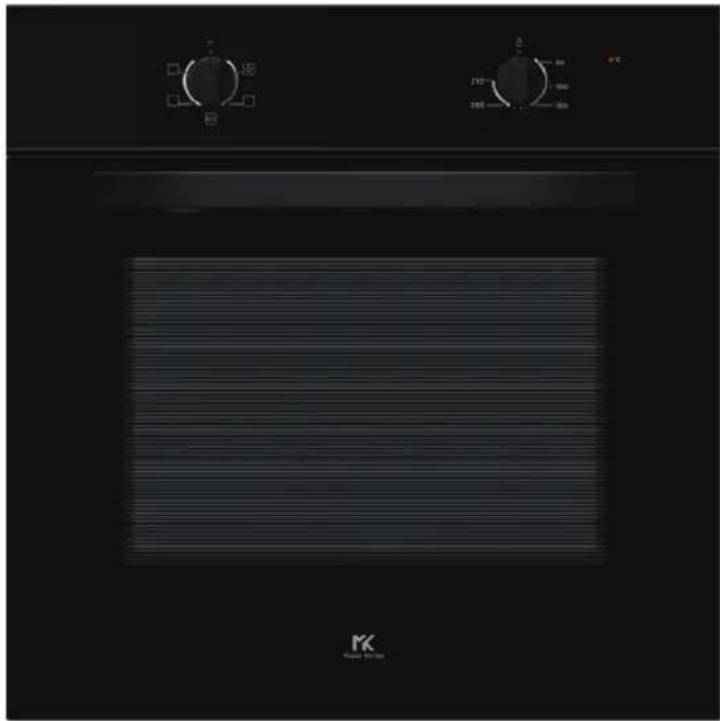
Built-in oven MKO 41/12 MS BK
User manual
natural_image
Exterior view of a modern kitchen oven with dual control knobs and a horizontal panel (no visible text or symbols)Read this manual carefully before using your built-in oven. The manual contains suggestions and information for maintaining the aesthetic and functional qualities of this appliance.
Thank you for choosing Master Kitchen oven.
To use this product correctly and prevent any potential danger, please read these instructions carefully before using the appliance.
Keep these instructions in a place where can be easily found.
If you are uncertain about the information contained in these instructions, please contact the Customer Support Center.
The manufacturer is not responsible for any damage to persons or property resulting from incorrect installation or improper use of the appliance.
The manufacturer also reserves the right to apply changes to the products, in the event that they are considered necessary or useful, even in the interest of the consumer, without compromising the main functioning and safety features of the products.
CONTENT
4 SAFETY INFORMATION
4 General information
5 Warning
7 Causes of damage
8 GENERAL INSTALLATION AND DIMENSIONS
10 COOKING FUNCTIONS
11 FIRST USE
12 GETTING TO KNOW YOUR APPLIANCE
12 Control panel
13 Cooling fan
14 Accessories
15 Disassemble the oven door
16 Replacing the lamp
17 Replacing the power cord
18 ENERGY SAVING GENERAL SUGGESTIONS
19 CLEANING AND MAINTENANCE
21 TROUBLESHOOTING
22 CUSTOMER CARE
22 Maintenance card
23 GENERAL INFORMATION
24 FOOD TEST IN ACCORDANCE WITH EN 60350-1
24 SUGGESTED COOKING IN ECO MODE
24 ADDITIONAL TYPICAL RECIPES
25 ENERGY SAVING ACCORDING TO EN 60350-1
25 DATA SHEET (EU 65/2014 & EU 66/2014)
GENERAL INFORMATION
This appliance is intended for household use only, not for outdoor use. For safety reasons, the appliance must be used as built-in. DO NOT use this appliance in non-stationary places such as ships and caravans.
Check if the appliance is damaged after unpacking and do not connect it if it has been damaged. Connect the appliance to power socket by professionals if it is not equipped with a plug. Damage caused by improper connection is not covered by the warranty. The oven must always be used within the scope of normal domestic use, not for professional use. It is only for the preparation of food, any other use is not allowed. The appliance must be supervised during operation.
This appliance can be used by children aged from 8 years and above and persons with reduced physical, sensory or mental capabilities or lack of experience and knowledge if they have been given supervision or instruction concerning use of the appliance in a safe way and understand the hazards involved. Children shall not play with the appliance. Children must not clean the appliance or carry out general maintenance unless they are at least 8 years old and are not constantly supervised. Keep package materials out of the reach of children.
Keep children and pets away from the appliance during operation or cooling as the accessible parts may be incandescent.
WARNING
Risk of electric shock!
- Improper repairs are dangerous. If the power cable is damaged, it must be replaced by experienced service technicians. If the equipment is faulty, disconnect it from the mains power or disconnect the circuit breaker in the meter. Contact the after-sales service.
- The cable can melt if it comes into contact with hot parts of the oven. Never place the cable in contact with the hot parts of the appliance.
- Do not use high pressure cleaners or steam cleaners, as they can cause an electric shock.
- A defective appliance can cause electric shock. Never switch on a defective appliance. Disconnect the appliance from the mains or disconnect the circuit breaker in the meter. Contact the Service Center.
Risk of burns / scalding!
- The appliance becomes hot during use. Never touch the internal surfaces of the appliance, accessories and heating elements.
- Keep children at a safe distance while the appliance is in operation and before cooling down after use.
- The accessories and the ovenproof dishes become hot. Always use oven gloves to remove accessories or dishes from the oven.
- Alcoholic vapors can ignite in the hot cooking compartment. Never prepare food where large doses of alcoholic liquids are used.
- Be careful when opening the oven door as hot steam can escape, sometimes the hot steam not visible. When opening the oven door, do not stay too close to the oven.
Risk of injury!
- Scratched glass on the oven door can cause breakage. Do not use glass scrapers or abrasive cleaners.
- The hinges of the oven door move accordingly when you open and close the oven door. Keep your hands away from the hinges, or you may get caught.
Risk of fire!
- Combustible objects in the oven compartment can cause fire. Never store combustible objects in the oven. Never open the oven door if there is smoke inside. Turn off the appliance and disconnect it from the mains power or disconnect the circuit breaker in the meter.
- Air flow occurs when the oven door is open. Greaseproof paper can come into contact with the heating element and catch fire. Do not put wax paper simply resting on the accessories during preheat. Always keep greaseproof paper stuck with a plate or cake pan. Cover only the necessary surface with greaseproof paper. The greaseproof paper must not protrude too much from the trays.
Magnetic danger!
Permanent magnets are used for control panel or control elements. They can affect electronic implants, for example, pacemakers or insulin pumps. Anyone who wears electronic devices must be at least 10 cm away from the control panel.
CAUSES OF DAMAGE
Attention!
There is a risk of damage to the appliance!
- To avoid damage to the enamel:
- Do not place heat resistant pans or other objects directly on the bottom surface of the appliance during cook (it is only allowed for defrosting).
- Do not lay the aluminum foil directly on the bottom surface of the equipment.
- Do not put water directly into the hot appliance.
- Do not keep moist dishes and food inside the appliance after completing the cooking phase.
- Be careful when removing or inserting accessories.
The discoloration of the enamel does not affect the performance of the equipment. This is not an anomaly under the law.
- Aluminum sheets: the aluminum sheets in the oven compartment must not come into contact with the internal glass of the oven door. This could cause permanent discoloration of the glass.
- Silicone trays: Do not use silicone trays or mats, lids or accessories that contain silicone if they are not suitable for baking. The oven sensor (if present) could be damaged.
- Humidity in the oven compartment: after a prolonged period of time, the humidity in the oven compartment could cause corrosion. Let the appliance dry after use.
- Cooling with the oven door open: after operating at high temperature, wait for the oven to cool down with the door closed. Do not jam anything in the oven door as even if there is a small crack, the upper part of the oven (control panel) could be damaged over time.
- Fruit juices: when baking cakes with particularly juicy fruit, do not overfill the pan. Fruit juice leaking out of the pan may leave stains that cannot be removed. If available, use the deeper universal tray.
- Heavy dirty gaskets: if the gasket placed between the appliance and the oven door is dirty, the latter may not close properly during operation and damage the front of the oven (control panel). For this reason, we recommend to keep the gasket clean.
- Oven door as a seat, shelf or worktop: do not sit on the open oven door or place or hang anything on it. Do not place pans or accessories on the oven door.
- Food residues: food or fat residues inside the oven cavity can cause fire, we recommend to clean after each cooking.
- Move the oven during installation: do not grab or lift the appliance by the oven door handle. The handle was not designed to support the weight of the appliance and could break.
- If you use residual heat: remove food from the oven, or high moisture content can develop inside the compartment. This can lead to condensation and cause corrosion damage to your high quality appliance as well as damage your kitchen. Avoid condensation by opening the door or using the "Defrost" mode.
GENERAL INSTALLATION AND DIMENSIONS
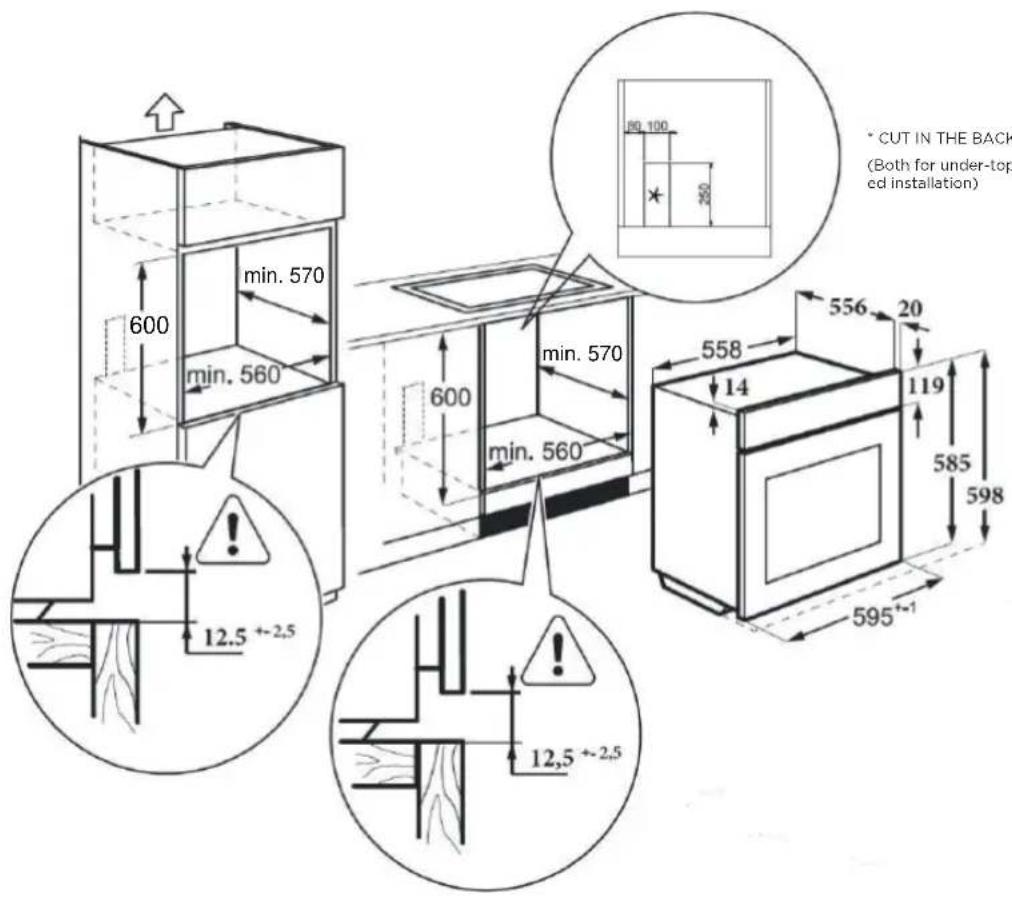
* CUT IN THE BACK OF THE FURNITURE (Both for under-top installation and for column-mounted installation)
To use this appliance safely, please ensure that it has been installed in accordance with the installation instructions. Damage that occurs due to incorrect installation is not covered by the warranty.
During installation, wear protective gloves to avoid cutting yourself with any sharp edges.
ATTENTION: the oven must not be installed behind a decorative panel to prevent the appliance from overheating.
Do not install or use the appliance if it is damaged.
Before turning on the appliance, please remove all packaging materials and protective adhesive films.
The dimensions shown in above are in mm.
FURNITURE CHARACTERISTICS NOTES: In built-in furniture the components (plastic materials or veneered wood) must be held together by heat-resistant adhesives (at least 100 °C); unsuitable materials and adhesives can cause deformations and necklines.
The cabinet must allow free passage of electrical connections and must be strong enough to support the weight of the equipment.
The oven must be securely mounted in the niche provided, it can be installed inside a column cabinet or under the top of a modular piece of furniture, and ensuring sufficient ventilation.
Assembly instructions:
- Please make cabinets based on the data of "Cabinet diagram".
- Before installation, please check whether the power socket is grounded and the cabinet size meets the installation requirements.
- Install the machine at the designated location in the kitchen and install it in an upright cabinet.
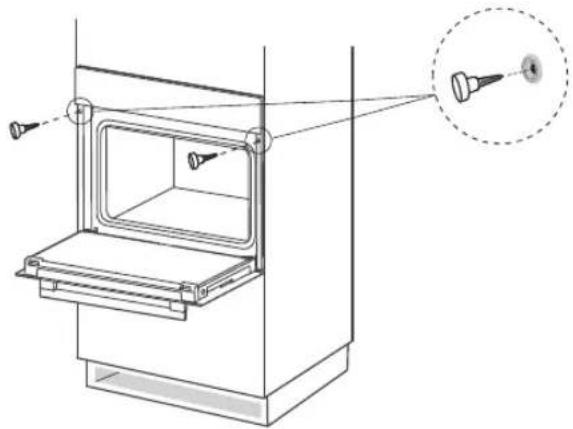
- Open the furnace door, determine the two installation holes on the frame, and fix the machine at the installation position with the screws provided with the product.
natural_image
Technical line drawing of a mechanical device with an inset showing a pin and magnified detail (no text or symbols)Connection to the mains:
- The oven is equipped with a three-pole power cable with free terminals.
- If the oven is permanently connected to the power supply, prepare a device that ensures disconnection from the network, with a contact opening distance (at least 3 mm) that allows complete disconnection in the conditions of overvoltage category III.
Make sure that:
- The plug and socket are suitable for a current of 10 Amps.
- Both are easily accessible and no live parts can be accessed during the insertion or removal of the plug itself.
- The plug can be inserted without difficulty.
- Once the plug has been inserted, the oven does not rest on it when it is installed in the cabinet.
- The terminals of two devices are not connected to the same plug.
- Replace the power cord with the type of H05VV-F or H05RR-F in specification of 3x1.5 mm2.
- Pay attention to the connection polarity of the free terminals (Brown = Phase; Blue = Neutral; Yellow-Green = Earth)
MESSA A TERRA
Note: make sure that the characteristics of your domestic power cable (voltage, maximum power and current) are compatible with your new oven.
COOKING FUNCTIONS
Your appliance has various operating modes that make it easy to use; in the table below, you can find an explanation of the different cooking functions present in the oven you have purchased. The symbols will help you to identify the most suitable cooking function for your dishes.
Type of function Temperature For what?
 | Electricity | / | To illuminate the oven compartment without turning on any heating element. |
 | Superior static cooking | 50°C~250°C | This function takes advantage of the heat generated by the grill and the superior resistance. This type of cooking is suitable for cakes with a glossy surface and food that you want to brown on top. |
 | Eco | 50°C~250°C | It is suitable for gentle cooking with low energy consumption. |
 | Traditional cooking | 50°C~250°C | Traditional cooking takes advantage of the combined action of the lower and upper heating elements. Heat spreads into the cavity by natural convection. It is ideal for cooking medium or small plates and dishes always on a single shelf. |
 | Lower static cooking | 50°C~250°C | This cooking function only activates the lower resistance, creating a strong heat concentration in the lower surface of the cavity. It is ideal for finishing cooking and making the bottom of cakes, pizzas or tarts crisper. |
Oven lamp
When you turn on the appliance in any mode, the lamp inside the cooking cavity will always be on until the operation is end (with the exception of the ECO function).
Before using the appliance for the first time, it is necessary to clean the oven compartment and its accessories carefully.
- Remove all stickers, protective films and packaging components.
- Remove all internal accessories from the oven cavity.
- Thoroughly clean the accessories using soapy water and a sponge or soft brush.
- Make sure that the oven compartment does not contain packaging residues, such as polystyrene granules or splinters of wood that can cause a fire risk.
- Clean the smooth surfaces of the oven compartment and oven door with a soft, damp cloth.
- To remove the smell of new appliance, heat the appliance when it is empty and the oven door is closed.
- Keep the kitchen well ventilated while the appliance heats up for the first time.
Keep children and pets out of the kitchen during this process.
Close the doors to adjacent rooms. - When switching on for the first time, adjust the oven as indicated below:
Settings
| Heating mode |  |
| Temperature | 250°C |
| Time | 1h |
After the appliance has cooled down:
- Clean the surfaces of the cavity and the oven door with soapy water and sponge.
- Dry all surfaces.
- Insert the accessories.
GETTING TO KNOW YOUR APPLIANCE
IDENTIFY THE APPLIANCE
In this chapter, it introduces the control panel and accessories. At the same time, you will find information on the various functions of your appliance.
Note: Depending on the model, the individual details and colors may differ.
CONTROL PANEL
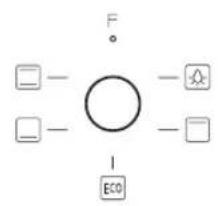
Functions knob Temperature knob Warning light
flowchart
graph TD
    A[" "] --> B[" "]
    C[" "] --> D[" "]
    E[" "] --> F[" "]
    G[" "] --> H[" "]
    I[" "] --> J[" "]
    K["F"] --> L[" "]
    M["ECO"] --> N[" "]
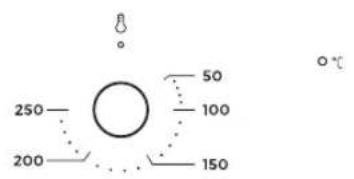
Attention: the illustration is for reference, the graphics may not correspond exactly to the model you purchased.
Knobs
By turning the knobs, the operating mode of the oven is set. Each knob is positioned exactly in the center of the screen printed icons on the control panel glass, so you can easily adjust your appliance (easily and directly). There are no restrictions on operating modes, giving you complete freedom in using the appliance.
Light Indicator
The indicator light is a kind of light that warns you whether the heating elements inside the appliance are working or not. When the appliance is switched on, the indicator light will turn on and off intermittently, it will be on when at least one of the heating elements is in operation while it will be off when no heating element is in operation.
Selecting the cooking function
In position "o" the cooking function is not set. To select a cooking function, you must use the knob on the left of the control panel. There is a pointer on the knob, turn it until the pointer indicates the cooking function you wish to use.
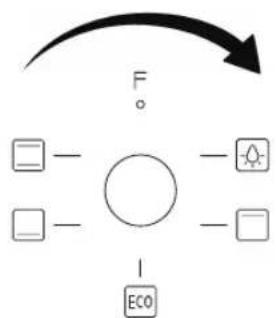
flowchart
graph TD
    A[" "] --> B[" "]
    C[" "] --> B
    D[" "] --> B
    E[" "] --> B
    F[" "] --> B
    G[" "] --> B
    H[" "] --> B
    I[" "] --> B
    J["ECO"] --> K[" "]
    style A fill:#fff,stroke:#000
    style C fill:#fff,stroke:#000
    style D fill:#fff,stroke:#000
    style E fill:#fff,stroke:#000
    style F fill:#fff,stroke:#000
    style G fill:#fff,stroke:#000
    style H fill:#fff,stroke:#000
    style I fill:#fff,stroke:#000
    style J fill:#fff,stroke:#000
Set the temperature
To select the desired cooking temperature, it is same as selecting the cooking function. You can do this by using the temperature control knob located on the right of the control panel. There is a pointer on the knob, turn it until the pointer indicates the desired temperature. Then the oven starts working.
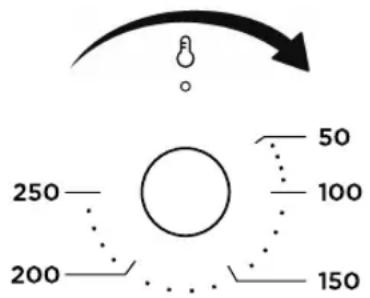
Warning light
When the oven becomes operational, the light located on the right of the control panel turns on and during the cooking period it turns on and off intermittently in relation to the operation of the heating elements.
Changes
While the oven is in operation, the knobs on the control panel can be turned by you to change the cooking settings (function and temperature).
If you change the function while the oven is in use, it means changing the cooking mode of the food (if the knob is set to LIGHT, the heating elements will be off while if it is returned to the "o" position, the whole appliance will be off, including oven light and indicator light).
Turning the temperature control knob while the oven is in operation means changing the cooking temperature of the food. If during cooking, the knob is returned to the "o" position, the heating elements switch off while the light inside the cavity will still be on.
Attention!
After use, even if switched off, the oven will be hot inside. Never touch the internal surfaces or internal elements of the oven. Use oven gloves to remove the accessories or pans from the oven, and let the appliance cool down. To avoid injury or burns, keep children at a safe distance.
Note
Changing the cooking functions and temperature can have a negative influence on the cooking result, we recommend not to change it unless you are very experienced in cooking.
Attention!
If you open the oven door while operation is in progress, the oven will not be interrupted. Please pay attention to the risk of burns.
COOLING FAN
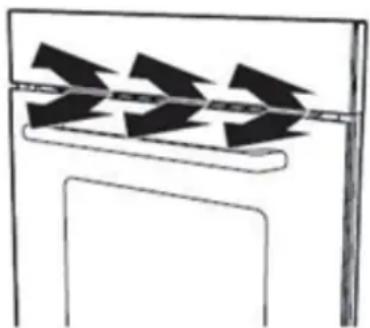
The cooling fan turns on and off when needed. The hot air comes out through special slots positioned between the oven door and the control panel. To cool down the oven more quickly, after its operation, the cooling fan may continue to run for some time after which it will automatically turn off.
ATTENTION: do not cover the ventilation slots positioned between the oven door and the control panel as the appliance could overheat.
natural_image
Simple line drawing of a mechanical component with three black arrows indicating motion or force direction (no text or symbols)ACCESSORIES
Your appliance is equipped with a range of accessories. In this chapter, you can find introduction of the included accessories and information on how to use them correctly.
Accessories included
Your appliance is equipped with the following accessories:
natural_image
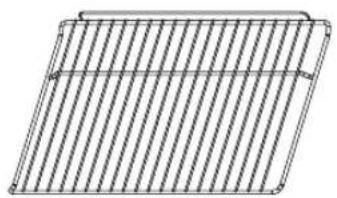
Pure geometric diagram of a rectangular grid with diagonal lines, no text or symbols presentWire grille
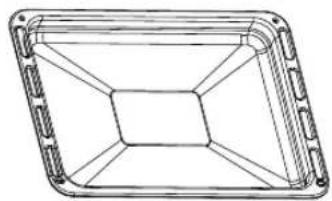
natural_image
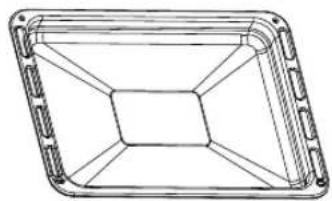
Technical line drawing of a rectangular frame with internal grid pattern (no text or symbols)Drip pan
Attention: the image is indicative, the graphics may not correspond exactly to the model you purchased.
WIRE GRILLE: it is used as a support for your baking trays, pastry moulds, and all containers other than the drip pan supplied or for cooking mainly in the Grill and Ventilated Grill functions (meat and fish to be grilled, toast etc.).
DRIP PAN: it is normally used to collect grilled sauces or to cook food directly; if not used, during cooking, the drip pan must be removed from the oven.
Oven accessories that may come into contact with foodstuffs are made of materials that comply with the requirements of current legislation. Only use the original accessories. They are specifically designed for your appliance; you can purchase accessories from the authorised Service Centre.
Note
Accessories can deform when they become hot. This does not compromise their function; once cooled, they return to their original shape.
Insert accessories
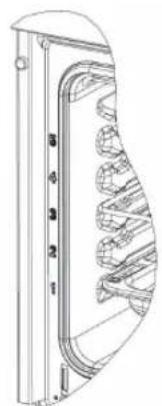
The oven compartment has five positions. The positions are numbered from bottom to top.
WARNING: do not cook in any function by placing the food (with or without container) on the bottom of the oven but always use the positions numbered
- Always be sure to insert the accessories into the oven compartment in the right way.
- Always insert the accessories completely into the oven compartment, so that they do not touch the internal glass of the oven door.
In the image on the side, the COOKING LEVELS numbered on the front of the oven.
In the cooking tables you will find an indication of the ideal position for each use of the oven.
natural_image
Technical line drawing of a mechanical component with curved internal structure (no text or symbols)DISASSEMBLE THE OVEN DOOR
Attention!
Risk of breakage and injury!!
The oven door is equipped with glass panels that can break if operate improperly. Shards of glass are sharp and can cause injury.
■ Do not drop the oven door or the individual glass panels.
■ If a glass is damaged, stop using the oven, contact the Service Center.
■ If a glass panel breaks, keep children away and carefully collect all pieces of glass.
■ Attention: the oven door may close again if you try to remove the internal glass panels before removing it from the appliance.
■ Do not use the appliance that without internal glasses.
DISASSEMBLY AND ASSEMBLY OF THE OVEN DOOR FROM THE APPLIANCE
The oven door must be removed from the structure to allow easy and safe cleaning:
- Open the oven door completely.
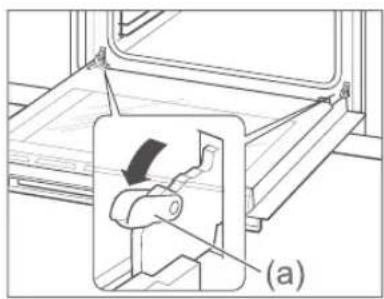
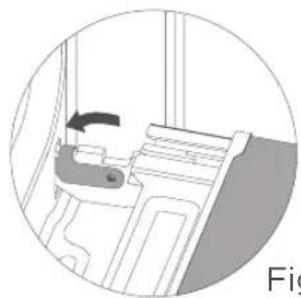
- Open the two locking levers on the left and on the right outwards (a) as shown alongside (Fig.1).
- Slowly close the oven door until it stops.
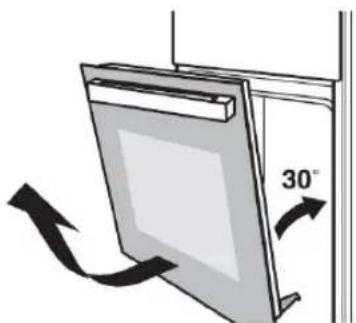
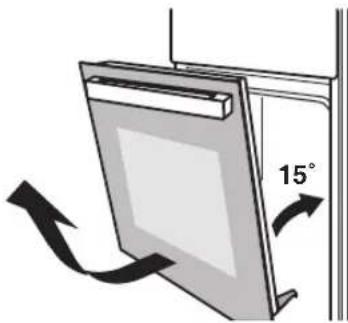
- Grasp the door on the sides with your hands, lift it slightly upwards and remove it (Fig.2).
- Clean the oven door
- After cleaning has been carried out, refit the oven door on the appliance by performing the reverse procedure, make sure that the hinges are inserted in the right position on the right and left. You must be able to insert them easily and without resistance.
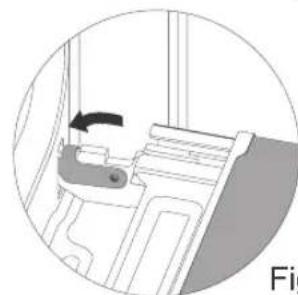
If you feel any resistance, check that the hinges are correctly inserted in their respective seats. - After closing the locking levers on the right and left by pushing them inwards as shown in Fig.3, if the oven door is mounted correctly you can close it without any problem; in addition to closing correctly, if the oven door is mounted correctly, it must leave the ventilation slots between the glass door and the control panel free.
natural_image
Technical diagram of a mechanical assembly with a highlighted component (a), showing no text or symbols.Fig.1
natural_image
Diagram of a door frame with an 15-degree angle indicator and directional arrows (no text or symbols)Fig.2
natural_image
Diagram of a mechanical component with an arrow indicating rotation, no visible text or symbolsFig.3
REPLACING THE LAMP
If the lamp on the rear wall of the oven goes out, it must be replaced. Heat resistant halogen lamps are available from the Service Center or specialized dealers (230 V \~, 25 W, G9, T 300 °C).
When handling the halogen lamp, use a dry cloth. It will increase the life cycle of the lamp.
ATTENTION
Risk of electric shock!
When replacing the lamp, the connector contacts are alive. Before replacing the lamp, unplug the appliance or disconnect the circuit breaker in the counter.
Risk of burns!
The appliance becomes very hot during operation. Never touch the internal surfaces of the appliance or the heating elements when it is still hot. Always let the appliance cool down. Keep children at a safe distance.
- Place a cool cloth on the bottom of the oven, to prevent damage.
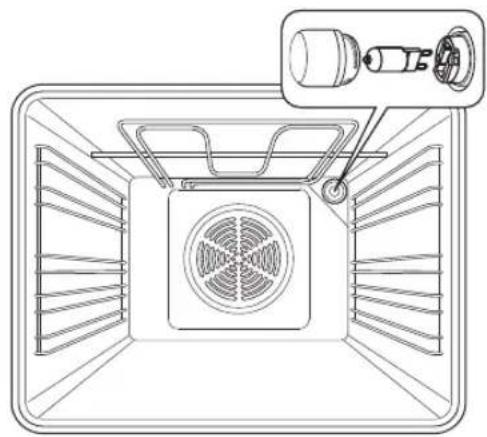
- Rotate the glass cover counter-clockwise to remove it.
- Pull out the lamp. ATTENTION: pull the lamp, DO NOT rotate it.
- Insert the new lamp, making sure the clips are in the correct position.
- Refit the glass cover.
- Remove the cloth from the bottom of the cavity, reconnect the power supply and select the LIGHT function to see if the lamp turns on.
natural_image
Technical line drawing of a ventilation system with fan and vent, showing internal structure and component details (no text or symbols)Glass cover
If the glass cover of the halogen lamp is damaged, it must be replaced.
You can find the glass cover at the after-sales service. Please specify the model and serial number of your appliance.
REPLACING THE POWER CORD
Instructions for replacing power cord:
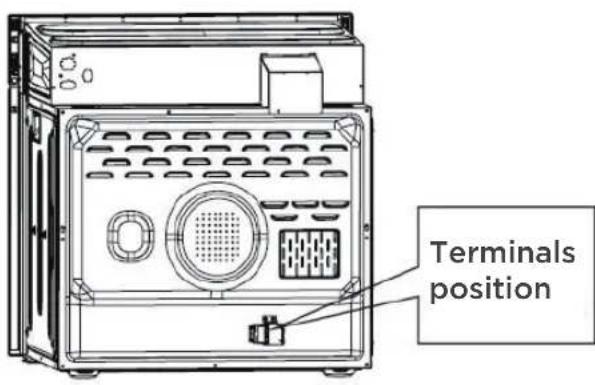
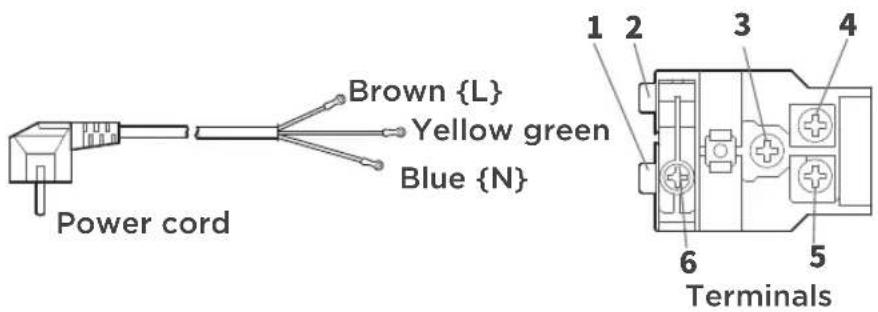
a) After removing the plug from the socket, use a small flat screwdriver to open the terminals at points 1 and 2.
b) Use the Phillips screwdriver to remove screws 3, 4, 5 and 6.
c) Change the power cord to the new one and fix the yellow / green wire in step 3, the brown wire in step 4 and the blue wire in step 5.
d) To complete the operation, tighten the screw of point 6 and close the terminal block.
Warning - Risk of electric shock!
Wrong repairs are dangerous. Repairs can be made and cables damaged replaced only by specialized service technicians. If the appliance is faulty, remove the cable from the power socket or disconnect the circuit breaker in the counter. Contact the after-sales service.
Attention!
The oven could be supplied with a cable without a plug (for the characteristics of the plug and the electrical connection, see the specific chapter).
ENERGY SAVING GENERAL SUGGESTIONS
- Remove all unnecessary accessories during the cooking and baking process
- Do not open the oven door during cooking and baking
- If you open the oven door during cooking and baking, turn on the "Light" mode (without changing the temperature setting)
- Reduce the temperature in unventilated mode to 50^ C from 5 to 10min before the end of cooking and baking time. This way, you can use the heat of the oven compartment to complete the process
- Use the residual heat inside the oven after a cooking is completed to heat other foods.
- Do not preheat the empty oven, if not necessary. If preheating is necessary, put the food in the oven immediately after it has reached the temperature indicated by the light switch off
- Do not use reflective aluminium foil to cover the bottom of the oven compartment
- Use moulds and containers with a dark opaque coating and light weight. Try not to use heavy accessories with shiny surfaces, such as stainless steel or aluminium.
ENVIRONMENT PROTECTION
The package protects your new appliance from damage during transport. The materials used are carefully chosen and must be recycled. Recycling reduces the use of raw materials and waste. Electrical and electronic appliances often contain useful materials. Please do not dispose of them with your household waste.
HEALTH
Acrylamide is mainly produced by heating starchy food (e.g. potatoes, French fries, bread) at very high temperature for a long time.
Suggestions
- Use short cooking times.
- Cook the food to a golden color on the surface, do not burn it to a dark brown.
- Larger portions have less acrylamide.
- Use a cooking mode with a fan.
- Baked French fries: use more than 450g per tray, spread them evenly and turn them from time to time. Use the information on the product if available to obtain the best cooking result.
CLEANING AND MAINTENANCE
Detergents
With good maintenance and cleaning, your appliance will keep its appearance and remain fully functional for many years to come. Here are some guidelines for cleaning and maintaining your appliance correctly.
Make sure that the different surfaces are not damaged by using the wrong cleaning agents, follow the information in the table. Depending on the appliance model, not all of the listed areas may be present.
Attention!
Risk of damage to surfaces
Do not use:
- Strong and abrasive detergents or detergents containing soda, ammonia, acids and chlorides
- Products containing solvents.
- Stainless steel brushes or steel wool pads or sponges that still contain abrasive substances.
- Oven sprays, glass or dishwasher cleaners.
- Special cleaners to clean the appliance when it is hot.
Before using for the first time, clean the oven thoroughly with a new sponge.
Suggestion
It is highly recommended to purchase cleaning and care products through the after sales service and follow the manufacturer's instructions and recommendations.
| External area of the appliance | Plastic |
| Plastic | Hot soapy water:Clean with a towel and then dry with a soft cloth. Do not use glass products or scrapers. |
| Enamelled surfaces (oven interior) | Hot soapy water:Clean with a towel and then dry with a soft cloth. |
| Control panel | Hot soapy water:Clean with a towel and then dry with a soft cloth. Do not use glass products or scrapers. |
| Oven door glasses | Hot soapy water:Clean with a towel and then dry with a soft cloth.Do not use steel scrapers or steel wool pads. |
| Oven door handle | Hot soapy water:Clean with a towel and then dry with a soft cloth.If the descaler comes into contact with the door handle, clean immediately. Otherwise, any stain can no longer be removed. |
| Glass cover for internal lighting | Hot soapy water:Clean with a towel and then dry with a soft cloth. |
| Oven gasket (do not remove) | Hot soapy water:Clean with a sponge. Don't wipe. |
| Internal accessories (Drip pan / Wire grille) | Hot soapy water:Wet well and clean with a sponge or a soft damp cloth. Use only neutral detergents, do not use abrasive products, abrasive sponges, solvents or metal objects.Do not wash in the dishwasher. |
Note
- The enamel is baked in the oven at very high temperature. This can cause some slight variation in color. This is normal and does not affect operation. The edges of thin trays cannot be fully glazed, for this they can be sharp. This does not compromise the anti-corrosion protection.
- Always keep the appliance clean and in case of dirt remove it immediately to avoid accumulation.
Suggestions
- Clean the cooking compartment and its accessories after each use and allow them to dry thoroughly. Use a soft cloth moistened with warm soapy water.
- Immediately after use remove traces of limescale, fat, starch and albumin (eg egg white).
- Remove any traces of food containing sugar immediately after use, if possible, while the residue is still hot.
- Regularly check the oven gasket and its cleanliness (located between the cavity and the oven door is located around the cavity frame). To clean the gasket please refer to the information in the previous table.
Do not use the oven if the gasket is damaged, contact the Authorized Service Center.
TROUBLESHOOTING
| Failure | Possible cause | Notes/Solution |
| The appliance does not work | Faulty fuse. | Check the meter life saver. |
| Blackout | Check that the kitchen light or other appliances in the kitchen are working. | |
| The knobs have slipped off their respective rods | The knobs were accidentally pulled out. | Simply insert the knobs into the respective rods placed in the control panel and press them so that they snap together and can be rotated normally. |
| The knobs cannot be turned easily. | There may be dirt under the knobs. | The knobs can be removed for cleaning. To remove the knobs, simply remove them from the respective rod by pulling them towards themselves.Carefully clean the knobs using a cloth and soapy water. Dry thoroughly, using a soft cloth. Do not use sharp or abrasive materials.Do not wet or wash in the dishwasher.Do not remove the knobs too often so that the coupling with its rod does not become too loose. |
Failure Notes/Solution
| After a cooking process you can hear a noise and you can notice an air leak between the oven door and the control panel. | The cooling fan continues to work even when the oven is off for a few minutes, to avoid high humidity conditions inside the oven and to cool it down. The cooling fan will turn off automatically. |
| The food is not completely cooked in the time indicated by the recipe. | A temperature different from that indicated in the recipe has been used; check if the set temperature corresponds to that indicated by the recipe. The amount of ingredients used is different from that indicated in the recipe; please check the recipe again and the relative quantities of ingredients. |
| Non-uniform gilding | The set temperature is too high, or the cooking level needs to be optimized; check recipe and settings. The pan chosen for the selected cooking function was not great for size and/or color and/or material.When using radiant heat (" Traditional cooking"), use dishes with a matt finish, dark colours and light weight. |
CUSTOMER CARE
Our customer service is ready to help you solve any kind of problem in using your appliance. We will always find an appropriate solution. Please contact the supplier where you purchased your appliance. When you call us, please provide the model and S/N (serial number) so that we can advise you correctly. The rating label can be found on the front of the oven, it is visible when you open the door.
Example:
| Template | MKO 41/12 MS BK |
| Recommended voltage: | 220-240V~ |
| Recommended frequency: | 50Hz-60Hz |
| Electric power: | 2.1 kW |
To save time, you can make a note of your appliance model and service phone number in the space below if needed.
MAINTENANCE CARD
| Model number | Date of purchase |
| Serial number | Shop of purchase |
ATTENTION
This appliance must be installed in accordance with the regulations in force and used only in a well-ventilated space. Read the instructions before installing or using the appliance.
Note
Please note that the home visit of a technician from our service centers is not free, even if the applialncne is in warranty period.
If you decide to rely on a certified professional, you will be sure that the repair will be carried out by technicians who will bring the original spare parts for your appliance.
We thank you again for purchasing a MasterKitchen built-in oven and we hope that your appliance will give you delicious dishes and great satisfaction in the kitchen.
GENERAL INFORMATION
| Do you want to cook your own recipe | Try to use the settings of a similar recipe and optimize the cooking process based on the result. |
| Is the cake ready? | Stick a stick into the cake about 10 minutes before the cooking time is over. If there is no dough sticking to the toothpick when you pull it out, the cake is ready. |
| Cake loses volume as it cools after cooking | Lower the set temperature by 10 °C and check the dough preparation instructions again. |
| The cake is higher in the center than the edge | Do not grease the outer ring of the cake pan |
| The cake is too dark at the top | Use a lower cooking level and/or use a lower temperature (this may result in a longer cooking time) |
| The cake is too dry | Increase the set temperature by 10°C (this may result in a shorter cooking time) |
| The food looks good but the humidity inside it is too high | Lower the set temperature by 10°C (this may result in a longer cooking time) and recheck the recipe. |
| The goldness is no uniform | Lower the set temperature by 10°C (this may result in a longer cooking time). Use the "Traditional cooking" function on one level only. |
| The cake is less golden on the bottom | Use a lower cooking level |
| Condensate water vapour during cooking | This is a normal physical event, during the cooking phase a lot of water vapor can form in the cooking compartment. The appliance has a high energy efficiency and during operation it gives off only a small amount of heat to the outside. Due to the high temperature differences between the inside and the outside of the appliance, condensation can form on the door, on the control panel or on the panels of neighboring furniture. With preheating, or by opening the oven door with caution, condensation can be reduced. |
| What kind of trays can be used? | Any heat-resistant cake pan can be used. Aluminium should not be used in direct contact with food. |
| FOOD TEST IN ACCORDANCE WITH EN 60350-1 | ||||
| DISH | COOKING LEVEL | FUNCTION | TEMPERATURE in °C | COOKING TIME in min. |
| Shortbread biscuits | 4 |  | 150-170 | 20-30 |
| Sponge cake (with water) | 2 |  | 170-180 | 25-35 |
| Apple Cake | 4 |  | 180-190 | 35-45 |
| Small cake | 4 |  | 180-190 | 15-25 |
| Pizza | 3 |  | 190-210 | 15-25 |
For all recipes in the table above, always preheat the oven for 5 - 15 minutes regardless of the other cooking instructions.
SUGGESTED COOKING IN ECO MODE
| DISH | COOKING LEVEL | FUNCTION | TEMPERATURE in °C | COOKING TIME in min. |
| Baked Potatoes and Cheese | 1 |  | 180 | 90-100 |
| Cheesecake | 1 |  | 160 | 100-150 |
| Meatloaf | 1 |  | 190 | 110-130 |
N.B. Oven preheating is not required for all recipes in ECO mode.
ADDITIONAL TYPICAL RECIPES
| DISH | COOKING LEVEL | FUNCTION | TEMPERATURE in °C | COOKING TIME in min. |
| Vegetable casserole | 2 |  | 200 | 40-50 |
| White bread (leavened) | 1 |  | 200 | 25-35 |
| Roast pork about 2 kg | 2 |  | 175 | 120-130 |
| Fish about 2.5 Kg | 2 |  | 250 | 12 then turn and continue for 8-12 |
N.B. For all recipes in the table above, always preheat the oven for 8 - 15 minutes regardless of the other cooking instructions.
ENERGY SAVING ACCORDING TO EN 60350-1
Please note the following information:
- The measurement is carried out in "ECO" mode to determine the data regarding the traditional cooking mode and the label class.
- During the measurement, only the necessary accessory is in the oven compartment. All other parts must be removed
- The oven is installed as described in the installation guide and positioned in the center of the built-in cabinet.
- For the measurement, it is necessary to close the door as at home, even when the cable disturbs the sealing function of the seal during the measurement. To ensure that there are no adverse effects regarding the sealing disturbed due to energy data, it is necessary to close the door carefully during measurement. It may be necessary to use an instrument to guarantee sealing of the gasket as at home, where no cable disturbs the sealing function.
- The determination of the volume of the oven compartment was carried out as described in the current legislation.
DATA SHEET (EU 65/2014 & EU 66/2014)
| Model MKO 41/12 MS BK | |
| No. of compartments | 1 |
| Heat source | Electric |
| Usable volume | 70 L |
| EC electric, compartment (conventional) | 0.79 kWh/cycle |
| EC electric, compartment (forced air) | --- kWh/cycle |
| EEI Cavity | 94 |
| Energy class (A+++ to D) | A |
- Impostare la temperatura
- ACCESSORI
- Copertura in vetro
- Built-in oven MKO 41/12 MS BK
- User manual
- CONTENT
- GENERAL INFORMATION
- WARNING
- Risk of electric shock!
- Risk of burns / scalding!
- Risk of injury!
- Risk of fire!
- Magnetic danger!
- CAUSES OF DAMAGE
- Attention!
- - To avoid damage to the enamel:
- GENERAL INSTALLATION AND DIMENSIONS
- Assembly instructions:
- Connection to the mains:
- MESSA A TERRA
- COOKING FUNCTIONS
- Oven lamp
- Before using the appliance for the first time, it is necessary to clean the oven compartment and its accessories carefully.
- After the appliance has cooled down:
- GETTING TO KNOW YOUR APPLIANCE
- IDENTIFY THE APPLIANCE
- CONTROL PANEL
- Knobs
- Light Indicator
- Selecting the cooking function
- Set the temperature
- Warning light
- Changes
- Note
- COOLING FAN
- ACCESSORIES
- Accessories included
- Insert accessories
- DISASSEMBLE THE OVEN DOOR
- Risk of breakage and injury!!
- DISASSEMBLY AND ASSEMBLY OF THE OVEN DOOR FROM THE APPLIANCE
- REPLACING THE LAMP
- ATTENTION
- Risk of burns!
- Glass cover
- REPLACING THE POWER CORD
- Warning - Risk of electric shock!
- ENERGY SAVING GENERAL SUGGESTIONS
- ENVIRONMENT PROTECTION
- HEALTH
- Suggestions
- CLEANING AND MAINTENANCE
- Detergents
- Risk of damage to surfaces
- Do not use:
- Suggestion
- TROUBLESHOOTING
- CUSTOMER CARE
- Example:
- ENERGY SAVING ACCORDING TO EN 60350-1
- Please note the following information:
Brand : Master Kitchen
Model : MKO 41/12 MS BK
Category : Oven