
SC-BMAX5 - Hi-Fi System PANASONIC - Free user manual and instructions
Find the device manual for free SC-BMAX5 PANASONIC in PDF.


| Product Type | All-in-One Hi-Fi System with Bluetooth |
| Model Number | SC-BMAX5 |
| Dimensions (W x H x D) | 280 mm x 397 mm x 293 mm (11 1/16" x 15 11/16" x 11 9/16") |
| Weight | 6.5 kg (14.3 lbs) |
| Power Supply | AC 110-240 V, 50/60 Hz |
| Power Consumption | 40 W (low power mode: 0.5 W, networked standby: 2.0 W) |
| Built-in Battery | Li-ion 7.2 V, 2475 mAh |
| Battery Playback Time | Approx. 9 hours (at specified conditions) |
| Charging Time | Approx. 3 hours (unit off) |
| Bluetooth Version | 5.0, Class 1, A2DP, AVRCP, SBC codec |
| Wireless Range | Up to 10 m (33 ft) line of sight |
| Inputs | Optical (Toslink), AUX (3.5 mm stereo), USB (Type A, 5 V 1 A), Microphone (6.3 mm mono), Guitar (6.3 mm mono) |
| Output | AUDIO OUT (3.5 mm stereo) |
| RMS Output Power | Total 75 W: Woofer mono 45 W (4 Ω), Tweeter L/R 15 W per channel (6 Ω) |
| Speaker Configuration | 2-way: 1 x 14 cm (5 1/2") woofer, 2 x 5.7 cm (2 1/4") cone tweeters |
| Illumination Effects | 9 multi-color patterns (M1-M9) and 3 single-color patterns (S1-S3) with strobe option |
| USB Playback | MP3 files (FAT16/32, exFAT, up to 32 GB) |
| Operating Temperature Range | 0 °C to 40 °C (32 °F to 104 °F) |
| Placement Orientation | Vertical or horizontal (with rubber feet down) |
| Multi Connect | Up to 2 Bluetooth devices simultaneously |
| Included Accessories | AC power cord, optical cable, quick guide |
Frequently Asked Questions - SC-BMAX5 PANASONIC
User questions about SC-BMAX5 PANASONIC
0 question about this device. Answer the ones you know or ask your own.
Ask a new question about this device
Download the instructions for your Hi-Fi System in PDF format for free! Find your manual SC-BMAX5 - PANASONIC and take your electronic device back in hand. On this page are published all the documents necessary for the use of your device. SC-BMAX5 by PANASONIC.
USER MANUAL SC-BMAX5 PANASONIC
Wireless Speaker System
Sistema de altavoces
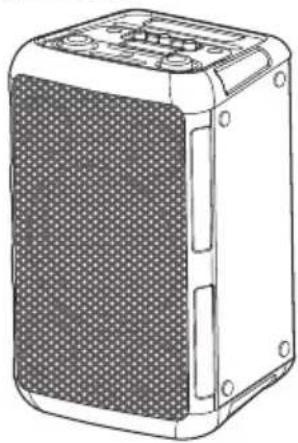
Model No. SC-BMAX10
SC-BMAX5
SC-BMAX10
natural_image
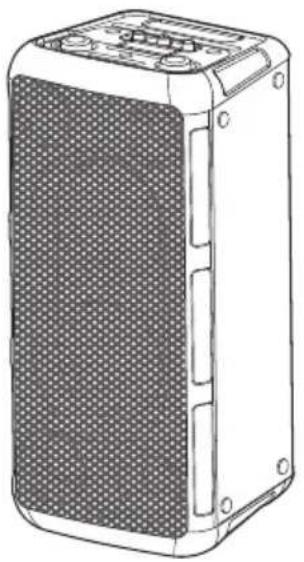
Line drawing of a rectangular electronic device with a mesh panel and mounting holes (no text or symbols)SC-BMAX5
natural_image
Line drawing of a rectangular electronic device with a textured surface and mounting brackets (no text or symbols)Thank you for purchasing this product.
For optimum performance and safety, please read these instructions carefully.
Please keep this manual for future reference.
If you have any questions, visit:
https://help.na.panasonic.com/
Register online at https://help.na.panasonic.com/ (U.S. customers only)
These operating instructions are applicable for model SC-BMAX10 and SC-BMAX5.
Unless otherwise indicated, illustrations in these operating instructions are of SC-BMAX10. Your system and the illustrations can look differently.
Table of contents
Supplied accessories 2
IMPORTANT SAFETY INSTRUCTIONS ..... 2
Safety precautions 3
Transporting the unit 4
Power sources 5
Overview of unit 6
Bluetooth® operation 7
Using a USB device 8
External equipment 9
Using a microphone or guitar 10
Illumination effects 10
Others 10
Troubleshooting 11
Maintenance 11
References 12
Specifications 13
To remove the battery when disposing of this unit .... 14
Limited Warranty (ONLY FOR U.S.A.) 16
Supplied accessories
Check and identify the supplied accessories.
SC-BMAX10 SC-BMAX5
| □ 5 AC power supply cordFor the United States (TSXA232) | □ 4 AC power supply cordFor the United States (TSXA232) |
| For India (TSXA231) | For Thailand (TSXA229) |
| For Thailand (TSXA229) | For others (TSXA226) |
| For others (TSXA226) | □ 1 Optical cable (TSXF231) |
| □ 1 Optical cable (TSXF231) |
Note:
- Product numbers correct as of July 2024. These may be subject to change.
- Do not use any other optical cable except the supplied one.
IMPORTANT
SAFETY
INSTRUCTIONS
Read these operating instructions carefully before using the unit. Follow the safety instructions on the unit and the applicable safety instructions listed below. Keep these operating instructions handy for future reference.
- Read these instructions.
- Keep these instructions.
- Heed all warnings.
-
Follow all instructions.
-
Do not use this apparatus near water.
-
Clean only with dry cloth.
-
Do not block any ventilation openings. Install in accordance with the manufacturer's instructions.
-
Do not install near any heat sources such as radiators, heat registers, stoves, or other apparatus (including amplifiers) that produce heat.
-
Do not defeat the safety purpose of the polarized or grounding-type plug. A polarized plug has two blades with one wider than the other. A grounding-type plug has two blades and a third grounding prong. The wide blade or the third prong are provided for your safety. If the provided plug does not fit into your outlet, consult an electrician for replacement of the obsolete outlet.
-
Protect the power cord from being walked on or pinched particularly at plugs, convenience receptacles, and the point where they exit from the apparatus.
-
Only use attachments/accessories specified by the manufacturer.
-
Use only with the cart, stand, tripod, bracket, or table specified by the manufacturer, or sold with the apparatus. When a cart is used, use caution when moving the cart/apparatus combination to avoid injury from tip-over.
-
Unplug this apparatus during lightning storms or when unused for long periods of time.
-
Refer all servicing to qualified service personnel. Servicing is required when the apparatus has been damaged in any way, such as power-supply cord or plug is damaged, liquid has been spilled or objects have fallen into the apparatus, the apparatus has been exposed to rain or moisture, does not operate normally, or has been dropped.

Safety precautions
WARNING
Unit
- To reduce the risk of fire, electric shock or product damage,
- Do not expose this unit to rain, moisture, dripping or splashing.
- Do not place objects filled with liquids, such as vases, on this unit.
– Use the recommended accessories. - Do not remove covers.
- Do not repair this unit by yourself. Refer servicing to qualified service personnel.
Battery pack (Lithium ion battery pack)
- Risk of fire, explosion and burns. Do not disassemble, heat above 60^ (140°F) or incinerate.
CAUTION
Unit
- To reduce the risk of fire, electric shock or product damage,
- Do not install or place this unit in a bookcase, built-in cabinet or in another confined space. Ensure this unit is well ventilated.
- Do not obstruct this unit's ventilation openings with newspapers, tablecloths, curtains, and similar items.
- Do not place sources of naked flames, such as lighted candles, on this unit.
- This unit is intended for use in moderate and tropical climates.
- This unit may receive radio interference caused by mobile telephones during use. If such interference occurs, please increase separation between this unit and the mobile telephone.
- Set the unit up on an even surface away from direct sunlight, high temperatures, high humidity, and excessive vibration.
- This system might get warm after prolonged usage. This is normal. Do not be alarmed.
AC power supply cord
- The power plug is the disconnecting device. Install this unit so that the power plug can be unplugged from the socket outlet immediately.
Battery
- Danger of explosion if battery is incorrectly replaced. Replace only with the type recommended by the manufacturer.
- When disposing of the batteries, please contact your local authorities or dealer and ask for the correct method of disposal.
- Do not heat or expose to flame.
- Do not leave the battery(ies) in a car exposed to direct sunlight for a long period of time with doors and windows closed.
- Do not expose to low air pressure at high altitudes.
-
Do not expose to extremely low air pressure, as this may result in explosions or leakage of flammable liquids and gases.
-
Avoid the use in the following conditions
– High or low extreme temperatures during use, storage or transportation. - Disposal of a battery into fire or a hot oven, or mechanically crushing or cutting of a battery, that can result in an explosion.
- Extremely high temperature and/or extremely low air pressure that can result in an explosion or the leakage of flammable liquid or gas.
The symbols on this product (including the accessories) represent the following:
For U.S.A
THE FOLLOWING APPLIES ONLY IN THE U.S.A
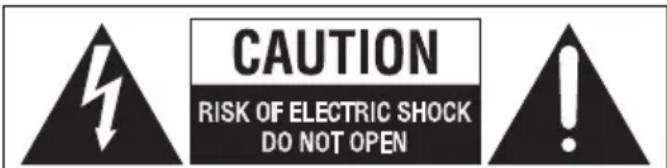
CAUTION: TO REDUCE THE RISK OF ELECTRIC SHOCK, DO NOT REMOVE SCREWS. NO USER-SERVICEABLE PARTS INSIDE. REFER SERVICING TO QUALIFIED SERVICE PERSONNEL.

The lightning flash with arrowhead symbol, within an equilateral triangle, is intended to alert the user to the presence of uninsulated “dangerous voltage” within the product’s enclosure that may be of sufficient magnitude to constitute a risk of electric shock to persons.

The exclamation point within an equilateral triangle is intended to alert the user to the presence of important operating and maintenance (servicing) instructions in the literature accompanying the appliance.
This device complies with Part 15 of the FCC Rules. Operation is subject to the following two conditions:
(1) This device may not cause harmful interference, and
(2) this device must accept any interference received, including interference that may cause undesired operation.
FCC ID: ESX-BMAX10 (for SC-BMAX10) ESX-BMAX5 (for SC-BMAX5)
FCC Note:
This equipment has been tested and found to comply with the limits for a Class B digital device, pursuant to Part 15 of the FCC Rules.
These limits are designed to provide reasonable protection against harmful interference in a residential installation. This equipment generates, uses, and can radiate radio frequency energy and, if not installed and used in accordance with the instructions, may cause harmful interference to radio communications. However, there is no guarantee that interference will not occur in a particular installation. If this equipment does cause harmful interference to radio or television reception, which can be determined by turning the equipment off and on, the user is encouraged to try to correct the interference by one or more of the following measures:
- Reorient or relocate the receiving antenna.
- Increase the separation between the equipment and receiver.
- Connect the equipment into an outlet on a circuit different from that to which the receiver is connected.
- Consult the dealer or an experienced radio/TV technician for help.
FCC Caution:
Any unauthorized changes or modifications to this equipment would void the user's authority to operate this device.
Supplier's Declaration of Conformity
Trade Name: Panasonic
Model No.: SC-BMAX10 / SC-BMAX5
Responsible Party: Panasonic Corporation of North America
Two Riverfront Plaza, Newark, NJ 07102-5490
Support Contact: https://help.na.panasonic.com/
FCC Radiation Exposure Statement
This equipment complies with FCC radiation exposure limits set forth for an uncontrolled environment.
This transmitter must not be co-located or operating in conjunction with any other antenna or transmitter.
Conforms to UL STD 62368-1.
For Thailand
This telecommunication equipment conforms to NTC/NBTC technical requirement.
Transporting the unit
Preparation
Disconnect all connected devices and cables from the unit.
1 Hold the handle of the unit firmly when transporting the unit.
2 Place the unit on a flat, stable surface with the rubber feet facing down.
Placement
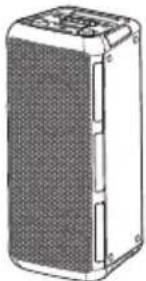
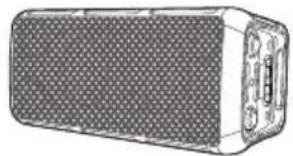
You can place this system vertically or horizontally.
Vertical placement Horizontal placement
natural_image
Illustration of a rectangular electronic device with a mesh panel and mounting brackets (no text or symbols)(Place the side with the rubber feet facing down.)
natural_image
Line drawing of a rectangular electronic device with a textured surface and ports (no text or symbols)Note:
- Keep your speakers more than 10 mm ( ^13 /s.") from other objects for proper ventilation.
- These speakers do not have magnetic shielding. Do not put them near TVs, PCs or other equipment easily influenced by magnetism.
- When you play at high levels for a long period, it can cause damage to the speakers and decrease the life of the speakers.
-
Decrease the volume in these conditions to prevent damage:
-
When the sound is distorted.
- When you adjust the sound quality.
CAUTION!
- Improper handling or transportation manner may cause the unit to fall, etc., resulting in damage and/or personal injury.
- Do not place the unit on a sloping or unstable surface.
- Do not place your feet under the unit.
-
Do not touch the speaker cone's reverberating surfaces:
-
This may damage the speaker cone.
-
The speaker cone may be hot.
-
Do not put the unit on a table or any elevated surface.
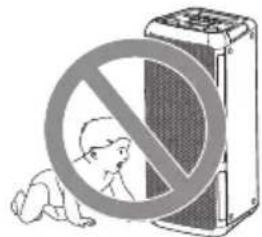
- Do not allow children to climb on the unit.
- Be careful when babies or children are near.
Power sources
The unit can be turned on by using AC power supply source. If AC power supply source is not available, you can use the built-in battery.
Using the AC power source
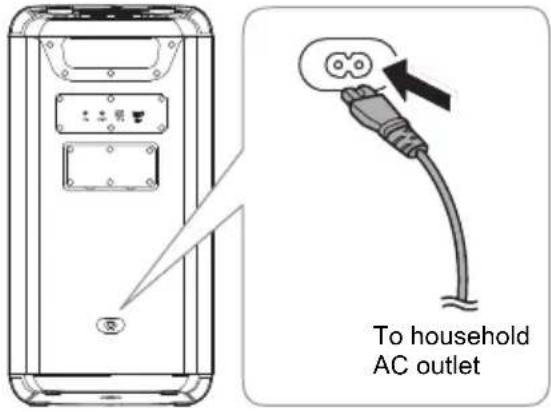
Connect the AC power supply cord only after all the other connections have been made.
Connect the AC power supply cord.
Do not use any other AC power supply cord except the supplied one.
Rear view
Conserving power
The system consumes a small amount of power when it is in low power mode. Disconnect the power supply if you do not use the system.
Some settings will be lost after you disconnect the system. You have to set them again.
Note on AC power supply cord
(For the AC power plug of three pins with fuse)
Before use
Remove the connector cover.
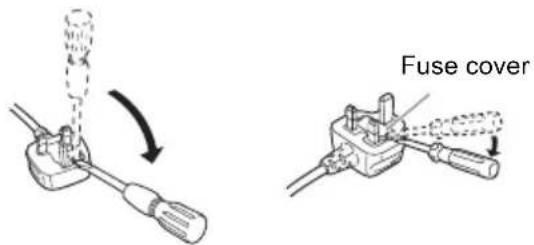
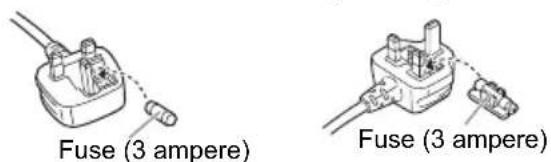
How to replace the fuse
The location of the fuse differ according to the type of AC power plug (figures A and B). Confirm the AC power plug fitted and follow the instructions below.
Illustrations may differ from actual AC power plug.
- Open the fuse cover with a screwdriver.
Figure A Figure B
- Replace the fuse and close or attach the fuse cover.
Figure BFigure A
Using the built-in battery
This unit contains lithium-ion rechargeable battery. Do not remove it except for when disposing of the product. Charge the battery before use.
The battery is charged automatically when AC power supply cord is connected.
While the battery is being charged, the battery indicator bars scroll, and once fully charged, all the bars light up.

The battery indicator shows the battery levels.

Note:
- Connect to the AC power supply cord for first time use to wake up the battery.
- Connect AC power supply cord for charging before battery is flat.
- The unit will automatically shut down when the battery is flat.
- When this unit is not used over a long period of time, charge the built-in battery at least once every 1-2 months to prevent it from deteriorating.
- It is recommended to charge the battery in the temperature of between 10°C (50°F) and 35°C (95°F). The battery indicators may flash even though AC power supply cord is connected and charging may not be possible when it is out of recommended temperature range.
- The battery may not charge when the temperature surrounding the battery is high during the operation or right after the operation even when it is within the recommended temperature range. In such case, stop the usage and let it cool down.
- If the battery life is significantly reduced after a full charge, it may indicate that the battery needs replacement. Consult the store where you purchased the unit for a battery replacement. Alternatively, you can still use the unit by connecting it to an AC power source.
Overview of unit
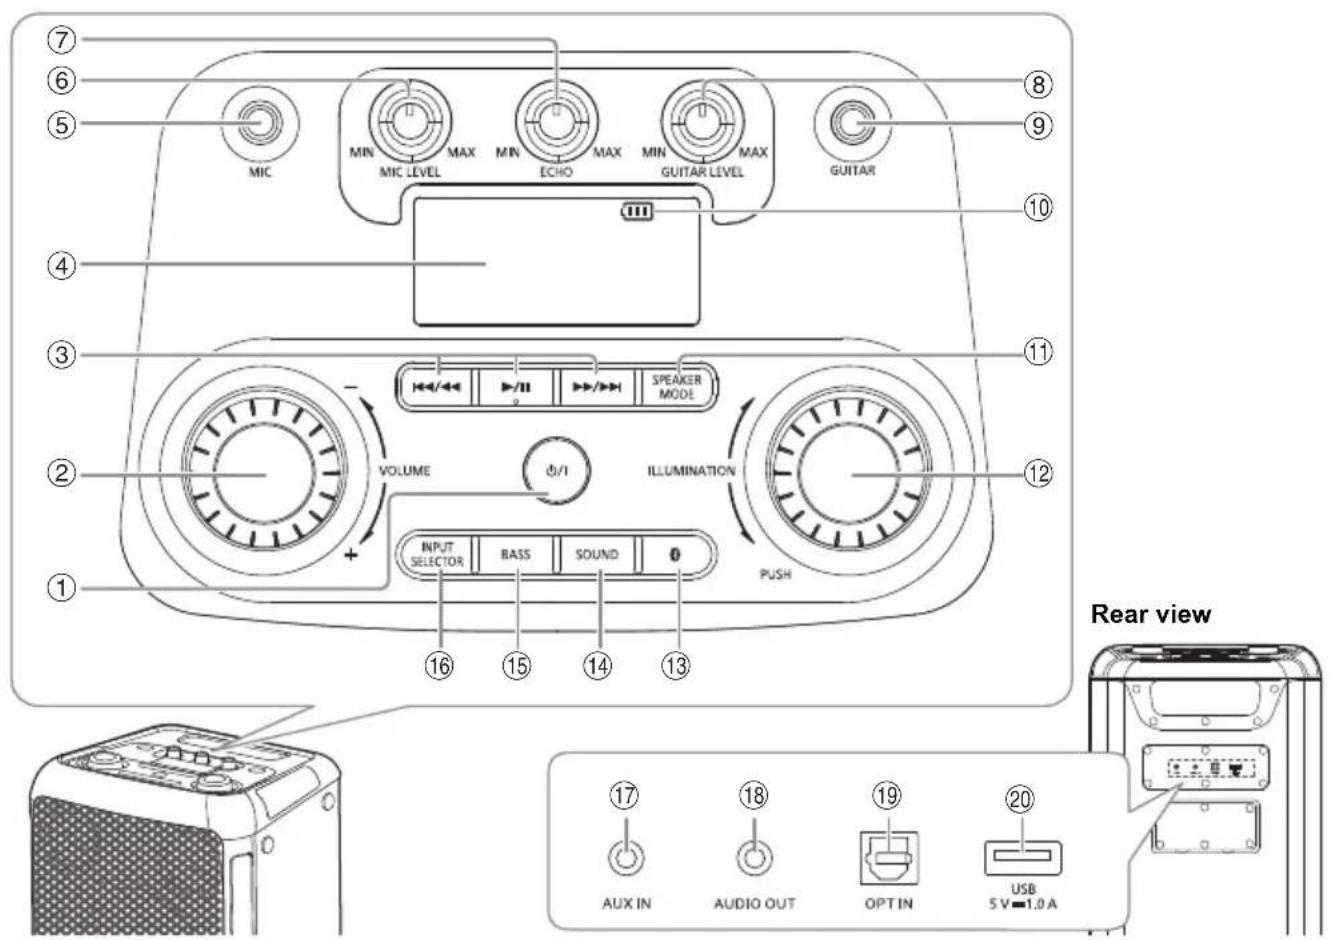
① Low power mode/on switch [⏻/l]
Press to turn the unit from on to low power mode or vice versa. In low power mode, the unit is still consuming a small amount of power.
②Adjust the volume level
③Basic playback control
④Display panel
⑤Microphone jack
⑥Adjust the microphone volume level
⑦Adjust the microphone echo level
⑧Adjust the guitar volume level
⑨Guitar jack
⑩Battery indicator
⑪Select the speaker mode
⑫Select the illumination effects and colours
⑬Select Bluetooth ^® as the source
⑭Select the sound effect
$$ \begin{array}{c}\text {ROCK} \rightarrow \text {JAZZ} \rightarrow \text {SAMBA} \rightarrow \text {POP} \rightarrow \text {FLAT}\\uparrow\end{array} $$
⑮Turn on or turn off the bass effect
ON BASS OFF BASS
Note:
When you turn on the bass effect, the sound effect will turn off, and vice versa.
⑯Select the audio source
$$ \begin{array}{c}\text {BLUETOOTH} \rightarrow \text {USB AUOPT} \rightarrow\\uparrow\end{array} $$
⑰AUX IN jack
⑱AUDIO OUT jack
⑲Optical In jack
⑳USB port (5 V 1.0 A)
Bluetooth® operation
You can connect and play an audio device wirelessly through Bluetooth ^® .
Preparation
- Turn on the unit.
- Turn on the Bluetooth® feature of the device and put the device near the system.
- Read the operating instructions of the device for details.
Pairing a device
1 Press [ ]
"PAIRING" is shown.
2 Select "SC-BMAX10" or "SC-BMAX5" from the Bluetooth® menu of the device.
If prompted for a passkey, input "0000".
The device connects with this system automatically after pairing is complete.
Note:
- If a Bluetooth ^ device is connected, you need to disconnect the device before pairing a new device ( “Disconnecting a device”).
- You can pair up to 8 devices with this system. If a 9th device is paired, the device that has been paired for the longest time will be replaced.
- Depending on the searching functionality of the Bluetooth® device and the surrounding environment, if the product name is not shown on the Bluetooth® menu of the device, turn off and then turn on the Bluetooth® feature of the device repeatedly during the pairing process.
Connecting a device
1 Press [ ]
2 Select "SC-BMAX10" or "SC-BMAX5" from the Bluetooth® menu of the device.
3 Start playback on the device.
Note:
- A device must be paired to connect.
- When "BLUETOOTH" is selected as the source, this system will automatically try to connect to the last connected device.
Bluetooth® playback
Play Press [▶/■].
Pause Press [▶/■]. Press again to continue playback.
Skip Press [I◄◄/◄◄] or [►►/►►I] to skip track.
Search Press and hold [|◀◀/◀◀] or [▶▶/▶▶].
Note:
Depending on the Bluetooth ^® device, some operations may not work.
Multi Connect
This system supports Multi Connect, which can connect up to 2 devices simultaneously.
To switch between the connected devices
When one of the connected devices is playing, you can easily switch control to another connected device simply by starting a playback on that device. The previous playback will be paused automatically.
Note:
This function may not work for some apps or devices (depending on app or device specifications).
Disconnecting a device
While a Bluetooth® device is connected
Press and hold [▶/III].
"PAIRING" is shown.
Note:
- This function disconnects all connected devices.
• A device is disconnected when you: - Select a different source.
- Move the device out of the maximum range.
- Disable the Bluetooth ^® transmission of the device.
– Turn off the unit or the device.
Bluetooth® standby
This function automatically turns on the system when you establish a Bluetooth ^® connection from a paired device.
Press and hold [ ] to turn on this function.
"ON BLUETOOTH STANDBY" is shown.
To cancel, press and hold the button again until "OFF BLUETOOTH STANDBY" is shown.
Note:
- Some devices may take longer to respond. If you are connected to a Bluetooth® device before turning off the system, wait for a minimum of 5 seconds before connecting to this system from your Bluetooth® device again.
- When you disconnect and connect the AC power supply cord, the Bluetooth® standby function may not work even though the setting is on. In this case, turn on the unit and check the Bluetooth® standby setting.
Using a USB device
Preparation
Before you connect a USB device to the system, make sure you do a backup of the data.
Decrease the volume and connect the USB device to the USB port.
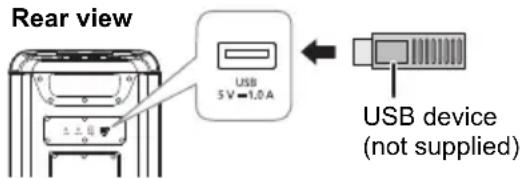
Hold the unit when connecting or disconnecting the USB device.
Note:
Do not use a USB extension cable. The system cannot recognise USB device connected through a cable.
USB playback
You can playback MP3 files in the USB device.
Press [INPUT SELECTOR] repeatedly to select "USB".
| Play Press [▶/■]. | |
| Pause Press [▶/■].Press again to continue playback. | |
| Skip | Press [l◀◀/◀◀] or [▶▶/▶▶] to skip track.During pause, press and hold [▶/■] to skip album. |
| Search | Press and hold [l◀◀/◀◀] or [▶▶/▶▶] |
| Repeat | During playback, press and hold [▶/■] repeatedly to select a repeat mode.ONE REPEAT: Repeat a single track.ALL REPEAT: Repeat all tracks.OFF REPEAT: Cancel repeat. |
Note:
- Files are defined as tracks and folders are defined as albums.
- Tracks must have the extension ".mp3" or ".MP3".
- Tracks will not necessarily be played in the order you recorded them.
- Some files can fail to work because of the sector size.
Charging a device
Charging starts when a device (rated value: 5 V/1 A) is connected to the USB port of this unit.
Preparation
Turn on the unit.
Connect a device.
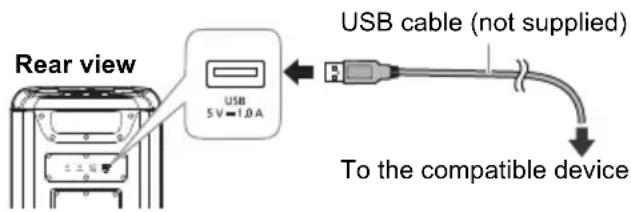
Confirm from the screen of the connected device, etc. to make sure charging has started.
Note:
- A cable compatible with your device is required. Use the cable that comes with your device.
- Even if you connect a cable compatible with the USB port of this unit, your device may not be charged. In that case, use the charger that comes with the device.
- Do not connect a device with a rated value higher than 5 V/1 A to this unit.
- To check if charging is complete, look at the screen of the connected device, etc.
- Once fully charged, remove the USB cable from the USB port.
- When the unit is powered on using the built-in battery, charging stops when the unit is turned off.
External equipment
Preparation
- Disconnect the AC power supply cord.
- Turn off all equipment and read the appropriate operating instructions.
Note:
- Do not bend cables at sharp angles.
- Components and cables are sold separately.
- Turn off the equaliser or reduce the volume of the external device. High level of input signal can distort the sound.
Using the optical input
You can connect a TV, VCR, DVD player etc., and listen to the audio through this unit.
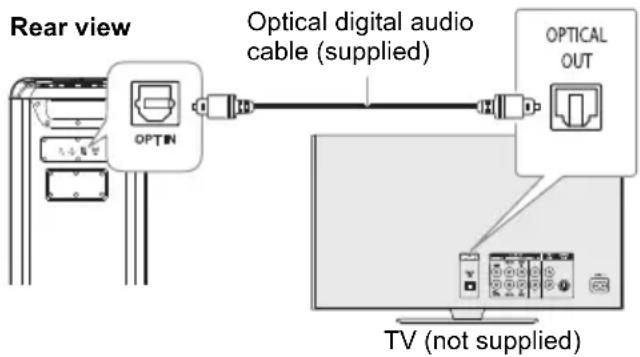
1 Connect an external device.
2 Turn on the unit.
3 Press [INPUT SELECTOR] repeatedly to select "OPT".
4 Play the external device.
Note:
• This system supports linear PCM signal.
- Supported Sampling frequency: 32 kHz, 44.1 kHz, 48 kHz, 88.2 kHz, up to 96 kHz
- The sound is muted or noise could occur if the signal format or frequency is not supported.
- If there are sounds coming from the TV's speakers, decrease the volume of the TV to its minimum.
Using the auxiliary input
Rear view
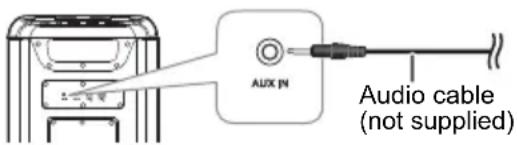
1 Connect an external device.
Plug type: ∅ 3.5 mm (") stereo
2 Turn on the unit.
3 Press [INPUT SELECTOR] repeatedly to select "AUX".
4 Play the external device.
Connecting additional units
You can connect to additional units to enjoy sound output from these units. It is recommended to place all units vertically.
Preparation
Turn off all the units and turn [VOLUME] of each unit to reduce the volume level.
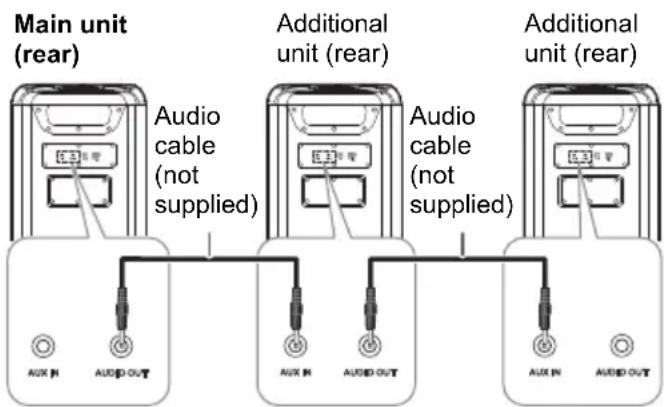
1 Connect main unit and all the additional units (SC-BMAX10 or SC-BMAX5) with audio cables (not supplied).
Plug type: ∅ 3.5 mm ( ″ stereo
2 Turn on all the units.
3 On the additional units: Press [INPUT SELECTOR] repeatedly to select "AUX".
4 Press [SPEAKER MODE] repeatedly to select the desired speaker channels.
| L+R Left and right channelsWhen all the units are to play simultaneously. |
| L Left channelTo achieve stereo sound effect, setting for unit place on the left side. |
| R Right channelTo achieve stereo sound effect, setting for unit place on the right side. |
5 On main unit: Start your desired playback.
Note:
- You can connect this unit and up to two additional units.
- The sound effect will be controlled separately by each unit. Make the same sound settings on the additional units if necessary.
- The illumination and strobe lights effects on the additional units may differ from the main unit even when same illumination pattern is selected.
Using a microphone or guitar
Preparation
Turn [MIC LEVEL] and [GUITAR LEVEL] to their minimum before you connect or disconnect a microphone/guitar.
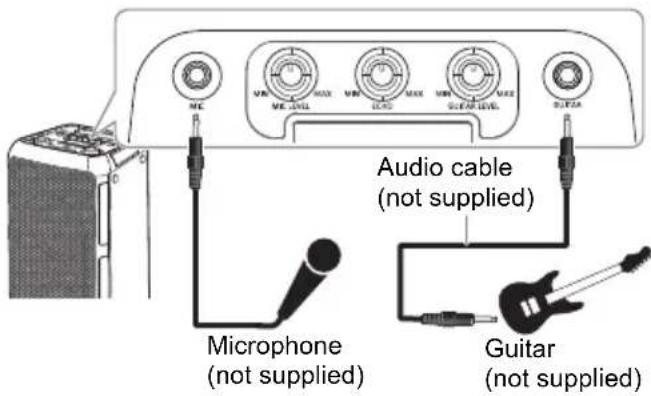
1 Connect a microphone or guitar.
Plug type: ∅ 6.3 mm (1/4) monaural
2 If you want to sing or play guitar along with background music, play the music source and adjust the volume of the system
3 Adjust the volume of microphone or guitar.
For microphone: Turn [MIC LEVEL].
For guitar: Turn [GUITAR LEVEL].
Adjust echo level
Turn [ECHO] to adjust the echo level of the microphone.
Note:
- If a strange noise (howling) is emitted, move the microphone/guitar away from the speakers, or decrease the volume of the microphone/guitar.
- When you do not use the microphone/guitar, disconnect it from the microphone/guitar jack, and decrease the volume of the microphone/guitar to its minimum.
Illumination effects
You can change the illumination effect on the unit.
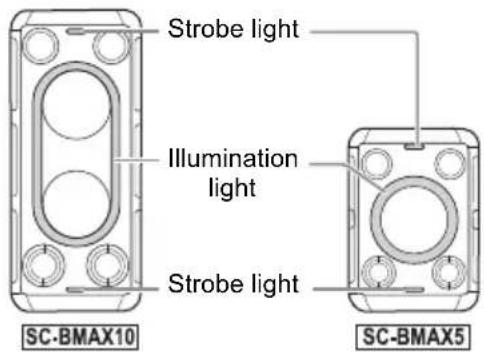
Turn [ILLUMINATION] to select the effect.
| M-1 to M-9 Selection of 9 illumination patterns in multiple colours. |
| S-1 to S-3 Selection of 3 illumination patterns in single colour.Press [ILLUMINATION] repeatedly to select a colour. |
| OFF Turn off illumination and strobe lights, also decrease the brightness of the display panel. |
Using strobe lights
Press and hold [ILLUMINATION] to turn on or turn off the strobe lights.
Others
Auto off
When the equipment turns on "Bluetooth® standby function", if it has no audio playback, in Aux in, Optical, USB and Bluetooth® mode will enter networked standby mode within 20 minutes.
When the equipment turns off "Bluetooth® standby function", if it has no audio playback, in Aux in, Optical, USB and Bluetooth® mode will enter another condition (low power mode) within 20 minutes.
Note:
This function may not work when a microphone/guitar is connected.
Software update
Occasionally, Panasonic may release updated software for this unit that may add or improve the way a feature operates. These updates are available free of charge. For more details, refer to the following website.
https://panasonic.jp/support/global/cs/audio/ (This site is in English only.)
Troubleshooting
Before requesting service, make the following checks. If you are in doubt about some of the check points, or if the solutions indicated do not solve the problem, consult your dealer for instructions.
Common problems
The unit does not work.
- The safety device has been activated. Do the following:
- Press and hold [∅/l] to turn the unit to power off and the display turns off.
- Press [☐/I] again to turn on the unit. If the problem persists, consult your dealer.
Sound is distorted or no sound.
- Adjust the volume of the system.
- Turn off the system, determine and correct the cause, and then turn on again. It can be caused by straining of the speakers through excessive volume or power, and when using the system in a hot environment.
A humming sound can be heard during playback.
- An AC power supply cord or fluorescent light is near the cables. Keep other appliances and cords away from the cables of this system.
The sound level reduces.
- The protection circuit has been activated due to the continuous use at high volume output. This is to protect the system and maintain the sound quality.
USB
The USB device or the contents in it cannot be read.
- The format of the USB device or the contents in it are not compatible with the system.
- USB devices with storage capacity of more than 32 GB cannot work.
- USB devices may not be recognised when connected to this system with a USB extension cable or USB hub.
Slow operation of the USB device.
- Large content size or large memory USB device takes longer time to read.
Bluetooth®
Pairing cannot be done.
- Check the Bluetooth® device condition.
- The device is out of the 10 m communication range. Move the device nearer to the system.
The device cannot be connected.
- The pairing of the device was unsuccessful. Do pairing again. ( 7)
- The pairing of the device has been replaced. Do pairing again. ( 7)
- This system might be connected to a different device. Disconnect the other device and try connecting the device again.
- The system may have a problem. Turn off the system and then turn on again.
The device is connected but audio cannot be heard through the system.
- For some built-in Bluetooth ^® devices, you have to set the audio output to "SC-BMAX10" or "SC-BMAX5" manually. Read the operating instructions of the device for details.
Playback during Multi Connect is not working or no sound.
- Restart the app of the device.
- The control of the device was not turned successfully. Disconnect the existing connected devices and try again.
Sound from the device is interrupted.
- The device is out of the 10 m (33 ft) communication range. Move the device nearer to the system.
- Remove any obstacle between the system and the device.
- Other devices that use the 2.4 GHz frequency band (wireless router, microwaves, cordless phones, etc.) are interfering. Move the device nearer to the system and distance it from the other devices.
Battery
The battery indicator blinks while connected to the AC power supply cord.
- The battery temperature is either too low or too high. Adjust the room temperature accordingly, and wait for a while to confirm that the blinking stops.
If the problem persist, the battery might be deteriorated, consult your dealer. - If the battery life is significantly reduced after a full charge, it may indicate that the battery needs replacement. Consult your dealer for a battery replacement. Alternatively, you can still use the unit by connecting it to an AC power source.
Factory reset
Reset the memory when the following situations occur:
- There is no response when buttons are pressed.
- You want to clear and reset the memory contents.
1 Turn [VOLUME] to set the volume to "0".
2 Press and hold [INPUT SELECTOR] and [BASS].
Continue to press and hold the buttons until "RESET" is shown.
All the settings are set back to the factory preset.
Note:
You cannot perform factory reset when Bluetooth ^® standby function is turned on.
Maintenance
Disconnect the AC power supply cord before maintenance. Clean this system with a soft, dry cloth.
- Never use alcohol, paint thinner or benzine to clean this system.
- Before using chemically treated cloth, read the instructions that came with the cloth carefully.
References
About Bluetooth®
Panasonic bears no responsibility for data and/or information that is compromised during a wireless transmission.
Frequency band
- This system uses the 2.4 GHz frequency band.
Certification
- This system conforms to the frequency restrictions and has received certification based on frequency laws. Thus, a wireless permit is not necessary.
- The actions below are punishable by law in some countries:
- Taking apart or modifying the unit.
– Removing specification indications.
Restrictions of use
- Wireless transmission and/or usage with all Bluetooth® equipped devices is not guaranteed.
- All devices must conform to standards set by the Bluetooth SIG, Inc.
- Depending on the specifications and settings of a device, it can fail to connect or some operations can be different.
- This system supports Bluetooth security features. But depending on the operating environment and/or settings, this security is possibly not sufficient. Transmit data wirelessly to this system with caution.
- This system cannot transmit data to a Bluetooth® device.
Range of use
- Use this device at a maximum range of 10m (33 ft).
- The range can decrease depending on the environment, obstacles or interference.
Interference from other devices
- This system may not function properly and troubles such as noise and sound jumps may arise due to radio wave interference if this unit is located too close to other Bluetooth® devices or the devices that use the 2.4 GHz band.
- This system may not function properly if radio waves from a nearby broadcasting station, etc. is too strong.
Intended usage
- This system is for normal, general use only.
- Do not use this system near an equipment or in an environment that is sensitive to radio frequency interference (example: airports, hospitals, laboratories, etc.).
Licenses
The Bluetooth ^® word mark and logos are registered trademarks owned by Bluetooth SIG, Inc. and any use of such marks by Panasonic Holdings Corporation is under license. Other trademarks and trade names are those of their respective owners.
Specifications
General
| Power supply | AC 110 V to 240 V, 50/60 Hz |
Power consumption
| SC-BMAX10 | 65 W |
| SC-BMAX5 | 40 W |
Power consumption in low power mode and networked standby
| With “OFF BLUETOOTH STANDBY” setting(low power mode) | 0.5 W |
| With “ON BLUETOOTH STANDBY” setting(networked standby) | 2.0 W |
Power consumption in low power mode during charging (maximum)
Dimensions (W x H x D)
| SC-BMAX10 | 280 mm × 550 mm × 310 mm (11116" × 211116" × 1214") |
| SC-BMAX5 | 280 mm × 397 mm × 293 mm (11116" × 151116" × 11916") |
Mass
| SC-BMAX10 | 9.3 kg (20.5 lbs) |
| SC-BMAX5 | 6.5 kg (14.3 lbs) |
Operating temperature range 0°C to +40°C
| (+32°F to +104°F) |
Battery charging temperature range +10°C to +35°C
| (+50°F to +95°F) |
Operating humidity range
| 35% to 80% RH (no condensation) |
Amplifier section
RMS output power
SC-BMAX10
| L Ch (Woofer, Tweeter) | 75 W (4 Ω), 1 kHz, 30% THD |
| R Ch (Woofer, Tweeter) | 75 W (4 Ω), 1 kHz, 30% THD |
| Total RMS power 150 W |
SC-BMAX5
| Woofer (mono) 45 W (4 Ω), 1 kHz, 30% THD |
| Tweeter (L/R Ch) |
| 15 W per channel (6 Ω), 1 kHz, 30% THD |
| Total RMS power 75 W |
Bluetooth® section
| Version | Bluetooth® Ver. 5.0 |
| Class | Class 1 |
| Supported profiles | AVRCP, A2DP |
| Frequency band | 2.4 GHz band FH-SS |
| Operating frequency | 2402 MHz to 2480 MHz |
| Operation distance | 10 m (33 ft) line of sight |
| Supported codec | SBC |
Terminals section
USB port
| USB standard | USB 2.0 full-speed |
| Media file format support | MP3 (*.mp3) |
| Sampling frequency | 32 kHz, 44.1 kHz, 48 kHz |
| Audio word size | 16 bits |
| Channel count | 2 ch |
| USB device file system | FAT16, FAT32, exFAT |
OPT IN
| Optical digital input | Optical terminal |
| Sampling frequency | |
| 32 kHz, 44.1 kHz, 48 kHz, 88.2 kHz, 96 kHz | |
| Supported bit depth | 16 bits, 24 bits |
| Audio format | PCM (2 ch) |
Microphone
| Terminal | Mono, 6.3 mm ( 14 ") jack (1 system) |
Guitar
| Terminal | Mono, 6.3 mm ( 14 ") jack (1 system) |
AUX IN
| Terminal | Stereo, 3.5 mm ( 18 ") jack (1 system) |
| JDIO OUT | |
| Terminal | Stereo, 3.5 mm ( 18 ") jack (1 system) |
Speaker section
Speaker unit(s)
| SC-BMAX10 | |
| Tweeter | 5.7 cm ( 214 ") cone type x 2 |
| Woofer | 14 cm ( 512 ") cone type x 2 |
| SC-BMAX5 | |
| Tweeter | 5.7 cm ( 214 ") cone type x 2 |
| Woofer | 14 cm ( 512 ") cone type x 1 |
Battery section
SC-BMAX10
| Built-in battery | 7.2 V (Li-ion 4950 mAh) |
| Battery life in use | |
| Playback time | Approx. 15 hours* |
Battery charging time (25°C (77°F))
| Unit is OFF | Approx. 4 hours |
SC-BMAX5
| Built-in battery | 7.2 V (Li-ion 2475 mAh) |
| Battery life in use | |
| Playback time | Approx. 9 hours* |
Battery charging time (25°C (77°F))
| Unit is OFF | Approx. 3 hours |
* This battery playtime is only a reference and may vary depending on music content and battery aging after numerous charging and discharging cycles. It's achievable with a predefined music source, illumination light turned off, FLAT EQ mode, volume level at SC-BMAX5 28 or SC-BMAX10 29, and Bluetooth® streaming source.
Note:
- Specifications are subject to change without notice. Mass and dimensions are approximate.
- Total harmonic distortion is measured by the digital spectrum analyser.
To remove the battery when disposing of this unit
Remove the built-in battery before disposing of this unit.
Never disassemble this product, except for when disposing of it.
The illustrations below are not intended for repair of this unit, but for its disposal. Once you disassemble this unit, it can never be reassembled.
Note:
- Before disassembling this unit, disconnect the AC power supply cord and discharge the battery completely.
- If you have trouble removing the battery, consult your dealer or nearest service center.
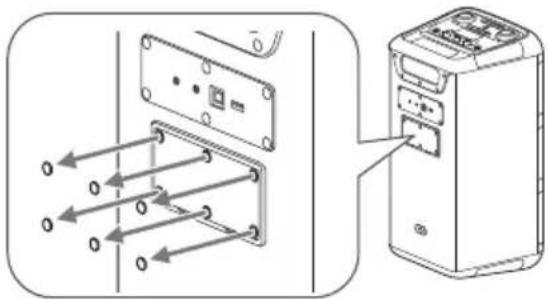
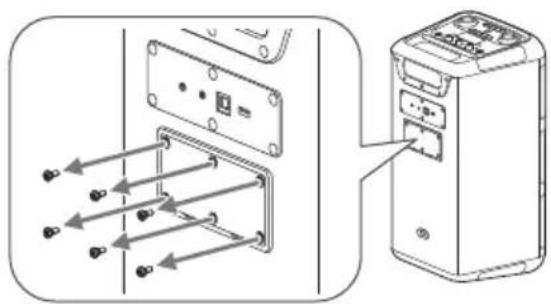
1 Remove the battery cover.
Remove the screw covers (x6) from the battery cover. Use an object with sharp end (e.g. tip of a thumbtack) to lift the screw covers.
natural_image
Diagram showing internal components of a computer tower with arrows indicating flow direction (no text or symbols present)Remove the screws (x6) that secure the battery cover. Use a commercially available Phillips head screwdriver (size: No. 2) to remove the screws.
natural_image
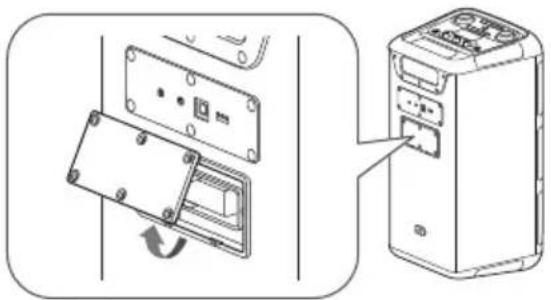
Diagram showing internal components of a computer tower with arrows indicating movement or connection (no text or symbols present)Lift up and remove the battery cover.
natural_image
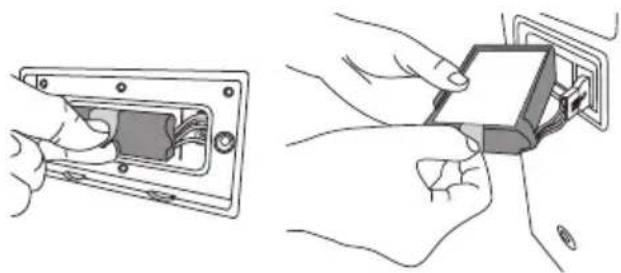
Diagram showing a computer tower with an open case and a close-up of its internal components (no text or symbols present)2 Remove the battery.
Pinch on to the tab and pull the battery out from the battery compartment.
natural_image
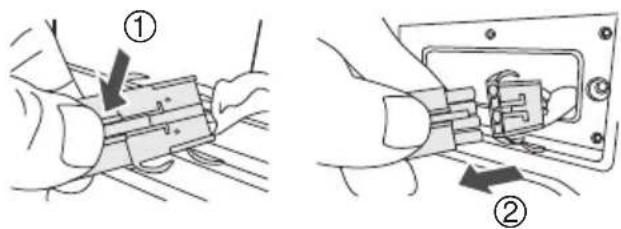
Illustration showing two hands installing or adjusting a small electronic component (no text or symbols present)Disconnect and remove the battery from the unit.
Handling of the used rechargeable battery
• Insulate the terminals with cellophane tape or similar material.
- Do not disassemble.
- When the battery becomes unusable, bring it to a facility that accepts used rechargeable batteries instead of disposing of it.
To dispose of or transfer this unit
The unit may keep the user settings information in the unit. If you discard this unit either by disposal or transfer, then follow the procedure to return all the settings to the factory defaults to delete the user settings ( 11).
- The operation history may be recorded in the memory of this unit.
For U.S.A
To dispose of your product, please recycle in accordance with local environmental regulations. For further recycling please visit https://shop.panasonic.com/recycle
For India
Information on hazardous constituents as specified in sub-rule1 of rule16 in electrical and electronic equipment. Declaration of Conformity with the requirements of the E-Waste (Management) Amendment Rules, 2023 with the sub-rule1 of rule16 limits with respect to Lead, Mercury, Cadmium, Hexavalent chromium, Polybrominated biphenyls, Polybrominated diphenyl ethers.
The content of hazardous substance with the exemption of the applications listed in SCHEDULE II of the E-Waste (Management) Amendment Rules, 2023:
- Lead (Pb) – not over 0.1% by weight.
- Cadmium (Cd) – not over 0.01% by weight.
- Mercury (Hg) – not over 0.1% by weight.
- Hexavalent chromium (Cr6+) – not over 0.1% by weight.
- Polybrominated biphenyls (PBBs) – not over 0.1% by weight.
- Polybrominated diphenyl ethers (PBDEs) – not over 0.1% by weight.
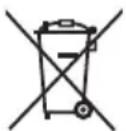

For the purpose of recycling to facilitate effective utilization of resources, please return this product to a nearby authorized collection center, registered dismantler of recycler, or Panasonic service center when disposing of this product.
Customer care number (Toll free): 080-6984-1333
Please see the Panasonic website for further information on collection centers, etc. or call the customer care toll-free number
https://www.panasonic.com/in/corporate/e-waste-management.html
| Do's & Don'ts | ||
| No | Do's | Don'ts |
| 1 | All electrical and electronic products are required to be handed over only to the Authorized recycler. | The product should not be opened by the user himself /herself, but only by authorized service personnel. |
| 2 | The product should be handed over only to authorized recycler for disposal. | The product is not meant for re-sale to any unauthorized agencies / scrap dealers / kabariwalas. |
| 3 | Keep the product in an isolated area, after it becomes non-functional / unreparable so as to prevent its accidental breakage. | The product is not meant for mixing into household waste stream. |
| 4 | Refer to Operating Instructions for handling of end of life products. | Do not keep any replaced spare part(s) from the product in an exposed area. |
| 5 | Always dispose of products that have reached end of life at Panasonic Life Solutions India Authorized Service Centre. | Do not donate old electronic items to anybody. Do not dispose of your product in garbage bins along with municipal waste that ultimately reaches landfill. |
| 6 | Wherever possible or as instructed, separate the packaging material according to responsible waste disposal options and sorting for recycling. | Do not give e-waste to informal and unorganized sectors like Local Scrap Dealers / Rag Pickers. |
Limited Warranty (ONLY FOR U.S.A.)
Panasonic Products Limited Warranty
Limited Warranty Coverage (For USA Only)
If your product does not work properly because of a defect in materials or workmanship, Panasonic Corporation of North America (referred to as “the warrantor”) will, for the length of the period indicated on the chart below, which starts with the date of original purchase (“warranty period”), at its option either (a) repair your product with new or refurbished parts, (b) replace it with a new or a refurbished equivalent value product, or (c) refund your purchase price. The decision to repair, replace or refund will be made by the warrantor.
| Product or Part Name Parts Labor | ||
| Wireless Speaker System 1 Year 1 Year | ||
| All included Accessories 90 Days Not | Applicable |
During the “Labor” warranty period there will be no charge for labor. During the “Parts” warranty period, there will be no charge for parts. This Limited Warranty excludes both parts and labor for non-rechargeable batteries, antennas, and cosmetic parts (cabinet). This warranty only applies to products purchased and serviced in the United States. This warranty is extended only to the original purchaser of a new product which was not sold “as is”.
Mail-In Service -- Online Repair Request
Online Repair Request
To submit a new repair request and for quick repair status visit our Web Site at https://help.na.panasonic.com/
When shipping the unit, carefully pack, include all supplied accessories listed in the Owner's Manual, and send it prepaid, adequately insured and packed well in a carton box. When shipping Lithium Ion batteries please visit our Web Site at https://help.na.panasonic.com/ as Panasonic is committed to providing the most up to date information. Include a letter detailing the complaint, a return address and provide a daytime phone number where you can be reached. A valid registered receipt is required under the Limited Warranty.
IF REPAIR IS NEEDED DURING THE WARRANTY PERIOD, THE PURCHASER WILL BE REQUIRED TO FURNISH A SALES RECEIPT/PROOF OF PURCHASE INDICATING DATE OF PURCHASE, AMOUNT PAID AND PLACE OF PURCHASE. CUSTOMER WILL BE CHARGED FOR THE REPAIR OF ANY UNIT RECEIVED WITHOUT SUCH PROOF OF PURCHASE.
Limited Warranty Limits and Exclusions
This warranty ONLY COVERS failures due to defects in materials or workmanship, and DOES NOT COVER normal wear and tear or cosmetic damage. The warranty ALSO DOES NOT COVER damages which occurred in shipment, or failures which are caused by products not supplied by the warrantor, or failures which result from accidents, misuse, abuse, neglect, mishandling, misapplication, alteration, faulty installation, set-up adjustments, misadjustment of consumer controls, improper maintenance, power line surge, lightning damage, modification, introduction of sand, humidity or liquids, commercial use such as hotel, office, restaurant, or other business or rental use of the product, or service by anyone other than a Factory Service Center or other Authorized Servicer, or damage that is attributable to acts of God.
THERE ARE NO EXPRESS WARRANTIES EXCEPT AS LISTED UNDER "LIMITED WARRANTY COVERAGE". THE WARRANTOR IS NOT LIABLE FOR INCIDENTAL OR CONSEQUENTIAL DAMAGES RESULTING FROM THE USE OF THIS PRODUCT, OR ARISING OUT OF ANY BREACH OF THIS WARRANTY.
(As examples, this excludes damages for lost time, travel to and from the servicer, loss of or damage to media or images, data or other memory or recorded content. The items listed are not exclusive, but for illustration only.)
ALL EXPRESS AND IMPLIED WARRANTIES, INCLUDING THE WARRANTY OF MERCHANTABILITY, ARE LIMITED TO THE PERIOD OF THE LIMITED WARRANTY.
Some states do not allow the exclusion or limitation of incidental or consequential damages, or limitations on how long an implied warranty lasts, so the exclusions may not apply to you. This warranty gives you specific legal rights and you may also have other rights which vary from state to state. If a problem with this product develops during or after the warranty period, you may contact your dealer or Service Center. If the problem is not handled to your satisfaction, then write to:
Panasonic Corporation of North America
Consumer Affairs Department
Two Riverfront Plaza
Newark NJ 07102-5490
PARTS AND SERVICE, WHICH ARE NOT COVERED BY THIS LIMITED WARRANTY, ARE YOUR RESPONSIBILITY. Product registration is not mandatory. Failure to complete the form does not affect the consumer's warranty rights.
Shop
Accessories!
for all your Panasonic gear
Go to
https://help.na.panasonic.com/
Get everything you need to get the most out of your Panasonic products
Accessories & Parts for your Camera, Phone, A/V products, TV, Computers & Networking,
Personal Care, Home Appliances, Headphones, Batteries, Backup Chargers & more...
Customer Services Directory
For Product Information, Operating Assistance, Parts, Owner's Manuals, Dealer and Service info go to https://help.na.panasonic.com/
For the hearing or speech impaired TTY: 1-877-833-8855
As of July 2024
The model number and serial number of this product can be found on either the back or the bottom of the unit. Please note them in the space provided below and keep for future reference.
MODEL NUMBER
SERIAL NUMBER
User memo:
DATE OF PURCHASE
DEALER NAME
DEALER ADDRESS
TELEPHONE NUMBER
Parte responsible: Panasonic Corporation of North America
Two Riverfront Plaza, Newark,
NJ 07102-5490
Contacto de Soporte: https://help.na.panasonic.com/
natural_image
Illustration of a rectangular electronic device with a textured surface and mounting holes (no text or symbols)natural_image
Illustration of a rectangular electronic device with a textured surface and ports (no text or symbols)Nota:
natural_image
Diagram of a mechanical tool with a rotating arrow indicating rotation (no text or symbols)| SC-BMAX10 | 9.3 kg (20.5 lbs) |
| SC-BMAX5 | 6.5 kg (14.3 lbs) |
natural_image
Diagram showing internal components of a computer tower with arrows indicating flow direction (no text or symbols present)natural_image
Diagram showing internal components of a computer tower with arrows indicating flow direction (no text or symbols present)natural_image
Diagram showing a device with an open case and a server rack, no text or symbols presentnatural_image
Illustration showing two hands installing or adjusting a wall-mounted electrical socket (no text or symbols present)Panasonic Corporation of North America
Two Riverfront Plaza, Newark, NJ 07102-5490
https://help.na.panasonic.com/
- Wireless Speaker System
- Sistema de altavoces
- Table of contents
- Supplied accessories
- Note:
- IMPORTANT
- SAFETY
- INSTRUCTIONS
- Safety precautions
- WARNING
- Unit
- Battery pack (Lithium ion battery pack)
- CAUTION
- AC power supply cord
- Battery
- For U.S.A
- THE FOLLOWING APPLIES ONLY IN THE U.S.A
- FCC Note:
- FCC Caution:
- FCC Radiation Exposure Statement
- For Thailand
- Transporting the unit
- Preparation
- Placement
- Vertical placement Horizontal placement
- CAUTION!
- Power sources
- Using the AC power source
- Connect the AC power supply cord.
- Conserving power
- Note on AC power supply cord
- (For the AC power plug of three pins with fuse)
- Using the built-in battery
- Overview of unit
- Bluetooth® operation
- Pairing a device
- Press [ ]
- Select "SC-BMAX10" or "SC-BMAX5" from the Bluetooth® menu of the device.
- Connecting a device
- Start playback on the device.
- Bluetooth® playback
- Multi Connect
- To switch between the connected devices
- Disconnecting a device
- While a Bluetooth® device is connected
- Press and hold [▶/III].
- Bluetooth® standby
- Press and hold [ ] to turn on this function.
- Using a USB device
- USB playback
- Charging a device
- External equipment
- Using the optical input
- Using the auxiliary input
- Connecting additional units
- On main unit: Start your desired playback.
- Using a microphone or guitar
- Adjust echo level
- Illumination effects
- Using strobe lights
- Others
- Auto off
- Software update
- Troubleshooting
- Common problems
- The unit does not work.
- Sound is distorted or no sound.
- A humming sound can be heard during playback.
- The sound level reduces.
- USB
- The USB device or the contents in it cannot be read.
- Slow operation of the USB device.
- Bluetooth®
- Pairing cannot be done.
- The device cannot be connected.
- The device is connected but audio cannot be heard through the system.
- Playback during Multi Connect is not working or no sound.
- Sound from the device is interrupted.
- The battery indicator blinks while connected to the AC power supply cord.
- Factory reset
- Reset the memory when the following situations occur:
- Turn [VOLUME] to set the volume to "0".
- Press and hold [INPUT SELECTOR] and [BASS].
- Maintenance
- Disconnect the AC power supply cord before maintenance. Clean this system with a soft, dry cloth.
- References
- About Bluetooth®
- Frequency band
- Certification
- Restrictions of use
- Range of use
- Interference from other devices
- Intended usage
- Licenses
- Specifications
- General
- Amplifier section
- RMS output power
- Bluetooth® section
- Terminals section
- Speaker section
- Battery section
- To remove the battery when disposing of this unit
- Remove the battery cover.
- Remove the battery.
- Handling of the used rechargeable battery
- To dispose of or transfer this unit
- For India
- Limited Warranty (ONLY FOR U.S.A.)
- Panasonic Products Limited Warranty
- Limited Warranty Coverage (For USA Only)
- Mail-In Service -- Online Repair Request
- Online Repair Request
- Limited Warranty Limits and Exclusions
- ALL EXPRESS AND IMPLIED WARRANTIES, INCLUDING THE WARRANTY OF MERCHANTABILITY, ARE LIMITED TO THE PERIOD OF THE LIMITED WARRANTY.
- Shop
- Accessories!
- Customer Services Directory
- Nota:
Brand : PANASONIC
Model : SC-BMAX5
Category : Hi-Fi System