V TWELVE DSP MK2 - Receiver Helix - Free user manual and instructions
Find the device manual for free V TWELVE DSP MK2 Helix in PDF.


| Product Type | Car Audio Digital Signal Processor (DSP) with Amplifier |
| Brand | Helix |
| Model | V TWELVE DSP MK2 |
| Channels | 12 |
| Power Output (RMS) | 4 x 60W @ 4Ω or 12 x 25W @ 4Ω (configurable) |
| Dimensions (W x H x D) | 210 x 45 x 130 mm |
| Weight | 1.2 kg |
| Power Supply | 12V DC (car battery, 10-15V operating range) |
| Current Consumption | 5A max |
| Inputs | 4 high-level speaker inputs, 2 optical (Toslink), 2 coaxial (S/PDIF), Bluetooth audio streaming |
| Outputs | 12 RCA preamp outputs (6 pairs) |
| Frequency Response | 10 Hz - 40 kHz (±0.5 dB) |
| Signal-to-Noise Ratio | 110 dB (A-weighted) |
| THD+N | <0.002% |
| DSP Processing | 64-bit floating point, FIR filters, time alignment, 31-band EQ, crossover, phase adjustment |
| Remote Control | Included wired remote for volume and presets |
| Bluetooth | Built-in for audio streaming and app control (iOS/Android) |
| Compatibility | Works with factory and aftermarket radios, requires 12V vehicle electrical system |
| Installation | Professional installation recommended; can be mounted under seat or in trunk |
| Maintenance & Cleaning | Wipe with a dry soft cloth; avoid moisture and cleaning agents |
| Safety | Disconnect from battery before installation; ensure proper ventilation; do not expose to water |
| Spare Parts & Repairability | No user-serviceable parts; contact authorized Helix dealer for repairs |
| General Information | Professional-grade DSP for custom car audio systems; designed in Germany |
Frequently Asked Questions - V TWELVE DSP MK2 Helix
User questions about V TWELVE DSP MK2 Helix
0 question about this device. Answer the ones you know or ask your own.
Ask a new question about this device
Download the instructions for your Receiver in PDF format for free! Find your manual V TWELVE DSP MK2 - Helix and take your electronic device back in hand. On this page are published all the documents necessary for the use of your device. V TWELVE DSP MK2 by Helix.
USER MANUAL V TWELVE DSP MK2 Helix
12-channel amplifier with integrated DSP
natural_image
Diagram of a NanoFit Adapter cable with two connectors (no text or symbols on the diagram itself)③ Control Taster
Kanal A = Vorne links
Kanal C = Hinten links
Jumper 3 (J 3): Kanal G - J
Jumper 4 (J 4): Kanal K - L
natural_image
Abstract red geometric shape on black background, no text or symbols presentnatural_image
Close-up of a curved wire symbol on dark background, enclosed in red square (no text or labels)→ Rear L High – Hochtöner HL
→ Rear R High – Hochtöner HR
→ Rear L Low – Tieftöner HL
→ Rear R Low – Tieftöner HR
→ Subwoofer 1 – Subwoofer
→ Subwoofer 2 – Subwoofer
flowchart
graph TD
    A["Input A"] --> B["Front L Full"]
    A --> C["Front R Full"]
    A --> D["Rear L Full"]
    A --> E["Rear R Full"]
    B --> F["Input B"]
    C --> G["Input C"]
    E --> H["Input D"]
    F --> I["Summen-signal A bis D"]
    G --> J["Subwoofer 1 (K)"]
    H --> K["Subwoofer 1 (K)"]
    I --> L["Front L Full (A) SFX - Front Processing"]
    J --> M["Front R Full (B) SFX - Front Processing"]
    K --> N["Front R Full (B) SFX - Front Processing"]
    L --> O["Front R Full (B) SFX - Front Processing"]
    M --> P["Front R Full (B) SFX - Front Processing"]
    N --> Q["Front R Full (B) SFX - Front Processing"]
    O --> R["Front R Full (B) SFX - Front Processing"]
    P --> S["Front R Full (B) SFX - Front Processing"]
    Q --> T["Front R Full (B) SFX - Front Processing"]
    R --> U["Front R Full (B) SFX - Front Processing"]
    S --> V["Front R Full (B) SFX - Front Processing"]
    T --> W["Front R Full (B) SFX - Front Processing"]
    U --> X["Front R Full (B) SFX - Front Processing"]
    V --> Y["Front R Full (B) SFX - Front Processing"]
    W --> Z["Front R Full (B) SFX - Front Processing"]
    X --> AA["Front R Full (B) SFX - Front Processing"]
    Y --> AB["Front R Full (B) SFX - Front Processing"]
    Z --> AC["Front R Full (B) SFX - Front Processing"]
    AA --> AD["Front R Full (B) SFX - Front Processing"]
    AB --> AE["Front R Full (B) SFX - Front Processing"]
    AC --> AF["Front R Full (B) SFX - Front Processing"]
    AD --> AG["Front R Full (B) SFX - Front Processing"]
    AE --> AH["Front R Full (B) SFX - Front Processing"]
    AF --> AI["Front R Full (B) SFX - Front Processing"]
    AG --> AJ["Front R Full (B) SFX - Front Processing"]
    AH --> AK["Front R Full (B) SFX - Front Processing"]
    AI --> AL["Front R Full (B) SFX - Front Processing"]
    AJ --> AM["Front R Full (B) SFX - Front Processing"]
    AK --> AN["Front R Full (B) SFX - Front Processing"]
    AL --> AO["Front R Full (B) SFX - Front Processing"]
    AM --> AP["Front R Full (B) SFX - Front Processing"]
    AN --> AQ["Front R Full (B) SFX - Front Processing"]
    AO --> AR["Front R Full (B) SFX - Front Processing"]
    AP --> AS["Front R Full (B) SFX - Front Processing"]
    AQ --> AT["Front R Full (B) SFX - Front Processing"]
    AR --> AU["Front R Full (B) SFX - Front Processing"]
    AS --> AV["Front R Full (B) SFX - Front Processing"]
    AT --> AW["Front R Full (B) SFX - Front Processing"]
    AU --> AX["Front R Full (B) SFX - Front Processing"]
    AV --> AY["Front R Full (B) SFX - Front Processing"]
    AW --> AZ["Front R Full (B) SFX - Front Processing"]
    AX --> BA["Front R Full (B) SFX - Front Processing"]
    AY --> BB["Front R Full (B) SFX - Front Processing"]
    AZ --> BC["Front R Full (B) SFX - Front Processing"]
    BA --> BD["Front R Full (B) SFX - Front Processing"]
    BB --> BE["Front R Full (B) SFX - Front Processing"]
    BC --> BF["Front R Full (B) SFX - Front Processing"]
    BE --> BG["Front R Full (B) SFX - Front Processing"]
    BF --> BH["Front R Full (B) SFX - Front Processing"]
    BG --> BI["Front R Full (B) SFX - Front Processing"]
    BH --> BJ["Front R Full (B) SFX - Front Processing"]
    BI --> BK["Front R Full (B) SFX - Front Processing"]
    BJ --> BL["Front R Full (B) SFX - Front Processing"]
    BK --> BM["Front R Full (B) SFX - Front Processing"]
    BL --> BN["Front R Full (B) SFX - Front Processing"]
    BM --> BO["Front R Full (B) SFX - Front Processing"]
    BN --> BP["Front R Full (B) SFX - Front Processing"]
    BO --> BQ["Front R Full (B) SFX - Front Processing"]
    BP --> BR["Front R Full (B) SFX - Front Processing"]
    BQ --> BS["Front R Full (B) SFX - Front Processing"]
    BR --> BT["Front R Full (B) SFX - Front Processing"]
    BS --> BU["Front R Full (B) SFX - Front Processing"]
    BT --> BV["Front R Full (B) SFX - Front Processing"]
    BU --> BW["Front R Full (B) SFX - Front Processing"]
    BV --> BX["Front R Full (B) SFX - Front Processing"]
    BW --> BY["Front R Full (B) SFX - Front Processing"]
    BX --> BZ["Front R Full (B) SFX - Front Processing"]
    BY --> CA["Front R Full (B) SFX - Front Processing"]
    CA --> CB["Front R Full (B) SFX - Front Processing"]
    CB --> CC["Front R Full (B) SFX - Front Processing"]
    CC --> CD["Front R Full (B) SFX - Front Processing"]
    CD --> CE["Front R Full (B) SFX - Front Processing"]
    CE --> CF["Front R Full (B) SFX - Front Processing"]
    CF --> CG["Front R Full (B) SFX - Front Processing"]
    CG --> CH["Front R Full (B) SFX - Front Processing"]
    CH --> CI["Front R Full (B) SFX - Front Processing"]
    CI --> CJ["Front R Full (B) SFX - Front Processing"]
    CJ --> CK["Front R Full (B) SFX - Front Processing"]
    CK --> CL["Front R Full (B) SFX - Front Processing"]
    CL --> CM["Front R Full (B) SFX - Front Processing"]
    CM --> CN["Front R Full (B) SFX - Front Processing"]
    CN --> CO["Front R Full (B) SFX - Front Processing"]
    CO --> CP["Front R Full (B) SFX - Front Processing"]
    CP --> CQ["Front R Full (B) SFX - Front Processing"]
    CQ --> CR["Front R Full (B) SFX - Front Processing"]
    CR --> CS["Front R Full (B) SFX - Front Processing"]
    CS --> CT["Front R Full (B) SFX - Front Processing"]
    CT --> CU["Front R Full (B) SFX - Front Processing"]
    CU --> CV["Front R Full (B) SFX - Front Processing"]
    CV --> CW["Front R Full (B) SFX - Front Processing"]
    CW --> CX["Front R Full (B) SFX - Front Processing"]
    CX --> CY["Front R Full (B) SFX - Front Processing"]
    CY --> CZ["Front R Full (B) SFX - Front Processing"]
    CZ --> DA["Front R Full (B) SFX - Front Processing"]
    DA --> DB["Front R Full (B) SFX - Front Processing"]
    DB --> DC["Front R Full (B) SFX - Front Processing"]
    DC --> DD["Front R Full (B) SFX - Front Processing"]
    DD --> DE["Front R Full (B) SFX - Front Processing"]
    DE --> DF["Front R Full (B) SFX - Front Processing"]
    DF --> DG["Front R Full (B) SFX - Front Processing"]
    DG --> DH["Front R Full (B) SFX - Front Processing"]
    DH --> DI["Front R Full (B) SFX - Front Processing"]
    DI --> DJ["Front R Full (B) SFX - Front Processing"]
    DJ --> DK["Front R Full (B) SFX - Front Processing"]
    DK --> DL["Front R Full (B) SFX - Front Processing"]
    DL --> DJ
→ Rear L High – Hochtöner HL
→ Rear L Low – Tieftöner HL
→ Rear R High – Hochtöner HR
→ Rear R Low – Tieftöner HR
→ Subwoofer 1 – Subwoofer
→ Subwoofer 2 – Subwoofer
bar
| Virtual Inputs | Side to Virtual Routing (%) | Side to Virtual Routing (%) | Side to Output Routing (%) | |---|---|---|---| | [Virtual A] | Front L Full | 100.0 | Front L High | | [Virtual A] | Front L Full | 100.0 | Amp Out A | | [Virtual B] | Front R Full | 100.0 | Front R High | | [Virtual B] | Front R Full | 100.0 | Amp Out B | | [Virtual C] | Rear L Full | 100.0 | Front L Mid | | [Virtual C] | Rear L Full | 100.0 | Amp Out C | | [Virtual D] | Rear R Full | 100.0 | Front R Mid | | [Virtual D] | Rear R Full | 100.0 | Amp Out D | | [Virtual E] | Front Center Full | 100.0 | Front L Low | | [Virtual E] | Rear Fill Full | 100.0 | Amp Out E | | [Virtual F] | Pass Through 1 | 100.0 | Front R Low | | [Virtual F] | Pass Through 2 | 100.0 | Amp Out F | | [Virtual G] | Pass Through 1 | 100.0 | Rear L Full | | [Virtual G] | Pass Through 2 | 100.0 | Amp Out G | | [Virtual H] | Pass Through 3 | 100.0 | Rear L Full | | [Virtual H] | Pass Through 4 | 100.0 | Amp Out H | | [Virtual I] | Pass Through 3 | 100.0 | Front Center High | | [Virtual I] | Pass Through 4 | 100.0 | Amp Out I | | [Virtual J] | Pass Through 4 | 100.0 | Front Center Low | | [Virtual K] | Subwoofer1 | 100.0 | Subwoofer1 | | [Virtual L] | Subwoofer2 | 100.0 | Subwoofer2 | | [Virtual M] | Pass Through 4 | 100.0 | Line Out 1 | | [Virtual N] | Pass Through 5 | 100.0 | Line Out 2 | DRAG & DROPbar_stacked
| Category | Platform | Percentage (%) | | :--- | :--- | :--- | | Front L Full | VirtualA | 100.0 | | Front L Full | VirtualB | 100.0 | | Forward H-FU | VirtualA | 100.0 | | Forward H-FU | VirtualB | 100.0 | | Forward L Full | VirtualC | 100.0 | | Forward L Full | VirtualD | 100.0 | | Forward B Full | VirtualC | 100.0 | | Forward B Full | VirtualD | 100.0 | | Forward L Full | VirtualC | 100.0 | | Forward L Full | VirtualD | 100.0 | | Forward B Full | VirtualC | 100.0 | | Forward B Full | VirtualD | 100.0 |
Remote Output Configuration
ADEP.3 Configuration
natural_image
Close-up of an electronic circuit board with multiple 10-pin connectors and labeled input ports (no readable text beyond component labels)natural_image
Close-up of electronic circuit board with multiple LED connectors and a green checkmark overlay (no readable text or symbols)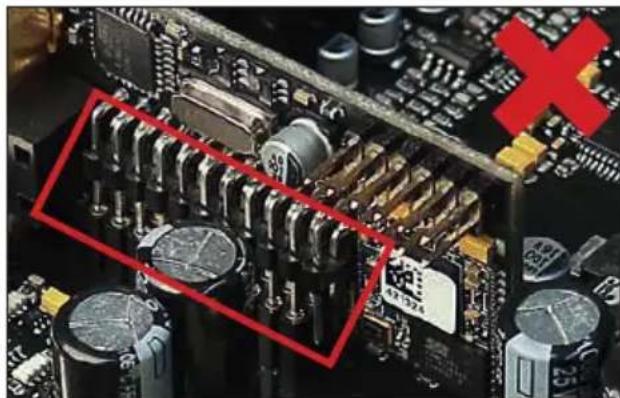
natural_image
Close-up of a computer motherboard with visible circuitry and capacitors, no readable text or symbols present.ACO – Advanced 32 Bit CoProcessor
- @ 4 Ohm....12 x 75 Watt
- @ 2 Ohm.... 12 x 120 Watt
Congratulations on your purchase of this innovative and high-qual ity HELIX product.
Thanks to more than 30 years of experience in research and development of audio products the HELIX V TWELVE DSP MK2 sets new standards in the range of digital amplifiers.
We wish you many hours of enjoyment with your new HELIX V TWELVE DSP MK2.
Yours,
AUDIOTEC FISCHER
General instructions
General installation instructions for HELIX components
To prevent damage to the unit and possible injury, read this manual carefully and follow all installation instructions. This product has been checked for proper function prior to shipping and is guaranteed against manufacturing defects.
Before starting your installation, disconnect the battery's negative terminal to prevent damage to the unit, fire and / or risk of injury. For a proper performance and to ensure full warranty coverage, we strongly recommend to get this product installed by an authorized HELIX dealer.
Install your HELIX V TWELVE DSP MK2 in a dry location with sufficient air circulation for proper cooling of the equipment. The amplifier should be secured to a solid mounting surface using proper mounting hardware. Before mounting, carefully examine the area around and behind the proposed installation location to insure that there are no electrical cables or components, hydraulic brake lines or any part of the fuel tank located behind the mounting surface. Failure to do so may result in unpredictable damage to these components and possible costly repairs to the vehicle.
General instruction for connecting the HELIX V TWELVE DSP MK2 amplifier
The HELIX V TWELVE DSP MK2 amplifier may only be installed in vehicles which have a 12 Volts negative terminal connected to the chassis ground. Any other system could cause damage to the amplifier and the electrical system of the vehicle.
The positive cable from the battery for the complete system should be provided with a main fuse at a distance of max. 30 cm from the battery. The value of the fuse is calculated from the maximum total current input of the car audio system.
Use only suitable cables with sufficient cable cross-section for the connection of HELIX V TWELVE DSP MK2. The fuses may only be replaced by identically rated fuses (2 x 30 A) to avoid damage of the amplifier.
Prior to installation, plan the wire routing to avoid any possible damage to the wire harness. All cabling should be protected against possible crushing or pinching hazards. Also avoid routing cables close to potential noise sources such as electric motors, high power accessories and other vehicleharnesses.
Connectors and control units
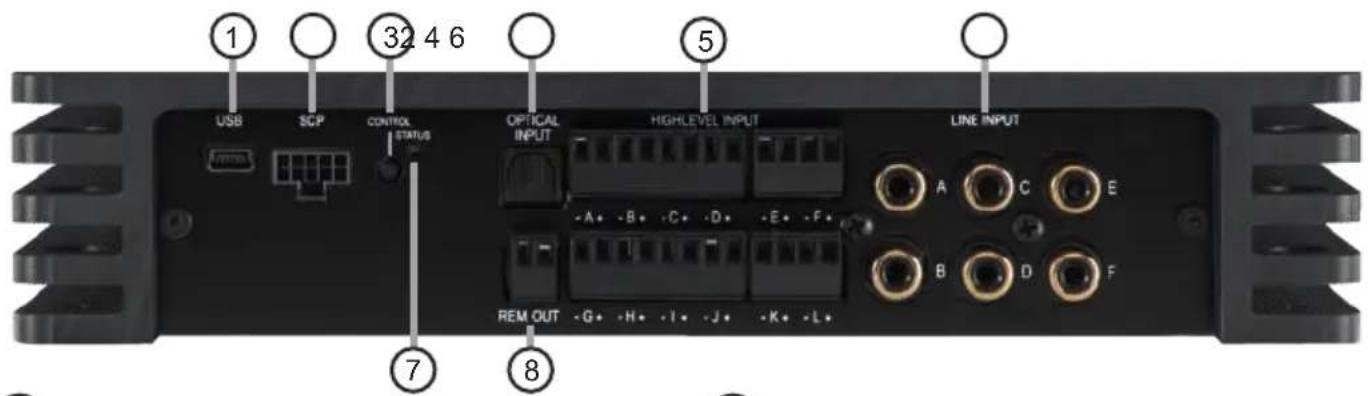
① USB Input
Connects the HELIX V TWELVE DSP MK2 to your PC.
② SCP (Smart Control Port)
Multifunction interface for e.g. an optional remote control or other HELIX accessory.
③ Control pushbutton
Use this button to either switch between the setups or initiate a reset of the device.
④ Optical Input
Optical input for digital stereo signals (SPDIF format).
⑤ Highlevel Input
Highlevel speaker inputs for connecting a factory radio or an aftermarket radio without lowlevel line outputs.
⑥ Line Input
RCA / Cinch inputs for connecting pre-amplifier signals.
⑦ Status LED
The Status LED indicates the operating mode of the amplifier and its DSP memory.
⑧ Rem. Out
The remote output has to be used to turn on / off external amplifiers. Both connections are internally wired parallel.
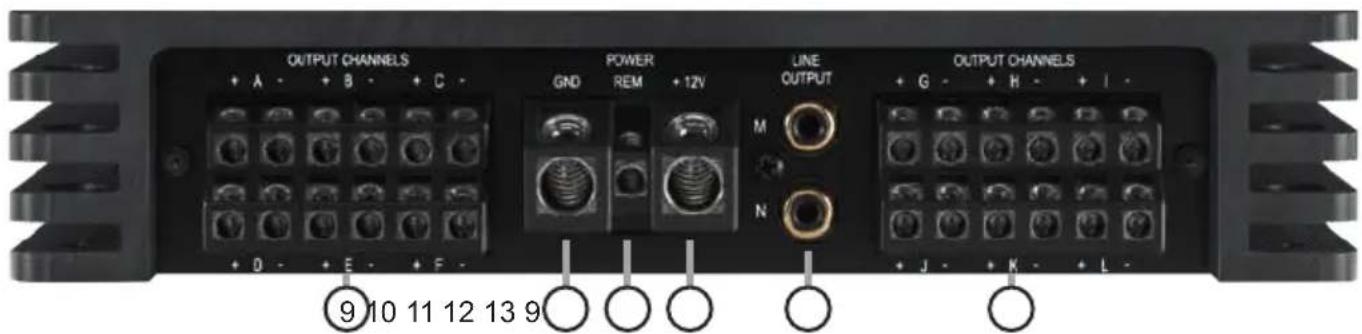
⑨ Output Channels
Speaker outputs for connecting speaker systems.
10 GND
Connector for the ground cable (negative terminal of the battery or metal body of the vehicle).
11 REM
Connector for the remote cable of the radio.
⑫ +12 V
Connector for the +12 V power cable to the positive terminal of the battery.
13 Line Output
Line outputs for connecting external amplifiers. Make sure that the remote output (Rem. Out) is used to turn on these devices.
① USB Input
Connect your personal computer to the V TWELVE DSP MK2 using the provided USB cable. The required PC software to configure this amplifier can be downloaded from the Audiotec Fischer website www.audiotec-fischer.com.
Please note: It is not possible to connect any USB storage devices.
② SCP (Smart Control Port)
This multi-functional input is designed for HELIX V TWELVE DSP MK2 accessory products like a remote control which allows to adjust several features of the signal processor. Depending on the type of remote control, at first its functionality has to be defined in the “Device Configuration Menu” of the DSP PC-Tool software.
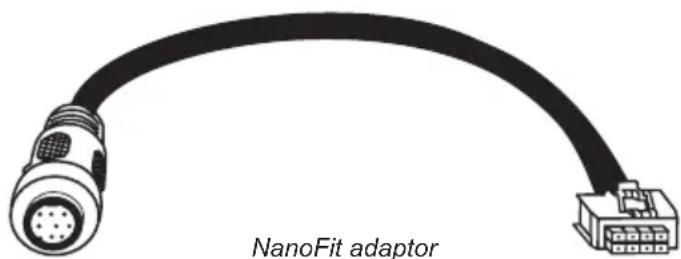
Attention: If the accessory product does not have a NanoFit connector solely use the NanoFit adaptor which is included in delivery for connection.
natural_image
Diagram of a NanoFit adaptor connector with two pins (no text or symbols on the diagram itself)③ Control pushbutton
The V TWELVE DSP MK2 provides 10 internal memory locations for sound setups. The Control pushbutton allows the user to switch between two memory locations or to perform a device reset. The setups can be defined in the DSP PC-Tool.
-
Setup switch: Press Control pushbutton for 1 second. The memory locations one and two are defined by default. Switching is indicated by a single red flash of the Status LED. Alternatively, the optional URC.3 remote control can be used for switching. To switch between all internal memory locations, optional accessories like the DIRECTOR display remote control, CONDUCTOR or WIFI CONTROL are required.
-
Device reset: Press pushbutton for five seconds. This completely erases the internal memory and is indicated by a continuous red glowing and constant green flashing of the Status LED.
Attention: After erasing the setups from memory the V TWELVE DSP MK2 will not reproduce any audio output until the device is updated via the DSP PC-Tool software.
④ Optical Input
Optical input in SPDIF format for connecting signal sources with a digital audio output. The sampling rate of this input must be between 12 and 96 kHz. The input signal is automatically adapted to the internal sample rate.
In order to control the volume of this input, we recommend to use an optional remote control or the WIFI CONTROL.
Note: This amplifier can only handle stereo input signals and no MP3- or Dolby-coded digital audio stream!
Note: In standard configuration the manual activation via an optional remote control is configured.
⑤ Highlevel Input
12-channel highlevel loudspeaker input to connect the amplifier directly to loudspeaker outputs of OEM / aftermarket radios or OEM amplifiers that do not have any pre-amplifier outputs. Input sensitivity
als factory-set to 11.3 Volts. However, it is possible to optimally adapt the input sensitivity to the signal source using the DSP PC-Tool software (DCM menu → Signal Management) and by repositioning jumpers inside the device (see page 30, point 4; Adjustment of the input sensitivity).
Important: It is mandatory to properly adapt the input sensitivity of the V TWELVE DSP MK2 to the signal source before first use. Disregarding this may cause severe damage to the amplifier.
Attention: Solely use the pluggable screw-terminals for the highlevel connectors which are included in delivery or an optional available cable harness from the HELIX accessory assortment!
Important: It is strictly forbidden to use the High-level Input and lowlevel Line Input of an individual channel at the same time as this may cause severe damage to the lowlevel line outputs of your car radio. Nevertheless it is possible to use the Highlevel Input of one channel and the lowlevel Line Input of another channel simultaneously.
⑥ Line Input
6-channel pre-amplifier input to connect signal sources such as radios. Input sensitivity is factory-set to 2.8 Volts.
It is possible to optimally adapt the input sensitivity to the signal source using the DSP PC-Tool software (DCM menu → Signal management) and by repositioning jumpers inside the device (see page 30, point 4; Adjustment of the input sensitivity).
⑦ Status LED
The Status LED indicates the operating mode of the amplifier and of its memory.
Green: Amplifier is ready for operation.
Orange: Power Save Mode is active.
Red: Protection Mode is active. This may have different root causes. The HELIX V TWELVE DSP MK2 is equipped with protection circuits against over- and undervoltage as well as overheating. Please check for connecting failures such as short-circuits or other wrong connections.
If the amplifier is overheated the internal temperature protection switches off the remote and signal output until it reaches a safe temperature level again.
Red / green slow flashing: No operating software installed. Connect the amplifier to the DSP PC-Tool software and confirm the automatic update of the operating system. You will find the latest version of the DSP PC-Tool software at www.audiotec-fischer.com.
Red / green fast flashing: The currently selected sound setup memory is empty. A new setup has to be loaded via the DSP PC-Tool software or switch to a memory position with existing sound setup.
⑧ Rem. Out
We strongly recommend to use this output for turning on / off additional amplifiers that are connected to the Line Output of the HELIX V TWELVE DSP MK2. This is essential to avoid any interfering signals. This output is activated automatically as soon as the booting process of the DSP is completed. Additionally this output will be turned off during the "Power Save Mode" or a software update process.
⑨ Output Channels
Speaker outputs to connect speaker systems. The impedance per channel must not be lower than 2 Ohms.
Important: We highly recommend to make the general settings in the DSP PC-Tool software before the first start-up. Especially if the V TWELVE DSP MK2 will be used to drive fully active speaker systems, a wrong setup can destroy your tweeters right away.
10 GND
The ground cable should be connected to a common ground reference point (this is located where the negative terminal of the battery is grounded to the metal body of the vehicle) or to a prepared metal location on the vehicle chassis i.e. an area which has been cleaned of all paint residues. Recommended cross section: min. 16 mm ^2 / AWG 6.
11 REM
The remote input has to be used to turn on / off the V TWELVE DSP MK2 if the signal source which is connected to the Highlevel Input is not activating the “automatic turn-on” function or if the amplifier shall only be activated / deactivated by a remote signal applied to the remote input. The remote lead should be connected to the remote output / automatic antenna (aerial positive) output of the head unit / car radio. This is only activated if the head unit is switched on. Thus the amplifier is switched on and off together with the head unit. This input needn’t to be assigned if the Highlevel Input is used. To deactivate the “automatic turn-on” function
read the description on page 33, point 7; Configuration of the remote input.
⑫ +12 V
Connect the +12 V power cable to the positive terminal of the battery. Recommended cross section: min. 16 mm ^4 / AWG 6.
13 Line Output
Processed 2-channel pre-amplifier output with a maximum output voltage of 3 Volts for connecting additional power amplifiers. Please make sure that you always turn on/off external amplifiers using the remote output (Rem. Out) of the V TWELVE DSP MK2. Never directly control the external amps by a signal from the ignition switch of your car! Additionally this output will be turned off when the "Power Save Mode" of the amplifier is active. The outputs can be assigned to any of the inputs as desired using the DSP PC-Tool software.
The HELIX V TWELVE DSP MK2 must be connected as follows:
Caution: Carrying out the following steps will require special tools and technical knowledge. In order to avoid connection mistakes and / or damage, ask your dealer for assistance if you have any questions and follow all instructions in this manual (see page 25). It is recommended that this unit will be installed by an authorized HELIX dealer.
1. Connecting the pre-amplifier inputs
Use the correct cable (RCA / cinch cable) to connect these inputs to the pre-amplifier / lowlevel / cinch outputs of your head unit / car radio or factory installed amplifier. Each input can be assigned to any output using the DSP PC-Tool software. The automatic turn-on circuit does not work when using the pre-amplifier inputs. In this case the remote input has to be connected to activate the HELIX V TWELVE DSP MK2.
Important: It is strictly forbidden to use the Highlevel and lowlevel Line Input of an individual channel at the same time as this may cause severe damage to the lowlevel line outputs of your head unit / car radio / factory installed amplifier. Nevertheless it is possible to use the Highlevel Input of one channel and the lowlevel Line Input of another channel simultaneously.
2. Connecting the highlevel speaker inputs
The highlevel loudspeaker inputs can be connected directly to the loudspeaker outputs of an OEM radio, aftermarket radio or factory installed amplifier using appropriate cables (loudspeaker cables with 1 mm^2 / AWG 18 max. ).
We recommend the following channel assignment if a common car radio will be connected to the signal processor:
Channel A = Front left
Channel B = Front right
Channel C = Rear left
Channel D = Rear right
Actually it is not mandatory to use all high level speaker inputs. If only two channels will be connected we recommend to use the channels A and B. Make sure that the polarity is correct. If one or more connections have reversed polarity it may affect the performance of the amplifier.
If this input is used the remote input does not need to be connected as the amplifier will automatically turn on once a loudspeaker signal is received.
3. Connecting a digital signal source
If you have a signal source with an optical digital output you can connect it to the amplifier using the appropriate input. In standard configuration the manual activation via an optional remote control is configured.
Alternatively you can activate the automatic turn-on feature in the DCM menu of the DSP PC-Tool software. The feature activates the digital input as soon as a digital audio signal is detected.
The automatic turn-on circuit does not work when a digital input is used. Therefore it is mandatory to connect the remote input (REM).
Important: The signal of a digital audio source normally does not contain any information about the volume level. Keep in mind that this will lead to full level on the outputs of the HELIX V TWELVE DSP MK2 and your connected amplifiers. This may cause severe damage to your speakers. We strongly recommend to use an optional remote control for adjusting the volume level of the digital signal input!
Information: The HELIX V TWELVE DSP MK2 can only handle uncompressed digital stereo signals in PCM format with a sample rate between 12 kHz and 96 kHz and no MP3- or Dol-by-coded digital audio stream!
4. Adjustment of the input sensitivity
Attention: It is mandatory to properly adapt the input sensitivity of the V TWELVE DSP MK2 to the signal source in order to avoid damage to the amplifier.
The input sensitivity can be adjusted via the DSP PC-Tool software and by repositioning jumpers inside the device. The setting will be undertaken in two steps:
- Pre-adjustment of the value range using the jumpers inside the device.
- Exact adjustment of the input sensitivity by using the DSP PC-Tool software.
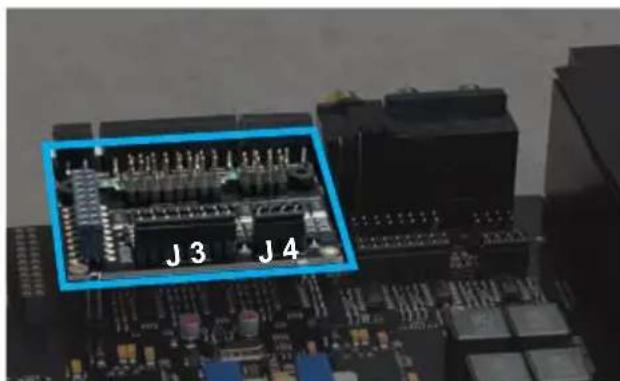
Req. step 1: The factory setting of the input sensitivity (Highlevel 11.3 Volts; RCA / Cinch 2.8 Volts) of the V TWELVE DSP MK2 are appropriate for the most common radios. As soon as the connected signal source provides an maximum input voltage of 14 Volts – for example, if a factory installed amplifier is used as signal source – all four internal jumpers has to be repositioned to the “High Voltage Range” (Highlevel 8 - 32 Volts; RCA / Cinch 2 - 8 Volts). To get access to the jumpers the device has to be opened. Therefore dismantle the side panel where the USB input is located by removing the two Phillips and two Allen screws and pull out the bottom plate sideways.
Now you have access to the jumpers.
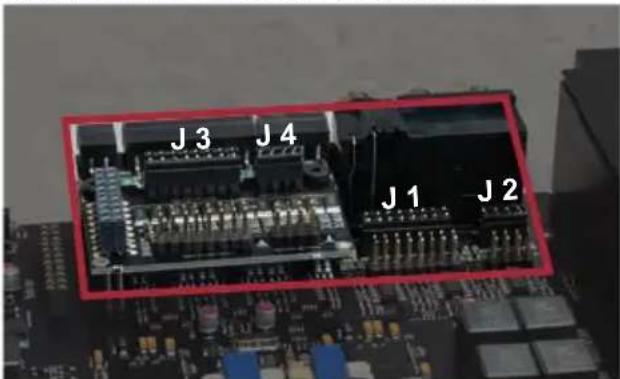
Overview plug-in positions:
Jumper 1 (J 1): Channel A - D
Jumper 2 (J 2): Channel E - F
Jumper 3 (J 3): Channel G - J
Jumper 4 (J 4): Channel K - L
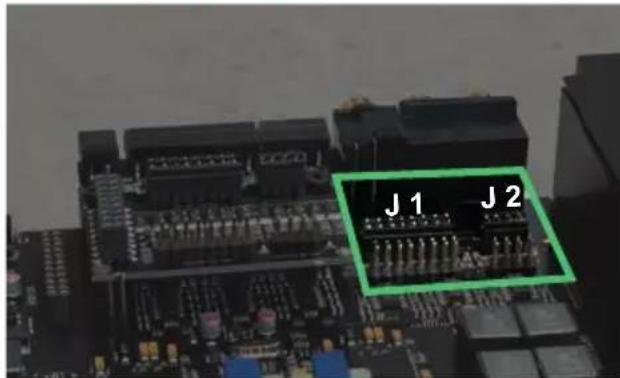
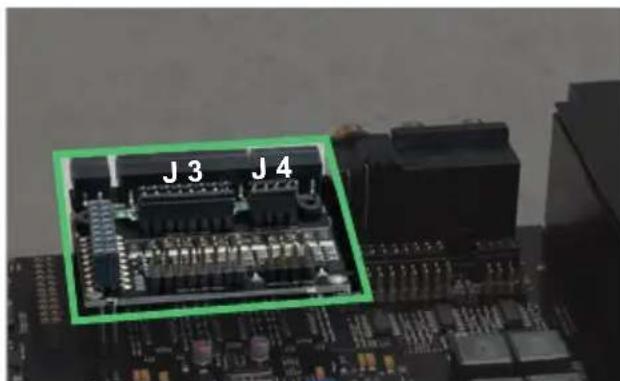
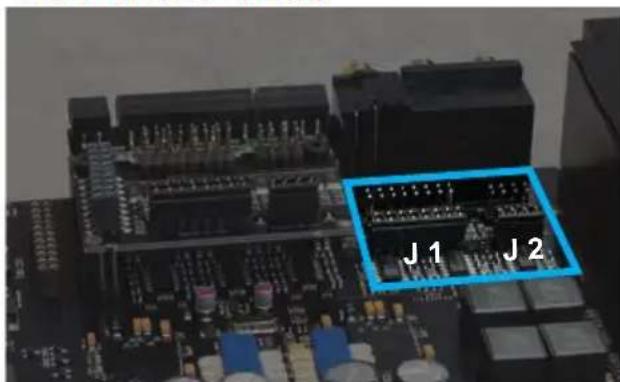
For repositioning a jumper simply pull it upwards and plug it into the desired plug position. Make sure that the jumper is reinserted properly and all pins are fully inserted.
If you are not sure regarding the signal sources output voltage, please contact your HELIX specialist dealer.
Low Voltage Range jumper plug-in positions (by default):
Value range: Highlevel 4 - 16 Volts
RCA / Cinch 1 - 4 Volts
High Voltage Range jumper plug-in positions:
Value range: Highlevel 8 - 32 Volts
RCA / Cinch 2 - 8 Volts
Installation
After setting the jumpers to the desired plug-in positions, you can reassemble the amplifier.
Reg. step 2: Now you can optimally adapt the input sensitivity to the connected signal source by using the DSP PC-Tool software.
Note: Mute all signal outputs of the V TWELVE DSP MK2 during this setup.
Therefore follow the subsequent steps:
- Turn on the amplifier and then start the software. TFind the setting for adjusting the input sensitivity in the "Signal Management" tab of the DCM menu under the item "Main Input → Input Gain".
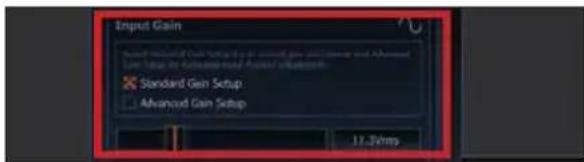
- Select the setup method to adjust the input sensitivity.
Standard Gain Setup: This method allows go globally set the input sensitivity for all input channels (only with "Low Voltage Range" jumper plug-in position – see page 31).
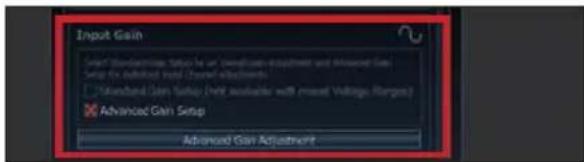
Advanced Gain Setup: With this method, both a global setting of all channels and an individual setting for the individual channel pairs is possible.(Automatically activated at High Voltage Range jumper positions)
- Select the used input (RCA / Cinch or high-level.
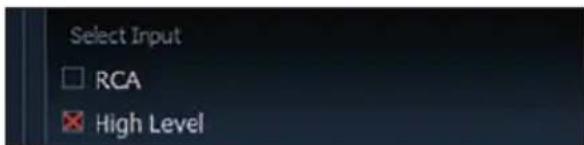
-
Adjust the volume of your radio to approx. 90 % of the max. volume and playback an appropriate test tone, e.g. pink noise (0 dB).
-
If the clipping indicator in the DSP PC-Tool already lights up (see following picture), you have to reduce the input sensitivity using the scroll bar until the indicator turns off.

natural_image
Abstract red geometric shape on black background, no text or symbols present- Increase the input sensitivity until the clipping indicator lights up. Now turn the control one step back so the indicator turns off again.

natural_image
Close-up of a curved metallic wire or hook on dark background, enclosed in red square (no text or symbols)Various adjustment examples of the input sensitivity can be found on page 34. For further applications please contact your HELIX specialist dealer.
5. Connection to power supply
Make sure to disconnect the battery before installing the HELIX V TWELVE DSP MK2!
Connect the +12 V power cable to the positive terminal of the battery. The positive wire from the battery to the amplifier power terminals needs to have an inline fuse at a distance of less than 12 inches (30 cm) from the battery. The value of the fuse is calculated from the maximum total current draw of the whole car audio system (V TWELVE DSP MK2 = max. 80 A RMS at 12 V power supply). If your power wires are short (less than 1 m / 40") then a wire gauge of 16 mm² / AWG 6 will be sufficient. In all other cases we strongly recommend gauges of 25 - 35 mm² / AWG 4 - 2!
The ground cable (same gauge as the +12 V wire) should be connected to a common ground reference point (this is located where the negative terminal of the battery is grounded to the metal body of the vehicle), or to a prepared metal location on the vehicle chassis, i.e. an area which has been cleaned of all paint residues.
6. Connecting the remote input
The remote input (REM) has to be connected to the radio remote output if the amplifiers lowlevel Line Inputs or the Optical Input is solely / are used as signal input/s. We do not recommend controlling the remote input via the ignition switch to avoid pop noise during turn on / off. If the Highlevel Input is used this input does not need to be connected as long as the car radio has BTL output stages.
7. Configuration of the remote input
The V TWELVE DSP MK2 will be turned on automatically if the Highlevel Input is used or if a signal is applied to the remote input terminal. The "Auto Remote" switch allows to deactivate the automatic turn-on feature of the highlevel inputs. The feature should be deactivated (Auto Remote = Off) if there are e.g. noises while switching on / off the amplifier.
Note: If the automatic turn-on function is deactivated it is mandatory to use the remote input terminal to power up the amplifier! The high-level signal will be ignored in this case.
Note: The automatic turn-on feature of the highlevel inputs is activated ex works.
To deactivate the automatic turn-on feature you have to open the device and change the position of the "Auto Remote" switch. Therefore the device has to be opened as described in point 4 (see marking in the following picture).
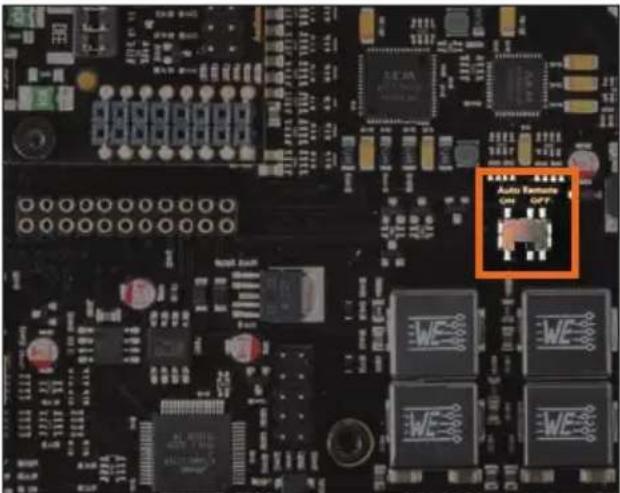
On: Activation via highlevel speaker input is enabled (by default). Off: Activation via highlevel speaker input is disabled.
8. Configuration of the internal DSP
The general DSP settings should be conducted with the DSP PC-Tool software before using the amplifier for the first time.
Ignoring this advice may result in damaging the connected amplifiers / loudspeakers. Information about connecting the V TWELVE DSP MK2 to a computer can be found on page 36.
9. Connecting the loudspeaker outputs
The loudspeaker outputs can be connected directly to the wires of the loudspeakers. Never connect any of the loudspeaker cables with the chassis ground as this will damage your amplifier and your speakers.
Ensure that the loudspeakers are correctly connected (in phase), i.e. plus to plus and minus to minus. Exchanging plus and minus causes a total loss of bass reproduction. The plus pole is indicated on most speakers. The impedance of the speakers must not be lower than 2 Ohms.
10. Connecting the remote output
This output (Rem. Out) is used to supply remote signals to the external amplifier/s. Always use this remote output signal to turn on the amplifiers in order to avoid on / off switching noises.
Examples for adjusting the input sensitivity:
| Source Jumper positions | Input Gain in DSP PC-Tool | |
| 4- to 6-channel OEM-RadioUp to 25 Watts RMS power per channel at 4 Ohms or up to 50 Watts RMS power at 2 Ohms | Low Voltage Range – default jumper positions (see fig. 1) | Standard Gain Setup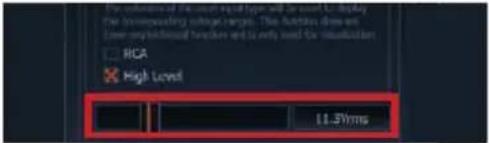 |
| OEM-Radio with additional 4- to 12-channel amplifier>25 Watts and up to 200 Watts RMS power at 4 Ohms or up to 100 Watts RMS power per channel at 8 Ohms | High Voltage Range (see fig. 2) | Advanced Gain Setup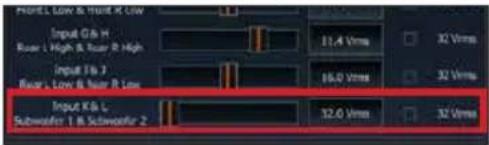 |
| 4- to 6-channel aftermarket radio with pre-amplifier outputsUp to a maximum RCA / Cinch output voltage of 4 volts RMS | Low Voltage Range – default jumper positions (see fig. 1) | Standard Gain Setup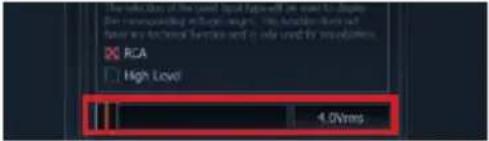 |
Figure 1 – Low Voltage Range:
Value range: Highlevel 4 - 16 Volts RCA / Cinch 1 - 4 Volts
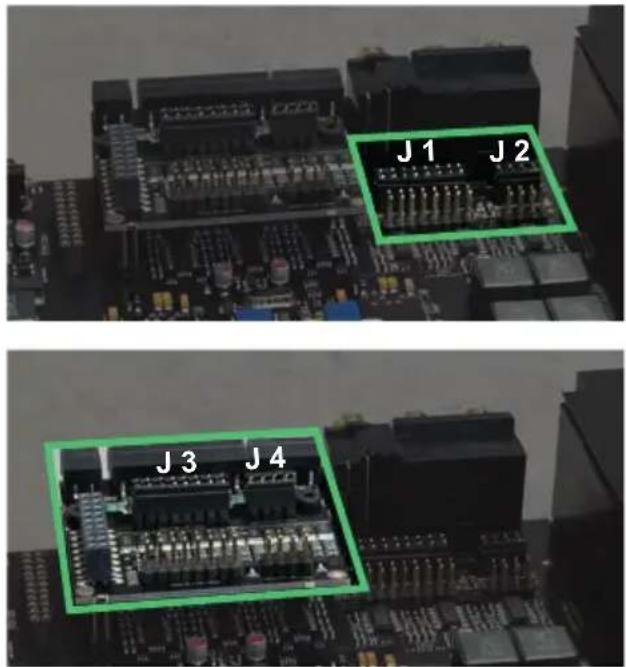
Figure 2 – High Voltage Range:
Value range: Highlevel 8 - 32 Volts RCA / Cinch 2 - 8 Volts
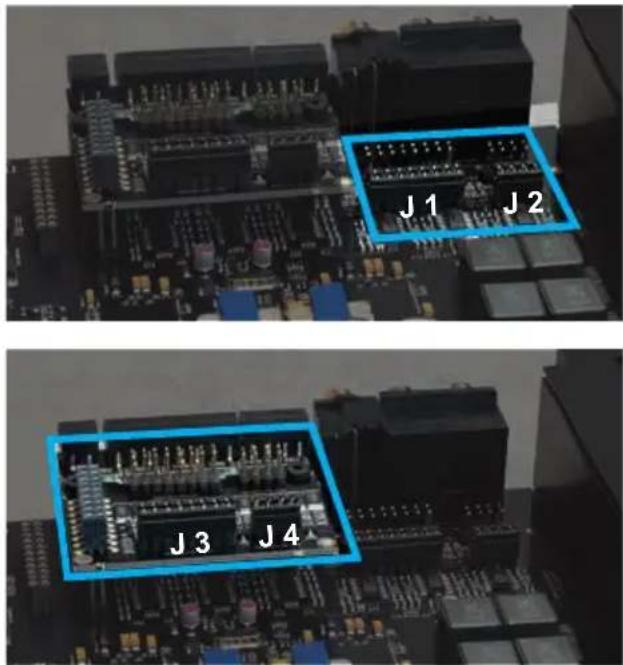
For further applications please contact your HELIX specialist dealer.
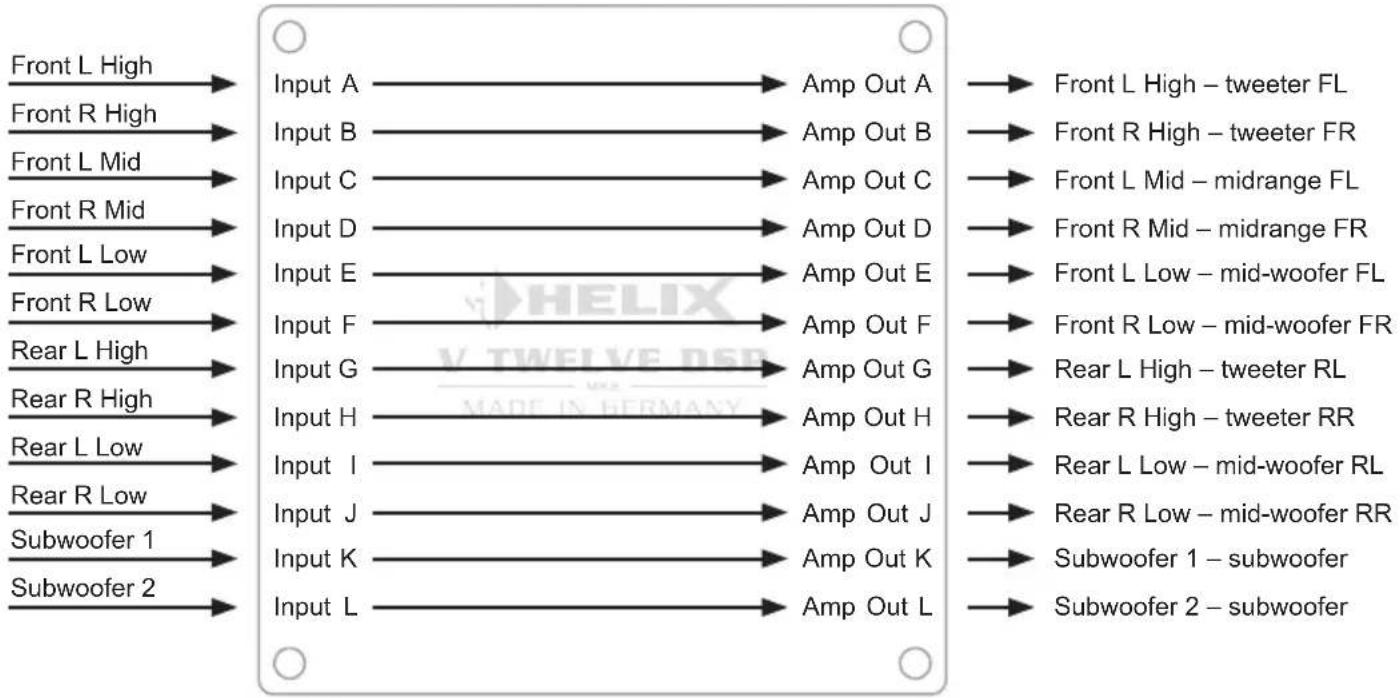
1 to 1 channel routing (IOR)
From OE system Inputs Outputs To speakers
flowchart
graph LR
    A["Front L High"] --> B["Input A"]
    C["Front R High"] --> D["Input B"]
    E["Front L Mid"] --> F["Input C"]
    G["Front R Mid"] --> H["Input D"]
    I["Front L Low"] --> J["Input E"]
    K["Front R Low"] --> L["Input F"]
    M["Rear L High"] --> N["Input G"]
    O["Rear R High"] --> P["Input H"]
    Q["Rear L Low"] --> R["Input I"]
    S["Rear R Low"] --> T["Input J"]
    U["Subwoofer 1"] --> V["Input K"]
    W["Subwoofer 2"] --> X["Input L"]

    B --> Y["Amp Out A"]
    D --> Z["Amp Out B"]
    F --> AA["Amp Out C"]
    H --> AB["Amp Out D"]
    J --> AC["Amp Out E"]
    N --> AD["Amp Out F"]
    P --> AE["Amp Out G"]
    R --> AF["Amp Out H"]
    T --> AG["Amp Out I"]
    V --> AH["Amp Out J"]
    X --> AI["Amp Out K"]
    Y --> AJ["Front L High – tweeter FL"]
    Z --> AK["Front R High – tweeter FR"]
    AA --> AL["Front L Mid – midrange FL"]
    AB --> AM["Front R Mid – midrange FR"]
    AC --> AN["Front L Low – mid-woofer FL"]
    AD --> AO["Front R Low – mid-woofer FR"]
    AE --> AP["Rear L High – tweeter RL"]
    AF --> AQ["Rear R High – tweeter RR"]
    AG --> AR["Rear L Low – mid-woofer RL"]
    AH --> AS["Rear R Low – mid-woofer RR"]
    AI --> AT["Subwoofer 1 – subwoofer"]
    AJ --> AU["Subwoofer 2 – subwoofer"]
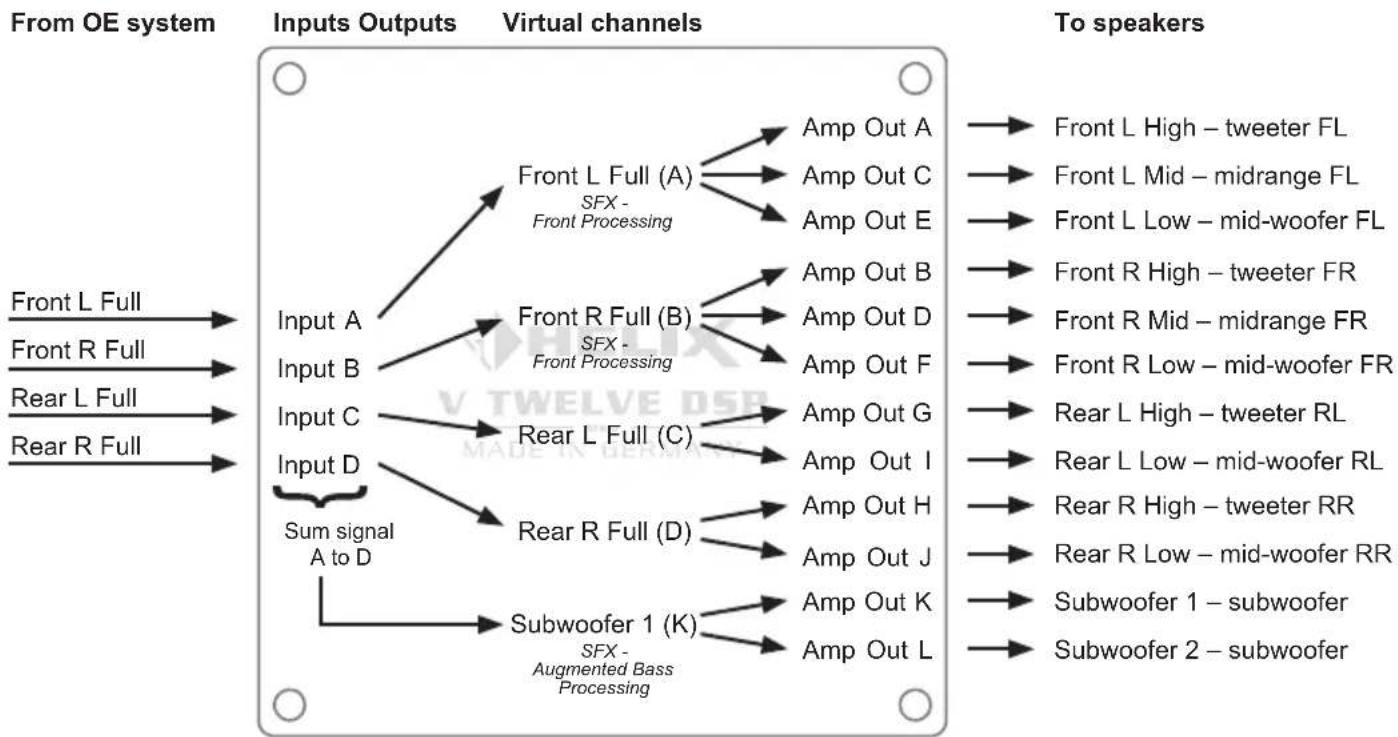
Channel routing with Virtual Channel Processing
flowchart
graph LR
    A["From OE system"] --> B["Inputs Outputs"]
    B --> C["Virtual channels"]
    C --> D["To speakers"]
    A --> E["Input A"]
    A --> F["Input B"]
    A --> G["Input C"]
    A --> H["Input D"]
    E --> I["Front L Full (A)"]
    E --> J["Front R Full (B)"]
    E --> K["Rear L Full (C)"]
    E --> L["Input D Sum signal A to D"]
    F --> M["Front R Full (B)"]
    F --> N["Front R Full (C)"]
    F --> O["Rear R Full (D)"]
    G --> P["Subwoofer 1 (K)"]
    G --> Q["Subwoofer 2 - subwoofer"]
    C --> R["Amp Out A"]
    C --> S["Amp Out C"]
    C --> T["Amp Out E"]
    C --> U["Amp Out B"]
    C --> V["Amp Out D"]
    C --> W["Amp Out F"]
    C --> X["Amp Out G"]
    C --> Y["Amp Out I"]
    C --> Z["Amp Out H"]
    C --> AA["Amp Out J"]
    C --> AB["Amp Out K"]
    C --> AC["Amp Out L"]

    style A fill:#f9f,stroke:#333
    style B fill:#ccf,stroke:#333
    style C fill:#cfc,stroke:#333
    style D fill:#fcc,stroke:#333
    style E fill:#ffc,stroke:#333
    style F fill:#ffc,stroke:#333
    style G fill:#ffc,stroke:#333
    style H fill:#ffc,stroke:#333
    style I fill:#cff,stroke:#333
    style J fill:#cff,stroke:#333
    style K fill:#cff,stroke:#333
    style L fill:#cff,stroke:#333
    style M fill:#ffc,stroke:#333
    style N fill:#ffc,stroke:#333
    style O fill:#ffc,stroke:#333
    style P fill:#ffc,stroke:#333
    style Q fill:#ffc,stroke:#333
    style R fill:#ffc,stroke:#333
    style S fill:#ffc,stroke:#333
    style T fill:#ffc,stroke:#333
    style U fill:#ffc,stroke:#333
    style V fill:#ffc,stroke:#333
    style W fill:#ffc,stroke:#333
    style X fill:#ffc,stroke:#333
    style Y fill:#ffc,stroke:#333
    style Z fill:#ffc,stroke:#333
For further applications please contact your HELIX specialist dealer.
It is possible to freely configure the HELIX V TWELVE DSP MK2 with our DSP PC-Tool software. The user interface is designed for easy handling of all functions and allows an individual adjustment of each of the fourteen DSP channels.
Prior to connecting the amplifier to your PC visit our website and download the latest version of the DSP PC-Tool software.
Check from time to time for software updates. You will find the software and the respective user manual on www.audiotec-fischer.com.
We strongly recommend to carefully read the DSP PC-Tool knowledge base before using the software for the first time in order to avoid any complications and failures.
Important: Make sure that the amplifier is not connected to your computer before the software and USB driver are installed!
In the following the most important steps how to connect and the first start-up are described:
-
Download the latest version of the DSP PC-Tool software (available on our website www.audiotec-fischer.com) and install it on your computer.
-
Connect the amplifier to your computer using the USB cable that is included in delivery. If you have to bridge longer distances please use an active USB extension cable with integrated repeater or the optionally available WIFICONTROLinterface.
- First turn on the amplifier and then start the software. The operating software will be updated automatically to the latest version if it is not up-to-date.
- Now you are able to configure your V TWELVE DSP MK2 with our intuitive DSP PC-Tool software. Nevertheless, interesting and useful hints can be found in our knowledge base on www.audiotec-fischer.com.
Caution: We highly recommend to set the volume of your car radio to minimum position during first start-up. Additionally no devices should be connected to the amplifier until general settings in the DSP PC-Tool software have been made. Especially if the V TWELVE DSP MK2 will be used in fully active applications, a wrong setup can destroy your speakers right away.
flowchart
graph LR
    subgraph Inputs
        A["Input EQ"] --> B["Input Processing"]
        C["ISA"] --> D["Input to Virtual routing"]
    end

    subgraph Virtual Processing
        E["Virtual processing EQ"] --> F["SFX"]
        G["Virtual processing Time Gain"] --> E
    end

    subgraph Outputs
        H["Output processing EQ X/Over"] --> I["Output limiter"]
        J["Output processing Time Gain"] --> I
    end

    style Inputs fill:#f9f,stroke:#333
    style Outputs fill:#bbf,stroke:#333
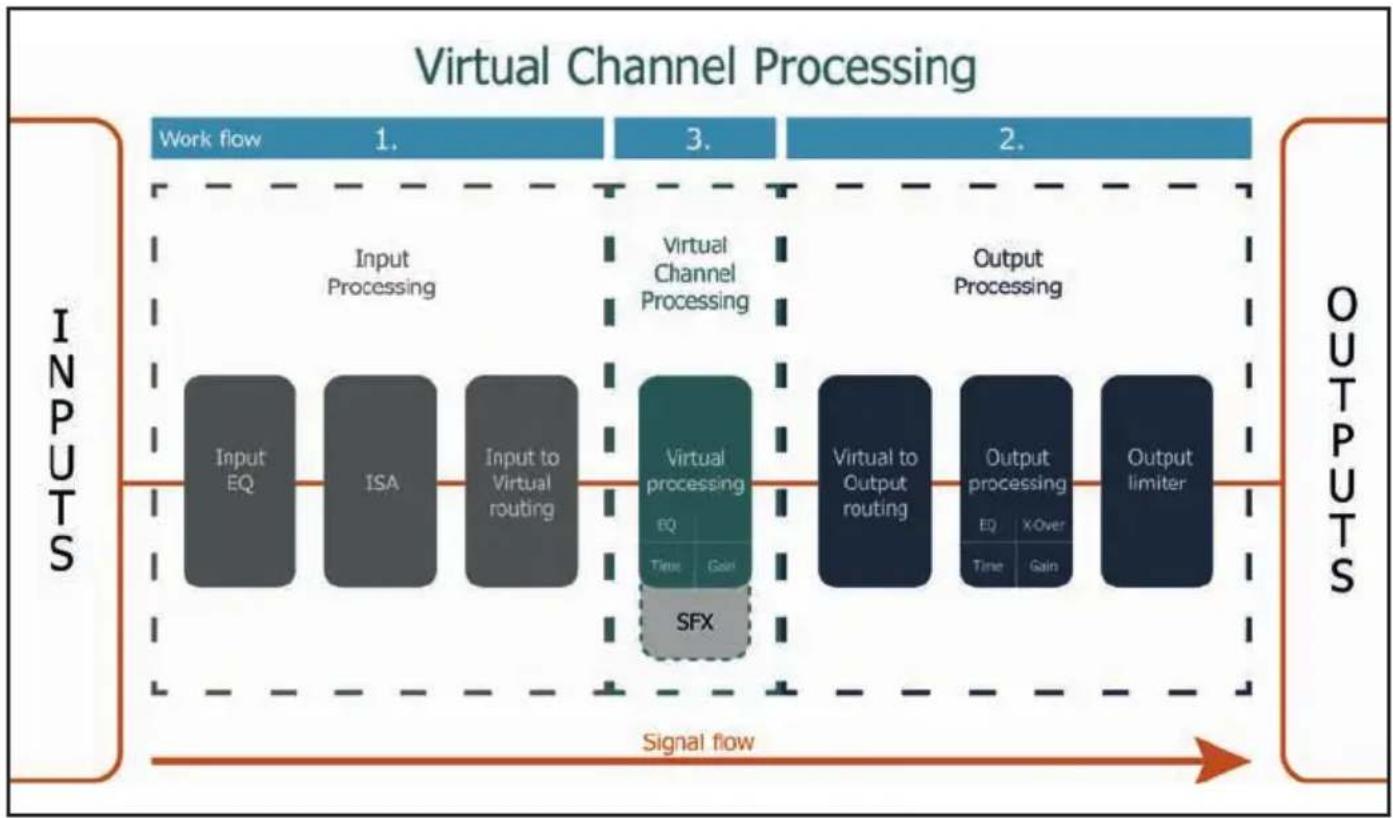
Operating concept of the VCP
In opposite to previous methods the Virtual Channel Processing (VCP) is a multi-stage signal processing concept that enables the perfect configuration of complex sound systems, opening up completely new possibilities for sound tuning.
The function extends the previous scope of the device by an additional layer of processed channels, which is located between the inputs and outputs. A total of twelve additional processed virtual channels and fourteen processed output channels are available.
This virtual channel layer offers several advantages, especially in complex system configurations.
The main advantages of this concept are:
- Cross-channel group equalizers that affect several output channels simultaneously
- Multi-way speaker configuration of DSP sound effects (SFX)
- Additional features such as Rear Attenuation
– Cross-channel group equalizer
Example application: Active multi-way speaker configuration
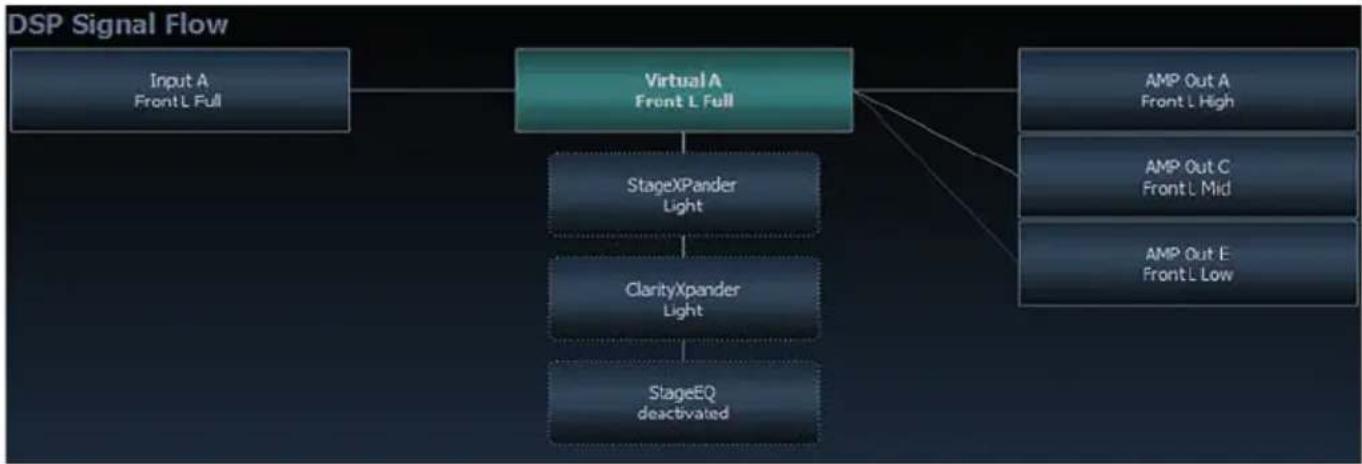
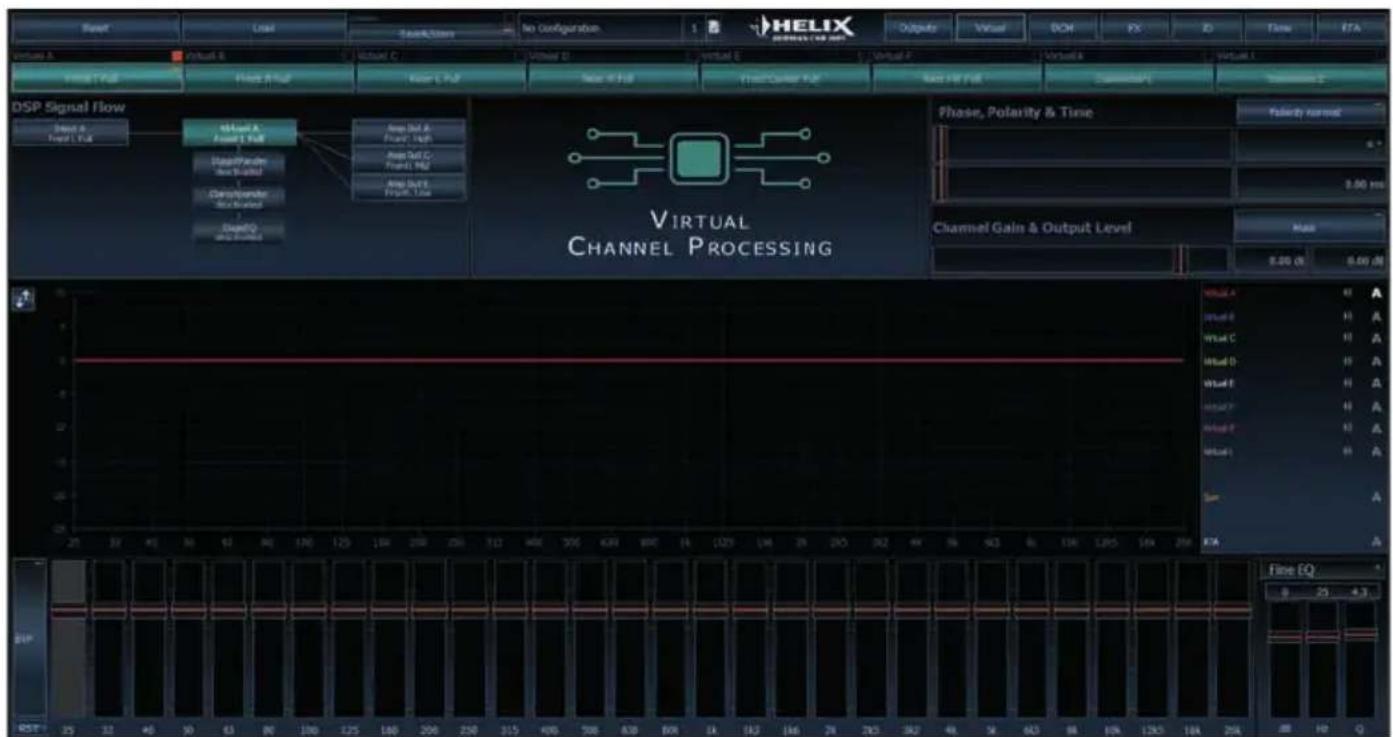
If an input signal (e.g. front left) is first routed to a virtual channel (Front L Full) and this signal is then routed to an active multi-way system (e.g. front left – tweeter, midrange and woofer), the group equalizer of the virtual channel will influence all assigned output channels in their tonality. The advantage of this concept is that any amplitude and phase shift of the group equalizer is applied to all channels of the multi-way configuration simultaneously, thus avoiding any negative impact on the interaction of the individual speaker channels.
flowchart
graph TD
    A["Input A\nFront L Full"] --> B["Virtual A\nFront L Full"]
    B --> C["StageXPander\nLight"]
    B --> D["ClarityXPander\nLight"]
    B --> E["StageEQ\ndeactivated"]
    C --> F["AMP Out A\nFront L High"]
    D --> G["AMP Out C\nFront L Mid"]
    D --> H["AMP Out E\nFront L Low"]
– Multi-way configuration of the DSP sound effects (SFX)
Example application: 2- or even 3-way center speaker
After activating "Virtual Channel Processing", the DSP sound effects, such as RealCenter management or Augmented Bass Processing, are also available. These are no longer linked to the outputs but tied to specific "virtual channels".
Front Processing: virtual channels Front L Full (A) and Front R Full (B)
Center Processing: virtual channel Center Full (E)
Augmented Bass Processing: virtual channels Subwoofer 1 (K) and Subwoofer 2 (L). The subwoofer volume is also tied to these channels.
This makes it possible to route the DSP sound effects to any number of outputs, for example to realize 2- or even 3-way center speaker configurations. There are hardly any limits to flexibility here.
-Additionalfeatures
In addition, the VCP enables the implementation of further new functions. One of these is, for example, the "Rear Attenuation". With the help of a remote control, the volume of the virtual channels "Rear L Full" and "Rear R Full" can be controlled separately. So it is possible even without switching the sound setup, to adjust the volume of the rear speakers (or any other channel, which is routed through these channels).
Configuration of the Virtual Channel Processing (VCP)
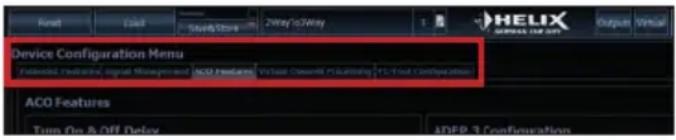
To configure the VCP, you first have to enable "Virtual Channel Processing" in the DCM menu of the DSP PC-Tool software. Therefore, go to the "Virtual Channel Processing" tab in the DCM menu and click on the right box with the VCP graphic. Then the configuration will be carried out in two steps. Here's an example of a 3-way configuration with a 2-way input signal.
Workflow step 1 – Input routing
First, the input signals in the various input matrices (“Main to Virtual Routing”, “HEC / AUX to Virtual Routing”, “Digital to Virtual Routing”) need to be routed to the respective virtual channels. This is the same as in normal mode, means that the input signals on the left side are dragged and dropped onto the respective summation matrix. The difference to normal mode is that the names and signal properties of the virtual channels are defined here (Front L Full, Front R Full, Rear L Full, Rear R Full, Front Center Full etc.).
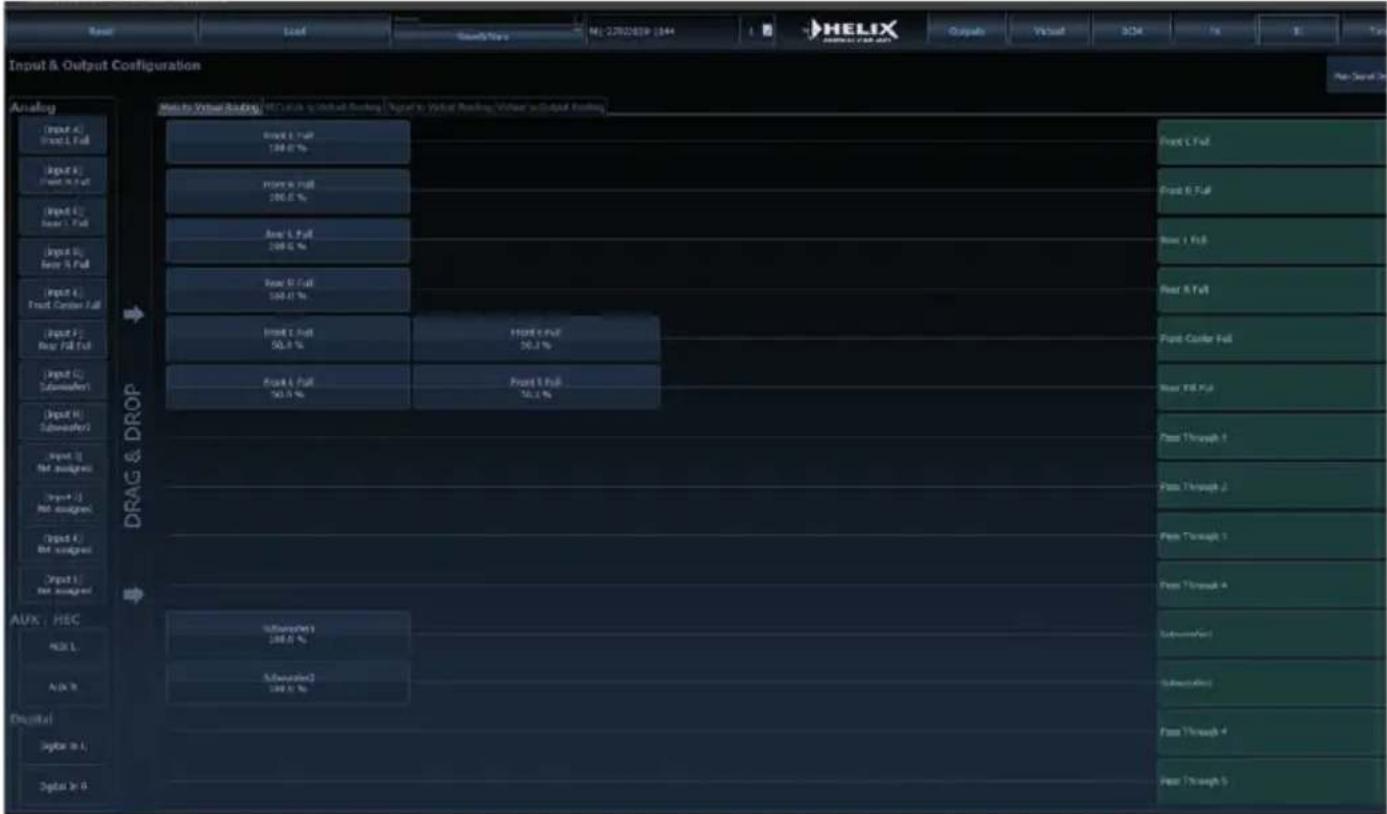
a. First, all input signals must be applied to the respective designated signal types of the virtual channels, means the input with the signal "front left" must be routed to the virtual channel "Front L Full" and so forth.
b. In the case of an adaptation of an OEM active multi-way system, all "front left" signals in this example have to be summed up on the virtual channel "Front L Full" (the input EQ remains effective in the inputs as usual).

Configuration of the Virtual Channel Processing (VCP)
Workflow step 2 – Output routing
After all the input signals used in the respective signal routing matrix have been configured, the virtual channels must now be assigned to the physical output channels. Here, a virtual signal (e.g. Front L Full) can be assigned to multiple outputs, such as "front left" tweeter, midrange and woofer. The configuration of these speaker-specific output channels is done in the "Outputs" menu (called "Main" in normal mode) of the DSP PC-Tool. Here you can also configure the channel-specific equalizers, high- and lowpass filters, time alignment, output level and phase settings.
a. In order to assign the virtual channels to the respective output channels the individual virtual signals in the output routing matrix ("Virtual to Output Routing") are dragged and dropped onto the output channels. At this point, the signals typically needn't to be summed, means that each output of this matrix only receives one virtual signal. For example, the output "Front L High" is linked to the virtual signal "Front L Full"; the same is done for the Front L Low".
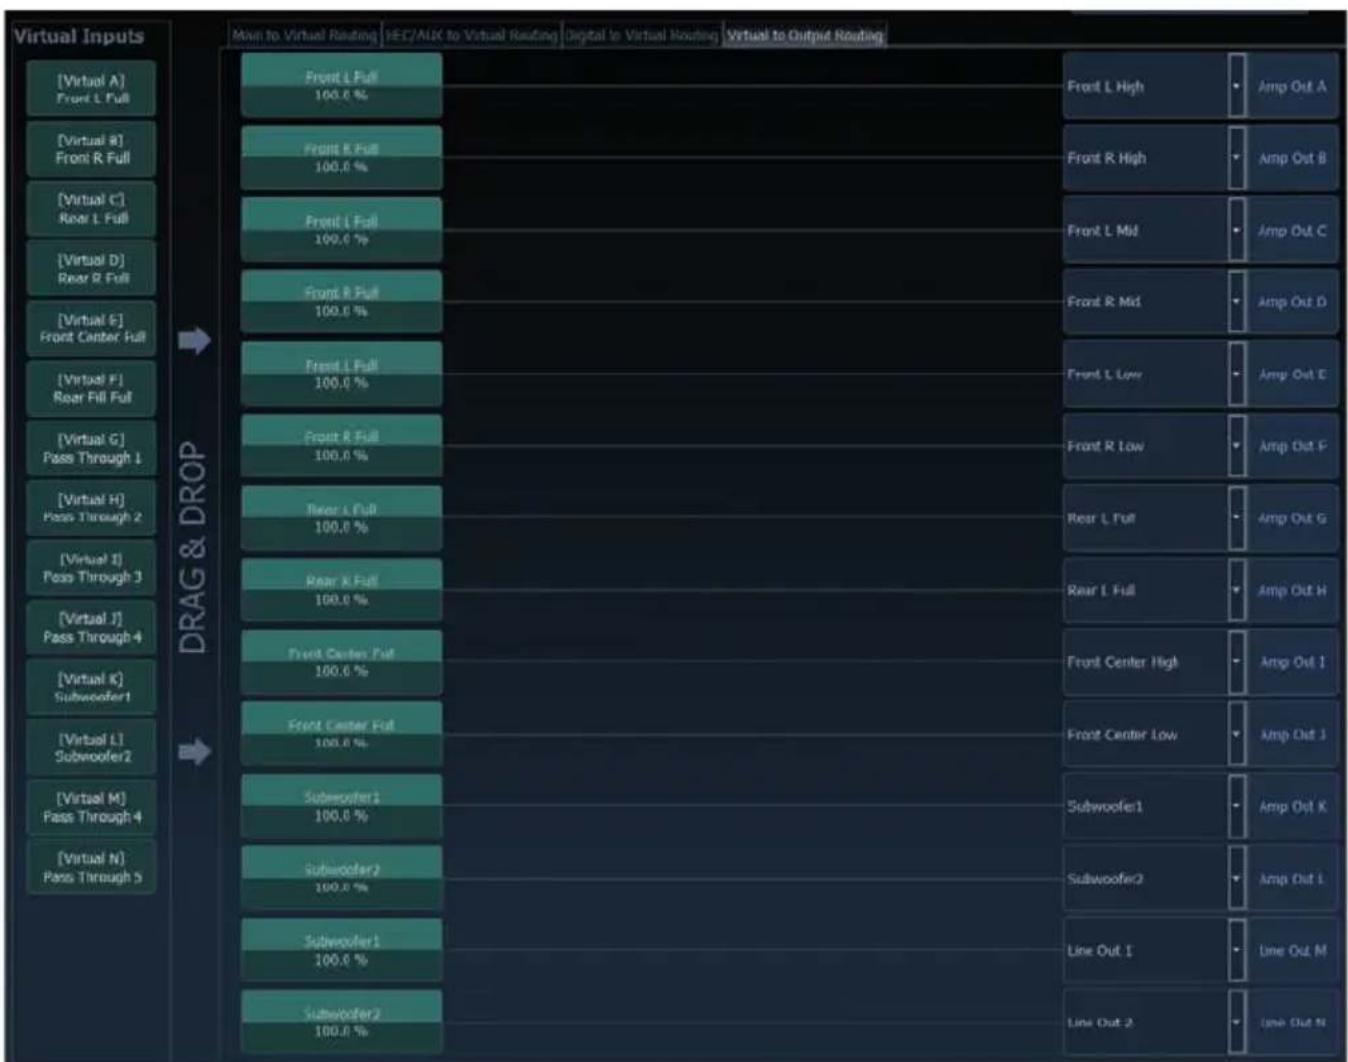
b. At this point, even a virtual channel in which a DSP sound effect has been activated can be routed to multiple output channels. For example, the "Front Center Full" signal can be assigned to multiple output channels to create an active multi-way center speaker. The corresponding high- and lowpass filters are then configured in the output channels of the "Main" menu.
Workflow step 3 – Configuration of the virtual channels and notes on the application of the DSP sound effects (SFX)
Now switch to the “Virtual” menu of the DSP PC-Tool. Here you get an overview of the signal flow of the individual channels and the activated sound effects. In addition, it is possible to influence the tonality of all subsequent output channels of a virtual channel at the same time, for example with the help of the equalizer, polarity and other functions.
Notes on the configuration of the DSP sound effects (SFX)
The HELIX V TWELVE DSP MK2 provides unique DSP sound effects such as Augmented Bass Processing, RealCenter, and more when “Virtual Channel Processing” is enabled. In order to enjoy the DSP sound effects, certain settings must be made in the hardware and software configuration.
Note: The DSP sound effects are only available in the V TWELVE DSP MK2 when "Virtual Channel Processing" is enabled. "VCP" can be activated in the DCM menu of the DSP PC-Tool software.
Notes for center processing with its features "RealCenter" and "ClarityXpander"
To be able to use the RealCenter and ClarityXpander function for a center speaker, the following steps must be carried out:
1a. It is necessary to assign an input signal to the virtual channels "Front L Full" and "Front R Full" (see workflow step 1).
1b. In the input routing you have to assign either a sum signal (front left + front right) or an existing center signal to the virtual channel "Front Center Full".
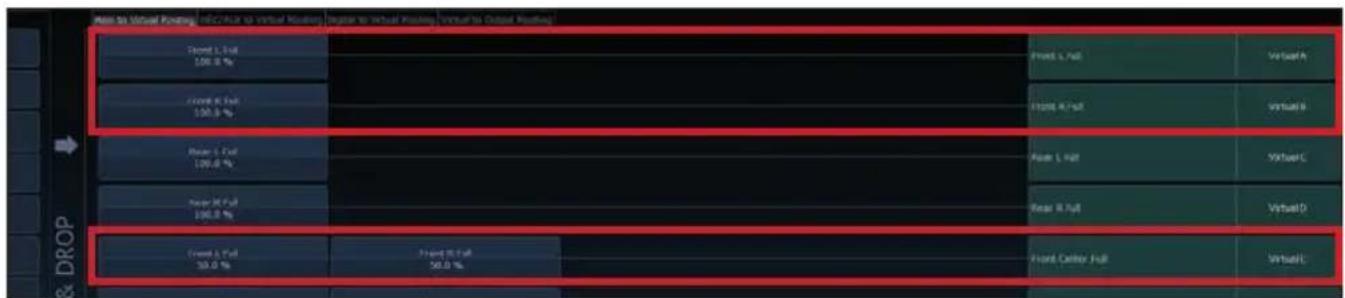
Configuration of the Virtual Channel Processing (VCP)
- Change to the "Virtual to Output Routing" matrix and route the "Virtual E – Front Center Full" channel to the desired output channels (as described in workflow step 2) to which the center processing shall be applied.

For information about input routing see workflow step 1
- Now switch to the FX menu and activate the desired sound effect in the "Center Processing" tab by setting the appropriate check mark.

For information about output routing see workflow step 2
Notes for front processing with its StageXpander and ClarityXpander features
The StageXpander and Front ClarityXpander settings always affect the virtual channels "Front L Full" and "Front R Full".
Hints for "Augmented Bass Processing" with its "Dynamic Bass Enhancement" and "SubXpander" function
For Augmented Bass Processing certain settings have to be made in order to use it.
- An input signal has to be assigned to at least one of the virtual subwoofer channels ("Subwoofer 1" or "Subwoofer 2") (see workflow step 1).
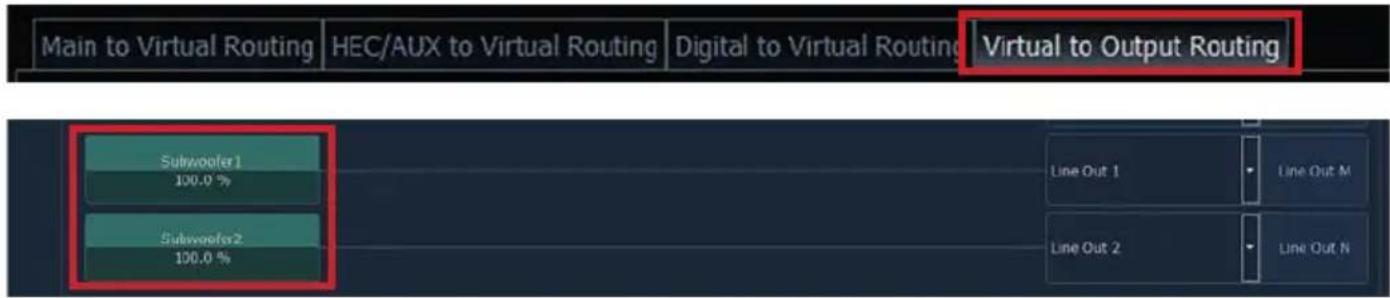
- Change to the "Virtual to Output Routing" matrix and route the channel (s) "Virtual K – Subwoofer 1" and / or "Virtual L – Subwoofer 2" to the desired output channel or channels (as described in workflow step 2) to which the subwoofer signal and its Augmented Bass Processing shall be applied to.
- Now switch to the FX menu and activate the desired sound effect.

Note: the bass processing is switched on and off together for both "Subwoofer 1" and "Subwoofer 2" channels, nevertheless the two channels still remain separately processed for stereo applications.
Configuration of a subwoofer remote control
First, the appropriate remote control must be activated in the "Extended Features" tab in the DCM menu of the DSP PC-Tool software and configured, depending on the model.

If the VCP is not activated, the subwoofer remote control of the V TWELVE DSP MK2 is permanently assigned to the output channels K and L (Output Channels). In this case it does not matter which output is named "Subwoofer" in the IO routing matrix.
In the main menu you can also see to which outputs the SubRC (subwoofer remote control) is tied:
![Main DCM FX IO Time RTA Amp Out I Amp Out J Amp Out K [SubRC] Amp Out L [SubRC] Line Out M Line Out N Front Center High Front Center Low Subwoofer1 Subwoofer2 Subwoofer3 Subwoofer4](/content/2026/05/907637/images/1c0610b129784f3cb9b784de0e6e917fab063ae381142e6d142cf14adbffd5c8.jpg)
When VCP is activated, the subwoofer remote control is tied to the output channels that are supplied with one of the two virtual subwoofer signals ("Subwoofer 1" or "Subwoofer 2") in the "Virtual to Output Routing" matrix. This can be any combination of output channels.
In the following example these are the pre-amplifier outputs / Line Outputs M and N:
flowchart
graph TD
    A["Main to Virtual Routing"] --> B["Subwoofer1 100.0 %"]
    C["HEC/AUX to Virtual Routing"] --> D["Subwoofer2 100.0 %"]
    E["Digital to Virtual Routing"] --> F["Line Out 1"]
    E --> G["Line Out M"]
    E --> H["Line Out 2"]
    E --> I["Line Out N"]
    J["Virtual to Output Routing"] --> K["End"]
Note: Please note that an input signal must be assigned to the two virtual subwoofer signals "Subwoofer 1" and / or "Subwoofer 2" in the other routing matrices.
Afterwards, the subwoofer control is also displayed in the Main menu next to the name of the channel [SubRC]:
![Outputs Virtual DCM FX IO Time RTA Amp Out I Amp Out J Amp Out K Amp Out L Line Out M [SubRC] Line Out N [SubRC] Front Center High Front Center Low Subwoofer1 Subwoofer2 Line Out 1 Line Out 2](/content/2026/05/907637/images/6ce62217a9e05df847dc96efe9c44e1f6b2c206223c9e78d1e672e044375d2fa.jpg)
Beside the unique DSP sound effects the V TWELVE DSP MK2 provides a bunch of new system features.
In the DCM menu of the DSP PC-Tool software individual settings can be made for several of these system features.
Turn On & Off Delay
This function allows to determine the delay time with which the integrated DSP is switched on and off. The factory setting is 0.2 seconds. The delay time should only be modified if there are e.g. noises while switching on / off the amplifier.
URC Setup Switch Configuration
The ACO provides ten internal memory locations for sound setups instead of the common two.
By using an optional URC remote control or the Control pushbutton it is possible to toggle between two of the ten memory locations. These two memory locations can be determined in the "URC Setup Switch Configuration". The memory locations one and two are preassigned by default. To switch between all internal memory locations, the optionally available remote controls DIRECTOR and CONDUCTOR or the HELIX WIFI CONTROL are / is recommended.
Remote Output Configuration
This function controls if the remote output (which switches on and off the connected amplifiers) will be temporarily deactivated during a sound setup switch. This function is activated (ON) by default.
ADEP.3 Configuration
If the V TWELVE DSP MK2 is connected to an OEM radio via the highlevel inputs it may happen that the ADEP.3 circuit has to be adapted to the diagnostic mode of the radio if the latter is equipped with a so-called “class SB” output stage".
The ADEP.3 circuit should be adjusted if there are e.g. distortions in the upper volume range.
The compatibility mode is disabled by default.
HELIX Extension Card slot (HEC slot)
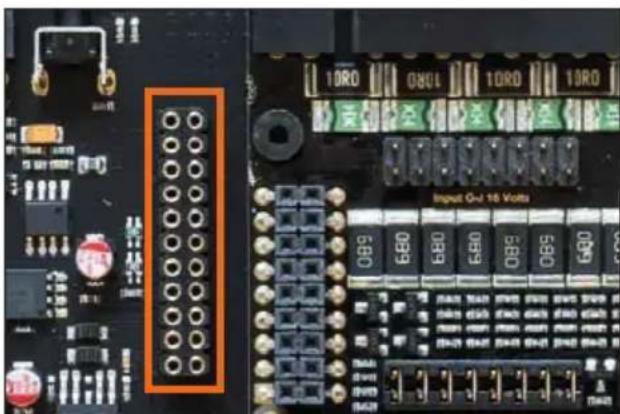
It is possible to extend the functionality of the HELIX V TWELVE DSP MK2 amplifier by inserting an optional HELIX Extension Card (HEC) – for example a Bluetooth® Audio Streaming module, an additional optical digital input or an USB audio input.
To install a HELIX Extension Card it is necessary to remove the side panel of the V TWELVE DSP MK2 and replace it by the new side panel that comes with the HEC module.
Attention: Install the HEC module only in the designated device and its specific slot. Using the HEC module in other devices or slots can result in damage of the HEC module, the amplifier, the head unit / car radio or other connected devices!
Read in the following the steps how to install a HEC module:
- First disconnect all cables from the device.
- Dismantle the side panel where the USB input is located by removing the two Phillips and two Allen screws.
- Pull out the bottom plate sideways.
- Prepare the module for installing it into the device. Any further mounting information will be found in the instruction manual of the respective HEC module.
- Insert the HEC module into the specific slot of the device which is marked in the following picture.
natural_image
Close-up of an electronic circuit board with multiple input terminals and a highlighted connector (no readable text or symbols)- Make sure that the HEC module is installed properly and all pins are fully inserted into the socket.
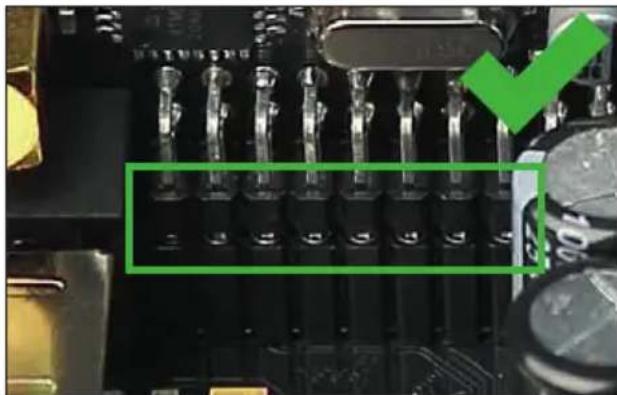
natural_image
Close-up of a circuit board with multiple LED connectors and a green checkmark highlighting a specific component (no readable text or symbols)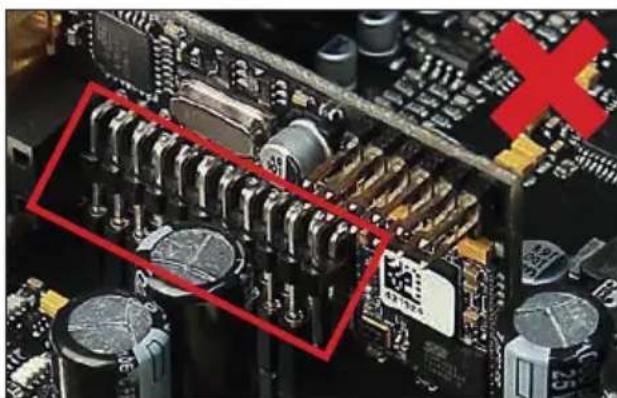
natural_image
Close-up of a computer motherboard with visible circuitry and a red X symbol overlay (no readable text or symbols)- Reinsert the bottom plate and fix the new side panel which is delivered with the HEC module with the two Phillips and two Allen screws.
- Bolt the HEC module to the side panel. Precise mounting information will be found in the instruction manual of the respective HEC module.
- Reconnect all cables to the device.
- Turn on the amplifier. The HEC module is automatically detected by the device and the Status LED of the HEC module lights up green.
- Now you are able to configure the HEC module in the DSP PC-Tool software.
Pure Class GD amplifier technology
Audiotec Fischers proprietary Pure Class GD concept takes the efficiency of conventional Class D amps to the next level. By varying the internal supply voltage depending on the amplifier's input signals, idle losses are significantly reduced and overall efficiency is close to maximum at any time. So heat dissipation is almost negligible thus allowing smallest heat sinks and most compact form factors. Besides that Pure Class GD amp outperforms conventional Class D designs in terms of sound quality by implementing a fully differential signal path and improved output filter design.
ACO - Advanced 32 Bit CoProcessor
The HELIX V TWELVE DSP MK2 incorporates an extraordinary powerful 32 Bit CoProcessor of the latest generation for all monitoring and communication tasks, both internally and externally. In opposite to the 8 Bit predecessor generation this MCU achieves way higher speeds with respect to setup switching and data communication with our DSP PC-Tool software. A further significant advantage is the integrated, native boot loader of the CoProcessor. It allows software upgrades of all components of the integrated DSP in order to adjust the microcontroller-controlled ADEP.3 circuit for example to future requirements of the diagnostic system of factory radios or if the device will be extended with additional interfaces. In addition, thanks to the new flash memory, the ACO offers 10 memory locations for sound setups instead of the common two.
Smart highlevel input ADEP.3
Modern, factory-installed car radios incorporate sophisticated possibilities of diagnosing the connected speakers. In particular the latest generation of car radios are equipped with additional monitoring functions so that failure messages and loss of specific features (e.g. fader function) quite often appear if an amplifier will be hooked up – but not with the V TWELVE DSP MK2.
The new ADEP.3 circuit (Advanced Diagnostics Error Protection, 3rd Generation), which can be adapted to the diagnostic mode of the radio, avoids all these problems without loading the speaker outputs of the OE radio during high volumes unnecessarily (see page 44, item "ADEP.3 Configuration").
Power Save Mode
The Power Save Mode is incorporated in the basic setup. It allows to significantly reduce the power consumption of the amplifiers that are connected to the HELIX V TWELVE DSP MK2 once there's no input signal present for more than 60 seconds. Please note that in many up-to-date cars with "CAN" or any other internal bus structures it may happen that the radio remains "invisibly" turned on for up to 45 min. even after locking and leaving the car! Once the "Power Save Mode" is active the remote output and therefore the connected amplifiers will be turned off. The V TWELVE DSP MK2 will reactivate the remote output within a second if a music signal is applied. It is possible to either modify the turn-off time of 60 sec. or completely deactivate the "Power Save Mode" via the DSP PC-Tool software.
Start-Stop capability
The switched power supply of the HELIX V TWELVE DSP MK2 assures a constant internal supply voltage even if the battery's voltage drops to 6 Volts during engine crank.
Technical Data
Power RMS ≤ 1% THD+N
- @ 4 Ohms....12 x 75 Watts
- @ 2 Ohms 12 x 120 Watts
Max. output power per channel*.....Up to 160 Watts RMS @ 2 Ohms
Amplifier technology....Pure Class GD
Inputs....6 x RCA / Cinch
12 x Highlevel speaker input
1 x Optical SPDIF (12 - 96 kHz)
1 x Remote In
Input sensitivity....RCA / Cinch: max. 4 V or max. 8 V
Highlevel: max. 16 V or max. 32 V
Input impedance....RCA / Cinch: 12 kOhms
Highlevel: 9 - 33 Ohms or 20 kOhms
Outputs....12 x Speaker output
2 x RCA / Cinch
2 x Remote Out
Output voltage RCA / Cinch....3 Volts
Frequency response....20 Hz - 22,000 Hz
DSP resolution....64 Bit
DSP power 295 MHz (1.2 billion MAC operations/second)
Sampling rate 48 kHz
DSP type ......Audio signal processor
Signal converters....A/D: BurrBrown
D/A: BurrBrown
Signal-to-noise ratio (A-weighted)......Digital input: 107 dB
Analog input: 102 dB
Distortion (THD)....< 0.015 %
Damping factor ....> 70
Operating voltage 10.5 - 18 Volt (max. 5 sec. down to 6 Volts)
Power rating ....DC 12 V = 80 A max.
Idle current....700 mA
Max. remote output current ....500 mA
Fuse....2 x 30 A LP-Mini-Fuse (APS)
Additional features....HEC slot, ADEP.3 circuit, Smart Control Port,
32 Bit CoProcessor, Auto Remote switch
Dimensions (H x W x D)....44 x 220 x 220 mm / 1.73 x 8.66 x 8.66"
* In typical multi-channel applications (2- / 3-way system + rear + subwoofer)
Warranty Disclaimer
The limited warranty comply with legal regulations.
Failures or damages caused by overload or improper use are not covered by the warranty. Please return the defective product only with a valid proof of purchase and a detailed malfunction description.
Technical specifications are subject to change!
Errors are reserved! For damages on the vehicle and the device, caused by handling errors of the device, we can't assume liability. This product is tagged with a CE-Certifikation mark. Thereby these devices are certified for the use in vehicles within the European Community (EC).
Note:
"The Bluetooth® word mark and logos are registered trademarks owned by Bluetooth SIG, Inc. and any use of such marks by Audiotec Fischer GmbH is under license. Other trademarks and trade names are those of their respective owners."
AUDIOTEC
FISCHER
- ③ Control Taster
- Remote Output Configuration
- ADEP.3 Configuration
- ACO – Advanced 32 Bit CoProcessor
- General instructions
- General installation instructions for HELIX components
- General instruction for connecting the HELIX V TWELVE DSP MK2 amplifier
- Connectors and control units
- ① USB Input
- ② SCP (Smart Control Port)
- ③ Control pushbutton
- ④ Optical Input
- ⑤ Highlevel Input
- ⑥ Line Input
- ⑦ Status LED
- ⑧ Rem. Out
- ⑨ Output Channels
- GND
- REM
- ⑫ +12 V
- Line Output
- The HELIX V TWELVE DSP MK2 must be connected as follows:
- Connecting the pre-amplifier inputs
- Connecting the highlevel speaker inputs
- Connecting a digital signal source
- Adjustment of the input sensitivity
- Overview plug-in positions:
- Installation
- Connection to power supply
- Make sure to disconnect the battery before installing the HELIX V TWELVE DSP MK2!
- Connecting the remote input
- Configuration of the remote input
- Configuration of the internal DSP
- Connecting the loudspeaker outputs
- Connecting the remote output
- to 1 channel routing (IOR)
- Operating concept of the VCP
- – Cross-channel group equalizer
- – Multi-way configuration of the DSP sound effects (SFX)
- -Additionalfeatures
- Configuration of the Virtual Channel Processing (VCP)
- Workflow step 1 – Input routing
- Workflow step 2 – Output routing
- Workflow step 3 – Configuration of the virtual channels and notes on the application of the DSP sound effects (SFX)
- Notes on the configuration of the DSP sound effects (SFX)
- Notes for center processing with its features "RealCenter" and "ClarityXpander"
- Notes for front processing with its StageXpander and ClarityXpander features
- Hints for "Augmented Bass Processing" with its "Dynamic Bass Enhancement" and "SubXpander" function
- Configuration of a subwoofer remote control
- Turn On & Off Delay
- URC Setup Switch Configuration
- HELIX Extension Card slot (HEC slot)
- Pure Class GD amplifier technology
- ACO - Advanced 32 Bit CoProcessor
- Smart highlevel input ADEP.3
- Power Save Mode
- Start-Stop capability
- Technical Data
- Warranty Disclaimer
- Note:
Brand : Helix
Model : V TWELVE DSP MK2
Category : Receiver