
7920E - Machine de calibration Hazet - Free user manual and instructions
Find the device manual for free 7920E Hazet in PDF.


| Product Type | Torque calibration unit for indicating and automatic-release torque wrenches |
| Model | Hazet 7920E |
| Torque Range | 1 to 800 Nm |
| Accuracy Levels | 0.25% (for 1% precision wrenches) and 0.5% (for 2% precision wrenches) |
| Sensors | HBM sensors: 1-200 Nm and 60-800 Nm |
| Drive | Servo gear with quick-change mounting for torque measurement flange |
| Force Arm Extension | Up to 1.2 m |
| Calibration Directions | Both clockwise and counterclockwise |
| Power Supply | 230V / 50 Hz, backup fuse 16 A |
| Socket Inserts Included | 5 inserts: 1/4", 3/8", 1/2", 3/4", 1" |
| Compliance Standards | DIN EN ISO 6789-1:2017 and DIN EN ISO 6789-2:2017 |
| Software Features | Test bed control, measurement data recording, calibration certificate generation, article management |
| User Access Levels | Admin and tester roles; password protected |
| Display | External monitor via HDMI; laptop connection via LAN |
| Maintenance Interval | Visual inspection every 3 months; emergency stop check monthly; lubrication weekly; sensor calibration yearly |
| Storage Temperature | -10 to +45 °C |
| Relative Humidity (Storage) | Max. 60% |
| Spare Parts | Only original HAZET parts; contact service for orders |
| Warranty | Void upon unauthorized modifications or use of non-original parts |
| Intended Use | Calibration of torque wrenches (1-800 Nm) by qualified personnel only |
| Safety Features | Emergency stop main switch, guards, CE compliance, crushing hazard warning |
| Accessories (Not Included) | Temperature/humidity sensor, monitor, keyboard, mouse |
| Service Contact | kalibrierlabor@hazet.de |
Frequently Asked Questions - 7920E Hazet
User questions about 7920E Hazet
0 question about this device. Answer the ones you know or ask your own.
Ask a new question about this device
Download the instructions for your Machine de calibration in PDF format for free! Find your manual 7920E - Hazet and take your electronic device back in hand. On this page are published all the documents necessary for the use of your device. 7920E by Hazet.
USER MANUAL 7920E Hazet
HIGHEST TECHNOLOGY IN TOOL MANUFACTURE SINCE 1868

7920 E

Betriebsanleitung
Operating Instructions
HAZET calibration unit

natural_image
Exterior view of a Haze 7920 E industrial machine on a black platform (no signage or text beyond model name)① For your information
- General information.... 36
- Explanation of symbols.... 36
② For your safety
- Owner's liability 37
- Intended use.... 37
- Dangers that may arise from using the tool 38
③ Design and function.... 39-44
④ Before commissioning 45-46
⑤ Measurement /Calibration 47-48
- Calibration of indicating torque wrench 48
- Calibration of automatic-release torque wrench.... 48
⑥ Test equipment list 49
⑦ Uncertainty of measurement 50
⑧ Software 51-64
⑨ Maintenance and care.... 65-67
⑩ Storage 67
⑪ Disposal 67
Ursprungsprache deutsch – original language: German – Langue d'origine: allemand
natural_image
Exterior view of a Hazei 7920 E optical instrument on a stand (no signage or text beyond model name)natural_image
Diagram of a device front panel with a square button and three slots (no text or symbols)
natural_image
Close-up of a metallic gear with a star-shaped cutout, shown against a plain background (no text or symbols)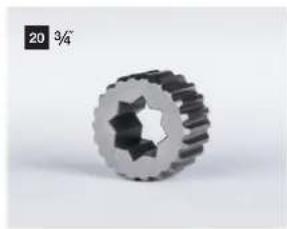
natural_image
Close-up of a metallic gear with visible teeth and central hole (no text or symbols)
natural_image
Close-up of a metallic gear with visible teeth and central bore (no text or symbols)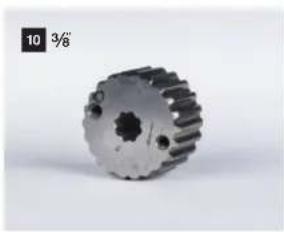
natural_image
Close-up of a metallic gear with visible teeth and central bore (no text or symbols)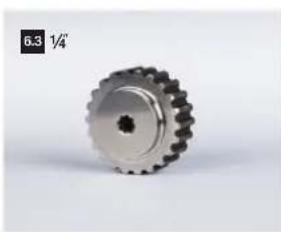
natural_image
Close-up of a metallic gear with visible teeth and central bore (no text or symbols)Schiebeplatte

natural_image
Person in blue jacket assembling a mechanical component with a clamp (no visible text or symbols)
natural_image
Person in blue jacket adjusting a mechanical component with metal pins (no visible text or symbols)
natural_image
Close-up of a mechanical assembly with a metallic flange and attached wiring, labeled 'HAZET' in the corner (no readable text beyond label)HINWEIS!

natural_image
Close-up of a mechanical assembly with a metallic cylindrical component mounted on a workbench, no visible text or symbols.natural_image
Person operating a mechanical assembly with a flanged component and a labeled part (7920 E), no readable text or symbols beyond the label.ACHTUNG!
natural_image
Exterior view of a modern office building (no signage)natural_image
Person using a metal measuring tool on a workbench labeled '7920 E' (no other text or symbols visible)
natural_image
Person operating a Hazei 7920 E testing machine with a tool, no visible text or symbols on the equipment itself.natural_image
Close-up of a black cylindrical object with a red vertical line and 'HROSET' label, no readable text or symbols beyond the label.
natural_image
Close-up of a mechanical device with a digital display and a highlighted cylindrical component, showing no readable text or symbols.
line
| Moment | Value | | ------ | ----- | | 0.0 sec | 0 | | 2.5 sec | 2 | | 5.0 sec | 15 | | 7.5 sec | 20 | | 10.0 sec | 20 | | 12.5 sec | 20 | | 15.0 sec | 20 | | 17.5 sec | 20 | | 20.0 sec | 20 |natural_image
Close-up of a metallic mechanical assembly with flanged base and central housing (no visible text or symbols)
HAZET Kalibrierservice!
natural_image
Close-up of a mechanical assembly with metallic components and reflective surfaces (no visible text or symbols)
natural_image
Close-up of a mechanical device with metallic components and a black housing (no visible text or symbols)- Please make sure that the user of this calibration unit carefully reads the associated operating instructions and fully unders - tands all information given before it is used.
- The operating instructions contain important advice that is necessary for safe and trouble-free operation of your HAZET calibration unit.
- Complete observation of all safety advice and information forms part of intended use of the HAZET calibration unit.
- For this reason, always keep these operating instructions together with your HAZET calibration unit.
- This HAZET calibration unit was developed for specific applications. HAZET emphasises that this calibration unit may not be modified or used in any way not corresponding to its intended application.
- HAZET will not be liable for any injuries to persons or damage to property originating from improper or inappropriate use, misuse of the tool, or from a disregard of the safety instructions.
- Furthermore, the general safety regulations and regulations for the prevention of accidents valid for the application area of the calibration unit must be observed and respected.
2. Explanation of symbols
ATTENTION: Pay strict attention to these symbols!
READ THE OPERATING INSTRUCTIONS AND APPLICATION NOTES!

The operator is obligated to read and observe all application instructions, operating instructions and safety regulations, and to instruct all users of the HAZET calibration unit in accordance with these
NOTE!

This symbol indicates advice that is helpful when using the tool.
WARNING!

This symbol indicates important descriptions, dangerous conditions, safety risks and safety advice.
CAUTION!

This symbol marks advice which if disregarded results in damage, malfunction and/or functional failure of the device.

TO BE USED BY QUALIFIED PERSONNEL ONLY!
Special knowledge is required to operate this unit. That is why is must be used by qualified personnel only.

CRUSHING HAZARD!
Moving parts pose a crushing hazard!

② For your safety
-en

1. Owner's liability
The HAZET calibration unit was developed and manufactured according to the technical norms and standards valid at this time and is considered to be operationally reliable. Nevertheless, the HAZET calibration unit may present a danger when it is not used as intended or used in an inappropriate way by non-qualified personnel. Please make sure that any person performing work on or with the HAZET calibration unit carefully reads and fully understands these operating instructions before commencing work.
- The operating instructions must be kept together with the HAZET calibration unit at all times.
- Modifications of any type as well as fittings or alterations to the HAZET calibration unit are strictly prohibited.
- All specified installation values or setting ranges must be observed.
- This calibration unit may only be used by specialist personnel.
2. Intended use
Operational reliability can only be ensured, if the tool is used as intended and in compliance with the indications given in the operating instructions. In addition to the safety advice in these operating instructions, the general safety regulations, regulations for the prevention of accidents and regulations for environmental protection valid for the application area of calibration must be observed and respected.
- Safety equipment must always be within easy reach and should be checked regularly.
- Any incorrect use of the calibration unit or use that fails to comply with the safety instructions can result in serious injury or death.
-
Any deviation from the intended use and/or any misapplication of the calibration unit is not permitted and will be considered as improper use.
-
Any claims against the manufacturer and/or its authorised agents because of damage caused by improper use of the calibration unit are void.
- Any personal injury or material losses caused by improper use of the tool are the sole responsibility of the operator.
- Any use that is beyond this scope is deemed to be improper use.
- The manufacturer is not liable for any damages and deviating results that arise from this; the user bears the sole risk.
- This product is solely intended for the calibration of torque wrenches in a range from 1 up to 800 Nm.
- Any use that is beyond this scope is deemed to be improper.
- The manufacturer is not liable for any damages that arise from this, the user bears the sole risk.
- This product may only be operated, maintained and repaired by authorised, trained and instructed personnel. This personnel must have been given a special training with respect to possible risks.
- Observe the country-specific safety and accident prevention regulations and the statutory occupational safety and environmental protection provisions.
- All warning notes and safety signs on the HAZET calibration unit must always be in a legible state and may not be removed. Missing or damaged signs must be replaced immediately.
- The HAZET calibration unit may only be set up by qualified specialist personnel.
-en
② For your safety
- Maintenance work and repairs may only be performed by qualified specialist personnel.
• Work on electrical equipment may only be performed by qualified specialist personnel. - Only authorised personnel may work on the HAZET calibration unit. All persons working on the HAZET calibration unit must have read the operating instructions beforehand.

3. Dangers that may arise from using the tool
- Before each use, check the HAZET calibration unit for full functionality. If its function is not guaranteed after this test or if damage is discovered, do not use the calibration unit. If the calibration unit is nevertheless used with its full functionality not being guaranteed, there is a risk of serious physical injury, damage to health and material damage.
• Full functional efficiency is given when: - the device is absolutely damage-free.
- All service or repair work must be carried out by qualified personnel only. Only use original spare parts so as to guarantee its long-term operational safety.
- For safety reasons, modifications to the HAZET calibration unit are strictly prohibited. Any modification of the tool will result in immediate exclusion from warranty and liability.




Caution:
Moving parts pose a crushing hazard!

Do not reach into the device during operation!
- Generally, all work on the HAZET calibration unit must be carried out only with the power supply having been shut down. This is the case unless a different procedure is explicitly specified at the corresponding location.
- Prior to starting after maintenance, check whether all guards have been attached.
- Only remove guards with the product shut down and secured.
- The protective measures (e.g. earthing resistor, main switch) must be tested after all work on the electrical controller
- The general safety and accident prevention regulations (EU Machinery Directive, the German Accident Prevention Regulations and the VDE guidelines) shall apply in all when operating the HAZET calibration unit
- All modifications of the product that are not authorised by the manufacturer will void all warranty claims by the user.
- The user must ensure that no unauthorised persons shall work on the HAZET calibration unit.
- By means of corresponding instructions and checks, the operator must ensure cleanliness and clearness.

Do not reach into the device during operation!

natural_image
Exterior view of a HATET 7920 E industrial machine on a black platform (no signage or text beyond model number)1. Design and function
HAZET calibration unit for indicating and automatic-release torque wrenches. Calibration in accordance with DIN EN ISO 6789-1:2017 and DIN EN ISO 6789-2:2017 is possible.
- Motor-operated calibration unit controlled by integrated PC.
- 2 accuracy levels possible: - 0.25% - suitable for indicating and automatic-release torque wrenches with a precision of 1% (e.g. HAZET smartTAC and HAZET eTAC) - 0.5% - suitable for indicating and automatic-release torque wrenches with a precision of 2% (e.g. HAZET 6000 series)
- Modular system - high-quality HBM sensors (1-200 Nm and 60-800 Nm) - Quick-change system for nominal sizes (from 6.3 14 to 25 14 ) - Extendable arm, up to 1.2 m
- Both actuation directions can be calibrated (right / left) - Necessary for the calibration of indicating torque wrenches
- Integrated PC connection of screen, laptop, PC possible. - Advantage 1 operating system, user-independent - Possibility of an online update and remote maintenance service
- Software included
- Test bed control
- Measurement data recording
- Calibration certificate, declaration of conformity or combination of the two (like HAZET) also with customised company data
- Article management - HAZET data pool, including all parameters for consideration of uncertainty of measurement
• Output of required screen resolution
2. Function description
- The fundamental structure of the HAZET calibration unit comprised a base plate, side panels and a cover plate.
- The rotating unit with torque signal acquisition and the guides for force resistance are mounted in the cover plate.
- The rotating unit comprises a servo gear with a quick-change mounting for the torque measurement flange.
- The required test angle speed and the required torque are generated via the servo gear.
- A quick-change mounting for the torque measurement flange is fitted to the servo gear.
- Two linear guides arranged in parallel with a slide unit form the so-called force resistance - ce unit.
- The slide can be moved and fixed using the required support area.
- Height adjustment at the handle support point allows horizontal alignment of the test subject.
- The force support unit is attached to the slider via a quick-release mounting.
- The force arm can be extended up to a length of 1.2 m.
- The electric controller and measurement data recording is located on the base plate inside the cover panel.
3. Control devices and their functions
- The unit is equipped with adjustable feet.

When setting up the unit, ensure that it is horizontally aligned.
- To do this, adjust the height via the adjustable feet.
4. Power supply specifications
- Connected load 240V / 50 Hz / back-up fuse 16 A
Before commissioning, it must be ensured in each case that the following conditions are met:
- all protection devices are fitted and functional
- the function of the main switch is available
- the power supply is ensured
- all necessary media are provided for operation
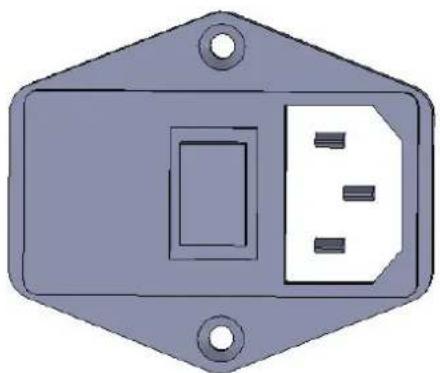
5. Connect 230V mains cable
- The calibration unit requires 230V / 50 Hz for operation.
- The fuse of the earthing contact socket should be 16 A.
- Ensure that the toggle switch adjacent to the IEC socket and the yellow / red main switch are switched off.
- First insert the mains cable into the connection socket of the calibration unit before inserting the other end into the earthed socket.
natural_image
Diagram of a device front panel with a square button and three slots (no text or symbols)
Do not reach into the device during operation!
6. Protection devices
- Safety devices such as the enclosure may not be removed or disabled.
- If this is unavoidable in the case of a repair, the safety equipment must be replaced immediately afterwards and put into operation.
7. Main switch
- The HAZET calibration unit is equipped with an EMERGENCY STOP main switch.
- The unit's drives are immediately shut down when this is operated and the entire test bench incl. PC switched off.

Recommissioning:
Recommissioning is only possible after you have have brought the calibration unit to the initial position.

Caution: before you bring the HAZET calibration unit to the initial position you must remove the test object!
8. Commissioning, set-up, adjustment, test sequences
- check all visible bolted connections for tightness, use a torque wrench.
- check all electrical plug connections for tightness.
- fill all greasing points (if fitted or required) with grease or oil.
- attach all necessary guards.
• To prevent data loss, it is imperative that the PC is shut down as usual before switching off the HAZET calibration unit.
9. Tool change, change socket inserts
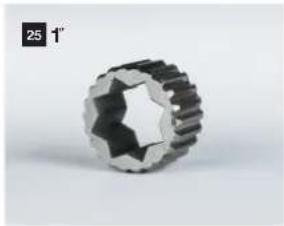
- For the individual torque wrench types, the associated inserts must be inserted into the measurement pick-ups.
natural_image
Close-up of a metallic gear with a star-shaped cutout, shown against a plain background (no text or symbols)
natural_image
Close-up of a metallic gear with visible teeth and central hole (no text or symbols)
natural_image
Close-up of a metallic gear with visible teeth and central bore (no text or symbols)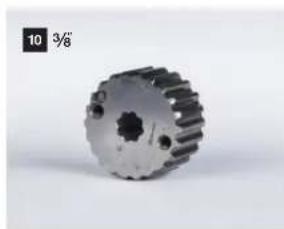
natural_image
Close-up of a metallic gear with visible teeth and central bore (no text or symbols)
natural_image
Close-up of a metallic gear with evenly spaced teeth, no visible text or symbols• These 5 inserts are for socket sizes 25 1", 20 3/4", 12 1/2", 10 3/8" and 6.3 1/4"
10. Adjusting the force arm / sliding plate
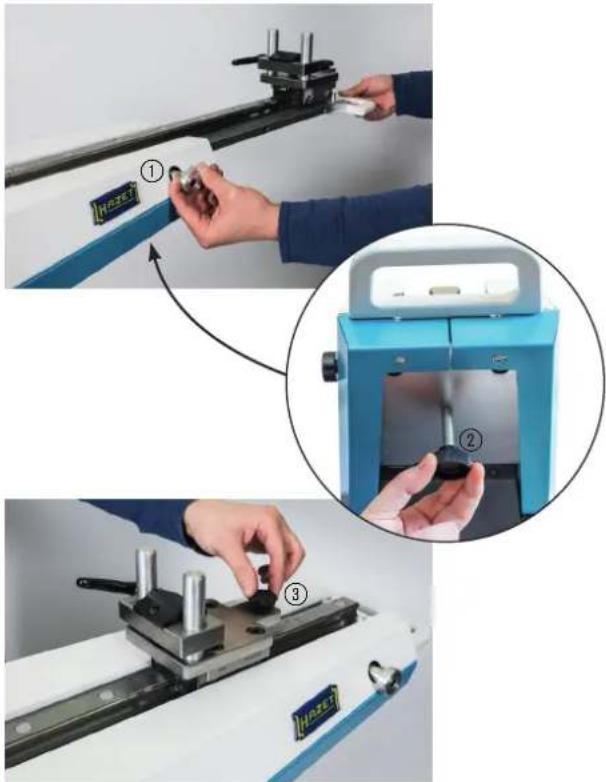
- The force arm must be individually set for the corresponding torque wrench (rough length adjustment).
- To do this, release locking bolt ① as well as the locking knurled banjo bolt ② on the underside of the force arm and moving this into the corresponding position.
- Then re-tighten the locking bolt and fasten the knurled banjo bolt hand-tight.
- You can use the sliding plate to make the exact length adjustment ③ and the necessary height adjustment ④.
Force arm
Sliding plate

natural_image
Person assembling a mechanical component with a numbered label (4) on the device (no visible text or symbols)
natural_image
Person in blue jacket assembling a mechanical component with metal parts (no visible text or symbols)
Caution: in all cases, pay attention to the horizontal position and alignment of the torque wrench and ensure that it is not inserted in a wedged position!

Note: the torque wrench must not be inserted in a wedged position or be wedged from the height adjustment.

③ Design and function
11. Measurement pick-up
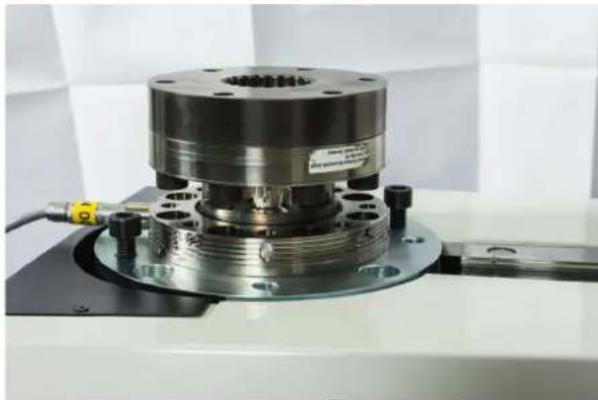
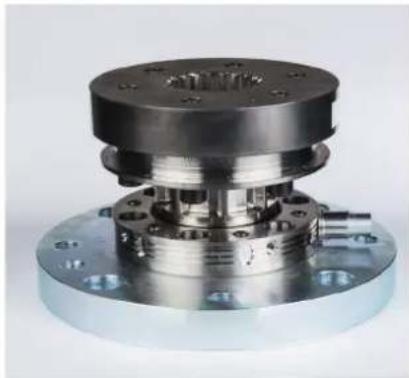
- The measurement pick-up can be exchanged for the individual torque wrench types. To do this, release the four hex socket bolts, size 8.

natural_image
Close-up of a mechanical clamp or mounting bracket with a metallic flange and bolted base, mounted on a workbench (no visible text or symbols)NOTE!

To remove the measurement pick-up, it may be necessary to lift the measurement pick-up with the help of 2 of the 4 previously-loosened hex socket bolts out of its tightly-fitted position - offset threaded bores in the measurement pick-up. Offset threaded bores in the measurement pick-up are intended for such use.
natural_image
Close-up of a metallic mechanical assembly with mounting flange and bolted base (no visible text or symbols)- When the measurement pick-up has been released from its tightly-fitted position it can be removed and exchanged.

natural_image
Person operating a mechanical assembly with a 7920 E model, no visible text or symbols on the equipment itself.CAUTION!

When replacing the measurement pick-up, in all cases ensure that the connection cable points forwards in the direction of the main switch. Affix the measurement pick-up and bolt it tightly again.
CAUTION!
The measurement pick-up and cable must not be separated as the cable contains the "TEDS" of the measurement pick-up. The HAZET calibration unit detects the sensor via this.

For technical data of the HBM measurement pick-ups, please see the attached technical data and calibration certificates. Included in the scope of delivery.

12. Monitor / PC monitor
- An external monitor can be connected to the HAZET calibration unit.
- This can be connected directly using a standard HDMI cable.
- Furthermore, an external keyboard or a PC mouse can be connected via the USB interface.

natural_image
Close-up of a black electronic device with two metallic connectors and a transparent wall-mounted socket, placed on a dark surface against a blue background (no visible text or symbols)• Alternatively, a laptop can be connected via a LAN connection to the visualisation and data recording.
13. Computer
- The PC that is within the HAZET calibration unit is automatically activated when the power switch is switched on as well as the connected peripheral devices such as the keyboard, mouse and monitor.
• To prevent data loss, it is imperative that the PC is shut down as usual before switching off the HAZET calibration unit.

Note: the monitor, keyboard and mouse are not included in delivery.
14. Insertion of the test object
- When you have set the HAZET calibration unit to the test object, insert the torque wrench.

natural_image
Person using a mechanical testing device with a 7920 E label, no visible text or symbols on the device itself.
natural_image
Person operating a mechanical testing setup with a 7920 E label and a tool, no readable text or symbols beyond the label.- Ensure that the calibration mark ① on the handle of the torque wrench lies centrally in the support!
- Ensure that the test object is horizontally aligned!
• The test object must not be wedged!

natural_image
Close-up of a black horizontal bar with a red vertical line and 'HOUST' logo, no readable text or symbols beyond the label.
natural_image
Close-up of a mechanical device with a digital display and a highlighted cylindrical component, showing no visible text or symbols.The necessary steps for calibration are explained from page 14.

Do not reach into the device during operation!
④ Before commissioning
NOTE!

In order to calibrate in compliance with the standard, you must connect and use a standard temperature and humidity sensor.
Caution: Not included in delivery!
1. Program start
Start the software by double-clicking on the link.

First select the language using the selection function (GERMAN / ENGLISH).
2. Master data
First, update the master data and create manufacturers, manage users and configure the filing of the test certificates. These steps are described further in the following and in the Software chapter.
Note: HAZET is pre-set as the manufacturer and corresponding test objects (torque wrenches) are stored with their parameters and technical data.

Do not reach into the device during operation!
Changing the user
Hinweis: An admin and a tester are pre-set.
| User: Admin |
| Password: Admin |
| User: Tester | |
| Password: Tester |
You have the option of creating new users. The corresponding steps are explained in the Software User Administration and User Authorization chapter (page 27)
Note: Only a created admin has permissions to change or create test parameters and master data. The tester can only carry out the test or calibration with the corresponding menu structure.
Changing the manufacturer
You have the option of creating new manufacturers. The corresponding steps are explained in the Software Manufacturers chapter (page 19)
3. Configuration:
In the Configuration tab you have the option of placing your manufacturer logo in the test certificate. To do this, store your logo in the displayed file path to use it in the output documents.
Furthermore, it is possible to bring the HAZET calibration unit into the initial position (The initial position is comparable to a zero position).

Caution: before you bring the HAZET calibration unit to the initial position you must remove the test object!

Do not reach into the device during operation!
⑤ Measurement / Calibration
NOTE!

When a torque wrench is calibrated for the first time, the initial test may take longer than the subsequent tests. This has to do with a speed control that is "learning".
NOTE!

Place the handle of the torque wrench against the support. This reduces the free travel to be bridged.
- When you have set the HAZET calibration unit to the test object and inserted the test object correctly, start the software. When you calibrate a HAZET torque wrench, the parameters are pre-set and you can select the HAZET torque wrench from the overview. All test parameters are carried over from the factory settings. Then enter the tester and the serial number. Start calibrating by pres - sing the button for the desired test direction ("left" or "right"). Afterwards, you can adopt the temperature and humidity.
- If you calibrate a torque wrench that is not pre-set in the software, you must fill in all relevant mandatory fields and enter the necessary parameters.
- To do this, create a new test object and fill in all mandatory fields and technical data of the torque wrench. The software and set-up as well as creation is described further in chapter 5. Software.
Notes on calibration:
Set the measurement pick-up to "0" prior to calibration. Press "Start" to commence calibration. The temperature and humidity is queried first. You must adjust the corresponding parameters here! When the torque value is queried, set the torque wrench to the displaced value and reinsert the torque wrench and confirm with "set". The torque wrench is then preloaded. Subsequently, the torque wrench must be set to the measured value of the first measuring point and reinserted. After confirming, the test is started automatically. When the first measuring point is processed, the two additional measuring points must be processed in the same order until the check is concluded.
ATTENTION

When adjusting the torque value on the torque wrench, always ensure the correct and central position of the handle for the support!
After calibration you can add the result and the test object to the test equipment list. Here you can manage the test objects and identify the status. If a test object is due for a test, if it was output, or if the test object is in your warehouse, if it is ready for use or not. You can update the status settings.
NOTE!

When calibrating the HAZET smart-TAC torque wrench, use the HAZET app and have the values displayed directly on the tablet, thus simplifying read-off and entry of the measured values!

⑤ Measurement / Calibration
1. Calibration of indicating torque wrenches:
- if all parameters are updated and entered and the torque wrench is being calibrated,
the displayed value must be entered manually. To do this, read the displayed value of the torque wrench and enter it into the mandatory field.
line
| Moment | Value | | ------ | ----- | | 0.0 sec | 0.0 | | 2.5 sec | 3.0 | | 5.0 sec | 15.0 | | 7.5 sec | 20.0 | | 10.0 sec | 20.0 | | 12.5 sec | 20.0 | | 15.0 sec | 20.0 | | 17.5 sec | 20.0 | | 20.0 sec | 20.0 |2. Calibration of automatic-re-lease torque wrenches:
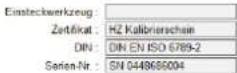
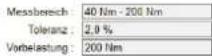
- The program guides you through the calibration.
- The measuring points must – after the torque wrench has been adjusted – be confirmed
Messen


Do not reach into the device during operation!
⑥ Test equipment list
If you have created and calibrated test objects, you can store your test objects in the test equipment list. This is used to monitor the test equipment.
In the test equipment list, you have an overview of the status and location of the test object, the next test date as well as the user and the cost center.
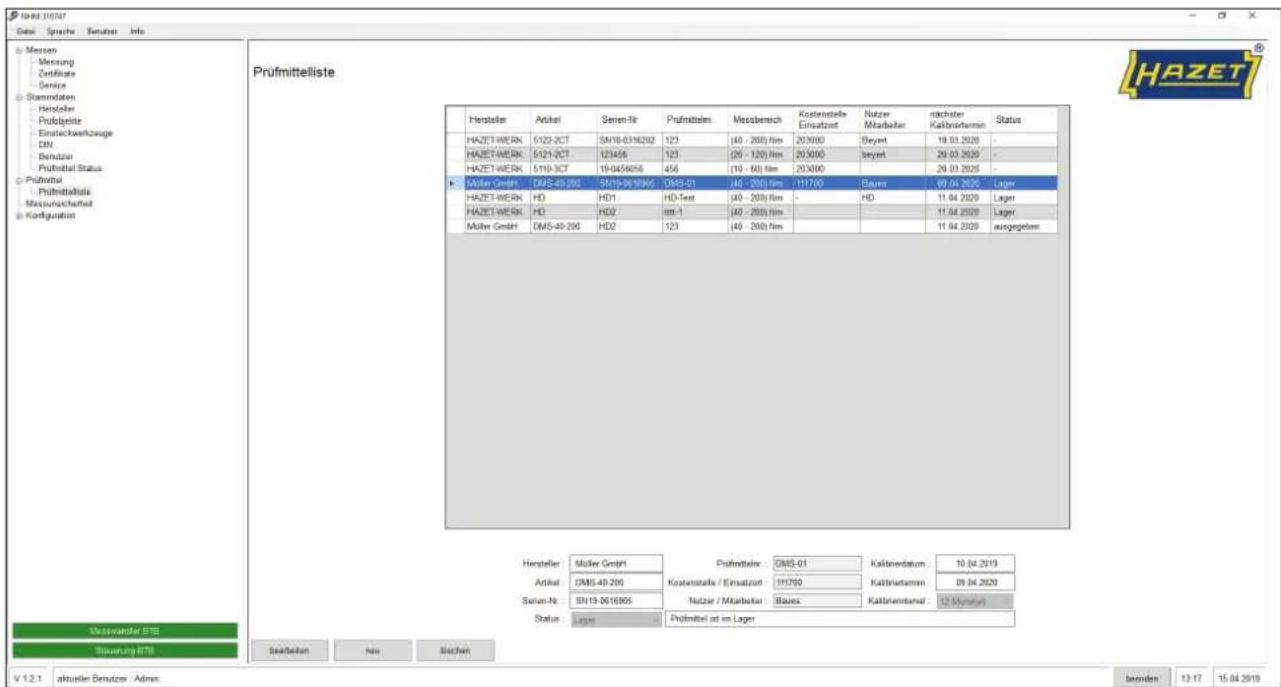
Note: To create an additional test equipment status, you can create and manage new characteristics using master data and test equipment status.
⑦ Uncertainty of measurement
If you want to include new test objects in your test equipment list, you must specify the uncertainty of measurement when you have it. All HAZET torque wrenches already have the uncertainty of measurement stored. If you do not have the data, you must conduct the consideration of the uncertainty of measurement yourself. To do this, you have the option of conducting the consideration of the uncertainty of measurement directly from the measurement or you can go directly to the Uncertainty of measurement tab.

The consideration of the uncertainty of measurement is conducted in accordance with DIN EN ISO 6789:2017.

Caution: When adjusting the torque value on the torque wrench, always ensure the correct and central position of the handle for the support!

Do not reach into the device during operation!
1. Starting calibration

Note: calibration can only be started when you have filled in all relevant mandatory information.
Select a stored test object or create a new object (see description: Create new test objects). Enter the tester and the serial number of the test object.
Note: HAZET torque wrenches are pre-set and can be picked from the pre-selection.
Note: calibration can only start when measurement pick-ups and controller are operational and ① all data has been updated.

Enter the tester and the serial number of your test object.
Note: assignment of the serial number is important for conclusions to be drawn with respect to previous calibrations!
Note: The newly created test object is displayed at the end of the overview list.

Certificates
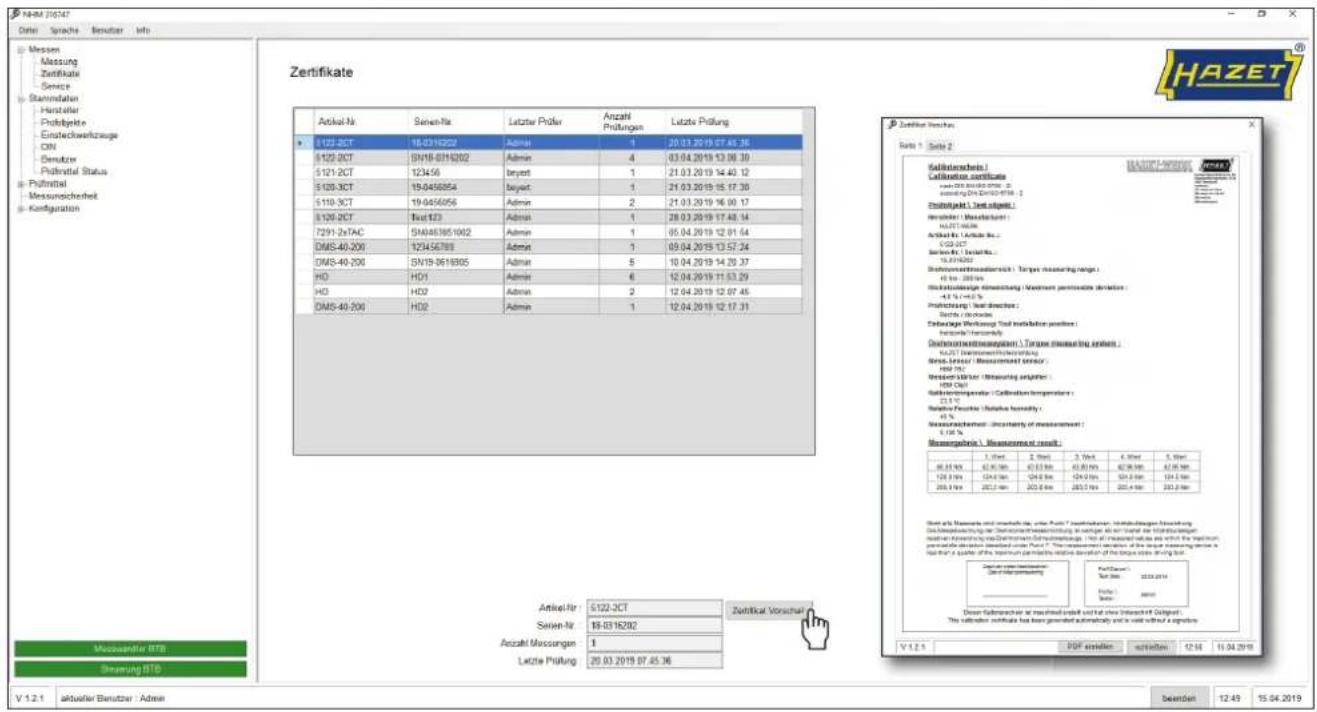
The certificates relating to previous and implemented calibrations are shown here. In addition, further details and data relating to test objects are displayed.
Manufacturer
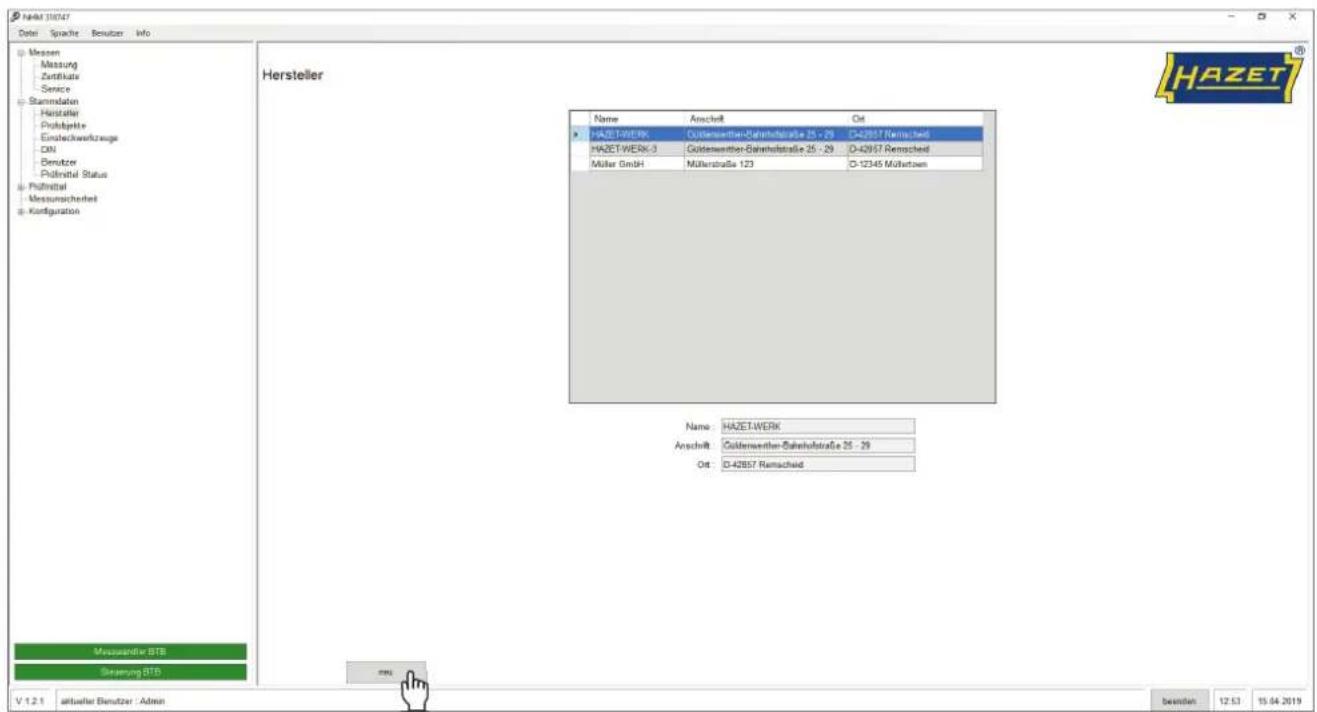
Select the manufacturer. HAZET is pre-set. You have the option of creating a new manufacturer: select "new" to create a new manufacturer.

Do not reach into the device during operation!
⑧ Software
en

The new manufacturer is displayed and can now be selected.
Test objects

Select a test object. HAZET torque wrenches are pre-set.
You can create new test objects, select "new"
to create a further test object.

Fill in the mandatory fields "Article number", "Manufacturer" and "Insert tool".

Do not reach into the device during operation!
⑧ Software
en

Select the desired unit.

Select the desired output certificate. HAZET calibration certificate and HAZET declaration of conformity are pre-set.
You have the option of creating a new output certificate.

Do not reach into the device during operation!

Select the desired standard that should be applied.
You have the option of creating a new standard.
Save your entry.

The new test object is now displayed and can be selected.

Do not reach into the device during operation!
⑧ Software
en
Insert tools

Select an insert tool. HAZET insert tools are pre-set.
You have the option of creating a new insert tool, select "new" to create a further insert tool.

Fill in the mandatory fields "Designation" and "Article no." Save your entry. The new insert tool is displayed and can be selected.

Do not reach into the device during operation!
Standards
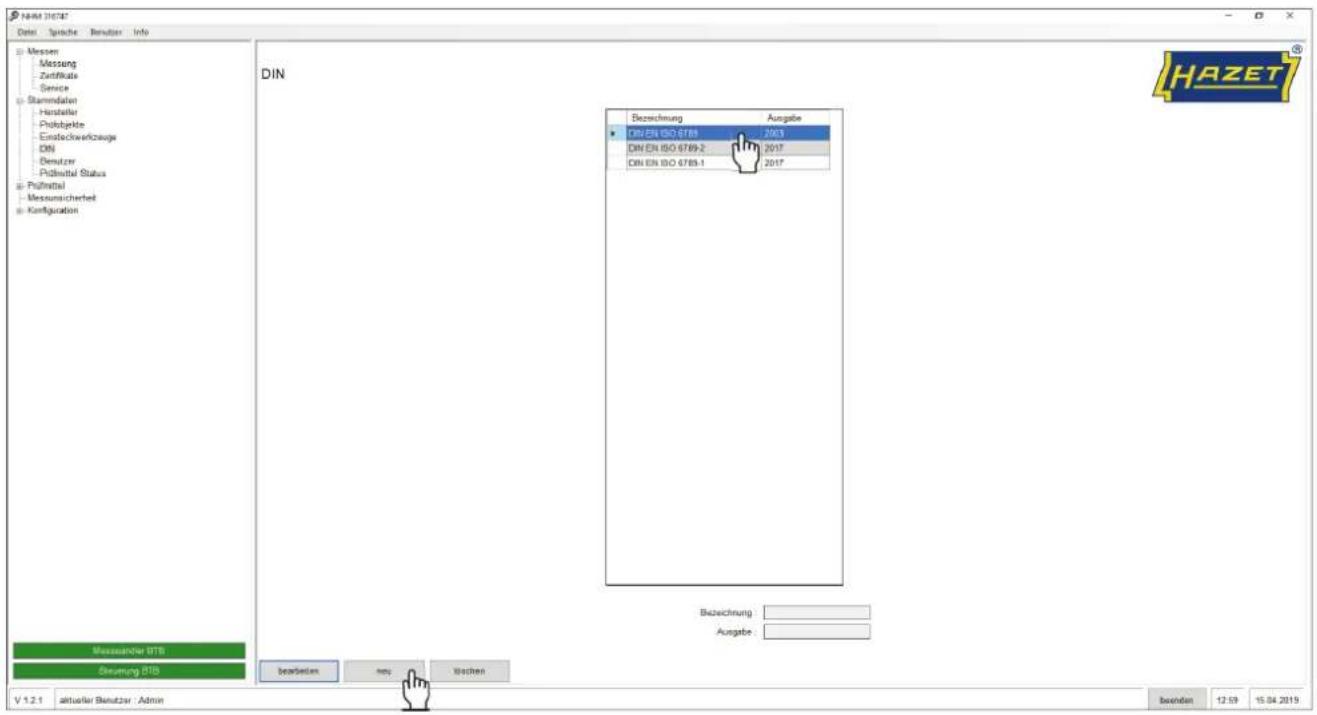
Select a standard. DIN EN ISO 6789:2017, DIN EN ISO 6789-1:2017, and DIN EN ISO 6789-2:2017 are pre-set. You have the option of creating new standards. Select "new" to create a further standard.

Fill in the mandatory fields "Designation" and "Output". Save your entry.

Do not reach into the device during operation!
⑧ Software
-en
Certificate templates

Select a certificate template. HAZET calibration certificate and HAZET declaration of conformity are pre-set. You have the option of creating new certificate templates, select "new" to create a further certificate template.
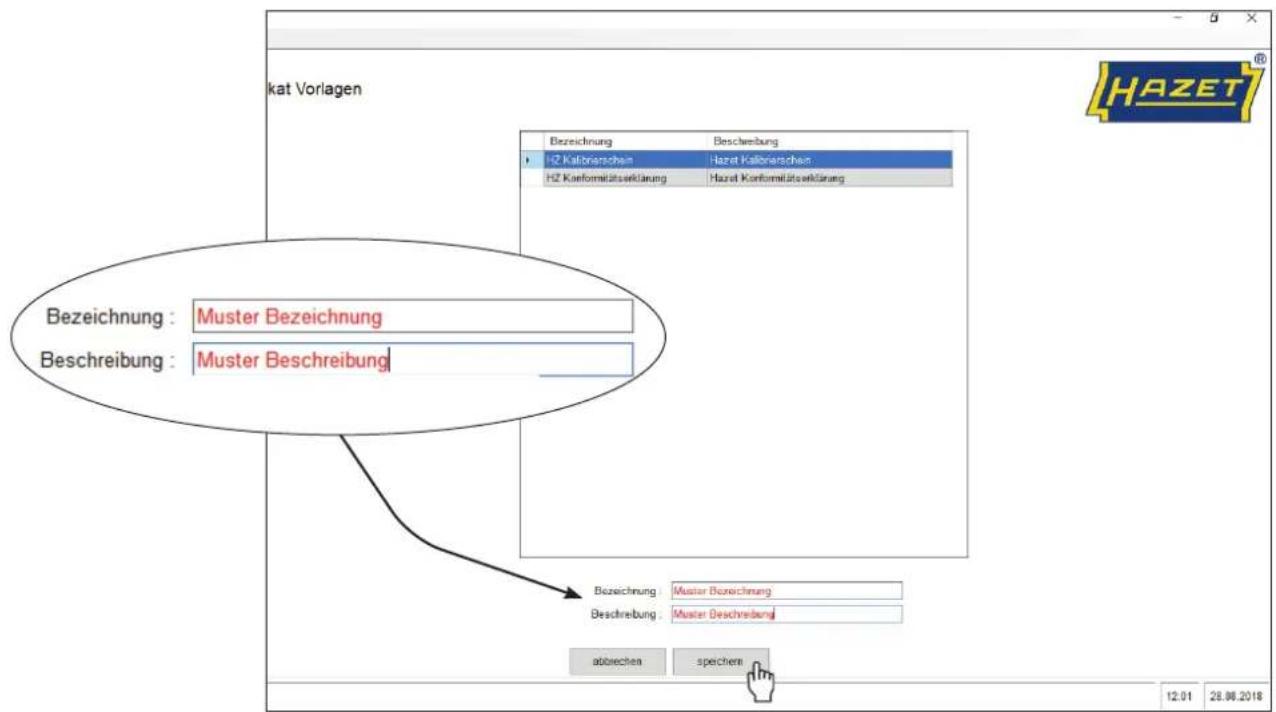
Select "new" to create a new certificate template. Fill in the mandatory fields "Designation" and "Description". Save your entry.

Do not reach into the device during operation!

The new certificate template is displayed and can be selected.
User administration

Select a user. An admin and a tester are pre-set. You have the option of creating a new tester, select "new" to create a further tester.

Do not reach into the device during operation!
⑧ Software
en

Save your entry. Please select the appropriate authorization of the new user (admin or tester).

The new tester is displayed and can be selected.

Do not reach into the device during operation!
Folders

Select directories to specify the file path of the measured values and to select the storage location.

Select measured values to specify the file path of the measured values and to select the storage location.

Do not reach into the device during operation!
⑧ Software

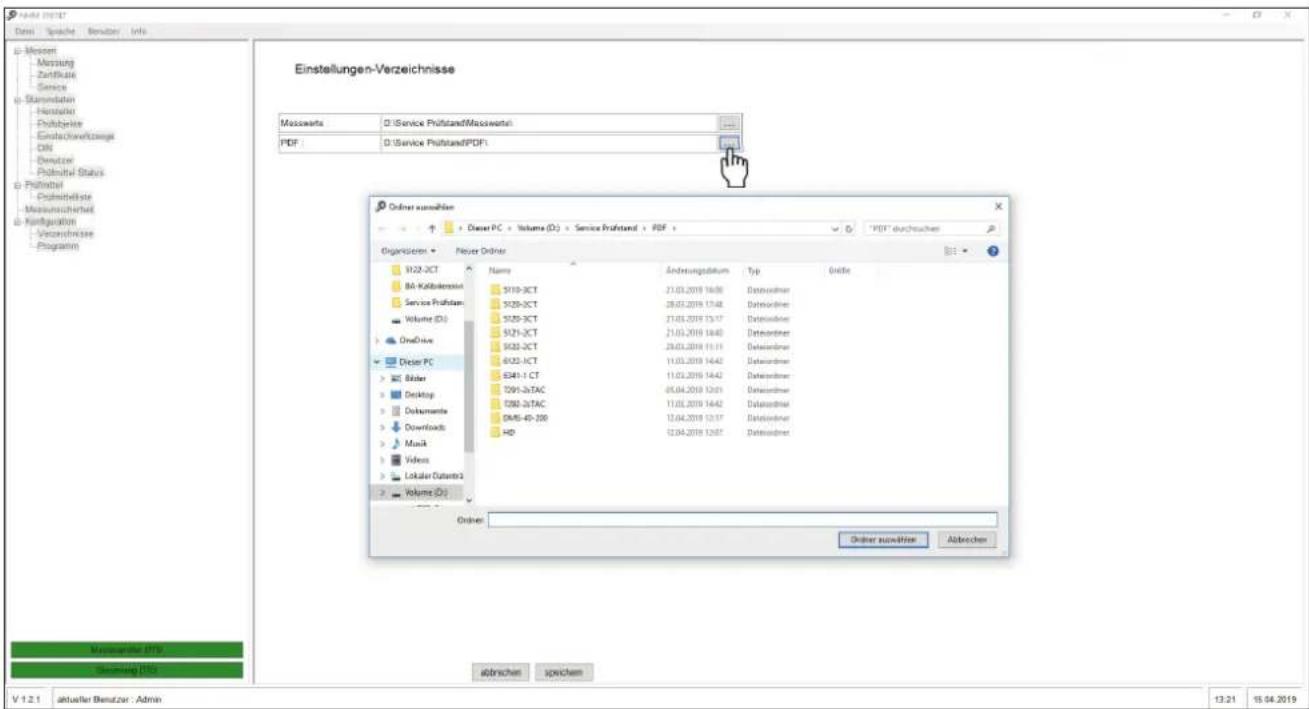
Select PDF to specify the file path of the PDF directory and to select the storage location.
Program

Initial position of test device

Do not reach into the device during operation!

Select initial position in the event of a malfunction of the HAZET calibration unit.
Caution: remove the test object from the HAZET calibration unit and then confirm "Initial position"

Note: Pay particular attention to right/left operation!

Do not reach into the device during operation!
Calibrate measurement pick-up
The measurement pick-up and the connection cable Connecting cables must be sent in for calibration once per year.
To remove the corresponding components, you should proceed as follows:
- switch off main switch
- isolate the unit from the mains and remove the mains plug from the socket.
- release the connections of the measurement pick-up.
- loosen the bolted connections.
natural_image
Close-up of a mechanical assembly with a metallic flange and bolted housing (no visible text or symbols)
See chapter
3.10 Measurement pick-up
HAZET calibration service!
- HAZET offers you a special service so that your calibration unit is always ready for use.
- Inform our service team that your utilised measurement pick-up is in need of calibration. The service team will coordinate the procedure with you.
- Simply get in touch!
Software update and remote maintenance:
- HAZET offers you a comprehensive service! You always receive the latest updates!
- HAZET offers you the option of remote maintenance.
- Simply get in touch!
Address for service and calibration
HAZET-WERK
- Before commencing maintenance or cleaning work on the HAZET calibration unit, this must be taken out of commission and secured against unintentional activation.
- The stickers with warning information on the HAZET calibration unit must be checked regularly for legibility and inadmissible covering.
- Damaged or illegible information signs must be replaced immediately.
-
In the event of installation and commissioning, and work performed with or on the HAZET calibration unit, it must be ensured that accidental and unintentional operation / activation of the HAZET calibration unit is excluded by means of a further person.
-
Basic instructions for the implementation of maintenance work:
- When performing all maintenance work, never place tools and components (bolts, etc.) on or in the HAZET calibration unit (risk of breakage!)
- Always be well prepared for work by keeping suitable containers or boxes at hand to store components that are to be removed and for your tools.
- Thoroughly clean dirty components before re-use and use suitable spray oils where necessary.
- Complete each work step and check your work steps, in particular the safety devices, before reactivating the HAZET calibration unit.
Maintenance and care
• Always keep the device clean
- Do not use degreasing agents or water in order to avoid corrosion.
• Inspection and repair may only be carried out by qualified personnel.
Your contact for:
• Service and calibration
- Maintenance and repair
• kalibrierlabor@hazet.de
Spare parts
- Only use the manufacturer's original spare parts.
- For questions and spare parts orders, please indicate the article number of the device.
- Unsuitable or defective spare parts may cause damage, malfunction or total failure of the device.
- The use of non-approved spare parts will void all warranty, service and liability claims as well as all claims for compensation against the manufacturer or its agents, distributors and sales representatives.
| Months | ||||
| Weeks | ||||
| Days | ||||
| Per shift | ||||
| Maintenance work | ||||
| Visual inspection of the HAZET calibration unit- look for loose bolts- look for possible damage to the 230V mains cable | 3 | |||
| Check the EMERGENCY STOP function 1 | ||||
| Check the bearing running surfaces 1 | ||||
| Lubricate the carriage (see chapter 9.1.1) 1 | ||||
| Calibrate the HBM measurement pick-ups (see chapter 3.7.1) 1 | ||||
| General maintenance 6 | ||||
| Cleaning the HAZET calibration unit 1 | ||||
| Calibrating the measurement pick-ups / calibration unit 12 | ||||
⑨ Maintenance and care

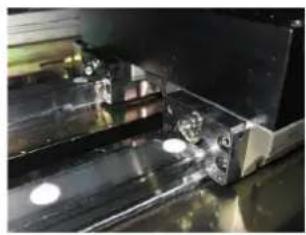
Force arm (torque bracket)
- The HAZET calibration unit is equipped with four force arms (torque brackets).
- Please use genuine lubrication grease from the company THK for lubricating the force arms (torque brackets).
natural_image
Close-up of a metallic mechanical component with reflective surfaces and mounting holes (no visible text or symbols)
natural_image
Close-up of a mechanical assembly with metal components and a black component (no visible text or symbols)⑩ Storage
Storage

The tool must be stored according to the following conditions:
- Do not store the tool outdoors.
- Keep the tool in a dry and dust-free place.
- Do not expose the tool set to liquids and aggressive substances.
• Storage temperature: -10 up to +45°C.
• Relative air humidity: max. 60 %.
When decommissioning the HAZET calibration unit, serious injury can occur due to a lack of care or insufficient expertise.
- ONLY clean the HAZET calibration unit when it is switched off.
- ONLY allow connections to be separated by trained personnel.
Decommission the HAZET calibration unit as follows:
- Switch off the main switch.
- Switch off the toggle switch at the mains power plug connection
- Pull out the mains plug.
- Where possible, cover the entire HAZET calibration unit to protect it from dirt and damage.
⑪ Disposal
Disposal
- For disposal, clean the device and disassemble it according to the regulations for work safety and environmental protection. Please recycle components.

Do not reach into the device during operation!
Notizen / Notes
Notizen / Notes
Notizen / Notes
Notizen / Notes
HAZET®

natural_image
Illustration of a multi-wheeled industrial cart inside a circular frame (no text or symbols)
natural_image
Circular image displaying multiple hand tools including pliers, screwdrivers, and a wrench, arranged in a row (no text or symbols visible)
natural_image
Close-up of mechanical components including a screwdriver, clamps, and a digital meter inside a circular frame (no text or symbols visible)
natural_image
Two HAZER air-pipe motors shown in a circular frame (no text or symbols visible)
natural_image
Circular grayscale image showing various electronic devices including headphones, a standing chair, and a flashlight (no text or symbols visible)
natural_image
Close-up of automotive suspension components inside a circular frame (no text or symbols visible)



- ① For your information
- ② For your safety
- HINWEIS!
- ACHTUNG!
- HAZET Kalibrierservice!
- Explanation of symbols
- READ THE OPERATING INSTRUCTIONS AND APPLICATION NOTES!
- NOTE!
- WARNING!
- CAUTION!
- TO BE USED BY QUALIFIED PERSONNEL ONLY!
- CRUSHING HAZARD!
- -en
- Owner's liability
- Intended use
- Dangers that may arise from using the tool
- Caution:
- Design and function
- Function description
- Control devices and their functions
- Power supply specifications
- Connect 230V mains cable
- Protection devices
- Main switch
- Recommissioning:
- Commissioning, set-up, adjustment, test sequences
- Tool change, change socket inserts
- Adjusting the force arm / sliding plate
- ③ Design and function
- Measurement pick-up
- Monitor / PC monitor
- Computer
- Insertion of the test object
- ④ Before commissioning
- Program start
- Master data
- Changing the user
- Changing the manufacturer
- Configuration:
- ⑤ Measurement / Calibration
- Notes on calibration:
- ATTENTION
- Calibration of indicating torque wrenches:
- Calibration of automatic-re-lease torque wrenches:
- ⑥ Test equipment list
- ⑦ Uncertainty of measurement
- Starting calibration
- Certificates
- Manufacturer
- ⑧ Software
- en
- Test objects
- Insert tools
- Standards
- Certificate templates
- Folders
- Program
- Calibrate measurement pick-up
- HAZET calibration service!
- Software update and remote maintenance:
- Address for service and calibration
- Maintenance and care
- Spare parts
- ⑨ Maintenance and care
- Force arm (torque bracket)
- ⑩ Storage
- Storage
- ⑪ Disposal
- Disposal
- Notizen / Notes
- HAZET®
Brand : Hazet
Model : 7920E
Category : Machine de calibration