DW601S - Dishwasher KKT Kolbe - Free user manual and instructions
Find the device manual for free DW601S KKT Kolbe in PDF.


| Brand | KKT Kolbe |
| Model | DW601S |
| Product Type | Freestanding dishwasher |
| Width | 45 cm |
| Height | 85 cm |
| Depth | 60 cm |
| Weight | 40 kg |
| Power Supply | 220-240 V, 50 Hz |
| Power Consumption | 1900 W |
| Energy Efficiency Class | A+ |
| Number of Place Settings | 8 |
| Programs | Eco, Intensive, Quick, Glass, Auto |
| Key Functions | Delay start, Salt and rinse aid indicators, Adjustable upper rack |
| Water Consumption per Cycle | 10 L |
| Noise Level | 49 dB |
| Maintenance | Clean filters regularly, check spray arms |
| Safety Features | Child lock, Anti-flood system |
| Spare Parts | Filters, spray arms, detergent dispenser, racks |
| Reparability | Replaceable parts available via authorized service |
| User Manual | Available for free download in PDF |
Frequently Asked Questions - DW601S KKT Kolbe
User questions about DW601S KKT Kolbe
0 question about this device. Answer the ones you know or ask your own.
Ask a new question about this device
Download the instructions for your Dishwasher in PDF format for free! Find your manual DW601S - KKT Kolbe and take your electronic device back in hand. On this page are published all the documents necessary for the use of your device. DW601S by KKT Kolbe.
USER MANUAL DW601S KKT Kolbe
User's manual → English language
Modelle: DW601S / DW601W
natural_image
Line drawing of a standard multi-level kitchen appliance (no text or symbols)
natural_image
Line drawing of a woven basket with grid pattern (no text or symbols)7
natural_image
3D wireframe model of a mechanical component with two labeled sections (7.1 and 7.2), no readable text or symbols beyond labels.8
natural_image
Technical line drawing of a multi-layered grid-like structure with no visible text or symbols| Wasserhärte Dosierungs-°dH (D) °fH (F) °Clarke (GB) | Mmol/l | einstellung / Anzeige durch Programm-Leuchten | Regenierung bei jedem Xten Programm-ablauf * | Salz-ver-brauch | |||
| 0 - 5 | 0 - 9 | 0 - 6 | 0 - 0.94 | H1 / - 0 | |||
| 6 - 11 | 10 - 20 | 7 - 14 | 1.0 - 2.0 | H2 / 90 | X = 10 9 | ||
| 12 - 17 | 21 - 30 | 15 - 21 | 2.1 - 3.0 | H3 / 90 + ▶▶ | X = 5 | 12 | |
| 18 - 22 | 31 - 40 | 22 - 28 | 3.1 - 4.0 | H4 / ECO | X = 3 | 20 | |
| 23 - 34 | 41 - 60 | 29 - 42 | 4.1 - 6.0 | H5 / ECO + ▶▶ | X = 2 | 30 | |
| 35 - 55 | 61 - 98 | 43 - 69 | 6.1 - 9.8 | H6 / ECO + 90 | X = 1 | 60 | |
1^ = 1,25^ = 1,78^ = 0,178mmol / l
Werkseinstellung: H3
flowchart
graph TD
    A["1: Hand holding sample"] --> B["2: Pan with SAIZ coating"]
    B --> C["3: Hand pouring liquid into pot"]
    C --> D["4: Hand rotating sample with arrow"]
natural_image
Illustration of a hand pressing down on a device with a knob and control knob (no text or symbols)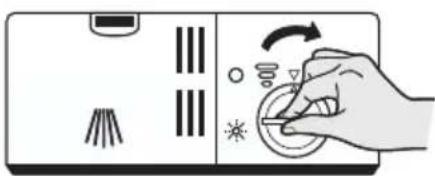
natural_image
Illustration of a hand operating a control panel with icons for lighting and adjustment (no text or symbols)natural_image
Technical line drawing of a mechanical component with no visible text or symbolsnatural_image
Four sequential line drawings of a car chassis with wheels, showing mechanical assembly and mounting details (no text or symbols)1.1 1.41.31.2
natural_image
Diagram showing two stages of a container array with arrows indicating rotation or movement (no text or symbols)natural_image
Pure diagram of vertical slats arranged in a grid pattern without any text, numbers, or symbolsnatural_image
Circular diagram with grid lines and a crossed X symbol, no readable text or labels
natural_image
Illustration of a hand holding a spoon above a bowl with arrows indicating rotation (no text or symbols)natural_image
Illustration of a hand holding a mechanical component with arrows indicating motion (no text or symbols)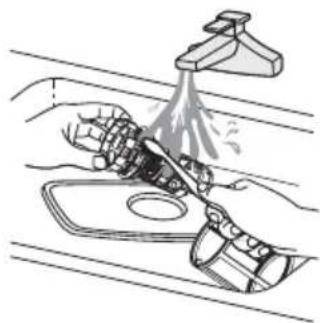
natural_image
Illustration of a kitchen sink with a hand using a tool to clean or spray the surface (no text or symbols)natural_image
Illustration of a hand holding a tool with arrows indicating motion or process (no text or symbols)natural_image
Mechanical assembly diagram showing a lever mechanism with a magnified inset of the component (no text or symbols)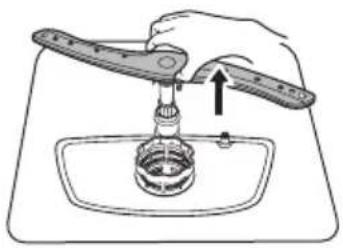
natural_image
Illustration of a hand using a tool to lift a bottle into a basin (no text or symbols)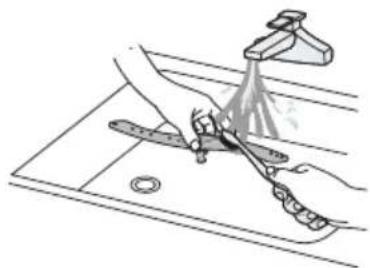
natural_image
Illustration of hands washing a kitchen sink with a faucet (no text or symbols)natural_image
Line drawing of a faucet with handle and valve (no text or symbols)natural_image
Line drawing of a kitchen sink with a gridded wall and side table (no text or symbols)natural_image
Line drawing of a multi-tiered kitchen appliance with visible door, vent, and base plate (no text or symbols)natural_image
Diagram showing a hand pressing down on a mechanical component with an inset circular view highlighting the motion (no text or symbols)7. Technische Daten
nach EN-Norm
Models: DW601S / DW601W
natural_image
Line drawing of a standard kitchen appliance with front panel and side buttons (no text or symbols)
Thank you for your confidence and congratulations on the purchase of your new dishwasher!
Read this manual carefully and thoroughly before unpacking the appliance.
It contains important information about safe installation, maintenance and use, as well as important warnings about the use of your appliance.
Mark the passages that are important to you, keep the manual so that you can refer to it at any time and also pass it on to other users, as well as the installer of the appli- ance.
In view of the continuous development, we reserve the right to make any necessary modifications to the appliance and / or the manual in order to better meet the requirements of user-friendliness, user protection and current technical standards.
You can find the latest version of your user manual as well as further data, documents and information on the corresponding product page or in the "Questions & Answers" section of our online shop at www.kolbe.de.
You have chosen a good appliance that will serve you for many years with proper operation and care.
Should you have any complaints despite our thorough quality control, please contact our in-house customer service.
They will be happy to help you.
To ensure a smooth process in the event of any queries, we recommend that you note the respective 20-digit serial number of your appliance in the corresponding field below.
This can be found on the rating label of your appliance or on its packaging.
Your KKT KOLBE - Team
Serial number of my appliance:
KKT KOLBE
User's manual
Dishwasher, models: DW601S, DW601W
Version 1.0
KKT KOLBE is a registered trademark.
Table of Content
Important Safety Instructions 4
Further Notes and Symbols 13
1. Product Overview ...... 18
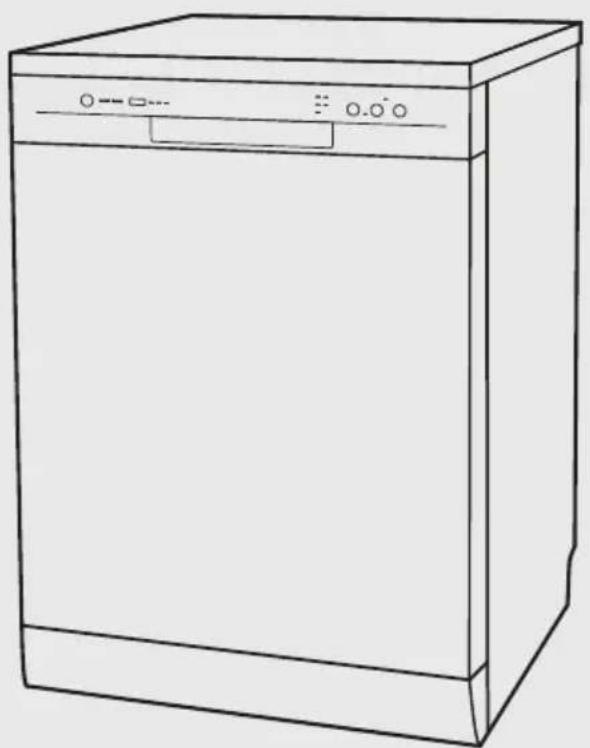
1.1 Appliance components and accessories
1.2 Appliance specifications
1.3 Control panel and display
2. Before Operation 22
2.1 Unpacking and preparing the appliance
2.2 Notes on commissioning
2.3 Setting the water softener and salt filling
2.4 Filling and adjusting the rinse aid dispenser
2.6 Filling the detergent dispenser
2.7 Loading dishes
3. Operation, Setting and Use .... 35
3.1 Washing programme overview
3.2 Washing procedure
3.3 Additional functions
3.4 After completion of the wash cycle
4. Cleaning and Maintenance .... 41
4.1 Cleaning the dishwasher
4.2 Cleaning the filter system
4.3 Cleaning the spray arms
4.4 Caring for the dishwasher
5. Troubleshooting 46
5.1 Problems, possible causes and what to do
5.2 Error codes and meaning
6. Installation of the Appliance 51
6.1 Important notes and installation requirements
6.2 Water connection
6.3 Connection to the power supply
6.4 Positioning of the appliance
6.5 Levelling and height adjustment / adjustment of the levelling feet
7. Technical Data .... 59
KKT Kolbe Support and Service 61
Important Safety Instructions
This manual is the basis for the safe use of your appliance.
Read and follow the instructions carefully before installing and operating it!
The manufacturer is not responsible for any damage or problems caused by failure to follow the instructions, incorrect installation or improper handling.
Intended use

WARNING!
Dangers to life and limb and risks of damage!
This appliance may present a potential hazard to persons and the environment due to lack of prerequisites or knowledge for its handling!
To avoid this, observe the following instructions!
- Keep children under 8 years and pets at a safe distance from the appliance!
-
Do not allow children to play with the appliance or its components!
-
Children aged from 8 years and above or persons with reduced physical, sensory or mental capabilities or lack of experience and knowledge must not use, clean or generally maintain this appliance unless they are supervised or have been given instruction concerning use of the appliance in a safe way by a person responsible for their safety and understand the hazards involved!
- This appliance is designed for indoor domestic use and is intended for cleaning crockery. Only use it for its intended purpose!
- The appliance is intended for use up to a maximum altitude of 2000 metres above sea level.
- The appliance is not intended for operation via a separate remote control or an external timer.
- Unused electrical equipment can be a safety hazard! Do not leave the appliance switched on unused and disconnect it from the power supply if you are not going to use it for a long period of time!
General warnings

WARNING!
Danger to life and injury!
- If there are pipes in your hot water system that have not been used for more than 2 weeks, flush them by letting the water flow from each tap for a few minutes! Under certain circumstances, hydrogen gas may have built up in them, which is released as a result.
Hydrogen gas is explosive and flammable!
Do not smoke and do not use fire, until the room has been well ventilated!
- Keep all packaging materials, assembly accessories and small parts out of reach of children and pets! These can be very dangerous if, for example, they are pulled over the head or swallowed!
- This appliance must be installed and commissioned in com pliance with all applicable regulations and standards, as well as the relevant instructions in this manual!
To do this, the appliance must be disconnected from the power supply!
If you are unsure, contact a suitably qualified specialist!
- Using defective or damaged equipment can be very dangerous! Before use, make sure that the product and its components including water hoses and cables are in complete and perfect condition!
In the event of malfunction or damage, do not use the appliance, immediately disconnect it from the power supply and contact customer service or appropriately qualified personnel!
- Repairs, modifications or maintenance on the appliance by unqualified persons are dangerous and can cause considerable damage!
These may only be carried out by a suitably qualified specialist in compliance with all applicable safety regulations, including the instructions in this manual and the appliance must be disconnected from the power supply for this purpose!
Never attempt to make changes to appliance components, cables or plugs by yourself and do not disassemble any parts of the appliance if this is not expressly instructed in this manual!
- Edges and components of the appliance can be sharp-edged and cause injuries!
Exercise appropriate caution during any handling and protect yourself if necessary, e.g. with work gloves!
- Check the inside of the appliance before starting a wash cycle to rule out the possibility of children or animals getting into the appliance if the door has been left open!
- Some dishwashing detergents are highly alkaline and can be very dangerous if swallowed!
Also avoid skin and eye contact with detergents and rinse water and keep children away from the dishwasher when the door is open!
Remove any detergent and rinse water residues from the appliance after use!
Keep all detergents in a safe place and out of the reach of children and pets!
- Position knives and other sharp or pointed utensils with the sharp or pointed side facing downwards to avoid injury!
- Do not leave the appliance door fully open, except when loading and unloading the dishwasher, to avoid the risk of accidents and damage!
- Immediately after the end of a wash cycle, the dishes may be very hot!
Allow it to cool down before removing it, to avoid burning yourself!

WARNING!
Risk of electric shock / Dangers from electricity!
- To avoid electric shock and damage, disconnect the appliance from the power supply during installation, maintenance, cleaning or other work on it!
- Before use, check whether the technical data on the appliance's rating plate (especially voltage in V and frequency in Hz) are compatible with the local conditions!
If this is not the case, return the appliance to the point of sale!
If anything is unclear, contact your electricity supplier!
- The appliance is fitted with a grounding conductor plug and must be connected to a grounded outlet installed in accordance with all applicable regulations! If you are unsure, consult a suitably qualified specialist!
- Modifications to the power supply system or the replacement of a defective cable may only be carried out by a certified electrician!
There is a risk of life-threatening electric shock for unqualified persons!
- Do not use multiple sockets or extension cables to connect the appliance!
These do not provide the necessary safety!
- To avoid damage to the power cable and associated hazards, make sure that it is not bent or crushed and cannot come into contact with hot surfaces, sharp edges or similar!
Do not pull the plug out of the socket by the cable, but grasp it directly!
- Contact of liquids or moisture with live parts may cause a short circuit or electric shock!
Always keep the outside of the appliance and the cable dry!
Do not use pressure washers or steam cleaners to clean the appliance!
• To avoid possible electric shock due to creeping current, do not operate the appliance with wet or damp hands and wear footwear during operation!

WARNING!
Causes for damage and functional impairments with possible consequential dangers to life and limb!
- To prevent instability and damage, follow the relevant instructions in this manual carefully during installation and only operate the appliance after all components are properly attached!
- Ensure that the surfaces surrounding the appliance (including the underside of the worktop, if applicable) are adequately protected against moisture, to prevent damage, e.g. from steam!
- Only connect the appliance to the main water valve with new hose sets! Do not reuse old sets!
- The appliance is designed for normal household washing loads.
Follow the instructions in the relevant sections to avoid overloading! - Only use detergent, rinse aid and salt intended for dishwashers and follow the manufacturer's dosage recommendations!
Do not use soap, hand dishwashing liquid or washing powder! - Place sharp-edged or pointed objects in such a way that they cannot damage the door seal!
- Only wash crockery labelled as dishwasher-safe in the appliance or follow the manufacturer's recommendations!
- Do not wash any items in this appliance that have come into contact with corrosive, acidic or alkaline chemicals, paint, petrol, iron or steel deposits!
- If crockery breaks, do not use the appliance until all shards have been removed!
- During operation, only open the appliance door carefully at the start of a washing programme! Otherwise hot water and detergent could escape!
- Never stand or sit on the open appliance door or the crockery basket and do not place heavy objects on them!
This can cause damage and unbalance the appliance!
• Always keep the appliance in a clean condition and clean all components at the recommended intervals to avoid functional impairment and damage! Do not use any aggressive or abrasive cleaning agents to avoid damaging the surfaces and observe the notes and instructions in the relevant section of this manual for cleaning and care!
Further Notes and Symbols
In this manual
Symbols for hazards and information

Warning of danger to persons and of damage
Read the safety instructions marked with this symbol particularly carefully and act in accordance with the instructions in order to avoid danger!
Also pass on these instructions to other users and the installer!
Danger grading by combined signal words:
WARNING!
Indication of a hazardous situation which, if not avoided, may result in death or serious injury
CAUTION!
Indication of a hazardous situation which, if not avoided, may result in minor or moderate injury
ATTENTION!
Indication of a situation which, if not avoided, may result in damage to the product or on objects in its surroundings

Information and tips
Following the instructions marked with this symbol will provide you with useful information, make the respective procedure easier and may save you some problems.
Note on illustrations
The figures in this manual are for illustrative purposes and may occasionally differ slightly from the appearance.
Appliance, components and accessories
Symbols on appliance parts, accessories, etc.
The following symbols attached to the appliance, its components and accessories (if applicable) indicate important information for the safe operation of the appliance. Do not remove or damage them, always ensure good visibility and replace damaged symbols!

General danger warning!
There is a potential hazard!
Behave with appropriate caution.

Warning of electrical voltage!
Some components of the product are live during and also after operation!
Take care not to come into contact with them and take appropriate protective measures if necessary.

Warning of flammable substances!
Contained or emerging substances, liquids or gases easily self-ignite!
Avoid contact with ignition sources or sources of danger, e.g. also water or air!

Warning of hot surface!
The product may become hot during operation and cause injury and damage.
Do not touch it until it has cooled down and keep the clearances around the appliance recommended in this manual.

Follow these instructions for use
Read this manual carefully, before using the product and pass on the relevant information to other users and the installer.

EU conformity
The product complies with the applicable EU requirements regarding safety, environmental protection and health protection.
Disposal and environmental protection
Symbols for disposal
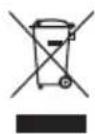
No disposal in household waste (WEEE marking)
Do not dispose of the product as unsorted waste! Take it to a collection point for the recycling of electrical and electronic equipment for reuse and recovery. To do this, have a qualified electrician remove the cable and make the door closing device unusable.

Recyclable material (Möbius strip)
Separate the relevant components of the product by type from the residual waste and dispose of them in accordance with local regulations.

Recyclable material (Triman symbol)
Separate the product from residual waste for disposal according to the accompanying sorting instructions.
General notes on disposal
- Improper disposal may endanger the environment and human health! By ensuring that the product and its packaging are disposed of properly, you will help to avoid possible hazards. This also applies to the disposal of old appliances, if applicable.
- The packaging materials used have been carefully selected and should be recycled to reduce raw material consumption and waste. Separate their components by type and dispose of them accordingly.
- For information on current disposal methods and recycling, contact your local authorities, your waste disposal company or the vendor.
Notes on water and energy saving
- Always bear in mind that washing dishes in the dishwasher following this manual will mostly use less energy and water than washing them by hand.
- If possible, use the ECO programme. This is particularly energy-efficient and environmentally friendly.
- Only use the intensive programme when actually required.
- To reduce the environmental impact of wastewater, pay attention to the composition of your cleaning products. For example, those labelled „Bio“ or „Eco“ are usually more environmentally friendly because they contain no or only small amounts of environmentally harmful active ingredients.
The cleaning effect may be limited as a result.
- To avoid unnecessarily high water and energy consumption, do not pre-wash the dishes manually.
This is normally not necessary and is not recommended.
- Note that water and energy can be saved by respecting the maximum loading capacity indicated in this manual. Also follow the further instructions for loading the dishwasher in the corresponding sections.
- Clean the filters at the recommended intervals, to prevent impurities from becoming trapped and thus increasing energy consumption.
- To save energy in stand-by mode, the appliance switches off automatically after 15 minutes of inactivity.
Notes on transporting the appliance
If you need to transport the appliance after unpacking / at a later time, observe the following instructions to avoid damage:
- As the appliance is heavy, do not move it alone, but with at least one additional person.
- Keep the original packaging of the product and always transport the appliance packed in it in the same way as when it was delivered. Observe the markings on it!
- If the original packaging is not present, use one similar to this one. Secure all loose / detachable parts so that they cannot touch each other.
- Ensure that the appliance is in a vertical position during transport and when setting it down. If absolutely necessary, it can be tilted onto its back.
- Avoid any impact on the product and its components and take appropriate protective measures if necessary.
Storage instructions
If you need to store the product for a certain period of time, observe the following instructions to avoid damage:
- Pack the appliance together with desiccant bags if possible in the original carton or similar packaging and seal it with adhesive tape.
- Choose a dry and clean storage place.
- Make sure to keep it in an horizontal position.
- Do not load the packaging.
- Only store the appliance for as long as absolutely necessary.
- Do not store the product near chemically aggressive or corrosive substances to avoid possible corrosion.
- Check the appliance regularly for visible damage during the storage period and replace the packaging if necessary.
1. Product Overview
1.1 Appliance components and accessories
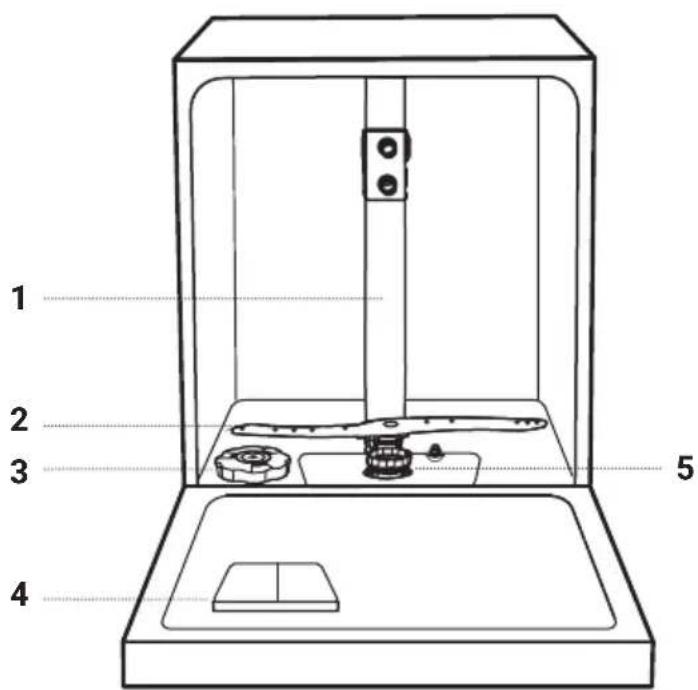
1 Inner pipe
2 Lower spray arm
3 Salt container
4 Detergent and rinse aid dispenser
5 Filter assembly
6 Cutlery basket
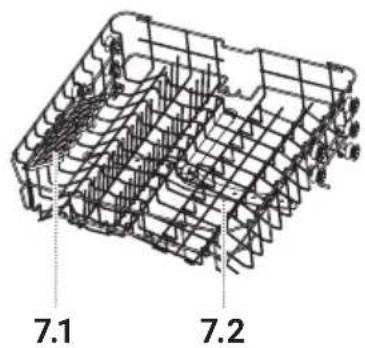
7 Upper crockery basket
7.1 Cutlery rack
7.2 Lower spray arm
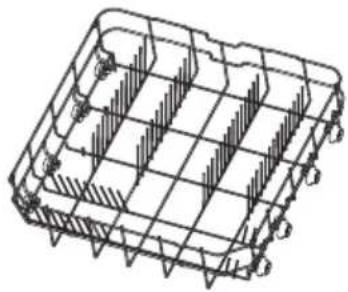
8 Lower crockery basket
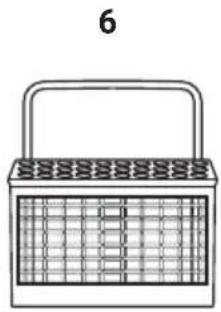
natural_image
Line drawing of a wire basket with grid pattern and handle (no text or symbols)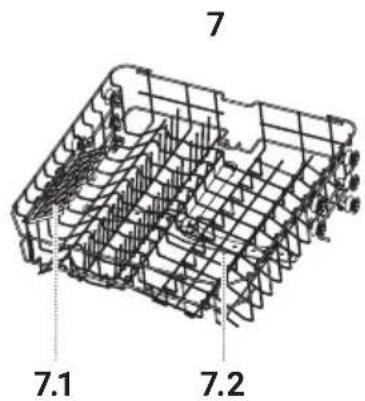
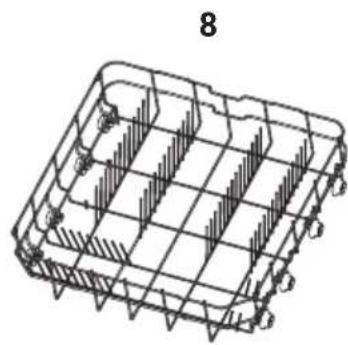
natural_image
Technical line drawing of a 3D grid-based mechanical component with no visible text or symbols1.2 Appliance specifications
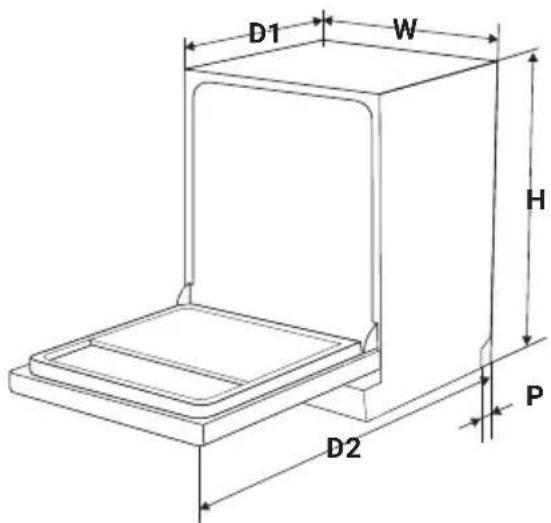
Product dimensions
Width (W) 59.8 cm
Depth (D1) 60 cm
Depth (D2)
incl. open door
117.5 cm
Plinth recess (P) 4.8 cm
Height (H) 84.5 cm
Height of plinth panel 12.5 cm
Length of power cable 150 cm
Length of waste water hose 138 cm
Length of fresh water hose 150 cm
Features and further properties
• Control panel with LED indicator lights
• 5 washing programmes:
- Intensive
- Universal
• ECO - 90 Minutes
- Rapid
• 3 selectable additional functions:
- Start time delay
- Half load
-
Button lock / Child lock
-
Loading capacity: 12 crockery sets
• Safety hose with aquastop
• Pre-assembled cover plate for free-standing installation
For further properties see "Technical Data"
1.3 Control panel and display
The following overview is a brief description
of the button functions and display.
For detailed operating instructions, see the relevant sections.
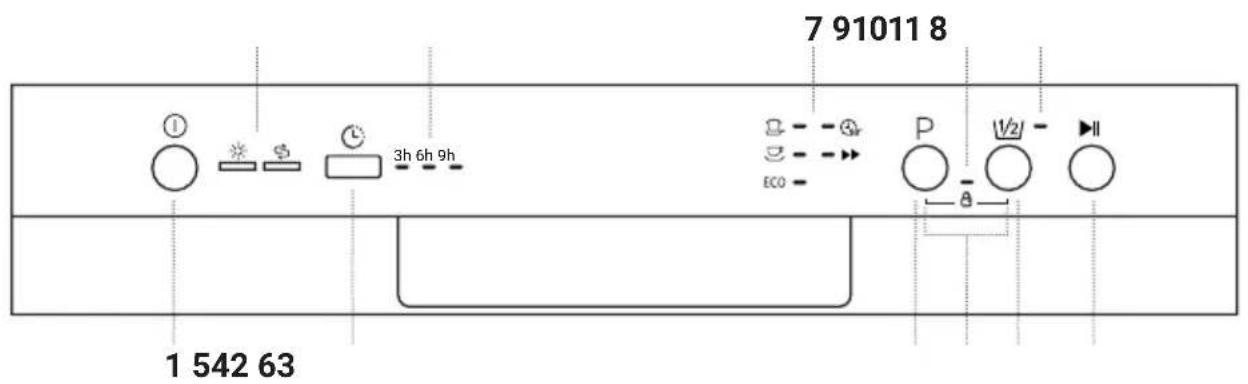
Control buttons
| 1 | 1 | On / Off Switching the appliance on/off by pressing the button | |
| 2 | P | Programme selection | Selecting the washing programme by pressing the button repeatedly if necessary |
| Adjusting the rinsing salt dosage | |||
| 3 | Start time delay | Postponing the start time of the selected programme by 3, 6 or 9 hours by pressing the button several times if necessary | |
| 4 | Half load | De-/ Activating the function for half load by pressing the button | |
| 5 | Start / Pause | Starting / Pausing the selected programme by pressing the button | |
| 6 | 8 | Button lock / Child lock | Locking / Unlocking the control panel (except for the on / off button) by pressing both buttons simultaneously |
7 Programme indicator lights
| Intensive | Indicate the currently selected programme(for programme details, see the following table)or in the setting mode of the water softener,the currently selected salt dosageaccording to the water hardness. | |
| Universal | ||
| ECO | ECO | |
| 90 Minutes | ||
| Rapid |
Function indicator lights
| 8 | 3h6h9h | Start time delay | Displays the set start time delay of the selected programme by 3, 6 or 9 hours. |
| 9 | 1/2 | Half load | Indicates activation of the additional function for half-load operation. |
| 10 | Button lock /Child lock | Indicates that the control panel(except for the on/off button) is locked. | |
| 11 | Signal indicator lights | ||
| ※ | Rinse aid | Indicates when rinse aid needs to be filled. | |
| $ | Salt | Indicates when rinsing salt needs to be filled. | |
2. Before Operation
2.1 Unpacking and preparing the appliance

Smell perception during unpacking
A slight odour may be noticeable when unpacking the appliance.
This is normal and harmless and will soon disappear.
- When unpacking the appliance, make sure that it has not been damaged during transport.

WARNING!
Risk of injury and electric shock!
If you notice any damage to the appliance, its cable or other components, do not connect it and do not put it into operation!
This can be very dangerous!
Contact the customer service.
- We recommend writing down the 20-digit serial number on the inner cover of this manual for possible queries.
- If the appliance has been properly installed (see relevant sections), before using it, ensure that all packaging materials, stickers, protective films and transport protection materials have been removed from the product and properly disposed of and that any remaining small parts such as assembly materials are safely maintained.

WARNING!
Danger of suffocation!
Small parts, foils etc. can be very dangerous if they are swallowed or pulled over the head, for example!
Always keep them out of reach of children and pets.
2.2 Notes on commissioning

Operating requirements
Always observe to the following limit values for operation:
• Maximum permissible water pressure / inlet: 1 MPa
• Minimum permissible water pressure / inlet: 0.04 MPa
- Load limit per wash cycle: 9 tableware sets
- Only operate the appliance if it is in perfect condition and has been properly installed, ideally by a suitably qualified specialist.
- Before commissioning, adjust the salt dosage of the water softener according to your water hardness and fill the salt container, fill and adjust the dosage setting of the rinse aid container and fill the detergent dispenser, as described in the following sections.
- To operate, set and use the appliance, proceed as described in the relevant sections.

Smell perception during operation
If your appliance smells slightly of solvent or similar after commissioning, this is normal. With new appliances, plastic and synthetic odours can occur during the first 20 to 30 wash cycles due to heating. However, these odours will gradually dissipate.
2.3 Setting the water softener and salt filling

Function of the water softener
The water softener is designed to remove limescale, minerals and salts from the water using rinsing salt, to ensure optimum washing results and to prevent lime scale residues on dishes, accessories and appliance parts, as well as harmful or adverse effects on the operation of the appliance due to deposits resulting from hard water. The more minerals present, the harder your water will be. This varies from place to place.
For information about the hardness of your water supply, contact your water supplier.
Adjusting the salt dosage of the water softener
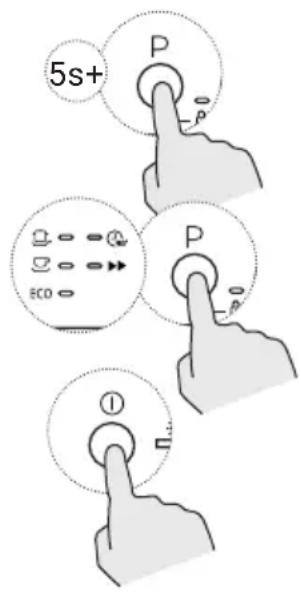
Set the water softener manually according to the water hardness in your region, as follows:
- Close the appliance door and switch on the appliance.
- Within 60 seconds after turning on the appliance, press and hold the programme selection button P for more than 5 seconds to enter the water softener setting mode.
- Press the programme selection button Repeatedly until the dosage setting according to your water hardness appears on the display (sequence: H1→H2→H3→H4→H5→H6; see table)
- Press the on/off button ⓣ to confirm the setting.
| Water hardness Dosage | ||||||
| °dH (D) °fH (F) °Clarke(GB) | Mmol/l | setting / indicated by programme lights | Regeneration at every Xth programme cycle * | Salt consumption | ||
| 0 - 5 | 0 - 9 | 0 - 6 | 0 - 0.94 H1 / - 0 | ▶▶ | ||
| 6 - 11 | 10 - 20 | 7 - 14 | 1.0 - 2.0 | H2 / [IMAGE] | X = 10 9 | |
| 12 - 17 | 21 - 30 | 15 - 21 | 2.1 - 3.0 | H3 / [IMAGE] + ▶▶ | X = 5 | 12 |
| 18 - 22 | 31 - 40 | 22 - 28 | 3.1 - 4.0 | H4 / ECO | X = 3 | 20 |
| 23 - 34 | 41 - 60 | 29 - 42 | 4.1 - 6.0 | H5 / ECO + ▶▶ | X = 2 | 30 |
| 35 - 55 | 61 - 98 | 43 - 69 | 6.1 - 9.8 | H6 / ECO + [IMAGE] | X = 1 | 60 |
1^ = 1.25^ = 1.78^ = 0.178mmol / l
Factory setting: H3
* Every cycle with a regeneration operation consumes additional 2.0 litres of water, the energy consumption increases by 0.02 kWh and the programme extents by 4 minutes.
Filling the salt container

ATTENTION! Risk of damage!
Only fill the salt container with dishwasher salt (regenerating salt)!
Any type of salt that is not specifically intended for use in dishwashers, especially table salt, will damage the water softener!
If any spilt grains of salt or salt water remain inside the appliance for a long time, this can lead to corrosion and damage the filter system, the pump or other important appliance parts!
To avoid this, only fill the water softener with salt shortly before starting a wash cycle!
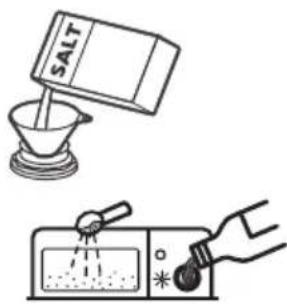
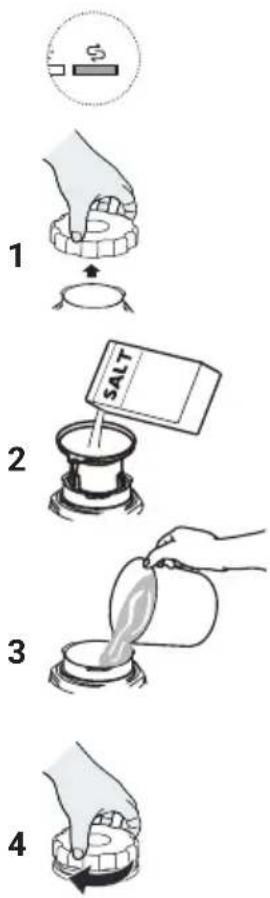
Fill the salt container before commissioning or when the signal light for rinsing salt lights up, as follows:
- Remove the lower basket and unscrew the cap of the salt container (1, for the position see section "Appliance components...").
- Place the end of the supplied funnel into the hole and pour in about 1.5kg of dishwasher salt (2).
- Fill the salt container to its maximum limit with water (3, If a small amount of water escapes from the salt container, this is normal and harmless).
- Screw the cap tightly back onto the salt container (4).
- Start any wash cycle immediately after filling the salt into the salt container (We recommend using a short programme), to remove any salt residue remaining in the appliance.

Notes on salt filling and display
The salt container may only be topped up if this is indicated by the salt indicator light ✉
The signal light goes out, after the salt container has been filled with salt.
However, depending on how well the salt dissolves, it may continue to glow for some time after filling.
flowchart
graph TD
    A["Raw Material"] --> B["Add Salt"]
    B --> C["Pump with Salt"]
    C --> D["Heating into a pot"]
    D --> E["Final Product"]
2.4 Filling and adjusting the rinse aid dispenser

ATTENTION! Risk of damage!
Only use liquid branded rinse aid for dishwashers to fill the rinse aid dispenser! Never fill the rinse aid dispenser with other substances (e.g. dishwashing detergent, liquid washing-up liquid).

Function of the rinse aid
The rinse aid is released during the last rinse to prevent water from forming droplets on your crockery, which can leave stains and streaks. It also improves drying by making the water roll off the dishes.
Rinse aid signal light and fill level indicator
The intervals at which the rinse aid dispenser must be refilled depend on the number of wash cycles and the dosage setting. If rinse aid is required, this is indicated by the signal light for rinse aid You can also see the fill level of the rinse aid dispenser on its visual indicator next to the lid, as follows:

full 34 full 12 full 14 full empty


Note: The rinse aid level should not be below 14 .
Filling / refilling the rinse aid container
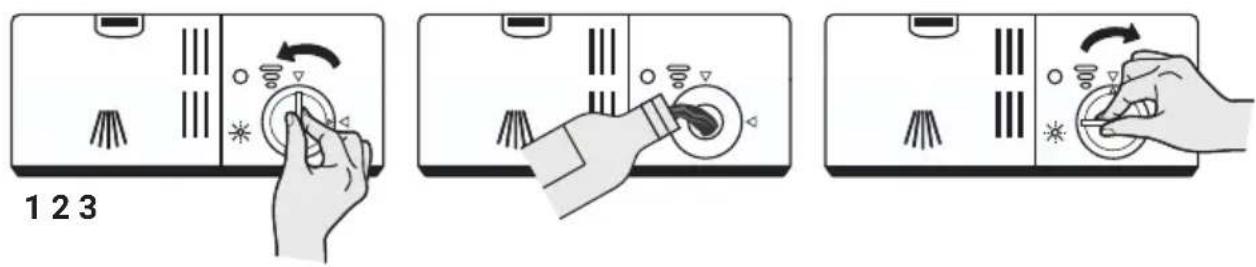
- Open the cap of the rinse aid container by rotating it anti-clockwise (1).
- Pour the rinse aid into the dispenser (2). Take care not to overfill it!
- Close the cap by rotating it clockwise (3).
Setting the rinse aid dosage
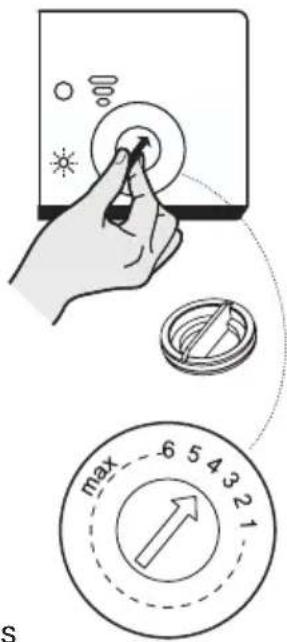
- Remove the cap of the rinse aid container and turn the indicator dial to the desired setting.
- Refit the cap.

Notes on the appropriate dosage setting
- The dosage scale consists of 6 settings; the higher the number, the higher the rinse aid dose. The default and recommended setting is 4.
- If you notice that the dishes are not completely dry after the wash cycle, or if stains are visible, select a higher setting.
- If a bluish film or whitish streaks or stains form on glasses or knife blades, select a lower setting.
2.6 Filling the detergent dispenser

WARNING!
Risk of poisoning and injury!
Some dishwashing detergents are corrosive! Ingestion can lead to death! Also avoid eye and skin contact and always keep dishwashing liquid away from children and pets!


Chemical components of detergents
The chemical ingredients that make up commercially available dishwashing detergents are necessary to remove and dissolve all soiling and rinse it out of the appliance.
Cleaning products labelled as "organic" or "eco" usually only contain small amounts of environmentally harmful active ingredients.
The cleaning effect may be limited as a result.

Storage and use of dishwashing detergents
- Only use detergent specifically designed for use in dishwashers.
- Keep detergent powder fresh and dry.
- Only add powder detergent to the dispenser shortly before starting a wash cycle.
Filling / refilling the detergent dispenser
Fill the detergent dispenser before each wash cycle as follows:
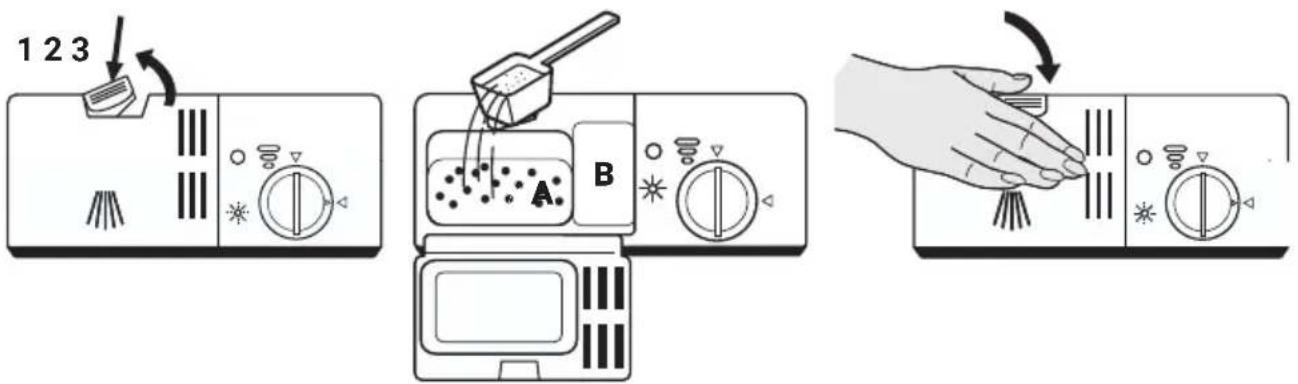
- Open the dispenser lid by pressing the release button (1).
- Pour the detergent for the main wash cycle into the large detergent compartment of the dispenser (2, A). The amount depends on the degree of soiling of the dishes and may vary.
Follow the manufacturer's recommendations.
- For a better cleaning result, especially with heavy soiling, add some detergent into the small detergent compartment of the dispenser for the pre-wash phase (2, A).
- Close the flap and press it firmly, so that the latch engages (3).
2.7 Loading dishes
General information and recommendations for cleaning of crockery and utensils in the dishwasher
- When buying crockery and utensils, make sure that they are labelled dishwasher-safe.
- For particular items, select a programme with the lowest possible temperature.
- To prevent damage, do not take glass and cutlery out of the dishwasher immediately after the programme has ended.
Unsuitable for dishwashers
- Cutlery with wooden, horn, china or mother-of-pearl handles
- Plastic items that are not heat resistant
- Older cutlery with glued parts that are not temperature resistant
- Bonded cutlery items or dishes
- Pewter or cooper items
- Crystal glass
• Steel items subject to rusting - Wooden platters or chopping boards
- Items made from synthetic fibres
Suitable for dishwashers
- Some types of glasses can become dull after a large number of wash cycles.
• Silver and aluminum parts have a tendency to discolour during washing. - Glazed patterns may fade if machine washed frequently.
Before loading the dishwasher
- Remove coarse food residues from crockery and utensils.
- Soak remnants of burnt food.
- It is not necessary to pre-wash the dishes by hand (see also notes on water and energy saving at the beginning or this manual).
General instructions for inserting crockery and utensils

CAUTION!
Risk of injury and risk of damage!
Sharp and pointed utensils pose a potential risk of injury and cause damage!
Always face sharp and pointed sides downwards and ensure that they cannot touch anything!
Also observe the instructions for inserting cutlery!

ATTENTION!
Risk of damage and malfunction!
Place all crockery and utensils so that the spray arms can rotate freely!
Make sure that the door seal is not touched!
Make sure that glasses do not touch each other!
- Place crockery and utensils so that they are stacked securely and cannot tip over or get moved by the spray of water.
- Point the openings of vessels such as cups, glasses, pots/pans etc. downwards and place curved or recessed objects (e.g. with recessed bottoms) slantly so that the water can run off.
- Do not place dishes and cutlery inside or on top of each other.
- Do not wash very small items in the dishwasher as they could easily fall out of the baskets.
- To optimise the washing result and energy consumption, take care not to overload the dishwasher (Note the maximum loading capacity!) and follow the instructions in the following sections.
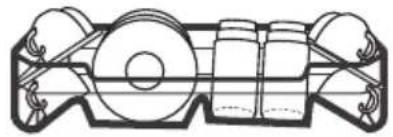
Loading the upper crockery basket
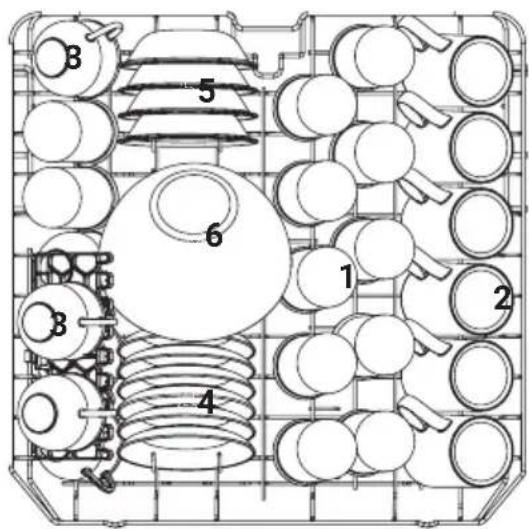
The upper basket intended for delicate and light dishware such as glasses, coffee and tea cups and saucers, as well as plates, small bowls and slightly soiled pans.
natural_image
Technical line drawing of a mechanical component with no visible text or symbolsExample of loading the upper basket
(according to EN standard)
1 Glasses
2 Mugs
3 Cups
4 Saucers
5 Dessert bowls
6 Glass bowl
Height adjustment of the upper basket
To place higher dishes in the upper or lower basket, you can easily adjust the height of the upper basket:
• Pull out the upper basket (1.1).
- Remove the upper basket (1.2).
- Re-attach the upper basket to upper or lower rollers (1.3).
- Push in the upper basket (1.4).

natural_image
Four sequential line drawings of a toy car chassis with wheels, shown from front to side views (no text or symbols)1.1 1.41.31.2
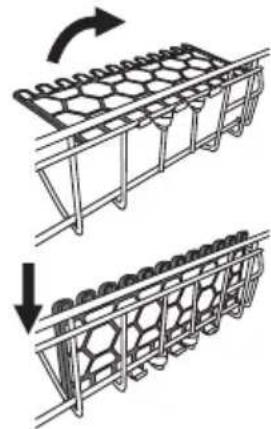
Adjusting the cup rack on the upper basket
- If you need more space in the upper basket, simply fold the cup rack upwards so that you can lean tall glasses against it (see illustration).
- If you don't need it, you can also remove the cup tray completely.
natural_image
Diagram showing two stages of a container rack with circular patterns, one moving upward and the other falling (no text or symbols)Loading the lower crockery basket
Large items of crockery and utensils that are difficult to clean should be placed in the lower basket, e.g. pots, pans, lids, serving bowls and dishes.
- Place serving dishes and lids on the sides in order to avoid blocking the rotation of the top spray arm.
- For crockery placed at the front of the basket, in line with the detergent dispenser, observe the recommended maximum diameter of 19 cm so as not to obstruct the automatic opening of the detergent dispenser during operation.
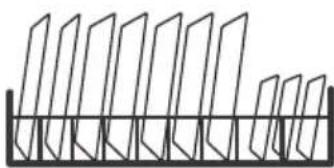
natural_image
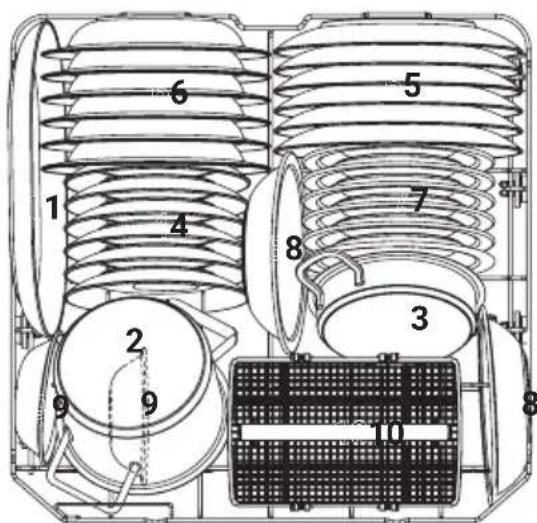
Pure geometric diagram of vertical planes intersecting a horizontal line (no text or symbols)Example of loading the lower basket
(according to EN standard)
1 Oval platter
2 Small pot
3 Oven pot
4 Dessert plates
5 Dinner plates
6 Soup plates
7 Melamine dessert plates
8 Melamine bowls
9 Dessert bowls
10 Cutlery basket
Loading the cutlery basket (according to EN standard)

CAUTION!
Risk of injury and damage!
Sharp or pointed utensils pose a potential risk of injury and damage!
Always position them with the sharp or pointed side facing downwards and do not allow them to protrude through the grid of the cutlery basket!

natural_image
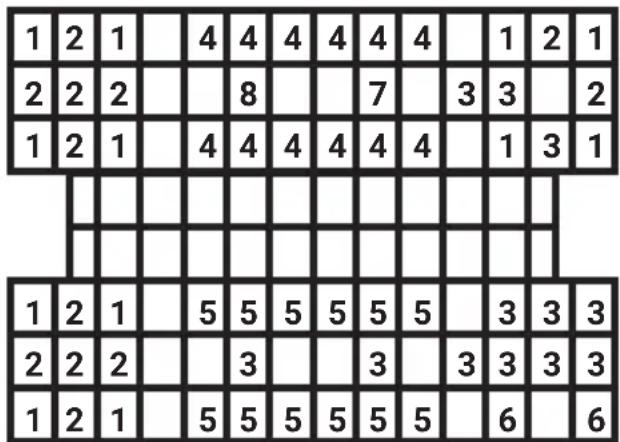
Circular diagram with grid lines and intersecting black and white symbols (no text or labels)- Place the cutlery in the designated places in the cutlery basket.
- Make sure that they do not nest together, as this can affect the washing result.
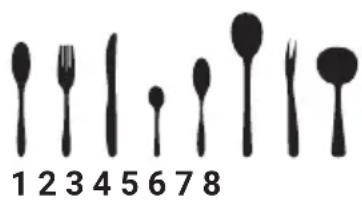
Example of loading the cutlery basket
(according to EN standard)
1 Soup spoons
2 Forks
3 Knives
4 Tea spoons
5 Dessert spoons
6 Serving spoons
7 Serving fork
8 Gravy ladle
3. Operation, Setting and Use
3.1 Washing programme overview
| Program | Programme information | Cycle description | Detergent Pre/Main | Running time | Energy consumption | Water consumption | Rinse aid needed |
| Intensive | For heaviest soiled crockery, and normally soiled pots, pans, dishes etc. with dried-on food | Pre-wash (50°C)Wash (65°C)RinseRinseRinse (65°C)Drying | 4/16 g(1 or 2 tabs) | 205 min | 1.621 kWh | 17.8 l Yes | |
| Universal | For normally soiled pots, plates, glasses and lightly soiled pans | Pre-wash (45°C)Wash (55°C)RinseRinse (65°C)Drying | 4/16 g(1 or 2 tabs) | 175 min | 1.302 kWh | 14.2 l Yes | |
| ECO | Most efficient for normally soiled tableware in terms of its combined energy and water consumption | Pre-washWash (45°C)Rinse (60°C)Drying | 4/16 g(1 or 2 tabs) | 230 min | 0.923 kWh | 11 l Yes | |
| 90 min | For normally soiled dishes that need a quick wash | Wash (60°C)RinseRinse (65°C)Drying | 20 g(1 tab) | 90 min | 1.350 kWh | 11.5 l Yes | |
| Rapid | A short programme for lightly soiled dishes that do not need drying | Wash (50°C)RinseRinse (45°C) | 20 g(1 or 2 tabs) | 30 min | 0.751 kWh | 11.2 l No |

Notes on ECO programme and table data
The ECO programme is best suited to cleaning normally soiled dishes and is the most efficient for this purpose in terms of combined energy and water consumption.
It is also used for the test cycle to check compliance with EU Eco design regulations.
The figures for the other programmes are for guidance only.

Further notes on saving energy
Your appliance meets the latest standards and its energy consumption has already been optimised to a large extent.
To minimise the energy and water consumption of the appliance, follow the corresponding recommendations at the beginning of this manual.
To save energy in stand-by mode, the appliance switches off automatically after 15 minutes of inactivity.

3.2 Washing procedure
Programme selection and start of operation
- Draw out the lower and upper basket, load the dishes as described before and push them in again completely. It is recommended to load the lower basket first.
- Fill the detergent dispenser according to your current needs.
- Make sure that the plug is inserted into the socket and the water supply is turned on to full pressure.
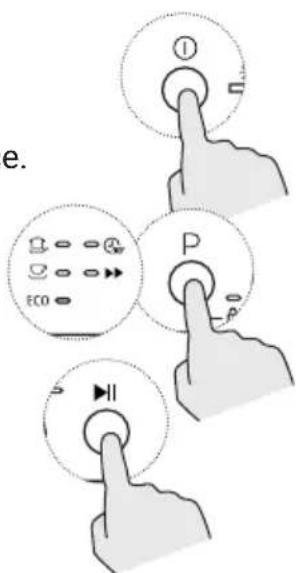
- Close the door, press the on/off button to switch on the appliance.
- Select the desired washing programme by pressing the programme selection button P repeatedly until the corresponding programme indicator lights up.
- If desired, select one or more additional functions as described in the following sections.
- Press the start/pause button ▶to start operation.
Changing the programme during operation
A programme can only be changed shortly after it has started, as otherwise the detergent may already have been released or the rinsing water may already have been drained. If this is the case, the corresponding programme must be reset and the detergent must be refilled.
To reset and reset the programme setting and set it again, proceed as follows:
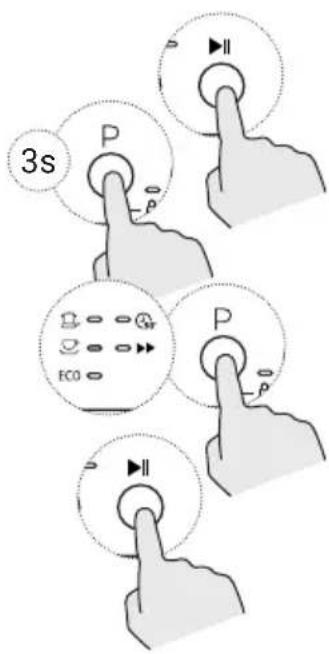
- Press the start/pause button ▶ to pause operation.
- Press the programme selection button P for at least 3 seconds to switch to programme selection mode.
- Select the desired washing programme as described before.
- Press the start/pause button ▶II. The wash cycle will start after 10 seconds.
Adding dishes after starting a cycle

CAUTION!
Risk of scalding!
Vapour escaping from the appliance can be very hot and cause scalding!
Only open the door very carefully after starting operation!
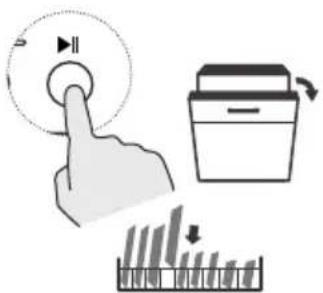
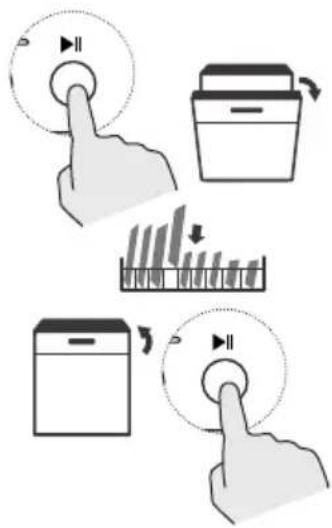
Forgotten dishes can be inserted at any time, as long as the detergent dispenser has not yet opened. In this case, proceed as follows:
- Press the start/pause button ▶II to pause the washing process.
- Wait 5 seconds, then open the door carefully.
- Add the forgotten dish(es).
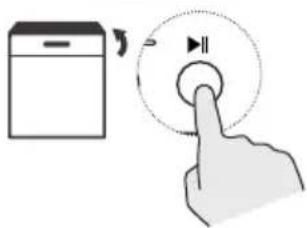
- Close the door.
- Press the start/pause button ▶II. Operation will continue after 10 seconds.

3.3 Additional functions
The following functions can be activated individually in addition to the selected programme.
Set them as described in the corresponding section:
Start time delay
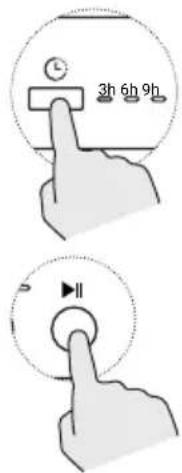
Use this function to shift the start time of the selected programme by 3, 6 or 9 hours, as follows:
- Select a washing programme as described before.
- Press the button for the start time delay (several times if necessary, to shift the time for the programme start by 3, 6 or 9 hours.
The currently set start time delay is indicated by the corresponding indicator light lighting up.
- Press the start/pause button ▶II.
• After the set time has elapsed (starting from pressing the start/pause button) operation is started automatically with the selected washing programme.
Half load
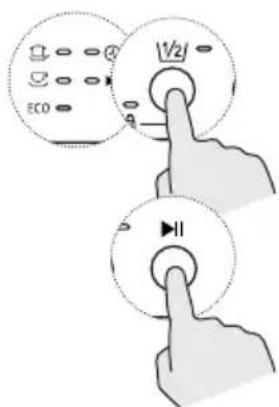
When you only want to wash about half the possible amount of dishes, use this function in order to reduce the energy and water consumption of the selected programme:
- Select one of the following washing programs:
- Press the button for the "Half load" function 12 so that the function indicator light next to the button lights up.
- Start the operation by pressing the start/pause button ▶.

Button lock / Child lock
To prevent unintentional operation, e.g. by children, use this function to lock all operating buttons except the on/off button ① as follows:
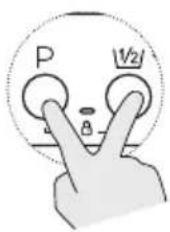
- Press the programme selection button and the button for "Half load" 1/2 simultaneously so that the corresponding indicator light shows that the button lock has been activated. All buttons except the on/off button ① now have no function.
- To unlock the control panel again, press the programme selection button P and the button for "Half load" 📊 simultaneously again until the corresponding indicator light 🔒 goes out. You can now use the control panel again as usual.
3.4 After completion of the wash cycle

CAUTION!
Risk of burns!
The dishes may be very hot immediately after the end of the wash cycle!
Allow it to cool down before emptying it, to avoid burning yourself!


ATTENTION!
Risk of damage!
Hot dishes are sensitive to shock!
To avoid damage, leave it to cool for about 15 minutes before removing it from the appliance!
- To prevent water from dripping from the upper basket into the lower one during removal of dishes, empty the lower basket first and then the upper basket.
4. Cleaning and Maintenance

WARNING!
Risk of electric shock!
To avoid electric shocks and short circuits, disconnect the appliance from the power supply before cleaning and maintenance work!
The ingress of liquids or moisture into live components can cause an electric shock and/or short circuit or damage to the locking device or other components! Do not use too much liquid to clean relevant areas, such as the control panel, do not use high-pressure or steam jet cleaners and do not use spray cleaners!

CAUTION!
Risk of injury!
Internal components can be sharp-edged! Protect yourself accordingly against injuries, e.g. when cleaning the filters!

ATTENTION!
Risk of damage!
Do not use any aggressive or acidic or alcoholic cleaning agents, scouring agents or abrasive, sharp or pointed utensils for cleaning! These can damage or discolour the appliance's surfaces and the control panel! Some types of paper towels can also leave marks! Before use, check the manufacturer's instructions of your cleaning agents and utensils for appropriate suitability! Cleaning residues can damage the appliance's surfaces! Always remove them immediately and completely!
To ensure that your dishwasher retains its appearance, that it remains fully functional and to prevent odours from forming, take good care of the appliance! Always keep all parts of the appliance clean and remove any soiling immediately, as described in the following sections.
4.1 Cleaning the dishwasher
We recommend regular basic cleaning of the appliance as required, but at least every 2 months.
- Use a soft cloth with warm soapy water to clean the outside of the appliance, the control panel and the door area.
Note: The sides of the appliance door are not reached by the spray arms when washing. Clean them too, with the door open. - Clean the door seals regularly with a soft, damp cloth or sponge.
- To clean the inside surfaces of the appliance, use a cloth moistened with water and a little vinegar or a cleaning product designed for dishwashers.
- Clean all surfaces until all soiling has been completely removed, remove cleaning residues with a cloth and clear water and then dry with a soft cloth.
4.2 Cleaning the filter system
The filter system in the base of the interior of the appliance retains coarse soiling and foreign objects such as toothpicks or any shards during washing.
These can also clog the filters.
Therefore, check the condition of the filters regularly and clean them if necessary, but at least once a week under running water as described in this chapter.

ATTENTION!
Risk of damage and possible malfunction!
When using the dishwasher without or with improperly inserted filters, coarse dirt particles can enter the system and cause clogging, impair the performance of the appliance and damage dishes and utensils!
Never use the dishwasher without correctly assembled and inserted filters!
Removing the filter module
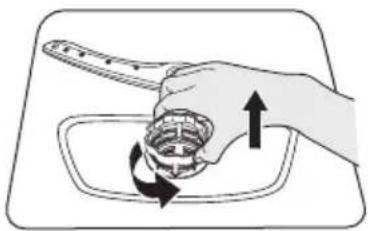
- Hold the coarse filter and rotate it anticlockwise to unlock the filter assembly.
- Lift the filter assembly upwards and out of the bottom of the dishwasher.
• Make sure that no foreign bodies can get into the opening!
Disassembling the filter module
- Pull the fine filter off the bottom of the filter assembly.
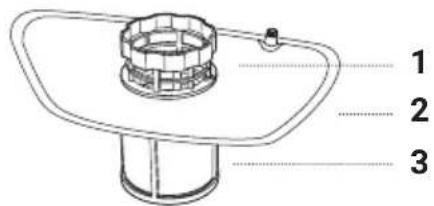
- Detach the coarse filter from the main filter by gently squeezing the tabs at the top and pulling it out upwards.
1 Coarse filter
2 Main filter
3 Fine filter
- Remove any foreign bodies from the filters and be careful not to injure yourself if shards or other sharp or pointed objects have been collected in it! Clean them of coarse food residues by rinsing them under running water.
- For thorough cleaning, use a soft cleaning brush.
Re-assembling and -inserting the filter module
- Reassemble the filters in the reverse order to that in which they were removed.
- Replace the filter module.
- Rotate the coarse filter clockwise to the close arrow, but do not overtighten it.
natural_image
Illustration of a hand holding a spoon next to a bowl with arrows indicating rotation (no text or symbols)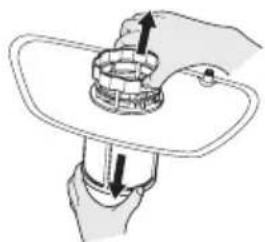
natural_image
Illustration of a hand holding a mechanical component with arrows indicating motion (no text or symbols)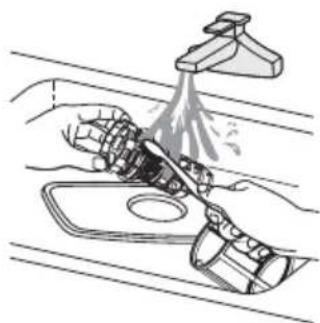
natural_image
Illustration of hands using a tool to clean or spray liquid from a kitchen sink (no text or symbols)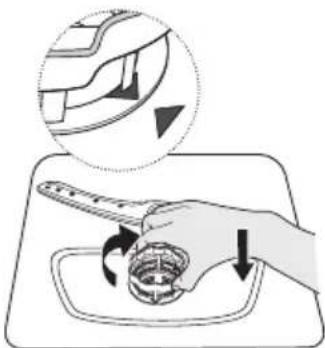
natural_image
Illustration of a hand holding a small container with arrows indicating rotation or movement (no text or symbols)4.3 Cleaning the spray arms
Hard water chemicals can clog the nozzles of the spray arms and block the bearings. Therefore, clean the spray arms regularly, at least every 3 months.
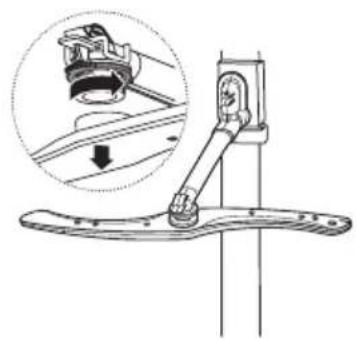
Removing the spray arms
• To remove the upper spray arm, hold it at the pivot point in the centre and turn the spray arm clockwise.
• To remove the lower spray arm, pull it out upwards.
Cleaning the spray arms
- Wash the spray arms in warm water with a little soap and use a soft brush to clean the nozzles and remove any foreign objects from them.
Reinserting the spray arms
• After thorough cleaning, reinsert both spray arms in the reverse order to the removal procedure.
natural_image
Mechanical assembly diagram showing a lever mechanism with a magnified inset of the component (no text or symbols)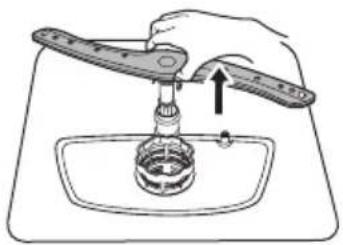
natural_image
Illustration of a hand using a tool to lift a small container into a basin (no text or symbols)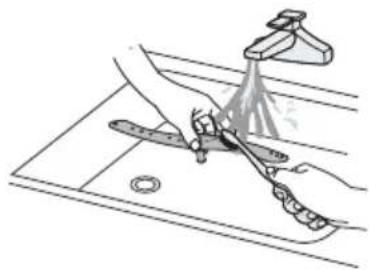
natural_image
Illustration of a kitchen sink with a hand using a tool to clean or wash the surface (no text or symbols)4.4 Caring for the dishwasher
After every wash cycle
- After every wash cycle, leave the door slightly open for some time so that moisture and odours are not trapped inside.
Seals
One of the factors that cause odours to form in the dishwasher is food that remains trapped in the seals.
- In particular, clean the seals regularly as described.
Maintenance
During use of the dishwasher, deposits of dirt or limescale may form which can significantly affect the operation of the appliance. To prevent this, observe the following instructions:
- Always ensure that the salt container is sufficiently filled and that the correct dosage setting is used according to your water hardness (see relevant section).
- Clean the appliance components regularly as described before. We recommend additional cleaning of the appliance with a commercial machine cleaner for dishwashers according to the manufacturer's instructions every 1-3 months.
Frost precaution
In winter, if necessary, take frost protection measures on the dishwasher after each wash cycle:
- Cut off the electrical power to the dishwasher at the supply source.
- Turn off the water supply and disconnect the water inlet pipe from the water valve.
- Drain the water from the inlet pipe and water valve (Have an appropriate collection container ready).
- Reconnect the water inlet pipe to the water valve.
- Remove the filter module at the bottom of the tub and use a sponge to soak up water in the sump.
If the appliance is not used for a longer period of time
To maintain the door seals and to prevent odours from forming in the appliance, the following steps are recommended, e.g. before several days of absence:
- Carry out an empty wash cycle.
- Pull the plug out of the socket and switch off the water supply.
- Leave the appliance door slightly open.
Moving the dishwasher
- As the appliance is heavy, do not move it alone, but with at least one additional person.
- Make sure you hold it in a vertical position. If absolutely necessary, it can be tilted onto its back.
5. Troubleshooting

WARNING! Risk of electric shock, injury and damage!
Do not use the appliance in case of damage or defect!
This can be dangerous!
Disconnect it from the power supply immediately.
Repairs and modifications are very dangerous for unqualified persons and can cause damage!
Never carry out repairs or modifications to the appliance yourself and do not disassemble it!
5.1 Problems, possible causes and what to do
The following table may help you to find your own solutions to possible problems with the appliance.
If the suggested solutions mentioned above do not solve a problem, contact the customer service or a suitably qualified specialist!
Problem Possible cause What to do
| Dishwasher doesn't start | Fuse blown, or circuit break tripped | Replace fuse or circuit breaker.Remove any other appliances sharing the same circuit with the dishwasher. |
| No power supply Make sure the dishwasher is turned on,the power cord is properly plugged into the wall socket and there is no power outage. | ||
| Low water pressure Check that the water supply is connected properly and the water is turned on. | ||
| Door of dishwasher not properly closed | Make sure to close the door properly and latch it. | |
| Water not pumped form dishwasher | Blocked drain hose Check the drain hose for kinks or clamps. | |
| Filter clogged Check coarse the filter | ||
| Drain pipe blocked Check that the water of the kitchen sink drains well. If this is not the case, contact a certified installation specialist. | ||
| Suds in the tub Wrong detergent Open the dishwasher. When the foam has dissolved, pour about 4 l of cold water into the drain.Close the door, start a programme and stop it again after the pumping-out phase. If foam is still present, repeat the process.Use only the special dishwasher detergent. | ||
Spilled rinse aid Always wipe up rinse aid spills immediately.
Problem Possible cause What to do
| Stained tub interior Use of detergent with colourant | Make sure that the detergent has no colourant. | |
| White film on inside surface | Hard water minerals To clean the interior, use a damp sponge with dishwasher detergent and wear rubber gloves.To avoid foaming or suds, never use any other cleaners. | |
| Rust stains on cutlery | Non stainless steel utensils or flash rust from such utensils | Avoid washing items that are not corrosion resistant in the dishwasher. |
| White salt stains on dishes and utensiles | Salt spilled during filling, not removed | Always run a washing programme without any crockery immediately after adding salt. |
| Lid of the water softener loose | Check the softener lid is secure.To remove the salt stains, carry out another wash cycle. | |
| White lime spots on dishes and glasses | Lime deposits from hard water | Check the salt dosage setting of the water softener according to your water hardness. |
| Cloudiness on glassware. | Combination of soft water and too much detergent | If you have soft water, use less detergent and select a shorter cycle to wash the glassware and to get them clean. |
| Black or grey marks on dishes | Aluminium utensils have rubbed against dishes | Remove the stains with a mild scouring agent suitable for your dishes. |
| Detergent left in dispenser | Dishes block deter-gent dispenser | Re-load the dishes properly, as described before. |
Problem Possible cause What to do
| The dishes are not clean. | Dishes not loaded correctly | Follow the instructions in the corresponding sections. |
| Programme not powerful enough | Select a more intensive program. | |
| Not enough detergent | Use more detergent, or use a stronger one. | |
| Blocked detergent dispenser flap | Rearrange the items in the basket so that the dispenser flap can open freely. | |
| Items blocking movement of spray arms | Rearrange the items in the basket so that the spray arms can rotate freely. | |
| Filter module clogged or incorrectly inserted; may also cause the spray arm jets to get blocked. | Clean and/or fit the filter correctly, as described before. | |
| Clogged spray arm jets | Clean the spray arm jets, as described before. | |
| The dishes are not dry. | Improper loading Load | the dishwasher as described. |
| Dishes removed too soon | Do not empty your dishwasher immediately after washing. Open the door slightly so that the steam can escape. Take out the dishes until the inside temperature is safe to touch. Unload the lower basket first to prevent the dropping water from the upper basket. | |
| Wrong program With a short program, the washing temperature is lower, decreasing cleaning performance. Choose a programme with a long washing time. | ||
| Use of cutlery with a low-quality coating | Cutlery or dishes of this type are not suitable for washing in the dishwasher. Water drainage is more difficult with these items. | |
Problem Possible cause What to do
| Knocking noise in the dishwasher | Spray arm knocking against an item in a basket. | Interrupt the programme and rearrange the items which are obstructing the spray arm. |
| Rattling noise in the dishwasher | Items of crockery are loose in the dishwasher | Interrupt the programme and rearrange the items of crockery. |
| Knocking noise in the water pipes | Unfavourable installation or cross-section of the pipeline | This has no influence on the dishwasher function. If in doubt, contact a installation specialist. |
5.2 Error codes and meaning

ATTENTION!
Risk of damage with error display E4!
To avoid water damage, switch off the main water supply in the event of an overflow before taking any further steps!
If there is water in the base tray, remove it before putting the dishwasher back into operation to prevent it from malfunctioning!
| Flashing indicator lights | Meaning Possible cause | |
| ▶▶ | Longer inlet time • Tap not fully turned on• Water intake restricted• Water pressure too low | |
| ▶▶90° | Not reaching required temperature. | • Malfunction of heating element |
| ECO | Overflow • Some element of dish-washer leaks | |
| ECO▶▶ | Failure of communication between main PCB with display pcb | • Open circuit• Broken communication wiring |
6. Installation of the Appliance
6.1 Important notes and installation requirements

WARNING!
Risk of electric shock, injury and risk of damage!!
Incorrect installation can be dangerous to persons and cause damage!
Follow all instructions in this manual carefully and ensure a solid and correct installation!
We recommend that the appliance is installed by suitably qualified personnel!
The appliance must be disconnected from the power supply during the entire installation process!

CAUTION!
Risk of injury!
Some parts of the unit can be sharp-edged!
Protect yourself accordingly when handling the appliance, e.g. with work gloves!
The appliance is heavy!
Do not move the appliance alone, but with at least one other person and use suitable aids!
For installation, all applicable regulations, including the instructions, dimensions and spacing regulations in this manual, must be observed and complied with!
- Before installing the dishwasher, follow the instructions in the section "Unpacking and preparing...".
-
Follow the instructions in this chapter in the order given and have the following aids to hand:
-
Appliance and accessories including this manual
• Measuring tool, including spirit level or similar - Screwdriver
6.2 Water connection
Important notes and instructions before connecting the water supply
- Pipe installations and changes to the water supply should be carried out by a certified installation specialist!
- Note that a safety device against drinking water contamination due to backflow must be installed for the connection to the drinking water supply (according to DIN EN 1717)!
- If the water connection pipes are new or have not been used for a long period of time, let the water run and make sure that it is clear and free of impurities!
- Do not reuse old or used hose sets for installation!
- If your sink has a hose, it must not be installed on the same water pipe as the dishwasher, otherwise it may burst! If necessary, disconnect it and close the opening.

Safety hose / Aquastop
The supplied safety supply hose is double-walled and leak-proof (Aquastop). If the supply hose breaks or if the space between the supply hose and the outer corrugated hose fills with water, an interlock is activated which blocks the water supply.
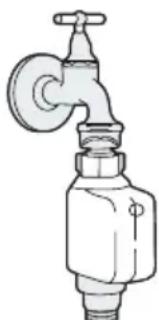
Connecting the appliance to the cold water supply
- Pull The safety supply hoses completely out of the storage compartment located at the rear side of the dishwasher.
- Tighten the screws of the safety supply hose to the cold water tap with thread 3/4 inch. Make sure that it is firmly seated and tightly closed.
- Turn the water fully on before starting the dishwasher.
natural_image
Line drawing of a faucet with a handle and valve (no text or symbols)Disconnecting the appliance from the water supply
- Turn off the water supply.
- Unscrew the safety supply hose from the water connection.
Connecting the appliance to the water drain
- Insert the drain hose into a drain pipe with a minimum diameter of 4 cm (A) or connect it to the sink siphon (B).
Doing this, observe the following specifications:
- The drain hose must be mounted correctly and fixed and must not be kinked or squeezed.
- The drain connection must not be higher than 1000 mm above the dishwasher's installation surface.
- The free end of the hose must not be immersed in water to avoid the back flow of it.
- If an extension of the drain hose is necessary, use a similar drain hose with a maximum length of 4 meters, otherwise the cleaning effect of the dishwasher may be impaired.
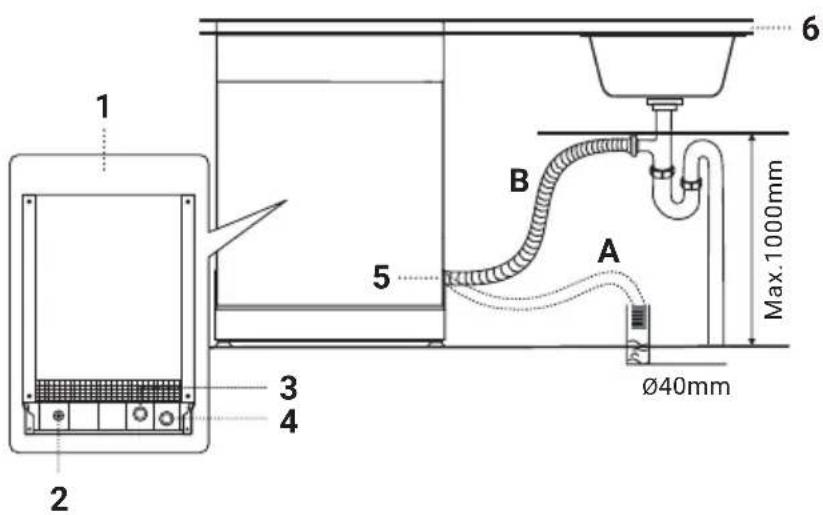
1 Dishwasher rear side
2 Power supply
3 Water inlet
4 Water drain
5 Drain hose
6 Workspace
6.3 Connection to the power supply
The appliance cable is fitted with a standard plug.
To connect it to a socket, follow the instructions below:
- Before installing the appliance, make sure that it is compatible with your power supply, in particular that the local voltage and frequency match the information on the rating plate (information in V and Hz).
If you are unsure, contact your electricity supplier or a qualified electrician.
- Provide a separate circuit for connecting the appliance and protect it with a 10A/13A/16A fuse, a time-delay fuse or a circuit breaker.
- Changes to the power supply and replacement of the socket or a defective cable may only be carried out by a certified electrician.
- If the plug is no longer accessible after installation, ensure that an easily accessible all-pole circuit breaker (fuse) with a contact gap of at least 3 mm is integrated into the appliance's circuit, which complies with the applicable regulations and ensures complete disconnection of the appliance from the power supply in an emergency!
- Connect the plug of the mains cable directly to a properly earthed socket outlet near the appliance!
- Do not use multiple sockets or extension cables to connect the appliance to the mains!
These do not guarantee the necessary safety!
- Make sure that the cable cannot be kinked or twisted during and after installation and that its temperature never exceeds 75°C.
6.4 Positioning of the appliance
General notes on positioning

ATTENTION! Risk of damage!
Moisture escaping from the appliance (e.g. steam when opened the door after operation) can damage furniture parts and surfaces surrounding the appliance! Protect them adequately against moisture, especially the underside of the worktop in the case of sub-installation!
- Choose an installation position for the dishwasher near the existing inlet and drain hoses and power supply.
Note: When building in the appliance, it may be necessary to cut a hole in the opposite cabinet side for the electrical connection, depending on where your socket is located.
Free-standing position or sub-installation
- The appliance is suitable for free-standing positioning as well as for substructure (e.g. for installation under a worktop).
- The laminated surface of the fitted cover plate as standard is heat-resistant, scratch-resistant and dirt-repellent and it requires no special care.
It is therefore ideal as an appliance surface for free-standing positioning of the appliance.
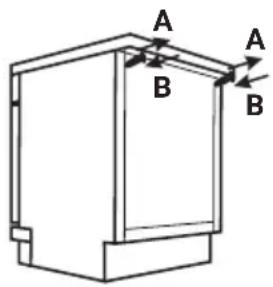
- For sub-/installation, you can remove the pre-assembled cover plate from the top of the appliance by loosening the screws on the back of the appliance below the cover plate (A).
This will reduce the appliance height by 3 cm. Tighten the screws again after removing the cover plate (B).
- Follow the further notes and instructions in the following sections according to the desired type of installation.
Free-standing installation of the appliance
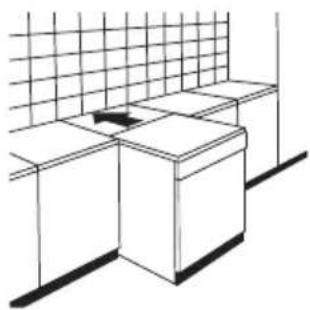
- Align the dishwasher so that its back rests against the wall behind it and the sides along adjacent furniture or walls.
- Fit the water inlet and outlet hoses on the right or left to ensure proper installation.
Fitting the appliance between pieces of furniture or other appliances
The height of the dishwasher was designed in order to allow the appliance to be fitted between existing cabinets of the same height in modern fitted kitchens.
- If necessary, adjust the height of the dishwasher accordingly by adjusting the screw height of the feet, as described in the relevant section.
natural_image
Line drawing of a kitchen sink with a grid-patterned wall and side table (no text or symbols)Positioning of the appliance for building-in / sub-installation
Note the following notes and illustrations:
- The distance between the top of the dishwasher and the cabinet should be min. 5mm.
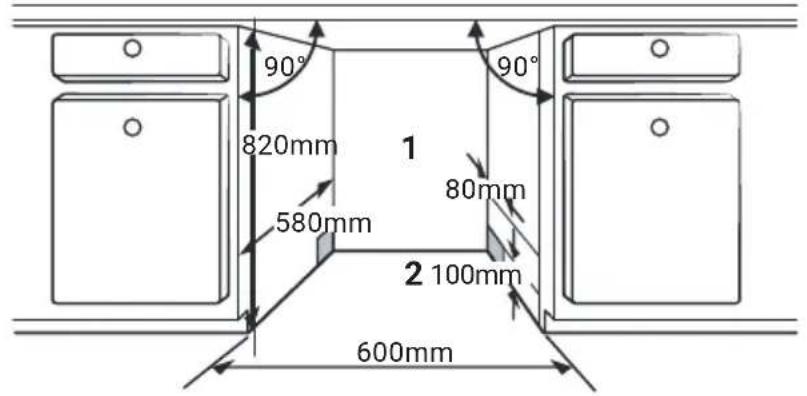
1 Electrical, drain and water supply
2 Space between cabi-
net bottom and floor
- If the dishwasher is installed at the corner of the cabinet, there should be some space to the side when opening the door (see illustration).
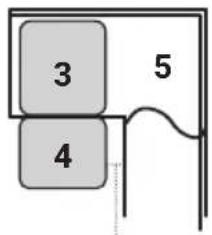
6 min. 50mm
3 Dishwasher
4 Appliance door
5 Cabinet
6 Space between appliance door and cabinet
6.5 Levelling and height adjustment / adjustment of the levelling feet
The dishwasher must be level to be able to guarantee a proper washing performance and dish rack operation. To ensure this, proceed as follows:
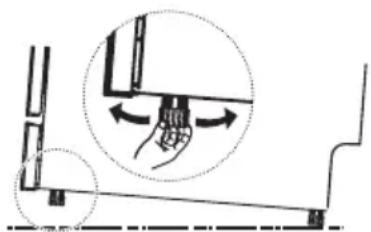
- Check the horizontal alignment of the appliance from side to side and from front to back by placing a spirit level crosswise and lengthwise on the upper edges of the appliance, or at the bottom of the washing chamber as shown in the illustration.
- If this is not the case, level the dishwasher horizontally by adjusting the heights of the levelling feet individually, as described in the following section.
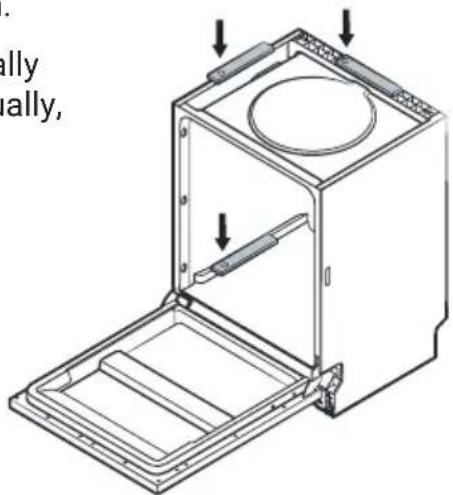
Height adjustment of the levelling feet
There are 4 feet integrated into the base of the dishwasher, which can be unscrewed individually to level the dishwasher on uneven or non-level surfaces. On delivery, these are still completely screwed in.
To adjust each foot height individually, proceed as follows:
- Adjust the respective height of the foot by lifting the appliance slightly on the relevant side and screwing it out by hand or with a flat screwdriver to the desired height as shown in the illustration.
natural_image
Diagram showing a hand operating a tool on a mechanical platform, with no visible text or symbols.
ATTENTION!
Risk of damage!
To avoid damage, make sure that the appliance cannot not tip over and that the angle of inclination of the appliance does not exceed 2^ when adjusting the foot heights!
- Check that the appliance is correctly positioned and readjust if necessary.
7. Technical Data
according to EN standard
Manufacturer KKT KOLBE
Model identifier DW601S, DW601W
Rated capacity 1 12 place settings
Dimensions (W×D×H) 60 × 60 × 85 cm
Type free-standing
Energy efficiency class 1 E
Energy efficiency index 1 55.9
Cleaning performance index 1 1.125
Drying performance index 1 1.065
Energy consumption 2 0.923 kWh
Water consumption 3 11 l
| Programme duration | 1 3 h 50 min | |
| Airborne acoustical noise emissions | 1 | 52 dB(A) re 1 pW |
| Airborne acoustical noise emission class | 1 | D |
| Off-mode | - | |
| Standby mode | 0.49 W | |
| Delay start | 1.00 W | |
| Networked standby | - | |
1 Values based on operation in the ECO programme
2 Consumption value based on operation in the ECO programme using cold water fill. The actual energy consumption will depend on how the appliance is used.
3 Consumption value based on operation in the ECO programme using cold water fill. The actual energy consumption will depend on how the appliance is used and on the hardness of the water.
For more information on your model, use the following link or the QR code shown to access the official EU product database EPREL:
https://www.eprel.ec.europa.eu/qr/1969482

Note on product conformity
Model designation:
DW601S, DW601W
Free-standing household dishwashers
Manufacturer / Distributor:
For the above-mentioned product, the corresponding EC Declaration of Conformity is available.
Some of the relevant documents can be viewed and downloaded from our website under the corresponding product page.
You are welcome to obtain the complete documents upon written request via the above contact address.
Jan Kolbe
Head of Product Management

KKT Kolbe Support and Service
We are happy to help if anything should be wrong.
During the 24-month warranty period, our customer service will provide remedy for all malfunctions that are due to material or manufacturing defects.
Directly on site and of course free of charge!
You can reach our customer service under:
KKT KOLBE Customer service
Tel. 0049 9502 6679390
Mail: gs@kolbe.de
→ You can find further data and documents on our website at Questions & Answers.
Have the following information ready for this:
Customer number
Date of invoice or delivery note
Appliance type (model number)
Serial number
Note:
You will find the 20-digit serial on the type plate
on the outside of the packaging box
or on the side of the appliance door.
If noted, you will also find it on the first page of this manual.
Min. availability of spare parts
- Spare parts according to (EU)2019/2022, Annex II, 5, (1), a 7 years after the last sale of the dishwasher, currently 24.06.2031
- Spare parts according to (EU)2019/2022, Annex II, 5, (1), b 10 years after the last sale of the dishwasher, currently 24.06.2034
Thanks for reading. We wish you lots of fun with your appliance.
- Technische Daten
- Thank you for your confidence and congratulations on the purchase of your new dishwasher!
- You can find the latest version of your user manual as well as further data, documents and information on the corresponding product page or in the "Questions & Answers" section of our online shop at www.kolbe.de.
- KKT KOLBE
- User's manual
- Table of Content
- Important Safety Instructions 4
- Further Notes and Symbols 13
- Product Overview ...... 18
- Before Operation 22
- Operation, Setting and Use .... 35
- Cleaning and Maintenance .... 41
- Troubleshooting 46
- Installation of the Appliance 51
- Technical Data .... 59
- KKT Kolbe Support and Service 61
- Important Safety Instructions
- Intended use
- WARNING!
- Dangers to life and limb and risks of damage!
- General warnings
- Danger to life and injury!
- Risk of electric shock / Dangers from electricity!
- Causes for damage and functional impairments with possible consequential dangers to life and limb!
- Further Notes and Symbols
- In this manual
- Warning of danger to persons and of damage
- CAUTION!
- ATTENTION!
- Information and tips
- Note on illustrations
- Appliance, components and accessories
- Symbols on appliance parts, accessories, etc.
- General danger warning!
- Warning of electrical voltage!
- Warning of flammable substances!
- Warning of hot surface!
- Follow these instructions for use
- EU conformity
- Disposal and environmental protection
- Symbols for disposal
- No disposal in household waste (WEEE marking)
- Recyclable material (Möbius strip)
- Recyclable material (Triman symbol)
- General notes on disposal
- Notes on water and energy saving
- Notes on transporting the appliance
- Storage instructions
- Product Overview
- Appliance components and accessories
- Appliance specifications
- Product dimensions
- Features and further properties
- Control panel and display
- Before Operation
- Unpacking and preparing the appliance
- Smell perception during unpacking
- Risk of injury and electric shock!
- Danger of suffocation!
- Notes on commissioning
- Operating requirements
- Smell perception during operation
- Setting the water softener and salt filling
- Function of the water softener
- Adjusting the salt dosage of the water softener
- Filling the salt container
- ATTENTION! Risk of damage!
- Notes on salt filling and display
- Filling and adjusting the rinse aid dispenser
- Function of the rinse aid
- Rinse aid signal light and fill level indicator
- Filling / refilling the rinse aid container
- Setting the rinse aid dosage
- Notes on the appropriate dosage setting
- Filling the detergent dispenser
- Chemical components of detergents
- Storage and use of dishwashing detergents
- Filling / refilling the detergent dispenser
- Loading dishes
- General information and recommendations for cleaning of crockery and utensils in the dishwasher
- Unsuitable for dishwashers
- Suitable for dishwashers
- Before loading the dishwasher
- General instructions for inserting crockery and utensils
- Loading the upper crockery basket
- Example of loading the upper basket
- Height adjustment of the upper basket
- Adjusting the cup rack on the upper basket
- Loading the lower crockery basket
- Example of loading the lower basket
- Risk of injury and damage!
- Example of loading the cutlery basket
- Operation, Setting and Use
- Washing programme overview
- Notes on ECO programme and table data
- Further notes on saving energy
- Washing procedure
- Programme selection and start of operation
- Changing the programme during operation
- Adding dishes after starting a cycle
- Risk of scalding!
- Additional functions
- Start time delay
- Half load
- Button lock / Child lock
- After completion of the wash cycle
- Risk of burns!
- Risk of damage!
- Cleaning and Maintenance
- Risk of electric shock!
- Risk of injury!
- Cleaning the dishwasher
- Cleaning the filter system
- Risk of damage and possible malfunction!
- Removing the filter module
- Disassembling the filter module
- Re-assembling and -inserting the filter module
- Cleaning the spray arms
- Removing the spray arms
- Cleaning the spray arms
- Reinserting the spray arms
- Caring for the dishwasher
- After every wash cycle
- Seals
- Maintenance
- Frost precaution
- If the appliance is not used for a longer period of time
- Moving the dishwasher
- Troubleshooting
- WARNING! Risk of electric shock, injury and damage!
- Problems, possible causes and what to do
- Error codes and meaning
- Installation of the Appliance
- Important notes and installation requirements
- Water connection
- Important notes and instructions before connecting the water supply
- Safety hose / Aquastop
- Connecting the appliance to the cold water supply
- Disconnecting the appliance from the water supply
- Connecting the appliance to the water drain
- Connection to the power supply
- Positioning of the appliance
- General notes on positioning
- Free-standing position or sub-installation
- Free-standing installation of the appliance
- Fitting the appliance between pieces of furniture or other appliances
- Positioning of the appliance for building-in / sub-installation
- Levelling and height adjustment / adjustment of the levelling feet
- Height adjustment of the levelling feet
- Technical Data
- Note on product conformity
- Model designation:
- Manufacturer / Distributor:
- KKT Kolbe Support and Service
- Min. availability of spare parts
Brand : KKT Kolbe
Model : DW601S
Category : Dishwasher