
CN-3600SE - Regulator Furman - Free user manual and instructions
Find the device manual for free CN-3600SE Furman in PDF.


| Type | Power Conditioner / Voltage Regulator |
| Model | CN-3600SE |
| Brand | Furman |
| Dimensions (H x W x D) | 1.75 in. (44.5 mm) x 19 in. (482.6 mm) x 10.5 in. (266.7 mm) |
| Weight | 9.0 lbs (4.1 kg) |
| Input Voltage Range | 95-140 VAC |
| Output Voltage (Regulated) | 120 VAC ± 5% |
| Maximum Current | 15 Amps |
| Peak Current Capacity | 50 Amps (momentary) |
| Number of Outlets | 10 (8 switched, 2 always-on) |
| Surge Protection | 18,000 Amps (3-line, H-N, H-G, N-G) |
| RMS Voltage Regulation | ± 5% steady state |
| Noise Filtration | LiFT (Linear Filtering Technology) |
| Power Consumption | 15 Watts maximum |
| Front Panel Features | Power switch, outlet on/off switches, voltage meter, dimmer |
| Mounting | 19-inch rack mount, 1U |
| Safety Certifications | ETL Listed |
| Warranty | 3 years (limited) |
| Included Accessories | Power cord, rack ears, manual |
| Construction | Steel chassis, powder coat finish |
Frequently Asked Questions - CN-3600SE Furman
User questions about CN-3600SE Furman
0 question about this device. Answer the ones you know or ask your own.
Ask a new question about this device
Download the instructions for your Regulator in PDF format for free! Find your manual CN-3600SE - Furman and take your electronic device back in hand. On this page are published all the documents necessary for the use of your device. CN-3600SE by Furman.
USER MANUAL CN-3600SE Furman
CONTRACTOR SERIES SmartSequencer™
CN-3600SE
Instruction Manual
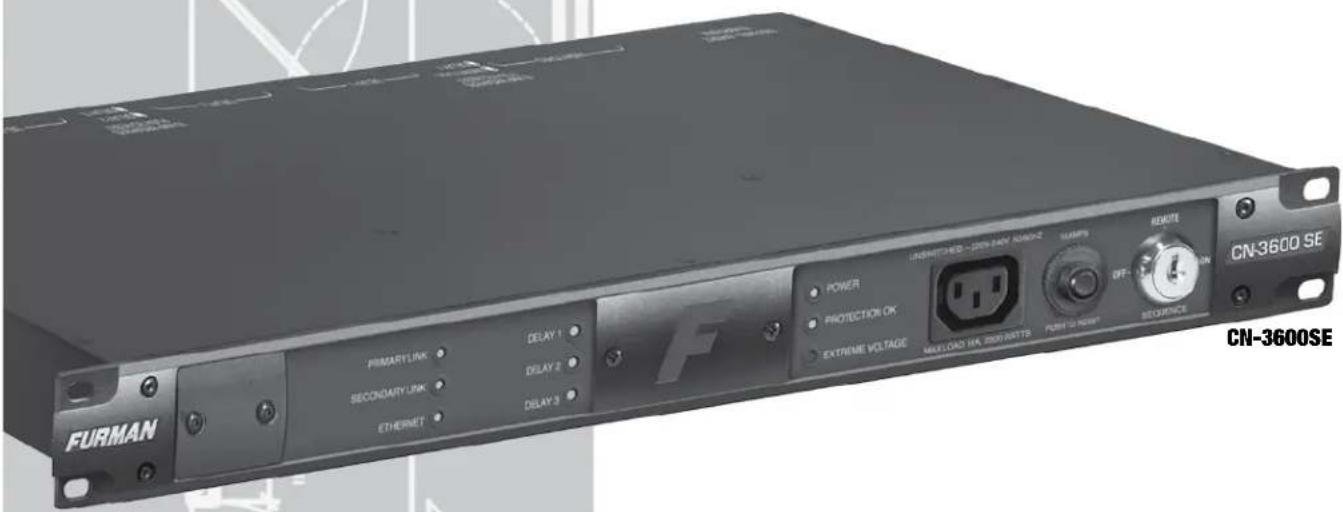
16 A Maximum


natural_image
Front view of a rack-mounted network device with multiple power outlets and connectors (no visible text or labels)For additional information refer to the Quick Start Guide, included with product packaging.
www.furmancontractor.com
For more information call:
Congratulations and thank you for choosing the Furman CN-3600SE. We assure you that your sequencer will provide many years of trouble free operation. The CN-3600SE is a 230VAC 16 Amp Contractor Grade Surge Protector and Power Sequencer equipped with Furman's exclusive SmartSequencing™ technology. SmartSequencing™ defines a whole new level of power manage-
ment and control while streamlining installations from start to finish.
Why choose Furman?
At Furman Sound, we have spent the last 30 years quietly obsessing about AC Power Quality and how best to protect your professional equipment from the noise and hazards of AC power. Over the years we have developed a multitude of technologies that have spared countless devices from damage and earned the trust and respect of the Professional A/V industry. This manual will explain some of the Furman technologies that have been incorporated into the design of the CN-3600SE. If you are already a Furman customer you are probably already familiar with our portfolio of protective
technologies. If this is your first Furman Contractor purchase, we appreciate your business. We have spared no expense in making sure that your CN-3600SE will perform admirably. Welcome Aboard!
Why choose AC power sequencing?
AV equipment is most vulnerable and susceptible to damage during those first few milliseconds after the power is turned on or off.
When audio amplifiers are powered, a large inrush current occurs as the large capacitors in the power supply charge. This inrush can be on the order of several hundred amps for a number of AC cycles. If more than one amplifier is connected to a single branch circuit, the inrush current is multiplied and can cause the circuit breaker to trip, or the line voltage to sag. Additionally, if the amplifier is powered either before or concurrent with signal processing equipment, the result can be a dreaded speaker "pop". This all-too familiar noise occurs as transients from the signal processing equipment flow uncontrolled to the inputs of the power amplifier. The amplifier amplifies this signal and passes the transient "pop" along to the speakers. The result can be catastrophic to both speaker and amplifier.
Powering down A/V is equally as perilous. Unlike other A/V equipment, the large capacitors found in amplifiers will store their charge. This means if signal processing devices and amplifiers are switched off simultaneously, the amplifiers are still operational as the signal processing equipment is switched off. Just as with startup, the power down phase can cause equipment to emit transients which are amplified by the amplifier, then propagated to the speakers and "pop"!
AC Power sequencing addresses these problems by powering up your equipment in stages. The signal processing equipment is powered up first and allowed to stabilize, and then the amplifiers are powered up. The first stage signal processing equipment may still emit transient noise upon power up, but because the amplifiers have yet to power on, the transient signal passes without incident.
Power sequencing stages the activation of heavy loads, which prevents nuisance breaker trips and equipment damage due to line sags and brownouts. This means that inrush currents are offset in time, rather than occurring simultaneously. This can also be advantageous to upstream equipment if the sequencer is supplementing other power management such as a UPS or voltage regulator.
The Furman Contractor CN-3600SE provides three delay stages. Each stage is independently fused and protected. If three stages of power sequencing are not enough for your application, you can chain together multiple (up to 99) sequencers using Furman's exclusive SmartSequencing™ technology for up to 297 independent stages! Please review the reference materials for CN-3600SE thoroughly, for a clear understanding of SmartSequencing
Before You Begin Inspect Upon Receipt
The box should contain the following items:
1) Contractor Series Quick Start Guide
2) Pair of Security Keys
3) Two removable Cover Shields and four screws
4) Three Phoenix -Type Connectors
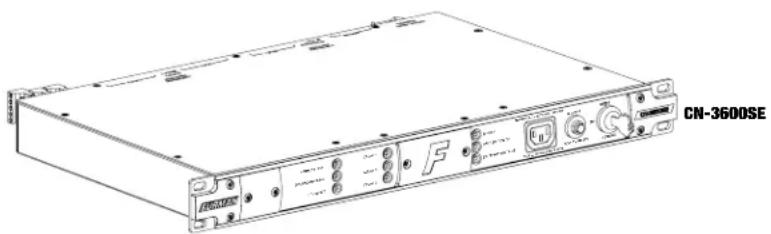
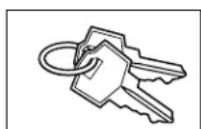
Pair of Security Keys Two Removable Cover Shields and Four Screws

natural_image
Pure electrical circuit lines without any symbols
3 Phoenix Type Connectors (2 four pin, 1 five pin)
Table of Contents
Technologies....2
Front and Back Panel Features....3
Security and Safety....4
SmartSequencing™101....4,5
DIP Switch Settings....5, 6, 7
SmartSequencing Link Status Lights....7
Indicator Lights....8
Circuit Breakers....8
Rear Panel Terminal Barrier Strips....9, 10
CN-3600SE System Setup....10
Example Setup Diagrams....11
Trouble Shooting Guide....12
Specifications....13
Warranty Information....13
Technologies

SmartSequencing™
Furman SmartSequencing ^™ is a communication technology that allows Furman contractor devices to be linked together and controlled up to distances of 300 Meters (about 1000 feet). SmartSequencing devices can be chained together to form a network of sequencers. A maximum of 99 SmartSequencers can be linked together to form a SmartSequencing network that spans a distance of 30 KM (18.2 Miles)!
SmartSequencing devices can be connected together without regard for polarity, wire type, and environmental noise. It is an extremely forgiving technology. Although we recommend solid twisted pair for best results, virtually any wire size and type can be used over short distances without concern for signal degradation.

SMP Protection
Furman's exclusive Series Multistage Protection (SMP) Technology prevents equipment downtime by monitoring and quickly reacting to extreme line voltage conditions. SMP protection is designed to withstand voltages of 6000 Volts and 3000 Amps without sustaining damage. As the name implies, there are multiple stages of protection which are designed to shield connected equipment from line hazards.

Linear Filtering Technology
Linear Filtering Technology (LiFT) uses a finely tuned low-pass filter to reduce differential AC noise. LiFT is remarkable in its ability to linearly filter AC noise such that the attenuation curve is continuous over a wide bandwidth.
Extreme Voltage Shutdown
Furman's trusted (EVS) over-voltage detection protects against prolonged over-voltage conditions, such as accidental connection to high voltage or an intermittent loss of neutral. It does so by continuously monitoring the incoming AC voltage. When an unsafe condition is detected, a relay shuts off the power to the outlets until the EVS condition has subsided. The CN-3600SE also allows the user to define how the unit will recover from an EVS shut-down. The Extreme Voltage Shutdown technology is a tremendous asset.
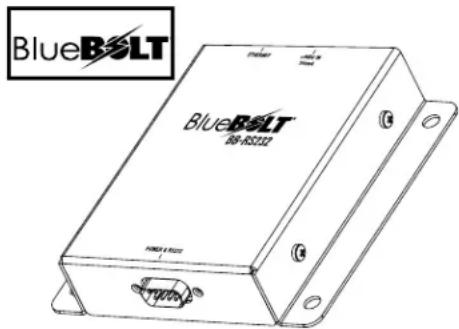
Optional BlueBolt to RS232 adapter
BB-RS232
Remote Access (and BlueBOLT®) The CN-3600SE is a member of Furman's Contractor series of devices. All members of the Contractor series can be controlled remotely using an integral data-link and command API. The remote access feature allows for integration with various control systems. In addition to remote control, API queries provide situational awareness and local power quality data.
Furman's optional BlueBOLT® RS-232-to-Ethernet adaptor (shown above) provides additional control programming and monitoring from any Web-enabled device via Telnet, direct HTTP connection, or www.mybluebolt.com
CN-3600SE Front Panel Features

Triggers sequence in remote mode.
- Activates or deactivates sequence
- Hold button to re-sync multiple sequencers
BASIC POWER MANAGEMENT
• UNSWITCHED OUTLET - 10A Courtesy Outlet
- CIRCUIT BREAKER- Press to reset in the event of current overload.
KEY SWITCH SETTINGS
3 position ON/OFF Security Switch
- OFF = Bypasses remote sequenced outlets to OFF
- REMOTE = Engages and activates remote features
- ON = Bypasses remote sequenced outlets to ON
NOTE: Settings affect COMM port (see full manual)
CN-3600SE Back Panel Features
PHOENIX TYPE CONNECTORS


Security and Safety
The CN-3600SE is readily adaptable to a wide range of installation requests and requirements. It was designed from the ground up to be compatible with Furman legacy and third party equipment. Forced Off inputs and selectable DIP switch settings are provided to allow easy interface to devices, such as alarm systems.
Additional Features
The CN-3600SE is equipped with LED indicators to provide visual aid in tracking conditions such as power, protection, sequencing and communication. The CN-3600SE is supplied by a 1.5mm^2 AWG, 2.5 meter AC cord. All Contractor Series units are backed by our 15 year Limited Warranty
Important Safety Instructions
- Please read and follow all instructions.
- Please keep these instructions.
-
Please heed all warnings.
-
WARNING: This device is intended for indoor use only. Do not use this device in or near water. To reduce the risk of fire or electric shock, do not expose this device to rain or moisture.
- CAUTION: Always On receptacles are present, providing constant AC power. To reduce risk of shock, please disconnect the CN-3600SE from AC power before servicing any equipment connected to the CN-3600SE Sequencer.
- Clean only with dry cloth.
- CAUTION: Do not install near any heat sources such as radiators, heat registers, stoves, or other equipment that may produce heat.
- Protect the power cord from being walked on or pinched, particularly at plugs, convenience receptacles, and the point where they exit the device.
-
WARNING: The DE-9 RS-232 communications port provides power for Furman accessories (e.g. BB-RS232). Please verify pin assignment and protocol before connecting any other manufacturer's device to this port.
-
Please, only use accessories specified by the manufacturer.
- Refer all servicing to qualified personnel. Servicing is required when the unit has been damaged in anyway or fails to operate.
- WARNING: Do not use power cord as the main power disconnect. The device is intended for AC power sequencing.
- Do not defeat the safety purpose of the Schuko plug. A Schuko plug has two pins and a grounding contact or receptacle. If the Schuko plug does not fit into your outlet, please consult an electrician for assistance.
- This device is supplied with a detachable IEC-C19 to CEE-7/7 Schuko power cord. Any prospective replacement cord must comply with the minimum ratings of the line cord originally supplied with this device and be HAR Certified for use in the country in which the unit is deployed.
- WARNING: This device must be connected to an AC outlet with a protective earth ground connection.
SmartSequencing™ 101
SmartSequencing™ technology provides a very simple means of connecting together a group of Furman Contractor devices to form a network or "chain" of sequencers. SmartSequencing™ allows all devices within a chain to be controlled and queried from a single Primary sequencer. One of the defining characteristics of SmartSequencing™ technology is its ability to allow anyone to quickly achieve professional results.
SmartSequencing Hierarchy:
In a SmartSequencing™ network, there can only be one Primary unit. Secondary units respond to the commands from the Primary. The Primary unit manages the communications within the SmartSequencing™ chain. (This includes principal communication between the chain of sequencers and the outside world, e.g. Blue-BOLT®). Secondary units relay messages and/or execute commands and queries that have been routed to them by the Primary unit. The CN-3600SE can serve as a Primary or Secondary sequencer depending on the setting of DIP Switch #8 – more on this later.
SmartSequencing Communications:
A Furman SmartSequencing™ chain communicates using a bucket brigade technique. A Primary sequencer communicates to the first downstream Secondary sequencer by sending commands out of its Primary (P) OUT terminals to the Secondary (S) IN terminals of the next downstream Secondary sequencer. If there are additional Secondary sequencers within the chain, the first Secondary sequencer will communicate to the next downstream Secondary sequencer using its Primary (P) OUT terminals to the second Secondary (S) Unit's Secondary IN terminals. This continues down the chain until the last Secondary sequencer has received the message. The last Secondary sequencer will receive commands into its Secondary (S) IN terminal port but will not forward the message because there are no more units downstream.
Forming a chain of sequencers:
Create a SmartSequencing chain by linking the Primary (P) OUT terminals of the Primary to the Secondary (S) IN terminals of the first Secondary sequencer. To add more sequencers, simply
connect this first upstream Secondary Primary OUT (P) terminals to the Secondary (S) IN terminals of the next Secondary sequencer downstream. This pattern continues until all sequencers have been linked together as is shown in the figure below.
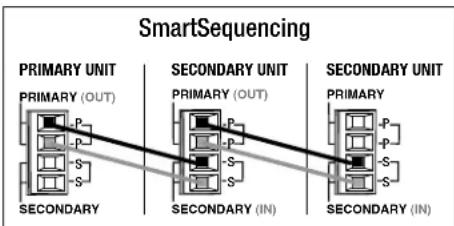
flowchart
graph LR
    A["PRIMARY UNIT\nPRIMARY (OUT)"] --> B["SECONDARY"]
    C["SECONDARY UNIT\nPRIMARY (OUT)"] --> D["SECONDARY (IN)"]
    E["SECONDARY UNIT\nPRIMARY"] --> F["SECONDARY (IN)"]
Example of SmartLink connections
SmartSequencing is polarity independent, so it does not matter which OUT (P) terminal is connected to the IN (S) terminals on the next sequencer. All that matters is that the connections proceed in the order in which you would like your chain of sequencers to activate.
SmartSequencing™ 101 (continued)
Please note that the factory default DIP switch settings for the CN-3600SE configure the unit to operate in Primary mode. If you will be connecting together multiple CN-3600SE sequencers to form a chain, you will need to change the DIP switch settings on Secondary units such that they are configured to operate in Secondary mode. To do this, remove the security cover near the center of the front cover and place DIP Switch #8 in the OFF position – more on this in the following section.
SmartSequencing – A Robust Interface:
When connecting together sequencers, your mistakes are easily forgiven. Please don't consider this as license to proceed without care, but rather as an assurance that the SmartSequencing interface has been designed to be fault tolerant and survive shorts, opens, ESD, EMI, errant wiring, and accidental connection to earth ground. Such conditions will need to be corrected before communications can proceed, but should not damage the interface.
We recommend that units be linked together using 0.60mm^2 AWG twisted pair wire – as used in the IT and telephone industry. In truth, over short distances, the wire used does not have much influence on system performance. When creating sequencer chains over large distances (greater than 50 meters) the use of twisted pair wire is strongly recommended.
Additional SmartSequencing™ information is available within this manual and on the Furman Contractor website at www.furmancontractor.com. Details such as connection diagrams, Quick Start Guide, etc., can be found at the website.
DIP Switch Settings
DIP Switch and Delay Adjustment
The DIP Switch is found near the center of the front panel, under the Security Cover. You can access the DIP switch by removing the security cover screws using a #2 Philips screwdriver. The DIP Switch is used to set various options on the CN-3600SE. It is also used in combination with the DLY ADJ pot to adjust the delay range.

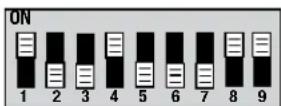
NOTE: The DIP switch ON / OFF settings are indicated as shown below throughout this manual.
DIP SWITCH DEFAULT SETTING - Switches are factory pre-set as shown below. Switches 1, 4, 8, and 9 are up (ON) position.
DIP 1, 2, & 3 and the Delay Adjustment
DIP Switch positions 1, 2 and 3 are used to define the time delay or that is imposed between activating/deactivating consecutive delay stages. The CN-3600SE will activate its Delay 1 outlet as soon as an activation message or signal has been received, but impose a delay (defined by the settings of DIP 1, 2 & 3) when activating the second and third delay stages and when forwarding the message to the next downstream CN-3600SE. Upon activation, the delay countdown starts after the first output has been activated. When deactivating, the DELAY 3 stage is deactivated immediately and then the delay defined by DIP Switch positions 1, 2, and 3 is imposed prior to deactivating the Delay 2 outlet. The deactivation of DELAY 1 follows the deactivation of DELAY 2 in similar fashion.
When units are connected in a chain, the last sequencer in the chain is deactivated first and the deactivation sequence follows up the chain toward the Primary sequencer in reverse order.
DIP 1 = ON adds 1 minute to the maximum time delay
DIP 2 = ON adds 2 minutes to the maximum time delay
DIP 3 = ON adds 4 minutes to the maximum time delay
Note: The DIP switch settings are cumulative, thus if all three DIP switches are in the ON position, the maximum allowable time delay will be 7 minutes, i.e. 1min+2min+4min=7min. The factory default setting is DIP 1 ON, DIP 2 and 3 are OFF. You can set these switches in any position you like to achieve your preferred time delay. The table below summarizes the settings of DIP switch positions 1, 2 & 3 and corresponding maximum time delay.
| DIP 1 DIP 2 DIP 3 Maximum | |||||
| Time | Delay | ||||
| OFF | OFF | OFF | 10 | Seconds | |
| ON | OFF | OFF | 1 | Minute | |
| OFF | ON | OFF | 2 | Minutes | |
| ON | ON | OFF | 3 | Minutes | |
| OFF | OFF | ON | 4 | Minutes | |
| ON | OFF | ON | 5 | Minutes | |
| OFF | ON | ON | 6 | Minutes | |
| ON | ON | ON | 7 | Minutes | |
Delay Adjustment
The Delay Adjustment (DLY ADJ) pot is used in conjunction with DIP 1, 2, & 3 to precisely dial in your preferred delay time. The DLY ADJ is located to the left of the DIP Switch. If DLY ADJ is turned to its 100% value (fully clockwise), the time delay will be equal to the maximum time delay defined by DIP switches 1, 2, and 3. If the DLY ADJ is in the 12:00 o'clock position (50%), then the time delay will be 50% of the maximum time delay interval defined by the setting of DIP Switch positions 1, 2 & 3. If all three DIP switches are off, and the DLY ADJ is turned completely counter-clockwise, the time delay is 100 milliseconds, which is the minimum time setting. The Delay Adjustment potentiometer comes factory-set at 50%, the 12 o'clock position.
Example: If the DIP Switches are set to a 6 minute maximum time delay and the DLY ADJ is set to its 50% setting, then the delay interval between sequenced banks will be 3 minutes. (DIP 1 OFF or DOWN, DIP 2 and DIP 3 ON or UP) x 50% = 3 minutes.
DIP Switch Settings (continued)

DIP 4 FORCE OFF Setting
DIP Switch position 4 sets the FORCE OFF safety feature. DIP 4 is used in conjunction with the FORCE OFF terminals on the rear panel of the sequencer. FORCE OFF is designed to cut AC power to all outlets instantaneously. The feature is a solution for installations where municipalities require a means of deactivating A/V equipment in the presence of fire or any other alarm. The FORCE OFF input is only enabled on the Primary sequencer, please refer to DIP switch position 8 for further details.
The rear panel FORCE OFF terminals can be used with a momentary or maintained dry contact switch operating in either a Normally Open (NO) or Normally Closed (NC) state. The factory default position for DIP 4 is ON, making the FORCE OFF input operate in Normally Open (NO) mode. In this configuration, the FORCE OFF will be triggered when the FORCE OFF pins are shorted together. If DIP Switch position #4 is OFF the FORCE OFF pins will operate in a Normally Closed (NC) state. In this configuration the FORCE OFF pins must remain shorted for the CN-3600SE to operate normally and FORCE OFF will be initiated when the short between the two FORCE OFF pins is removed.
If a FORCE OFF event is triggered on the Primary unit, the FORCE OFF message will be communicated to all SmartLink connected devices. The power to all of the outlets will be disabled in reverse order and the DELAY1, 2 & 3 LEDs will begin to blink. To clear the FORCE OFF, the FORCE OFF pins must first be cleared of the condition that originally triggered the FORCE OFF event. After this has been done you can reset the FORCE OFF in any one of two ways:
1) Rotate the key switch to OFF and then back to the Remote (REM) or ON position.
2) Cycle the power to the unit OFF/ON
Once FORCE OFF has been cleared, normal operation will resume.
Force off (DIP 4) has priority over all other DIP switch settings, including DIP 5, 6, & 7. The Force Off feature is always active on the Primary unit even though alarms may not be a consideration for the installation. - Further information on DIP 5, DIP 6, and DIP 7 can be found in the sections that follow.
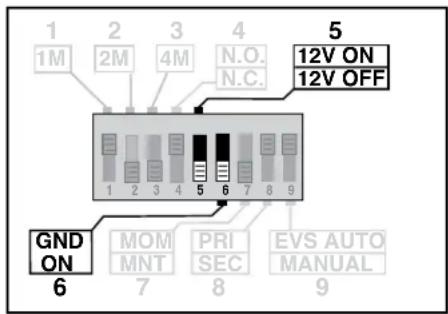
DIP 5 and 6 Remote Input Setting
DIP Switch positions 5 and 6 are used to define what happens when either 12VDC or GND are applied to the remote (REM) terminal input. All of the signals discussed in this section appear on the REMOTE PORT connector on the rear panel of the CN-3600SE. The factory default settings for DIP 5 and DIP 6 are OFF. When DIP 5 and DIP 6 are set to OFF, a connection between the 12VDC signal terminal to the REM terminal triggers the sequenced outlets off. With DIP 5 ON and DIP 6 OFF, connecting the 12VDC signal to the REM terminal will cause the outlet power to turn on.
Another option is to set DIP 6 ON. In this state connecting GND to the REM terminal will cause the outlet power to turn on regardless of the setting of DIP switch 5. The table below summarizes the power outlet behavior as a function of DIP 5 and DIP 6.
| DIP 5 | DIP 6 | Outlet behavior as a function of the REM signal input |
| OFF | OFF | Outlet is deactivated when REM is connected to 12VDC |
| ON | OFF | Outlet is activated when REM is connected to 12VDC |
| OFF | ON | Outlet is activated when REM is connected to GND |
| ON | ON | Outlet is activated when REM is connected to GND |
| Note that the setting of DIP switch 6 overrides DIP switch 5.If DIP Switch 6 is ON the setting of DIP switch 5 is ignored. | ||
The alternate settings for DIP 5 and DIP 6 may be useful in situations where the existing remote key switch operates differently from what was anticipated for the CN-3600SE factory default settings, or Furman standard wall switch products (RS-1 and RS-2). Please feel free to contact Furman tech support if further assistance is necessary.
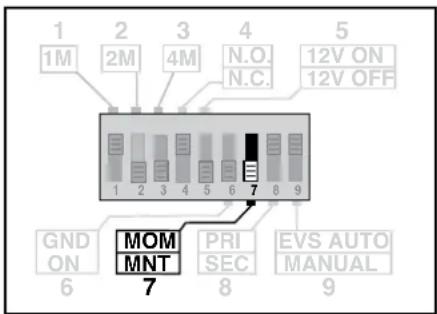
DIP Switch Position 7
DIP Switch position 7 is used to define the switching preference for switches or control devices connected to the remote (REM) signal input. A preferred method of remote switching can be set to operate the CN-3600SE in a Maintained Mode DIP 7 OFF or a Momentary Mode DIP 7 ON. The factory default for DIP 7 is OFF (Maintained Mode) When operating in Maintained Mode, the REM input assumes that an external switch or device will behave like a toggle switch wherein the switch contacts remain in a given position (open or closed) until the state of the switch has been changed. Maintained switching is considered more stable because control signals must be continuously asserted to "maintain" a system in operation.
When operating in Momentary Mode DIP 7 ON the REM input assumes that the external switch or device connected to its contacts will behave like a push button switch - wherein the switch contacts make momentary contact when the button is pressed and then open again when the button is released. Momentary switching allows multiple push button switches to be connected in parallel with the REM input. This allows the CN-3600SE to be toggled ON or OFF from multiple locations.
DIP Switch Settings (continued)

DIP 8 Primary / Secondary setting
DIP Switch position 8 is used to define the role of a CN-3600SE in the SmartSequencing™ system. In an array of sequencers connected via Smart-Link, there can be only one Primary Sequencer, followed by multiple (up to 99) Secondary Sequencers. A Primary Sequencer will send commands to all Secondary sequencers over the SmartLink interface. If DIP Switch 8 is ON, the CN-3600SE is set as Primary Sequencer. If DIP Switch 8 is OFF the CN-3600SE will operate as a Secondary Sequencer.

DIP Switch position 9 is used to define how the CN-3600SE will recover from an Extreme Voltage (EVS) error. In some instances you may want the system to automatically recover once an EVS event has subsided, in other instances you may prefer to leave the system off until it can be manually restarted.
If DIP Switch 9 is set to ON (EVS AUTO) the CN-3600SE will automatically recover from an EVS error as soon as the line Voltage returns to a range within the EVS recovery points. Please see table below.
| Condition: Point | EVS Trigger Recovery Point | EVS |
| High Voltage | 275 +/- 5 VAC | 260 +/- 5VAC |
| Low Voltage | 175 +/- 5 VAC | 195 +/- 5 VAC |
If DIP Switch 9 is set to OFF (EVS MANUAL) the CN-3600SE will require manual intervention to clear the EVS error. This means that line Voltage must return to a range within EVS recovery points (table below) and either of the following clearing mechanisms must be carried out:
- Rotate the key switch from the ON or REM position to the OFF position, wait 2 seconds and then rotate the key back to the ON or REM position.
- Cycle the power ON/OFF
Important Note:
When operating multiple sequencers in a SmartSequencing chain the Secondary units will follow the EVS recovery behavior of the Primary unit. In other words, if the Primary sequencer is set to EVS AUTO, secondary sequencers within the chain will also recover when the Primary unit recovers, regardless of the setting of DIP Switch 9 on the Secondary units. If you require that all sequencers remain off after an EVS event then the Primary unit should be set to EVS MANUAL mode.
SmartSequencing Link Status Lights
PRIMARY LINK
SECONDARY LINK
The CN-3600SE is equipped with multi-color link status lamps to indicate the health and status of the SmartSequencing links. In general terms; "Green means Good and Red means Bad". There are exceptions to both rules, such as the lamp test that occurs as part of power on self-test, and lamp activity as a consequence of the CN-3600SE's hierarchy within a chain, but for normal operation the rule holds.
Here are the exceptions:
1) If a CN-3600SE is operating in Primary mode, its PRIMARY LINK light should not illuminate continuously. This is because, as a Primary unit, the CN-3600SE will have no connection to its Secondary Link (refer to Figure 3). The Primary Link light will blink ON/OFF as an indication of activity.
2) If a CN-3600SE is operating in Secondary mode, and is the last unit in a chain of sequencers, its SECONDARY LINK light should never illuminate. This is because, as the last Secondary
unit in a chain, the CN-3600SE will have no Secondary units beyond it and thus no connection to its Primary Link.
3) Upon power up the CN-3600SE will execute a self-test where all front panel lamps will be exercised through their full range of colors. During this brief period, the lights operate independently and have no correlation with the condition of the SmartSequencing links.
During normal operation the PRIMARY LINK and SECONDARY LINK lights will blink as messages are passed between units in the SmartSequencing chain. You may observe an occasional Red blink as a lost or corrupted message is retransmitted between two successive devices. Do not be troubled by this as this is normal behavior and an indication that the error detection/recovery portion of the SmartSequencing protocol is doing its job.
If you notice that the PRIMARY LINK or SECONDARY LINK lights are either permanently or predominantly Red you may want to investigate the connection between the CN-3600SE and its upstream companion, if the PRIMARY LINK light
is Red, or downstream companion if the SECONDARY LINK light is Red. Refer to page 12 of this manual on Troubleshooting for further details.
| LIGHT ACTIVITY | MEANING / INTERPRETATION |
| 1PRIMARY LINK ○SECONDARY LINK ● | This is normal LED behavior for a Primary unit operating a chain of sequencers. The PRIMARY LINK LED will blink at 1 Hz. |
| 2PRIMARY LINK ●SECONDARY LINK ● | This is normal behavior for a secondary unit operating in between two other units. The green LEDs show that there is activity on both P and S communications channels. |
| 3PRIMARY LINK ●SECONDARY LINK ● | This indicates that a unit that is operating in Secondary mode has lost connection to its Primary, or upstream unit. Please check the connection between the S terminals on this unit and the P terminals of the preceding |
| 4PRIMARY LINK ●SECONDARY LINK ○ | This indicates that the device cannot communicate with its downstream neighbor. If this is the last sequencer within a chain of sequencers, this is the expected LED behavior. If this is not the last unit within a chain, this indicates that the S link on this device is not communicating with the P link on the following (downstream) device. Check the wiring. |
Indicator Lights and Circuit Breakers
DELAY 1, 2 & 3 Lamps:

The DELAY 1, 2 & 3 lights indicate the ON/OFF state of the DELAY outputs on the rear of the CN-3600SE. In general; "If the DELAY light is illuminated, the corresponding rear panel outlet is powered on. There are two exceptions as detailed below:
1) When the CN-3600SE is in FORCE OFF mode the DELAY lights will blink ON/OFF in unison at a 1 second interval.
2) Upon power up, the CN-3600SE will execute a self-test where all front panel lights will be exercised through their full range of colors. During this brief period, the DELAY lights operate independent of the status of the rear panel outlets.
If the CN-3600SE is operating under safe power conditions and no fault conditions exist, all three Delay LEDs will remain illuminated when all outlets are ON. Once triggered to sequence OFF, each LED goes off in sequence as its corresponding delay bank is deactivated.
Note that the DELAY 3 output and the rear panel DELAY 3 relay contacts are closely associated. When the DELAY 3 indicator is illuminated, the DELAY 3, Common (C) and Normally Open (NO) terminals will be shorted. When the indicator DELAY 3 LED is off, the DELAY 3, Common (C) and Normally Open (NO) terminals will be open circuit.
POWER, PROTECTION and EVS Lights:

The POWER LED
The POWER LED is provided to indicate the ON or OFF state of the UNSWITCHED power outlets. This includes the front panel UNSWITCHED convenience outlet and the rear panel UNSWITCHED outlets. If power is provided to the outlets, the LED will illuminate green. If the CN-3600SE is operating under safe power conditions and no fault conditions exist the POWER LED will remain lit.
The PROTECTION OK LED
When illuminated, the Green PROTECTION OK LED indicates the surge protection circuitry is operational. An unlit PROTECTION OK LED may indicate that the protective circuits have become compromised or damaged. Although the SMP and EVS features on the CN-3600SE may still function, if the PROTECTION OK LED is not illuminated please contact the Furman Service Department for assistance.
The EXTREME VOLTAGE (EVS) LED indicates the state of the EVS detection system. This LED is normally off, but illuminates Red when an EVS error has occurred. If the unit is configured to automatically clear EVS errors (DIP Switch 9 = ON), this LED will turn off approximately 5 seconds after the incoming line voltage has returned to normal. If the unit is configured for manual EVS recovery (DIP Switch 9 = OFF), this LED will remain illuminated Red until the EVS error has been manually cleared. See page 7 for further details.
Circuit Breakers
The CN-3600SE has a maximum current limitation of 16 Amperes at 230 Volts (3680 Watts). However, the unit is equipped with a total of five thermal circuit breakers. The front panel has one 16 Amp circuit breaker and the rear panel has four 10 Amp breakers. All breakers feature a round button which will pop outward if the amount of current distributed to all loads exceeds the rating of the circuit breaker.
Front Panel 16 Amp Breaker:
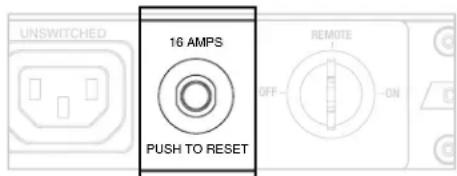
The 16A front panel breaker provides an overall current limit for all loads connected to the CN-3600SE. If the combined current, drawn by all devices connected to the CN-3600SE ever exceeds the 16 Amp threshold, the circuit breaker will "trip", cutting off power to all connected devices. If this occurs; the operator must take action reduce the load by unplugging one or more loads from the CN-3600SE and then reset the breaker. To reset the breaker simply press in on the center plunger. Because the 16 Amp breaker is a thermally activated device, it is suggested that the breaker be allowed a few minutes to cool before resetting.
Rear Panel 10 Amp Breakers:

natural_image
Two identical circular mechanical components with labeled sections (U, V, D, T) and a small inset view of the top section (D, E, F, G, H), no text or symbols present.The four rear panel 10 Amp breakers provide an overall current limit for each corresponding IEC bank. If the combined current draw on a single bank ever exceeds the 10 Amp threshold, the circuit breaker on that bank will "trip", cutting power to the bank. If this occurs, the operator must take action and reduce the current draw by unplugging the load from the affected bank or redistributing the loads amongst the other banks before resetting the breaker. To reset the breaker simply press in on the center plunger. Because the 10 Amp breaker is a thermally activated device, it is suggested that the breaker be allowed a few minutes to cool before resetting.
Rear Panel Terminal Barrier Strips
REMOTE PORT
4 Pin Phoenix-Type Barrier Strip
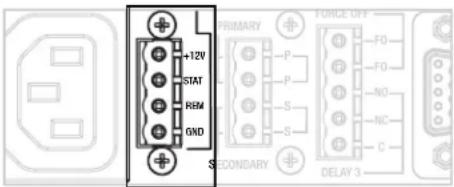
| Pin # | Label | Description |
| 1 | +12V output | General purpose 12VDC 12 mA |
| 2 | STAT | Status output, intended to drive LED |
| 3 | REM | Remote control input |
| 4 | GND | General purpose ground 10mA Max |
The Remote Port Barrier strip provides basic control of the CN-3600SE by Maintained or Momentary contact switch (such as the Furman RS-1 and RS-2 wall switches). Even existing infrastructure can be used to provide basic operation thru use of existing contacts. - Please refer to page 6, DIP Switch # 7 for further details.
In the most basic configuration, only two wires and a common push-button switch shorted across +12V and REM terminals are required to initiate a remote ON or OFF sequence. If a four-conductor cable is used, an LED may be installed between the STAT (Anode) and GND (Cathode) pins to indicate when the CN-3600SE's power outlets are either on or in transition. The example connection diagrams on page 11 provide further details.
The +12VDC terminal pin is a general purpose, isolated 12VDC 12mA voltage source relative to the GND (#4) pin. It is provided to allow the user to control the operation of the sequencer in "Legacy" mode (as opposed to SmartSequencing mode) by feeding the +12VDC signal back into the REM terminal; which is pin #3 on the same barrier strip.
The STAT (status) terminal pin is a general purpose output that is intended to drive an external LED. The STAT pin provides status information on the CN-3600SE through a combination of static and dynamic LED activity. An LED can be connected between the STAT pin and the GND pin.
The LED should be oriented such that the Anode (long wire) is connected to the STAT pin and the Cathode (flat side) is connected to the GND (#4) pin.
1) If the LED is OFF, the DELAY outputs are OFF 2) If the LED is ON, the DELAY outputs are ON 3) If the LED is blinking, the DELAY 1,2 or 3 outputs are in transition either from ON to OFF or OFF to ON.
The REM terminal pin is alternately an input or an output depending on the state of DIP Switch 7. If DIP switch 7 is ON, the REM pin acts as an output, if DIP Switch 7 is OFF the REM pin acts as an input.
When acting as an input (DIP 7 = OFF) the behavior of the CN-3600 will be based on the combination of the signal (+12VDC, GND, or Open Circuit) presented at the REM pin and the setting of DIP switches 5 & 6. This is explained in detail on page 6.
When acting as an output (DIP 7 = ON) the REM is asserted low (GND) momentarily whenever the START SEQUENCE button on the front panel is pressed. This allows Furman Legacy devices to "see" the start sequence button on the CN-3600SE.
The GND terminal pin serves a ground reference point for all other pins on the remote terminal connector. GND is also intended to be fed back into the REM pin when the CN-3600SE is configured for GND ON mode. This is explained in detail in section DIP 5 and 6 Remote Input Setting on page 6.
SmartSequencing
4 Pin Phoenix-Type Barrier Strip

| Pin # | Label | Description |
| 1 | P | Primary SmartSequencing |
| 2 | P | Primary SmartSequencing |
| 3 | S | |
| 4 | S | |
The four terminal pins on the SmartSequencing Barrier Strip are used to link together CN-3600SE units into a SmartSequencing network or "chain". Pin groups 1, 2 and pin groups 3, 4 are non-polarized, so when connecting two SmartSequencing devices there is no need to be concerned about polarity. You do however need to be careful to connect the P terminals of the upstream device to the S terminals of the downstream device. Communications and the sequencing order will depend upon it!
The only rule to follow is:
Upstream sequencers connect to downstream sequencers by connecting the P terminals of the upstream sequencer to the S terminals of the downstream sequencer. This is captured in the diagram below and also explained in detail in SmartSequencing 101 section on pages 4 and 5.

flowchart
graph LR
    A["PRIMARY UNIT\nPRIMARY (OUT)"] --> B["SECONDARY"]
    C["SECONDARY UNIT\nPRIMARY (OUT)"] --> D["SECONDARY (IN)"]
    E["SECONDARY UNIT\nPRIMARY"] --> F["SECONDARY (IN)"]
FORCE OFF / DELAY 3
5 Pin Phoenix-Type Barrier Strip
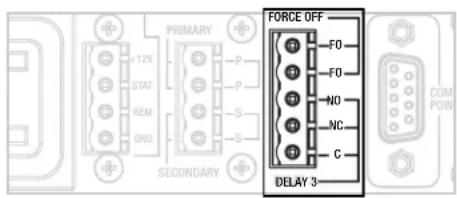
| Pin # | Label | Description |
| 1 | FO | FORCE OFF Input |
| 2 | FO | FORCE OFF Input Common |
| 3 | NO | DELAY 3 Normally Open (NO) Terminal |
| 4 | NC | DELAY 3 Normally Closed (NC) Terminal |
| 5 | COM | DELAY 3 Switch Common (COM) Terminal |
Rear Panel Terminal Barrier Strips
FORCE OFF Terminals:
The two FORCE OFF terminals are dry switch contact inputs that are used to trigger the FORCE OFF feature of the CN-3600SE. This is a safety shutdown feature that is active on the Primary sequencer only. The connections to the FORCE OFF inputs will depend largely upon the state of DIP switch 4. If DIP Switch 4 is OFF, the FORCE OFF terminals must be shorted together for the CN-3600SE to operate normally. If DIP Switch #4 is ON, the FORCE
OFF terminals must be open circuit for the CN-3600SE to operate normally. If DIP Switch 4 is OFF, and the FORCE OFF terminals are open circuit, the CN-3600SE will enter into FORCE OFF mode. If DIP Switch 4 is ON, and the FORCE OFF terminals are shorted, the CN-3600SE will enter into FORCE OFF mode. By default, DIP Switch 4 is ON and the FORCE OFF Terminals are assumed to be an open circuit.
DELAY 3 Terminals
The three DELAY 3 terminals 3, 4 & 5 follow the state of the DELAY 3 outlet. If the DELAY 3 outlet is OFF, the COM terminal will be shorted to the NC terminal and open circuit with respect to the NO terminal. Conversely, if the DELAY 3 outlet is ON, the COM terminal will be shorted to the NO terminal and open circuit with respect to the to the NC terminal. The DELAY 3 terminals are driven by a relay internal to the CN-3600SE. The contacts should not exceed 32VDC at 100mA.
CN-3600SE System Setup
When connecting your equipment up to a CN-3600SE it is important to remember the outlet groups will sequence on in numerical order. This means that DELAY1 will be activate first followed by DELAY 2 and then DELAY 3.
This means that the signal processing equipment with the longest start up time should be connected to DELAY 1. The DELAY 2 outlets should be used to power equipment that receives or acts upon low level signals from the signal processing equipment. The DELAY 3 outlets should power Amplifiers and Speaker-Amps.
| Delay Stage Suggested Equipment | |
| UNSWITCHED OUTLETS • Computer (DAW)• Analog Mixing Console (large format) | |
| DELAY 1 • Wireless Microphones• Analog and Digital Signal Processing• Preamps | |
| DELAY 2 • Mixing Console• Headphone Amp• Recording Equipment | |
| DELAY 3 • Amplifiers• Speaker-Amps | |
The overall goal is to activate the next successive DELAY stage only when the equipment connected to the foregoing DELAY stage has had the opportunity to power up and stabilize. This may require some experimentation on your part. It is better to overestimate the delay time and then trim the delay time down later.
The factory default delay time for each stage on the CN-3600SE is 30 seconds. This should be appropriate for most signal processing equipment, but may be too short to allow computers time to boot up. The optimal delay adjustment will depend upon your equipment.
Single Unit Set Up
The factory default DIP switch settings on the CN-3600SE will be appropriate for most (non-networked) single unit setups. You may need to remove the security covers to make adjustments to the time delays (DIP and DLY ADJ setting) or gain access to the START SEQUENCE button. Simply connect your equipment in the order discussed in the foregoing section and press the SEQUENCE START button or turn the Key Switch to the ON position.
Multiple Unit Set Up
If you plan to use more than one CN-3600SE sequencer in a SmartSequencing network or "chain" the factory default DIP Switch settings will be correct for the first "Primary" unit only. Subsequent (downstream) CN-3600SE's will need to be configured as Secondary devices. To do this you will need to remove the two screws from the front panel security cover using a #2 Philips screw driver and change the position of DIP Switch 8 from ON to OFF. This will need to be done on all devices except for the first unit in the chain.
Once you have your sequencers configured and the SmartSequencing terminals wired together you can start making decisions about what devices should plug into which DELAY stage outlets. Please refer back to the previous section for recommendations on how devices should be ordered.
Breaker Overload
The overall current capacity for the CN-3600SE is 16 Amps. This refers to the combined steady-state current drawn by all devices plugged into the power outlets. If the combined current level ever exceeds 16 Amps, the circuit breaker will trip, cutting off power to all connected equipment. The CN-3600SE also has four 10 Amp breakers associated with each outlet group. The total power consumed by any of the four outlet groups must not exceed 10 Amps. If an outlet group current ever exceeds 10 Amps, the breaker will trip and cut off power to the offending group. If either of these conditions occur, the operator must take action by reducing the load by unplugging one or more devices. Although 16 Amps is an absolute limit, the CN-3600SE will allow the operator to come as close as possible to using the full 16 Amps.
Power sequencing greatly reduces the risk of tripping the breaker because power sequencing offsets large inrush currents by activating equipment in stages, rather than simultaneously. This allows each stage to settle to its steady-state current draw before the next stage is powered. If for any reason, reasonable efforts have been made to resolve breaker trips and trips continue, please feel free to contact Furman technical support.
EXAMPLE 1 DIAGRAM - LARGE SET-UP. PRIMARY MAY BE CONTROLLED VIA RS-232
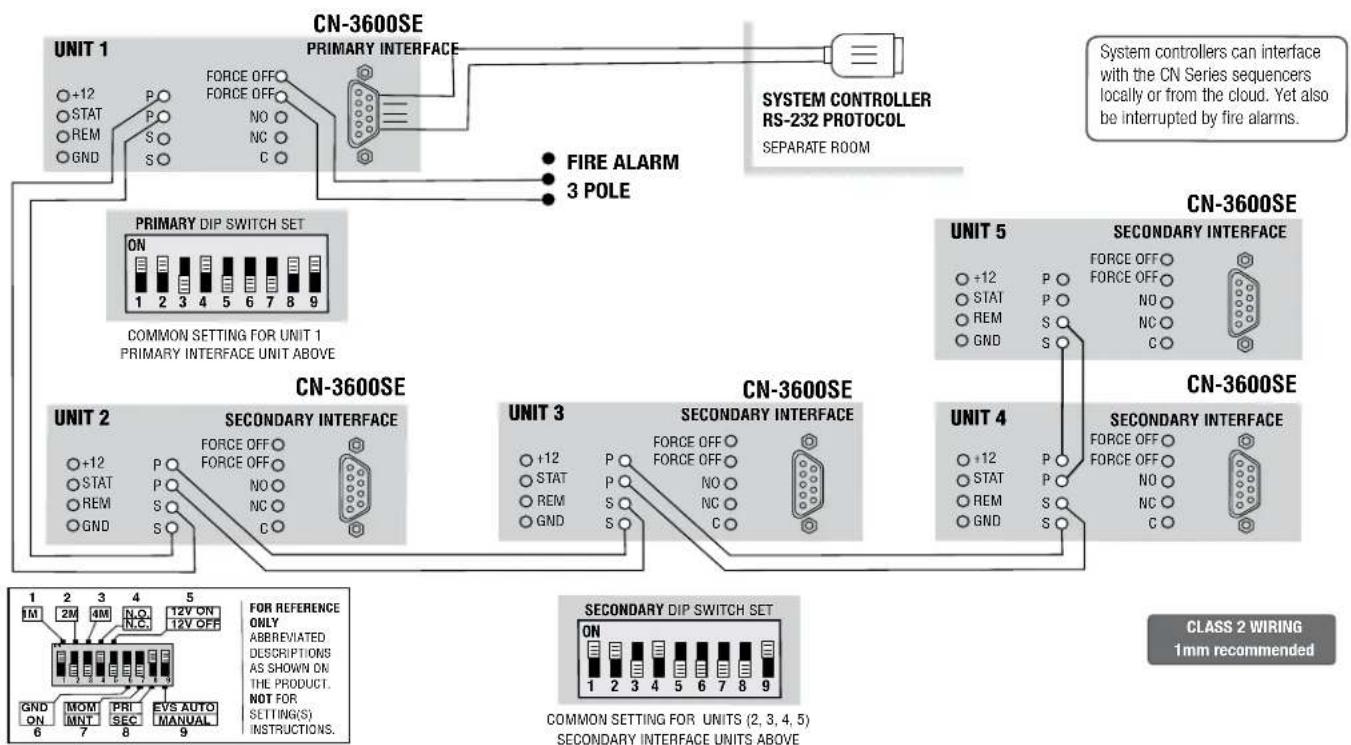
flowchart
graph TD
    A["CN-3600SE"] --> B["UNIT 1"]
    B --> C["POWER OFF"]
    B --> D["FORCE OFF"]
    B --> E["NO"]
    B --> F["NC"]
    B --> G["C"]
    H["FIRE ALARM"] --> I["3 POLE"]
    J["SYSTEM CONTROLLER RS-232 PROTOCOL"] --> K["Separate ROOM"]
    L["PRIMARY DIP SWITCH SET"] --> M["ON"]
    M --> N["1 2 3 4 5 6 7 8 9"]
    O["COMMON SETTING FOR UNIT 1 PRIMARY INTERFACE UNIT ABOVE"] --> P["CN-3600SE"]
    P --> Q["ON"]
    Q --> R["1 2 3 4 5 6 7 8 9"]
    S["SECONDARY INTERFACE"] --> T["ON"]
    T --> U["1 2 3 4 5 6 7 8 9"]
    V["UNIT 2"] --> W["POWER OFF"]
    V --> X["FORCE OFF"]
    V --> Y["NO"]
    V --> Z["NC"]
    V --> AA["C"]
    AB["CN-3600SE"] --> AC["ON"]
    AC --> AD["1 2 3 4 5 6 7 8 9"]
    AE["SECONDARY INTERFACE"] --> AF["ON"]
    AF --> AG["1 2 3 4 5 6 7 8 9"]
    AH["UNIT 3"] --> AI["POWER OFF"]
    AH --> AJ["FORCE OFF"]
    AH --> AK["NO"]
    AH --> AL["NC"]
    AH --> AM["C"]
    AN["CN-3600SE"] --> AO["ON"]
    AO --> AP["1 2 3 4 5 6 7 8 9"]
    AQ["SECONDARY INTERFACE"] --> AR["ON"]
    AR --> AS["1 2 3 4 5 6 7 8 9"]
    AT["UNIT 4"] --> AU["POWER OFF"]
    AT --> AV["FORCE OFF"]
    AT --> AW["NO"]
    AT --> AX["NC"]
    AT --> AY["C"]
    AZ["CN-3600SE"] --> BA["ON"]
    BA --> BB["1 2 3 4 5 6 7 8 9"]
    BC["SECONDARY INTERFACE"] --> BD["ON"]
    BD --> BE["1 2 3 4 5 6 7 8 9"]
    BF["FOR REFERENCE ONLY ABBREVIATED DESCRIPINGS AS SHOWN ON THE PRODUCT. NOT FOR SETTING(S) INSTRUCTIONS."] --> BG["GND ON 6, MOM MNT 7, PRI SEC 8, EVS AUTO MANUAL 9"]
EXAMPLE 2 DIAGRAM - SMALL LEGACY SET-UP

- My CN-3600SE is dead; there are no lights or activity upon power up.
Check the front panel 16 Amp breaker. Reset the breaker if necessary. Consider reducing the loads if this event is repeated.
- One or more of the outlet banks on my CN-3600SE is dead; the DELAY LED turns on, but there is no power at the outlets
Check the rear panel 10 Amp breaker associated with the failed outlet group. Reset the breaker if necessary. Consider reducing the load if this event is repeated.
- My DELAY1, DELAY2, and DELAY3 LEDs are flashing ON and OFF.
This indicates that the CN-3600SE has entered into FORCE OFF mode. Check the setting of DIP Switch 4 and Pins 1 and 2 of the FORCE OFF/DELAY # terminals. Clear the error according to the instructions given on page 8.
- My front panel breaker keeps tripping (popping out)
This usually means that the combined load is exceeding the 16 Amp threshold for the device. Consider removing some of the loads.
- One of the rear panel breaker keeps tripping (popping out).
This usually means that the load presented to the corresponding outlet bank is exceeding the 10 Amp threshold for the outlet bank. Consider removing or swapping some of the loads
- My stack is not sequencing, I see Red lights on the PRIMARY LINK and or SECONDARY LINK LEDs.
Check the setting of DIP switch #8. Only one unit (Primary) within a chain of CN-3600SE devices can have DIP switch 8 set to ON. All other (Secondary) units must have DIP switch 8 set to OFF. Check the wiring on the SmartSequencing terminal block – especially on the units that precede and follow the unit with the RED LEDs.
- My PROTECTION OK LED is off.
This usually indicates that the EVS protection circuit has become damaged or compromised. Try cycling the power on the CN-3600SE. If the PROTECTION OK LED still does not come on, the protection mechanism in the unit should not be relied upon. The unit should be referred to Furman for service.
- My EVS LED is on.
This indicates that the EVS fault condition has been detected and the device has disabled the outputs to protect connected equipment. If the EVS is set for AUTO recovery the LED should extinguish as soon as voltage returns to normal. If the EVS is set to MANUAL, the EVS error will need to be manually cleared. Please refer to page 8 for details on how to clear the EVS error.
- My sequencers are out of sync.
Sequencers can fall out of sequence if one or more sequencers experience a power failure or an EVS condition. When this happens the sequencer will normally remain off to avoid restarting connected equipment out of sequence. To reestablish sync, press the SEQUENCE button on the primary unit and allow the chain of sequencers to sequence off. Then press the START SEQUENCE button again and all units should sequence back on.
- Unit is off and will not turn on.
Check to ensure that the unit has power at the wall outlet and power cord is not damaged
- Re-syncing Multiple Sequencers
There can be unique situations where a chain of sequencers fall out of sync. For example, loss of sync can occur when a branch circuit experiences an overload or high voltage and triggers an EVS shutdown of one or more units. To avoid activating outlets out of sync, the CN-3600SE has been programmed not to activate its outputs upon EVS recovery. The method used to recover sync will depend upon how your units are connected.
SmartSequencing connected systems:
For SmartSequencing connected systems you can just press the START SEQUENCE button on the front panel or rotate the key switch to the OFF position. This will cause the entire chain of sequencers to sequence down in reverse order. The next time the START SEQUENCE button is pressed, or the key is switched ON, all units will sequence back on.
Legacy Interface connected systems
For systems that are connected using the Legacy Interface, the START SEQUENCE button should be pressed and held for eight seconds. This will cause the REM terminal on the unit to temporarily become an output and assert the "Go Home" signal to all legacy connected devices. Please note that, unlike SmartSequencing chains, Legacy connected devices will not cycle down in hierarchical order. It is therefore advised that all sound sources be muted before a re-sync action is initiated. Once the re-sync is initiated, units will cycle down and return to an off state. A sequence can now be "ramped up" in order (and sound sources may be unmuted).
Specifications
Maximum AC Current Rating:
• CN-3600SE: 16 Amps, 220-240 VAC (Thermal breaker)
AC Cord:
- 1.5 mm2 x 3, 2.5 m length, detachable IEC-C19 to CEE-7/7 Schuko plug
AC Receptacles:
- Convenience Outlet (Front Panel) 1 Un-switched IEC-C13
- Rear Panel Outlets: 2 Un-switched IEC-C13
- 6 Sequenced IEC-C13 (3 outlet pairs each controlled by separate relay)
Surge/Under-Overvoltage Protection:
• AC Surge Protection: SMP
- Spike Protection Mode: Line to neutral, zero ground leakage
- Spike Clamping Voltage: 376VAC peak @ 6,000 Volts/3,000 Amps
• Response Time: 1 nanosecond
• Maximum Surge Current: 6,500 Amps
- AC Under-voltage Protection: EVS, 175VAC+/-3VAC
• AC Overvoltage Protection: EVS, 275VAC+/-5VAC
- AC Overvoltage Reset Modes: Manual and Auto-reset (configurable)
AC Filtering:
• LiFT
- Noise Attenuation: Linear, 10dB @10KHz, 40dB@100KHz, 50dB@500KHz
Operating Temperature Range:
• 5C (40F) to 40C (105F) degrees
Humidity Range:
- < 90% rH (Relative Humidity)
Specifications subject to change due to product upgrades and improvements.
GND Mode On, Momentary/Maintained, Primary/Secondary, EVS Reset Auto/Manual
- Potentiometer: Front panel, time calibration hidden by security cover, fine tune delay adjust
Control/Status/Triggering (Rear Panel):
- Remote Terminal: +5-30VDC In, 12VDC (12mA) Out
- SmartSequencing: Phoenix type 4-Pin Connector, with Screw Terminals, Primary & Secondary Links (Current Loop - 1000' nominal)
- Remote Terminal: Phoenix type 4-Pin Connector with Screw Terminals; +12V, STAT, REM, GND
- Force Off/Delay 3 Terminal: Phoenix type 5-Pin Connector with Screw Terminals, FORCE OFF, DELAY 3 (32VDC at 100mA Max)
• RS-232 Compatible: DE-9 Connector
- IP Addressability: Optional, via BB-RS232 Ethernet/RS-232 Adaptor (sold separately) for IP control via BlueBOLT®
- Voltmeter: Available with RS-232 and other options, +/- 1VAC accuracy
- Ammeter: Available with RS-232 and other options, +/-0.3 A accuracy
• 4 Thermal Circuit Breakers: pushbutton
Power Consumption (No Load): • 10 Watts
C.E. Compliant
Warranty Information
15 YEAR LIMITED PRODUCT WARRANTY
Furman warrants to the original purchaser of this product for a period of fifteen (15) years from the date of purchase, that the unit shall be free of defects in design, material or workmanship, and Furman will repair or replace any defective unit.
Full Warranty and Policy information available at www.furmancontractor.com
CAUTION! WARRANTY LIMITATION FOR INTERNET PURCHASERS
Furman products purchased through the Internet do not carry a valid Product Warranty unless purchased from an Authorized Furman Internet Dealer and the original factory serial numbers are intact (they must not have been removed, defaced or replaced in any way). Purchasing from an Authorized Furman Internet Dealer insures that the product was intended for consumer use, has passed all quality inspections and is safe. Buying through auction sites or unauthorized dealers may result in the purchase of salvaged, failed and/or products not intended for use in the US. In addition, Authorized Furman Internet dealers have demonstrated sufficient expertise to insure warranty compliant installations.
For a list of Authorized Furman Internet Dealers go to www.furmansound.com
FURMAN
1690 Corporate Circle, Petaluma, CA 94954
707-763-1010 • 877-486-4738 • www.furmansound.com
©2012 Furman. Furman logo is a US registered trademarks of Panamax.
DIN-00021-A ENGLISH
11-12
- CONTRACTOR SERIES SmartSequencer™
- CN-3600SE
- Instruction Manual
- Why choose Furman?
- Why choose AC power sequencing?
- Before You Begin Inspect Upon Receipt
- The box should contain the following items:
- Table of Contents
- Technologies
- SMP Protection
- Linear Filtering Technology
- Extreme Voltage Shutdown
- BB-RS232
- BASIC POWER MANAGEMENT
- KEY SWITCH SETTINGS
- CN-3600SE Back Panel Features
- Security and Safety
- Additional Features
- Important Safety Instructions
- SmartSequencing™ 101
- SmartSequencing Hierarchy:
- SmartSequencing Communications:
- Forming a chain of sequencers:
- SmartSequencing™ 101 (continued)
- SmartSequencing – A Robust Interface:
- DIP Switch Settings
- DIP Switch and Delay Adjustment
- DIP 1, 2, & 3 and the Delay Adjustment
- Delay Adjustment
- DIP Switch Settings (continued)
- Important Note:
- SmartSequencing Link Status Lights
- PRIMARY LINK
- SECONDARY LINK
- Here are the exceptions:
- Indicator Lights and Circuit Breakers
- DELAY 1, 2 & 3 Lamps:
- POWER, PROTECTION and EVS Lights:
- The POWER LED
- The PROTECTION OK LED
- Circuit Breakers
- Front Panel 16 Amp Breaker:
- Rear Panel 10 Amp Breakers:
- Rear Panel Terminal Barrier Strips
- REMOTE PORT
- Pin Phoenix-Type Barrier Strip
- SmartSequencing
- The only rule to follow is:
- FORCE OFF / DELAY 3
- Pin Phoenix-Type Barrier Strip
- FORCE OFF Terminals:
- DELAY 3 Terminals
- CN-3600SE System Setup
- Single Unit Set Up
- Multiple Unit Set Up
- Breaker Overload
- Specifications
- Maximum AC Current Rating:
- AC Cord:
- AC Receptacles:
- Surge/Under-Overvoltage Protection:
- AC Filtering:
- Operating Temperature Range:
- Humidity Range:
- Control/Status/Triggering (Rear Panel):
- Warranty Information
- YEAR LIMITED PRODUCT WARRANTY
- CAUTION! WARRANTY LIMITATION FOR INTERNET PURCHASERS
- FURMAN
Brand : Furman
Model : CN-3600SE
Category : Regulator