
Rotomat-V-230609 - Food processor ADE - Free user manual and instructions
Find the device manual for free Rotomat-V-230609 ADE in PDF.


| Product Type | Kitchen Cutter (Commercial) |
| Model | Rotomat-V-230609 (Series: V3, V5, V9) |
| Capacity (gross/net) | V3: 3 L / 1.5 L; V5: 5 L / 3.1 L; V9: 9 L / 5.4 L |
| Dimensions (approx.) | V3: 296x457x300 mm; V5: 296x457x362 mm; V9: 348x560x420 mm |
| Net Weight | V3: 13.5 kg; V5: 14.5 kg; V9: 23.0 kg |
| Power Supply | 230 V / 50 Hz |
| Power Consumption | V3 & V5: 0.6 kW; V9: 1.2 kW |
| Operating Speed | 600 – 2,800 rpm (variable via speed controller) |
| Main Materials | Stainless steel AISI 304 (housing, pot INOX 18/10), AISI 420 (blades) |
| Blade Type | Two rotating sickle-shaped blades (self-sharpening optional) |
| Safety Features | Magnetic switch, micro switch (lid, locking arm, pot presence); restart after power failure; emergency stop button |
| Additional Features | Pulse function, integrated scraper, filler plug for liquids, adjustable feet |
| Cleaning Instructions | Hand wash only (no dishwasher); use mild neutral pH 7-8 detergent; do not use abrasive materials or pressure washers |
| Maintenance | Minimum maintenance; sharpening blades via stone; replacement of belt, cable, feet if needed (contact service) |
| Warranty | 1 year from date of purchase (proof required); excludes moving parts and normal wear |
| Included Accessories | Scraper, sharpening stone, operating instructions |
| Intended Use | Commercial cutting, chopping, pureeing of vegetables, cheese, nuts, bread, meat, fish, etc. (no frozen, bones, or non-food) |
| Certification | CE, complies with EC Machinery Directive 2006/42/EC, EMC, RoHS |
Frequently Asked Questions - Rotomat-V-230609 ADE
User questions about Rotomat-V-230609 ADE
0 question about this device. Answer the ones you know or ask your own.
Ask a new question about this device
Download the instructions for your Food processor in PDF format for free! Find your manual Rotomat-V-230609 - ADE and take your electronic device back in hand. On this page are published all the documents necessary for the use of your device. Rotomat-V-230609 by ADE.
USER MANUAL Rotomat-V-230609 ADE
OPERATING INSTRUCTIONS
Kitchen Cutter

natural_image
Exterior view of a modern ADE-branded kitchen appliance with control knobs and a central rotary knob (no visible text or symbols on the device itself)Rotomat-V Series Kitchen Cutter
Rotomat-V-230609-Rev001-UM-en
1. CONTENTS
- CONTENTS....1
- FOREWORD 2
2.1 Introduction.... 2
2.2 Use....2 - START-UP....3
3.1 Opening the packaging.... 3
3.2 Installation 3
3.3 Wiring 4
3.4 Checkup Before Use.... 4 - START-UP AND SAFETY PRECAUTIONS 4
4.1 General Precautions....4
4.2 Mechanical and Electrical Safety Devices....4
4.3 Residual risks 5
4.4 Acceptance testing 5 - PRODUCT OVERVIEW....6
5.1 Machine Components....6
5.2 Overview of Controls 6 - OPERATING THE KITCHEN CUTTER....7
6.1 Operating functions....7
6.2 Using the machine....7
6.3 Sharpening the Blade 8 - CLEANING, MAINTENANCE, AND DISPOSAL 8
7.1 Cleaning 8
7.2 Maintenance....9
7.3 Disposal....9 - TRAINING 9
- WARRANTY....9
- TECHNICAL DATA.... 10
- CE DECLARATION OF CONFORMITY.... 11
- WIRING DIAGRAM.... 12
- EXPLODED VIEWS.... 13
- SPARE PARTS LISTS.... 16
2. FOREWORD

This symbol means: “Observe operating instructions.” Read these operating instructions carefully and observe the information contained therein. Keep these operating instructions handy for future reference.
This publication contains a comprehensive description of how to install, operate, and maintain the kitchen cutter.
The publication, referred to below as the “manual,” aims to provide the user with clear and comprehensible information to ensure a long service life and smooth operation of the machine.
The machine is designed for chopping food, such as vegetables, cheese, nuts, bread, meat, fish, etc., into small pieces and is intended for commercial use. It is also ideal for preparing vegan dishes such as hummus. The integrated scraper ensures optimal processing. You can also add liquids during food processing using the filling opening.
We reserve the right to continuously improve our kitchen cutters, which shall in no way affect the instructions and information contained in this manual.
Before using the kitchen cutter for the first time, you must read this manual carefully.
Should this manual be damaged or lost, apply for a copy from the manufacturer immediately.
Many accidents and injuries that occur during the operation of the machine result from insufficient familiarity with its functions and safety devices. Before starting work with the machine, please read the instructions herein carefully and follow them to the letter.
2.1 Introduction
The design of the Rotomat-V series kitchen cutters complies with applicable safety standards. Consequently, all our appliances are fitted with a plate featuring the “CE” mark attesting to the product's conformity with said standards.
The machine features a support base that carries a pot, inside which are two rotating blades bolted to a spindle.
Products can be chopped or pureed depending on how long they are processed by the two blades.
The machine is made of stainless steel (AISI 304). This material guarantees hygiene during contact with food and is highly resistant to acid salts and oxidation.
The hardened and sharpened blades are made of AISI 420 stainless steel. Therefore, these blades are ideal for cutting, crumbling, beating, and kneading food, and there is no need to change them. The pot is made of stainless steel (Inox 18/10) with a heat-spreading bottom. The pot is fitted with handles for easy handling and removal.
The blades are driven by an electric motor. The power buttons used to switch the kitchen cutter on and off are connected to an auxiliary control circuit that prevents unintentional start-up after power supply interruption.
2.2 Use
The kitchen cutter serves to chop, cut, and crumble food, such as meat, fish, vegetables, cheese, nuts, etc., into small pieces. Before putting food in the pot, you should preferably divide it into portions in advance.
Two horizontally rotating sickle-shaped blades ensure a perfect cut.
Make sure the pot is only partially filled with food in order to achieve the best possible cutting results. Do not fill the pot with food or liquids past the maximum fill level.
The machines are equipped with ventilated electric motors with high efficiency. Avoid running the kitchen cutter at low speed for extended periods (more than 30 seconds). This prevents the motor from being sufficiently ventilated and can cause it to overheat. Allow sufficient time for the motor to cool down before you continue using the machine.
The machine may only be used in its original condition and with original parts. Dismantling or deactivating any mechanical or electrical safety devices is not permitted. Before starting the machine, ensure there are no loose electrical connections, i.e., provisional or uninsulated cables. If you notice any signs of damage to the safety devices, defects, malfunctions, broken parts, incorrect operation, unusual noises, or similar, shut down the machine immediately and contact ADE for repair or replacement.
3. START-UP
Upon receiving the package box with the kitchen cutter, visually inspect the box for any damage that may have occurred during transportation.
If you notice any signs of damage, contact the dealer from whom you purchased the appliance without delay.
3.1 Opening the packaging
- Open the box and remove the machine.
- Check the box contents and verify that they match the information on the packing slip. The package includes:
- Packaging box with packaging material
○ Machine
○ Operating instructions with CE declaration of conformity - Scraper
- Sharpening stone

Packaging materials are recyclable and must never be disposed of with household waste. Check with the local authorities for the appropriate ways to dispose of waste properly.

The machine must be disposed of under local regulations. Never dispose of the packaging material out in the open!
3.2 Installation

Before plugging the machine into the power supply, check that the machine's power rating specified on its nameplate corresponds to the supply voltage and frequency of your local power grid.

In the event of a mismatch, never connect the machine to the power supply, as this may cause damage to the machine and lead to fire!
The kitchen cutter must be placed on a level, smooth, and vibration-free surface that is stable and strong enough to support the machine and thus ensure its safe operation. Any unevenness of the surface on which the machine is rested can be compensated using the adjustable feet. The machine should be placed on a worktop about 80 cm from the floor.
Leave adequate free space around the kitchen cutter to ensure its smooth operation, cleaning, and maintenance. Leave a space of at least 300 mm free around the machine.
Proper machine operation is guaranteed near heat sources at temperatures not exceeding +35 °C and relative humidity not exceeding 75%.
3.3 Wiring
Before plugging in the machine, check that the machine's power rating specified on its nameplate matches the specifications of your local power grid.
Before plugging the machine into the power outlet, ensure the power grid features an electrical overload cutout.
3.4 Checkup Before Use
Check the kitchen cutter for proper functioning before using it for the first time. Press the "I" start button and the "0" stop button to check whether the kitchen cutter starts and stops correctly. Next, check whether the machine shuts off as soon as the lid is removed. Check the "PULSE" button works properly. Finally, check whether the speed controller works properly by checking whether the speed increases when you turn the controller clockwise and vice versa.
4. START-UP AND SAFETY PRECAUTIONS
4.1 General Precautions
The kitchen cutter must only be used by qualified and adequately trained personnel familiar with the machine's safety functions. Responsibility for personnel training rests with the owner of the machine.
Always unplug the machine from the power supply before attempting any cleaning or maintenance work.
Where maintenance or cleaning work implies removing the safety guards from the kitchen cutter, always consider all potential hazards in advance.
Any maintenance or cleaning work must be performed with the utmost care and attention.
Inspect the power cord regularly; frayed or damaged cords pose a significant electrical hazard.
Under no circumstances should the kitchen cutter be used if it is not working properly. Never attempt to repair the machine single-handedly. Contact customer service for guidance.
The kitchen cutter must never be used with frozen products, meat or fish with bones, or non-food products.
The manufacturer accepts no liability whatsoever if...
... the machine is used by unauthorized persons.
... other than original spare parts are used.
... the instructions in this manual are not followed.
... the machine is used and cleaned with unsuitable products.
4.2 Mechanical and Electrical Safety Devices
The machine has the following mechanical safety devices:
- Mechanical safety is ensured by the lid, which can only be removed by swinging the locking arm.
The machine has the following electrical safety devices:
- Magnetic switch and mechanical micro switch that shut off the machine when
o the locking arm is swung,
- the lid is removed, or
- the pot is not in place;
The machine can only be switched on when these safety devices are in the closed position;
- Relay in the control circuit; The machine must be restarted after a power failure or power interruption.
All safety devices are permanently fitted to the machine and must not be removed. Dismantling or tampering with them or any unauthorized modifications would make the machine unsafe. This will result in the manufacturer no longer being responsible for accidents or injuries.
4.3 Residual risks
Even though professional kitchen cutters feature electrical and mechanical safety devices, there are certain risks, or residual risks, which cannot be ruled out and which are referred to in this manual by the following symbol:

These risks include cutting injuries resulting from improper handling of the blades when adding food or from cleaning or sharpening the blades.
4.4 Acceptance testing
- Check that all safety devices are in place and fitted correctly.
- Check all controls and safety elements for proper functioning:
- Press the start button (ON) and the stop button (OFF).
- Swing the locking arm to the side while the machine is running. The machine must stop.
- Check the speed control (SPEED).
- Check the PULSE button for pulse operation.
5. PRODUCT OVERVIEW
5.1 Machine Components

| No. | Designation | No. | Designation |
| 1 | Housing cover | 6 | Filler plug |
| 2 | Housing | 7 | Housing base |
| 3 | Machine controls | 8 | Pot |
| 4 | Speed controller | 9 | Pot lid |
| 5 | Adjustable feet | 10 | Locking arm |
5.2 Overview of Controls

| No. | Marking | Designation |
| 1 | ON / I | Start button |
| 2 | OFF / 0 | Stop button |
| 3 | PULSE | Pulse operation |
| 4 | SPEED | Speed controller |
6. OPERATING THE KITCHEN CUTTER
6.1 Operating functions
Switching on
Press the start button (ON / I) to switch the machine on.
Switching off
Press the stop button (OFF / 0) to switch the machine off.
Pulse operation
Press the PULSE button to activate the pulse mode.
Speed controller
Turn the speed controller clockwise to increase the speed.
Turn the speed controller counterclockwise to reduce the speed.
Adding Liquids
As the food is being processed, you can add liquids through the filling opening (10) to achieve the proper consistency.
6.2 Using the machine

Never add food to the pot while the motor is running!
1) Before you switch the machine on, turn the speed controller to the left as far as it will go.
2) Turn the locking arm counterclockwise far enough to remove the lid.
3) Put the product to be processed into the pot. If the chunks are too large, divide them into portions before putting them into the pot.

Beware of the two blades, as there is a risk of cutting.
Fill the pot up to the mark at most.
Avoid running the kitchen cutter on empty!
4) Replace the lid and turn the locking arm to the locked position.
5) Position your body in a way that makes work comfortable and prevents accidents. Always keep your body perpendicular to the worktop.
6) Switch on the kitchen cutter by pressing the start button.

Avoid running the kitchen cutter at low speed for extended periods. The
appliance features a safety cut-off that shuts off the appliance after 30 seconds of operation at the lowest speed. This protects the appliance from potential overheating of the motor. When operating the appliance at low speed, allow it to cool down for at least 30 seconds.
7) After you have finished work, switch off the machine by pressing the stop button and turn the speed controller back to the "0" position.
6.3 Sharpening the Blade
Always sharpen the blades as soon as you notice a decrease in performance. Use the following procedure to sharpen the blades:
- Turn the locking arm counterclockwise until the lid can be removed.
- Remove the blade holder.
- Move the cutting edge of the blades from heel to tip evenly across the sharpening stone until the cutting edge feels perfectly sharp.
7. CLEANING, MAINTENANCE, AND DISPOSAL
For the sake of hygiene, the kitchen cutter must be kept clean at all times. Thoroughly clean the machine at least once a day. You may also clean it more frequently if necessary. When cleaning the machine, ensure that all parts that come directly or indirectly into contact with food are thoroughly cleaned.

Before cleaning, disconnect the machine from the power supply. Do this by pulling the plug out of the power outlet.

Never clean the kitchen cutter or any parts in the dishwasher!
When cleaning the machine and pot lid, only use a cloth moistened with warm water at about 60 °C and a non-foaming, eco-friendly dishwashing detergent with a neutral pH of 7-8. Never clean the slicer with harmful products liable to affect the health of either operators or customers. Adhere to the relevant instructions when using cleaning products!
Under no circumstances should any abrasive detergents or rough sponges be used, as they would irreparably damage the machine's anodized surfaces.
Never use high-pressure cleaners or water jets to clean the machine.
Prevent liquids from entering the interior of the kitchen cutter (especially the blade drive shaft), which could impair its functionality and increase the risk of electric shock.
Let all parts dry out completely. Any residual water may lead to the formation of flash rust.
7.1 Cleaning
1) Isolate the machine from the power supply by unplugging it. It is never enough just to switch off the machine by pressing the stop button.
2) Set the speed controller to the "0" position.
3) Remove the lid by swinging the locking arm to the side.
4) Pull out the spindle with the sickle blades. Remove the pot from its working position.

Always wear suitable cut-resistant gloves when dismantling or cleaning the blades.
5) Thoroughly clean all parts using an eco-friendly dishwashing detergent with a neutral pH of 7-8, rinse them with clear water, and allow them to dry thoroughly.

natural_image
Technical line drawing of a kitchen appliance with a lid, fan, and pot (no text or symbols)
Never clean the kitchen cutter or any parts in the dishwasher!
6) Reassemble the machine by fitting the pot so that the small pin on the upper side of the pot is engaged in the corresponding slot on the machine housing.
7) Insert the blade spindle and position the center pin in the corresponding slot.
8) Swing the locking arm to the center of the lid and lock the lid in place on the pot.
7.2 Maintenance
The machine generally requires no maintenance. Replace worn parts if necessary.
Before attempting any maintenance work, always unplug the machine from the power supply. It is never enough just to switch off the machine by pressing the stop button. Also, set the speed controller to the "0" position.
You do not need to readjust the belt. However, it may be necessary to replace the belt depending on its condition. If you need replacement, contact customer service.
With time, the adjustable feet can wear out and thus lose their elasticity, causing the machine to become unstable. In this occurs, you must replace them.
Regularly check the power cord for any signs of wear and tear. If the machine's power cord shows signs of wear, it must be replaced. If you need replacement, contact customer service.
The blades must be properly sharpened to ensure good performance of the machine and perfect cutting results.
The appliance requires no lubrication or oiling.
7.3 Disposal
If you wish to shut down the machine, make sure that no one can use it; therefore, disconnect all cables and cut them. You can then dispose of the machine. Contact a specialist service provider for proper disposal. Ensure proper disposal of the various machine components depending on their material.
8. TRAINING
The adult operator installing the kitchen cutter must be adequately trained in the use, cleaning, and servicing and be aware of potential hazards resulting from improper use of the machine.
The training will be given by the suitably authorized and trained installer familiar with the European community machine standards.
9. WARRANTY
If this product is proven to have failed within 1 year from the date of purchase (proof of purchase is required) due to defects in material and workmanship, ADE will repair or replace this product.
The warranty does not cover all moving parts, such as cables, blades, pots, etc. The warranty does not extend to external normal wear and tear or damage caused by accident or misuse.
This warranty does not cover the products tampered with by unauthorized personnel.
The warranty agreement does not affect the customer's statutory rights.
Any complaints shall be addressed to the dealer from whom you purchased the machine.
- TECHNICAL DATA
| Model | Rotomat-V3-230 | Rotomat-V5-230 | Rotomat-V9-230 |
| Pot capacity (gross) | 3 liters | 5 liters | 9 liters |
| Pot capacity (net) | 1.5 liters | 3.1 liters | 5.4 liters |
| We recommend filling the pot to about one-third of its capacity, depending on the product to be processed, to achieve perfect cutting results. The pot should never be filled above the “Max” mark. | |||
| Dimensions (approx.) | 296 x 457 x 300 mm | 296 x 457 x 362 mm | 348 x 560 x 420 mm |
| Operating speed | 600 – 2,800 rpm | ||
| Power | 0.6 kW | 0.6 kW | 1.2 kW |
| Current type | 230 V/50 Hz | 230 V/50 Hz | 230 V/50 Hz |
| Net weight (approx.) | 13.5 kg | 14.5 kg | 23.0 kg |
| Package dimensions | 300 x 505 x 370 mm | 300 x 505 x 430 mm | 365 x 600 x 485 mm |
| Gross weight, approx. | 16.0 kg | 17.0 kg | 26.0 kg |
| Blade | Two rotating sickle blades attached to a spindle | ||
Optional:
- Emulsion blades
- Toothed blades
- Pesto blades
ADE
CE
EC Declaration of Conformity
Manufacturer:
ADE Germany GmbH
Neuer Höltigbaum 15
22143 Hamburg
Person authorized to compile the relevant technical documentation:
ADE Germany GmbH
Neuer Höltigbaum 15
22143 Hamburg
Type/Model:
Kitchen Cutter
Rotomat-V
Serial numbers:
Rotomat-V3-230
61922-xxxxxxxx-00001
to 61922-xxxxxxxx-99999
Rotomat-V5-230
62583-xxxxxxxx-00001
to 62583-xxxxxx-99999
Rotomat-V9-230
62584-xxxxxxxx-00001
to 62584-xxxxxx-99999
The above-mentioned manufacturer declares under their sole responsibility that the above-mentioned machine complies with the following EC directives as amended:
2006/42/EC
Machinery Directive
(OJ L 157, 6/9/2006, p. 24 - 86)
2014/30/EU
EMC Directive
(OJ L 96, 3/29/2014, p. 79 - 106)
2011/65/EU
RoHS Directive
(OJ L 174, 7/1/2011, p. 88 - 110)
Directive 2014/35/EU was complied with in accordance with Annex I No. 1.5.1 MRL 2006/42/EC with regard to its protection objectives.
This declaration refers only to the machine in the condition in which it was placed on the market. This declaration becomes invalid if the machine is converted in a way that has not been approved by the manufacturer.
P. Mack
Hamburg,
02.06.2023
Managing Director
Place,
Date
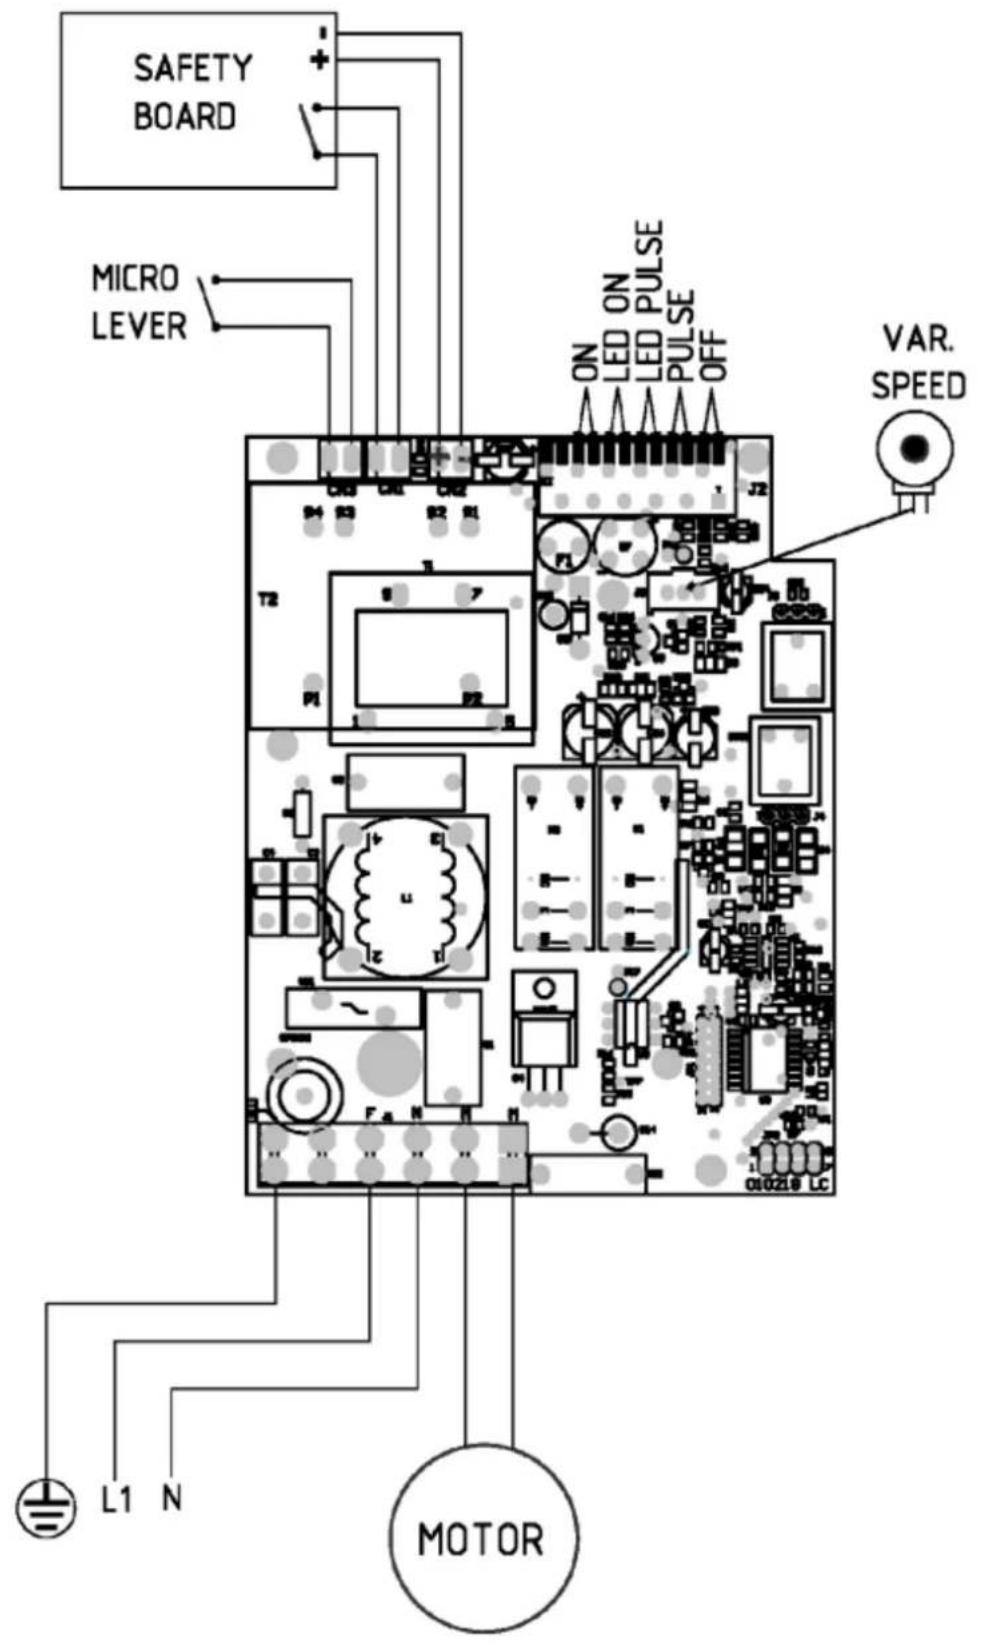
12. WIRING DIAGRAM
Rotomat-V
13. EXPLODED VIEWS
Rotomat V3

Rotomat V5
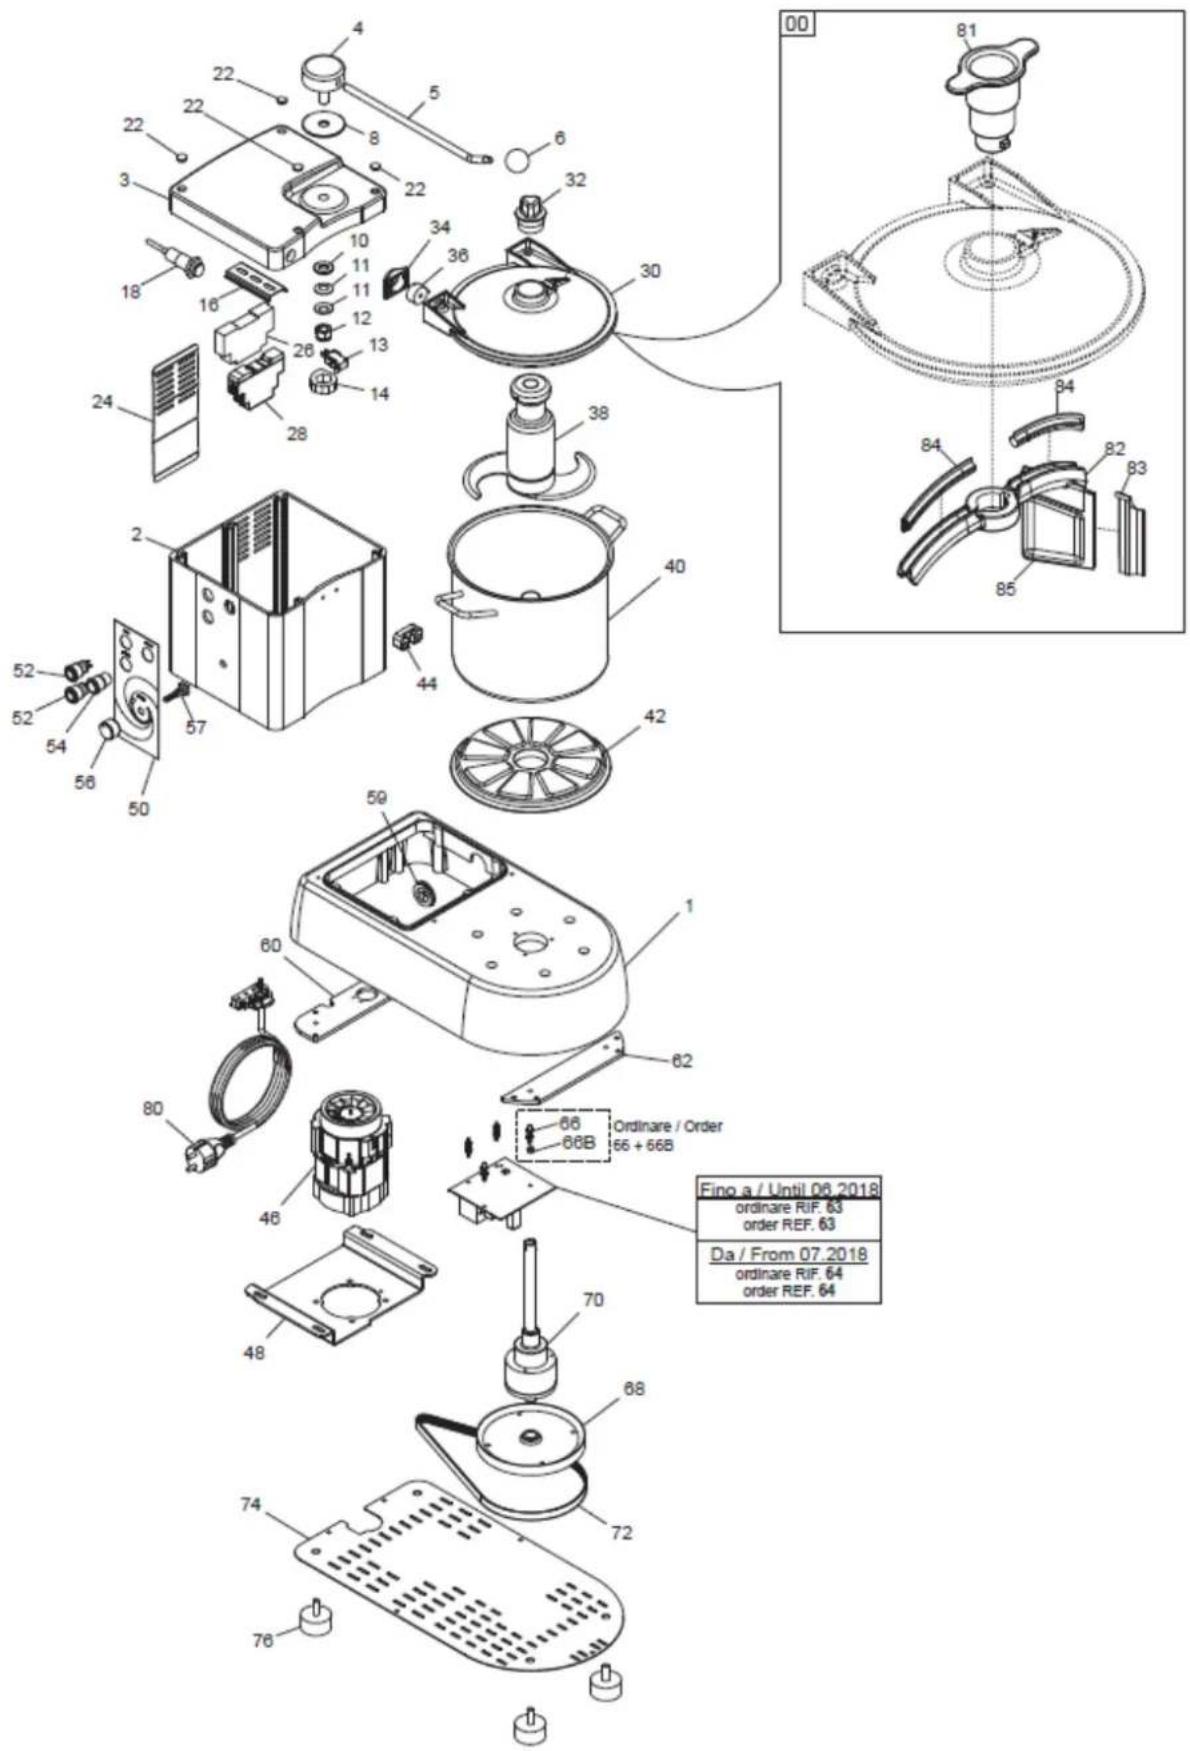
Rotomat V9

14. SPARE PARTS LISTS
- To be inserted
Distributor:
Manufacturer:
ADE Germany GmbH
Neuer Höltigbaum 15
22143 Hamburg
+49 40 432 776 - 0
昌 +49 40 432 776 - 10
info@ade-germany.de
www.ade-germany.de
- OPERATING INSTRUCTIONS
- Rotomat-V Series Kitchen Cutter
- CONTENTS
- FOREWORD
- Introduction
- Use
- START-UP
- Opening the packaging
- Installation
- Wiring
- Checkup Before Use
- START-UP AND SAFETY PRECAUTIONS
- General Precautions
- Mechanical and Electrical Safety Devices
- Residual risks
- Acceptance testing
- PRODUCT OVERVIEW
- Machine Components
- Overview of Controls
- OPERATING THE KITCHEN CUTTER
- Operating functions
- Switching on
- Switching off
- Pulse operation
- Speed controller
- Adding Liquids
- Using the machine
- Never add food to the pot while the motor is running!
- Beware of the two blades, as there is a risk of cutting.
- Avoid running the kitchen cutter at low speed for extended periods. The
- Sharpening the Blade
- CLEANING, MAINTENANCE, AND DISPOSAL
- Cleaning
- Maintenance
- Disposal
- TRAINING
- WARRANTY
- Optional:
- ADE
- CE
- EC Declaration of Conformity
- WIRING DIAGRAM
- EXPLODED VIEWS
- SPARE PARTS LISTS
Brand : ADE
Model : Rotomat-V-230609
Category : Food processor