
Rotomat 210614 - Food processor ADE - Free user manual and instructions
Find the device manual for free Rotomat 210614 ADE in PDF.


| Product Type | Food Processor |
| Brand | ADE |
| Model | Rotomat 210614 |
| Motor Power | 800 W |
| Bowl Capacity | 1.5 L |
| Number of Speed Settings | 2 speeds + pulse |
| Functions | Chopping, slicing, shredding, blending, kneading, emulsifying |
| Included Accessories | Stainless steel blade, slicing disc, shredding disc, dough hook, whisk |
| Material | Bowl: plastic; Blade: stainless steel |
| Product Dimensions | 25 x 20 x 35 cm |
| Weight | 2.5 kg |
| Power Supply | 220-240 V, 50/60 Hz |
| Cable Length | 1.2 m |
| Safety Features | Interlocking lid, non-slip feet, overload protection |
| Cleaning | Detachable parts dishwasher safe; motor base wipe with damp cloth |
| Maintenance | Keep ventilation slots clear; do not immerse base in water |
| Spare Parts | Bowl, blade, discs, lid available from ADE service centers |
| Reparability | Moderate; motor unit sealed, accessories replaceable |
| Warranty | 2 years |
Frequently Asked Questions - Rotomat 210614 ADE
User questions about Rotomat 210614 ADE
0 question about this device. Answer the ones you know or ask your own.
Ask a new question about this device
Download the instructions for your Food processor in PDF format for free! Find your manual Rotomat 210614 - ADE and take your electronic device back in hand. On this page are published all the documents necessary for the use of your device. Rotomat 210614 by ADE.
USER MANUAL Rotomat 210614 ADE
Rotomat series kitchen cutter
Rotomat-210614-Rev004-UM-en
Table of Contents
- INTRODUCTION 2
1.1 Introduction....2
1.2 Use....2 - START-UP 3
2.1 Opening the packaging....3
2.2 Installation 3
2.3 Electrical connection....4
2.4 Operational control 4 - SAFETY PRECAUTIONS AND OPERATING FUNCTIONS .... 4
3.1 General precautions 4
3.2 Mechanical and electrical fuses 5
3.3 Inspection test 5
3.4 Operating features....5
3.5 Grinding the blades....6 - CLEANING, MAINTENANCE AND DISPOSAL 6
4.1 Cleaning 6
4.2 Maintenance....7
4.3 Disposal....7 - TRAINING 7
- WARRANTY 8
- TECHNICAL DATA....8
- CE MARKING AND DECLARATION OF CONFORMITY....9
- BLOCK DIAGRAM.... 10
1. INTRODUCTION

This symbol means: "Consult operating instructions". Read the instructions for use carefully before use and follow all instructions provided therein. Keep the instructions for use for future reference.
This publication contains all necessary information for the installation, operation and maintenance of the kitchen cutter.
The purpose of this publication, hereinafter also referred to as the “manual”, is to inform the user in a clear and easily understandable form in order to ensure a long service life and a fault-free operation of the machine.
The machine has been developed and manufactured to shred foods such as meat, fish, vegetables, cheese, nuts, etc. into small pieces in the commercial sector.
Kitchen cutters are subject to continuous improvements, but this in no way affects the instructions and details in this manual.
This manual must be read carefully before putting the kitchen cutter into operation.
If this manual becomes worn out or gets lost over time, immediately request a copy of the manual from the manufacturer.
The majority of accidents and injuries that occur when using the machine is due to insufficient knowledge of its functions and safety devices. Therefore, the instructions and information contained in this manual should be read carefully before starting work with the machine.
1.1 Introduction
The Rotomat series kitchen cutters are designed according to the applicable safety standards. For this reason, on each device you will find the “CE” identification label that certifies conformity with the requirements.
The machine consists of a base that carries a pot, with two rotating blades screwed to a spindle inside the pot.
The products can be shredded or processed into mash depending on the working time of the two blades.
All machine components are made of chrome steel (AISI 430; housing) or stainless steel (AISI 304; pot). This material guarantees hygiene during contact with foods, as well as great resistance to acid salts and oxidation.
The hardened and polished blades are made of blade holder stainless steel (AISI 420). This allows foods to be cut, crumbled, beaten and kneaded without having to change the blades. The pot is made of stainless steel (18/10 stainless steel) with heat spreading bottom. The pot is equipped with handles that provide maximum handiness and easy removal.
The blades are driven by an electric motor. Start-up and stopping are triggered by buttons connected to an auxiliary control circuit that prevents unintentional start-up after a possible power outage.
1.2 Use
The Rotomat series kitchen cutters are designed for shredding, cutting and crumbling into small pieces, as well as for beating and kneading of foods such as meat, fish, vegetables, cheese, nuts, etc. Foods to be processed should already be pre-portioned into pieces so that they fit easily through the feed opening on the lid.
Two horizontally rotating sickle blades ensure perfect cutting.
The user is advised to fill the pot only partially to achieve the best possible cutting results.
The continuous operating time of the shredding machine should be limited to 24 minutes (duty cycle = 40% per hour) in order to avoid overheating of the motor. The operation can be resumed after appropriate rest period, during which the motor cools down. If you process a very tough material, the intervals should correspondingly be kept shorter.
At shorter switch-on times, the cooling intervals are also correspondingly shorter.
The machine may only be used in its original condition and with original parts. Disassembly or disabling of the mechanical and electrical safety devices is not allowed. The machine must not be operated with loose electrical connections, i.e. with provisional or uninsulated cables. In the event of damage to safety devices, defects, malfunctions, suspected breakage, incorrect operation, unusual noises, etc., the machine must be taken out of operation immediately and ADE must be notified of renewal or replacement.
2. START-UP
Upon receipt of the kitchen cutter package, make sure that it is free of any damage that occurred during transport.
In the event of any damage, please notify immediately the dealer from whom the device was purchased.
2.1 Opening the packaging
- Open the box and remove the machine;
-
Check the package contents and check that it matches the specifications on the delivery note. The delivery includes:
-
Packaging box with packaging material
- Machine
- Operating Manual
- CE Declaration of Conformity
- Scraper
- Whetstone.

Packaging materials are valuable materials and must not be disposed of in household waste. Check with your local authorities for proper disposal options.

Local regulations must be followed during disposal.
Never dispose of packaging materials in nature!
2.2 Installation

Before connecting to the power supply, make sure that the local power supply and current frequency comply with the data indicated on the machine nameplate.

The machine must not be connected in the event of non-compliance, otherwise this may cause damage to the machine and fire!
Place the kitchen cutter on a flat, smooth and vibration-free surface that is stable and firm enough to ensure adequate safety taking into account the net weight of the machine. Any unevenness can be corrected using the adjustable feet. The recommended working height should be about 80 cm.
There must be sufficient space around the kitchen cutter to ensure fault-free operation, cleaning and maintenance of the machine. This clearance should be at least 300 mm.
Proper operation of the machine is guaranteed at a relative humidity not exceeding 80% and with heat sources in the immediate vicinity with a temperature not exceeding 30irc C.
2.3 Electrical connection
Before carrying out the connection, be sure to check whether the power grid ratings comply with the ratings indicated on the machine nameplate.
Insert the plug into the socket and check whether the existing mains supply is equipped with a suitable circuit breaker.
2.4 Operational control
Before using for the first time, check the kitchen cutter for perfect operability. To do this, press the "I" start button first and then press the "0" stop button. After that, check if the machine stops operating as soon as the lid is removed. Lastly, turn the knob clockwise (rotating speed should increase) and then counter-clockwise (rotating speed should decrease) to make sure that the speed controller functions properly.
3. SAFETY PRECAUTIONS AND OPERATING FUNCTIONS
3.1 General precautions
The kitchen cutter may only be used by trained staff that is familiar with the safety standards in this manual.
If the staff changes regularly, each person operating the device must be sufficiently trained and instructed well in advance before starting work.
Unplug the machine from the mains outlet before performing any cleaning or maintenance work.
When maintaining or cleaning the kitchen cutter, make sure you first remove the safety devices and necessarily consider all sources of danger.
Exercise utmost care when performing maintenance or cleaning work.
Check the condition of the power cord on a regular basis; a worn or damaged cord is a major electrical source of danger.
If the kitchen cutter does not function properly, it must not be used under any circumstances. Do not make any repairs. Contact your customer service.
The kitchen cutter must not be used for frozen products, meat and fish with bones, as well as for non-food products.
Never put your fingers into the feed opening when the machine is in operation.
The manufacturer cannot be held liable if...
- ... the machine is used by unauthorised persons.
- ... you use other than the original spare parts.
- ... instructions in this manual are not followed.
- ... the machine is maintained and cleaned with unsuitable products.
3.2 Mechanical and electrical fuses
The following mechanical safety device is installed:
- Safety is provided by the lid, which can be removed only with a hinged locking arm.
The following electrical safety devices are installed:
- A magnetic switch and a mechanical micro-switch, which turn off the machine when the lid is removed and turn it on again only when this safety device is in the closed position;
- A relay in the control circuit: the machine must be restarted in the event of an accidental power outage.
The kitchen cutter is provided with the normative measures for the electrical and mechanical safety devices, both in the operating and in the cleaning and maintenance phases.
All fuses are mounted on the machine and must not be removed. Scrapping or unauthorised modifications to the machine make it a dangerous device. In such cases, the manufacturer cannot be held liable for any accidents or injuries.
3.3 Inspection test
- Check whether all safety devices have been installed correctly.
- Before starting work, please use the operating buttons to check whether the machine can actually be turned on and off.
3.4 Operating features
The kitchen cutter is equipped with switches that are arranged on the housing as follows:
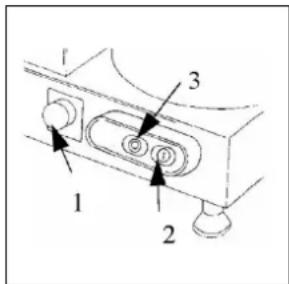
- Speed controller for setting the blade speed
- "I" start button
- "0" stop button

- Locking arm
- Lid
- Container
- Feed opening

Only put the product to be processed into the pot when the motor is turned off!
- Before starting work, turn the speed controller to the "0" position.
- Turn the locking arm counter-clockwise until the lid can be removed.
- Put the product to be processed into the pot.

Pay attention to the two blades - risk of cutting!
- Before putting very large pieces into the pot, they should be shredded manually.

Fill liquid products only up to the maximum mark in the pot.
- Take a body posture that makes work easy and excludes accidents. The body must be perpendicular to the work surface.
-
Replace the lid and turn the locking arm to the locking position.
-
To turn on the kitchen cutter, press the start button.
- Additional ingredients can be added through the feed opening during processing.
- Once the machine has completed the processing operation, press the stop button to turn it off and turn the speed controller back to the "0" position.

Never let the cutter operate empty!
3.5 Grinding the blades
As soon as the two blades become dull, grind them as follows:
- Turn the locking arm until the lid can be removed.
- Remove the blade holder.
- Move the cutting edge evenly from inside to outside to make the blade sharp again.

4. CLEANING, MAINTENANCE AND DISPOSAL
The kitchen cutter must always be clean for hygienic reasons. The machines must be cleaned thoroughly at least once a day; they can be cleaned more frequently, if necessary.
In particular, the machine parts that come into direct contact with foods or get close to them must be cleaned thoroughly.
Always use scratch-resistant protective gloves when cleaning.
To clean the machine and the lid, only use a cloth dampened with warm water (approx. 60°C) and a non-foaming, environmentally friendly dishwashing detergent with a neutral pH value of 7-8. For cleaning and disinfecting, only products or additives may be selected that are food-compatible and approved for this purpose. Be sure to observe the instructions for use of the cleaning agents! After such treatment, wipe off with clear water and dry thoroughly.
Do not use scouring tools or rough sponges and never clean the machine under running water or in the dishwasher.
4.1 Cleaning
1) Pull the plug from the mains socket to disconnect the machine from the mains. Pressing the stop button on the machine should by no means be regarded as sufficient for this purpose.
2) Set the speed controller to the "0" position.
3) Open the lid by sliding the locking arm aside until the lid can be removed.
4) Remove the spindle with the sickle blades and then remove the pot from its working position.
5) Thoroughly clean all parts with an environmentally friendly dishwashing detergent with a neutral pH value of 7-8.

Removable parts must never be cleaned in the dishwasher, except for the stainless steel pot. If cleaned in the dishwasher, the blades will become dull quickly!

Protective gloves must be worn at all times when regrinding the blades personally. There is a risk of cuts!
6) Clean the removed sickle blade with lukewarm water and some liquid detergent, rinse with clean water, allow it to dry and disinfect, for example, with some alcohol.
7) To reassemble the machine, position the pot so that the small pin on the top of it is inserted into the corresponding guide on the machine housing.
8) Insert the blade spindle while positioning the centre pin in the corresponding socket.
9) Slide the locking arm to the centre of the lid to lock the lid on the pot.

When cleaning, make sure that no water penetrates into the blade drive shaft, because otherwise damage may occur inside the machine.

Under no circumstances can the machine or its parts be treated with a water jet or high-pressure cleaner.
4.2 Maintenance
Before starting any maintenance work, be sure to unplug the power cord from the mains outlet to disconnect the machine from the power grid. Pressing the stop button on the machine should by no means be regarded as sufficient for this purpose. In addition, set the speed controller to the "0" position.
The belt must not be readjusted. It may be necessary to replace it depending on the use. In this case, please contact the customer service.
The adjustable feet can wear out over time, lose their elasticity and make the machine unstable. In this case, they must be replaced.
Check the condition of the power cord on a regular basis. If the power cord of the machine shows any signs of wear and tear, it must be replaced. In this case, please contact the customer service.
To achieve good performance and perfect cutting results, the blade must be well ground. If the blades become dull, they must be reground by a professional grinding service. The cross section of the blade should be at least 5 mm.
The device requires no lubrication or oiling.
4.3 Disposal
If the machine is taken out of operation for any reason, make sure that it can no longer be used by anyone by disconnecting and cutting the electrical connections.
The machine can be disposed of after decommissioning. For this purpose, contact any specialist company; the materials of various components must be considered during disposal.
5. TRAINING
During the installation of the kitchen cutter, the adult operator of the machine must be sufficiently trained in the use, cleaning and maintenance of the machine; in particular, the operator must be aware of dangers resulting from improper use.
Training must be carried out by a person who has been entrusted with the installation of the machine and who has sufficient knowledge of the EC standards in mechanical engineering.
6. WARRANTY
ADE will repair or replace this product if it fails within 1 year of the date of sale (proof of purchase is required) due to lack of workmanship or defective material.
The above does not apply to all moving parts such as a cord, blade, pot, etc. Warranty does not apply to normal appearance of usage or sign of wear or any damages caused by accidents or misuse.
The warranty will not apply for devices that have been opened by unauthorised persons.
This warranty agreement does not affect the customer's legal rights in any manner.
The dealer from whom you purchased the machine is responsible for complaints.
7. TECHNICAL DATA
| Model | Rotomat 3 | Rotomat 5 | Rotomat 9 |
| Pot gross capacity 3.2 litres 5.2 litres 9.3 litres | |||
| Useful capacity 1.5 litres 3.1 litres 5.4 litres | |||
| (It is recommended to fill the pot with products only to about one-third depending on the product to be processed to achieve perfect cutting results) | |||
| Footprint | 310 x 160 mm | 310 x 160 mm | 410 x 225 mm |
| Dimensions approx. | 380 x 320 x 270 mm | 380 x 320 x 320 mm | 470 x 330 x 400 mm |
| Working speed | 1,100–2,600 RPM | 1,100–2,600 RPM | 1,100–2,600 RPM |
| Power | 0.35 kW | 0.35 kW | 0.7 kW |
| Current type | 230 V/50 Hz | 230 V/50 Hz 230 V/50 Hz | |
| Tare weight approx. | 10 kg | 11 kg | 25 kg |
| Noise dB | max. 75 | max. 75 | max. 75 |
| Packaging dimensions | 430 x 340 x 290 mm | 440 x 340 x 400 mm | 720 x 350 x 500 mm |
| Blades | Two rotating sickle blades attached to a spindle. | ||
8. CE MARKING AND DECLARATION OF CONFORMITY
CE
Declaration of conformity by the manufacturer
This product has been manufactured in accordance with the harmonised European standards. They conform to the regulations of the EC-directives listed below:
– Machinery directive 2006/42/EC
- EMC Directive 2014/30/EC
– Low voltage directive 2014/35/EC
– RoHS Directive 2011/65/EC
in the currently valid versions.
The declaration will be void if a change that was not agreed with us has been made on the machine.
Hamburg, June 2021
ADE Germany GmbH
Manufacturer: ADE Germany GmbH
Rotomat series kitchen cutter

flowchart
graph TD
    A["MOTOR"] -->|BROWN| B["RELAY"]
    A -->|BLUE| C["TRANSFORMER"]
    A -->|YELLOW/GREEN| D["CABLE"]
    E["SPEED DIAL"] --> F["Switch"]
    G["Polarity"] --> H["ON/OFF SWITCH"]
    I["COVER MICRO-SWITCH"] --> J["LEVER MICRO-SWITCH"]
    K["BLACK"] --> L["Black"]
    M["BYND"] --> N["Yellow/Green"]
Distributor:
- Rotomat series kitchen cutter
- Table of Contents
- INTRODUCTION
- Introduction
- Use
- START-UP
- Opening the packaging
- Installation
- Electrical connection
- Operational control
- SAFETY PRECAUTIONS AND OPERATING FUNCTIONS
- General precautions
- Mechanical and electrical fuses
- Inspection test
- Operating features
- Only put the product to be processed into the pot when the motor is turned off!
- Pay attention to the two blades - risk of cutting!
- Fill liquid products only up to the maximum mark in the pot.
- Never let the cutter operate empty!
- Grinding the blades
- CLEANING, MAINTENANCE AND DISPOSAL
- Cleaning
- Removable parts must never be cleaned in the dishwasher, except for the stainless steel pot. If cleaned in the dishwasher, the blades will become dull quickly!
- Protective gloves must be worn at all times when regrinding the blades personally. There is a risk of cuts!
- Maintenance
- Disposal
- TRAINING
- WARRANTY
- TECHNICAL DATA
- CE MARKING AND DECLARATION OF CONFORMITY
- CE
- Declaration of conformity by the manufacturer
- ADE Germany GmbH
Brand : ADE
Model : Rotomat 210614
Category : Food processor