
ZW50-210903 - Scale ADE - Free user manual and instructions
Find the device manual for free ZW50-210903 ADE in PDF.


| Product Type | Digital Kitchen Scale |
| Brand | ADE |
| Model | ZW50-210903 |
| Capacity | 5 kg / 11 lbs |
| Division | 1 g (0.1 oz) |
| Display | LCD, 4 digits |
| Power Supply | 2 x AAA batteries (not included) |
| Dimensions | Approx. 20 x 15 x 2 cm |
| Weight | Approx. 300 g |
| Material | Stainless steel platform, plastic body |
| Functions | Tare, Auto-off, Unit conversion (g/oz/lb:oz/ml/fl.oz), Low battery indicator, Overload indicator |
| Usage | For kitchen and household weighing |
| Cleaning | Wipe with a damp cloth; do not immerse in water |
| Safety | Do not exceed max capacity; keep away from water and heat sources |
| Accessories | User manual (PDF available) |
| Spare Parts | Batteries (standard AAA) |
| Repairability | Not user-serviceable; contact manufacturer for issues |
| Certification | CE, RoHS compliant |
| Package Contents | Scale, user manual (downloadable) |
Frequently Asked Questions - ZW50-210903 ADE
User questions about ZW50-210903 ADE
0 question about this device. Answer the ones you know or ask your own.
Ask a new question about this device
Download the instructions for your Scale in PDF format for free! Find your manual ZW50-210903 - ADE and take your electronic device back in hand. On this page are published all the documents necessary for the use of your device. ZW50-210903 by ADE.
USER MANUAL ZW50-210903 ADE
OPERATING INSTRUCTIONS
Electronic counting scale
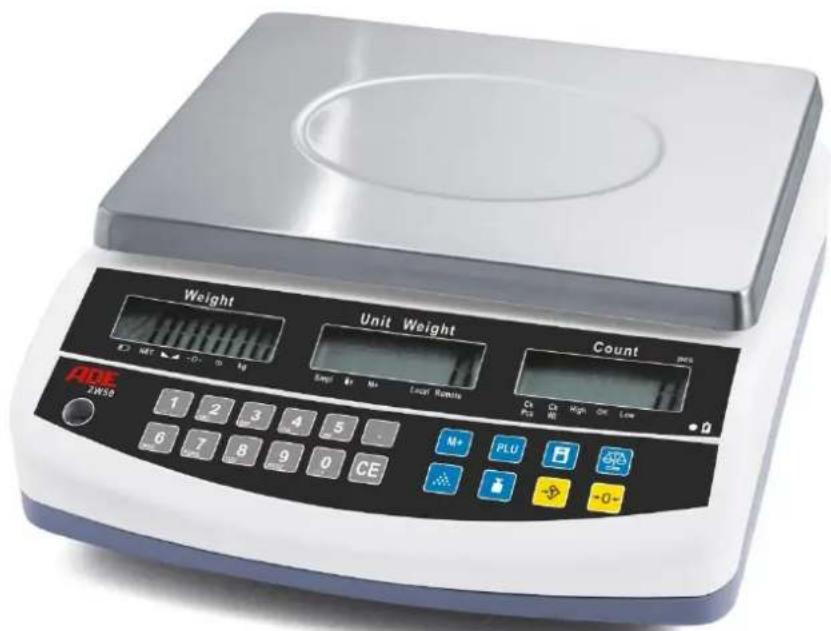
ZW50 Series Counting Scale
ZW50-210903-Rev006-UM-en
Contents
- Applications .... 3
- Warnings 3
- Scope of Supply 4
- Setting Up the Scale 4
4.1 Setting Up the Local Scale.... 4
4.2 Setting Up the Remote Scale 5
- Display Overview 6
- Key Functions....7
- Displays....8
7.1 Weight Display (WEIGHT) 8
7.2 Unit Weight Display (UNIT WEIGHT) 8
7.3 Count Display (COUNT) 9
7.4 Battery Charge Indicator 9
- Operation....10
8.1 General....10
8.2 Switching On the Scale....10
8.3 Zeroing the Display....10
8.4 Taring....10
8.5 Determining / Entering the Unit Weight....11
8.6 Piece Counting ....13
8.7 Check Weighing....13
8.8 Summation Memory....14
8.9 PLU (Product Look Up)....14
-
Parameters....17
-
RS-232 Data Output 19
- Care, Maintenance, and Warranty ....19
11.1 Care and Cleaning....19
11.2 Error Messages ....19
11.3 Storage and transportation conditions....20
11.4 Disposal....20
11.5 Warranty....20
- Technical Data....21
- Declaration of Conformity .....22
1. Applications

This symbol means: "Observe operating instructions." Read these operating instructions carefully and observe the information contained therein. Keep these operating instructions handy for future reference.
The ZW50 series digital counting scale offers accurate, fast, and versatile counting and check weighing and is intended for use in areas not regulated by law.
This scale features an auxiliary connection, enabling you to connect an additional weighing base (e.g., platform, pallet, or floor scale) for weighing heavier weights or counting larger quantities.
- The ZW50 series comprises four models with capacities of up to 30 kg.
- All models are equipped with stainless steel weighing platforms and ABS plastic housings.
- All scales feature sealed keypads with color-coded membrane switches and three large, easy-to-read liquid crystal displays (LCD). The LCD display has a backlight that can be enabled or disabled.
- All scales have an automatic zero function, an acoustic alarm for preset weights, automatic taring, preset taring, and a summation memory that allows storing and recalling total quantities.
- The scale offers a memory capacity for 100 unit weight items (PLU), the tare function, and the alphanumeric description of frequently used items.
- The scale offers a choice between kg and lbs units.
- The ZW50 series is fitted with a bidirectional RS232 data interface, enabling you to connect a PC or printer.
- The scale can be powered from a 230 V power outlet or a 6 V 4 Ah rechargeable battery.
2. Warnings
The scale complies with the directives and standards for electrical equipment, electromagnetic compatibility, and the stipulated safety requirements. Improper use of the scale may cause personal injury and material damage.
Read these operating instructions carefully before using the appliance for the first time. This will prevent damage to the appliance. Keep the operating instructions in a safe place.
Observe the following instructions to ensure safe and smooth operation of the scale:

Never expose the scale to extreme temperatures, direct sunlight, or other sources of heat. This may adversely affect the liquid crystal display.

Electronic scales must not come into contact with water. Only use the scale in a dry place. Wipe the scale with a damp cloth. If you accidentally spill water onto the scale, switch it off immediately and let it dry thoroughly.

Never use harsh or abrasive cleaning agents to clean the scale. They can damage the shiny surface of the housing and make it more prone to soiling.

Before connecting the included mains cable to the scale, ensure the voltage on the rating plate corresponds to that of your local power grid. Connect the mains cable to the local mains supply.

Never attempt to open the scale! If you have any problems, contact the customer service of your authorized dealer.
We can no longer guarantee safe operation:
- when the power cord or plug shows visible signs of damage;
• after prolonged storage in wet environments;
Should this occur, contact your service provider for your safety.
Caution: Never use power cords other than those supplied by the manufacturer!
3. Scope of Supply
- Scale
- Rechargeable battery (integrated)
- Weighing platform
- IEC power cord
- Protective cover
- Operating Instructions
4. Setting Up the Scale
4.1 Setting Up the Local Scale
- Carefully remove the scale and accessories from the box.
- Remove any transportation aids before starting work with the scale. The transport lock is located on the underside of the scale.
- Place the scale on a stable and level surface. Do not place the scale on a wobbly or vibrating tabletop to prevent incorrect measurement results.
- Do not set up the scale near vibrating equipment.
- Align the scale parallel to the tabletop using the four adjustable feet (the air bubble should be in the center of the bubble level).
- Remove the weighing platform from the separate packaging and carefully fit it into the holes on the top of the scale.
- Plug the power cord into the socket on the bottom of the scale. Switch on the scale. The on/off switch is located on the bottom right-hand side of the housing. When switching on the scale, make sure the weighing platform is empty. The scale runs a switch-on routine and confirms the end of the initialization process with a beep.

If there are any items on the weighing platform during the initialization process, the scale may function incorrectly. Switch the scale off and repeat the switch-on routine.
- The scale is now ready for use.
- Place the load in the center of the weighing platform to ensure accurate measurement results. Ensure the load does not protrude beyond the weighing platform.
4.2 Setting Up the Remote Scale
The ZW50 series can be connected to any size of load cell type weighing base via the remote scale port on the right side of the scale housing. Ensure you have the correct base for the scale, as each is matched for calibration.
Place the remote scale in the position where it is to be used and level it by adjusting the four feet and using the bubble level.
Press the key and test the weighing settings.
The cable for the load cell goes to a 9-pin D-Sub connector with the following connections:
| Pin | Connection |
| 1, 2 | Ex+ Sen+ (5 V) |
| 4, 5 | Ex- Sen- (0 V) |
| 7 | Signal- |
| 8 | Signal+ |
- The sense wires connections of a 6-wire load cell are not used and should be connected to the respective excitation pins.
- The remote scale should be set for a realistic resolution with respect to the input voltage of the load cells.
- If a single 2 mV/V load cell is fitted and more than 60% of the load cell is used for full capacity, the high output span of >6 mV makes it possible to set a high resolution. If this criterion is met, the remote scale can be set to a high resolution with a maximum of 1:30,000, e.g., 10 g at 300 kg. This means that the remote scale can have the same accuracy as the local scale.
- Where more than one load cell is fitted or the total load cell capacity is not utilized, then a reduced resolution should be selected in the remote scale technical setup.
- For example, if a system uses four 2 mV/V 1000 kg load cells for a scale of 1000 kg capacity, the span output at full scale will be only 2.5 mV. In this case, the resolution should be reduced to give a good number of A/D counts per displayed division, e.g., set to 1:5000 or 0.2 kg at 1000 kg.
- Setting a high resolution without providing a good input to the remote scale ADC will not give better accuracy and may prevent the scale from meeting performance specifications.
-
For optimal performance, ensure a minimum of 0.1 V / d .
-
Display Overview

| No. | Marking | Designation |
| 1 | Weight | Weight display (in kilograms) |
| 2 | Unit Weight | Unit weight display (in grams) |
| 3 | “Numeric keypad” | For data input;These keys are used to manually enter values for tare weight, piece weight, and sample size;A secondary function is to enter alphanumeric characters for PLU descriptions, etc. |
| 4 | “Bubble level” | For scale leveling |
| 5 | Count | Count display (in pieces) |
| 6 | Recharge | Indicates that the battery is charging |
| 7 | “Function keys” | Activate predefined functions |
6. Key Functions
| Key symbol | Designation | Function | |
 |  ... ... | Numeric keys | For data input;These keys are used to manually enter values for tare weight, piece weight, and sample size;A secondary function is to enter alphanumeric characters for PLU descriptions, etc. |
 | Decimal point key | Sets decimal places | |
 | Delete key | Pressing this key clears the unit weight or an erroneous entry. | |
 | Addition key | This key is used to add the current count to the summation memory. You can add up to 99 values or the full capacity of the tare range in the “Weight” display. Also prints the displayed values when auto-print is disabled. | |
 | PLU key | Allows you to store and recall the PLU (Product Look Up) sample information. | |
 | Limit key | This key sets the upper limit for the number of items counted. The scale beeps when this upper limit is exceeded. | |
 | Scale changeover key | This key is used to select the local or remote scale. | |
 | Unit weight key | This key is used to enter the number of sample items. | |
 | Sample weight key | This key is used to enter the weight of a sample manually. | |
 | Tare key | This key is used to tare the scale. It stores the current weight as a tare value, subtracting the tare value from the total weight and displaying the results as a net weight. A value entered manually using the keypad is saved as a tare value. | |
 | Zero key | This key sets the zero point for all subsequent weighing operations. It resets the display to zero. | |
7. Displays
The scales have three digital displays. These are “Weight,” “Unit Weight,” and “Count.”

The arrows above the symbols indicate the following:
| Symbol | Meaning | |
 | Low battery level | |
 | Net weight | |
 | Stability | |
 | Zero setting | |
 | Weight unit in use | |
 | ||
7.2 Unit Weight Display (UNIT WEIGHT)
This display shows the unit weight of a sample. This weight value is entered manually by the user or measured by the scale. The unit of measure is either “gram” on all scales with kilogram selected as a weighing unit or in pounds (lbs).
The arrow indicators above the respective symbols will be on in the following cases:
| Symbol | Meaning |
 | The unit weight entered manually or measured by the scale is less than 0.1 g.The scale continues the weighing process. The arrow indicator comes on to alert the user of a potential problem. |
 | The scale has determined that there is an insufficient number of samples to accurately determine the count.The scale continues the weighing process. The arrow indicator comes on to alert the user of a potential problem. |
 | When a value has been entered into the M+ memory, the arrow indicator above “M+” will be on. |
 | Changeover between the scales. |
7.3 Count Display (COUNT)
This display shows the number of items on the scale or the value of the accumulated count. See the “Operation” section.
The arrow indicators above the individual symbols indicate the following:
| Symbol | Meaning | |
| CkPcs | Check weighing is active during counting. | |
| CkWt | Check weighing is active during weighing. | |
| High | Check weighing is active. The weighing result is above the upper limit. | |
| OK | Check weighing is active. The weighing result is between the upper and lower limits. | |
| Low | Check weighing is active. The weighing result is below the lower limit. | |
7.4 Battery Charge Indicator
7.4.1 Display Indicator
The scales can operate from the mains or rechargeable batteries. The battery life is up to 70 hours, depending on the parameter settings.

NOTICE: The battery status indicator is displayed when the scale is not connected to the mains. When the scale is connected to the mains, check the LED indicator.
7.4.2 LED Indicator
 | Green | The scale is connected to the mains.The battery has a full charge. To ensure that the battery is fully charged, do not unplug the scale from the mains for at least one hour. |
| Yellow | The yellow light indicates that the battery requires further charging. | |
| Red | The red light indicates that the battery is low and must be charged immediately. It can take up to twelve hours to fully charge the battery. Before resuming operation, you must fully charge the battery. |
NOTICE: Leave the battery for 12 hours to fully charge before using the scale for the first time.
8. Operation
8.1 General
Both the local and remote scales have the same basic weighing functions. Because of its technical specifications, however, the resolution of the remote scale may differ from that of the local scale.
Each scale (local or remote) has the ability to count pieces based on the current unit weight. Given its higher sensitivity compared to the remote scale, we recommend using the local scale for counting samples and the remote scale for counting larger quantities.
Each of the scales can be tared separately. This offers a particular advantage when using different sorting containers (a small container for the samples and a large container for the pieces to be counted).
When the scale is switched from local to remote, a clear display will be shown to identify the change, and the scales will count based on the tare and unit weight currently in use for the scale selected. The "Weight" and "Unit Weight" displays indicate the changeover with "CHANGE LOCAL" or "CHANGE REMOTE."
You can toggle between the local and remote scales at any time using the key, or, provided the respective function is activated, the system automatically switches to the remote scale if the negative weight on the remote scale changes to a positive value exceeding 50d. For frequently used items, counting is made easier by using PLU numbers. Up to 100 PLUs can be saved and retrieved (see the "PLU" section below).
8.2 Switching On the Scale
The on/off switch is located on the bottom right-hand side of the housing.
When switching on the scale, make sure the weighing platform is empty. The scale runs a switch-on routine and confirms the end of the initialization process with a beep. The scale is now ready for use.

If there are any items on the weighing platform during the initialization process, the scale may function incorrectly.
Switch the scale off and repeat the switch-on routine.
8.3 Zeroing the Display
When the gross weight is within ± 2% of the zero, set at power on for either scale; then a new zero is set. The system executes the tare function when the gross weight is greater than ± 2% .
- You can press the key at any time to set the zero point from which all other weighing and counting operations are performed. Zeroing is normally required only when the weighing platform is empty. When the zero point is obtained, the “Weight” display will show the arrow indicator at 0
- The scale has an automatic re-zeroing function to account for minor drifting or accumulation of material on the platform. However, you may need to press the -0- key to re-zero the scale if small amounts of weight are still shown even when the weighing platform is empty.
8.4 Taring
Select the local or remote scale as required by pressing the key. Preset tare values can be used for the local scale and remote scale.
If a new tare value is to be used, there are two methods for entering a tare value. The first method uses the weight on the weighing platform, and the second uses a value to be entered by the user.
8.4.1 Method 1:
- Zero the scale by pressing the -0- key if necessary. The arrow indicator above the 0 symbol will be on. Place a container on the weighing platform. The display will show its weight.
- Press the key to tare the scale. The weight that was displayed is stored as the tare value, and that value is subtracted from the display, leaving zero on the display. The arrow indicator above “Net” will be on.
- As the product is added, only the net weight of the product will be shown. The scale can be tared a second time if another type of product is to be added to the first one. The process can go on until the capacity is reached.
- After removing the container, the display shows a negative value. If the scale was tared just before removing the container, this value is the gross weight of the container plus the weight of all products that were removed. The arrow indicator above the symbol will also
be on because the weighing platform is back to the same condition as it was when the key was last pressed.
8.4.2 Method 2:
This method implies manually entering the tare weight using the keypad. This option is especially useful when all containers are the same or when you need to know the net weight for the container that is already full and whose weight is known.
- Remove all items from the weighing platform and press the -0 - key to zero the display. Enter the tare weight (including the decimal point) using the keypad and save it by pressing the key. The display will show the negative weight value equal to the tare value.
- Place the container on the weighing platform.
- The display will show the weight of the container minus the tare weight.
- When the full container is placed on the weighing platform, the tare value will be subtracted from the gross weight, displaying only the net weight of the contents.
- If the input value is not consistent with the increment of the scale, the scale will round the tare value to the nearest value possible. For example, if a tare value of 103g is entered into the 60kg scale with 5g readability, then the display will show 105g .
- The tare values for each scale are held in memory so that they are not lost when changing between the remote and local scales.
8.4.3 Taring the Remote Scale
Select the remote scale by pressing the above.

Then, follow the procedure as described
8.5 Determining / Entering the Unit Weight
In order to do piece counting, it is necessary to know the average weight of the items to be counted. If the unit weight is already known, you can enter it manually using the keypad. Alternatively, you can weigh a known number of the items and let the scale determine the average unit weight.
8.5.1 Determining the Unit Weight
The basic functions for piece counting are the same for the local and remote scales.
In order to perform piece counting, it is necessary to know the average weight of the items to be counted. This can be done either by weighing a known number of the items and letting the scale determine the average unit weight or by manually inputting a known unit weight using the keypad.
8.5.2 Weighing a Sample to Determine the Unit Weight
To determine the average weight of the items to be counted, place a known quantity of the items on the scale and then enter the quantity being weighed. The scale will then divide the total weight by the number of samples and display the average unit weight.
- Zero the scale by pressing the key if necessary. If a container is to be used, place the container on the scale and tare as explained earlier.
- Place a known quantity of items on the scale. After the "Weight" display is stable, enter
the quantity of items using the numeric keys followed by pressing the key.
- The number of units will be shown in the "Count" display, and the computed average weight will be shown in the "Unit Weight" display.
- As more items are added to the scale, the weight and the count will increase.
- If the quantity of items placed on the scale is lower than the reference, the scale will recompute the unit weight and increase it. To lock the unit weight and prevent automatic recom-
putation, press the key.
- If the scale is not stable, the calculation will not be completed. If the weight is below zero, the "Count" display will show a negative count.
8.5.3 Entering a Known Unit Weight
If the unit weight is already known, it can be entered using the keypad.
- Enter the value for the unit weight using the numeric keys followed by pressing the key. The "Unit Weight" display will indicate the value you have entered.
- Place the pieces to be counted on the weighing surface. The display will show the weight and the quantity based on the unit weight. When weighing in kilograms (kg), the unit weight is shown in grams. When weighing in pounds (lb), the unit weight is shown in pounds.
8.5.4 Automatic Update of Unit Weight
The scale will automatically update the unit weight when a sample less than the initial sample count is added. The scale beeps when the value is updated. It is wise to check the quantity is correct when the unit weight has been updated automatically.
To lock the unit weight and prevent automatic update, press the key.
This feature is turned off as soon as the number of items added exceeds the count used as a sample.
8.6 Piece Counting
After the unit weight has been determined or entered, the scale can be used for piece counting. The scale can be tared to account for the net weight, as explained in the previous section.
- With the scale tared, place the pieces to be counted on the weighing platform. The "Count" display will show the number of pieces computed using the total weight and the unit weight.
- It is possible to increase the accuracy of the unit weight at any time during the counting
process by manually entering the sample quantity and then pressing the key. The unit weight can be adjusted based on a larger sample quantity. This will give greater accuracy when counting larger sample sizes.
8.7 Check Weighing
The scale has a check weighing function applicable to both weighing and counting modes. Depending on the criteria met, the "Count" display then shows an arrow above HIGH, OK, or LOW. This check weighing function is supported by an acoustic alarm.
8.7.1 Check Weighing in Counting Mode / Setting the Upper And Lower Limits
Pressing the key activates the check weighing function in counting mode. Press the

key to switch to "Cnt" and confirm your selection with the key.
- The "Weight" display will now show HI CNT. Enter the upper limit for a quantity at which an acoustic alarm should sound using the 10-key keypad and confirm with the key.
- The "Weight" display will now show LO CNT. Enter the lower limit for a quantity at which an acoustic alarm should sound using the 10-key keypad and confirm with the key.
- The system takes you back to weighing mode.
- The arrow indicator above Ck Pcs in the "Count" display indicates that the function is activated.
- Also, depending on the criteria met, the corresponding arrow indicator will light up above HIGH, OK, or LOW in the "Count" display.
IMPORTANT: Saving the value "0" deactivates the check weighing function.
8.7.2 Check Weighing in Weighing Mode / Setting the Upper And Lower Limits
Pressing the key activates the check weighing function in weighing mode. Press the

key to switch to "nEt" and confirm your selection with the key.
- The "Weight" display will now show HI NET. Enter the upper limit for a weight at which an acoustic alarm should sound using the 10-key keypad and confirm with the key.
- The "Weight" display will now show LO NET. Enter the lower limit for the weight at which an acoustic alarm should sound using the 10-key keypad and confirm with the key.
- The system takes you back to weighing mode.
- The arrow indicator above Ck Wt in the "Count" display indicates that the function is activated.
- Also, depending on the criteria met, the corresponding arrow indicator will light up above HIGH, OK, or LOW in the "Count" display.
IMPORTANT: Saving the value "0" deactivates the check weighing function.
8.7.3 Acoustic Alarm Function
The check weighing function is supported by an acoustic alarm. From the parameter settings menu (chapter 9), the following alarm options can be selected under "F1 oFF" in the "bEEP" subparameter. The scale is preset to "bEEP oFF" by default.
| “bEEP oFF” | The beeper is set to off. |
| “bEEP on in” | The beeper is set to on between limits. |
| “bEEP on out” | The beeper is set to on outside limits. |
8.8 Summation Memory
8.8.1 Manual Summation Memory
- The values (weight and count) shown on the display can be added to the values in the
memory by pressing the key, no matter whether you are using the local scale or remote scale. The "Weight" display will show the total weight. The "Count" display will show the total accumulated count. The "Unit Weight" display will show the number of times items have been added to the summation memory. The values will be displayed for 2 seconds before the scale returns to normal weighing mode. - The scale must return to zero or a negative number before another sample can be added to the memory.
- You can also add more products by pressing the M+ key. This process can go on up to
- 99 entries or until the capacity of the "Weight" display is exceeded.
- To observe the total value stored, press the key. The total will be displayed for 2 seconds.
- To clear the memory, press the M+ key to recall the total from the memory and
- then press the key to clear all values from the memory.
8.8.2 Automatic Summation Memory
- The scale can be set to automatically accumulate total when a weight is placed on the scale.
This eliminates the need to press the key to store values in the memory. However, the key is still active and can be pressed to store the values immediately. In this case, the values will not be stored when the scale resets to zero.
- See section 9 (Parameters) for enabling automatic summation.
8.9 PLU (Product Look Up)
The ZW50 scale has the capacity to store 100 PLU (Product Look Up) numbers (00-99). The PLU numbers are used to store information about the commonly used items, such as tare weights, average unit weights, and description of the item. This data can be retrieved quickly and easily by entering a PLU number. The PLU number can be assigned the tare weight with additional text, piece weight with additional text, or additional text only.
The tare weight is required for calculating the net weight where a container is used during weighing. Product descriptions are used for sending data over the RS-232 data interface for viewing (PC) or printing (printer), and the unit weight is used for parts counting.
These data should be entered against a particular PLU before the weighing process starts so that the desired PLUs can be recalled during the weighing process.
8.9.1 Storing PLUs Manually
Tare weight:
If the scale is used in counting mode, check whether the quantity or counting scale needs to be tared. Select the quantity or reference scale accordingly.
- Press the -0- key if necessary. All three displays will show zero (0).
- Tare the container as described under 8.4.1 above, for example, by placing the container
on the scale and pressing the key, or enter the tare weight manually using the keypad (see 8.4.2). The scale will be in the Net mode.
Piece weight:
If the scale is used in counting mode, select the reference scale.
- Determine the piece weight (see 8.5.2) or, if it is known, enter the piece weight directly (see
8.5.3) using the keypad and then press the key.
The further procedure is the same for tare and piece weight:
- To save under a specific PLU, press the key and the corresponding PLU number. There are a total of 100 PLUs (00 to 99).
Example:
Below is an example of how to set up "PLU 27" with the description "M4 Brass Screw":
| Key(s) to press | Weight display | Unit Weight display | Count display | Remarks |
 | “PLU” | “- - ” | “ ” | |
| 2, 7 | “PLU” | “27” | “ ” | |
 | “PLU 27” | “x x x x x x” | “x x x” | The current description will be shown with the first character flashing. This character can be entered using the numeric keypad. |
With the first character flashing,  pressing the years all the descriptions. pressing the years all the descriptions. | “PLU 27” | “ ” | “ ” | |
| Continue entering characters until the description is complete. | “PLU 27” | “M4SCHR” | “MESSIN” | 12 characters in total spreading over both displays (Unit Weight and Count). |
Enter the additional texts as described in 8.6.2.
Confirm entries with the key. The data will be stored in the PLU number entered.
Notes:
- Use the key to go back to the previous character or the key to advance to the next character.
- While the character is flashing, press and hold the key a little longer to enter a space.
- Tare values will only be stored with PLU data while the scale is in the Net mode.
- Where the weight of the container is less than the automatic zero range (2% of capacity by default), the scale will be zeroed automatically, and no tare weight will be stored. This can be avoided by using a heavier container, changing the zero range, or using the digital tare method.
8.9.2 Entering Description Manually
The description of an item can be up to 12 characters long and can be a mix of numbers, symbols, and letters. When entering the item description, the numeric keypad works in a similar way to a mobile telephone.
Pressing a key briefly shows the number, and holding the key down scrolls through all the characters. Pressing and holding the key displays in succession all the numbers and characters assigned to the respective key.
The numbers and characters are shown below:
| Key | Character | Key | Character |
| 1 | - / \ | 6 | M N O |
| 2 | A B C | 7 | P Q R S |
| 3 | D E F | 8 | T U V |
| 4 | G H I | 9 | W X Y Z |
| 5 | J K L | 0 | [ ] “Space” |
The limitations of the 7-segment display sometimes make it difficult to display some letters. The individual characters are displayed as shown below:
| A | B | C | D | E | F | G | H | I | J | K | L | M | N | O | P | Q | R | S | T | U | V | W | X | Y | Z | - | / | \ | ( | ) |
| R | b | C | d | E | F | G | H | , | U | F | L | n | o | P | r | S | t | U | u | y | 2 | ,1 | ,1 | [ | ] |
The characters are stored as text, which means they will be displayed correctly when output to a PC or printer via the RS232 data interface.
8.9.3 Recalling Stored PLUs Manually
- To recall the PLU values, first select either local or remote scale.
- Then, press the key, enter the PLU number (00 – 99), and then press the key again to recall the data.

- The display will show the recalled data for one second and then return to weighing with the tare and piece weight values in place.
Example:
| Key(s) to press | Indication in Display“Weight” | Indication in Display“Unit Weight” | Indication in Display“Count” |
 | “PLU” | “- -” | “ ” |
| 2, 7 | “PLU” | “27” | “ ” |
| [B7TW] | “PLU 27” | “M4SCHR” | “MESSIN” |
| After one second, the display will return to normal weighing mode with the tare and piece weight values previously entered. | “× × × ×” | “× × × ×” | “× ×” |
Notes:
PLU
- If the key is held down after the numeric entry, the display will show the description as long as the key is pressed.
- In the example, the display shows "PLU 27" "M4SCHR" "MESSIN" for one second; if no data is stored, the display will show "PLU 27" " " "".
- If the tare weight value is outside the range permitted for the selected scale (for example, if the local scale is selected, whereas the tare weight applies to the remote scale, the capacity of the local scale will be exceeded), the "Weight" display will show zero tare weight.
- If the tare weight value stored does not match the increment of the selected scale (for example, storing -1.446 for a scale with d = 0.05 ), the tare weight should be rounded depending on the scale resolution (for example, in this case, -1.45 will be used as the tare value).
- If a PLU number is recalled that does not have any information stored against it, the scale will continue to work with the tare and unit weight values unchanged.
9. Parameters
The parameters can be set by calling up a secure menu. The parameters are divided into two sections. One section is for the user, and the other is for the authorized technician.
- To enter the user parameters section, press the key during the self-test after switching on the scale.
- Press the key to scroll through the main parameters. The "Weight" display shows the names of the parameters.
- To select any parameter, press the key.
- Press the key to scroll through the sub-parameters.
- Press the key to save your selection.
- You can exit a sub-parameter at any time by pressing the key. Pressing this key several times takes you back to weighing mode.
| PA-RAME-TER | SUB-PA-RAME-TER | DISPLAY | SETTING |
| F1 oFF | bEEP | “bEEP” “oFF” | The beeper is set to off. |
| “bEEP” “on in” | The beeper is set to on between limits. | ||
| “bEEP” “on out” | The beeper is set to on outside limits. | ||
| EL | “L itE” “oFF” | Backlight is set to off. | |
| “L itE” “on” | Backlight is set to on at all times. | ||
| “L itE” “AUt” | Backlight is set to work automatically when a weight is placed on the scale. | ||
| UN i t | “Unit” “kg/lb” | kg/lb units are enabled. | |
| “Unit” “kg” | kg only is enabled. | ||
| “Unit” “lb” | lb only is enabled. | ||
| oFF | “0” “3” “5” “15” “30” | Automatic power-off. The scale switches off automatically after x minutes of inactivity. | |
| F2 Prt | P MODE | Pr int | Au OFF: prints only when the automatic summation memory is set to off.Au ON: prints only when the automatic summation memory is set to on. |
| P Cont | Sets the RS-232 interface to print continuously and the summation function is disabled. | ||
| SEr r E | Sets the RS-232 interface to print continuously the weight only (for remote display). | ||
| P bAU d | b 600b 1200b 2400b 4800b 9600 | Sets the required baud rate (communication speed via the RS-232 interface). The default baud rate is 4800. | |
| Par itY | 8 n 17 E 17 o 1 | 8 data bits, no parity7 data bits, even parity7 data bits, odd parity | |
| PtYPE | tPUPLP50 | TPUP printerLP printer | |
| U id | Shows the current user ID (authorized technical personnel only). | ||
| SC id | Shows the current scale ID (authorized technical personnel only). | ||
| teCH | Allows access to the technical parameters using a password (authorized technical personnel only). Not normally accessed by the user. |

Any changes to these parameters, whether accidental or intentional, by unauthorized persons can severely affect the functionality of the scale!
10. RS-232 Data Output
Specifications:
RS-232 output for weighing data, default settings:
- ASCII code
• 4800 baud (can be selected from 600 to 9600) - 8 data bits (8 data bits no parity, 7 data bits even parity, and 7 data bits odd parity can be selected)
- No parity
Connector style:
• 25-pin D-Sub socket
Pin 2 Output, Pin 3 Input, Pin 7 Signal Ground
Output sample:
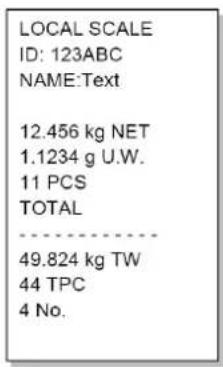
11. Care, Maintenance, and Warranty
11.1 Care and Cleaning
Always disconnect the appliance from the power supply before cleaning. Never clean the appliance with aggressive cleaning agents; only use a damp cloth or conventional disinfectants. Make sure that no liquid gets inside the appliance!
11.2 Error Messages
The scale may display an error message during the initial power-on test or during operation. Below is a description of the error messages. If an error message is shown, turn the scale off and repeat the procedure that caused the error message, such as turning the scale on, calibration, or other functions.

If the error message is still shown, contact your dealer for further guidance.
| ERRORMESSAGE | DESCRIPTION | POSSIBLE CAUSES |
| Err 4 | The initial zero is greater than the permissible value (typically 4% of maximum weighing capacity) when power is turned on or when the key is pressed. | - A weight is on the weighing platform when turning the scale on.- Excessive weight on the weighing platform when zeroing the scale.- Improper calibration of the scale.- Damaged load cell.- Damaged electronics. |
| Err 5 | Keypad error. | - Improper operation of the scale. |
| Err 6 | A/D count is not correct when turning the scale on. | - The weighing platform is not installed.- Damaged load cell.- Damaged electronics. |
| FAIL H or FAIL L | Calibration error. | - Improper calibration.If the problem persists, contact your authorized dealer for assistance. |
11.3 Storage and transportation conditions
Keep all parts of the packaging for possible return shipments to avoid possible damage during transportation.
11.4 Disposal

Waste electrical and electronic equipment and rechargeable batteries do not belong in household waste.
Dispose of defective or old equipment and rechargeable batteries according to local statutory requirements!

Only dispose of discharged batteries or batteries with insulated "terminals" to avoid the risk of a short circuit!
Check with your local authority about the possibilities for environmentally friendly and proper disposal.
11.5 Warranty
If this product is proven to have failed within 1 year from the date of purchase (proof of purchase is required) due to defects in material and workmanship, ADE will repair or replace this product. The warranty does not cover all moving parts, such as rechargeable batteries, cables, etc.
Using accessories other than those approved by ADE, particularly rechargeable batteries, will void the warranty.
This warranty does not extend to external normal wear and tear or damage caused by accident or misuse. This warranty does not cover the products tampered with by unauthorized personnel. The warranty agreement shall not affect the customer's statutory rights.
Complaints shall be addressed to the dealer from whom the scale and spare parts have been purchased or who provides the after-sales service.
- Technical Data
| Model: | ZW50-3 | ZW50-6 | ZW50-15 | ZW50-30 |
| Maximum load | 3 kg | 6 kg | 15 kg | 30 kg |
| Division d | 0.1 g | 0.2 g | 0.5 g | 1 g |
| Resolution | 1:30,000 | 1:30,000 | 1:30,000 | 1:30,000 |
| Taring range | up to 3 kg | up to 6 kg | up to 10 kg | up to 30 kg |
| Reproducibility | 0.1 g | 0.2 g | 0.5 g | 1 g |
| Linearity ± | 0.2 g | 0.4 g | 1 g | 2 g |
| Units of measure | kg/lbs | kg/lbs | kg/lbs | kg/lbs |
| Interface | RS-232 Data Output | |||
| Stabilization time | 2 seconds on average | |||
| Operating temperature | 0 °C – 40 °C | |||
| Protection class | IP34 | |||
| Power supply | 6 VDC, 4 Ah, IEC power cord via 230 V power outlet | |||
| Calibration | With external weight | |||
| Display | Three 6-digit LCD digital displays | |||
| Housing | ABS plastic housing, stainless steel weighing platform | |||
| Weighing platform | 295 x 220 mm | |||
| Housing dimensions | (W x D x H) 320 x 340 x 125 mm | |||
| Net weight | 3.8 kg | |||
| Applications | Multi-purpose scale with piece counting function | |||
| Functions | Weighing, piece counting, summation memory, preset piece count with acoustic signal, up to 100 PLUs with description, piece and tare weight, automatic power-off, backlight | |||
Remote Scale Specifications
| Control voltage | 5 VDC |
| Signal range | 0-20 mV (allows 3 mV/V LC with 5 mV zero balance) |
| Zero range | 0-5 mV |
| Sensitivity | 0.02 μV / internal counting resolution or better |
| Internal counting resolution | max. 500,000 at 10 mV input voltage |
| Load | min. 87 Ω, 4x 350 Ω load cells |
| Connection | 4-wire connection of the load cells plus shielding |
| Maximum cable length | 6 meters |
| Connection | 9-pin D-Sub |
13. Declaration of Conformity
CE
Manufacturer's declaration of conformity
This scale was manufactured according to the harmonized European standards. It complies with the provisions of the EU directives listed below:
- EMC Directive 2014/30/EU
– Low Voltage Directive 2014/35/EU
– RoHS Directive 2011/65/EU
in their current version.
This declaration becomes invalid if the scale is converted in a way that has not been approved by us.
Hamburg, September 2021
ADE Germany GmbH
Neuer Höltigbaum 15
22143 Hamburg
Manufacturer:
ADE Germany GmbH
Neuer Höltigbaum 15
22143 Hamburg
+49 40 432 776 - 0
+49 40 432 776 - 10
info@ade-germany.de
www.ade-germany.de
Distributor:
- OPERATING INSTRUCTIONS
- ZW50 Series Counting Scale
- Contents
- Applications
- Warnings
- Scope of Supply
- Setting Up the Scale
- Setting Up the Local Scale
- Setting Up the Remote Scale
- Key Functions
- Displays
- Unit Weight Display (UNIT WEIGHT)
- Count Display (COUNT)
- Battery Charge Indicator
- Display Indicator
- LED Indicator
- Operation
- General
- Switching On the Scale
- Zeroing the Display
- Taring
- Method 1:
- Method 2:
- Taring the Remote Scale
- Determining / Entering the Unit Weight
- Determining the Unit Weight
- Weighing a Sample to Determine the Unit Weight
- Entering a Known Unit Weight
- Automatic Update of Unit Weight
- Piece Counting
- Check Weighing
- Check Weighing in Counting Mode / Setting the Upper And Lower Limits
- Check Weighing in Weighing Mode / Setting the Upper And Lower Limits
- Acoustic Alarm Function
- Summation Memory
- Manual Summation Memory
- Automatic Summation Memory
- PLU (Product Look Up)
- Storing PLUs Manually
- Tare weight:
- Piece weight:
- The further procedure is the same for tare and piece weight:
- Example:
- Notes:
- Entering Description Manually
- Recalling Stored PLUs Manually
- PLU
- Parameters
- RS-232 Data Output
- Specifications:
- Connector style:
- Output sample:
- Care, Maintenance, and Warranty
- Care and Cleaning
- Error Messages
- Storage and transportation conditions
- Disposal
- Warranty
- Declaration of Conformity
- CE
- Manufacturer's declaration of conformity
- ADE Germany GmbH
- Manufacturer:
Brand : ADE
Model : ZW50-210903
Category : Scale