WM6109 - Washing machine Sauber - Free user manual and instructions
Find the device manual for free WM6109 Sauber in PDF.


| Product Type | Washing machine |
| Brand | Sauber |
| Model | WM6109 |
| Capacity | 6.0 kg |
| Dimensions (W×D×H) | 595 × 470 × 850 mm |
| Net Weight | 54 kg |
| Power Supply | 220-240 V ~ 50 Hz |
| Max Current | 10 A |
| Standard Water Pressure | 0.05 – 1 MPa |
| Spin Speed | 1000 rpm (adjustable) |
| Energy Efficiency Class | A++ |
| Annual Energy Consumption | 173 kWh/year |
| Annual Water Consumption | 9240 L/year |
| Noise Level – Washing | 59 dB(A) |
| Noise Level – Spinning | 74 dB(A) |
| Programmes | Cotton Eco, Cotton/Normal, Synthetic, Daily Wash, Delicate, Drum Clean, Spin Only, Rinse&Spin, Drain Only, Ends in (delay 3/6/9h), Mix |
| Additional Functions | Prewash, Extra Rinse, No Spin, Delay (0-24h), Spin Speed selection, Child Lock, Mute Buzzer |
| Safety Features | Door lock, child lock, anti-flood, transport bolt removal required |
| Maintenance – Filters | Inlet filter, drain pump filter; clean periodically |
| Maintenance – Detergent Dispenser | Removable for cleaning; use suitable detergents |
| Maintenance – Drum Clean Programme | 90°C high-temperature sterilisation |
| Spare Parts Availability | Contact service centre; standard parts may be available |
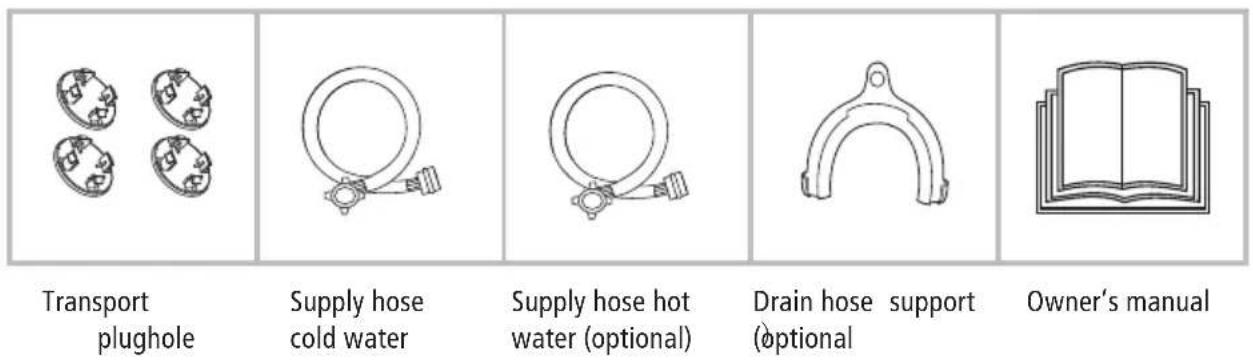
| Accessories Included | Inlet hose, drain hose, transport hole plugs, user manual |
Frequently Asked Questions - WM6109 Sauber
User questions about WM6109 Sauber
0 question about this device. Answer the ones you know or ask your own.
Ask a new question about this device
Download the instructions for your Washing machine in PDF format for free! Find your manual WM6109 - Sauber and take your electronic device back in hand. On this page are published all the documents necessary for the use of your device. WM6109 by Sauber.
USER MANUAL WM6109 Sauber
natural_image
Diagram of a mechanical or fluid system with a valve and pipe fitting, showing flow paths without any text or symbols.natural_image
Mechanical assembly diagram showing a lever mechanism with a curved arrow indicating motion (no text or symbols)natural_image
Pure electrical circuit lines without any symbolsnatural_image
Diagram of a hand holding a pipe fitting a bolt, with a threaded base (no text or symbols)2.4.8. Colocar la Manguera de Salida
natural_image
Simple line drawing of a bathtub with a tube inserted into the cup and a piping bag attached (no text or symbols)natural_image
Line drawing of a kitchen sink with faucet and water dispenser (no text or symbols)natural_image
Illustration of a garment with hands holding small blocks and tools, no text or symbols presentnatural_image
Simple line drawing of a bag with a ribbon and patterned interior (no text or symbols)natural_image
Illustration of a bag being woven in a basket with an arrow indicating process (no text or symbols)2.5.5. Detergentes para su Lavadora
natural_image
Illustration of a hand holding a circular object with a curved arrow indicating rotation (no text or symbols)natural_image
Diagram of a mechanical device with internal components and directional arrows (no text or symbols)natural_image
Diagram of a mechanical device with a rotating arrow indicating rotation (no text or symbols)natural_image
Diagram of a mechanical device with arrows indicating direction (no text or symbols)natural_image
Illustration of a hand using a tool to lift a pipe into a tank (no text or symbols visible)natural_image
Diagram of a pipe fitting with a valve, showing mechanical components without any text or symbols.natural_image
Illustration of a faucet and drain valve assembly (no text or symbols)natural_image
Close-up of hands holding a white appliance with buttons and a small screen (no visible text or symbols)natural_image
Hand pressing down on a white surface with a curved arrow indicating motion (no text or symbols visible)natural_image
Close-up of a hand holding a white appliance with a black arrow pointing to a small object (no visible text or symbols)natural_image
Symbol of a trash bin crossed with no text or numbers, accompanied by a black horizontal bar (no text or symbols present)19e ecocare
be ecoblue
19e smart
sauber
Lavadora WM6109 Manual de usuario Washing machine WM6109 User manual.
be efficient
be sauber
SAFETY INSTRUCTIONS
■ Safety Instructions .... 2
INSTALLATION
■ Product Description .... 7
■ Installation 8
OPERATIONS
■ Quick Start 11
■ Before Each Washing 12
■ Detergent Dispenser 13
■ Control Panel 14
■ Option.... 15
■ Other Functions 15
■ Programmes.... 17
■ Washing Programmes Table 18
MAINTENANCES
■ Cleaning And Care 19
■ Trouble Shooting 22
■ Technical Specifications 24
■ Product Fiches 25
■ Safety Instructions
For your safety, the information in this manual must be followed to minimize the risk of fire or explosion, electric shock, or to prevent property damage, personal injury or loss of life.
Explanation of the symbols:
Warning!
This combination of symbol and signal word indicates a potentially dangerous situation which may result in death or serious injuries unless it's avoided.
⚠ Caution!
This combination of symbol and signal word indicates a potentially dangerous situation which may result in slight or minor injuries or damage to property and the environment.
Note!
This combination of symbol and signal word indicates a potentially dangerous situation which may result in slight or minor injuries.
Warning!
The electric shock!
- If the supply cord is damaged, it must be replaced by the manufacturer, its service agent or similarly qualified persons in order to avoid a hazard.
- The new hose-sets supplied with the appliance are to be used and that old hose-sets should not be reused.
- Before any maintenance the device, unplug the appliance from the mains.
- Always unplug the machine and turn off the water supply after use. The max. inlet water pressure, in pascals. The min. inlet water pressure, in pascals.
- To ensure your safety, power plug must be inserted into an earthed three-pole socket. Check carefully and make sure that your socket is properly and reliably earthed.
- Make sure that the water and electrical devices must be connected by a qualified technician in accordance with the manufacturer's instructions and local safety regulations.
Risk to children!
- EN countries: the appliance can be used by children aged from 8 years and above and persons with reduced physical, sensory or mental capabilities or lack of experience and knowledge if they have been given supervision or instruction concerning use of the appliance in a safe way and understand the hazards involved. Children shall not play with the appliance. Cleaning and user maintenance shall not be made by children without supervision.
• Children of less than 3 years should be supervised to ensure that they do not play with appliance.
• Animals and children may climb into the machine. Check the machine before every operation. -
Kids should be supervised that they do not play with the appliance.
-
Glass door may be very hot during the operation. Keep kids and pets far away from the machine during the operation very wet rooms as well as in the rooms with explosive or caustic gas.
- Remove all packages and transport bolts before using the appliance. Otherwise, serious damage may result.
- Plug must be accessible after installation.
Risk of explosion!
- Do not wash or dry articles that have been cleaned in, washed in, soaked in, or dabbed with combustible or explosive substances( such as wax, oil, paint, gasoline, degreasers, dry-cleaning solvents, kerosene, etc.) This may result in fire or explosion.
• Before hand thoroughly rinse items of washing by hand.
Caution!
Installing the product!
• This washing machine is for indoor use only.
• It isn't intended to be built-in using.
• The openings must not be obstructed by a carpet.
- Washing machine shall not be installed in bath room or very wet rooms as well as in the rooms with explosive or caustic gases.
- The washing machine with single inlet valve only can be connected to the cold water supply. The product with double inlet valves should be correctly connected to the hot water and cold water supply.
- Plug must be accessible after installation.
- Remove all packages and transport bolts before using the appliance. Otherwise, serious damage may result.
Risk of damaging appliance!
- Your product is only for home use and is only designed for the textiles suitable for machine washing.
- Do not climb up and sit on top cover of the machine.
-
Do not lean against machine door.
• Cautions during Handling Machine: -
Transport bolts shall be reinstalled to the machine by a specialized person.
- The accumulated water shall be drained out of the machine.
- Handle the machine carefully. Never hold each protruded part on the machine while lifting. Machine door can not be used as the handle during the conveyance.
- This appliance is heavy. Transport with care.
- Please do not close the door with excessive forces. If it is found difficult to close the door, please check if the clothes are put in or distributed well.
• It is forbidden to wash carpets.
Operating the appliance!
- Before washing the clothes at first time, the product shall be operated in one round of the whole procedures without the clothes inside.
-
Flammable and explosive or toxic solvents are forbidden. Gasoline and alcohol etc. Shall not be used as detergents. Please only select the detergents suitable for machine washing, especially for drum.
-
Make sure that all pockets are emptied. Sharp and rigid items such as coin,brooch,nail,screw or stone etc. may cause serious damages to this machine.
- Please check whether the water inside the drum has been drained before opening its door. Please do not open the door if there is any water visible.
- Be careful of burning when the product drains hot washing water.
- Never refill the water by hand during washing.
- After the program is completed, Please wait for two minutes to open the door.
Packaging/Old appliance
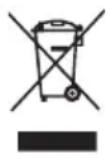
This marking indicates that this product should not be disposed with other household wastes throughout the EU. To prevent possible harm to the environment or human health from uncontrolled waste disposal, recycle it responsibly to promote the sustainable reuse of material resources. To return your used device, please use the collection systems or contact the retailer where the product was purchased. They return and can take this product for environmental safe recycling.
■ Product Description
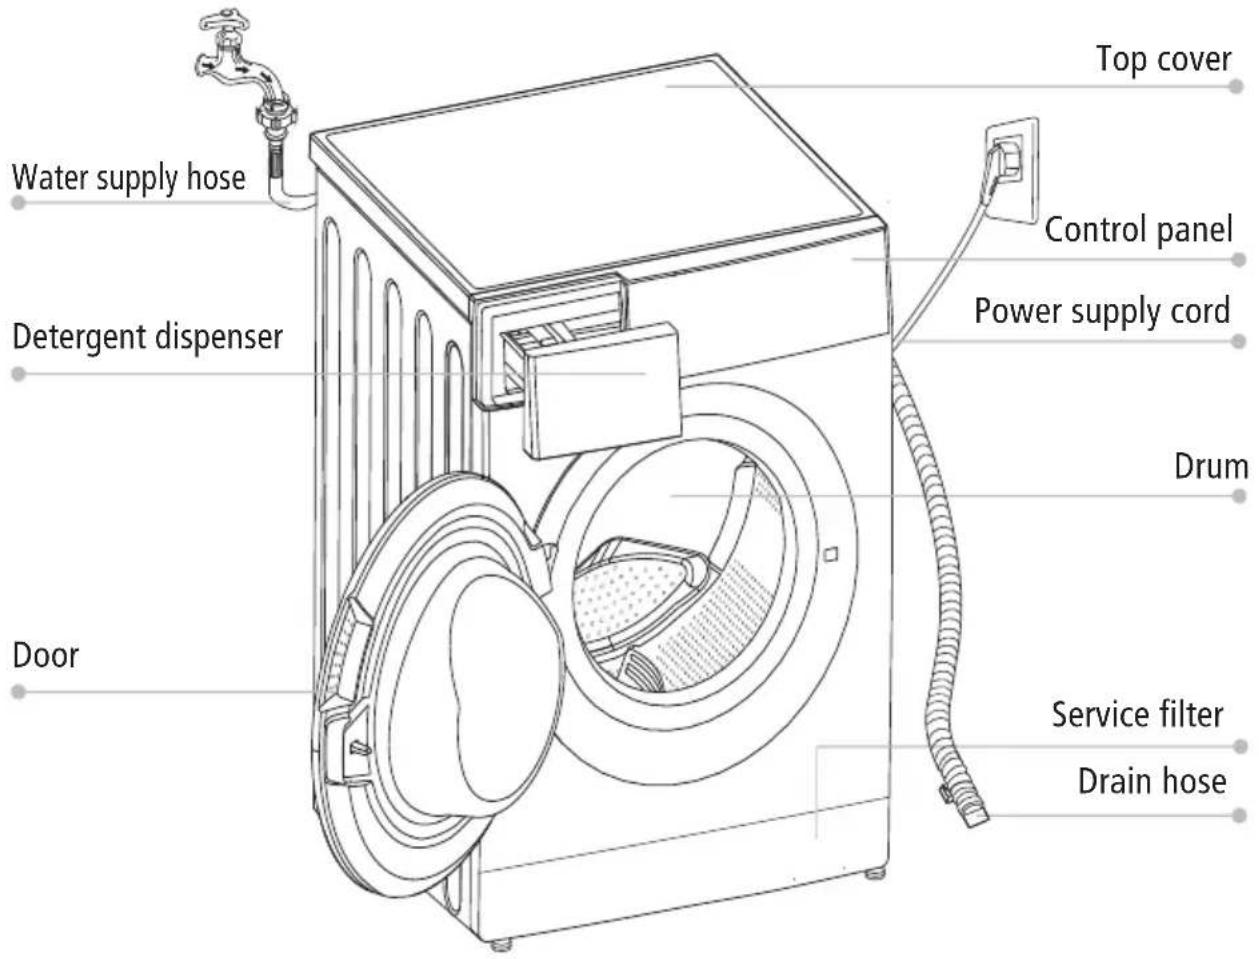

Note!
- The product line chart is for reference only, please refer to real product as standard.
Accessories
■ Installation
Installation area

Warning!
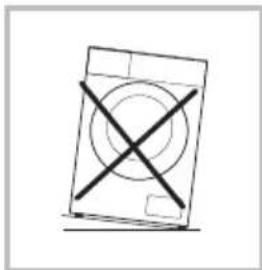
- Stability is important to prevent the product from wandering!
- Make sure that the product should not stand on the power cord.
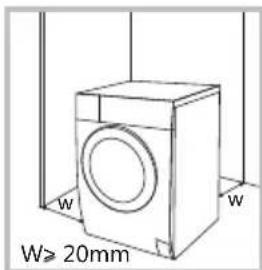
Before installing the machine, the location characterized as follows shall be selected:
- Rigid, dry, and level surface
- Avoid direct sunlight
- Sufficient ventilation
4.Room temperature is above 0°C - Keep far away from the heat resources such as coal or gas.
Unpacking the washing machine

Warning!
- Packaging material (e.g. Films, Styrofoam) can be dangerous for children.
-
There is a risk of suffocation! Keep all packaging well away from children.
-
Remove the cardboard box and styrofoam packing.
- Lift the washing machine and remove the base packing. Make sure the small triangle foam is removed with the bottom one together. If not, lay the unit down with side surface, then remove the small foam from the unit bottom manually.
- Remove the tape securing the power supply cord and drain hose.
- Remove the inlet hose from the drum.
Remove transport bolts

Warning!
- You must remove the transport bolts from the backside before using the product.
- Produltneed the transport bolts again if you move the, so make sure keep them in a safe place.
Please take the following steps to remove the bolts:
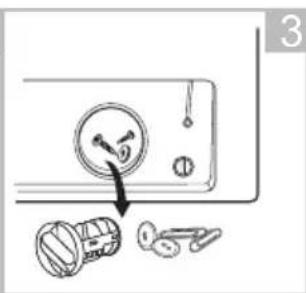
- Loosen 4 bolts with spanner and then remove them.
- Stop the holes with transport hole plugs.
- Keep the transport bolts properly for future use.
natural_image
Simple line drawing of a washing machine with no text or symbols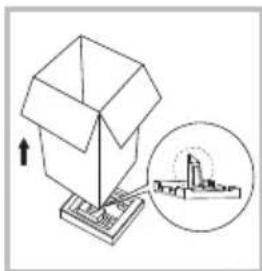
natural_image
Illustration of a cardboard box with an upward arrow and a magnified inset showing a city skyline (no text or symbols)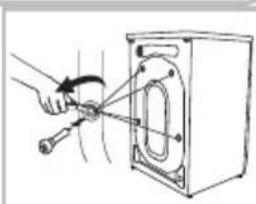
natural_image
Illustration of a hand using a tool to adjust or install a washing machine (no text or symbols visible)Levelling the washing machine

Warning!
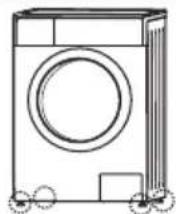
- The lock nuts on all four feet must be screwed tightly against the housing.
- Check if the legs are closely attached to the cabinet. If not, please turn them to their original positions tighten the nuts.
- Loosen the lock nut turn the feet until it closely contacts with the floor.
- Adjust the legs and lock them with a spanner, make sure the machine is steady.
1
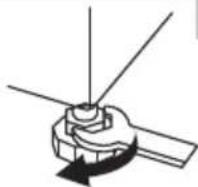
Raise
2
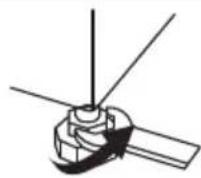
Lower
3
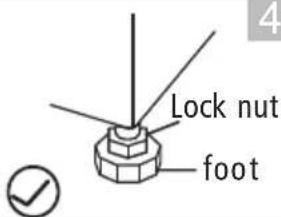
4
Connect Water Supply Hose

Warning!
• To prevent leakage or water damage, follow the instructions in this chapter!
- wDenöntlektrnkosrush, modify or sever
- For the model equips hot valve, connect it to hot water tap with hot water supply hose. Energy consumption will decrease automatically for some program.
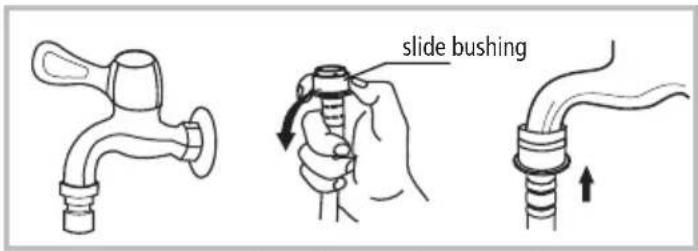
Connect the inlet pipe as indicated, There are two ways to connect the inlet pipe.
- Connection between ordinary tap and inlet hose.
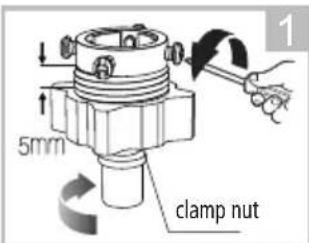
Loosen clamp nut and four bolts
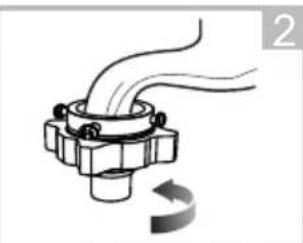
natural_image
Diagram of a mechanical assembly with rotating components and a curved arrow indicating rotation (no text or symbols)Tighten clamp nut Press slide bushing, insert inlet hose into connecting base
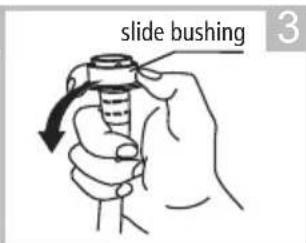
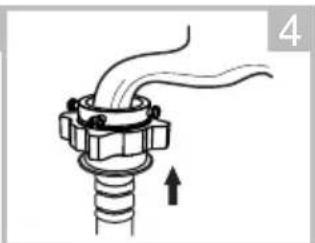
natural_image
Diagram of a mechanical valve assembly with a directional arrow indicating motion (no text or labels)Connection finished
2.Connection between screw tap and inlet hose.
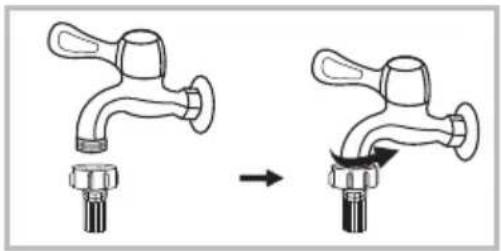
natural_image
Diagram showing a faucet being inserted into a tap, with no text or symbols presentTap with threads and inlet hose
Special tap for washing machine
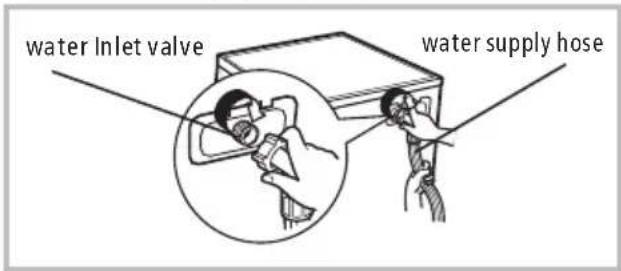
Connect the other end of inlet pipe to the inlet valve at the backside of product and fasten the pipe tightly clockwise.
Drain Hose
⚠ Warning!
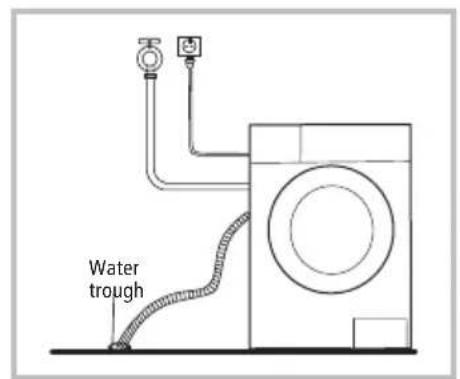
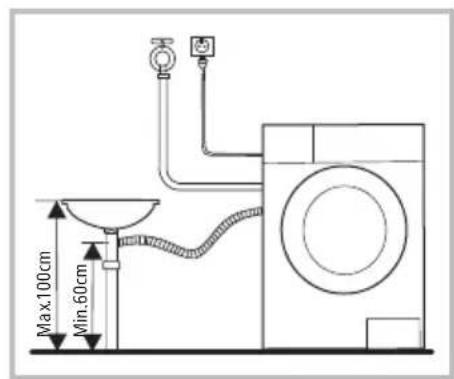
- Do not kink or protract the drain hose.
- Position drain hose properly, otherwise damage might result of water leakage.
There are two ways to place the end of drain hose:
- Put it into the water trough. 2. Connect it to the branch drain pipe of
the trough.
Note!
If the machine has • drain hose support, please install it like the following.
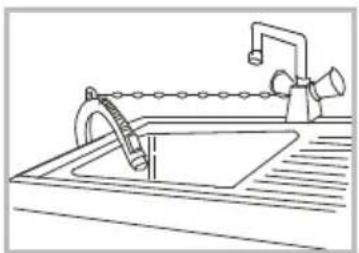
natural_image
Line drawing of a kitchen sink with faucet and faucet (no text or symbols)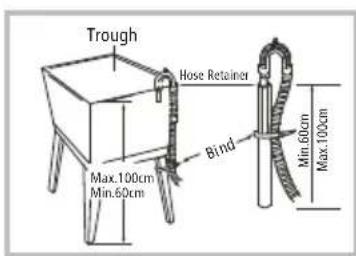
⚠ Warning!
- When installing drain hose, fix it properly with a rope.
- If drain hose is too long, do not force it into washing machine as it will cause abnormal noises.
Quick Start
Caution!
- Before washing, please make sure it's installed properly.
Before washing at first time, the washing machine shall be operated in one route whole procedures without clothes in as follows.
1. Before Washing
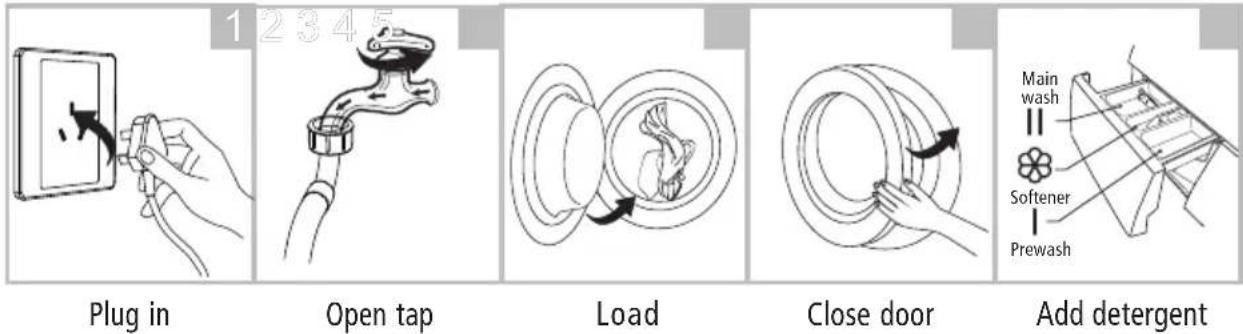
Note!
- Detergent need to be added in "case I" after selecting pre-washing for machines with this function.
2. Washing
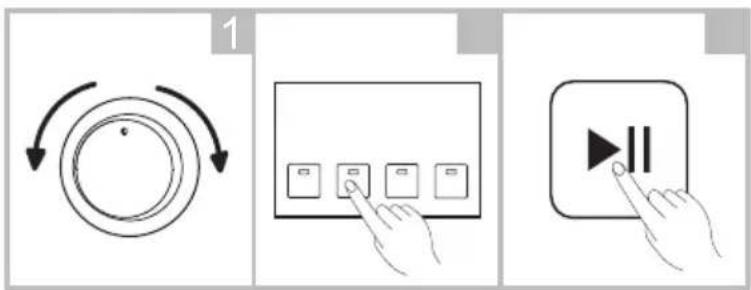
Select Programme
Select function or default
Start up
Note!
- If default is selected, step 2 can be skipped.
-
- The function button line chart is for reference only, please refer to real product as standard.
3. After Washing
The door lock and the [Start / Pause] lights flash with the buzzer beeping or two small points flash on the digital screen.
■ Before Each Washing
- The working condition of the washer should be(0-40)°C. If used under 0°C, the inlet valve and draining system may be damaged. If the machine is placed under condition of 0°C or less, then it should be transferred to normal ambient temperature to ensure the water supply hose and drain hose are not frozen before use.
- Please check the labels and the explanation of using detergent before wash. Use non-foaming or less-foaming detergent suitable for machine washing properly.
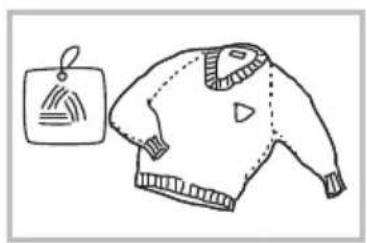
natural_image
Simple line drawing of a sweater with a tag (no text or symbols)Check the label
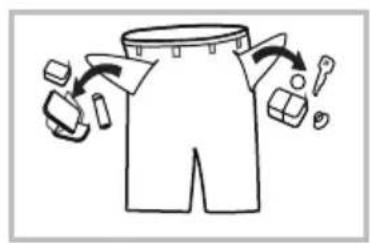
Take out the items out of the pockets
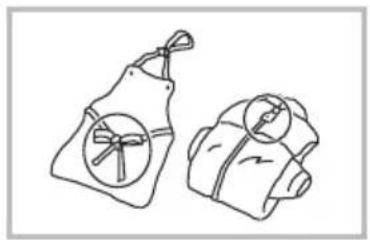
natural_image
Line drawing of two backpacks with circular designs (no text or symbols)Knot the long strips,zip or button
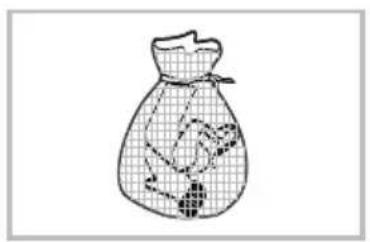
natural_image
Line drawing of a money bag with a grid pattern and a small diagram on the side (no text or symbols)Put small clothes into the pillow slip
natural_image
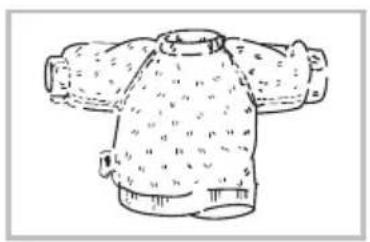
Line drawing of a knitted garment with shoulder-length sleeves and textured fabric (no text or symbols)Turn easy-pilling and long-pile fabric inside out
flowchart
graph TD
    A["Top Stage"] --> B["Middle Stage"]
    B --> C["Bottom Stage"]
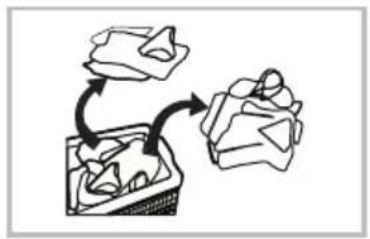
Separate clothes with different textures
Warning!
- When washing a single clothes, it may easily cause great eccentricity and give alarm due to great unbalance. Therefore it is suggested to add one or two more clothes to be washed together so that draining can be done smoothly.
- Don't washing the clothes touching with kerosene, gasoline, alcohol and other flammable materials.
■ Detergent Dispenser
I Prewash detergent
II Main wash detergent
Softener
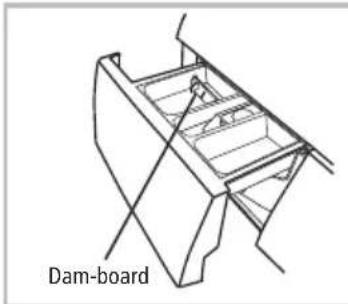
Liquid detergent
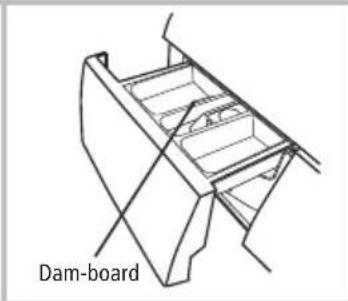
Powder detergent
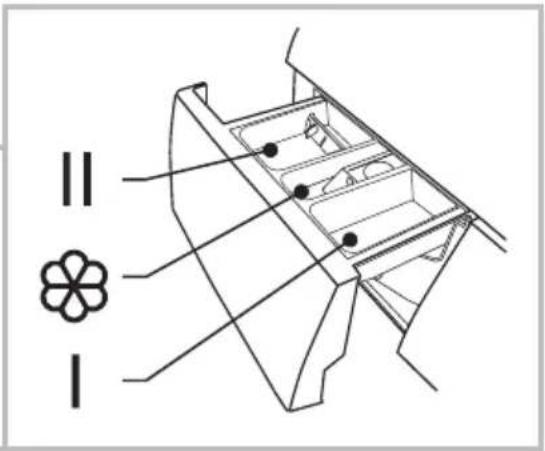
Pull out the dispenser
① Caution!
- Detergent only need to be added in "case I" after selecting pre-washing for machines with this function.
| Programme | I | II | |
| Cotton Eco 40 °C | ● | ○ | |
| Cotton Eco 60 °C | ● | ○ | |
| Cotton | ○ | ● | ○ |
| Cotton 20 °C | ○ | ● | ○ |
| Cotton 30 °C | ○ | ● | ○ |
| Cotton 40 °C | ○ | ● | ○ |
| Cotton 60 °C | ○ | ● | ○ |
| Cotton 90 °C | ○ | ● | ○ |
| Synthetic | ○ | ● | ○ |
| Synthetic 40 °C | ○ | ● | ○ |
| Synthetic 60 °C | ○ | ● | ○ |
| Drum Clean |
| Programme | I | II | |
| Spin Only | |||
| Drain Only | |||
| Rinse&Spin | ○ | ||
| Delicate 30 °C | ● | ○ | |
| Delicate | ● | ○ | |
| Ends in 9H | ● | ○ | |
| Ends in 6H | ● | ○ | |
| Ends in 3H | ● | ○ | |
| Daily Wash 45' | ● | ○ | |
| Daily Wash 30' | ● | ○ | |
| Daily Wash 15' | ● | ○ |
- Means must ○ Means optional
Control Panel
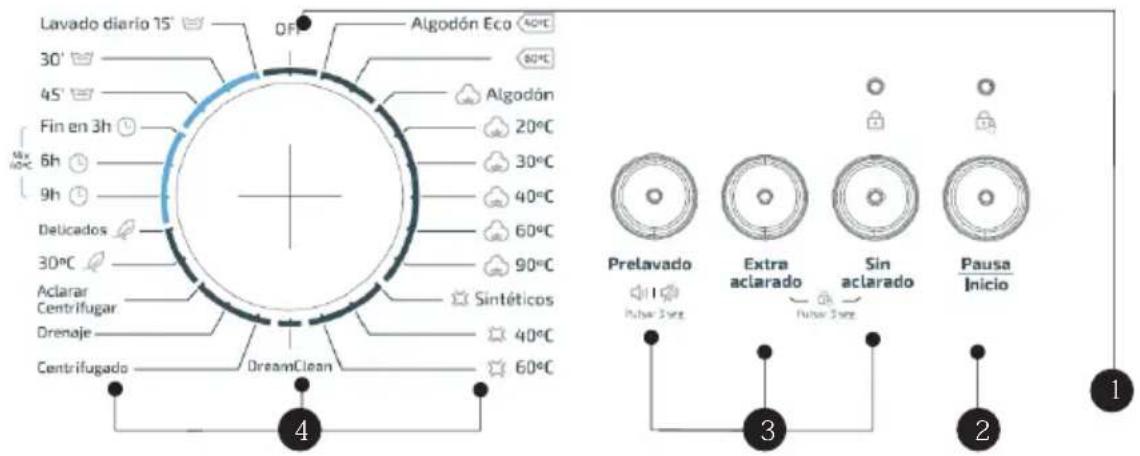

Note!
The chart is for reference only, Please refer to real product as standard.
1 Off
Product is switched off.
3 Option
This allows you to select an additional function and will light when selected.
2 Start/Pause
Press the button to start or pause the washing cycle.
4 Programmes
Available according to the laundry type.
Option
Prewash: The Prewash function can get an extra wash before main wash, it is suitable for washing the dust rises to surface of the clothes; You need to put detergent into the Case (I) when select it.
Extra Rinse: The laundry will undergo extra rinse once after you select it.
No Spin: It will not spin if you choose this function.
Delay: Delay function can be set with this button, the delaying time is 0-24H.
Spin Speed: It can be set the spin speed to press the button repeatedly
| Programme | Option | Programme | Option | ||
| Prewash | Extra Rinse | Prewash | Extra Rinse | ||
| Cotton Eco 40 °C | Drain Only | ||||
| Cotton Eco 60 °C | Rinse&Spin | ○ | |||
| Cotton/Normal | ○ | ○ | Delicate 30 °C | ○ | |
| Cotton/Normal 20 °C | ○ | ○ | Delicate | ○ | |
| Cotton/Normal 30 °C | ○ | ○ | Ends in 9H | ||
| Cotton/Normal 40 °C | ○ | ○ | Ends in 6H | ||
| Cotton/Normal 60 °C | ○ | ○ | Ends in 3H | ||
| Cotton/Normal 90 °C | ○ | ○ | Daily Wash 45' | ||
| Synthetic | ○ | ○ | Daily Wash 30' | ||
| Synthetic 40 °C | ○ | ○ | Daily Wash 15' | ||
| Synthetic 60 °C | ○ | ○ | Spin Only | ||
| Drum Clean | |||||
| Spin Only | |||||
○ Means optional
■ Other Functions
Mute the buzzer


Choose the Programme Press the [Prewash]/[Delay]button for 3sec.the buzzer is mute.
To act the buzzer function, press the button again for 3 seconds. The setting until will be kept the next reset.
Caution!
- MuAfter ting the buzzer function, the sounds will not be activated any more.

Child Lock
To avoid mis operation by children.
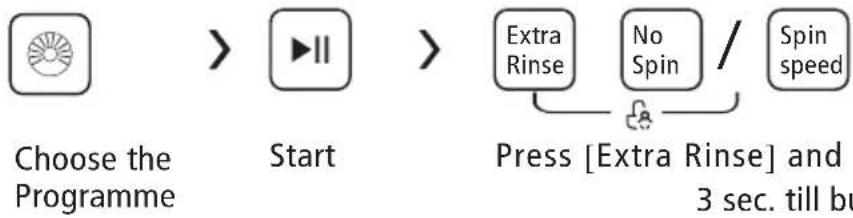
flowchart
graph LR
    A["Choose the Programme"] --> B["Start"]
    B --> C["Press [Extra Rinse"] and 3 sec. till bu]
    C --> D["Extra Rinse"]
    C --> E["No Spin"]
    C --> F["Spin speed"]
Caution!
- Press the two button 3sec. also to be released the function.
- The "Child Lock" will lock all buttons except [OFF].
- Cut off the power supply, the kid's protection is to be released.
- If you want to change the program on child lock condition, you should unlock the child lock first, then rotate the knob to OFF position, finally choose the program you want.
Temp.
The temperature is: Cold, 20^ C, 30^ C, 40^ C, 60^ C, 90^ C
Speed
:The speed is
1000: 0-400-600-800-1000
| Programme | Default Speed(rpm) | Programme | Default Speed(rpm) |
| 1000 | 1000 | ||
| Cotton Eco 40 °C | 1000 | Spin Only | 1000 |
| Cotton Eco 60 °C | 1000 | Drain Only | - |
| Cotton/Normal | 1000 | Rinse&Spin | 1000 |
| Cotton/Normal 20 °C | 1000 | Delicate 30 °C | 600 |
| Cotton/Normal 30 °C | 1000 | Delicate | 600 |
| Cotton/Normal 40 °C | 800 | Ends in 9H/Mix 60 °C | 1000 |
| Cotton/Normal 60 °C | 800 | Ends in 6H/Mix 40 °C | 1000 |
| Cotton/Normal 90 °C | 800 | Ends in 3H/Mix | 1000 |
| Synthetic | 1000 | Daily Wash 45' | 800 |
| Synthetic 40 °C | 1000 | Daily Wash 30' | 800 |
| Synthetic 60 °C | 1000 | Daily Wash 15' | 800 |
| Drum Clean | 400 |
Programmes
Programmes are available according to the laundry type.
| Programmes | |
| Cotton/ Normal | Hard-wearing textiles, heat-resistant textiles made of cotton or linen. |
| Synthetic | Wash synthetic articles, for example: shirts, coats, blending.While washing the knitting textiles, detergent quantity shall be reduced due to its loose string construction and easily forming bubbles. |
| Daily Wash | It is suitable for washing few and not very dirty clothes quickly. |
| Cotton Eco | To increase the washing effects, washing time is increased. |
| Ends in | The function can be set with this programme,the total time including washing time and delaying time is 3h,6h or 9h. |
| Delicate | For delicate, washable textiles, e.g. made of silk, satin, synthetic fibres or blended fabrics. |
| Drum Clean | It applies 90 °C high temperature sterilization to make the clothes washing more green. When this procedure is performed, the clothes or other washing cannot be added. When proper amount of chlorine bleaching agent is put in,the barrel cleaning effect will be better. The customer can use this programme regularly according to the need. |
| Spin Only | Extra spin |
| Rinse&Spin | Extra rinse with spin. |
| Drain Only | Drain off the water. |
| Mix | You can select this procedure wash the tough clothes, that need much more time and strength .It is used for the daily clothes of cotton,such as sheets, chains, pillowcases bathrobe and underwear. |
■ Washing Programmes Table
| Programme | Load(kg) | Temp.(°C) | Default Time |
| 6.0 | Default | 6.0 | |
| 50Hz | |||
| Cotton Eco 40 °C | 6.0 | 40 | 3:35 |
| Cotton Eco 60 °C | 6.0 | 60 | 3:52 |
| Cotton | 6.0 | Cold | 1:35 |
| Cotton 20 °C | 6.0 | 20 | 1:19 |
| Cotton 30 °C | 6.0 | 30 | 1:20 |
| Cotton 40 °C | 6.0 | 40 | 1:40 |
| Cotton 60 °C | 6.0 | 60 | 1:45 |
| Cotton 90 °C | 6.0 | 90 | 2:40 |
| Synthetic | 3.0 | Cold | 1:18 |
| Synthetic 40 °C | 3.0 | 40 | 1:33 |
| Synthetic 60 °C | 3.0 | 60 | 1:43 |
| Drum Clean | - | 90 | 1:21 |
| Spin Only | 6.0 | - | 0:12 |
| Drain Only | - | - | 0:01 |
| Rinse&Spin | 6.0 | - | 0:31 |
| Delicate 30 °C | 2.5 | 30 | 1:00 |
| Delicate | 2.5 | Cold | 0:55 |
| Ends in 9H | 6.0 | 40 | 1:13 |
| Ends in 6H | 6.0 | 40 | 1:13 |
| Ends in 3H | 6.0 | 40 | 1:13 |
| Daily Wash 45' | 2.0 | 30 | 0:45 |
| Daily Wash 30' | 2.0 | 20 | 0:30 |
| Daily Wash 15' | 2.0 | Cold | 0:15 |
• The EU energy efficiency class is A++ for 6kg
Energy test program: Cotton Eco 60°C/40°C. Speed: the highest speed; Other as the default. Half load for 6.0Kg machine:3.0Kg.
"Cotton Eco 60°C/40°C" is the standard washing programs to which the information in the label and the fiche relates, and they are suitable to clean normally soiled cotton laundry and that they are the most efficient programmes in terms of combined energy and water consumptions for washing that type of cotton laundry, that the actual water temperature may differ from the declared cycle temperature.
• The AR energy efficiency class is A
Energy test program: Cotton ECO 40°C. Speed: the highest speed; Other as the default.

Note!
- The parameters in this table are only for user's reference. The actual parameters may be different with the parameters in above mentioned table.
■ Cleaning And Care

Warning!
- Before your maintenance starts, please unplug the machine and close the tap.
Cleaning The Cabinet
Proper maintenance on the washing machine can extend its working life. The surface can be cleaned with diluted non-abrasive neutral detergents when necessary. If there is any water overflow, use the wet cloth to wipe it off immediately. No sharp items are allowed.
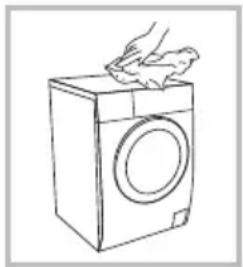
natural_image
Line drawing of a hand washing a washing machine with a cloth (no text or symbols)
Note!
- Formic acid and its diluted solvents or equivalent are forbidden, such as alcohols or chemical products, etc.
Cleaning The Drum
The rusts left inside the drum by the metal articles shall be removed immediately with chlorine-free detergents. Never use steel wool.

Note!
- Don't put laundry in the washing machine during the drum cleaning.
Cleaning The Door Seal And Glass
Wipe the glass and seal after each wash to remove lint and stains. If lint builds up it can cause leaks. Remove any coins, buttons and other objects from the seal after each wash.
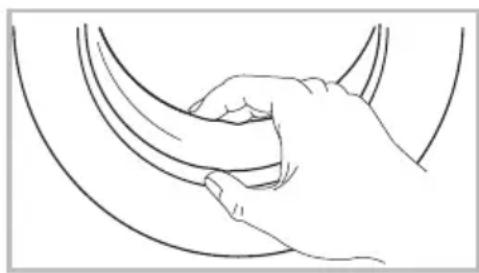
natural_image
Line drawing of a hand gripping a curved object (no text or symbols)Cleaning The Inlet Filter

Note!
- Inlet filter must be cleaned if there is less water.
Washing the filter in the tap
- Close the tap.
- Remove the water supply hose from the tap.
3.clean the filter. - Reconnect the .water supply hose
Washing the filter in washing machine:
- Screw off the inlet pipe from the backside of the machine.
- Pull out the filter with long nose pliers and reinstall it back after being washed.
- Use the death the filter.
- Reconnect the inlet pipe.
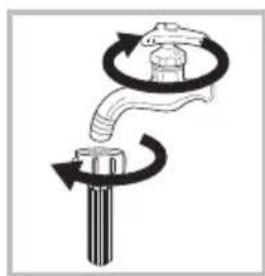
natural_image
Diagram showing a valve mechanism with rotating arrows and a base, no text or symbols present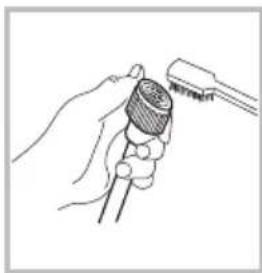
natural_image
Line drawing of a hand holding a tool with a pen inserted (no text or symbols)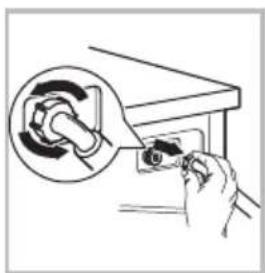
natural_image
Hand holding a tool with a magnified inset showing the internal mechanism (no text or symbols)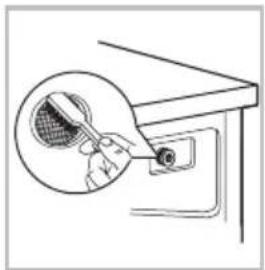
natural_image
Line drawing of a hand holding a magnifying glass over a screen, with no visible text or symbols
Note!
- If the brush is not clean, you can pull out the filter washed separately;
- Reconnect, turn on the tap.
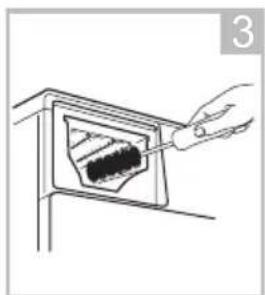
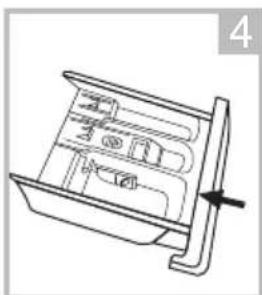
Clean The Detergent Dispenser
- Press down the arrow location on softener cover inside the dispenser drawer.
- Lift the clip up and take out softener cover and wash all grooves with water.
3.Restore the softener cover and push the drawer into position.
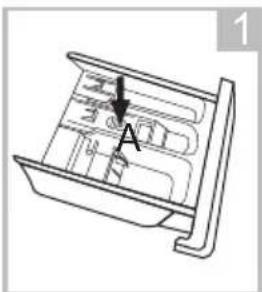
natural_image
Line drawing of a mechanical device with internal compartments and a central component (no text or symbols)Pull out the dispenser drawer with press the A
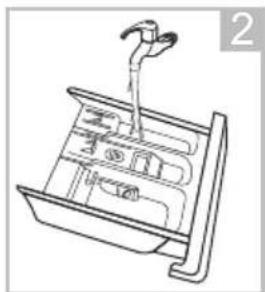
natural_image
Line drawing of a mechanical device with a lever and internal components (no text or symbols)Clean the dispenser drawer under water
natural_image
Line drawing of a hand inserting a component into a device (no text or symbols)Clean inside the recess with an old toothbrush
natural_image
Technical line drawing of a mechanical component with no visible text or symbolsInsert the dispenser drawer

Note!
Do not use alcohol, solvents or chemical products to clean the machine.
Cleaning The Drain Pump Filter
⚠ Warning!
- Be careful of the hot water!
- Allow detergent solution to cool down.
- Unplug the machine to avoid electrical shock before washing.
- Drain pump filter can filter the yarns and small foreign matters from the washing.
- Clean the filter periodically to ensure the normal operation of washing machine.
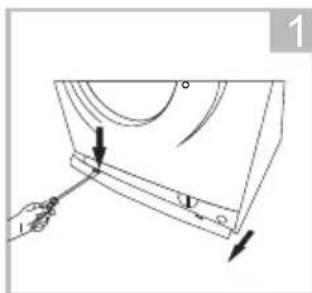
natural_image
Diagram of a hand using a tool to lift a curved mechanical component, with arrows indicating direction (no text or symbols)Open the Service filter
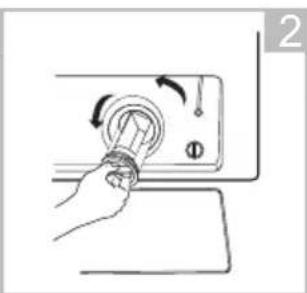
natural_image
Hand holding a rotary knob on a device panel, no text or symbols visibleOpen the filter by turning to the counter clockwise
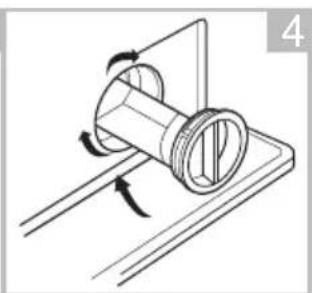
Remove extraneous matter
natural_image
Diagram of a mechanical device with rotating components and directional arrows (no text or symbols)Close the lower cover cap
Caution!
- Make sure that valve cap and emergency drain hose are reinstalled properly, cap plates should be inserted aligning to hole plates otherwise water may leak;
- Some machines don't have emergency drain hose, rotate lower cover cap directly to make water run into basin.
- When the appliance is in use and depending on the programme selected there can be hot water in the pump. Never remove the pump cover during a wash cycle, always wait until the appliance has finished the cycle, and is empty. When replacing the cover, ensure it is securely re-tightened.
■ Trouble Shooting
The start of the appliance does not work or it stops during operation. First try to find a solution to the problem, If not, contact the service centre.
| Description | Reason | Solution |
| Washing machine cannot start up | Door is not closed properly | Restart after the door is closedCheck if the clothes is stuck |
| Door can’t be opened | Washer's safety protection design is working | Disconnect the power, restart the product |
| Water leakage | The connection between inlet pipe or outlet hose is not tight | Check and fasten water pipesClean up outlet hose |
| Detergent residues in the box | Detergent is dampened or agglomerated | Clean and wipe the detergent box |
| Indicator or display does not light | Disconnect the powerPC board or harness has connection problem | Check if the power is shut down and the power plug is connected correctly |
| Abnormal noise | Check if the fixing (bolts) have been removedCheck it’s installed on a solid and level floor |
| Description | Reason | Solution | ||||
| Pause/Start | No Spin | Extra Rinse | Prewash | |||
| Flash | Off | Off | Off | Off | Door is not closed properly | Restart after the door is closedCheck if the clothes is stuck |
| Off | Flash | Off | Off | Water injecting problem while washing | Check if the water pressure is too lowStraighten the water pipeCheck if the inlet valve filter is blocked | |
| Off | Off | Flash | Off | Off | Overtime water draining | Check if the drain hose is blocked |
| Off | Off | Flash | Off | Off | Water overflow | Restart the washer |
| Others | Please try again first, call up service line if there are still troubles | |||||
| Description | Reason | Solution |
| E30 | Door is not closed properly | Restart after the door is closedCheck if the clothes is stuck |
| E10 | Water injecting problem while washing | Check if the water pressure is too lowStraighten the water pipeCheck if the inlet valve filter is blocked |
| E21 | Overtime water draining | Check if the drain hose is blocked |
| E12 | Water overflow | Restart the washer |
| Others | Please try again first, call up service line if there are still troubles | |

Note!
- After the check, activate the appliance. If the problem occurs again, contact the service.
■ Technical Specifications
| Power Supply | 220-240V~,50Hz |
| MAX.Current | 10A |
| Standard Water Pressure | 0.05MPa~1MPa |
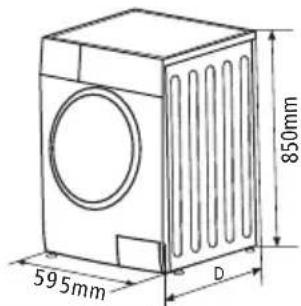
| Model | Capacity | Dimension (W*D*Hmm) | Rated PowerNet WeightWa | |
| WM6109 | 6.0kg | 595*470*850 | 54kg 1950W |
Model
WM6109
| Capacity | 6kg |
| Spin Speed | 1000 rpm |
| Energy efficiency class | A++ |
| Annual energy consumption | 173kWh /annual |
| Power consumption of off - mode | 0.5W |
| Power consumption of Left on -mode | 1.0W |
| Annual water consumption | 9240L /annual |
| Spin- drying efficiency class | C |
| Standard washing cycle | Cotton ECO |
| Energy consumption of the standard 60°C at full load | 0.85 kwh /cycle |
| Energy consumption of the standard 60°C at partial load | 0.82 kwh /cycle |
| Energy consumption of the standard 40°C at partial load | 0.52 kwh /cycle |
| Programme duration of standard 60°C at full load | 232 min |
| Programme duration of standard 60°C at partial load | 210 min |
| Programme duration of standard 40°C at partial load | 204 min |
| Water consumption of the standard 60°C at full load | 48L /cycle |
| Water consumption of standard 60°C at partial load | 37L /cycle |
| Water consumption of the standard 40°C at partial load | 37L /cycle |
| Remaining moisture content of the standard 60°C at full load | 59 % |
| Remaining moisture content of the standard 60°C at partial load | 63 % |
| Remaining moisture content of the standard 40°C at partial load | 63 % |
| Noise level of washing | 59dB (A) |
| Noise level of spinning | 74 dB (A) |

Note!
- Programme setting for testing in accordance with applicable standard En60456.
- When using the test programmes, wash the specified load using the maxinspeed.
- The actual parameters will depend on how the applicance is used, and maybe different with the parameters in above mentioned table.
Remarks:
The energy efficiency (highest efficiency) to D (lowest efficiency).
Energy consumption per year, based on 220 standard washing cycles for standard programme at 60^ C and 40^ C at full and partial load, and the consumption of the low-power modes. Actual energy consumption will depend on how the appliance is used.
Water consumption per year based on 220 standard washing cycles for standard programme at 60°C and 40°C at full and partial load. Actual water consumption will depend on how the appliance is used.
Spin-drying efficiency class from G (least efficient) to A (most efficient).
The standard 60°C programme and the standard 40°C programme are the standard washing programmes. These programmes are suitable to clean normally soiled cotton laundry and they are the most efficient programmes in terms of combined energy and water consumptions for washing that type of cotton laundry. The actual water temperature may differ from the declared cycle emperature.
Please choose the suitable type of detergent for the various washing temperatures to get the best washing performance with less water and energy consumption.
- Colocar la Manguera de Salida
- Detergentes para su Lavadora
- sauber
- SAFETY INSTRUCTIONS
- INSTALLATION
- OPERATIONS
- MAINTENANCES
- ■ Safety Instructions
- Warning!
- ⚠ Caution!
- Note!
- Risk to children!
- Risk of explosion!
- Caution!
- Installing the product!
- ■ Product Description
- Accessories
- ■ Installation
- Installation area
- Unpacking the washing machine
- Remove transport bolts
- Levelling the washing machine
- Connect Water Supply Hose
- Drain Hose
- ⚠ Warning!
- Quick Start
- Before Washing
- Washing
- After Washing
- ■ Before Each Washing
- ■ Detergent Dispenser
- ① Caution!
- Control Panel
- Option
- ■ Other Functions
- Programmes
- ■ Cleaning And Care
- Cleaning The Cabinet
- Cleaning The Drum
- Cleaning The Door Seal And Glass
- Cleaning The Inlet Filter
- Clean The Detergent Dispenser
- Cleaning The Drain Pump Filter
- ■ Trouble Shooting
- Remarks:
Brand : Sauber
Model : WM6109
Category : Washing machine