
EXTC - Audio effect pedal Radial Engineering - Free user manual and instructions
Find the device manual for free EXTC Radial Engineering in PDF.


| Product Type | Stereo effects interface for integrating guitar pedals with line-level pro audio gear |
| Channels | 2 (Stereo) |
| Frequency Response | 20Hz to 20kHz (-0.5dB/+0.5dB) |
| Noise Floor | -105dBu |
| Dynamic Range | >+130dBu |
| Maximum Input Level | >+25dBu |
| Total Harmonic Distortion | 0.007% @ 0dBu, 1kHz |
| Intermodulation Distortion | 0.002% @ 0dBu, 1kHz |
| Common-Mode Rejection Ratio | 34dBu @ 60Hz, 42dBu @ 3kHz |
| Insertion Loss | 0dB |
| Input Connections | 2x XLR/TRS combo jacks, 2x 1/4" TS insert receive |
| Output Connections | 2x XLR, 2x 1/4" TRS, 2x 1/4" TS insert send |
| Power Supply | 15VDC 400mA (center-pin positive, included) |
| Construction | 14-gauge steel chassis, durable powder coat finish |
| Dimensions (approx.) | Standard 1/2 rack width, 1U height (rack mountable with optional kit) |
| Weight (approx.) | 1.5 kg (3.3 lbs) |
| Front Panel Controls | Send level, Receive level, Blend (wet/dry), Phase invert, EFX Loop on/off switch |
| LED Indicators | Power On, EFX Loop On |
| Special Features | Transformer-isolated sends, Class-A buffer circuitry, stereo or dual mono operation |
| Mounting Options | Optional SA Series rack adaptor kit for 19" rack (single or dual unit) |
| Warranty | Three-year transferable limited warranty |
Frequently Asked Questions - EXTC Radial Engineering
User questions about EXTC Radial Engineering
0 question about this device. Answer the ones you know or ask your own.
Ask a new question about this device
Download the instructions for your Audio effect pedal in PDF format for free! Find your manual EXTC - Radial Engineering and take your electronic device back in hand. On this page are published all the documents necessary for the use of your device. EXTC by Radial Engineering.
USER MANUAL EXTC Radial Engineering
Radial Engineering Ltd.
1165-1845 Kingsway Ave, Port Coquitlam
British Columbia, Canada, V3C 1S9
Tel: 604-942-1001 • www.radialeng.com
Email: info@radialeng.com
Radial® EXTC Stereo User Guide
Table of Contents Page
Overview....1
Features 2-3
Connecting to your audio interface....4
Connecting to your pedals....5
The Send and Receive controls 6
The Blend knob and Phase switch 6-7
Additional Applications.... 7-8
Rack mounting the EXTC Stereo 9
Specifications 10
Warranty ....Back cover
Thank you for purchasing the Radial EXTC Stereo, a unique interface that allows you to seamlessly incorporate stereo guitar pedals and effects with the inputs and outputs of your recording interface or mixing console.
We recommend you take a few minutes to read this short manual before you begin using the EXTC Stereo, as it covers the various features of the device and tips for setup. Should you have any questions about the EXTC Stereo or any other Reamp devices, please visit our website at www.radialeng.com for additional resources and frequently asked questions.
OVERVIEW
The ability to incorporate guitar pedal effects with line-level pro audio gear is a popular ‘secret weapon’ of mixing engineers in studios worldwide. The EXTC Stereo makes this possible, giving you the ability to connect stereo effects pedals such as reverbs and delays to the line-level inputs and outputs of your console or recording interface. Use it to send drum overheads to a multi-tap delay, or breathe new life into a stale keyboard patch with a flanger or chorus pedal. Try it on vocals, strings, or any source you can think of to add a new creative element to your mixes and revitalize your old pedal collection.
The EXTC Stereo features both XLR and 1/4" TRS connections to integrate with any audio interface, along with send and receive level controls to optimize the signal path through both modern and vintage pedal effects. A wet/dry blend knob gives you precise control over how much of the affected signal gets mixed in, with an EFX Loop on/off switch for quick auditioning. The EXTC Stereo can be rack mounted with an optional adaptor kit, and front panel inputs and outputs for your pedals ensure you can connect in an instant when inspiration strikes.
FEATURES - FRONT PANEL

- POWER LED: Illuminates when the EXTC Stereo is receiving power.
- SEND LEVEL: Adjusts the signal level going out to the effects pedals to optimize levels and avoid overloading pedal inputs.
- RECEIVE LEVEL: Adjusts the return levels from the pedal effects for best signal-to-noise ratio.
- PHASE: Inverts the polarity of the wet signal path to bring it into phase with the dry signal when the two are blended together.
- BLEND: Controls the wet/dry mix between the return from the effects pedals and the original unprocessed signal.
- EFX LOOP ON: Turns the effects loop on/off for A/B auditioning. LED indicator lights up with the effects loop is active.
- STEREO EFFECTS INSERT: Left and Right send and receive jacks for connecting stereo effects pedals to the EXTC for signal processing. For mono effects use only the Left send and receive connections.
- PSU IN: Connection for the included 15V 400mA power supply.
FEATURES - BACK PANEL
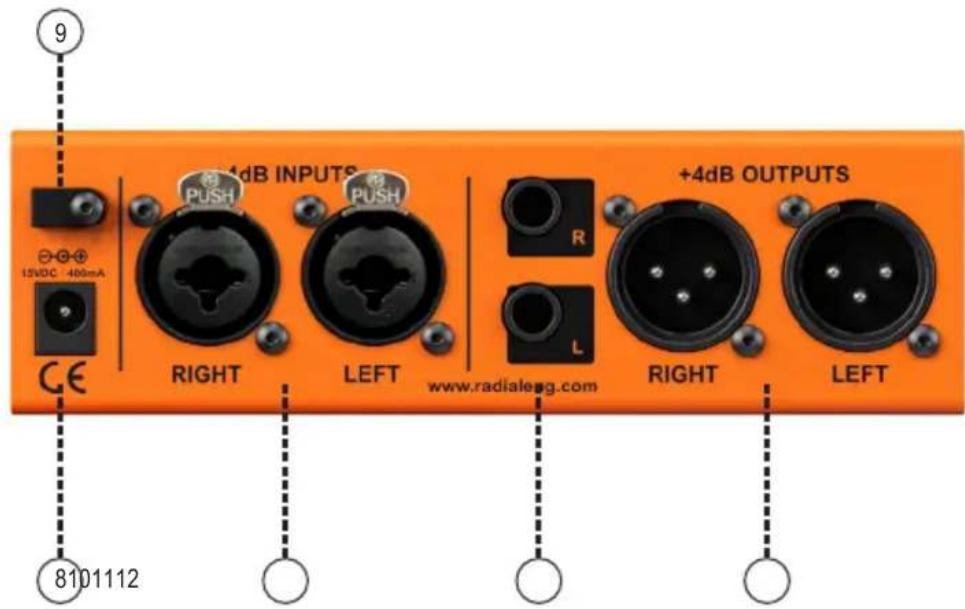
- CABLE CLAMP: Affixes the PSU cable to the EXTC Stereo to prevent accidental disconnection.
- BALANCED INPUTS: Combo jack inputs allow you to connect XLR or 1/4" TRS line-level sources to the EXTC Stereo.
- TRS OUTPUTS: Balanced 1/4" TRS outputs to connect to the line-level inputs of a recording interface or mixer.
- XLR OUTPUTS: Balanced XLR outputs for connection to the line-level inputs of a recording interface or mixer.
MAKING CONNECTIONS
Before connecting to the EXTC Stereo, ensure that your audio system levels are turned down to prevent plug-in transients from damaging sensitive components such as tweeters.
The EXTC Stereo is powered via a 15VDC center-pin positive supply (included). There is no on/off power switch; the EXTC Stereo will be ready to use as soon as power is connected and the Power LED on the front panel will illuminate.
Connecting to your audio interface or mixer
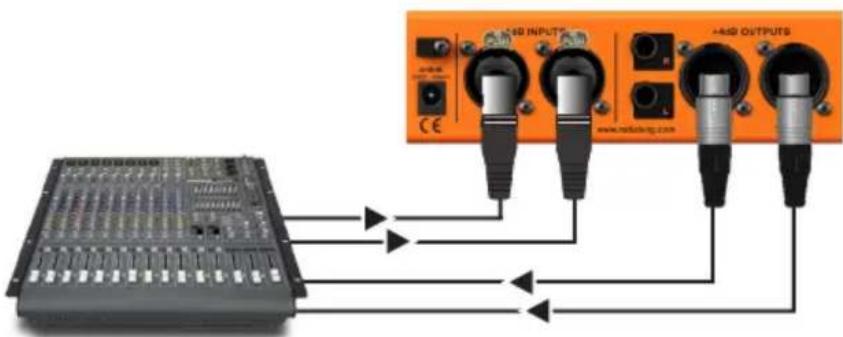
The EXTC Stereo features balanced line-level inputs and outputs over both XLR and 14 " TRS connections, making it easy to hook up recording interfaces or mixing consoles without the need for adaptor cables.
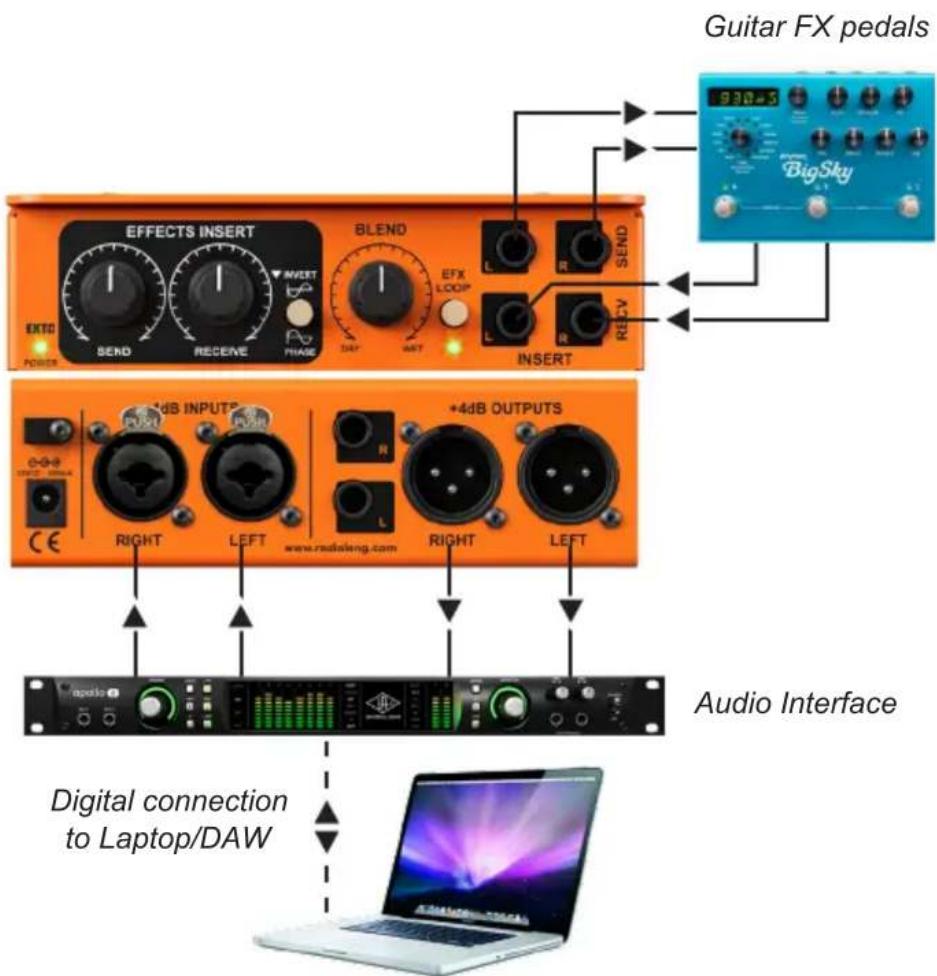
Start by connecting a pair of line-level outputs from your interface to the balanced +4dB INPUTS on the rear panel. These connections will feed the original audio tracks from your DAW (Digital Audio Workstation) to the EXTC Stereo and your guitar pedals.
To send the processed signal from the EXTC Stereo back to your recording system, connect the left and right +4dB OUTPUTS to a pair of line-level inputs on your interface and route the signals to a new stereo track.

flowchart
graph TD
    A["Audio INPUT"] --> B["+ABS OUTPUTS"]
    C["Audio Output"] --> D["+ABS OUTPUTS"]
    E["Laptop"] --> F["Control Unit"]
    B --> G["Output"]
    D --> G
    F --> G
Connecting a recording interface to the EXTC Stereo using TRS cables
Connecting a mixer to the EXTC Stereo using XLR cables
Connecting to your guitar effects pedals
To interface your pedals with the EXTC Stereo, use standard 1/4" TS unbalanced guitar cables and connect them to the front panel effects insert jacks. The left and right SEND jacks connect to the inputs of the first pedal in your signal chain, while the outputs of the last pedal are returned to the EXTC Stereo by connecting to the left and right RECV jacks.
When using the EXTC Stereo for the very first time, start by connecting just a single pedal to these effects insert jacks, which will make it easier to troubleshoot before you add additional pedals.

flowchart
graph TD
    A["Effects INSERT"] --> B["BLEND"]
    B --> C["REFD LEEP"]
    C --> D["REPLY"]
    D --> E["IGERT"]
    E --> F["BigSky"]
    F --> G["9.30-5"]
    G --> H["Switch"]
    H --> I["Revel"]
    I --> J["Signal"]
    J --> K["Output"]
Connecting guitar pedals to the EXTC Stereo
GETTING STARTED
Once you've made all your connections to the EXTC Stereo, you are ready for the fun part: playing back audio tracks through your pedals.
Begin by setting up the controls as follows: set the SEND and RECEIVE controls to 12 o'clock, turn the BLEND control fully clockwise to the 'wet' position, and engage the EFX LOOP on/off switch so the green LED illuminates.
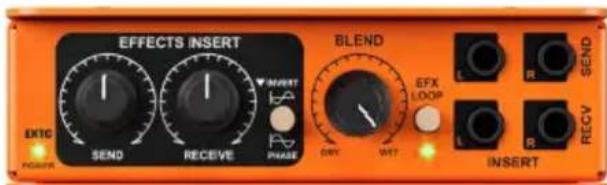
Recommended initial settings on the EXTC Stereo
In your recording software, assign the audio track you wish to process to the inputs of the EXTC Stereo, and begin playback. You should be able to monitor the return path in your recording system and hear the effect from your pedals.
The Send and Receive controls
The EXTC Stereo features two controls to assist in fine tuning your levels for optimal gain-staging through your pedal effects. The SEND control adjusts the left and right signal levels sent to your pedal inputs, while the RECEIVE control adjusts the signals coming back from the pedals to feed your audio interface.
If you want to increase the level feeding your pedal chain for a greater signal-to-noise ratio, slowly increase the SEND level control. Should you begin to overload the inputs of your pedals and cause unwanted distortion, turn this control down slightly.

The Send & Receive controls
Similarly, to set the RECEIVE control watch the input meters on your recording interface or DAW during playback while slowly turning this dial clockwise. If the meters begin to indicate signal clipping, back off slightly on this control.
The Blend control & Phase switch
The BLEND control on the EXTC Stereo mixes the original dry signal with the newly introduced effects created by the guitar pedals. This gives you precise control over how much or how little of the effect you blend into your recording.

The Blend and Phase controls
Starting with this control turned fully clockwise to the ‘wet’ setting allows you to hear only the output from your effects, so you can dial in the settings on your pedals until you have the results you are looking for from your delay or reverb. Then you can experiment with different settings on the BLEND control to see which best suits the track and your mix.
Some tracks like vocals benefit from being set closer to the 'dry' setting, with just a touch of the effect added, while others sound better with more of the effect blended into the mix.
If you notice that the signal is ‘thinning out’ when the BLEND control is around the 12 o’clock position this may be a result of phase cancellation between the wet and dry signals. The most common culprit of this problem are pedals that invert the phase of the signal, and may be more likely with vintage effects. Should you encounter this problem, simply engage the PHASE switch to reverse the polarity or ‘phase’ of the signal from the effects insert.
After you have spent some time dialing in the controls on your effects pedals and the EXTC Stereo, you can easily A/B between your current settings and the original unprocessed signal using the EFX LOOP on/off switch. This gives you an instant reference point without having to change settings in your DAW or alter the controls on the EXTC.
ADDITIONAL APPLICATIONS
The EXTC Stereo was designed to easily send audio tracks to and from a set of stereo guitar pedals, but its usefulness in the studio doesn't stop there. The following diagrams show three additional ways you can put the EXTC Stereo to use with your guitar and amplifier effects.
Reamping through one or two amplifiers
The front panel insert SEND jacks on the EXTC Stereo can be used to feed guitar amplifiers and digital amp FX modelers. This allows you to play your dry guitar tracks through an amplifier to experiment with amp settings and microphone placement, using the original method for studio Reamping®. Both the left and right SEND jacks are transformer isolated to help prevent hum and buzz when connected to two separate devices.
In this application, the RECV jacks and the +4dB OUTPUTS of the EXTC Stereo would go unused. To feed the signal back into your recording system you would place a microphone on the amplifier or connect your amp modeler directly to your recording interface.

Connecting amplifiers and amp modelers to the EXTC Stereo
Connecting mono guitar pedals
The EXTC Stereo is doubly handy with mono guitar pedals, as it allows you to connect two separate pedal chains at once. The left and right channels of the EXTC Stereo are completely discrete, so one side won't affect the other. Keep in mind that the SEND, RECEIVE, and BLEND controls will affect both channels equally.

flowchart
graph TD
    A["INTenna"] --> B["EFFECTS INSERT"]
    B --> C["BI50"]
    C --> D["BI50"]
    D --> E["BI50"]
    E --> F["BI50"]
    F --> G["BI50"]
    G --> H["BI50"]
    H --> I["BI50"]
    I --> J["BI50"]
    J --> K["BI50"]
    K --> L["BI50"]
    L --> M["BI50"]
    M --> N["BI50"]
    N --> O["BI50"]
    O --> P["BI50"]
    P --> Q["BI50"]
    Q --> R["BI50"]
    R --> S["BI50"]
    S --> T["BI50"]
    T --> U["BI50"]
    U --> V["BI50"]
    V --> W["BI50"]
    W --> X["BI50"]
    X --> Y["BI50"]
    Y --> Z["BI50"]
    Z --> AA["BI50"]
    AA --> AB["BI50"]
    AB --> AC["BI50"]
    AC --> AD["BI50"]
    AD --> AE["BI50"]
    AE --> AF["BI50"]
    AF --> AG["BI50"]
    AG --> AH["BI50"]
    AH --> AI["BI50"]
    AI --> AJ["BI50"]
    AJ --> AK["BI50"]
    AK --> AL["BI50"]
    AL --> AM["BI50"]
    AM --> AN["BI50"]
    AN --> AO["BI50"]
    AO --> AP["BI50"]
    AP --> AQ["BI50"]
    AQ --> AR["BI50"]
    AR --> AS["BI50"]
    AS --> AT["BI50"]
    AT --> AU["BI50"]
    AU --> AV["BI50"]
    AV --> AW["BI50"]
    AW --> AX["BI50"]
    AX --> AY["BI50"]
Connecting mono guitar pedals to the EXTC Stereo
Direct recording from your pedalboard
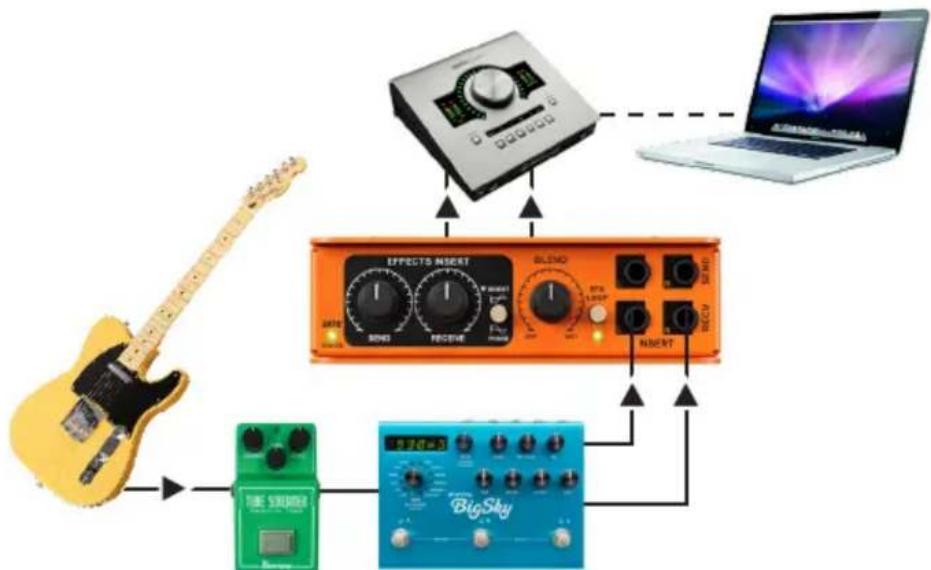
Since the EXTC Stereo is designed to take the signal from effects pedals and convert it to a balanced line-level output, you can use it for direct recording from your pedalboard without having to re-patch the rear panel outputs. Leave the +4dB OUTPUTS connected to a pair of line-level inputs on your recording interface, and connect the output of your pedalboard to the insert RECV jacks on the EXTC Stereo.
flowchart
graph TD
    A["Electric Guitar"] --> B["Effects Insert"]
    C["Laptop"] --> D["Audio Processor"]
    E["BigSky"] --> F["Output Stage"]
    B --> G["Main Control Panel"]
    D --> H["Main Control Panel"]
    F --> I["Main Control Panel"]
    G --> J["Audio Receiver"]
    H --> K["Audio Receiver"]
    I --> L["Audio Receiver"]
    J --> M["Audio Receiver"]
    K --> N["Audio Receiver"]
    L --> O["Audio Receiver"]
    M --> P["Audio Receiver"]
    N --> Q["Audio Receiver"]
    O --> R["Audio Receiver"]
    P --> S["Audio Receiver"]
    Q --> T["Audio Receiver"]
    R --> U["Audio Receiver"]
    S --> V["Audio Receiver"]
    T --> W["Audio Receiver"]
Using the EXTC Stereo for direct recording
RACK MOUNTING THE EXTC STEREO
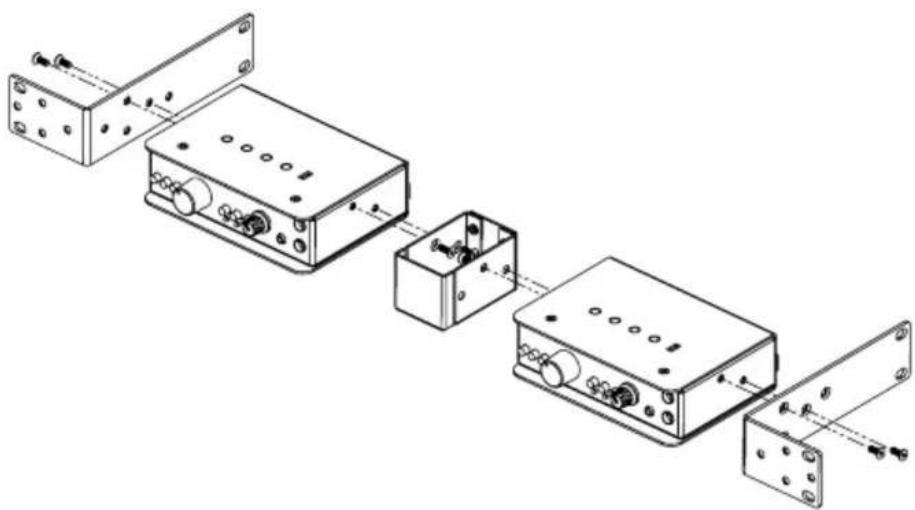
Using the optional SA Series Rack Adaptor kit, you can easily mount the EXTC Stereo in standard 19" equipment racks for permanent installation. The SA Series kit allows you to mount either one or two devices in a single 1RU rackspace. Part no R800 9422 00.
Single unit rackmounting

natural_image
Technical line drawing of an electronic device with multiple components and mounting holes (no text or symbols)Double unit rackmounting
natural_image
Technical line drawing of a mechanical assembly with multiple components and mounting brackets (no text or symbols)SPECIFICATIONS\*
Audio Circuit Type: Proprietary Active Circuit with Class-A buffers
Number of Channels: 2
Frequency Response: 20Hz to 20kHz (-0.5dB/+0.5dB)
Noise Floor: -105dBu
Dynamic Range: ....>+130dBu
Maximum Input:....>+25dBu
Intermodulation Distortion: 0.002% @ 0dBu, 1kHz
Total Harmonic Distortion: 0.007% @ 0dBu, 1kHz
Common-Mode Rejection Ratio: 34dBu @ 60Hz, 42dBu @ 3kHz
Insertion Loss: 0dB
Features
Input connections: 1/4" TRS/XLR Combo Jacks, 1/4" TS Insert Recv
LED Indicators: Power On, EFX Loop On
Output Connectors: 1/4" TRS, XLR, 1/4" TS Insert Send
Mounting Options: ....SA series rack mount available
Extras:....Send & Receive level controls, Blend control, Phase
General
Power: 15VDC 400mA
Construction: 14-gauge Steel Chassis
Finish: Durable Powder Coat
THREE YEAR TRANSFERABLE LIMITED WARRANTY
RADIAL ENGINEERING LTD. ("Radial") warrants this product to be free from defects in material and workmanship and will remedy any such defects free of charge according to the terms of this warranty. Radial will repair or replace (at its option) any defective component(s) of this product (excluding finish and wear and tear on components under normal use) for a period of three (3) years from the original date of purchase. In the event that a particular product is no longer available, Radial reserves the right to replace the product with a similar product of equal or greater value. In the unlikely event that a defect is uncovered, please call 604-942-1001 or email service@radialeng.com to obtain an RA number (Return Authorization number) before the 3 year warranty period expires. The product must be returned prepaid in the original shipping container (or equivalent) to Radial or to an authorized Radial repair centre and you must assume the risk of loss or damage. A copy of the original invoice showing date of purchase and the dealer name must accompany any request for work to be performed under this limited and transferable warranty. This warranty shall not apply if the product has been damaged due to abuse, misuse, misapplication, accident or as a result of service or modification by any other than an authorized Radial repair center.
THERE ARE NO EXPRESSED WARRANTIES OTHER THAN THOSE ON THE FACE HEREOF AND DESCRIBED ABOVE. NO WARRANTIES WHETHER EXPRESSED OR IMPLIED, INCLUDING BUT NOT LIMITED TO, ANY IMPLIED WARRANTIES OF MERCHANTABILITY OR FITNESS FOR A PARTICULAR PURPOSE SHALL EXTEND BEYOND THE RESPECTIVE WARRANTY PERIOD DESCRIBED ABOVE OF THREE YEARS. RADIAL SHALL NOT BE RESPONSIBLE OR LIABLE FOR ANY SPECIAL, INCIDENTAL OR CONSEQUENTIAL DAMAGES OR LOSS ARISING FROM THE USE OF THIS PRODUCT. THIS WARRANTY GIVES YOU SPECIFIC LEGAL RIGHTS, AND YOU MAY ALSO HAVE OTHER RIGHTS, WHICH MAY VARY DEPENDING ON WHERE YOU LIVE AND WHERE THE PRODUCT WAS PURCHASED.
To meet the requirements of California Proposition 65, it is our responsibility to inform you of the following:
WARNING: This product contains chemicals known to the State of California to cause cancer, birth defects or other reproductive harm.
Please take proper care when handling and consult local government regulations before discarding.

Made in Canada

www.radialeng.com
Radial Engineering Ltd.
1165-1845 Kingsway Ave, Port Coquitlam, British Columbia, V3C 1S9
Tel: 604-942-1001 • www.radialeng.com • info@radialeng.com
Radial® EXTC Stereo User Guide - Part #: R870 1206 00 / 12-2020
Copyright 2021 Radial Engineering Ltd. All rights reserved.
Specifications and appearance subject to change without notice.




- Radial® EXTC Stereo User Guide
- Table of Contents Page
- OVERVIEW
- FEATURES - FRONT PANEL
- MAKING CONNECTIONS
- Connecting to your audio interface or mixer
- Connecting to your guitar effects pedals
- GETTING STARTED
- The Send and Receive controls
- The Blend control & Phase switch
- ADDITIONAL APPLICATIONS
- Reamping through one or two amplifiers
- Connecting mono guitar pedals
- Direct recording from your pedalboard
- RACK MOUNTING THE EXTC STEREO
- SPECIFICATIONS\*
- Features
- General
- THREE YEAR TRANSFERABLE LIMITED WARRANTY
Brand : Radial Engineering
Model : EXTC
Category : Audio effect pedal