
PA-5500TU - Uncategorized DAP-Audio - Free user manual and instructions
Find the device manual for free PA-5500TU DAP-Audio in PDF.


| Product Type | Power Amplifier |
| Brand | DAP-Audio |
| Model | PA-5500TU |
| Power Output (Stereo) | 2 x 500W RMS at 4 Ohms |
| Power Output (Bridge) | 1 x 1500W RMS at 8 Ohms |
| Frequency Response | 20 Hz - 20 kHz ±0.5 dB |
| Input Sensitivity | 0.775V (0 dBu) |
| Input Impedance | 10 kOhms (balanced), 20 kOhms (unbalanced) |
| Signal-to-Noise Ratio | > 100 dB |
| Total Harmonic Distortion | < 0.05% |
| Protection Features | Short circuit, thermal, DC, and overvoltage protection |
| Connectivity | XLR and 1/4" TRS inputs, speakon and binding post outputs |
| Cooling | Variable speed fan, front to rear airflow |
| Dimensions (W x H x D) | 19 x 3.5 x 14 inches (483 x 89 x 356 mm) |
| Weight | 28 lbs (12.7 kg) |
| Power Supply | AC 110-120V / 220-240V, 50/60 Hz (switchable) |
| Power Consumption | 1200 VA max |
| Operating Temperature | 0°C to 40°C (32°F to 104°F) |
| Maintenance | Clean with dry cloth; do not use solvents. Ensure vents are free of dust. |
| Safety | Class I equipment; requires ground connection. Use only in dry indoor locations. |
| Spare Parts & Repairability | Contact your DAP-Audio dealer for authorized service. Use only original parts. |
Frequently Asked Questions - PA-5500TU DAP-Audio
User questions about PA-5500TU DAP-Audio
0 question about this device. Answer the ones you know or ask your own.
Ask a new question about this device
Download the instructions for your Uncategorized in PDF format for free! Find your manual PA-5500TU - DAP-Audio and take your electronic device back in hand. On this page are published all the documents necessary for the use of your device. PA-5500TU by DAP-Audio.
USER MANUAL PA-5500TU DAP-Audio
Thank you for purchasing this DAP product.
The purpose of this user manual is to provide instructions for the correct and safe use of this product.
Keep the user manual for future reference as it is an integral part of the product. The user manual shall be stored at an easily accessible location.
This user manual contains information concerning:
- Safety instructions
• Installation and operation of the device - Intended and non-intended use of the device
- Maintenance procedures
- Troubleshooting
- Transport, storage and disposal of the device
Non-observance of the instructions in this user manual may result in serious injuries and damage of property.
©2022 DAP. All rights reserved.
No part of this document may be copied, published or otherwise reproduced without the prior written consent of Highlite International.
Design and product specifications are subject to change without prior notice.
For the latest version of this document or other language versions, please visit our website www.highlite.com or contact us at service@highlite.com.
Highlite International and its authorized service providers are not liable for any injury, damage, direct or indirect loss, consequential or economic loss or any other loss arising from the use of, or inability to use or reliance on the information contained in this document.
Table of contents
1. Introduction......4
1.1. Before Using the Product 4
1.2. Intended Use 4
1.3. Text Conventions....4
1.4. Symbols and Signal Words....5
1.5. Symbols on the Information Label 5
2. Safety 5
2.1. Warnings and Safety Instructions ....6
2.2. Requirements for the User....7
3. Description of the Device 8
3.1. Front View 8
3.2. Back View 8
3.3. Product Specifications 9
3.4. Dimensions....10
4. Installation....10
4.1. Safety Instructions for Installation 10
4.2. Installation Site Requirements ....10
4.3. Rack Mounting 10
4.4. Connecting the Wi-Fi Antenna....10
4.5. Connecting the DAB/FM Wire Antenna ....11
4.6. Connecting the Device to a Router....11
4.7. Connecting Audio Devices....11
4.7.1. DAB/FM Signal Reception....11
4.8. Installation of the Batteries 12
4.9. Connecting to Power Supply....12
5. Setup....13
5.1. Warnings and Precautions ....13
5.2. Turning On/Off 13
5.3. Software Updates....13
5.4. Network Setup 13
5.4.1. Wi-Fi Setup....13
5.4.1.1. Wi-Fi Setup via Esptouch App 14
5.4.2. LAN Setup 14
5.4.3. Network Indicator Display Status....14
5.5. Entering Passwords and Searching for Phrases 15
5.6. Setup Examples ....15
5.6.1. Stereo Mode....15
5.6.2. Bridge Mode....16
5.6.3. 100 V Mode ....16
6. Operation....17
6.1. Safety Instructions for Operation....17
6.2. Control Modes 17
6.3. Control Panel 17
6.4. Start-up....18
6.4.1. Choosing Menu Language 18
6.4.2. Configuring the Network for the First Time....18
6.5. Menu Overview 19
6.6. Main Menu Options ....21
6.6.1. My Favourite....22
6.6.1.1.Managing My Favourite With a PC or Smartphone 23
6.6.1.2.Managing My Favourite With the Skytune Radio Portal 24
6.6.2. Internet Radio....26
6.6.2.1. Skytune 26
6.6.2.2. Search(Skytune) 27
6.6.2.3. History 28
6.6.3. Media Centre....28
6.6.3.1. UPnP 29
6.6.3.2. My Playlist....29
6.6.3.3. Clear My Playlist....29
6.6.4. DAB Radio....30
6.6.5. FM Radio 30
6.6.6. Bluetooth....31
6.6.7. Alarm....32
6.6.7.1. Time....33
6.6.7.2. Sound....33
6.6.7.3. Repeat....34
6.6.7.4. Alarm Volume 35
6.6.7.5. Alarm Duration....35
6.6.8. Sleep Timer....35
6.6.9. Configuration 36
6.6.9.1. Network....36
6.6.9.2. Date & Time....38
6.6.9.3. Language 40
6.6.9.4. DAB Setup 40
6.6.9.5. FM Setup 41
6.6.9.6. Local Radio 43
6.6.9.7. Playback Setup 44
6.6.9.8. Resume Play Options....44
6.6.9.9. Power-on Options 45
6.6.9.10. Dimmer 45
6.6.9.11. EQ....46
6.6.9.12. Buffer Time 47
6.6.9.13. Line Out Gain....47
6.6.9.14. Information 48
6.6.9.15. Software Update....49
6.6.9.16. Reset to Default 49
6.7. Saving Internet Radio Stations to My Favourite....49
6.8. Viewing Radio Station Information 50
6.9. Setting Volume 50
6.10. Manual FM Frequency Tuning....50
6.11. Editing Lists....51
6.12. Alarm....51
6.13. Remote Control 52
6.13.1. Functions of the Remote Control Buttons....52
6.13.2. Entering Passwords and Searching for Phrases ....53
-
Troubleshooting ....54
-
Maintenance ....55
8.1. Safety Instructions for Maintenance....55
8.2. Preventive Maintenance....55
8.2.1. Basic Cleaning Instructions....55
8.3. Corrective Maintenance....55
-
Deinstallation, Transportation and Storage ....55
-
Disposal 56
-
Approval....56
1. Introduction
1.1. Before Using the Product

Important
Read and follow the instructions in this user manual before installing, operating or servicing this product.
The manufacturer will not accept liability for any resulting damages caused by the non-observance of this manual.
After unpacking, check the contents of the box. If any parts are missing or damaged, contact your Highlite International dealer.
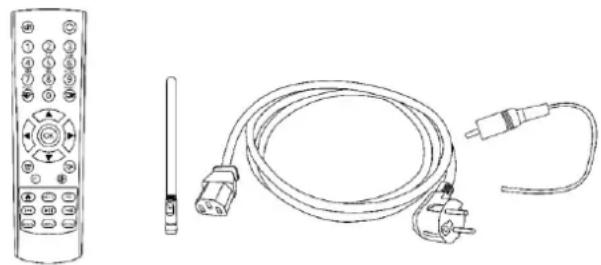
Your shipment includes:
• DAP PA-5500TU 500W 100V Amplifier
• Schuko to IEC power cable (1,5 m)
- Wi-Fi antenna
• DAB/FM wire antenna
- Remote control
- User manual
natural_image
Line drawing of a remote control with a coiled cable and plug, alongside a separate remote device (no text or symbols)
Fig. 01
1.2. Intended Use
This device is intended for use as a media player with an amplifier. It is suitable only for indoor installation. It is not suitable for households.
Any other use, not mentioned under intended use, is regarded as non-intended and incorrect use.
1.3. Text Conventions
Throughout the user manual the following text conventions are used:
- Buttons: All buttons are in bold lettering, for example "Press the UP/DOWN buttons"
• References: References to chapters and parts of the device are in bold lettering, for example:
"Refer to 2. Safety", "press the power switch (03)"
• 0–255: Defines a range of values
• Notes: Note: (in bold lettering) is followed by useful information or tips
1.4. Symbols and Signal Words
Safety notes and warnings are indicated throughout the user manual by safety signs.
Always follow the instructions provided in this user manual.

DANGER
Indicates an imminently hazardous situation which, if not avoided, will result in death or serious injury.

WARNING
Indicates an imminently hazardous situation which, if not avoided, could result in death or serious injury.

CAUTION
Indicates a potentially hazardous situation, which, if not avoided, may result in minor or moderate injury.

Attention
Indicates important information for the correct operation and use of the product.

Important
Read and observe the instructions in this document.

Electrical hazard

Provides important information about the disposal of this product.
1.5. Symbols on the Information Label
This product is provided with an information label. The information label is located on the bottom plate of the device.
The information label contains the following symbols:

This device is designed for indoor use.

This device falls under IEC protection class I.

This device shall not be treated as household waste.


Caution: Risk of electric shock. Disconnect input power before opening.
Warning: This appliance must be earthed.
2. Safety

Important
Read and follow the instructions in this user manual before installing, operating or servicing this product.
The manufacturer will not accept liability for any resulting damages caused by the non-observance of this manual.
2.1. Warnings and Safety Instructions

DANGER
Danger for children
For adult use only. The device must be installed beyond the reach of children.
- Do not leave various parts of the packaging (plastic bags, polystyrene foam, nails, etc.) within children's reach. Packaging material is a potential source of danger for children.

DANGER
Electric shock caused by short-circuit
This device falls under IEC protection class I.
- Make sure that the device is electrically connected to ground (earth). Connect the device only to a socket-outlet with ground (earth) connection.
- Do not cover the ground (earth) connection.
- Do not let the power cable come into contact with other cables. Handle the power cable and all connections with the mains with caution.
- Do not modify, bend, mechanically strain, put pressure on, pull or heat up the power cable.
- Make sure that the power cable is not crimped or damaged. Examine the power cable periodically for any defects.
- Do not immerse the device in water or other liquids. Do not install the device in a location where flooding may occur.
- Do not use the device during thunderstorms. Disconnect the device from the electrical power supply immediately.

WARNING
Electric shock caused by dangerous voltage inside
There are areas within the device where dangerous touch voltage may be present.
- Do not open the device or remove any covers.
- Do not operate the device if the covers are open.
- Disconnect the device from electrical power supply before service and maintenance, and when the device is not in use.

Attention
Power supply
- Before connecting the device to the power supply, make sure that the current, voltage and frequency match the input voltage, current and frequency specified on the information label on the device.
- Make sure that the cross-sectional area of the extension cords and power cables is sufficient for the required power consumption of the device.

Attention
General safety
- Do not block the ventilation openings. Without proper heat dissipation and air circulation, the internal components may overheat. This can result in product damage.
- Do not shake the device. Avoid brute force when installing or operating the device.
- If the device is dropped or struck, disconnect the device from the electrical power supply immediately.
- If the device is exposed to extreme temperature variations (e.g. after transportation), do not switch it on immediately. Let the device reach room temperature before switching it on, otherwise it may be damaged by the formed condensation.
- If the device fails to work properly, discontinue the use immediately.

Attention
This device shall be used only for the purposes it is designed for.
This device is designed to be used as a media player with an amplifier. Any incorrect use may lead to hazardous situations and result in injuries and material damage.
This device does not contain user-serviceable parts. Unauthorized modifications to the device will render the warranty void. Such modifications may result in injuries and material damage.

Attention
Do not expose the device to conditions that exceed the rated IP class conditions.
This device is IP20 rated. IP (Ingress Protection) 20 class provides protection against solid objects greater than 12 mm, such as fingers, and no protection against harmful ingress of water.
2.2. Requirements for the User
This product may be used by ordinary persons. Maintenance and installation may be carried by ordinary persons. Service shall be carried out only by instructed or skilled persons. Contact your Highlite International dealer for more information.
Instructed persons have been instructed and trained by a skilled person, or are supervised by a skilled person, for specific tasks and work activities associated with the service of this product, so that they can identify risks and take precautions to avoid them.
Skilled persons have training or experience, which enables them to recognize risks and to avoid hazards associated with the service of this product.
Ordinary persons are all persons other than instructed persons and skilled persons. Ordinary persons include not only users of the product but also any other persons that may have access to the device or who may be in the vicinity of the device.
3. Description of the Device
The PA-5500TU 500W 100V Amplifier can be installed in a standard 19-inch rack. It is a D-class amplifier with a media player that supports multiple (wireless) media sources, such as: DAB+, FM radio, AUX in/out and Bluetooth. The device can also be operated with the supplied IR remote control.
3.1. Front View

Fig. 02
01) 4 x mounting openings (for installation in a 19-inch rack)
02) LED power indicator (Blue)
03) Power switch ON/OFF
04) 3,5 mm jack connector AUX IN
05) Input selector
06) Master volume control
07) Bass level control
08) Treble level control
09) Microphone level control
10) XLR/6,3 mm jack combo microphone connector IN
11) Infra-red port
12) 2,4-inch TFT display and control buttons
13) Tune/Select control
3.2. Back View

Fig. 03
14) Wi-Fi antenna connector IN
15) RJ45 LAN connector IN
16) Digital connector (TOSLINK) OUT
17) Digital connector (coaxial) OUT
18) DAB/FM wire antenna connector IN
19) Ground/earth connection
20) (Line 1-4) RCA analog line-level connectors IN (Left/Right)
21) RCA analog line-level connectors OUT (Left/Right)
22) Stereo/Bridge selector
23) Speaker terminals OUT
24) IEC power connector IN
25) Cooling fan
3.3. Product Specifications
| Model: | PA-5500TU 500W 100V Amplifier | |
| Electrical: | ||
| Input voltage: | 220-240 V AC, 50 Hz | |
| Power consumption: | 96 W | |
| SMPS: | Yes | |
| Playback: | ||
| Supported audio files: | AAC/AAC+, FLAC, MP3 | |
| Outputs: | ||
| Amplifier technology: | Class D | |
| RMS output power: | 460 W | |
| Output power (8 Ω @ 1 kHz): | 240 W | |
| Bridge output power (100 V): | 260 W | |
| Output channels: | 2 | |
| Output mode: | Bridge, Stereo | |
| Output impedance: | Stereo: min. 4 Ω, Bridge: 8 Ω | |
| Inputs: | ||
| Stereo inputs: | 4 | |
| Product properties: | ||
| Electronic protection: | Overload, Short circuit | |
| Audio Specifications: | ||
| Playback functions: | Play/Folder/Function | |
| THD level: | < 0.1% | |
| Signal-to-noise ratio: | >100 dB | |
| Frequency response: | 20 Hz-20 kHz | |
| FM frequency: | 87-108 MHz | |
| FM antenna impedance: | 75 Ω | |
| DAB+ frequency: | 174,928-239,2 MHz | |
| Parametric main equalizer: | 2 bands | |
| Carrier frequency: | 2,4 GHz | |
| Bluetooth range: | 20 m | |
| Transformer: | 100 V | |
| Physical: | ||
| Dimensions: | 482 x 330 x 44.5 mm (L x W x H) | |
| Weight: | 3.2 kg | |
| Operation and control: | ||
| Control panel: | 2.4-inch TFT display and buttons | |
| Connections: | ||
| Power connections: | IEC power connector IN | |
| Input connections: | RJ45 Ethernet connector IN, 8 x RCA line-level | |
| Output connections: | Terminal connector, 2 x RCA line-level, 1 x TOSLINK, 1 x coaxial | |
| Construction: | ||
| Housing: | Metal | |
| Color: | Black | |
| IP rating: | IP20 | |
| Amplifier airflow: | Front to back | |
| Amplifier cooling: | Radial fan | |
| Thermal: | ||
| Minimum ambient temperature ta: | 0 °C | |
| Maximum ambient temperature ta: | 40 °C | |
3.4. Dimensions

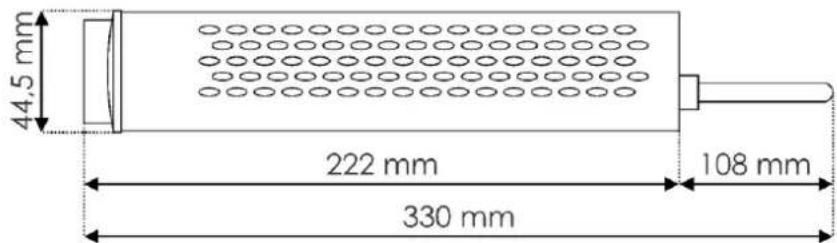
Fig. 04
4. Installation
4.1. Safety Instructions for Installation

Attention
Make sure there is enough space for ventilation around the device.
- Do not block the ventilation openings. Without proper heat dissipation and air circulation, the internal components may overheat. This can result in product damage.
- Do not install near equipment that produces heat, for example amplifiers.
4.2. Installation Site Requirements
- The device must be installed only indoors.
• The device can be placed on a flat surface or mounted in a standard 19-inch rack. - The maximum ambient temperature t_ = 40^ must never be exceeded.
• The relative humidity must not exceed 50 % with an ambient temperature of 40 °C.
4.3. Rack Mounting
The device can be mounted in a standard 19-inch rack. The device requires 1 rack unit (RU) of space, which is 44.5 mm high.
Make sure that the rack is sufficiently secured to prevent it from becoming unstable or falling over.
To mount the device in a two-post rack, follow the steps below:
01) Insert 4 cage nuts in the openings on the rack posts where you want to mount the device.
02) Position the device in front of the rack posts so that the 4 mounting openings (01) on the flanges face the openings on the rack posts with cage nuts.
03) Using a screwdriver, mount the device to the rack posts with 4 screws.
4.4. Connecting the Wi-Fi Antenna
01) Put the Wi-Fi antenna into the Wi-Fi antenna connector (14).
02) Turn the Wi-Fi antenna clockwise to tighten it.
Note: Make sure that the Wi-Fi antenna points up.
4.5. Connecting the DAB/FM Wire Antenna
Put the DAB/FM wire antenna into the DAB/FM wire antenna connector (18).
4.6. Connecting the Device to a Router
To make a LAN connection, it is necessary to connect the device to a router.
01) Plug one end of the network cable into an RJ45 connector on your router.
02) Plug the other end of the network cable into the RJ45 LAN connector (15) on the device.
Note:
If you use a network cable and the DHCP function on the router is activated, it is not necessary to configure the network.
4.7. Connecting Audio Devices
Connect audio devices to the audio outputs and inputs.
- The device has the following audio outputs: TOSLINK connector (16), coaxial connector (17), RCA analog line-level connectors (21) and the speaker terminals (23).
- The device has the following audio inputs: (Line 1–4) RCA analog line-level connectors (20), the 3,5 mm jack AUX connector (04) and the XLR/6,3 mm jack microphone connector (10).
Note: To avoid interference, the PA-5500TU shall be turned off when connecting devices.
Connect the RCA analog line-level connectors (21) to audio devices such as, an additional amplifier, a mixer, a console, etc. If your audio device has digital inputs, connect those to the digital TOSLINK connector (16) or the coaxial connector (17).
Connect the speaker terminals (23) to 2 speakers (Stereo mode), 1 speaker (Bridge mode), a speaker group of 260 W or 1 x 100 V PA speaker. See 5.6.1. Stereo Mode, 5.6.2. Bridge Mode or 5.6.3. 100 V Mode on pages 15–16 for more information.
Connect the (Line 1-4) RCA analog line-level connectors (20) to audio devices such as a CD player or a tuner.
Connect the 3,5 mm jack AUX connector (04) to the audio devices such as a smartphone, MP3 player or a laptop. When this connector is in use, the internet radio will be muted.
Connect the XLR/6,3 mm jack microphone connector (10) to a dynamic microphone.
4.7.1. DAB/FM Signal Reception
To receive radio stations in DAB or FM, connect your audio device to the RCA analog line-level connectors (21) or to the speaker terminals (23). The digital outputs TOSLINK connector (16) and the digital coaxial connector (17) do not work in this operation mode.
Connect a correct antenna (for example, a household aerial antenna) to the DAB/FM wire antenna connector (18).
If reception conditions are good, you can connect the supplied wire antenna. If possible, put the device near a window and unwind the antenna.
4.8. Installation of the Batteries
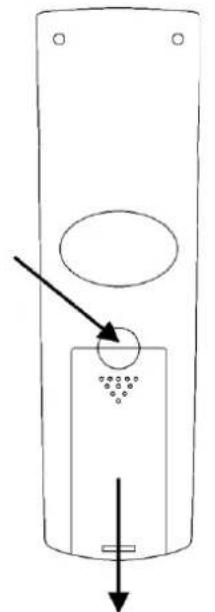
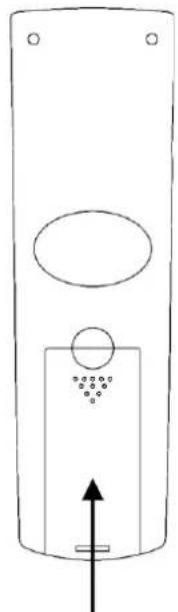
The supplied remote control is delivered without batteries. It accepts 2 x AAA 1,5 V (alkaline) batteries. To install the batteries:
01) Press on the battery compartment cover and move it down, to open (Fig. 05).
02) Insert 2 x AAA 1,5 V batteries into the battery housing (Fig. 06).
03) Close the battery compartment cover (Fig. 07).
natural_image
Simple line drawing of a cylindrical device with an oval top and internal components, showing an arrow pointing to a circular feature (no text or symbols)Fig. 05
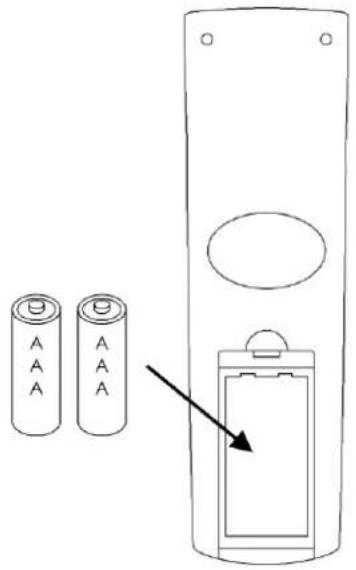
Fig. 06
natural_image
Simple line drawing of a vertical cylindrical device with an oval top and central button, no text or symbols present.Fig. 07
Note: Make sure that you install the batteries with correct polarity orientation.
4.9. Connecting to Power Supply

DANGER
Electric shock caused by short-circuit
The device accepts AC mains power at 220–240 V and 50 Hz. Do not supply power at any other voltage or frequency to the device.
This device falls under IEC protection class I. Make sure that the device is always electrically connected to the ground (earth).
Before connecting the device to the socket-outlet:
- Make sure that the power supply matches the input voltage specified on the information label on the device.
- Make sure that the socket-outlet has ground (earth) connection.
Connect the device to the socket-outlet with the power plug.
5. Setup
5.1. Warnings and Precautions

Attention
Connect all data cables before supplying power.
Disconnect power supply before connecting or disconnecting data cables.
When the PA-5500TU is not connected to other devices, it functions as a stand-alone device. It can be operated manually or with an infrared (IR) remote control.
For more information about the control modes, refer to 6.2. Control Modes on page 17.
5.2. Turning On/Off
The device has a power switch.
- Set the power switch (03) to ON position to turn on the device.
- Set the power switch (03) to OFF position to turn off the device.
Make sure that the device is turned off with the power switch (03) when the device is not in use, to save energy.
Note: The alarm function does not work when the device is turned off.
5.3. Software Updates
When a new software update is available, it will be downloaded and installed automatically the next time the device is on and connected to the internet. Do not turn the device off when the software is being updated.
5.4. Network Setup
The PA-5500TU can be connected to a computer, laptop, tablet or smartphone with a wireless module (Wi-Fi). It is also possible to connect the devices with a CAT-5 cable (LAN).
5.4.1. Wi-Fi Setup
In this section you can connect the device to the router. You can configure your network connection in one of the 3 ways: Scan, with WPS or via Esptouch app on your smartphone. See 5.4.1.1. Wi-Fi Setup via Esptouch App on page 14 for more information.
![T111 12:09 Wi-Fi network 1/5 < Add/Remove AP > < AP:[] > < Signal: > < IP:[Dynamic] > < DNS:[Dynamic]](/content/2026/05/902551/images/101a5b9d3637f8214b91ca4b8f9a83fe303543e3dbd8f8480c1e5e2fcff6abaf.jpg)
01) Turn the TUNE/SELECT control to choose ADD/REMOVE AP.
02) Press the TUNE/SELECT control to confirm.
03) Turn the TUNE/SELECT control to choose ADD AP(SCAN), ADD AP(WPS BUTTON) or ADD AP(SMARTCONFIG). See Wi-Fi Network on page 37 for more information.
04) Press the TUNE/SELECT control to confirm.
5.4.1.1. Wi-Fi Setup via Esptouch App
It is possible to configure the network with Esptouch app, using a smartphone.
Note: Esptouch app does not support 5G networks.
01) Download Esptouch app from the iOS App Store or the Android Play Store to your smartphone.
02) Connect your smartphone to the same Wi-Fi network that you want to connect the PA-5500TU to.
03) Start Esptouch on your smartphone. The smartphone's display shows:
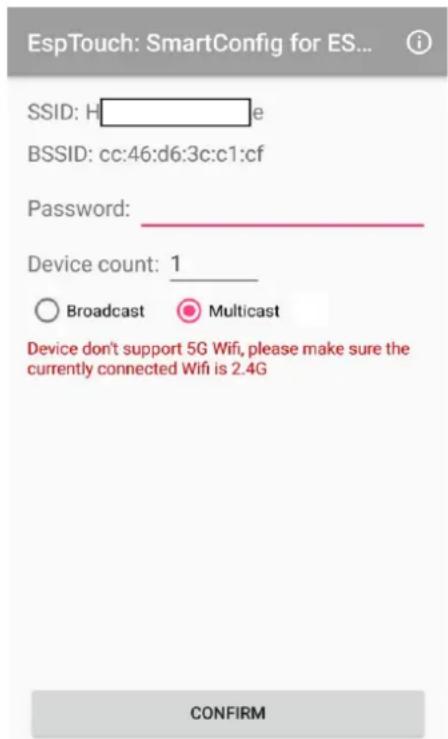
04) Enter the password of your Wi-Fi network in PASSWORD field.
05) Choose MULTICAST.
06) Click CONFIRM.
07) Choose ADD AP(SMARTCONFIG) in Wi-Fi Network menu. (See Wi-Fi Network on page 37 for more information.) The PA-5500TU will connect to the network.
08) When the connection is successful, the device's display reads "Association complete".
5.4.2. LAN Setup
If the device is connected to your router with a network cable, internet access is automatic. No further actions are necessary.
5.4.3. Network Indicator Display Status
The Wi-Fi indicator is visible in the upper left corner of the display. It has the following 2 statuses:

natural_image
Two yellow icons: one with a funnel and bar chart, the other with a grid of boxes and a downward arrow (no text or symbols)Wi-Fi internet connection
LAN internet connection
5.5. Entering Passwords and Searching for Phrases
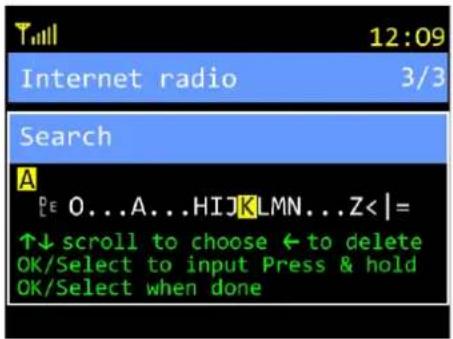
To enter a password or search for phrases:
01) Turn the TUNE/SELECT control to choose characters and press the TUNE/SELECT control to confirm. Repeat this step to type in the desired word or phrase. The available characters are uppercase letters, digits, punctuation marks, and some symbols.
Note: If you make a mistake, press the UP button to remove the wrong character.
02) Press and hold down the TUNE/SELECT control for 5 seconds to confirm.
5.6. Setup Examples
Depending on the way you want to use the speaker(s), you can use the device in Stereo, Bridge or 100 V mode.
5.6.1. Stereo Mode
In Stereo mode, you can connect 2 speakers or 2 speaker groups.
The device delivers 2 x 460 W (for 4 Ω speakers) and 2 x 240 W (for 8 Ω speakers). Use the (+) terminals and (-) terminals to connect the speakers. The minimum total impedance is 4 Ω.
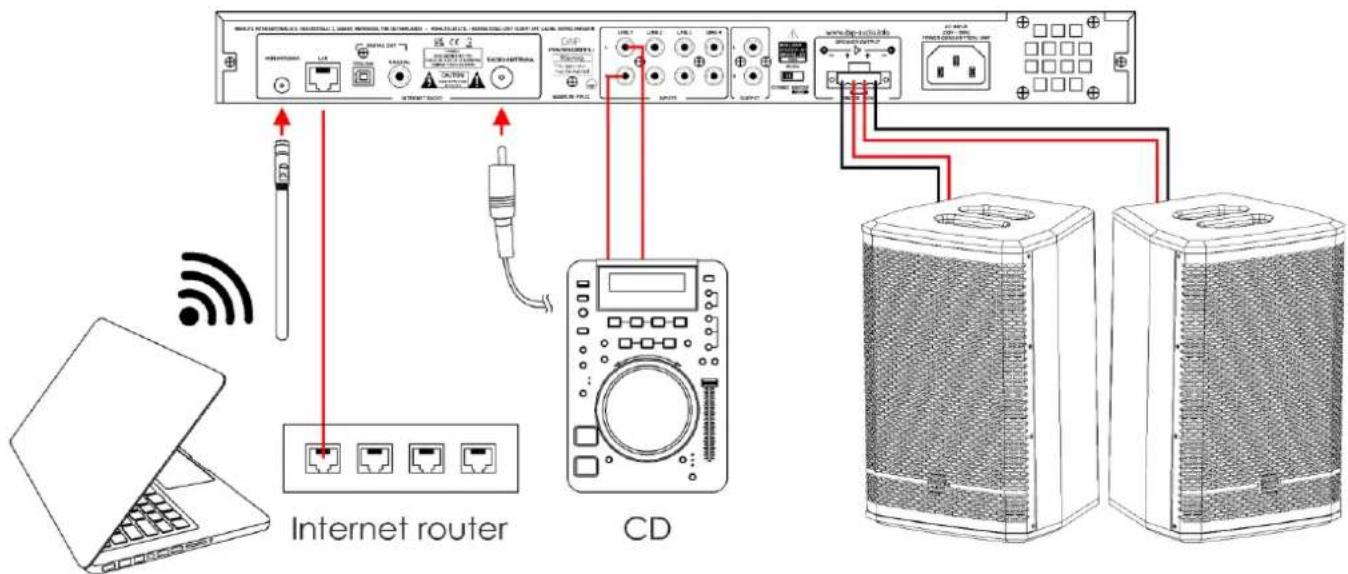
Fig. 08
Note: Make sure that the stereo/bridge selector (22) is in STEREO position.
5.6.2. Bridge Mode
In Bridge mode, you can connect 1 speaker or 1 speaker group. The device will generate double output power.
Use both (+) terminals to connect the speaker(s). The minimum total impedance is 8 Ω.
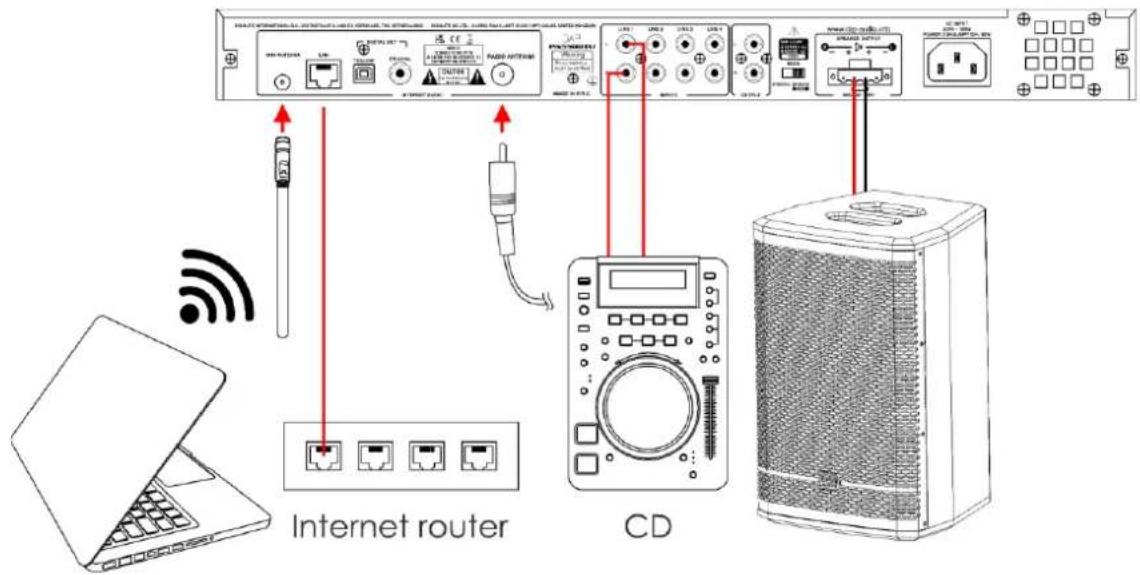
Fig. 09
Note: Make sure that the stereo/bridge selector (22) is in BRIDGE/100V position.
5.6.3. 100 V Mode
In 100 V mode, you can connect 1 x 100 V PA speaker or a speaker group of 260 W. Use both (+) terminals to connect the speaker(s).
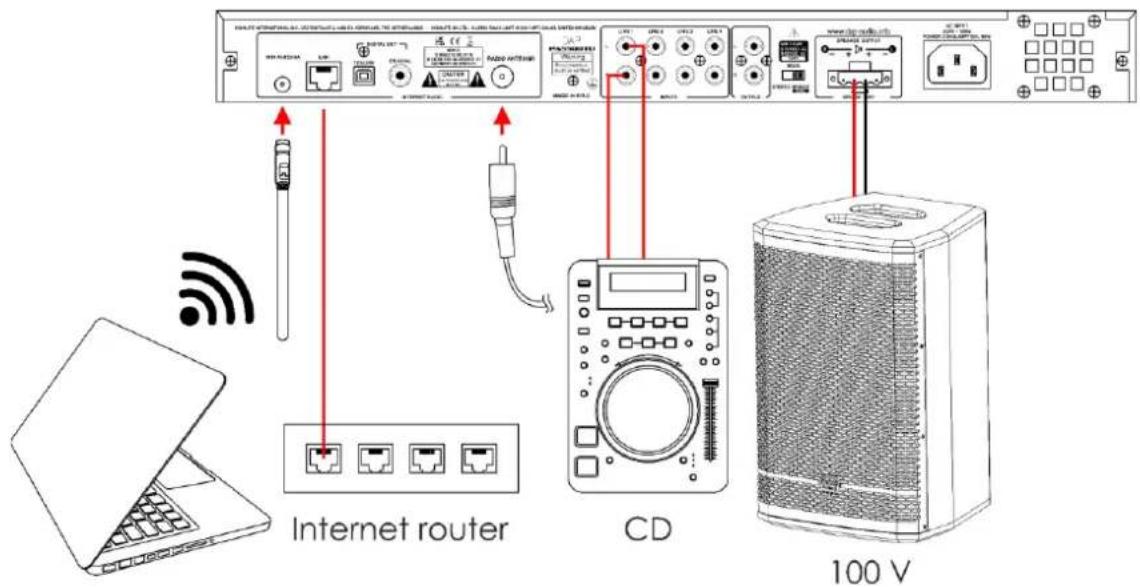
Fig. 10
Note: Make sure that the stereo/bridge selector (22) is in BRIDGE/100V position.
6. Operation
6.1. Safety Instructions for Operation

Attention
This device must be used only for the purposes it is designed for.
This device is intended for use as a media player with an amplifier. It is suitable only for indoor installation. It is not suitable for households.
Any other use, not mentioned under intended use, is regarded as non-intended and incorrect use.

Attention
Power supply
Before connecting the device to the power supply, make sure that the current, voltage and frequency match the input voltage, current and frequency specified on the information label on the device.
6.2. Control Modes
To use the device, it is necessary to establish an internet connection. See 5.4. Network Setup on page 13 for more information.
The PA-5500TU supports the following control modes:
- Internet radio
• Media centre (UPnP/DLNA)
• DAB radio - FM radio
- Bluetooth
See pages 26–31 for more information.
6.3. Control Panel
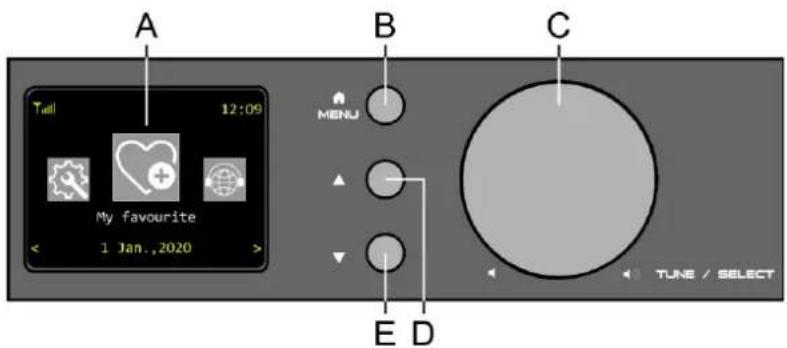
• Use the MENU button to switch between the main menu and the last active operation mode.
- Use the UP button to navigate through the main menu, to scroll through the available characters/numbers, to return to the previous menu screen or to cancel your choice.
- Use the DOWN button to navigate through the main menu, to scroll through the available characters/numbers or to browse through radio station information screens.
- Use the TUNE/SELECT control to navigate through the menus, to confirm your choices, to insert passwords or to set the volume.
6.4. Start-up
If you start the device for the first time, you will have to choose the menu language and configure the wireless network. You need to perform these actions only once.
6.4.1. Choosing Menu Language
See 6.6.9.3. Language on page 40 for more information.
6.4.2. Configuring the Network for the First Time
- If you use LAN, the device will automatically connect to the network.
- If you use Wi-Fi, you will have to configure the network. See 5.4. Network Setup on page 13 for more information.
When the network is configured or when you use LAN (and on each subsequent start-up), the display shows:

After 5 seconds the display shows the main menu.
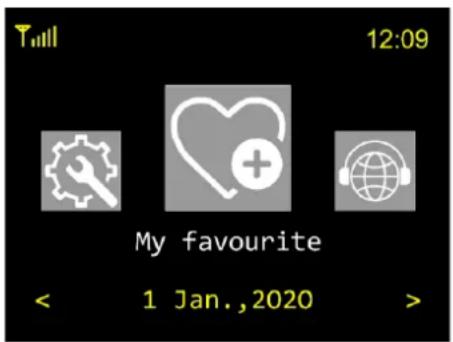
After a few seconds the device will enter the previously used operation mode.
Note:
If no button is pressed, after 20 seconds of inactivity, the display will return to the currently used operation mode. Press the MENU button to return to the main menu.
6.5. Menu Overview
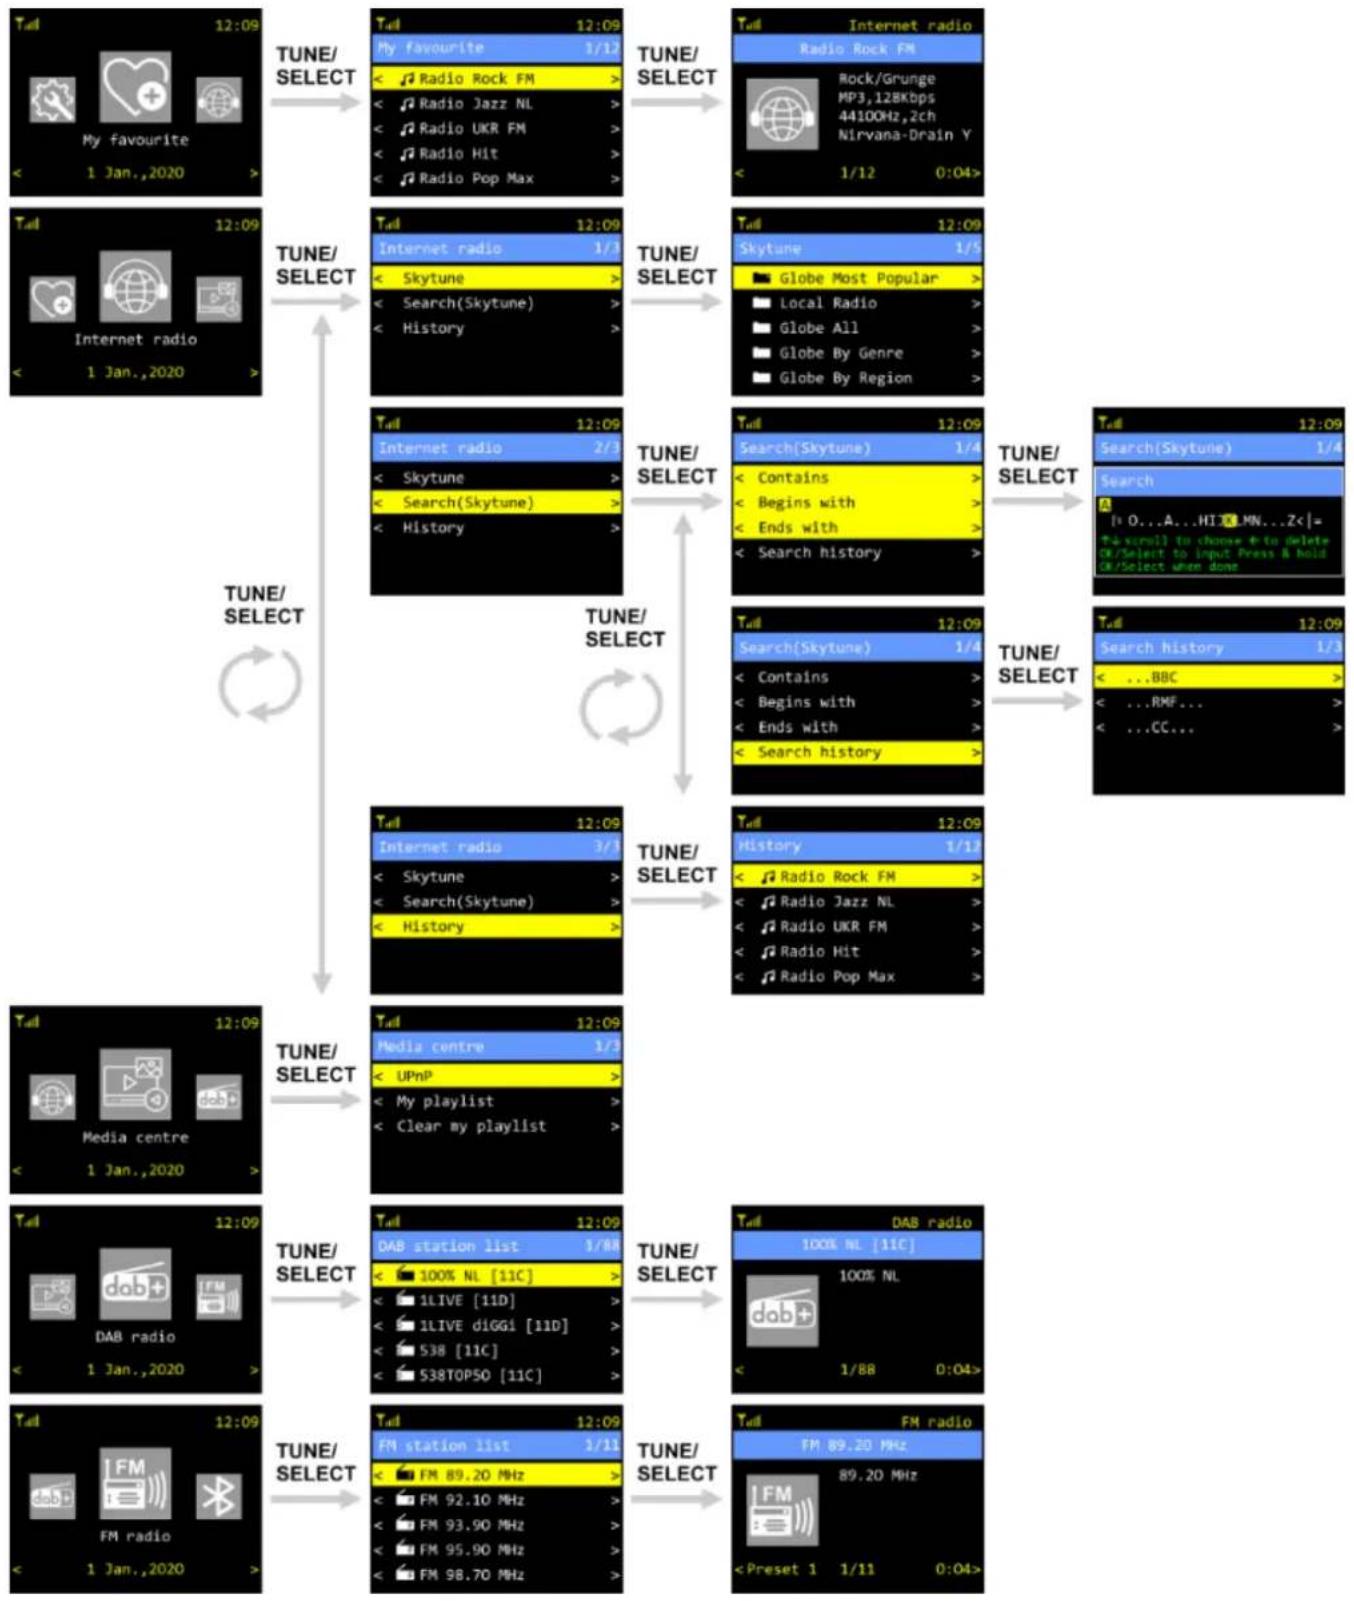
flowchart
graph TD
    A["My favourite 1 Jan.,2020"] --> B["Tune/SELECT"]
    B --> C["Radio Rock FM 1/12"]
    C --> D["Radio Jazz NL 1/12"]
    D --> E["Radio UKR FM 1/12"]
    E --> F["Radio Hit 1/12"]
    F --> G["Radio Pop Max 1/12"]
    G --> H["Internet radio 1/12"]
    H --> I["Radio Rock FM 1/12"]
    I --> J["Rock/Grunge MP3,128Kbps 44100Hz,2ch Nirvana-Drain Y 1/12"]
    J --> K["Global Most Popular 1/12"]
    K --> L["Local Radio 1/12"]
    L --> M["Globe All 1/12"]
    M --> N["Globe By Genre 1/12"]
    N --> O["Globe By Region 1/12"]
    O --> P["Search Skytune 1/12"]
    P --> Q["Globe Most Popular 1/12"]
    Q --> R["Search Skytune 1/12"]
    R --> S["Globe Most Popular 1/12"]
    S --> T["Search Skytune 1/12"]
    T --> U["Globe Most Popular 1/12"]
    U --> V["Search Skytune 1/12"]
    V --> W["Globe Most Popular 1/12"]
    W --> X["Search Skytune 1/12"]
    X --> Y["Globe Most Popular 1/12"]
    Y --> Z["Search Skytune 1/12"]
    Z --> AA["Globe Most Popular 1/12"]
    AA --> AB["Search Skytune 1/12"]
    AB --> AC["Globe Most Popular 1/12"]
    AC --> AD["Search Skytune 1/12"]
    AD --> AE["Globe Most Popular 1/12"]
    AE --> AF["Search Skytune 1/12"]
    AF --> AG["Globe Most Popular 1/12"]
    AG --> AH["Search Skytune 1/12"]
    AH --> AI["Globe Most Popular 1/12"]
    AI --> AJ["Search Skytune 1/12"]
    AJ --> AK["Globe Most Popular 1/12"]
    AK --> AL["Search Skytune 1/12"]
    AL --> AM["Globe Most Popular 1/12"]
    AM --> AN["Search Skytune 1/12"]
    AN --> AO["Globe Most Popular 1/12"]
    AO --> AP["Search Skytune 1/12"]
    AP --> AQ["Globe Most Popular 1/12"]
    AQ --> AR["Search Skytune 1/12"]
    AR --> AS["Globe Most Popular 1/12"]
    AS --> AT["Search Skytune 1/12"]
    AT --> AU["Globe Most Popular 1/12"]
    AU --> AV["Search Skytune 1/12"]
    AV --> AW["Globe Most Popular 1/12"]
    AW --> AX["Search Skytune 1/12"]
    AX --> AY["Globe Most Popular 1/12"]
    AY --> AZ["Search Skytune 1/12"]
    AZ --> BA["Globe Most Popular 1/12"]
    BA --> BB["Search Skytune 1/12"]
    BB --> BC["Globe Most Popular 1/12"]
    BC --> BD["Search Skytune 1/12"]
    BD --> BE["Globe Most Popular 1/12"]
    BE --> BF["Search Skytune 1/12"]
    BF --> BG["Globe Most Popular 1/12"]
    BG --> BH["Search Skytune 1/12"]
    BH --> BI["Globe Most Popular 1/12"]
    BI --> BJ["Search Skytune 1/12"]
    BJ --> BK["Globe Most Popular 1/12"]
    BK --> BL["Search Skytune 1/12"]
    BL --> BM["Globe Most Popular 1/12"]
    BM --> BN["Search Skytune 1/12"]
    BN --> BO["Globe Most Popular 1/12"]
    BO --> BP["Search Skytune 1/12"]
    BP --> BQ["Globe Most Popular 1/12"]
    BQ --> BR["Search Skytune 1/12"]
    BR --> BS["Globe Most Popular 1/12"]
    BS --> BT["Search Skytune 1/12"]
    BT --> BU["Globe Most Popular 1/12"]
    BU --> BV["Search Skytune 1/12"]
    BV --> BW["Globe Most Popular 1/12"]
    BW --> BX["Search Skytune 1/12"]
    BX --> BY["Globe Most Popular 1/12"]
    BY --> BZ["Search Skytune 1/12"]
    BZ --> CA["Globe Most Popular 1/12"]
    CA --> CB["Search Skytune 1/12"]
    CB --> CC["Globe Most Popular 1/12"]
    CC --> CD["Search Skytune 1/12"]
    CD --> CE["Globe Most Popular 1/12"]
    CE --> CF["Search Skytune 1/12"]
PA-5500TU 500W 100V Amplifier
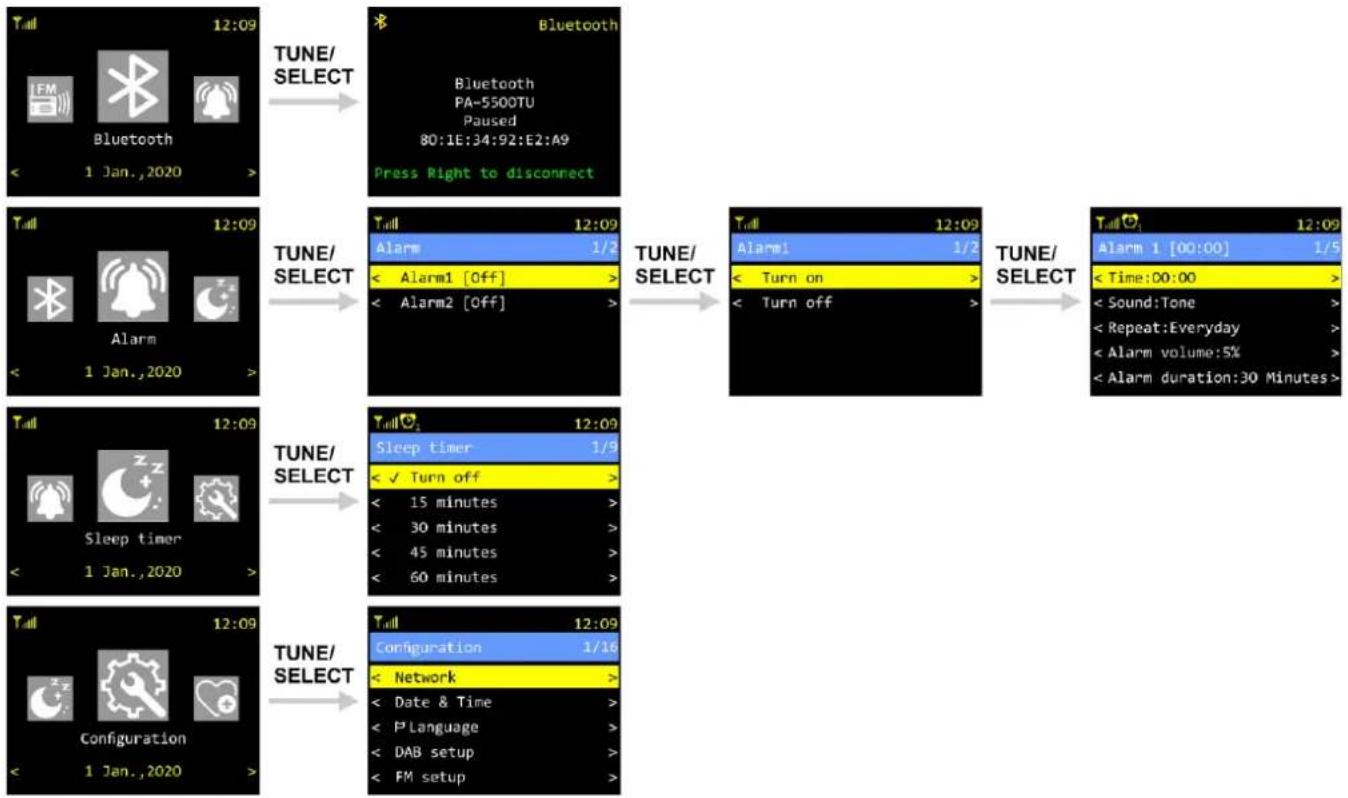
flowchart
graph TD
    A["Bluetooth 12:09"] -->|TUNE/SELECT| B["Bluetooth PA-5500TU Paused 80:1E:34:92:E2:A9 Press Right to disconnect"]
    C["Alarm 12:09"] -->|TUNE/SELECT| D["Alarm 1/2 [Off"] < Alarm1 > < Alarm2["Off"]]
    E["Sleep timer 12:09"] -->|TUNE/SELECT| F["Sleep timer 1/9 < Turn off > < 15 minutes > < 30 minutes > < 45 minutes > < 60 minutes"]
    G["Configuration 12:09"] -->|TUNE/SELECT| H["Configuration 1/16 < Network > < Date & Time > < P Language > < DAB setup > < FM setup"]
    I["Alarm 12:09"] -->|TUNE/SELECT| J["Alarm 1/2 [Off"] < Turn on > < Turn off >]
    K["Alarm duration:30 Minutes"] -->|TUNE/SELECT| L["Alarm duration:30 Minutes >"]
6.6. Main Menu Options
The main menu has the following options:

My Favourite
My Favorite (see 6.6.1. My Favourite)

Internet Radio
Internet Radio (see 6.6.2. Internet Radio)

Media Centre
Media Centre (see 6.6.3. Media Centre)

DAB Radio
DAB Radio (see 6.6.4. DAB Radio)
FM Radio
FM Radio (see 6.6.5. FM Radio)

Bluetooth
Bluetooth (see 6.6.6. Bluetooth)
Alarm
Alarm (see 6.6.7. Alarm)

Sleep Timer
Sleep Timer (see 6.6.8. Sleep Timer)

Configuration
Configuration (see 6.6.9. Configuration)
- Turn the TUNE/SELECT control to navigate through the menu and to choose options in submenus.
- Press the TUNE/SELECT control to open the submenus and to confirm your choices.
- Press the UP button to return to a previous menu screen or to cancel your latest input.
- Press the DOWN button to scroll for more options (if available).
6.6.1. My Favourite
In this menu you can browse through and listen to your favorite internet radio stations.
Note:
To be able to browse through your favorite internet radio stations, you need to search for and save them on the device. See 6.6.2. Internet Radio on page 26 and 6.7. Saving Internet Radio Stations to My Favourite on page 49 for more information.
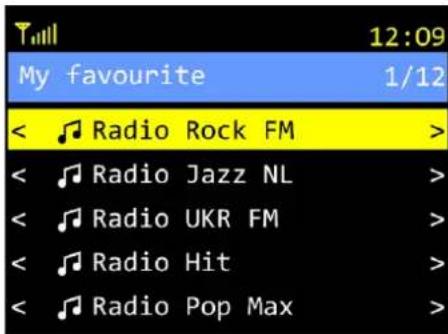
01) Turn the TUNE/SELECT control to choose one of the available radio stations.
02) Press the TUNE/SELECT control to confirm. The display shows the information screen:
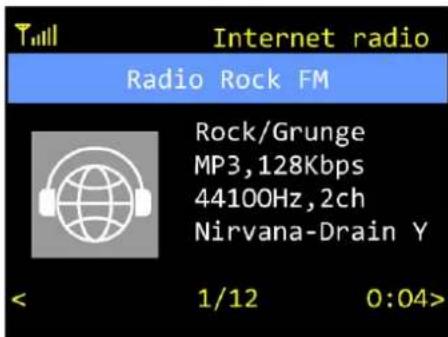
03) Set the volume. See 6.9. Setting Volume on page 50 for more information.
6.6.1.1. Managing My Favourite With a PC or Smartphone
It is possible to view and edit My Favourite with a PC or a smartphone.
01) Connect your PC/smartphone to the same Wi-Fi network as the PA-5500TU.
02) Find the PA-5500TU's IP address. See Network Information on page 48 for more information.
03) Open an internet browser.
04) Enter the IP address in the address bar of your internet browser. The screen shows:
MY FAVOURITE
English
Channel Presets
| ID | Channel Name | Channel URL |
| 1. | #1 Hits 70s | ***** Channel URL is maintained by Skytune |
| 2. | 977 Music - Oldies | ***** Channel URL is maintained by Skytune |
| 3. | 0-24 80er Pop Rock | ***** Channel URL is maintained by Skytune |

Channel Playing on Device
| Channel Name | 0-24 80er Pop Rock |
| Play state: playingDelete from My Favourite |

Add Channel
| Channel Name | Please enter your favourite channel name. (Support hotkey, Ctrl-V / Command-V) | |
| Channel URL | Please enter its stream (NOT webpage) URL. (Support hotkey, Ctrl-V / Command-V) | |
| Channel Country | ---- Select ---- | |
| Genre of Channel | ---- Select ---- | |
| Save | Reset | |
You can view/edit the following options:
• ID Number on the list
- Channel Name Station name
• Channel URL Audio stream/DAB/FM data address
- Play Activate station
- Edit Edit station information
- Delete Delete station from the list
- Move Move station on the list
• Channel Playing On Device Currently active station
- Delete from My Favourite Delete station from My Favourite
- Add Channel Insert station name and URL
- Save Save newly added station
- Reset Reset information
6.6.1.2. Managing My Favourite With the Skytune Radio Portal
It is possible to view and edit My Favourite with the Skytune radio portal.
01) Connect your PC/smartphone to the same Wi-Fi network as the PA-5500TU.
02) Open an internet browser.
03) Enter www.skytune.net in the address bar of your internet browser.
04) Click BROWSE/SEARCH button on the screen. The screen shows:
Skytune
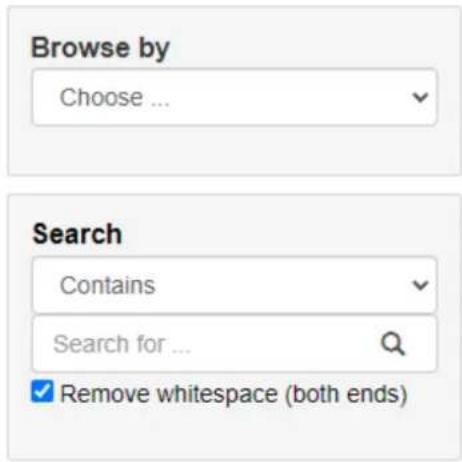
05) Search for a desired radio station. The screen shows:
Skytune
Radio
Suggest Station
FA.Q.
Contact
Language
Browse by
Genre
Music
Bluegrass
Search
Contains
Search for
√ Remove whitespace (both ends)
Genre > Music > Bluegrass

1550 AM Bluegrass WIGN

181 FM - Front Porch (Bluegrass)

181 fm Frontporch (Bluegrass)

181.fm Frontporch (Bluegrass) (mobile)

95.7 That Station

Abiding Radio - Bluegrass Hymns

APS Radio - Bluegrass

Bluegrass Country

Bluegrass Country 2

Bluegrass Planet Radio

Bluegrass Sampler

Blues Music 4 Ever
06) Click on the heart icon next to the desired radio station. The screen shows:
Add Favourite / Listen to Station
Which operation do you want to apply to the station?
181.fm Frontporch (Bluegrass)
Add station to my radio device favourite
○ Listen to station on my radio device
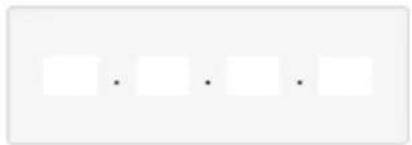
Please enter your radio device's IP below. Please notice that the device must be on same subnet.
natural_image
Three isolated black dots on a white background, no text or symbols presentSend
Close
• ADD STATION TO MY RADIO DEVICE FAVOURITE (Add the station to My Favourite.)
• LISTEN TO STATION ON MY RADIO DEVICE (Listen to the station without adding to My Favourite.)
07) Check one of the 2 options:
08) Find the device's IP address. See Network Information on page 48 for more information.
09) Enter the IP address in the IP address field.
10) Click SEND to confirm the action. The desired radio station will be added to My Favourite. You will be redirected to My Favourite screen. See 6.6.1.1. Managing My Favourite With a PC or Smartphone on page 23 for more information.
6.6.2. Internet Radio
In this menu you can search for and listen to internet radio stations.
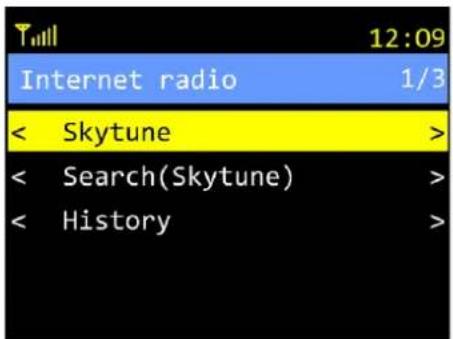
01) Turn the TUNE/SELECT control to choose one of the 3 options:
• SKYTUNE (See 6.6.2.1. Skytune)
• SEARCH(SKYTUNE) (See 6.6.2.2. Search(Skytune))
• HISTORY (See 6.6.2.3. History)
02) Press the TUNE/SELECT control to confirm.
6.6.2.1. Skytune
In this menu you can browse through the available internet radio stations.
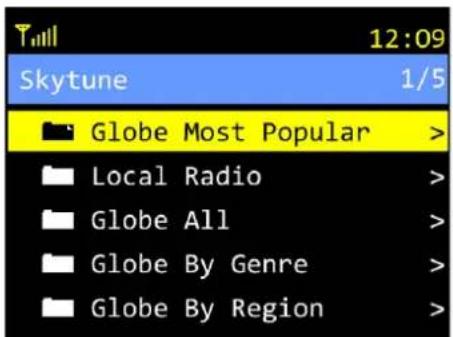
01) Turn the TUNE/SELECT control to choose one of the 5 options:
• GLOBE MOST POPULAR (Most popular internet radio stations in the world)
• LOCAL RADIO (Local internet radio stations)
• GLOBE ALL (All internet radio stations)
• GLOBE BY GENRE (Internet radio stations grouped by genre)
• GLOBE BY REGION (Internet radio stations grouped by continent, country and genre)
02) Press the TUNE/SELECT control to confirm.
03) Turn the TUNE/SELECT control to choose folders/subfolders.
04) Press the TUNE/SELECT control to open folders/subfolders.
05) Press the TUNE/SELECT control to activate internet radio stations.
06) Set the volume. See 6.9. Setting Volume on page 50 for more information.
6.6.2.2. Search(Skytune)
In this menu you can search for internet radio stations by name.
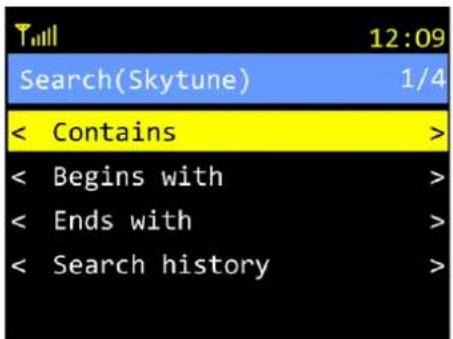
01) Turn the TUNE/SELECT control to choose one of the 4 options:
• CONTAINS (Search for words and phrases.)
- BEGINS WITH (Search for the initial name letters.)
• ENDS WITH (Search for the final name letters.)
- SEARCH HISTORY (Search for the words/phrases/letters that you searched for before.)
02) If you chose CONTAINS, BEGINS WITH or ENDS WITH, press the TUNE/SELECT control to confirm. The display shows:
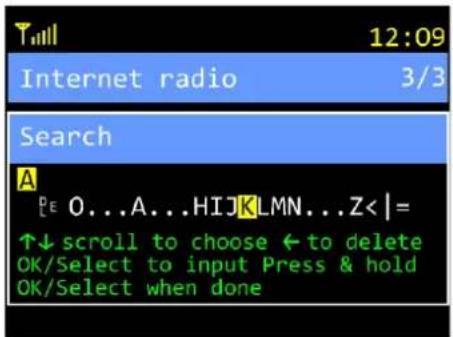
03) Turn the TUNE/SELECT control to choose characters and press the TUNE/SELECT control to confirm. Repeat this step to type in the desired word or phrase. The available characters are uppercase letters, digits, punctuation marks, and some symbols.
Note: If you make a mistake, press the UP button to remove the wrong character.
04) Press and hold down the TUNE/SELECT control for 5 seconds to search for internet radio stations containing the desired word or phrase.
05) Turn the TUNE/SELECT control to choose internet radio stations.
06) Press the TUNE/SELECT control to activate the chosen internet radio station.
07) Set the volume. See 6.9. Setting Volume on page 50 for more information.
If you chose Search History in step 1, press the TUNE/SELECT control to confirm. The display shows:
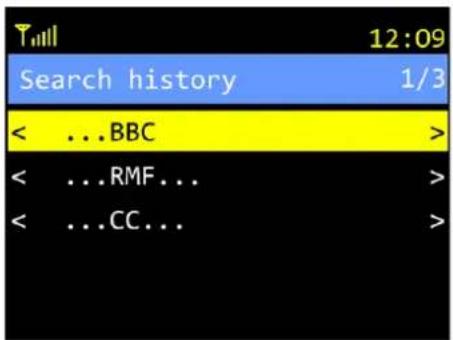
Turn the TUNE/SELECT control to choose the desired word or phrase and press the TUNE/SELECT control to confirm. The device will search for radio stations containing the chosen word or phrase.
6.6.2.3. History
In this menu you can view and activate up to 99 recently listened to internet radio stations.
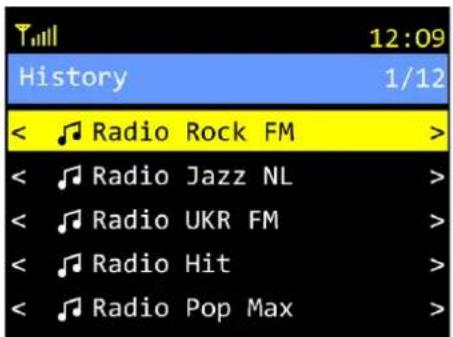
01) Turn the TUNE/SELECT control to choose internet radio stations.
02) Press the TUNE/SELECT control to activate the chosen internet radio station.
6.6.3. Media Centre
In this menu you can stream music from a media server (e.g. a PC with Windows Media Player 10 and higher) via UPnP or DLNA.
- Enable UPnP on your router and on your PC. Read the user manuals of your PC's operating system and of your router for more information.
- On your PC, enable sharing of the folders containing music files. Read the user manual of your PC's operating system for more information
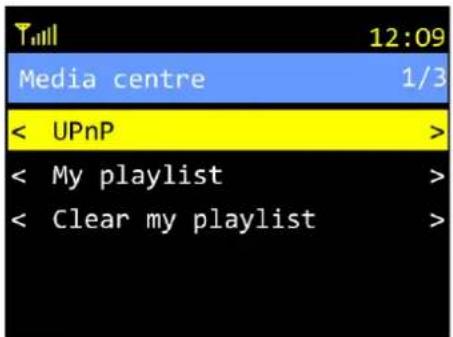
01) Turn the TUNE/SELECT control to choose one of the 3 options:
• UPnP (Universal Plug and Play. See 6.6.3.1. UPnP.)
• MY PLAYLIST (My playlist. See 6.6.3.2. My Playlist.)
- CLEAR MY PLAYLIST (Clear my playlist. See 6.6.3.3. Clear My Playlist.)
02) Press the TUNE/SELECT control to confirm.
6.6.3.1. UPnP
In this menu you can access the UPnP media server.
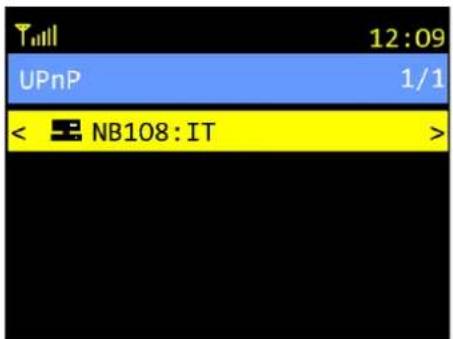
01) Turn the TUNE/SELECT control to choose the available media server(s).
02) Press the TUNE/SELECT control to open the media server.
03) Turn the TUNE/SELECT control to browse through the shared folders.
04) Press the TUNE/SELECT control to open the chosen folder.
05) Turn the TUNE/SELECT control to browse through the shared music files.
06) Press the TUNE/SELECT control to play the chosen music file.
07) Press and hold down the TUNE/SELECT control for 5 seconds to add the chosen music file to the playlist. See 6.6.3.2. My Playlist on page 29 for more information.
6.6.3.2. My Playlist
In this menu you can browse through and listen to your favorite UPnP music files. You can add up to 99 music files.
Note:
To be able to browse through your favorite UPnP music files, you need to add them first. See 6.6.3.1. UPnP on page 29 for more information.
01) Turn the TUNE/SELECT control to choose one of the available music files.
02) Press the TUNE/SELECT control to confirm. The device will play the chosen file.
03) Set the volume. See 6.9. Setting Volume on page 50 for more information.
6.6.3.3. Clear My Playlist
In this menu you can clear the UPnP playlist.
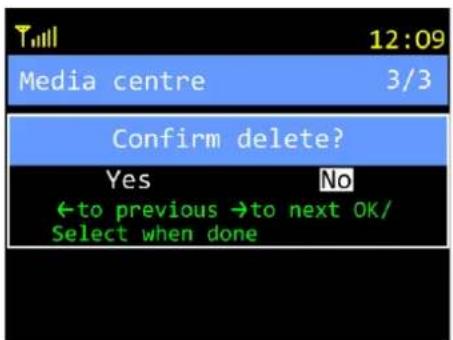
01) Turn the TUNE/SELECT control to choose one of the 2 options:
• YES (Yes. The device will clear the playlist.)
- NO (No. The display will return to the previous menu.)
02) Press the TUNE/SELECT control to confirm.
6.6.4. DAB Radio
In this menu you can browse through and listen to DAB radio stations.
Note:
To be able to browse through DAB radio stations, you need to search for and save them on the device.
01) Press the TUNE/SELECT control to start the scan. The display shows "Scan DAB station?".
02) Press the TUNE/SELECT control to confirm. The device will search for and save all available DAB radio stations. The display shows:
![Tmll 12:09 DAB station list 1/88 < 100% NL [11C] > < 1LIVE [11D] > < 1LIVE diGGi [11D] > < 538 [11C] > < 538TOP50 [11C] >](/content/2026/05/902551/images/2c3dc62b0432d08c98fe2ec7f13c7279265200414a64baa3e0ac2677603caba6.jpg)
03) Turn the TUNE/SELECT control to choose one of the available DAB radio stations.
04) Press the TUNE/SELECT control to confirm. The display shows the information screen:
![Till DAB radio 100% NL [11C] 100% NL dab+ < 1/88 0:04>](/content/2026/05/902551/images/1ce88819bafab8da83738d03426acdacad9d94f75b9e0afc01cbe84b0468f0c6.jpg)
6.6.5. FM Radio
In this menu you can browse through and listen to FM radio stations. Also, it is possible to manually tune the FM radio frequency. See 6.10. Manual FM Frequency Tuning on page 50 for more information.
Note:
To browse through FM radio stations, you need to search for and save them on the device.
01) Press the TUNE/SELECT control to start the scan. The display shows "Scan FM station?".
02) Press the TUNE/SELECT control to confirm. The device will search for and save all available FM radio stations. The display shows:
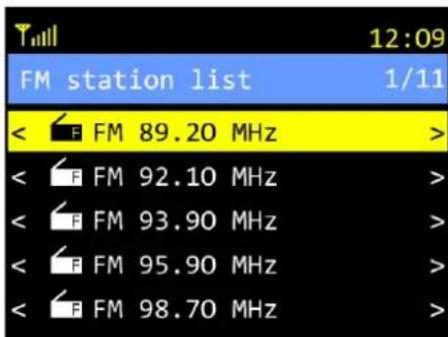
03) Turn the TUNE/SELECT control to choose one of the available FM radio stations.
04) Press the TUNE/SELECT control to confirm. The display shows the information screen:
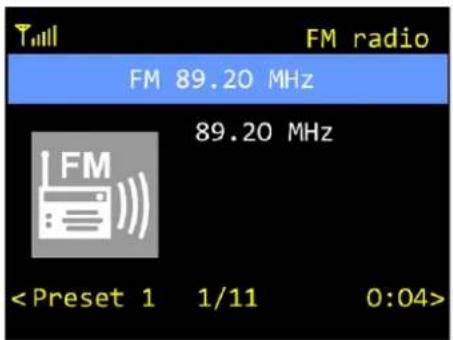
6.6.6. Bluetooth
In this menu you can stream Bluetooth signals from your mobile devices (smartphones, tablets, notebooks, etc.).
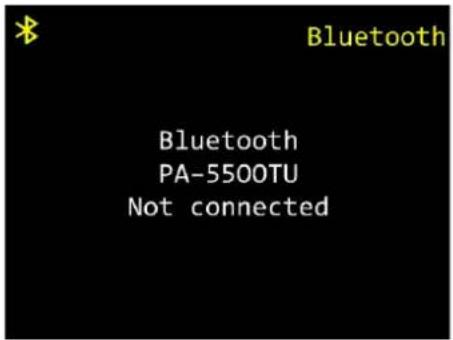
To be able to stream Bluetooth signals, the PA-5500TU needs to be paired with your mobile device.
01) Start Bluetooth on your mobile device.
02) On your mobile device, scan for the available Bluetooth devices. The ID of the PA-5500TU is "PA-5500TU".
03) On your mobile device, connect with the PA-5500TU. The display shows:
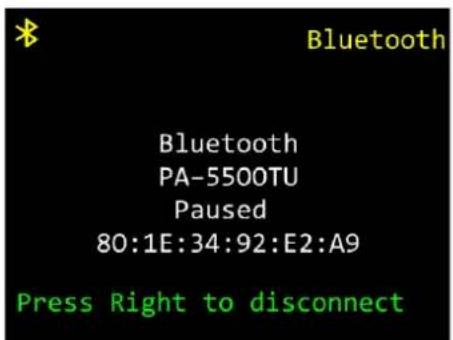
04) On your mobile device, search for and play any music or video file or visit streaming services. The PA-5500TU will receive signals from your mobile device.
6.6.7. Alarm
In this menu you can set the time when the device turns on. You can set 2 alarms.
![Tmll 12:09 Alarm 1/2 < Alarm1 [Off] > < Alarm2 [Off] >](/content/2026/05/902551/images/ef18584262ae57ed89006c4223f026bf4c2a1a481db34ef6ea47449028d89056.jpg)
01) Turn the TUNE/SELECT control to choose one of the 2 available alarms.
02) Press the TUNE/SELECT control to confirm. The display shows:
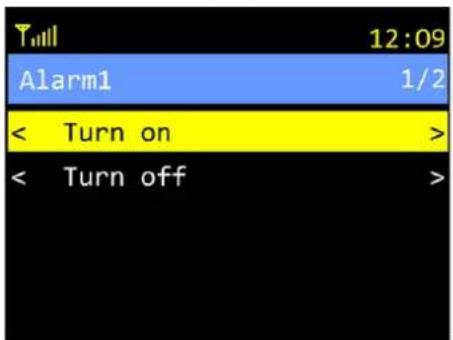
03) Turn the TUNE/SELECT control to choose one of the 2 options:
- TURN ON (Set the alarm. See step 4 below.)
- TURN OFF (The display will return to the previous screen.)
04) Press the TUNE/SELECT control to confirm. The display shows:
![12:09 Alarm 1 [00:00] 1/5](/content/2026/05/902551/images/3e3b74dc24753501c6e86e1aeaf116e71b716e0d1e44ea1bebc7453d6a76becb.jpg)
05) Turn the TUNE/SELECT control to choose one of the 5 options:
• TIME (Time settings. See 6.6.7.1. Time.)
• SOUND (Sound settings. See 6.6.7.2. Sound.)
• REPEAT (Alarm repetition options. See 6.6.7.3. Repeat.)
• ALARM VOLUME (Alarm volume. See 6.6.7.4. Alarm Volume.)
• ALARM DURATION (Alarm duration. See 6.6.7.5. Alarm Duration.)
06) Press the TUNE/SELECT control to confirm.
6.6.7.1.Time
In this menu you can set the alarm time.
![12:09 Alarm 1 [00:00] Time 00 00 HH : 00 ↑↓ to increase/decrease ←→ to previous/next OK/Select when done](/content/2026/05/902551/images/0667e32b247665ea34f530961ac0b4e23ae81e81e2caf771d6e6e53b5f8dc312.jpg)
01) Press the UP/DOWN buttons to choose the hours or the minutes.
02) Turn the TUNE/SELECT control to set the values. The adjustment ranges are 00–23 (hours) and 00–59 (minutes).
03) Press the TUNE/SELECT control to confirm.
6.6.7.2. Sound
In this menu you can choose the sound source of the alarm. You can choose the default alarm tone or one of the available (favorite) internet, FM or DAB radio stations.
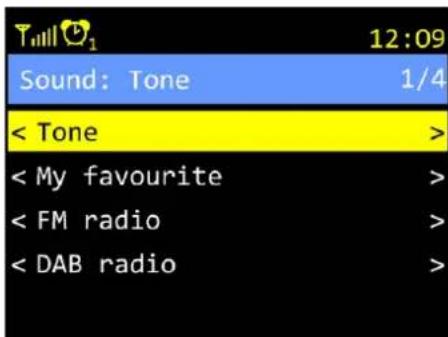
01) Turn the TUNE/SELECT control to choose one of the 4 options:
• TONE (Default alarm tone)
• MY FAVOURITE (My Favorite. See 6.6.1. My Favourite on page 22 for more information.)
• FM RADIO (FM Radio. See 6.6.5. FM Radio on page 30 for more information.)
• DAB RADIO (DAB Radio. See 6.6.4. DAB Radio on page 30 for more information.)
02) Press the TUNE/SELECT control to confirm.
6.6.7.3. Repeat
In this menu you can set the alarm frequency. Alarms can be set for chosen days or for every day of the week.
By default, the alarms are set to EVERYDAY.
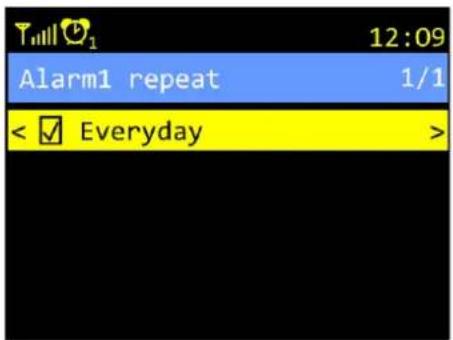
To change the settings:
01) Press the TUNE/SELECT control. The display shows:
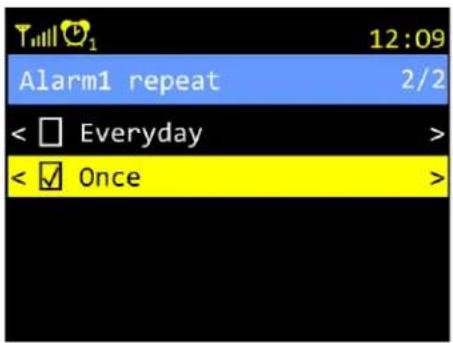
02) Turn the TUNE/SELECT control to choose ONCE.
03) Press the TUNE/SELECT control to confirm. The display shows:
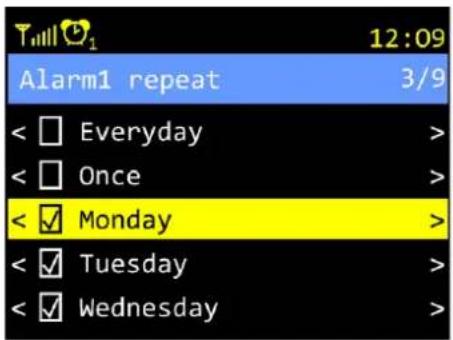
04) Turn the TUNE/SELECT control to choose the desired day of the week and press the TUNE/SELECT control to confirm. Repeat this step as many times as required, to choose the other days.
6.6.7.4. Alarm Volume
In this menu you can set the alarm volume.
![12:09 Alarm 1 [00:00] Alarm1 ↑↓ to increase/decrease ← to abort < Alarm volume:5% > < Alarm duration:30 Minutes >](/content/2026/05/902551/images/d7f13f8bcb206430f73df7b1b5a5e3a73cb5ecb52a6e96087e41dac520e3d3c2.jpg)
01) Turn the TUNE/SELECT control to set the alarm volume. The adjustment range is 2–100 %, in increments of 5 %.
02) Press the TUNE/SELECT control to confirm.
6.6.7.5. Alarm Duration
In this menu you can set the alarm duration.
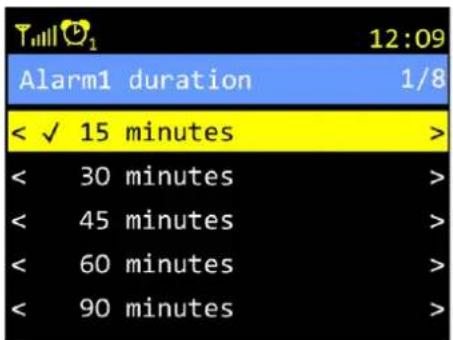
01) Turn the TUNE/SELECT control to set the alarm duration. The adjustment range is 15–180 minutes (8 increments: 15, 30, 45, 60, 90, 120, 150, 180 minutes).
02) Press the TUNE/SELECT control to confirm.
6.6.8. Sleep Timer
In this menu you can set the sleep timer.
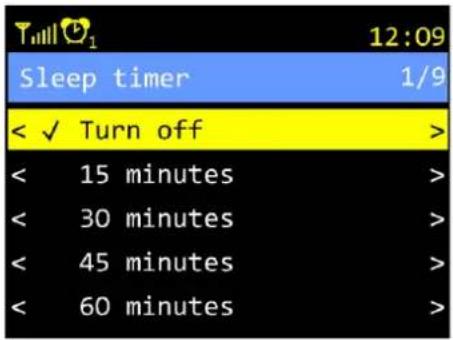
01) Turn the TUNE/SELECT control to set the sleep timer. The adjustment range is 15–180 minutes (8 increments: 15, 30, 45, 60, 90, 120, 150, 180 minutes) and TURN OFF (Sleep timer off). 02) Press the TUNE/SELECT control to confirm. The device will enter stand-by mode after the preset amount of time.
6.6.9. Configuration
In this menu you can view and change the device's settings.
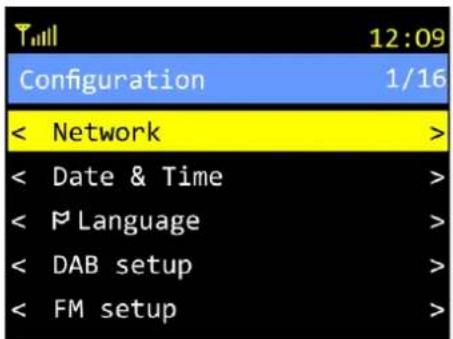
01) Turn the TUNE/SELECT control to choose one of the 16 submenus:
• NETWORK: Network settings. See 6.6.9.1. Network on page 36.
- DATE & TIME: Date and time settings. See 6.6.9.2. Date & Time on page 38.
• LANGUAGE: Language settings. See 6.6.9.3. Language on page 40.
• DAB SETUP: DAB radio settings. See 6.6.9.4. DAB Setup on page 40.
• FM SETUP: FM radio settings. See 6.6.9.5. FM Setup on page 41.
• LOCAL RADIO: Local radio source. See 6.6.9.6. Local Radio on page 43.
- PLAYBACK SETUP: Playback settings. See 6.6.9.7. Playback Setup on page 44.
- RESUME PLAY OPTIONS: Resume play settings. See 6.6.9.8. Resume Play Options on page 44.
• POWER-ON OPTIONS: Power-on settings. See 6.6.9.9. Power-on Options on page 45.
• DIMMER: Dimmer settings. See 6.6.9.10. Dimmer on page 45.
• EQ: Equalizer settings. See 6.6.9.11. EQ on page 46.
- BUFFER TIME: Buffer settings. See 6.6.9.12. Buffer Time on page 47.
• LINE OUT GAIN: Line out gain settings. See 6.6.9.13. Line Out Gain on page 47.
• INFORMATION: Network and system information. See 6.6.9.14. Information on page 48.
- SOFTWARE UPDATE: Software update. See 6.6.9.15. Software Update on page 49.
- RESET TO DEFAULT: Restore factory settings. See 6.6.9.16. Reset to Default on page 49.
02) Press the TUNE/SELECT control to confirm.
6.6.9.1. Network
In this menu you can set up the network.
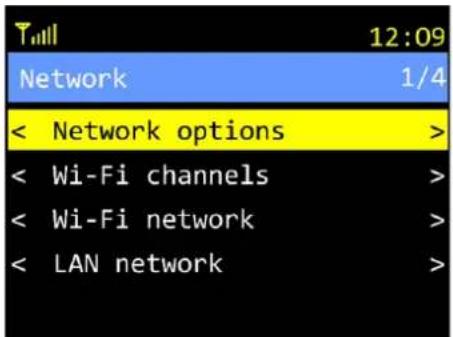
01) Turn the TUNE/SELECT control to choose one of the 4 submenus:
• NETWORK OPTIONS (Network options)
• WI-FI CHANNELS (Wi-Fi channel selection)
• WI-FI NETWORK (Wi-Fi network setup)
• LAN NETWORK (LAN network options)
02) Press the TUNE/SELECT control to confirm.
Network Options
In this submenu you can set the Wi-Fi access.
01) Turn the TUNE/SELECT control to choose one of the 2 options:
- ALWAYS ON (Wi-Fi remains on. It provides faster access when turning on the device.)
• AUTO OFF IN 30s (Wi-Fi turns off after 30 seconds when not used, to save energy.)
02) Press the TUNE/SELECT control to confirm.
Wi-Fi Channels
In this submenu you can set the country-specific Wi-Fi radio channels.
01) Turn the TUNE/SELECT control to choose one of the 4 options:
- CHINA
• JAPAN
• USA
• EUROPE
02) Press the TUNE/SELECT control to confirm.
Wi-Fi Network
In this submenu you can connect the device to your local Wi-Fi network.
01) Turn the TUNE/SELECT control to choose one of the 5 submenus:
- ADD/REMOVE AP (The device will scan for routers in the area. There are 4 options.)
- ADD AP(SCAN) (The device will scan for available routers. You will need to insert the network password.)
- ADD AP(WPS BUTTON) (The device will scan for available WPS routers. Choose the desired network, confirm and press the WPS button on your router to connect.)
- ADD AP(SMARTCONFIG) (Configure the network via Esptouch app on your smartphone. See 5.4.1.1. Wi-Fi Setup via Esptouch App on page 14.)
- REMOVE AP (Choose a network and confirm, to remove it.)
• AP (Indication of active networks)
- SIGNAL (Signal quality indicator. If the signal is lower than 70 dBm, check the position of the router or look if there are any errors.)
• IP (IP setting. Choose between DYNAMIC and FIXED.)
• DNS (DNS setting. Choose between DYNAMIC and FIXED.)
02) Press the TUNE/SELECT control to open the submenus.
03) Turn the TUNE/SELECT control to choose options.
04) Press the TUNE/SELECT control to confirm.
LAN Network
In this submenu you can change the settings of your LAN network.
01) Turn the TUNE/SELECT control to choose one of the 2 submenus:
- IP (IP setting. Choose between DYNAMIC and FIXED.)
• DNS (DNS setting. Choose between DYNAMIC and FIXED.)
02) Press the TUNE/SELECT control to open the submenus.
03) Turn the TUNE/SELECT control to choose options.
04) Press the TUNE/SELECT control to confirm.
6.6.9.2. Date & Time
In this menu you can adjust the time settings.
![T111 12:09 Date & Time 1/8 < Time zone: [Amsterdam] > < Set time format > < Set date format > < DST(Daylight Saving Time> < NTP:[Use network time] >](/content/2026/05/902551/images/2aec04ec3a2a6ddae33890e75d54a3c788258586ccbc24ca1d4fcb39dbeb81f9.jpg)
01) Turn the TUNE/SELECT control to choose one of the 8 options:
• TIME ZONE (Time zone selection)
- SET TIME FORMAT (Time format selection)
- SET DATE FORMAT (Date format selection)
• DST (Daylight Saving Time)
• NTP (Network Time protocol settings)
• NTP SERVER (Time server for automatic time setting)
- SET TIME FROM DAB (Use the time of the currently active DAB radio station)
- SET TIME FROM FM (Use the time of the currently active FM radio station)
02) Press the TUNE/SELECT control to confirm.
Time Zone
In this submenu you can set the time zone.
01) Turn the TUNE/SELECT control to choose one of the 2 options:
• AUTO-SET TIME ZONE (Time zones will be chosen automatically.)
- MANUAL-SET TIME ZONE (Choose the correct time zone manually. The time zones are grouped by continent and country.)
02) Press the TUNE/SELECT control to confirm.
Set Time Format
In this submenu you can set the time display format.
01) Turn the TUNE/SELECT control to choose one of the 2 options:
• 12 HOUR (12-hour format)
• 24 HOUR (24-hour format)
02) Press the TUNE/SELECT control to confirm.
Set Date Format
In this submenu you can set the date display format.
01) Turn the TUNE/SELECT control to choose one of the 2 options:
• DD/MM/YYYY (Day, month, year)
• MM/DD/YYYY (Month, day, year)
02) Press the TUNE/SELECT control to confirm.
DST (Daylight Saving Time)
In this submenu you can turn the daylight saving time on and off.
01) Turn the TUNE/SELECT control to choose one of the 2 options:
• ON DST (The device will adjust the displayed time to the summer or winter time.)
- OFF DST (The device will not adjust the time.)
02) Press the TUNE/SELECT control to confirm.
NTP (Network Time Protocol)
In this submenu you can set whether the device will automatically show the network time or not.
01) Turn the TUNE/SELECT control to choose one of the 2 options:
- USE NETWORK TIME (The device will show the network time.)
• DO NOT USE NETWORK TIME (The device will not show the network time.)
02) Press the TUNE/SELECT control to confirm.
NTP Server
In this submenu you can set the time server, necessary for automatic time setting.
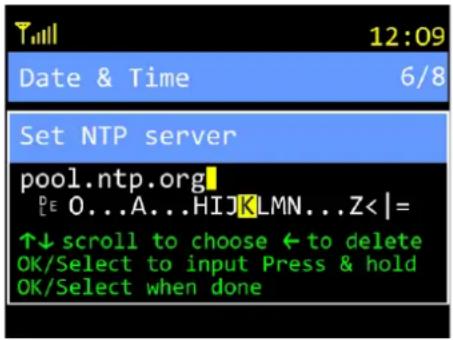
01) Turn the TUNE/SELECT control to choose characters and press the TUNE/SELECT control to confirm. Repeat this step to type in the address of the time server. The available characters are uppercase and lowercase letters, digits, punctuation marks, and some symbols.
Note: If you make a mistake, press the UP button to remove the wrong character.
02) Press and hold down the TUNE/SELECT control for 5 seconds to confirm.
Set Time From DAB
In this submenu you can set whether the device will show the time of the DAB transmitter or not.
01) Turn the TUNE/SELECT control to choose one of the 2 options:
• ON (DAB transmitter time is on.)
• OFF (DAB transmitter time is off.)
02) Press the TUNE/SELECT control to confirm.
Set Time From FM
In this submenu you can set whether the device will show the time of the FM transmitter or not.
01) Turn the TUNE/SELECT control to choose one of the 2 options:
• ON (FM transmitter time is on.)
• OFF (FM transmitter time is off.)
02) Press the TUNE/SELECT control to confirm.
6.6.9.3. Language
In this menu you can set the main menu language.
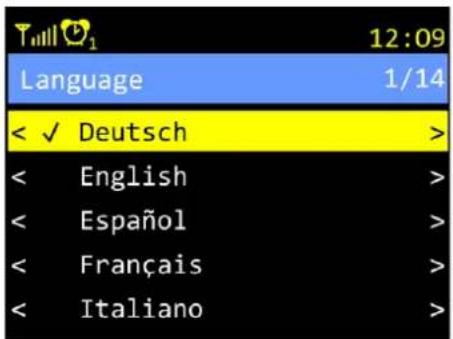
01) Turn the TUNE/SELECT control to choose one of the 14 languages: GERMAN, ENGLISH, SPANISH, FRENCH, ITALIAN, DUTCH, POLISH, RUSSIAN, CZECH, HUNGARIAN, SLOVAK, ROMANIAN, CROATIAN or CHINESE.
02) Press the TUNE/SELECT control to confirm.
6.6.9.4. DAB Setup
In this menu you can search for, save and listen to DAB radio stations.
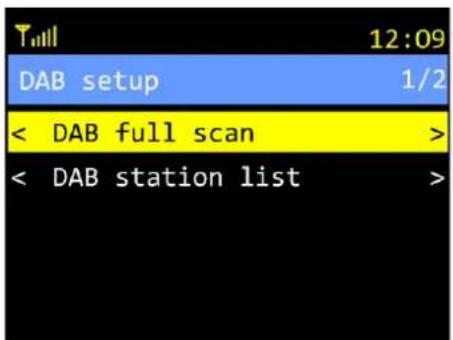
01) Turn the TUNE/SELECT control to choose one of the 2 options:
• DAB FULL SCAN (The device will search for and save all available DAB radio stations.)
• DAB STATION LIST (Browse through DAB radio stations.)
02) Press the TUNE/SELECT control to confirm.
Note: To be able to browse through DAB radio stations, you need to search for and save them on the internet radio.
03) Press the TUNE/SELECT control to start the scan. The device will search for and save all available DAB radio stations. The display shows:
![T 12:09 DAB station list 1/88 < 100% NL [11C] < 1LIVE [11D] < 1LIVE diGGi [11D] < 538 [11C] < 538TOP50 [11C]](/content/2026/05/902551/images/28f81cfaeccabc35354a5fb8d0a72e9bc96f14e81710cb0ff22643aafadf217f.jpg)
04) Turn the TUNE/SELECT control to choose one of the available DAB radio stations.
05) Press the TUNE/SELECT control to confirm. The display shows the information screen:
![Till DAB radio 100% NL [11C] 100% NL dab+ < 1/88 0:04>](/content/2026/05/902551/images/6a4d20523292a797dcd406cadaf1e2636a6b48a826143d5d8fe7f4fcb1e89d94.jpg)
6.6.9.5. FM Setup
In this menu you can set up, browse through and listen to FM radio stations.
![12:09 FM setup 1/5 < FM area > < Scan setting:[All stations]> < Audio setting:[Auto stereo]> < FM full scan > < FM station list >](/content/2026/05/902551/images/7972b1939881a8ba0395821a784713ac07ba800561faf4984e01fdf375681c05.jpg)
01) Turn the TUNE/SELECT control to choose one of the 5 submenus:
• FM AREA (Choose the desired FM area.)
• SCAN SETTING (FM search settings)
• AUDIO SETTING (Choose between Stereo and Mono.)
• FM FULL SCAN (The device will search for and save all available FM radio stations.)
• FM STATION LIST (Browse through FM radio stations.)
02) Press the TUNE/SELECT control to confirm.
FM Area
In this submenu you can choose the FM area where the device will search for FM radio stations.
01) Turn the TUNE/SELECT control to choose one of the 3 FM areas:
- ASIA>OTHERS
• AMERICAS
• EUROPE>OTHERS
02) Press the TUNE/SELECT control to confirm.
Scan Setting
In this submenu you can adjust the FM search settings.
01) Turn the TUNE/SELECT control to choose one of the 2 options:
- STRONG STATIONS ONLY (The device will search for and save only the strongest FM radio stations.)
- ALL STATIONS (The device will search for and save all available FM radio stations.)
02) Press the TUNE/SELECT control to confirm.
Audio Setting
In this submenu you can adjust the audio settings.
01) Turn the TUNE/SELECT control to choose one of the 2 options:
• FORCED MONO (The device will use one channel to convert a signal to sound.)
• AUTO STEREO (The device will use multiple channels to convert multiple signals to sound.)
02) Press the TUNE/SELECT control to confirm.
FM Full Scan
In this submenu the device will search for and save all available FM radio stations.
When the scan is complete, the display shows:
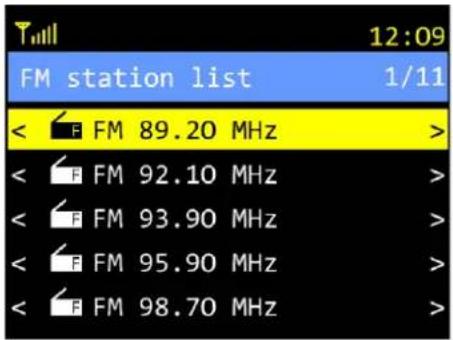
01) Turn the TUNE/SELECT control to choose one of the available FM radio stations.
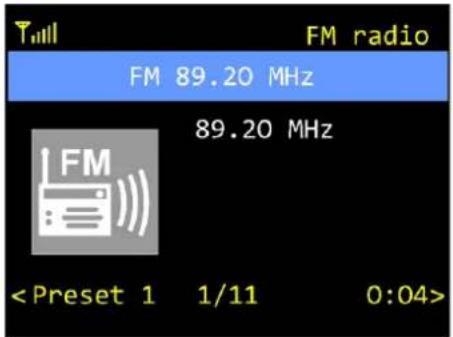
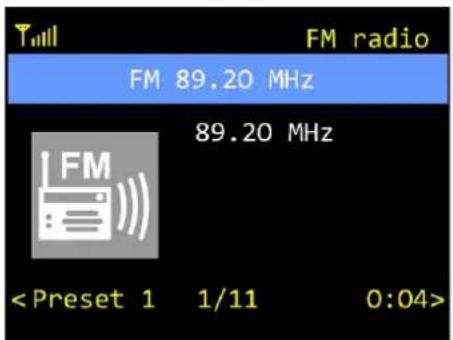
02) Press the TUNE/SELECT control to confirm. The display shows the information screen:
FM Station List
In this submenu you can browse through and listen to FM radio stations.
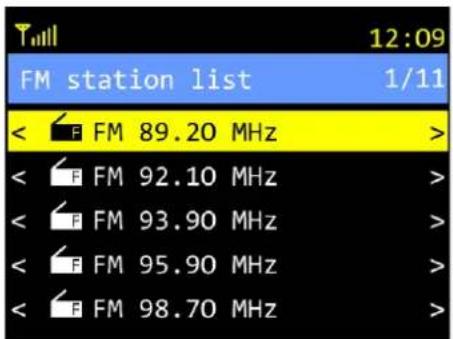
01) Turn the TUNE/SELECT control to choose one of the available FM radio stations.
02) Press the TUNE/SELECT control to confirm. The display shows the information screen:
6.6.9.6. Local Radio
In this submenu you can adjust the local radio settings.
01) Turn the TUNE/SELECT control to choose one of the 2 options:
• AUTO-SET LOCAL RADIO (The device will automatically scan for radio stations in your area.)
- MANUAL-SET LOCAL RADIO (Choose your local area manually. The local areas are grouped by continent and country.)
02) Press the TUNE/SELECT control to confirm.
6.6.9.7. Playback Setup
In this menu you can adjust the media center playback settings.
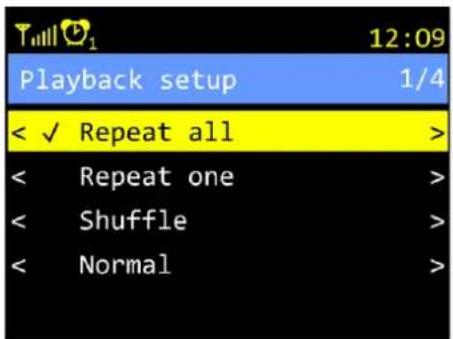
01) Turn the TUNE/SELECT control to choose one of the 4 options:
- REPEAT ALL (The device will repeat all tracks.)
- REPEAT ONE (The device will repeat one track.)
- SHUFFLE (The device will play all tracks once, in a random order.)
• NORMAL (The device will play all tracks once.)
02) Press the TUNE/SELECT control to confirm.
6.6.9.8. Resume Play Options
In this menu you can decide whether the device, on start-up, will run the last active operation mode or will stay in the main menu.
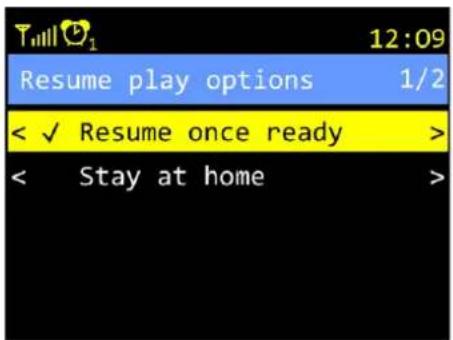
01) Turn the TUNE/SELECT control to choose one of the 2 options:
- RESUME ONCE READY (The device will run the last active operation mode.)
• STAY AT HOME (The device will stay in the main menu.)
02) Press the TUNE/SELECT control to confirm.
6.6.9.9. Power-on Options
In this menu you can decide whether the device, after a power outage, will return to stand-by mode or to the main menu.
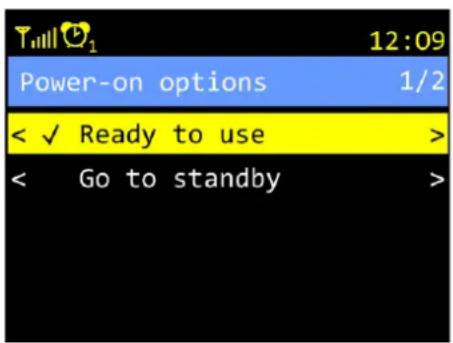
01) Turn the TUNE/SELECT control to choose one of the 2 options:
- READY TO USE (The device will return to the main menu.)
• GO TO STANDBY (The device will activate stand-by mode.)
02) Press the TUNE/SELECT control to confirm.
6.6.9.10. Dimmer
In this menu you can set the behavior of the display and the display brightness.
![T 12:09 Dimmer 1/2 < Mode:[Normal] > < Level >](/content/2026/05/902551/images/999652efaa60e1c2eff162a4be77ac419d90b1a20d4d888af5948a96a6c01a6c.jpg)
01) Turn the TUNE/SELECT control to choose one of the 2 submenus:
- MODE (Set the behavior of the display.)
- LEVEL (Set the display brightness.)
02) Press the TUNE/SELECT control to confirm.
Mode
In this submenu you can set the display behavior.
01) Turn the TUNE/SELECT control to choose one of the 2 options:
• NORMAL (The display will remain at full brightness.)
• DIM (The display will be dimmed after 15 seconds.)
02) Press the TUNE/SELECT control to confirm.
Level
In this submenu you can set the display brightness.
01) Turn the TUNE/SELECT control to choose one of the 2 options:
- BRIGHT (The display brightness at full brightness. The adjustment range is 20–100 %.)
- DIM (The display brightness when dimmed. The adjustment range is 0–100 %.)
02) Press the TUNE/SELECT control to confirm.
03) Turn the TUNE/SELECT control to set the values.
04) Press the TUNE/SELECT control to confirm.
6.6.9.11. EQ
In this menu you can set the equalizer (Advanced) or choose one of the 11 equalizer presets.
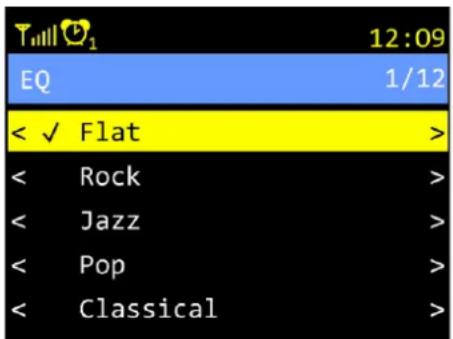
01) Turn the TUNE/SELECT control to choose one of the 12 options:
- 11 equalizer presets (FLAT, ROCK, JAZZ, POP, CLASSICAL, DANCING, HEAVY METAL, DISCO, LIVE, SOFT, HALL)
- ADVANCED
02) Press the TUNE/SELECT control to confirm. If you chose ADVANCED, please read steps 3–6 below.
Advanced
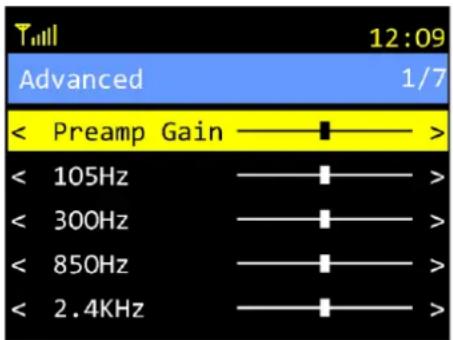
03) Turn the TUNE/SELECT control to choose one of the 7 settings:
- PREAMP GAIN (Preamp gain. From -18 dB to 0 dB)
• 105 Hz (From -12 dB to +12 dB)
• 300 Hz (From -12 dB to +12 dB)
• 850 Hz (From -12 dB to +12 dB)
• 2,4 kHz (From -12 dB to +12 dB)
• 6,9 kHz (From -12 dB to +12 dB)
• 3D DEPTH (3D depth. 0–100 %)
04) Press the TUNE/SELECT control to confirm.
05) Turn the TUNE/SELECT control to set the values.
06) Press the TUNE/SELECT control to confirm.
6.6.9.12. Buffer Time
In this menu you can set the buffer time. When the device is on, it caches data to prevent interruptions in the data transfer. If your internet reception is poor, you can increase the buffer time to lower the number of interruptions.
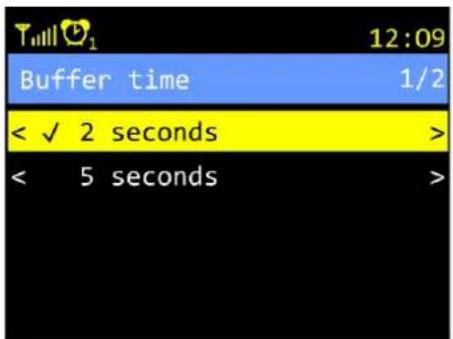
01) Turn the TUNE/SELECT control to choose one of the 2 options:
- 2 seconds
- 5 seconds
02) Press the TUNE/SELECT control to confirm.
6.6.9.13. Line Out Gain
In this menu you can set the line output gain level.
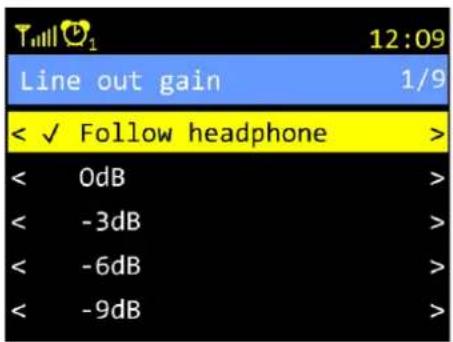
01) Turn the TUNE/SELECT control to choose one of the 9 options:
• FOLLOW HEADPHONE (Follow headphone. Not applicable in this version of the device.)
• 0 dB
-3 dB
-6 dB
-9 dB
-12 dB
-15 dB
-18 dB
-21 dB
02) Press the TUNE/SELECT control to confirm.
6.6.9.14. Information
In this menu you can view the device's parameters.
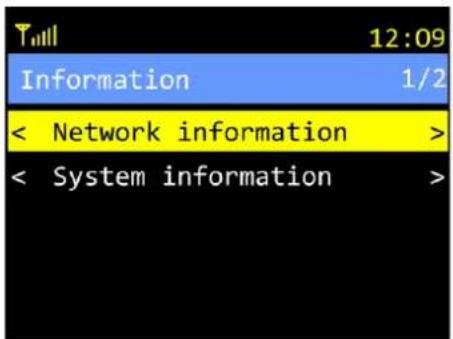
01) Turn the TUNE/SELECT control to choose one of the 2 submenus:
• NETWORK INFORMATION (Network's settings)
• SYSTEM INFORMATION (System settings)
02) Press the TUNE/SELECT control to confirm.
Network Information
In this submenu you can view the device's network settings.
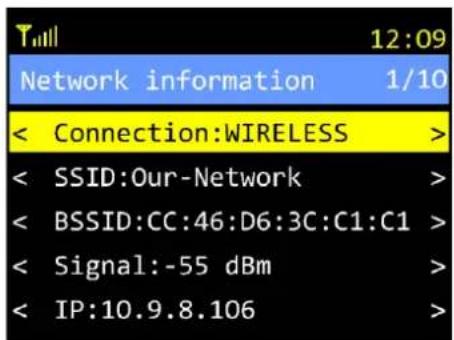
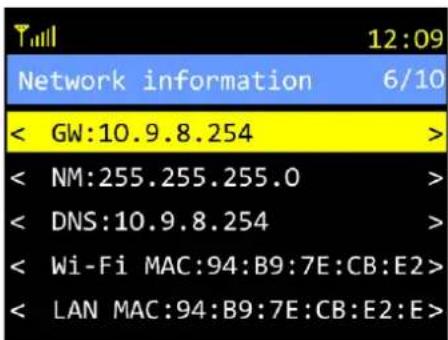
Turn the TUNE/SELECT control to scroll through all the entries.
System Information
In this submenu you can view the device's system information.
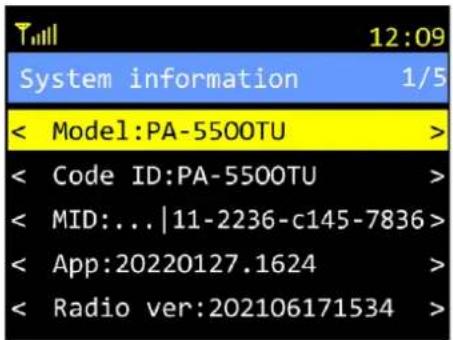
Turn the TUNE/SELECT control to scroll through all the entries.
6.6.9.15. Software Update
In this menu you can update the device's software. When the latest software version is already installed, the display reads "Already up to date".
6.6.9.16. Reset to Default
In this menu you can reset the settings to the default factory settings.
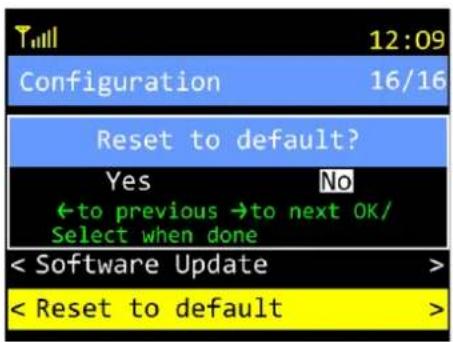
01) Turn the TUNE/SELECT control to choose one of the 2 options:
- YES (Yes. The device will restore the default factory settings.)
• NO (No. The display will return to the main menu.)
02) Press the TUNE/SELECT control to confirm.
6.7. Saving Internet Radio Stations to My Favourite
It is possible to save internet radio stations to My Favourite. You can browse through the saved internet radio stations. See 6.6.1. My Favourite on page 22 for more information.
When an internet radio station is active, the display shows:
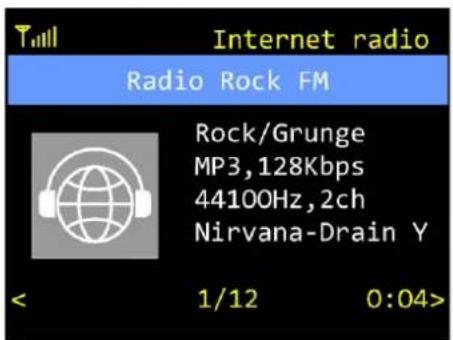
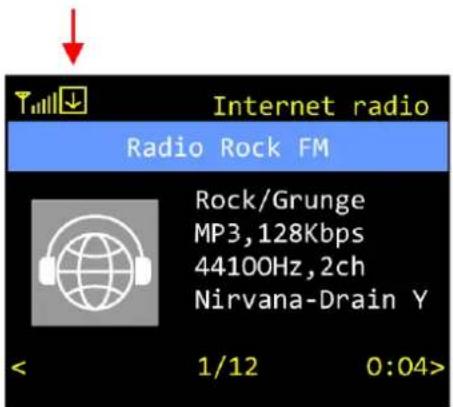
Press and hold down the TUNE/SELECT control for 5 seconds to save the internet radio station to My Favourite. The display promptly shows:
6.8. Viewing Radio Station Information
It is possible to view information about the currently active internet, DAB or FM radio station.
01) Activate an internet, DAB or FM radio station. See 6.6.1. My Favourite, 6.6.2. Internet Radio, 6.6.4. DAB Radio and 6.6.5. FM Radio on pages 22–30 for more information.
02) Repeatedly press the DOWN button to browse through different information screens.
Note:
The screens show such pieces of information as the currently played track, current time, file quality, file compression quality or radio signal quality. The contents of each screen depend on the currently active radio station.
6.9. Setting Volume
It is possible to set the volume of the currently active internet, DAB or FM radio station.
01) Activate an internet, DAB or FM radio station. See 6.6.1. My Favourite, 6.6.2. Internet Radio, 6.6.4. DAB Radio and 6.6.5. FM Radio on pages 22–30 for more information.
02) Turn the TUNE/SELECT control to the left/right to decrease/increase the volume.
6.10. Manual FM Frequency Tuning
It is possible to manually tune the FM radio frequency.
01) Activate an FM radio station. See 6.6.5. FM Radio on page 30 for more information. The display shows:
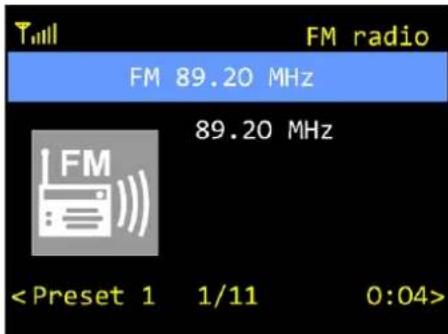
02) Press and hold down the TUNE/SELECT control until the display shows:
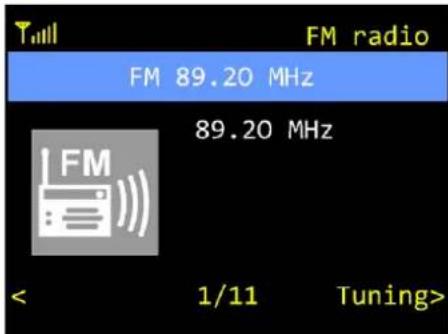

03) Press the UP/DOWN buttons to increase/decrease the frequency.
04) Press and hold down the TUNE/SELECT control until "Tuning" disappears from the display.
6.11. Editing Lists
It is possible to change the order in which the radio stations are saved. It is also possible to remove radio stations from the lists.
01) Activate an internet, DAB or FM radio station and go to the list of available radio stations. See 6.6.1. My Favourite, 6.6.2. Internet Radio, 6.6.4. DAB Radio and 6.6.5. FM Radio on pages 22–30 for more information. For example, if you are in 6.6.5. FM Radio menu, the display shows:
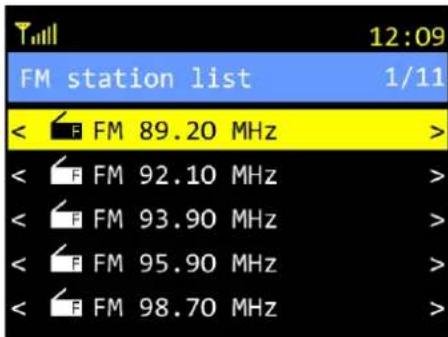
02) Turn the TUNE/SELECT control to choose the desired radio station.
03) Press the DOWN button. The display shows:
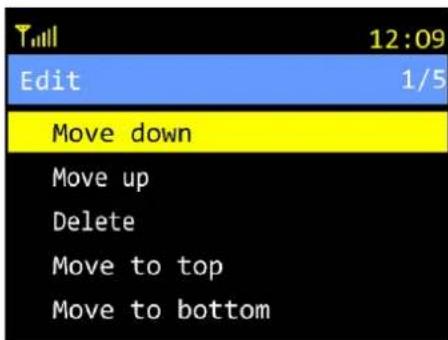
04) Turn the TUNE/SELECT control to choose one of the 5 options:
- MOVE DOWN (Move down. The radio station will move down by one position.)
- MOVE UP (Move up. The radio station will move up by one position.)
- DELETE (Delete. The radio station will be removed from the list.)
• MOVE TO TOP (Move to top. The radio station will move to the top of the list.)
• MOVE TO BOTTOM (Move to bottom. The radio station will move to the bottom of the list.)
05) Press the TUNE/SELECT control to confirm. The device will perform the chosen action.
6.12. Alarm
To use the alarm function:
01) Set the alarm. See 6.6.7. Alarm on page 32 for more information. When the alarm sounds, the display shows:
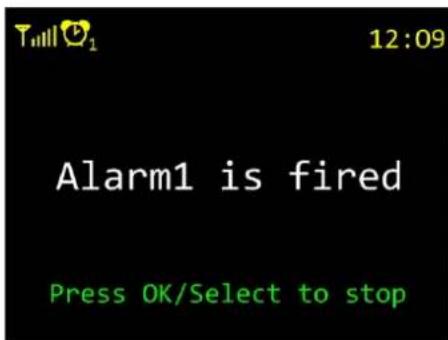
02) Press the TUNE/SELECT control to turn the alarm off.
6.13. Remote Control
The device can be controlled with an IR remote control. The remote control is included in the delivery.

DANGER
Do not ingest batteries, chemical burn hazard
The remote control accepts 2 x AAA batteries. If the batteries are swallowed, they can cause severe internal burns in just 2 hours which can lead to death.
6.13.1. Functions of the Remote Control Buttons
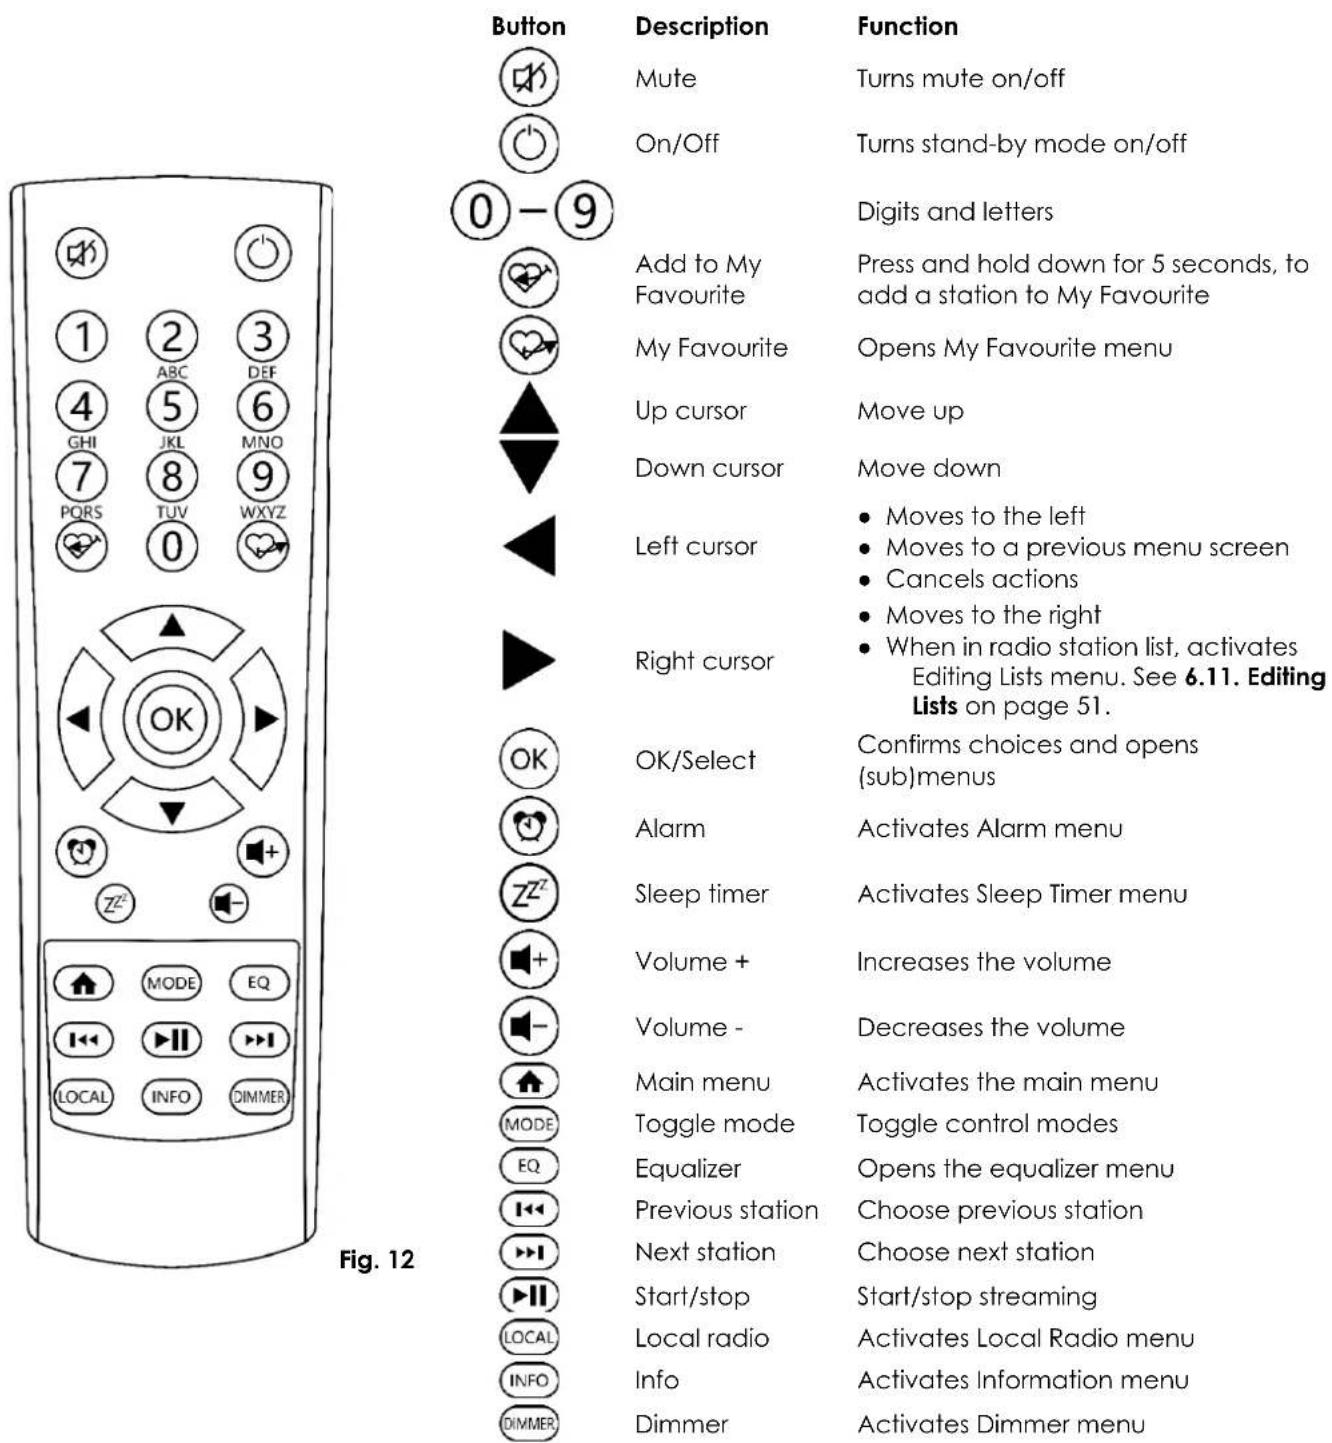
6.13.2. Entering Passwords and Searching for Phrases
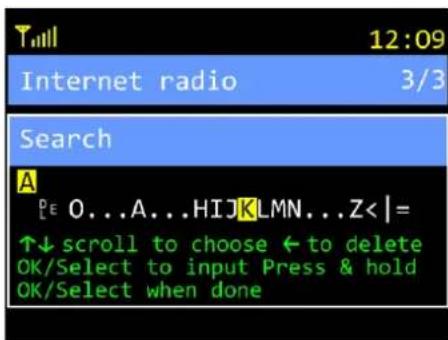
To enter a password or search for phrases with the remote control:
01) Press the UP/DOWN cursors to choose characters and press the OK/SELECT button to confirm. Repeat this step to type in the desired word or phrase. The available characters are uppercase letters, digits, punctuation marks, and some symbols.
Note: Alternatively, you can repeatedly press the 0–9 buttons to type in words or phrases. Each button (0–9) has a set of letters assigned to it.
Note: If you make a mistake, press the LEFT cursor to remove the wrong character.
02) Press and hold down the OK/SELECT control for 5 seconds to confirm.
7. Troubleshooting
This troubleshooting guide contains solutions to problems which can be carried out by an ordinary person. The device does not contain user-serviceable parts. Unauthorized modifications to the device will render the warranty void. Such modifications may result in injuries and material damage. Refer servicing to instructed or skilled persons. Contact your Highlite International dealer in case the solution is not described in the table.
| Problem | Probable cause(s) | Solution |
| The device does not function at all | No power to the device | Check if power is switched on and cables are plugged in |
| Internal fuse is blown | Return the device to your DAP dealer | |
| No sound | The volume is set to minimum | Increase the volume |
| The device cannot connect to Wi-Fi | Wi-Fi antenna is not connected | Install the supplied Wi-Fi antenna and put it in a vertical position |
| Wi-Fi network is offline | Check if the network works on another deviceCheck if a DHCP server is availableCheck if the static IP address is configuredCheck if your firewall does not block the output ports | |
| The router limits access to MAC addresses | Check the MAC address (Wi-Fi MAC or LAN MAC in Network Information on page 48) and add it to the allowed equipment list of your router (AP) | |
| Wi-Fi signal is too weak | Check the distance between the device and the Wi-Fi routerMove the device closer to the router | |
| Unsupported encryption method | Set the encryption method to WEP, WPA or WPA2 | |
| Incorrect Wi-Fi password | Enter the correct Wi-Fi password | |
| Some radio stations do not work | Stations are not broadcasting at this time of the day (time zone) | |
| The maximum number of listeners is reached | ||
| The URL is out of date | Tune in again (URLs are updated daily) | |
| DAB or FM does not work or the signal is weak | Reset the device's parameters to the default factory settings. See6.6.9.16. Reset to Default on page 49Extend the antennaMove the device closer to a windowCheck if there are electrical devices that cause interference | |
| Media server is not available | Incorrect network | Check if the device and the media server use the same network |
| Firewall limits the access | Disable your firewall for verification | |
| Playback stutters (buffering) | Bandwidth is too low or busy | Check the internet connectionTest reception with another stationIncrease the buffer time. See6.6.9.12. Buffer Time on page 47 |
| The device does not respond to the remote control | The remote control is beyond outside of the range of the sensor of the infrared port | Walk closer to the device or change the angle at which you point the remote control to the device. See6.13. Remote Control on page 52 |
| The batteries in the remote control are depleted | Change the batteries of the remote control |
8. Maintenance
8.1. Safety Instructions for Maintenance

DANGER
Electric shock caused by dangerous voltage inside
Disconnect power supply before servicing or cleaning.
8.2. Preventive Maintenance

Attention
Before use, examine the device visually for any defects.
Make sure that:
- All screws used for installing the device or parts of the device are tightly fastened and are not corroded.
- There are no deformations on housings, fixations and installation points.
- The power cables are not damaged and do not show any material fatigue.
8.2.1. Basic Cleaning Instructions
To clean the device, follow the steps below:
01) Disconnect the device from the electrical power supply.
02) Allow the device to cool down for 5 minutes.
03) Clean the device with a soft, lint-free cloth.

Attention
- Do not immerse the device in liquid.
- Do not use alcohol or solvents.
8.3. Corrective Maintenance
The device does not contain user-serviceable parts. Do not open the device and do not modify the device.
Refer repairs and servicing to instructed or skilled persons. Contact your Highlite International dealer for more information.
9. Deinstallation, Transportation and Storage
- Disconnect power supply before deinstallation.
- Use the original packaging to transport the device, if possible.
- Clean the device before storing. Follow the cleaning instructions in chapter 8.2.1. Basic Cleaning Instructions on page 55.
- Store the device in the original packaging, if possible.
10. Disposal
Correct disposal of this product
Waste Electrical and Electronic Equipment
This symbol on the product, its packaging or documents indicates that the product shall not be treated as household waste. Dispose of this product by handing it to the respective collection point for recycling of electrical and electronic equipment. This is to avoid environmental damage or personal injury due to uncontrolled waste disposal. For more detailed information about recycling of this product contact the local authorities or the authorized dealer.
11. Approval
CE
UK CA
Hereby, Highlite International declares that the device is in compliance with Directive 2014/53/EU (RED – Radio Equipment Directive).
The full text of the EU declaration of conformity is available at the respective product page on the website of Highlite International (www.highlite.com).
- Table of contents
- Introduction......4
- Safety 5
- Description of the Device 8
- Installation....10
- Setup....13
- Operation....17
- Introduction
- Before Using the Product
- Intended Use
- Text Conventions
- Symbols and Signal Words
- DANGER
- WARNING
- CAUTION
- Attention
- Important
- Electrical hazard
- Symbols on the Information Label
- Safety
- Warnings and Safety Instructions
- Requirements for the User
- Description of the Device
- Product Specifications
- Dimensions
- Installation
- Safety Instructions for Installation
- Installation Site Requirements
- Rack Mounting
- Connecting the Wi-Fi Antenna
- Connecting the DAB/FM Wire Antenna
- Connecting the Device to a Router
- Note:
- Connecting Audio Devices
- DAB/FM Signal Reception
- Installation of the Batteries
- Connecting to Power Supply
- Setup
- Warnings and Precautions
- Turning On/Off
- Software Updates
- Network Setup
- Wi-Fi Setup
- Wi-Fi Setup via Esptouch App
- LAN Setup
- Network Indicator Display Status
- Entering Passwords and Searching for Phrases
- Setup Examples
- Stereo Mode
- Bridge Mode
- 100 V Mode
- Operation
- Safety Instructions for Operation
- Control Modes
- Control Panel
- Start-up
- Choosing Menu Language
- Configuring the Network for the First Time
- PA-5500TU 500W 100V Amplifier
- Main Menu Options
- My Favourite
- Managing My Favourite With a PC or Smartphone
- MY FAVOURITE
- Managing My Favourite With the Skytune Radio Portal
- Skytune
- Browse by
- Search
- Add Favourite / Listen to Station
- Internet Radio
- Skytune
- Search(Skytune)
- History
- Media Centre
- UPnP
- My Playlist
- Clear My Playlist
- DAB Radio
- FM Radio
- Bluetooth
- Alarm
- 6.6.7.1.Time
- Sound
- Repeat
- Alarm Volume
- Alarm Duration
- Sleep Timer
- Configuration
- Network
- Network Options
- Wi-Fi Channels
- Wi-Fi Network
- LAN Network
- Date & Time
- Time Zone
- Set Time Format
- Set Date Format
- DST (Daylight Saving Time)
- NTP (Network Time Protocol)
- NTP Server
- Set Time From DAB
- Set Time From FM
- Language
- DAB Setup
- FM Setup
- FM Area
- Scan Setting
- Audio Setting
- FM Full Scan
- FM Station List
- Local Radio
- Playback Setup
- Resume Play Options
- Power-on Options
- Dimmer
- Mode
- Level
- EQ
- Advanced
- Buffer Time
- Line Out Gain
- Information
- Network Information
- System Information
- Software Update
- Reset to Default
- Saving Internet Radio Stations to My Favourite
- Viewing Radio Station Information
- Setting Volume
- Manual FM Frequency Tuning
- Editing Lists
- Alarm
- Remote Control
- Functions of the Remote Control Buttons
- Entering Passwords and Searching for Phrases
- Troubleshooting
- Maintenance
- Safety Instructions for Maintenance
- Preventive Maintenance
- Make sure that:
- Basic Cleaning Instructions
- Corrective Maintenance
- Deinstallation, Transportation and Storage
- Disposal
- Correct disposal of this product
- Approval
Brand : DAP-Audio
Model : PA-5500TU
Category : Uncategorized