
Jeppe Utzon BBQ - Barbecue ELECTROLUX - Free user manual and instructions
Find the device manual for free Jeppe Utzon BBQ ELECTROLUX in PDF.


| Product Type | Barbecue |
| Brand | Electrolux |
| Model | Jeppe Utzon BBQ |
| Dimensions (H x W x D) | 85 × 110 × 60 cm |
| Weight | 28 kg |
| Fuel Type | Charcoal |
| Cooking Area | 2500 cm² |
| Main Material | Stainless steel |
| Ignition Type | Manual (charcoal chimney) |
| Temperature Control | Adjustable air vents |
| Main Functions | Grilling, smoking, roasting |
| Cleaning Method | Hand wash grate with mild soap; wipe exterior |
| Safety Features | Stable legs, heat-resistant handles, ash catcher |
| Spare Parts Available | Grate, ash pan, warming rack, cover |
| Warranty | 2 years |
| Assembly Required | Yes |
| Recommended Use | Outdoor patio, garden |
Frequently Asked Questions - Jeppe Utzon BBQ ELECTROLUX
User questions about Jeppe Utzon BBQ ELECTROLUX
0 question about this device. Answer the ones you know or ask your own.
Ask a new question about this device
Download the instructions for your Barbecue in PDF format for free! Find your manual Jeppe Utzon BBQ - ELECTROLUX and take your electronic device back in hand. On this page are published all the documents necessary for the use of your device. Jeppe Utzon BBQ by ELECTROLUX.
USER MANUAL Jeppe Utzon BBQ ELECTROLUX
natural_image
Close-up of metallic metal slats with a small inset image of a simple metal bracket (no text or symbols visible)
natural_image
Exterior view of a modern office building (no signage)
natural_image
Close-up of a modern kitchen surface with a dark top and white panels, no visible text or symbolsCONTENTS
1 Jeppe Utzon BBQ 3 General Warnings 3
2 Jeppe Utzon BBQ 4 Installation 4 Servicing 4 Cleaning 4
3 Using your Jeppe Utzon BBQ 5 Controls 5 Lighting burners 6 Hotplates 6
4 Cleaning and care 7 Stainless Steel 7 BBQ Plate 7 Ignition Electrode 7
5 Troubleshooting 8
6 Installation 9 Gas Connection 9 Conversion for use with different gases 9 Supply pipe sizing 9 Appliance for operation on N.G. 9 Regulator 9 Checking the Gas Supply 10 Appliance for operation on L.P.G. 10 Battery Connection 10
7 Testing the appliance 12
8 Electrolux Warranty Australia 13
1 JEPPE UTZON BBQ
Read the following carefully:
General Warnings
- The Jeppe Utzon BBQ is not suitable for use by young children or infirm persons, without supervision
- Young children should be supervised to ensure they do not play with this appliance
- During use, this appliance becomes hot. Care should be taken to avoid touching hot surfaces
- Keep grill and hotplates clear of obstructions
- In order to avoid a fire, the appliance must be kept clean
- Do not spray aerosols in the vicinity of the appliance when it is in operation
- Do not store flammable materials in or under the appliance, e.g. aerosols
- Sliding covers to remain in fully open position at all times that appliance is in use
2 JEPPE UTZON BBQ
NOTE: You must read these warnings carefully before installing or using the cooktop. If you need assistance, contact our Customer Care Department. The manufacturer will not accept liability, should the instructions below or any other safety instructions incorporated in this book be ignored.
Installation
- An authorised person must install this appliance and MUST provide a certificate of compliance
- Before using the appliance, ensure that all packing materials are removed from the appliance
-
Do not use Jeppe Utzon BBQ indoors
-
In order to avoid any potential hazard, the installation instructions in this booklet, and any labels on the appliance must be followed
- The Jeppe Utzon BBQ is only a built in unit and can not be moved.
Servicing
- Servicing MUST only be carried out by authorised personnel
- To maintain safe operation, it is recommended that an authorised service person inspect the product every two years
- For battery ignition, the battery will require periodic replacement
NOTE: The battery supplied is a perishable item and is not covered by the warranty.
Cleaning
• Always ensure the Jeppe Utzon BBQ is turned off before cleaning
- The Jeppe Utzon BBQ contains aluminium fittings. Do not use caustic based cleaners
- Do not use steam cleaners, as this may cause moisture build up on electrical components
- Always clean the BBQ immediately after any food spillage
- BBQ plates can be placed in Dishwasher if desired
3 USING YOUR JEPPE UTZON BBQ
Congratulations
Congratulations and thank you for choosing our Product. We are sure you will find your new Jeppe Utzon BBQ a pleasure to use and a great asset to your cooking. Before you use the BBQ, we recommend that you read through the whole user manual which provides the description of the BBQ and its functions. To avoid the risks that are always present when you use a gas BBQ, it is important that the BBQ is installed correctly and that you read the safety instructions carefully to avoid misuse and hazards. For future reference, please store this booklet in a safe place.
Aerosol sprays
Do not spray aerosols in the vicinity of this appliance while it is in operation as aerosols can contain flammable propellants.
Warning – Ventilation
Where the Jeppe Utzon BBQ is installed in any confined area, the area must be properly ventilated.
Controls
- A control knob controls each burner. The markings on the control panel indicate which burner the knob controls, and the settings for that burner. (See Figure 1)
NOTE: Gas controls turn anticlockwise from 'OFF' and have limited movement.
Figure 1
Mounting Gas Bottle
If using LPG, the gas cylinder can be placed underneath or alongside the Jeppe Utzon BBQ. Minimum LPG cylinder size 9kg.
Lighting burners
Electronic Ignition:
The knob must be turned to the 'HIGH' position, then pushed down for approximately 5 seconds. If the flame goes out when the knob is released simply depress the knob again and hold it down for the required length of time. Turning the control knob towards the 'LOW' position can vary the height of the flame. In the absence of battery power, carry out the ignition directly to the burner with a hand held ignition source.
NOTE:
- Keep hands clear of burners when lighting
- If burner does not light within 5 seconds, turn knob to 'OFF' position, allow gas to disperse, then try lighting again
- Burners MUST be operated between 'HIGH' and 'LOW' settings only
- Open sliding covers fully before attempting to light the burners
Hotplates
- Before use, wash BBQ plates in hot soapy water, rinse and dry thoroughly
- Before cooking, heat BBQ plate for 5-10 minutes over a medium heat
- To check if the temperature of the BBQ is correct, sprinkle a few drops of water onto the surface. If it sizzles and evaporates the BBQ plate is ready for cooking

Ensure the appliance is off and cool before cleaning.
4 CLEANING AND CARE
Cleaning and Care
Stainless Steel
All grades of stainless steel may stain, discolour or attain an adhering layer of grime in normal operation. To achieve maximum surface appearance, stainless steel must be kept clean by regularly using the following cleaning procedures, thus ensuring good performance and long service life. Wash with warm soapy water and rinse with clean water, being sure to follow the polish or brushing lines. Where the stainless steel has become extremely dirty with signs of surface discolouration, (due to periods of neglect or misuse) use a stainless steel cleaner.
When removing these stains be sure to follow the polish or brushing lines.
BBQ Plate
• After use, let the Jeppe Utzon BBQ plate cool before washing in hot soapy water
- Do not plunge the hot BBQ plate into cold water as warping may occur
- If some food residues remain do not scrub surface with metal scourer but soak the BBQ plate for a while in water with mild detergent
• After washing, ensure the BBQ plate has been dried adequately
Ignition Electrode
GENTLY clean the electrode with a damp cloth to avoid lighting difficulties. Ensure the electrode is dry before use.
natural_image
Modern architectural exterior with large glass windows and a modern concrete structure (no visible text or symbols)5 TROUBLESHOOTING
If you have a problem with the BBQ, check the table below. You may be able to solve the problem and this will save you from paying for a service call. You will have to pay for a service call even in the warranty period if the problem is one listed below.
| Fault Possible Cause Remedy | ||
| Burner will not light even though the sparker in ‘HIGH’ is working. | Knob not held down long enough position for flame hold knob down for 5 seconds in safeguard. ‘HIGH’ position. (Refer page 3) | Repeat lighting procedure and seconds in |
| Gas supply valve turned off. Turn on gas supply to appliance. | ||
| Control knob not on. Turn knob on. (Refer page 2) | ||
| Wrong knob turned. Ensure the knob you are turning corresponds to the burner you want to light. | ||
| Port blockage in ignition area. Ensure that ports in ignition area are clean and dry. | ||
| Ignition electrode wet or dirty. Dry or clean ignition electrode. | ||
| No spark is obtained when control knob is activated. | Battery is flat. | Replace battery. (Refer page 6) |
| Polarity wrong on battery. Reorient battery to correct position. (Refer page 6) | ||
| Ignition electrode wet or dirty. Dry or clean ignition electrode. | ||
| Flames uneven or Flame ports tending to lift. | blocked or wet. | Clean or dry flame ports. |
| Flames not staying on Knob when knob released. in ‘HIGH’ | not held down long enough Repeat lighting procedure and position for flame hold knob down for 5 seconds in safeguard. ‘HIGH’ position. (Refer page 3) | |
| Knob not set between Knob MUST be set between ‘HIGH’ and ‘LOW’. | set between these positions. | |
| Dirt or spillage on flame safeguard sensor. | Clean flame safeguard sensor tip. | |
| BBQ plate rocks on trivet. | Normal. Most BBQ plates will not To minimise, avoid rapid cooling of plate after use, ie. allow to cool remain flat. | in air. |
Recommended to be serviced by Electrolux Service every two years, not covered by warranty.
6 INSTALLATION
INSTALLATION INSTRUCTIONS
This appliance must be installed by an authorised person and in compliance with:
1 AS 5601 (AG 601) 'Gas Installations' (Australia) or NZS 5261 'Installation of Gas Burning Appliances and Equipment' (New Zealand) or the relevant installation code for gas appliances of your country.
2 The local gas fitting regulations, municipal building codes, electrical wiring regulations and any other relevant statutory regulations.
3 The particular instructions as given below. Before commencing installation, ensure that the appliance gas type given on the data plate on the appliance corresponds with the type of gas to which it is intended the appliance be connected.
4 A certificate of compliance by the authorized installer MUST be given to the customer after the appliance is successfully installed.
5 Required surrounding clearances from combustibles are 100mm from back wall and 1000mm vertically above BBQ.
Overall dimensions for the BBQ are: 1560mm Wide x 662mm Deep x 800mm High.
Location of gas fitting on right hand side of BBQ.
Gas Connection
Connection to N.G. to be according to AS5601, fitting to standard bayonet connection.
Conversion for use with different gases
This appliance is adjusted for use with the particular gas shown on the data plate. However, it can be converted for use with other gases. If this is required contact your local spare parts supplier.
Supply pipe sizing
The total hourly gas consumption for the appliance is shown on the data label. The required supply pressure (i.e. at inlet to appliance regulator, where fitted) for each gas type is shown on the data label. Use this information in conjunction with the length of run, number of elbows, tees and bends, the available service pressure and the supply requirements of other installed appliances to determine a suitable pipe size. For assistance in this matter, refer to the appropriate section of the installation Code AS5601 (AG601).
An appliance regulator is provided. The regulator must be positioned so that the pressure test nipple and adjuster screw are accessible when the appliance is installed. When fitting this device, ensure that the arrow showing the direction of the flow is pointed correctly. Connect the gas supply to the 1/2" B.S.P. internal thread inlet of the regulator.
Checking the Gas Supply
1 Check the manometer zero point is correct.
2 Connect the manometer to the BBQ pressure point. This is located on the regulator or LPG inlet fitting.
3 Turn on the gas supply and battery and try to ignite the gas.
NOTE: It will take additional time to light the gas for the first time as air needs to be purged from the pipes.
4 Check the operating pressure and adjust the regulator to the appropriate setting for the particular gas type
APPLIANCE FOR OPERATION ON L.P.G.
Checking the Gas Supply
1 Check the manometer zero point is correct.
2 Connect the manometer to the BBQ pressure test point. This is located on the regulator or LPG inlet fitting.
3 Turn on the gas supply and electricity and try to ignite gas.
NOTE: It will take additional time to light the gas for the first time, as air needs to be purged from the pipes.
4 Check the operating pressure and adjust the regulator to the appropriate setting for the particular gas type (See Table 1).
NOTE: The regulator is located on the gas cylinder. An inlet fitting with pressure test point is provided. Connect the gas supply to the 1/2" B.S.P. internal thread inlet of the fitting.
Check all joints and ensure that all connections are gas tight.
Cylinder or network connection must be carried out according to the relevant local standards.
GAS CONSUMPTION (MJ/H) - FLAME SAFEGUARD
| Natural (1.00kPa) Propane (2.75kPa) | ||||
| Burner | Injector Size (mm) | Gas Consumption (MJ/h) | Injector Size (mm) Gas | Consumption (MJ/h) |
| SS Burner | 1.75 12.5 0.95 12.5 | |||
Table 1
Changing Battery
battery supplied is a perishable item and is not covered by the warranty
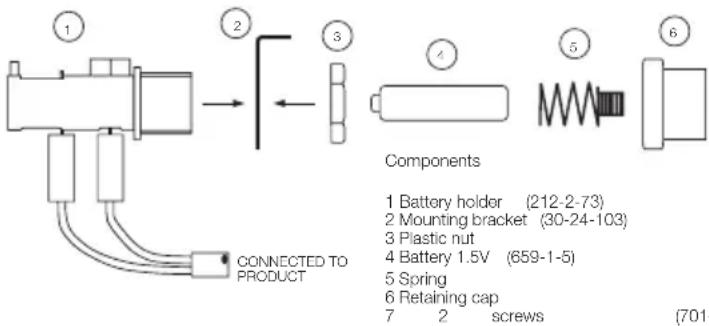
Installation Notes:
1 Mount the bracket in an easily accessible location under the benchtop, using the two screws provided
2 remove the cap and plastic nut from battery holder
3 Place the threaded end of the battery holder through the large hole in the bracket
4 screw the plastic nut into the battery holder
5 Ensure the battery and spring remain in the holder and screw the retaining cap on.
Battery Connection
The battery used is a 1.5 Volt 'AA' Battery. This supplies the power for the ignition system of the BBQ burners. To install, follow the instructions as shown on Figure below.
NOTE: Pay special attention to the orientation of the battery when installing. The battery supplied is a perishable item and is not covered by the warranty.
This appliance shall only be used in an above ground open-air situation with natural ventilation, without stagnant areas, where gas leakage and products of combustion are rapidly dispersed by wind and natural convection.
Any enclosure in which the appliance shall be used shall comply with one of the following:
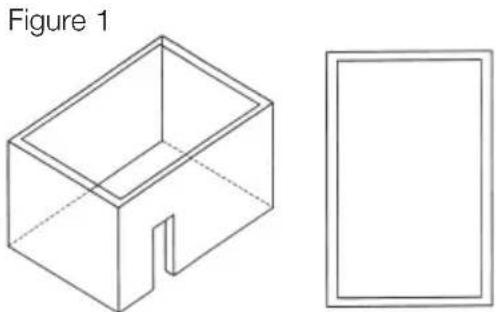
- An enclosure with walls on all sides, but with at least one permanent opening at ground level and no overhead cover. See Figure 1
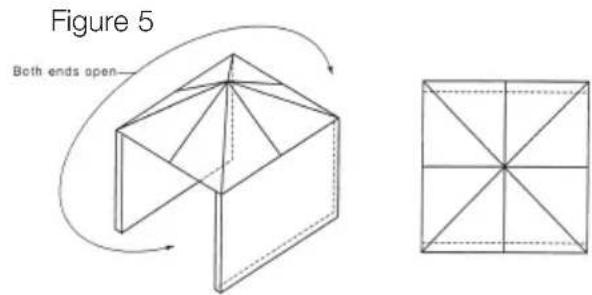
- Within a partial enclosure that includes an overhead cover and no more than two walls See Figure 2 & 5
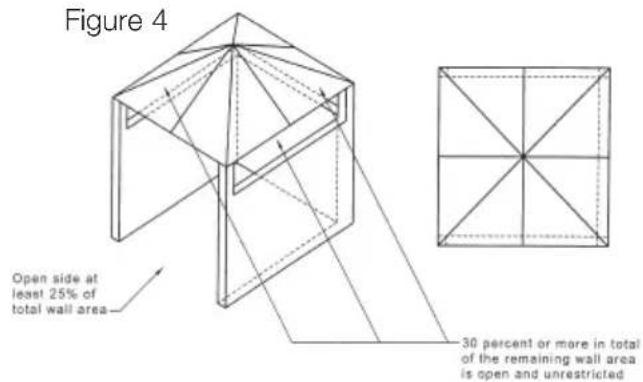
- Within a partial enclosure that includes an overhead cover and more than two walls, the following shall apply—
(i) at least 25% of the total wall area is completely open; and
(ii) at least 30% of the remaining wall area is open and unrestricted. See Figure 3 & 4
- In the case of balconies, at least 20% of the total side, back and front wall areas shall be and remain open and unrestricted
natural_image
Line drawing of a 3D box and its corresponding rectangular frame, labeled Figure 1 (no text or symbols on the diagram itself)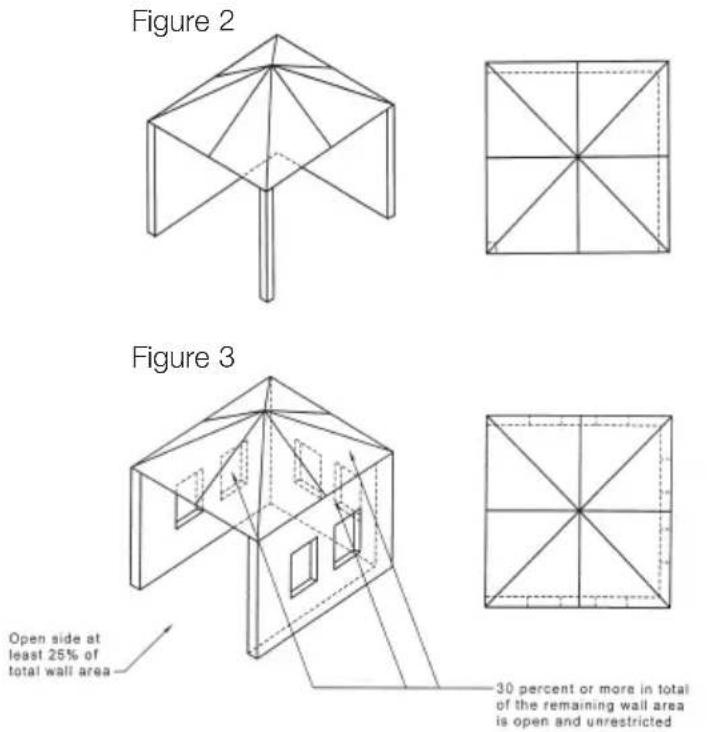
7 TESTING THE APPLIANCE
After installation, test the appliance and ensure that it operates correctly before handing it over to the customer. The following procedure is recommended:
1 Turn on the gas and attempt ignition on all burners, both separately and in combination. (For correct procedure refer to section 'Lighting Burners' on page 2.) Note that additional time needs to be allowed for the initial lighting, as air has to be purged from the pipes.
2 Observe the flame appearance on each burner. If it is much larger or much smaller than expected, the injector size and supply pressure may require checking.
3 When all the foregoing is satisfactory, check the turndown setting on each burner, as this may need adjustment. Valves have a by pass controlling screw, which may be accessed by removing the knob. This screw will be located on a particular area of the valve. Normally, this will have been correctly set at the factory and should not require adjustment.
Please ensure the supply pressure has been checked PRIOR to any adjustment.
3 If the appliance cannot be adjusted to perform safely, inform the customer of the problem and affix an appropriate warning notice to the appliance. If the fault appears to be dangerous the appliance should be disconnected. If a minor fault exists, the customer may wish to use the appliance while awaiting service.
4 The customer should be advised that, in the event of a fault, the Service Centre or the retailer from whom the appliance was purchased should be contacted.
5 When satisfied that the unit is operating correctly, turn off and instruct the customer on correct operation as outlined in this booklet. Ask the customer to operate the controls to ensure that the correct procedure is understood.
Servicing must only be carried out by an authorised service person. Injector sizes required for various gas types are shown in Table 1. The appliance inlet pressure for each gas type is also shown.
natural_image
Close-up of a wooden door frame with a black handle, against a plain wall (no text or symbols visible)
8 ELECTROLUX WARRANTY - AUSTRALIA
FOR SALES IN AUSTRALIA APPLIANCE: [JEPPE UTZON BBQ]
This document sets out the terms and conditions of product warranties for Electrolux branded appliances. It is an important document. Please keep it with your proof of purchase documents in a safe place for future reference should you require service for your Electrolux appliance.
General Terms and Conditions
- In this warranty
(a) 'Electrolux' means Electrolux Home Products Pty Ltd ABN 51 004 762 341 in respect of Appliances purchased in Australia;
(b) 'Appliance' means any Electrolux product purchased by you accompanied by this document;
(c) 'Warranty Period' means
(i) where you use the Appliance for personal, domestic or household purposes in Australia the period of 12 months
(ii) where you use the Appliance for commercial purposes, in Australia the period of 3 months, (if the period stated is 0 months you are not covered by this product warranty following the date of original purchase of the Appliance;
(d) 'you' means the purchaser of the Appliance not having purchased the appliance for re-sale, and 'your' has a corresponding meaning.
- This warranty only applies to Appliances purchased and used in Australia and is in addition to (and does not exclude, restrict, or modify in any way) any non-excludable statutory warranties in Australia.
- Electrolux warrants that, when dispatched from an Electrolux warehouse, the Appliance is free from defects in materials and workmanship for the Warranty Period.
- During the Warranty Period Electrolux or its Authorised Service Centre will, at no extra charge if your appliance is readily accessible without special equipment, and subject to these terms and conditions, repair or replace any parts which it considers to be defective. You agree that any replaced Appliances or parts become the property of Electrolux. This warranty does not apply to light globes, batteries, filters or similar perishable parts.
- Parts and Appliances not supplied by Electrolux are not covered by this warranty.
- Where you are within an Electrolux service area, this warranty covers the cost of transport of the Appliance to and from Authorised Service Centres of Electrolux and travelling costs for representatives of the Authorised Service Centre to and from your home or business. If you are outside an Electrolux service area, you will bear these costs. For information about whether you are within an Electrolux service area, please phone 13 13 49 in Australia.
- Proof of purchase is required before you can make a claim under this warranty.
- You may not make a claim under this warranty unless the defect claimed is due to faulty or defective parts or
workmanship. Electrolux is not liable in the following situations (which are not exhaustive):
(a) The Appliance is damaged by:
(i) accident
(ii) misuse or abuse, including failure to properly maintain or service
(iii) normal wear and tear
(iv) power surges, electrical storm damage or incorrect power supply
(v) incomplete or improper installation
(vi) incorrect, improper or inappropriate operation (vii) insect or vermin infestation.
(b) The Appliance is modified without authority from Electrolux in writing.
(c) The Appliance's serial number or warranty seal has been removed or defaced.
(d) The Appliance was serviced or repaired by anyone other than Electrolux or its Authorised Service Centres.
- This warranty, the contract to which it relates and the relationship between you and Electrolux are governed by the law applicable in the Australian State where the Appliance was purchased or the law applicable.
Limitation of Liability
- To the extent permitted by law:
(a) Electrolux excludes all warranties other than as contained in this document;
(b) Electrolux shall not be liable for any loss or damage whether direct or indirect or consequential arising from your purchase, use or non-use of the Appliance.
- Provisions of the Trade Practices Act and State consumer legislation in Australia, and the Consumer Guarantees Act, imply warranties or conditions, or impose obligations, upon Electrolux which cannot be excluded, restricted or modified. To the extent permitted by law, the liability of Electrolux (if any) arising out of or in relation to the Appliance or any services supplied by Electrolux shall be limited (where it is fair and reasonable to do so).:
(a) in the case of Appliances, at its option, to the replacement or repair of the Appliances or the supply of equivalent products or the payment of the cost of replacing the Appliances or having the Appliances repaired or of acquiring equivalent Appliances. Upon being replaced, parts and Appliances become the property of Electrolux; or
(b) in the case of services, at its option, to the supply of the services again or the payment of the cost of having the services re-supplied;
Privacy
You acknowledge that in the event that you make a warranty claim it will be necessary for Electrolux and its Authorised Service Centres to exchange information in relation to you to enable Electrolux to meet its obligations under this warranty.
Important Notice
Before Calling a Service Technician please check carefully the operating instructions, service booklet and the warranty terms and conditions.
FOR SERVICE
OR TO FIND THE ADDRESS OF YOUR NEAREST STATE SERVICE CENTRE IN AUSTRALIA
Please call 13 13 49
For the cost of a local call (Australia only)
SERVICE AUSTRALIA
Electrolux
ELECTROLUX HOME PRODUCTS
FOR SPARE PARTS
OR TO FIND THE ADDRESS OF YOUR
NEAREST STATE SPARE PARTS CENTRE IN AUSTRALIA
Please call 13 13 50
For the cost of a local call (Australia only)
- CONTENTS
- JEPPE UTZON BBQ
- General Warnings
- JEPPE UTZON BBQ
- Installation
- Servicing
- Cleaning
- USING YOUR JEPPE UTZON BBQ
- Congratulations
- Aerosol sprays
- Warning – Ventilation
- Controls
- Mounting Gas Bottle
- Lighting burners
- Electronic Ignition:
- NOTE:
- Hotplates
- CLEANING AND CARE
- Cleaning and Care
- Stainless Steel
- BBQ Plate
- Ignition Electrode
- TROUBLESHOOTING
- INSTALLATION
- INSTALLATION INSTRUCTIONS
- This appliance must be installed by an authorised person and in compliance with:
- Gas Connection
- Conversion for use with different gases
- Supply pipe sizing
- Checking the Gas Supply
- APPLIANCE FOR OPERATION ON L.P.G.
- Check all joints and ensure that all connections are gas tight.
- Changing Battery
- Battery Connection
- TESTING THE APPLIANCE
- Please ensure the supply pressure has been checked PRIOR to any adjustment.
- ELECTROLUX WARRANTY - AUSTRALIA
- General Terms and Conditions
- Limitation of Liability
- Privacy
- Important Notice
- FOR SERVICE
- Please call 13 13 49
- SERVICE AUSTRALIA
- Electrolux
- FOR SPARE PARTS
- Please call 13 13 50
Brand : ELECTROLUX
Model : Jeppe Utzon BBQ
Category : Barbecue