
SHX55HP201WWS - Heating SHX - Free user manual and instructions
Find the device manual for free SHX55HP201WWS SHX in PDF.


| Product Type | Fan Heater |
| Brand | SHX |
| Model | SHX55HP201WWS |
| Color | White |
| Dimensions (W x D x H) | 20 cm x 15 cm x 30 cm |
| Weight | 2.5 kg |
| Power Supply | AC 220-240V, 50/60Hz |
| Power Consumption | 2000W (max) |
| Heating Levels | 2 (Low: 1000W, High: 2000W) plus Fan Only |
| Thermostat | Adjustable thermostat with temperature dial |
| Safety Features | Overheat protection, tip-over auto shut-off |
| Energy Efficiency Class | A |
| Noise Level | ≤45 dB |
| Oscillation | Yes (70° wide angle) |
| Cord Length | 1.8 m |
| Material | Flame-retardant plastic |
| Filter Type | Washable rear dust filter |
| Maintenance | Clean filter every 2 weeks; wipe exterior with damp cloth |
| Spare Parts Availability | Filter, thermostat, heating element available |
| Repairability Index | 8/10 (easy disassembly, standard screws) |
Frequently Asked Questions - SHX55HP201WWS SHX
User questions about SHX55HP201WWS SHX
0 question about this device. Answer the ones you know or ask your own.
Ask a new question about this device
Download the instructions for your Heating in PDF format for free! Find your manual SHX55HP201WWS - SHX and take your electronic device back in hand. On this page are published all the documents necessary for the use of your device. SHX55HP201WWS by SHX.
USER MANUAL SHX55HP201WWS SHX
natural_image
Front view of a white rectangular electronic device with a digital display showing temperature reading (no text or symbols on the device itself)HERZLICHEN GLÜCKWUNSCH!
natural_image
Simple line drawing of a rectangular object with two side supports at the bottom (no text or symbols)①
②
WANDMONTAGE
natural_image
Simple line drawing of a pencil inside a door, no text or symbols present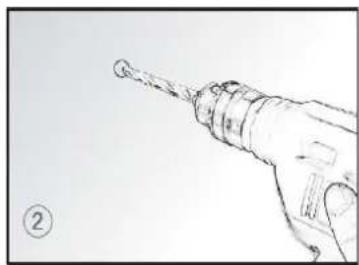
natural_image
Hand holding a screwdriver with a pointed tip, no text or symbols visible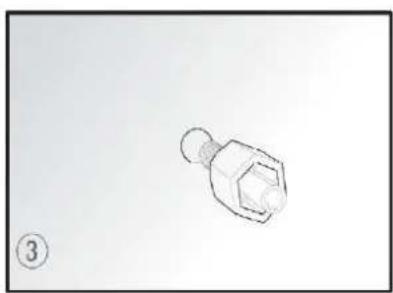
natural_image
Simple line drawing of a hexagonal bolt with a circular end cap, no text or symbols presentnatural_image
Simple line drawing of a corner joint with a circular arrow and number 4, no text or symbols present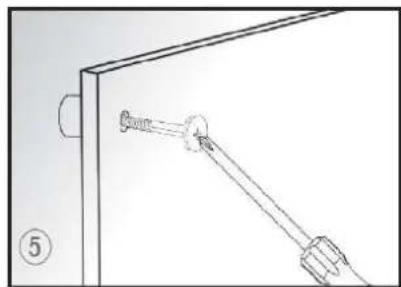
natural_image
Technical line drawing of a mechanical assembly with a bracket and connecting rod (no text or symbols)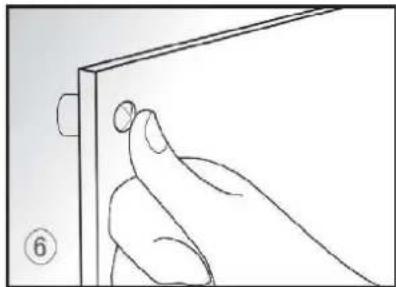
natural_image
Line drawing of a hand holding a small circular object against a rectangular panel (no text or symbols)| Important information on safety, location and electrical connection | 18 – 20 |
| Recycling, Disposal and Declaration of Conformity 20 | |
| Delivery Content 20 | |
| Description of the device 21 | |
| Start Up 21 – 27 | |
| Safety Measurements 28 | |
| Cleaning Instructions 28 | |
| Activities at the beginning and end of the season 28 – 29 | |
| Trouble Shooting 29 | |
| Technical informations 30 | |
| Required information on electrical individual room heaters 31 | |
| Warranty 32 | |
Please note that the SHX panel is not suitable for continuous operation and may only be used in well-insulated rooms.
PLEASE READ THE INSTRUCTIONS CAREFULLY, BEFORE USING THE PRODUCT. PROTECT YOURSELF AND OTHERS BY FOLLOWING THE SAFETY INSTRUCTIONS. IF YOU ARE NOT FOLLOWING THE INSTRUCTIONS, IT MAY CAUSE PERSONAL AND/OR PROPERTY DAMAGE AND/OR LOSS OF WARRANTY!
IMPORTANT INFORMATION ON SAFETY, LOCATION AND ELECTRICAL CONNECTION.



-
Use this device only in accordance with the guidelines in the operating instructions. Any other use that is not recommended by the manufacturer could result in fire, electric shock, or personal injury.
-
This device is only intended for heating living spaces in households and must not be used for any other purpose.
- Remove the packaging and make sure that the heating panel is not damaged. If in doubt, do not use the device and contact the service center or your dealer.
- Before connecting to the mains, you must check whether the type of current and the mains voltage match the specifications on the device rating plate.
-
The electrical socket in which you connect the device must not be defective or loose and must be suitable for the required current load and, above all, must be reliably grounded.
-
Avoid using an extension cord as this could overheat and cause a fire.
- If the power supply cable is damaged, it must be replaced by the manufacturer or an authorized service center in order to avoid all possible risks. Do not twist or bend the power cord.
- If in doubt, have your electrical installation checked by a qualified electrician.
- It is forbidden to adapt or modify the properties of this device in any way and only use spare parts and accessories recommended by the manufacturer (failure to do so will invalidate the guarantee).
- If the device has a defect, switch it off and contact the customer hotline.
- Always contact the manufacturer's authorized service center for any repairs to the device, power plug or cable. You can access the customer service centers online at www.shx.at.
- This device may only be used by adults.
- Children under 8 years of age and persons with limited physical, psychological, sensory or mental abilities as well as lack of experience and knowledge may only use this device if it is done under appropriate supervision and it provides detailed instructions on how to use the device in a safe manner and how it came, and the existing dangers have been described.
- Do not operate the device unsupervised. If you leave the room, always switch off the device.
- Do not use the heating panel in small rooms where there are people who are unable to leave the room on their own, unless they are constantly monitored.
- Children must not play with the device.
- Keep children away from packaging material. If swallowed there is a risk of suffocation!
- This device is not equipped with a device for controlling the room temperature.
- The device is not suitable for continuous and precision operation.
- This device is only intended for heating living spaces in households and must not be used for any other purpose.
- This panel is only for wall mounting in dry indoor areas.
- Do not use the heating panel near water or excessive moisture, e.g. in the wet basement, next to the swimming pool, bathtub or shower. Make sure that no water can enter the device.
- Do not use the heating panel in close proximity to gasoline, gas, oil, alcohol or other explosive and easily flammable liquids / gases.
- Keep a distance of at least 1m from other highly flammable substances such as:
a. vessels under pressure (e.g. spray containers)
b. Furniture
c. Textiles of all kinds - Do not place any objects on the panel.
- Never cover the device during operation and cooling down.
- Make sure that no objects get between the heating panel and the mounting wall that touch the heating surface.
- Always switch off the device before pulling the plug.
- Do not pull the power cord to unplug the device. Always pull on the plug to pull out the power cord.
- Always allow the device to cool down before you want to clean or disassemble it.
- Unplug the device when it is not in use before cleaning it, it requires maintenance.
- Do not touch the plug with wet hands to avoid electric shock.


ATTENTION

ATTENTION

ATTENTION
RISK OF INJURY
The fan heater and the exiting are rare very hot!
Therefore, never touch the fan heater during operation this could otherwise lead to serious burns.
RISK OF FIRE
The fan heater must not be covered during operation!
SAFETY DISTANCE:
Hold min. 1m safety distance to easily inflammable objects such as furniture, curtains, paper, etc.!
LOCATION:

Always set up the device so that the air can flow in and out freely.
RISK OF BURNING:
The fan heater gets very hot during use and can cause burns.
Particular caution is required when children and vulnerable people are present.
RISK OF OVERHEATING:
Do not heat rooms with a volume of less than 4m^3 .

RECYCLING
The packaging materials can be recycled. It is therefore recommended to dispose of them in the sorted waste.
DISPOSAL
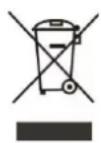
The symbol "crossed-out garbage can" requires the separate disposal of waste electrical and electronic equipment (WEEE). Electrical and electronic devices can contain dangerous and environmentally hazardous substances. Therefore, do not dispose of it in unsorted residual waste, but at a designated collection point for used electrical and electronic equipment. In this way you contribute to the protection of resources and the environment.
For more information, please contact your dealer or local authorities.

DECLARATION OF CONFIRMITY
We hereby confirm that this article complies with the essential requirements, regulations and guidelines of the EU.
You can view the detailed declaration of conformity at any time under the following link:
www.shx.at/downloads
Subject to errors and technical changes.
www.shx.at
DELIVERY CONTENT
The scope of delivery of the SHX tower heater includes:
- 1x heating panel
- 4x plastic dowel
- 4x screws
- 4x caps for screws
- 2x feet and screws
• 1x instruction manual - 1x drill bit (8mm)
• 150 cm cord (preinstalled) with contour plug
DESCRIPTION OF THE DEVICE
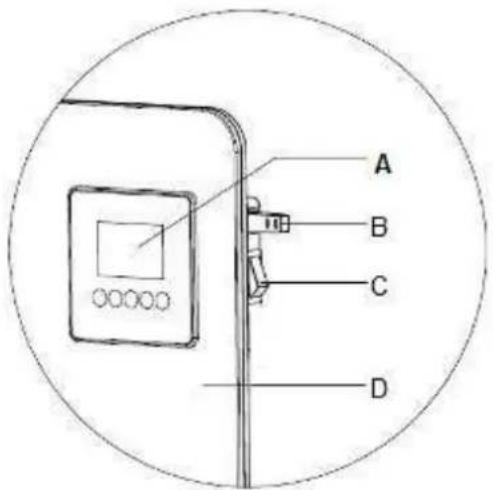
A → control panel + display
B → NTC-Sensor
C → ON/OFF switch
D → heating panel
START UP
SAFETY INSTRUCTIONS FOR ASSEMBLY
The SHX-heating panel can be mounted on walls or other vertical surfaces.
Please note:
-
The SHX heating panel may only be installed with the wall mounting brackets supplied.
-
Make sure that the wall you mount the panel on can carry the weight of the panel.
-
To avoid overloading the circuit, do not connect the panel to a circuit to which other devices are already connected.
-
The heater must not be located immediately below a socket outlet.
-
Mount the panel 20-100cm above the floor.
-
Leave a space of at least 50cm to all sides of the device. Leave at least 1-2 meters to all sides if there are solid or flammable objects.
-
Make sure that there is no material in the immediate surrounding of the heating panel that can deform or discolour at a temperature above 100^ C.
-
In order not to impair the heating efficiency, do not position any furniture or other objects in front of the heating panel.
-
Never install the cord behind the panel.
HINWEIS
It is recommended that the assembly is carried out in pairs, in order to avoid damaging the device.
PRE - INSTALLATION
- Open the box and remove the device.
- Remove the packaging completely from the device.
- Then check the device for damage.
- Carefully unwind the power cord, also paying attention to damage.
- You can use the SHX convector both as a free-standing device and as a wall heater. Please proceed as follows:
STANDING DEVICE
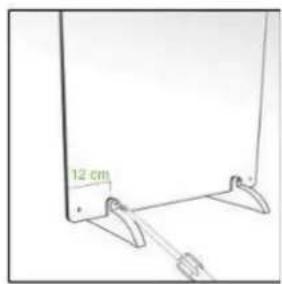
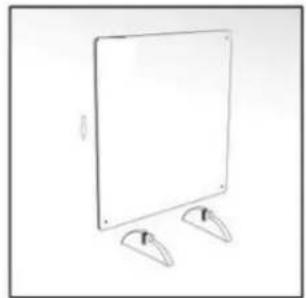
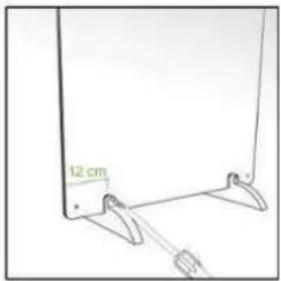
- Place the two feet on the floor, making sure that the slots are parallel to each other.
Now place the panel in the slots provided in the feet, which must be at least 12cm from the outer edge.
- Now screw the panel with the feet using the supplied screws.
natural_image
Simple line drawing of a rectangular monitor with two side handles, no text or symbols present.①
②
WALL HEATER
-
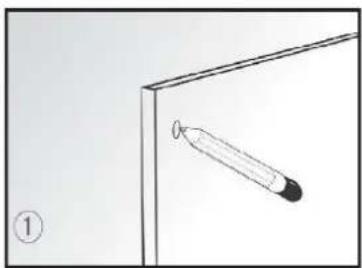
Hold the panel against the wall and markt he four positions trough the holes.
-
Drill the holes with a drilling machine.
natural_image
Simple line drawing of a pen inserted into a corner, no text or symbols present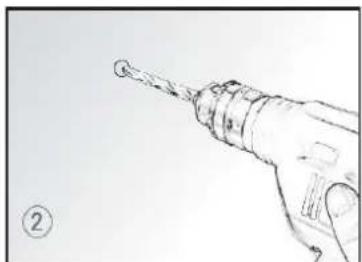
natural_image
Line drawing of a hand holding a screwdriver (no text or symbols)-
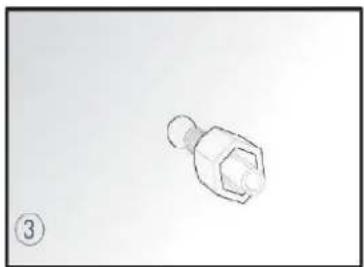
Insert the four rails fitting into the holes in the wall.
-
Now hold the panel against the four rail fittings matching the four holes on the device.
-
Now mount the panel against the wall, by screwing the screws trough the panel into the rails.
-
Put the caps onto the fasten bolts. It is recommended to use some glue to stick the caps onto the bolts steadily.
natural_image
Simple line drawing of a mechanical component with a numbered label (3) and no text or symbols on the object itself.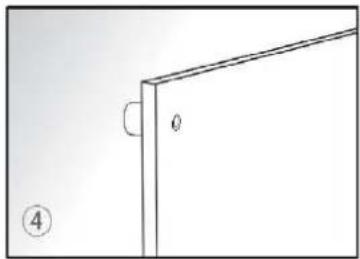
natural_image
Simple line drawing of a corner joint with a small circular mark and number 4, no text or symbols present.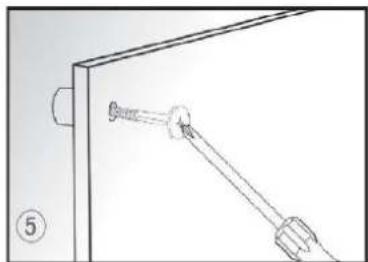
natural_image
Technical line drawing of a mechanical assembly with a bracket and rod (no text or symbols)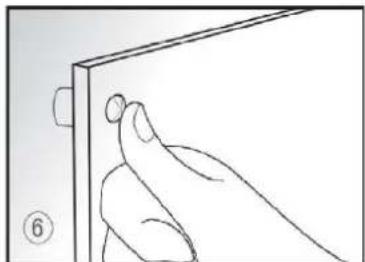
natural_image
Line drawing of a hand holding a small object near a rectangular panel (no text or symbols)Note: If you want to disassemble the device, simply remove the covers, unscrew the screws with a screwdriver and remove the device from the wall.
Make sure that you mount the device at least 20 cm above the floor.
DESCRIPTION OF THE DISPLAY AND CONTROL PANEL
- Indicator WIFI
- Indicator CHILD LOCK
- Indicator ECO-MODE
4.+5. Indicator SET TEMPERATURE - Indicator ON/OFF
7.+8. Indicator ROOM TEMPERATURE - Button ON/OFF
- Button SET/WIFI
- Button INCREASE
- Button DECREASE
- Button CHILD LOCK
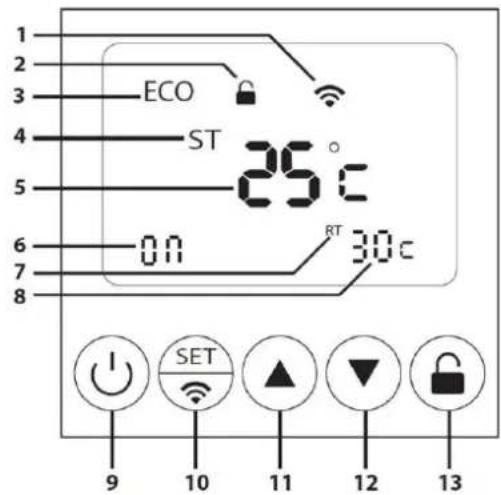
SET THE FUNCTIONS
Please press the ON / OFF switch on the side of the device to put the panel in an operational mode. "OF" lights up on the display - this means that the device is in standby mode.
1. TURN ON
To switch on the device, press the ⏻ button on the control panel - the "ON" indicator appears on the display.
The set standard temperature of the panel is 25^ C. If the ambient temperature is below it at the time of switching on, the device starts to heat automatically.
If the room temperature is higher, you must set the desired temperature (see 2. Heating function).
NOTE
Never switch off the heating panel by pulling the plug directly from the mains. Always press the button first and then the ON/OFF switch before disconnecting the device from the mains.
2. HEATING-FUNCTION
- Switch on the device using the button.
- You will now see the standard display on the display. (ON and room temperature display).
- To start the heating function, press the button once the "ST" display starts to flash.
- Use the buttons to set the desired temperature (up to 37C °).
- Approx. 10 seconds after your input, the panel automatically saves the setting and now starts to heat.
NOTE
If the set temperature is lower than the current room temperature, the device does not heat.
3. TIMER-FUNKTION
You can use the timer function to switch the heating panel on and off automatically.
TURN ON:
- Switch on the device using the button.
- You will now see the standard display on the display. (ON and room temperature display).
- Press the button until "ON" flashes on the display.
- Then use the buttons to set the desired time when the device should switch on automatically (0-24 hours).
TURN OFF:
- Switch on the device using the button.
- You will now see the standard display on the display. (ON and room temperature display).
- Press the key until "OF" flashes on the display.
- Then use the buttons to set the desired time when the device should switch off (0-24 hours)
NOTE
Please note, that the temperature can't be set, whilst the TIMER is on.
Turn off the timer to set the desired temperature.
4. CHILD LOCK
- Press the child lock button for 3 seconds and the child lock indicator lights up on the display.
- If you want to restart the device, press the childproof lock button again for 3 seconds and the display goes out. Now you can restart the device.
5. WIFI FUNCTION
The panel is equipped with a WIFI function.
DOWNLOAD THE APP
There are two ways to download the app for installation on your smartphone:
Methode A:
- Open the App Store/Play Store on your phone.
- Search „Tuya Smart“ and download it.
Methode B:
- Scann the QR-Code with your camera:

- Open your Internet-Browser.
- Push „Download and Install“.
WIFI-Connection
- Press the - button for 5 seconds on the control panel of the panel. The WIFI indicator for the WIFI function lights up on the display.
- Open the "Tuya Smart" app on your smartphone and enter your phone number.
- You will then receive a verification code to log in to the app.
- Enter the verification code and press "Login".
- Press "Add device" and select your Internet.
- Enter the WiFi password and press OK to confirm and connect your device to the WiFi.
- If your smartphone shows that the process was successful and the WLAN indicator on the heater display stops flashing and remains lit, the panel is connected to your WLAN.
PLEASE NOTE:
What to do if the connection fails:
- If your smartphone shows that the connection has failed, you must switch to the "slowly flashing state" and connect to the panel's own network.
- If the WiFi indicator flashes rapidly on the display, press the SET button for 5 seconds. The WLAN indicator now lights up and changes to a slowly flashing state.
- Now open the W-LAN menu on your smartphone and connect to the WIFI "SMARTLIFE" and connect to it.
- As soon as you open the TUYA app, the device automatically connects to your smartphone.
- If it is shown on your cell phone that the process was successful and the WLAN indicator on the heater display stops flashing and lights up, the process is complete.
You can now use your smartphone as a remote control:
1. Set the temperature
- Open the "Tuya Smart" app to select the heating panel.
- Click on the device to be operated and call up the device user interface. The power switch in the lower left corner of the phone display turns off and the color of the display is dark red, indicating that the device is turned off.
- Click the switch and power button in the lower left corner of the phone interface. The color of the telephone interface lights up bright red and indicates that the device is switched on.
- Press the + or - button to set the temperature.
- If the set temperature is higher than the ambient temperature, the device starts to heat up - otherwise the device is in the state to be heated.
2. Timer
- Open the "Tuya Smart" app to select the Heipanel.
- Click on the device to be operated and call up the user interface.
- Click Timing.
- Click Add Timing.
- Select the hour, minute, and day of the week and click Confirm.
3. Device sharing for more users
- Call up the user interface of the device. Click on "More" in the top right corner and select the device to be shared.
- Click Add Share, enter the new member's phone number, and click Finish.
4. Withdraw device approval from users
- Open the "Tuya Smart" app and go to the "Personal Center" to click on device sharing.
- Delete the member's phone number to revoke approval.
5. Change WIFI address and remove the device
- Open the "Tuya Smart" app to access your device.
- Click on the device for which you want to change the WIFI address.
- Click Remove Device, and then click OK.
- Remove device manually: Press the button for 5 seconds to remove the device directly.
6. Change device name
- Click on the device for which you want to change the name.
- Click on "..." in the top right corner of the mobile phone and then on "Change device name".
- Enter a new name.
- Click Save.
5. Child lock
- Click the child lock icon on the control panel to turn it on.
SAFETY MEASURMENTS
The SHX panel is equipped with protective devices that protect the device and are designed to prevent a fire.
Please note that neither mechanism is an auto stop or other comfort function. Always switch the device off, pull out the mains plug and wait until the heater cools down before you move, clean or store the device.
OVERHEATING PROTECTION
If there is any risk of overheating (e.g. cover of the device, mains overload ... ..), the built-in overheating protection switches the device off.
As soon as the device cools down, the device automatically switches on and continues as before.
CLEANING INSTRUCTIONS
Before cleaning the device, switch off the heater, pull out the mains plug and then wait until the device has completely cooled down.
Clean the panel with a soft, moderately damp cloth and then wipe it with a dry cloth.

Allow the device to cool down completely, before cleaning it

- Do not dip the device in water or splash it with any other liquid.
- Do not use gasoline, alcohol or solvents for cleaning the device.
- Do not spray insecticides or similar means on the device.
- Do not use the device in rooms with high humidity.
- DO NOT COVER THE DEVICE – RISK OF FIRE!
ACTIVITIES AT THE BEGINNING / END OF THE SEASON
At the end of the season
- Check whether the panel, the power supply cable and the socket are in good condition and undamaged.
- Follow the installation and safety instructions carefully.
At the beginning of the season
- If you want to leave the device mounted on the wall, pull out the plug and store the cable carefully.
- While the panel is not connected to the electrical mains, you can cover the panel.
- If you want to remove the device from the wall, first carefully remove the covers of the screws and then the screws.
NOTE
We recommend to do the disassembly of the panel heater in pair, so it doesn't get damaged.
- Pack the device and store it in a safe, cool and dry place.
TROUBLESHOOTING
Before you contact our customer hotline / service center, please check whether the error can be remedied using the information below.
| PROBLEM POSSIBLE CAUSE SOLUTION | ||
| The heating panel does not turn on. | Power failure. | Wait for the power supply to restore. |
| The device is not connected to the power supply. | Connect / plug in the device correctly. | |
| The side ON / OFF switch is not on. | Press the ON / OFF switch to ON. | |
| The panel only works for a short time. | The desired temperature has already been reached. | Set a higher temperature. |
| The power plug is not inserted correctly. | Insert the mains plug firmly into the socket. | |
| There is an unpleasant smell in the room during operation | The panel is covered. Remove | all objects -ATTENTION RISK OF FIRE IN COMBUSTIBLE FLAMMABLE SUBSTANCES !!! |
| There is not enough distance to other objects. | The minimum distance to other objects is 1 meter. | |
| There is something between the heating panel and the mounting wall. | Remove any objects behind the heating panel. | |
TECHNICAL INFORMATIONS
| Technical information | |
| Item no. | SHX55HP201WWS |
| Current | 550W |
| Heating area | 0-37°C |
| Input voltage | 220-240V |
| Frequency | 50-60Hz |
| Weight | 7,4 kg |
| Measurements | 800 x 600 x 11 mm |
| Contact addresses for further information | Schuss Home Electronic GmbHScheringgasse 3, A-1140 WienTel: +43 (1) 97 0 21 – 0Serviceline: +43 (1) 97 0 21 – 502www.shx.atFB-Nr: 236974 t / FB-Gericht: Wien |
REQUIRED INFORMATION ON ELECTRICAL INDIVIDUAL
ROOM HEATERS
| Model identifier(s): SHX55HP201WWS | |||||
| Item Symbol | Value Unit Item | Unit | |||
| Heat output | Type of heat input, for electric storage local space heaters only (select one): | ||||
| Nominalheat output | P_nom 0,55 | kW | manual heat charge control, with integrated thermostat | No | |
| Minimum heat output (indicative) | P_min 0 kW | manual heat charge control with room and/or outdoor temperature feedback | No | ||
| Maximum continuous heat output | P_max,c | 0,55 | kW | electronic heat charge control with room and/or outdoor temperature feedback | No |
| Fan assisted heat output | No | ||||
| Auxiliary electricity consumption | Type of heat output/room temperature control (select one) | ||||
| At nominal heat output | eI_max | N/A | kW | single stage heat output and no room temperature control | No |
| At minimum heat output | eI_min | N/A | kW | Two or more manual stages, no room temperature control | No |
| In standby mode | eI_sb | 0,000 1354 | kW | ||
| with mechanic thermostat room temperature control | No | ||||
| with electronic room temperature control | No | ||||
| electronic room temperature control plus day timer | No | ||||
| electronic room temperature control plus week timer | Yes | ||||
| Other control options (multiple selections possible) | |||||
| room temperature control, with presence detection | No | ||||
| room temperature control, with open window detection | No | ||||
| with distance control option | Yes | ||||
| with adaptive start control | No | ||||
| with working time limitation | Yes | ||||
| with black bulb sensor | No | ||||
| Contact details | Schuss Home Electronic GmbH Scheringgasse 3 1140 Vienna Austria | ||||
WARRANTY
By purchasing a SHX quality product you have acquired an innovative, long lasting and reliable item.
For this SHE device we grant a warranty of 2 years from the date of purchase, valid in Austria only.
In the unlikely event that service work is required on your device in this period we warrant free repair (spare parts and labour) or (subject to Schuss's decision) to replace the product. In the event that neither repair nor exchange make sense from an economical perspective we reserve the right to issue a credit based on current value. When dealing with air conditioning devices you should always contact the customer hotline first (see label on the device or the title page of the instruction manual), in case of fans contact your dealer or us directly. Please note that repair not performed by the authorised workshop in Austria immediately renders this warranty void.
This warranty does not include:
• Repair of replacement of parts due to normal wear
- Damage due to non-compliance with the instruction manual
• Devices that are used commercially – even in part
• Devices damaged by external forces (falling, impact, cracking, improper use etc.) as well as aesthetic wear
• Devices that have been used improperly
• Devices that were not opened by our authorised workshop.
- Unfulfilled customer expectations.
- Damage caused by force majeure, water, lightning and overvoltage.
- Devices on which type denomination and/or serial number on the device have been erased, rendered illegible or removed.
- Service work not performed by our authorised workshops, transport costs to an authorised workshop or us and back as well as associated risks.
Please note that within the warranty period we charge a flat rate of 60 € (indexed as per consumer price index 2010, June 2015) in case of operating errors or if no fault can be found.
The total warranty period of 2 years is not extended if warranty service is performed (repair or device replacement).
The 2 year warranty is only valid if the original invoice (must contain name and address of the dealer as well as full device name) and the respective warranty certificate are produced, on which the device type and serial number (can be found on the box and the device's rear or bottom) are to be noted! Only the statutory warranty coverage applies if the warranty certificate cannot be produced!
Please note that the statutory warranty coverage is not altered by this warranty and that it applies in full regardless.
Schuss Home Electronic GmbH and its vicarious agents are only liable for damages in case of gross negligence or intent. Liability for loss of profit, expected but not incurred savings, consequential damages and damages from third party claims is excluded in any case. Damages to or for recorded data are always excluded from the liability for damages.
Congratulations on your choice. We hope you will enjoy using your SHE device!
ADDRESS
SHX Sales
Schuss Home Electronic GmbH
A-1140 Vienna, Scheringgasse 3
Tel.: +43 (0)1/ 970 21
Type designation:
Serial number:
Together with the device, this warranty certificate must be handed to the authorised workshop or dealer you bought the device from in the event of a warranty claim!
- HERZLICHEN GLÜCKWUNSCH!
- WANDMONTAGE
- Please note that the SHX panel is not suitable for continuous operation and may only be used in well-insulated rooms.
- IMPORTANT INFORMATION ON SAFETY, LOCATION AND ELECTRICAL CONNECTION.
- ATTENTION
- RISK OF INJURY
- RISK OF FIRE
- SAFETY DISTANCE:
- RISK OF BURNING:
- RISK OF OVERHEATING:
- RECYCLING
- DISPOSAL
- DECLARATION OF CONFIRMITY
- DELIVERY CONTENT
- DESCRIPTION OF THE DEVICE
- START UP
- SAFETY INSTRUCTIONS FOR ASSEMBLY
- Please note:
- HINWEIS
- PRE - INSTALLATION
- STANDING DEVICE
- WALL HEATER
- DESCRIPTION OF THE DISPLAY AND CONTROL PANEL
- SET THE FUNCTIONS
- TURN ON
- NOTE
- HEATING-FUNCTION
- TIMER-FUNKTION
- TURN ON:
- TURN OFF:
- CHILD LOCK
- WIFI FUNCTION
- DOWNLOAD THE APP
- Methode A:
- Methode B:
- WIFI-Connection
- You can now use your smartphone as a remote control:
- Set the temperature
- Timer
- Device sharing for more users
- Withdraw device approval from users
- Change WIFI address and remove the device
- Change device name
- Child lock
- SAFETY MEASURMENTS
- OVERHEATING PROTECTION
- CLEANING INSTRUCTIONS
- ACTIVITIES AT THE BEGINNING / END OF THE SEASON
- At the end of the season
- At the beginning of the season
- TROUBLESHOOTING
- TECHNICAL INFORMATIONS
- REQUIRED INFORMATION ON ELECTRICAL INDIVIDUAL
- ROOM HEATERS
- WARRANTY
- This warranty does not include:
- ADDRESS
Brand : SHX
Model : SHX55HP201WWS
Category : Heating