
SWALPH-B12003HRB - Uncategorized SWANN - Free user manual and instructions
Find the device manual for free SWALPH-B12003HRB SWANN in PDF.


| Brand | Swann |
| Model | SWALPH-B12003HRB |
| Product Type | Security Camera |
| Resolution | 1080p Full HD |
| Night Vision | Up to 30 meters (infrared) |
| Field of View | 90° diagonal |
| Power Supply | 12V DC, 1A |
| Connectivity | Ethernet (PoE) or Wi-Fi (dual-band 2.4/5GHz) |
| Storage | MicroSD card (up to 128GB) or cloud subscription |
| Audio | Built-in microphone and speaker (two-way audio) |
| Motion Detection | PIR sensor with adjustable sensitivity |
| Weather Resistance | IP65 (outdoor use) |
| Mounting | Wall mount with adjustable bracket |
| Dimensions | 120 x 70 x 75 mm (camera body) |
| Weight | 350 g |
| Compatibility | Swann Security App (iOS/Android) |
| Warranty | 1 year |
| Certifications | CE, FCC, RoHS |
| Maintenance | Clean lens with dry cloth; avoid water jets |
| Safety Instructions | Use only provided power adapter; do not expose to extreme temperatures |
Frequently Asked Questions - SWALPH-B12003HRB SWANN
User questions about SWALPH-B12003HRB SWANN
0 question about this device. Answer the ones you know or ask your own.
Ask a new question about this device
Download the instructions for your Uncategorized in PDF format for free! Find your manual SWALPH-B12003HRB - SWANN and take your electronic device back in hand. On this page are published all the documents necessary for the use of your device. SWALPH-B12003HRB by SWANN.
USER MANUAL SWALPH-B12003HRB SWANN
TripleHead™ Wireless Motion Sensor Spotlight
with Remote Control
OVERVIEW
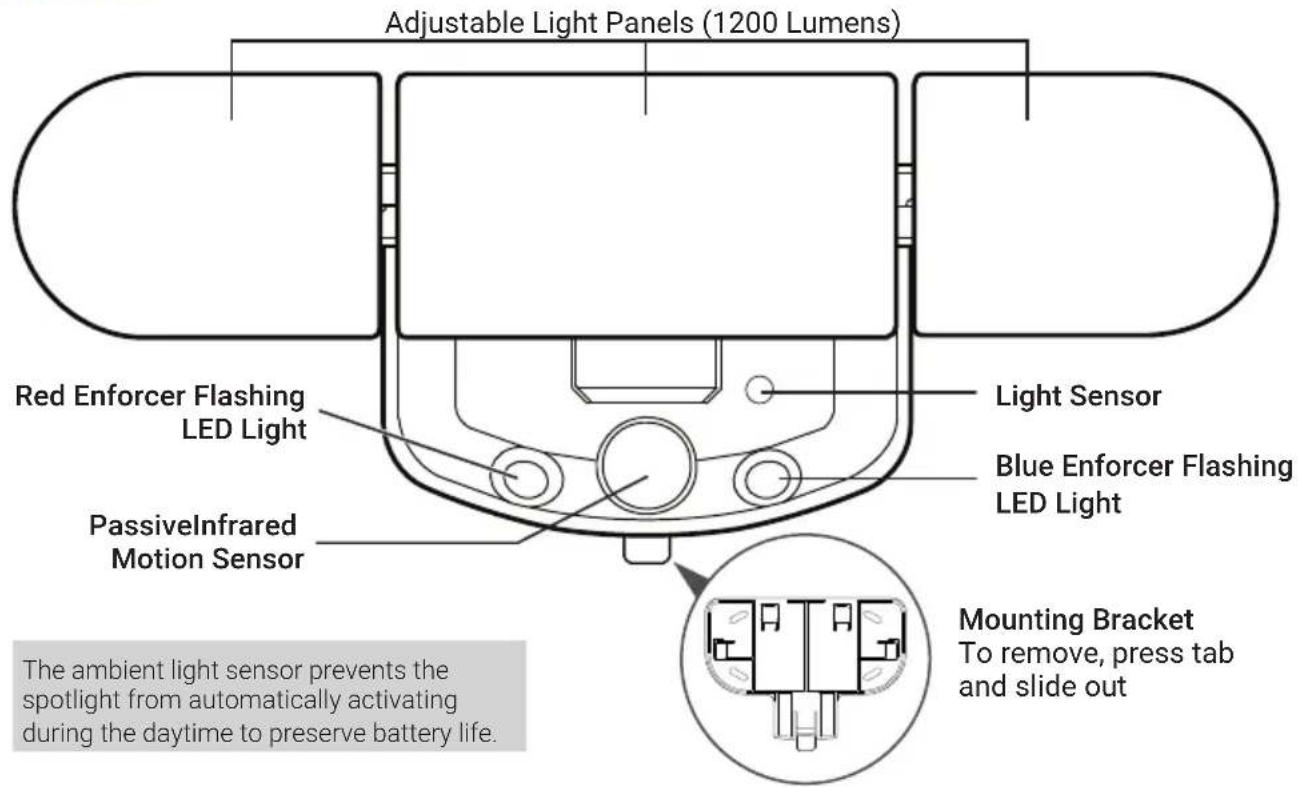
Spotlight
Remote Control
Override sensor and manually turn light panels ON for 10 minutes.
After 10 minutes light panels will turn off and operate in auto (sensor) mode
Power OFF.
The spotlight will revert to auto (sensor) mode after 1 hour if no other button is pressed
Set light panels to stay OFF when motion is detected
Set Enforcer Lights to stay OFF when motion is detected
Set motion sensor sensitivity to Low. Detection range is up to 10ft/3m
Set motion sensor sensitivity to Medium. Detection range is up to 13ft/4m
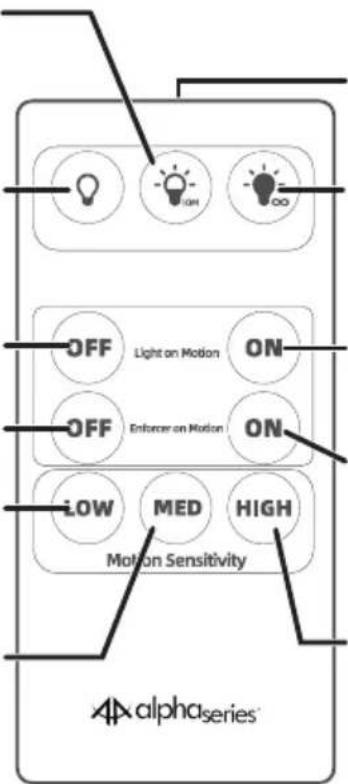
Infrared (IR) signal transmitter
*Override sensor and manually turn light panels ON for an indefinite amount of time until the Power OFF button is pressed
Set light panels to automatically turn ON when motion is detected. Light panels will turn off 20 seconds after no motion is detected
Set Enforcer Lights to automatically turn ON when motion is detected. Enforcer Lights will turn off 20 seconds after no motion is detected
Set motion sensor sensitivity to High. Detection range is up to 20ft/6m
* Keeping the light panels on continuously for prolonged periods of time will significantly shorten battery lifespan and reduce operating time.
BATTERY INSTALLATION
Spotlight
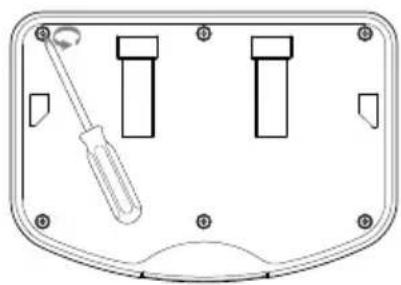
The spotlight requires four D size batteries (not supplied). For reliable, long-lasting performance, use only high quality alkaline batteries. To install batteries (see Figure 1):
- Unscrew the six screws securing the battery compartment cover on the rear of the spotlight with a Philips screwdriver and lift it off.
- Insert batteries according to the polarity markings (+ and -) indicated inside the battery compartment.
- Replace the battery compartment cover and screw it back into place with the previously removed screws.
natural_image
Technical line drawing of a device panel with screwdriver and two rectangular components (no text or symbols)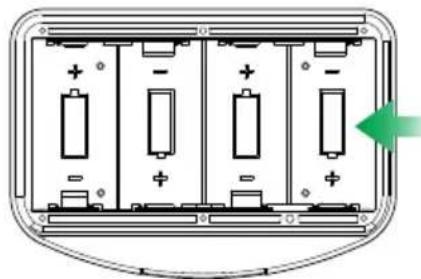
natural_image
Diagram of a four-pin electronic device with four batteries and an arrow indicating a green directional change (no text or symbols present)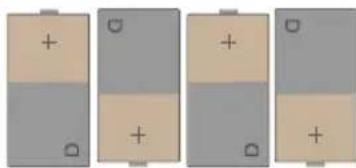
natural_image
Four identical battery cell diagrams showing charge distribution (no text or symbols)Figure 1
Remote Control

WARNING! THIS PRODUCT CONTAINS A COIN CELL BATTERY.
If swallowed, a lithium coin cell battery can cause severe or fatal injuries within 2 hours.
The battery is hazardous if swallowed, keep out of reach of children.
If the battery compartment does not close securely, stop using the product.
If you think the battery may have been swallowed or placed inside any part of the body, seek immediate medical attention.
The remote control is powered by a CR2025 battery which comes pre-installed.
• To activate the battery, simply pull the plastic film out from the bottom of the remote control.
- To replace the battery, remove the locking screw on the back of the remote control using a small Phillips screwdriver, then push the tab on the left of the battery tray towards the right and pull out the battery tray from the remote control (see Figure 2). Place a new "CR2025" battery on the tray with the positive (+) side facing up. Insert the tray back into the remote control and secure with the locking screw.
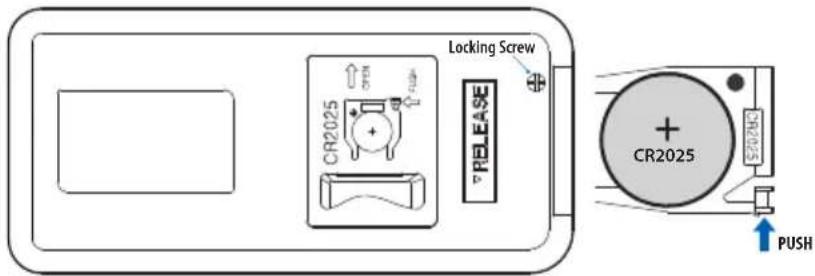
Figure 2
USING THE REMOTE CONTROL
- Point the remote control in the direction of the spotlight to operate it. Ensure the distance is within 5 meters/16 ft and there is no obstruction between the remote control and the spotlight.
- If you have more than one spotlight unit in the vicinity, the remote control should be pointed, as close as possible, to the spotlight you want to operate. This will prevent other units from receiving unwanted IR signals. IR signals emitted by the remote control may interfere with the operation of other nearby electronic devices.
- When pressing any button on the remote control, the spotlight will flash the Red Enforcer LED light once to confirm it has received the command.
- If you set both "Light on Motion" and "Enforcer on Motion" to ^off , the spotlight will temporarily stop detecting motion for 1 hour. After 1 hour, the spotlight will revert to automatic mode (i.e., light panels activate when motion is detected). You can re-enable the motion sensor at any time by pressing the "Light on Motion" button.
- If you want the spotlight to activate only the red and blue Enforcer lights when motion is detected, perform the steps below in the following order:
- Press the "Light on Motion" button.
- Press the "Enforcer on Motion" button.
- Press the "Light on Motion" button.
(OPTIONAL) PAIRING WITH THE INDOOR ALARM RECEIVER
You can pair the spotlight with a compatible Alpha-Series Indoor Alarm Receiver which will enable you to get sound alerts when motion is detected.
- Decide which Indoor Alarm Receiver Sensor Channel (1, 2 or 3) you want to assign to the spotlight, then press and hold the desired Sensor Channel Number button on the side of the Indoor Alarm Receiver until the corresponding Sensor Channel LED indicator lights up and a beep is heard. The Indoor Alarm Receiver is now in pairing mode.
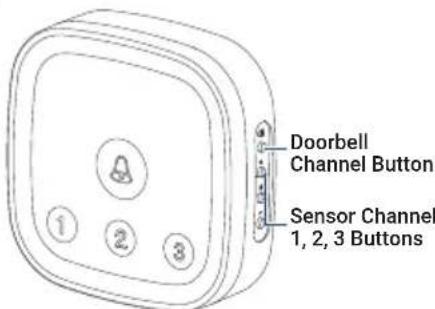
- Within 25 seconds, trigger the spotlight by waving your hand in front of it or walking past it. The Sensor Channel melody sounds with the corresponding Sensor Channel LED indicator blinking on the Indoor Alarm Receiver to confirm pairing has been successful.
- If pairing is not performed within 25 seconds, the Sensor Channel LED indicator goes off and the Indoor Alarm Receiver is no longer in pairing mode. Repeat steps above to pair the spotlight again.
Note: For more information on operating the Indoor Alarm Receiver such as adjusting the volume, refer to the instruction manual that came with your Alpha-Series home alarm system.
MOUNTING THE SPOTLIGHT
- The spotlight can be deployed outdoors, for example near the entry to your driveway or garage, or mount it near a likely access point such as the front door/entrance to your home or business.
- For optimal coverage, mount the spotlight approximately 2 meters/6.5 ft above the ground where the most likely approach path of visitors and vehicles is across the front of the spotlight. Motion detection is less effective when movement is directly towards or away from the front of the spotlight (see Figure 3).
- You can adjust the detection range of the spotlight using the Motion Sensitivity - Low/Med/High buttons on the remote control. In general, the higher the Motion Sensitivity setting, the greater the possibility of false triggering. To reduce false triggering, choose a lower Motion Sensitivity setting.
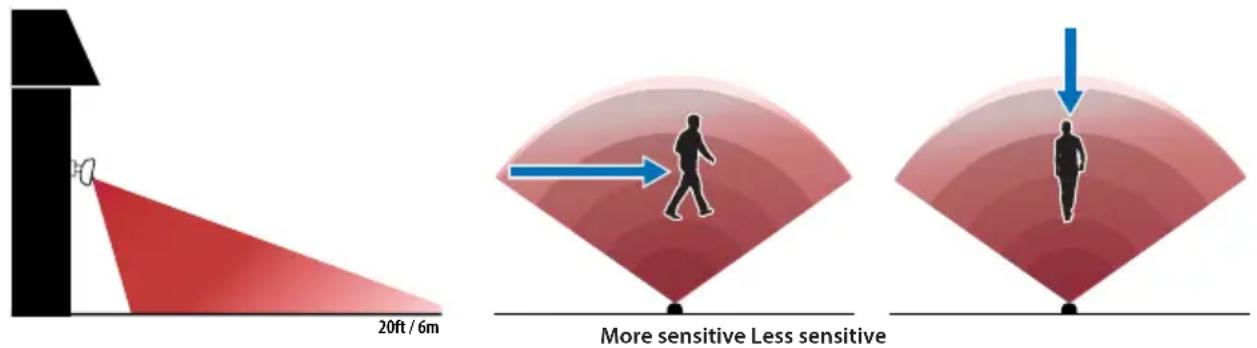
Figure 3
To mount the spotlight:
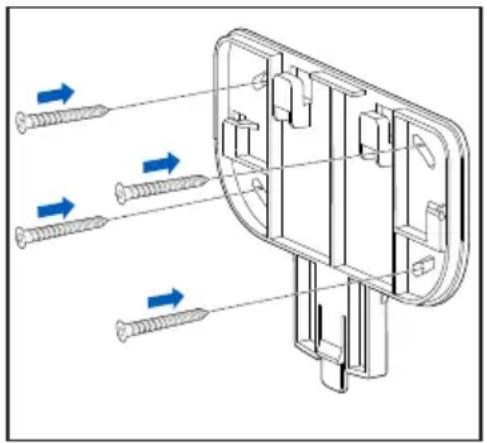
- Attach the mounting bracket to the mounting surface using the supplied screws (see Figure 4). If mounting on drywall/masonry, install wall anchors first.
- Align the slots on the rear of the spotlight with the tabs on the mounting bracket then press and slide down into the bracket until it locks into place.
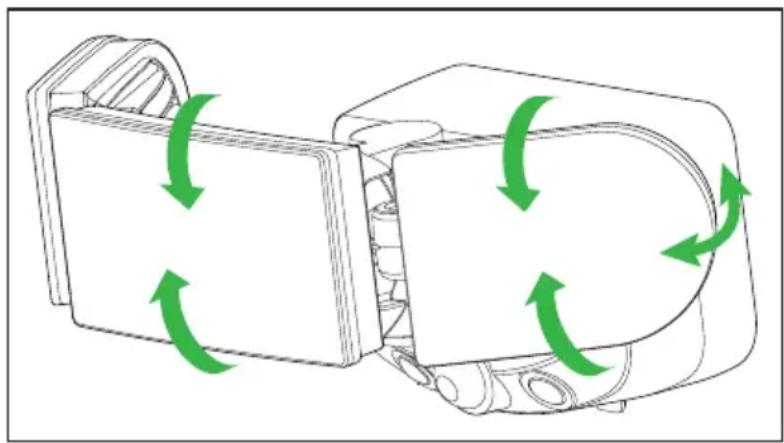
- Adjust the angle and direction of the left, center, and right light panels to cover different areas of the surroundings as desired (see Figure 5).
natural_image
Technical diagram of a mechanical component with multiple screw fasteners and directional arrows indicating assembly (no text or labels)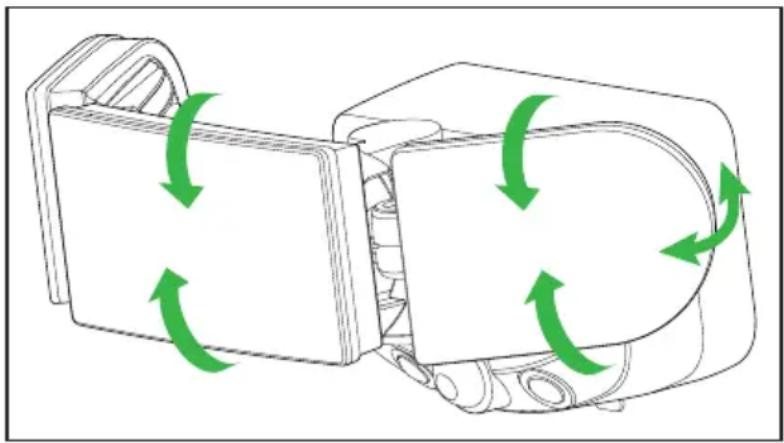
natural_image
Diagram of a mechanical device with green arrows indicating rotational or directional motion (no text or symbols)Figure 4 Figure 5
LIMITED WARRANTY TERMS & CONDITIONS
Swann Communications warrants this product against defects in workmanship and material for a period of one (1) year from its original purchase date. You must present your receipt as proof of date of purchase for warranty validation. Any unit which proves defective during the stated period will be repaired without charge for parts or labour or replaced at the sole discretion of Swann. The end user is responsible for all freight charges incurred to send the product to Swann's repair centres. The end user is responsible for all shipping costs incurred when shipping from and to any country other than the country of origin.
The warranty does not cover any incidental, accidental or consequential damages arising from the use of or the inability to use this product. Any costs associated with the fitting or removal of this product by a tradesman or other person or any other costs associated with its use are the responsibility of the end user. This warranty applies to the original purchaser of the product only and is not transferable to any third party. Unauthorized end user or third party modifications to any component or evidence of misuse or abuse of the device will render all warranties void.
By law some countries do not allow limitations on certain exclusions in this warranty. Where applicable by local laws, regulations and legal rights will take precedence.
Have Questions?
We are here to help! Visit us at http://support.swann.com. You can also email us at any time via: tech@swann.com
natural_image
Technical line drawing of a device panel with screwdriver and two rectangular buttons (no text or symbols)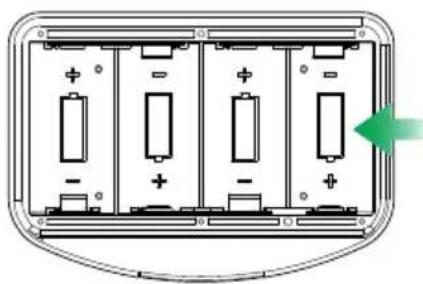
natural_image
Diagram of a four-pin electronic device with four battery cells and a green arrow indicating direction (no text or symbols)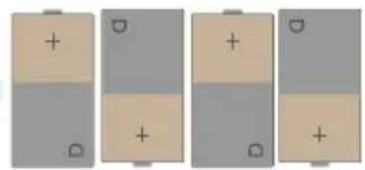
natural_image
Four identical panels of a battery with positive and negative charge indicators, no text or symbols present.Figura 1
Control remoto

natural_image
Technical diagram of a mechanical component with multiple screws and directional arrows indicating assembly or movement (no text or symbols present)Figura 4 Figura 5
natural_image
Diagram of a device with green arrows indicating rotational or directional motion (no text or symbols)TÉRMINOS Y CONDICIONES DE LA GARANTÍA LIMITADA
This equipment has been tested and found to comply with the limits for Class B digital device, pursuant to part 15 of the FCC Rules. These limits are designed to provide reasonable protection against harmful interference in a residential installation. This equipment generates, uses and can radiate radio frequency energy and, if not installed and used in accordance with the instructions, may cause harmful interference to radio communications. However, there is no guarantee that interference will not occur in a particular installation. If this equipment does cause harmful interference to radio or television reception, which can be determined by turning the equipment off and on, the user is encouraged to try to correct the interference by one or more of the following measures:
- Reorient or relocate the receiving antenna.
- Increase the separation between the equipment and the receiver.
- Connect the equipment into an outlet on a circuit different from that to which the receiver is connected.
- Consult the dealer or an experienced radio/TV technician for help.
Battery Safety Information
• Install only new batteries of the same type in your product.
- Failure to insert batteries in the correct polarity, as indicated in the battery compartment, may shorten the life of the batteries or cause batteries to leak.
- Do not mix old and new batteries.
- Do not mix alkaline, standard (Carbon-Zinc), rechargeable (Nickel Cadmium/Nickel Metal Hydride) or lithium batteries.
- Batteries should be recycled or disposed of as per state and local guidelines.
- TripleHead™ Wireless Motion Sensor Spotlight
- OVERVIEW
- Remote Control
- BATTERY INSTALLATION
- Spotlight
- WARNING! THIS PRODUCT CONTAINS A COIN CELL BATTERY.
- USING THE REMOTE CONTROL
- (OPTIONAL) PAIRING WITH THE INDOOR ALARM RECEIVER
- MOUNTING THE SPOTLIGHT
- LIMITED WARRANTY TERMS & CONDITIONS
- Have Questions?
- Control remoto
- TÉRMINOS Y CONDICIONES DE LA GARANTÍA LIMITADA
- Battery Safety Information
Brand : SWANN
Model : SWALPH-B12003HRB
Category : Uncategorized