
AquaTouch S5585 - Razor PHILIPS - Free user manual and instructions
Find the device manual for free AquaTouch S5585 PHILIPS in PDF.


 FR
FR
 AR
AR
 BG
BG
 CS
CS
 DA
DA
 DE
DE
 EL
EL
 EN
EN
 ES
ES
 ET
ET
 FI
FI
 HE
HE
 HR
HR
 HU
HU
 IT
IT
 KO
KO
 LT
LT
 LV
LV
 MK
MK
 NL
NL
 NO
NO
 PL
PL
 PT
PT
 RO
RO
 RU
RU
 SK
SK
 SL
SL
 SV
SV
 TH
TH
 TR
TR
 UK
UK
 VI
VI
 ZH
ZH
User questions about AquaTouch S5585 PHILIPS
0 question about this device. Answer the ones you know or ask your own.
Ask a new question about this device
Download the instructions for your Razor in PDF format for free! Find your manual AquaTouch S5585 - PHILIPS and take your electronic device back in hand. On this page are published all the documents necessary for the use of your device. AquaTouch S5585 by PHILIPS.
USER MANUAL AquaTouch S5585 PHILIPS

Inhalt
Einführung 6
Cleaning the shaver under the tap 19
Thorough cleaning 20
Cleaning the pop-up trimmer 21
Preparing the Quick Clean Pod for use 23
Using the Quick Clean Pod 24
Replacing the Quick Clean Pod Cartridge 25
Replacing the shaving heads 26
Support 28


Reinigungsanzeige
Make sure both the nose/ear trimmer attachment and nasal passages are clean before trimming.
Dried nasal mucus can block the cutting element, preventing the appliance from switching on. If the cutting element is blocked, clean the attachment.
Trimming ear hair
Make sure your outer ear channels are clean and free from wax.
1 Schalten Sie das Gerät ein.
2 Slowly move the trimming head along the rim of the ear to remove hairs that stick out beyond the rim.
3 Carefully insert the trimming head into the outer ear channel.
Do not insert the trimming head more than 0.5 cm into your ear channel, as this could damage the eardrum.


Once the travel lock is deactivated, the appliance switches on automatically.
Hinweis: The shaver unlocks automatically when it is connected to a wall socket.
Clean the appliance and the attachments after each use for optimal performance.
Cleaning the shaver under the tap
Clean the shaver after each use to prevent clogging and damage.
4 Rinse the hair chamber under a warm tap.


We advise you to clean the shaving heads thoroughly once a month or when the shaver does not shave as well as it used to.
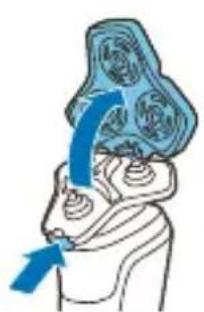
1 Make sure that the appliance is switched off and disconnected from the wall socket.
3 Rinse the hair chamber and shaving head holder under the tap.
4 Remove the shaving heads. For detailed instructions, see 'How do I replace the shaving heads?'
Cleaning the pop-up trimmer
Clean the trimmer after each use to prevent clogging and damage.
1 Make sure that the appliance is switched off and disconnected from the wall socket.
2 Push the trimmer release slide down to open the pop-up trimmer.

Never dry the trimmer or beard styler attachments with a towel or tissue, as this may damage the trimming teeth.
Clean the click-on attachments after each use for optimal performance.
Tip: If rinsing the nose/ear trimmer attachment under the tap is not sufficient, press the attachment onto handle and immerse the trimming head in a glass with warm water for a few minutes. Then switch on the appliance and rinse it under the tap.
4 Carefully shake off excess water from the beard styler, combs and nose/ear trimmer attachments and let them air dry completely.
Dry the cleansing brush attachment with a towel.
Tip: For optimal performance, lubricate the teeth of the beard styler attachment with a drop of sewing machine oil regularly.
Preparing the Quick Clean Pod for use

1 Twist and remove the top of the Quick Clean Pod.
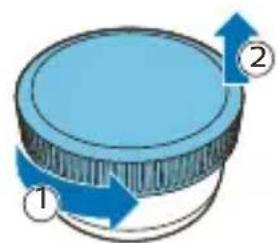
2 Twist the lid off of the Quick Clean Pod Cartridge.

3 Lift the tab on the seal and pull it by the corner to remove the seal from the Quick Clean Pod Cartridge.

4 Press the small circular piece on the handle of the Quick Clean Pod Cartridge to break the snap hook on the handle.

5 Place the Quick Clean Pod Cartridge into the Quick Clean Pod.

6 Put the top of the Quick Clean Pod back onto the base and turn it clockwise until you hear a click.

Do not tilt the Quick Clean Pod to prevent leakage.
Using the Quick Clean Pod

Hinweis: If you use the shaver with shaving foam, shaving gel or pre-shave products, thoroughly rinse the shaving heads before you use the Quick Clean Pod.
Always shake excess water off the shaver before you place it in the Quick Clean Pod.
1 Place the shaver upside down into the Quick Clean Pod. The shaver automatically detects that it is in the Quick Clean Pod.
2 Switch on the shaver to start the cleaning program.

Each cleaning program takes approximately one minute. During the cleaning program the cleaning symbol lights up continuously and the blue icon pulses.
The shaver handle vibrates twice quickly when the cleaning program is finished.
3 Let the shaver air-dry completely in the Quick Clean Pod before storing it.
Replacing the Quick Clean Pod Cartridge

Replace the Quick Clean Pod Cartridge immediately when the cartridge replacement icon on the Quick Clean Pod becomes visible or follow the table below.
Frequency of use Cycles When to replace
the Quick Clean Pod Cartridge
Every day About 30 Every month
A few times per week About 20 Every 2 months
Every week About 13 Every 3 months
Every month About 3 Every 3 months

1 Twist and remove the top of the Quick Clean Pod.

2 Lift the Quick Clean Pod Cartridge out of the Quick Clean Pod by the handle.
3 Pour any remaining fluid down a drain and recycle the empty cartridge in accordance with local waste regulations.

4 Place a new Quick Clean Pod Cartridge into the Quick Clean Pod.
Scan the QR code to the left or visit www.philips.com/cleaning-cartridge to order replacement Quick Clean Pod Cartridges.
Replacing the shaving heads

5 Place new shaving heads in the holder.

6 Place the retaining rings back onto the shaving heads and turn them clockwise to reattach the retaining ring.

7 Insert the hinge of the shaving head holder into the slot in the top of the shaving unit and close the shaving unit.
Support
| My shaver isn't clean after using the Philips Quick Clean Pod. | You removed the shaver before the cleaning program was finished. | Leave the shaver in the Philips Quick Clean Pod for the full cleaning program. Each cleaning program takes approximately 1 minute. The cleaning icon goes out when the cleaning program is finished. |
| The Philips Quick Clean Pod Cartridge needs to be replaced. | Replace the Philips Quick Clean Pod Cartridge. | |
| The Philips Quick Clean Pod is tilted. | Place the Philips Quick Clean Pod on a flat surface. | |
| My Philips Quick Clean Pod does not switch on. | The Philips Quick Clean Pod is powered by the motor of the shaver.The shaver is connected to the wall socket. | Place the shaver into the Philips Quick Clean Pod. Switch on the shaver.Disconnect the shaver from the supply unit. |
| The shaver battery is empty. | Charge the shaver before using the Philips Quick Clean Pod. | |
| My Philips Quick Clean Pod is overflowing. | You regularly use the Philips Quick Clean Pod after rinsing the shaver but not shaking off excess water. | Shake off excess water after rinsing the shaving heads each time before putting the shaver into the Philips Quick Clean Pod. |
| You shaved with shaving gel or foam and did not rinse the shaver before using the Philips Quick Clean Pod. | Rinse the shaving heads thoroughly before using the Philips Quick Clean Pod. |
- INHALT
- REINIGUNGSANZEIGE
- CLEANING THE SHAVER UNDER THE TAP
- CLEANING THE POP-UP TRIMMER
- PREPARING THE QUICK CLEAN POD FOR USE
- USING THE QUICK CLEAN POD
- ALWAYS SHAKE EXCESS WATER OFF THE SHAVER BEFORE YOU PLACE IT IN THE QUICK CLEAN POD
- REPLACING THE QUICK CLEAN POD CARTRIDGE
- FREQUENCY OF USE CYCLES WHEN TO REPLACE
- THE QUICK CLEAN POD CARTRIDGE
- REPLACING THE SHAVING HEADS
- SUPPORT
Brand : PHILIPS
Model : AquaTouch S5585
Category : Razor