
ABH-G 24V-2 - Hammer EINHELL - Free user manual and instructions
Find the device manual for free ABH-G 24V-2 EINHELL in PDF.


| Product type | Cordless Hammer Drill |
| Model | ABH-G 24V-2 |
| Brand | Einhell |
| Voltage supply | 24 V = |
| No-load speed | 0-1000 min⁻¹ |
| Hammer rate | 4400 min⁻¹ |
| Drilling capacity (concrete/stone) | 20 mm |
| Chuck type | SDS-Plus |
| Forward/reverse rotation | Yes |
| Battery type | Ni-Cd (rechargeable) |
| Battery charging time | Approx. 1 hour |
| Weight | 4.0 kg |
| Vibration level | 3.29 m/s² |
| Sound pressure level | 83 dB(A) |
| Sound power level | 94 dB(A) |
| Protection class | II |
| Additional handle | Yes, adjustable |
| Depth stop | Yes, adjustable |
| Hammer stop | Yes, for smooth drilling |
| Dust collector | Included |
| Safety lock (ON/OFF switch) | Yes, slide switch |
| Maintenance | Clean air vents with compressed air (max. 3 bar) |
| Replacement battery pack | Part no. 45.115.66 |
| Replacement switch | Part no. 45.195.80.01 |
| Warranty | 2 years |
Frequently Asked Questions - ABH-G 24V-2 EINHELL
User questions about ABH-G 24V-2 EINHELL
0 question about this device. Answer the ones you know or ask your own.
Ask a new question about this device
Download the instructions for your Hammer in PDF format for free! Find your manual ABH-G 24V-2 - EINHELL and take your electronic device back in hand. On this page are published all the documents necessary for the use of your device. ABH-G 24V-2 by EINHELL.
USER MANUAL ABH-G 24V-2 EINHELL

natural_image
Technical illustration of a screwdriver inserted into a threaded component, showing tool path and assembly (no text or symbols)
natural_image
Mechanical assembly diagram showing a threaded rod inserted into a spring-loaded housing (no text or symbols)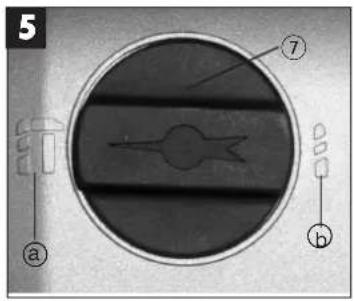

3
D
5 Battery capacity indicator
6 Drilling depth stop
7 Hammer stop
8 Reverse facility
9 Pushlock button for removable battery pack
2. Technical data
Voltage supply 24 V =
| Speed | 0-1000 |
Hammer rate: 4400 min
| Drilling capacity (max.): Concrete/Stone 20 mm |
Forward and reverse rotation yes
| Battery charging voltage 24 V = |
Battery charging current 2,4 A
| Mains voltage for charger 230 V ~ 50 Hz |
| Weight: | 4,0 |
| Vibration: | 3,29 | ^2 |
Sound pressure level: 83 dB(A)
| Sound power level: 94 dB(A) |
Protection class: ☐ / II
The noise and vibrations from this tool were measured in accordance with EN 50144-2-6. This hammer drill is not intended for use outdoors as defined in Article 3 of the Directive 2000/14/EC.
3. Safety rules
Important! When using electric tools it is essential that you comply with the following basic safety rules for the prevention of electrical shock and risk of injury or fire.
Please read these directions for use carefully before you start to use this tool, and put all the information into practice.
- Check that your mains voltage is the same as that marked on the rating plate.
- If you use a cable reel, run all the cable off the reel. The minimum conductor cross section used should be 1.5 ~mm^2 .
- If you use this electric hammer drill outdoors you must connect it using a suitable H07RN-F 3G
1.5 mm ^2 extension cable with a spray-water protected plug.
● Make sure of your footing, particularly when working free-handed on ladders or scaffolding.
- Use a detector to localize pipes and/or cables in walls with concealed electric, water or gas lines. Avoid any contact with conducting electrical parts or lines.
● Wear ear-muffs to protect your hearing: Risk of progressive loss of hearing!
● Wear goggles and use a breathing mask on dusty jobs.
● Never use the machine near vapors or combustible liquids.
● Always unplug the machine before cleaning it or changing drill bits etc.rpm
- Keep the power cable safe from damage. Oil and acids can damage cables.
● Never overload the machine.
- Important!
Follow all safety regulations in your country appli cable to the installation, use and maintenance of the machine.
● Drill bits may be catapulted by accident out of the tool and cause serious injuries:
- Before you begin your work always check that the drill bit is locked in the chuck.
- Examine the chuck regularly for signs of wear or damage.
- Never start a tool with hammer action until it is pressed against the workpiece (wall, ceiling, etc.).
- Take the drill bit out of the chuck when you have finished your work. - Always take the battery pack out of the hammer drill before you change the drill bit.
● Always check that the chisel bit or drill bit is firmly locked in the chuck before you start work.
- Check the chuck for wear or damage at regular intervals.
- Do not start a hammering tool until it is pressed against a workpiece (wall, ceiling, etc.).
● Always unplug the hammer drill when you have finished working and remove the chisel bit or drill bit from the tool.
● Always unplug the machine before changing chisel bits or drill bits etc.
- Protect eyes and assistants from small flying parts and splinters. Wear a helmet! Erect a screen wall!
- Use workgloves to protect fingers from crushing and skin from grazing.
● Vibrations can be harmful to the hand-arm system: Keep the impact time of vibrations to a minimum.
GB

GB
● Always keep the power cable away from where you want to drill.
- Keep the machine out of children's reach.
● Always hold the machine with two hands when it is running and make sure of your footing.
additional Safety rules
● Protect the cordless hammer drill and the charger from moisture and rain.
- Keep the charger and the cordless hammer drill out of the children's reach.
- Use only sharp drill bits and undamaged, properly fitting screwdriver bits.
● Wear suitable working clothes and safety goggles.
- Do not use the cordless hammer drill or the charger near vapors and inflammable liquids.
● Before you begin to drill in walls and masonry, check for concealed electric wiring, gas pipes and water pipes.
● Never throw old batteries into an open fire. Risk of explosion!
● Avoid contact with leaky batteries. Should contact arise nevertheless, wash the affected area of skin immediately with soap and water. If battery acid gets in your eye, rinse the eye with clear water for at least 10 minutes and consult a doctor immediately.
- Protect the charger and its cable from damage and sharp edges. Damaged cables are to be replaced immediately by an electrician.
● Examine your tool for any signs of damage. Have repairs carried out only by an electrician.
● Make sure that the contacts of the Ni-Cd battery pack do not touch other metallic objects, e.g. nails and screws. Risk of short-circuiting!
You will find additional safety rules for the use of electric tools in the enclosed booklet.
4. Important notes:
Be sure to read the following information before you use your cordless hammer drill for the first time:
- The replaceable NC battery pack for the cordless hammer drill is not charged when delivered. The battery pack has to be charged before you use the cordless hammer drill for the first time.
-
Charge the battery pack with the supplied charger. It takes approx. 1 hour to charge an empty battery. Never use the supplied charger to charge any other tools or appliances.
-
The battery pack reaches its maximum capacity after approx. five discharge/charge cycles.
- Ni-Cd batteries will also discharge when they are not in use. It is recommended, therefore, to charge the batteries regularly.
- Please note the data quoted on the rating plate of the battery charger. Operate the charger only from the same mains voltage as that quoted on the rating plate.
- In periods of heavy duty the battery pack will grow warm. Allow the battery pack to cool to room temperature before starting to charge it.
5. Loading the Ni-Cd battery pack
- To remove the battery pack from the handle, slide back the pushlock button and hold it in this position (9) while you pull the battery pack down and out..
- Check that your mains voltage is the same as that quoted on the rating plate. Insert the charger in a socket-outlet.
- Insert the battery pack in the charging adapter. The red LED indicates that the battery pack is being charged. It takes a maximum of 1 hour to charge an empty battery. The battery pack may grow warm while it is being charged. This is normal. The green LED on the charging adapter indicates the presence of charging voltage.
If the battery pack fails to become charged, please check
● whether there is voltage at the socket-outlet
● whether there is proper contact at the charging contacts on the charger.
If the battery still fails to become charged, please return
● the charger
● the battery pack
to our Customer Service Department.
To ensure that the NC battery pack provides long service, you should take care to recharge it promptly. You must recharge it when you find that the power of the cordless hammer drill drops.
Never allow the battery pack to discharge completely. This will result in damage to the Ni-Cd battery pack!
6. Preparations
- Use a detector to localize pipes and/or cables in walls with concealed electric, water or gas lines.
6.1 Proper use
The cordless hammer drill is designed for drilling work with hammer action in concrete, rock and brick, always using the correct drill bit.
6.2 Fitting and changing a bit (Fig. 2)
● Clean the bit and coat it with a little machine grease before you insert it.
● Pull back the locking sleeve (A) and hold in this position.
- Insert the dust-free bit with a twist as far as it goes into the SDS-Plus chuck. The bit will automatically be locked in place.
● Pull on the bit to check that it is secure.
6.3 Removing a bit (Fig. 3)
Pull back the locking sleeve (A), hold and pull out the bit.
7. Starting up (Fig. 1)
7.1 ON/OFF switch (3)
Infinitely variable speed control is possible with the ON/OFF switch. The further you push the switch, the higher the speed of the cordless hammer drill.
7.2 Switch for selecting the direction of rotation (8)
Using the slide switch above the ON/OFF switch you can select the direction of rotation of the cordless hammer drill and lock the drill so that it cannot be switched on accidentally. You can select between clockwise and counter-clockwise rotation. Change the direction of rotation only when the drill is at a standstill. If you fail to observe this point, the gearing may become damaged. When the slide switch is in the middle position, the ON/OFF switch is blocked.
7.3 Additional handle (4)
For safety reasons you should always use the hammer drill with the additional handle.
For a secure posture during work you should turn the additional handle. Twist the additional handle anticlockwise and turn.
Then fix the additional handle by twisting again.
7.4 Depth stop (6)
Undo the screw on the additional handle and insert the depth stop in the hole of the additional handle. Set the depth stop and retighten the screw on the additional handle.
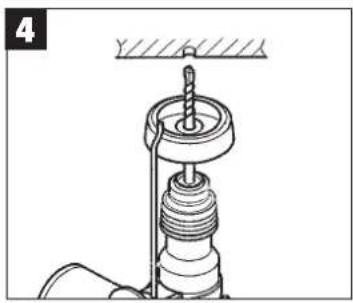
7.5 Dust collector (Fig. 4)
Before you start any hammer drilling work directly
over your head, slide the dust collector on the bit.
7.6 Hammer stop (Fig. 5)
The hammer drill comes with a hammer stop for smooth pre-drilling.
● Turn the lever switch (7) to the right to position (b) to switch off the hammer mechanism.
● To turn the hammer mechanism back on you have to turn the lever switch (7) back to position (a).
Important:
You only need to apply minimal pressure for hammer drilling. Do not apply too much pressure as this will put unnecessary strain on the motor. Check the hammer drill at regular intervals.
8. Maintenance
- Keep your machine clean at all times.
- Do not use aggressive agents to clean plastic parts.
● To prevent dust from collecting in the air vents, clean them with compressed air (max. 3 bar) each time you finish working with the machine.
9. Ordering of replacement parts
The following replacement parts are available from ISC GmbH.
Replacement battery pack 45.115.66
Switch
45.195.80.01

flowchart
graph TD
    A["Warning"] --> B{Failure}
    B -->|Yes| C["Warning"]
    B -->|No| D["Failure"]
    C --> E["iSC"]
    D --> E
    style A fill:#000,stroke:#fff,color:#fff
    style E fill:#f9f,stroke:#000,stroke-width:2px
Old and defective batteries do not belong in the refuse bin. Think of the environment! Cadmium is toxic. For correct disposal, return old and defective batteries postage-paid to ISC or take them to your local old battery depot. Ask at your town hall for details of the old battery depots in your area.
GB

NL
Eschenstraße 6 - D-94405 Landau/Isar (Germany)
Info-Tel. 0180-5 120 509 • Telefax 0.99 51-26 10 und 52 50
Technical changes subject to change
The guarantee period begins on the sales date and is valid for 2 years.
Responsibility is assumed for faulty construction or material or functional defects.
Any necessary replacement parts an necessary repair work are free of charge.
We do not assume responsibility for consequential damage.
Your customer service partner
© CERTIFICADO DE GARANTIA
©2 Poker Plus S.R.O.
Vypadova 1335
CZ-15300 Prahe 5 - Radotin
Tel. + Fax 02 579 10204
Technical & Commercial Company
12, Papastratou & Askipicu Sir.
GR 18545 Piräus
Tel 0210 4136155, Fax 0210 4137692
Bermas
Allulyevskoye shosse, 2A
RUS 127273 Moscow
Tel 095 7870179, Fax 095 5401750
LT Dirbita
Melalo str. 23
LT2038 Vilnius
Tel 05 2395769, Fax 05 2395770
ESI AS Baltoil
Roiu, Haaslava valid
EE 62102 Tartumaa
Tel 07 301710, Fax 07 301701
Halai Trading Co. LLC
POB 9262, Nakheel Rd. Deira, Shop No. 15
UAE Dubai
Tel./Fax 04 2279554
IR Alborz Abzar
No. 111, Bastan Passage Imam Khomeini Ave.
IH 11146 Teheran Tel: 091-6716070
Tel 0216718072, Fax 0216727177
(KZ) I.B.G.
Belinskij str. 102
KZ 486008 Chimkent
Tel 03252 518461, Fax 03252 570743
③ FIS d.o.o
Poslovni Centar 96
BIH 87000 Vitez
Tel 030 715 267, Fax 030 715 320
©5 MANIMEX d.o.o
Uzicke republike 93
CS 31000 Uzice
Tel 031 551 393, Fax 031 601 539
- D
- Technical data
- Safety rules
- GB
- additional Safety rules
- You will find additional safety rules for the use of electric tools in the enclosed booklet.
- Important notes:
- Loading the Ni-Cd battery pack
- Preparations
- Proper use
- Fitting and changing a bit (Fig. 2)
- Removing a bit (Fig. 3)
- Starting up (Fig. 1)
- ON/OFF switch (3)
- Switch for selecting the direction of rotation (8)
- Additional handle (4)
- For safety reasons you should always use the hammer drill with the additional handle.
- Depth stop (6)
- Dust collector (Fig. 4)
- Hammer stop (Fig. 5)
- Important:
- Maintenance
- Ordering of replacement parts
- NL
- © CERTIFICADO DE GARANTIA
Brand : EINHELL
Model : ABH-G 24V-2
Category : Hammer