
Slim Espresso Maker 20 Bar Pressure - Coffee maker Beautiful - Free user manual and instructions
Find the device manual for free Slim Espresso Maker 20 Bar Pressure Beautiful in PDF.


| Product Type | Semi-automatic espresso machine |
| Brand / Model | Beautiful / Slim Espresso Maker 20 Bar Pressure |
| Pump Pressure | 20 bar |
| Water Tank Capacity | 50 oz (1.5 liters) |
| Power Supply | 120 V AC, 60 Hz |
| Dimensions (approx.) | 13 x 10 x 12 inches (330 x 254 x 305 mm) |
| Weight (approx.) | 8.5 lbs (3.9 kg) |
| Materials | Stainless steel, plastic, silicone |
| Control Panel | Power, single shot, double shot, steam buttons; function dial (steam/hot water/standby) |
| Filter Baskets | 1-cup and 2-cup included |
| Portafilter | 2-spouted, commercial-style |
| Steam Wand | Rotatable with silicone tab, includes frothing tip |
| Warming Plate | Yes, heated top surface |
| Drip Tray | Removable, with full indicator (red float) |
| Additional Accessories | 2-in-1 tamper spoon, cleaning pin, frothing jug (stainless steel) |
| Programmable Shot Volumes | Single (~1.35 oz) and double (~2.7 oz), adjustable |
| Auto Shut-Off | After 5 minutes of inactivity (standby) |
| Cleaning and Descaling | Descaling with vinegar/water solution every 3 months; cleaning pin for steam wand and baskets |
| Safety Features | Polarized plug, pressure relief via steam wand, auto shut-off, safety warnings |
| Warranty | 2-year limited (mechanical), 90 days non-mechanical parts |
Frequently Asked Questions - Slim Espresso Maker 20 Bar Pressure Beautiful
User questions about Slim Espresso Maker 20 Bar Pressure Beautiful
0 question about this device. Answer the ones you know or ask your own.
Ask a new question about this device
Download the instructions for your Coffee maker in PDF format for free! Find your manual Slim Espresso Maker 20 Bar Pressure - Beautiful and take your electronic device back in hand. On this page are published all the documents necessary for the use of your device. Slim Espresso Maker 20 Bar Pressure by Beautiful.
USER MANUAL Slim Espresso Maker 20 Bar Pressure Beautiful
The kitchen is my family's happy place. It's where we cook and eat and bake and laugh and share our most beautiful moments together. That's what inspired the creation of Beautiful, my new collection of easy-to-use kitchenware that you'll want to keep out on your kitchen counter. So whether your kitchen has flour all over the place from a kid's baking session or you're throwing an adult dinner party, I hope every step will be simple, delicious and beautiful!

www.beautifulbydrew.com
Table of Contents
Section 1: Safety
Important Safeguards.... 6-7
Additional Important Safeguards 8-9
Notes on the Plug 9
Notes on the Cord 10
Plasticizer Warning 10
Electric Power 11
Section 2: Instructions
The Art of Extracting Espresso....14
Getting to Know Your 20 Bar Slim Espresso Maker ....15
Safety Warnings.... 17
Before Using for the First Time.... 18-19
Pull the Perfect Espresso Shot.... 20-23
Dial In Single or Double Shot Volume 23
Texture Milk for Espresso Drinks 23-26
User Maintenance Instructions 27
Care & Cleaning Instructions 27
Descalingcalin 28
Storing Instructions 29
Troubleshooting 29-32
Espresso Recipes 32-33
Warranty 34
Índice
When using electrical appliances, basic safety precautions should always be followed, including the following:
- READ ALL INSTRUCTIONS.
- Do not touch hot surfaces. Use handles or knobs. Use oven mitts or potholders.
- To protect against fire, electrical shock and injury to persons, do not immerse cord or plugs or appliance in water or other liquid.
- This appliance is not intended for use by persons (including children) with reduced physical, sensory or mental capabilities, or lack of experience and knowledge, unless they have been given supervision or instruction concerning use of the appliance by a person responsible for their safety.
- Close supervision is necessary when any appliance is used by or near children.
- Unplug from outlet when not in use and before cleaning.
- Allow Espresso Maker to cool before putting on or taking off parts, and before cleaning the appliance.
-
Do not operate any appliance with a damaged cord or plug or after the appliance malfunctions, or has been damaged in any manner. Return appliance to Customer Service for examination, repair or adjustment.
-
The use of accessory attachments not recommended by the appliance manufacturer may cause fire, electric shock or injuries to persons.
- Do not use outdoors.
- Do not let cord hang over the edge of table or counter, or touch hot surfaces.
- Do not place on or near a hot gas or electric burner, or in a heated oven.
- If this appliance begins to malfunction during use, press the POWER button; turn the function control to STANDBY. Then immediately unplug the cord. Do not use or attempt to repair the malfunctioning appliance.
- Never use the appliance without water. CAUTION: Relieve pressure through steam wand before removing cup or filter basket.
- Do not use this appliance for other than its intended use.
- Be certain lids are securely in place before operating appliance.
- Scalding may occur if the lids are removed during the brewing cycle.
- To disconnect, press the POWER button; turn the function control to STANDBY. Then remove plug from wall outlet.
- WARNING: To avoid the risk of injury, do not open the brew chamber during the brew process.
FOR HOUSEHOLD USE ONLY ADDITIONAL IMPORTANT SAFEGUARDS
WARNING: This appliance generates heat and escaping steam during use. Proper precautions must be taken to prevent the risk of burns, fires, or other injury to persons or damage to property.
CAUTION: The Espresso Maker must be allowed to cool down sufficiently before adding more water to avoid splattering.
- All users of this appliance must read and understand this Instruction Manual before operating or cleaning this appliance.
- The cord to this appliance should be plugged into a 120 V AC electrical outlet only.
- Use water only in this appliance! Do not put any other liquids or food products in this appliance. Do not mix or add anything to the water placed in this appliance, except as instructed in the Descaling section of this Instruction Manual.
-
DO NOT attempt to move an appliance containing hot liquids. Allow appliance to cool completely before moving.
-
Keep appliance at least 4 inches away from walls or other objects during operation.
- Place the appliance on a surface that is resistant to heat.
- Prior to connecting or disconnecting plug from wall outlet, press the POWER button; turn the function control to STANDBY.
- If this appliance falls or accidentally becomes immersed in water or any other liquid, unplug it immediately. Do not reach into the water! Do not use this appliance after it has fallen into or has become immersed in water. Contact Consumer Service for examination and repair.
- Always use fresh, cool water in your appliance. Warm water or other liquids, except as described in the descaling section, may cause damage to the Espresso Maker.
SAVE THESE INSTRUCTIONS
NOTES ON THE PLUG
This appliance has a polarized plug (one blade is wider than the other). To reduce the risk of electric shock, this plug will fit in a polarized outlet only one way. If the plug does not fit fully into the outlet, reverse the plug.
If it still does not fit, contact a qualified electrician. Do not modify the plug in any way.
NOTES ON THE CORD
a) A short power-supply cord (or detachable power-supply cord) is to be provided to reduce risks resulting from becoming entangled in or tripping over a longer cord.
b) Longer detachable power-supply cords or extension cords are available and may be used if care is exercised in their use.
c) If a long detachable power-supply cord or extension cord is used:
1) The marked electrical rating of the detachable power-supply cord or extension cord should be at least as great as the electrical rating of the appliance;
2) If the appliance is of the grounded type, the extension cord should be a grounding-type 3-wire cord; and
3) The longer cord should be arranged so that it will not drape over the countertop or table top where it can be pulled on by children or tripped over.
PLASTICIZER WARNING
CAUTION: To prevent Plasticizers from migrating to the finish of the counter top or table top or other furniture, place NON-PLASTIC coasters or place mats between the
appliance and the finish of the counter top or table top. Failure to do so may cause the finish to darken; permanent blemishes may occur, or stains can appear.
ELECTRIC POWER
If the electrical circuit is overloaded with other appliances, your appliance may not operate properly. It should be operated on a separate electrical circuit from other appliances.


Section 2
Instructions
2
The art of extracting espresso
Consistency is key when it comes to a great shot of espresso. Optimal flavor is achieved as the brewing temperature is maintained. Grounds are pre-infused with low, steady water pressure before extraction. Shot volumes are automatically dispensed and can be adjusted to taste. The result is a perfectly balance, rich and flavorful espresso. The perfect espresso shot is all about achieving a balance of acidity, sweetness and bitterness. Many factor play a major role: temperature of the water: portafilter, and serving cups are crucial. Filter baskets and steam wand must be clean: coffee beans fresh and perfectly roasted. The fineness or coarseness of the grind, dose of ground coffee, and tamping pressure should be consistent when experimenting to achieve your perfect pull.
Getting to know your 20 Bar Slim Espresso Maker
Product may vary slightly from illustrations
- Heated Warming Plate
- Brew Head
- 50 oz Removable Water Tank
- Removable Drip Tray with Full Indicator
- Function Control Dial
- 1 and 2 Cup Filter Baskets
- Control Panel
- 2-in-1 Coffee Tamper Spoon
- Steam Wand with Silicone Tab
11.Cleaning Pin - 2 Spouted Portafilter

- POWER BUTTON. Press the power (☐) button to turn the unit on. The single shot (☐) and double shot (☐) buttons will begin to flash. When the system is up to temperature, all 4 buttons on the control panel will illuminate.
- STEAM BUTTON. After espresso shots have been pulled, press (💡) to activate the heater to texturize milk. When pressed, the STEAM button will flash. As temperature is achieved and steam is built, the button will illuminate.
- SINGLE SHOT PROGRAMMABLE BUTTON. Press once to initiate a 1.35 oz. extraction. Press and hold the button for 3 seconds to adjust and to dial in future single shot volume.
- DOUBLE SHOT PROGRAMMABLE BUTTON. Press once to initiate a 2.7 oz. extraction. Press and hold the button for 3 seconds to adjust and dial in future double shot volume.
- FUNCTION CONTROL DIAL. Once pressure is built and the STEAM button is illuminated (stops flashing), turn the dial to activate the STEAM wand.
- HOT WATER FUNCTION. Place a frothing pitcher under the steam wand. Turn the function control dial to WATER. Allow water to fill the container. Turn the function control dial to back to OFF position.


Safety Warnings
- Proper precautions must be made to avoid burns from sprays of hot water or steam.
- Always use the silicone covers and tabs installed on both the steam wand and the water dispenser to rotate and swing either wand to the perfect position.
- Avoid touching any hot surfaces on the machine or any metal parts of the portafilter, filter basket, water dispenser or steam wand while the Espresso Maker is in use or after it has just been used to prepare hot beverages.
- When too much water has accumulated in the drip tray, the red FULL indicator will rise. (See Figure 1.) To avoid water spillage, lift the drip plate off the tray. Slide the drip tray straight out to remove. Empty water, wipe dry, and reassemble. (See Figure 2.)
Figure 1
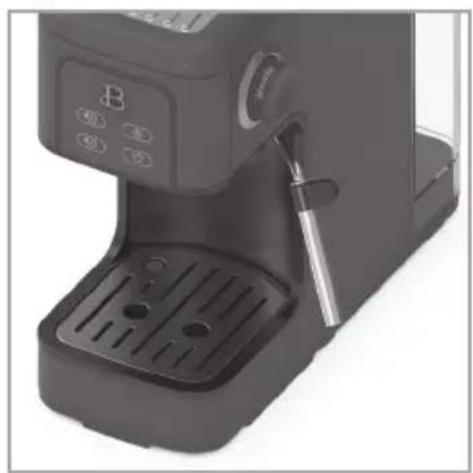
Figure 2

Before Using for the First Time
- Remove any packaging materials before use. Make sure the Espresso Maker is unplugged.
- Assemble the Drip Tray. Slide the drip tray in or out to remove for easy cleaning.
- Line the circular cutout of the FULL bar with the base of the unit; left and right ends should fit snugly in place. (See Figure 2.) Add the drip plate.
- Fill the Water Tank. Lift open the lid of the water tank and fill with cold water, or... grasp the water tank at the back of the Espresso Maker and lift it up and off the unit. (See Figure 3.)
- Fill the water tank with cold water to the MAX (1.5 liter) mark. (See Figure 4.)
- Slide the water tank back to its original position. Lift the lid to close.
- Pre-Clean and Prime the Pump. Place the Espresso Maker on a level surface, within close proximity to a sink to discard water.
- Place any empty (do not add coffee)1-cup or 2-cup filter basket into the portafilter. Insert and lock into the brew head following the detailed description in the section: "Pulling the Perfect Espresso Shot." (See Figures 6 and 7.)
- Center a wide-mouth spouted container or cup under the 2-spout portafilter. Place the steam wand's tip into the frothing jug. Place an empty container under the water dispenser.
- Plug the unit into a 120V AC electrical outlet.
- Press the power button to turn the unit on. The single shot (①) and double shot (②) buttons will begin to flash. When the system is up to temperature, all 4 buttons on the control panel will illuminate.
- Press the STEAM button. It will begin to flash until the temperature is reached. Turn the function control dial to STEAM. Hot steam will purge the line. After MAX 120 seconds, turn the function control dial to STANDBY.
-
Press the double shot (2) button continually, emptying the hot water, until the entire tank of water is purged through the system.
-
The pump is now primed, and the Espresso Maker is cleaned. You are ready to pull the perfect espresso shot.
Figure 3

Figure 4

Pull the perfect espresso shot
The secret to a perfect espresso shot is all about achieving the perfect balance of acidity, sweetness, and bitterness. Many factors play a major role: temperature of the water; portafilter, and serving cups is crucial, filter baskets and steaming wand should be clean; coffee beans must be fresh and perfectly roasted. The fineness or coarseness of the grind, dose of ground coffee, and tamping pressure should be consistent when experimenting to achieve your perfect pull.
Operation
-
Place empty cappuccino shot cups onto the warming plate before the pull.
-
Run a blank shot to preheat the cup and portafilter.
-
Plug the Espresso Maker into a 120V AC electrical outlet. All indicator lights will be off, except for the POWER button will flash.
-
Fill the water tank with up to 1.5 liters of cold, preferably filtered water, using the markings on the tank for reference. Close the lid.
IMPORTANT: Be sure to add enough water for shots plus the first blank shot.
NOTE: The water tank should always be filled past the MIN (5 oz.) mark. Never fill the watertank past the MAX (1.5 liter) mark.
- Insert either the 1 or 2 cup filter basket into the portafilter. (See Figure 5.)

20
-
Align the portafilter handle with the INSERT symbol on the brew head. (See Figure 6.)
-
Turn handle counter-clockwise (to the right) until the portafilter handle is facing front and lined up with the LOCK. Make sure the portafilter is sealed and locked securely into the brew head. (See Figure 7.)
Figure 6

Figure 7

-
Center a wide spouted container or cup onto drip plate under the 2-spout portafilter.
-
Press the power button to turn the unit ON. The single shot (1) and double shot (2) buttons will begin to flash. When the system is up to temperature, all 4 buttons on the control panel will illuminate.
-
Press either the single (1) or double shot (2) button to initiate extraction. Both spouts will stream hot water (a blank shot) to warm the espresso cup and portafilter and then turn OFF.
-
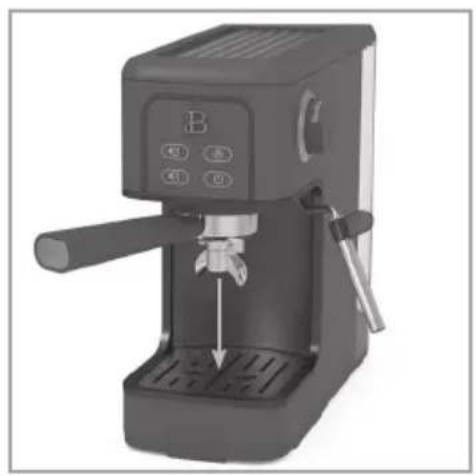
Remove the portafilter from the brew head. Turn the handle clockwise (to the left) to UNLOCK. The portafilter will drop down from the brew head. (See Figures 8 and 9.)
Figure 8
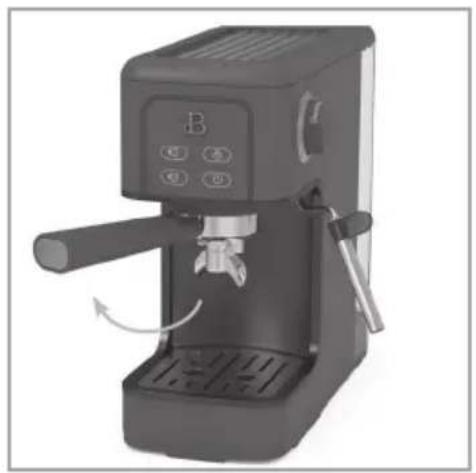
Figure 9

- Use the 2-in-1 tamper spoon (and scale if desired) to dose ground espresso coffee and add to the filter basket. Use the 1 cup filter basket for a single espresso; the 2 cup filter for a double espresso or 2 single espressos at the same time. (See Figure 10.)
Figure 10

- Use the tamper spoon to gently press the coffee and pack it. Make sure the tamper is perfectly dry as any wet spots will result in channeling. Wipe any loose coffee grounds from the rim of the portafilter to assure a proper fit into the brew head.
NOTE: When tamping for a double espresso, only tamp after the filter basket has been filled. Tamping between measures may create a layer in the coffee that may hinder extraction.
- Align the portafilter handle with the INSERT symbol on the brew head and turn counterclockwise until it is sealed and securely locked. (See Figures 6 and 7.)
- Press either the single shot (①) or double shot (②) button to initiate extraction. Both spouts will stream thick, rich espresso. The Espresso Machine is pre-set to deliver 1.35 oz. (single) to 2.7 oz. (double) shots of espresso, before automatically turning OFF.
- Remove the filter basket and discard used coffee puck.
CAUTION: To avoid scalding or burns, do not attempt to remove the portafilter handle during the brewing process, or when any button on the control panel is flashing.
IMPORTANT! Keeping your Espresso Maker clean and thoroughly rinsed is critical in pulling the perfect shot. Always run water through the brew head and purge the steam wand after each use. - When the unit is turned ON if SINGLE, DOUBLE and STEAM lights flash, it indicates that the knob is not in the STANDBY position. The knob needs to be rotated to the STANDBY position and then the unit can be used.
- If buttons flash during brewing it indicates that the water tank is empty and needs to be filled. Press any button to return to standby mode once the tank is filled.
Dial In Single or Double Shot Volume
- The Espresso Maker consistently dials in the perfect brew water temperature and measures the perfect volume for every shot.
- To adjust volumes for future shots, press and hold the single or double shot programmable button for 3 seconds to adjust and to dial in future single or double shot volume.
EXAMPLE: to change the volume on the single shot - press and hold the single shot for 3 seconds, water will begin to flow. Once you have the desired amount, release the single shot button to stop water flow. The new volume is now set, and can be re programmed at any time.
Texture Milk for Espresso Drinks
- Transition to Steam. IMPORTANT: Make sure the frothing jug is cold before texturing. Refrigerate or run cold water into the jug before use.
CAUTION: After extracting espresso, the steam wand is hot. Always use the silicone covers and tabs installed on the steam wand to rotate and swing the wand into the perfect position.
- Fill the stainless steel frothing jug no more than one-third (1/3) full with fresh, cold milk (skim milk froths best) and place it next to the Espresso Maker.
IMPORTANT: When texturing milk, the volume will double. Do not over-fill the frothing jug.
-
Press the STEAM button. When pressed, the STEAM button will flash. As temperature is achieved and steam is built, the button will illuminate solid. (See Figure 11.)
-
Turn the function control dial to STEAM. Make sure the steam wand is over the drip tray. Once steam is emitted from the wand (not water), turn the function control dial to STANDBY. (See Figure 12.)
-
Quickly place the tip of the steam wand at the surface of the milk and turn the function control dial to STEAM. Place the frothing pitcher on an angle, and make sure the wand is approximately 1/3-inch from either edge of the frothing pitcher. The steam wand should barely break the milk's surface to create fine micro-bubbles. Moving the wand in a circular motion, texture the milk until the desired volume is reached. When the milk temperature reaches between 140-150°F, it is ready, or 160°F for extra hot.
-
Turn the function control dial to STANDBY. Drop the pitcher down to remove the steam wand.
-
Pour. After texturing, swirl the milk around for several seconds to incorporate the milk at the bottom, with the micro-foam on top. Tap the frothing pitcher on the counter until the milk appears shiny and few bubbles remain. Pour textured milk as soon as possible. Swirl the espresso slightly to break the surface tension of the cream. Slowly introduce the micro-foam, integrating it with the espresso.
-
Wipe the steam wand with a wet kitchen towel and use the silicone tab to swivel the wand back over the drip tray.
NOTE: To avoid milk build up on and inside and the outside of the steam wand, ensure to purge the steam wand after every use. Make sure the steam wand is over the drip tray and turn the function control dial to STEAM - leave on for a few seconds and then turn.
- Press the power button on the side of the unit to turn the espresso machine on. The SINGLE and DOUBLE button indicator lights will flash, and the STEAM indicator light will illuminate solid. When the unit is finished preheating all 4 of the indicator lights will illuminate solid in the standby mode.
- Press either the SINGLE or DOUBLE button and the selected indicator light will begin to flash, and the unit will begin to brew. After brewing is complete the unit will return to the standby mode. While brewing, only the selected button (either SINGLE OR DOUBLE), and the power button will function.
- To adjust the coffee volume press and hold either the SINGLE or DOUBLE button for 3 seconds. The selected button indicator light will begin to flash. Release the button once the desired volume is reached. The coffee volume has now been adjusted and the unit will return to standby mode (the max volume for the SINGLE shot is 100ml and 150ml for the DOUBLE shot.
- To reset the coffee volume to factory settings: During standby mode press and hold both the SINGLE shot and DOUBLE shot buttons for 3 seconds, then the SINGLE and DOUBLE indicator lights will flash 5 times. This indicates that the coffee volume has been reset and the unit will then return to standby mode.
- Press the STEAM button and the indicator light will begin to flash indicating that the unit is preheating. Once the STEAM button indicator light is solidly lit; this indicates that the unit is heated to the correct temperature. Rotate the knob on the side of the unit to the steam position. The water pump will start working and the STEAM button indicator light will flash. Rotate the knob back to the STANDBY position, and the steam function will turn off and the STEAM indicator light will stay solidly lit. To return to the standby mode press the STEAM button again, and all four button indicators will become solidly lit.
- The SINGLE and DOUBLE shot buttons will flash quickly if they are pressed to brew coffee after frothing milk. To be able to brew coffee right after frothing milk do the following:
- Rotate the knob to the HOT WATER position. Place the steam wand over the drip tray, into a cup or frothing pitcher. Hot water will start to come out of the steam wand and the SINGLE indicator light will flash. When the boiler has cooled down, and the temperature is low enough to

brew coffee, the water pump will stop working and the SINGLE, DOUBLE and STEAM indicator lights will begin to flash. Rotate the knob to the STANDBY position and the unit will return to the standby mode and you will be able to brew coffee.
-
During standby mode rotate the knob to the HOT WATER position and both the SINGLE and DOUBLE indicator lights will be solidly lit. Hot water will begin to come out of the steam wand. Rotate the knob back to the STANDBY position and the hot water will shut off and the unit will return to standby mode.
-
If the knob is at the STEAM position before pressing the POWER switch on, the SINGLE, DOUBLE, and STEAM indicator lights will flash until the knob is rotated to the STANDBY position.
-
The steam function maximum working time is 2 minutes, and the hot water function the maximum working time is 2 minute.
-
During standby mode the unit will automatically shut off after 5 minutes if no function is pressed.
Figure 11

Figure 12

User Maintenance Instructions
This appliance requires little maintenance. It contains no user serviceable parts. Do not try to repair it yourself. Any servicing requiring disassembly other than cleaning must be performed by a qualified appliance repair technician.
Care & Cleaning Instructions
CAUTION: NEVER IMMERSE THE ESPRESSO MAKER IN WATER OR ANY OTHER LIQUID.
- When espresso making is complete, press the POWER button; turn the function control to STANDBY. Unplug the Espresso Maker from the electrical outlet and allow to cool completely before cleaning.
CAUTION: The Espresso Maker creates hot water and steam under pressure. To avoid burns on fingers or hands, always make sure the POWER light is off. NEVER touch the filter basket holder or steam wand immediately after brewing or steaming. Allow all parts to cool thoroughly before touching.
IMPORTANT: The portafilter and filter basket should be emptied and rinsed thoroughly with warm water after every use. - Clean the portafilter and filter baskets. Grasp the portafilter handle firmly and turn clockwise (to the left) until the handle faces the UNLOCKED position. The portafilter will drop down and out of the unit. (See Figures 8 and 9.)
- Remove the filter basket and discard used coffee puck.
- Rinse the portafilter and filter baskets immediately after use to remove residual coffee oils. If necessary, clean the filter basket with a kitchen brush or soak in a cleaning solution for 20 minutes. Rinse and dry thoroughly.
- A cleaning pin has been supplied to ease in the care and cleaning of your Espresso Maker. Use the smaller end of the cleaning pin to clear holes in the base of the filter baskets and clean the steam wand.
- Clean the steam wand and water dispenser. After frothing milk or dispensing hot water, twist to remove the water dispenser tip and the frothing tip from the steam wand and clean thoroughly.
-
Insert the cleaning pin's larger wire into both the water dispenser's and steam wand's outlet to clear. Rinse and screw the clean water reservoir tip and frothing tip securely back into the wands.
-
Remove the drip plate, FULL bar, and slide the drip tray straight out. Empty any collected water. Dry with a clean cloth and reassemble.
- Wipe the outside of the Espresso Maker and brew head with a damp cloth. WARNING: Never use solvents or any detergents that may scratch or damage the surface of the machine.
- Clean the stainless steel frothing jug, tamper, by hand.
- No parts of the Espresso Maker should be cleaned in the dishwasher.
Descaling
Minerals and calcium found in hard-water areas can accumulate and affect the operation of your machine. Depending on water conditions and frequency of use, your Espresso Maker should be cleaned with distilled vinegar approximately every 3 months to remove scale.
- Before cleaning your Espresso Maker, make sure the function control dial is in the STANDBY position and the appliance has been disconnected from the wall outlet.
- Fill the water tank with 1 part white vinegar to 3 parts cold water.
- Attach empty portafilter and any filter basket.
- Plug the Espresso Maker into 120V AC electrical outlet.
- Center a wide-mouth spouted container or cup under the 2-spout portafilter. Place the steam wand's tip into the frothing jug. Place an empty container under the water dispenser.
- Press the POWER button. The single shot (e1) and double shot (e2) buttons will beginto flash. When the system is up to temperature, all 4 buttons on the control panel will illuminate.
- Turn the function control dial to STEAM. Allow the hot steam to purge the line for at least 45 seconds.
- Press the double shot (2) button, then empty the hot water, until the entire tank of water is purged through the system.
- In hard water environments, it is recommended to repeat this procedure.
- After descaling, remove the water tank and refill with fresh, cold water. Repeat steps 7 through 9 to thoroughly rinse the Espresso Maker.
WARNING: Never immerse power cord, plug or Espresso Machine in water or any other liquid. The water tank should never be completely emptied during descaling.
- When the flow has stopped, press the POWER button. Make sure the all indicator lights are OFF. Unplug the Espresso Maker from the wall outlet when not in use.
- Remove portafilter, containers or cups and rinse with hot water for next use.
Storing Instructions
- Make sure unit is unplugged and fully cooled before storing.
WARNING: Never store Espresso Maker while it is hot or still plugged in. - Do not put any stress on cord where it enters unit, as this could cause cord to fray and break.
- Store the Espresso Maker in its box, in a clean, dry area.
Troubleshooting
| PROBLEM POSIBLE CAUSE SOLUTION | ||
| Coffee runs down the side of the portafilter. | Portafilter is not attached correctly, or has not been tightened sufficiently. | Re-insert the portafilter into the brew head. Make sure the handle is facing outward and is firmly engaged on the brew head. |
| Coffee pod is not properly fitted in the filter basket. | Make sure that no part of the coffee pod filter hangs over the lip of the filter basket. | |
| Edge of filter insert is not free of coffee granules. | Clean around the top edge of the filter and wipe the brew head with a clean, damp cloth. | |
| The brew head is dirty. Wipe br | rew head with a clean, damp cloth. | |
| Brew head rubber seal is damaged or worn. | Contact Customer Service. | |
| Espresso is not streaming. | No water in the water tank. | Fill tank with water. |
| Water tank is incorrectly assembled. | Press firmly down on the water tank to make sure it is correctly positioned. | |
| Brewing filter may be blocked. | See “Descaling” section of this Instruction Manual. | |
| The filter basket is blocked, coffee grounds are too fine or tamped down too hard. | Empty filter basket and rinse under water to clean. Use the cleaning pin to clear holes in the base of the filter basket. Wipe the brew head with a cloth. Redose the filter with a coarser coffee grind and tamp with less pressure. | |
| Espresso does not have any or enough cream. | Coffee is old or dry. Use freshly roasted and ground coffee. Always store in an airtight container. | |
| Coffee not compacted firmly enough. | Tamp coffee grounds with more pressure. | |
| Coffee grind is too coarse. Use a finer grind of pre-ground coffee or grind the coffee beans to a finer texture. | ||
| Dose is too small. Increase dose | ||
| Coffe is too cold. | Cups, filter and filter hand are cold. | Run a blank shot to pre-heat cups, portafilter and filter baskets. |
| If making a cappuccino or latte the milk may not be heated enough. | Ensure that milk is heated properly during texturing, but DO NOT boil the milk. | |
| No steam from the steam nozzle. | Steam nozzle is blocked. See | "Care & Cleaning Instructions." |
| Not enough froth when texturing. | Milk is not fresh. Begin again | with fresh milk. |
| Milk temperature is too warm. | Make sure that the milk is well refrigerated before use. | |
| Texturing jug is warm. Refrigerate or run cold water into the jug before use. | ||
| Steam nozzle is blocked. See | "Care & Cleaning Instructions". | |
| Milk has been boiled. Tamp coffee grounds with more pressure. | ||
| The milk is making large bubbles rather than microbubbles. | Use a finer grind of pre-ground coffee or grind the coffee beans to a finer texture. | |
| Cups are unevenly filled. | Uneven tamping or obstruction in the pouring spouts. | Make sure coffee is tamped evenly and check that both pouring spouts on the portafilter are unobstructed. See "Care & Cleaning Instructions". |
| Espresso tastes burnt. | Change the type of coffee being used. | Experiment with various types and brands of coffee beans. |
| Appliance has not been rinsed after descaling. | Purge a full water tank through the spresso Maker before pulling another espresso shot. | |
| Pump makes an unusually loud noise. | Not enough water in the tank, or the water tank is empty. | Fill the water tank. The water tank should always be filled past the MIN (5 oz.) mark. NEVER operate the Espresso Maker with an empty water tank. |
| Water tank is incorrectly assembled. | Press firmly down on the water tank to make sure it is correctly positioned. | |
| Machine does not operate. | Portafilter may be blocked. Remove portafilter and clean brewing head. See “Care & Cleaning Instructions.” | |
| Machine blocked by scale buildup. | See “Descaling.” | |
Espresso Recipes
SHORT BLACK
A single shot of espresso topped with a stable layer of crema.
FLAT WHITE
A single shot of espresso topped with a steamed milk, 1/3 coffee and 2/3 steamed milk.
YUAN YANG (COFFEE WITH TEA)
Yuan Yang is made by making strong black tea in a pot, stirring in evaporated or sweetened condensed milk and coffee, then sweetening to taste.
-
4 small black tea bags, paper and strings removed
-
1 (14-oz) can sweetened condensed milk
-
2 cups Americano Coffee (see recipe following)
Simmer tea and 1 cup water in a 2-qt. saucepan over medium heat for 3 minutes.
Squeeze out and discard tea bags. Stir in milk; boil. Cook, stirring, for 3 minutes. Stir in Americano coffee; pour into glasses.
AMERICANO OR LONG BLACK
A standard espresso shot diluted with hot water, served in a regular coffee cup or mug. Add hot water before the espresso to maintain the delicate crema.
CAFÉ LATTÉ
A single shot espresso with steamed milk, typically served in a glass. The top layer of microbubbles should be 10mm to seal the coffee.
CAPPUCCINO
Espresso with steamed milk, topped with creamy froth and a dusting of chocolate. The resulting drink is approximately 2/3 milky coffee, 1/3 microbubbles.
CAFÉ MOCHA
Prepared similarly to a cappuccino but with the addition of drinking chocolate. Stir chocolate into the espresso prior to adding the steamed milk and microbubbles. Top with whipped cream.
MACCHIATO
Traditionally served as a short or long espresso with a dash of milk or a small dollop of froth in the center of the crema.
ESPRESSO VODKA COCKTAIL
- 1.5 oz. vodka
- 1/2 oz. freshly squeezed lemon juice
- 1/2 oz. simple syrup
- 2 single espresso shots
- Ice for serving
- Lemon zest for garnish
Add vodka, lemon juice, simple syrup, espresso, and ice to a drink shaker. Shake well. Pour into a chilled glass and serve over ice. Garnish with lemon zest.
Limited Two-Year Warranty
Sensio Inc. dba Made by Gather™ hereby warrants that for a period of TWO YEARS from the date of purchase, this product will be free from mechanical defects in material and workmanship, and for 90 days in respect to non-mechanical parts. At its sole discretion, Sensio Inc. dba Made by Gather™ will either repair or replace the product found to be defective, or issue a refund on the product during the warranty period.
The warranty is only valid for the original retail purchaser from the date of initial retail purchase and is not transferable. Keep the original sales receipt, as proof of purchase is required to obtain warranty validation. Retail stores selling this product do not have the right to alter, modify, or in any way revise the terms and conditions of the warranty.
Exclusions:
The warranty does not cover normal wear of parts or damage resulting from any of the following: negligent use of the product, use of improper voltage or current, improper routine maintenance, use contrary to the operating instructions, disassembly, repair, or alteration by anyone other than qualified Sensio Inc. dba Made by Gather™ personnel. Also, the warranty does not cover Acts of God such as fire, floods, hurricanes, or tornadoes.
Sensio Inc. dba Made by Gather™ shall not be liable for any incidental or consequential damages caused by the breach of any express or implied
warranty. Apart from the extent prohibited by applicable law, any implied warranty of merchantability or fitness for a particular purpose is limited in time to the duration of the warranty. Some states, provinces or jurisdictions do not allow the exclusion or limitation of incidental or consequential damages, or limitations on how long an implied warranty lasts, and therefore, the above exclusions or limitations may not apply to you. The warranty covers specific legal rights which may vary by state, province and/or jurisdiction.
How To Obtain Warranty Service
You must contact Customer Service at our toll-free number: 1-877-775-3564. A Customer Service Representative will attempt to resolve warranty issues over the phone. If the Customer Service Representative is unable to resolve the problem, you will be provided with a case number and asked to return the product to Sensio Inc. dba Made by Gather™ Attach a tag to the product that includes: your name, address, daytime contact telephone number, case number, and description of the problem.
Also, include a copy of the original sales receipt. Carefully package the tagged product with the sales receipt, and send it (with shipping and insurance prepaid) to SENSIO Inc.'s address. Sensio Inc. dba Made by Gather™ shall bear no responsibility or liability for the returned product while in transit to Sensio Inc. dba Made by Gather™ Customer Service Center.
Beautiful®
Kitchenware
How To Obtain Warranty Service
You must contact Customer Service at our toll-free number: 1-877-775-3564. A Customer Service Representative will attempt to resolve warranty issues over the phone. If the Customer Service Representative is unable to resolve the problem, you will be provided with a case number and asked to return the product to Sensio Inc. dba Made by Gather™ Attach a tag to the product that includes: your name, address, daytime contact telephone number, case number, and description of the problem.
Also, include a copy of the original sales receipt. Carefully package the tagged product with the sales receipt, and send it (with shipping and insurance prepaid) to SENSIO Inc.'s address. Sensio Inc. dba Made by Gather™ shall bear no responsibility or liability for the returned product while in transit to Sensio Inc. dba Made by Gather™ Customer Service Center.
Beautiful®
Kitchenware
Sección 1
Seguridad

Figura 2
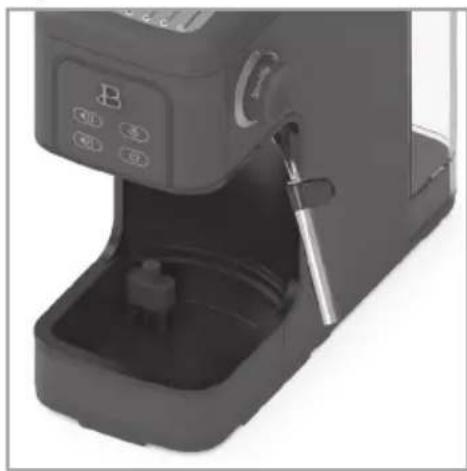
Figure 4
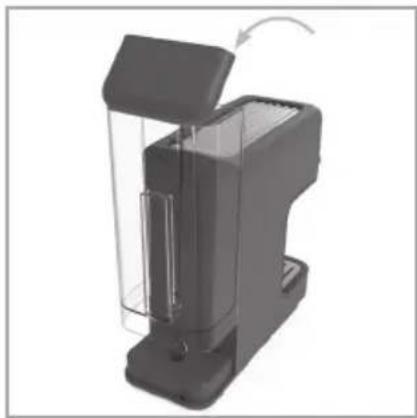
Figure 7
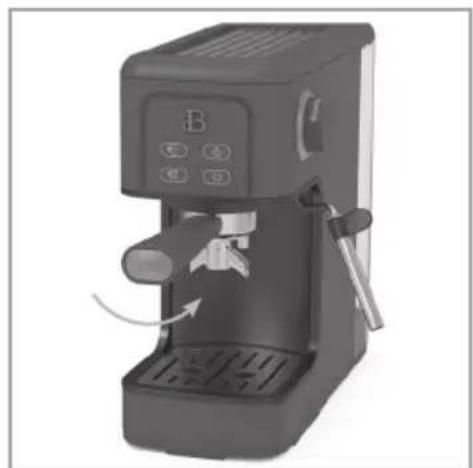
Figure 9
www.beautifulbydrew.com
For customer service questions or comments
- TABLE OF CONTENTS
- SECTION 1: SAFETY
- SECTION 2: INSTRUCTIONS
- ÍNDICE
- FOR HOUSEHOLD USE ONLY ADDITIONAL IMPORTANT SAFEGUARDS
- SAVE THESE INSTRUCTIONS
- NOTES ON THE PLUG
- NOTES ON THE CORD
- PLASTICIZER WARNING
- ELECTRIC POWER
- SECTION 2
- INSTRUCTIONS
- 2
- THE ART OF EXTRACTING ESPRESSO
- GETTING TO KNOW YOUR 20 BAR SLIM ESPRESSO MAKER
- PRODUCT MAY VARY SLIGHTLY FROM ILLUSTRATIONS
- SAFETY WARNINGS
- BEFORE USING FOR THE FIRST TIME
- PULL THE PERFECT ESPRESSO SHOT
- OPERATION
- DIAL IN SINGLE OR DOUBLE SHOT VOLUME
- TEXTURE MILK FOR ESPRESSO DRINKS
- USER MAINTENANCE INSTRUCTIONS
- CARE & CLEANING INSTRUCTIONS
- DESCALING
- STORING INSTRUCTIONS
- TROUBLESHOOTING
- ESPRESSO RECIPES
- SHORT BLACK
- FLAT WHITE
- YUAN YANG (COFFEE WITH TEA)
- AMERICANO OR LONG BLACK
- CAFÉ LATTÉ
- CAPPUCCINO
- CAFÉ MOCHA
- MACCHIATO
- ESPRESSO VODKA COCKTAIL
- LIMITED TWO-YEAR WARRANTY
- EXCLUSIONS
- HOW TO OBTAIN WARRANTY SERVICE
- SECCIÓN 1
- SEGURIDAD
Brand : Beautiful
Model : Slim Espresso Maker 20 Bar Pressure
Category : Coffee maker