BDB 822AP - Drill Baier - Free user manual and instructions
Find the device manual for free BDB 822AP Baier in PDF.


| Product Type | Drill |
| Brand | Baier |
| Model | BDB 822AP |
| Power Supply | Corded electric, 220-240 V, 50/60 Hz |
| Power Consumption | 850 W |
| No-Load Speed | 0-3000 rpm (variable) |
| Chuck Type | Keyless, 13 mm capacity |
| Drilling Capacity (Steel) | 13 mm |
| Drilling Capacity (Wood) | 40 mm |
| Drilling Capacity (Masonry) | 16 mm (hammer mode) |
| Impact Rate | 0-48000 bpm |
| Weight | 2.1 kg |
| Dimensions (L x W x H) | 310 x 70 x 200 mm |
| Functions | Drill, hammer drill, reversible, variable speed, depth stop |
| Safety Features | Double insulation, lock-on button, soft grip handle |
| Maintenance and Cleaning | Keep ventilation slots clean, replace brushes when worn, lubricate chuck periodically |
| Spare Parts and Repairability | Available from Baier service centers: carbon brushes, chuck, switch, power cord |
| General Information | Includes auxiliary handle, depth stop, carrying case |
Frequently Asked Questions - BDB 822AP Baier
User questions about BDB 822AP Baier
0 question about this device. Answer the ones you know or ask your own.
Ask a new question about this device
Download the instructions for your Drill in PDF format for free! Find your manual BDB 822AP - Baier and take your electronic device back in hand. On this page are published all the documents necessary for the use of your device. BDB 822AP by Baier.
USER MANUAL BDB 822AP Baier
natural_image
Exterior view of a BAIER electric drill (no text or symbols on body)2

DE Bohrkronenschaft ohne Absaugglocke
EN Core drill bit shank without extraction dome
π Fusto del tubo carotiere senza campana di aspirazione
3

DE Bohrkronenschaft mit Absaugglocke
EN Core drill bit shank with extraction dome
π Fusto del tubo carotiere con campana di aspirazione
4


DE Bohrkronenschaft ohne Absaugglocke EN Core drill bit shank without extraction dome IT Fusto del tubo carotiere senza campana di aspirazione

DE Bohrkronenschaft mit Absaugglocke EN Core drill bit shank with extraction dome IT Fusto del tubo carotiere con campana di aspirazione
9

DE Bohrkronenschaft ohne Absaugglocke
EN Core drill bit shank without extraction dome
π Fusto del tubo carotiere senza campana di aspirazione
10
DE Bohrkronenschaft mit Absaugglocke
EN Core drill bit shank with extraction dome
π Fusto del tubo carotiere con campana di aspirazione
11

natural_image
Diagram of a tool interacting with a surface, showing motion direction (no text or symbols)Impressum
Version: V01/2015-07
Copyright:
Maschinenfabrik
OTTO BAIERGmbH
Heckenwiesen 26
D-71679 Asperg
It is prohibited to forward or reproduce this document or to exploit and disclose its contents, unless expressly permitted. Any infringements will result in liability to pay compensation for damages. All rights reserved in case of patent, utility model or design registration.
This instruction manual has been prepared with the greatest possible care. Nonetheless, OTTO BAIER
GmbH does not accept any liability whatsoever for possible errors in this instruction manual and their consequences. Equally, no liability whatsoever is accepted for direct or consequential damage or losses resulting from improper use of the machine.
The national health and safety regulations and the requirements of this instruction manual are to be observed when using the machine.
All product names and brand names used are the property of the holder and are not explicitly marked as such.
Subject to change without notice.
Contents
1 About this instruction manual ..... 24
1.1 Important information 24
1.2 Symbols used in the instruction manual 24
2 Safety Instructions 24
2.1 Workplace safety 24
2.2 Electrical safety 25
2.3 Personal safety 25
2.4 Power tool use and care 25
2.5 Service 26
2.6 Safety Warnings for Drills 26
2.7 Additional safety warnings 26
2.7.1 Operating personnel requirements ..... 26
2.7.2 Workplace safety 26
2.7.3 Electrical safety 27
2.7.4 Safety of people 27
2.7.5 Hazards when using and handling the power tool 28
2.7.6 Service / Maintenance / Repair 28
2.7.7 Explanation of the pictograms on the machine 29
3 Technical Characteristics 30
3.1 Technical specifications 30
3.2 EC Declaration of Conformity 31
3.3 Machine characteristics 31
3.4 Machine parts and controls 31
3.5 Intended use 31
4 Before Starting Work 32
5 Operation and Control 32
5.1 Tool Bit Assembly 32
5.1.1 Inserting a core drill bit shank 32
5.1.2 Inserting the dry diamond core drill bit on the core drill bit shank 33
5.1.3 Changing the centring drill bit 33
5.2 Connecting the dust extractor 33
5.3 Switching on the dry diamond drill and drilling 33
5.3.1 Drill centring hole 34
5.3.2 Drilling a box hole 34
5.4 Ending the drilling process 34
6 Cleaning 35
7 Maintenance 35
8 Recommended uses for BAIER dry diamond core drill bits 35
9 Handling dry diamond core drill bits 36
10 Tools and Accessories 36
11 Disposal 36
12 Warranty 37
EN
1 About this instruction manual
This instruction manual contains all important information necessary for safe handling of the dry diamond drill.
The dry diamond drill is also referred to as the "tool" or "machine" in this instruction manual.
Figure references
References to figures, which are located at the beginning of the instruction manual are displayed in the text with this symbol 1 (here, for example, the reference is to Figure number 1).
1.1 Important information

Read the instruction manual
Before starting any work with or on the tool, this instruction manual, the safety instructions and the warnings must be read through carefully and observed.
Always keep this instruction manual together with the equipment.

An approved half-mask with filter must be worn!
1.2 Symbols used in the instruction manual

DANGER
"DANGER" indicates an imminent hazard, which will result in immediate death or severe physical injuries.
→ This arrow indicates appropriate measures to avert the pending hazard.

WARNING
"WARNING" indicates an imminent hazard, which could result in death or severe physical injuries.
→ This arrow indicates appropriate measures to avert the pending hazard.

CAUTION
"CAUTION" indicates an imminent hazard, which can result in minor or moderate physical injuries.
→ This arrow indicates appropriate measures to avert the pending hazard.

NOTE
"NOTE" indicates possible property damage, gives use recommendations and helpful tips.
2 Safety Instructions
General Power Tool Safety Warnings

WARNING
Read all safety warnings and all instructions.
Failure to follow the warnings and instructions may result in electric shock, fire and/or serious injury.
Save all warnings and instructions for future reference.
The term "power tool" in the warnings refers to your mainsoperated (corded) power tool or battery-operated (cordless) power tool.
2.1 Workplace safety
a) Keep work area clean and well lit.
Cluttered or dark areas invite accidents.
b) Do not operate power tools in explosive atmospheres, such as in the presence of flammable liquids, gases or dust.
Power tools create sparks which may ignite the dust or fumes.
c) Keep children and bystanders away while operating a power tool.
Distractions can cause you to lose control.
2.2 Electrical safety
a) Power tool plugs must match the outlet. Never modify the plug in any way. Do not use any adapter plugs with earthed (grounded) power tools.
Unmodified plugs and matching outlets will reduce risk of electric shock.
b) Avoid body contact with earthed or grounded surfaces, such as pipes, radiators, ranges and refrigerators.
There is an increased risk of electric shock if your body is earthed or grounded.
c) Do not expose power tools to rain or wet conditions.
Water entering a power tool will increase the risk of electric shock.
d) Do not abuse the cord. Never use the cord for carrying, pulling or unplugging the power tool. Keep cord away from heat, oil, sharp edges and moving parts.
Damaged or entangled cords increase the risk of electric shock.
e) When operating a power tool outdoors, use an extension cord suitable for outdoor use.
Use of a cord suitable for outdoor use reduces the risk of electric shock.
f) If operating a power tool in a damp location is unavoidable, use a residual current device (RCD) protected supply.
Use of an RCD reduces the risk of electric shock.
2.3 Personal safety
a) Stay alert, watch what you are doing and use common sense when operating a power tool. Do not use a power tool while you are tired or under the influence of drugs, alcohol or medication.
A moment of inattention while operating power tools may result in serious personal injury.
b) Use personal protective equipment. Always wear eye protection.
Protective equipment such as dust mask, non-skid safety shoes, hard hat, or hearing protection used for appropriate conditions will reduce personal injuries.
c) Prevent unintentional starting. Ensure the switch is in the off-position before connecting to power source and/or battery pack, picking up or carrying the tool.
Carrying power tools with your finger on the switch or energising power tools that have the switch on invites accidents.
d) Remove any adjusting key or wrench before turning the power tool on.
A wrench or a key left attached to a rotating part of the power tool may result in personal injury.
e) Do not overreach. Keep proper footing and balance at all times.
This enables better control of the power tool in unexpected situations.
f) Dress properly. Do not wear loose clothing or jewellery. Keep your hair, clothing and gloves away from moving parts.
Loose clothes, jewellery or long hair can be caught in moving parts.
g) If devices are provided for the connection of dust extraction and collection facilities, ensure these are connected and properly used.
Use of dust collection can reduce dust-related hazards.
2.4 Power tool use and care
a) Do not force the power tool. Use the correct power tool for your application.
The correct power tool will do the job better and safer at the rate for which it was designed.
b) Do not use the power tool if the switch does not turn it on and off.
Any power tool that cannot be controlled with the switch is dangerous and must be repaired.
c) Disconnect the plug from the power source and/or the battery pack from the power tool before making any adjustments, changing accessories, or storing power tools.
Such preventive safety measures reduce the risk of starting the power tool accidentally.
d) Store idle power tools out of the reach of children and do not allow persons unfamiliar with the power tool or these instructions to operate the power tool.
Power tools are dangerous in the hands of untrained users.
e) Maintain power tools. Check for misalignment or binding of moving parts, breakage of parts and any other condition that may affect the power tool's operation. If damaged, have the power tool repaired before use.
Many accidents are caused by poorly maintained power tools.
f) Keep cutting tools sharp and clean.
Properly maintained cutting tools with sharp cutting edges are less likely to bind and are easier to control.
EN
g) Use the power tool, accessories and tool bits etc. in accordance with these instructions, taking into account the working conditions and the work to be performed.
Use of the power tool for operations different from those intended could result in a hazardous situation.
2.5 Service
a) Have your power tool serviced by a qualified repair person using only identical replacement parts.
This will ensure that the safety of the power tool is maintained.
2.6 Safety Warnings for Drills
- Wear ear protectors when impact drilling. Exposure to noise can cause hearing loss.
- Use auxiliary handle(s), if supplied with the tool.
Loss of control can cause personal injury.
- Hold power tool by insulated gripping surfaces, when performing an operation where the cutting accessory may contact hidden wiring or its own cord.
Cutting accessory contacting a "live" wire may make exposed metal parts of the power tool "live" and could give the operator an electric shock.
2.7 Additional safety warnings
2.7.1 Operating personnel requirements
• People below the age of 16 may not use the machine.
- The operating personnel must be familiar with the content of this instruction manual.
2.7.2 Workplace safety
- Secure the work area also behind openings and cutouts.
Unsecured work areas can endanger you and other people. - Watch out for open and concealed electricity cables, and water and gas pipes. Use suitable detectors to find concealed utility pipes and cables, or contact the local utility company for advice.
Contact with electricity cables can cause fires and an electric shock. Damage to a gas pipe can cause an explosion. Penetrating a water pipe causes damage to property or could cause an electric shock.
- Do not use the power tool near flammable materials.
Sparks could ignite these materials.
- Avoid causing situations where other people can stumble or trip.
Tripping over cables can cause serious injuries.
- Secure the workpiece.
A workpiece securely held in clamping devices or a vice is more safely held than in the hand.
- Avoid dust accumulation in the workplace.
Dusts can easily ignite.
- Ensure adequate ventilation in closed rooms.
Risk due to dust and impaired vision.
- Dust from materials such as coatings containing lead, several types of wood, minerals and metals can be harmful to health and cause allergic reactions, respiratory diseases and/or cancer.
Asbestos-containing material may only be machined by specialists.
▶ Wherever possible, use a dust extractor suitable for the material you are working on (e.g. a special BAIER dust extractor).
▶ Ensure the workplace is properly ventilated.
▶ We recommend wearing a face mask respirator with filter class P2 or P3 (to EN 149:2001).
Observe the relevant regulations in your country for the materials to be machined.
2.7.3 Electrical safety
- Before each use, check the power tool, connection cable and plug for damage. Damaged equipment is dangerous, and no longer safe to use.
- Note the mains voltage! The power source voltage must match the details given on the rating plate of the power tool.
- If using the power tool with mobile generators, loss of power or atypical behaviour on switching on is possible.
- Do not use the power tool if the cable is damaged. Do not touch the damaged cable and disconnect the mains plug if the cable is damaged while you are working.
Damaged cables increase the risk of an electric shock.
- Only use extension cables suitable for the machine's power consumption and which have a minimum core cross-section of 1.5 mm ^2 . If you use a cable drum, always completely unwind the cable.
The rolled up cable can heat up and start to burn.
- Regularly clean the ventilation slots of your power tool by blowing it out. Never use liquids. Never insert screwdrivers or any other objects into the ventilation slits. Do not cover the ventilation slits.
The motor fan draws dust into the housing and a large accumulation of metal dust can cause electrical hazards.
- External electromagnetic interference (e.g. mains voltage fluctuations, electrostatic discharges) can cause the power tool to switch off automatically.
In this case, switch off the power tool and then switch it back on again.
- Do not use any insert tools which require liquid coolant.
The use of water or other liquid coolants could result in an electric shock.
2.7.4 Safety of people
- Wear personal protective equipment and, depending on the work situation, use:

Full-face protection, eye protection or safety glasses/goggles, hard hat and special apron
Protect yourself against debris thrown up by wearing a hard hat, safety goggles or face protection and wear an apron, if necessary.

Hearing protection
The typical A-weighted sound pressure level of this power tool is over 85 dB (A) while working with the tool. If you are exposed to loud noise for lengthy periods, there is a risk of hearing damage or even hearing loss.

Anti-vibration safety glove
At a release value A (8) for arm-hand vibrations of over 2.5 m/s ^2 , the wearing of anti-vibration safety gloves is recommended.

Non-slip safety footwear

Dust mask, half-face filter mask or face mask respirator
Inhaling fine mineral dust can cause health damage. We recommend wearing a face mask respirator with filter class P2 or P3 (to EN 149:2001).
Working with dry diamond core drill bits is a grinding process in which extremely fine dust is produced. When cutting materials containing quartz there is a very high risk of silicosis; in this case the machine should only be used in conjunction with a suitable dust extractor (e.g. a special BAIER dust extractor).
- Ensure other people keep a safe distance from your work area. Any person entering the work area must be wearing personal protective equipment. Broken pieces of the workpiece or broken insert tools can fly off and cause injuries, even outside the immediate work area.
- Keep the mains power lead away from rotating insert tools. If you lose control of the tool, the mains power lead can be cut or caught and your hand or arm can be pulled into the rotating insert tool.
- Never put down the power tool until the insert tool has come to a complete standstill. The rotating insert tool can come into contact with the surface on which the power tool is placed, which could cause you to lose control of the power tool.
- Do not leave the power tool running while you are carrying it.
Your clothing can get caught by inadvertent contact with the rotating insert tool and the insert tool can drill into your body.
- If the machine is switched on, do not direct insert tools towards your own or other people's bodies. Do not touch or take hold of the tools.
2.7.5 Hazards when using and handling the power tool
- If the machine is used for hand-held drilling, always hold both handles firmly when switching on and while working with the machine. (The additional handle must be tightly screwed onto the drill!). When switching on and while working with the machine, expect reaction torques (e.g. due to sudden jamming or breakage of the insert tool).
- Do not use any accessories, which have not been especially provided and recommended for this power tool by the manufacturer. Just because you can attach the accessories to your power tool is not a guarantee of safe use.
- The approved speed of the insert tool must be at least as high as the maximum speed given on the power tool. Accessories which rotate faster than approved can break and fly off the tool.
- Change insert tools carefully and only use the mounting tools provided, if they are in perfect condition. Disconnect the mains plug before changing the insert tool. Use of the mounting tool provided prevents damage to the power tool and insert tool.
- Never use damaged insert tools. Before each use, check insert tools for splinters and cracks. If the power tool or insert tool is dropped or falls, check whether it is damaged, or use an undamaged insert tool. If you have checked and inserted the insert tool, keep yourself and other people nearby outside the plane of the rotating insert tool and let the power tool run at maximum speed for one minute. Most damaged insert tools break during this test period.
- Do not expose power tools to extreme heat or cold.
Mechanical and electrical damage can occur during extreme heat and/or cold. - Allow the insert tools, tool holders and other parts cool in the immediate vicinity of the work area after use.
The equipment can be very hot after use. Do not touch or grip the parts. Risk of injury.
• Additional signs or other, non BAIER-specific parts may not be screwed or riveted onto the motor, handle, gearbox or protective housing.
This could damage the power tool and cause malfunctions to occur.
- Avoid unnecessary noise emissions.
• Note and follow the safety and work instructions for the accessories used.
2.7.6 Service / Maintenance / Repair
- If the power tool is dropped or becomes wet, have it checked.
A possibly damaged power tool is dangerous and no longer safe to operate. Before using the power tool again, have it checked by our customer service or an authorised service centre of Maschinenfabrik OTTO BAIER GmbH.
• Repair and maintenance work may only be carried out by an authorised workshop of Maschinenfabrik OTTO BAIER GmbH.
Otherwise, all liability and warranty claims against Maschinenfabrik OTTO BAIER GmbH expire. - Ensure that original BAIER spare parts and original BAIER accessories only are used when needed.
Original parts are available from authorised dealers. Use of non original parts can cause damage to the machine and an increased risk of accidents. - Regular servicing by Maschinenfabrik OTTO BAIER GmbH or a servicing and repair company authorised by us is specified.
Many accidents are caused by poorly serviced and maintained power tools.
2.7.7 Explanation of the pictograms on the machine

The CE mark on a product means that the product conforms with all the applicable European regulations and has been subjected to the prescribed conformity assessment procedures.

Protection class II equipment
The machine is insulated in such a way that it has no exposed metal parts that could be live in the event of a fault. It does not have a protective earth conductor.

Environmentally friendly disposal of waste equipment
Waste equipment contains valuable recyclable materials which should be reused or recycled. Batteries, lubricants and similar materials must not be allowed to get into the environment.
Therefore, please dispose of waste equipment through suitable collection systems.

Wear hearing protection!
The typical A-weighted sound pressure level of this power tool is over 85 dB (A) – wear ear protectors when working with the tool!

Read the instruction manual!
Before starting any work with or on the machine, this instruction manual, the safety instructions and the warnings must be read through carefully and observed.
3 Technical Characteristics
3.1 Technical specifications
| Dry diamond drill type BDB 822AP BDB 823A | ||
| Manufacturer Maschinenfabrik OTTO BAIER GmbH | ||
| Operating voltage (V/Hz)~230 / 50/60 | ||
| Power consumption (watt) 1650 1800 | ||
| Protection class | ☐/II/II | ☐ |
| Speed (min-1) 1800 1650 | ||
| Core drill bit diameter, hand-guided (mm) 40 – 90 100 – 150 | ||
| Impact frequency (imp) | 35000 | 33000 |
| Bit holder | M18 | M18 |
| Weight (kg)1) | 5.0 | 5.2 |
| Speed electronics | Yes | Yes |
| Sound measurement2) K = 3 dB L_pA (sound pressure) dB (A) | 91 92 | |
| L_WA (sound power) dB (A) | 99 | 99 |
| Vibration measurement:3) K = 1.5 m/s2Front handle (11)1 m/s2 | ||
| Rear handle (2)1 m/s2 | 4.9 | 5.5 |
1) Weight according to EPTA procedure 01/2003.
2) Measured values for noise determined according to EN 60745. Wear hearing protection!
3) Total vibration values (vector sum in three directions) determined according to EN 60745 The vibration emission values given in this instruction manual have been measured according to a method of measurement standardised in EN 60745 and can be used for comparison between power tools. They are also suitable for a preliminary estimate of the vibratory stresses. The vibration emission values given represent the main applications of the power tool. If the power tool is used for other applications, with different insert tools or are insufficiently serviced, this can significantly increase the vibratory stresses over the whole work period. For a precise estimate of the vibration emission values, the times during which the tool is switched off or is running but not actually in use should also be taken into account. This can reduce the vibration stresses over the whole work period significantly.

WARNING
Health risk due to vibrations.
Additional safety measures should be taken to protect the user, e.g. wearing anti-vibration protective gloves, correct maintenance of power tools and insert tools, keeping hands warm and good organisation of work sequences.
3.2 EC Declaration of Conformity
CE
We herewith declare, with sole responsibility, that this product conforms to the following standards or normative documents:
EN 60745
in accordance with the provisions of the Directives 2006/42/EC; 2014/30/EU; 2011/65/EU
The head of development is authorised to write the technical documents.
These are available from: Maschinenfabrik OTTO BAIER GmbH, Heckenwiesen 26, D-71679 Asperg

Thomas Schwab Managing Director

Armin Stiegele Head of Development
Asperg, 01.09.2014
3.3 Machine characteristics
The machines are equipped with specially developed electronics with soft start. It monitors the speed and the green / red indicator lights (items 1 and 2, see Figure 1) help to achieve the most favourable work progress and therefore tool-protecting working conditions.
Visual display
Green: Speed for optimum drilling performance
Green / red: Speed within the limit range Red: Speed too low – stopping
If this warning signal is ignored, i.e. the feed is not reduced, the electronics switch off on overload. After the dry diamond core drill bit has stopped, remove it from the drill hole. The machine can be restarted immediately.
The machine is also equipped with a selectable soft impact mechanism. It protects the diamond segments of the core drill bits, allows faster working and carries the drill dust away from the diamond segments, which in turn enables a longer tool life for the diamond core bits.
3.4 Machine parts and controls
(See Figure 1)
1 Green LED
2 Red LED
3 ON / OFF switch
4 Handle
5 Connection cable
6 Additional handle (can be mounted for left and right-handed persons)
7 Open-ended spanner size SW22 / SW24
8 Nozzle for dust extractor hose connection
9 Extraction dome with core drill bit shank and resettable centring drill bit
10 BAIER dry diamond core drill bit ∅ 82 mm
11 Soft impact feature ON / OFF switch
12 Outside thread (M18) of the output shaft
13 Output shaft
3.5 Intended use
The BDB 822AP and BDB 823A dry diamond drills listed in this instruction manual are approved only for dry drilling in masonry (clay bricks, lime-sand blocks, undressed stone) and concrete.
The BDB 822AP and BDB 823A dry diamond drills may not be used for wet drilling.
The following materials may not be drilled: wood, metal and glass, etc.
Observe the relevant regulations in your country for the materials to be machined and extraction.
4 Before Starting Work
To ensure safe working with the dry diamond drill, the following points must be observed before each use:
- Read through all safety instructions and warnings in this instruction manual.
- Wear protective clothing such as hard hat, face protection or safety goggles, safety gloves and if necessary an apron.
- The voltage on the rating plate must be identical with the mains voltage.
- Before each use, check the machine, connection cable and plug, tight fit of the core drill bit shank (with or without extraction dome) and the dry diamond core drill bit.
- The additional handle must be tightly screwed onto the machine.
- Only use the dry diamond core drill bits recommended by Maschinenfabrik OTTO BAIER GmbH for the respective use (see selection table with recommended uses on page 35).

NOTE
The dry diamond core drill bit can be damaged irreparably by overheating or jamming in the core drill hole.
If harmful dust is produced during the work, a suitable dust extractor must be connected to the dry diamond drill (e.g. BAIER special dust extractor).
5 Operation and Control
5.1 Tool Bit Assembly
5.1.1 Inserting a core drill bit shank
Before inserting the dry diamond core drill bits, either
• 2 a core drill bit shank with resettable centring drill bit or
- 3 a core drill bit shank with extraction dome and resettable centring drill bit must be screwed onto the dry diamond drill.

DANGER
Risk of injury due to electric shock.
→ Disconnect the mains plug before carrying out any work on the dry diamond drill.

CAUTION
Risk of injury due to hot drill bits.
The drill bits fitted can get hot if used for a lengthy time. Wear safety gloves when changing the drill bits or allow the drill bits to cool first.
Inserting a core drill bit shank without extraction dome
2 Screw the core drill bit shank (4) with resettable centring drill bit (5) on the output shaft (1). Hold the output shaft (1) in position with an open-ended spanner size SW22 and tighten the core drill bit shank (4) by turning it clockwise with a second open-ended spanner, size SW24.
Inserting a core drill bit shank with extraction dome
3 If the core drill bit shank (4) with extraction dome (3) and with resettable centring drill bit (5) is used, the extraction dome (3) must also be pushed towards the machine, so that the second open-ended spanner size SW24 can grip the core drill bit shank (4); tighten by turning clockwise.
5.1.2 Inserting the dry diamond core drill bit on the core drill bit shank
Select the dry diamond core drill bit according to the required drillhole diameter and the material to be drilled.
Inserting a dry diamond core drill bit on the core drill bit shank without extraction dome
2 Screw a dry diamond core drill bit (6) onto the core drill bit shaft (4). Hold the output shaft (1) in position with an open-ended spanner size SW22 and tighten the dry diamond core drill bit (6) by turning it clockwise with a second open-ended spanner, size SW24.
Inserting a dry diamond core drill bit on the core drill bit shank with extraction dome
3 If the dry diamond core drill bit (6) is used on the core drill bit shank (4) with extraction dome (3), the extraction dome (3) must also be pushed towards the machine, so that the second open-ended spanner size SW24 can grip the dry diamond core drill bit (6); tighten by turning clockwise.

NOTE
Check the fit and condition of the dry diamond core drill bit. A damaged dry diamond core drill bit may not be used and must be replaced immediately.
5.1.3 Changing the centring drill bit
A blunt or broken off centring drill bit must be replaced.
2/3 Push the centring drill bit (5) with the knurled sleeve (2) towards the front and lock by turning the knurled sleeve (2). Hold onto the output shaft (1) with an open-ended spanner (size SW22), use pliers to unscrew and remove the centring drill bit (5) anti-clockwise and replace with a new centring drill bit.
5.2 Connecting the dust extractor
Connecting the dust extractor to the core drill bit shank with extraction dome
- Check the dust extractor to ensure that it is working properly.
- 4 Push the dust extractor hose (3) firmly onto the nozzle (2) of the extraction dome (1).

NOTE
The nozzle (2) is designed to fit the suction hose (3) of a BAIER special dust extractor.
4 When the suction hose (3) is cold, a good deal of effort is required to push it onto the nozzle (2) of the extraction dome (1).
Dust extraction for dry diamond core drill bits with 1 14 " connection
If dry diamond core drill bits with 1¼" connection are used, the dust is extracted using the BAIER suction rotor (available as accessory, see BAIER catalogue Id. No. 68379) in combination with a BAIER special dust extractor.
5.3 Switching on the dry diamond drill and drilling

NOTE
The dry diamond core drill bit can be damaged irreparably by overheating or jamming in the core drill hole.
If harmful dust is produced during the work, a suitable dust extractor must be connected to the dry diamond drill (e.g. BAIER special dust extractor).
Switch the drill's soft impact feature on or off, depending on the material to be drilled:
- Drilling with soft impact feature is recommended for drilling in concrete and other hard materials.
- Drilling without soft impact feature is recommended for drilling in abrasive materials and materials with a lower hardness.
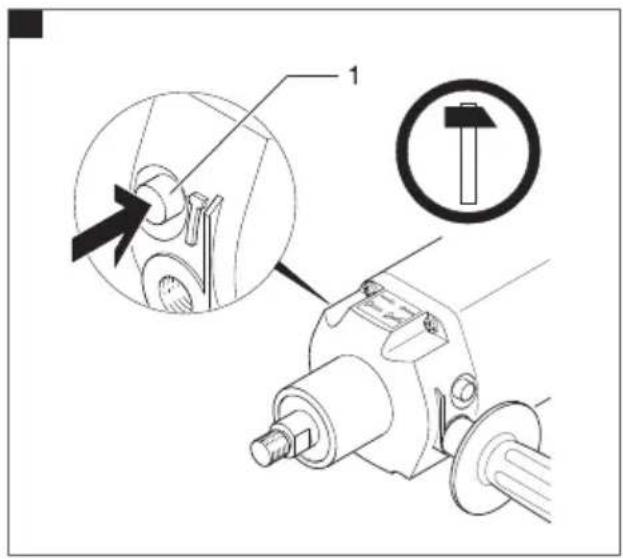
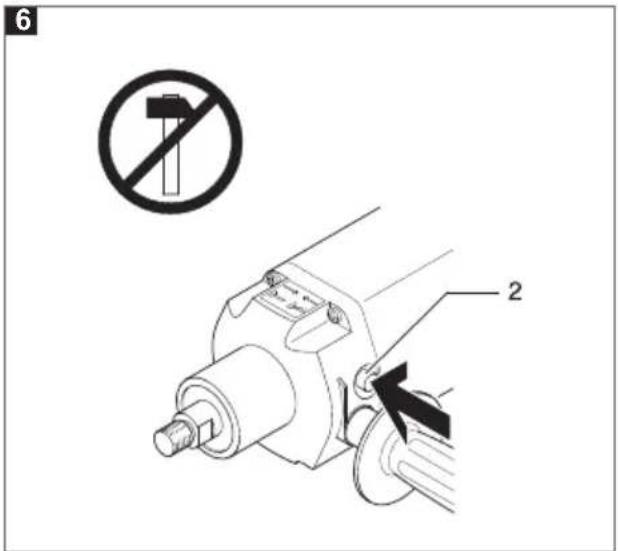
Switching on / off the soft impact feature
• 5 Switch on soft impact feature:
Press the side of the soft impact switch marked green (1).
• 6 Switch off soft impact feature:
Press the side of the soft impact switch marked black (2).
5.3.1 Drill centring hole
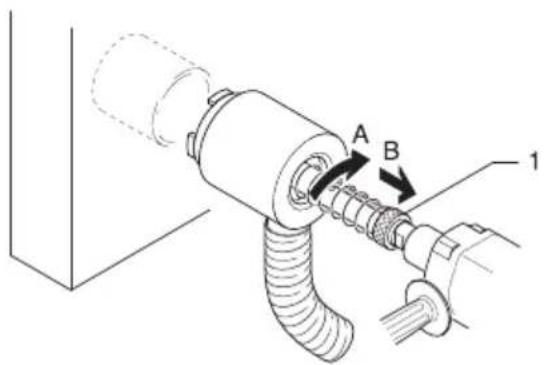
- 7/8 Push the centring drill bit (1) with the knurled sleeve (3) towards the front (A) and lock by turning anti-clockwise (B).
- Switch on the dust extractor connected to the extraction dome (2) (see "Chap. 5.2 Connecting the dust extractor").
• Always hold on tight to both handles of the dry diamond drill with both hands. - 7/8 Move the centring drill bit (1) into the required position on the wall.
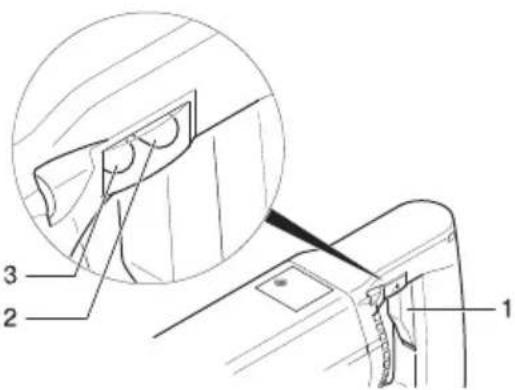
• 11 Press the ON / OFF switch (1) to switch on the dry diamond drill. - 7/8 Drill until the diamond dry core drill bit is centred approx. 5 – 10 mm deep in the wall.
- 9/10 Switch off the machine and after it has stopped unlock the dry diamond core drill bit knurled sleeve (1) by turning it clockwise (A) and allow it to snap back (B).
5.3.2 Drilling a box hole
- Leave the dust extractor connected to the extraction dome switched on.

NOTE
The dry diamond core drill bit can be damaged irreparably by overheating or jamming in the core drill hole.
The feed can only be as high as the diamond dry core drill bit can wear away the material. Therefore, do not exert too large a force on the dry diamond core drill bit and avoid canting.
- Feed the dry diamond core drill bit into the pre-centred hole.
- Switch on the dry diamond drill.
- Apply a light, uniform feed pressure and continue drilling to the required depth.
- Pull back the dry diamond core drill bit a little now and again to remove the drill dust.
• 11 If the feed is too fast, the red LED (2) lights up. Then, reduce the feed immediately until the green LED (3) lights up again. If this warning signal is ignored, i.e. the feed is not reduced, the electronics switch off the dry diamond drill on overload. The drilling process can then be restarted and continued as described above.

NOTE
Blunt dry diamond core drill bits can be resharpened if necessary using BAIER whetstones or other suitable materials.
Note and follow the information and instructions on handling dry diamond core drill bits (see page 36).
5.4 Ending the drilling process

NOTE
To avoid damage to the diamond segments, do not switch off the dry diamond drill until the rotating dry diamond core drill bit has been completely removed from the masonry.
• 11 The dry diamond drill switches off as soon as the ON / OFF switch (1) is released.
Breaking out the drill core

NOTE
The dry diamond core drill bit can be damaged irreparably if it is jammed in the core drill hole. Never use the dry diamond core drill bit to break out the drill core!
• 12 Use a suitable tool (e.g. chisel, BAIER BMH 622 chipping hammer) to break out the drill core in the wall.
6 Cleaning

DANGER
Risk of injury due to electric shock.
→ Disconnect the mains plug before carrying out any work on the dry diamond drill.
The machine must be cleaned after each drilling work session.
- Carefully clean the machine and blow out with compressed air.
- Ensure handles are dry and free from grease.
7 Maintenance

DANGER
Risk of injury due to electric shock.
→ Disconnect the mains plug before carrying out any work on the dry diamond drill.
The dry diamond drill must be serviced at least once a year. Further, servicing will be necessary depending on the wear of the carbon brushes. Only servicing and repair firms authorised by Maschinenfabrik OTTO BAIER GmbH may carry out maintenance of the machine. Also ensure that original BAIER spare parts and original BAIER accessories only are used.
8 Recommended uses for BAIER dry diamond core drill bits
| Uses | Identification colour of the dry diamond core drill bits | |||
| silver, titanium | blue or orange yellow | |||
| Concrete xxx xxx | ||||
| Concrete, reinforced | xxx x | |||
| Precast concrete blocks | ||||
| Clinker xx xx xxx | ||||
| Sand-lime blocks | xx xxx | |||
| Lime-sand block, high-density | xxx | |||
| Bricks xxx | ||||
| Poroton | xxx xx | |||
| Cellular concrete | xxx | xxx | ||
| Plaster | xx xxx | |||
| xxx | optimally suitable |
| xx | well-suited |
| x | suitable |
9 Handling dry diamond core drill bits
- Always use and store dry diamond core drill bits in accordance with the manufacturer's instructions.
- Too soft diamond segments:
- Dry diamond core drill bits wear too quickly at very high removal rate.
Remedy: The material to be machined requires dry diamond core drill bits with a harder bond.
• Too hard diamond segments:
The diamond grains become blunt and do not break out of the bond. The dry diamond core drill bits no longer have any cutting power.
Remedy: The material to be machined requires dry diamond core drill bits with a softer bond.
- If extraction is not used during machining, the dry diamond core drill bit rubs increasingly against "soft" drill dust. The core bit segments heat as a result, they become soft and the diamond splinters sink into the substrate. The dry diamond core drill bit becomes less sharp. The cutting performance reduces and the user increases the pressure on the dry diamond core drill bit, which in turn increases the effect. After drilling a few holes, the core bit segments are "glazed" or they tear off at the least resistance in the stone and the dry diamond core drill bit must be replaced.
- Sharpening the dry diamond core drill bit on the BAIER professional whetstone (Id. No. 15453) or on a soft stone between drilling enables sunken in diamonds to be re-released and the dry diamond core drill bit is sharp again.
- It is necessary to cool the drill bit segments through extraction to extend the life of the dry diamond core drill bit and to keep the cutting speed high.
- Excessive drilling pressure can cause material fatigue in the base metal and therefore the formation of cracks. Before use, ensure that there are no cracks in the dry diamond core drill bit.
- 11 The dry diamond core drill bit should plunge into the wall only after the working speed has been reached – green LED (3) lights up.
- After approx. 2 minutes of cutting time the machine should be run with no load for 10 seconds, so that the dry diamond core drill bit can cool.
10 Tools and Accessories
- BAIER dry diamond core drill bits for cutting boxes for all kinds of different areas of use (see "Chap. 8 Recommended uses for BAIER dry diamond core drill bits").
▶ in hard stone (colour code blue)
∅ 68 mm (Id. No. 2394)
∅ 82 mm (Id. No. 2402)
▶ in soft stone (colour code orange)
∅ 68 mm (Id. No. 48330)
∅ 82 mm (Id. No. 48322)
▶ in sand-lime blocks (colour code yellow)
∅ 68 mm (Id. No. 65680)
∅ 82 mm (Id. No. 65268)
▶ in reinforced concrete (colour code silver, titanium)
Ø 68 mm (Id. No. 6374)
∅ 82 mm (Id. No. 6263)
- BAIER core drill bit shank with resettable centring drill bit (Id. No. 53199)
- BAIER extraction dome with core drill bit shank and resettable centring drill bit, holder M18/M16 (Id. No. 53207)
• BAIER replacement centring drill bit (Id. No. 34587)
• BAIER suction rotor M18 to 1¼" (Id. No. 68379) - BAIER adapter for suction rotor M18 to M16 (Id. No. 67595)
- BAIER adapter for suction rotor M18 to 1¼" (Id. No. 67678)
• BAIER BMH 622 chisel hammer (Id. No. 13680)
• BAIER special dust extractor
• Professional whetstone (Id. No. 15453)
• BAIER metal transport case (Id. No. 13771)
• BAIER plastic transport case (Id. No. 8495)
11 Disposal

Recycle the machine and its packaging in an environmentally friendly way in accordance with the provisions applicable in your country.
12 Warranty
The power tools placed on the market and distributed by Maschinenfabrik OTTO BAIER GmbH take into account the regulations of the laws concerning engineering tools and equipment to protect against risks to health and safety. We guarantee the perfect quality of our products and accept the costs of subsequent repairs by replacing the damaged parts or replacement with a new tool in case of design, material and/or manufacturing errors within the warranty period. The warranty period for commercial use is 12 months.
The following are prerequisite for a warranty claim due to design, material and/or manufacturing errors:
1. Proof of purchase and compliance with the instruction manual
A mechanically produced original copy of a purchase voucher must always be submitted in order to make a warranty claim. It must contain the complete address, date of purchase and type designation of the product.
The instruction manual for the respective machine and the safety instructions must have been complied with.
Damage due to faulty operation cannot be recognised as a warranty claim.
2. Correct deployment of the machine
Maschinenfabrik OTTO BAIER GmbH's products are developed and produced for specific purposes.
A warranty claim cannot be acknowledged in the event of failure to comply with the intended use in accordance with the instruction manual, misuse or use for another purpose or use of unsuitable accessories. The warranty does not apply if the machine is deployed in continuous and piece-work operation or for rental and hire purposes.
3. Compliance with servicing intervals
Regular servicing by us or a servicing and repair firm authorised by us is prerequisite for warranty claims. Servicing is specified for when the carbon brushes are worn, however at least once a year.
The machine must be cleaned in accordance with the provisions of the instruction manual.
All warranty entitlements expire in case of intervention/tampering with the machine by third parties (opening the machine).
Servicing and cleaning work are not generally covered by the warranty.
4. Use of original BAIER spare parts
Ensure that original BAIER spare parts and BAIER accessories only are used. They are available from authorised dealers. The type and quantity of grease are to be used according to the valid grease list. Use of non-original parts can cause consequential damage to the machine and an increased risk of accidents. Dismantled, partly dismantled machines and machines repaired with third party spare parts are excluded from the warranty.
5. Wearing parts
Certain components are subject to use-induced wear or normal wear and tear caused by use of the respective power tool. These components include, among other things, carbon brushes, ball bearings, switches, power cords, seals, shaft sealing rings. Wearing parts are not covered by the warranty.
- Impressum
- Contents
- EN
- About this instruction manual
- Figure references
- Important information
- Read the instruction manual
- Symbols used in the instruction manual
- DANGER
- WARNING
- CAUTION
- NOTE
- Safety Instructions
- General Power Tool Safety Warnings
- Workplace safety
- Electrical safety
- Personal safety
- Power tool use and care
- Service
- Safety Warnings for Drills
- Additional safety warnings
- Operating personnel requirements
- Workplace safety
- Electrical safety
- Safety of people
- Hearing protection
- Anti-vibration safety glove
- Dust mask, half-face filter mask or face mask respirator
- Hazards when using and handling the power tool
- Service / Maintenance / Repair
- Explanation of the pictograms on the machine
- Protection class II equipment
- Environmentally friendly disposal of waste equipment
- Wear hearing protection!
- Read the instruction manual!
- Technical Characteristics
- Technical specifications
- EC Declaration of Conformity
- CE
- Machine characteristics
- Machine parts and controls
- (See Figure 1)
- Intended use
- Before Starting Work
- Operation and Control
- Tool Bit Assembly
- Inserting a core drill bit shank
- Inserting a core drill bit shank without extraction dome
- Inserting a core drill bit shank with extraction dome
- Inserting the dry diamond core drill bit on the core drill bit shank
- Inserting a dry diamond core drill bit on the core drill bit shank without extraction dome
- Inserting a dry diamond core drill bit on the core drill bit shank with extraction dome
- Changing the centring drill bit
- Connecting the dust extractor
- Connecting the dust extractor to the core drill bit shank with extraction dome
- Dust extraction for dry diamond core drill bits with 1 14 " connection
- Switching on the dry diamond drill and drilling
- Switching on / off the soft impact feature
- Drill centring hole
- Drilling a box hole
- Ending the drilling process
- Breaking out the drill core
- Cleaning
- Maintenance
- Recommended uses for BAIER dry diamond core drill bits
- Handling dry diamond core drill bits
- Tools and Accessories
- Disposal
- Warranty
- Proof of purchase and compliance with the instruction manual
- Correct deployment of the machine
- Compliance with servicing intervals
- Use of original BAIER spare parts
- Wearing parts
Brand : Baier
Model : BDB 822AP
Category : Drill