Mediterraneo X - Media player Gold Note - Free user manual and instructions
Find the device manual for free Mediterraneo X Gold Note in PDF.


| Product Type | Media Player / Turntable |
| Brand | Gold Note |
| Model | Mediterraneo X |
| Dimensions (W x H x D) | 470 mm x 210 mm x 360 mm |
| Weight | 25 kg |
| Power Consumption | Max 27 W |
| Power Supply | 18V output, 100-240V / 50-60Hz |
| Speeds | 33 1/3 rpm and 45 rpm, electronic with fine pitch control |
| Wow & Flutter | < 0.1% |
| Rumble | -82 dB |
| Motor | Ultra-precise 12V synchronous motor |
| Transmission | 70 shores rectified EPDM belt |
| Platter | Aluminium and high-density POM (45mm, 7 kg) |
| Platter Bearing | 4.3 mm ceramic ball |
| Tonearm | Gold Note B-7 Ceramic |
| Tonearm Counterweights | 110 g and 28.5 g |
| Anti-Skating | Nylon wire with bullet counterweight, adjustment bar with grooves |
| VTA Adjustment | Yes, via 1.5 mm Allen key |
| Dust Cover | Smoked acrylic with detachable hinges |
| Display | Touchscreen display with brightness adjustment |
| Package Contents | Turntable, dust cover with spacers, clamp, anti-skating, counterweights, tonearm pre-installed, drive belt, 18V power supply, phono cable, spike washers, Allen keys (2.5, 2.0, 1.5 mm), platter spindle tip, oil jar, protractor/overhang and stroboscope, GN stylus gauge, felt mat, ball bearing, lifting eye bolt, user manual |
| Warranty | Against defective materials and workmanship; registration required within 15 days |
| Cleaning | Only soft 100% cotton dry cloth |
| Safety | Do not disassemble; protect from rain/humidity; use only original power adapter; refer to qualified service personnel |
Frequently Asked Questions - Mediterraneo X Gold Note
User questions about Mediterraneo X Gold Note
0 question about this device. Answer the ones you know or ask your own.
Ask a new question about this device
Download the instructions for your Media player in PDF format for free! Find your manual Mediterraneo X - Gold Note and take your electronic device back in hand. On this page are published all the documents necessary for the use of your device. Mediterraneo X by Gold Note.
USER MANUAL Mediterraneo X Gold Note
Thank you for purchasing one of our units and welcome into the Gold Note world, where we turn High-End audio and music into a new experience.
Maurizio Aterini, founder of Gold Note
IMPORTANT SAFETY INFORMATION
PLEASE NOTE
1 Do not disassemble any part of the product.
2 Do not use any part of the product for other purposes.
3 For service and problems of any kind, contact qualified Gold Note personnel.
4 Protect the product from rain, humidity and keep away from heat sources, electric and electronic motors etc. The power cord supplied must be used only on this unit.
5 Gold Note does not have responsibility for any improper use of this unit.
GENERIC INFORMATION
Read these instructions and store them.
Heed all warnings.
Follow the instructions.
Do not use this apparatus near water.
Clean only with a dry cloth.
Do not block the ventilation openings and install in accordance with the manufacturer's instructions.
Do not install near heat sources such as radiators, heat registers, stoves or other apparatus (including amplifiers) that produce heat.
Do not defeat the safety purpose of the polarised or grounding-type plug: a polarised plug hastwo blades with one wider than the other.
A grounding type plug has two blades and a third grounding prong. The wide blade or
the third prong are provided for your safety.
If the provided plug does not fit into your outlet, consult an electrician for replacement of the obsolete outlet. or pinched particularly at plugs, convenience receptacles, and the point where they exit from the apparatus.
| Only use attachments/accessories specified by the manufacturer.
Use only with the cart, stand, tripod, bracket, or table specified by the manufacturer, or sold with the apparatus.
When a cart is used, use caution when moving the cart/apparatus combination to avoid injury from tip-over.
Unplug this apparatus during lightning storms or when unused for long periods of time. Refer all servicing to qualified service personnel only. Servicing is required when the apparatus has been damaged in any way (such as when the power cord or plug is damaged, liquid has been spilled or objects have fallen into the apparatus, the apparatus has been exposed to rain or moisture) and in any case when the apparatus does not operate normally or has been dropped.
This appliance has a serial number located on the rear panel.
Please record the model and serial number and retain them for your records.
MODEL
SERIAL NUMBER

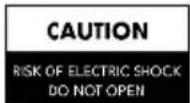

CAUTION!
To reduce the risk of electric shock, do not remove cover (or back). No user-serviceable parts inside. Refer only to qualified Gold Note service personnel for service.
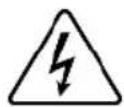


WARNING!
To prevent fire or shock hazard, do not expose this appliance to rain or moisture.
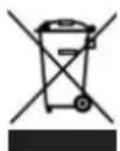
GOLD NOTE - Information on the correct management of waste from household Equipment pursuant to the European Directive 2012/19/EU
The crossed-out wheelie bin symbol shown on the equipment or its packaging indicates that the product, at the end of its useful life, must be collected separately from other waste to allow its proper treatment and recycling. The user must therefore deliver, free of charge, the end-of-life equipment to the centres for the separate collection of waste electrical and electronic equipment, or return it to the dealer in accordance with the procedures established by the legislation.
The appropriate separate collection of discarded equipment allows for proper recycling, treatment and environmentally compatible disposal, helping to avoid the possible dispersion of hazardous substances and negative effects on the environment and health, favouring the reuse and/or recycling of the materials of which the equipment is composed of. Illegal dumping of the product by the user involves the application of administrative sanction provided for by the legislation in force. We invite you consult the current legislation and the measures adopted by the public service operating in your country or territory.
| INDEX
UNBOXING
TECHNICAL SPECIFICATIONS
SETTING UP THE TURNTABLE 3
INSTALLING THE TURNTABLE 4
POWER ADAPTER
SPEED SELECTION & FEATURES
CARTRIDGE CALIBRATION
DETACHABLE DUST COVER
PRODUCT REGISTRATION
TROUBLESHOOTING
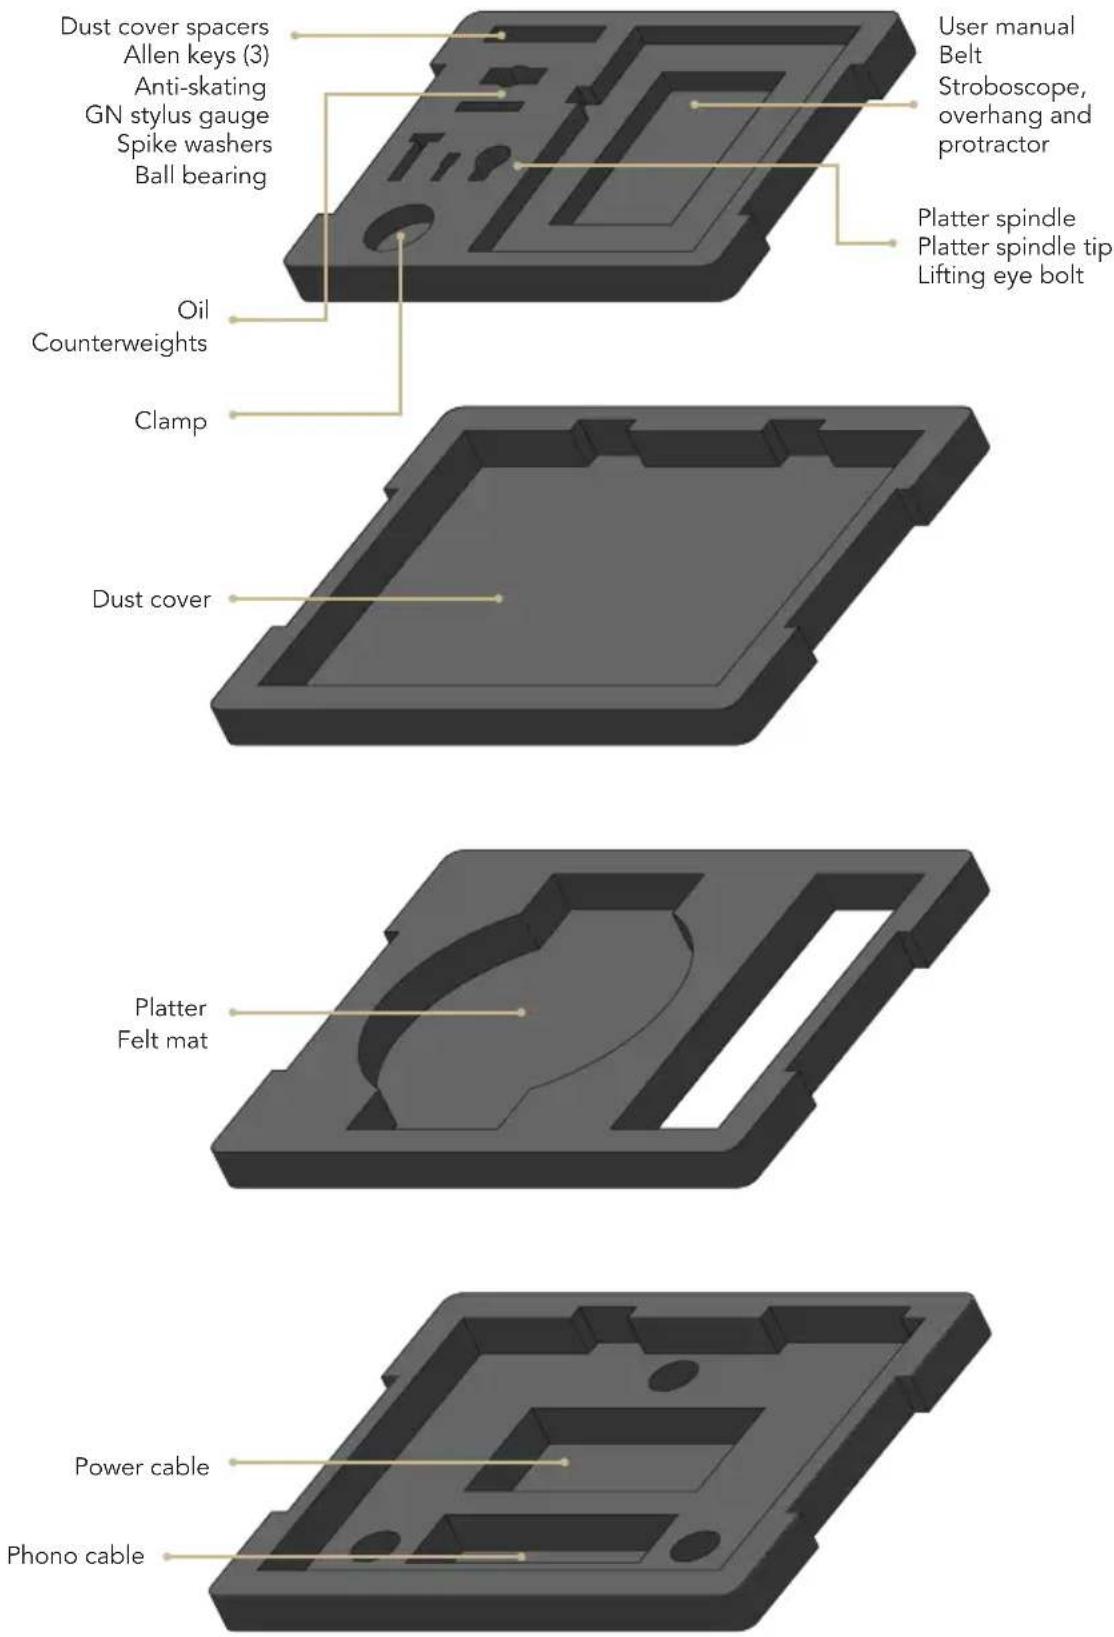
PACKAGE CONTENT
| 1xMEDITERRANEO X | 1xDUSTCOVER(with spacers) | 1xTURNTABLECLAMP | 1xANTI-SKATING | |
| 2xCOUNTERWEIGHTS|110g |28.5g | 1XTONEARM(pre-installed and calibrated) | 1xDRIVEBELT | ||
| 1x18V POWER SUPPLY(with cable) | 1xPHONOCABLE | 3xSPIKEWASHERS | 3xALLEN KEYS|2.5mm | 2.0mm | 1.5mm | |
| 1xPLATTER SPINDLE TIP | 1xOIL JAR | 1xPROTRACTOR/OVERHANG and STROBOSCOPE | 1xGN STYLUS GAUGE | |
| 1xFELT MAT | 1xBALLBEARING | 1xLIFTING EYE BOLT | 1xUSERMANUAL | |
UNBOXING
| TECHNICAL SPECIFICATIONS
MAIN FEATURES
| Wow & flutter:
< 0,1%
Rumble: -82dB
Speed:
33 ^1/3 rpm and 45 rpm ±0,1%
Speed changing:
Electronic with fine pitch control
Transmission:
70 shores rectified EPDM belt
Motor:
Ultra-precise 12V synchronous motor
Platter:
Aluminium and high-density POM
(45mm, 7Kg)
Platter spindle:
Split-spindle™ clamping design
Platter bearing:
4,3mm ceramic ball
Tonearm:
Gold Note B-7 Ceramic
Dust cover: Smoked acrylic with hinges
POWER
Power supply:
18V output, 100-240V / 50-60Hz
Power consumption: max 27W
DIMENSIONS AND WEIGHT
Dimensions: 470mm W | 210mm H | 360mm D 590mm W | 510mm H | 460mm D - boxed
Weight: Kg. 25 Kg. 30 - boxed
| SETTING UP THE TURNTABLE
FIRST OPERATION
1 Please remove carefully the protecting foam and check if all the listed items are supplied.
2 Place the turntable on a flat surface, then adjust the feet to level the turntable.
3 Install the counterweight on the tonearm, ensure the tracking weight matches the requirements of your cartridge.
4 Install the drive belt around the motor pulley first, then carefully run it around the platter.
5 Plug the power adapter cable into the turntable, then connect it to the AC.
TURNTABLE CONTROLS
The turntable can be fully controlled using the touchscreen display.
1 Tap the display once to turn ON the turntable.
2 Tap and hold for 3 seconds the Home button to turn OFF the turntable.
POSITIONING THE TURNTABLE
Your turntable has been designed for Hi-Fi systems. It must be protected from direct sun and humidity. Do not place it near heating sources, electrical and electronic motors, mobile phones etc. The levelling and positioning on a solid shelf, is crucial to achieve the best audio performances possible.
PITCH ADJUSTMENTS
The pitch can be adjusted easily from the display.
Select the speed and tap "PITCH", then use the + and - icon to precisely adjust the speed.
Tap "SAVE" to apply the adjustment and exit the pitch control, tap "BACK" to cancel any adjustments.
Tap "DEFAULT" to set the speed to the factory default.
INSTALLING THE TURNTABLE
PLATTER
1 Remove the cap from the center of the turntable.
2 Insert the ball bearing into the bearing housing of the turntable taking care to centre it on the bottom seat.
3 Add oil to the spindle as shown below.
4 Insert the spindle into the bearing housing.*
5 Screw the lifting eye bolt in the platter to lift it.
6 Position the platter on the spindle.
* PLEASE NOTE: the bearing housing is already installed in the plinth of the turntable. Do not remove it.
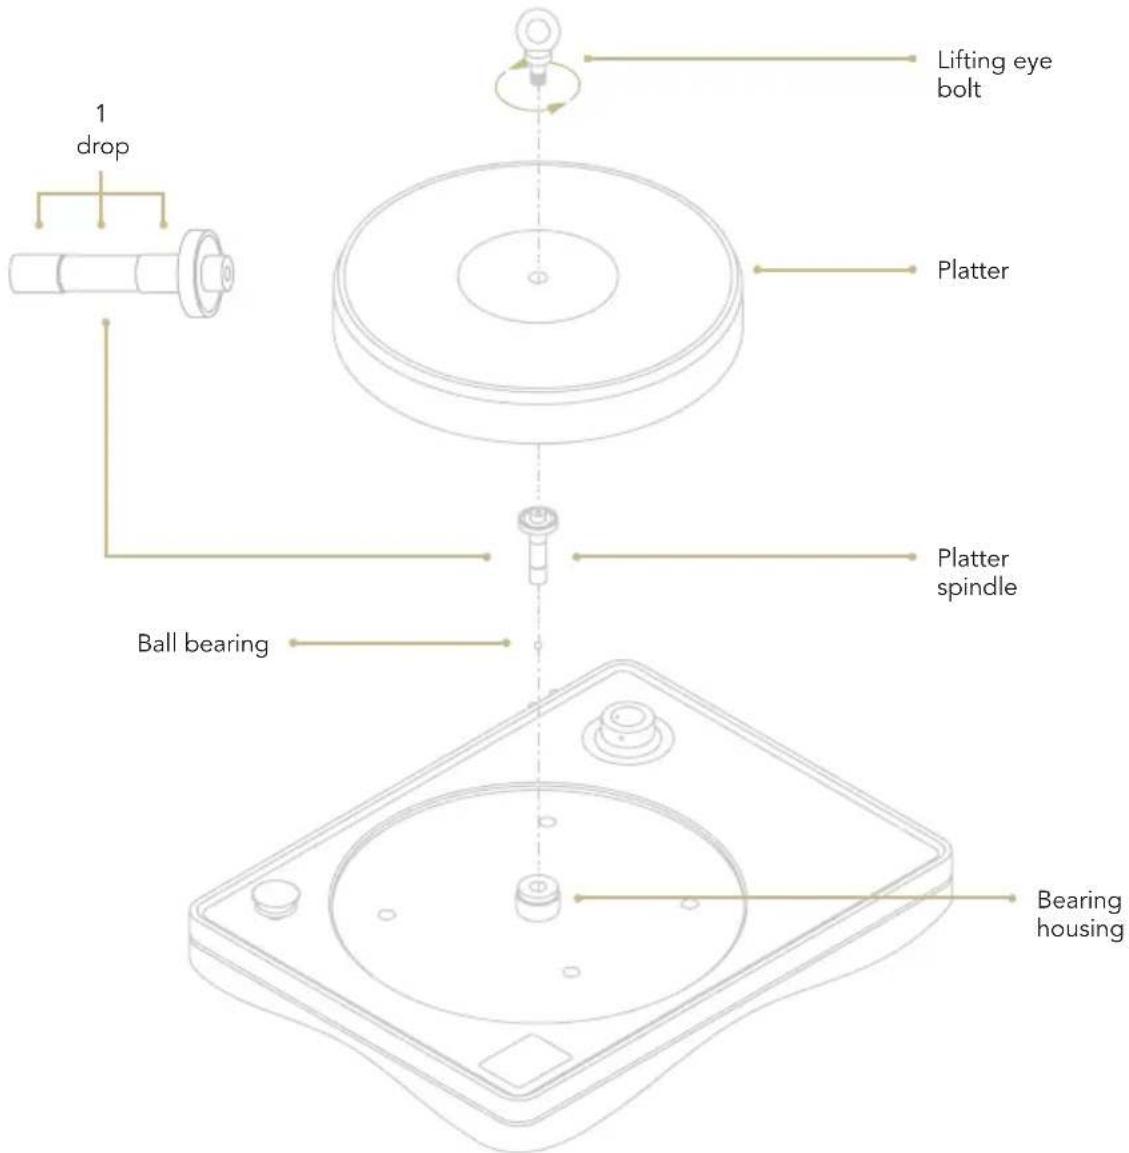
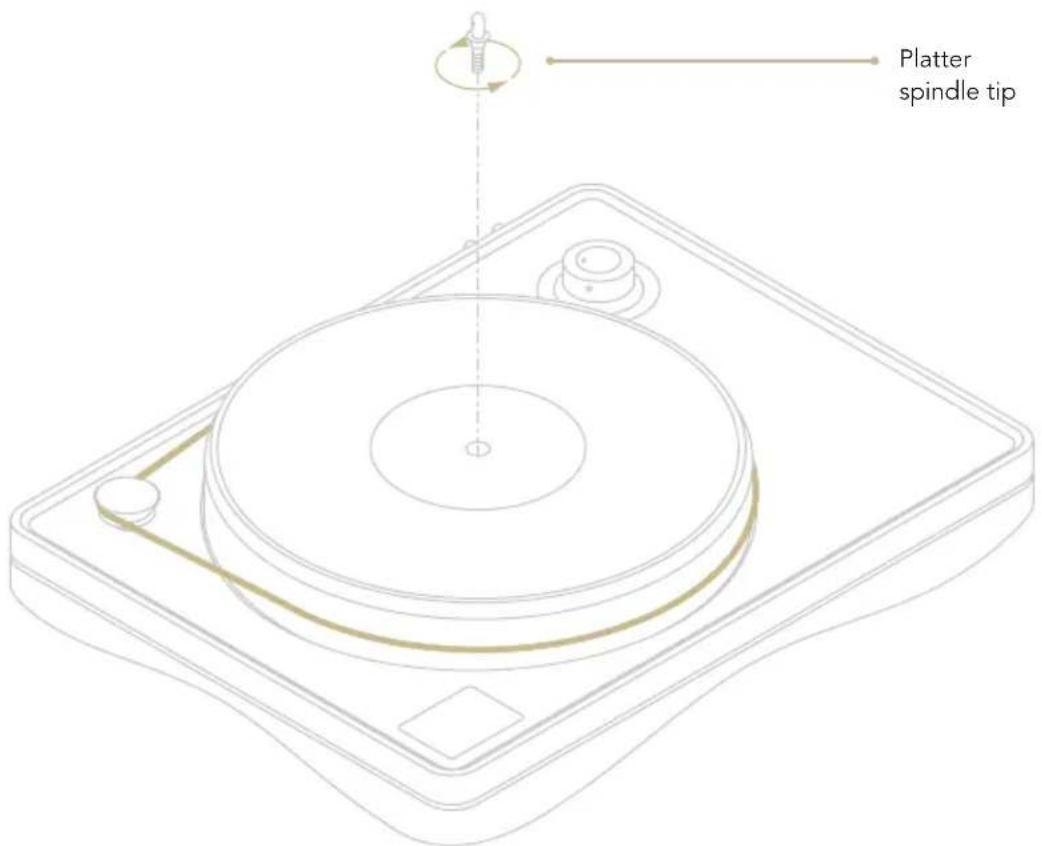
7 Remove the eye bolt from the platter.
8 Tighten the spindle tip onto the spindle to lock the platter in place.
9 Wrap the belt around the pulley and the platter as shown in the picture.
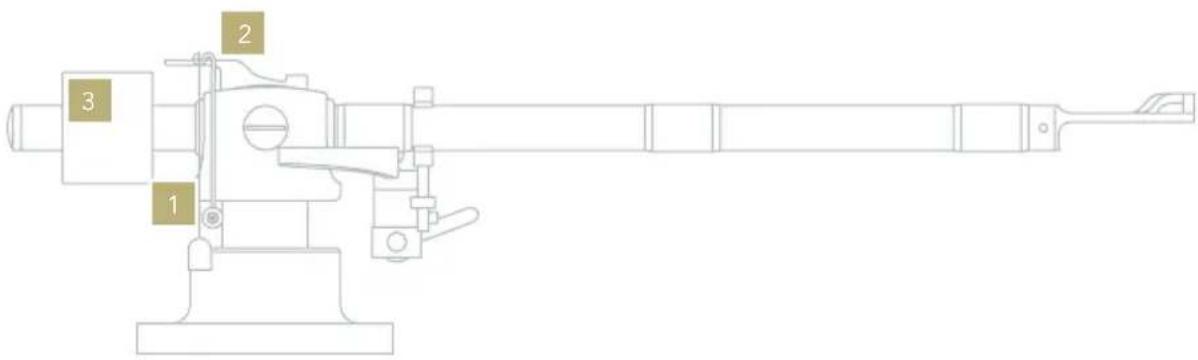
ANTI-SKATING AND COUNTERWEIGHT
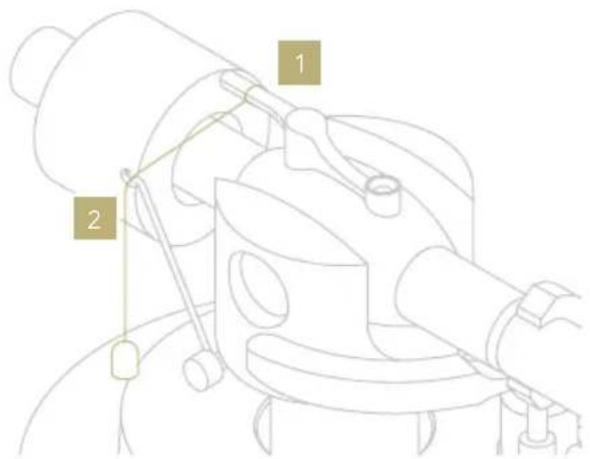
1 Anti-skating: Nylon wire with bullet counterweight.
2 Anti-skating: Adjustment bar.
3 Tonearm counterweight: to set up the correct tracking force depending on the phono cartridge in use.
INSTALLING THE ANTI-SKATING SYSTEM
1 Slip the loop of the ANTI-SKATING nylon wire over the groove of the ADJUSTMENT BAR.
2 Feed the wire through the loop of the SUPPORT HOOP.
3 Adjust the ANTI-SKATING force choosing the correct groove on the ADJUSTMENT BAR.
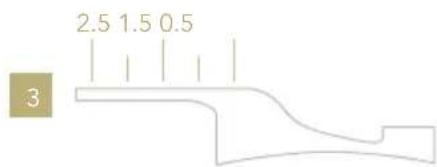
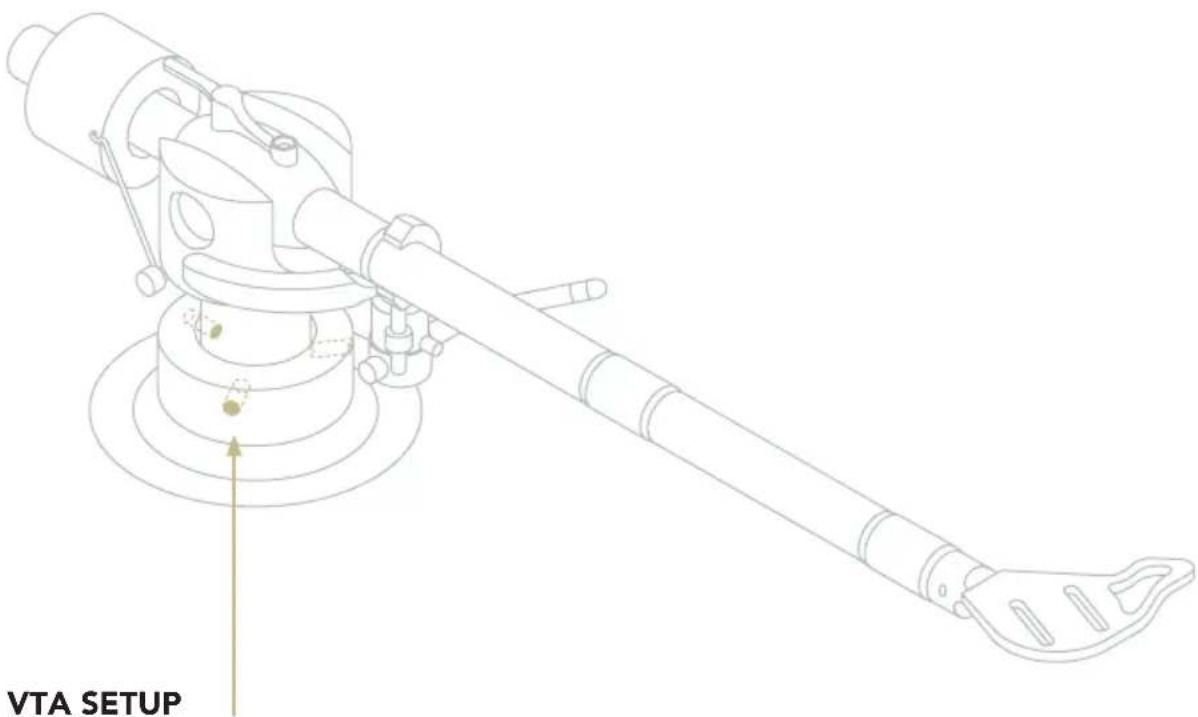
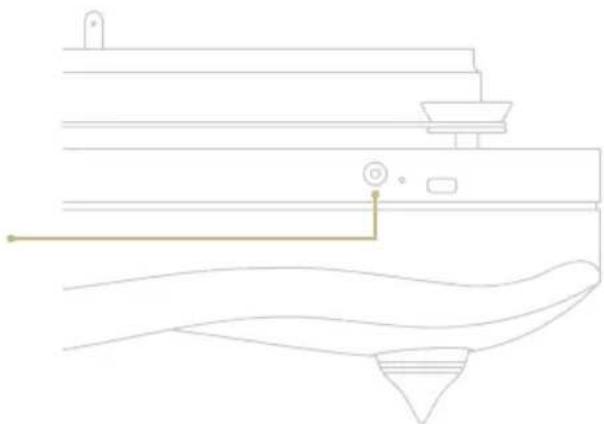
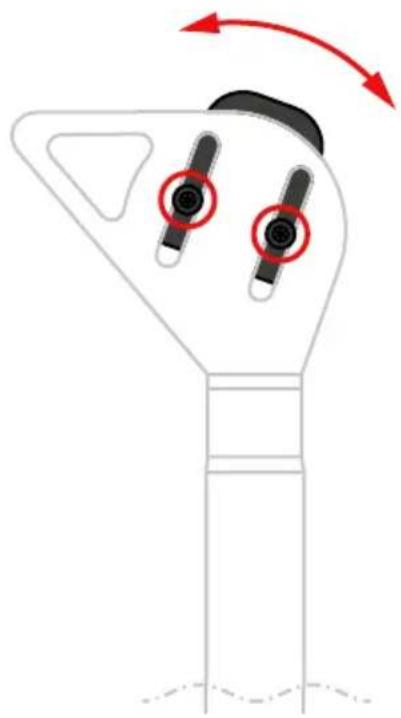
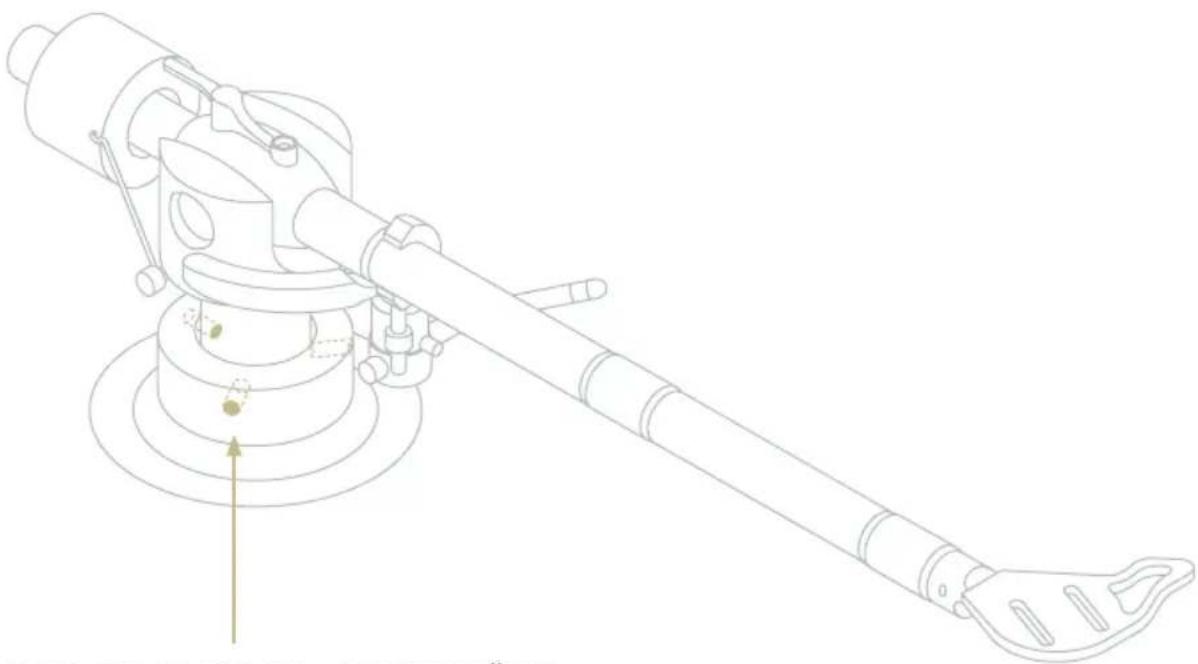
Use the 1.5mm Allen key supplied to adjust the VTA. Before moving the tonearm, loosen the hex bolts found in the tonearm collar. We recommend to loosen one hex bolt at a time (usually loosening one is enough to adjust the VTA).
| POWER ADAPTER
CONNECTING THE POWER SUPPLY ADAPTER
Before plugging the power adapter in to the AC make sure the connector is plugged into the turntable.
PLEASE NOTE
Use only the original power adapter to power the turntable to ensure the correct functioning.
natural_image
Line drawing of a mechanical component with no visible text or symbols| SPEED SELECTION & FEATURES
TURNING ON AND OFF THE TURNTABLE
Connect the Mediterranean X to the power supply, then tap the display once (Fig. 1).
To turn OFF the Mediterranean X, tap and hold the Home button for 3 seconds (Fig. 2).

natural_image
Simple beige circle centered on a black background, no text or symbols present.Fig. 1 Fig. 2
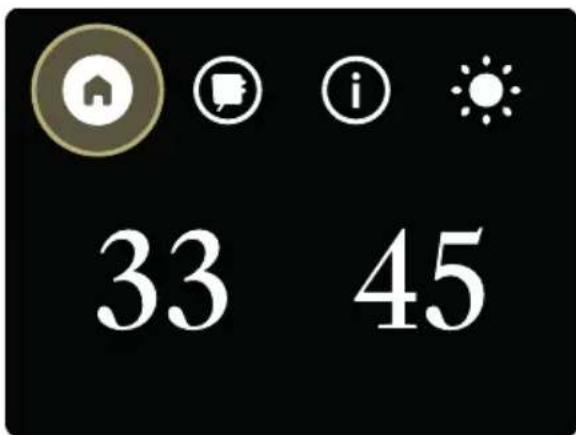
HOME PAGE
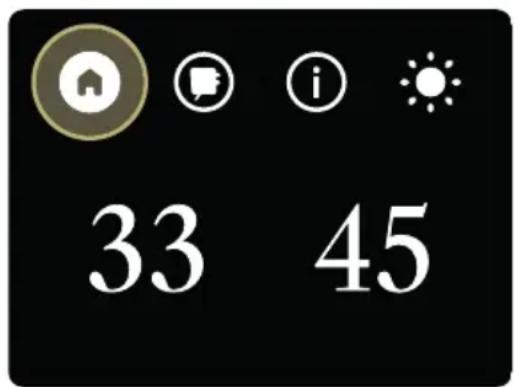
From the home page you can select the speed, check the cartridge timer, see the product information, and adjust the brightness of the display.
Home
Allows you to select the speed, start/stop the playback and turn OFF the turntable.
Cartridge menu
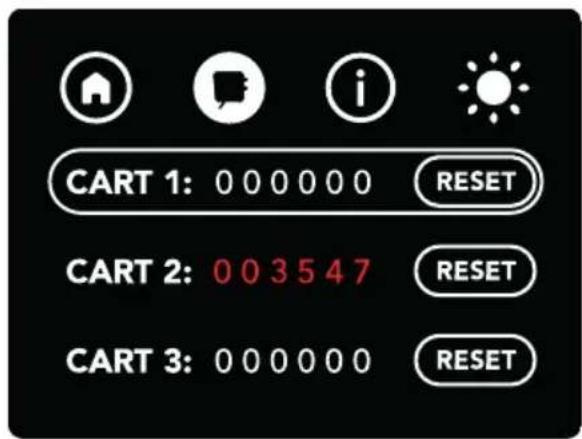
Shows the active cartridge and the time count for all cartridges.
Information
Shows the serial number (S/N) of the unit and the current firmware version.
Brightness Adjustment
3 options available: 100%, 50% and OFF. When OFF, tap the display to activate the brightness temporarily.
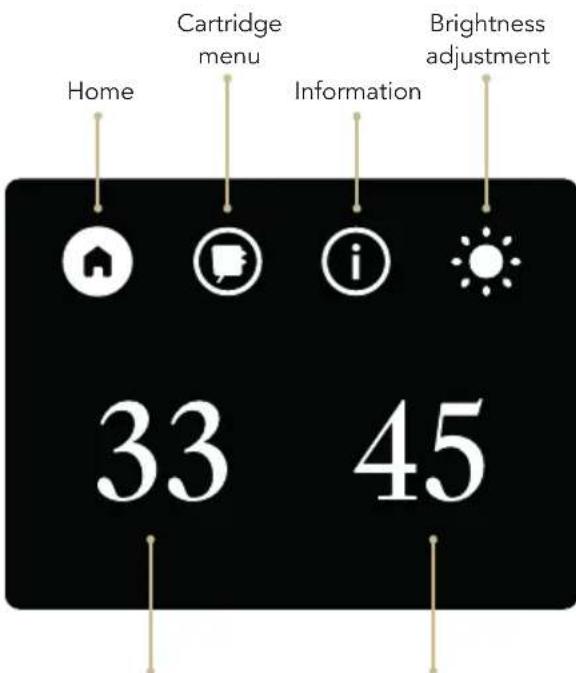
33 ^1/3 rpm 45 rpm
33 / 45
Tap the desired speed to start the turntable. To stop it, tap the speed again.
When the platter's rotation is stable, the other functions become available.

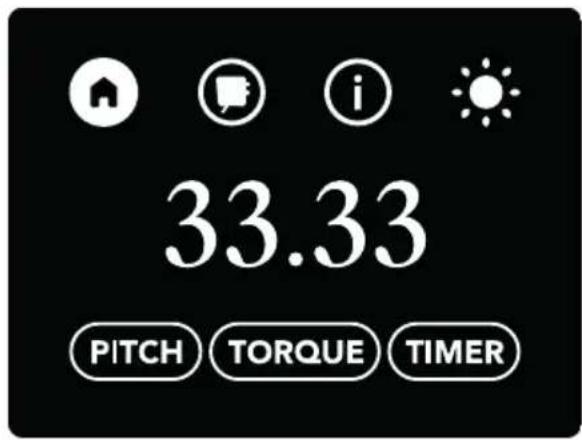
Opens the Pitch adjustment.

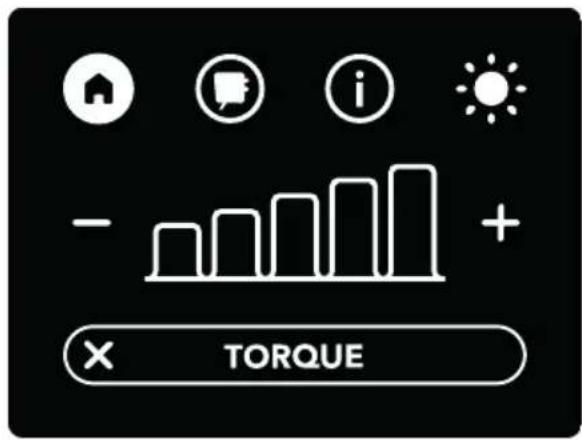
Opens the Torque adjustment.

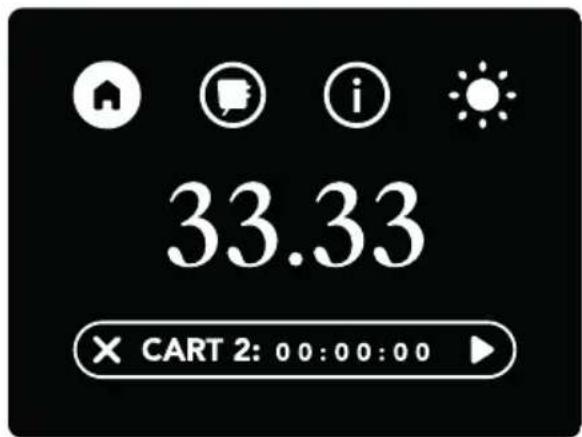
Shows the timer viewer to start and stop the time count for the active cartridge.
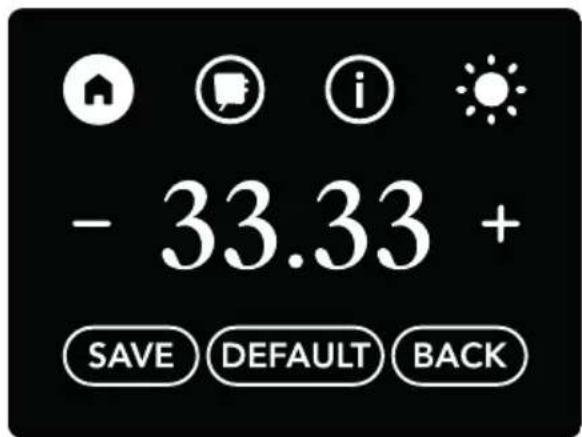
PITCH ADJUSTMENT
Pitch adjustment is only available after the platter speed has stabilised.

Use + and - to increase/decrease the rotation speed.*
* Please note that the displayed speed is always 33.33, it does not change as you adjust the pitch.

Tap "SAVE" to confirm the pitch adjustment and store the setting into memory.

Tap "DEFAULT" to set the pitch adjustment to the factory default.

Tap "BACK" to exit without saving the pitch adjustment.
TORQUE ADJUSTMENT
Adjusting the torque allows you to change the amount of force applied by the motor to the pulley and the platter.
Torque is not related to rotational speed - which can be changed with Pitch adjustment - and only affects the rotational force.
Changing the torque will result in subtle audio differences depending on the combination of cartridge and vinyl. The torque changes in real-time while the platter is spinning to give you instant feedback.
You can choose between five settings.
5 white bars = maximum torque
1 white bar = minimum torque
Please ensure to press SAVE to apply the selected torque setting.
CARTRIDGE MENU
Tap one of the cartridges to select it as the active cartridge, this will be displayed in the timer viewer.
When playing 33/45 LPs, the timer viewer allows you to start/stop the time count for the active cartridge.
You can see the time count in minutes for each cartridge and reset it. When a cartridge totals over 1000 minutes of playback, it's marked in red as it requires maintenance.
TIMER VIEWER
The active cartridge is displayed in the timer viewer when the speed is selected.
Tap ▶/II to start/stop the timer for the current session, tap × to close the viewer.
The time count continues even when the viewer is closed and until it's manually stopped.
When the timer is stopped, the time count for the session is added to the total time count for the active cartridge. This can be viewed in the Cartridge Timer.
| CARTRIDGE CALIBRATION
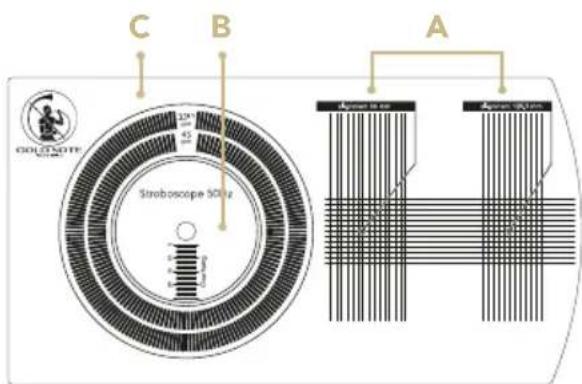
Our turntables and tone arms are always pre-calibrated at our factory but you can use the GN Calibration tool to adjust the:
A Phono Cartridge alignment.
B Overhang.
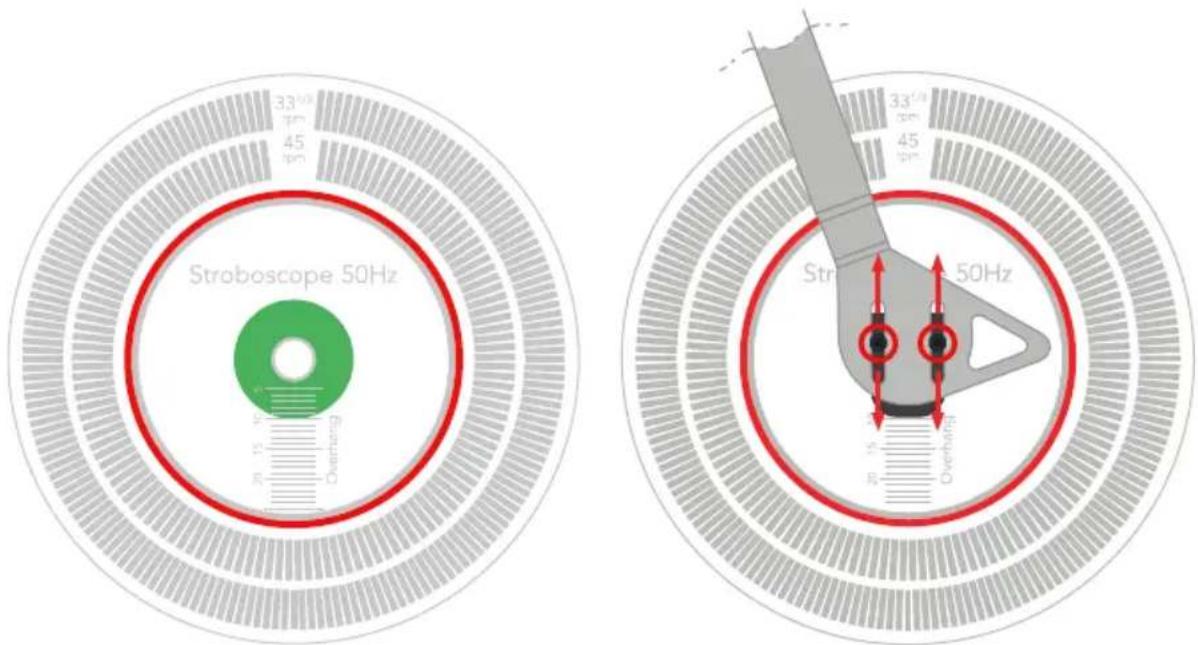
C 45rpm and 33 ^1/3 rpm speed (requires a strobe light).
SPEED ADJUSTMENTS
Check the speed with the help of a strobe light while the platter is spinning.
The outer line is to check the 33^1/3 rpm.
The inner line is to check the 45rpm.
OVERHANG
To set the correct overhang the Calibration Tool must be inserted on to the turntable record pin and the cartridge Tip must be positioned on top of the pin.
Adjust the position of the cartridge until the overhang of the phono cartridge matches the manufacturer's specifications.
ALIGNMENT
To correctly align the phono cartridge and achieve the best tracking position, point the tip of the phono cartridge into the circles as in the picture below.
The body of the phono cartridge must be aligned to the vertical lines.
natural_image
Diagram of a mechanical device with two circular components and red arrows indicating rotation (no text or symbols)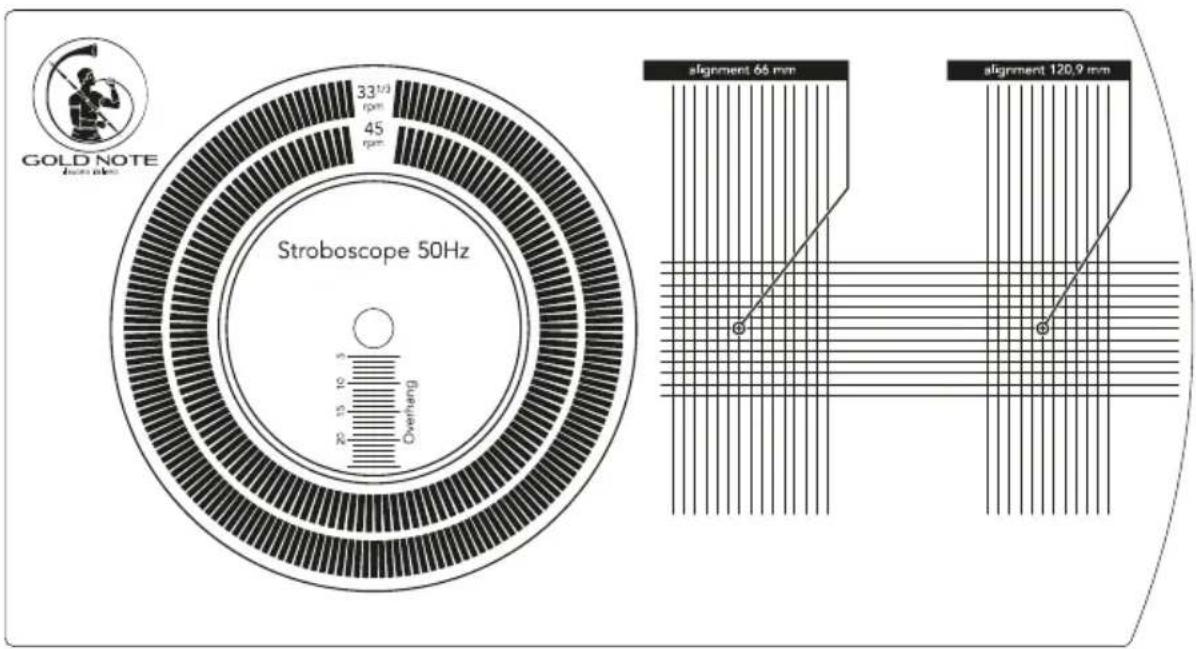
other
| Parameter | Value | | ----------------- | --------- | | Width | 33/10/3 | | Frequency | 45 | | R | 15 | | Overhang | 5 || DETACHABLE DUST COVER
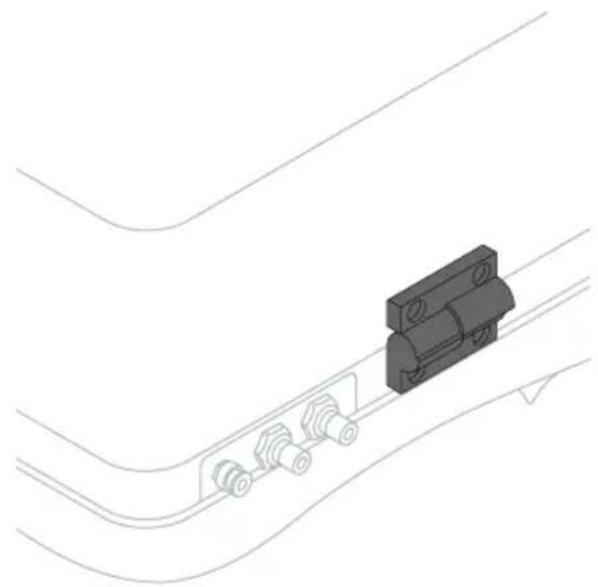
The dust cover features detachable hinges, a new proprietary design developed to let you enjoy your turntable at the best.
The hinges provide a stop point at about 90^ : in this position the dust cover is stable and held in place by the hinges.
Removing the dust cover is simple and quick: lift the dust cover until it reaches the 90° stop point and it's completely opened, then gently slide it towards LEFT (facing the turntable) to detach it from the plinth.
Please note: the dust cover can be removed and reinserted only when it's in its resting position, at 90°.
natural_image
Pure technical line drawing of a mechanical component or connector attached to a curved pipe (no text or symbols)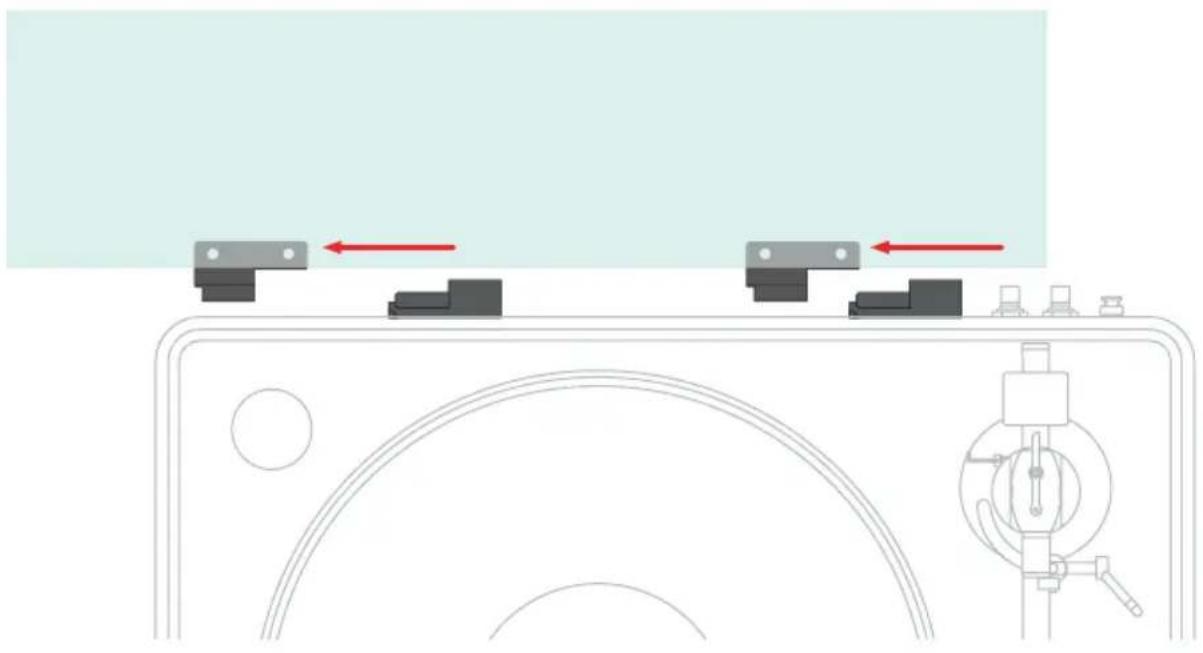
natural_image
Diagram of a mechanical device with two gray bracket components and red directional arrows indicating movement or force (no text or symbols)PRODUCT REGISTRATION
PRODUCT REGISTRATION
We recommend to register the unit on our internet website within 15 days from the purchase at
www.goldnote.it/product-registration
If the unit is not registered correctly or has been purchased from a different country of the purchaser home address the unit will not be covered by any warranty and the registration will be refused.
Please note that the warranty does not cover in any case: Tubes, Phono Cartridge Stylus and Batteries.

www.goldnote.it/product-registration
WARNING
Gold Note products should only be opened, serviced and inspected by certified Gold Note technicians and dealers. Work performed by unqualified personnel may cause serious damage or personal injury. Opening of the product by non-authorised personnel will void the guarantee.
In this case, contact your dealer to be advised on how the fault can be solved.
Do not return any object directly to the factory or to the distributor without being authorised to do so.
WARRANTY
All Gold Note products come with a warranty against defective materials and workmanship.
Any service and inspection must be carried out by a Gold Note dealer or distributor so in case you need any assistance with this product, please contact the seller.
PLEASE NOTE
Descriptions and technical characteristics may vary at any time and without notice.
TROUBLESHOOTING
| PROBLEM CAUSE SOLUTION | ||
| Levelling the turntable. | The turntable is not levelled. | Use a spirit level to help yourself and adjust the levelling by screwing or unscrewing the feet.Unscrewing a foot increase the height of that corner. |
| Cleaning the turntable. | The turntable is dusty or requires cleaning. | With EXTREME care use ONLY very soft 100% cotton cloth to sweep dust and stains out.Any acid, alcohol or not extremely soft cloth will irreversibly damage the turntable fine aesthetic.Only dry cloth is allowed. |
| Motor heating. | The motor is too hot. | AC synchronous motors as the ones used by Gold Note may warm up to 50°Celsius without creating any problem. |
| Noise on startup. | The turntable produces a slight rubbing noise upon startup. | It is normal for the belt to produce a slight noise before the optimal speed is reached. |

Discover more on our website
www.goldnote.it
Tonarm: Gold Note B-7 Ceramic
natural_image
Technical line drawing of a mechanical device with no visible text or symbolsnatural_image
Line drawing of a hand holding a device with a sensor and control panel (no text or symbols)FUNKTIONSÜBERSICHT
natural_image
Simple circular shape with a beige outline on a black background (no text or symbols)Abb. 1 Abb. 2
HOMEPAGE
natural_image
Diagram of a device with two black buttons and red circular indicators, no text or symbols present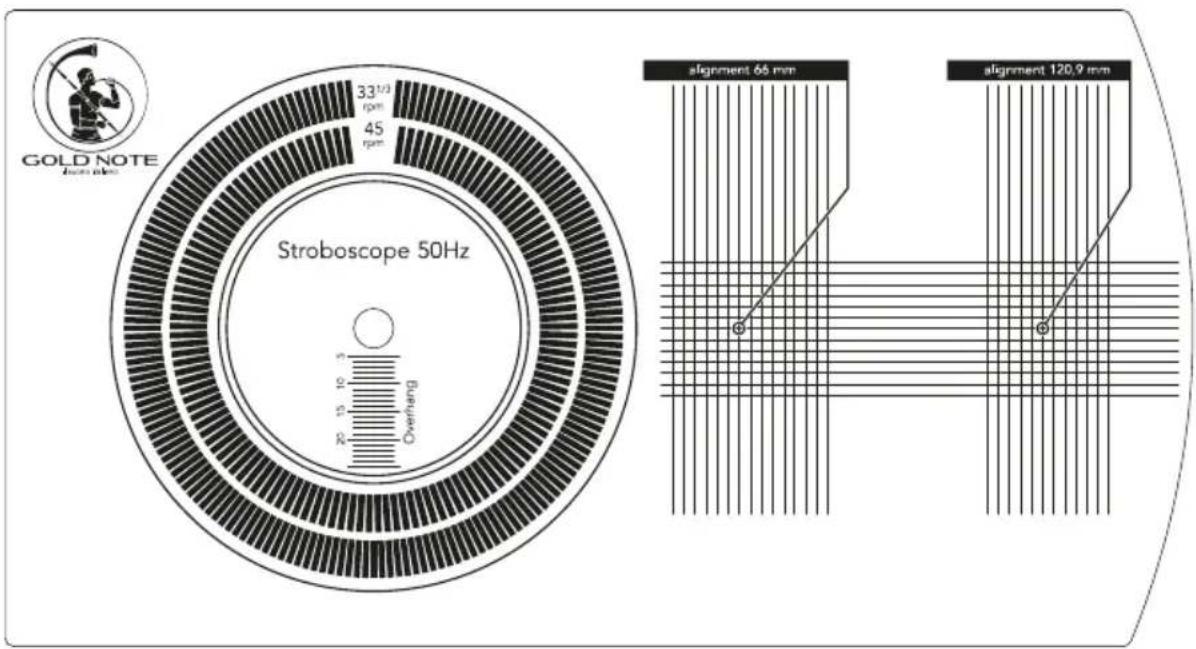
other
| Parameter | Value | | ----------------- | --------- | | Width (rpm) | 33^1/3 | | Frequency (rpm) | 45 | | Overhang distance | 10 | | Alignment Length | 66 mm | | Alignment Height | 120.9 mm || ABNEHMBARE SCHUTZHAUBE
natural_image
Pure technical line drawing of a mechanical component or connector attached to a curved pipe (no text or symbols)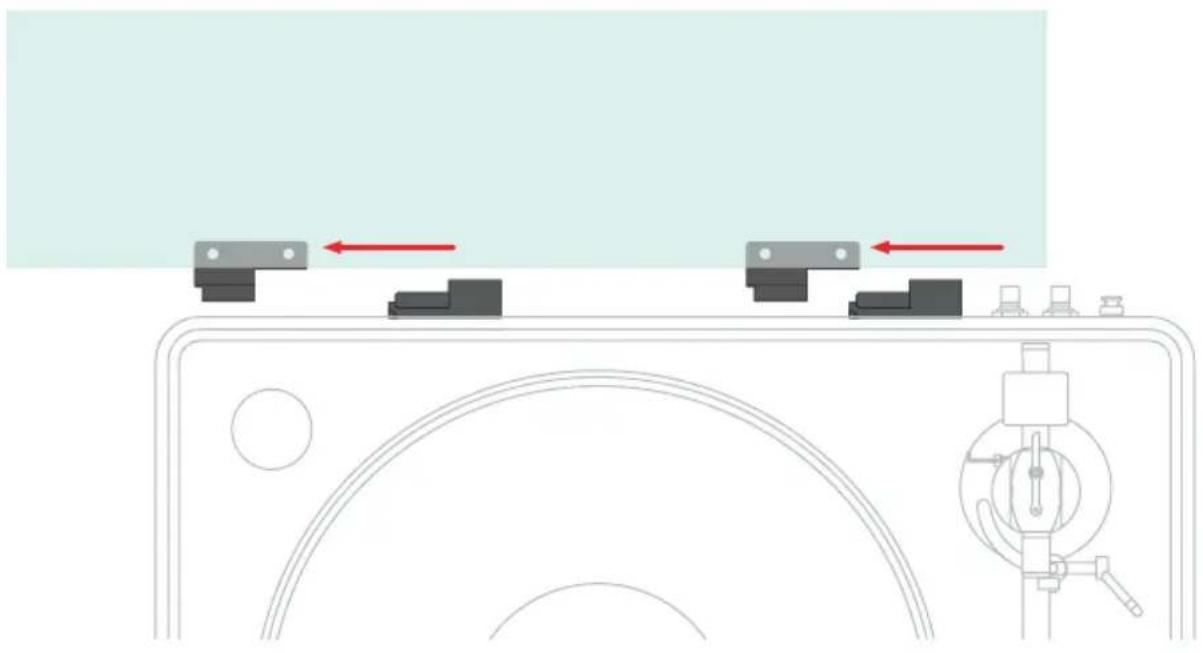
natural_image
Diagram of a mechanical device with two gray bracket components and red directional arrows indicating movement or force (no text or symbols)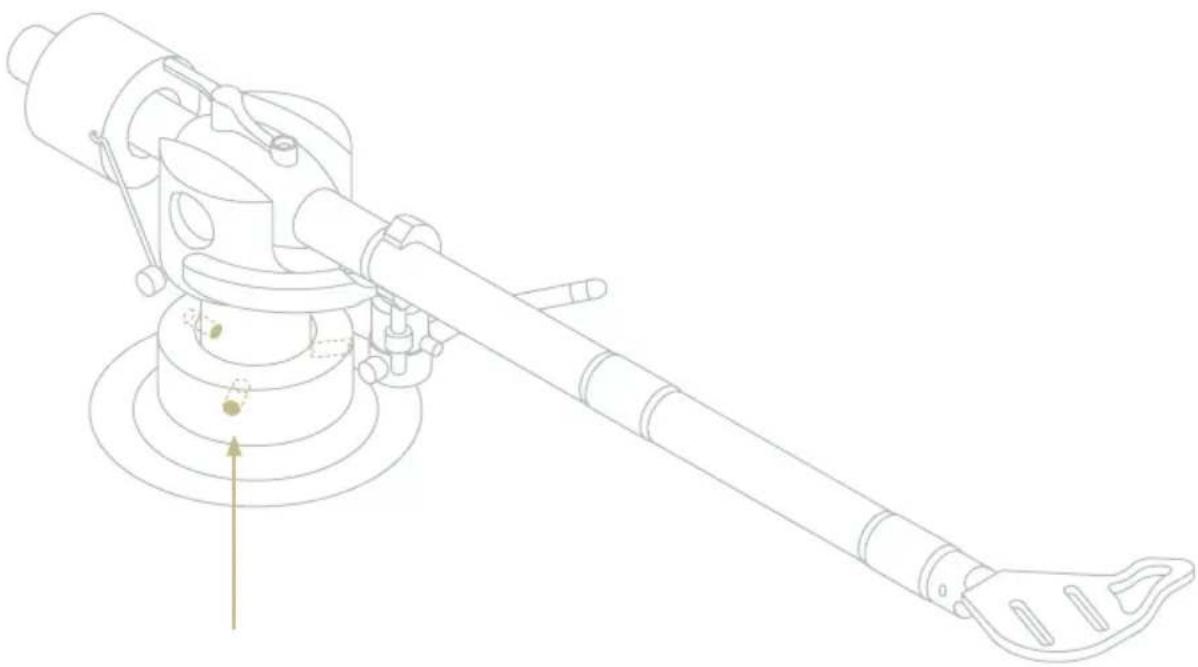
natural_image
Technical line drawing of a mechanical device with no visible text or symbolsCONFIGURAZIONE VTA
natural_image
Line drawing of a mechanical or architectural component with no visible text, numbers, or symbolsnatural_image
Diagram of a mechanical device with two circular components and red arrows indicating rotation (no text or symbols)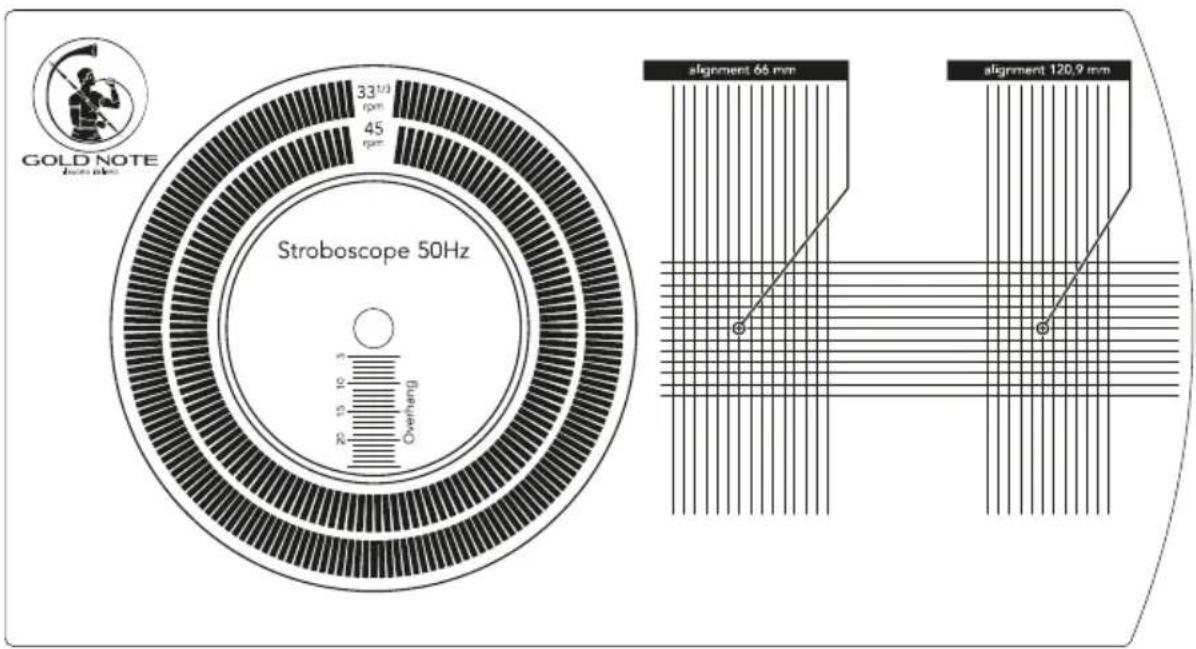
other
| Parameter | Value | | ----------------- | --------- | | Amplitude (rpm) | 33/12/3 | | Frequency (R) | 45 | | Alignment (mm) | 66 | | Alignment (mm) | 120.9 || CAPPA PARA-POLVERE
natural_image
Pure technical line drawing of a mechanical component or bracket with no text, numbers, or symbols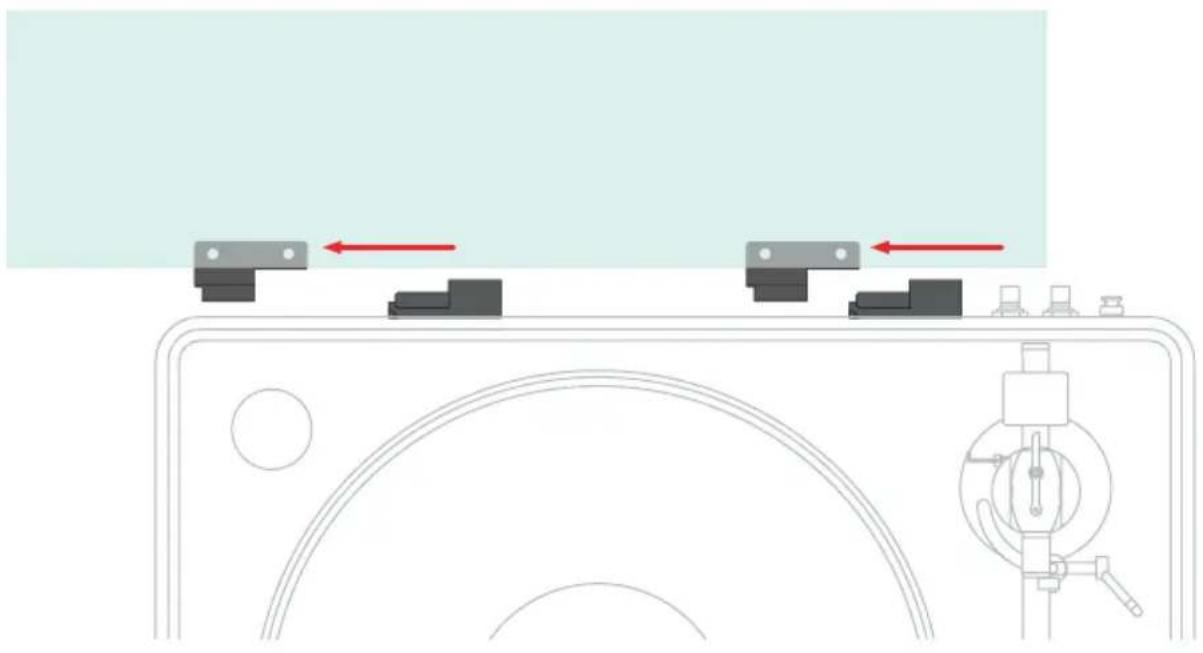
natural_image
Diagram of a mechanical device with two gray bracket components and red directional arrows indicating movement or force (no text or symbols)Designed and handmade in Firenze, Italy
www.goldnote.it
copyright ©2023 Akamai S.r.l. All rights reserved
- IMPORTANT SAFETY INFORMATION
- PLEASE NOTE
- GENERIC INFORMATION
- MODEL
- SERIAL NUMBER
- CAUTION!
- WARNING!
- GOLD NOTE - Information on the correct management of waste from household Equipment pursuant to the European Directive 2012/19/EU
- | INDEX
- PACKAGE CONTENT
- UNBOXING
- | TECHNICAL SPECIFICATIONS
- MAIN FEATURES
- POWER
- DIMENSIONS AND WEIGHT
- | SETTING UP THE TURNTABLE
- FIRST OPERATION
- TURNTABLE CONTROLS
- POSITIONING THE TURNTABLE
- PITCH ADJUSTMENTS
- INSTALLING THE TURNTABLE
- PLATTER
- ANTI-SKATING AND COUNTERWEIGHT
- INSTALLING THE ANTI-SKATING SYSTEM
- | POWER ADAPTER
- CONNECTING THE POWER SUPPLY ADAPTER
- | SPEED SELECTION & FEATURES
- TURNING ON AND OFF THE TURNTABLE
- HOME PAGE
- Home
- Cartridge menu
- Information
- Brightness Adjustment
- / 45
- PITCH ADJUSTMENT
- TORQUE ADJUSTMENT
- TIMER VIEWER
- | CARTRIDGE CALIBRATION
- SPEED ADJUSTMENTS
- OVERHANG
- ALIGNMENT
- | DETACHABLE DUST COVER
- PRODUCT REGISTRATION
- WARNING
- WARRANTY
- TROUBLESHOOTING
- FUNKTIONSÜBERSICHT
- HOMEPAGE
- | ABNEHMBARE SCHUTZHAUBE
- CONFIGURAZIONE VTA
- | CAPPA PARA-POLVERE
Brand : Gold Note
Model : Mediterraneo X
Category : Media player