ASP-137 - Frying Pan Aroma - Free user manual and instructions
Find the device manual for free ASP-137 Aroma in PDF.


| Product Type | Frying Pan |
| Brand | Aroma |
| Model | ASP-137 |
| Material | Stainless Steel with Non-stick Coating |
| Diameter | 28 cm |
| Depth | 5 cm |
| Handle Material | Silicone-covered Stainless Steel |
| Handle Attachment | Riveted |
| Oven Safe | Yes, up to 180°C |
| Induction Compatible | Yes |
| Dishwasher Safe | No (hand wash recommended) |
| Weight | 1.2 kg |
| Color | Black |
| Cooking Surface | Non-stick |
| Suitable for | Gas, Electric, Ceramic, Induction |
| Warranty | 2 years |
| Country of Origin | China |
| Care Instructions | Hand wash with soft sponge; avoid metal utensils |
| Lid Included | No |
| Repairability | Not repairable (handle is riveted) |
Frequently Asked Questions - ASP-137 Aroma
User questions about ASP-137 Aroma
0 question about this device. Answer the ones you know or ask your own.
Ask a new question about this device
Download the instructions for your Frying Pan in PDF format for free! Find your manual ASP-137 - Aroma and take your electronic device back in hand. On this page are published all the documents necessary for the use of your device. ASP-137 by Aroma.
USER MANUAL ASP-137 Aroma
natural_image
Top-down view of a modern kitchen appliance with a glass lid and control knob (no visible text or symbols)instruction manual
ASP-137 | ASP-137B
3-in-1 Grillet®
Questions or concerns about your Aroma product?
www.AromaCo.com/Support
1-800-276-6286

Multicookers/Rice Cookers
Pressure Cookers

Water Kettles
Indoor Grills
Induction Cooktops
AROMA®
To Enhance and Enrich Lives.
Here at Aroma we strive to make a difference —to design and distribute products that enhance and enrich people's lives.
Aroma offers an array of exceptional products to make cooking simple and satisfying. Discover other countertop appliances and cookware from our current product lineup to complement your kitchen.
Stay connected for more recipe ideas and monthly giveaways!

www.AromaTestKitchen.com

/AromaHousewares

IMPORTANT SAFEGUARDS
Basic safety precautions should always be followed when using electrical appliances, including the following:
- Important: Read all instructions carefully before first use.
- Do not touch hot surfaces. Use handles or knobs.
- To protect against fire, electric shock and injury to persons, do not immerse the electrical cord in water or any other liquid.
- Close supervision is necessary when any appliance is used by or near children.
- Unplug from outlet when not in use and before cleaning. Allow the appliance to cool before putting on or taking off parts and before cleaning the appliance.
- Do not operate any appliance with a damaged cord or plug or after the appliance malfunctions or has been damaged in any manner. Contact Aroma ^® customer service for examination, repair or adjustment.
- The use of accessory attachments not recommended by Aroma® Housewares may result in fire, electric shock or injury.
- Do not use outdoors.
-
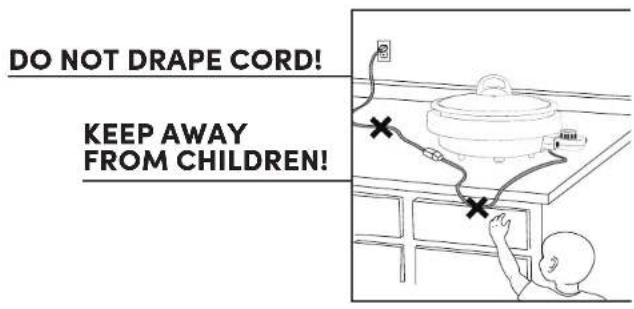
Do not let the power cord touch hot surfaces or hang over the edge of the counter or table.
-
Do not place on or near a hot burner or in a heated oven.
- Extreme caution must be used when using or moving the appliance while containing hot oil or other hot liquids.
- Do not use the appliance for other than its intended use.
- Always attach the plug to the appliance first, and then plug the cord into the wall outlet. To disconnect, turn any control to Off then remove the plug from the wall outlet.
- Use only on a dry, level and heat-resistant surface.
- This appliance should be operated on a separate electrical circuit from other operating appliances. If the electrical circuit is overloaded with other appliances, this appliance may not operate properly.
- Use only the provided Aroma® temperature control probe when operating this appliance.
- This appliance is not intended for deep frying food.
Published By:
Aroma Housewares Co. | 6469 Flanders Drive, San Diego, CA 92121, U.S.A.
1-800-276-6286 | www.AromaCo.com
©2019 Aroma Housewares Company | All rights reserved.
SAVE THESE INSTRUCTIONS

IMPORTANT SAFEGUARDS
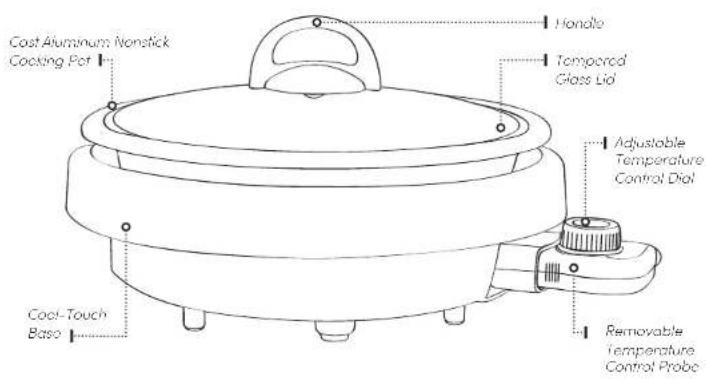
Parts Identification
Short Cord Instructions
- A short power-supply cord is provided to reduce the risks resulting from becoming entangled in or tripping over a longer cord.
Polarized Plug
This appliance has a polarized plug (one blade is wider than the other); follow the instructions below:
To reduce the risk of electric shock, this plug is intended to fit into a polarized outlet only one way. If the plug does not fit fully into the outlet, reverse the plug. If it still does not fit, contact a qualified electrician. Do not attempt to modify the plug in any way.
If the supply cord is damaged, it must be replaced by the manufacturer, its service agent or a similarly qualified person in order to avoid a hazard.
THIS APPLIANCE IS FOR HOUSEHOLD USE ONLY.
Controls/Functions
Temperature Control Dial Turn the knob clockwise to the desired temperature to start heating. Turn the knob counter-clockwise to the Off position to turn appliance Off.
BEFORE FIRST USE
- Read all instructions and important safeguards.
- Remove all packaging materials and check that all items have been received in good condition.
- Tear up all plastic bags as they can pose a risk to children.
- Remove and discard the red plastic sleeve on the Temperature Control Probe.
- Lift the Cooking Pot away from the Probe side, then pull it away from the Cool-Touch Base. Wash the Cooking Pot, Base and assembled Lid with warm, soapy water using a sponge or dishcloth.
- Rinse thoroughly to remove all soap residue.
- Condition the nonstick surface of the cooking pan with oil or vegetable shortening.
TO CLEAN
- Disconnect the plug from the wall outlet, and then remove the Temperature Control Probe from the appliance.
- Allow the unit to completely cool. Pull the Cooking Pot away from the Cool-Touch Base.
- Wash the Cooking Pot, Base and Lid with warm, soapy water, using a sponge or dishcloth. Rinse thoroughly to remove soap residue. For even and faster cleanup, the Cooking Pot, Base and Lid can be washed in the dishwasher..
- Dry thoroughly with a soft cloth.
TROUBLESHOOTING
The 3-in-1 Grillet® will not turn on and begin heating.
- The Temperature Probe is not securely connected to the pot. Make sure the Temperature Probe is pushed firmly into the port on the Cool-Touch Base. If the problem persists, please contact Aroma® customer service toll-free at (800) 276-6286 or through email at CustomerService@AromaCo.com for repair service.
Note:
Do not use harsh abrasive cleaners, scouring pads or products that are not considered safe to use on nonslick coolings.
If washing in the dishwasher, a slight discoloration to the Cooking Pot and accessories may occur. This is cosmetic only and will not affect performance.
Any other servicing should be performed by Arama® Housewares.
ASSEMBLING THE LID
- Using a Phillips-head screwdriver, remove the screw from the Lid Handle.
- Place the Handle on top of the lid. Make sure the hole on the Handle and hole on the Lid line up.
- Place the screw under the lid so it fits into the hole from the Lid to Handle.
- Tighten the screw into place. Be careful to not over-tighten.
USING YOUR 3-IN-1 GRILLET®
- Place the Cooking Pot into the Cool-Touch Base. It should snap securely into place.
- Plug the Temperature Control Probe into the port in the Cool-Touch Base.
- Turn the Temperature Control Dial to the Off position. Plug the power cord into an available power outlet.
- Add food to be cooked to the Cooking Pot. If desired, cover the pot with the Tempered Glass Lid to help decrease cooking time and ensure even cooking.
- Turn the Temperature Control Dial to the desired temperature. The indicator light will illuminate.
- The indicator light will turn off once the Cooking Pot has reached the selected temperature. During operation, the indicator light will turn on and off, indicating the proper temperature is being maintained.
- When cooking has finished, turn the Temperature Control Dial to the Off position and unplug the power cord from the power outlet.

Caution:
During and after use, the Tempered Glass Ltd and the Cooking Pol will become very hot. Be sure to use the handle and wear protective oven mitts or gloves.
To prevent food borne illness, always make sure food is cooked thoroughly before serving.
Note:
Wooden, heal-proof plastic and nylon utensils are recommended. Metal utensils may scratch the noystick surface.
When slow cooking, simmoring or steaming place the Tempered Glass Lid on top of the 3-in-1 Grillef ^2 .
TO SIMMER
- Place the Cooking Pot into the Cool-Touch Base. It should snap securely into place.
- Plug the Temperature Control Probe into the port in the Cool-Touch Base.
- Turn the Temperature Control Dial to the Off position. Plug the power cord into an available power outlet.
- Place food inside the Cooking Pot. Place the tempered glass lid on top.
- Turn the Temperature Control Dial to the desired temperature. The indicator light will illuminate. When preparing soup or stew, allow extra time for it to simmer. This will allow flavors to fully blend and meat to become more tender.
- During operation, the indicator light will turn off and on once the selected temperature is reached to maintain that temperature. If the temperature is set above 212^ when steaming or simmering, the indicator light will not turn off because the maximum temperature reached when cooking with liquid is the boiling point (212^) .
- When cooking has finished, turn the Temperature Control Dial to the Off position and unplug the power cord from the power outlet.
Helpful Hints:
To thicker stew, mix in 1/4 cup of flour with enough water to form a thin paste. Gradually add it to the slew, stirring until thickened. If using fresh parsley or herbs in your recipe, add them in the last few moments of cooking to preserve flavor.
Canned slew tomatoes or water with bouillon seasoning and spices added make great stock starters for soups and stews.
TO STEAM
- Place the Cooking Pot into the Cool-Touch Base. It should snap securely into place.
- Plug the Temperature Control Probe into the port in the Cool-Touch Base.
- Turn the Temperature Control Dial to the Off position. Plug the power cord into an available power outlet.
- Place food on a heat-safe dish or metal rack that will fit inside the 3-in-1 Grillet® with lid closed. Pour one cup of water (or more if needed) into the pot. Place food inside the Cooking Pot. Place the Tempered Glass Lid on top.
- Turn the Temperature Control Dial to a high setting. The indicator light will illuminate.
- During operation, the indicator light will turn off and on once the selected temperature is reached to maintain that temperature. If the temperature is set above 212^ F when steaming, simmering or slow cooking, the indicator light will not turn off because the maximum temperature reached when cooking with liquid is the boiling point ( 212^ F).
- When steaming has finished, turn the temperature control dial to the Off position and unplug the power cord from the power outlet.

Caution:
During and after use, the Tempered Glass Lid and the nonstick pot will become very hot. Be sure to use the handle and wear protective oven mitts or gloves.
To prevent food borne illness, always make sure food is cooked thoroughly before serving.
Note:
Wooden, heat-proof plastic and nylon utensils are recommended. Metal utensils may scratch the nonslick surface.
All vegetables should be thoroughly cleaned and washed before steaming. Thin, leafy vegetables such as cabbage do not require as much water as root vegetables, such as carrots.
Do not remove I'd during stooming, as steam will escape and the cooking time will be extended.
Food can be placed directly on the grilled surface of the pot for steaming.
Steaming Guide
Food Steaming Time
| Asparagus 8-14 Minutes | |
| Broccoli 8-12 Minutes | |
| Cabbage 12-16 Minutes | |
| Carrots 12-18 Minutes | |
| Cauliflower 12-18 Minutes | |
| Chicken 17-20 Minutes | |
| Corn (on Iro Cob) 14-18 Minutes | |
| Crab Legs 14-20 Minutes | |
| Eggs 10-15 Minutes | |
| Fish 12-18 Minutes | |
| Green Beans 14-20 Minutes | |
| Peas 8-12 Minutes | |
| Pork 16-24 Minutes | |
| Potatoes 24-40 Minutes | |
| Spinach 8-12 Minutes | |
| Squash | 16-30 Minutes |
| Zucchini | 12-18 Minutes |
Note:
- These sleaming chairs are for reference only. Actual cooking times may vary.
LIMITED WARRANTY
Aroma Housewares Company warrants this product against defects in material and workmanship for one year from provable date of purchase in the United States. Within this warranty period, Aroma Housewares Company will repair or replace, at its discretion, defective parts at no charge, provided the product is returned, freight prepaid with proof of purchase and U.S. \$20.00 for shipping and handling charges payable to Aroma Housewares Company. Before returning an item, please call the toll free number below for a return authorization number. Allow 2-4 weeks for return shipping.
This warranty does not apply if the warranty period expired; the product has been modified by any unauthorized service center or personnel; the defect was subject to abuse, improper use not conforming to product manual instructions, or environmental conditions more severe than those specified in the manual and specification, neglect of the owner or improper installation; the defect was subject to Force Majeure such as flood, lightning, earthquake, other natural calamities, war, vandalism, theft, brownouts or sags (damage due to low voltage disturbances).
This warranty gives you specific legal rights, which may vary from state to state, and does not cover areas outside of the United States.
SERVICE & SUPPORT
In the event of a warranty claim, or if service is required for this product, please contact Aroma® customer service toll-free at:
1-800-276-6286
M-F, 8:30am-4:30pm, Pacific Time
Or we can be reached online at:
CustomerService@AromaCo.com
For your records, we recommend stapling your sales receipt to this page along with a written record of the following:
- Date of Purchase:
- Place of Purchase:
Aroma Housewares Company
6469 Flanders Drive, San Diego, CA 92121, U.S.A.
1-800-276-6286|www.AromaCo.com
M-F, 8:30am - 4:30pm, Pacific Time
Note:
Proof of purchase is required for all warranty claims.
natural_image
White and black electric cooktop with lid and side arm (no visible text or symbols)To Enhance and Enrich Lives.

natural_image
Line drawing of multiple fork shapes arranged in a row (no text or symbols)www.AromaCo.com
- instruction manual
- AROMA®
- Stay connected for more recipe ideas and monthly giveaways!
- IMPORTANT SAFEGUARDS
- SAVE THESE INSTRUCTIONS
- Parts Identification
- Short Cord Instructions
- Polarized Plug
- THIS APPLIANCE IS FOR HOUSEHOLD USE ONLY.
- Controls/Functions
- BEFORE FIRST USE
- TO CLEAN
- TROUBLESHOOTING
- The 3-in-1 Grillet® will not turn on and begin heating.
- Note:
- ASSEMBLING THE LID
- USING YOUR 3-IN-1 GRILLET®
- Caution:
- TO SIMMER
- Helpful Hints:
- TO STEAM
- Steaming Guide
- LIMITED WARRANTY
- SERVICE & SUPPORT
- 1-800-276-6286
Brand : Aroma
Model : ASP-137
Category : Frying Pan