
ASP-700 - Frying Pan Aroma - Free user manual and instructions
Find the device manual for free ASP-700 Aroma in PDF.


| Product Type | Electric Skillet |
| Brand | Aroma |
| Model | ASP-700 |
| Diameter | 12 inches (30 cm) |
| Depth | 2.5 inches (6.4 cm) |
| Weight | 4.5 lbs (approx. 2 kg) |
| Power | 1500 watts |
| Voltage | 120 V, 60 Hz |
| Temperature Range | 200°F to 400°F (93°C to 204°C) |
| Non-Stick Coating | Yes, PTFE-based |
| Indicator Light | Heating indicator light |
| Handle | Cool-touch handle |
| Dishwasher Safe | No, hand wash recommended |
| Auto Shut-Off | Yes, for safety |
| Overheat Protection | Yes |
| Removable Temperature Control | Yes |
| Spare Parts Available | Temperature control probe, lid |
| Warranty | 1 year limited |
| Cleaning Instructions | Wipe with damp cloth; do not immerse in water |
| Intended Use | Household cooking only |
Frequently Asked Questions - ASP-700 Aroma
User questions about ASP-700 Aroma
0 question about this device. Answer the ones you know or ask your own.
Ask a new question about this device
Download the instructions for your Frying Pan in PDF format for free! Find your manual ASP-700 - Aroma and take your electronic device back in hand. On this page are published all the documents necessary for the use of your device. ASP-700 by Aroma.
USER MANUAL ASP-700 Aroma
natural_image
White Aroma rice cooker with black base and digital display (no visible text or symbols on body)instruction manual
ASP-700
Smart Electric Hot Pot


Digital Rice & Grain Multicookers

Rice & Grain
Cookers

Electric Kettles

Indoor Grills

...and More!
AROMA®
To Enhance and Enrich Lives.
Here at Aroma we strive to make a difference —to design and distribute products that enhance and enrich people's lives.
Aroma offers an array of exceptional products to make cooking simple and satisfying. Discover other countertop appliances and cookware from our current product lineup to complement your kitchen.
REGISTER YOUR PRODUCT

SCAN TO REGISTER
AromaCo.com/registration
Activate your warranty. Registration is quick and easy.
Be notified of:
- new product releases
- new test kitchen recipes
• sales and promotions ...and more!

/AromaHousewares

IMPORTANT SAFEGUARDS
Basic safety precautions should always be followed when using electrical appliances, including the following:
- Important: Read all instructions carefully before first use.
- Do not touch hot surfaces. Use the handles or knobs.
- To protect against fire, electrical shock and injury to persons, do not immerse the power cord, plug or appliance in water or any other liquid. See instructions for cleaning.
- Close supervision is necessary when the appliance is used by or near children.
- Unplug from the wall outlet when not in use and before cleaning. Allow the unit to completely cool before putting on or removing parts and before cleaning the appliance.
- Do not operate any appliance with a damaged power cord or plug, or after the appliance malfunctions or has been damaged in any manner. Contact Aroma® customer service for examination, repair or adjustment.
- The use of accessory attachments not recommended by Aroma® Housewares may result in fire, electrical shock or injury.
- Do not use outdoors.
- Do not allow the power cord to touch hot surfaces or hang over the edge of a counter or table.
- Do not place on or near a hot gas or electric burner or in a heated oven.
- Extreme caution must be used when moving the appliance containing hot food, oil or other liquids.
- Do not use the appliance for anything other than its intended use.
-
Do not touch, cover or obstruct the steam vent on the top of the cooker as it is extremely hot and may cause scalding.
-
The lid will be extremely hot during and after use. Be sure to wear protective oven mitts or gloves.
- Always unplug from the plug gripping area. Never pull on the power cord.
- To turn off the unit, press the (○) /On|Off button then safely remove the plug from the wall outlet.
- Use only on a level, dry and heat-resistant surface.
- The cooker should be operated on a separate electrical circuit from other operating appliances. If the electrical circuit is overloaded with other appliances, the appliance may not operate properly.
- Always make sure the exterior of the cooking pot is dry prior to use. If the cooking pot is returned to the cool-touch power base when wet, it may damage or cause the product to malfunction.
- To prevent damage or deformation, do not use the cooking pot on a stovetop or burner.
- Use only with a 120V AC power outlet.
- The power base must only be used with the cooking pot provided.
- Intended for countertop use only.
- Do not use for deep frying.
- CAUTION: To prevent overflow while boiling, do not allow liquids to exceed the MAX line.
- Do not move the cooking pot during the heating process.
- Do not immerse the cooking pot and power base in water.
Published By:
Aroma Housewares Co. | 6469 Flanders Drive, San Diego, CA 92121, U.S.A.
1-800-276-6286 | www.AromaCo.com
©2022 Aroma Housewares Company | All rights reserved.
SAVE THESE INSTRUCTIONS

IMPORTANT SAFEGUARDS
Parts Identification
Short Cord Instructions
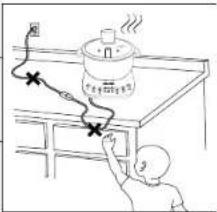
- A short power supply cord is provided to reduce the risk resulting from becoming entangled in or tripping over a longer cord.
- Longer extension cords are available and may be used if care is exercised in their use.
- If a longer detachable power-supply cord or extension cord is used: a.) The marked electrical rating of the extension cord should be at least as great as the electrical rating of the appliance.
b.) The extension cord should be arranged so that it will not drape over the countertop or tabletop where it can be pulled on by children or tripped over unintentionally.
c.) If the appliance is of the grounded type, the extension cord should be a grounding 3-wire cord.
DO NOT DRAPE CORD!
KEEP AWAY FROM CHILDREN!
Grounding Instructions
This appliance must be grounded while in use to protect the operator from electrical shock. The appliance is equipped with a 3-conductor cord and a 3-prong grounding-type plug to fit the proper grounding-type receptacle. The appliance has a plug that looks like figure (A).

THIS APPLIANCE IS FOR HOUSEHOLD USE ONLY.
4.

Controls/Functions
(⊕) / On|Off
Powers the cooker on and off or cancels a current function.
Time
Adjusts the amount of time desired. Select from 30, 60, or 90 minutes.
Heat
Adjusts the desired temperature ranging from low, medium, to high.
Cook
Starts the heating process. Press to pause or resume when Time is selected.
Up/Down
Ideal for moving the steamer basket up or down. Perfect for keeping food separated from the soup.
5.
BEFORE FIRST USE
- Read all instructions and important safeguards.
- Remove all packaging materials and check that all items have been received in good condition.
- Tear up all plastic bags and dispose of them properly as they can pose a risk to children.
- Lift the cooking pot and glass lid up and away from the power base.
- Wash the interior of the cooking pot, glass lid, and accessories with warm, soapy water. With a damp cloth, gently wipe the exterior of the cooking pot. Do not wipe electrical components as this may cause damage to the unit.
- Dry all parts and accessories thoroughly then reassemble for use.
- Condition the surface of the cooking pot with oil or vegetable shortening.
TO CLEAN
- Disconnect the plug from the wall outlet.
- Allow the unit to completely cool.
- Lift the cooking pot and glass lid up and away from the power base.
- Wash the interior of the cooking pot, glass lid, and accessories with warm, soapy water. With a damp cloth, gently wipe the exterior of the cooking pot. Do not wipe electrical components as this may cause damage to the unit.
- Dry all parts and accessories thoroughly then reassemble for next use.
TROUBLESHOOTING
The unit will not turn on and begin heating.
- Make sure the cooking pot has been placed correctly on the power base and that there are no food residue between the cooking pot and the power base's heating element.

Caution:
During and after use, the tempered glass lid will become extremely hot. Be sure to use the handle and wear protective heat-resistant oven mitts or gloves.
Do not use harsh abrasive cleaners, scouring pads or products that are not considered safe to use on tempered glass.
Note:
- Never submerge the cooking pot and cool-touch power case in water. To clean, simply wipe with a damp cloth. - Not satisfied with your Aroma® purchase? Our product experts can help Before returning, please contact Customer Service at 1-800-276-6286 for product support, helpful tips and more!
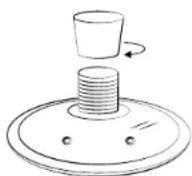
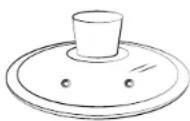
TO ASSEMBLE THE LID
- Unscrew the bottom piece. Turn the knob counterclockwise while firmly holding the bottom piece and top ring.
- Insert the bottom piece through the hole in the glass lid from the bottom.
- Place the top ring on top of the glass lid and into the bottom piece.
- While holding the bottom piece and glass lid firmly with one hand, use the other hand to turn the knob clockwise until it is secured in place.
1

Bottom Piece
2

Bottom Piece
3

4
To Cook
- Place the power base on a sturdy, level and dry surface.
- Make sure the power base is completely dry then place the cooking pot onto the power base.
- Add food and/or liquid into the cooking pot.
- If desired, place food in the provided steamer basket, then lower the steamer basket into the cooking pot. Securely set the glass lid on top.
- Plug the power cord into a 120V AC wall outlet. A long beep will sound and all LEDs will turn on and off simultaneously.
- Press the (☐)/On|Off button to turn the unit on.
- To adjust the height of the steamer basket, press the Up or Down button.
- Press the Cook button. The high heat indicator light will automatically illuminate. After 5 seconds, the unit will beep signifying that the heating cycle has begun. (The default heat setting for Cook is high heat. To adjust the temperature, press the Heat button to select low, medium or high.)
- To adjust the time, press the Time button to select 30, 60, or 90 minutes.
- If Time is selected and pausing is needed while cooking, press the Cook button and the LED light will flash. To resume cooking, press the Cook button once more.
- When cooking has completed before the timer is up, turn the cooker off by pressing (☐)/On/Off. When the timer has completed, the cooker will automatically turn off.
- Unplug the power cord.

Caution:
Always use caution when lifting the glass lid while cooking as hot steam will escape and can cause scalding.
To prevent food-borne illness, always make sure food is cooked thoroughly before serving.
Note:
- When cooking, place the glass lid on the unit to avoid splatters and spills and to lessen the total amount of cook time and ensure even heating.
- When simmering, boiling, or stewing, place the glass lid on top of the cooking pot for faster heating.
- When Time is not selected, the maximum cooking time is 2 hours. The unit will then automatically shut off.
RECIPES
Milk Broth Base
4 cups milk
½ onion, diced
4 cups chicken stock
2 tbsp. butter
1 tsp. salt
1 tsp. sugar
Add butter to a large saucepan and apply medium heat. Once the butter is melted, add in diced onions and sauté until transparent and soft. Pour in chicken stock, milk, salt and sugar. Heat thoroughly. Transfer the prepared broth to the cooking pot and bring to a boil by pressing the (☐)/On|Off button followed by the Cook button. Serve and enjoy with other hot pot ingredients such as meat, vegetables, tofu or seafood.
SERVES 2-3.
| 3 cups | sauerkraut |
| 1 | green onion, chopped |
| 4 | garlic cloves, minced |
| 1/2 inch | ginger root, sliced |
| 1/2 lb. | pork belly, thinly sliced |
| 6 cups | chicken broth |
| 1 tbsp. | oil |
| 1 tsp. | salt |
| 1 tbsp | sugar |
| 2 tbsp. | cooking wine |
| 1 tbsp. | pepper |
Add oil to a large saucepan and apply medium heat. Once heated, add in garlic and ginger and sauté until fragrant. Add in the thinly sliced pork belly and stir-fry for 5 minutes or until the pork belly has browned. Once browned, add in sauerkraut and sauté for another 6 minutes. Pour in chicken broth, salt, sugar and cooking wine. Heat thoroughly. Transfer the prepared broth to the cooking pot and bring to a boil by pressing the (☐)/On|Off button followed by the Cook button. Serve and enjoy with other hot pot ingredients such as meat, vegetables, tofu or seafood.
SERVES 2-3.
For additional recipes, visit us at
www.AromaCo.com
RECIPES
Chicken Tomato Soup Base
| 1 | onion, diced |
| 1 | celery stalk, minced |
| 3 | tomatoes, peeled and diced |
| 8 cups | chicken stock |
| 3 tsp. | olive oil |
| 1 tbsp. | ketchup |
| 1 tsp. | salt |
| 2 tsp. | sugar |
| 1 tbsp. | cooking wine |
Add oil to a large saucepan and apply medium heat. Once heated, add in diced onions and sauté until soft and transparent. Mix in diced tomatoes, tomato juice and ketchup and simmer until the consistency of the base thickens. Once thickened, stir in minced celery, chicken stock, salt and sugar. Transfer the prepared broth to the cooking pot and bring to a boil by pressing the (☐)/On/Off button followed by the Cook button. Serve and enjoy with other hot pot ingredients such as meat, vegetables, tofu or seafood.
SERVES 2-3.
Curry Soup Base
| 7 cups | vegetable stock |
| 112 tbsp. | sugar |
| 2 tbsp. | oil |
| 7 | garlic cloves, minced |
| 12 inch | ginger, cut into thick slices |
| 1 cup | coconut milk |
| 3 tbsp. | Thai red curry paste, to taste |
Add oil to a large frying pan, and apply medium heat. Once heated, add in garlic and ginger and sauté until fragrant. Stir in the vegetable stock and coconut milk. Heat thoroughly. Whisk in the Thai red curry paste until the paste is dissolved then cover and let simmer for 5 minutes. Remove the large ginger slices from the broth. Transfer the prepared broth to the cooking pot and bring to a boil by pressing the (☐)/On|Off button followed by the Cook button. Serve and enjoy with other hot pot ingredients such as meat, vegetables, tofu or seafood.
SERVES 2-3.
For additional recipes, visit us at
www.AromaCo.com
10.
LIMITED WARRANTY
Aroma Housewares Company warrants its products against defects in material and workmanship for one year from the provable date of purchase in the United States.
Within this warranty period, Aroma Housewares Company will repair or replace, at its discretion, defective parts at no charge. Proof of the date of purchase, such as the original dated sales receipt, will be required with any request for warranty repair or replacement. All liability is limited to the amount of the purchase price.
This warranty does not apply if the warranty period expired; the product has been modified by any unauthorized service center or personnel; the defect was subject to abuse, improper use not conforming to product manual instructions, or environmental conditions more severe than those specified in the manual and specification, neglect of the owner or improper installation; the defect was subject to Force Majeure such as flood, fire, lightning, earthquake, other natural calamities, war. The warranty excludes accessories and replacement ports. This warranty is void if the product is used for other than single-family household use or subjected to any voltage and waveform other than as specified on the rating label (e.g., 120V \~ 60Hz).
Aroma sole obligation under the warranty shall be to replace the defective product with a working one or a similar model of equivalent value, if the same model is not available, in the occurrence of any failure or defect covered under the warranty during the warranty period. Refurbished items or items not purchased through an authorized retailer are not eligible for warranty claims. Transportation charges on parts, or products in whole, submitted for repair or replacement, under this warranty, must be borne by the purchaser.
This warranty gives you specific legal rights, which may vary from state to state, and does not cover areas outside the United States.
SERVICE & SUPPORT
In the event of a warranty claim, or if service is required for this product, please contact Aromd customer service toll-free at:
1-800-276-6286 | CustomerService@AromaCo.com M-F, 8:30am-4:30pm, Pacific Time
www.AromaCo.com
Aroma Housewares Company 6469 Flanders Drive, San Diego, CA 92121, U.S.A.
Activate your warranty. Registration is quick and easy.

SCAN TO REGISTER or visit AromaCo.com/registration
Note:
Proof of purchase is required for all warranty claims.

natural_image
White ceramic kitchen appliance with a steamer and black base (no visible text or symbols)To Enhance and Enrich Lives.

natural_image
Line drawing of multiple fork shapes arranged in two rows (no text or symbols)www.AromaCo.com

- instruction manual
- AROMA®
- REGISTER YOUR PRODUCT
- IMPORTANT SAFEGUARDS
- SAVE THESE INSTRUCTIONS
- Parts Identification
- Short Cord Instructions
- Grounding Instructions
- THIS APPLIANCE IS FOR HOUSEHOLD USE ONLY.
- Controls/Functions
- (⊕) / On|Off
- Time
- Heat
- Cook
- Up/Down
- BEFORE FIRST USE
- TO CLEAN
- TROUBLESHOOTING
- The unit will not turn on and begin heating.
- Caution:
- Note:
- TO ASSEMBLE THE LID
- To Cook
- RECIPES
- Milk Broth Base
- LIMITED WARRANTY
- SERVICE & SUPPORT
Brand : Aroma
Model : ASP-700
Category : Frying Pan