AEM-810 - Coffee maker Aroma - Free user manual and instructions
Find the device manual for free AEM-810 Aroma in PDF.


| Product Type | Espresso Machine |
| Model | AEM-810 |
| Brand | Aroma |
| Power Supply | 120V AC, 60Hz |
| Power Consumption | 1000 W (estimated) |
| Water Reservoir Capacity | 1 L (estimated) |
| Heating System | Thermoblock |
| Pump Pressure | 15 bar (estimated) |
| Dimensions (L x W x H) | 10 x 8 x 12 in (estimated) |
| Weight | 5 lb (estimated) |
| Material | Plastic and stainless steel |
| Functions | Brew espresso, steam milk, dispense hot water |
| Controls | Power switch, brew key, steam key, control knob |
| Accessories Included | Portafilter, single and double shot cups, scoop/tamper, drip tray |
| Cord Type | 3-prong grounding plug, short cord |
| Safety Features | Grounded plug, thermal protection |
| Cleaning | Wipe exterior with damp cloth; wash portafilter, drip tray, and accessories with warm soapy water |
| Warranty | 2-year limited warranty |
| Customer Service | 1-800-276-6286 (U.S. toll-free) |
| Intended Use | Household use only |
Frequently Asked Questions - AEM-810 Aroma
User questions about AEM-810 Aroma
0 question about this device. Answer the ones you know or ask your own.
Ask a new question about this device
Download the instructions for your Coffee maker in PDF format for free! Find your manual AEM-810 - Aroma and take your electronic device back in hand. On this page are published all the documents necessary for the use of your device. AEM-810 by Aroma.
USER MANUAL AEM-810 Aroma
natural_image
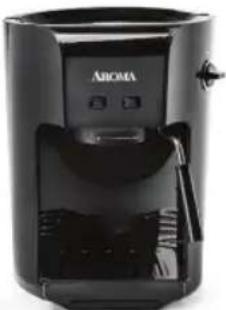
Black Aroma coffee maker with a small fork and wooden handle, no visible text or symbols on the device itself.instruction manual
AEM-810
Espresso Machine
Questions or concerns about your Aroma product?
www.AromaCo.com/Support
1-800-276-6286

AROMA®
To Enhance and Enrich Lives.
natural_image
A modern rice cooker with black and white design, no visible text or symbols on the body.Multicookers/Rice Cookers
natural_image
Exterior view of a modern rice cooker with digital display (no visible text or symbols)Pressure Cookers
natural_image
Exterior view of a modern silver and black kettle (no text or symbols visible)Water Kettles
natural_image
Black and white photo of a portable cooking pot with lid and side-mounted handle (no visible text or symbols)Indoor Grills
natural_image
Black electrical induction cooker with circular top and side legs (no visible text or symbols)Induction Cooktops
Here at Aroma we strive to make a difference —to design and distribute products that enhance and enrich people's lives.
Aroma offers an array of exceptional products to make cooking simple and satisfying. Discover other countertop appliances and cookware from our current product lineup to complement your kitchen.
Stay connected for more recipe ideas and monthly giveaways!
AROMA® TEST KITCHEN

www.AromaTestKitchen.com



/AromaHousewares
When using electrical appliances basic safety precautions should always be followed, including the following:
- Important: Read all instructions carefully before using the appliance.
- To protect against fire, electric shock and injury to persons, do not immerse appliance, plug or cord in water or any other liquid. Do not operate with wet hands. See instructions for cleaning.
- This appliances should not be used by or near children or individuals with certain disabilities.
- Do not touch the Steam Wand or any other hot surfaces during or after operation. Allow the appliance to cool and use caution before handling.
- To disconnect, turn all controls off then remove plug from power outlet.
- Always switch the appliance OFF, and then remove plug from the power outlet when the appliance is not in use, before putting on or taking off parts, or before removing and cleaning.
- Do not operate appliance with a damaged cord or plug, or after appliance malfunctions or has been damaged in any manner. Do not attempt to disassemble the appliance. Contact Aroma® customer service for examination, repair or electrical/mechanical adjustment.
- The use of accessory attachments not recommended by Aroma® Housewares may result in fire, electrical shock or injury.
-
Do not use outdoors.
-
Do not let cord hang over the edge of a table or counter or touch hot surfaces.
- Do not place this appliance on or near a hot gas or electric burner or in a heated oven.
- Always unplug from the plug gripping area. Never pull on the cord.
- Do not use this appliance for other than its intended use.
- Use only on a level, dry and heat-resistant surface.
- The appliance should be operated on a separate electrical circuit from other operating appliances. If the electrical circuit is overloaded with other appliances the espresso machine may not operate properly.
- This appliance is for household use only.
- When in use, do not place the appliance against a wall. Ensure that there is at least 3 inches of free space on all sides for good ventilation.
SAVE THESE INSTRUCTIONS
Short Cord Instructions
-
A short power-supply cord is provided to reduce the risks resulting from becoming entangled in or tripping over a longer cord.
-
Longer extension cords are available and may be used if care is exercised in their use.
-
If a longer extension cord is used:
a.) The marked electrical rating of the extension cord should be at least as great as the electrical rating of the appliance.
b.) The longer cord should be arranged so that it will not drape over the counter top or tabletop where it can be pulled by children or tripped over unintentionally.
c.) The extension cord should be a grounding-type 3-wire cord.
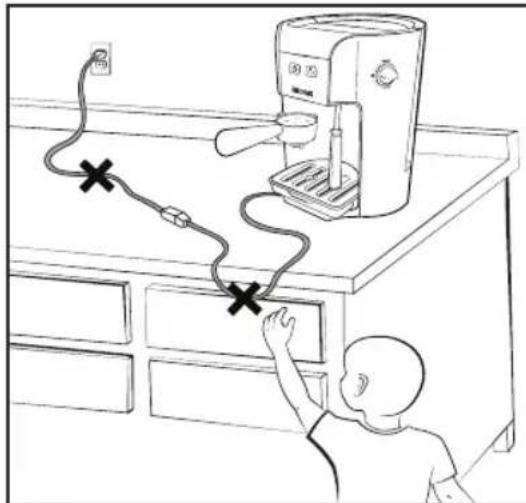
DO NOT
DRAPE CORD!
KEEP AWAY
FROM CHILDREN!
Grounding Instructions
This appliance must be grounded while in use to protect the operator from electrical shock. The appliance is equipped with a 3-conductor cord and a 3-prong grounding-type plug to fit the proper grounding-type receptacle. The appliance has a plug that looks like figure (A).
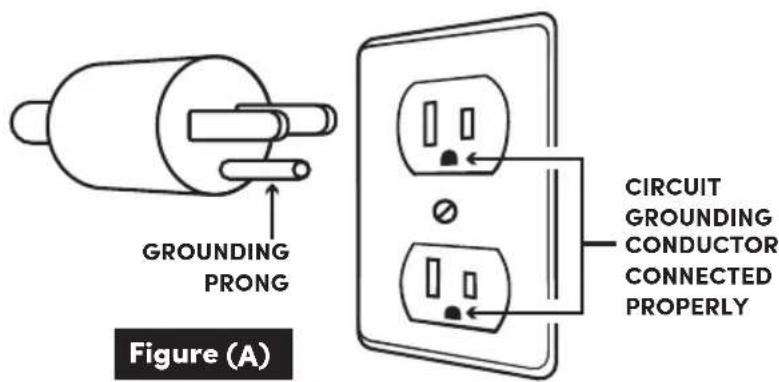
THIS APPLIANCE IS FOR HOUSEHOLD USE ONLY.
Parts Identification
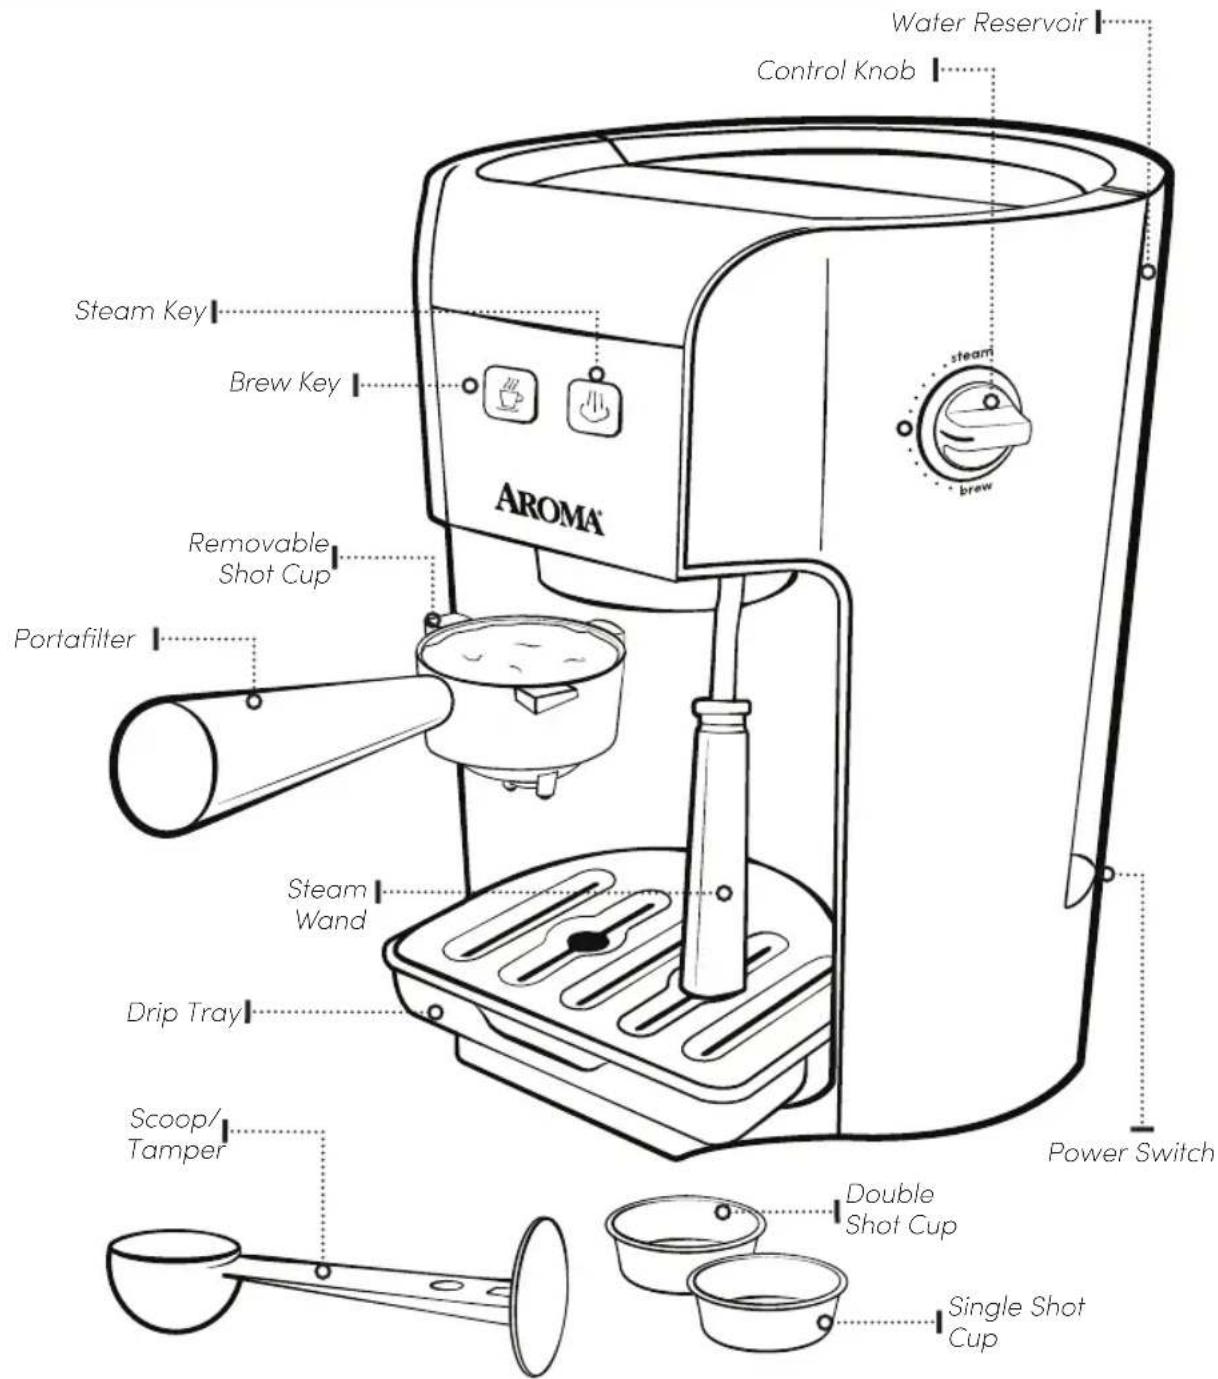
Controls/Functions
Power Switch (⊕)
Turns the power on or off.
Brey Key
Allows the espresso maker to heat up for hot water or brewing espresso.
Steam Key
Allows the espresso maker to prepare for steaming milk.
Brew (Control Knob)
Initiates brewing espresso.
Steam (Control Knob)
Initiates steam or hot water from wand.
BEFORE FIRST USE
- Read all instructions and important safeguards.
- Remove all packing materials and make sure that the product has been received in good condition.
- Take care to keep the electrical components on the exterior of the espresso machine dry. Wipe the exterior of the espresso maker with a damp cloth.
- Remove the Water Reservoir and wash with warm, soapy water. Rinse and dry thoroughly before returning to the espresso machine.
- Wash all other accessories including the Drip Tray, Portafilter, and Cups as well, again making sure to rinse and dry thoroughly.
- Fill the Water Reservoir between the minimum and maximum line.
TO CLEAN
- Wipe the exterior of the espresso maker with a damp cloth, taking care to avoid the electrical components.
- Remove the Drip Tray and drain, if needed. Return to the espresso machine.
- Wash the Portafilter and removable shot cup with warm soapy water. Rinse and dry completely.
- Allow Steam Wand to cool completely for a few minutes. Remove plastic tube to wipe down metal Steam Wand with a damp cloth. Wash the plastic tube with warm soapy water. Dry completely. Return tube to wand for next use.
TROUBLESHOOTING
The espresso machine and power switch light do not work when powered on.
- Make sure the espresso machine is connected to a functioning electrical outlet.
The espresso machine won't start brewing.
- The thermoblock heater is not hot enough yet. Wait until the Brew Key light remains constantly on.

Caution:
Always unplug the espresso maker and allow it to cool completely before cleaning.
Never attempt to disassemble the espresso machine.
Never immerse the espresso machine, power cord or plug in water.
Always take care not to allow electrical components to come into contact with water.
Do not use abrasive cleaners or scouring pads of any kind on the espresso machine. This will cause damage to the finish and may create a risk of electrical shock.
Note:
- Any other servicing should be performed by Aroma® Housewares.
TROUBLESHOOTING
(CONT.)
There is no coffee coming out of the espresso machine.
- The Water Reservoir is empty. Fill water between the minimum and maximum line.
- The coffee grind is too fine. Grind coffee to medium ground.
- There is too much coffee in the filter. Try putting less coffee into the filter.
- Coffee has been compressed too much. Refill the Shot Cup with coffee and do not tamp it.
Coffee comes out around the edge of the filter holder.
- Filter holder is not fully locked into position.
- Coffee grounds collected around the Portafilter. Remove all excessive coffee ground on the rim.
- There is too much coffee in the filter. Try putting less coffee into the filter.
No steam is being generated.
- The Water Reservoir is empty. Fill water between the minimum and maximum line.
- The appliance is not turned on. Turn on unit and follow the operating instructions.
- The Steam Wand is blocked. Turn off the unit, allow it to cool. Then unplug it and clean out Steam Wand with a needle or toothpick.
Milk is not foamy after frothing.
- The appliance ran out of water to create steam. Ensure that there is enough water in the reservoir.
- Milk is not cold enough. Chill milk and frothing pitcher prior to making cappuccino.
Coffee comes out too quickly.
· The coffee ground is too coarse. Use a finer grind.
- There's not enough coffee in the removable Shot Cup. Use more coffee.
Note:
· If the problem persists,
please contact our
customer service
department toll-free
at (800) 276-6286
or through email at
CustomerService@
AromaCo.com.
BREWING ESPRESSO
- Plug the espresso machine into an available 120V AC wall outlet.
- Turn the Power Switch to the ON position.
- Press the Brew Key. It will blink red while it heats.
- While the espresso machine is heating, put the desired size Shot Cup into the Portafilter. Press firmly into place.
- Use the scoop to fill the shot cup with fine coffee grounds. Use the tamper side of the Scoop to compress the coffee grounds. Scrape off any overfill.
- Insert the Portafilter into the espresso machine and twist right until secure.
- Place your coffee cup under the Portafilter spout.
- When the Brew Key is a solid red, the espresso machine is ready to brew.
- Turn the Control Knob to BREW. Espresso will begin brewing. Once you have the desired amount, or the water stream becomes less dark and clear, turn the knob back to O.
- Remove your cup. Twist the Portafilter to the left and carefully remove. Discard the used coffee grounds, then clean according to CLEANING INSTRUCTIONS page 6.
- Turn off the espresso machine when finished.
HOT WATER
- Fillow steps 1-3 in BREWING ESPRESSO page 8.
- Place your mug underneath the Steam Wand.
- When the Brew Key is solid red, the espresso machine is ready to make hot water. NOTE: the green Steam Key should NOT be pressed; make sure it is not illuminated.
- Turn the Control Knob to STEAM. Hot water will begin pouring from the Steam Wand.
- When desired amount of hot water has been reached, turn the Control Knob back to O.
- Turn the espresso machine off when finished.

Caution:
Be careful when using the Steam Wand for hot water to avoid burns from spraying.
STEAMING MILK
- Follow steps 1-3 in BREWING ESPRESSO page 8.
- After the Brew Key is solid red, press the Steam Key. It will blink green.
- When the Steam Key is solid green, the espresso maker is ready to steam.
- Fill a small stainless steel or ceramic pitcher with cold milk.
- Place the tip of the Steam Wand just barely below the surface of the milk.
- While still holding the pitcher in place, turn the Control Knob to STEAM; it should make the sound of tearing paper. Adjust the height of the milk higher or lower to achieve this noise. Allow the milk to foam with the Steam Wand at this height for a few seconds until the desired amount of foam is achieved and the pitcher starts to become just warm to the touch.
- When the desired amount of foam is achieved and pitcher is barely warm, submerge the Steam Wand slightly further into the milk at roughly a 45° angle to create a whirlpool. Gently move the pitcher in a circular motion around the Steam Wand if needed to help create the whirlpool. If the Steam Wand starts to make a loud hissing noise, lift it up slightly.
- Once the pitcher becomes hot to the touch, after about 50 seconds, turn the knob back to O. Remove the pitcher and carefully wipe residue off of the Steam Wand once cooled with a damp cloth.
- Turn off the espresso machine when finished.
BREW & STEAM
- Follow steps 1-9 of BREWING ESPRESSO on page 8.
- After the espresso has been brewed, follow steps 2-9 of STEAMING MILK on page 9.
- Once milk is steamed, follow step 10 of BREWING ESPRESSO on page 8.
- Pour the desired amount of milk over the espresso; spoon desired frothed milk on top.
Note:
- While not necessary, it is recommended to purge the Steam Wand of any extra water before steaming your milk. To do this, follow steps 1-3 of STEAMING MILK. Then before steaming milk, place an empty cup under the Steam Wand and turn the control knob to STEAM. BE CAUTIOUS of hot water and steam! After letting the Steam Wand purge into an empty cup for 1-2 seconds, it is ready to steam milk.
NOTES
LIMITED WARRANTY
Aroma Housewares Company warrants this product against defects in material and workmanship for two years from provable date of purchase in the United States.
Within this warranty period, Aroma Housewares Company will repair or replace, at its discretion, defective parts at no charge, provided the product is returned, freight prepaid with proof of purchase and U.S. \$20.00 for shipping and handling charges payable to Aroma Housewares Company. Before returning an item, please call the toll free number below for a return authorization number. Allow 2-4 weeks for return shipping.
This warranty does not apply if the warranty period expired; the products has been modified by any unauthorized service center or personnel; the defect was subject to abuse, improper use not conforming to product manual instructions, or environment conditions more severe than those specified in the manual and specification, neglect of the owner or improper installation; the defect was subject to Force Majeure such as flood, lightning, earthquake, other natural calamities, war, vandalism, theft, brownouts or sags (damage due to low voltage disturbances).
This warranty gives you specific legal rights, which may vary from state to state, and does not cover areas outside the United States.
SERVICE & SUPPORT
In the event of a warranty claim, or if service is required for this product, please contact Aroma® customer service toll-free at:
1-800-276-6286
M-F, 8:30am-4:30pm, Pacific Time
Or we can be reached online at:
CustomerService@AromaCo.com
For your records, we recommend stapling your sales receipt to this page along with a written record of the following:
- Date of Purchase:
- Place of Purchase:
natural_image
Exterior view of a black Aroma air fryer with control panel and side door (no visible text or symbols)To Enhance and Enrich Lives.
- instruction manual
- AROMA®
- Stay connected for more recipe ideas and monthly giveaways!
- SAVE THESE INSTRUCTIONS
- Short Cord Instructions
- Grounding Instructions
- THIS APPLIANCE IS FOR HOUSEHOLD USE ONLY.
- Parts Identification
- Controls/Functions
- Power Switch (⊕)
- Brey Key
- Steam Key
- Brew (Control Knob)
- Steam (Control Knob)
- BEFORE FIRST USE
- TO CLEAN
- TROUBLESHOOTING
- Caution:
- Note:
- (CONT.)
- There is no coffee coming out of the espresso machine.
- Coffee comes out around the edge of the filter holder.
- No steam is being generated.
- Milk is not foamy after frothing.
- Coffee comes out too quickly.
- BREWING ESPRESSO
- HOT WATER
- STEAMING MILK
- BREW & STEAM
- NOTES
- LIMITED WARRANTY
- SERVICE & SUPPORT
Brand : Aroma
Model : AEM-810
Category : Coffee maker