
DVD-2500BTCI - DVD/Blu-ray player DENON - Free user manual and instructions
Find the device manual for free DVD-2500BTCI DENON in PDF.

| Product Type | DVD/Blu-ray Player |
| Brand | DENON |
| Model | DVD-2500BTCI |
| Dimensions (W x H x D) | 435 x 80 x 340 mm |
| Weight | 5.0 kg |
| Power Supply | 220-240 V AC, 50/60 Hz |
| Power Consumption | 30 W (standby: 0.5 W) |
| Compatible Disc Formats | BD-ROM, DVD-Video, DVD-R/RW, Audio CD, CD-R/RW |
| Video Outputs | HDMI (1080p/720p), Composite (RCA) |
| Audio Outputs | HDMI, Optical and Coaxial Digital Audio, Stereo Analog (RCA) |
| Main Features | Blu-ray and DVD playback, CD playback, search functions, zoom, repeat |
| Care and Cleaning | Clean the device with a dry cloth; do not use chemicals |
| Safety | Do not block ventilation holes; unplug when not in use for extended periods |
| Spare Parts and Repairability | Contact an authorized DENON service center; no user-serviceable parts |
| General Information | Class B digital device; complies with Canadian NMB-003 standard |
Frequently Asked Questions - DVD-2500BTCI DENON
User questions about DVD-2500BTCI DENON
0 question about this device. Answer the ones you know or ask your own.
Ask a new question about this device
Download the instructions for your DVD/Blu-ray player in PDF format for free! Find your manual DVD-2500BTCI - DENON and take your electronic device back in hand. On this page are published all the documents necessary for the use of your device. DVD-2500BTCI by DENON.
USER MANUAL DVD-2500BTCI DENON
The lightning flash with arrowhead symbol, within an equilateral triangle, is intended to alert the user to the presence of uninsulated "dangerous voltage" within the product's enclosure that may be of sufficient magnitude to constitute a risk of electric shock to persons.

The exclamation point within an equilateral triangle is intended to alert the user to the presence of important operating and maintenance (servicing) instructions in the literature accompanying the appliance.
WARNING: TO REDUCE THE RISK OF FIRE OR ELECTRIC SHOCK, DO NOT EXPOSE THIS APPLIANCE TO RAIN OR MOISTURE.
Laser Safety
CAUTION:
VISIBLE AND INVISIBLE LASER RADIATION WHEN OPEN. DO NOT STARE INTO BEAM.
LOCATION: INSIDE, NEAR THE DECK MECHANISM.
CAUTION:
USE OF CONTROLS OR ADJUSTMENTS OR PERFORMANCE OF PROCEDURES OTHER THAN THOSE SPECIFIED HEREIN MAY RESULT IN HAZARDOUS RADIATION EXPOSURE. THIS PRODUCT SHOULD NOT BE ADJUSTED OR REPAIRED BY ANYONE EXCEPT PROPERLY QUALIFIED SERVICE PERSONNEL.
SAFETY INSTRUCTIONS
- Read Instructions - All the safety and operating instructions should be read before the product is operated.
- Retain Instructions - The safety and operating instructions should be retained for future reference.
- HeedWarnings - All warnings on the product and in the operating instructions should be adhered to.
- Follow Instructions - All operating and use instructions should be followed.
- Cleaning - Unplug this product from the wall outlet before cleaning. Do not use liquid cleaners or aerosol cleaners.
- Attachments - Do not use attachments not recommended by the product manufacturer as they may cause hazards.
- Water and Moisture - Do not use this product near water - for example, near a bath tub, wash bowl, kitchen sink, or laundry tub; in a wet basement; or near a swimming pool; and the like.
- Accessories - Do not place this product on an unstable cart, stand, tripod, bracket, or table. The product may fall, causing serious injury to a child or adult, and serious damage to the product. Use only with a cart, stand, tripod, bracket, or table recommended by the manufacturer, or sold with the product. Any mounting of the product should follow the manufacturer's instructions, and should use a mounting accessory recommended by the manufacturer.
- A product and cart combination should be moved with care. Quick stops, excessive force, and uneven surfaces may cause the product and cart combination to overturn.
- Ventilation - Slots and openings in the cabinet are provided for ventilation and to ensure reliable operation of the product and to protect it from overheating, and these openings must not be blocked or covered. The openings should never be blocked by placing the product on a bed, sofa, rug, or other similar surface. This product should not be placed in a built-in installation such as a bookcase or rack unless proper ventilation is provided or the manufacturer's instructions have been adhered to.
- Power Sources - This product should be operated only from the type of power source indicated on the marking label. If you are not sure of the type of power supply to your home, consult your product dealer or local power company. For products intended to operate from battery power, or other sources, refer to the operating instructions.
- Grounding or Polarization - This product may be equipped with a polarized alternating-current line plug (a plug having one blade wider than the other). This plug will fit into the power outlet only one way. This is a safety feature. If you are unable to insert the plug fully into the outlet, try reversing the plug. If the plug should still fail to fit, contact your electrician to replace your obsolete outlet. Do not defeat the safety purpose of the polarized plug.
-
Power-Cord Protection - Power-supply cords should be routed so that they are not likely to be walked on or pinched by items placed upon or against them, paying particular attention to cords at plugs, convenience receptacles, and the point where they exit from the product.
-
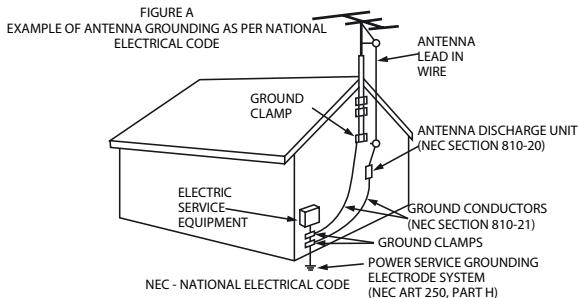
Outdoor Antenna Grounding - If an outside antenna or cable system is connected to the product, be sure the antenna or cable system is grounded so as to provide some protection against voltage surges and built-up static charges. Article 810 of the National Electrical Code, ANSI/NFPA 70, provides information with regard to proper grounding of the mast and supporting structure, grounding of the lead-in wire to an antenna discharge unit, size of grounding conductors, location of antenna-discharge unit, connection to grounding electrodes, and requirements for the grounding electrode. See Figure A.
-
Lightning - For added protection for this product during a lightning storm, or when it is left unattended and unused for long periods of time, unplug it from the wall outlet. This will prevent damage to the product due to lightning and power-line surges.
-
Power lines - An outside antenna system should not be located in the vicinity of overhead power lines or other electric light or power circuits, or where it can fall into such power lines or circuits. When installing an outside antenna system, extreme care should be taken to keep from touching such power lines or circuits as contact with them might be fatal.
-
Overloading - Do not overload wall outlets, extension cords, or integral convenience receptacles as this can result in a risk of fire or electric shock.
-
Object and Liquid Entry - Never push objects of any kind into this product through openings as they may touch dangerous voltage points or short-out parts that could result in a fire or electric shock. Never spill liquid of any kind on the product.
-
Servicing - Do not attempt to service this product yourself as opening or removing covers may expose you to dangerous voltage or other hazards. Refer all servicing to qualified service personnel.
-
Damage Requiring Service - Unplug this product from the wall outlet and refer servicing to qualified service personnel under the following conditions:
a) When the power-supply cord or plug is damaged.
b) If liquid has been spilled, or objects have fallen into the product.
c) If the product has been exposed to rain or water.
d) If the product does not operate normally by following the operating instructions. Adjust only those controls that are covered by the operating instructions as an improper adjustment of other controls may result in damage and will often require extensive work by a qualified technician to restore the product to its normal operation.
e) If the product has been dropped or damaged in any way.
f) When the product exhibits a distinct change in performance - this indicates a need for service.
- Replacement Parts - When replacement parts are required, be sure the service technician has used replacement parts specified by the manufacturer or have the same characteristics as the original part. Unauthorized substitutions may result in fire, electric shock, or other hazards.
- Safety Check - Upon completion of any service or repairs to this product, ask the service technician to perform safety checks to determine that the product is in proper operating condition.
- Wall or Ceiling Mounting - The product should be mounted to a wall or ceiling only as recommended by the manufacturer.
- Heat - The product should be situated away from heat sources such as radiators, heat registers, stoves, or other products (including amplifiers) that produce heat.
FCC INFORMATION (For US customers)
1.PRODUCT
This product complies with Part 15 of the FCC Rules. Operation is subject to the following two conditions: (1) this product may not cause harmful interference, and (2) this product must accept any interference received, including interference that may cause undesired operation.
2. IMPORTANT NOTICE: DO NOT MODIFY THIS PRODUCT
This product, when installed as indicated in the instructions contained in this manual, meets FCC requirements. Modification not expressly approved by DENON may void your authority, granted by the FCC, to use the product.
3. NOTE
This product has been tested and found to comply with the limits for a Class B digital device, pursuant to Part 15 of the FCC Rules. These limits are designed to provide reasonable protection against harmful interference in a residential installation.
This product generates, uses and can radiate radio frequency energy and, if not installed and used in accordance with the instructions, may cause harmful interference to radio communications. However, there is no guarantee that interference will not occur in a particular installation. If this product does cause harmful interference to radio or television reception, which can be determined by turning the product OFF and ON, the user is encouraged to try to correct the interference by one or more of the following measures:
Reorient or relocate the receiving antenna.
- Increase the separation between the equipment and receiver.
- Connect the product into an outlet on a circuit different from that to which the receiver is connected.
- Consult the local retailer authorized to distribute this type of product or an experienced radio/TV technician for help.
This Class B digital apparatus complies with Canadian ICES-003.
- Handle the power cord carefully.
Hold the plug when unplugging the cord.
Installation Location 2
Cautions on Installation 2
Caution on Handling 3
Dew Warning 3
Avoid the Hazards of Electrical Shock and Fire 3
Before Using 3
Supplied Accessories 3
Trademark Information 3
About Discs 4
Disc Handling 4
Cleaning Discs 4
Playable Discs and Files 4
Unplayable Discs 5
Color Systems 5
Region Codes 5
Structure of Disc/SD Memory Card Contents 5
Symbols Used in this Operating Instructions 5
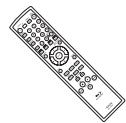
About the Remote Control 6
Loading the Batteries 6
Using a Remote Control 6
Setting this Unit not React to Other DENON's DVD Player's Remote Control 6
Changing the Signal Code of a Remote Control 6
Part Names and Functions 7
Front Panel 7
Rear Panel 7
Remote Control 8
Front Panel Display 9
Adjusting the Brightness of the Display 9
Examples of Displays during Operation 9
Connections
Connecting to a Display Device with HDMI Cable 10
Connecting to a Display Device and an Amplifier/ Receiver with HDMI Cable 10
HDMI Output Mode and Actual Output Signals 10
Audio Setting 11
Connecting the AC Cord 11
Playback
DirectPlayback 12
Operations Using Disc Menu, Title Menu, and Popup Menu 13
Playing Back a VR mode DVD-RW/-R 13
Pause 13
ResumePlayback 14
Fast Forward / Fast Reverse Playback 14
Slow Forward Playback 14
Step by StepPlayback 14
Dialog Speed 15
RepeatPlayback 15
A-B Repeat 15
ProgramPlayback 16
RandomPlayback 16
Zoom 17
Camera Angle 17
Search 17
On-Screen Display 18
Selecting the Format of Audio and Video 20
Selecting Audio Streams/Channels 20
Selecting Subtitle Language 21
Adjusting the Picture 21
Virtual Surround 22
Pure Direct Mode 22
Setting the BD Audio Mode 22
Playing Back an MP3, Windows Media™ Audio, JPEG and DivX® File 23
Kodak Picture CD 25
Reading the SD Memory Card 25
Function Setup
Using the Setup Menu 27
Quick 27
Custom 27
Initialize 33
Others
Troubleshooting 34
Language Code 35
Specifications 36
Features
HDMI (High-Definition Multimedia Interface)
You can enjoy clearer video output when connecting this unit to a display device with an HDMI-compatible port.
- Dialog Speed
Playback in slightly faster speed while keeping the sound quality as in the normal playback.
Dialog speed is available only on discs recorded in the Dolby Digital format.
- Still/Fast/Slow/Step Playback
Various playback modes are available including still pictures, fast forward/reverse, slow motion and step frames.
- Still Mode
The resolution of pictures while in the still (pause) mode can be adjusted.
- Random Playback for audio CD, MP3, JPEG, and Windows Media™ Audio
This unit can shuffle the playback order of tracks/files.
- ProgramPlayback for audio CD, MP3, JPEG, and Windows Media™ Audio
You can program the playback order of tracks/files in a desired order.
- BD/DVD Menus in a Desired Language
You can display BD/DVD menus in a desired language, if available on a BD/DVD.
- Auto Power Off
The power turns off automatically if there is no activity at the unit or its remote control for more than 30 minutes (refer to page 33).
- Subtitles in a Desired Language
You can select a desired language for subtitles if that language is available on the BD/DVD and DivX®.
- Selecting a Camera Angle
You can select a desired camera angle if a disc contains sequences recorded from different angles.
- Choices for Audio Language and Sound Mode
You can select a desired audio language and sound mode if different languages and modes are available on a disc.
Ratings Control (Parental Lock)
You can set the control level to limit playback of discs which may not be suitable for children.
Automatic Detection of Discs
This unit automatically detects if a loaded disc is BD, DVD, audio CD, MP3, JPEG, Windows Media™ Audio or DivX®.
Introduction
- On-Screen Display
Information about the current operation can be displayed on a screen, allowing you to confirm the currently active functions (such as program playback) using the remote control.
- Dimmer
The brightness of the front panel display can be adjusted.
- Screen Saver
The screen saver program starts if there is no activity at the unit or its remote for more than 5 minutes. The brightness of the display is darken by 75% . The program is deactivated when there is any activity.
- Picture Control
Picture control adjusts black level and noise reduction of the specific display.
Search
Chapter search: Search for a desired chapter.
Title search: Search for a desired title.
Track search: Search for a desired track/file.
Time search: Search for a desired time point or a title or a track/file.
Repeat
Chapter: Repeated playback of a chapter of the disc.
Title: Repeated playback of a title of the disc.
Track: Repeated playback of a track/file of the disc.
All: Repeated playback of the entire disc.
(not available for BD, DVD-video)
A-B: Repeated playback of a part between two points.
Group: Repeated playback of a folder of the MP3/JPEG/ Windows Media™ Audio/DivX® disc being played back is possible.
- Zoom
x1.2, x1.5, x2.0, x4.0 magnified image can be displayed. (not available for BD)
- Marker
Electric reference points designated by user can be called back.
-ResumePlayback
- User can resume playback from the point at which the playback has been stopped even if the power is turned off.
- Bit Rate Indication
The bit rate (the amount of video data currently being read) can be displayed during the playback of video contents. (not available for BD)
DRC (Dynamic Range Control)
Use this procedure to set the dynamic range of the output signals when playing back DVD/BD recorded in Dolby Digital/Dolby Digital Plus/Dolby TrueHD.
- Displaying a JPEG picture
Kodak Picture CD can be played back. Still images stored in JPEG format on DVD-RW/-R, CD-RW/-R or SD Memory Card can also be played back.
- Playing Back Windows Media™ Audio File
You can enjoy Windows Media™ Audio files which are recorded on DVD-RW/-R, CD-RW/-R or SD Memory Card.
-Playing Back an MP3 File
You can enjoy MP3 files which are recorded on DVD-RW/-R, CD-RW/-R or SD Memory Card.
-Playing Back DivX® File
You can enjoy DivX® files which are recorded on DVD-RW/-R or CD-RW/-R.
-
Official DivX® Certified product
-
Plays all versions of DivX® video (including DivX® 6) with standard playback of DivX® media files.
-Playing Back the Contents in SD Memory Card
-
You can playback MP3, Windows Media™ Audio, or JPEG stored in an SD Memory Card.
-
You can store picture-in-picture commentary, subtitles or other extras for BD-ROM Profile 1.1 files in a SD Memory Card and playback with the BD-ROM.
- BD-J Application
- With some BD that supports Java applications (BD-J), you can enjoy interactive function (e.g., game).
Important
Use only discs marked with logos listed on page 4.
Power Supply
The main power supply is engaged when the main plug is plugged in a 120V, 60Hz AC outlet. To operate the unit, press
Warning
To avoid fire or electric shock, do not expose this unit to rain or moisture.
WARNING:
LIVE PARTS INSIDE.
DO NOT REMOVE ANY SCREWS.
Installation Location
For safety and optimum performance of this unit:
- Do not stand the unit up vertically. Install the unit in a horizontal and stable position. Do not place anything directly on top of the unit. Do not place the unit directly on top of the TV.
- Shield it from direct sunlight and keep it away from sources of intense heat. Avoid dusty or humid places. Avoid places with insufficient ventilation for proper heat dissipation. Do not block the ventilation holes on the sides of the unit. Avoid locations subject to strong vibration or strong magnetic fields.
- Be sure to remove a disc and unplug the AC cord from the outlet before carrying the unit.
Non-use periods - Turn off the unit when it is not in use. Unplug the unit from the household AC outlet if it is not to be used for a long time. Unplug the unit during lightning storms.
Please read this operating instructions carefully before using the unit, and keep it for future reference.
Cautions on Installation
Noise or disturbance of the picture may be generated if this unit or any other electronic equipment using microprocessors is used near a tuner or TV.
If this happens, take the following steps:
- Install this unit as far as possible from the tuner or TV.
- Set the antenna wires from the tuner or TV away from this unit's AC cord and input/output connection cords.
- Noise or disturbance tends to occur particularly when using indoor antennas or 300/ ohms feeder wires. We recommend using outdoor antennas and 75/ ohms coaxial cables.
Note
- For heat dispersal, do not install this equipment in a confined space such as a book case or similar unit.
Introduction

Caution on Handling
- Cautions on using mobile phones.
Using a mobile phone near this unit may result in noise. If so, move the mobile phone away from this unit when it is in use.
- Before turning the power operation button on.
Check once again that all connections are correct and that there are not problems with the connection cables. Always set the power operation button to the standby position before connecting and disconnecting connection cables.
- Sufficiently ventilate the place of installation.
If the unit is left in a room full of the smoke from cigarettes, etc., for long periods of time, the surface of the optical pickup could get dirty, in which case it will not be able to read the signals properly.
Dew Warning
Moisture condensation may occur inside the unit when it is moved from a cold place to a warm place, or after heating a cold room or under conditions of high humidity. Do not use the unit at least for 2 hours until its inside is dry.
Avoid the Hazards of Electrical Shock and Fire
- Do not handle the AC cord with wet hands.
- Do not pull on the AC cord when disconnecting it from AC wall outlet. Grasp it by the plug.
- If, by accident, water is spilled on this unit, unplug the AC cord immediately and take the unit to our authorized service center for servicing.
Before Using
Pay attention to the following before using this unit:
- Moving the unit.
To prevent short-circuits or damaged wires in the connection cables, always unplug the power supply cord and disconnect the connection cables between all other audio components when moving the unit.
- Store the operating instructions in a safe place.
After reading the operating instructions, store them in a safe place as they could come in handy in the future.
- Whenever
is in the STANDBY state, the unit is still connected to AC line voltage.
Please be sure to unplug the cord when you leave home for, say, a vacation.
- Note that the illustrations in these instructions may differ from the actual unit for explanation purposes.
The serial number of this product may be found on the back of the unit. No others have the same serial number as yours. You should record the number and other vital information here and retain this book as a permanent record of your purchase to aid identification in case of theft.
| Date of Purchase | |
| Dealer Purchase from | |
| Dealer Address | |
| Dealer Phone No. | |
| Model No. | |
| Serial No. |
Supplied Accessories
Please check to make sure the following items are included with the main unit in the carton.
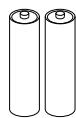
remote control (RC-1090)
"AA" (R6P) batteries x2
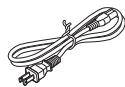
AC cord
operating instructions
service station list
warranty card

Trademark Information
HBM
HIGH-DEFINITION MULTIMEDIA INTERFACE
HDMI, the HDMI logo and High-Definition Multimedia Interface are trademarks or registered trademarks of HDMI Licensing LLC.
DOLBY
DIGITAL
Manufactured under license from Dolby Laboratories. Dolby and the double-D symbol are trademarks of Dolby Laboratories.
Dts
Digital Surround
Manufactured under license under U.S. Patent #s: 5,451,942; 5,956,674; 5,974,380; 5,978,762; 6,487,535 & other U.S. and worldwide patents issued & pending. "DTS" and "DTS Digital Surround" are registered trademarks and the DTS logos and Symbol are trademarks of DTS, Inc. © 1996-2007 DTS, Inc. All Rights Reserved.


Java and all other trademarks and logos are trademarks or registered trademarks of Sun Microsystems, Inc. in the United States and/or other countries.

DivX, DivX Certified, and associated logos are trademarks of DivX, Inc. and are used under license.

Plays Windows MediaTM
Windows Media and the Windows logo are trademarks or registered trademarks of Microsoft Corporation in the United States and/or other countries.
"Blu-ray Disc" and _blue rayDisc are trademarks.
DVD is a trademark of DVD Format/Logo Licensing Corporation.

is trademark of Eastman Kodak Company.
About Discs
Disc Handling
- Handle the discs so that fingerprints and dust do not adhere to the surfaces of the discs.
Always store the disc in its protective case when it is not used. - Note that discs with special shapes cannot be played on this product. Do not attempt to play back such discs, as they may damage the unit.
Cleaning Disks
- When a disc becomes dirty, clean it with a cleaning cloth. Wipe the disc from the center to out. Do not wipe in a circular motion.
- Do not use solvents such as benzine, thinner, commercially available cleaners, detergent, abrasive cleaning agents or antistatic spray intended for analog records.
Playable Discs and Files
This unit is compatible to play back the following discs.
To play back a BD or DVD, make sure that it meets the requirements for region codes and color systems as described on page 5.
You can play back discs that have the following logos on the disc. Other disc types are not guaranteed to play back.
| Playable discs | Logos |
| Blu-ray Disc | |
| - BD-video | |
| - BD-RE(ver.2.1) | |
| (Recorded in BDMV format) | |
| - BD-R(ver.1.1) | |
| (Recorded in BDMV format) | |
| (Unclosed discs may not be played back.) |
| DVD-video | DVD VIDEO | DVD VIDEO |
| DVD-RW (Finalized discs only) | DVD RW | DVD RW |
| DVD-R DVD-R DL (Finalized discs only) | DVD R | DVD R |
| CD-DA (audio CD) | COMPACT DISC DIGITAL AUDIO | |
| CD-RW | COMPACT DISC DIGITAL AUDIO ReWritable | COMPACT DISC ReWritable |
| CD-R | COMPACT DISC DIGITAL AUDIO Recordable | COMPACT DISC Recordable |
| Kodak Picture CD | Kodak Picture CD COMPATIBLE | |
| DTS - CD (5.1 Music Disc) | — | |
| Playable files | Logos | Media |
| MP3 | — | DVD-RW/-R CD-RW/-R SD Memory Card (including SDHC) miniSD Card microSD Card |
| Windows Media™ Audio | Plays Windows Media™ | |
| JPEG | — | |
| DivX® | DIVX® | DVD-RW/-R CD-RW/-R |
Note
- Discs containing the DivX® files with the DivX® GMC (Global Motion Compensation) playback feature, which is DivX® supplemental function, cannot be played back on this unit.
- This unit cannot play back the disc contents protected by Windows Media™ Digital Rights Management (DRM).
- "WMA" (Windows Media™ Audio) is an audio codec developed by Microsoft® in the United States of America.
- This unit supports AAC as an audio format recorded with video contents for BD-R, BD-RE. This unit does not support AAC as an independent audio file.
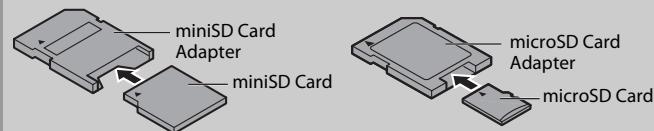
| Readable cards | Playable files / data |
| SD Memory Card (8MB - 2GB) | MP3, Windows Media™ Audio, JPEG, Picture-in-picture commentary, subtitles or other extras for BD-ROM Profile 1.1 |
| SDHC Memory Card (4GB) | |
| miniSD Card (8MB - 2GB) | |
| microSD Card (8MB - 2GB) |
Note for SD Memory Cards
- Do not remove the SD Memory Card or turn off the unit while the contents of the card is in playback. It may result in malfunction or loss of the card's data.
- Please keep the SD Memory Cards in their cases when you are not using them.
- Do not try to open or modify the card.
- Do not touch the terminal surface with your fingers or any metals.
- Do not attach additional labels or stickers to cards.
- Do not remove the label of the SD Memory Cards.
- This unit supports SD Memory Card with FAT12/FAT16 file system, and SDHC Memory Card with FAT32 file system.
- This unit may not read the SD Memory Cards formatted on computer. If that is the case, please reformat the SD Memory Cards on this unit and try again.
- This unit does not supports mini SDHC and micro SDHC Memory Card.
- For miniSD Card and microSD Card adapter is necessary.
- Portions of this product are protected under copyright law and are provided under license by ARIS/SOLANA/4C.
Introduction
Unplayable Discs
The following discs will not play back on this unit.
- BD-RE Ver.1.0 (BD-disc with cartridge)
BD-R Ver.1.2 (HTL 4x or LTH 2x) - BD contains MP3/ Windows Media™ Audio/ JPEG/ DivX® files
- BD/DVD hybrid disc (e.g., Total Hi Def hybrid disc)
- BD-video that does not include "A" on its region code.
DVD-video that does not include either "1" nor "ALL" on its region code.
DVD-ROM/RAM (For DVD-ROM discs, data files in DivX® 3.11, 4.x, 5.x and 6 can be played)
DVD-RW/-R recorded in non-compatible recording format - CD-ROM (Data files in DivX® 3.11, 4.x, 5.x and 6 can be played)
- CDV (Only the audio part can be played)
- CD-G (Only the audio signals can be output)
- CompactDisc-Interactive (CD-I)
Video Single Disc (VSD)
Video CD, Super Video CD - Super audio CD (Only the sound on the CD layer can be heard. The sound on the high-density super audio CD layer cannot be heard.)
DVD-audio
HD DVD - Disc with recording area less than 55mm in diameter
- Unauthorized disc (Pirated disc)
- Unfinalized disc
Color Systems
BD and DVD are recorded in different color systems throughout the world. The most common color system is NTSC (which is used primarily in the United States and Canada).
This unit uses NTSC, so BD or DVD you play back must be recorded in the NTSC system. You cannot play back BD or DVD recorded in other color systems.
Region Codes
This unit has been designed to play back BD with region A and DVD-video with region 1. You cannot play back BD or DVD-video that are labeled for other regions. Look for the symbols on the right on your BD or DVD-video. If these region symbols do not appear on your BD or DVD-video, you cannot play back the disc in this unit. The letter or number inside the globe refers to region of the world. A BD or DVD-video labeled for a specific region can only play back on the unit with the same region code.
BD-video


DVD-video

Structure of Disc/SD Memory Card Contents
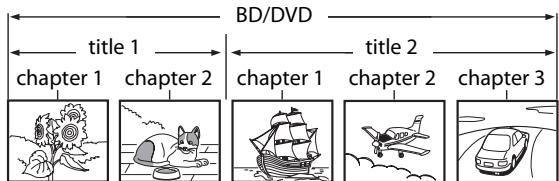
The contents of BD / DVD are generally divided into titles. Titles may be further subdivided into chapters.
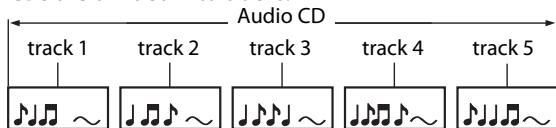
Audio CDs are divided into tracks.
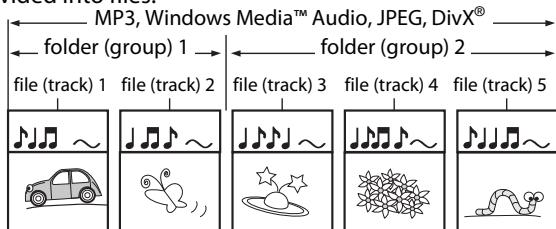
Data discs or SD Memory Cards contains MP3/Windows Media™ Audio/JPEG/DivX® is divided into folders, and the folders are subdivided into files.
Symbols Used in this Operating Instructions
To specify for which media type each function is, we put the following symbols at the beginning of each item to operate.
| Symbol | Description |
| BD-V | Description refers to BD-video and BD-RE (ver. 2.1)/BD-R recorded in BDMV format |
| DVD-V | Description refers to DVD-video and DVD-RW/-R recorded in video mode |
| DVD-VR | Description refers to DVD-RW/-R recorded in VR mode |
| CD | Description refers to audio CD and DTS-CD |
| MP3 | Description refers to DVD-RW/-R, CD-RW/-R and SD Memory Card with MP3 files |
| WMA | Description refers to DVD-RW/-R, CD-RW/-R and SD Memory Card with Windows Media™ Audio files |
| JPEG | Description refers to DVD-RW/-R, CD-RW/-R and SD Memory Card with JPEG files |
| DivX® | Description refers to DVD-RW/-R and CD-RW/-R with DivX® files |
If you do not find any of the symbols listed above under the function heading, the operation is applicable to all media.
About the button names in this explanation
< > : Buttons on the main unit
[ ]: Buttons on the remote control
Button name only:
Buttons on the main unit and remote control
About the Remote Control
Loading the Batteries
① Open the battery compartment cover.
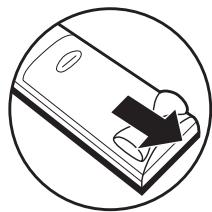
② Insert two "AA" (R6P) batteries, with each one oriented correctly.
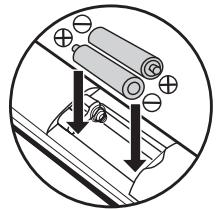
③ Close the cover.
Cautions on Batteries
- Use "AA" (R6P) batteries in this remote control.
- Replace the batteries with new ones approximately once a year, though this depends on the frequency with which the remote control is used.
- If the remote control does not operate within a close proximity of the main unit, replace the batteries with new ones, even if less than a year has passed.
- The included batteries serve only for verifying operation. Replace them with new batteries as soon as possible.
- When inserting the batteries, be careful to do so in the proper direction, following the and marks in the remote control's battery compartment.
-
To prevent damage or battery fluid leakage:
-
Do not mix a new battery with an old one.
- Do not mix two different types of batteries such as alkaline and manganese.
- Do not short-circuit, disassemble, heat or dispose of batteries in flames.
- Remove the batteries when not planning to use the remote control for a long period of time.
- If the batteries should leak, carefully wipe off the fluid from the inside of the battery compartment, then insert new batteries.
Using a Remote Control
Keep in mind the following when using the remote control:
- Make sure that there are no obstacles between the remote control and infrared sensor window on the unit.
- Remote operation may become unreliable if strong sunlight or fluorescent light is shining on infrared sensor window of the unit.
- Remote control for different devices can interfere with each other. Avoid using remote control for other equipment located close to the unit.
- Replace the batteries when you notice a fall off in the operating range of the remote control.
- The maximum operable ranges from the unit are as follows.
- Line of sight: approx. 23 feet (7m)
- Either side of the center: approx. 23 feet (7m) within 30^

Setting this Unit not React to Other DENON's DVD Player's Remote Control
If you have other DENON's DVD players around this unit, this unit reacts to the commands you made for DVD players through its remote control. To avoid this situation, you can set this unit not react to other DENON's DVD player's remote control.
1) In stop mode, press [SETUP].
2) Press [7],[8],[9],[2].
3) Press [SETUP].
- "Only Attached Remocon" will be displayed on the upper right corner of the screen and this unit only reacts to the commands from this unit's remote control.
- To set back to default, press [7],[8],[9],[1] at step 2. "Normal Remocon" will be displayed on the upper right corner of the screen and this unit reacts to both the commands from this unit's remote control and the other DENON's DVD players' remote control.
Note
- The setting remains after you turn off this unit or unplug the AC cord.
- If you try to operate this unit with the other DENON's DVD players' remote control, some of the operation may not available depends on the manufactured year or type of the remote control.
Changing the Signal Code of a Remote Control
To avoid the other DENON's BD players responding the remote signal of this unit, you can change the signal code of the remote control. If the signal code of the remote control does not match to the signal code of the unit, you cannot control the unit with the remote control.
Change the signal code of the unit
1) In stop mode, press [SETUP].
2) Use [ / ] to select GIN TOM, then press [ENTER].
3) Use [ / ] to select other, then press [ENTER].
4) Use [ / ] to select "Remote Control Setting".
5) Press [ENTER] to select "DENON1" or "DENON2".
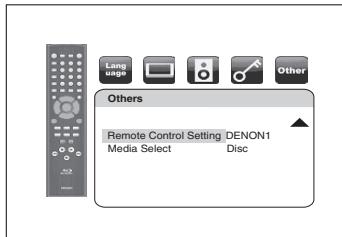
6) Press [SETUP] to exit.
- At this point the new signal code of the unit is effective. Please change the signal code of the remote control to match to the signal code of the unit with following procedure.
Change the signal code of the remote control
Set to "DENON1":
Press and hold [RETURN], and press [3], [2], [1].
Set to "DENON2":
Press and hold [RETURN], and press [1], [2], [3].
- If the signal code does not match, the signal code of the remote control will be displayed on the front panel display.
- The default setting and the setting after you change the batteries is "DENON1".
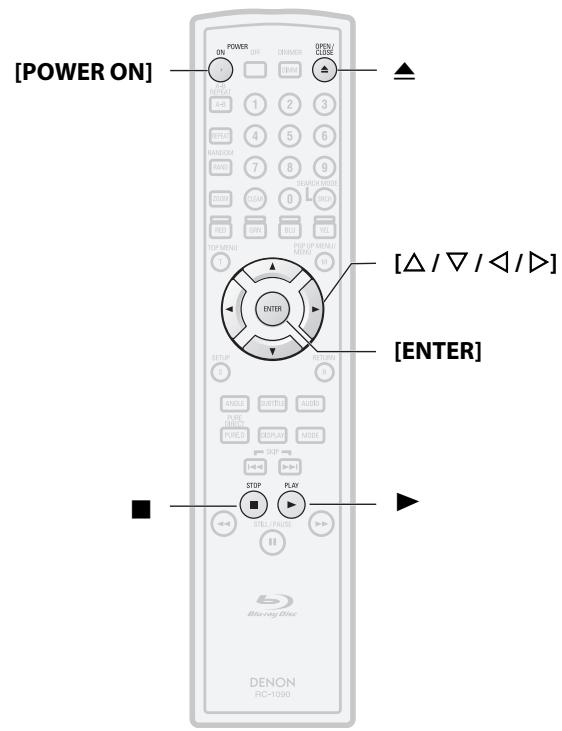
Part Names and Functions
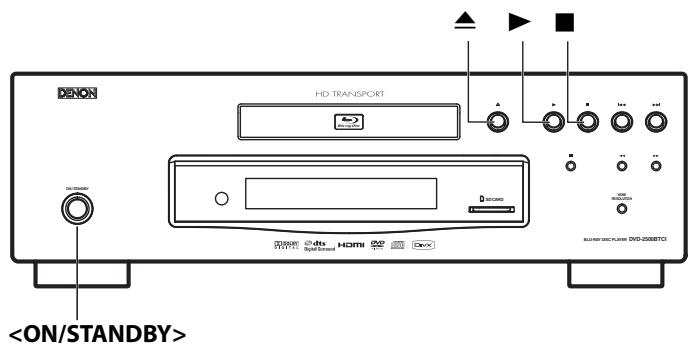
Front Panel
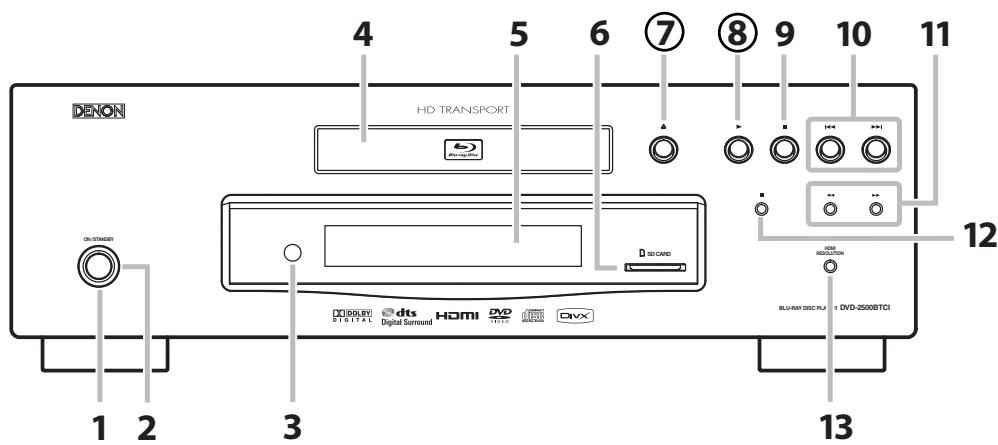
Rear Panel

The unit can also be turned on by pressing the buttons with circled numbers.
- ON/STANDBY button
Press to turn the unit on or off.
- Power indicator
This indicator lights up in green when the power is on, and lights up in red when in standby mode.
- Infrared sensor window
Receive signals from your remote control so that you can control the unit from a distance.
- Disc tray
Place a disc when opening the disc tray.
- Display
Refer to "Front Panel Display" on page 9.
- SD CARD slot
Insert an SD Memory Card, and play back the contents in it.
- (OPEN/CLOSE) button
Press to open or close the disc tray.
- (PLAY) button
Press to start or resume playback.
- (STOP) button
Press to stop playback.
10.1/▶(SKIPDOWN/UP) button
Press to skip down/up titles/chapters/tracks/file.
- / (FAST FORWARD/REVERSE) button
During playback, press to fast forward / fast reverse the playback. When playback is in pause, press to slow forward the playback.
- (STILL/PAUSE) button
Press to pause playback.
- HDMI RESOLUTION button
Press to set the HDMI jack's video signal output mode.
- HDMI OUT jack
Use an HDMI cable to connect to a display with an HDMI jack.
- CONTROL CONNECTOR (RS-232C)
Control terminal for system extension.
- ROOM TO ROOM IN / OUT jacks
Connecting the DENON Satellite Remote
Control to these jacks enables you to
operate more than one DENON components
with one remote control.
- ACIN Terminal
Use the AC cord to connect to the AC outlet.
Note
- Do not touch the inner pins of the jacks on the rear panel. Electrostatic discharge may cause permanent damage to the unit.
Remote Control
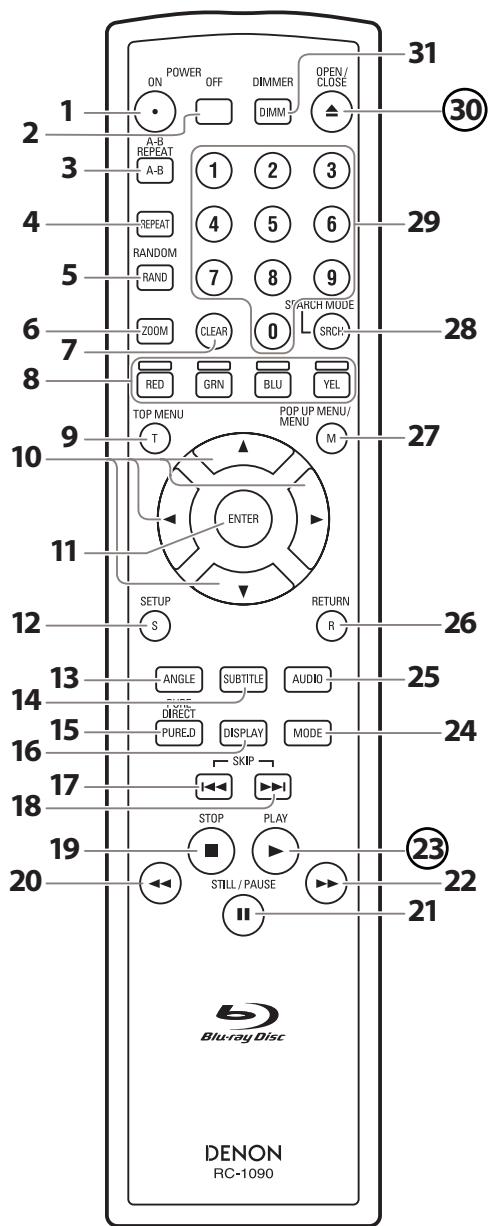
The unit can also be turned on by pressing the buttons with circled numbers.
1. POWER ON button
- Press to turn the unit on.
2. POWER OFF button
- Press to turn the unit off.
3. A-B REPEAT button
- Press to mark a segment between A and B for A-B repeat playback.
4. REPEAT button
- Press to select the repeat mode.
5. RANDOM button
- Press to display the random playback screen for shuffling the playback order of tracks/files.
6. ZOOM button
- During playback, press to enlarge the picture on the screen.
7. CLEAR button
- Press to clear the information once entered, to clear the marker settings, or to cancel the programming for CD, etc.
8. RED/GRN/BLU/YEL button
- Press to select item on some BD menus.
9. TOP MENU button
- Press to display the top menu.
10. Cursor / / / buttons
- Press to select items or settings.
11. ENTER button
- Press to confirm or select menu items.
12. SETUP button
- Press to display the setup menu.
13. ANGLE button
- Press to access various camera angles on the disc.
- Press to rotate the JPEG/Kodak Picture images.
14. SUBTITLE button
- Press to display the subtitle menu.
15. PURE DIRECT button
- Press to stop output of front panel display.
16.DISPLAY button
- Press to display the On-Screen display menu.
17. SKIP | button
- During playback, press to return to the beginning of the current title chapter, track or file.
18. SKIP▶▶ button
- During playback, press to skip the next chapter, track or file.
19. STOP button
- Press to stop playback.
20. REW button
- During playback, press to fast reverse the playback.
21. STILL/PAUSE button
- Press to pause playback.
- When playback is in pause, press repeatedly to forward the playback step by step.
22. FFW▶ button
- During playback, press to fast forward the playback.
- When playback is in pause, press to slow forward the playback.
23. PLAY▶ button
- Press to start playback or resume playback.
24. MODE button
- During playback, press to display the picture adjustment menu, and rapid playback.
- During the JPEG playback, press to display menus for changing the visual effect for switching the image or changing the size of the image.
- In stop mode with BD inserted, press to display a menu for setting the BD audio mode.
- In stop mode with BD or DVD inserted, press to display a menu for setting the virtual surround.
- In stop mode with audio CD, or disc with MP3, Windows Media™ Audio, JPEG files inserted, press to display menus for program and random playback.
25. AUDIO button
- Press to display the audio menu.
26. RETURN button
- Press to return to the previously displayed menu screen.
27. POP UP MENU / MENU button
- Press to display the disc menu.
28.SEARCH MODE button
- Press to display the search menu.
29.Number buttons
- Press to enter the title/chapter/track/file numbers.
30. OPEN/CLOSE button
- Press to open or close the disc tray.
31. DIMMER button
- Press to adjust the brightness of the front panel display.
Note
- [ZOOM], and [RANDOM] are not available for BD.
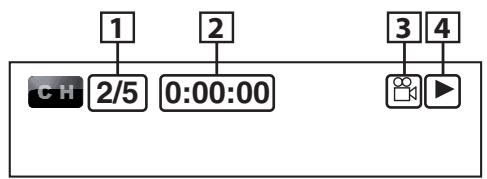
Front Panel Display
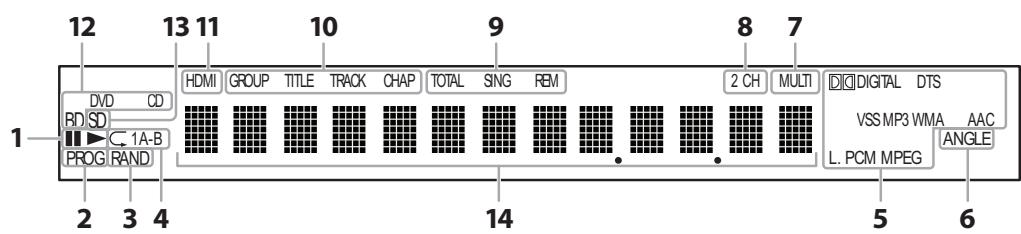
- : Appears when playing back a disc.
II: Appears when playback is paused. - Appears during program playback.
- Appears during random playback.
- Appears during repeat playback.
- These indicate the format being decoded.
- This is not a indication of the recorded format or the format that will be output.
- Appears when playing back a multi angle disc.
- Appears when playing back a multi-channel audio disc.
- Appears when playing back a 2-channel audio disc.
- Indicates the time display mode.
TOTAL: Appears when displaying the total remain/elapsed time of audio CD.
SING : Appears when sound data is being played or sound data is highlighted in program menu.
REM : Appears when displaying remaining time.
Adjusting the Brightness of the Display
You can adjust the brightness of the display by the pressing [DIMMER] repeatedly. The brightness changes as bright dimmer auto each time you press [DIMMER]. If you select auto, the display gets dimmer during playback.
Note
-
[DIMMER] is not available when the setup menu is displayed.
-
These indicate the type of the different sections of the currently playing disc.
- Appears when HDMI video or audio signals are being output.
Does not appear when HDMI connection is not verified.
- Indicates the type of the currently playing disc.
- Appears when inserting an SD Memory Card.
- Appears various type of information on the disc, the elapsed playing time, etc.
Examples of Displays during Operation
| Display | Description |
| POWER-ON | Power on |
| POWER-OFF | Standby mode |
| OPEN | Tray open |
| CLOSE | Tray is closing |
| LOADING | Loading the disc |
| NO DISC | No disc inserted |
| NO SD MEMORY | No SD Memory Card inserted |
| —— | This unit cannot read the disc or SD Memory Card inserted. |
| STOP | Stop mode. |
| 480.i | HDMI output mode(480i) is selected. |
| 480.P | HDMI output mode(480p) is selected. |
| 720.P | HDMI output mode(720p) is selected. |
| 1080.i | HDMI output mode(1080i) is selected. |
| 1080.P | HDMI output mode(1080p) is selected. |
| 1080.P24 | HDMI output mode(1080p24 frame) is selected. |
| Normal | Pure direct mode is set to pure direct off. |
| Display Off | Pure direct mode is set to front panel display off. |
| POO 01 | The total number of the track that has been registered for the program playback and track number currently selected. |
| POO F001-0002 | The total number of the files that has been registered for the program playback and folder/file number currently selected. |
| POO ROOT-0002 | When the root folder is selected "ROOT" is displayed. |
| ALL CLEAR | "All Clear" for program playback setting is selected. |
Note
- When playing back the disc that contains more than 100 titles, display of the chapter and time on the front panel display will be moved a few dots to the right.
Connecting to a Display Device with HDMI Cable
Connecting this unit to device with an HDMI jack using an HDMI cable enables digital transfer of both digital video signals and multi-channel audio signals.
After making the connection, please make HDMI settings on setup menu according to your display device. Refer to page 28-30.
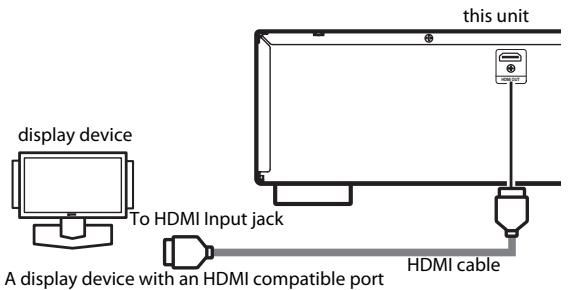
Cables not included.
Please purchase the necessary cables at your local store.
Connecting to a Display Device and an Amplifier/Receiver with HDMI Cable
Connecting this unit to display device and an amplifier/receiver with an HDMI jack using HDMI cables enables digital surround sound with high quality video.
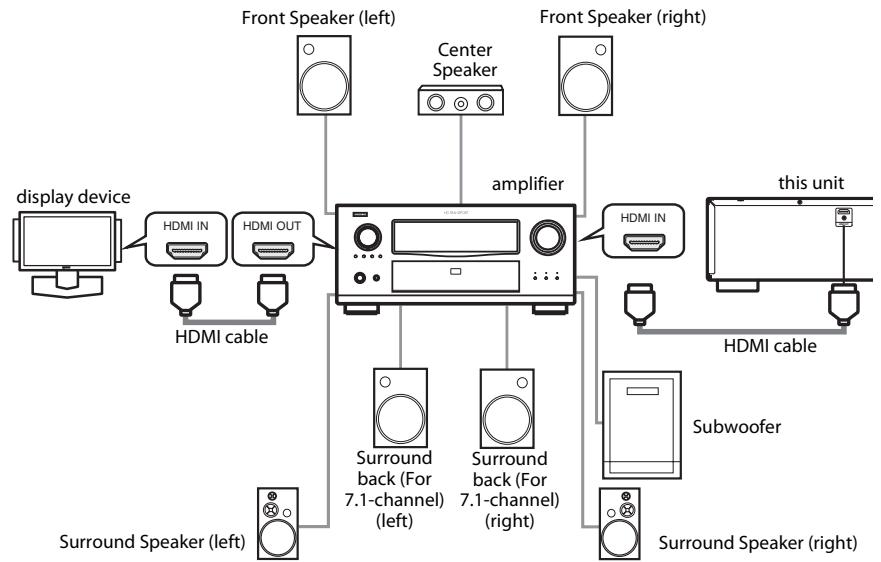
Cables not included.
Please purchase the necessary cables at your local store.
HDMI Output Mode and Actual Output Signals
Press
| Front Panel Display | HDMI Video Resolution |
| 480. i | 480 Interlaced |
| Press <HDMI RESOLUTION> ↓ | |
| 480. P | 480 Progressive |
| Press <HDMI RESOLUTION> ↓ | |
| 720. P | 720 Progressive |
| Press <HDMI RESOLUTION> ↓ | |
| 1080. i | 1080 Interlaced |
| Press <HDMI RESOLUTION> ↓ | |
| 1080. P | 1080 Progressive |
| Press <HDMI RESOLUTION> ↓ | |
| 1080. F24 | 1080 Progressive 24 frame |
| Press <HDMI RESOLUTION> | |
Note
- After you select a HDMI output mode, corresponding HDMI video resolution will be output. Then if the connected display device is not compatible with the HDMI video resolution, this unit will output the next HDMI video resolution in order until this unit finds the HDMI video resolution that is supported by connected display device.
- During BD playback,
is not available. - Video and audio signals may distorted temporarily when switching to/from the HDMI output mode.
- You can also change the HDMI output mode from "HDMI Video Resolution" in the "Video" menu on the setup menu. Refer to page 29.
- In order to get natural and high quality film reproduction of 24-frame film material, select "1080p24" if the connected display device is compatible with 1080p24 frame input.
- Even if you set to "1080p24" for the "HDMI Video Resolution", when the contents of the disc is not compatible for 1080p24 frame, 1080p60 frame will be output.
Connections
Audio Setting
When using HDMI connections make the "HDMI Audio Out" settings in the "Audio" menu on the setup menu according to the specifications of the device or monitor to be connected.
| Device to be connected | “HDMI Audio Out” setting | Output HDMI audio signal |
| Device compatible with DTS, DTS-HD, Dolby Digital, Dolby Digital Plus or Dolby TrueHD decoding | HDMI Multi(Normal) | Dolby Digital, Dolby Digital Plus, Dolby TrueHD, DTS, or DTS-HD bitstream are output from HDMI OUT. Make the speaker settings on the connected AV amplifier, etc. |
| Device compatible with 3 or more channels of audio inputs (not DTS, DTS-HD, Dolby Digital, Dolby Digital Plus or Dolby TrueHD compatible) | HDMI Multi(LPCM) | Multi-channel audio signals are output from the HDMI terminal. Make the speaker settings with the speaker setting items appear after you select “HDMI Multi(LPCM)”. Refer to page 30. |
| Device compatible with 2-channel audio input or device not compatible with audio input | HDMI 2ch | Down-mixed 2-channel audio signals are output from HDMI OUT. |
Audio signals output from HDMI OUT
| Disc type | Audio recording format | “HDMI Audio Out” setting | ||
| HDMI Multi(Normal) | HDMI Multi(LPCM) | HDMI 2ch | ||
| BD-video | Dolby Digital | Dolby Digital*1 | Multi LPCM | 2ch Downmix LPCM |
| Dolby Digital Plus | Dolby Digital Plus*1 | Multi LPCM*2 | 2ch Downmix LPCM | |
| Dolby TrueHD | Dolby TrueHD*1 | Multi LPCM*3 | 2ch Downmix LPCM | |
| DTS | DTS*1 | Multi LPCM | 2ch Downmix LPCM | |
| DTS-HD | DTS-HD*1 | Multi LPCM*4 | 2ch Downmix LPCM | |
| LPCM | Multi LPCM | Multi LPCM | 2ch Downmix LPCM | |
| BD-RE/BD-R | AAC | AAC | Multi LPCM | 2ch Downmix LPCM |
| LPCM | Multi LPCM | Multi LPCM | 2ch Downmix LPCM | |
| DVD-video | Dolby Digital | Dolby Digital | Multi LPCM | 2ch Downmix LPCM |
| DTS | DTS | Multi LPCM | 2ch Downmix LPCM | |
| LPCM | Multi LPCM | Multi LPCM | 2ch Downmix LPCM | |
| DivX® | Dolby Digital | Dolby Digital | Multi LPCM | 2ch Downmix LPCM |
| MP3/MP2 | 2ch LPCM | 2ch LPCM | 2ch LPCM | |
| audio CD/ MP3/Windows Media™ Audio | 2ch LPCM | 2ch LPCM | 2ch LPCM | |
| DTS-CD | DTS | Multi LPCM | 2ch Downmix LPCM | |
1If "BD Audio Mode" is set to "Mix Audio Output" audio will be output as multi LPCM. Refer to page 22.
2Outputs audio signals decoded from independent subsstream.
3Outputs audio signals decoded from Dolby Digital stream.
4Outputs audio signals decoded from DTS core stream.
- If the connected device is not compatible with the HDMI BITSTREAM, audio will be output as Multi LPCM or 2ch Downmix LPCM depends of the capability of the connected device even if you select "HDMI Multi(Normal)" in "HDMI Audio Out" setting. Refer to page 30.
Copyright protection system
To play back the digital video images of a BD/DVD via an HDMI connection, it is necessary that both the unit and the display device (or an AV amplifier) support a copyright protection system called HDCP (high-bandwidth digital content protection system). HDCP is copy protection technology that comprises data encryption and authentication of the connected AV device. This unit supports HDCP. Please read the operating instructions of your display device or AV amplifier for more information.
- HDMI: High-Definition Multimedia Interface
Note
- When using HDCP-incompatible display device, the image will not be viewed properly.
- Among the devices that support HDMI, some devices can control other devices via the HDMI jack, this unit cannot be controlled by another device via the HDMI jack.
- The audio signals from the HDMI jack (including the sampling frequency, the number of channels and bit length) maybe limited by the device that is connected.
- Among the monitors that support HDMI, some do not support audio output (e.g., projectors). In connections with device such as this unit, audio signals are not output from the HDMI output jack.
Connecting the AC Cord
After you made all necessary connections, connect the AC cord to the AC IN. Then connect the AC cord to the AC outlet.

Supplied cables used in this connection are as follows:
- AC cord x 1
Note
- Insert the plugs securely. Incomplete connections will result in the generation of noise.
About the button names in this explanation
< > : Buttons on the main unit
[ ]: Buttons on the remote control
Button name only:
Buttons on the main unit and remote control
DirectPlayback
BD-V DVD-V DVD-VR CD
1 Press
2 Turn on the display device and select the HDMI input on the device.
Press to open the disc tray.
4 Place the disc on the disc tray with its label side facing up.
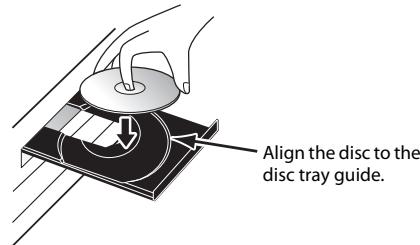
Press to close the disc tray. It may take a while
Some discs may start playback automatically.
Press to start playback.
For many of BD-video and DVD-video, a menu screen may appear.
In this case, use [ / / / ] to select the desired item, then press [ENTER].
7 Press once to stop playback temporarily.
Refer to "Resume Playback" on page 14.
To eject the disc:
Press to open the disc tray, then remove the disc before turning off the unit.

About the button names in this explanation
< > : Buttons on the main unit
[ ]: Buttons on the remote control
Button name only:
Buttons on the main unit and remote control
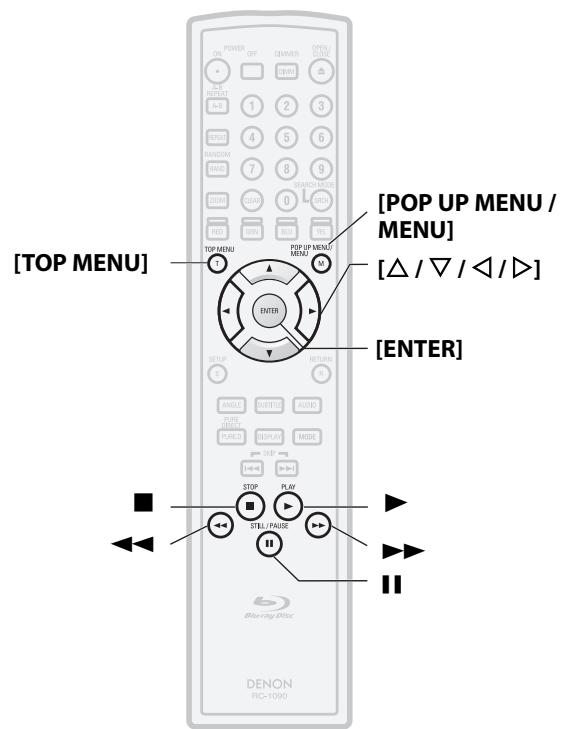
Operations Using Disc Menu, Title Menu, and Popup Menu
BD-V DVD-V DVD-VR
Many of BD and DVD disc contains Disc menu (DVD), Title menu (BD/DVD) or Pop-up menu (BD-video) which describes the contents of the disc, or a disc menu, which guides you through the available functions in the disc. The contents of the menus may differ depending on the discs.
Disc menu (DVD)
1) Press [POP UP MENU / MENU].
- The disc menu will appear.
2) Use [ / / / ] to select an item, then press [ENTER].
Title menu (BD/DVD)
1) Press [TOP MENU].
2) Use [ / / / ] to select an item, then press [ENTER].
Pop-up menu (BD-video)
- This is a special feature available for some BD. When you press [POP UP MENU / MENU], a menu pops out on the screen while the contents still play back.
1) During BD playback, press [POP UP MENU / MENU].
2) Use [ / / / ] to select an item, then press [ENTER].
Note
- If the feature is not available, may appear on the TV screen.
- Contents of menus and corresponding menu operations may vary among discs. Refer to the manual accompanying the disc for details.
Playing Back a VR mode DVD-RW/-R
DVD-VR
When you are playing back a VR mode DVD-RW/-R, you can choose "Original" or " Playlist" if the disc contains a " Playlist".
1) In stop mode, press [POP UP MENU / MENU] to call up DVD menu.
2) Use [ / ] to select "Original" or " Playlist".
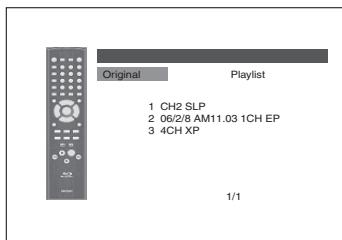
3) Use [ / ] to select desired title, then press [ENTER].
Note
"Original" is the title which is actually recorded on the disc.
- Playlist is edited version of the Original.
DVD menu varies depending on discs.
- If the disc does not contain Playlist, Playlist will not be displayed on the DVD menu.
Pause
1) During playback, press II. Playback will be paused.
1
2) Press to return to normal playback.
Note
- For BD, DVD and DivX®, set "Still Mode" to "Field" in the "Video" menu if pictures in the pause mode are blurred (refer to page 29).
ResumePlayback
1) During playback, press ■.
- Resume message will appear on the screen.
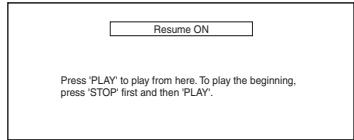
2) Press▶.
In a few seconds, playback will resume from the point at which it stopped last. To cancel the resume playback and start playing back the disc from the beginning, press again while the playback is stopped.
Note
- For MP3, JPEG or Windows Media™ Audio, playback will resume from the beginning of the current file.
- The resume information will be saved even when the power is turned off.
- If you unplug the AC cord, open the disc tray or press again in stop mode, the resume information will be cleared.
- Resume playback is not available for the BD that supports Java applications (BD-J).
Fast Forward / Fast Reverse Playback

1) During playback, press or repeatedly to select a desired forward or reverse speed.
Button

▶▶Button

2) Press to return to normal playback.
- For BD and DVD, speed changes in 5 different levels. For audio CD, MP3, Windows Media™ Audio, and DivX®, speed changes in 3 different levels.
- For audio CD, MP3 and Windows Media™ Audio, sound will be output at any speed of fast forward and reverse search.
Note
- For MP3 and Windows Media™ Audio, fast forward/fast reverse search between different files are not available.
- For audio CD, fast forward/fast reverse search between different titles are not available during the program playback.
- For some DivX® files, fast forward/fast reverse search may not function.
Slow Forward Playback

1) During playback, press II.
2) Press▶.
- Slow motion playback will begin and sound will be muted.
3) Press▶ repeatedly to select a desired speed.
- Slow forward speed changes in 3 different levels.
▶Button

4) Press to return to normal playback.
Note
- Set "Still Mode" to "Field" in the "Video" menu if pictures in the slow playback mode are blurred (refer to page 29).
- Slow reverse is not available.
Step by StepPlayback

1) During playback, press II.
- Playback will pause and sound will be muted. The disc advances frame by frame each time is pressed.

2) Press to return to normal playback.
Note
- Set "Still Mode" to "Field" in the "Video" menu if pictures in the pause mode are blurred (refer to page 29).
- Only step by step forward is available.
About the button names in this explanation
< > : Buttons on the main unit
[ ]: Buttons on the remote control
Button name only:
Buttons on the main unit and remote control
Dialog Speed
BD-V DVD-V DVD-VR
This function plays back approximately at 1.3 times of normal playback with sound being output. This function is available only on discs recorded in the Dolby Digital format.
1) During playback, press [MODE] repeatedly until the dialog speed setting appears.

2) Press [ENTER] or [ / ] to switch (x1.3), or off.
"Off": Plays back in normal speed.
"JJ": Plays back approximately at 1.3 times of normal playback.
3) Press to return to normal playback.
Note
- Every time you press , the setting will be turned "Off".
- Subtitle can be viewed during this function.
- Picture control, and audio language setting cannot be changed during this function.
- Virtual surround does not function during this function.
- This function may not work at some points on a disc.
- During this function, 2ch LPCM sound will be output.
Repeat Playback
Available repeat function may vary depending on the discs.
1) During playback, press [REPEAT] repeatedly until desired repeat mode appears on the screen.
The following repeat modes are available.
| Repeat mode | Available media | ||
| Chapter repeat | BD-V | DVD-V | DVD-VR |
| The current chapter will be played back repeatedly. | |||
| Title repeat | BD-V | DVD-V | DVD-VR |
| The current title will be played back repeatedly. | |||
| Track repeat | CD | MP3 | WMA |
| The current track or file will be played back repeatedly. | JPEG | DivX® | |
| Group repeat | MP3 | WMA | JPEG |
| The current folder will be played back repeatedly. | DivX® | ||
| All repeat | DVD-VR | CD | MP3 |
| All titles, tracks or files in the media will be played back repeatedly. | WMA | JPEG | DivX® |
A-B Repeat
BD-V | DVD-V | DVD-VR | CD | DivX®
Desired section can be played back repeatedly.
1) Press [A-B REPEAT] at the desired starting point A.
2) Press [A-B REPEAT] at the desired ending point B.
- The repeat sequence begins.
3) Press [A-B REPEAT] to exit the sequence.
Playback
Note
- The chapter/title/track/group repeat setting will be cleared when moving to other chapter, title, track/file or folder.
- Repeat playback does not function during A-B repeat playback.
- Repeat chapter/title is not available with some scenes.
- A-B Repeat can only be set within the current title or current track/file.
- A-B Repeat is not available with some scenes.
- To cancel the A point which was set, press [CLEAR].
- A-B Repeat playback does not function during chapter, title, track, group or all repeat playback.
- For some DivX^® files, A-B Repeat playback may not function.
ProgramPlayback
CD
MP3
WMA
JPEG
You can program the disc to play back in your desired order.
1) In stop mode, press [MODE].
- The program screen will appear.
2) Use [ / ] to select a track/file, then press [ENTER].
- For MP3, Windows Media™ Audio, and JPEG, use [ / ] to select a folder, then press [ENTER] first, and then use [ / ] to select a track/file, then press [ENTER].
- Press [CLEAR] to erase the last track/file of the program.
- Select "All Clear" at the bottom of the list to erase all the tracks/files in the program.
- The programmed track/file is displayed in the right hand screen.
- If the entire program cannot be displayed on the screen, "▼" or "▲" appears.
- Use [ / ] to going back forward between the hierarchy of folders.
- If eight or more tracks/files were set in a program, use the | | | | to see all the tracks/files.
3) Press to start program playback.
- Program playback will start.
Note
- During the program playback, press once to set the resume point, and then press to resume the program playback from where was pressed (audio CD) or from beginning of the file where was pressed (MP3, Windows Media™ Audio, or JPEG).
- During the program playback, press twice to display the program screen. To go back to the normal program playback, press [RETURN] to exit from the program screen, then press .
- Your program is still stored until either the disc tray is open or power is turned off.
- Up to 99 tracks/files can be entered.
- To repeat the current track/file in the program, press [REPEAT] repeatedly until "Track" appears during play back. To repeat the entire program press [REPEAT] repeatedly until "All" appears during playback.
- Even if an inserted disc contains mixed MP3, JPEG and Windows Media™ Audio files, program function allows 99 files in combination of MP3, JPEG and Windows Media™ Audio files.
- The current selected number on the front panel display blinks while setting the program playback.
- "F" is displayed in the front panel display while selecting the folder.( *** is folder number.), and file is displayed as "-***" after the folder indication.
- Playback from a desired track/ file and random playback are not available during program playback.
Playback
Random Playback
CD
MP3
WMA
JPEG
This function shuffles the play back order of tracks/files.
1) In stop mode, press [RANDOM].
![DENON DVD-2500BTCI - 1) In stop mode, press [RANDOM]. - 1](/content/2019/11/89755/images/be05d784b354df8367fd69ea1581e2d20c728c310785d9a325fce2c3bb4bda37.jpg)
2) Press to start random playback.
Note
- During the random playback, press once to set the resume point, and then press to resume the random playback fromwhere was pressed (audio CD) or from beginning of the file where was pressed (MP3, Windows Media™ Audio, or JPEG).
- During the random playback, press twice to display the random playback screen. To cancel the random playback, press [RANDOM] when the random playback screen is displayed.
- To repeat the current track/file in the random selection, press [REPEAT] repeatedly until "Track" appears during playback. To repeat the entire random selection press [REPEAT] repeatedly until "All" appears during playback.
- You cannot go back to the previous track/file during random playback.
- For a disc containing mixed MP3, JPEG and Windows Media™ Audio files, random playback of those files will be performed.
- "RAND" is displayed on the front panel display.
About the button names in this explanation
<>: Buttons on the main unit
[ ]: Buttons on the remote control unit
Button name only:
Buttons on the main unit and remote control unit
Zoom
DVD-V DVD-VR JPEG DivX
This function allows you to enlarge the video image and to pan through the zoomed image.
1) Press [ZOOM] during playback.
- Playback will continue.
2) Press [ZOOM] repeatedly to select a desired zoom factor: x1.2, x1.5, x2.0, x4.0 or off.
- "x4.0" zoom is not available for JPEG and DivX®.
![DENON DVD-2500BTCI - 2) Press [ZOOM] repeatedly to select a desired zoom factor: x1.2, x1.5, x2.0, x4.0 or off. - 1](/content/2019/11/89755/images/4418790b0fa0c5803979d9e3c4227be4d6285b3d90e109b1b2ef506644722300.jpg)
3) Use [ / / / ] to move the zoomed picture across the screen.
![DENON DVD-2500BTCI - 3) Use [ / / / ] to move the zoomed picture across the screen. - 1](/content/2019/11/89755/images/542751cd3617f2c22446441da57b2edc144ab31415ff9163aa8d4054736978ef.jpg)
4) Press [ZOOM] to exit zoom mode.
Note
- For BD, zoom function is not available.
- Zoom function does not work while disc menu is shown.
- Navigation screen is not available on JPEG.
- You cannot pan through the zoomed picture on some JPEG files.
- For some DVD, "x4.0" zoom is not available.
- For DivX® files with small image, zoom function is not available.
- For DivX^® , depends on the size of the image, some zoom factor may not available.
Camera Angle
BD-V | DVD-V
Some BD and DVD contain scenes which have been shot simultaneously from various angles. You can change the camera angle when appears on the screen.
1) Press [ANGLE] during playback.
- The selected angle will be displayed on the display bar at the top of the screen.
2) Use [ / ] to select your desired angle.
Note
- If the "Angle Icon" setting is "Off" in the "Others" menu, will not appear. Refer to page 33.
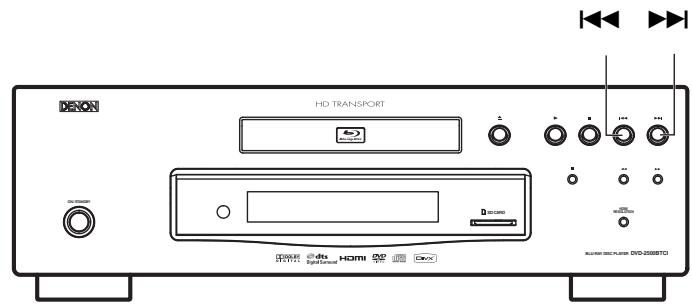
Search
Using |▶/▶
1) Press▶▶ to skip to the next chapter, track or file during playback.
To go back to the previous chapter, track or file, press twice in quick successions.
Note
- If title contains no chapters, | | | | | | changes the title.
Using [SEARCH MODE]
- By using the [SEARCH MODE], you can select following search options.
| Search mode | Available media | ||
| TT / GH Title / Chapter search | BD-V | DVD-V | DVD-VR |
| TR Track Search | CD | MP3 | WMA |
| JPEG | DivX® | ||
| Time Search | BD-V | DVD-V | DVD-VR |
| CD | DivX® | ||
| MKR Marker Search | BD-V | DVD-V | DVD-VR |
| CD | |||
Playback
1) Select a type of search by pressing [SEARCH MODE].
- Every time you press [SEARCH MODE], type of search changes.
2) Enter the desired chapter, track, file, title number or time to search for using [the Number buttons].
Chapter, title, track or time search will start.
Note
- During program and random playback, search functions are not available except the search using / .
- Time search function is available only in the same track, file or title.
- For some DivX^® files, time search may not function.
- For BD, chapter and time search are available only during playback.
Marker search
This feature allows you to assign a specific point on a title or track to be called back later.
1) During playback, press [SEARCH MODE] repeatedly until marker setting appears.
2) Use [ / ] to select a marker number (1-9).
3) When the disc reaches the point you want to set a marker, press [ENTER].
- The title or track and elapsed playback time will appear on the screen.
4) Press [SEARCH MODE] or [RETURN] to exit.
5) To return to the marker later, call the marker setting by pressing [SEARCH MODE] repeatedly during playback or in stop mode, and use [ / ] to choose a desired marker, then press [ENTER].
Note
- Opening the disc tray, turning off the power or selecting "AC" at step 2 and pressing [ENTER] will erase all markers.
- To clear a marker, use [ / ] to select the marker number to be cleared and press [CLEAR].
- You can mark up to 9 points.
- For BD, marker search between different titles is not available.
- For BD, you can return to the maker only during playback.
On-Screen Display
You can check information about the current disc by pressing [DISPLAY].
To call the On-Screen Display, press [DISPLAY] during playback. Each time you press [DISPLAY], the information changes.
Depending on the media, available information varies.
BD-V
OFF Title/Chapter information Title information(elapsed time) Title information(remaining time) HDMI information
OFF
DVD-V DVD-VR
OFF Chapter information ( elapsed time)
Chapter information (remaining time) Title information (elapsed time) Title information (remaining time)
Bit rate information HDMI information OFF
CD
OFF Track information (elapsed time) Track information (remaining time) Disc information (elapsed time)
Disc information (remaining time) HDMI information
OFF
(*not available during the program/random playback)
MP3 JPEG
OFF File name information File information ( elapsed time)
→HDMI information → OFF
(not available for JPEG)
WMA
OFF File name information Tag information (title name)
Tag information (artist name) File information (elapsed time)
→HDMI information → OFF
DivX®
OFF File name information File information ( elapsed time)
File information (remaining time) HDMI information OFF
- For audio CD, MP3, Windows Media™ Audio and JPEG, during the program or random playback, the indication will be displayed after the track/file information.
Playback

About the button names in this explanation
< > Buttons on the main unit
[ ]: Buttons on the remote control
Button name only:
Buttons on the main unit and remote control
Chapter information
- WARNING: TO REDUCE THE RISK OF FIRE OR ELECTRIC SHOCK, DO NOT EXPOSE THIS APPLIANCE TO RAIN OR MOISTURE.
- Laser Safety
- CAUTION:
- SAFETY INSTRUCTIONS
- FCC INFORMATION (For US customers)
- 1.PRODUCT
- IMPORTANT NOTICE: DO NOT MODIFY THIS PRODUCT
- NOTE
- Connections
- Playback
- Function Setup
- Others
- Features
- Introduction
- - On-Screen Display
- - Dimmer
- - Screen Saver
- - Picture Control
- Search
- Repeat
- - Zoom
- - Marker
- -ResumePlayback
- - Bit Rate Indication
- DRC (Dynamic Range Control)
- - Displaying a JPEG picture
- - Playing Back Windows Media™ Audio File
- -Playing Back an MP3 File
- -Playing Back DivX® File
- -Playing Back the Contents in SD Memory Card
- - BD-J Application
- Important
- Power Supply
- Warning
- WARNING:
- Installation Location
- Cautions on Installation
- Note
- Caution on Handling
- Dew Warning
- Avoid the Hazards of Electrical Shock and Fire
- Before Using
- Supplied Accessories
- Trademark Information
- HBM
- DOLBY
- Dts
- About Discs
- Disc Handling
- Cleaning Disks
- Playable Discs and Files
- Note for SD Memory Cards
- Unplayable Discs
- Color Systems
- Region Codes
- Structure of Disc/SD Memory Card Contents
- Symbols Used in this Operating Instructions
- About the button names in this explanation
- Button name only:
- About the Remote Control
- Loading the Batteries
- Cautions on Batteries
- Using a Remote Control
- Setting this Unit not React to Other DENON's DVD Player's Remote Control
- Changing the Signal Code of a Remote Control
- Change the signal code of the unit
- 6) Press [SETUP] to exit.
- Change the signal code of the remote control
- Part Names and Functions
- Front Panel
- Rear Panel
- Remote Control
- POWER ON button
- POWER OFF button
- A-B REPEAT button
- REPEAT button
- RANDOM button
- ZOOM button
- CLEAR button
- RED/GRN/BLU/YEL button
- TOP MENU button
- Cursor / / / buttons
- ENTER button
- SETUP button
- ANGLE button
- SUBTITLE button
- PURE DIRECT button
- 16.DISPLAY button
- SKIP | button
- SKIP▶▶ button
- STOP button
- REW button
- STILL/PAUSE button
- FFW▶ button
- PLAY▶ button
- MODE button
- AUDIO button
- RETURN button
- POP UP MENU / MENU button
- 28.SEARCH MODE button
- 29.Number buttons
- OPEN/CLOSE button
- DIMMER button
- Front Panel Display
- Adjusting the Brightness of the Display
- Examples of Displays during Operation
- Connecting to a Display Device with HDMI Cable
- Cables not included.
- Connecting to a Display Device and an Amplifier/Receiver with HDMI Cable
- HDMI Output Mode and Actual Output Signals
- Audio Setting
- Copyright protection system
- Connecting the AC Cord
- DirectPlayback
- Operations Using Disc Menu, Title Menu, and Popup Menu
- BD-V DVD-V DVD-VR
- Disc menu (DVD)
- Title menu (BD/DVD)
- Pop-up menu (BD-video)
- Playing Back a VR mode DVD-RW/-R
- DVD-VR
- Pause
- ResumePlayback
- 1) During playback, press ■.
- 2) Press▶.
- Fast Forward / Fast Reverse Playback
- Slow Forward Playback
- Step by StepPlayback
- Dialog Speed
- Repeat Playback
- A-B Repeat
- ProgramPlayback
- CD
- MP3
- WMA
- JPEG
- 3) Press to start program playback.
- Random Playback
- 1) In stop mode, press [RANDOM].
- 2) Press to start random playback.
- Zoom
- DVD-V DVD-VR JPEG DivX
- 1) Press [ZOOM] during playback.
- 2) Press [ZOOM] repeatedly to select a desired zoom factor: x1.2, x1.5, x2.0, x4.0 or off.
- 3) Use [ / / / ] to move the zoomed picture across the screen.
- 4) Press [ZOOM] to exit zoom mode.
- Camera Angle
- BD-V | DVD-V
- 1) Press [ANGLE] during playback.
- 2) Use [ / ] to select your desired angle.
- Using |▶/▶
- 1) Press▶▶ to skip to the next chapter, track or file during playback.
- Using [SEARCH MODE]
- Marker search
- On-Screen Display
- BD-V
- DVD-V DVD-VR
- MP3 JPEG
- DivX®
- Chapter information
Brand : DENON
Model : DVD-2500BTCI
Category : DVD/Blu-ray player