
GZPA Reference 4PURE-SQ - Receiver Ground Zero - Free user manual and instructions
Find the device manual for free GZPA Reference 4PURE-SQ Ground Zero in PDF.


| Product Type | 4-Channel Car Amplifier |
| Brand | Ground Zero |
| Model | GZPA Reference 4PURE-SQ |
| Series | Reference Series |
| Number of Channels | 4 |
| RMS Power @ 4 Ohm (1% THD+N) | 4 x 150 W |
| RMS Power @ 2 Ohm (1% THD+N) | 4 x 270 W |
| RMS Power @ 1 Ohm (1% THD+N) | 4 x 425 W |
| RMS Power @ 4 Ohm Bridged (1% THD+N) | 2 x 540 W |
| RMS Power @ 2 Ohm Bridged (1% THD+N) | 2 x 850 W |
| Total Harmonic Distortion + Noise (THD+N) | < 0.005% |
| Signal-to-Noise Ratio | > 106 dB |
| Frequency Response | 5 Hz - 38 kHz (±1 dB) |
| Damping Factor | > 250 |
| Input Sensitivity | 1 V - 6 V |
| Fuse Rating | 2 x 120 A Mini-ANL |
| Operating Voltage | 10 - 16 V DC |
| Dimensions (W x H x L) | 236 x 67.5 x 590 mm (9.29 x 2.66 x 23.23 in) |
| Adjustable BIAS Setting | Continuously variable from Class AB to near Class A |
| LED Illumination | White LED interior illumination (removable jumper) |
| Cooling Fan | Temperature-sensitive controlled fan (removable jumper for SQ competitions) |
| Protection Features | Thermal, over current, speaker short, speaker DC protection |
| Input Connections | Rhodium RCA inputs |
| Output Connections | Speaker terminals |
Frequently Asked Questions - GZPA Reference 4PURE-SQ Ground Zero
User questions about GZPA Reference 4PURE-SQ Ground Zero
0 question about this device. Answer the ones you know or ask your own.
Ask a new question about this device
Download the instructions for your Receiver in PDF format for free! Find your manual GZPA Reference 4PURE-SQ - Ground Zero and take your electronic device back in hand. On this page are published all the documents necessary for the use of your device. GZPA Reference 4PURE-SQ by Ground Zero.
USER MANUAL GZPA Reference 4PURE-SQ Ground Zero
• High-End pure sound quality amplifier
• 1 Ohm stabile stereo / 2 Ohm bridged
• Symmetrical dual-2-channel direct-signal layout
• Shielded and separated dual power supply
• Continuously variable Bias Setting Class AB -> nearly Class A
- Adjustable input sensitivity
• Soft delayed remote turn-on
• Power & Protection indicator
• Thermal, over current, speaker short, Speaker DC protection
• Temperature-sensitive controlled fan
• Plexiglas bottom plate
- White LED illumination inside
• High quality Rhodium RCA plugs
• Selected high-end SANKEN® transistors
• Low distortion LM4562 OP with 0.00003% THD+N
• Ground Zero exclusive Mundorf Mcap® capacitors
• Special made audio-optimized Mundorf secondary capacitors for maximum buffering
- Capsuled ALPS potentiometers with channel separated level adjustment and summarize-function
- Low-tolerance Vishay Dale emitter-resistors for accurate bias point stabilization
• Copper anodized aluminum strand cast heatsink
Preamble
Thank you for choosing this Ground Zero Product. The Reference Series stands for selected high-end products with outstanding sound-quality. The GZPA Reference 4PURE-SQ is a high-end 4-channel amplifier with a dual-mono direct-signal layout. Due to the separated channels and direct signal paths it offers an excellent sound quality performance. The direct signal paths could be realized by avoiding sound affecting parts, potentiometers and switches. In this manual you will find detailed information about the 4-channel amplifier GZPA Reference 4PURE-SQ. For any questions please contact your dealer or the Ground Zero service. You can find the contact details at the end of this manual and on the web page:
www.ground-zero-audio.com
Introduction
Amplifiers provide high-performance sound reinforcement for your mobile audio equipment. Its versatility makes the amplifier compatible to optional an equalizer, frequency-dividing crossovers and other audio processors in a customized system. The multi-mode bridging capability allows flexibility in hosting several different speaker configurations. To achieve the best performance, it is highly recommended to read this owner's manual prior to the installation.
Tools and materials you need
- Screwdriver
• Hexagon socket screwdriver different sizes
• Electric drill, 3 mm / 0.12" carbide drill bit - Mounting screws
• Power wire min. 2 x 25 mm ^4 / 2 x 3 AWG
• Ground wire min. 2 x 25 mm ^4 / 2 x 3 AWG
• Speaker wire min. 2 x 2,5 mm² / 13 AWG
Please note!
- As a precaution it is advisable to disconnect the vehicle's battery before making connection to the +12 Volts supply wiring (see owner's manual of your car for further information).
- Please use great caution drilling your trunk. Your gas tank and brake lines can be damaged by puncturing with your drill bit – this could cause damage or failure of your cars operating systems.
- Never pass wires over sharp angles. It is recommended to buffer the power supply of the amplifier with an additional battery to guarantee a stable operation voltage.
WARNING!
High powered audio systems in a vehicle are capable of generating "Live Concert" levels of sound pressure. Continued exposure to excessively high sound levels may cause hearing loss or damage. Also, operation of a motor vehicle while listening to audio equipment at high volume levels may impair your ability to hear external sounds such as; horns, warning signals, or emergency vehicles, thus constituting to a potential traffic hazard. In the interest of safety, Consumer Electronics recommends listening at lower volume levels while driving.
Plan your system setup
Prior to the installation, please consider the following matters
a. If you plan to expand your system by adding other components sometime in the future, ensure adequate space is left, and cooling requirements are met.
b. Please make sure that the side panels will be not covered, to assure the cooling fans can work well.
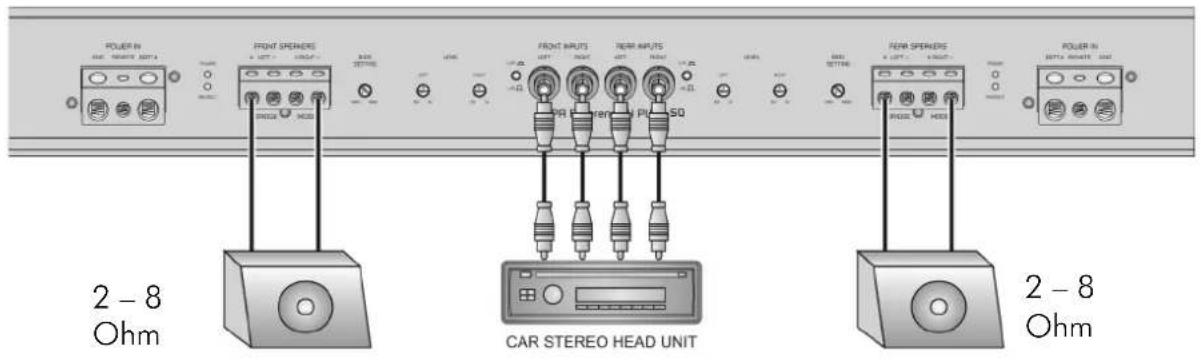
c. We recommend using only high quality, shielded RCA-Cables to connect the amplifier with the head-unit or processor.
d. To guarantee the maximum performance, we recommend using high quality pure copper or silver cables for speaker and power connection.
Mounting your amplifier
a. Select a suitable location that is convenient for mounting, is accessible for wiring and has ample room for air circulation and cooling.
b. Use the amplifier as a template to mark the mounting holes, remove the amplifier and drill 4 holes. Then mount the amplifier with the mounting screws.
Power & Fuse
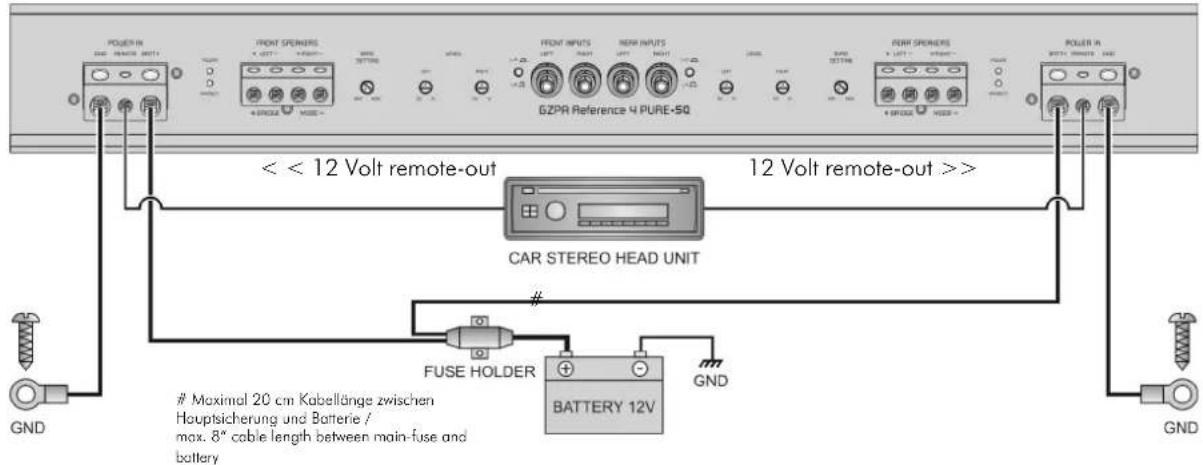
Chose a mounting position where all eclectic wires are protected from being damaged by sharp edges, heat or other conditions. +12Volt DC electrical connections must be fused on the battery side. Make sure your radio and all other devices will be turned off while connection your system. In case of a defective fuse, please note that the GZPA Reference 4 PURE-SQ has two internal 120 Ampere mini-ANL fuses. To replace them, the acrylic bottom plate needs to be detached by using a screwdriver.
Turning on the amplifier
The amplifier automatically turns on a few seconds after you turn on your radio. Note: Your amplifier temporarily shuts down if it gets too hot, then restarts automatically once it cools (around 80^ C / 176^ F).
Adjusting the audio level
We recommend using an oscilloscope for an adequate adjustment. With that tool you can detect the maximum possible, distortion-free output-level of the head unit / processor by using a sine wave signal. In case you do not have the possibility to proceed as per above description, please follow the instruction below:
- LEVEL (Min/Max): Turn fully counter-clockwise to MIN position
- Turn the auto sound system's volume control to about two-third of its full range. Use a high-quality signal (high resolution CD! No compressed audio files!) Set back all sound affecting adjustments of the head unit.
- Adjust the LEVEL carefully until you reach the maximum possible audio level that the speaker is able to reproduce without any distortions.
To avoid any defect and reach the best performance we recommend asking your dealer for assistance.
Adjusting the BIAS
The BIAS setting adjusts the operational mode of the amplifier. It is continuously adjustable from MIN (class AB) to MAX (near to class A). The sound can be described as warm at \~class A mode and more analytic and direct at class AB mode. Please note, that the current consumption and the heating is higher at \~class A mode. The power ratings are not affected by the BIAS setting.
Level summarize function
By using the summarize-switch the two channel-separated Level controllers can be summarized to one stereo controller. In L + R position the „Right“ Level controller is controlling both channels. In L/R switch-position both Level-controllers can be used to adjust each channel separately.
LED Illumination
All Reference amplifiers have a two-piece LED interior illumination. In case the illumination must be switched off, you have to remove the jumpers from the main board. Therefore, you need to remove the Plexiglas bottom plate by using a screwdriver. The two "LED-Switch" jumpers are located on the left and right part of the main board. Once the jumpers have been removed, the LED illumination is disabled.
Sound Quality Competition
The Reference amplifiers are using integrated cooling fans to avoid overheating and keep a constant temperature at daily use. As a matter of the construction, the operating noise of the fans might affect the performance at low volumes during professional sound quality competition judging. For this reason, it is possible to switch off the cooling fans by removing a jumper on the main board. Therefore, you need to remove the acrylic bottom plate by using a screwdriver. Once the FAN switch jumper has been removed, the cooling fans are disabled. Please note, that it's recommended to switch off the fan when the amplifier is used at low to medium volume level. Permanent high power output could cause an overheating of the amplifier. Even a defect of the unit might be possible. The warranty expires after removing the fan's jumper.
Controls and function
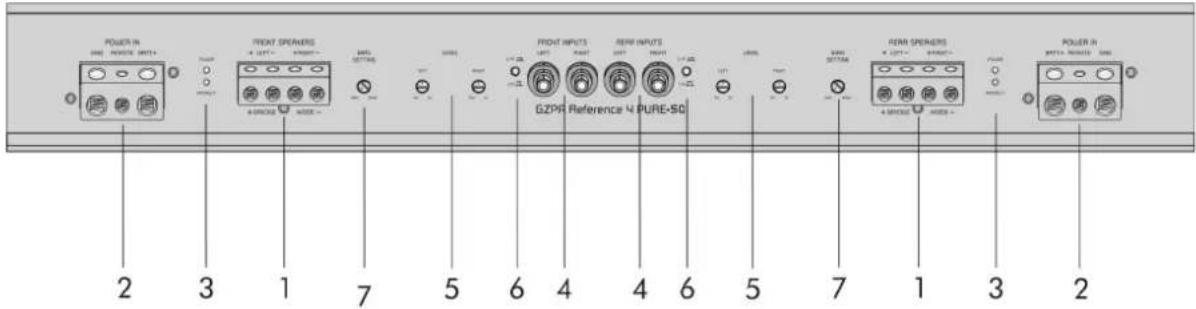
| 1 | Speaker terminals | For connection of the speakers |
| 2 | Power terminals | GND Ground connectionREM Remote inBATT +12 Volt |
| 3 | Status indication | WHITE OKRED Error |
| 4 | RCA inputs | Terminal for connection of the RCA wiresTo avoid failure, please use high quality RCA wires |
| 5 | Input level controller | With this controller you can adjust the input sensitivity |
| 6 | Level summarize function | To control both channels using one single level control (details on page 10) |
| 7 | Bias Setting | Adjusting the BIAS from class AB to more to class A(details on page 10) |
Trouble shooting
This power amplifier includes a protection features to prevent the electronic from damage due to misuse or faulty conditions. When the unit senses excessive heat, short circuited speakers or overload, the protection indicators will light, and the system will be turned off. Check the occurred problem, you should turn all levels down and all power off and carefully check the installation for wiring mistakes or short. When the amplifier shuts down due to excessive heat, the protection indicators will not light: simply allow time for the unit to cool. Prior to removing your amplifier refer to the list below and follow the suggested procedures. Always check the loudspeakers and wires first.
| Problem | Check points |
| Amplifier is not powered up | Check that there is battery power on the +12V terminal.Check that remote terminal has at least +12V DC remote connection.Check a good ground connection. Check all fuses.Check the protection LED is not lit. |
| Protection LED illuminates when amplifier is powered up | Check shorts on speaker wires.Remove speaker wires and reset the amplifier. If the protection LED still comes on, then the amplifier is faulty. |
| Fuse blowing | Check that the minimum speaker impedance is correct.Check short on power cable and vehicle chassis. |
| Overheating | Check that the minimum speaker impedance is not below 1ohm per channel.Check speaker shortage.Check that there is a good airflow around the amplifier. |
| Sound too low / Distorted sound | Check that the input level control is set to match the output level of the unit.Check the head unit volume.Check speaker shorts.Check that crossover frequencies have been set properly. |
| High hiss / engine noise in speakers | Check a good ground and for speaker shorts.Disconnect all RCA inputs from the amplifier. If hiss/noise disappears, check it with a good RCA interconnect. Then check the components driving the amplifier. |
REFERENCE SERIES
GZPA Reference 4PURE-SQ
Wiring diagrams and technical specifications
Stromanschluß / Power connection
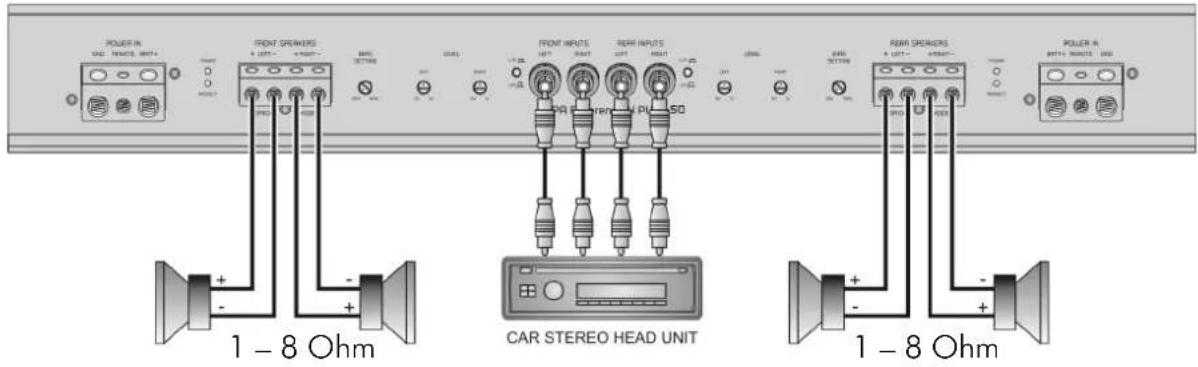
4 Kanal Anschluß / 4 channel connection
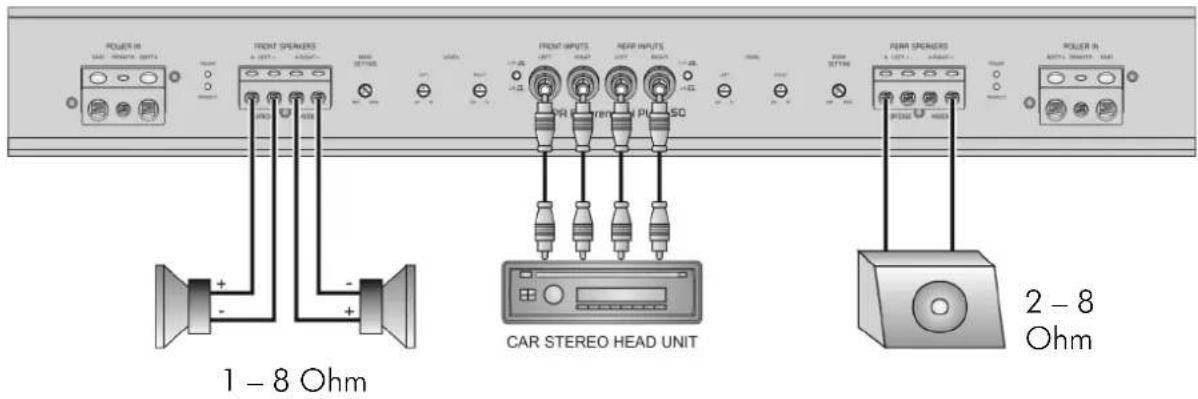
3 Kanal Anschluß / 3 channel connection
| Model | GZPA Reference 4PURE-SQ |
| RMS Power @ 4 ΩCEA Standard CEA-2006-A | 4 x 150W (1% THD+N)4 x 180W (10% THD+N) |
| RMS Power @ 2 ΩCEA Standard CEA-2006-A | 4 x 270W (1% THD+N)4 x 325W (10% THD+N) |
| RMS Power @ 1 ΩCEA Standard CEA-2006-A | 4 x 425W (1% THD+N)4 x 500W (10% THD+N) |
| RMS Power @ 4Ω bridgedCEA Standard CEA-2006-A | 2 x 540W (1% THD+N)2 x 650W (10% THD+N) |
| RMS Power @ 2Ω bridgedCEA Standard CEA-2006-A | 2 x 850W (1% THD+N)2 x 1000W (10% THD+N) |
| Damping factor | >250 |
| THD + N | < 0.005 % |
| Signal to noise Ratio | >106 dB |
| Frequency response | 5 Hz - 38 KHz(± 1 dB) |
| Input sensitivity | 1 V - 6 V |
| Fuse | Internal Mini-ANL-fuse2 x 120A |
| Operating voltage | 10 - 16 Volt |
| DimensionsW x H x L mm | 236 x 67.5 x 590 |
| DimensionsW x H x L inch | 9.29" x 2.66" x 23.23" |
Zertifikat - Certificate
GZPA Reference 4PURE-SQ
Serial number label
natural_image
Empty rounded rectangle shape with no text, numbers, or symbolsEngineer:
Power rating @ 14.4V 1% THD
CEA Standard CEA-2006-A
| Gemessene Ausgangsleistung / Measured output power | |||
| Channel | 4 ohms load | 2 ohms load | 1 ohm load |
| Front left | |||
| Front right | |||
| Rear left | |||
| Rear right | |||
The limited warranty for this product is covered by GROUND ZERO's regional distribution partners and their terms and conditions. For further information contact your local retailer or distributor.
Ground Zero GmbH
Erlenweg 25, 85658 Egmating, Germany
Tel. +49 (0)8095/873-830 Fax -8310
www.ground-zero-audio.com
- Preamble
- Introduction
- Tools and materials you need
- Please note!
- WARNING!
- Plan your system setup
- Mounting your amplifier
- Power & Fuse
- Turning on the amplifier
- Adjusting the audio level
- Adjusting the BIAS
- Level summarize function
- LED Illumination
- Sound Quality Competition
- Controls and function
- Trouble shooting
- REFERENCE SERIES
- GZPA Reference 4PURE-SQ
- Stromanschluß / Power connection
- Maximal 20 cm Kabellänge zwischen
- Kanal Anschluß / 4 channel connection
- Kanal Anschluß / 3 channel connection
- Zertifikat - Certificate
- Ground Zero GmbH
Brand : Ground Zero
Model : GZPA Reference 4PURE-SQ
Category : Receiver