OPC506 - Grinder DK2 Power - Free user manual and instructions
Find the device manual for free OPC506 DK2 Power in PDF.


| Product Type | Commercial Chipper |
| Model | OPC506 |
| Brand | DK2 Power |
| Engine | Kohler Gas Engine |
| Chipper Type | Swing Chute, Towable |
| Cutting Blades | Dual Reversible Blades |
| Fuel Type | Mid-Grade or Higher Gasoline |
| Oil Type | 10W30 |
| Oil Shutoff Protection | Yes (Low Oil Shutoff) |
| Starting Method | Pull Starter |
| Safety Key Lock | Yes |
| Towing Capacity | Max 25 mph |
| Wheel Type | DOT Approved (Road Towing) |
| Chipper Capacity | Wood Only (No Metal or Plastic) |
| Blade Maintenance | Reversible; Use OEM Blades Only |
| Warranty | 1 Year Parts (Engine has separate Kohler warranty) |
Frequently Asked Questions - OPC506 DK2 Power
User questions about OPC506 DK2 Power
0 question about this device. Answer the ones you know or ask your own.
Ask a new question about this device
Download the instructions for your Grinder in PDF format for free! Find your manual OPC506 - DK2 Power and take your electronic device back in hand. On this page are published all the documents necessary for the use of your device. OPC506 by DK2 Power.
USER MANUAL OPC506 DK2 Power
4301 S Valley View Blvd STE 10-11
Las Vegas, NV 89103
1-702-331-5353
DETAIL K2, INC.
1080 Clay Avenue Unit 2
Burlington, Ontario, Canada L7L0A1
DK2 USA EAST
6245 Industrial Parkway
Whitehouse, OH 43571
TOLL FREE 1-888-277-6960 EMAIL - INFO@DETAILK2.COM
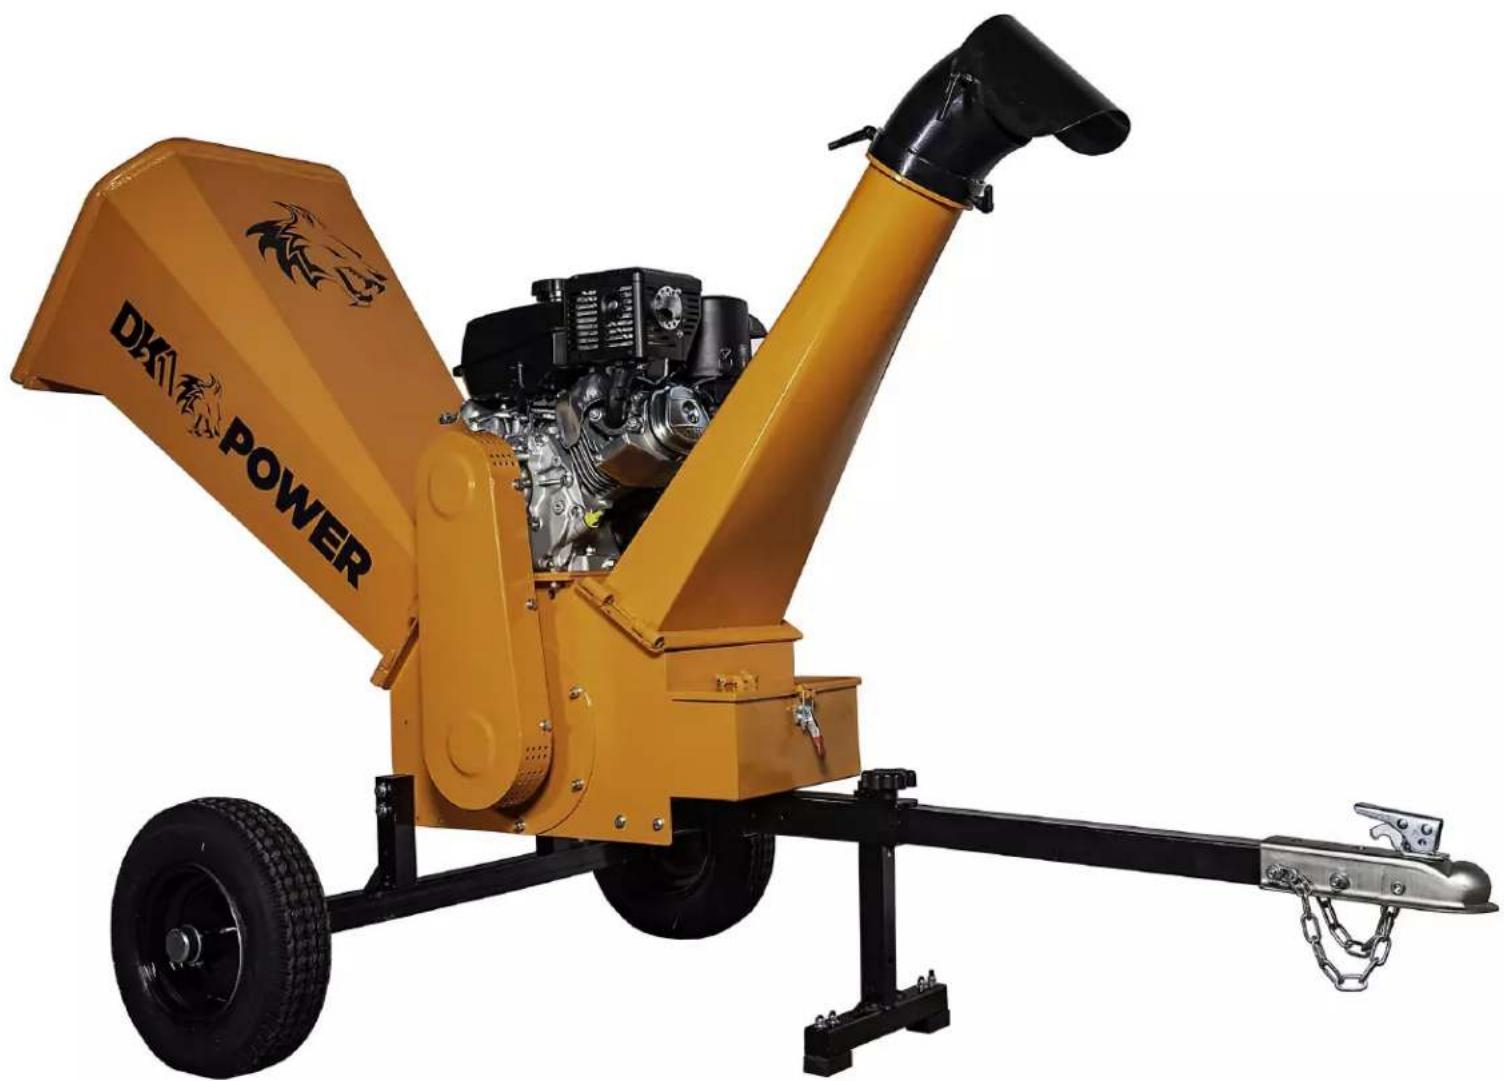
COMMERCIAL CHIPPER
SWING CHUTES
TOWABLE
KOHLER ENGINE
natural_image
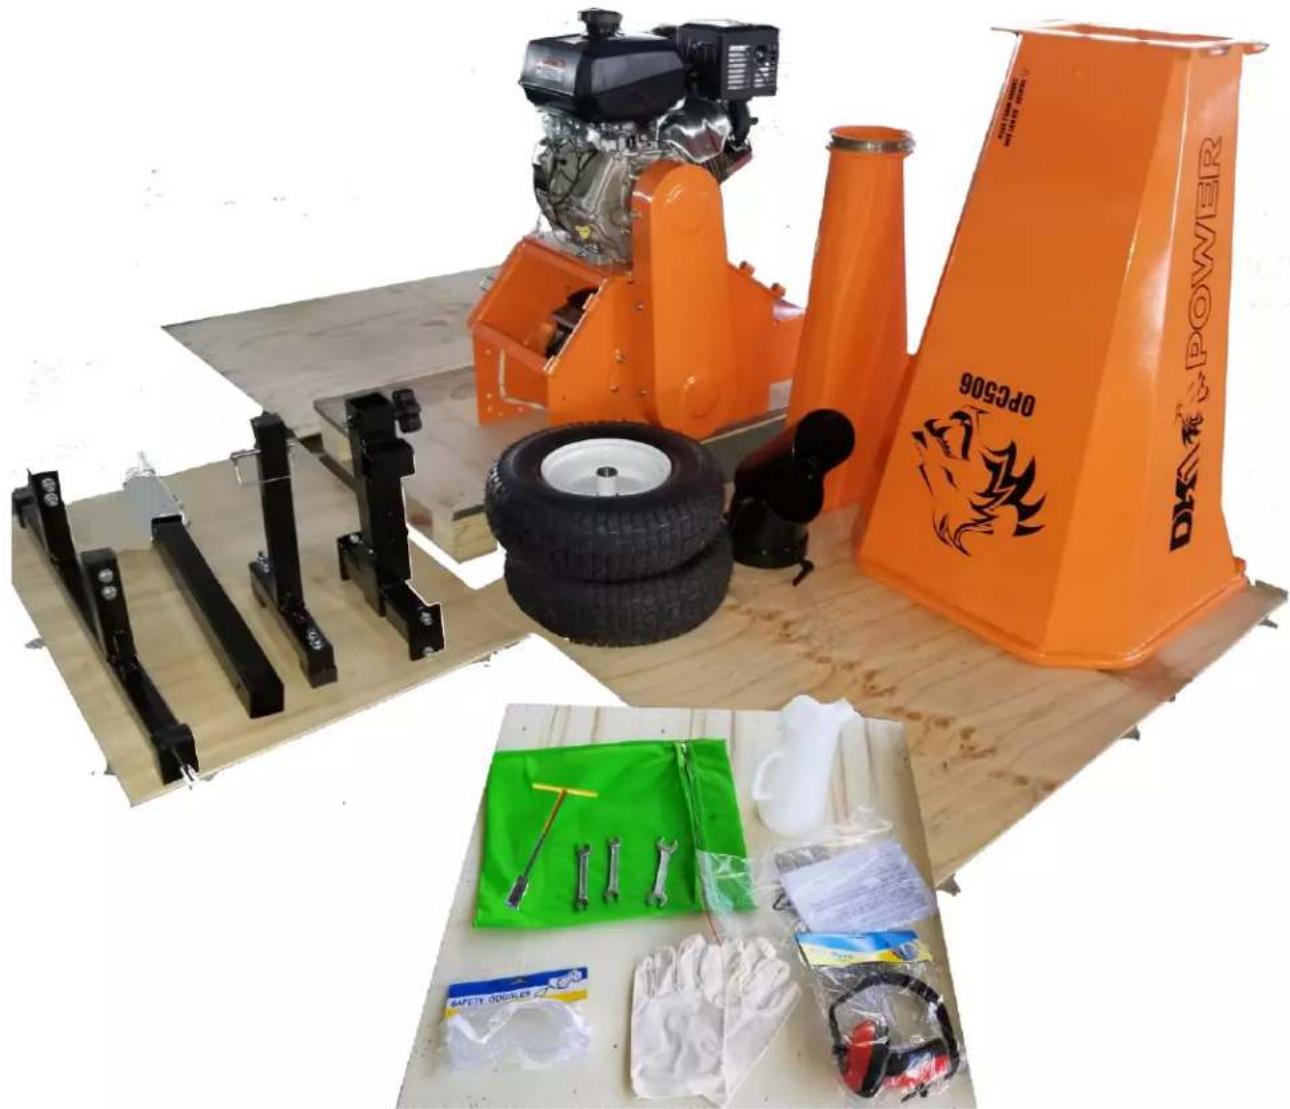
Yellow Dkk Power manual snowblower with visible engine and support structure (no text or symbols on the machine itself)Open and unpack all items. Leave lots of working space. Inspect all parts.
The Chipper is shipped in a crate. Leave the sides folded down and use as your work space.
natural_image
Exterior view of an orange DKK Power robotic saw with mechanical components and safety gear (no signage or text)NOTE: UPON INSPECTION OF PARTS IF YOU FIND ANY DAMAGE OR MISSING PARTS PLEASE CALL DK2 POWER AT 702-331-3535 OR CONTACT US VIA OUR WEBSITE WWW.DK2POWER.COM
WE WILL REPLACE ANY DAMAGED or MISSING PARTS TO YOU FREE
PLEASE DO NOT RETURN TO THE STORE
STEP 2:
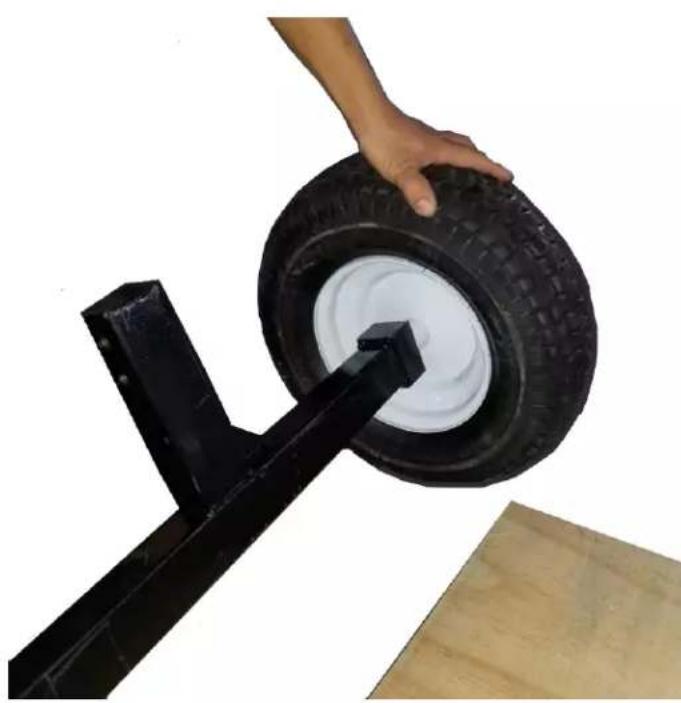
- Remove all hardware from axle.
- Install 2 wheels with washers, nuts, cotter pins and caps.
- Your chipper tires are DOT approved and you can tow on the road. Safely tow at 25 mph max is recommended.
- The extended axle is standard and adds stability on hills and corner turns when towing.
natural_image
Hand pressing a tire on a black metal support structure, with wooden base nearby (no text or symbols visible)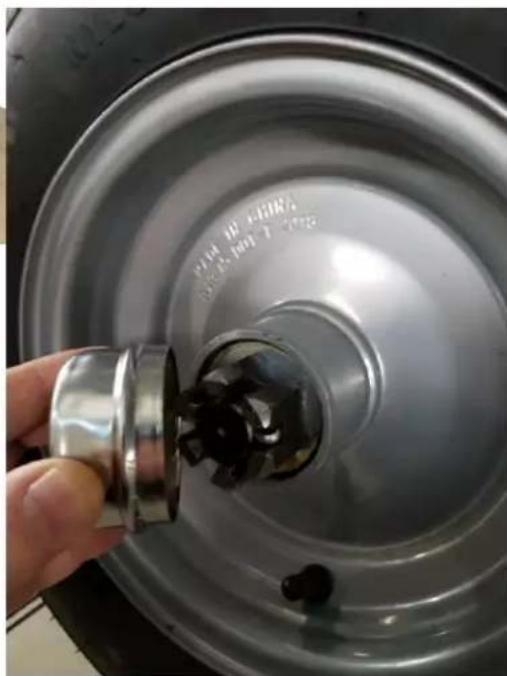
natural_image
Close-up of a hand pouring liquid into a metallic mechanical component, with no visible text or symbols.STEP 3:
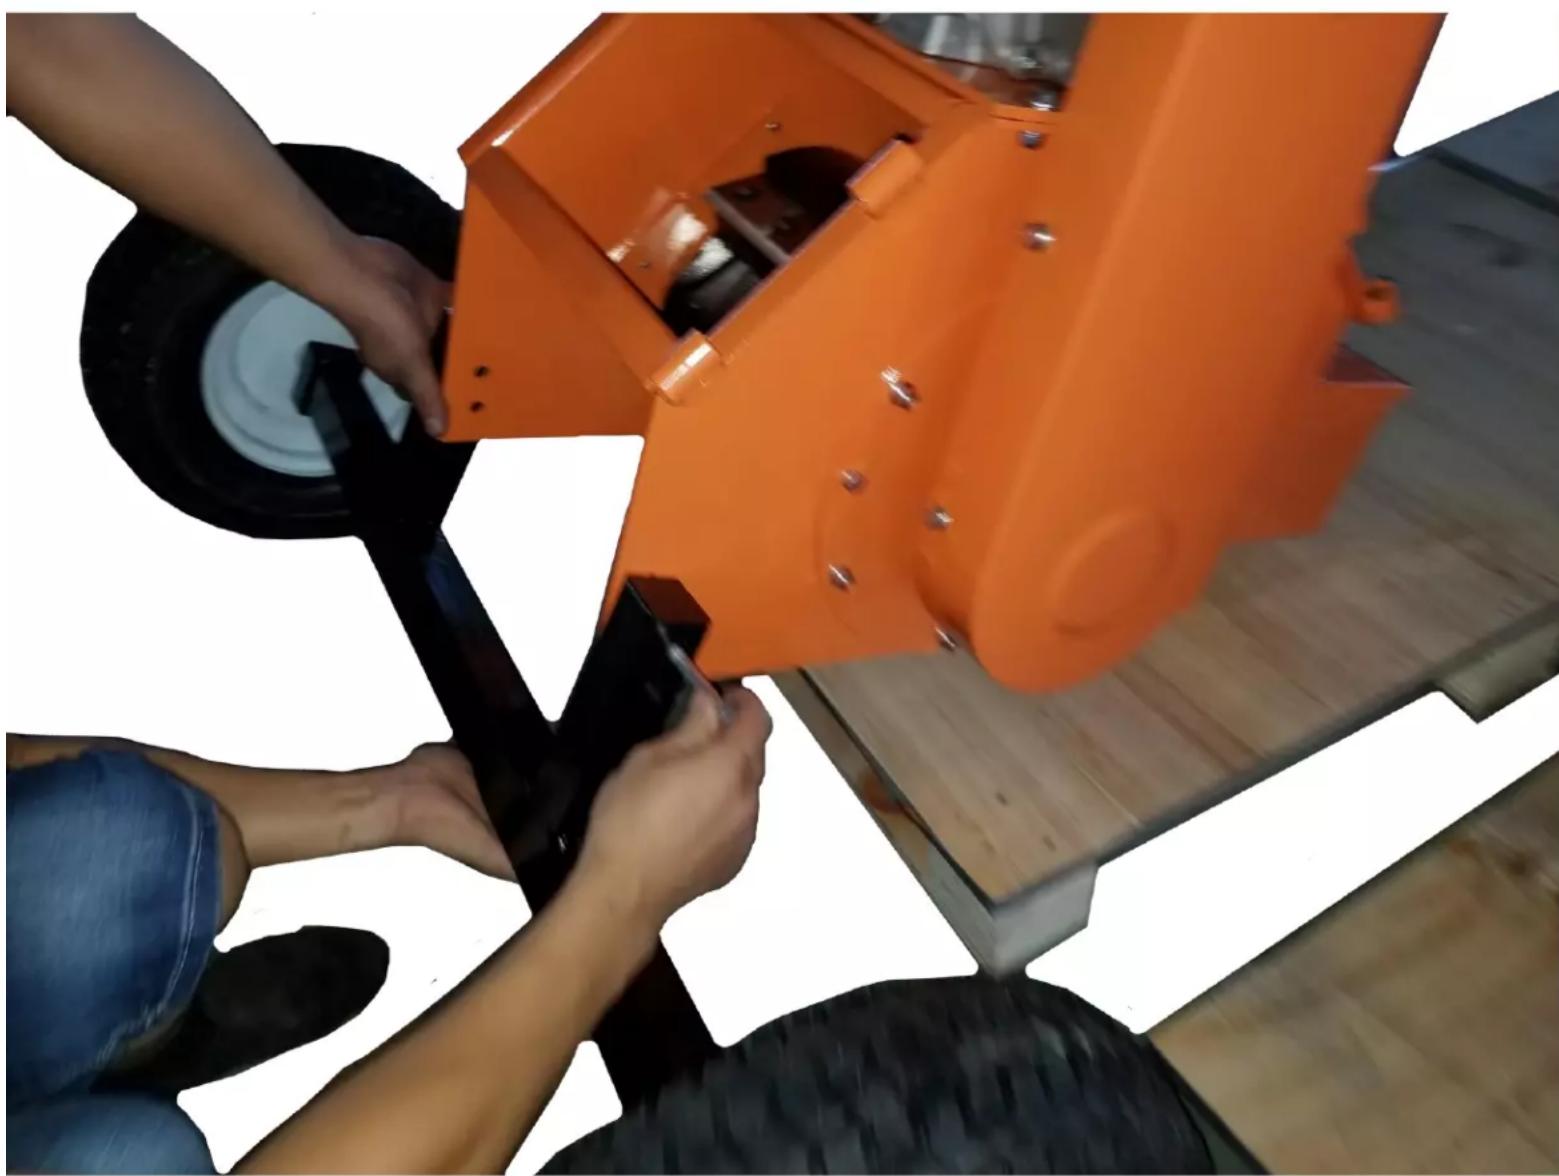
- Place rear wheel axle assembly on Chipper using supplied bolts and install both wheels.
- Install the bolts from the OUTSIDE with the nuts on INSIDE.
natural_image
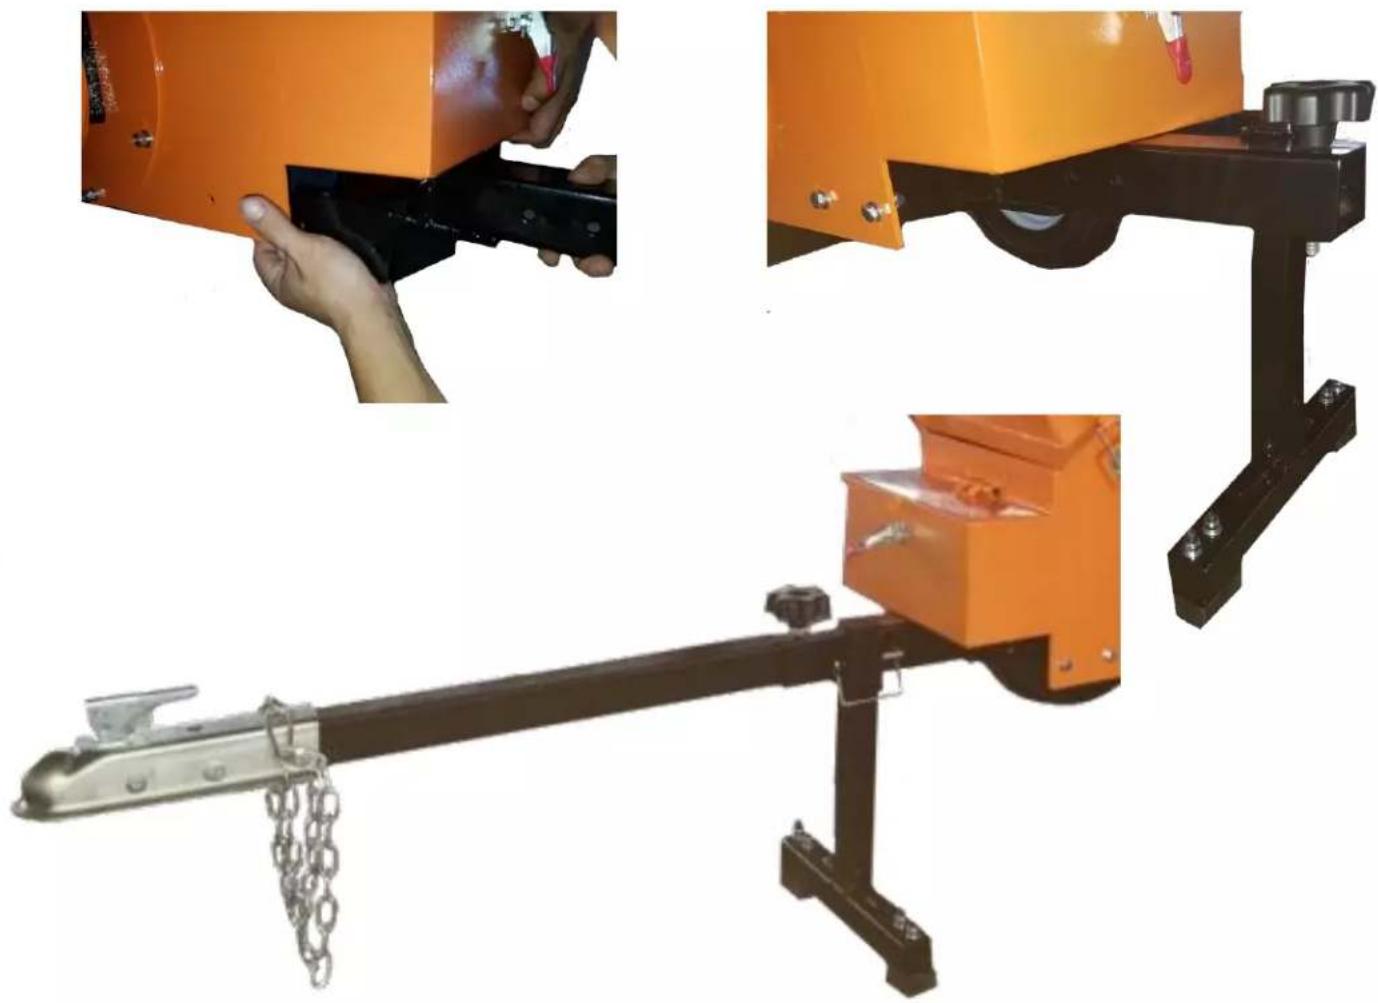
Person assembling a large orange vehicle wheel on a wooden platform (no visible text or symbols)- INSTALL THE TOW BAR HITCH USING 4 BOLTS. PLACE BOLTS FROM OUTSIDE AND PLACE NUTS ON INSIDE.
- ASSEMBLE TOW STAND AND INSERT THE HITCH PIN
- INSERT TOW BAR AND SECURE WITH TOW BAR SCREW LOCK
natural_image
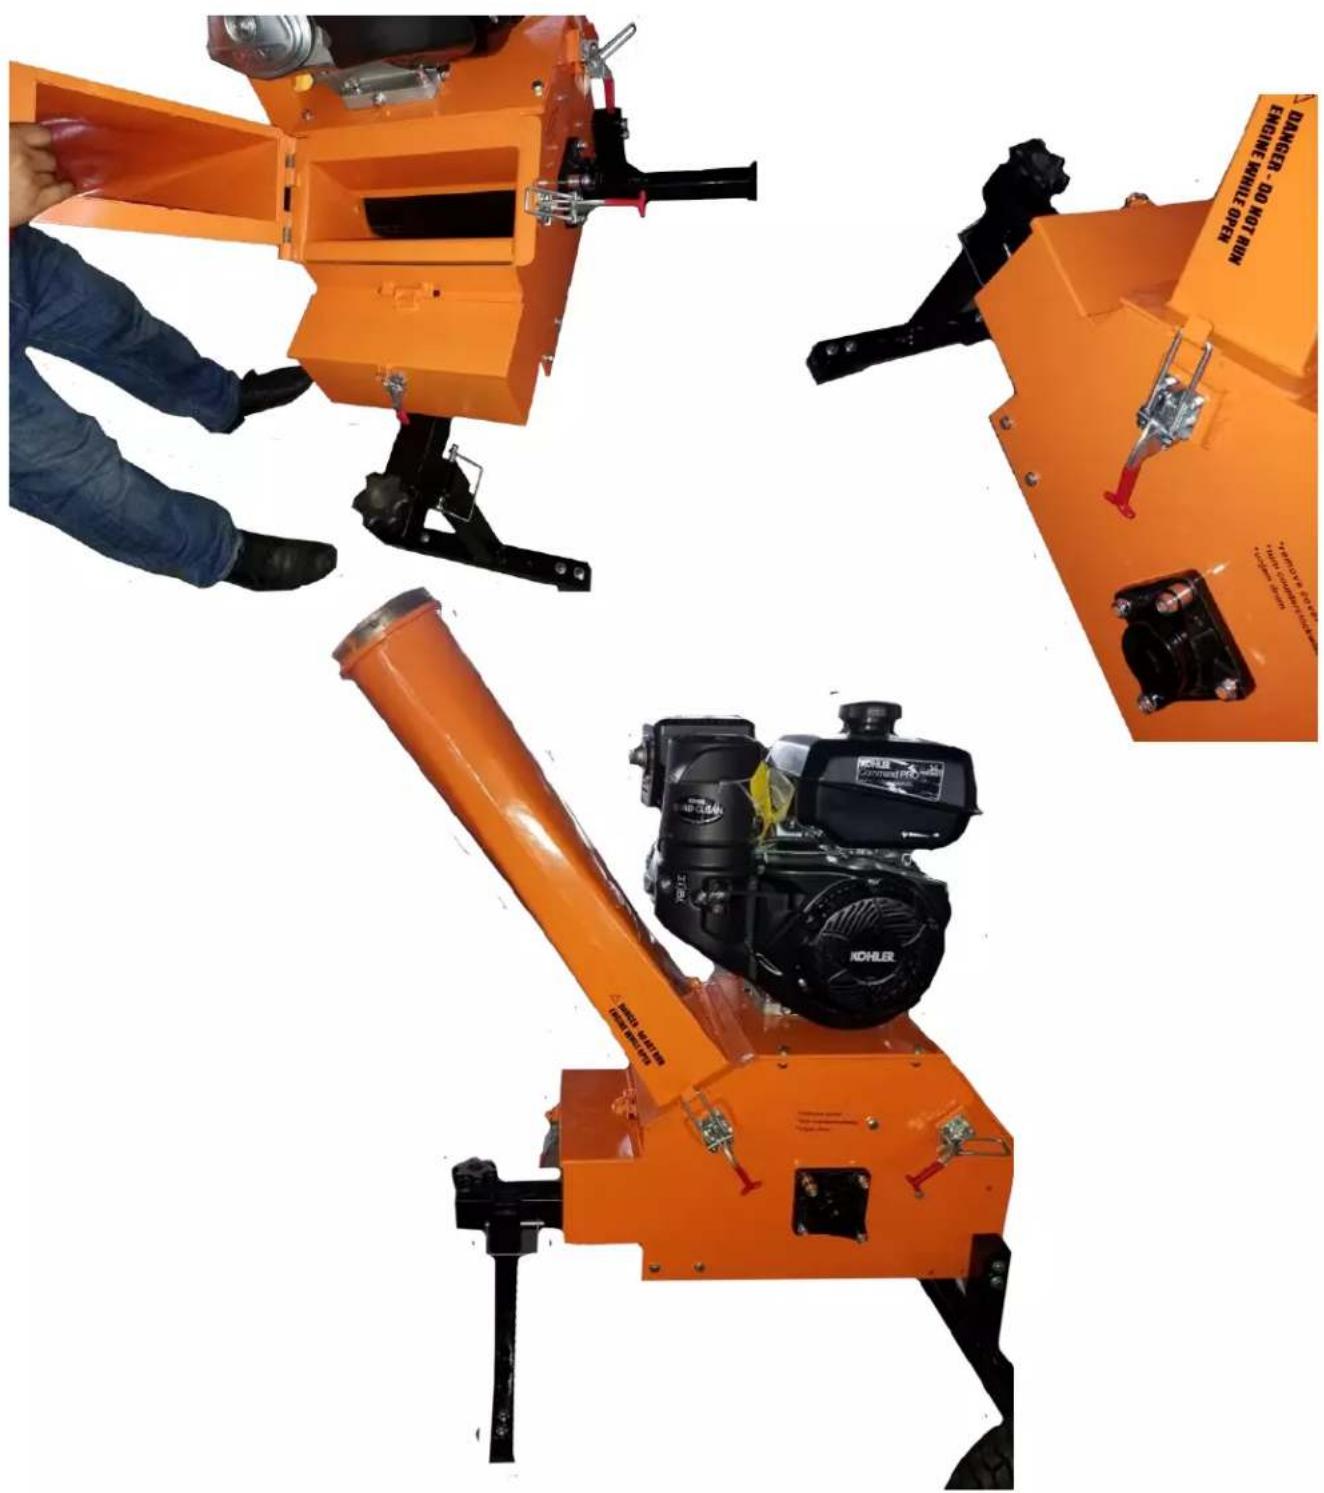
Three-panel image showing a hand operating an orange industrial machine, with no visible text or symbols.- INSTALL CHIP CHUTE ON BARN HINGES. SWING CHUTE CLOSED AND LOCK IT.
- A RUBBER MALLET MAY BE USED IF NEEDED TO SET THE BARN HINGE PINS INTO THE MATING HINGES FOR THE FIRST TIME INSTALL.
natural_image
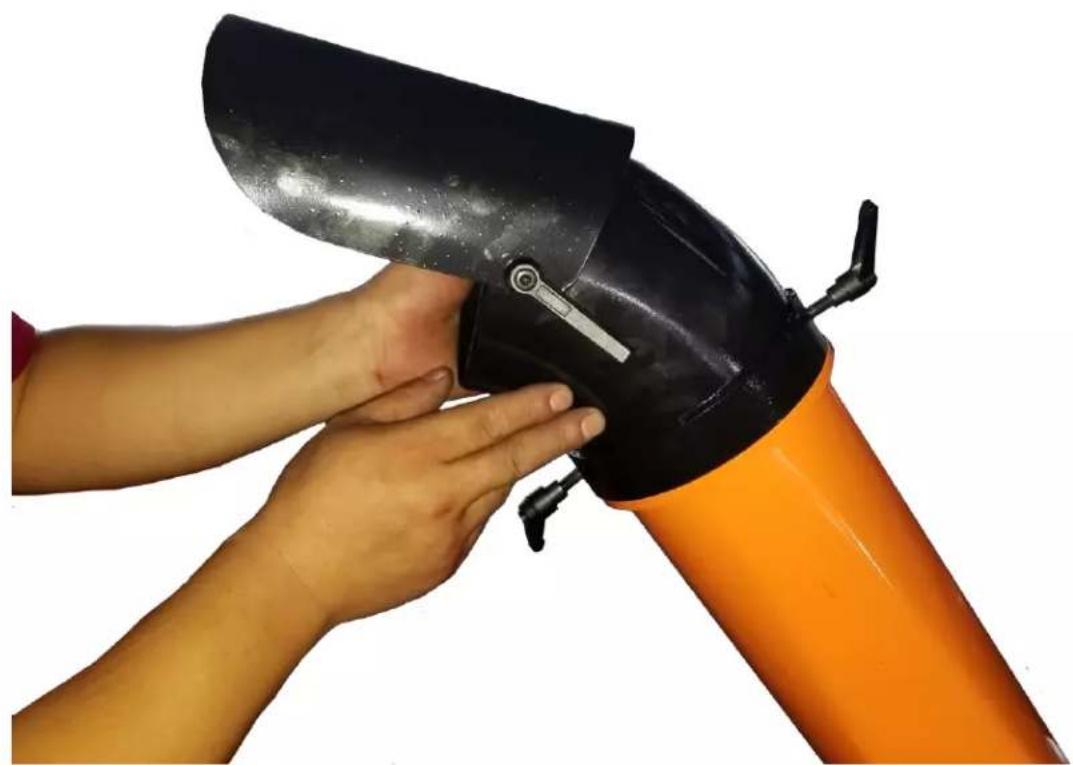
Three orange industrial machines with visible internal components, one labeled 'KOHLER' and Chinese text, being handled by a person (no readable signage or symbols on the machines themselves).- Install the Chip Chute Directional Deflector and tighten the locking handles.
natural_image
Close-up of hands assembling a black and orange cylindrical device (no text or symbols visible)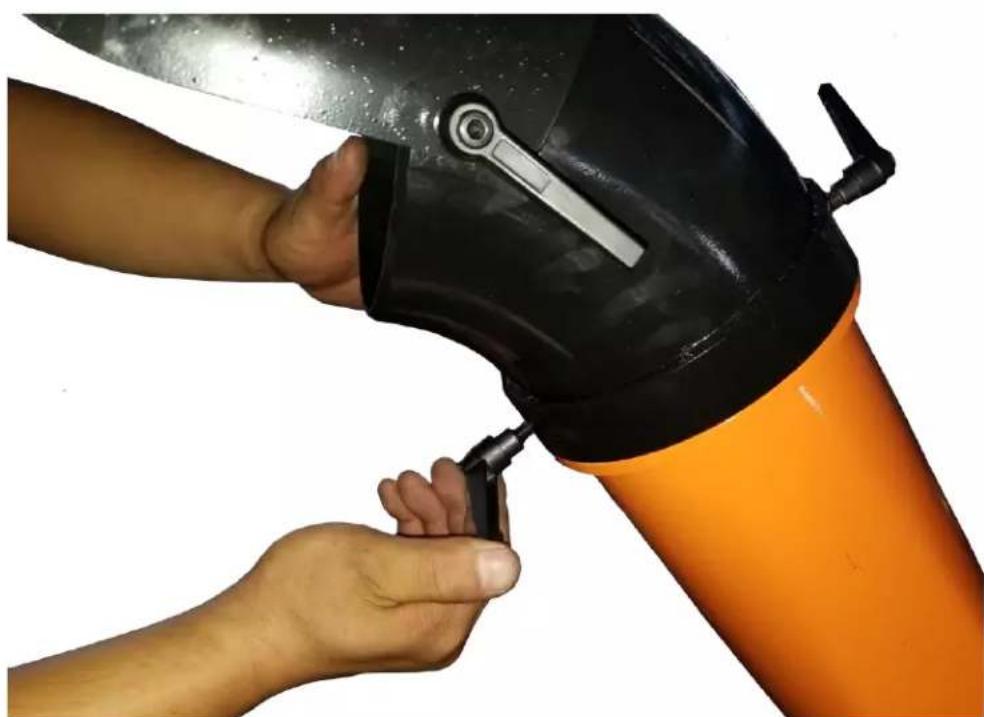
natural_image
Close-up of hands operating a black and orange industrial machine tool (no visible text or symbols)-
Install the feed chute on the 2 hinges. To seat the hinge pins for the first time a rubber mallet may be used to tap the pins into the hinges. These are tight fitting to reduce vibration noise.
-
Close the Chute and latch it.
-
Plug the safety key shut off wire connectors together.
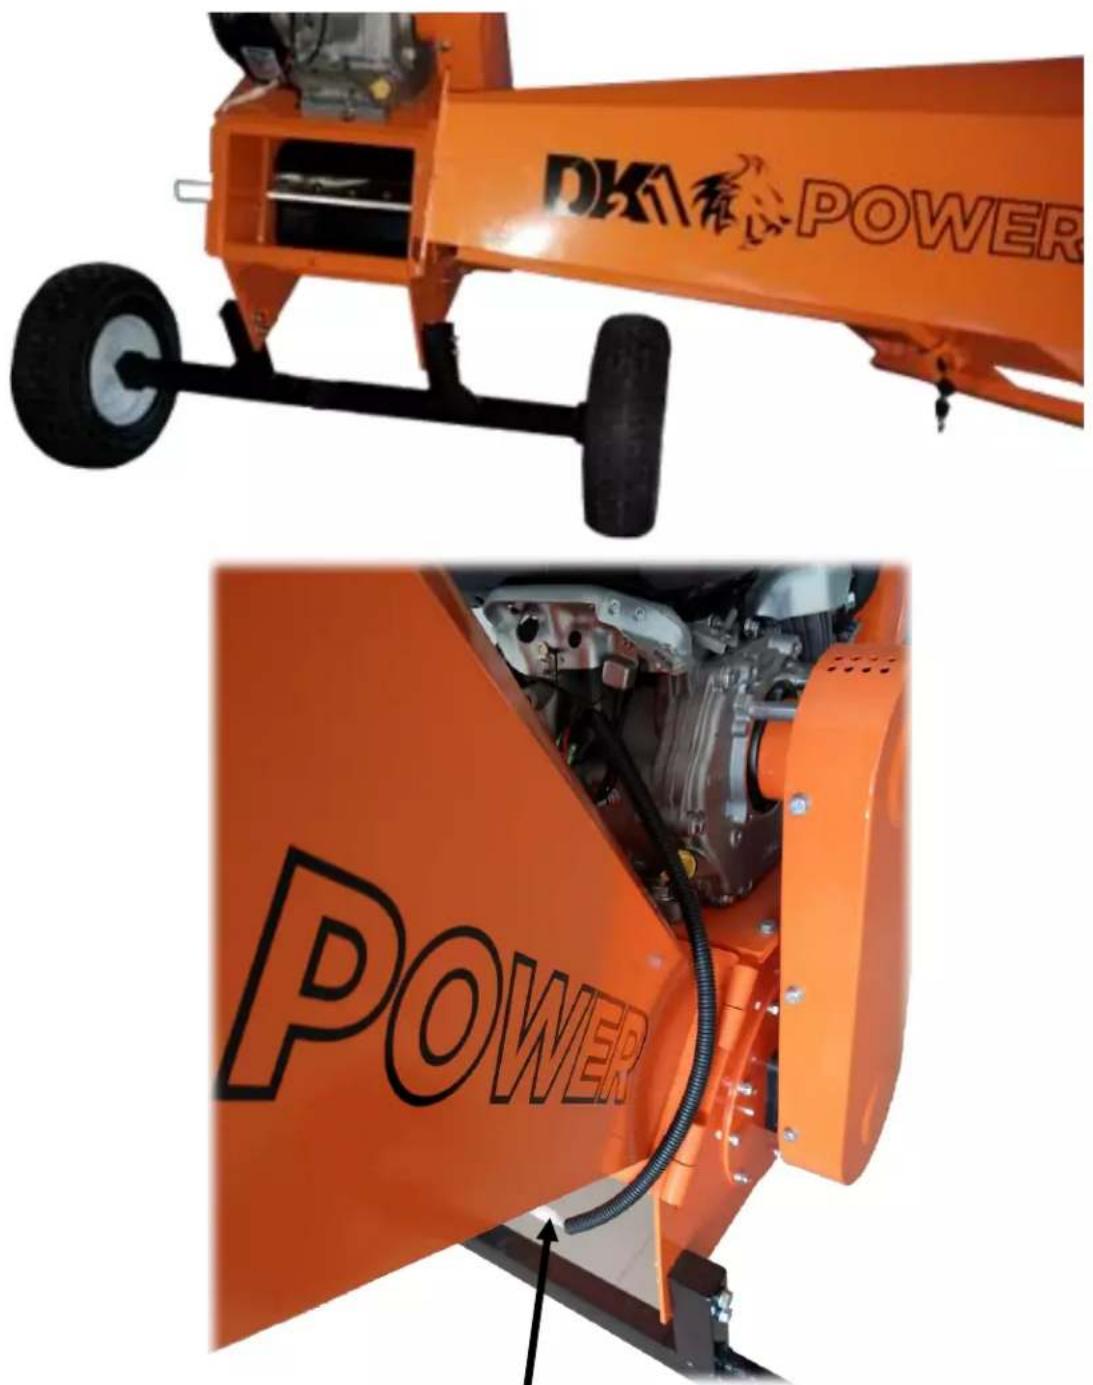
READ THE KOHLER ENGINE MANUAL SUPPLIED WITH YOUR UNIT FOR FULL ENGINE OPERATION, SAFETY, AND MAINTENANCE.
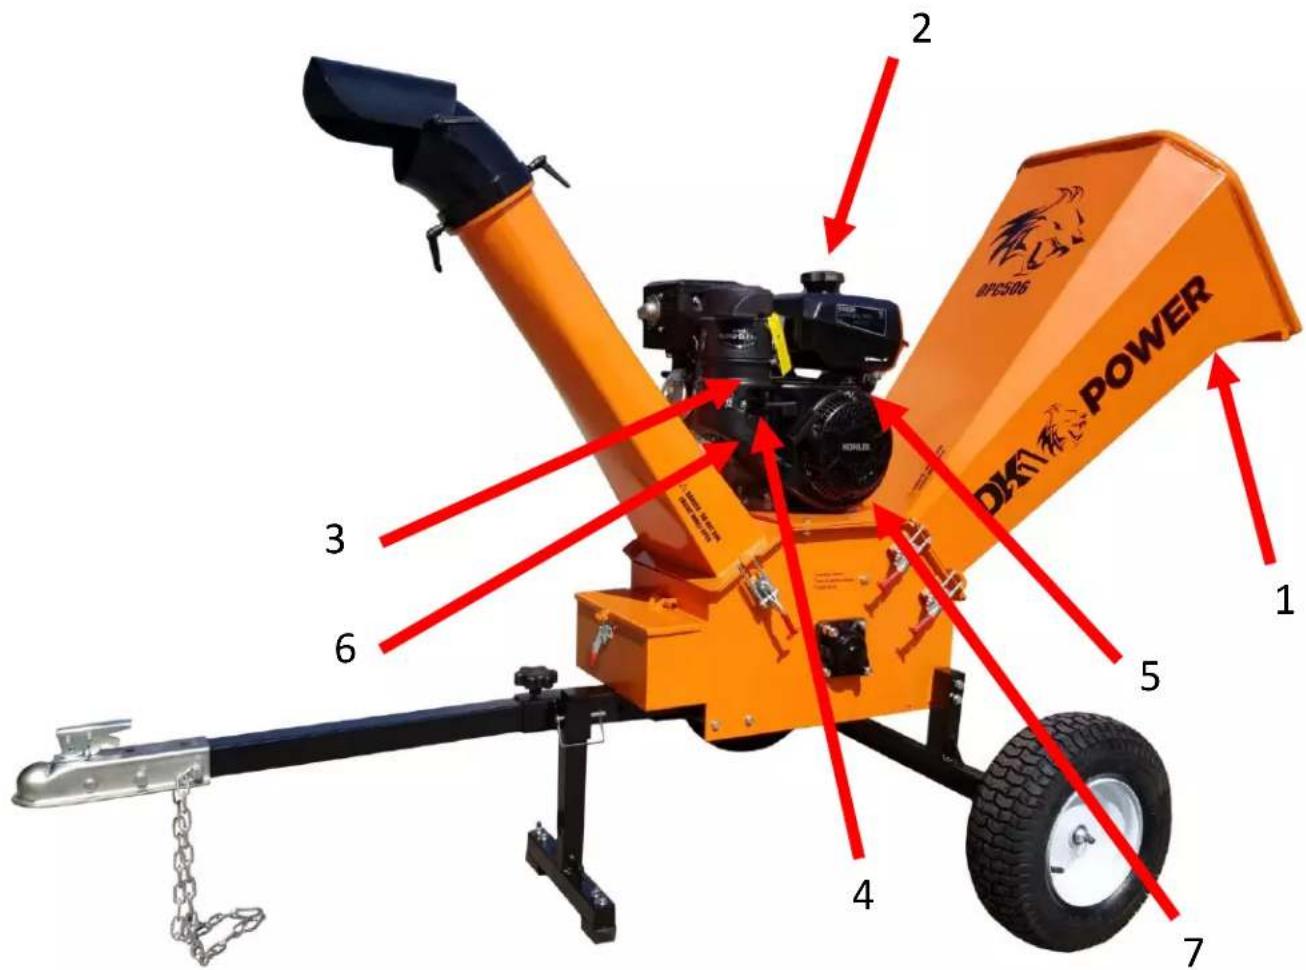
| 1 | ON/OFF KEY LOCK |
| 2 | GAS – USE MID GRADE OR HIGHER |
| 3 | CHOKE – LEFT IS ON / RIGHT IS OFF (RUN POSITION) |
| 4 | GAS ON/OFF SWITCH – LEFT IS OFF / RIGHT IS ON |
| 5 | THROTTLE – RABBIT FAST / TURTLE SLOW |
| 6 | PULL STARTER– PULL TIGHT- THEN PULL START |
| 7 | OIL – FILL TO MARK 10W30, WILL NOT START IF OIL IS LOW, HAS LOW OIL SHUTOFF PROTECTION. 2 YELLOW CAPS ARE OIL FILL CAPS. USE EITHER ONE TO FILL OIL. |
Your Chipper is equipped with dual REVERSABLE cutting blades.
- Turn engine key off, remove key and unplug the spark plug.
- Open the large feed chute
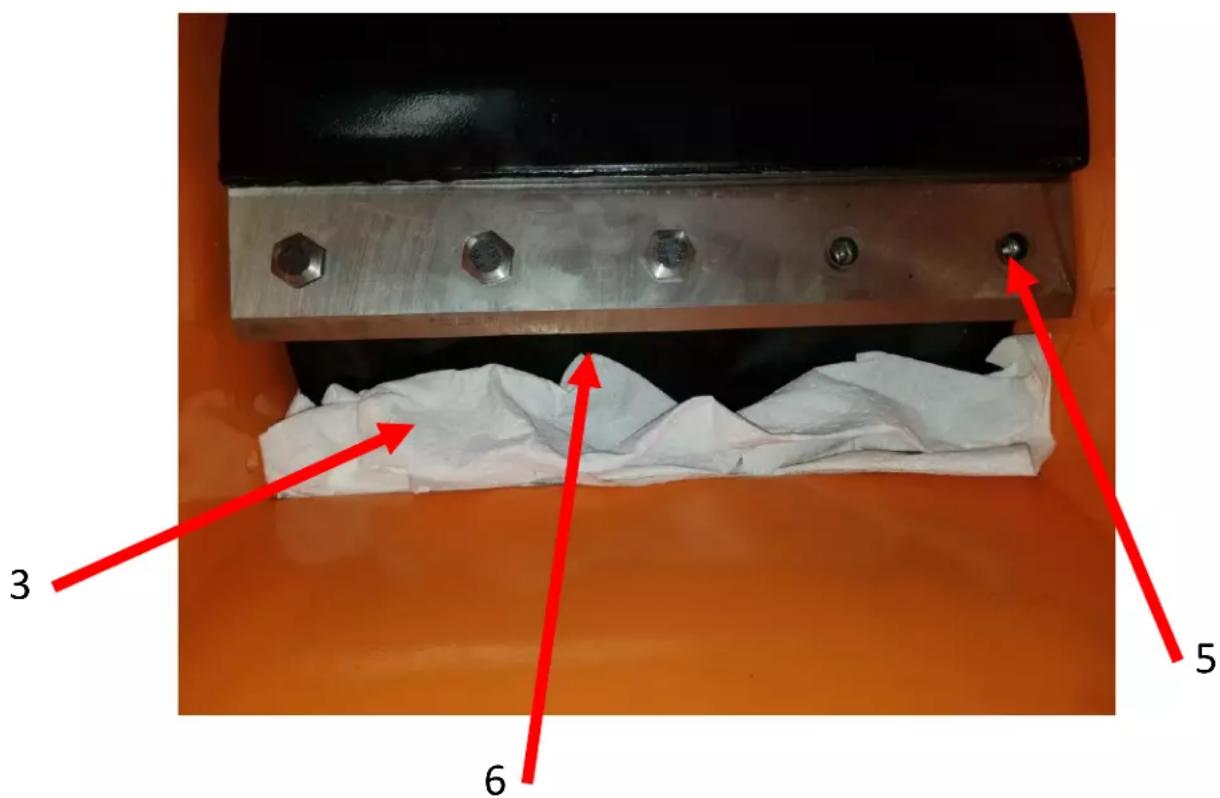
- Before removing the bolts that mount the blades place paper towels in the area opening between the drum and the drum housing. This will prevent bolts from dropping into the drum housing.
- Remove the first 4 bolts.
- Before removing the last bolt be sure to support the blade from sliding down into the drum. More paper towels or a shop towel does a good job.
- Remove the blade, reverse it to the new sharp edge and reinstall it. Use only DK2 POWER OEM blades.
- Use Loctite on the bolt threads when replacing bolts.
- Use the supplied T-Handle tool to remove and replace bolts
- Wear protective gloves, the blades are very sharp.
- Remove the paper towels, any paper left in the chipper will be cut up on the next running operation.
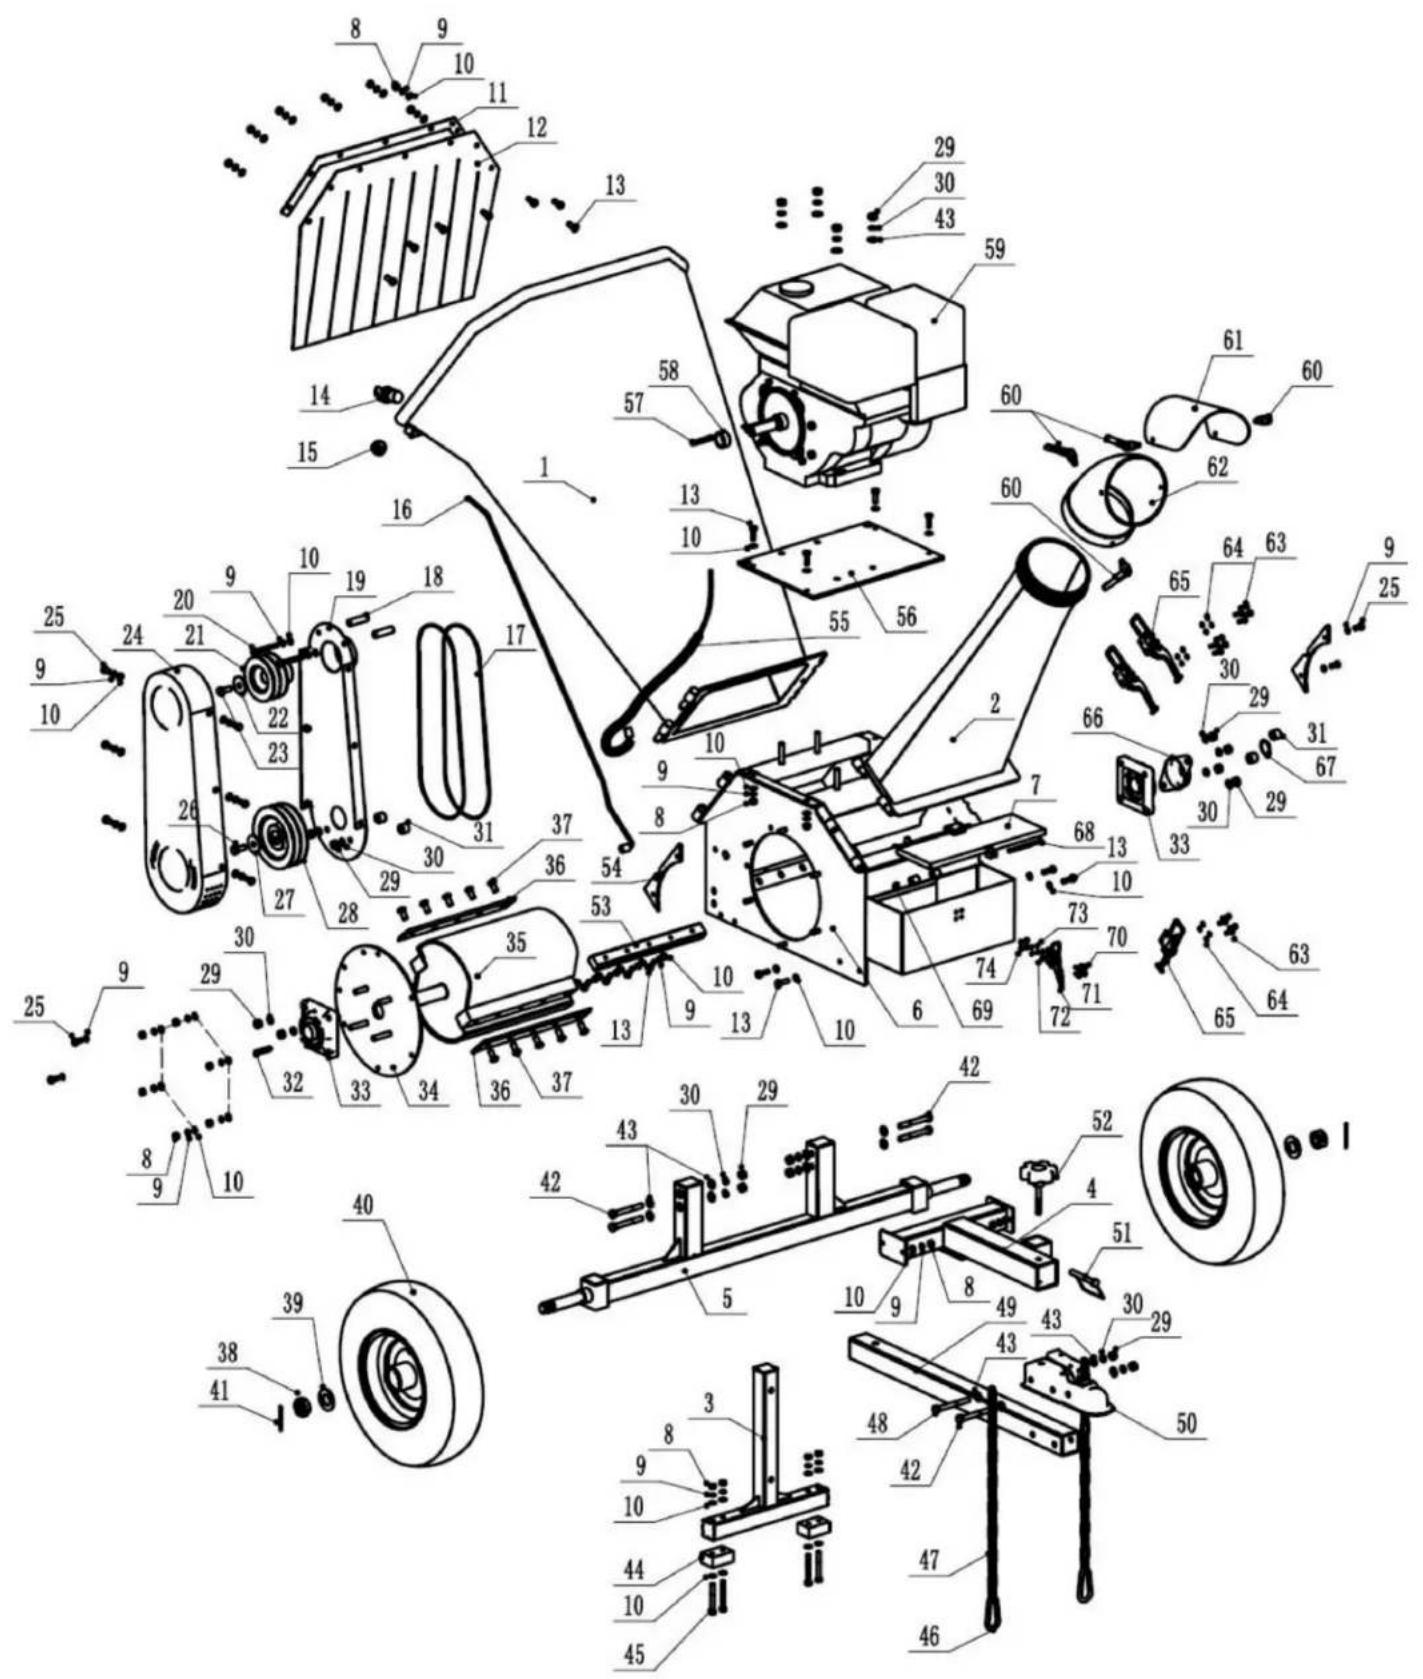
| No. Specification | No. Specification |
| 1feed hopper | 38Hexagonal slotted thin nutM24*1.5 |
| 2outlet hopper | 39washerø25*ø47.5*3.0 |
| 3support foot | 40DOT Tire |
| 4tow bar connecting part | 41pinø4.0X40 |
| 5wheel axle | 42boltM10*80 |
| 6crush house | 43washerø10*ø22*2.2 |
| 7tool box cover | 44rubber |
| 8M8 locknut | 45boltM8*65 |
| 9ø8lockwasher | 46buckle |
| 10washerø8*ø16*1.6 | 47chain |
| 11plate for protection sheet | 48boltM10*90 |
| 12protection sheet | 49tow bar |
| 13hexagon headed boltM8X25 | 50hitch trailer |
| 14key switch | 51Square latch |
| 15pipe plug | 52M10 knob |
| 16wire | 53blade gap adjusting plate |
| 17belt | 54feeding helper plate |
| 18Spacer sleeveø9*ø14*44 | 55engine wire |
| 19Belt cover accessory plate | 56engine plate |
| 20 boltM8*60 | 57key |
| 21engine pulley | 58Spacer sleeveø26*ø35*15 |
| 22washerø10*ø40*3.0 | 59engine |
| 23bolt3/8-24UNF-25 | 60knob |
| 24belt cover | 61outlet hopper adjusting plate |
| 25 boltM8*16 | 62upper part of outlet hopper |
| 26boltM10X25 | 63bolt M6*16 |
| 27washerø10*ø40*3.0 | 64ø 6lockwasher |
| 28rotor pulley | 65clip |
| 29M10locknut | 66bearing cap |
| 30ø10lockwasher | 67B shaft ringø30 |
| 31Spacer sleeveø11*ø20*17 | 68Inside hexagonal cylindrical head screwM6*90 |
| 32key | 69M6locknut |
| 33Mounted Bearings | 70boltM5*16 |
| 34steel plate for Mounted Bearing | 71clip |
| 35rotor | 72washerø5*ø10*1.0 |
| 36blade | 73ø 5lockwasher |
| 37blade bolt | 74M5locknut |
CLEAR AREA OF ALL PEOPLE AND PROPERTY THAT COULD BE DAMAGED. THINK SAFETY. CHIPS ARE FLYING PROJECTILES AND CAN CAUSE INJURY. CHECK BOTH CHUTES AND MAKE SURE THEY ARE CLOSED AND LOCKED. WEAR SAFETY GLASSES, HEARING PROTECTION, AND GLOVES
DO NOT WEAR LOOSE FITTING CLOTHES THAT COULD GET STUCK IN THE CHIPPER
ONLY CHIP WOOD, NO METAL OR PLASTIC.
CHILDREN SHOULD NOT RUN THIS EQUIPMENT
STAY ALERT OF YOUR SURROUNDING AND PERSONS THAT COULD APEAR IN THE CHIP PATH WHILE YOU ARE WORKING.
FEED LARGE DIA TREES SLOWLY INTO THE CUTTING DRUM ALLOWING THE DRUM TO REGAIN RPM AND CUTTING SPEED BETWEEN CUTS.
RUN ALL CONTENTS IN THE HOPPER THROUGH THE MACHINE BEFORE SHUTTING ENGINE OFF TO PREVENT LOOSE WOOD FROM LOGING BETWEEN BLADES JAMMING DRUM BEFORE YOUR NEXT ENGINE START UP. REMOVE SMALL SIDE COVER WITH 2 NUTS AND TURN DRUM COUNTERCLOCKWISE TO FREE UP WOOD STUCK IN THE BLADE.
NEVER RUN CHIPPER WITH CHUTES OPEN. RUNNING A MACHINE WITH CHUTES OPEN CAN CAUSE INJURY OR DEATH.
READ AND OBEY ALL WARNING LABELS ON THIS MACHINE.
TOW THE MACHINE 25 MPH MAX.
DK\ POWER
PLEASE DO NOT RETURN TO THE STORE
YOU HAVE A 1 YEAR WARRANTY AND DK2 WILL REPLACE A DEFECTIVE PART FOR FREE
CALL US AT 702-331-5353 FOR FAST WARRANTY PARTS AND QUESTIONS
WHAT IS COVERED
DK2 Inc. warrants to the original purchaser of any DK2 product that it will be free and clear of manufacturing defects in workmanship and materials under normal use and service for a period of one (1) year from the date of the original purchase.
If within one (1) year from the original date of purchase this product fails due to defect in material or workmanship, Detail K2 will repair, replace, or supply any defective part at our option for DK2 trailer products. DK2 POWER outdoor power equipment is 1-year parts only warranty no labor.
Upon expiry of one (1) year, Detail K2 will have no further liability related to the product. Detail K2 does not authorize any party, including its authorized distributors or dealers, to offer any other warranty on behalf of Detail K2 Inc.
KOHLER ENGINES – KOHLER CH SERIES ENGINES COMMERCIAL 3 YR PARTS AND LABOR WARRANTY KOHLER ENGINES – KOHLER SH SERIES ENGINES RESIDENTIAL 2 YR PARTS AND LABOR WARRANTY see your Kohler manual for specific warranty.
DIESEL TRACTORS – Chassis component parts only, no labor, ENGINES – 1 YR KOHLER WARRANTY 3PT EQUIPMENT – 1-YEAR parts only, Gearbox drive unit 3-year warranty parts only.
DK2 POWER OUTDOOR EQUIPMENT – 1-Year parts only, no labor. 3-year commercial Kohler warranty.
THIS WARRANTY DOES NOT COVER OR APPLY TO:
Damage to the product due to misuse, mishandling and abuse
(b) Improper installation, maintenance and storage
(c) Expendable parts such as nuts and bolts, pins and springs, wiring and switch components, hydraulic hoses and fittings, cutting teeth, cutting chains, cutting blades, throttles, belts and tires.
(d) Normal wear and tear
(e) Consequential damage & incidental damages such as damage to persons or property
PROCEDURE FOR OBTAINING AN RETURN AUTHORIZATION
Within the one (1) year warranty period, the purchaser of the product must notify DK2 of the claimed defect and provide proof of original purchase. At this time the validity of the claim will be determined, and if approved replacement parts will be issued.
A Return Goods Authorization Number (RGA) will be issued if approved for DK2 Automotive products. No returned product will be accepted under warranty unless accompanied by an RGA# issued by Detail K2 Inc.
RESOLUTION FOR A DEFECTIVE PRODUCT
DK2 POWER – Tractors, Chippers, Stump Grinders, Log Splitters, 3pt, and Outdoor Power Equipment.
Call DK2 at 702-331-5353 in Las Vegas between 8am-4pm M-F Pacific Time.
DK2 Snow, Trailer, Rack and Winch Products.
Call DK2 at 888-277-6960 in Burlington Canada between 8am-4pm M-F Eastern Time.
Brand : DK2 Power
Model : OPC506
Category : Grinder