
L195DA - Television MAJESTIC - Free user manual and instructions
Find the device manual for free L195DA MAJESTIC in PDF.


| Product Type | LED TV |
| Screen Size | 18.5 inches |
| Display Technology | LED |
| Aspect Ratio | 16:9 |
| Panel Resolution | 1366 x 768 pixels |
| Brightness | 250 cd/m² |
| Contrast Ratio | 1000:1 |
| Response Time | 5 ms |
| Speakers | 2 x 5W |
| Viewing Angle | 178° horizontal / 178° vertical |
| TV System | DVB-C/T2/S2, PAL |
| Sound System | B/G, I, D/K |
| Dimensions (without stand) | 445 x 275 x 45 mm |
| Dimensions (with stand) | 445 x 311 x 170 mm |
| Weight | 3.5 kg |
| Power Supply | DC 12V, 4A |
| Wall Mount Standard | VESA 100 x 100 mm |
| Built-in DVD Player | Yes (Region 4) |
| Inputs | AV, SCART, HDMI (2), USB (2), YPbPr, Optical, Earphone, CI slot, Antenna |
| PVR Function | Yes (via USB) |
| Remote Control | Included |
| Operating Temperature | 0°C to 35°C |
Frequently Asked Questions - L195DA MAJESTIC
User questions about L195DA MAJESTIC
0 question about this device. Answer the ones you know or ask your own.
Ask a new question about this device
Download the instructions for your Television in PDF format for free! Find your manual L195DA - MAJESTIC and take your electronic device back in hand. On this page are published all the documents necessary for the use of your device. L195DA by MAJESTIC.
USER MANUAL L195DA MAJESTIC
natural_image
Line drawing of a flat-screen monitor displaying abstract circular shapes on screen (no text or symbols)LED TV
INSTRUCTION MANUAL
USER'S MANUAL
Safety Information
IMPORTANT SAFETY INSTRUCTIONS
Read these instructions.
Keep these instructions.
Heed all warnings.
Follow all instructions.
Do not use this apparatus near water.
Clean only with dry cloth.
Do not block any ventilation openings. Install in accordance with the
manufacture's instructions.
Do not install near any heat sources such as radiators, heat registers, stoves, or
other apparatus (including amplifiers) that produce heat.
Do not defeat the safety purpose of the polarized or grounding plug. A polarized plug has two blades with one wider than the other. A grounding plug has two blades and a third grounding prong. The wide blade or the third prong is provided for your safety. If the provided plug does not fit into your outlet, consult an electrician for replacement of the obsolete outlet.
Electrical for replacement of the obsolete outlet. Protect the power cord from being walked on or pinched particularly at the plugs, convenience receptacles, and at the point where they exit from the apparatus. Only use attachments/accessories specified by the manufacturer.
Use only with the cart, stand, tripod, bracket, or table specified by the manufacturer, or sold with the apparatus. When a cart or rack is used, use caution when moving the cart/apparatus combination to avoid injury from tip-over.

Unplug the apparatus during lightning storms or when unused for long periods of time.
Refer all servicing to qualified personnel. Servicing is required when the apparatus has been damaged in any way, such as power supply cord or plug is damaged, liquid has been spilled or objects have fallen into the apparatus has been exposed to rain or moisture, does not operate normally, or has been dropped.
CAUTION: These servicing instructions are for use by qualified service personnel only. To reduce the risk of electric shock, do not perform any servicing other than that contained in the operating instructions unless you are qualified to do so. WARNING: To reduce the risk of fire or electric shock, do not expose this apparatus to rain or moisture. The apparatus shall not be exposed to dripping or splashing and that objects filled with liquids, such as vases, shall not be placed on apparatus. WARNING: The mains plug is used as disconnect device, the disconnect device shall remain readily operable.

- This lightning flash with arrowhead symbol within an equilateral triangle is intended to alert the user to the presence of non-insulated "dangerous voltage" within the product's enclosure that may be of sufficient magnitude to constitute a risk of electric shock. - Warning: To reduce the risk of electric shock, do not remove cover (or back) as there are no user-serviceable parts inside. Refer servicing to qualified personnel. The exclamation point within an equilateral triangle is intended to alert the user to the presence of important operating and maintenance instructions in the literature accompanying the appliance. Apparatus with class I construction shall be connected to a mains socket outlet with a protective earthing connection.
Important Safety Precautions
Safety
Please, immediately pull out the AC power plug
from adapter if there is an abnormal sound or smell or the LED TV has sound but no picture, and contact after sales support.

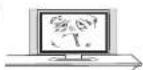

The LED TV should be kept free from rain, moisture and dust to prevent electrical shock and
short circuits. Do not cover the ventilation openings with table clothes, curtains, newspapers, etc.
The LED TV should be kept from high temperature heating sources or direct sunlight. Good ventilation is required. Allow 10 cm. between the LED TV and other appliances or built-in cabinet walls.

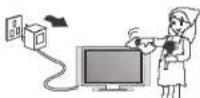
When you wipe the front cabinet, please make sure the power plug is pulled out and use a soft, dry, lint-free cloth and handle it with care. Do not repeatedly wipe the panel, nor scrape, tap or strike the panel with a hard object.
Do not wipe the LED TV with any petrol, chemical or alcohol based solvents as it will lead to product damage of the panel and cabinet.


When the television receiver is not used for an extended period of time, it is advisable to disconnect the AC power cord from the AC outlet.
Important Safety Precautions
Safety

Do not place the LED TV on an unstable surface.
Do not place the power cord or other cables across a walkway in case it is trampled on. Do not overload the power cord or power socket. When the power plug is used to disconnect and connect the device, it should easily go into the power source.

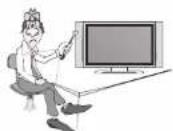
Do not disassemble the back cover, as it contains high voltages inside and will cause electric shock. Only qualified professionals should conduct internal adjustments, maintenance, and checks.
The TV set should not be subjected to water droplets, vapor, or splash. This equipment should not be placed on objects filled with liquids. Do not place flame sources, such as lit candles, on or near the LED TV. Please, pull out the power plug and contact after sales support if there are abnormal objects or water in the TV.

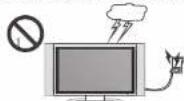
Pull out the power cord and antenna cable during electrical storms so the LED TV is not damaged by electrical surges. Keep all people away from the antenna cable during electrical storms.
Content
Important Safety Instructions
TV Controls 5
TV Inputs and Outputs 6
TV Stand Assembly 7
SYSTEM CONNECTIONS
AV Input 8
SCART Input 8
HDMI2(ARC/MMMI) Input 9
YPbPr Component Input 9
OPTICAL Output 10
USB Input 10
Antenna Connection 11
Remote Control 11-14
OSD MENU OPERATION
Main Menu 15-20
Picture 21
Sound 22
Time 23
Lock 24
Option 25
PVR 26
Built-in DVD Player Operation 29-34
Cleaning and Maintenance 35
Troubleshooting 36-37
Specifications 38
Important safety Instruction
- TV Controls


natural_image
Technical line drawing of a computer monitor chassis with front panel and rear panel (no text or labels)-
▶ After you load a disc, press play the disc, and press twice to pause.
-
▲ Press the ▲ button when the power is on the disc will eject, Press the button again to load the
disc automatically.
- MENU - This button activates the OSD menu. If a sub-menu is active, pressing this button will return
the selection to the previous menu level.
- SOURCE - This button switches between all the different sources of the TV. When the OSD is active, this button sets on the input button and confirms the menu selection.
this button acts as the enter button and confirms the menu selection.
-
CH(-) - This button performs the channel down function. If the OSD menu is active, this button functions as down control for the menu.
-
CH(•) - This button performs the channel up function. If the OSD menu is active, this button functions
as up control for the menu.
- VOL(-) - This button decreases the TV's volume. If the On Screen Display(OSD) menu is active,
pressing this button will move the selection to the left.
- VOL(+) - This button Increases the TV's volume. If the OSD menu is active, pressing this button will
move the selection to the right.
- POWER - Turn on the TV by pressing the button once. Press the button again to turn off the TV.
2. Installation
Wall-mounting
This television set is equipped with VESA mounting points on the back panel for use with wall-mounting brackets (not included).
NOTE: The distance between the holes is 100 x 100 mm in width and height.

natural_image
Top-down schematic of a computer monitor layout showing front, top, and side views (no text or labels)For wall-mounting, remove the screws to remove the entire stand assembly.
TV Inputs & Outputs
Rear Bottom

Rear Side

- POWER (DC 12V) Input
- USB2/1: USB/Multimedia input.
- L/R: Connect to the audio output jacks on your amplifier/home theater.
- SCART: Connecting for SCART signal.
- DVB-S2: Connected to external SATELLITE.
- DVB-T2: Connected to external antenna.
- OPTICAL: Digital Audio output for Surround Sound amplifiers and other devices.
- HDMI1 Input: HDMI in.
- HDMI2(ARC/MMMI) Input: HDMI In.
11.MINIYPbPr: Connecting for the Y/Pb/Pr Input in Component mode.
10.CI: Used to insert the CI card.
12.MINI AV: Connecting for VIDEO signal input in Composite mode. - EARPHONE OUT: Output for headphones or head units such as Majestic Head Units with TV input.
TV Stand Assembly

Instruction:
1. Place the TV unit on a flat and clean table.
2. Insert stand hold into the stand, Fix stand by 2 pcs screws via screw hole Band A.
System Connection
NOTE: Please, make sure the inputs and outputs have firm connections before
connecting power.
- COMPOSITE AV INPUT
Audio/video input: Use the SOURCE button to select AV on the remote control.


- SCART INPUT
Use the SOURCE button on the remote controller to select SCART.
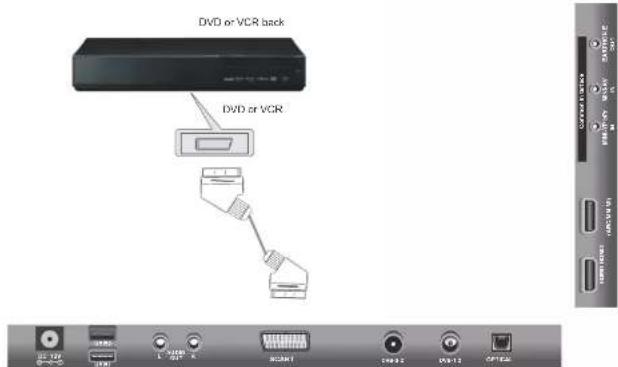
8
System Connection
- HDMI2(ARC/MMMI) INPUT
Allows you to connect your Android or iOS phone or Tablet to display the mobile device on the TV Screen.


- YPbPr COMPONENT INPUT
Video component input: Use the SOURCE button on the remote control to select YPbPr. This input consists of both Video (Green/Blue/Red) and Audio (Red/White)
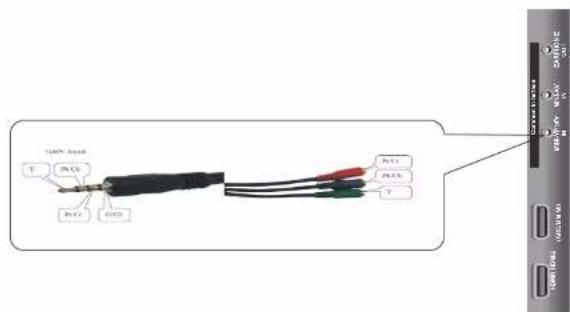

9
System Connection
5. OPTICAL OUTPUT
Allows connection of Digital audio systems and Surround Sound.

6. USB INPUT
Use the SOURCE button on the remote controller to select Media.

10
System Connection
7. Antenna connection
Antenna input impedance of this unit is 75ohm. VHF/UHF 75ohm coaxial cable can be connected to the antenna jack directly.
Antenna lead with 75 ohm male PAL Connector

Remote Control
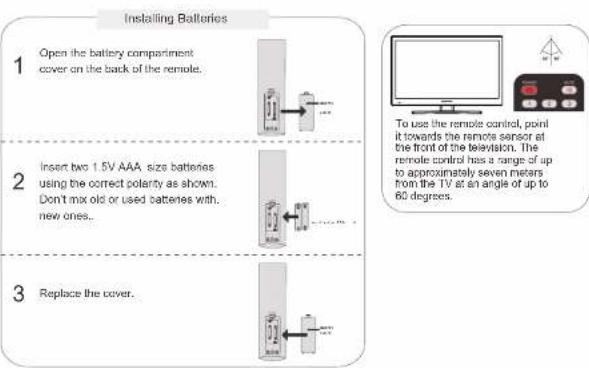
Note:
- Batteries should not be exposed to excessive heat such as direct sunlight, fire or the like.
- If not being used for a period of time, please remove the batteries from the remote in case of leakage.
Do not mix old & new batteries together.
11
Remote-Control Unit

12 13
| No. Button Description | ||
| 1 | POWER | Turns the TV on or off to standby mode. |
| 2 | MUTE | Press to mute the sound. Press again to regain sound. |
| 3 | 0-9 | Press 0-9 to select a TV channel directly. The cannel will change after 2 seconds. |
| 4 | SLEE P | Set the delay time for the TV to turn off automatically. |
| 5 | Return to the previously viewed program. | |
| 6 | P.MOD E | Select the picture mode. |
| 7 | S.M ODE | Select the sound mode. |
| 8 | AU TO | Use for adjustments in PC mode. |
| 9 | DISP LAY | Press to display the source and channel info. |
| 10 | SOURC E | Press to select signal the source for the TV. |
| 11 | MENU | Allows you to navigate the on screen menus (DS D). |
| 12 | EXIT | Exit from the current menu or sub-menu. |
| 13 | Allows you to navigate the on-screen menus and adjust the system settings to your preference. | |
| 14 | OK | Select the option. |
| 15 | CH+/- | Press these two buttons to change channels up/down. |
| 16 | VOL+/- | Press these two buttons to increase/decrease the volume. |
| 17 | SCAN | Press to Auto scan TV program. |
| 18 | AU DIO | Press to change the DTV or DVD audio language. |
| 19 | I/II | Select NICAM audio mode.Only be available for TV programmers with NICAM transmission, and default mode is mono. |
| 20 | ASPECT | Press this button to select the aspect ratio of the screen. |
| 21 | Eject/insert disc. | |
| 22 | D.MENU | Quick Teletext navigation or setup settings / DV D: VideoDV D Menu button. |
| 23 | SETU P | DV D system setup. |
| 24 | D DISP | Quick navigation during Teletext or setup settings / DVD: DVDInformation button. |
| 25 | R (DELE TE) | Delete function button. |
| 26 | G (RENA ME) | Rename function button. |
| 27 | Y (MOVE) | Move function button. |
| 28 | B (SKIP) | Skip function button. |
| 29 | FAV | Selects favorite channel(s). |
| 30 | EPG | Press to display EPG (Electronic Program Guide). |
| 31 | TIME S HIF T | Press to switch to TIME SHIFT mode. |
| 32 | REC.ME NU | Press to switch to REC.MENU immediately (DTV only). |
| 33 | SUBTIT LE | Press to select the subtitle language. |
| 34 | REVEA L | Shows hidden words or pages by Teletext. |
| 35 | TEXT | Switch on/off of Teletext window. |
| 36 | REC/ ● | Press to record the program immediately. |
| 37 | INDE X | Returns to Index page by Teletext. |
| 38 | TV/RA DIO | Press to switch between DTV and radio programs |
| 39 CANCEL | Switches the Teletext window to the background; only the current page no is visible. | |
| 40 | MIX | Sets the transparency of Teletext window. |
| 41 | REPEAT | DV D: Repeat mode selection. |
| 42 | SIZE | Zoom In or Out of the Teletext window. |
| 43 | HOLD | Holds on the current Teletext page. |
| 44 | SUBPAGE | Displays a sup-page of upper Teletext options. |
| 45 | ▶| | Play and Pause Media-Player / DVD. |
| 46 | ◀◀ | Fast Rewind Media-Player and DV D. |
| 47 | ▶▶ | Fast Forward Media-Player and DVD. |
| 48 | ■ | Stops playback Media-Player and DVD. |
| 49 | ◀◀ | Plays the previous Media Player or DVD file/chapter. |
| 50 | ▶◀ | Plays the next Media Player or DVD file/chapter.. |
Teletext function
Teletext or Austext is no longer available in Australia, nor is there any plan for a replacement. For more information, please visit the websites of the Australian channel providers.
However, one teletext option, "closed captions", is still available on most Australian television channels. This service allows you to activate subtitles while watching normal television programs that provide it.
Accessing closed captions
While watching a program, press the teletext button (TEXT/MIX) on the remote control, then enter the numbers 801 on the remote control to activate the subtitles. To exit the subtitles, press the TEXT/MIX button again.
OSD Menu Operation
Main Menu
Step one: It shows "OSD Language" for you to choose when boot for the first time Step two: enter "Country" menu Step three: Enter "Energy" menu

Enter "Tune Type" menu
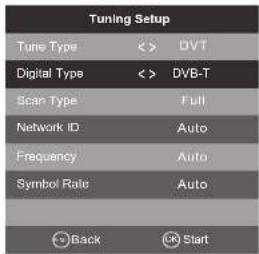
Input Source
It supports
Satellite/DTV/ATV/DVD/AV/SCART/YPbPr/HDMI1/HDMI2/USB1/USB2.

OSD Menu Operation OSD Menu Operation
Main Menu
Press [MENU] key to show main menu, there are six functions under main menu, they are CHANNEL, PICTURE, SOUND, TIME, SETUP, LOCK,
Press to select these functions.
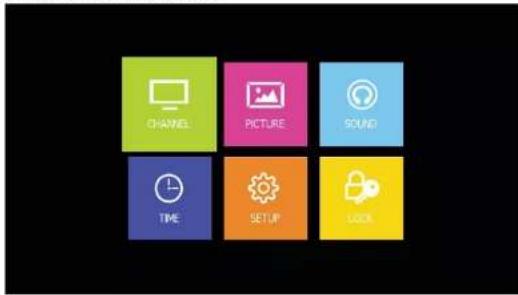
Channel

Main Menu
Auto Tuning
Under the Auto Tuning of CHANNEL menu,
Press /[OK] key to enter Auto Tuning, ◀ / ▶
the following prompt box will appear.

When Tune Type is DTV+ATV, press OK key to enter DTV auto searching.

OSD Menu Operation OSD Menu Operation
Main Menu Main Menu
When search DTV, if you want to skip ATV and directly enter DTV, press MENU to enter the menu as follows:
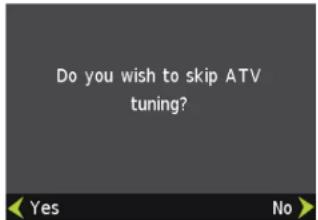
Press key to select Yes/No, Press OK to execute. "Yes" is to skip the ATV ▶/▶ searching and enter DTV searching. When searching, if you want to directly exit from searching, press EXIT to exit.
ATV Manual Tuning
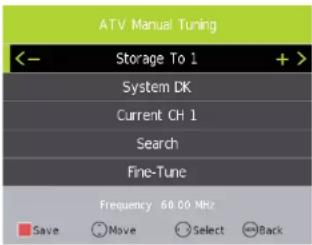
Press to adjust channels, when there is signal, ◀ / ▶
press OK thenbegin ATV searching.
Tips: After searching the channel manually, do press red key to save the channels, or, after you switch the status, the channel you searched won't be saved.
DTV Manual Tuning

Press to adjust channels, when there is signal, ◀ / ▶ press OK then begin DTV searching.
Program Edit

OSD Menu Operation OSD Menu Operation
Main Menu Picture
Channel edit function includes "Delete/Move/Rename/Skip/Fav", Fav/Skip mark will
appear only after the users have some setting on the channel(Fav and Ship can't be
sel together).
Delete: Press [RED] key to cancel the program that the cursor is in.
Move: Press [YELLOW] key, according to the prompt, execute MOVE function,
move the program order.
Skip: Press [BLUE] key, the program the cursor is will be marked with SKIP.
When execute CH+/CH-, skip this program, and this program can't be selected even
press the number key.
■ Rename: Rename function only appear and can be used under ATV program.
Press [GREEN] key under ATV, the program can be renamed.
FAV Favorite: Press [FAV] key, mark the program the cursor is in as favorite program.
PVR
In CHANNEL menu, under PVR File system option, Press [OK] key ◀ / ▶
to enter PVR menu, as follows:


Picture Mode
Standard->Mild->Dynamic->User->EC O Home, Picture mode selection.
Color Temperature
Standard->Cool ->Warm ->UserColor Temperature selection
Noise Reduction
Off->Low->Middle->High->AutoNoise reduction; it is under Hide status under VGA.
OSD Menu Operation OSD Menu Operation
Sound Time
Sound Mode
Press button to select Location, and then Press button ▲ / ▼ ◀ / ▶ to select, then press OK button to confirm.

Time Mode
Press button to select Location, and then Press button ▲ / ▼ ◀ / ▶ to select, then press OK button to confirm.

OSD Menu Operation OSD Menu Operation
LOCK Option
Lock Mode
Press button to select Location, and then Press button ▲ / ▼ ◀ / ▶ to select, then press OK button to confirm.
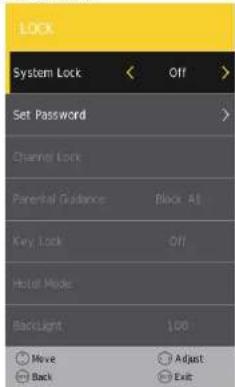
Lock Mode
Press button to select Location, and then Press button ▲ / ▼ ◀ / ▶ to select, then press OK button to confirm.
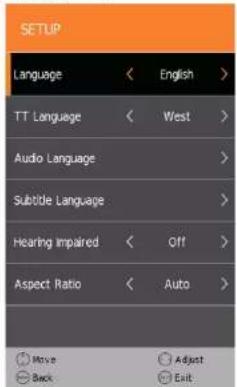
OSD Menu Operation OSD Menu Operation
PVR Media
Record
In DTV, press [REC] button, it will display the following menu below, and start to burn the current DTV program. Press button to move cursor to ◀ / ▶ exercise different function according to hint.

Timeshift
In DTV, press [TIME SHIFT] button to implement the function of Timeshift. Press button to move cursor to exercise different function ▶ / ▶ according to hint.

In the option of Media Player on MainMenu,
Press [OK] to enter the Media Player menu, see the picture as follows: Press to select Movie, Music or Photo. ◀ / ▶

Take Movie function for example, when there is focus point on Movie function, press [OK] button to enter into File Selector menu.

On FileSelector menu, select film source that needs to be play according to the hint. Press [PLAY/PAUSE] button to enter into the play mode of full screen; press [PLAY/PAUSE] to return to Media Player menu.
OSD Menu Operation
Media
Movie
on Media Player menu, move cursor to moive, press [OK] button to enter into FileSelector menu. Select the file you want to play, press [PLAY/PAUSE] to enter into full screen play. Press button to move cursor, and operate ▶ / ▶ according to different hint.

Music
In the same way, on Media Player menu, move cursor to Music, press [OK] button to enter into FileSelector menu. Select the file you want to play press [PLAY/PAUSE] to enter into full screen play. Press button ◀ / ▶ to move cursor, and operate according to different hint.

Photo
In the same way, on Media Player menu, move cursor to Photo, press [OK] button to enter into FileSelector menu. Select the file you want to play, press [PLAY/PAUSE] to enter into full screen play. Press button ◀ / ▶ to move cursor, and operate according to different hint.

Built-in DVD Player Operation
General disc informaiton
The following types of disc can be played on this unit:
| DVD | |
| CD |
Region number
The region number (Regional Restriction Code) is built into this unit. This unit can play region number 4 DVD video discs.

DVD video discs
DVD video discs are divided into titles, and the titles are subdivided into chapters.

You may find the following markings on DVD video discs; they are explained below:
| 3 | Multiple languages |
| 2 | Multi-language subtitles |
| 3 | Multi-angle |
| 16:9 LB | Multi-aspect |
| 4 | Region number |
| CC | Closed captions |
Audio CD discs
Audio CD discs are divided into tracks:
Track 1 Track 2 Track 3 Track 4 Track 5
Built-in DVD Player Operation (Cont.)
CAUTION:
- Only the types of disc mentioned on the previous page can be played on this unit; DVD-ROM, CD-ROM, CVD, VCD etc. cannot be played back.
- A DVD-RW (video mode) can generally be played back, but not necessarily all DVDs of this type: playback capability depends on the recording conditions.
- A DVD-RW (VR mode) cannot be played back.
- A DVD+R/+RW can generally be played back, but not necessarily all DVDs of this type: playback capability depends on the recording conditions.
- A DVD-R that has recorded movie data can generally be played back on this unit, but not necessarily all DVDs of this type: playback capability depends on the recording conditions.
- A DVD-R without any recorded movie data cannot be played back.
Handling, storing and cleaning discs
- Never put anything except a 12cm DVD (or CD) into the disc slot. Foreign objects can damage the unit.
- Carefully wipe any fingerprints and dust from the signal surface of the disc (glossy side) with a soft cloth. Wipe straight from the center to the outside of the disc.
- Never use chemical cleaning spray, liquids or solvents to clean discs. These chemicals will permanently damage the plastic surface of the disc.
- To remove a disc from its storage case, press down on the center of the case and lift the disc out, holding it carefully by the edges.
- Return any discs to their cases after use to protect them from dust and scratches.
- To prevent warping the disc, do not expose it to direct sunlight, high humidity or high temperatures for extended periods of time.
- Do not apply paper labels or write anything on either side of the disc. Sharp writing instruments, or the inks used in some felt-tip pens, may damage the surfaces of the disc.
DVD set up
Once you have made your initial settings, you can always operate the unit under the same conditions. The settings will be retained in the memory until they are changed, even if the power is turned off.
NOTE:
- Press [DVD SETUP] to activate the DVD player OSD menu.
- Press ◀/▶ to highlight and move between different sub-menus, then press ▼ to enter the sub-menu.
- Press ▲/▼ to move the highlight to the item you wish to select, then press ▶ to enter.
- Press ▲ / ▼ for adjustments.
- Press [DVD SETUP] to exit the OSD menu
Built-in DVD Player Operation (Cont.)
INITIAL SETTINGS (DVD)
General Settings page
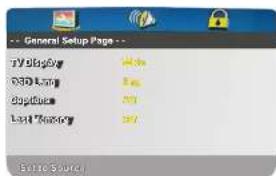
- TV DISPLAY: Set the screen ratio options are: Normal/PS (4:3 Pan Scan), Nomal/PS (4:3 Letter Box) and Wide (16:9). The default settings is wide.
- OSD Lang: Set the OSD Language options.
- CAPTION: Play captions on supported DVD titles, Options: ON/OFF.
- LAST MEMORY: Play DVD from last point. Options are: ON/OFF.
Audio Setup Page

- LT/RT: Logic Surround stereo audio output. This matrix-based coding process enables stereo audio tracks to carry four channels (left, center, right and surround) of audio data.
- Stereo: Analog stereo audio output. The player sends the subwoofer and speech signals to the Tv's speakers.
Preference Page
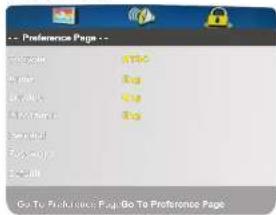
- TV Type: The DVD player supports output of various systems including Multi, NTSC, PAL. The default setting is PAL and this should not need to be changed.
- Audio: DVD language selection options.
- Subtitle: This player can display DVD subtitle languages if supported by the DVD disc. When playing DVD's, you can hide the subtitle or choose any of them as the current subtitle language.
- Disc menu: DVD Disc menu language selection options.
- PARENTAL This function disables playback of specific DVD's which may be unsuitable for children. Some DVDs are encoded with specific rating levels. If the rating level of the disc is higher than that preset in this menu, playback of the disc will be prohibited. After selecting one of the PARENTAL codes, the screen will display the PASSWORD page. The default password is "8888".
- PASSWORD [DVD only]: Allows you to change the current PASSWORD.
- Default: This option will return the DVD to its factory default settings.
Built-in DVD Player Operation (Cont.)
Basic playback functions
If this symbol ⚙ appears on the TV screen during operation, the function you are trying to access is currently not available on the disc.
- Turn on the TV and press [SOURCE] to select the input source as DVD.
- Insert the disc (label facing away from you) into the disc slot (side panel) approx 1/3 of the way in until you feel tension from the disc mechanism. Shortly after the mechanism will continue loading the disc all of the way in. DO NOT FORCE THE DISC IN. The TV will start playing the first file/track/chapter automatically.
NOTE: Regardless of the mode you have selected, when you insert a playable disc into the disc slot, the TV will switch to DVD mode and start playback automatically.
- To temporarily stop playback of a CD, press ▶ to stop playback, press it again to resume playback.
To temporarily stop playback of a DVD, press ■ once to stop playback, press it twice to stop playback completely.
Selecting a DVD menu
NOTES: The operation may differ depending on the disc used.
Selecting a menu may not be possible on some discs.
- Press [DVD MENU] during playback, the main menu screen will appear.
- Press ▲/▼ ◀/▶ (or the number buttons) to select the desired menu.
- Press [OK] and the selected menu playback starts.
Chapter (track) skip

flowchart
graph LR
    A["Vehicle"] --> B["Train"]
    B --> C["Mountain"]
Skipping forward
Press ▶ during playback to skip to the next chapter (or track).
Skipping backward
Press ✦ during playback to skip back to the previous chapter (or track).
NOTE: You can skip only through the chapters, not through the title on the DVD disc.
Built-in DVD Player Operation(Cont.)
Title Search [DVD]
Press [GOTO], then press the number buttons to enter the desired title number.
Repeat Playback
Press [REPEAT] during playback to activate repeat mode:
DVD
| If you want to ... | Press [REPEAT] ... |
| Repeat chapter( Chapter) | Once |
| Repeat title( Title) | Twice |
| Repeat all( All ) | Three times |
| Repeat O? | Four times |
CD
| If you want to ... | Press [REPEAT] ... |
| Repeat current track | Once |
| Repeat all tracks | Twice |
| Repeat off | Three times |
A-B repeat (designated range repeat playback)

flowchart
graph LR
    A["Point A"] --> B["Right Block"]
    B --> C["Right Block"]
    C --> D["Right Block"]
    D --> E["Point B"]
    style A fill:#f9f,stroke:#333
    style E fill:#f9f,stroke:#333
- Press [A B] during playback at the beginning of the section you want to repeat (Point A). "∠A" appears on the TV screen.
- Press [A B] again at the end of the section you want to repeat (Point B). "AB" appears briefly on the TV screen.
- To return to normal playback, press [A B] again.
Important note
The DVD default password is "0000" — you need that to enter the password/lock menu so that you can set your own password.
If you forget the password you have set, you have to enter the master password: "8888". This will clear your set password and go back to the default password, which you can change, if you wish.
Built-in DVD Player Operation(Cont.)
Subtitle language [DVD]
If the DVD you are watching has subtitles, press [SUBTITLE] repeatedly during playback until the desired subtitle language appears on the TV screen. Example: SUBTITLE 01/03 ENG
NOTE: Not all discs support this function.
![MAJESTIC L195DA - Subtitle language [DVD] - 1](/content/2026/05/895349/images/ab49382eae2fb32a78c33db224714ca5453fd154d27034b82f7dfb2bdaa27696.jpg)
Audio soundtrack language (multilanguage) [DVD]
This function works only with discs that have multiple audio soundtrack languages recorded.
Press [AUDIO] repeatedly during playback until the desired language appears on the TV screen.
NOTES:
- When the desired language is not selected, even though the button is pressed, the language is not available on the disc.
- If the language is not recorded on the disc, only the available language on the disc will be heard.
- When you turn off the power or change the disc, you have to select the language again.
On-screen information
Press [DISPLAY] repeatedly to show the disc information available (Title, Chapter, Title elapsed playing time, Language, etc.).
Picture/JPEG CD playback
To start a slide show from the thumbnail pictures:
- Press ▲/▼/◄/► to select the desired picture.
To go to the next or previous thumbnail pictures, press 🎨 or 🏠.
- Press [OK] or / ▶(Play) to start the slide show from the selected picture. During the slide show:
- PRESS 1 to pause. Press ▶(Play) to continue.
- PRESS ▶or ▶o skip to the next or previous file.
- If the picture appears upside down or sideways, press ▲/▼/◄/► to flip/rotate the picture.
Cleaning and Maintenance
WARNING!
For your personal safety, be sure to disconnect the power adaptor before proceeding with any maintenance or cleaning.
Cleaning the TV screen
- Do not touch the TV screen with sharp objects.
- Use a clean, soft cloth to wipe off any dust and fingerprints from the TV screen surface. Wipe in a straight motion from the center of the TV panel to the outside.
- Do not clean the screen with water or chemical cleaners, as this may damage the TV screen surface.
- Never use chemicals such as household cleaning sprays, antistatic sprays or fluids, benzene or thinner to clean the TV screen.
Cleaning the main unit
- Dust the TV set by wiping the screen and cabinet with a soft, clean cloth.
- If necessary, wipe the outside of the unit with a clean, soft cloth, moistened with lukewarm water.
- Do not use benzene, thinner or alcohol as these chemicals will smudge the surface finish.
Maintenance
- Do not dismantle this product by yourself, as this may cause damage. There are no user-serviceable parts contained in the TV set.
- If your TV set has been damaged, contact the after sales support line for advice or take it to a local service center for inspection or repair. No liability can be accepted for any damage caused by non-compliance with these instructions or any other improper use or mishandling of appliance.
- This product should not be adjusted or repaired by anyone except properly qualified personnel.
Troubleshooting
| Problem | Possible cause | Possible solution |
| No picture and sound. | The power adaptor is not plugged in or not working.The wrong input source is selected.The input source has failed to connect with the TV or is not turned on. | Plug the power adaptor into a suitable outlet. Try both the 9/30V DC & 240V adaptorsSelect the correct input source.Make sure the input source is correctly connected and turned on. |
| No sound. | The volume control is set to minimum.The mute button on the remote control has been pressedAn incorrect sound system mode is set. | Press the button to increase the volume.Press or the (or) button to restore/increase the volume.Set a correct sound system mode from the main menu to match your TV source. |
| No picture, or monochrome picture only. | The colour system setting does not match the program.The sound system setting does not match the program. | Select the appropriate colour system setting.Select the appropriate sound system setting.(If unsure, use Auto settings where available). |
| Sound or picture interference. | Some equipment that causes interference is close to the TV.More than one device is plugged into the same power outlet.An incorrect sound system mode is set. | Keep interference-causing equipment away from the TV.Plug the power adaptor into another, separate power outlet.Set a correct sound system mode from the main menu to match your TV source. |
| PVR recording failed, or “DISK NOT READY” is displayed. | You may not have removed your USB device after the last recording, which is necessary to protect the device from damage. | Remove the USB device after each recording if you experience recording problems. If “DISK NOT READY” is displayed, remove the device, reconnect and then proceed with your recording. |
Troubleshooting (Cont.)
| Problem | Possible cause | Possible solution |
| DTV Picture Pixelation | • Poor Signal | • Adjust the position or orientation of the TV antenna.• Check the antenna connection from the wall plate to the TV.• Try re-tuning the channels as the channel frequencies may be different in some areas. |
NOTE: Thank you for purchasing a Majestic quality TV. Our products have been designed with over 15 years of engineering excellence and are designed of the highest quality standard in the Marine and RV industry. Should you encounter any problems that cannot be easily addressed within this instruction manual please feel free to contact us at these locations:
Australia (Int'l Head Office): 073 102 3575
New Zealand: 09 415 6936
USA: 561 459 1900
All other countries please email support@majestic-global.com
Feel free to visit our website for more updated specifications or technical support www.majestic-global.com
Specifications
Picture & Sound
| MODEL | L195DA |
| Screen Size | 18.5" |
| Display Type | LED |
| Aspect Ratio | 16:9 |
| Panel Resolution (pixels) | 1366(H) X 768(V) |
| Brightness | 250 cd/m ^2 |
| Contrast Ratio | 1000:1 |
| Response Time | 5ms |
| Speakers | 2 x 5W |
| Viewing Angle | 178(H) x 178(V) |
| HD Modes | 480i, 480P, 576i, 576P, 720P, 1080i, 1080P |
| TV System | DVB-C/T2/S2/PAL |
| Sound System | B/G, I, D/K |
Other Info
| Dimensions - W/o Stand | 445 x 275 x 45mm |
| Dimensions - With Stand | 445 x 311 x 170mm |
| Wall Mounting | VESA 100 x 100 |
| Weight | 3.5kg |
| Voltage | DC12V=4A |
| Operating Temperature | 0° - 35°C |


- Safety Information
- IMPORTANT SAFETY INSTRUCTIONS
- Important Safety Precautions
- Safety
- Content
- Important safety Instruction
- Installation
- TV Inputs & Outputs
- TV Stand Assembly
- System Connection
- OPTICAL OUTPUT
- USB INPUT
- Antenna connection
- Remote Control
- Note:
- Teletext function
- Accessing closed captions
- OSD Menu Operation
- Main Menu
- Input Source
- OSD Menu Operation OSD Menu Operation
- Auto Tuning
- Main Menu Main Menu
- Main Menu Picture
- PVR
- Picture Mode
- Sound Time
- LOCK Option
- PVR Media
- Record
- Timeshift
- Media
- Movie
- Music
- Photo
- Built-in DVD Player Operation
- General disc informaiton
- Region number
- DVD video discs
- Audio CD discs
- Built-in DVD Player Operation (Cont.)
- CAUTION:
- Handling, storing and cleaning discs
- DVD set up
- INITIAL SETTINGS (DVD)
- Basic playback functions
- Selecting a DVD menu
- Skipping forward
- Skipping backward
- Built-in DVD Player Operation(Cont.)
- Title Search [DVD]
- Repeat Playback
- Important note
- Subtitle language [DVD]
- Audio soundtrack language (multilanguage) [DVD]
- NOTES:
- On-screen information
- Picture/JPEG CD playback
- Cleaning and Maintenance
- WARNING!
- Cleaning the TV screen
- Cleaning the main unit
- Maintenance
- Specifications
Brand : MAJESTIC
Model : L195DA
Category : Television