MIC-2511 - Measurement Sonel - Free user manual and instructions
Find the device manual for free MIC-2511 Sonel in PDF.


| Product type | Insulation Resistance Meter |
| Brand | Sonel |
| Model | MIC-2511 |
| Dimensions | 234 x 169 x 70 mm |
| Weight | approx. 1.3 kg |
| Power supply | Li-Ion 10.8 V 3.5 Ah rechargeable battery |
| Display | Graphical 5.6" LCD |
| Insulation resistance range | Up to 2.00 TΩ (depending on test voltage) |
| Test voltage range | 10 V to 2500 V |
| Measurement categories | CAT IV 600 V, CAT III 600 V (up to 3000 m altitude) |
| Memory capacity | 9999 results |
| Data transmission | USB |
| Ingress protection | IP65 |
| Operating temperature | -20°C to +50°C |
| Storage temperature | -25°C to +70°C |
| Humidity range | 20% to 90% |
| Low-voltage continuity | With ±200 mA current, range 0.10 Ω to 999 Ω |
| EPA measurements | Point-to-point, point-to-ground, surface, volume resistance |
| Special functions | PI, DAR, DD, SV, RampTest, temperature correction |
| Accessories included (optional) | AutoISO-2511 adapter for multi-core cables |
| Safety features | Double insulation, overload protection up to 1500 V, auto-discharge |
Frequently Asked Questions - MIC-2511 Sonel
User questions about MIC-2511 Sonel
0 question about this device. Answer the ones you know or ask your own.
Ask a new question about this device
Download the instructions for your Measurement in PDF format for free! Find your manual MIC-2511 - Sonel and take your electronic device back in hand. On this page are published all the documents necessary for the use of your device. MIC-2511 by Sonel.
USER MANUAL MIC-2511 Sonel
natural_image
Line drawing of a vintage electronic device with control panel and buttons (no text or symbols)User manual
MIC-2511
Insulation resistance meter
CE
User manual
MIC-2511
Insulation resistance meter
SONEL S.A.
Wokulskiego 11
58-100 Świdnica
Poland
Version 1.03 12.09.2023
The MIC-2511 meter is a modern, top quality measuring instrument which is easy and safe to use, provided that the principles presented in this manual are observed. In addition, becoming acquainted with the manual will help you avoid measuring errors and will prevent any possible problems with the operation of the meter.
CONTENTS
1 General information....5
1.1 Safety symbols....5
1.2 Behaviour of signalling LEDs....5
1.3 Safety....6
2 Quick start 7
3 Interface and configuration....8
3.1 On-screen keyboard 8
3.2 Menu icons 8
3.3 Gestures....9
3.4 Buttons on the housing....9
3.5 User's account....10
3.5.1 Adding and editing users.... 11
3.5.2 Deleting users....11
3.5.3 Switching users....11
3.6 Configuration of the meter – main settings....12
3.6.1 Language....12
3.6.2 Date and time 12
3.6.3 Meter 12
3.6.4 Measurements....12
3.6.5 Information....13
3.6.6 Factory reset of the meter 13
4 Measurements....14
4.1 Before you start....15
4.1.1 Connections for R ISO measurements....15
4.1.2 Connections for R x R CONT measurements ..... 17
4.1.3 Connections for EPA measurements 18
4.1.4 Measurement indicators 22
4.1.5 Measurement settings....23
4.2 Visual test....24
4.3 Insulation resistance - R ISO 25
4.3.1 Measurements with the use of test leads....25
4.3.2 Measurements using the AutoISO-2511 adapter....28
4.4 Measurements with a voltage increasing in steps – SV....31
4.5 Measurement with ramp test – RampTest ....33
4.6 Dielectric Discharge Indicator – DD 35
4.7 Polarization Index - PI (R _ISO 600 s)....37
4.8 Dielectric Absorption Ratio - DAR (R ISO 60 s) 39
4.9 Low-voltage measurement of resistance - R , R_CONT .....41
4.9.1 Calibration of test leads 41
4.9.2 Measurement of resistance (R x)....41
4.9.3 Measurement of resistance of protective conductors and equipotential bonding with ±200 mA current (RCONT) ..... 42
4.10 Measurements in the EPAs....44
5 Special features ....46
5.1 Graphs 46
5.2 Correcting the R iso value to the reference temperature....48
5.2.1 Correction without the temperature probe....48
5.2.2 Correction with the temperature probe....49
6 Memory of the meter....51
6.1 Memory structure and management ....51
6.2 Search function....51
6.3 Saving measurement result data to the memory....52
6.3.1 From the measurement result to the object in memory 52
6.3.2 From the object in memory to the measurement result 52
7 Data transmission....53
7.1 Set of accessories to connect the meter to a PC 53
7.2 Data transmission through USB port....53
8 Software update....54
9 Troubleshooting....55
10 Power supply....56
10.1 Battery power 57
10.2 Charging rechargeable battery....57
10.3 Power supply from mains 57
10.4 General rules for using Li-Ion rechargeable batteries....58
11 Cleaning and maintenance ....59
12 Storage....59
13 Dismantling and utilisation....59
14 Technical data....60
14.1 Basic data....60
14.1.1 Measurement of AC/DC voltage....60
14.1.2 Measurement of insulation resistance....60
14.1.3 Measurement of capacitance 62
14.1.4 Low-voltage measurement of continuity and resistance 62
14.1.5 Measurement of temperature....62
14.1.6 Measurement of resistance in EPA zones 63
14.2 Other technical data 64
14.3 Additional data....64
14.3.1 Additional uncertainties according to EN IEC 61557-2 (R _ISO )....64
15 Manufacturer....65
1 General information
1.1 Safety symbols
The following international symbols are used in the device and/or in this manual:
 | Warning.See explanation in the manual |  | Ground |  | AC current/voltage |
 | DC current/voltage | [0YX2] | Double insulation(protection class) |  | Declaration of Conformity with EU directives(Conformité Européenne) |
 | Do not dispose of with other household waste |  | Attention, risk of electric shock. The device generates a voltage of 2500 V |  | Do not connect the device to systems with voltages above 1500 V |
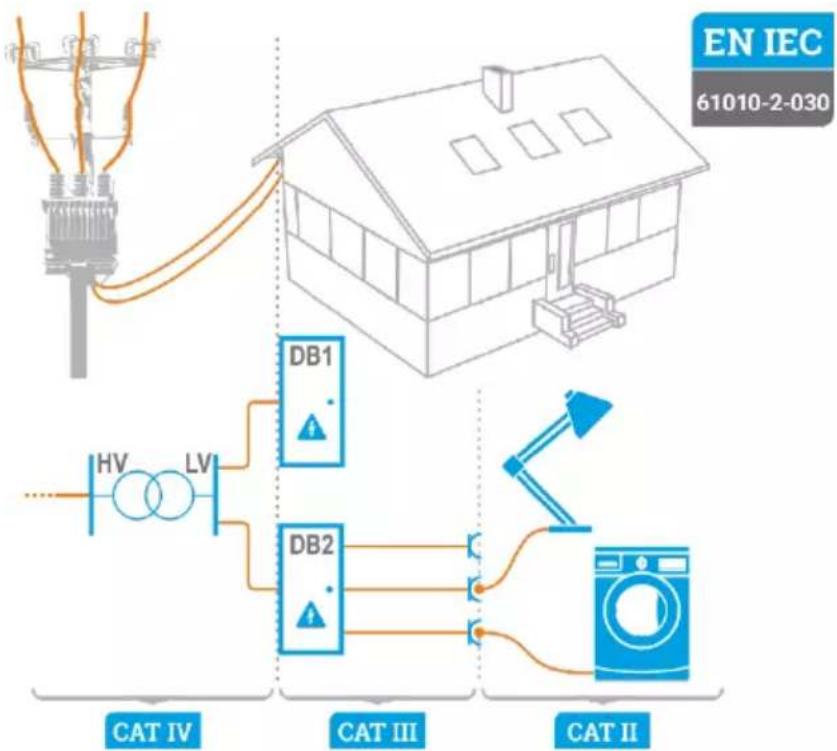
Measurement categories according to EN IEC 61010-2-030:
- CAT II – concerns measurements performed in circuits directly connected to low voltage installations,
- CAT III – concerns measurements performed in buildings installations,
- CAT IV – concerns measurements performed at the source of low voltage installation.
flowchart
graph TD
    A["Power Supply"] --> B["House"]
    B --> C["DB1"]
    B --> D["DB2"]
    C --> E["Light Bulb"]
    D --> F["Light Bulb"]
    G["Light Bulb"] --> H["HV"]
    G --> I["LV"]
    J["Light Bulb"] --> K["CAT IV"]
    J --> L["CAT III"]
    M["Light Bulb"] --> N["CAT II"]
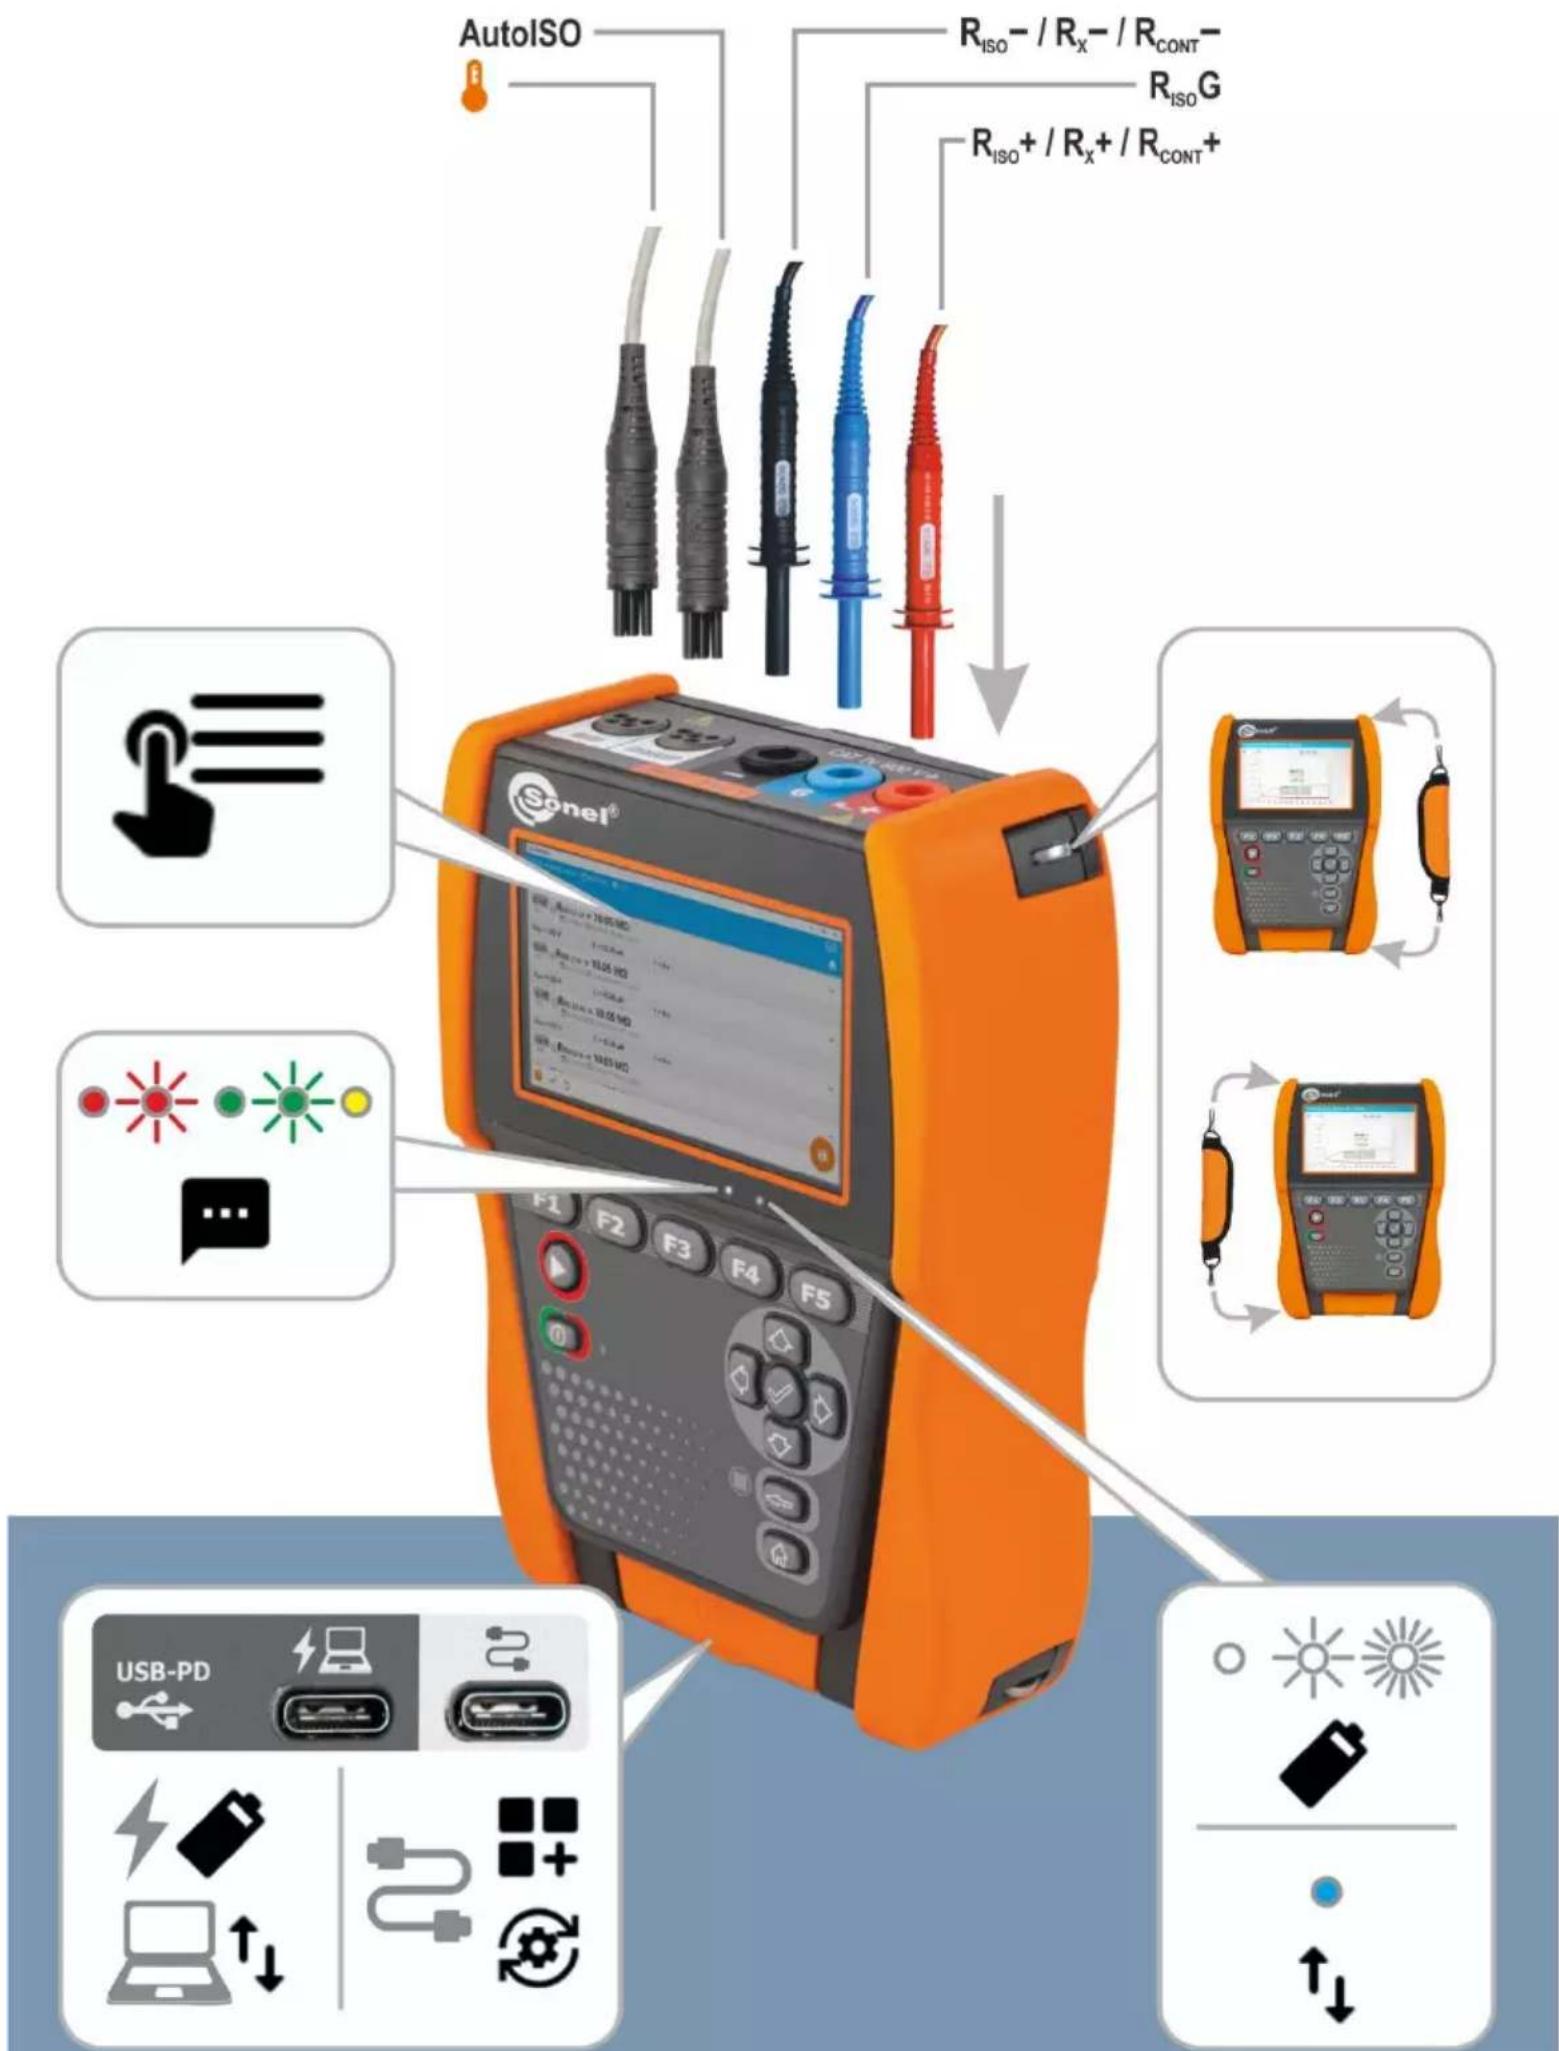
1.2 Behaviour of signalling LEDs

The LED is on continuously

The LED flashes slowly

The LED flashes rapidly
1.3 Safety
The MIC-2511 meter is designed for performing inspection tests for protection against electric shock in mains systems. The meter is used for making measurements and providing results to determine safety of electrical installations. Therefore, in order to provide the conditions for correct operation and accuracy of obtained results, the following recommendations must be observed:
- Before you proceed to operate the meter, acquaint yourself thoroughly with the present manual and observe the safety regulations and recommendations of the manufacturer.
- Any application that differs from those specified in the manual may result in damage to the device and constitute a source of danger for the user.
- The meter must only be operated by appropriately qualified personnel with relevant certificates authorising the personnel to perform works on electric systems. Unauthorized use of the meter may result in its damage and may be a source of serious hazard to the user and bystanders.
- Before the measurement of insulation resistance you must be sure that the test object is disconnected from the power supply.
- During the measurement of insulation resistance do not disconnect test leads from the test object before the measurement is completed. Otherwise the capacitance of the object will not be discharged, creating the risk of electric shock.
- When measuring the resistance of a cable, ensure that the other end of the cable is protected against accidental contact.
- Using this manual does not exclude the need to comply with occupational health and safety regulations and with other relevant fire regulations required during the performance of a particular type of work. Before starting the work with the device in special environments, e.g. potentially fire-risk/explosive environment, it is necessary to consult with the person responsible for health and safety.
- It is unacceptable to operate:
⇒ a damaged meter which is completely or partially out of order,
⇒ a meter with damaged insulation,
⇒ a meter stored for an excessive period of time in disadvantageous conditions (e.g. excessive humidity). If the meter has been transferred from a cool to a warm environment with a high level of relative humidity, do not start measurements until the meter has warmed up to the ambient temperature (approximately 30 minutes).
- Before measurement, choose a correct measurement function and make sure that the test leads are connected to their respective measuring terminals.
- The correct operation of the instrument and accessories must be checked regularly to avoid any hazard which may result from erroneous results.
- In a situation where the product works with other instruments or accessories, the lowest measurement category of the connected devices is used.
- Do not power the meter from sources other than those listed in this manual.
- Repairs may only be performed by an authorised service point.
WARNING
During measurements of insulation resistance, dangerous voltage up to 2.75 kV (2.5 kV + (0...10%)) occurs at the ends of test leads of the meter.

- The R _ISO inputs of the meter are protected electronically from overload (e.g. due to having been connected to a live circuit) up to 1500 V for 60 seconds.
- Due to continuous development of the meter's software, the actual appearance of the display for some features may slightly differ from that presented in this user manual. The latest version of the manual is provided on the manufacturer's website.
2 Quick start

When you start the device for the first time, you must set the interface language and create a user account. Finally, set the date, time and time zone.
1

Turn the meter on.
2

Create or log in to a user account.
3

Enter the meter settings
4

Select measurement. You can find information about it under icon and in this manual.
5

Enter the measurement settings.
6

Connect the meter to the tested object.
7

Start the measurement.
8

End the measurement or wait for it to be completed. Then, in the "Attachments" section, you can enter additional information about the measurement.
9

Save the result in the memory.
10
3s

Turn the meter off.

- The menu windows are available under the function buttons..
F1 - Help.
⇒ F2 – Main settings (sec. 3.6).
⇒ F3 – Measurements (sec. 4).
⇒ F4 - Memory (sec. 6).
- You can save measurements in two ways:
⇒ by performing a measurement and then assigning it to an object in the memory structure,
⇒ entering an object in the memory structure and making a measurement at this memory location.
3 Interface and configuration
3.1 On-screen keyboard
The on-screen keyboard has the same functions as the keyboard on any touchscreen device.
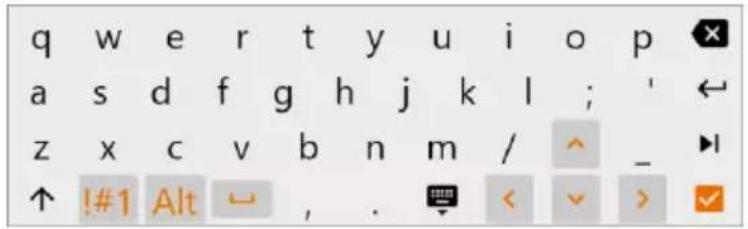

Delete

Go to new line

Go to the next field

Switch to a keyboard with numbers and special characters

Show diacritics

Confirm the entered text

Hide the keyboard
3.2 Menu icons
General


Go to the previous window
Return to the main menu
Help
Log out the user

Expand the item

Collapse the item

Save

Close window / cancel the action

Information
Measurements
+/-

Enter the markings
Add a measurement object
Measurement settings and limits

Start the measurement

Finish the measurement

Repeat the measurement

Show the graph
Memory


Add an object
Add a folder


Add an instrument
Add a measurement

Search

Go to the parent folder
3.3 Gestures
5s

Start the measurement by holding the icon for 5 seconds

Touch an item on the touch screen
3.4 Buttons on the housing
The physical buttons are used to navigate the menu – just like the touch interface controls. They are necessary for when you turn off the screen touch function.
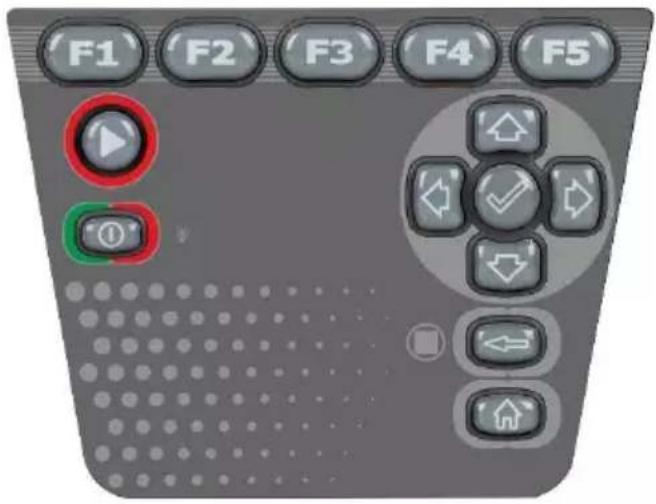
| F1 | Help | ↑ | Up |
| F2 | Main Settings | ↓ | Down |
| F3 | Measurements | ← | Left |
| F4 | Memory | → | Right |
| F5 | Recently used views | ✓ | Confirm |
| Turn on the meter / display brightness (short press)Turn on the meter (press and hold) | ← | Back / delete sign / stop measurement | |
 | Start / stop measurement | ↑ | Go to the main window |
To activate a given interface element, use the arrows to select it (successive selected elements will be highlighted), and then press the button to confirm your selection. The same principle applies to the entire interface: from measurement screens, through the memory management menu and to the help.
3.5 User's account
After logging in, you will gain access to the user accounts menu. The padlock symbol means that the user is protected by a password.


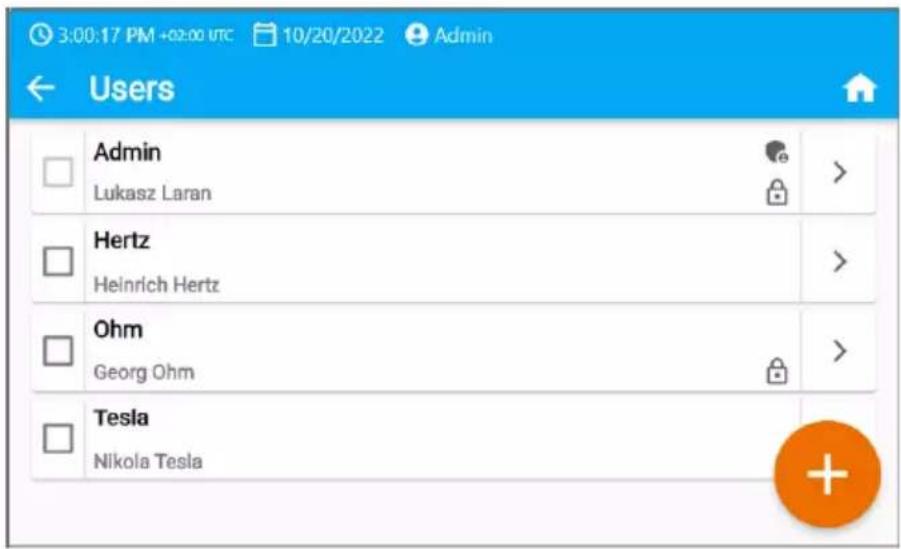
Users are introduced to a list of people, who performed tests using their signature name. The device can be used by a number of people. Every person can log in as a user with their own login and password. Passwords are used to prevent logging into another users account. Only the administrator has the right to enter and delete users. Other users can only change their own data.

- The meter can have only one administrator (admin) and a maximum of 4 users with limited rights.
- The user created by the administrator receives their own meter settings.
• These settings can only be changed by that user and the administrator.
3.5.1 Adding and editing users
1
- To enter a new user, select . +
- To change the data of a given user, select the user.
- Then enter or edit its data.
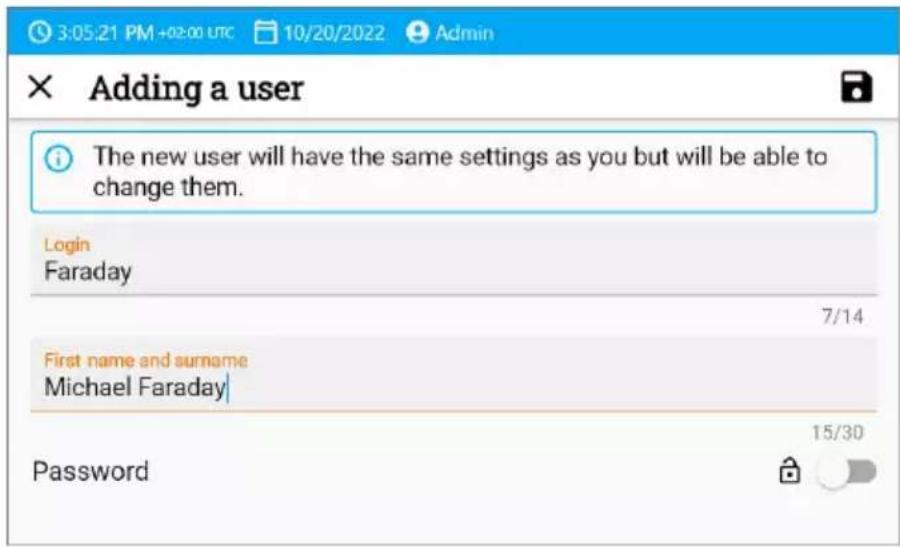
2


After touching the padlock, you can enter the password to access the user account. Touch it again if you want to disable the account password protection.
3

Finally, save your changes.
3.5.2 Deleting users
To delete users, mark them and select .The exception is the administrator account, which can only be deleted by restoring the meter to the factory settings (sec. 3.6.3).
3.5.3 Switching users
1

To change the user, log out the current user and confirm the ending of the session.
2

Now you can log in as another user.
3.6 Configuration of the meter – main settings

Here you can configure the meter to your needs.
3.6.1 Language

Here you can set the interface language.
3.6.2 Date and time
Available settings:
- Date.
- Time.
- Time zone.
3.6.3 Meter

Available settings:
- Communication – here you can configure the available communication methods.
- Display – here you can turn on/off the time for when the screen will turn off, adjust the brightness, turn on/off the touch function of the screen, change the size of fonts and icons in the measurement view.
- Sounds – here you can turn on/off the system sounds.
- Specialized mode – allows you to enter a special service code. This functionality is dedicated to our technical support.
- Recovery – here you can restore the meter to factory settings. See also sec. 3.6.6.
- Meter status – here you can check the used and available space in the internal memory.
3.6.4 Measurements

Available settings:
- Show messages about high voltage – displaying additional messages about high voltage while taking measurements.
- ID auto increment – creating new memory items with a unique ID for the parent folder in sequential numbering.
- Name auto increment – creating new memory items according to previously selected names and types.
- Temperature unit – setting the unit of temperature displayed and stored in the result after connecting the temperature probe.
3.6.5 Information

Here you can check information about the meter.
3.6.6 Factory reset of the meter

You have several options in this menu.
• Meter memory optimization. Use this function, if:
⇒ there are problems with saving or reading measurements,
⇒ there are problems navigating through folders.
If this method does not correct the problem, use the "Reset the meter's memory" function.
- Resetting the meter's memory. Use this function, if:
⇒ restoring the meters memory did not correct the problem.
⇒ there are other problems preventing the use of the memory
Before starting the deletion, we recommend that you transfer the data to a USB stick or a computer.
- Factory reset of the meter. All saved folders, measurements, user accounts and entered settings will be deleted.
After selecting the desired option, confirm your decision and follow the prompts.
4 Measurements
WARNING
- The tested object must not be under voltage higher than 50 V.
• Take particular care during cable measurement. The risk of electric shock is present also after discharging their capacitance by the meter, as the voltage can be rebuilt automatically. - During measurements, it is recommended to use electrical insulating personal protection equipment, which reduces the risk of touching the wires that may pose a threat to the user.

NOTE!
Connecting voltage higher than 1500 V between any of the test terminals may damage the meter.

During the measurement, make sure that test leads and crocodile clips do not touch each other and/or ground, because such a contact may cause the flow of surface currents resulting in additional error in measurement results.
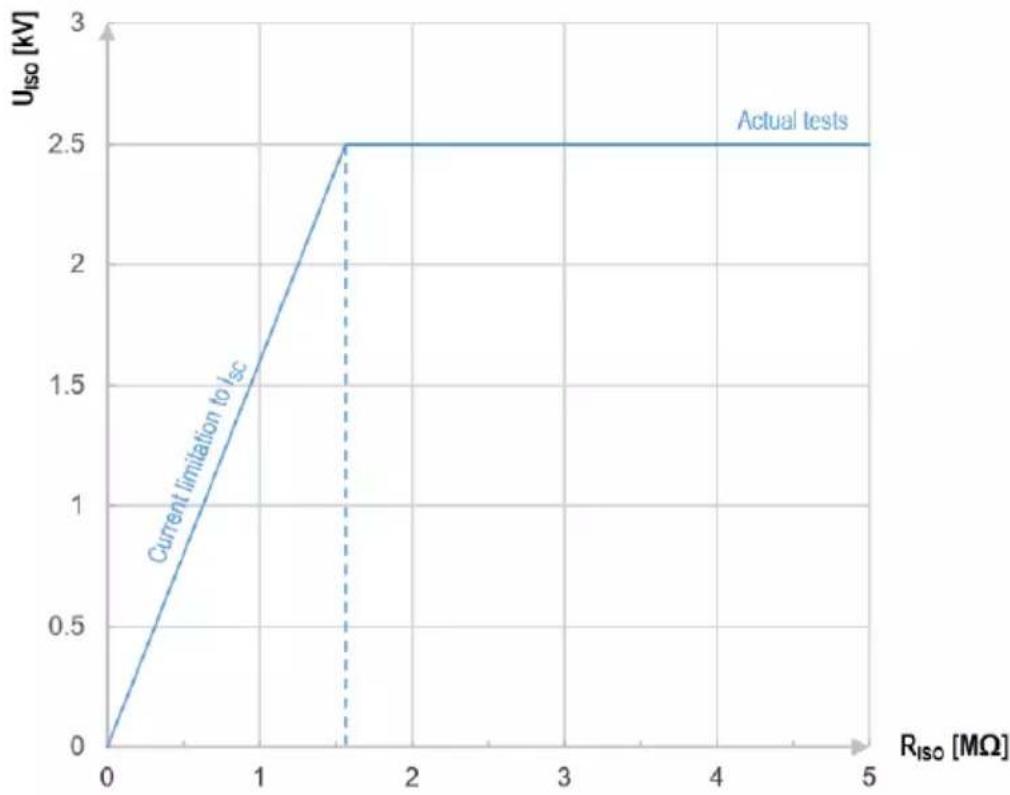
Inverter output current I_sc is 2 mA + mA. Activation of the current limit is indicated by a continuous beep. The measurement result is correct, but on the test terminals the voltage is lower than the set voltage. The current limitation occurs in the first phase of the measurement due to charging the capacitance of the tested object.
line
| RIso [MΩ] | UIso [kV] | | --------- | --------- | | 0 | 0 | | 1 | 1.5 | | 1.5 | 2.5 | | 5 | 2.5 |Graph 4.1. The actual test voltage U_ISO as a function of the measured insulation resistance R_ISO (for maximum test voltage)
4.1 Before you start
WARNING
- During measurements of insulation resistance, dangerous voltage up to 2.5 kV + (0...10%) occurs at the ends of test leads of the meter.
- It is forbidden to disconnect test leads before the measurement is completed. Failure to obey the above instruction will lead to high voltage electric shock and make it impossible to discharge the tested object.
• Take particular care during cable measurement. After discharging their capacitance by the meter the voltage can be rebuilt automatically.
4.1.1 Connections for R ISO measurements
The standard way of measuring the insulation resistance (R _ISO ) is the two-lead method.
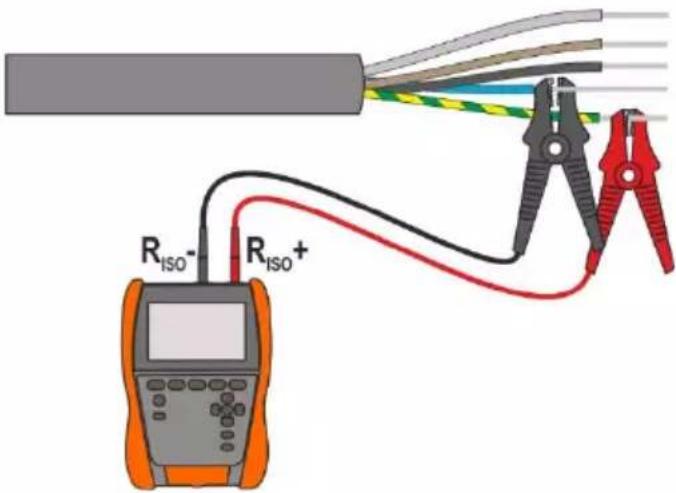
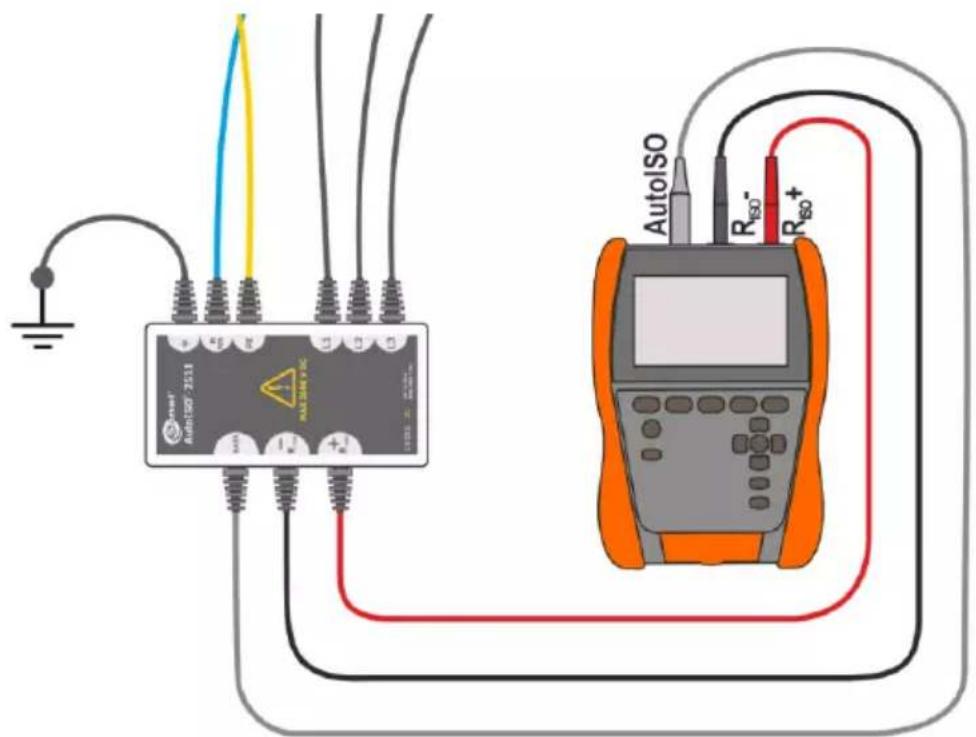
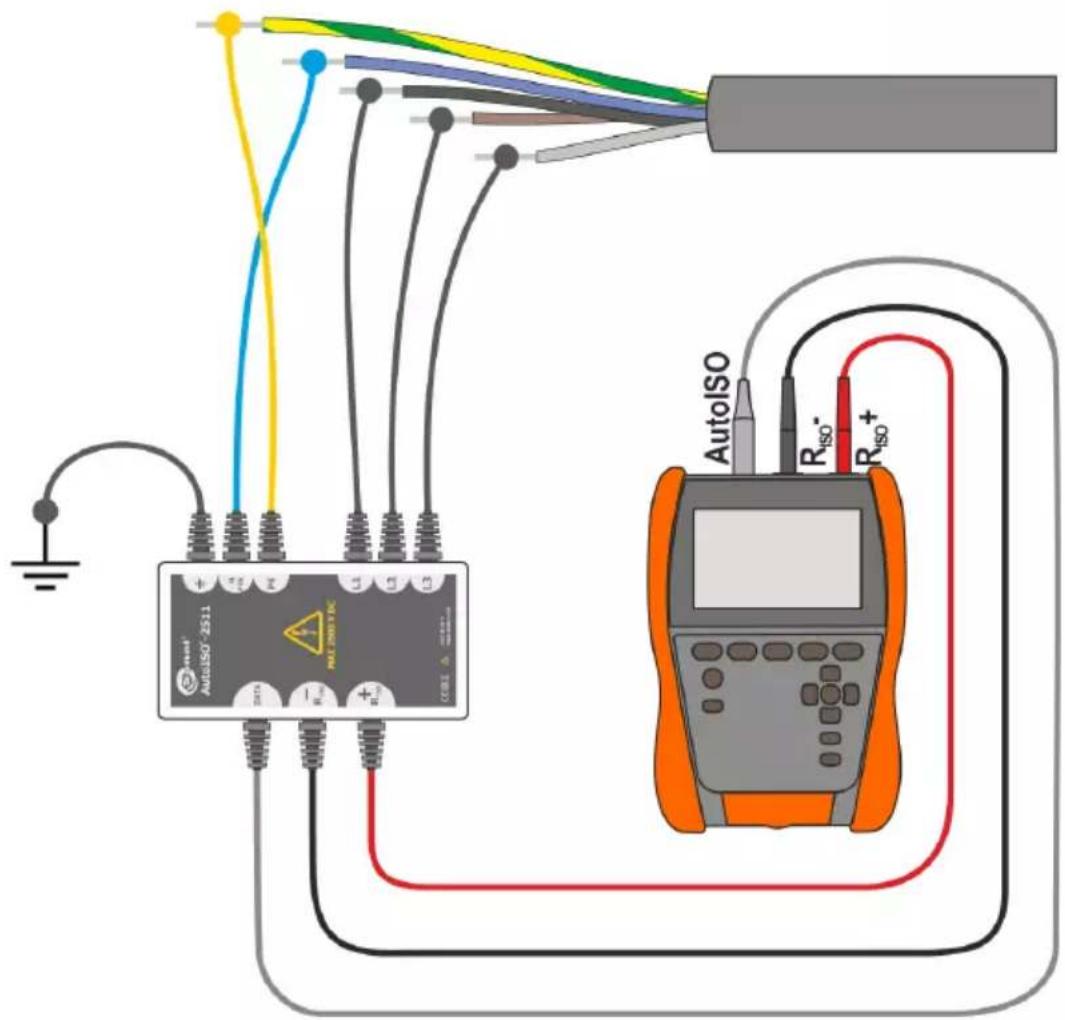
In case of power cables measure the insulation resistance between each conductor and other conductors shorted and grounded (Fig. 4.1, Fig. 4.2). In shielded cables, the shield is also shorted.
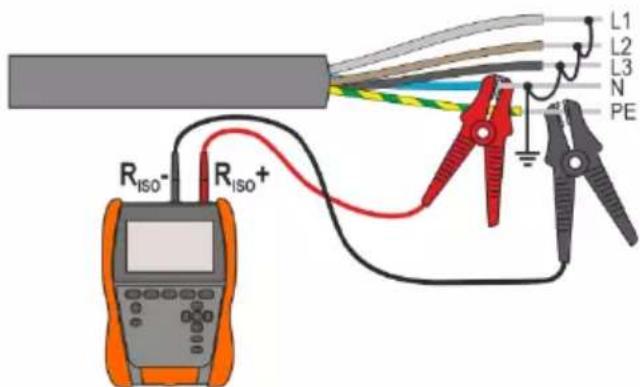
Fig. 4.1. Measurement of an unshielded cable
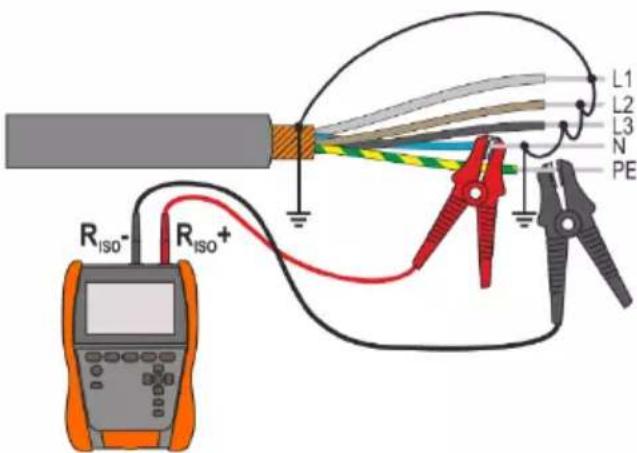
Fig. 4.2. Measurement of a shielded cable
In transformers, cables, insulators, etc. there is surface resistance that can distort the measurement result. To eliminate it, a three-lead measurement with G – GUARD socket is used. An example of the application of this method is presented below.
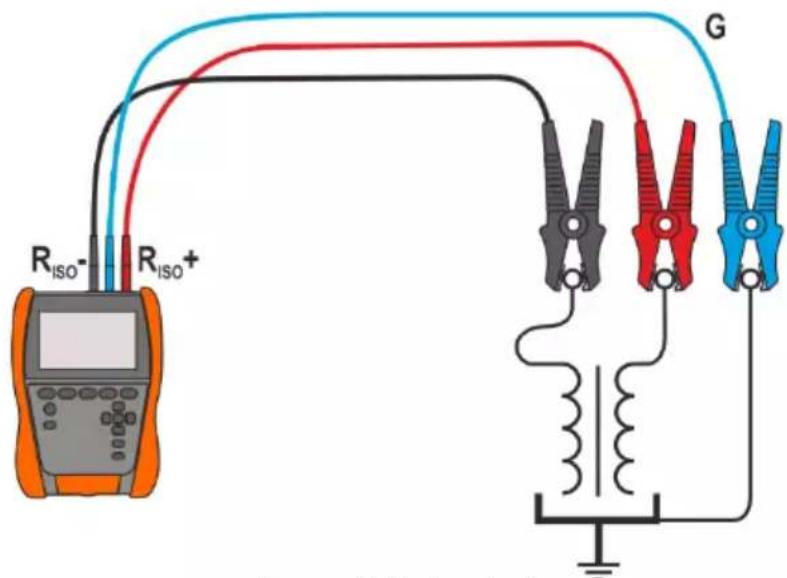
R_iso- – shielded test lead
Measurement of inter-winding resistance of a transformer.
Connect G socket to the transformer tank, and R_ISO+ and R_ISO- sockets to the windings.
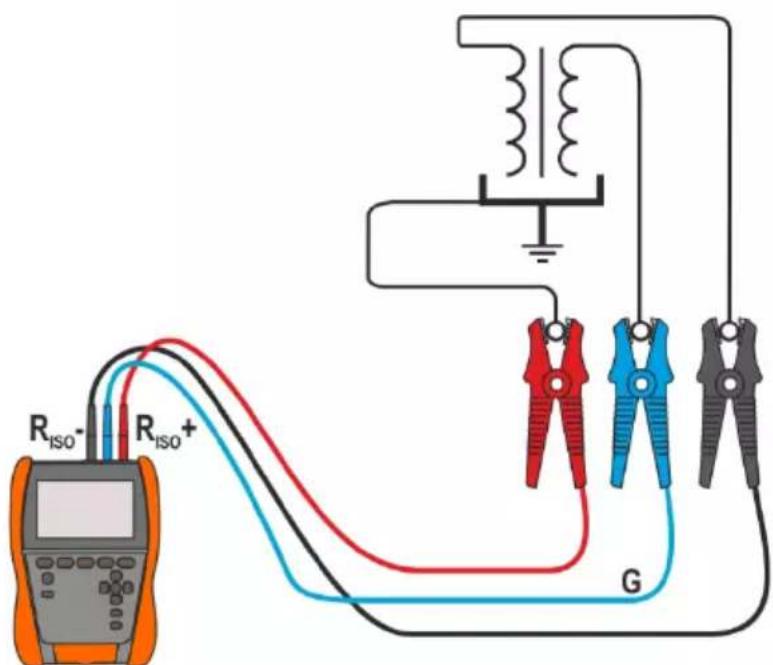
R_ISO – shielded test lead
Measurement of insulation resistance between one of the windings and the transformer tank. G socket of the meter should be connected to the second winding, and R_ISO+ socket to the ground potential.
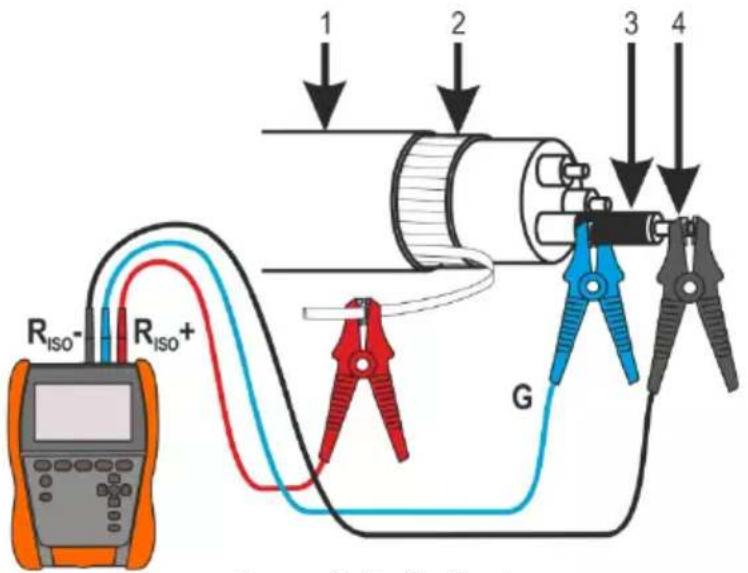
R_iso- – shielded test lead
1 - cable jacket
2 - cable shield
3 - metal foil wrapped around conductor's insulation
4 - conductor
Measurement of cable insulation resistance between one of cable conductors and its shield. The effect of surface currents (important in adverse weather conditions) is eliminated by connecting a piece of metal foil insulating the tested conductor with G socket of the meter.
The same shall apply when measuring the insulation resistance between two conductors of the cable - other conductors that do not take part in the measurement are attached to G terminal.
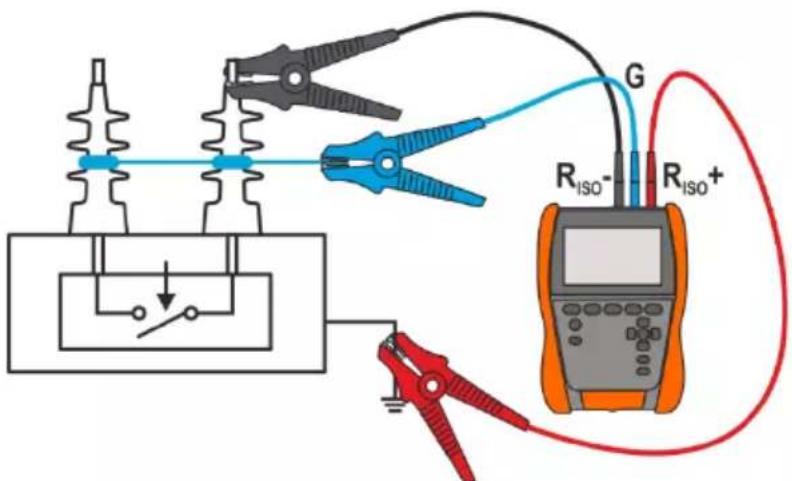
R_iso – shielded test lead
Insulation resistance measurement of high voltage breaker. G socket of the meter is connected with the insulators of disconnector terminals.
4.1.2 Connections for R , R_CONT measurements
Low-voltage measurement of resistance is carried out in the following circuit.
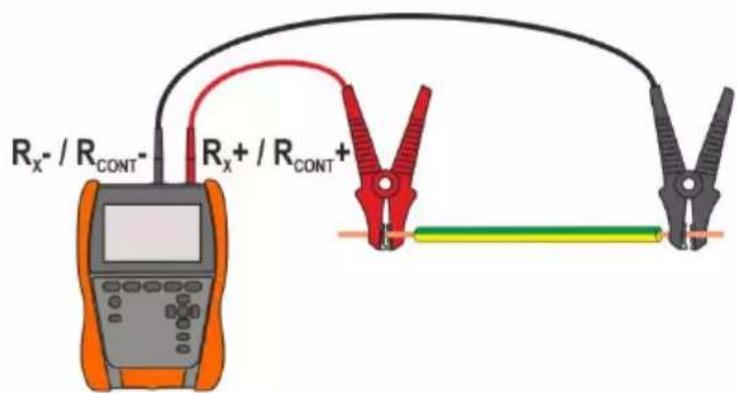
4.1.3 Connections for EPA measurements
The connection layouts vary depending on what you want to measure.
4.1.3.1 Point-to-point resistance - R_P1-P2
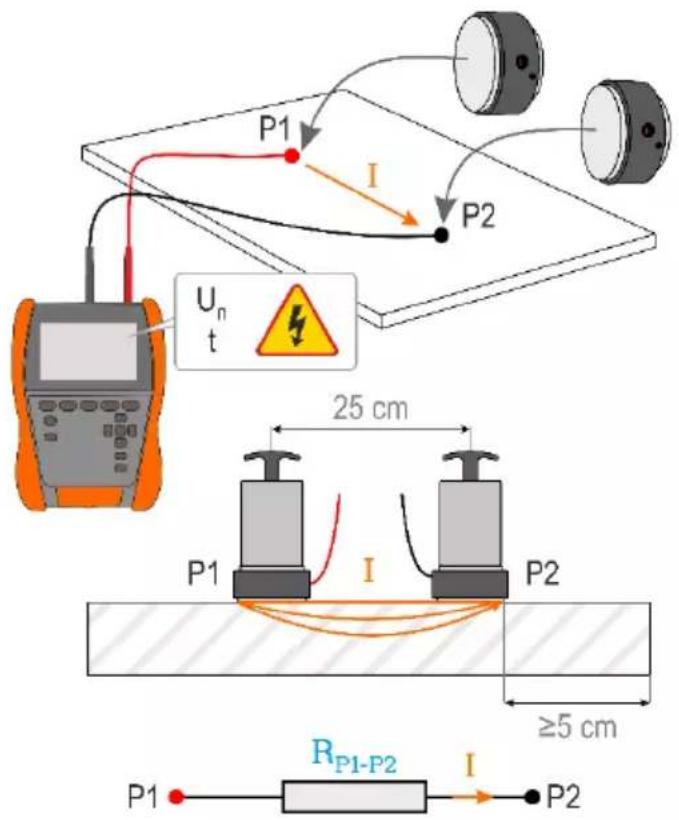
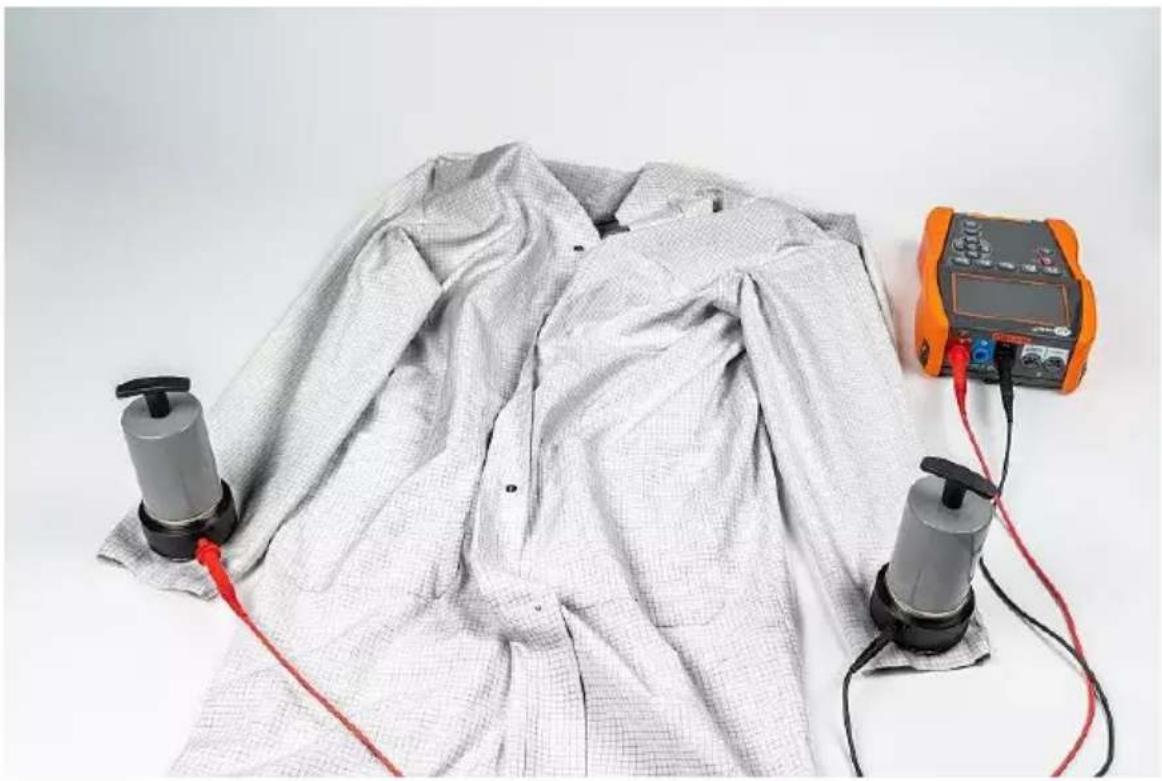
natural_image
Experimental setup with digital multimeter and two pressure gauges on a textured fabric background (no text or symbols visible)4.1.3.2 Point-to-ground resistance - R_P-G
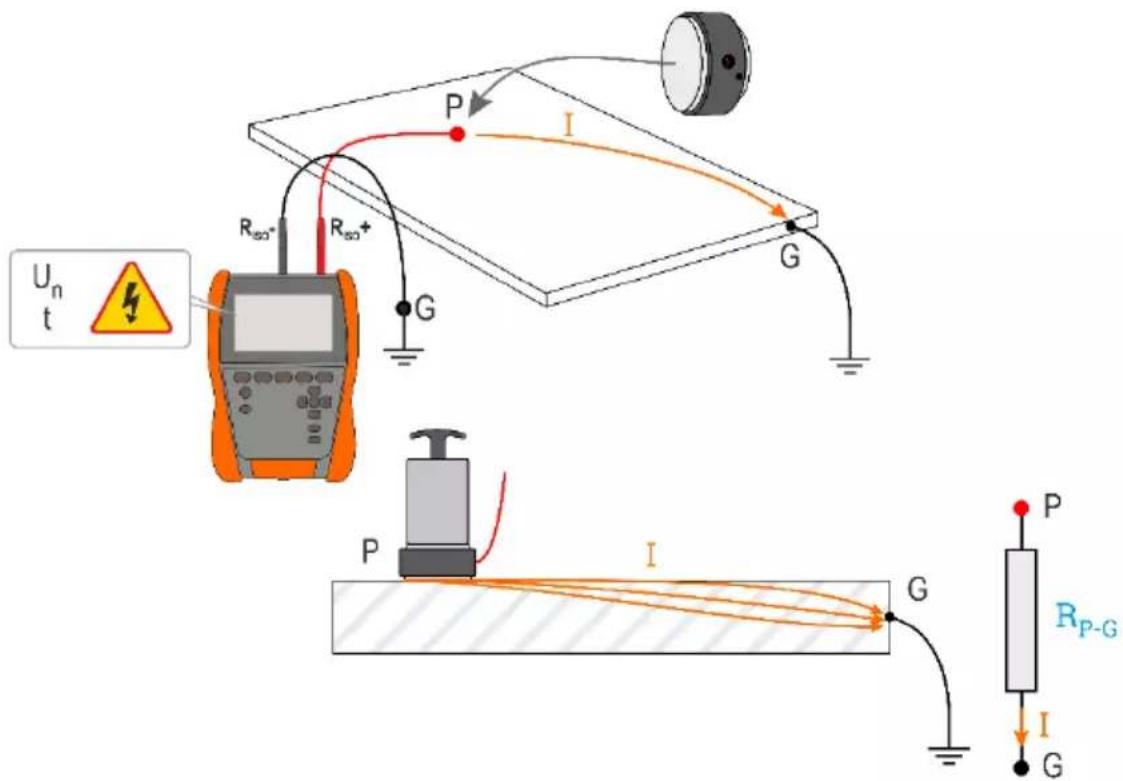
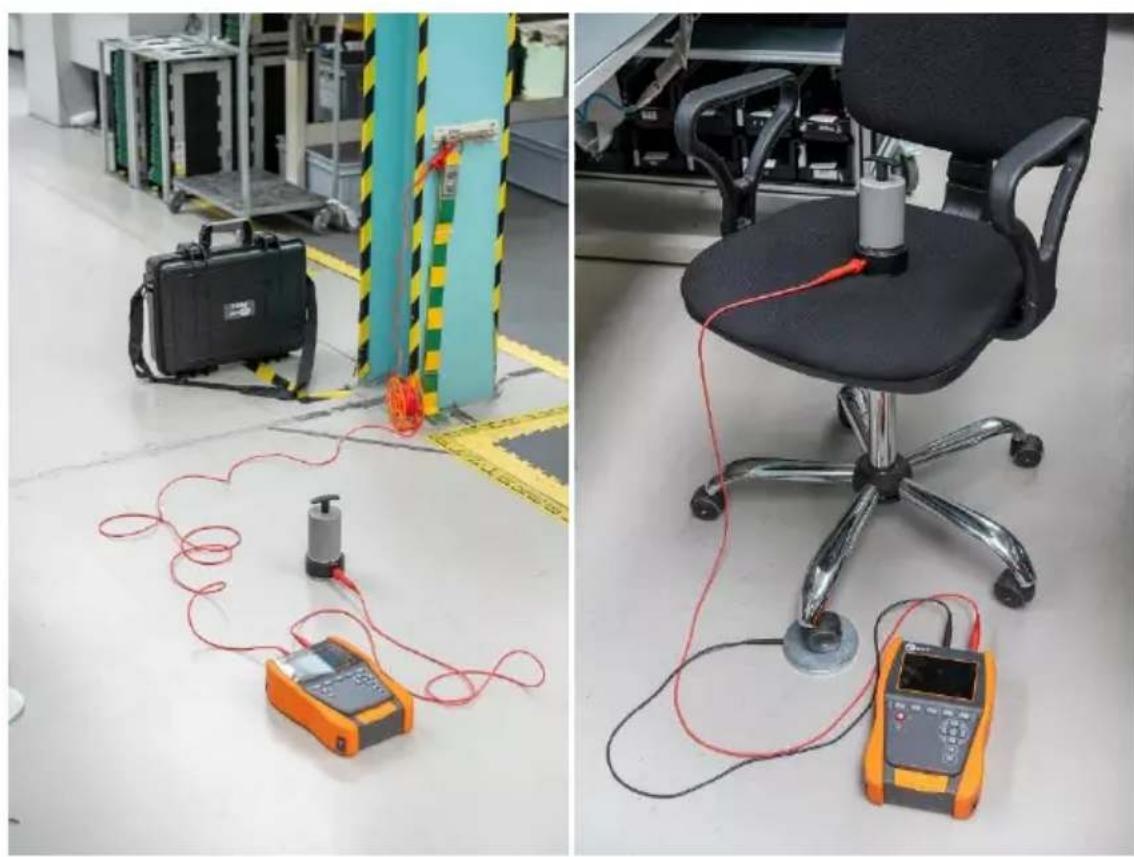
natural_image
Two lab setups: one with a black case and red wiring, the other with an orange multimeter on a floor (no visible text or symbols)4.1.3.3 Surface resistance - R_s
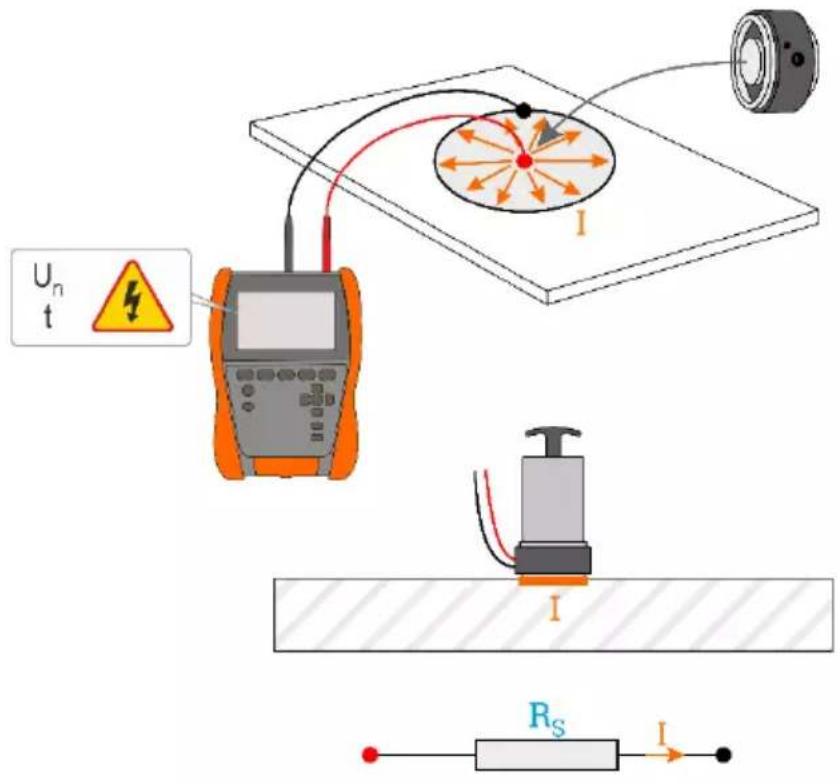
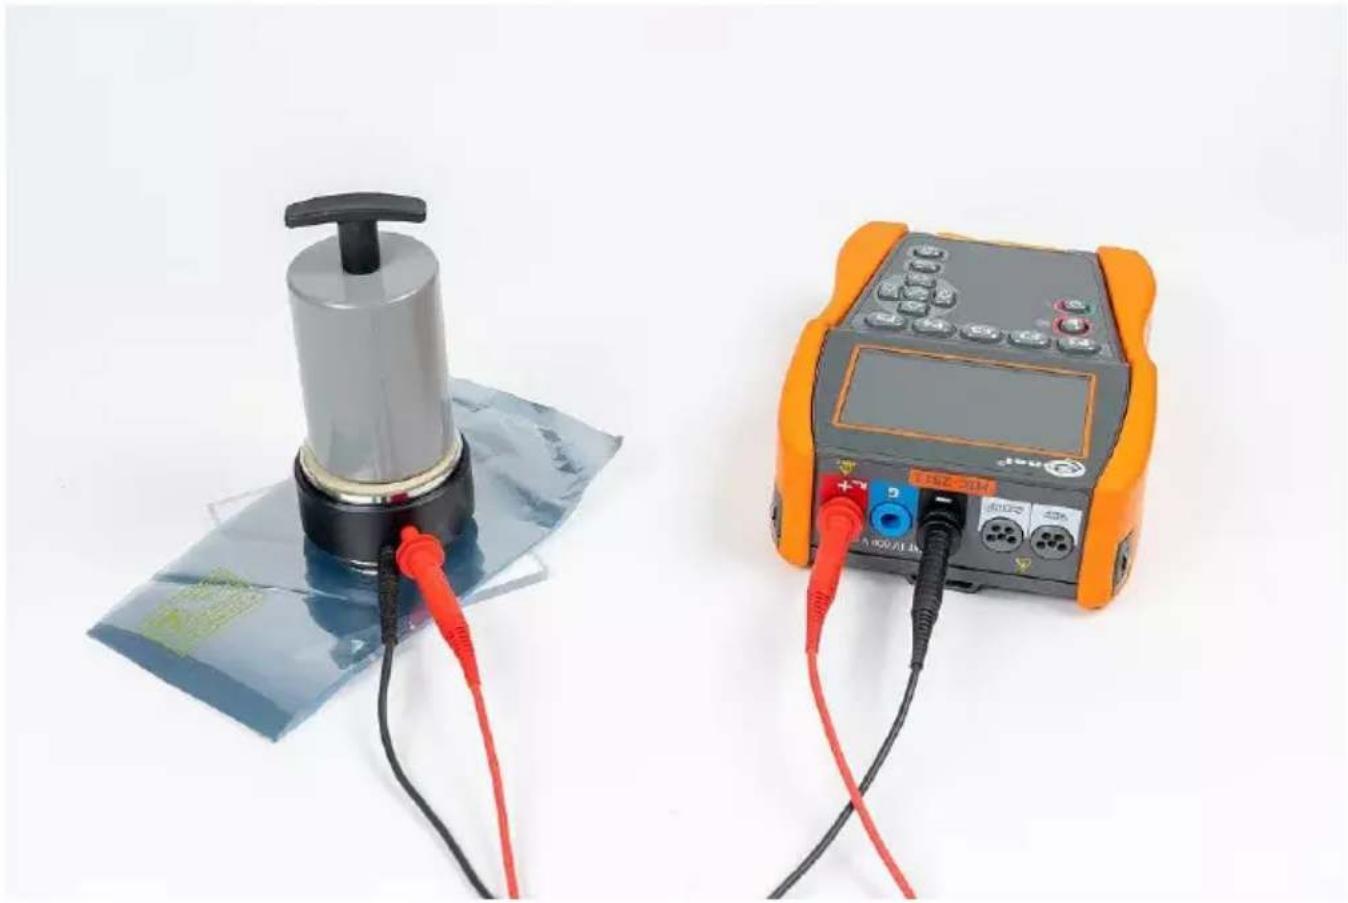
natural_image
Two electronic devices: a cylindrical device with red and black wires connected to a transparent plastic sheet, and an orange digital testing device with black/red probes and terminal labels (no readable text or symbols on the devices themselves).4.1.3.4 Volume resistance - R_v
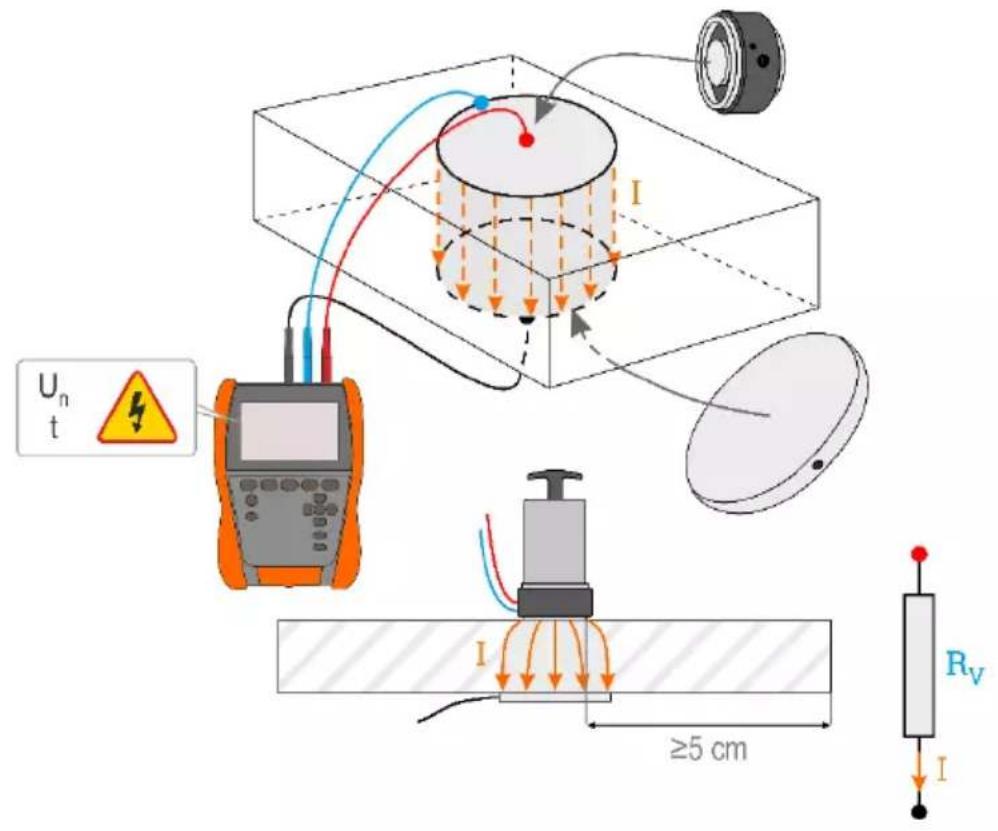
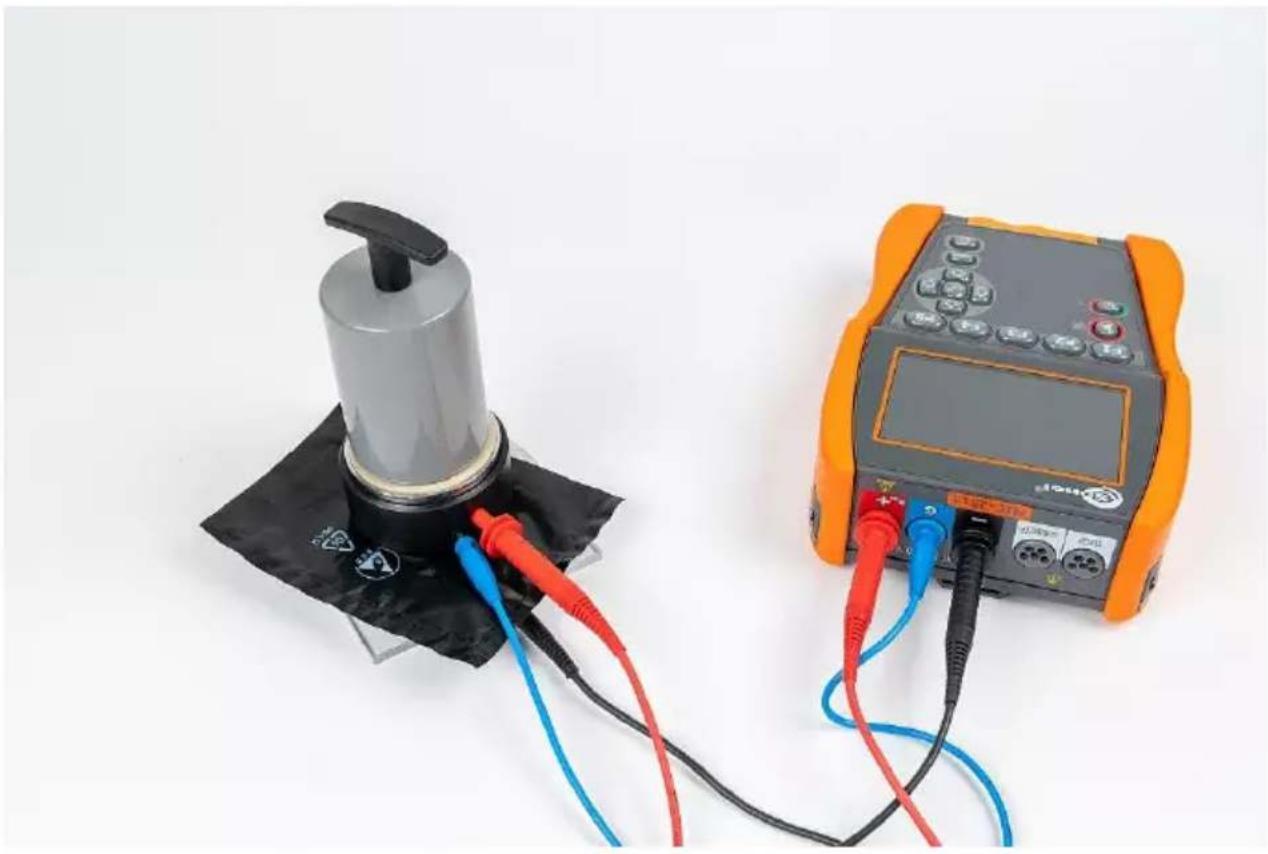
natural_image
Two electronic testing devices: a handheld device with black base and red/blue wires connected to an orange digital multimeter (no visible text or symbols)4.1.4 Measurement indicators
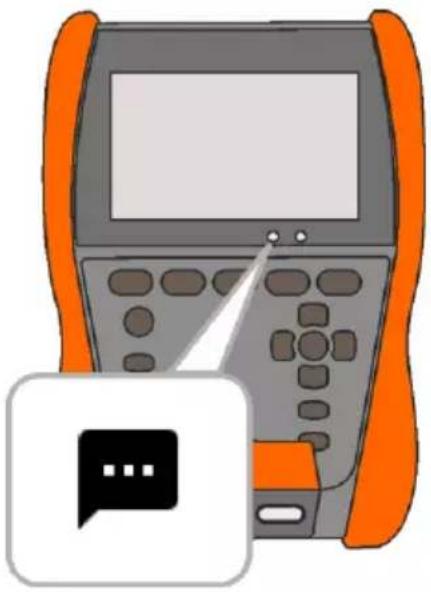
natural_image
Illustration of a mobile payment terminal with orange casing and control panel, accompanied by a speech bubble icon (no text or symbols on device)Before the measurement

The voltage on the object is present continuously and does not exceed 50 V. The measurement is possible, but it may be burdened with an additional error.
- The voltage on the object is present continuously and exceeds 50 V. The measurement is blocked.
• Emergency state of the meter.
During the measurement
Riso
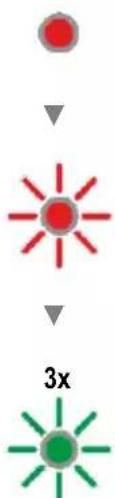
flowchart
graph TD
    A["Red Circle"] --> B["Red Starburst"]
    B --> C["Green Starburst"]
    C --> D["3x"]
The meter is measuring the insulation resistance.
The meter has finished measuring the insulation resistance and is currently discharging the tested object.
The measurement is completed and the tested object is discharged.
Rx

Continuity is maintained.
4.1.5 Measurement settings

In the measurement menu, you can enter or edit the markings of wire pairs in the tested object. The names (marking) may be:
- predefined,
• defined by user (after selecting Use your own wire markings).
+/- L1/L2
The label icons lead to the labelling window of a pair of lines. The new markings cannot be the same as those already introduced.
...
The icon opens the window for adding the measurement of the next pair of conductors.

Tests require appropriate settings. To do this, select this icon in the measurement window. A menu will open with parameter settings (different items depend on the selected measurement).

If you have set limits, the meter will show if the result are within them.
√ – the result is within the set limit.
☒ – the result is outside the set limit.
- assessment not possible.
4.2 Visual test
1

Select Visual test.
2
From the list of options that can be used, select the result of your inspection. Touch each item as many times as is needed to enter the appropriate test result:
○ – not performed,
- passed,
✗ - failed,
⑦ – undefined (no clear assessment),
- not applicable (not applicable to a given aspect),
- omitted (intentional, deliberate omission, e.g. due to no access).
If any option you need is missing, you can add it to the list.
3

End the test.
4
The test summary screen will appear. Touching the bar with the result will reveal your selections from step 2. If you want to enter additional information about the study, expand the Attachments field and fill in the comment field.
4.3 Insulation resistance - R ISO
The instrument measures the insulation resistance by applying the measuring voltage U_n to the tested resistance R and measuring the current I flowing through it. When calculating the value of the insulation resistance, the meter uses the technical method of resistance measurement (R = U/I).
To take a measurement, you must set ( )
• nominal test voltage U n,
• duration of the measurement t,
- times t_1, t_2, t_3 needed for calculating absorption coefficients,
- limits (if necessary).
The meter will suggest possible settings.
4.3.1 Measurements with the use of test leads
1

- Select R _ISO measurement.
- Enter the measurement settings (sec. 4.1.5).
2
Connect test leads according to sec. 4.1.1.
3
Press and hold the START button for 5 seconds. This will trigger a countdown, during which the meter does not generate a dangerous voltage, and the measurement can be interrupted without the need to discharge the tested object. After the countdown, the measurement will start.

Quick start, without a delay of 5 seconds – perform it by pressing ENTER and also pressing hold of the START button. The measurement is stopped after reaching the preset time or by pressing ESC.
Testing will continue until it reaches the preset time (sec. 4.1.5) or until ☐ or is pressed.

Touching the bar with the result reveals partial results.

During the measurement, it is possible to display the graph (sec. 5.1).
4
After the measurement is completed, you can read the result. Touching the bar with the result w now also reveal partial results.
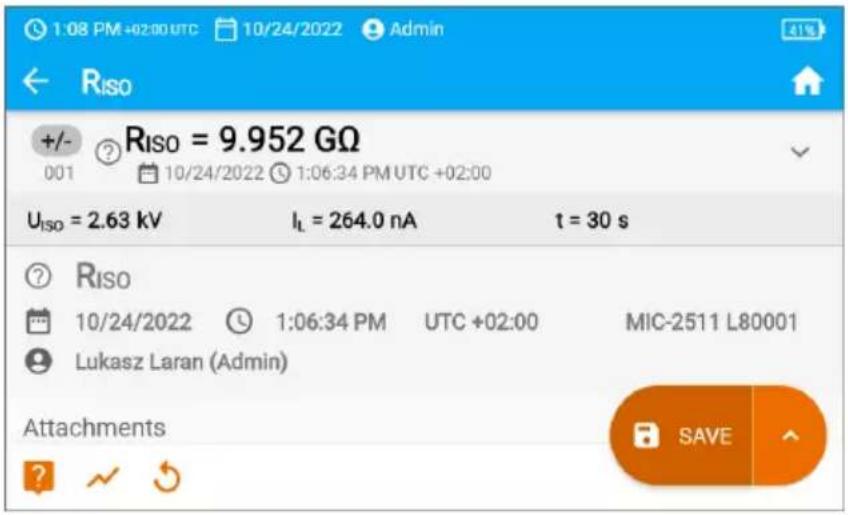

You can now also display the graph (sec. 5.1).
5
You may do the following with the measurement result:

ignore and exit to the measurement menu,
repeat it (the selection window for the measurement you want to repeat will be shown),
SAVE – save to memory,
SAVE AND ADD – create a new folder/device which is equivalent to the folder/device where the result of the previously performed measurement was saved,
SAVE TO THE PREVIOUS ONE – save the result in the folder/device where the result of the previously performed measurement was saved.

Additional information displayed by the meter
 | Test voltage is present on the terminals of the meter. | |
 NOISE NOISE | Interference voltage lower than 50 V DC or 1500 V AC is present on the tested object. Measurement is possible but may be burdened with additional error. | |
 LIMIT I LIMIT I | Activation of current limit. The symbol displayed is accompanied by a continuous beep. | |
 HILE HILE | Breakdown of the tested object insulation, the measurement is interrupted. The message appears after LIMIT I displaying for 20 s during the measurement, when the voltage previously reached the nominal value. | |
 UDET U_N >50 V UDET U_N >50 V | Dangerous voltage on the object. The measurement will not be performed. In addition to the displayed information:U N voltage value at the object is displayed,a two-tone beep is generated,red LED flashes. |
DISCHARGING

- Disabling t_2 time will also disable t_3 .
- The timer measuring the measurement time is started when U _ISO voltage is stabilized.
- LIMIT I informs of an operation with limited inverter power (Graph 4.1). If this condition persists for 20 seconds, the measurement is stopped.
- If the meter is unable to charge the capacitance of the tested object, LIMIT I is displayed and after 20 s the measurement is stopped.
- A short tone informs for every period of 5 seconds of time that has lapsed. When the timer reaches characteristic points ( t_1 , t_2 , t_3 times), then for 1 second, an icon of this point is displayed which is accompanied by a long beep.
- If the value of any of the measured partial resistance is out of range, then the value of the absorption coefficient is not shown and horizontal dashes are displayed.
- After completion of the measurement, the capacitance of the tested object is discharged by shorting R_so+ and R_iso- terminals with resistance of ca. 100 kΩ. At the same time, the message DISCHARGING is displayed, as well as the value of U_so voltage that is present at that time on the object. U_so decreases over time until it is fully discharged.
4.3.2 Measurements using the AutolISO-2511 adapter
Depending on the measurement facility and the established standards (each conductor to each or conductor to other shorted and grounded conductors), the measurement of the insulation resistance of wires or multi-core cables requires several connections. In order to shorten the measurement time and eliminate the inevitable connection errors, Sonel recommends an adapter that switches between individual pairs of conductors for the operator.
The AutoISO-2511 adapter is designed to measure the insulation resistance of cables and multi-core wires with a measuring voltage of up to 2500 V. The use of the adapter eliminates the possibility of making a mistake, and significantly reduces the time needed to measure the insulation resistance between pairs of conductors. For example, for 4-core cables, the user will perform only one connection operation (i.e. connect the adapter to the facility), while the AutoISO-2511 will perform the crossing for six consecutive connections.
1

Select R_ISO measurement.
2
Connect the adapter.

After connecting the adapter, the list of available measurement functions will be narrowed down to those dedicated to the adapter.
3
The screen displays the label of the connected adapter and the icon for selecting the number of wires of the tested object.
![1:10 PM +02:00 UTC 10/24/2022 Admin ← Riso AutoISO-2511 5-Wire READY U_N = 0 V === L1-L2 R_ISO = — Un = 2500 V t [s] = 60 L1-L3 R_ISO = — Un = 2500 V t [s] = 60 L1-N R_ISO = — Un = 2500 V ? √](/content/2026/05/895329/images/1348850010c9a2508d531cd3d58d2800b715618f0a831cb729793f689cec0455.jpg)

• Determine the number of wires of the tested object.
- For each pair of conductors enter the measurement settings (sec. 4.1.5).
4
Connect the adapter to the tested object.

Press and hold the START button for 5 seconds. This will trigger a countdown, after which the measurement will start.

Quick start, without a delay of 5 seconds – perform it by pressing ENTER and also pressing hold of the START button. The measurement is stopped after reaching the preset time or by pressing ESC.

Testing will continue until it reaches the preset time (sec. 4.1.5) or until is pressed.


Touching the bar with the result reveals partial results.

During the measurement, it is possible to display the graph (sec. 5.1).
After the measurement is completed, you can read the result. Touching the bar with the result w now also reveal partial results.
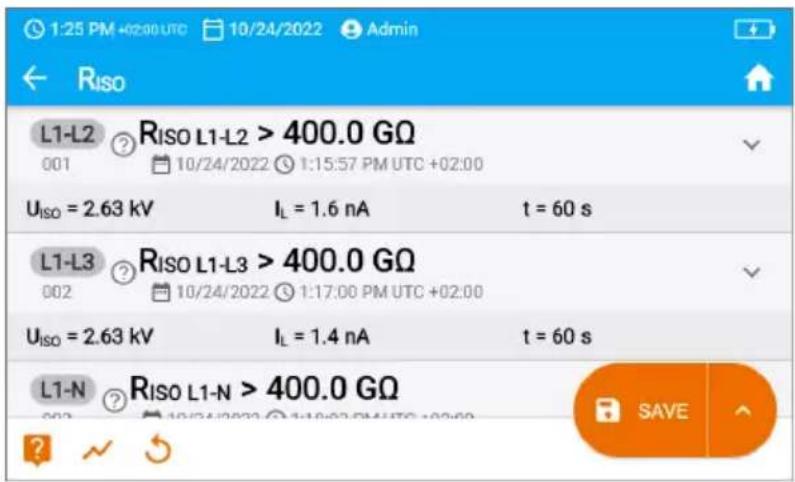

You can now also display the graph (sec. 5.1).
You may do the following with the measurement result:

ignore and exit to the measurement menu,

repeat it (the selection window for the measurement you want to repeat will be show

SAVE – save to memory,


SAVE AND ADD – create a new folder/device which is equivalent to the folder/device where the result of the previously performed measurement was saved,


SAVE TO THE PREVIOUS ONE – save the result in the folder/device where the result of the previously performed measurement was saved.

Remarks as for R_ISO measurement.
4.4 Measurements with a voltage increasing in steps - SV
Measurement with step voltage (SV) indicates that regardless of the value of the test voltage, an object with good resistance properties should not significantly change its resistance. In this mode the meter performs a series of 5 measurements with step voltage; the voltage change depends on the set maximum voltage:
• 250 V: 50 V, 100 V, 150 V, 200 V, 250 V,
- 500 V: 100 V, 200 V, 300 V, 400 V, 500 V,
• 1 kV: 200 V, 400 V, 600 V, 800 V, 1000 V,
• 2.5 kV: 500 V, 1 kV, 1.5 kV, 2 kV, 2.5 kV,
- Custom: you can enter any maximum voltage U MAX , which will be reached in steps of ^1/5UMAX . For example 700 V: 140 V, 280 V, 420 V, 560 V, 700 V.
To perform a measurement, first set ( )
• maximum (final) measurement voltage U _n ,
• total duration of the measurement t.
The end result for each of the five measurements is saved, which is signalled by a beep.
1

- Select SV measurement.
- Enter the measurement settings (sec. 4.1.5).
2
Connect test leads according to sec. 4.1.1.
3
Press and hold START button for 5 seconds. This will trigger a 5-second count-down, after which the measurement will start.

Quick start, without a delay of 5 seconds – perform it by pressing ENTER and also pressing hold of the START button. The measurement is stopped after reaching the preset time or by pressing ESC.
Testing will continue until it reaches the time preset by the user (sec. 4.1.5) or until is pressed.

Touching the bar with the result reveals partial results.

During the measurement, it is possible to display the graph (sec. 5.1).
4
After the measurement is completed, you can read the result. Touching the bar with the result w now also reveal partial results.
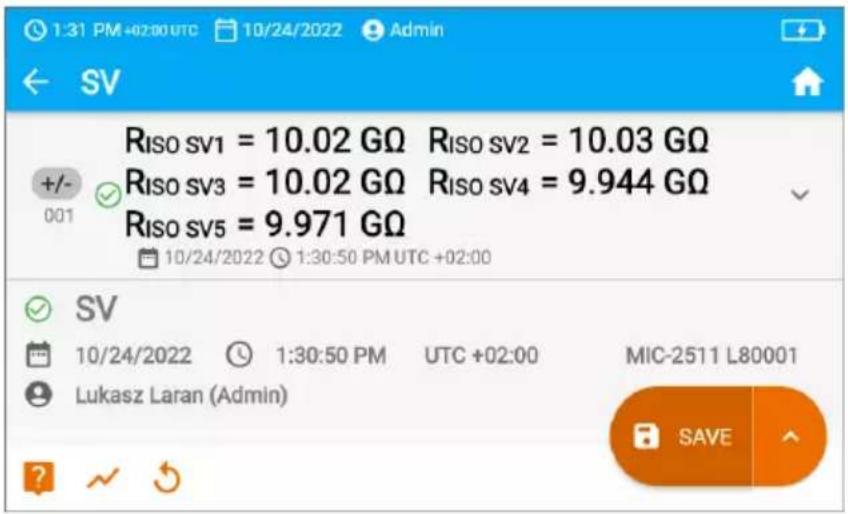

You can now also display the graph (sec. 5.1).
5
You may do the following with the measurement result:

ignore and exit to the measurement menu,

repeat it (the selection window for the measurement you want to repeat will be shown),

SAVE – save to memory,


SAVE AND ADD – create a new folder/device which is equivalent to the folder/device where the result of the previously performed measurement was saved,


SAVE TO THE PREVIOUS ONE – save the result in the folder/device where the result of the previously performed measurement was saved.

Remarks as for R_ISO measurement.
4.5 Measurement with ramp test – RampTest
Measurement with increasing voltage (RampTest) is to determine at which DC voltage value the insulation will (or will not) break down. The essence of this function is:
• to test the measured object with the voltage increasing to the final value U_n ,
- to check if the object will retain electrical insulating properties when the maximum voltage U_n is present there for the preset time t_2 .
The measuring procedure is illustrated in the graph below.
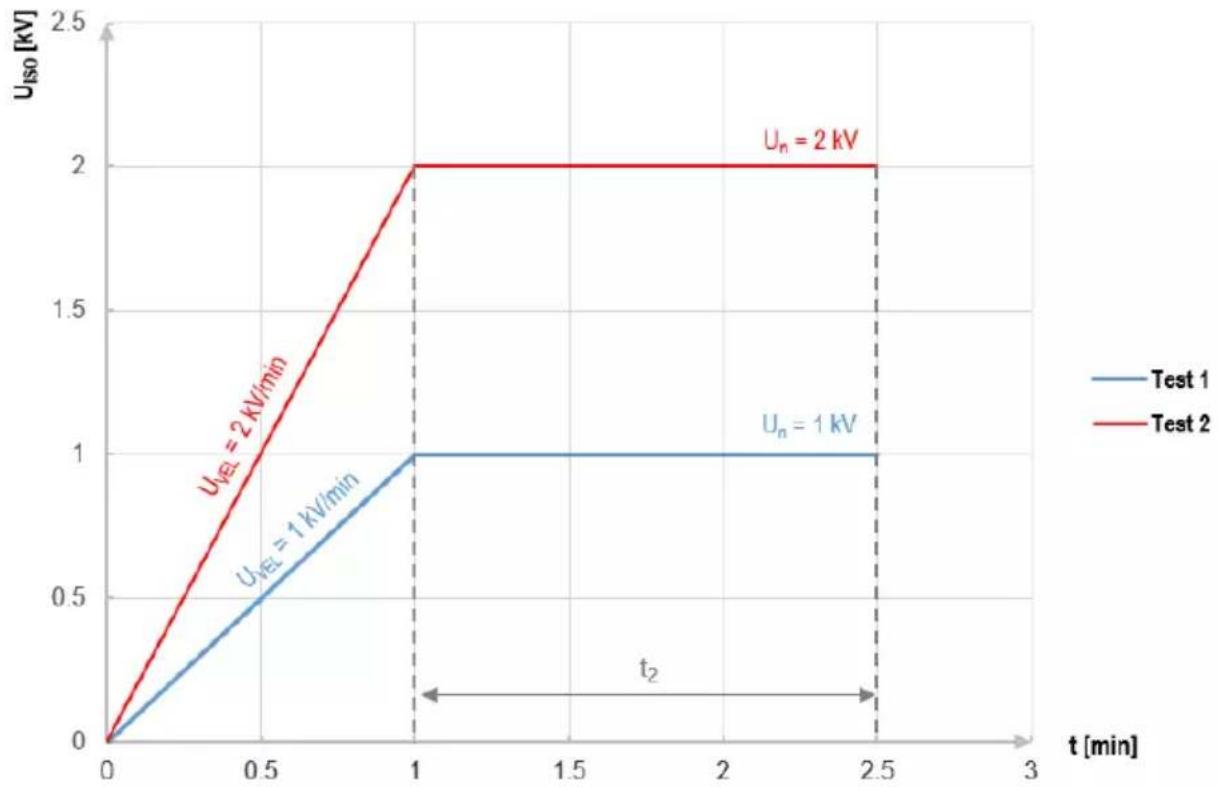
line
| t [min] | Test 1 U_ISO [kV] | Test 2 U_ISO [kV] | | ------- | ----------------- | ----------------- | | 0 | 0 | 0 | | 1 | 1 | 2 | | 2.5 | 1 | 2 |Graph 4.2. Voltage supplied by the meter as a function of time for two exemplary increase rates
To perform the measurement, first set ( )
- voltage U_n - voltage at which the rise is to end. It can be within the range of 50V 2500V ,
• time t – total duration of the measurement, - time t _2 – time during which the voltage should be maintained on the tested object (Graph 4.2),
- maximum short-circuit current I_sc – if during the measurement the meter reaches the preset value it will enter the mode of current limit, which means that it will stop further increase of forced current on this value,
- leakage current limit I_L ( I_L ≤ I_sc ) – if the measured leakage current reaches the preset value (a breakdown of the tested object occurs), the measurement is stopped and the meter displays the voltage at which it occurred.
1

- Select RampTest measurement.
- Enter the measurement settings (sec. 4.1.5).
2
Connect test leads according to sec. 4.1.1.

Press and hold START button for 5 seconds. This will trigger a 5-second count-down, after which the measurement will start.

Quick start, without a delay of 5 seconds – performed by pressing ENTER and also pressing hold of the START button. The measurement is stopped after reaching the preset time or by pressing ESC.

Testing will continue until it reaches the preset time (sec. 4.1.5) or until is pressed.


Touching the bar with the result reveals partial results.

During the measurement, it is possible to display the graph (sec. 5.1).
After the measurement is completed, you can read the result. Touching the bar with the result w now also reveal partial results.
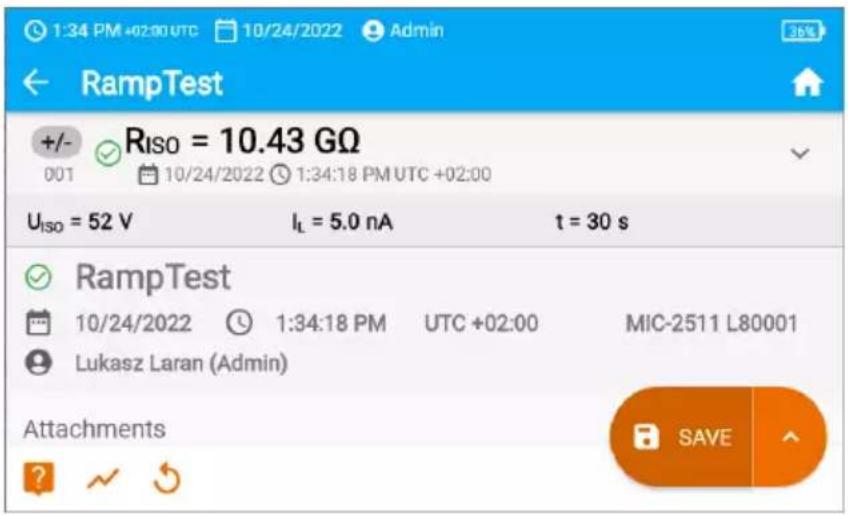

You can now also display the graph (sec. 5.1).
You may do the following with the measurement result:

ignore and exit to the measurement menu,

repeat it (the selection window for the measurement you want to repeat will be shown),

SAVE – save to memory,

SAVE AND ADD – create a new folder/device which is equivalent to the folder/device where the result of the previously performed measurement was saved,


SAVE TO THE PREVIOUS ONE – save the result in the folder/device where the result of the previously performed measurement was saved.
4.6 Dielectric Discharge Indicator – DD
The purpose of the test is to check the degree of moisture in the insulation of the tested object. The greater its moisture content, the greater the dielectric discharge current.
In the dielectric discharge test, after 60 seconds from the end of measurement (charging) of the insulation, the discharge current is measured. The DD is a value characterising the insulation quality independent from the test voltage.
The measurement operates in the following way:
- First the insulation is charged with a current for a set period. If the voltage is not equal to the set voltage, the object is not charged and the meter abandons the measurement procedure after 20 seconds.
- After the charging and polarisation is complete, the only current flowing through the insulation is the leakage current.
- Then the insulation is discharged and the total dielectric discharge current starts to flow through the insulation. Initially this current is the sum of the capacitance discharge current, which fades quickly with the absorption current. The leakage current is negligible, because there is no test voltage.
• After 1 minute from closing the circuit the current is measured.
The DD value is calculated using the formula:
$$ D D = \frac {I _ {1 \min}}{U _ {p r} \cdot C} $$
where:
h_ – current measured 1 minute after closing the circuit [nA],
U_pr - test voltage [V],
C - capacitance [μF].
The measurement result indicates the status of the insulation. It may be compared with the following table.
| DD value | Insulation condition | |
| >7 | Bad |  |
| 4-7 | Weak |  |
| 2-4 | Acceptable |  |
| <2 | Good |  |
To take a measurement, you must set ( )
• nominal test voltage U n,
• total duration of the measurement t,
- limits (if necessary).
The meter will suggest possible settings.
1

- Select DD measurement.
- Enter the measurement settings (sec. 4.1.5).
2
Connect test leads according to sec. 4.1.1.

Press and hold START button for 5 seconds. This will trigger a 5-second count-down, after which the measurement will start.

Quick start, without a delay of 5 seconds – perform it by pressing ENTER and also pressing hold of the START button. The measurement is stopped after reaching the preset time or by pressing ESC.

Testing will continue until it reaches the preset time (sec. 4.1.5) or until is pressed.


Touching the bar with the result reveals partial results.

During the measurement, it is possible to display the graph (sec. 5.1).
After the measurement is completed, you can read the result. Touching the bar with the result will now also reveal partial results.
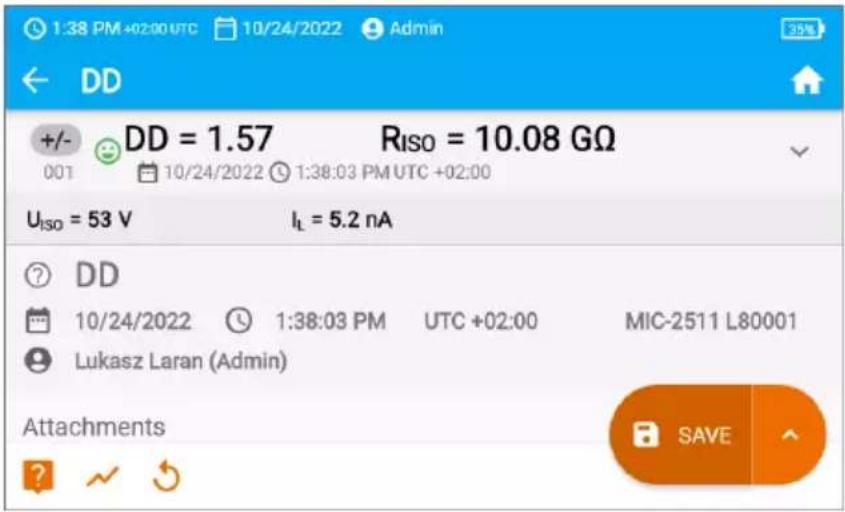

You can now also display the graph (sec. 5.1).
You may do the following with the measurement result:

ignore and exit to the measurement menu,
repeat it (the selection window for the measurement you want to repeat will be shown),

SAVE – save to memory,


SAVE AND ADD – create a new folder/device which is equivalent to the folder/device where the result of the previously performed measurement was saved,


SAVE TO THE PREVIOUS ONE – save the result in the folder/device where the result of the previously performed measurement was saved.

In environments with strong electromagnetic interferences the measurement may be affected by an additional error.
4.7 Polarization Index - PI (R ISO 600 s)
The polarization index (PI) determines the state of insulation through the ratio of the measured resistance value at the two moments of measurement ( R_t1 , R_t2 ).
- Time t_1 is the 60th second of measurement.
- Time t_2 is the 600th second of measurement.
The PI value is calculated using the formula:
$$ P I = \frac {R _ {t 2}}{R _ {t 1}} $$
where:
R_t2 – resistance measured at time t_2 ,
R_t1 – resistance measured at time t_1 .
The measurement result indicates the status of the insulation. It may be compared with the following table.
| PI value | Insulation condition | |
| <1 | Bad |  |
| 1-2 | Undetermined |  |
| 2-4 | Acceptable |  |
| >4 | Good |  |
To perform a measurement, first set ( ) measurement voltage U n.
1

- Select PI (R _ISO 600 s) measurement.
- Enter the measurement settings (sec. 4.1.5).
2
Connect test leads according to sec. 4.1.1.
3

Press and hold the START button for 5 seconds. This will trigger a countdown, during which the meter does not generate a dangerous voltage, and the measurement can be interrupted without the need to discharge the tested object. After the countdown, the measurement will start.

Quick start, without a delay of 5 seconds – perform it by pressing ENTER and also pressing hold of the START button. The measurement is stopped after reaching the preset time or by pressing ESC.
Testing will continue until it reaches the preset time (sec. 4.1.5) or until □ or is pressed.

Touching the bar with the result reveals partial results.
4
After the measurement is completed, you can read the result. Touching the bar with the result w now also reveal partial results.
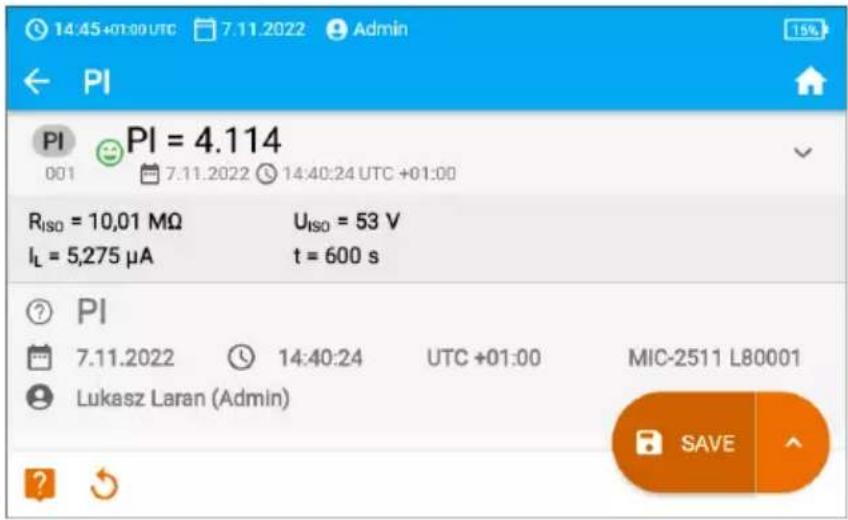
5
You may do the following with the measurement result:

ignore and exit to the measurement menu,

repeat it (the selection window for the measurement you want to repeat will be show

SAVE – save to memory,


SAVE AND ADD – create a new folder/device which is equivalent to the folder/device where the result of the previously performed measurement was saved,

SAVE TO THE PREVIOUS ONE – save the result in the folder/device where the result of the previously performed measurement was saved.

The polarization index value obtained during a measurement in which R_t1 > 5 G should not be taken as a reliable assessment of insulation condition.
4.8 Dielectric Absorption Ratio - DAR (R ISO 60 s)
The dielectric absorption ratio (DAR) determines the state of insulation through the ratio of the measured resistance value at the two moments of measurement ( R_t1 , R_t2 ).
- Time t _1 is the 15th or 30th second of measurement.
- Time t_2 is the 60. second of measurement.
The DAR value is calculated using the formula:
$$ D A R = \frac {R _ {t 2}}{R _ {t 1}} $$
where:
R_t2 – resistance measured at time t_2 ,
R_t1 – resistance measured at time t_1 .
The measurement result indicates the status of the insulation. It may be compared with the following table.
| DAR value | Insulation condition | |
| <1 | Bad |  |
| 1-1,39 | Undetermined |  |
| 1,4-1,59 | Acceptable |  |
| >1,6 | Good |  |
To take a measurement, you must set (法)
- Test voltage U _n ,
- time t 1.
1

- Select DAR (R _ISO 60 s) measurement.
- Enter the measurement settings (sec. 4.1.5).
2
Connect test leads according to sec. 4.1.1.
3

Press and hold the START button for 5 seconds. This will trigger a countdown, during which the meter does not generate a dangerous voltage, and the measurement can be interrupted without the need to discharge the tested object. After the countdown, the measurement will start.

Quick start, without a delay of 5 seconds – perform it by pressing ENTER and also pressing hold of the START button. The measurement is stopped after reaching the preset time or by pressing ESC.

Testing will continue until it reaches the preset time (sec. 4.1.5) or until □ or is pressed.


Touching the bar with the result reveals partial results.
4
After the measurement is completed, you can read the result. Touching the bar with the result w now also reveal partial results.
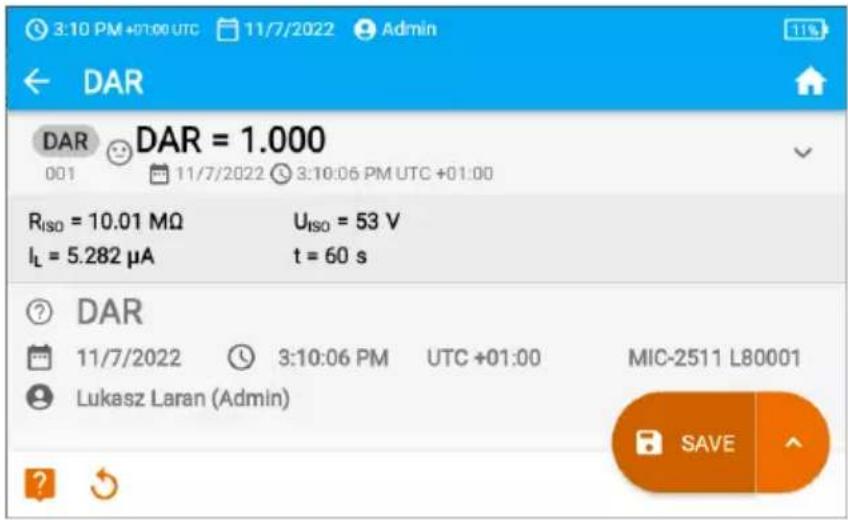
5
You may do the following with the measurement result:

ignore and exit to the measurement menu,

repeat it (the selection window for the measurement you want to repeat will be shown),

SAVE – save to memory,


SAVE AND ADD – create a new folder/device which is equivalent to the folder/device where the result of the previously performed measurement was saved,


SAVE TO THE PREVIOUS ONE – save the result in the folder/device where the result of the previously performed measurement was saved.
4.9 Low-voltage measurement of resistance - R _x , R _CONT
4.9.1 Calibration of test leads
In order to eliminate the impact of the resistance of test leads on measurement result, the compensation (nulling) of their resistance may be performed.
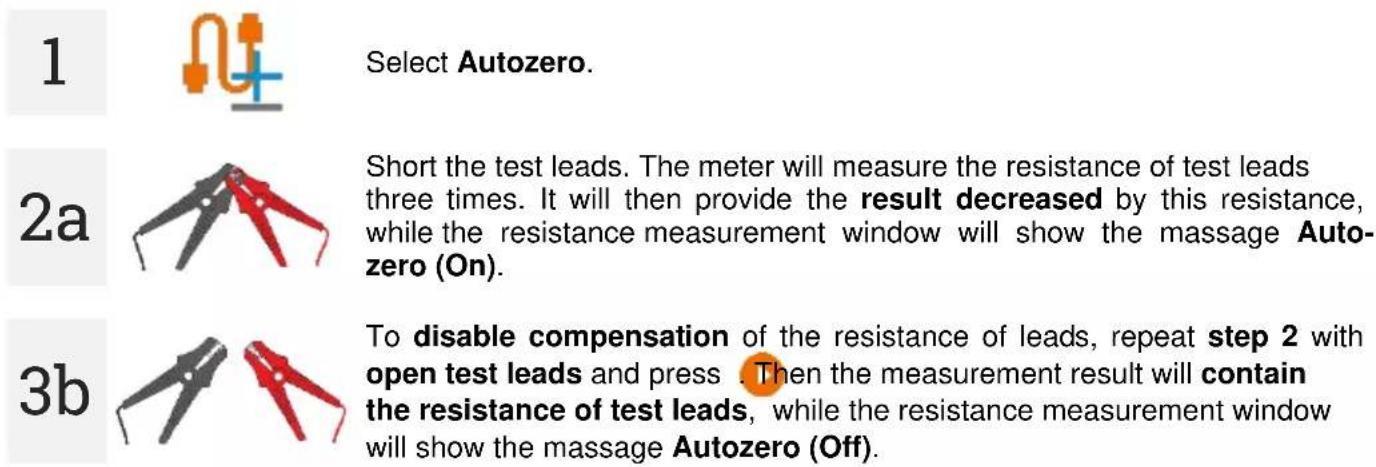
4.9.2 Measurement of resistance (R x)


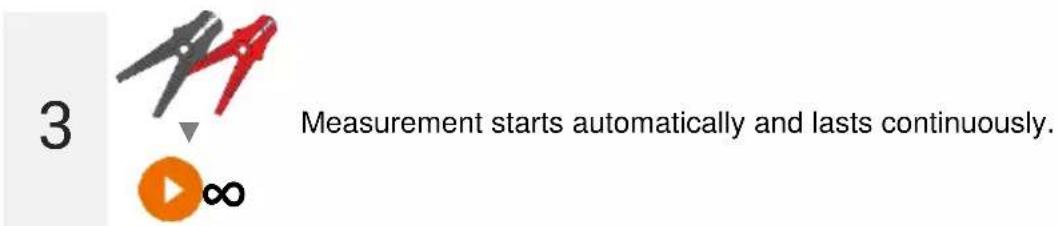
4.9.3
Measurement of resistance of protective conductors and equipotential bonding with ±200 mA current ( R_CONT )
1

- Select R CONT measurement.
- Enter the measurement settings (sec. 4.1.5).
2
Connect test leads according to sec. 4.1.2.
3

Press START.
Testing will continue until it reaches the preset time or until is pressed.

Touching the bar with the result reveals partial results.
4
After the measurement is completed, you can read the result. Touching the bar with the result w now also reveal partial results.
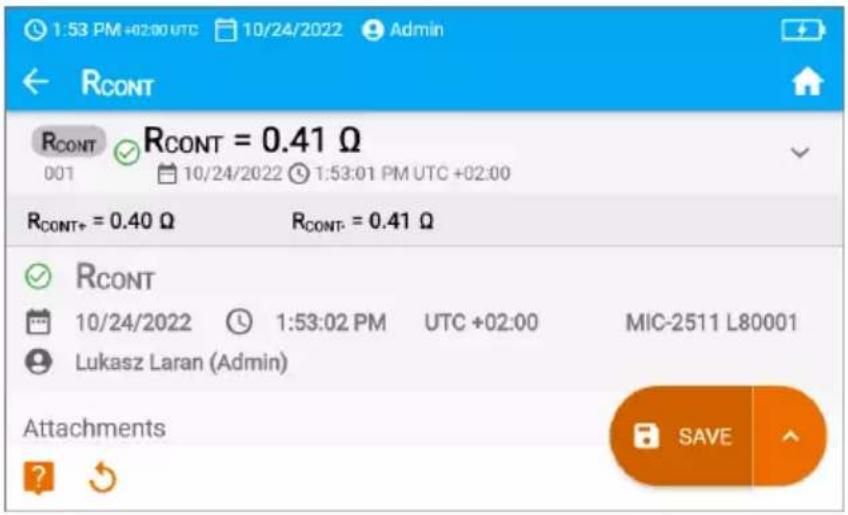
The result is the arithmetic mean of the values of two measurements at a current of 200 mA with opposite polarities: R_CONT+ and R_CONT- .
$$ R = \frac {R _ {\text { + }} + R _ {\text { CONTGC }}}{2} $$
5
You may do the following with the measurement result:

ignore and exit to the measurement menu,

repeat it (the selection window for the measurement you want to repeat will be shown),

SAVE – save to memory,


SAVE AND ADD – create a new folder/device which is equivalent to the folder/device where the result of the previously performed measurement was saved,


SAVE TO THE PREVIOUS ONE – save the result in the folder/device where the result of the previously performed measurement was saved.
4.10 Measurements in the EPAs
In EPAs (Electrostatic Protected Areas) materials for protection against electrostatic discharge (ESD) are used. They are classified according to their resistance and resistivity characteristics.
ESD shielding materials – full protection of this type is provided by a Faraday cage. An important material shielding from static discharges is conductive metal or carbon, which suppresses and weakens the energy of the electric field.
Conductive materials – have low resistance, enabling the charges to move quickly. If the conductive material is grounded, charges flow away quickly. Examples of conductive materials: carbon, metals-conductors.
Charge-dissipating materials – in these materials, charges flow to the ground more slowly than in the case of conductive materials, their destructive potential is reduced.
Insulating materials – difficult to ground. Static charges remain in this type of material for a long time. Examples of insulating materials: glass, air, commonly used plastic packaging.
| Material | Criteria |
| ESD discharge shielding materials | R_V > 100 |
| Conductive materials | 100 ≤ R_S < 100 k |
| Charge dissipating materials | 100 k ≤ R_V < 100 G |
| Insulating materials | R_S ≥ 100 G |
To take a measurement, you must set( );
- test voltage U_n - according to EN 61340-4-1: 10V / 100V / 500V .
- measurement duration t – according to EN 61340-4-1: 15 s ± 2 s.
• measurement method
point-to-point resistance - RP1 - P2
point-to-ground resistance -RP - G
surface resistance -Rs
volume resistance - R v .
- limits – see evaluation criteria according to EN 61340-5-1 (table below).
| Material | Criteria |
| Surfaces | R_P-G < 1 GΩ R_P1-P2 < 1 GΩ |
| Floors | R_P-G < 1 GΩ |
| Conductive packaging | 100 Ω ≤ Rs <100 kΩ |
| Load-dissipating packaging | 100 kΩ ≤ Rs <100 GΩ |
| Insulating packaging | R_S ≥ 100 GΩ |
Detailed guidelines can be found in the standards: IEC 61340-5-1, IEC/TR 61340-5-2, ANSI/ ESD S20.20, ANSI/ESD S541 and in the standards referred to in the above-mentioned documents.
1

- Select EPA measurement.
- Select the measurement method (sec. 4.1.5).
- Enter the measurement settings (sec. 4.1.5).
2
Connect the measurement system according to the adopted measurement method (sec. 4.1.3).
3
Press and hold START button for 5 seconds. This will trigger a 5-second count-down, after which the measurement will start.

Quick start, without a delay of 5 seconds – perform it by pressing ENTER and also pressing hold of the START button. The measurement is stopped after reaching the preset time or by pressing ESC.
Testing will continue until it reaches the preset time (step 2) or until is pressed.

Touching the bar with the result reveals partial results.
4
After the measurement is completed, you can read the result. Touching the bar with the result will now also reveal partial results.
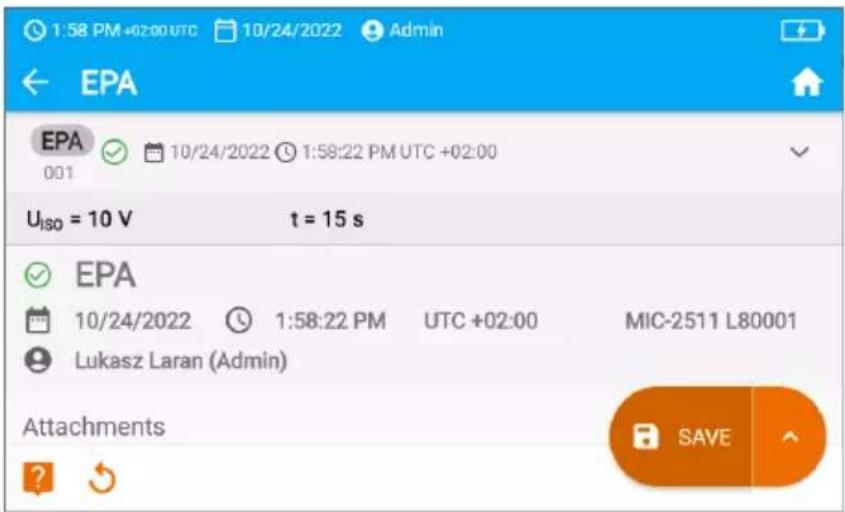
5
You may do the following with the measurement result:

ignore and exit to the measurement menu,
repeat it (the selection window for the measurement you want to repeat will be shown),
SAVE – save to memory,

SAVE AND ADD – create a new folder/device which is equivalent to the folder/device where the result of the previously performed measurement was saved,


SAVE TO THE PREVIOUS ONE – save the result in the folder/device where the result of the previously performed measurement was saved.
5 Special features
5.1 Graphs
1a

During the measurement, it is possible to display the graph. Using the options on the top bar, you can display:
- a graph for the required pair of wires,
• the data set to be presented.
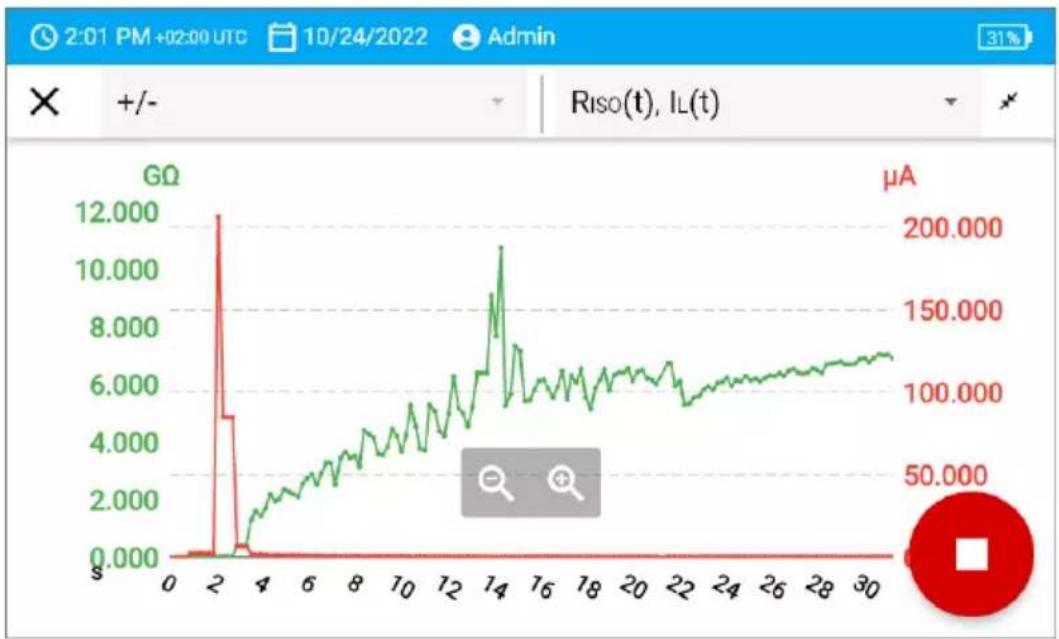
line
| Time | GΩ | μA | |------|--------|--------| | 0 | 0.000 | 0 | | 2 | 12.000 | 200.000| | 4 | 0.000 | 50.000 | | 6 | 2.000 | 100.000| | 8 | 4.000 | 150.000| | 10 | 6.000 | 200.000| | 12 | 8.000 | 250.000| | 14 | 11.000 | 300.000| | 16 | 7.000 | 250.000| | 18 | 6.500 | 225.000| | 20 | 6.800 | 225.000| | 22 | 6.500 | 225.000| | 24 | 6.800 | 225.000| | 26 | 7.000 | 225.000| | 28 | 7.200 | 225.000| | 30 | 7.500 | 225.000|1b

You can also open the graph after the measurement is finished.
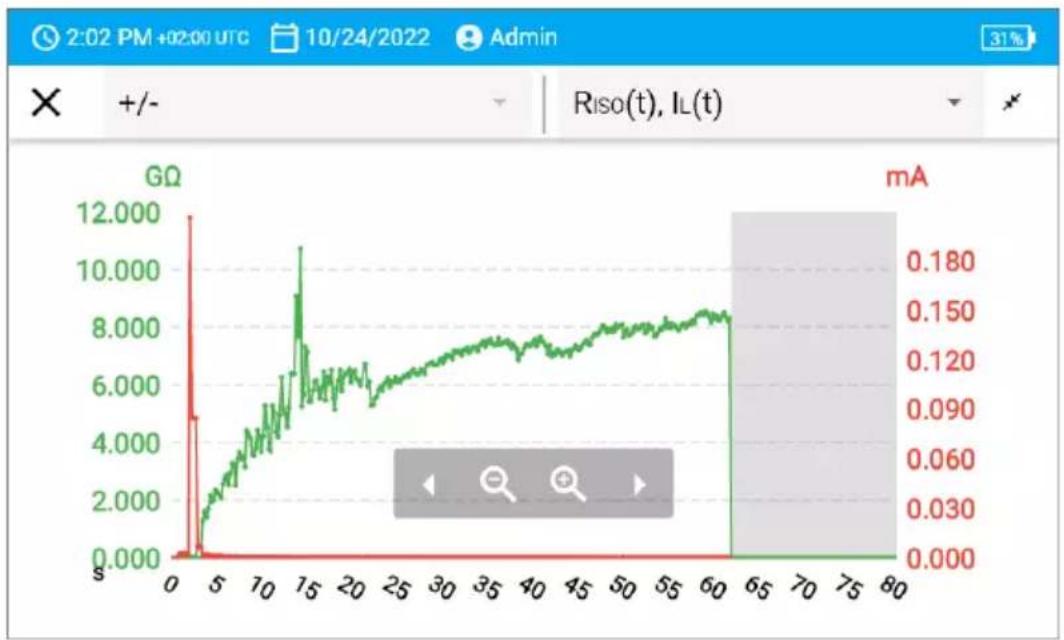
line
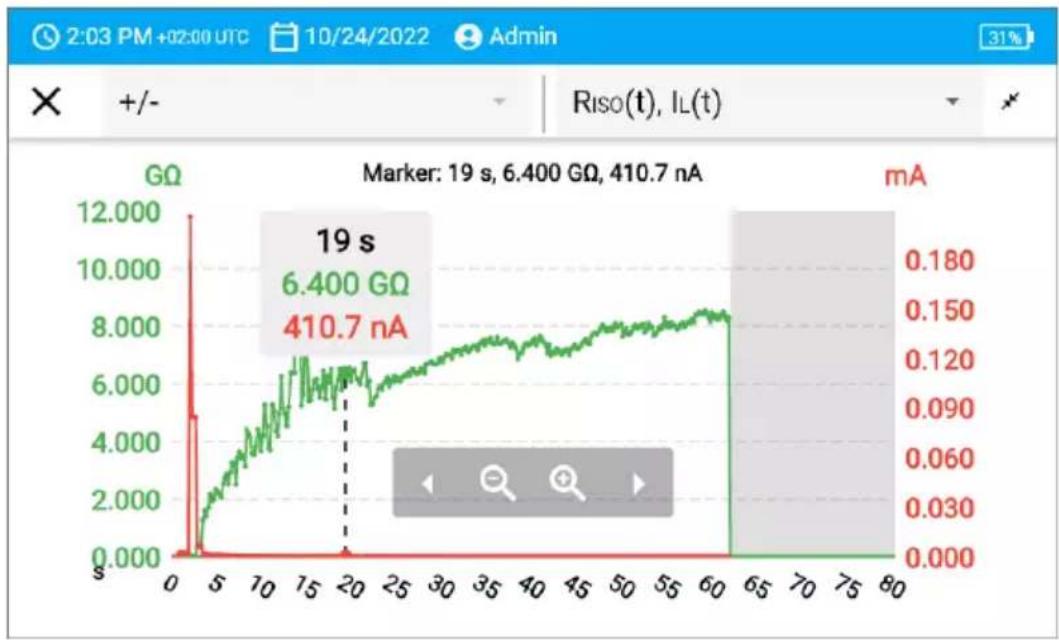
| Time | GQ | mA | |------|--------|--------| | 0 | 0.000 | 0.000 | | 5 | 12.000 | 0.180 | | 15 | 11.000 | 0.150 | | 20 | 6.000 | 0.120 | | 30 | 7.000 | 0.100 | | 40 | 7.500 | 0.090 | | 50 | 8.000 | 0.080 | | 60 | 8.500 | 0.070 | | 70 | 8.500 | 0.060 | | 80 | 8.500 | 0.050 |During or after the measurement, you can display or hide the sub-result for a given second of the test. To do this, simply touch the point on the graph that interests you.
line
| Time (s) | GΩ | mA | | -------- | ------ | ------ | | 19 | 6.400 | 410.7 |Description of function icons
+/- L1/L2 user
Marking the measured pair of conductors. If a measurement is in progress, only the currently measured pair is available

Switching to the shortened graph (last 5 seconds of the measurement)

Fitting the entire graph on the screen

Scrolling the graph horizontally

Extending the graph horizontally

Narrowing the graph horizontally
Return to the measurement screen
5.2 Correcting the R_ISO value to the reference temperature
The meter has the ability to convert the R_ISO measurement value to resistance values at reference temperatures acc. to the ANSI/NETA ATS-2009 standard. To obtain these results, the user has to:
- enter the temperature value manually or
- connect the temperature probe to the instrument.
The following options are available:
- R_ISO converted to a value at 20°C for oil insulation ((applies i.e. to insulation in cables),
- R iso converted to a value at 20°C for solid insulation (applies i.e. to insulation in cables),
- R _ISO converted to a value at 40°C for oil insulation (applies i.e. to insulation in rotating machinery),
- R_ISO converted to a value at 40°C for solid insulation (applies i.e. to insulation in rotating machinery).
5.2.1 Correction without the temperature probe
1

Perform the measurement.
2

Save the result in the memory
3
Go to this result in the memory of the meter.
4
Enter the temperature of the tested object and the type of its insulation. Then the meter will convert the measured resistance into the resistance at the reference temperature: 20^ ( R_ISO k20 ) and 40^ ( R_ISO k40 ).

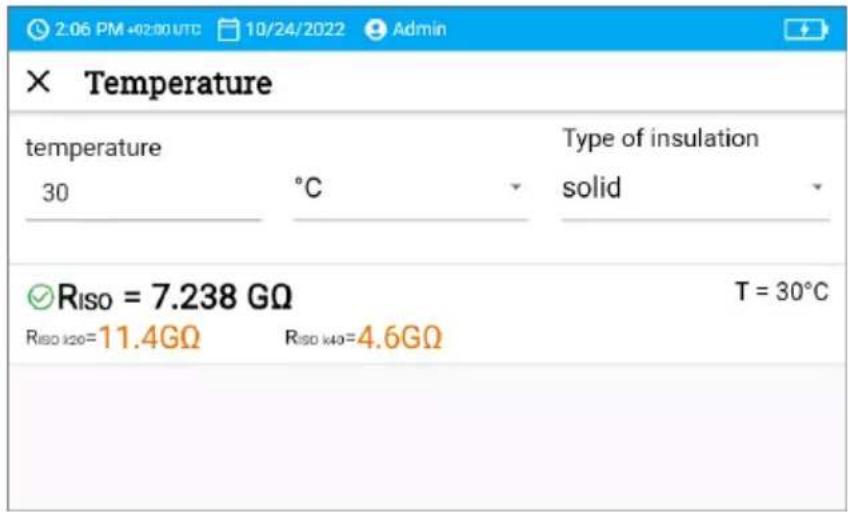

To obtain a temperature reading, you can also connect a temperature probe to the meter and enter its reading. See sec. 5.2.2, step 1.
5.2.2 Correction with the temperature probe
WARNING
To ensure user safety, it is not allowed to mount the temperature probe on objects with voltage higher than 50 V to earth. It is advisable to ground the examined object before mounting the probe.
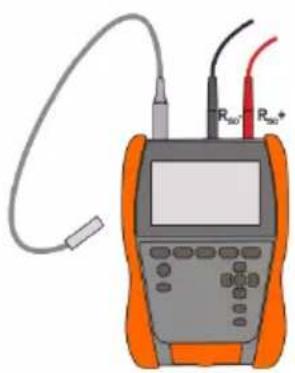
1
Connect the temperature probe to the meter. The temperature measured by the instrument is displayed at the top of the screen.
natural_image
Illustration of an orange handheld electronic device with a screen, wires, and probe tubes (no text or symbols visible)![2:15 PM +02:00 UTC 10/24/2022 Admin Riso READY UN= 0 V === +/- Riso = — Un = 2500 V t [s] = 60 +](/content/2026/05/895329/images/4c2f381505d473197dc643671f1d0a3687c7076857a36865f51fbca28a4c74ba.jpg)
2

Perform the measurement.
3

Save the result in the memory
4
Go to this result in the memory of the meter.
5
Enter the type of insulation of the tested object; the temperature at which the measurement was performed will be stored in the memory and cannot be changed. The meter will convert the measured resistance into the resistance at the reference temperature: 20^ ( R_SO k20 ) and 40^ ( R_ISO k40 ).

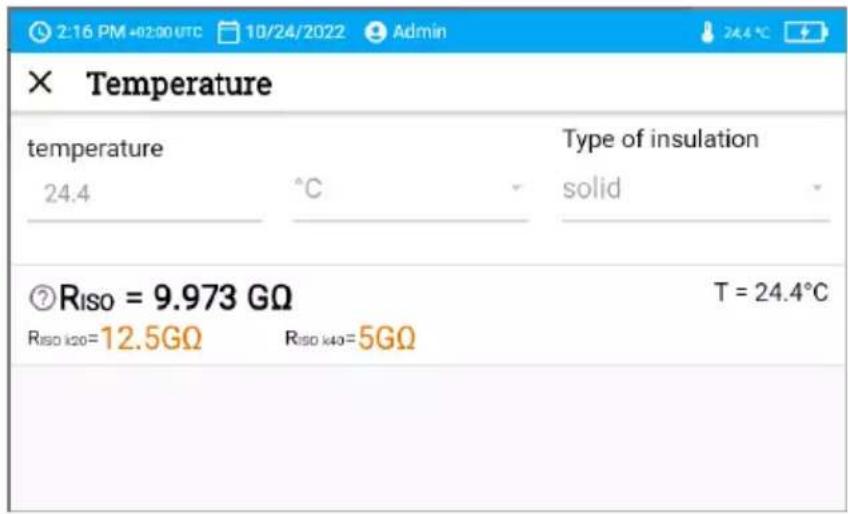

You will change the temperature unit by following sec. 3.6.4.
6 Memory of the meter
6.1 Memory structure and management
The memory of measurement results is in a tree structure. It consists of parent folders (maximum 100) in which child objects are nested (maximum 100). The number of these objects is unlimited. Each of them has sub-objects. The maximum total number of measurements is 9999.
Viewing and managing the memory structure is very simple and intuitive – see the tree below.

Add new:

folder

instrument

measurement (and go to the measurement menu to select and take a measurement)

Enter the object and:

show options

show object details

edit details of the object (enter/edit its characteristics)

Select the object and:

select all objects
delete selected objects

- In the memory menu you can see how many folders (☐) and measurement results (☐) are present in a given object.
- When the number of results in the memory reaches the maximum, saving the next one is only possible provided by overwriting the oldest result. In this situation, the meter will display an appropriate warning before saving.
6.2 Search function
To find the desired folder or object faster, use the search function. After selecting icon , Qmply enter the name of what you are looking for and tap on the appropriate result to proceed.
![3:23:05 PM + time 00:00 10/20/2022 Admin × app Manufacturing zone 0 [YTR234810] Appliance [YTR234830] Manufacturing zone 0 >](/content/2026/05/895329/images/d3da84005b7fb9b9e392f14d4e27054048d06ca9f13c6d10ef37bfc9591ed4a3.jpg)
6.3 Saving measurement result data to the memory
You can save measurements in two ways:
- by performing a measurement and then assigning it to an object in the memory structure (B),
- by entering an object in the memory structure and making a measurement from this level (+▶)!
However, you won't save them directly to parent folders. You will need to create a child folder for them.
6.3.1 From the measurement result to the object in memory
1

End the measurement or wait for it to be completed.
2

Save the result in the memory (SAVE).


Create a new folder/device which is equivalent to the folder/device where the result of the previously performed measurement was saved (SAVE AND ADD).


Save the result in the folder/device where the result of the previous performed measurement was saved (SAVE TO THE PREVIOUS ONE).
3
If you have selected the SAVE option, the window for selecting the save location selection window will open. Select the right one and save the result in it.
6.3.2 From the object in memory to the measurement result
1
In the meter's memory, go to the location where the results are to be saved.
2
Select the measurement you want to perform
3

Perform the measurement.
4

Save the result in the memory.
7 Data transmission
7.1 Set of accessories to connect the meter to a PC
In order to ensure the communication of the meter with a computer a USB cable and the relevant software are required:
- Sonel Reader,
- Sonel Reports PLUS.
The software may be used for many devices manufactured by SONEL S.A. which are equipped with a USB interface. Detailed information is available from the manufacturer and distributors.
If the required software has not been purchased with the meter, it may be obtained from the manufacturer or from an authorised distributor.
7.2 Data transmission through USB port
1

Enter the USB mode on the meter (sec. 3.6.3).
2
Use the USB cable to connect the meter to the computer.
3

Start the software for data transfer. During data transmission, all buttons on the meter are locked, except for those responsible for interrupting the transmission and switching off the device.

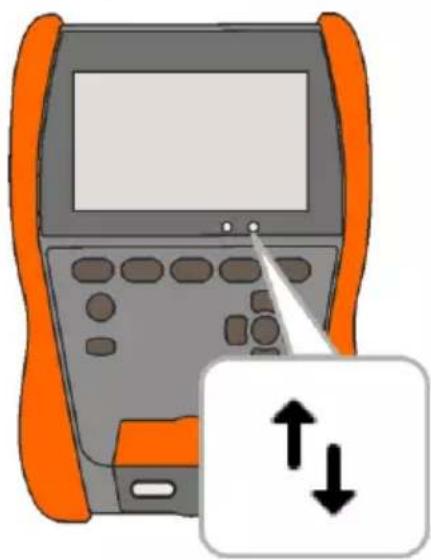
Additional information displayed by the meter
natural_image
Illustration of a handheld electronic device with control panel and directional arrows (no text or symbols)
USB communication, data transfer.
8 Software update
1
Download the update file from the manufacturer's website (www.sonel.com).
2
Save the update file to a USB stick. The stick must be formatted as a FAT32 file system.
3
3s

Turn the meter off.
4
Insert the USB stick into the right port of the meter.
natural_image
Illustration of a handheld electronic device with a gear icon and connection symbols (no text or labels)5

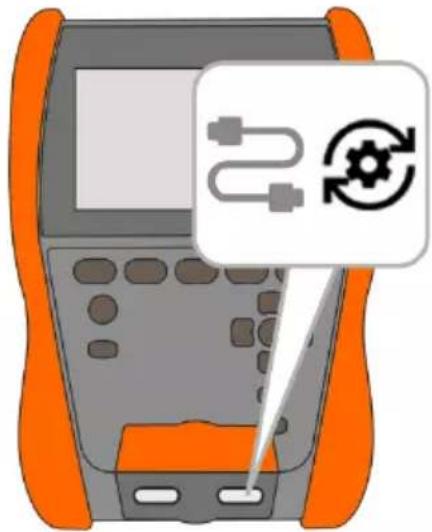
Press and hold down button to turn on the meter. Release only when the message on starting the update appears.

6
Watch the update progress. Wait until it's finished. You will be informed about the update result with an appropriate message.

- Before starting the update, charge the meter battery to 100%.
- The update will start if the software version on the USB stick is newer than the version currently installed on the meter.
- Do not turn off the meter while the update is in progress.
- During the update, the meter may turn off and on automatically.
9 Troubleshooting
Before sending the instrument for repairs, contact our service department. It may be possible that the meter is not damaged, and the problem has been caused by some other reasons.
The meter can only be repaired at outlets authorized by the manufacturer.
Troubleshooting of typical problems during the use of the meter is described in the table below.
| Symptom | Action |
| There are problems with saving or reading measurements. | Optimize the meter's memory (sec. 3.6.6). |
| There are problems navigating through folders. | |
| Repairing the meter's memory did not bring the expected results. | Reset the meter's memory (sec. 3.6.6). |
| There are problems preventing the use of memory. | |
| Operation of the meter is noticeably slower: long response to touching the screen, delays when navigating through the menu, long saving to memory, etc. | Reset the meter to the factory settings (sec. 3.6.6). |
| FATAL ERROR message and error code. | Contact the customer service centre and provide the error code to get help. |
| The meter does not respond to user actions. | Press and hold the button for ca. 7 seconds to turn off the meter. |
10 Power supply

NOTE!
- Before operating the meter, discharge the battery and then fully charge it, so that the indication of its charged status is correct.
- In order to do this as quickly as possible, proceed as follows:
⇒ set the maximum brightness of the display,
⇒ enter the measurement of insulation resistance,
set the maximum measurement voltage and the maximum measurement time,
⇒ start the measurement,
⇒ after discharging and the meter automatically switching off, proceed to charging the battery.
The charge level of the rechargeable battery is indicated by the symbol in the right upper corner of the display on a permanent basis.

Battery charged.

Charging voltage too high. Change the charger or power supply source.

Battery completely discharged – charge it. All measurements are blocked. The meter will turn off automatically when the battery charge drops to a critical level.

Battery temperature out of permissible range. If a charging is in progress, it will be aborted.

Charging of the battery is in progress.

No battery. The meter operates on an external power supply.

Battery failure. It is recommended to replace it with a new one.

Battery status unknown. Contact the customer service centre.

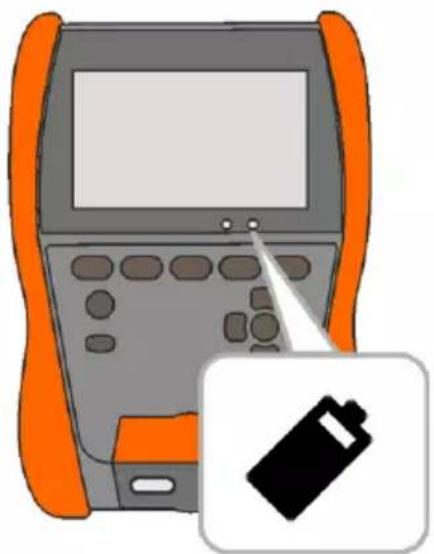
Additional information displayed by the meter
natural_image
Illustration of an orange and gray electronic device with a battery icon (no text or symbols)
Low battery charge level.

Battery problem

Charging of the battery is in progress.
10.1 Battery power
The meter is powered by a lithium-ion battery. The meter is charged by a USB power supply. It can be also charged from the car 12 V accessory socket, using an optional converter.
natural_image
Illustration of a mobile phone with a battery icon and lightning bolt (no text or symbols)
NOTE!
Do not power the meter from sources other than those listed in this manual.
10.2 Charging rechargeable battery
Charging starts once the power supply has been connected to the meter, regardless of whether the meter is on or off. The charging status is indicated on the display and by an active LED.
The charging algorithm allows the battery to be charged to approx. 90% in less than 2 hours. Charging time may take longer in non-optimal environmental conditions (too high or too low temperature) or in the case of using a USB-C-PD power adapter with parameters other than the factory supplied adapter (USB-C-PD 20 V min. 2.25 A).
Charging by any of the following methods is only possible with the meter turned off and will take more than 16 hours:
- power bank,
• power supply that does not support the USB-C-PD standard, - computer USB port,
• via the USB-A / USB-C adapter.
If the battery temperature is below 0°C or above 45°C then charging stops completely.
When the meter is turned off by Ⓐ button or by AUTO-OFF, the charging process is not stopped.
Indication of completed charging is shown by:

10.3 Power supply from mains
It is possible to charge the battery when carrying out the measurements. To do this, just connect the factory supplied charger to the meter.
When the meter is turned off by Ⓐ button or by AUTO-OFF, the charging process is not stopped.
10.4 General rules for using Li-Ion rechargeable batteries
- Store the meter with batteries charged at least to 50%. The battery pack may be damaged if stored when fully discharged. The ambient temperature for prolonged storage should be maintained within the range of 5^ C... 25^ C. The environment should be dry and well ventilated. Protect the device from direct sunlight.
- Charge the batteries in a cool, well-ventilated place at a temperature of 10^ C ... 28^ C. Modern fast chargers detect both too low and too high temperature of rechargeable batteries and react to the situation adequately. When the temperature is too low, charging is prevented as it may irreparably damage the batteries.
- Do not charge or use the batteries in extreme temperatures. Extreme temperatures reduce the lifetime of rechargeable batteries. Always observe the rated operating temperature. Do not dispose of the battery pack into fire.
- Li-ion cells are sensitive to mechanical damage. This kind of damage may cause its permanent damage and thus cause ignition or explosion. Any interference in the structure of Li-ion battery pack may cause its damage. This may result in its ignition or explosion. A short-circuit of the battery poles "+" and "-" may permanently damage the battery pack or even cause its fire or explosion.
- Do not immerse Li-Ion battery in liquids and do not store in humid conditions.
- If the electrolyte contained in the Lithium-Ion battery pack comes into contact with eyes or skin, immediately rinse the affected area with plenty of water and consult with a doctor. Protect the battery against unauthorised persons and children.
- When you notice any changes in the Lithium-Ion battery pack (e.g. changes in colour, swelling, excessive temperature), stop using the battery pack. Li-Ion batteries that are mechanically damaged, overcharged or excessively discharged are not suitable for use.
- Any misuse of the battery may cause its permanent damage. This may result in its ignition. The seller and the manufacturer shall not be liable for any damages resulting from improper handling of the Li-Ion battery pack.
11 Cleaning and maintenance

NOTE!
Use only the maintenance methods specified by the manufacturer in this manual.
The casing of the meter may be cleaned with a soft, damp cloth using all-purpose detergents. Do not use any solvents or cleaning agents which might damage the casing (powders, pastes, etc.).
Clean the probe with water and dry it.
The test leads should be cleaned with water and detergents, and then dried.
The electronic system of the meter does not require maintenance.
12 Storage
In the case of storage of the device, the following recommendations must be observed:
- disconnect all the test leads from the meter,
- clean the meter and all its accessories thoroughly,
- wind the test leads,
- in order to prevent a total discharge of the battery pack in the case of a prolonged storage, charge the device at least once every six months.
13 Dismantling and utilisation
Worn-out electric and electronic equipment should be gathered selectively, i.e. it must not be placed with waste of another kind.
Worn-out electronic equipment should be sent to a collection point in accordance with the regulations valid in a given region.
Before the equipment is sent to a collection point, do not dismantle any elements.
Observe local regulations concerning disposal of packages, waste batteries and rechargeable batteries.
14 Technical data
14.1 Basic data
⇒ The abbreviation "m.v." used in the specification of accuracy denotes a measured value
14.1.1 Measurement of AC/DC voltage
Measurement range: 0 V...1500 V
| Display range | Resolution | Accuracy |
| 0 V...1500 V | 1 V | ±(3% m.v. + 2 digits) |
• Frequency range: 45...65 Hz
14.1.2 Measurement of insulation resistance
- Accuracy of generated voltage (R load [Ω] ≥ 1000*U n [V]): 0...+5% or 0...+10% from the set value
• Measurement range acc. to EN IEC 61557-2: 10 kΩ ...2.000 TΩ ( I_ISOnom = 2 mA + (mA)^8.0 )
• Maximum short-circuit current I sc: ≤2 mA
Two-lead measurement
Approximate maximum values of the measured resistance, depending on the test voltage, are presented in the table below. For other voltages the range limits may be read from the chart below.
| Voltage | Measurement range |
| 10 V | 10 GΩ |
| 25 V | 20 GΩ |
| 50 V | 50 GΩ |
| 100 V | 100 GΩ |
| 250 V | 250 GΩ |
| 500 V | 500 GΩ |
| 1000 V | 1.00 TΩ |
| 2500 V | 2.00 TΩ |
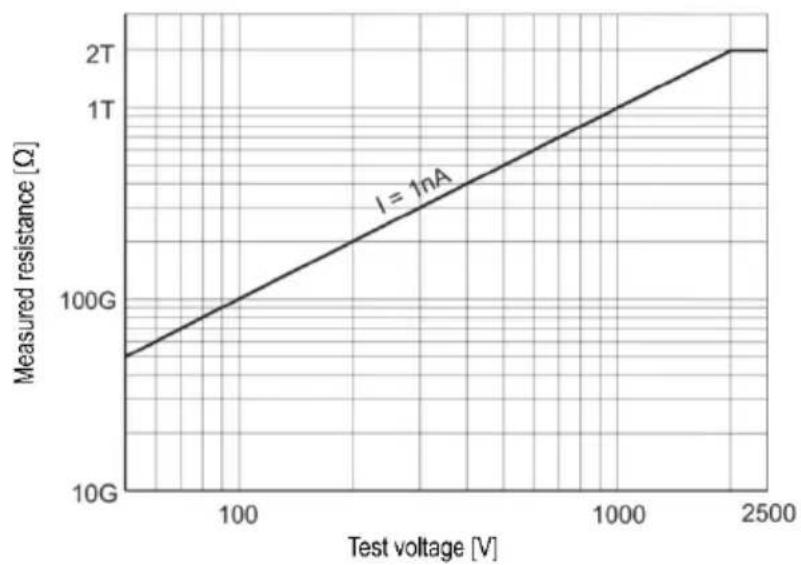
line
| Test voltage [V] | Measured resistance [Ω] | | ---------------- | ------------------------ | | 50 | 50G | | 100 | 100G | | 2500 | 2T || Display range | Resolution | Accuracy |
| 0.0...999.9 kΩ | 0.1 kΩ | ±(3% m.v. + 20 digits) |
| 1.000...9.999 MΩ | 0.001 MΩ | |
| 10.00...99.99 MΩ | 0.01 MΩ | |
| 100.0...999.9 MΩ | 0.1 MΩ | |
| 1.000...9.999 GΩ | 0.001 GΩ | |
| 10.00...99.99 GΩ | 0.01 GΩ | |
| 100.0...999.9 GΩ | 0.1 GΩ | |
| 1.000...2.000 TΩ | 0.001 TΩ |
Three-lead measurement
Additional error in the three-lead method (effect of G terminal): 0.05% in eliminating the leakage caused by resistance of 250 kΩ during measurement of 100 MΩ with test voltage of 50 V.
Measurement with AutolISO-2511
Approximate maximum values of the measured resistance, depending on the test voltage, are presented in the table below.
| Voltage | Measurement range |
| 10 V | 10 GΩ |
| 25 V | 20 GΩ |
| 50 V | 50 GΩ |
| 100 V | 100 GΩ |
| 250 V | 250 GΩ |
| 500 V | |
| 1000 V | 400 GΩ |
| 2500 V |
| Display range | Resolution | Accuracy |
| 0.0...999.9 kΩ | 0.1 kΩ | ±(4% m.v. + 20 digits) |
| 1.000...9.999 MΩ | 0.001 MΩ | |
| 10.00...99.99 MΩ | 0.01 MΩ | |
| 100.0...999.9 MΩ | 0.1 MΩ | |
| 1.000...9.999 GΩ | 0.001 GΩ | |
| 10.00...99.99 GΩ | 0.01 GΩ | |
| 100.0...400.0 GΩ | 0.1 GΩ | ±(8% m.v. + 20 digits) |

For insulation resistance below R_SOmin there is no accuracy specified because the meter works with the adjustable current limit in accordance with the following formula:
$$ R _ {\text { coin }} \quad \frac {U _ {\text { nomIs }}}{I I S O n o m} $$
where:
R_ISOmin – minimum insulation resistance measured without limiting the converter current U_ISOnom – nominal test voltage
I_ISOnom - nominal converter current (1.6 mA)
14.1.3 Measurement of capacitance
| Display range | Resolution | Accuracy |
| 0 nF...999 nF | 1 nF | ±(5% m.v. + 5 digits) |
| 1,00 μF...9,99 μF | 0,01 μF |
- Measurement of capacitance is available only during R _ISO measurement (when discharging the object).
- Accuracy of measurement is met for the tested capacitance connected in parallel with a resistance greater than 10 MΩ.
- For measurement voltages below 100 V the measurement error is not specified.
• Charging time of C=1 F capacitance up to 2500 V: 1.4 s.
• Discharge time of C=1 μF capacitance: 35 s.
14.1.4 Low-voltage measurement of continuity and resistance
Measurement of continuity of protective conductors and equipotential bondings with ±200 mA current
Measuring range according to EN IEC 61557-4: 0.10...999 Ω
| Display range | Resolution | Accuracy |
| 0.00...19.99 Ω | 0.01 Ω | ±(2% m.v. + 3 digits) |
| 20.0...199.9 Ω | 0.1 Ω | |
| 200...999 Ω | 1 Ω | ±(4% m.v. + 3 digits) |
• Voltage at open terminals: 8...16 V
• Output current at R < 2 Ω: Isc > 200 mA
• Compensation of test leads resistance
• Measurements for both current polarizations
Measurement of resistance with low current
| Display range | Resolution | Accuracy |
| 0.0...199.9 Ω | 0.1 Ω | ±(2% m.v. + 3 digits) |
| 200...999 Ω | 1 Ω | ±(4% m.v. + 4 digits) |
• Voltage at open terminals: 8...16 V
• Output current >10 mA
• Audio signal for measured resistance of <10 ± 10%
• Compensation of test leads resistance
14.1.5 Measurement of temperature
| Display range | Resolution | Accuracy |
| -40.0...99.9°C | 0.1°C | ±(3% m.v. + 8 digits) |
| -40.0...211.8°F | 0.1°F | ±(3% m.v. + 16 digits) |
• Measurement using an external probe
14.1.6 Measurement of resistance in EPA zones
| Display range for U_n=10V | Resolution | Accuracy |
| 0.0...999.9 kΩ | 0.1 kΩ | ±(8% m.v. + 20 digits) |
| 1.0...9.999 MΩ | 0.001 MΩ | |
| 10.00...99.99 MΩ | 0.01 MΩ | |
| 100.0...999.9 MΩ | 0.1 MΩ | |
| 1.0...10.0 GΩ | 0.1 GΩ |
• Test voltage: 10 V ± 5%
| Display range for U_n=100 V | Resolution | Accuracy |
| 0.0...999.9 kΩ | 0.1 kΩ | ±(3% m.v. + 20 digits) |
| 1.000...9.999 MΩ | 0.001 MΩ | |
| 10.00...99.99 MΩ | 0.01 MΩ | |
| 100.0...999.9 MΩ | 0.1 MΩ | |
| 1.000...9.999 GΩ | 0.001 GΩ | |
| 10.00...99.99 GΩ | 0.01 GΩ | |
| 100.0...200.0 GΩ | 0.1 GΩ | ±(8% m.v. + 20 digits) |
• Test voltage: 100 V ± 5%
| Display range for U_n =500 V | Resolution | Accuracy |
| 0.0...999.9 kΩ | 0.1 kΩ | ±(3% m.v. + 20 digits) |
| 1.000...9.999 MΩ | 0.001 MΩ | |
| 10.00...99.99 MΩ | 0.01 MΩ | |
| 100.0...999.9 MΩ | 0.1 MΩ | |
| 1.000...9.999 GΩ | 0.001 GΩ | |
| 10.00...99.99 GΩ | 0.01 GΩ | |
| 100.0...999.9 GΩ | 0.1 GΩ | ±(8% m.v. + 20 digits) |
| 1000 GΩ | 1 GΩ |
• Test voltage: 500 V ± 5%
14.2 Other technical data
a) type of insulation acc. to EN 61010-1 and EN IEC 61557.....double
b) measurement category acc. to EN IEC 61010-2-030
- rated operating altitude ≤2000 m IV 600 V
- rated operating altitude ≤3000 m ....III 600 V
c) ingress protection acc. to EN 60529 IP65
d) power supply Li-Ion 10,8 V 3,5 Ah rechargeable battery
e) dimensions 234 x 169 x 70 mm
f) weight ca. 1.3 kg
g) storage temperature....-25°C...+70°C
h) operating temperature....-20°C...+50°C
i) humidity 20%..90%
j) reference temperature....+23°C ± 2°C
k) reference humidity....40%..60%
I) display......graphical 5.6" LCD
m) number of RISO measurements acc. to EN IEC 61557-2 with battery power supply....min. 600
n) time of operation on a single battery charge
- for R_ISO = 5 M , U_ISO = 2.5 kV , T = (23 ± 5)^ , screen backlight 50% ....approx. 3 h
- under conditions according to EN IEC 61557-2 p. 6.7, screen backlight 50% .... approx. 7 h
o) memory of measurement results....9999 results
p) transmission of results....USB
q) quality standard......development, design and manufacturing are ISO 9001, ISO 14001, ISO 45001 compliant
r) the device meets the requirements of.... EN 61010-1, EN IEC 61557, EN IEC 61010-2-030
s) the product meets EMC requirements (immunity for industrial environment) according to the following standards ....
EN IEC 61326-1, EN IEC 61326-2-2

NOTE!
The meter is classified in terms of Electromagnetic Compatibility (EMC) as instruments of Class A (for use in industrial environments – according to EN 50011). Interferences, impacting the operation of other devices must be taken into account when the meters are used in other environments (e.g. domestic).
14.3 Additional data
Data on additional uncertainties are useful mainly when the meter is used in non-standard conditions and for metrological laboratories for the purpose of calibration.
14.3.1 Additional uncertainties according to EN IEC 61557-2 (R ISO)
| Significant parameter | Designation | Additional uncertainty |
| Position | E_1 | 0% |
| Supply voltage | E_2 | 1% (not displayed) |
| Temperature 0°C...35°C | E_3 | 6% |
15 Manufacturer
The manufacturer of the device and provider of guarantee and post-guarantee service:
SONEL S.A.
Wokulskiego 11
58-100 Šwidnica
Poland
tel. +48 74 884 10 53 (Customer Service)
e-mail: customerservice@sonel.com
web page: www.sonel.com

NOTE!
Service repairs must be performed only by the manufacturer.
NOTES
NOTES
NOTES
MEASURING MESSAGES

NOTE!
Connecting voltage higher than 1500 V between any of the test terminals may damage the meter and cause a hazard to the user.


NOISE

LIMIT I

HILE

UDET
U_N>50 V
Test voltage is present on the terminals of the meter.
Interference voltage lower than 50 V DC or 1500 V AC is present on the tested object. Measurement is possible but may be burdened with additional error.
Activation of current limit. The symbol displayed is accompanied by a continuous beep.
Breakdown of the tested object insulation, the measurement is interrupted. The message appears after LIMIT I displaying for 20 s during the measurement, when the voltage previously reached the nominal value.
Dangerous voltage on the object. The measurement will not be performed. In addition to the displayed information:
- U _N voltage value at the object is displayed,
- a two-tone beep is generated,
- red LED flashes.

Discharging the object in progress.

SONEL S.A.
Wokulskiego 11
58-100 Świdnica
Poland
Customer Service
tel. +48 74 884 10 53
e-mail: customerservice@sonel.com
- User manual
- MIC-2511
- CE
- Insulation resistance meter
- CONTENTS
- General information....5
- Quick start 7
- Interface and configuration....8
- Configuration of the meter – main settings....12
- Measurements....14
- Visual test....24
- Special features ....46
- Memory of the meter....51
- Data transmission....53
- Software update....54
- Troubleshooting....55
- Power supply....56
- Cleaning and maintenance ....59
- Storage....59
- Dismantling and utilisation....59
- Technical data....60
- Manufacturer....65
- General information
- Safety symbols
- Behaviour of signalling LEDs
- Safety
- WARNING
- Quick start
- Interface and configuration
- On-screen keyboard
- Menu icons
- General
- Measurements
- Memory
- Gestures
- Buttons on the housing
- User's account
- Adding and editing users
- 1
- 2
- 3
- Deleting users
- Switching users
- Configuration of the meter – main settings
- Language
- Date and time
- Meter
- Measurements
- Information
- Factory reset of the meter
- Measurements
- NOTE!
- Before you start
- Connections for R ISO measurements
- Measurement of inter-winding resistance of a transformer.
- Connections for R , R_CONT measurements
- Connections for EPA measurements
- Point-to-point resistance - R_P1-P2
- Point-to-ground resistance - R_P-G
- Surface resistance - R_s
- Volume resistance - R_v
- Measurement indicators
- Before the measurement
- During the measurement
- Riso
- Rx
- Measurement settings
- Visual test
- 4
- Insulation resistance - R ISO
- Measurements with the use of test leads
- 5
- Additional information displayed by the meter
- DISCHARGING
- Measurements using the AutolISO-2511 adapter
- Measurements with a voltage increasing in steps - SV
- Measurement with ramp test – RampTest
- Dielectric Discharge Indicator – DD
- Polarization Index - PI (R ISO 600 s)
- Dielectric Absorption Ratio - DAR (R ISO 60 s)
- Low-voltage measurement of resistance - R _x , R _CONT
- Calibration of test leads
- Measurement of resistance (R x)
- 4.9.3
- Measurements in the EPAs
- Special features
- Graphs
- 1a
- 1b
- Description of function icons
- Correcting the R_ISO value to the reference temperature
- Correction without the temperature probe
- Correction with the temperature probe
- Memory of the meter
- Memory structure and management
- Search function
- Saving measurement result data to the memory
- From the measurement result to the object in memory
- From the object in memory to the measurement result
- Data transmission
- Set of accessories to connect the meter to a PC
- Data transmission through USB port
- Software update
- Troubleshooting
- Power supply
- Battery power
- Charging rechargeable battery
- Power supply from mains
- General rules for using Li-Ion rechargeable batteries
- Cleaning and maintenance
- Storage
- Dismantling and utilisation
- Technical data
- Basic data
- Measurement of AC/DC voltage
- Measurement of insulation resistance
- Two-lead measurement
- Three-lead measurement
- Measurement with AutolISO-2511
- Measurement of capacitance
- Low-voltage measurement of continuity and resistance
- Measurement of continuity of protective conductors and equipotential bondings with ±200 mA current
- Measurement of resistance with low current
- Measurement of temperature
- Measurement of resistance in EPA zones
- Other technical data
- Additional data
- Additional uncertainties according to EN IEC 61557-2 (R ISO)
- Manufacturer
- MEASURING MESSAGES
Brand : Sonel
Model : MIC-2511
Category : Measurement