
IC420XE-25 - Uncategorized HYUNDAI - Free user manual and instructions
Find the device manual for free IC420XE-25 HYUNDAI in PDF.

| Product Type | Petrol Engine |
| Brand | Hyundai |
| Model | IC420XE-25 |
| Displacement | 420 cc |
| Bore | 90 mm (3.54 in) |
| Stroke | 66 mm (2.60 in) |
| Oil Capacity | 1.1 L (0.29 gal) |
| Net Weight | 33.5 kg (73.9 lb) |
| Fuel Type | Unleaded gasoline (86 octane or higher) |
| Recommended Oil | API SJ, SL or equivalent, SAE 10W-30 |
| Spark Plug Gap | 0.70–0.80 mm (0.028–0.031 in) |
| Spark Plug Torque | 18–22 N·m |
| Intake Valve Clearance | 0.08–0.12 mm (0.003–0.005 in) |
| Exhaust Valve Clearance | 0.13–0.17 mm (0.005–0.007 in) |
| Safety Features | Oil Alert system, spark arrester (optional) |
| Starting System | Electric and recoil starter |
| Ignition System | Transistorized magneto ignition |
| Fuel Tank Capacity | Approximately 1.1 L (estimated) |
| Warranty | Limited warranty, see manual for terms |
Frequently Asked Questions - IC420XE-25 HYUNDAI
User questions about IC420XE-25 HYUNDAI
0 question about this device. Answer the ones you know or ask your own.
Ask a new question about this device
Download the instructions for your Uncategorized in PDF format for free! Find your manual IC420XE-25 - HYUNDAI and take your electronic device back in hand. On this page are published all the documents necessary for the use of your device. IC420XE-25 by HYUNDAI.
USER MANUAL IC420XE-25 HYUNDAI

GENUINE PRODUCT OF HYUNDAI CORPORATION
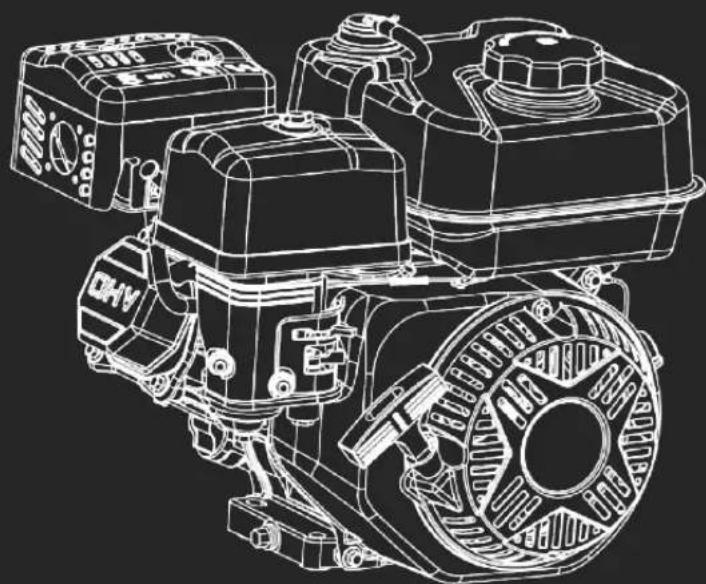
natural_image
Technical line drawing of a mechanical engine assembly (no text or symbols)INTRODUCTION
All information in this publication is based on the latest product information available at the time of printing.
This manual should be considered a permanent part of the engine and should remain with the engine if resold.
SAFETY MESSAGES
READ THIS OWNER'S MANUAL CAREFULLY
Pay special attention to these symbols and any instruction that follow.
A safety message alerts you to potential hazards that could hurt you or others.
These signal words mean:

You WILL be KILLED or SERIOUSLY HURT if you don't follow instructions.

You CAN be KILLED or SERIOUSLY HURT if you don't follow instructions.

You CAN be HURT if you don't follow instructions.
Each message tells you what the hazard is, what can happen, and what you can do to avoid or reduce injury.
You will also see other important messages that are preceded by the word NOTICE.

Your engine or other property can be damaged if you don't follow instructions.
The purpose of these messages is to help prevent damage to your engine, other property, or the environment.
CONTENTS
INTRODUCTION. 1
SAFTY MESSAGES. 1
SAFTY INFORMATION. 3
COMPONENT & CONTROL LOCATION.... 4
BEFORE OPERATION CHECKS.... 5
OPERATION....6
STARTING THE ENGINE. 6
STOPPING THE ENGINE. 8
SETTING ENGINE SPEED . 9
SERVICING YOUR ENGINE.... 10
THE IMPORTANCE OF MAINTENANCE. 10
MAINTENANCE SAFETY. 10
MAINTENANCE SCHEDULE. 11
REFUELING . 12
ENGINE OIL . 13
RECOMMENDED OIL 13
OIL LEVEL CHECK. 13
OIL CHANGE. 14
AIR CLEANER. 15
INSPECTION. 15
CLEANING. 15
SEDIMENT CUP. 16
SPARK PLUG 17
IDLE SPEED 18
STORAGE 18
TRANSPORTING 20
TROUBLE SHOOTING 20
WIRING DIAGRAMS 22
SPECIFICATIONS 23
DECLARATION OF CONFORMITY. 24
USEFUL INFORMATION 25
CONTACT US.... 26
SAFETY INFORMATION
CAUTION
This engine is shipped without oil. If you start the engine without oil, the engine will be damaged beyond repair and will not be covered under warranty.


WARNING
Gasoline and its vapors are extremely flammable and explosive. Fire or explosion can cause severe burns or death.
WHEN ADDING FUEL
- Turn engine OFF and let engine cool at least 2 minutes before removing Fuel filler cap.
- Fill fuel tank outdoors or in well-ventilated area.
- Do not overfill fuel tank.
- Keep gasoline away from sparks, open flames, pilot lights, heat, and other ignition sources.
- Check fuel lines, tank, cap, and fittings frequently for cracks or leaks. Replace if necessary.
WHEN STARTING ENGINE
- Make sure spark plug, muffler, fuel filler cap and air cleaner are in place.
- Do not crank engine with spark plug removed.
- If fuel spills, wait until it evaporates before starting engine.
- If engine floods, set choke to OPEN/RUN position, place throttle lever in MAX and crank engine starts.
WHEN OPERATING EQUIPMENT
- Do not choke carburetor to stop engine.
WHEN TRANSPORTING EQUIPMENT
- Transport with fuel tank EMPTY.
WHEN STORING GASOLINE OR EQUIPMENT WITH FUEL IN TANK
- Store away from furnaces, stoves, water heaters or other appliances that have pilot light or other ignition source because they can ignite gasoline vapors.


WARNING
Starting engine creates sparking.
Sparking can ignite nearby flammable gases.
Explosion and fire could result.
- If there is natural or LP gas leakage in area, do not start engine.
- Do not use pressurized starting fluids because vapors are flammable.


WARNING
Rapid retraction of starter cord (kickback) will pull hand and arm toward engine faster than you can let go.
Broken bones, fractures, bruises or sprains could result.
- When starting engine, pull cord slowly until resistance is felt, then pull rapidly.
- Direct coupled equipment components such as, but not limited to, blades, impellers, pulleys, sprockets, etc., must be securely attached.


WARNING
Rotating parts can contact or entangle hands, feet, hair, clothing, or accessories. Traumatic amputation or severe laceration can result.
- Operate equipment with guards in place.
- Keep hands and feet away from rotating parts.
- Tie up long hair and remove jewelry.
- Do not wear loose-fitting clothing, dangling drawstrings or items that could become caught.


WARNING
Engines give off carbon monoxide, an odorless, colorless, poison gas. Breathing carbon monoxide can cause nausea, fainting or death.
- Start and run engine outdoors.
- Do not start or run engine in enclosed area, even if doors or windows are open.


WARNING
Running engines produce heat. Engine parts, especially muffler, become extremely hot.
Severe thermal burns can occur on contact.
Combustible debris, such as leaves, grass, brush, etc. can catch fire.

- Allow muffler, engine cylinder and fins to cool before touching.
- Remove accumulated debris from muffler area and cylinder area.
- Install and maintain in working order a spark arrester before using equipment on forest-covered, grass-covered, brush-covered unimproved land. The state of California requires this. Other states may have similar laws. Federal laws apply on federal land.
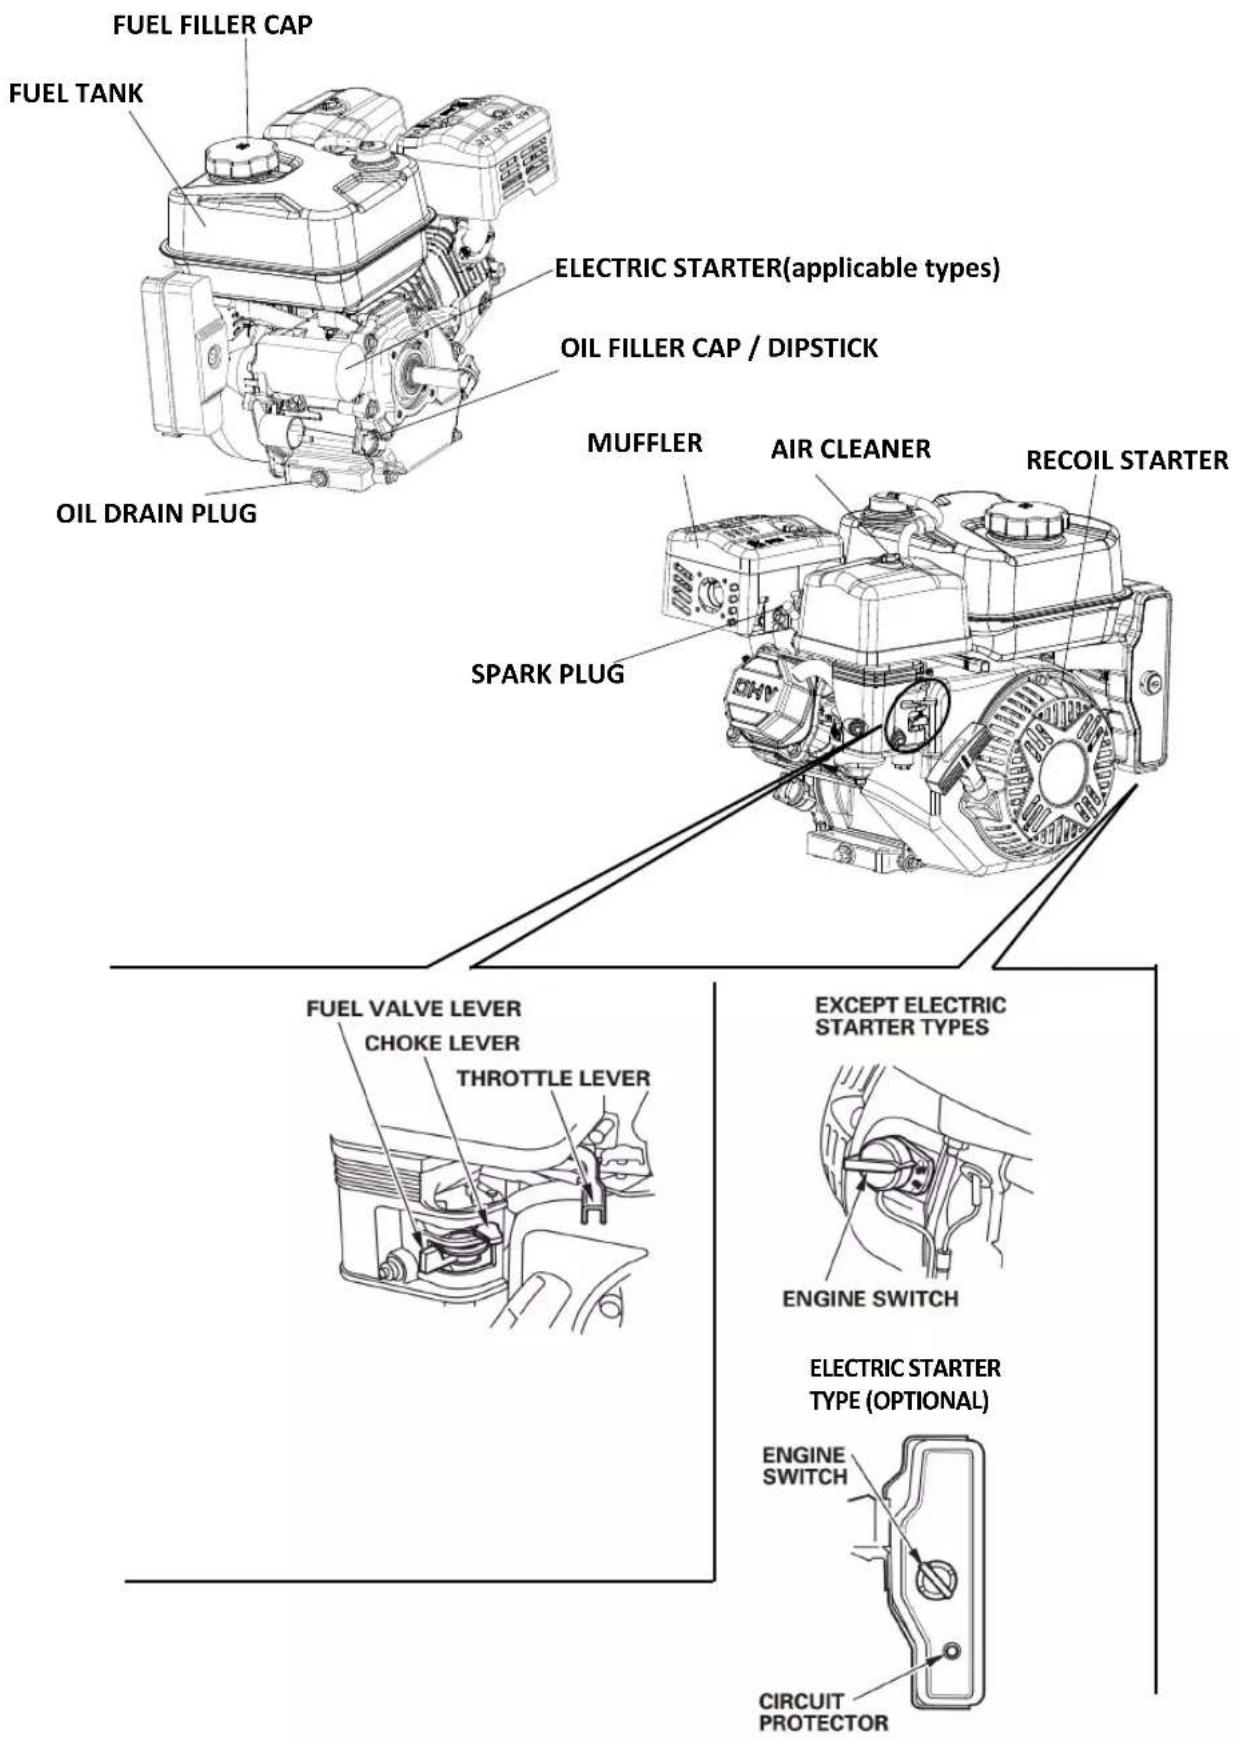
COMPONENT & CONTROL LOCATION
For your safety, and to maximize the service life of your equipment, it is very important to take a few moments before you operate the engine to check its condition. Be sure to take care of any problem you find, or have your servicing dealer correct it, before you operate the engine.
WARNING
Improperly maintaining this engine, or failure to correct a problem before operation, can cause a malfunction in which you can be seriously hurt or killed.
Always perform a preoperation inspection before each operation, and correct any problem.
Before beginning your preoperation checks, be sure the engine is level and the engine switch is in the OFF position.
Always check the following items before you start the engine:
Check the General Condition of the Engine
- Look around and underneath the engine for signs of oil or gasoline leaks.
- Remove any excessive dirt or debris, especially around the muffler and recoil starter.
- Look for signs of damage.
- Check that all shields and covers are in place, and all nuts, bolts, and screws are tightened.
Check the Engine
- Check the fuel level. Starting with a full tank will help to eliminate or reduce operating interruptions for refueling.
- Check the engine oil level. Running the engine with a low oil level can cause engine damage.
The Oil Alert system (applicable types) will automatically stop engine before the oil level falls below safe limits. However, to avoid the inconvenience of an unexpected shutdown, always check the engine oil level before startup. - Check the reduction case oil level on applicable types. Oil is essential to reduction case operation and long life.
- Check the air filter element. A dirty air filter element will restrict air flow to the carburetor, reducing engine performance.
- Check the equipment powered by this engine.
Review the instructions provided with the equipment powered by this engine for any precautions and procedures that should be followed before engine startup.
OPERATION
SAFE OPERATING PRECAUTIONS
Before operating the engine for the first time, please review the SAFETY INFORMATION section on page 3 and the BEFORE OPERATION CHECKS on page 5.
WARNING
Carbon monoxide gas is toxic. Breathing it can cause unconsciousness and even kill you.
Avoid any areas or actions that expose you to carbon monoxide.
Review the instructions provided with the equipment powered by this engine for any safety precautions that should be observed with engine startup, shutdown or operation.
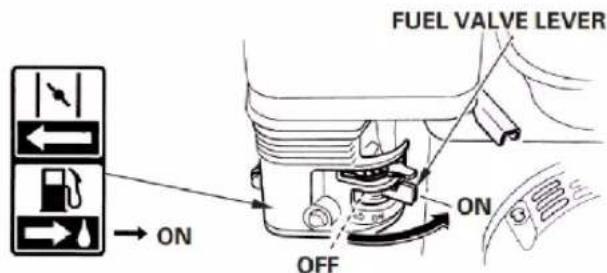
STARTING THE ENGINE
- Move the fuel valve lever to the ON position.
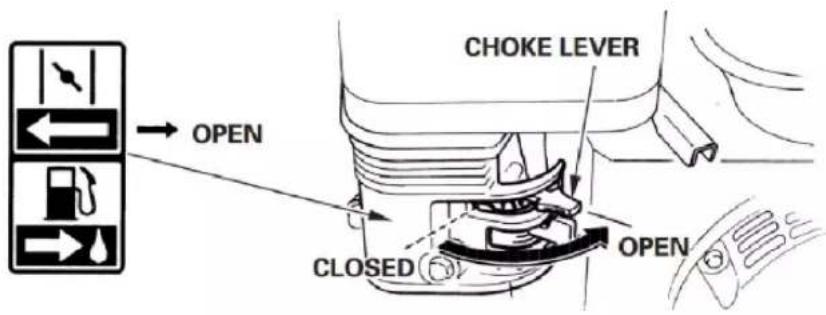
- To start a cold engine, move the choke lever to the CLOSED position.
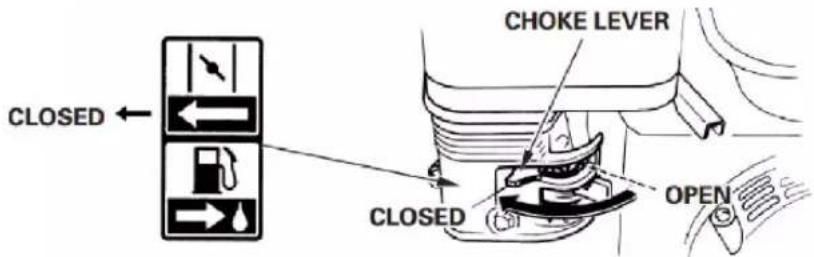
To restart a warm engine, leave the choke lever in the OPEN position
Some engine applications use a remote-mounted choke control rather than the engine-mounted choke lever shown here. Refer to the instructions provided by the equipment manufacturer.
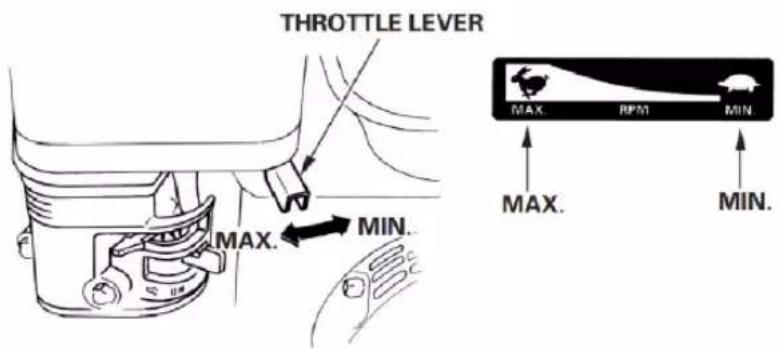
- Move the throttle lever away from the MIN. position, about 1/3 of the way toward the MAX. position.
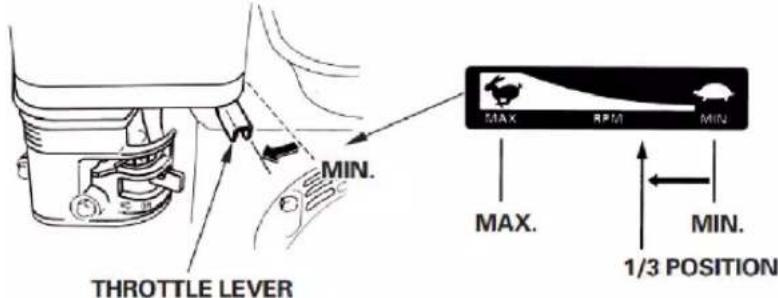
Some engine applications use a remote-mounted throttle control rather than the engine-mounted
throttle lever shown here. Refer to the instructions provided by the equipment manufacturer.
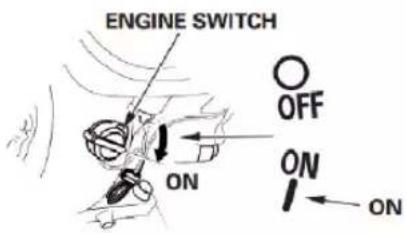
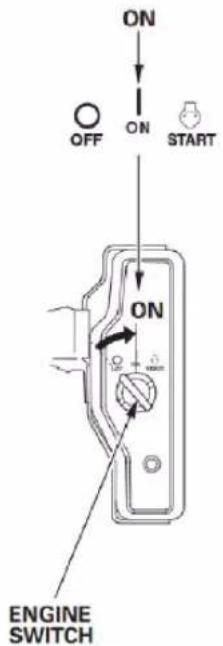
- Turn the engine switch to the ON position.
EXCEPT ELECTRIC STARTER TYPES
ELECTRIC STARTER TYPES
- Operate the starter.
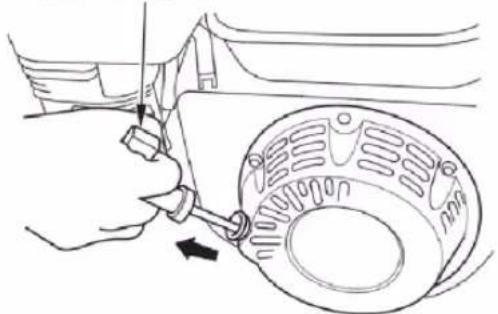
RECOIL STARTER:
Pull the starter grip lightly until you feel resistance, then pull briskly. Return the starter grip gently.
STARTER GRIP
natural_image
Line drawing of a hand using a tool to adjust or install a car tire component (no text or symbols present)NOTICE
Do not allow the starter grip to snap back against the engine. Return it gently to prevent damage to the starter.
ELECTRIC STARTER (applicable types):
Turn the key to the START position, and hold it there until the engine starts.
If the engine fails to start within 5 seconds, release the key, and wait at least 10 seconds before operating the starter again.
NOTICE

Using the electric starter for more than 5 seconds at a time will overheat the starter motor and can damage it.
When the engine starts, release the key, allowing it to return to the ON position.
- If the choke lever has been moved to the CLOSED position to start the engine, gradually move it to the OPEN position as the engine warms up.
STOPPING THE ENGINE
To stop the engine in an emergency, simply turn the engine switch to the OFF position. Under normal conditions, use the following procedure. Refer to the instructions provided by the equipment manufacturer.
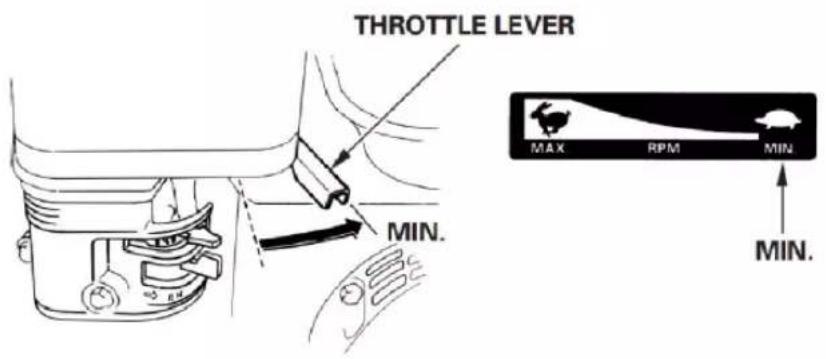
- Move the throttle lever to the MIN. position.
Some engine applications use a remote-mounted throttle control rather than the engine-mounted throttle lever shown here.
- Turn the engine switch to the OFF position.
EXCEPT ELECTRIC STARTER TYPES
ELECTRIC STARTER TYPES

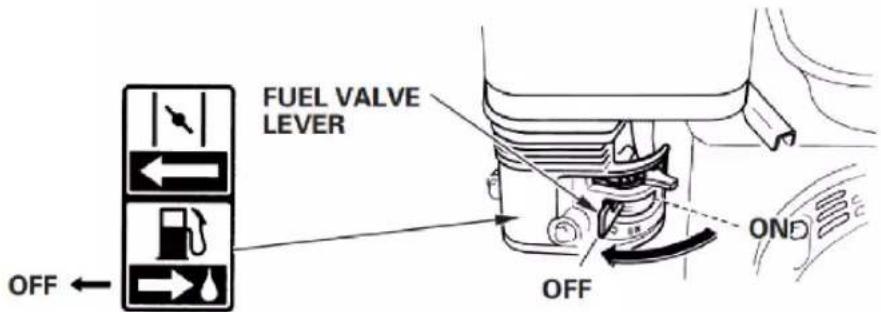
- Turn the fuel valve lever to the OFF position.
SETTING ENGINE SPEED
Position the throttle lever for the desired engine speed.
Some engine applications use a remote-mounted throttle control rather than the engine-mounted throttle lever shown here. Refer to the instructions provided by the equipment manufacturer.
For engine speed recommendations, refer to the instructions provided with the equipment powered by this engine.
SERVICING YOUR ENGINE
THE IMPORTANCE OF MAINTENANCE
Good maintenance is essential for safe, economical and trouble-free operation. It will also help reduce pollution.
WARNING
Improper maintenance, or failure to correct a problem before operation, can cause a malfunction in which you can be seriously hurt or killed.
Always follow the inspection and maintenance recommendations and schedules in this owner's manual.
To help you properly care for your engine, the following pages include a maintenance schedule, routine inspection procedures, and simple maintenance procedures using basic hand tools. Other service tasks that are more difficult, or require special tools, are best handled by professionals and are normally performed by a technician or other qualified mechanic.
The maintenance schedule applies to normal operating conditions. If you operate your engine under severe conditions, such as sustained high-load or high-temperature operation, or use in unusually wet or dusty conditions, consult your servicing dealer for recommendations applicable to your individual needs and use.
MAINTENANCE SAFETY
Some of the most important safety precautions follow. However, we cannot warn you of every conceivable hazard that can arise in performing maintenance. Only you can decide whether or not you should perform a given task.
WARNING
Failure to properly follow maintenance instructions and precautions can cause you to be seriously hurt or killed.
Always follow the procedures and precautions in this owner's manual.
SAFETY PRECAUTIONS
● Make sure the engine is off before you begin any maintenance or repairs. This will eliminate several potential hazards:
—Carbon monoxide poisoning from engine exhaust.
Be sure there is adequate ventilation whenever you operate the engine.
—Burns from hot parts.
Let the engine and exhaust system cool before touching.
—Injury from moving parts.
Do not run the engine unless instructed to do so.
- Read the instructions before you begin, and make sure you have the tools and skills required.
- To reduce the possibility of fire or explosion, be careful when working around gasoline. Use only a nonflammable solvent, not gasoline, to clean parts. Keep cigarettes, sparks and flames away from all fuel related parts.
Remember that your servicing dealer knows your engine best and is fully equipped to maintain and repair it.
To ensure the best quality and reliability, use only new genuine parts or their equivalents for repair and replacement.
MAINTENANCE SCHEDULE
| REGULAR SERVICE PERIOD (3)Perform at everyindicated month oroperating hour interval,whichever comes first. | Each Use | FirstMonthsor20 Hrs | Every 3Monthsor50 Hrs | Every 6Monthsor100 Hrs | Every Yearor300Hrs | |
| ITEM | ||||||
| Engine oil | Check level | ○ | ||||
| Change | ○ | ○ | ||||
| Reduction caseoil(applicable types) | Check level | ○ | ||||
| Change | ○ | ○ | ||||
| Air Cleaner | ○ | |||||
| Clean | ○(1) | |||||
| Replace | ○* | |||||
| Sediment cup | Clean | ○ | ||||
| Spark plug | Check-adjust | ○ | ||||
| Replace | ○ | |||||
| Spark arrester(Optional parts types) | Clean | ○ | ||||
| Idle speed | Check-adjust | ○(2) | ||||
| Valve clearance | Check-adjust | ○(2) | ||||
| Fuel tank &filter | Clean | ○(2) | ||||
| Combustionchamber | Clean | After every 300 Hrs. (2) | ||||
| Fuel tube | Check | Every 2 years(Replace if necessary) (2) | ||||

Replace paper element type only.
(1) Service more frequently when used in dusty areas.
(2) These items should be serviced by your servicing dealer, unless you have the proper tools and are mechanically proficient. Refer to manual for service procedures.
Failure to follow this maintenance schedule could result in non-warrantable failures.
REFUELING
Recommended Fuel
| Unleaded gasoline | ||
| U.S. | Pump octane rating 86 or higher | |
| Except U.S. Research | octane rating 91 or higher | |
| Pump octane rating 86 or higher | ||
This engine is certified to operate on unleaded gasoline. Unleaded gasoline produces fewer engine and spark plug deposits and extends exhaust system life.
WARNING
Gasoline is highly flammable and explosive, and you can be burned or seriously injured when refueling.
- Stop engine and keep heat, sparks, and flame away.
• Refuel only outdoors. - Wipe up spills immediately.
NOTICE
Fuel can damage paint and some types of plastic. Be careful not to spill fuel when filling your fuel tank. Damage caused by spilled fuel is not covered under Warranty.
Never use stale or contaminated gasoline or oil/gasoline mixture. Avoid getting dirt or water in the fuel tank.
Occasionally you may hear a light “spark knock” or “pinging” (metallic rapping noise) while operating under heavy loads. This is no cause for concern.
If spark knock or pinging occurs at a steady engine speed, under normal load, change brands of gasoline. If spark knock or pinging persists, see an authorized servicing dealer.
NOTICE
Running the engine with persistent spark knock or pinging can cause engine damage.
Running the engine with persistent spark knock or pinging is considered misuse, and the Distributor's Limited Warranty does not cover parts damaged by misuse.
- With the engine stopped and on a level surface, remove the fuel tank cap and check the fuel level. Refill the tank if the fuel level is low.
- Add fuel to the bottom of the fuel level limit of the fuel tank. Do not overfill. Wipe up spilled fuel before
starting the engine.
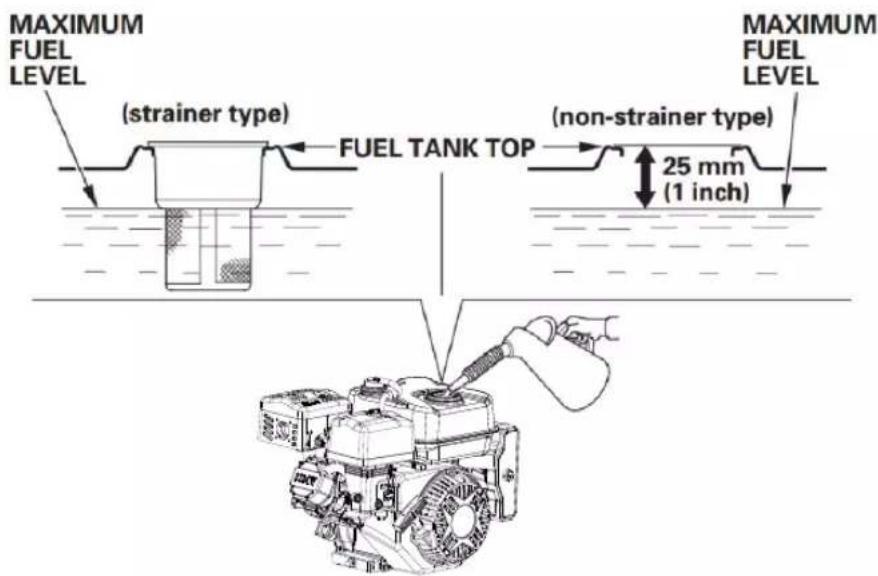
Refuel in a well-ventilated area before starting the engine. If the engine has been running, allow it to cool. Refuel carefully to avoid spilling fuel. Do not fill the fuel tank completely. Fill tank to approximately 25 mm (1 inch) below the top of the fuel tank to allow for fuel expansion. It may be necessary to lower the fuel level depending on operating conditions. After refueling, tighten the fuel tank cap securely.
Never refuel the engine inside a building where gasoline fumes may reach flames or sparks. Keep gasoline away from appliance pilot lights, barbecues, electric appliances, power tools, etc.
Spilled fuel is not only a fire hazard, it causes environmental damage. Wipe up spills immediately.
ENGINE OIL
Oil is a major factor affecting performance and service life. Use 4-stroke automotive detergent oil.
Recommended Oil
Use 4-stroke motor oil that meets or exceeds the requirements for API service classification SJ, SL, or equivalent. Always check the API service label on the oil container to be sure it includes the letters SJ, SL, or equivalent.

bar
SAE Viscosity Grades | Ambient Temperature | Grade | | :--- | :--- | | -30 | 30 | | -20 | 10W-30 | | -10 | 5W-30 | | 0 | 0 | | 10 | 0 | | 20 | 0 | | 30 | 0 | | 40 | 0 | | 50 | 0 | | 60 | 0 | | 70 | 0 | | 80 | 0 | | 90 | 0 | | 100°F | 0 |SAE 10W-30 is recommended for general use. Other viscosities shown in the chart may be used when the average temperature in your area is within the indicated range.
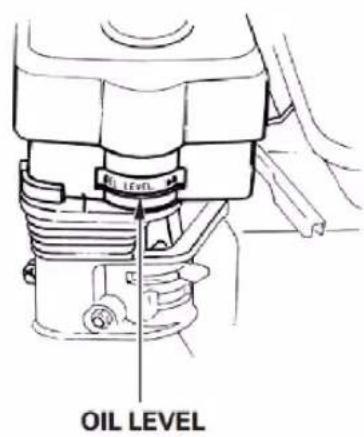
Oil Level Check
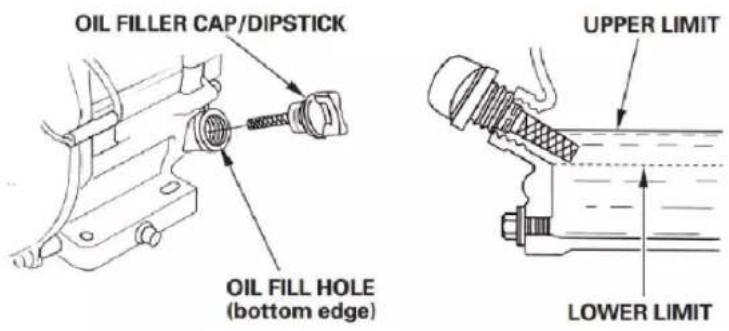
Check the engine oil level with the engine stopped and in a level position.
- Remove the oil filler cap/dipstick and wipe it clean.
- Insert the oil filler cap/dipstick into the oil filler neck as shown, but do not screw it in, then remove it to check the oil level.
-
If the oil level is near or below the lower limit mark on the dipstick, fill with the recommended oil to the upper limit mark (bottom edge of the oil fill hole). Do not overfill.
-
Reinstall the oil filler cap/dipstick.
NOTICE
Running the engine with a low oil level can cause engine damage.
The Oil Alert system (applicable types) will automatically stop the engine before the oil level falls below the safe limit. However, to avoid the inconvenience of an unexpected shutdown, always check the engine oil level before startup.
Oil Change
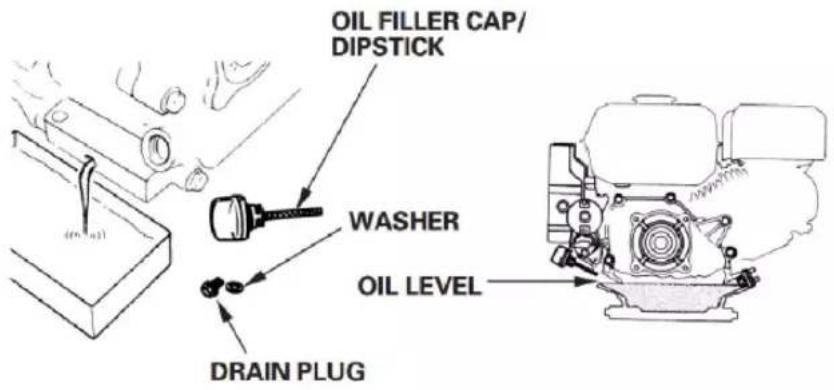
Drain the used oil when the engine is warm. Warm oil drains quickly and completely.
- Place a suitable container below the engine to catch the used oil, then remove the oil filler cap/dipstick, oil drain plug and washer.
- Allow the used oil to drain completely, then reinstall the oil drain plug and new washer, and tighten the oil drain plug securely.
Please dispose of used motor oil in a manner that is compatible with the environment. We suggest you take used oil in a sealed
container to your local recycling center or service station for reclamation. Do not throw it in the trash, pour it on the ground, or down a drain.
- With the engine in a level position, fill to the upper limit mark (bottom edge of the oil fill hole) on the dipstick with the recommended oil.
NOTICE
Running the engine with a low oil level can cause engine damage.
The Oil Alert® system (applicable types) will automatically stop the engine before the oil level falls below the safe limit. However, to avoid the inconvenience of an unexpected shutdown, fill to the upper limit, and check the oil level regularly.
- Install the oil filler cap/dipstick and tighten securely.
AIR CLEANER
A dirty air cleaner will restrict air flow to the carburetor, reducing engine performance. If you operate the engine in very dusty areas, clean the air filter more often than specified in the MAINTENANCE SCHEDULE.
NOTICE
Operating the engine without an air filter, or with a damaged air filter, will allow dirt to enter the engine, causing rapid engine wear. This type of damage is not covered by the Distributor's Limited Warranty.
Inspection
Remove the air cleaner cover and inspect the filter elements. Clean or replace dirty filter elements. Always replace damaged filter elements. If equipped with an oil-bath air cleaner, also check the oil level.
Cleaning
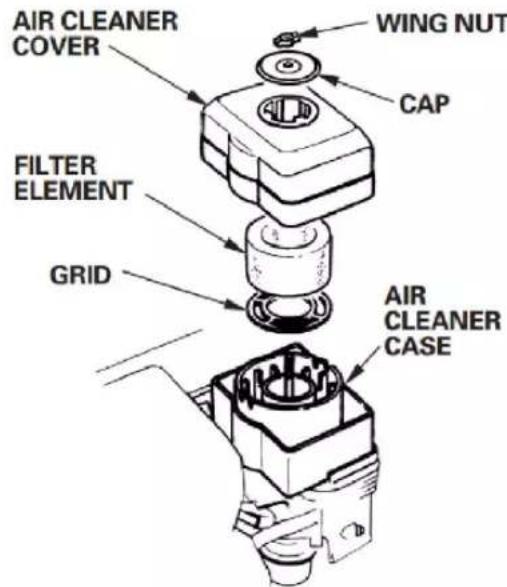
Dual-Filter-Element Types
- Remove the wing nut from the air cleaner cover, and remove the cover.
- Remove the wing nut from the air filter, and remove the filter.
- Remove the foam filter from the paper filter.
- Inspect both air filter elements, and replace them if they are damaged. Always replace the paper air filter element at the scheduled interval.
- Clean the air filter elements if they are to be reused.
Paper air filter element: Tap the filter element several times on a h compressed air [not exceeding 207 kPa (2.1 kgf/cm, 30 psi)] through the filter element from the inside. Never try to brush off dirt; brushing will force dirt into the fibers.
Foam air filter element: Clean in warm soapy water, rinse, and allow to dry thoroughly. Or clean in nonflammable solvent and allow to dry. Dip the filter element in clean engine oil, then squeeze out all

excess oil. The engine will smoke when started if too much oil is left in the foam.
- Wipe dirt from the inside of the air cleaner case and cover, using a moist rag. Be careful to prevent dirt from entering the air duct that leads to the carburetor.
- Place the foam air filter element over the paper element, and reinstall the assembled air filter. Be sure the gasket is in place beneath the air filter. Tighten the air filter wing nut securely.
- Install the air cleaner cover, and tighten the wing nut securely.
Oil-Bath Type
- Remove the wing nut, and remove the air cleaner cap and cover.
- Remove the air filter element from the cover. Wash the cover and filter element in warm soapy water, rinse, and allow to dry thoroughly. Or clean in nonflammable solvent and allow to dry.
- Dip the filter element in clean engine oil, then squeeze out all excess oil. The engine will smoke if too much oil is left in the foam.
- Empty the used oil from the air cleaner case, wash out any accumulated dirt with nonflammable solvent, and dry the case.
- Fill the air cleaner case to the OIL LEVEL mark with the same oil that is recommended for the engine. Oil capacity: 60 cm (2.0 US oz, 2.1 Imp oz)
- Reassemble the air cleaner, and tighten the wing nut securely.
SEDIMENT CUP
Cleaning
WARNING
Gasoline is highly flammable and explosive, and you can be burned or seriously injured when handling fuel.
- Stop engine and keep heat, sparks, and flame away.
-
Handle fuel only outdoors.
• Wipe up spills immediately. -
Move the fuel valve to the OFF position, then remove the fuel sediment cup and O-ring.
- Wash the sediment cup and O-ring in nonflammable solvent, and dry them thoroughly.
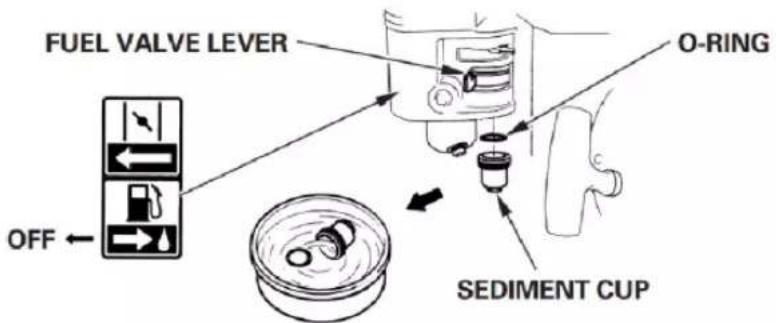
- Place the O-ring in the fuel valve, and install the sediment cup. Tighten the sediment cup securely.
- Move the fuel valve to the ON position, and check for leaks. Replace the O-ring if there is any leakage.
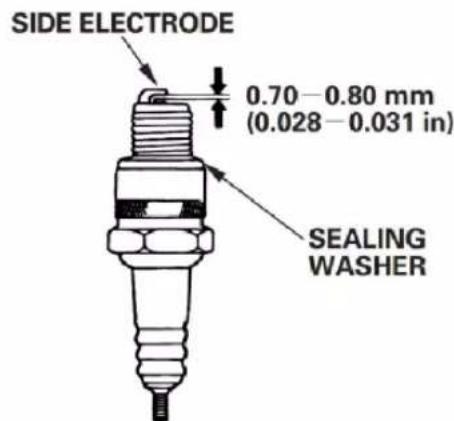
SPARK PLUG
Recommended Spark Plugs: F7TC.F7RTC or other equivalents
The recommended spark plug is the correct heat range for normal engine operating temperatures.
NOTICE
An incorrect spark plug can cause engine damage.
For good performance, the spark plug must be properly gapped and free of deposits.
-
Disconnect the spark plug cap, and remove any dirt from around the spark plug area.
-
Remove the spark plug with a spark plug wrench.
-
Inspect the spark plug. Replace it if damaged, badly fouled, if the sealing washer is in poor condition, or if the electrode is worn.
-
Measure the spark plug electrode gap with a wire-type feeler gauge. Correct the gap, if necessary, by carefully bending the side electrode. The gap should be: 0.70 -0.80 mm (0.028 -0.031 in)
-
Install the spark plug carefully, by hand, to avoid cross-threading.
-
After the spark plug is seated, tighten with a spark plug wrench to compress the sealing washer.
-
When installing a new spark plug, tighten 1/2 turn after the spark plug seats to compress the washer.
-
When reinstalling the original spark plug, tighten 1/8 —1/4 turn after the spark plug seats to compress the washer.

NOTICE
A loose spark plug can overheat and damage the engine. Overtightening the spark plug can damage the threads in the cylinder head.
- Attach the spark plug cap to the spark plug.
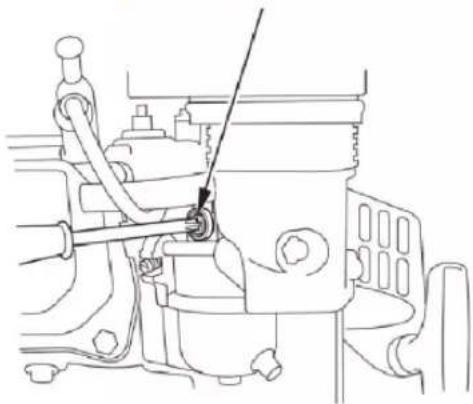
IDLE SPEED
Adjustment
- Start the engine outdoors, and allow it to warm up to operating temperature.
- Move the throttle lever to its minimum position.
- Turn the throttle stop screw to obtain the standard idle speed. Standard idle speed: 1,800±150 rpm.
THROTTLE STOP SCREW
natural_image
Technical line drawing of a mechanical assembly with no visible text or symbolsSTORAGE
STORING YOUR ENGINE
Storage Preparation
Proper storage preparation is essential for keeping your engine trouble-free and looking good. The following steps will help to keep rust and corrosion from impairing your engine's function and appearance, and will make the engine easier to start when you use it again.
Cleaning
If the engine has been running, allow it to cool for at least half an hour before cleaning. Clean all exterior surfaces, touch up any damaged paint, and coat other areas that may rust with a light film of oil.
NOTICE
Using a garden hose or pressure washing equipment can force water into the air cleaner or muffler opening. Water in the air cleaner will soak the air filter, and water that passes through the air filter or muffler can enter the cylinder, causing damage.
Fuel
Gasoline will oxidize and deteriorate in storage. Deteriorated gasoline will cause hard starting, and it leaves gum deposits that clog the fuel system. If the gasoline in your engine deteriorates during storage, you may need to have the carburetor, and other fuel system components, serviced or replaced.
The length of time that gasoline can be left in your fuel tank and carburetor without causing functional problems will vary with such factors as gasoline blend, your storage temperatures, and whether the fuel tank is partially or completely filled. The air in a partially filled fuel tank promotes fuel deterioration. Very warm storage temperatures accelerate fuel deterioration. Fuel problems may occur within a few months, or even less if the gasoline was not fresh when you filled the fuel tank.
Fuel system damage or engine performance problems resulting from neglected storage preparation
are not covered under the Distributor's Limited Warranty.
You can extend fuel storage life by adding a gasoline stabilizer that is formulated for that purpose, or you can avoid fuel deterioration problems by draining the fuel tank and carburetor.
Adding a Gasoline Stabilizer to Extend Fuel Storage Life
When adding a gasoline stabilizer, fill the fuel tank with fresh gasoline. If only partially filled, air in the tank will promote fuel deterioration during storage. If you keep a container of gasoline for refueling, be sure that it contains only fresh gasoline.
- Add gasoline stabilizer following the manufacturer's instructions.
- After adding a gasoline stabilizer, run the engine outdoors for 10 minutes to be sure that treated gasoline has replaced the untreated gasoline in the carburetor.
- Stop the engine.
Draining the Fuel Tank and Carburetor
WARNING
Gasoline is highly flammable and explosive, and you can be burned or seriously injured when handling fuel.
- Stop engine and keep heat, sparks, and flame away.
- Handle fuel only outdoors.
-
Wipe up spills immediately.
-
Place an approved gasoline container below the carburetor, and use a funnel to avoid spilling fuel.
- Remove the carburetor drain bolt and gasket. Remove the sediment cup and O-ring, then move the fuel valve lever to the ON position.
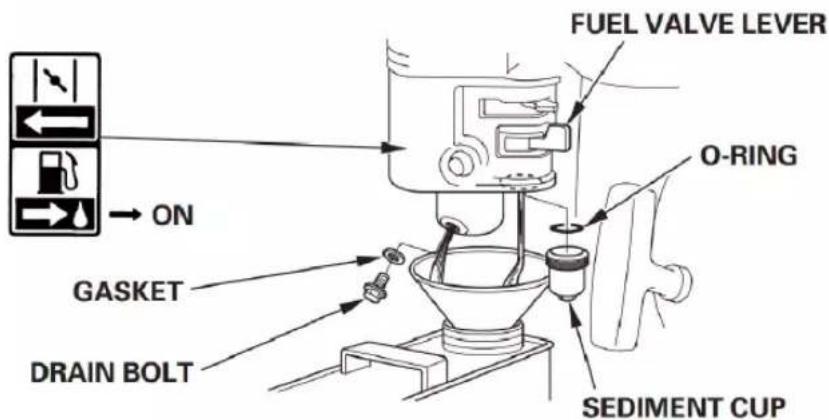
- After all the fuel has drained into the container, reinstall the drain bolt, gasket, sediment cup and O-ring. Tighten the drain bolt and sediment cup securely.
Engine Oil
- Change the engine oil.
- Remove the spark plug.
- Pour a tablespoon 5—10 cm (5—10 cc) of clean engine oil into the cylinder.
- Pull the starter rope several times to distribute the oil in the cylinder.
- Reinstall the spark plug.
- Pull the starter rope slowly until resistance is felt. This will close the valves so moisture cannot enter the engine cylinder. Return the starter rope gently.
Align notch on pulley with hole at top of cover.
Storage Precautions
If your engine will be stored with gasoline in the fuel tank and carburetor, it is important to reduce the hazard of gasoline vapor ignition. Select a well-ventilated storage area away from any appliance that operates with a flame, such as a furnace, water heater, or clothes dryer. Also avoid any area with a spark-producing electric motor, or where power tools are operated.
If possible, avoid storage areas with high humidity, because that promotes rust and corrosion. Keep the engine level in storage. Tilting can cause fuel or oil leakage.
With the engine and exhaust system cool, cover the engine to keep out dust. A hot engine and exhaust system can ignite or melt some materials. Do not use sheet plastic as a dust cover. A nonporous cover will trap moisture around the engine, promoting rust and corrosion.
If equipped with a battery for electric starter types, recharge the battery once a month while the engine is in storage. This will help to extend the service life of the battery.
Removal from Storage
Check your engine as described in the BEFORE OPERATION CHECKS section of this manual (see page 3).
If the fuel was drained during storage preparation, fill the tank with fresh gasoline. If you keep a container of gasoline for refueling, be sure it contains only fresh gasoline. Gasoline oxidizes and deteriorates over time, causing hard starting.
If the cylinder was coated with oil during storage preparation, the engine will smoke briefly at startup. This is normal.
TRANSPORTING
If the engine has been running, allow it to cool for at least 15 minutes before loading the engine-powered, equipment on the transport vehicle. A hot engine and exhaust system can burn you and can ignite some materials.
Keep the engine level when transporting to reduce the possibility of fuel leakage. Turn the fuel valve to the OFF position.
TROUBLE SHOOTING
| ENGINE LACKS POWER | Possible Cause Correction | |
| 1. Check air filter. Filter element(s) Clean or replace restricted. | filter element(s). | |
| 2. Check fuel. Bad fuel; engine Drain fuel tank and stored without treating or draining gasoline, or refueled with bad gasoline. | carburetor.Refuel with fresh gasoline. | |
| 3. Take engine to Fuel filter Replace or repair an authorized restricted, faulty components servicing carburetor malfunction, as necessary. | ||
| servicing malfunction, malfunction, to shop manual, valves stuck, etc. | ||
| ENGINE WILL P NOT START | ossible Cause Correction | |
| 1. Electric starting Battery (applicable types): discharged. | ||
| Check battery Fuse fuse and fuse. | burnt out. Replace fuse | |
| 2. Check control Fuel val positions. | lve OFF. Move lever to ON position. | |
| Choke open. Move lever to | CLOSED position unless the engine is warm. | |
| Engine switch Turn engine OFF. to ON position. | switch | |
| 3. Check engine Engine oil level. | oil level Fill with the low (Oil Alert recommended oil models). to the proper level. | |
| 4. Check fuel. | Out of fuel. | Refuel. |
| Bad fuel; engine stored without treating or draining gasoline, or gasoline. refueled with bad gasoline. | Drain fuel tank and carburetor. Refuel with fresh | |
| 5. Remove and inspect spark fouled, plug. | Spark plug faulty, or improperly spark plug. | Gap or replace |
| Spark plug wet with fuel (flooded engine). | Dry and reinstall spark plug. Start engine with throttle lever in MAX. position. | |
| 6. Take engine to an authorized servicing dealer, or refer to shop manual. | Fuel filter restricted, carburetor malfunction, ignition malfunction, valves stuck, etc. | Replace or repair faulty components as necessary. |
Frequent fuse failure usually indicates a short circuit or an overload in the electrical system. If the fuse burns out frequently, take the engine to a servicing dealer for repair.
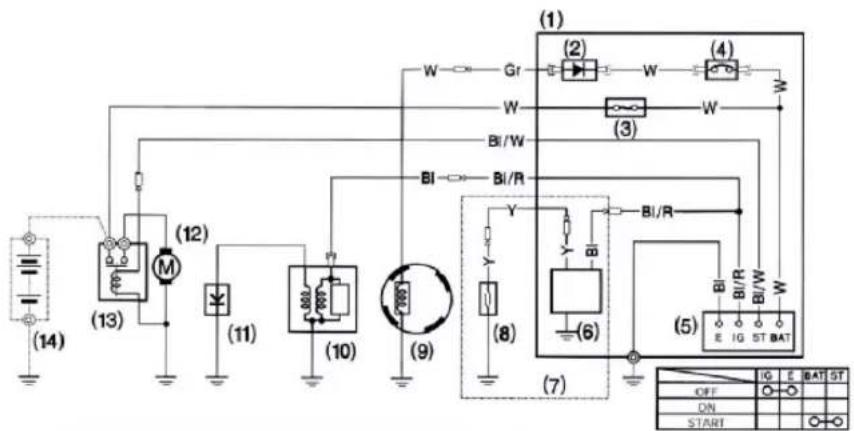
With Oil Alert and Electric Starter
With Oil Alert and Without Electric Starter
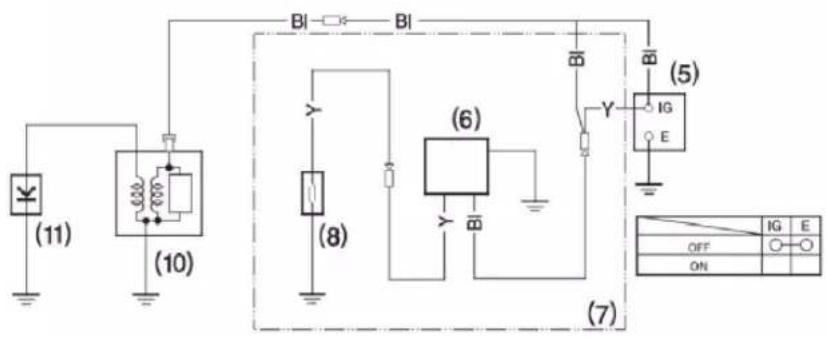
(1) CONTROL BOX (8) OIL LEVEL SWITCH
(2) RECTIFIER (9) CHARGING COIL
(3) FUSE (10) IGNITION COIL
(4) CIRCUIT BREAKER (11) SPARK PLUG
(5) ENGINE SWITCH (12) STARTER MOTOR
(6) OIL ALERT UNIT (13) STARTER SOLENOID
(7) Type with Oil Alert unit (14) BATTERY(12V)
| BI | Black | Br | Brown | |
| Y Yellow | low O Orange | |||
| Bu Blue | Lb Light blue | |||
| G Green | Lg | Light green | ||
| R Red | P | Pink | ||
| W White Gr Gray |
Specifications
| Model | IC210P-19, IC210PE-19, IC210X-19, IC210XE-19, IC210P-20, IC210PE-20, IC210X-20, IC210XE-20 | IC420X-25IC420XE-2 5 | IC460X-25IC460XE-25 |
| Displacement 212CC | 420CC | 457CC | |
| Bore 70mm(2.76in) | 90mm(3.54in) | 92mm(3.62in) | |
| Stroke 55mm(2.17in) | 66mm(2.60in) | 68.8mm( 2.71in) | |
| Oil Capacity 0.6L(0.165gal) | 1.1L(0.29gal) | 1.1L(0.29gal) | |
| Net Weight | 14.7/16.7 kg | 31/33.5 kg | 32/34.5 kg |
| Spark Plug Gap 0.6-0.8mm(0.024~0.031in) | |||
| Spark Plug Torque 18~22N.m | |||
| Intake Valve Clearance 0.08~0.12mm(0.003~0.005in) | |||
| Exhaust Valve Clearance 0.13~0.17mm(0.005~0.007) | |||
Declaration of Conformity
| Importer and Authorised Representative | |
| Genpower LtdIsaac Way, Pembroke Dock, SA72 4RW | |
| Country of Origin: | China |
| Description: | Petrol Engine |
| SKU Code: | IC210P-19, IC210PE-19, IC210X-19, IC210XE-19, IC210P-20, IC210PE-20, IC210X-20, IC210XE-20, IC420X-25, IC420XE-25, IC460X-25, IC460XE-25 |
| Date of Issue: | 03/08/2021 |
| Regulations and Directives of Compliance | |
| 97/68/EC Non Road Mobile Machinery Directive2000/14/EC Outdoor Noise Directive2004/108/EC Electro Magnetic Compatibility Device2006/42/EC Machinery Directive | |
| Statement of Declaration | |
| We the importer and authorised representative of the product described confirm conformity within the provisions of applicable regulations and directives listed within this document. | |
| Signed on Behalf of Genpower Ltd | |
Place of Issue: Genpower LtdSignatory Name: Roland LlewellinPosition: Managing Director | |
Useful Information
Check Out Our YouTube Channel
Our videos on YouTube include:
- Unboxing
• Assembly of your machine
• How to service your machine - Products in use
- 'How To' videos
- Product features
Go to YouTube and search 'Hyundai Power Products'.
Warranty
Proof of purchase will be requires before you make a warranty claim. Full warranty terms and conditions can be found on the HYUNDAI POWER PRODUCTS website:
www.hyundaipowerproducts.co.uk
Manual Updates
Our manuals are constantly being reviewed and updated. Should you find an error, omission or something unclear, please contact us for assistance. We reserve our right to make any modifications without prior notice whenever necessary. Our latest manuals are also placed online. All our manuals can be downloaded at: www.hyundaipowerproducts.co.uk
Returning Your Product
If you are returning your product, please contact the dealer for their returns policy.
Leaving A Review
We work very hard to give all of our customers the best possible service. If you have any problems, before leaving negative feedback, please contact us to give us a chance to resolve the issue. We would be delighted if you left us positive feedback! To leave a review, please go to:
uk.trustpilot.com/review/hyundaipowerequipment.co.uk
Ordering Spare Parts
You can find the spare part you are looking for at power-shares.co.uk
Contact Us

Phone
Call our team on 01646 687 880

aftersales@hyundaipowerproducts.co.uk

Online Live Chat
Go to www.hyundaipowerproducts.co.uk

Post
Genpower Ltd, Isaac Way, Pembroke Dock, Pembrokeshire, SA72 4RW.

Hyundai Support Website
Go to hyundaisupport.co.uk

GENUINE PRODUCT OF HYUNDAI CORPORATION
For Inquiries, Please Contact:
GENPOWER LTD
Isaac Way, London Road,
Pembroke Dock, UK, SA72 4RW.
T: +44 (0) 1646 687 880
E: info@hyundaipowerproducts.co.uk
www.hyundaipowerproducts.co.uk