
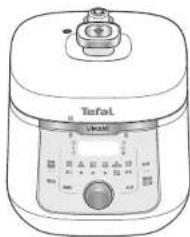
CY3601 - Multicooker TEFAL - Free user manual and instructions
Find the device manual for free CY3601 TEFAL in PDF.


| Product Type | Multicooker / Electric Pressure Cooker |
| Brand | Tefal |
| Model | CY3601 |
| Rated Power | 900 W |
| Rated Voltage/Frequency | 110 V, 60 Hz |
| Nominal Capacity | 4.0 L |
| Cooking Capacity | 2.6 L |
| Dimensions (W x D x H) | Approx. 307 × 276 × 288 mm |
| Weight (Main Unit) | Approx. 5.0 kg |
| Power Cord Length | 0.8 m |
| Pressure (Activation / Safety) | 80 kPa / 140 kPa |
| Cooking Modes | Pressure Cooking, Rice, Steam, No-Water, Simmer, Browning, Sous Vide, Keep Warm, Reheat, Delayed Start |
| Recipe Mode | Curry/Stew, Soup, Meat Stew, Stew (Japanese), Fish Stew |
| Control | Rotary control knob with push-to-confirm, digital display with buttons (Time/Temp, Delay Start, Clean, Start/Cancel) |
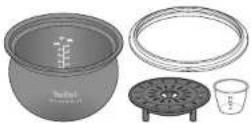
| Accessories Included | Steaming rack, rice measuring cup (approx. 180 ml) |
| Sealing Ring | Removable, dishwasher-safe |
| Lid Safety Features | Pressure locking, automatic lid lock when pressurized, pressure display pin, steam release button, safety valve |
| Cleaning Function | Steam cleaning and odor removal (with lemon) |
| Dishwasher-Safe Parts | Sealing ring, rice measuring cup, steaming rack |
| Warranty | International limited guarantee (see manual for terms) |
| Country of Origin | Made in China |
Frequently Asked Questions - CY3601 TEFAL
User questions about CY3601 TEFAL
0 question about this device. Answer the ones you know or ask your own.
Ask a new question about this device
Download the instructions for your Multicooker in PDF format for free! Find your manual CY3601 - TEFAL and take your electronic device back in hand. On this page are published all the documents necessary for the use of your device. CY3601 by TEFAL.
USER MANUAL CY3601 TEFAL
● Thank you for purchasing this Tefal electric pressure cooker.
● To ensure safe and proper use, please first read these instructions
● After reading these instructions, please keep them handy for future reference.
● 非常感謝你購買本公司的產品。
Requests pertaining to use 09
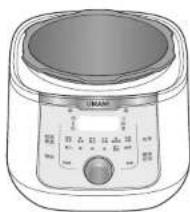
Part names ....10
Using your electric pressure cooker
for the first time 14
Inspecting your electrical pressure cooker
prior to pressure cooking ....15
Precautions regarding pressure cooking .....16
Cooking mode 17
How to use
Recipe mode 18
Cooking mode (rice cooking, pressure
cooking, steam, waterless cooking) .....22
Cooking mode (simmer) 26
Cooking mode (browning) 28
Cooking mode (sous vide) 30
Delayed start cooking 32
Reheating 33
Keep warm 34
When you need to open the lid
immediately (cancel cooking) 35
Others
Care after each use 36
Troubleshooting 41
Product specifications ....43
International warranty 44
Declaration of the Presence Condition
of the Restricted Substances Marking .....46
Warranty document 47
使用入門
安全預防措施 47
使用相關注意事項 52
零件名稱 53
首次使用 57
進行高壓烹調前的檢查項目....58
高壓烹調預防措施 59
烹調模式 60
使用方法
精選食譜 61
Please thoroughly read these Safety Precautions prior to use in order to operate this product correctly.
The precautionary items provided here are intended to facilitate the correct and safe use of this product in order to prevent harm to people as well as damage to property. Information presumed to relate to situations arising out of mistaken use are divided into the two categories of WARNING and CAUTION. Please follow all instructions noted for each category, as both refer to important safety-related content.

WARNING
Content presumed to entail risk of death or serious injury if mistakenly handled.
Power/Power Cord

instruction
Individually use a 110 V AC power outlet with a 15 A rating.
Sharing a power outlet with another appliance may result in fire or breakdown due to heat generation.
- Also, if using an extension cord, use one individually with a 15 A rating.

Instruction
Regularly remove dust, etc. from the power plug.
If dust, etc. builds up on the plug, it may cause insulation to deteriorate due to humidity, etc. and result in fire. - Remove the power plug and wipe with a dry cloth.

instructions
Be sure to fully insert the power plug into the socket
Failure to insert the plug fully into the socket may result in electric shock and/or high temperature and cause a fire.

Distributive
Do not attach/remove the power plug with wet hands.
Doing so could result in electric shock.

Instruction
Cease use immediately if the power plug, power cord or main unit becomes abnormally hot or stops conducting electricity during operation.
Continuing use in such a state could result in a short circuit or fire. Please contact our Repair Center.

Prohibited
Avoid conduct that could break the power cord or power plug.
Do not damage, process, bring in close proximity to hot apparatus, forcibly bend, twist, pull, place under heavy objects, or bundle the power cord/power plug. Use in a damaged state could lead to electric shock, short circuit, or fire.
If the supply cord is damaged, it must be replaced by the manufacturer, its service agent or similarly qualified persons in order to avoid a hazard.

Prohibited
Do not use the power cord if it is damaged or sitting loosely in the power outlet.
Doing so could result in electric shock, short circuits, or fire.
Handling

This product must never be disassembled, repaired, or modified by someone other than a repair technician.
exhibited
Doing so could result in fire or abnormal operation leading to injury.
- Please contact our Repair Center regarding repair.

Practice sufficient caution to ensure children do not play with this product.
Instruction
Failure to do so could result in burns, electric shock, or injury.

Keep out of reach of children and do not allow children to use independently.
Prohibited
Doing so could result in burns, electric shock, or injury.

The container must not be opened until the pressure has decreased sufficiently. The lid will lock automatically if there is internal pressure.
Exhaust the steam manually after pressure cooking is complete. Note that there is a possibility of pressure remaining in the cooking pot even after steam release so please practice caution. It is extremely dangerous to open the lid with even a small amount of pressure remaining in the cooking pot, as the lid may fly off or contents fly out.

Be sure to use the lid handle to open the lid after cooking and keep hands, face, etc. away from the steam and hot water.
Instruction
Contact with steam could result in a burn.

Do not allow this product, the power cord, or power plug, to be exposed to water.
Prohibited
Doing so could result in short circuits or electric shock.

Only use this product with the provided accessories.
Exhibited
Failure to do so could result in unexpected accidents.
HONITLED
Do not use this product if the sealing ring is damaged.

Doing so could result in the lid coming ajar during cooking leading to a burn or injury.
Prohibited
Do not heat this cooking pot using an external heat source such as a microwave or oven.

Doing so could result in damage or injury.

Be sure to inspect the nozzle for possible blockages prior to use.
Instruction Using in a blocked state is hazardous as appropriate pressure adjustment could be prevented.

Do not put foreign objects on the lid interior. Also do not substitute the safety valve with another object.
Instruction

This product is only to be used by a person with physical/intellectual/mental disabilities or person with no product knowledge/experience (including children), under the following circumstances.
• If under supervision
- If the person has been taught how to use the product safely and/or understands the risks involved
Failure to note the above may lead to burns, electric shock, or injury.

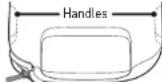
Do not hold the lid handle when carrying this product. Instead, hold the handles on the bottom of the product to move carry it. When holding the handles, use oven mitts and beware of burns.
It is extremely dangerous to open the lid with even a small amount of pressure remaining in the cooking pot, as the lid may fly off or contents fly out. Be sure to hold the handle located on the base when carrying.
Handles

Do not operate this product using an external timer or remote control system.
Doing so could result in unexpected accidents.

Do not place this product on a heated oven or cooktop, or close to open fire/consumables.
Doing so could result in fire.

Avoid food getting on top of the sealing ring or in the groove.
Injury
Food in such places could cause the lid to come ajar during cooking and result in a burn or Injury.
Points to note when cooking

Instruction
Be aware of the below points when cooking.
- Do not cook with the amount of ingredients exceeding the MAX line on the inside of the cooking pot.
To prevent the cooking pot's contents boiling over, reduce the amount of water.
- When cooking beans, ensure that the quantity of the ingredients and the liquid combined is 1/3 of the cooking pot depth or less. Moreover, be sure to cover the beans with the steaming rack placed upside down. Pressure cooking with an excessive amount of beans is hazardous as it would lead to the bean skin or other ingredients blocking the nozzle and preventing proper operation.
- Do not use baking soda or other ingredients that foam due to sudden heat reaction. Also, avoid using an excessive amount of oil and sake (cooking alcohol) as this is also dangerous.
- When cooking food with a thick texture such as curry or stew that becomes paste, pressure cook the ingredients first, then add the curry paste, etc. In a depressurized state. Pressure cooking thick-texture ingredients could result in such ingredients clogging up the nozzle and preventing proper operation of this product.
- Do not use any Ingredients that will swell (such as bran), since they could be dangerous for pressure cooking.
Those ingredients may clog up the nozzle and preventing proper operation of this product.
- Do not use paper or aluminum foil to cover the ingredients. Make sure to cover beans with the steaming rack.
Failure to do so may result in the beans blocking the nozzle, etc.
- Never heat the empty cooking pot.
- Do not force the lid open when the electric pressure cooker is in a pressurized state. It is extremely dangerous to open the lid even with a small amount of pressure remaining in the cooking pot as the lid could fly off and the contents could spurt out.
- Do not cook pasta or other noodles that could expand when cooked.
Ingredients could adhere to the pressure display pin, damage the main unit, and prevent pressure from being properly released.
- Add a minimum of 100 ml liquid such as water, soup, or stock when cooking.
Doing so could result in boiling without water.
- When cooking meat which has an outer layer of skin, be sure to pierce it in advance using a metal or bamboo skewer, etc.
If the skin swells due to the effects of pressure, do not pierce the skin after cooking. Doing so could result in a burn.
- When moving the cooking pot for steaming, do so carefully.
- Do not put foreign objects (particularly metal objects such as pins and wire) on the hot plate.
Doing so could result in injury due to electric shock or abnormal operation.
- Do not subject the cooking pot to strong impact during cooking or steaming.
- To prevent the cooking pot's contents boiling over, do not add more than the recommended amount of ingredients and water.
Doing so could damage the product or lead to injury.
- Never use your electric pressure cooker to fry food.
- If heating with the lid closed, be sure to stay close to this product.
Also, keep out of reach of children and pets.
- Do not pressure cook red bean paste, mashed sweet potato, oatmeal, etc. Such ingredients may foam or spray back, which could lead to nozzle blockage.

Instruction
If large amounts of steam escape from the rim of the lid during pressure cooking or continuously escapes the steam outlet for 1 minute or longer, immediately unplug the power cord and check if the product is clean and the quantity of contents is appropriate.
If the problem persists, contact our Repair Center.

Instruction
When opening the lid, press the steam release button and completely release the steam.
If steam remains inside this product, the lid may fly off, or the contents may fly out.

Prohibited
During or immediately after pressure cooking, do not touch or bring your face close to the steam outlet, steam, or lid.
Hot steam is released from the steam outlet during or immediately after pressure cooking, therefore there is a risk of a burn.

Prohibited
Do not touch any part of this product other than the handle during heating or immediately after. At such times, this product will be extremely hot therefore touching anywhere other than the handle entails a risk of burns. If necessary, use oven mitts and beware of burns.

Prohibited
Do not open the lid during pressure cooking. If unavoidable, follow the below procedures.
Check there is no one close by this product, then press and hold the "Start/Cancel" button to cancel cooking.
For details, be sure to refer to the procedure in "When You Need to Open the Lid Immediately (Canceling Cooking)" on page 35.

Caution
If this procedure is handled incorrectly, there is a risk of a person being harmed or property damage.
Power/Power Cord

Unplug
Keep this product unplugged from the power outlet when not in use.
Keeping it plugged in could result in electric shock or fire from short circuit due to insulation deterioration.

Instruction
Be careful not to get caught up in the power cord when it is connected to a power outlet.
Doing so could result in this product falling, burns, or injury.

FUNDERS
Do not use this product if the power cord is damaged.
Doing so could result in electric shock or fire. For purchasing a new power cord, please contact our Parts Order Center.

instruction
When unplugging the power plug, be sure to hold the tip of the power plug and not pull on the power cord.
Doing so could result in electric shock, short circuit, or fire.

Prohibited
Do not bring the power cord near the hot part of this product or allow the power cord to contact such parts.
Doing so could result in the power cord melting due to heat.

instruction
Check that the electrical voltage shown on this product matches that of the power outlet.
Please be aware that connection to the wrong voltage may result in product malfunction or other accidents not covered by warranty.
Safety Precautions (continued)
Handling

This product becomes hot during and after use, therefore please be careful when opening the lid.
There is a possibility of sustaining a burn due to the steam. Be sure to wear oven mitts.

Prohibited
Do not use this product if it is damaged due to impact, there is visible damage to the exterior, or it does not operate correctly.
Using this product in the abovementioned states could result in fire, etc.
→ Please contact our Repair Center regarding repair.

Hold the lid handle to open the lid. Holding any other part of this product could result in a burn due to steam, etc.
[Non-Text]
Do not turn over the lid after opening it. Hot water may drip and cause scalding.
It is recommended to place the lid horizontally without turning it over.

Instruction
Handle carefully to avoid damaging the sealing ring.
If the sealing ring is damaged, contact the Parts Procurement Center.

instruction
When pressurizing the electric pressure cooker, be sure to close the lid firmly, then turn the lock to the position so it locks.
Pressurizing this product without locking the lid would be hazardous as the lid would open during operation.

Prohibited
Keep your face and hands away from the nozzle during steam release. Failure to do so could result in bums.

Prohibited
Do not place a cloth, etc. between the main unit and the lid.
Doing so would damage the sealing ring.

Prohibited
Do not use this product with rice or other substances adhered to the sensor, heating plate, or sealing ring.

Instruction
When cooking food with thick texture, such as jam or compote, gently shake the main unit to the side before opening the lid and check that food or liquid does not spurt out.

Instruction
When adding ingredients for browning, be careful of oil sputter.
Failure to be careful could result in a burn.

Instruction
When using this product, use a flat, stable, and heat resistant surface, and keep away from water and fire.
Do not use in the following places.
- The edge of a table or kitchen counter - On a sliding table
- On an unstable surface or near flammable material
- On a tatami mat, carpet, tablecloth, plastic surface, etc.
• Under a tableware storage shelf
- On top of other electric products, etc. Doing so could result in falls, breakdowns, or fire.
- Close to walls, furniture, or curtains
- On a cloth that may block the heat dissipation port on the bottom of the main unit
- Doing so could result in discoloration or distortion due to steam and/or heat.

Instruction
Make sure your electric pressure cooker has sufficiently cooled down before cleaning.
Touching hot parts could result in a burn.

Prohibited
Only touch the safety valve when cleaning.

Instruction
Dissolve seasoning well before adding to contents.
Failure to do so could result in the food being undercooked or not cooking properly.

Prohibited
Do not use a cooking pot other than the one provided.

Prohibited
Do not soak the main unit in water when cleaning it after cooking.
Doing so will cause a failure.

Prohibited
Do not touch the heating plate for a while after cooking.
The heating plate remains hot after cooking and may cause burns.
Requests Pertaining to Use
• This product is only for indoor use.
- Adhere to the quantities shown in recipes or the maximum/minimum cooking amount.
• Always use the accessories intended for use with this product
- Do not cook empty.
- Do not place the cooking pot on any other heat source.
- Only use cooking utensils such as metal spatulas which have rounded edges, otherwise the coating of this product could get scratched. To enjoy using this product for longer, we recommend using nylon rubber or wooden utensils.
- Mistakenly swallowing coating that may have peeled off is not detrimental to a person's health.
- Do not cut ingredients inside the cooking pot.
- When cooking hard, pointy ingredients (meat on bones, etc.), do not press ingredients against the cooking pot interior or stir too vigorously.
- Use the accompanying steaming rack.
- Do not use this product for anything other than cooking food.
- This product is not a sterilizer. Do not use it to sterilize glass bottles.
- Do not directly place ingredients in the main unit without using the cooking pot.
- Maintain the cooking pot and other parts that heat up in a clean state. Also, always ensure the temperature sensor in the middle of the heating plate can move.
- Wash the cooking pot immediately after use.
- Clean the main unit by wiping with a damp cloth. Wash the cooking pot with a soft sponge and do not wash or rub it with a nylon scrubber. The sealing ring, cooking cup and steaming rack are dishwasher-safe.
- Do not immerse the main unit in water when cleaning after cooking. Doing so could result in this product falling.
- This product is designed for general household use. We bear no manufacturing liability or warranty liability whatsoever for business use, use for non-household purposes, or use breaching the instructions provided in this Instruction Manual.
- When disposing of this product, unplug the power cord then cut it to make it impossible to use.
- The heat sources for cooking are all included in this product.
- This product complies with all standards and regulations stipulated by the Low Voltage Directive, Electromagnetic Compatibility, Consumer Affairs Agency, etc.
- Cooking pots that have an abnormal used feel or that are damaged are not covered under warranty.
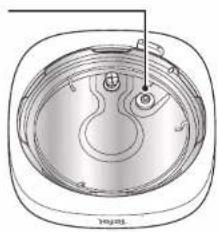
Part Names
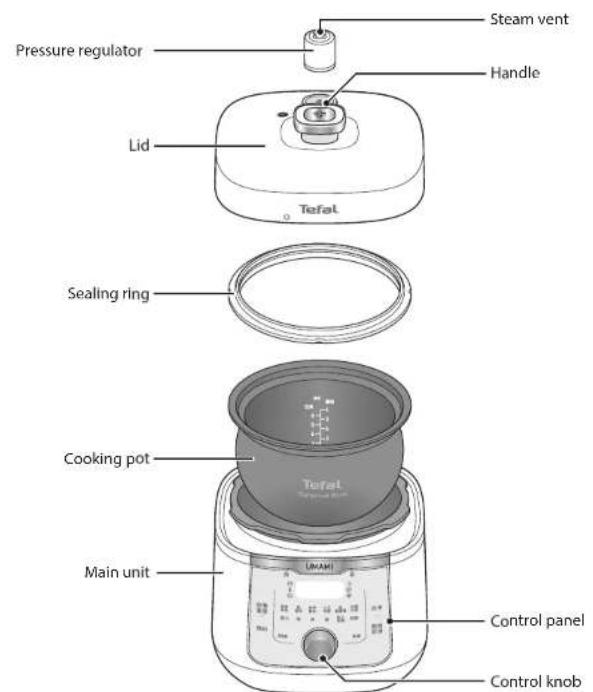
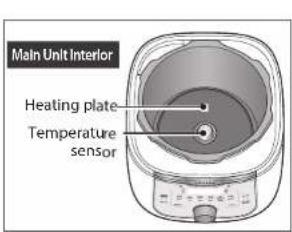
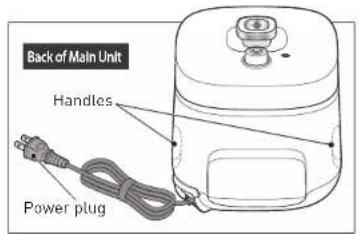
Lid Parts
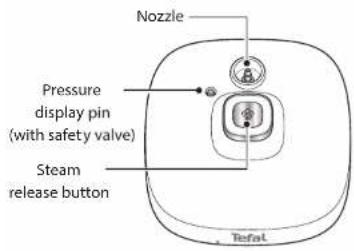
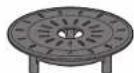
Accessories
● Rice measuring cup (Approx. 180 ml)

Safety valve
natural_image
Cross-sectional diagram of a mechanical component with internal channels and mounting holes (no text or labels)- Steaming rack
Part Names (continued)
Control Panel
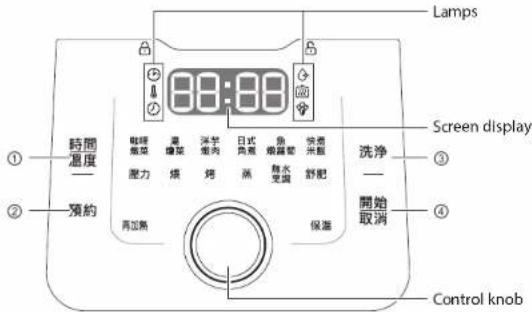
| 1 | Time/ Temperature | 時間/溫度 | Sets the cooking time and cooking temperature. |
| 2 | Delay start | 預約 | You can delay the cooking start time.→See page 32 |
| 3 | Clean | 洗淨 | Cleans the product with steam.→See page 39 |
| 4 | Start/Cancel | 開始/取消 | Press with a mode selected to start the selected mode. Cooking can be canceled by pressing this during cooking. |
Control knob
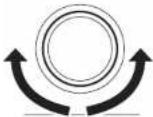
Turn the control knob
You can select the cooking mode and set the cooking time and cooking temperature.
If you change the cooking mode, the set cooking time and cooking temperature will be reset.

Press the control knob
The set cooking time and cooking temperature are confirmed.
Lamps
| Delay start lamp Lights | when the delay start time is set. | |
| Pressure (remaining) lamp | Lights when the pressure remains in the cooking pot after cooking. | |
| Time setting lamp | Flashes when the cooking time is set. |
| Cleaning lamp Lights during cleaning. | ||
| Keep warm lamp | After cooking, this lamp lights up while keep warm mode is turned on automatically.This lamp does not light up when keep warm mode is started manually. | |
| Temperature setting lamp | Lights when preheat is completed and pressure cooking is started. | |
* The time and temperature can be set when the "Delay start lamp", "Time setting lamp", and "Temperature setting lamp" are lit or flashing.
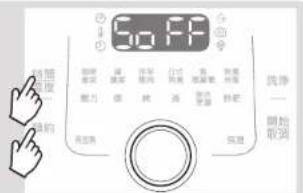
Mute mode
If you press the "Time/Temperature" button and the "Delay start" button at the same time, "SoFF" will be displayed and the operation sounds will be muted.
- If you press the "Time/Temperature" button and "Delay start" button at the same time again, "SoON" will be displayed and operation sounds will be enabled (no longer muted).
Using Your Electric Pressure Cooker for the First Time
Before using for the first time, wash the cooking pot, sealing ring, rice measuring cup and steaming rack with a neutral detergent, then dry thoroughly.
→ Refer to P. 37 for how to remove the sealing ring.
- Before using, remove the protective film attached to the operation panel.
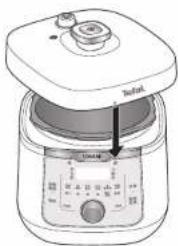
Opening/closing the lid
■ Opening the lid
① Hold the handle of the lid and turn in a counter-clockwise direction until the mark on the lid aligns with the 6 mark on the main unit.
② Lift the lid to open.
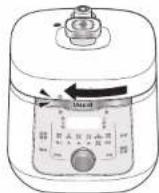
■ Closing the lid
① Align the Ⓐ mark on the lid with the 🔑 mark on the main unit and place the lid down.
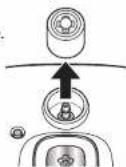
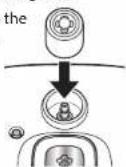
Attaching/removing the pressure regulator
■ Removing the pressure regulator
Pull upwards to remove.
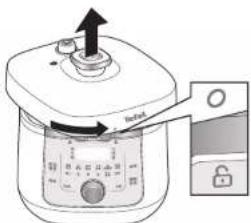
② Turn the lid in a clockwise direction until the ○ mark on the lid aligns with the 🔒 mark on the side of the main unit. If the marks are not aligned, the pressure will not increase.
■ Attaching the pressure regulator
Insert vertically into the nozzle from above.
Inspecting Your Electric Pressure Cooker Prior to Pressure Cooking
Inspect all sections before each use.
1 Remove the pressure regulator from the lid, and inspect each section.
2 After inspection, attach the pressure regulator to the lid.
Sealing ring (Rubber portion)
Check that it is attached to the lid properly and that there is no damage such as cracks or shrinkage. If the sealing ring is damaged, steam will leak, so please be sure to replace it → Refer to P. 37 for how to attach/remove the sealing ring.
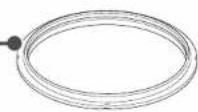
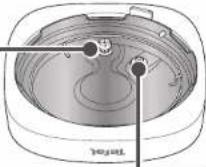
Nozzle
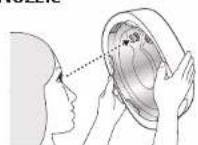
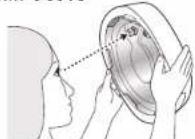
After removing the pressure regulator, hold the nozzle up in a well-lit place and inspect it for blockages.
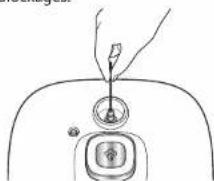
Remove any blockages with a toothpick, etc.
Safety valve
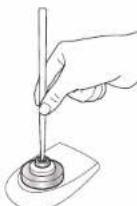
Press forcefully using a rounded chopstick, etc. to check if the valve pushes back like a spring.
Check that the safety valve is not dirty such as food or dirt adhered to the valve. If it is dirty, clean it.
Pressure display pin
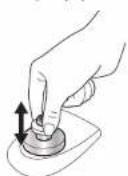
Hold in your hand and check to see if the rod moves smoothly. Check that the pressure display pin is not dirty such as food or dirt adhered to the valve. If it is dirty, clean it.
→ For how to remove the pressure display pin, see P. 38.
Precautions Regarding Pressure Cooking
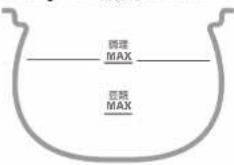
Maximum cooking amount
Be sure to observe the below maximum cooking amounts.
Particularly when cooking beans and other ingredients that expand when cooked, if the maximum cooking amount is exceeded, bean skin or other ingredients could block the nozzle and prevent proper operation.
Normal cooking
Ingredients + liquid is below the "Cooking MAX" 調理 MAX line
Beans
Beans + liquid are below the "Beans MAX" 豆類 MAX line
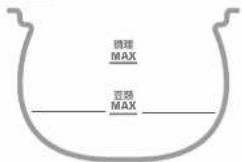
^a Do not use paper or aluminum foil to cover food directly as there is a risk of these materials blocking the nozzle, etc.
Be sure to cover the beans directly with the steaming rack.
Curry, stew, etc.
Ingredients + liquid should be 1/2 the cooking pot depth or less.
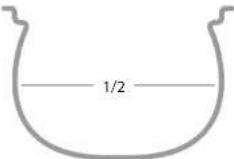
*Curry or stew paste should be added after pressure cooking is complete.
Minimum cooking amount
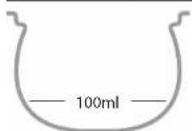
When pressure cooking, use a minimum of 100 ml of liquid, such as water, soup, or stock. As an approximate, around 100 ml of liquid evaporates after ten minutes of pressure cooking.
* For ingredients such as rice and beans that easily absorb liquid, add more liquid according to the recipe or desired cooking results.
Caution
Do not pressure cook noodles or other ingredients that Increase in quantity.
Cooking Mode
| Function | Default cooking time * | Available cooking time | Delay time | Keep warm time | Pressure Lid | Reference page | ||
| Pressure cooking (P1) | Stew cooking (P2) | |||||||
| Recipe Mode | Curry/ Stew 理煮/烘焙 | 30 min (Pressure cooking: 10 min + Stew cooking: 20 min) | 3 to 20 min(1 min interval) | 1 to 30 min(1 min interval) | 1 to 12 hours | 24 hours Yes locked | P.18 | |
| Soup酒/糖果 | 20 min (Pressure cooking: 5 min + Stew cooking: 15 min) | 1 to 45 min(1 min interval) | 1 to 30 min(1 min interval) | 1 to 12 hours | 24 hours Yes locked | |||
| Meat stew拌芋煮肉 | 23 min (Pressure cooking: 8 min + Stew cooking: 15 min) | 2 to 20 min(1 min interval) | 1 to 30 min(1 min interval) | 1 to 12 hours | 24 hours Yes locked | |||
| Stew日式角煮 | 30 min (Pressure cooking: 20 min + Stew cooking: 10 min) | 5 to 20 min(1 min interval) | 1 to 30 min(1 min interval) | 1 to 12 hours | 24 hours Yes locked | |||
| Fish stew鱼/紫薇酱 | 30 min (Pressure cooking: 10 min + Stew cooking: 20 min) | 2 to 20 min(1 min interval) | 1 to 30 min(1 min interval) | 1 to 12 hours | 24 hours Yes locked | |||
| Cooking mode | Cooking rice铁蒸米饭 | 7 min | 3 to 20 min(1 min interval) | 1 to 12 hours | 24 hours Yes locked | P.22 | ||
| Pressure cooking聚力 | 10 min | 1 to 50 min(1 min interval) | 1 to 12 hours | 24 hours Yes locked | ||||
| Slimmering烧 | 30 min | 3 min to 3 hours(1 min interval) | 1 to 12 hours | 24 hours No | Open/ Close | P.26 | ||
| Browning烧 | 5 min | 1 to 59 min(1 min interval) | N/A N/A No Open | P.28 | ||||
| Steam蒸 | 8 min | 1 to 30 min(1 min interval) | 1 to 12 hours | 24 hours Yes locked | P.22 | |||
| No-water cooking煮水豆腐 | 10 min | 1 to 30 min(1 min interval) | 1 to 12 hours | 24 hours Yes locked | ||||
| Sous vide舒肥 | 3 hours | 10 min to 22 hours(10 min interval) | N/A N/A No | Open/ Close | P.30 | |||
| Keep warm保函 | 24 hours | — — — | No | Open/ Close | ||||
| Reheat再加热 | 3 min | 3 min to 3 hours(1 min interval) | — | 24 hours No | Open/ Close | P.33 | ||
| Delayed start预约 | 2 hours | 1 to 12 hours(10 min interval) | — — — | Open/ Close | P.32 | |||
- The above default cooking times and available cooking times exclude preheat time.
- For the items where "Keep warm time" is specified, keep warm will start automatically after the set cooking time has elapsed.
*: Times are set in advance
Recipe Mode (Boil Slowly to Enrich Flavor)
After pressure cooking, stew cooking (boil slowly to enrich flavor) starts automatically to permeate flavors into ingredients..
1 Place the ingredients in the cooking pot.
- Be sure to add liquid keeping between the minimum and maximum lines.
- Add ingredients with thick texture, such as curry paste, only after pressure cooking.
• See the supplied recipe book for details.
2 Place the cooking pot in the main unit.
- Check there are no grains of rice, foreign objects or grime on the temperature sensor or heating plate before placing the cooking pot in the main unit.
- If there are any foreign objects, grime, water droplets or moisture, wipe before placing cooking pot in.
• Make sure that the lid is dry before closing.
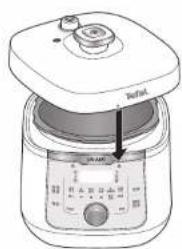
3 Close and lock the lid.
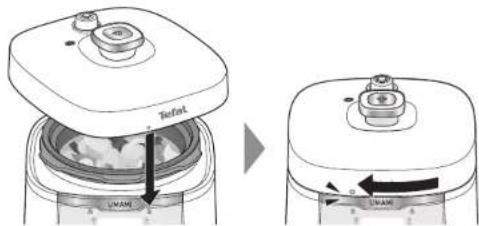
Requests
• Inspect before closing the lid. (P. 15)
- Check that the pressure regulator and sealing ring are correctly attached to the lid.
4 Connect the main unit and a power outlet using the power cord.
The buzzer will sound and displayed.

- If no operations are made within 30 seconds after turning on the power, the product goes into sleep mode and is displayed.
5 Turn the control knob to select the Recipe Mode or Cooking Mode.
| Recipe Mode | Curry/stew | 咖哩/燉菜 |
| Soup | 湯/燴菜 | |
| Meat stew | 洋芋燉肉 | |
| Stew | 日式角煮 | |
| Fish stew | 魚/燉蘿蔔 |
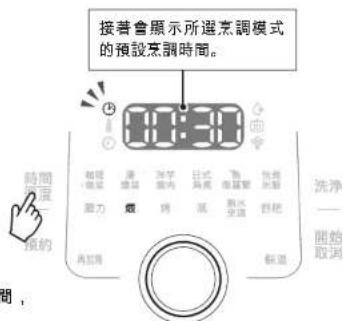
Once the cooking mode is selected, the default cooking time will be displayed.
6 Where necessary, set the cooking time.
In the Recipe Mode, set the pressure cooking time (P1) and the stew cooking time (P2) separately.
- Press the開始/取消 button to start cooking immediately.

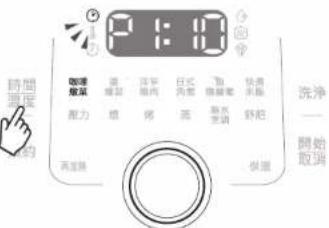
The ⏻ lamp will flash and the default cooking time (P1) for pressure cooking will be displayed.
② Turn the control knob to set the pressure cooking time (P1), and press the control knob to confirm.
• See P. 17 for the number of hours available for each mode.
- The time is displayed as "P1:(minutes)". (E.g. If "P1:10", then pressure cooking will be performed for 10 minutes.)
■ The setting time excludes preheat.
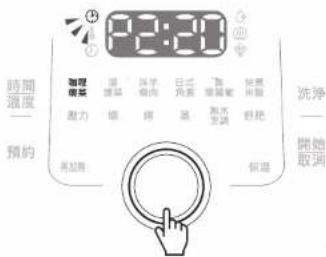
③ The default cooking time (P2) for stew cooking will be displayed. Turn the control knob to set the stew cooking time, and press the control knob to confirm.
• See P. 17 for the number of hours available for each mode.
- The time is displayed as "P2:(minutes)". (E.g. If "P2:20", then cooking will be performed for 20 minutes.)
- The temperature cannot be changed in the recipe mode. When trying to set the temperature, the cooking temperature and "AUo" are displayed alternately.
Recipe Mode (Continued)
7

Press to start cooking.
• Heating will start.
• During preheat
displayed and rotate.
- The time until pressure cooking starts depends on the type and amount of ingredients.
- Press the

button again to
cancel midway through cooking.

The timer will begin counting down when pressure cooking starts.
- The first few times you use your electric pressure cooker, a small amount of steam will leak from the lid when the pressure is high, but this is normal.
- When pressure is applied, the pressure (remaining) lamp will light up.
- Steam will escape from the steam vent during pressure cooking.

Once the countdown ends, the buzzer will sound.
- Once pressure cooking has ended, the mode will automatically change to keep warm mode, and the keep warm lamp will light up.
- The pressure (remaining) lamp will light up when the pressure is remaining in the cooking pot.

WARNING
Pressure still remains in the cooking pot at the time when counting is complete and the buzzer sounds.
8
Press the steam release button to release steam.
Check that the pressure display pin is lowered. If it is not lowered, press the steam release button to release the steam.
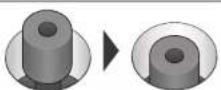
Steam release button
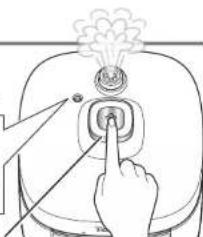
natural_image
Line drawing of a hand pressing a button on a device with a smokestack (no text or symbols)EN

Caution
Hot steam will be released from the pressure regulator during steam release.
Keep your hands, face, etc. away from the pressure regulator.
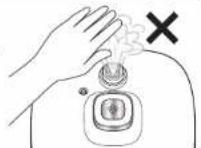
9
The lid can be opened once all the steam is released from the pressure regulator.
When the pressure in the cooking pot is released, no steam will be emitted from the pressure regulator. Open the lid carefully at this point.
① Move the handle slightly and check that there is no steam coming from the gap under the lid.
② Slide and lift the lid.
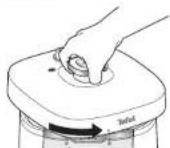

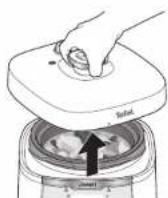
- If the lid is heavy when sliding it, pressure may still remain inside. Do not open it forcibly. Exhaust the steam as described in step 8.

Caution
- Be careful when opening the lid as hot steam will escape. Wear oven mitts if necessary.
- If you open the lid and turn it over, hot water may drip causing scalding, so be careful.
It is recommended that you place the lid horizontally without turning it over.
10
If you do not need to keep the ingredients warm, press and hold end keep warm mode.

Cooking Mode (rice cooking, pressure cooking, steam, no-water)
Ingredients are cooked at high temperature in a closed cooking pot, so they are cooked quickly and softly
1 Place the ingredients in the cooking pot.
- Be sure to add liquid keeping between the minimum and maximum lines.
- Add ingredients with thick texture, such as curry paste, only after pressure cooking.
- When cooking rice, put the rice in the cooking pot first then add water to the line matching the number of rice cups.
• See the supplied recipe book for details. - Use the steaming rack for steam cooking.
2 Place the cooking pot in the main unit.
- Check there are no grains of rice, foreign objects or grime on the temperature sensor or heating plate before placing the cooking pot in the main unit.
- If there are any foreign objects, grime, water droplets or moisture, wipe before placing cooking pot in.
• Make sure that the lid is dry before closing.
3 Close and lock the lid.
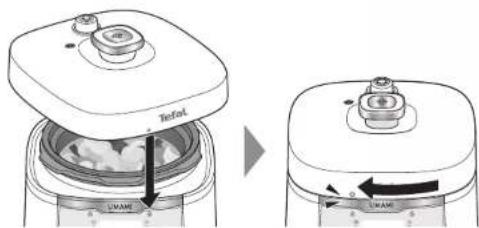
Requests
• Inspect before closing the lid. (P. 15)
- Check that the pressure regulator and sealing ring are correctly attached to the lid.
4 Connect the main unit and a power outlet using the power cord.
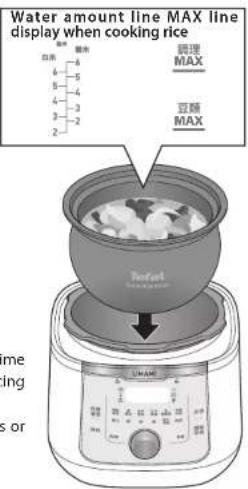
5 Turn the control knob to select the Cooking Mode.
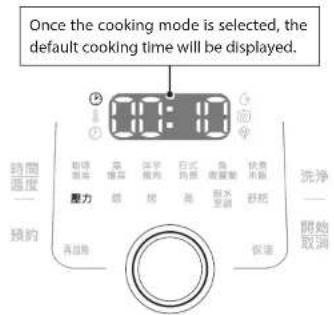
6 Where necessary, set the pressure cooking time.
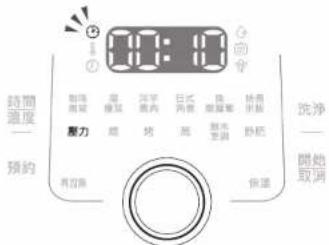
② Turn the control knob to set the pressure cooking time, and press the control knob to confirm.
• See P. 17 for the number of hours available for each mode.
- Set the time in "Hours:Minutes". (E.g. If "00:10" then pressure cooking will be performed for 10 minutes.)
• The setting time excludes preheat.
Pressure Cooking / Steam Cooking (Continued)
7
開始
Press 取消start cooking.
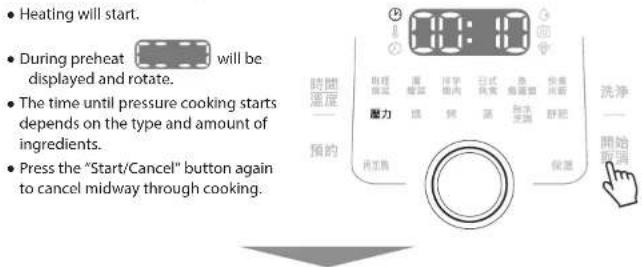
- Heating will start.
- During preheat will be displayed and rotate.
- The time until pressure cooking starts depends on the type and amount of ingredients.
- Press the "Start/Cancel" button again to cancel midway through cooking.
will be
The timer will begin counting down when pressure cooking starts.
- The first few times you use your electric pressure cooker, a small amount of steam will leak from the lid when the pressure is high, but this is normal.
- When pressure is applied, the pressure (remaining) lamp will light up.
- Steam will escape from the steam vent during pressure cooking.

Once the countdown ends, the buzzer will sound.
- Once pressure cooking has ended, the mode will automatically change to keep warm mode, and the keep warm lamp will light up.
- The pressure (remaining) lamp will light up when the pressure is remaining in the cooking pot.

WARNING
Pressure still remains in the cooking pot at the time when counting is complete and the buzzer sounds.
8
Press the steam release button to release steam.
Check that the pressure display pin is lowered. If it is not lowered, press the steam release button to release the steam.
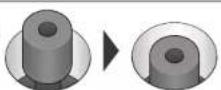
Steam release button
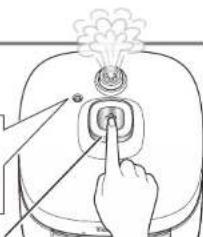
natural_image
Line drawing of a hand pressing a button on a device with a smokestack (no text or symbols)EN

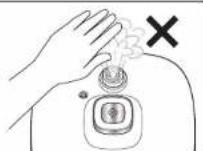
Caution
Hot steam will be released from the pressure regulator during steam release.
Keep your hands, face, etc. away from the pressure regulator.
9
The lid can be opened once all the steam is released from the pressure regulator.
When the pressure in the cooking pot is released, no steam will be emitted from the pressure regulator. Open the lid carefully at this point.
① Move the handle slightly and check that there is no steam coming from the gap under the lid.
② Slide and lift the lid.
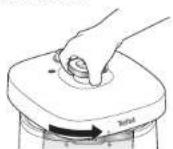

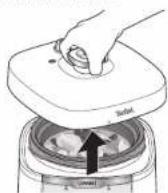
- If the lid is heavy when sliding it, pressure may still remain inside. Do not open it forcibly. Exhaust the steam as described in step 8.

Caution
- Be careful when opening the lid as hot steam will escape. Wear oven mitts if necessary.
- If you open the lid and turn it over, hot water may drip causing scalding, so be careful. It is recommended that you place the lid horizontally without turning it over.
10
If you do not need to keep the ingredients warm, press and hold end keep warm mode.

Cooking Mode (simmer 煨) (Non-pressure cooking)
Can cook for up to 3 hours therefore suited for preparing completed dishes.
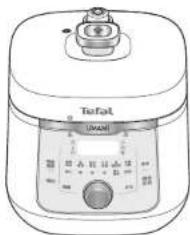
1 Place ingredients in the cooking pot and put the pot into the main unit.
- Check there are no grains of rice, foreign objects or grime on the temperature sensor or heating plate before placing the cooking pot in the main unit.
- If there are any foreign objects, grime, water droplets or moisture, wipe before placing cooking pot in.
• Make sure that the lid is dry before closing. - Do not use the steaming rack when cooking in browning mode.
natural_image
Line drawing of a rice cooker with control panel and lid (no text or symbols)2 Close and lock the lid.
3 Connect the main unit and a power outlet using the power cord.
4 Turn the control knob and select "Simmer"煨.
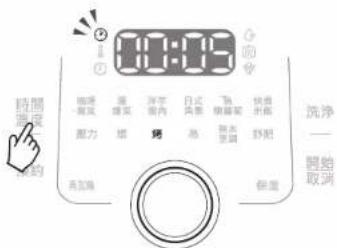
5 Where necessary, set the cooking time.

The ⑮mp will flash.
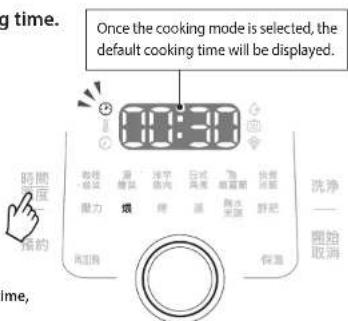
② Turn the control knob to set cooking time, and press the control knob to confirm.
- Set the time in "Hours: Minutes". (E.g. If "00:10" then cooking will be performed for 10 minutes.)
- The available cooking times are 3 minutes to 3 hours (1 hour units).
6 Press 取消start cooking.
During preheat will be displayed and rotate.
7 After cooking is complete, the mode will automatically change to keep warm, and the keep warm lamp will light up.
8 If you do not need to keep the ingredients warm, press and hold end keep warm mode.
Cooking Mode (browning 烤) (Non-pressure cooking)
This mode cooks at a high temperature with the lid open.
1 Place the cooking pot in the main unit.
- Check there are no grains of rice, foreign objects or grime on the temperature sensor or heating plate before placing the cooking pot in the main unit.
- If there are any foreign objects, grime, water droplets or moisture, wipe before placing cooking pot in.
- Put ingredients in once preheat finishes.
- Do not use the steaming rack when cooking in browning mode.
natural_image
Line drawing of a rice cooker with control panel and lid (no text or symbols)2 Connect the main unit and a power outlet using the power cord.
3 Turn the control knob to select "Browning".烤
4 Where necessary, set the cooking time.
The ⑮mp will flash.
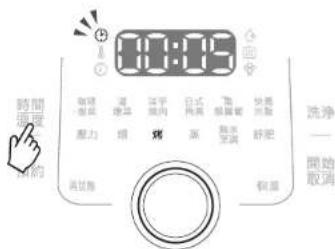
② Turn the control knob to set the cooking time, and press the control knob to confirm.
- Set the time in "Hours: Minutes". (E.g. If "00:10" then pressure cooking will be performed for 10 minutes.)
■ The available cooking times are 1 to 59 minutes (1 minute units).
5 Where necessary, set the cooking temperature.
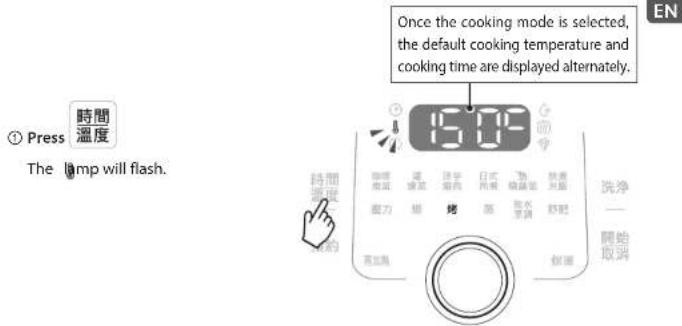
② Turn the control knob to set the cooking temperature, and press the control knob to confirm.
- The available cooking temperatures are 120°C minutes to 150°C (10°C units).
6 Press the 取消ton to start cooking.
- During preheat will be displayed and rotate.
- When preheating is complete, browning will start with a beep, and the timer will start counting down.
7 Once the cooking temperature is reached and the buzzer sounds, put the ingredients in the pot and begin browning.
The buzzer will sound again once the countdown of the set cooking time ends.
8 When cooking is finished, the buzzer sounds and heating ends.
Keep warm is not performed in "Browning" mode.
舒肥) (Non-pressure cooking) Cooking Mode (Sous vide
This mode cooks for a long time up to 22 hours at a low temperature.
Precautions for Sous vide
- Raw foods and foods that have not been completely pasteurized can cause health risks, so be careful.
- Take caution when serving food to people with lower immunity including pregnant women, infants, and elderly people. Do not eat if there is any concern about the state of cooking or food, health, etc.
- After purchasing ingredients, immediately store them in a refrigerator. Do not leave them at room temperature.
- Use fresh ingredients. Use a new zip-lock bag every time.
- Wash your hands thoroughly before touching food.
- If your hand is damaged or wounded, wear disposable gloves to avoid touching food directly.
Notes on Sous vide
- Place the seasoned ingredients in a zip-lock bag and remove all air before sealing.
- Add water to the cooking pot then cover the ingredients in the zip-lock bag in water
* Refer to the supplied recipe book for ingredients and preparations.
1 Place ingredients in the cooking pot and put the pot into the main unit.
- Check there are no grains of rice, foreign objects or grime on the temperature sensor or heating plate before placing the cooking pot in the main unit.
- If there are any foreign objects, grime, water droplets or moisture, wipe before placing cooking pot in.
• Make sure that the lid is dry before closing.
natural_image
Line drawing of a Tefal kitchen appliance with control panel (no text or symbols)2 Close and lock the lid.
3 Connect the main unit and a power outlet using the power cord.
4 Turn the control knob to select "Sous vide". 舒肥
5 Where necessary, set the cooking time.
① Press

lam
② Turn the control knob to set the cooking time, and press the control knob to confirm.
- Set the time in "Hours: Minutes". (E.g. If "00:10" then pressure cooking will be performed for 10 minutes.)
- The available cooking times are 10 minutes to 22 hours (10 minute units).
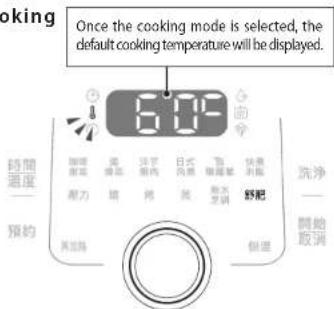
6 Where necessary, set the cooking temperature.
The lamp will flash.
② Turn the control knob to set the cooking temperature, and press the control knob to confirm.
- The available cooking temperatures are 60 to 90^ (1°C units).
7 Press to begin cooking.
Once cooking ends, the buzzer will sound and heating will end.
- During preheat will be displayed and rotate.
- When preheating is complete, Sous vide cooking will start with a beep, and the timer will start counting down.
8 When cooking is complete, the buzzer will sound and heating will end.
Keep warm will not be performed in the "Sous vide" mode.
Delay Start Cooking 預約
It is possible to delay the time before cooking starts.
The delay function is not possible with the "Browning" and "Sous vide" modes.

Caution Do not use the cooking pot for cooking raw meat, raw fish, raw eggs or raw seafood. Doing so may cause decay or smell.
1 Place ingredients in the cooking pot then place the pot in the main unit.
Place the lid to suit the selected cooking mode.
2 Connect the main unit and a power outlet using the power cord.
3 Select a mode and set the cooking temperature and cooking time as needed.

Press
預約
The ⏻ lamp flashes.
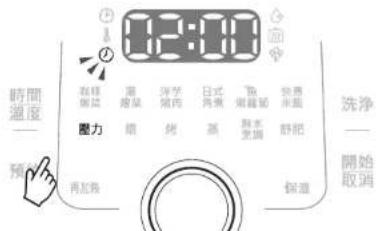
5 Turn the control knob to set the delay start time, and press the control knob to confirm.
Cooking will start after the set time elapses.
- Set the time in "Hours: Minutes". (E.g. If "02:00" then the cooking start time will be delayed by two hours.)
• Available delay start time options are 1 to 12 hours (1 hour units).

Press
開始取消
The countdown will begin and cooking will start once it reaches 0.
Reheating 預熱
1 Put the food in the cooking pot and set it in the main unit.
2 Close the lid and lock it.
It can be reheated even without the lid.
3 Connect the power cord to the main unit and the outlet.
4 Turn the control knob to select "Reheat", and press the control knob to confirm.
5 Set the cooking time.
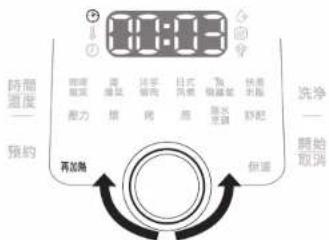
② Turn the control knob to set the cooking time, and press the control knob to confirm.
The ⏻ lamp will flash.
- Set the time in "Hours: Minutes". (E.g. If "00:10" then pressure cooking will be performed for 10 minutes.)
- The available cooking times are 10 minutes to 22 hours (10 minute units).
- The temperature cannot be changed in the "Reheat" mode.
When trying to set the temperature, the cooking temperature and "AUo" are displayed alternately.

Press 開始 To start cooking
After cooking is complete, keep warm starts automatically and the keep warm lamp will light up.
Keep Warm 保温
1 Turn the control knob to select "Keep warm", and press the control knob to confirm.
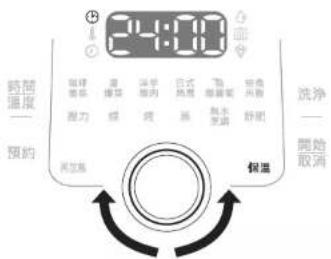
2 Press to start keep warm.
Keep warm will start.
If keep warm was started manually, the keep warm lamp will not light.

- To end midway, press the button again.
• After 24 hours from the start of keep warm, keep warm will automatically end.
• The keep warm time cannot be set. - The temperature cannot be changed in the "Keep warm" mode.
When trying to set the temperature, the cooking temperature and "AUtO" are displayed alternately.
When You Need to Open the Lid Immediately
(Canceling Cooking 取消烹飪)
1
Press

to end cooking.
2
Press the steam release button to discharge the steam.
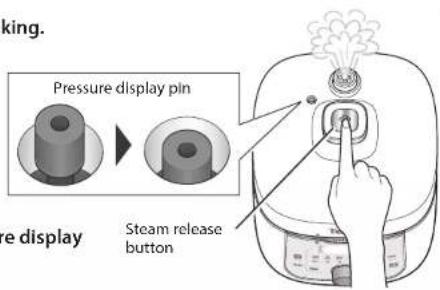
3
Check that the pressure display pin is lowered.
Steam release button
4
Open the lid when steam stops coming out from the pressure regulator.
① Move the handle slightly and check that there is no steam coming from the gap under the lid.
② Slide and lift the lid.
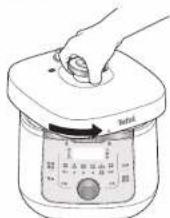

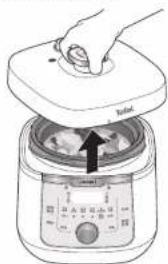
- If the lid is heavy when sliding it, pressure may still remain inside. Do not open it forcibly. Exhaust the steam as described in step 2.

Caution
- Be careful when opening the lid as hot steam will come out. Wear oven mitts as necessary.
- Do not turn over the lid after opening it. Hot water may drip and cause scalding.
It is recommended to place the lid horizontally without turning it over.
Care After Each Use 日常維護
After use, unplug the power plug from the power outlet, open the lid and allow the electric pressure cooker to cool. After cooking, care for your product as described below.
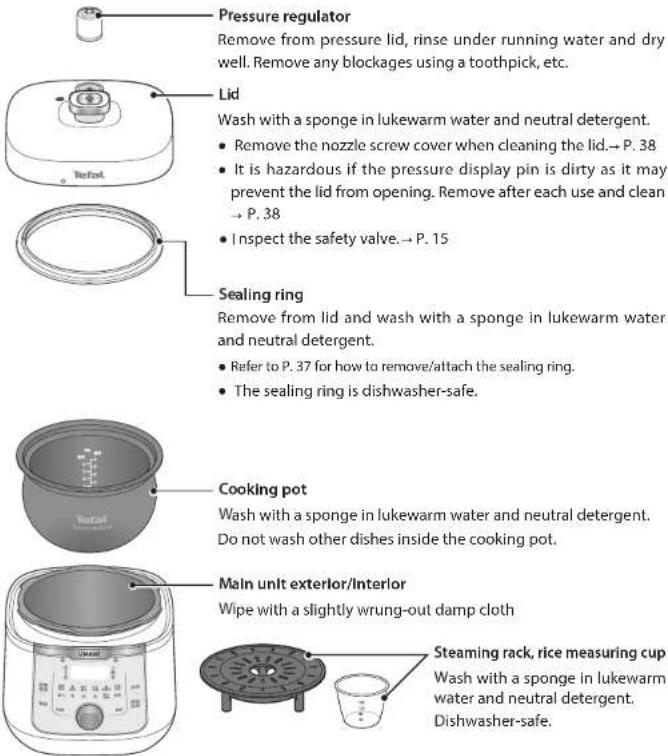
Requests
- Do not submerge the main unit in liquid.
- Do not use steel wool or detergent/sponges etc. with abrasive as it could damage the coating on the Inside of the cooking pot. Also, do not use hard, metal tools to remove burnt-on food, etc.
- Do not use benzine, thinner, bleach, sanitizing alcohol, etc.
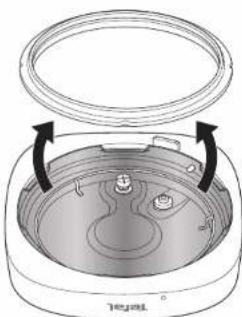
How to attach/remove the sealing ring
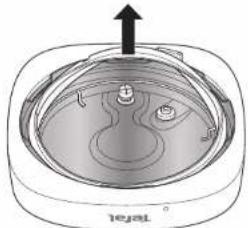
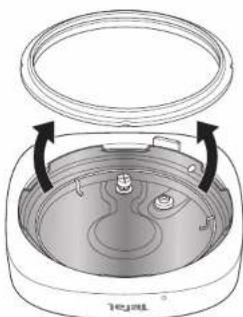
■ Removing the sealing ring
Pull up to remove.
natural_image
Diagram of a mechanical component with an upward arrow and labeled 'Yrel' at the bottom (no other text or symbols)▶
natural_image
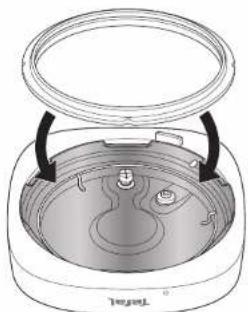
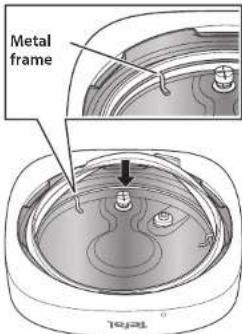
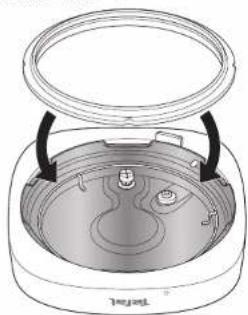
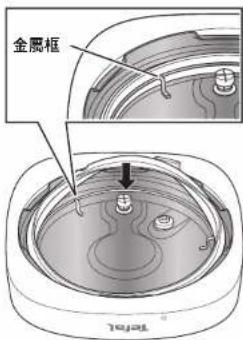
Diagram of a closed appliance with lid and internal components, showing rotation arrows (no text or symbols)■ Attaching the sealing ring
Attach to the metal frame inside the lid.
natural_image
Diagram of a food appliance with a lid and side ports, showing internal components (no text or symbols)▶
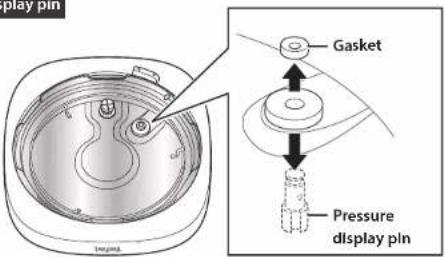
How to remove the pressure display pin
Remove the gasket of the pressure display pin, then remove the pressure display pin.
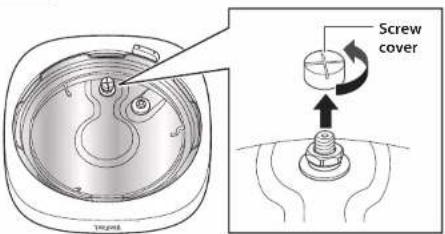
How to remove the nozzle screw cover
Turn the nozzle screw cover in a counter-clockwise direction to remove.
* Be careful not to lose the gasket or pressure display pin.
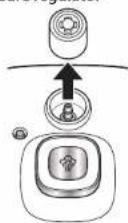
Attaching/removing the pressure regulator
■ Removing the pressure regulator
Pull upwards to remove.
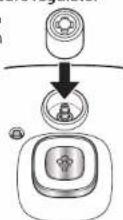
■ Attaching the pressure regulator
Insert vertically into the nozzle from above.
Cleaning function
Cleaning using pressure and steam can easily remove the odor from the cooking pot.
There are two cleaning methods, "steam cleaning" and "odor removal cleaning".
1 Pour water or vinegar and lemon in the cooking pot.
■ When performing "steam cleaning"
Pour a cup of water (about 180 ml) (using the supplied rice measuring cup) in the cooking pot.
■ When performing "odor removal cleaning"
Pour two cups of water (using the supplied rice measuring cup) and a lemon (cut into eight equal wedges) in the cooking pot.
2 Place the cooking pot on the main unit, close the lid and lock it.
- Check the temperature sensor and heating plate for foreign matter such as rice grains and dirt before setting it in the main unit.
- If there is foreign matter, dirt, water droplets, or other moisture on the product, wipe it off before setting.
• Before closing the lid, make sure it is dry.
Request
- Check before closing the lid. (P. 15)
- Make sure that the pressure regulator and sealing ring are properly attached to the lid.
3 Connect the power cord to the main unit and the outlet.
4
Press
洗净
The lamp and the lamp will light up.
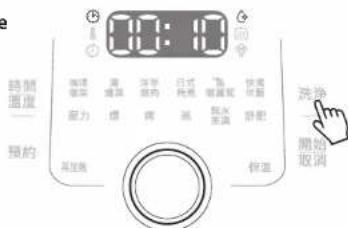
5 Press 取消 to start cleaning.
After preheating, cleaning will be done automatically for 10 minutes.
- During preheating, appears on the display and rotates.
• The time cannot be set.
• To end midway, press the 'toon again.

Care After Each Use (continued)
The buzzer sounds when cleaning is complete.
When the pressure remains in the cooking pot, the pressure (remaining) lamp lights up.

Warning
Even when the count is over and the buzzer sounds, there is still pressure in the cooking pot.
6 Press the steam release button to release the steam.

Caution
Hot steam is emitted from the pressure regulator during steam discharge. Keep your hands and face away from the pressure regulator.
7 Open the lid when steam stops coming out from the pressure regulator.
① Move the handle slightly and check
② Slide and lift the lld.
that there is no steam coming from the gap under the lid.
- If the lid is heavy when sliding it, pressure may still remain inside. Do not open it forcibly. Exhaust the steam as described in step 6.

Caution
- Be careful when opening the lid as hot steam will come out. Wear oven mitts as necessary.
- Do not turn over the lid after opening it. Hot water may drip and cause scalding. It is recommended to place the lid horizontally without turning it over.
8 After unplugging the power plug from the outlet and cooling the main unit, rinse the cooking pot thoroughly with water.
Troubleshooting
■ Can't open lid
| Possible cause Solution | ||
| Pot still pressurized Hold the steam release button down, release pressure from cooking pot, then open lid | ||
| Pressure display pinIs dirty and won't go down | Hold the steam release button c pressure from cooking pot.After cooling down for at least 2 pressure display pin with a chopAfter use, clean the pressure display pin. | 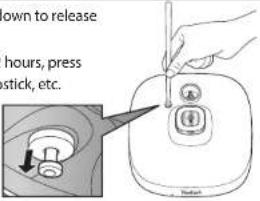 |
■ Can't close lid
| Possible cause Solution | |
| Steam coming from ingredients inside cooking pot | Cool ingredients slightly until steam settles, then close lid |
| Sealing ring not correctly attached | Attach sealing ring correctly→P.37 |
| Pressure display pin is dirty/ blocked | If lid is cool, press pressure display pin with a chopstick, etc. then clean pressure display pin. |
| Lid closed in wrong direction | Close in correct direction→P.14 |
■ Not cooking properly
| Possible cause Solution | |
| Rice:water ratio incorrect After pl | placing rice in the cooking pot using the rice measuring cup, add water referring to the line inside the pot |
| Setting time or water amount is incorrect | Cook in line with the correct setting time and water amount |
| Foreign material on heating plate or sensor | Wipe with a slightly wrung-out damp cloth |
Troubleshooting (Continued)
■ Steam leaking from lid
| Possible cause Solution | |
| Sealing ring not clean. | Remove and clean sealing ring. → P. 37 |
| Sealing ring not correctly attached. | Attach sealing ring correctly.→ P. 37 |
| Sealing ring broken. Cease use and contact our Customer Support Center. | |
■ Excessive amount of froth or steam escaping from steam vent during preparation
| Possible cause Solution | |
| Pressure regulator not correctly attached. | If pressure regulator is sideways or not sitting properly, press with a chopstick, etc. to correct. |
| Excessive ingredients/water quantity. Do not add ingredients or liquid above the MAX line. | |
| Lid not locked. Lock lid completely. | |
| Broken. Cease use and contact our Customer Support Center. | |
■ Steam constantly coming escaping from steam vent or pressuredisplay pin
| Possible cause Solution | |
| Pressure display pin is dirty/blocked. | Allow the product to cool, clean the pressure display pin, then restart cooking. |
■ Error code displayed on display portion
| Display Possible cause Solution | ||
| E0 Pressure switch is abnormal. | Cease use and contact our Customer Support Center. | |
| E1 | Bottom temperature sensor is abnormal. | |
| E2 | Lid is in incorrect position. Place the lid in the correct position. | |
| Lid switch sensor is abnormal. | Cease use and contact our Customer Support Center. | |
Product Specifications
| Tefal Umami Cooker Umami Electric Pressure Cooker 4L | |
| Rated voltage/ frequency | 110 V 60 Hz |
| Rated power consumption | 900 W |
| Main unit mass | Approx. 5.0 kg |
| Power cord length | 0.8 m |
| Main unit size | Approx. 307×276×288 mm |
| Pressure at which pressure regulator is activated | 80 kPa |
| PS | 140kPa |
| Nominal capacity/ cooking capacity | 4.0 L/2.6 L |
| Accessories | Steaming rack, rice measuring cup |
*Product specifications, design, price, etc. are subject to change.
*This product can only be used within Taiwan.
Made in China
Thank you for purchasing Tefal products. To provide complete services, we are honored to invite you to log in to the website and register as a member to provide services such as product warranty, maintenance, and consultation.
Please scan with your mobile phone or enter the URL below

Login URL: http://tefal-home.com.tw/services/warranty
When you successfully become a member, you can enjoy the following exclusive benefits for members:
French Tefal home appliances can enjoy a 1-year extended warranty for free. After spending \12,000 at department store counters, you can upgrade to a VIP member and enjoy a \1,000 gift voucher for joining the membership.
VIP members can redeem a birthday gift with their identity documents in the month of their birthday.
From time to time, you can receive product discounts and event information. Exclusive VIP product combination, VIP exclusive full gift message.
If you have any questions about the product, please contact the customer service center:
Customer service line: 02-7743-0640 Service hours: Monday to Friday 9:00\~13:00 and 14:00\~18:00 Service mailbox: satservice@groupeseb.com
TEFAL/T-FAL\* INTERNATIONAL LIMITED GUARANTEE : www.tefal.com
This product is repairable by TEFAL/T-FAL*, during and after the guarantee period. Accessories, consumables and end-user replaceable parts can be purchased, if locally available, as described on the TEFAL/T-FAL internet site www.tefal.com.
The Guarantee ^22 :
TEHAL/T-IAL guarantees this product against any manufacturing defect in materials or workmanship during the guarantee period within those countries ^46 as stated in the attached country list, starting from the initial date of purchase or delivery date. The international manufacturer's guarantee covers all costs related to restoring the proven defective product so that it conforms to its original specifications, through the repair or replacement of any defective part and the necessary labour. At TEHAL/T-IAL's choice, a replacement product may be provided instead of repairing a defective product. TEHAL/T-IAL's sole obligation and your exclusive resolution under this guarantee are limited to such repair or replacement.
Conditions & Exclusions:
TEFAL/T-FAL shall not be obliged to repair or replace any product which is not accompanied by a valid proof of purchase. The product can be taken directly in person or must be adequately packaged and returned, by recorded delivery for equivalent method of postage), to a TEFAL/T-FAL authorised service centre. Full address details for each country's authorised service centres are listed on TEFAL/T-FAL website (www.tefal.com) or by calling the appropriate consumer Service centre set out in the attached country list. In order to offer the best possible after-sales service and constantly improve customer satisfaction, TEFAL/T-FAL may send a satisfaction survey to all customers who have had their product repaired or exchanged in a TEFAL/T-FAL authorised service centre.
This guarantee applies only for products purchased and used for domestic purposes and will not cover any damage which occurs as a result of misuse, negligence, failure to follow TETAL/T-FAL instructions, or amortization or unauthorised repair of the product, faulty packaging by the owner or mishandling by any carer. It also does not cover normal wear and treat, maintenance or replacement of consumable parts, or the following:
- using the wrong type of water or consumable
mechanical damages, overloading
- damage as a result of lightning or power surges
- ingress of water, dust or insects into the product (excluding appliances with features
specifically designed for insects)
accidents including fire, flood, etc.
- scaling (any de-scaling must be carried out according to the instructions for use)
- damage to any glass or porcelain ware in the product
- professional or commercial use
- or poor results specifically due to wrong voltage or frequency as stamped on the product ID
or specification
Consumer Statutory Rights :
This International IHF-AL/T-FAI guarantee does not affect the Statutory Rights a consumer may have or those rights that cannot be excluded or limited, nor rights against the retailer from which the consumer purchased the product. This guarantee gives a consumer specific legal rights, and the consumer may also have other legal rights which vary from State or Country to Country. The consumer may assert any such rights at his sole discretion.
***Where a product purchased in a listed country and then used in another listed country, the international TEFALT-TFAL guarantee duration is the one in the country of usage, even if the product was purchased in a listed country with different guarantee duration. The repair process may require a longer time if the product is not locally sold by TEFALT-TFAL. If the product is not repairable in the new country, the international TEFALT-TFAL guarantee is limited to a replacement by a similar or alternative product at similar cost, where possible.
*TEFAL household appliances appear under the T-FAL brand in some territories like America and Japan. TEFAL/T-FAL are registered trademarks of Groupe SEB.
Please keep this document for your reference should you wish to make a claim under the guarantee.
| Country Phone Number | Guarantee length | Address |
| Taiwan | 1886 2-7743-0640 | 5EB ASIA Ltd.4F., No 37, DexingW. RD.,Shilin Dist.,Taipei City 11158TAIWAN (R.O.C.) |
安全預防措施
裝上/取下壓力調節器
■ 取下壓力調節器
向上拉起即可取下。
natural_image
Diagram of a device with a lid and internal components, no visible text or symbols蒸汽噴嘴
natural_image
Simple line drawing of a hand holding a small object above a device (no text or symbols)natural_image
Line drawing of a hand pressing a button on a device with a smokestack (no text or symbols)⚠️ 小心
注意事项
natural_image
Line drawing of a hand pressing a button on a device with a smokestack (no text or symbols)
小心
natural_image
Line drawing of a food kitchen appliance with a control panel (no text or symbols)2
關上並鎖定鍋蓋。
3
將主要裝置接上電源插座。
4
轉動控制旋鈕,選擇煨.
5
視需要設定烹調時間。
① 按下

④ 指示燈會閃爍。
natural_image
Line drawing of a rice cooker with control panel (no text or symbols)ZH
natural_image
Line drawing of a food microwave oven with control panel (no text or symbols)2 關上並鎖定鍋蓋。
3 將主要裝置接上電源插座。
4 轉動控制旋鈕,選擇「舒肥」。
(續)
5 視需要設定烹調時間。
natural_image
Illustration of a hand pressing down on a rice cooker with a black arrow indicating the handle (no text or symbols present)natural_image
Cross-sectional diagram of a mechanical component with an upward arrow, no visible text or symbols
natural_image
Diagram of a tealy device with lid and internal components, showing rotation arrows (no text or symbols)■ 連接密封環
連接到鋼蓋內側的金屬框上。
natural_image
Diagram of a device with a lid and internal components, no text or symbols present
取下感壓桿
限用物質含有情況標示聲明書
Declaration of the Presence Condition of the Restricted Substances Marking
| 設備名稱:法國特福鮮呼吸速燉萬用快鍋Equipment name | 型號(型式):CY360170Type designation (Type) | |||||
| 單元Unit | 限用物質及其化學符號Restricted substances and its chemical symbols | |||||
| 鉛Lead(Pb) | 汞Mercury(Hg) | 鎘Cadmium(Cd) | 六價鉻Hexavalent chromium( Cr^15 ) | 多溴聯苯Polybrominated biphenyls(PBB) | 多溴二苯醚Polybrominated diphenyl ethers(PBDE) | |
| 電源線組Power cord set | ○○ | ○○○○ | ||||
| 塑料件Plastic parts | ○○ | ○○○○ | ||||
| 金屬件Metallic parts | -○ | ○○○○ | ||||
| 內部線材Internal wire | ○○ | ○○○○ | ||||
| 電路板組Printed circuit board assembly | ○○ | ○○○○ | ||||
| 加熱元件 | ○○○○ | ○○ | ||||
| 備考1. “超出0.1 wt %”及“超出0.01 wt %”係指限用物質之百分比含量超出百分比含量基準值Note 1: “Exceeding 0.1 wt %” and “exceeding 0.01 wt %” indicate that the percentage content of the restricted substance exceeds the reference percentage value of presence condition.備考2. “○”係指該項限用物質之百分比含量未超出百分比含量基準值。Note 2: “○” indicates that the percentage content of the restricted substance does not exceed the percentage of reference value of presence.備考3. “-”係指該項限用物質為排除項目。Note 3: The “-” indicates that the restricted substance corresponds to the exemption. | ||||||
- How to use
- Others
- 使用入門
- 使用方法
- WARNING
- Power/Power Cord
- Handling
- Points to note when cooking
- Be aware of the below points when cooking.
- Caution
- Safety Precautions (continued)
- Requests Pertaining to Use
- Part Names (continued)
- Control Panel
- Control knob
- Lamps
- Mute mode
- Using Your Electric Pressure Cooker for the First Time
- Opening/closing the lid
- ■ Opening the lid
- ■ Closing the lid
- Attaching/removing the pressure regulator
- ■ Removing the pressure regulator
- ■ Attaching the pressure regulator
- Inspecting Your Electric Pressure Cooker Prior to Pressure Cooking
- Sealing ring (Rubber portion)
- Nozzle
- Safety valve
- Pressure display pin
- Precautions Regarding Pressure Cooking
- Maximum cooking amount
- Cooking Mode
- Recipe Mode (Boil Slowly to Enrich Flavor)
- Place the ingredients in the cooking pot.
- Place the cooking pot in the main unit.
- Close and lock the lid.
- Requests
- Connect the main unit and a power outlet using the power cord.
- Turn the control knob to select the Recipe Mode or Cooking Mode.
- Where necessary, set the cooking time.
- Recipe Mode (Continued)
- 7
- Press to start cooking.
- The timer will begin counting down when pressure cooking starts.
- Once the countdown ends, the buzzer will sound.
- 8
- Press the steam release button to release steam.
- 9
- The lid can be opened once all the steam is released from the pressure regulator.
- 10
- Cooking Mode (rice cooking, pressure cooking, steam, no-water)
- Turn the control knob to select the Cooking Mode.
- Where necessary, set the pressure cooking time.
- Pressure Cooking / Steam Cooking (Continued)
- 開始
- Press 取消start cooking.
- Cooking Mode (simmer 煨) (Non-pressure cooking)
- Cooking Mode (browning 烤) (Non-pressure cooking)
- Place the cooking pot in the main unit.
- Turn the control knob to select "Browning".烤
- Where necessary, set the cooking temperature.
- Press the 取消ton to start cooking.
- Once the cooking temperature is reached and the buzzer sounds, put the ingredients in the pot and begin browning.
- When cooking is finished, the buzzer sounds and heating ends.
- 舒肥) (Non-pressure cooking) Cooking Mode (Sous vide
- Precautions for Sous vide
- Notes on Sous vide
- Place ingredients in the cooking pot and put the pot into the main unit.
- Close and lock the lid.
- Connect the main unit and a power outlet using the power cord.
- Turn the control knob to select "Sous vide". 舒肥
- Where necessary, set the cooking time.
- Where necessary, set the cooking temperature.
- ② Turn the control knob to set the cooking temperature, and press the control knob to confirm.
- Press to begin cooking.
- When cooking is complete, the buzzer will sound and heating will end.
- Delay Start Cooking 預約
- Reheating 預熱
- Keep Warm 保温
- When You Need to Open the Lid Immediately
- Care After Each Use 日常維護
- How to attach/remove the sealing ring
- How to remove the pressure display pin
- How to remove the nozzle screw cover
- Cleaning function
- Pour water or vinegar and lemon in the cooking pot.
- Place the cooking pot on the main unit, close the lid and lock it.
- Request
- Connect the power cord to the main unit and the outlet.
- 4
- Press
- 洗净
- Press 取消 to start cleaning.
- Care After Each Use (continued)
- Press the steam release button to release the steam.
- Open the lid when steam stops coming out from the pressure regulator.
- After unplugging the power plug from the outlet and cooling the main unit, rinse the cooking pot thoroughly with water.
- Troubleshooting
- Troubleshooting (Continued)
- Product Specifications
- TEFAL/T-FAL\* INTERNATIONAL LIMITED GUARANTEE : www.tefal.com
- The Guarantee 22 :
- Conditions & Exclusions:
- Consumer Statutory Rights :
- 安全預防措施
- 裝上/取下壓力調節器
- ■ 取下壓力調節器
- 蒸汽噴嘴
- ⚠️ 小心
- 注意事项
- 小心
- 2
- 關上並鎖定鍋蓋。
- 3
- 將主要裝置接上電源插座。
- 轉動控制旋鈕,選擇煨.
- 5
- 視需要設定烹調時間。
- 關上並鎖定鍋蓋。
- 將主要裝置接上電源插座。
- 轉動控制旋鈕,選擇「舒肥」。
- (續)
- 視需要設定烹調時間。
- ■ 連接密封環
- 取下感壓桿
Brand : TEFAL
Model : CY3601
Category : Multicooker