KM9410I-28 - Cooker Respekta - Free user manual and instructions
Find the device manual for free KM9410I-28 Respekta in PDF.


| Product Type | Built-in Induction Hob |
| Brand | Respekta |
| Model | KM9410I-28 |
| Dimensions (W x D x H) | 590 x 520 x 60 mm (based on KM6600IB-28) |
| Cutout Dimensions (W x D) | 560 x 490 mm |
| Net Weight | 7.8 kg |
| Voltage / Frequency | 220-240V~ / 50Hz |
| Nominal Power | 7200 W |
| Number of Cooking Zones | 4 induction zones |
| Cooking Zone Power (Front Left) | 1800 W / 2100 W Power Boost |
| Cooking Zone Power (Rear Left) | 1800 W / 2100 W Power Boost |
| Cooking Zone Power (Rear Right) | 1800 W / 2100 W Power Boost |
| Cooking Zone Power (Front Right) | 1200 W / 1500 W Power Boost |
| Bridge Zone Power | 3000 W / 3600 W Power Boost |
| Control Type | Touch and slider control |
| Timer | Digital timer, 0-99 minutes |
| Child Safety Lock | Yes |
| Residual Heat Indicator | Yes ("H" display) |
| Overheating Protection | Yes |
| Automatic Shutdown | Yes |
| ECO Function (Power Limiting) | Yes (2.8/3.5/6.0/7.2 kW selectable) |
| Surface Material | Ceramic glass |
| Power Cord Length | 120 cm (without plug) |
| Accessories Included | Fixing brackets, sealing tape |
Frequently Asked Questions - KM9410I-28 Respekta
User questions about KM9410I-28 Respekta
0 question about this device. Answer the ones you know or ask your own.
Ask a new question about this device
Download the instructions for your Cooker in PDF format for free! Find your manual KM9410I-28 - Respekta and take your electronic device back in hand. On this page are published all the documents necessary for the use of your device. KM9410I-28 by Respekta.
USER MANUAL KM9410I-28 Respekta
Installation- & User's Instruction Induction Hob
natural_image
Black electrical stove burner with two circular ventricles and a warning symbol on the bottom (no text or numbers on main body)Respekta
Mod. No.:
KM6600IB-28
KM8800IF-28
KM9140I-28
Inhalt
1 : ALLGEMEINE INFORMATIONEN......de-3
flowchart
graph TD
    A["coil panel 1"] --> B["Main Board"]
    C["coil panel 2"] --> D["Power Board"]
    E["coil panel 3"] --> F["Main Board"]
    G["coil panel 4"] --> H["Main Board"]
    B --> I["Coil Panel 1"]
    D --> J["Coil Panel 2"]
    F --> K["Coil Panel 3"]
    H --> L["Coil Panel 4"]
KM8800IF-28
KM9140I-28
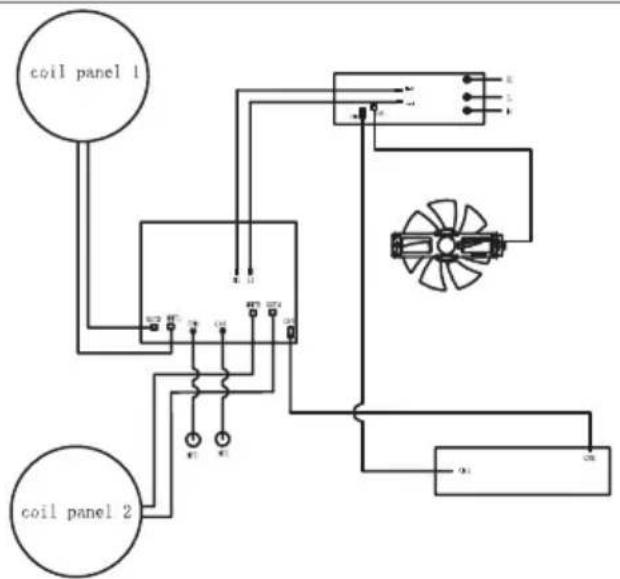
Abb. 3.4
natural_image
Diagram of a cooking pot with liquid and a ball on a surface, showing motion lines (no text or symbols)Abb. 4.1
natural_image
Illustration of a green checkmark inside a cooking pot (no text or symbols)Abb. 4.2
natural_image
Simple line drawing of a cooking pot with a U-shaped magnet attached (no text or symbols)Abb. 4.3
4.1.3 Topfgrößen
natural_image
Illustration of a cooking pot with a green checkmark inside, no text or symbols presentAbb. 4.4

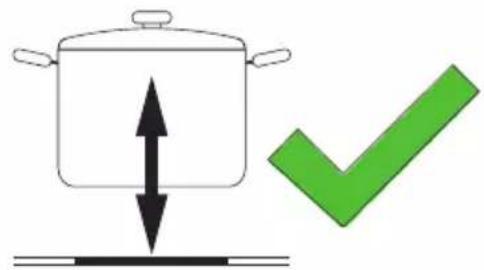
Abb. 4.5
4.1.4 Energieersparnis
natural_image
Simple line drawing of a stick figure with a circular head and a wavy tail, labeled '1' (no text or symbols on the figure itself)Abb. 4.11
natural_image
Line drawing of a cooking pot with three downward arrows indicating heating or cooling process (no text or symbols)Abb. 4.12
natural_image
Top-down diagram of a table with two circular objects and a green checkmark (no text or symbols)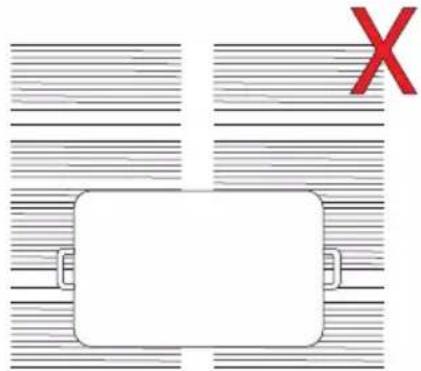
natural_image
Simple diagram with a white rectangular shape and a red 'X' symbol, surrounded by horizontal striped lines (no text or labels)Abb. 4.23
Abb. 4.24
Abb. 4.25
Abb. 4.26
natural_image
Two blank document sheets with horizontal lines and a green checkmark overlay (no text or symbols)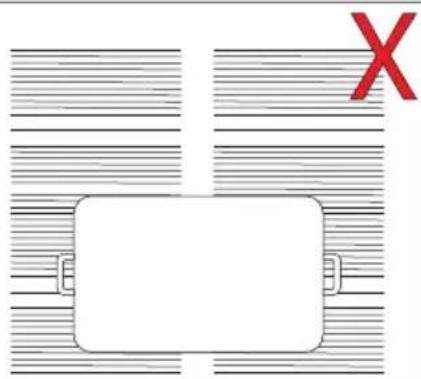
natural_image
Simple diagram with a rectangular shape and a red 'X' symbol, no text or labels presentAbb. 4.27
Abb. 4.31
Abb. 4.32
Abb. 4.34
natural_image
Simple line drawing of a hand pointing at a clock face (no text or symbols)Abb. 4.37
Abb. 5.2
natural_image
Pure mechanical diagram showing a lever and shaft assembly without any text, numbers, or symbolsb)
natural_image
Pure mechanical diagram showing a pipe connection with a screw and base plate (no text or symbols)KM6600IB-28KM8800IF-28
natural_image
Isometric technical drawing of a multi-chamber cooling unit with fans and cooling fins (no text or labels)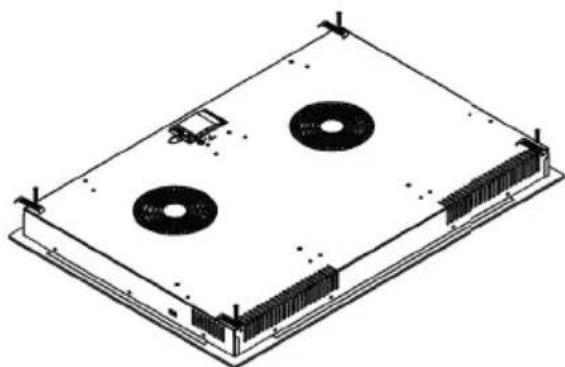
natural_image
Isometric technical drawing of a rectangular electronic device with four circular cutouts and mounting holes (no text or symbols)KM9140I-28
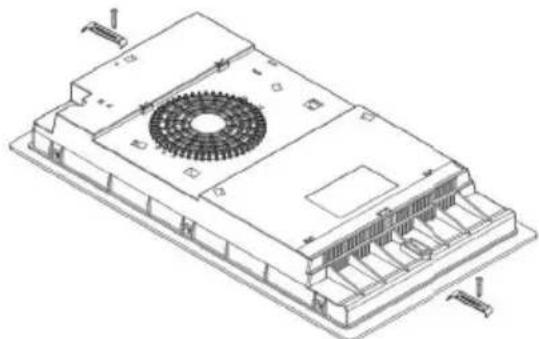
natural_image
Isometric technical drawing of a server rack with a central fan and mounting base (no text or symbols)Abb. 5.3
a) - Version 1
b) - Version 2

Abb. 5.4
L-N:220-240V\~
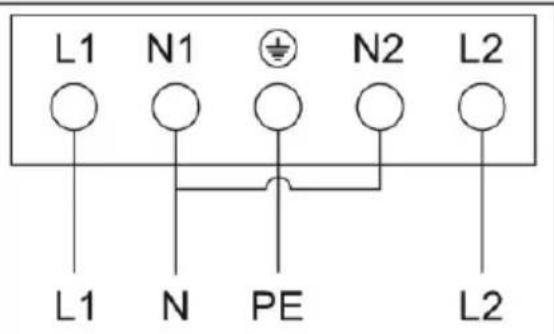
L1-L2:380-415V\~
KM8800IF-28
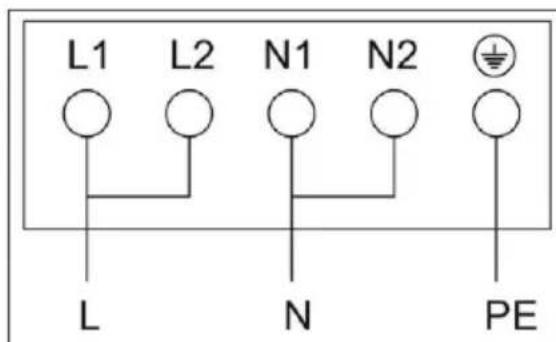
L-N:220-240V\~
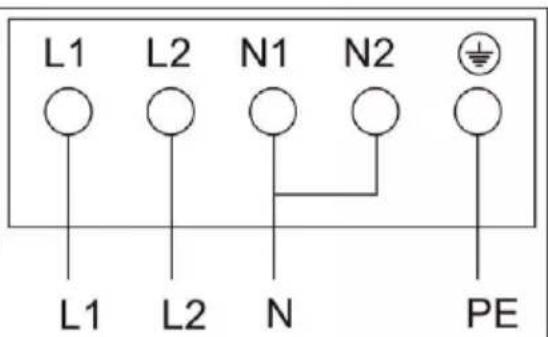
L1-L2:380-415V\~
Abb. 5.5
6 : WARTUNG
1.1 Reading the manual......en-3
2 : GENERAL SAFETY RULES......en-7
2.1 Important information ...... en-7
2.2 Environmental Protection......en-13
3: TECHNICAL DATA AND FEATURES......en-14
3.1 Technical data ...... en-14
3.2 Wiring diagram...... en-20
4:HOW TO USE......en-21
4.1 Preliminary advice...... en-21
4.2 Using the electric hob...... en-27
5: INSTALLATION ...... en-49
5.1 List of accessories...... en-49
5.2 Preliminary operations ...... en-49
5.3 Instructions for installation...... en-51
5.4 Connection of hob to mains ...... en-55
6: MAINTENANCE ...... en-57
6.1 Cleaning and care......en-57
7: TROUBLESHOOTING ...... en-59
7.1 Troubleshooting ...... en-59
7.2 Display of error codes ...... en-60
1 : GENERAL INFORMATION
1.1 Reading the manual
1.1.1 Overview
Dear customer, thank you for your trust and for purchasing an appliance from our range.
The appliance you purchased is designed to meet your home needs. We ask you to carefully follow these instructions for use, which describe the possible uses and operation of your appliance.
These instructions for use apply to various types of units, so you will also find descriptions of functions that your unit may not feature.
The manufacturer assumes no liability for damage to persons or property caused by incorrect or improper installation of the unit.
The manufacturer reserves the right to make the necessary changes to the various models in order to comply with the technical standards in force.
If you have any complaints, please contact your retailer's customer service.
1.1.2 Manufacturer data
1.1.3 Assistance service
If you have any technical questions regarding your unit, please contact your retailer's customer service.
Before calling customer service, make sure you have the following information with you:
- model identification code
1.1.4 Introduction and safety
Before installing and/or using the appliance, carefully read the instructions contained in this manual.
This will help you familiarise yourself with your new unit.
Keep this document handy so that you can refer to it at any time and pass it on to any subsequent owners.
Read the safety messages contained in the introduction to this manual and consider the safety notes such as: "Caution", "Warning", and "Danger" in the text.
| This symbol means:NOTEThis symbol indicates useful advice and calls attention to correct procedures and behaviours. Observing the instructions marked with this symbol will save you trouble.The symbol serves to highlight particular methods or procedures to be followed for correct use of the appliance. | |
| This symbol means:WARNINGThis symbol serves to highlight an operation to be carried out with special caution as it could endanger the structure of the appliance or its components. | |
| This symbol means:CAUTIONThis symbol serves to highlight information on safety. Read it thoroughly. Make sure that you also fully understand the causes of potential dangerous accidents. | |
| This symbol means:DANGERThis symbol serves to highlight a hazardous situation for yourself and others. Read it thoroughly. Make sure that you also fully understand the causes of potential dangerous or lethal accidents. | |
| This symbol means:DISPOSALThis symbol on the product or on the packaging indicates that the product must not be treated as normal household waste but must be disposed of via an appropriate collection depot for the recycling of electrical and electronic equipment. By contributing to the proper disposal of this product you protect the environment, the health and well-being of your fellow men. Incorrect disposal endangers the environment and health. You can obtain more information on recycling this product from your local authorities, waste disposal devices or the point of sale from which the product was purchased. |
1.1.5 Appliance identification
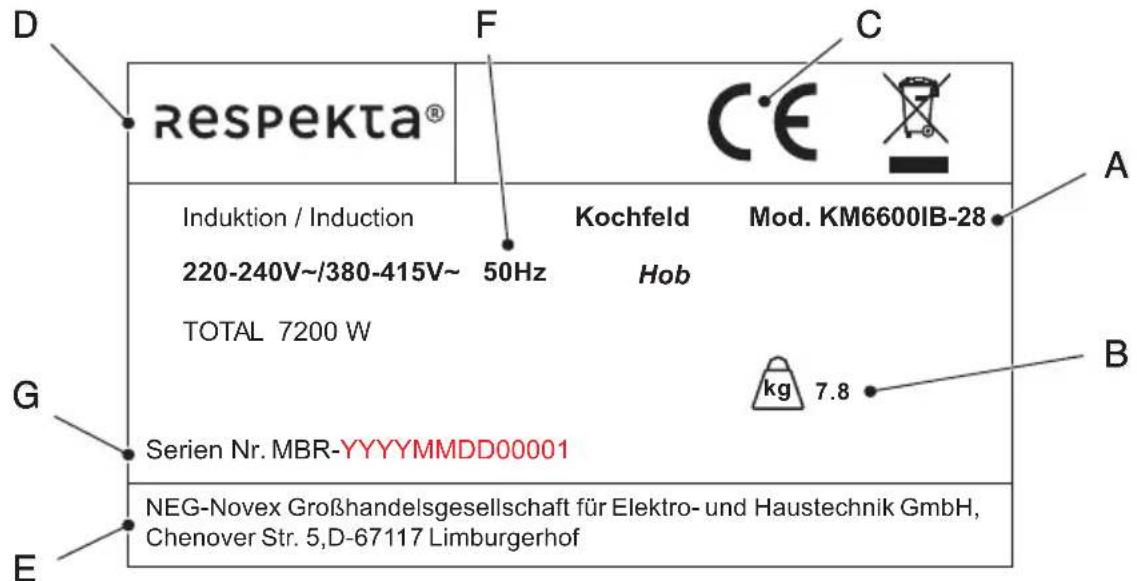
The following data are shown on the nameplate:
A - Model
B - Weight
C - CE Marking
D - Manufacturer
E - Manufacturer data
F - Description
G - Serial number

NOTE: We recommend writing down the data and serial numbers of the machine so they are readily available if needed.

NOTE: To make the assistance and spare parts service efficient, always quote the data on this nameplate.
Location of the nameplate
The appliance nameplate is located at the bottom.
CE declaration of conformity
The manufacturer of the appliances described here, to which this declaration refers, declares under his sole responsibility that these appliances comply with the basic safety, health and protection requirements of the relevant EC directives, and that the related test reports, in particular the EC declaration of conformity duly issued by the manufacturer or his authorised representative, are available for inspection by the competent authorities and can be requested through the vendor of the equipment. The manufacturer also declares that the components of the appliance or appliances described in this manual, which may come into contact with fresh food, do not contain toxic substances.
1.1.6 Warranty conditions
The manufacturer assumes no liability for damage caused by the buyer.
This appliance has been manufactured and tested according to the latest methods. Regardless of the seller's/dealer's 6-month legal warranty obligation, the manufacturer provides a warranty for material and manufacturing without defects for a period of 24 months from the date of purchase. The warranty is void in the event of interventions by the buyer or third parties. Damage caused by improper use or operation, improper installation or storage, improper connection, as well as force majeure or other external influences are not covered by the warranty. We reserve the right to repair or replace defective parts or change the unit in case of complaints. Only if the adjustment/s or replacement of the appliance ultimately fail to achieve the use intended by the manufacturer, may the buyer request a reduction in the purchase price or the cancellation of the purchase contract under warranty within six months, calculated from the date of purchase.
Claims for damages, including with respect to consequential damages, insofar as they are not based on wilful misconduct or gross negligence, are excluded.
The warranty claim must be proven by the buyer by presenting the purchase receipt. The warranty is valid within the Federal Republic of Germany.
2 : GENERAL SAFETY RULES
2.1 Important information
 | DANGER: There is a risk of fire if cleaning is not performed according to the instructions in this manual. |
 | DANGER: Risk of fire due to spontaneous combustion of oil and fat fumes. Avoid reusing oil, as used oil may contain organic residues which make spontaneous combustion more likely. |
 | DANGER: Do not place flammable products or objects soaked with flammable products in, on or near the appliance. |
 | DANGER: If you notice any damage on the surface of the hob, disconnect the unit immediately from the power supply to avoid electric shock. |
 | DANGER: Danger hot surfaces. Failure to comply with these instructions could cause burns and scalds.During use, the accessible parts of this appliance may become hot enough to cause burns.Do not touch the ceramic glass hob until the surface has cooled down; do not place clothes or any other object on the hot surface.Do not place metal objects such as knives, forks, spoons and lids on the hob as they could get hot.Cookware handles can feel hot to the touch. Check that cookware handles do not extend over other cooking zones that are switched on. |
 | DANGER: Do not make any changes to the unit. |
 | DANGER: Pay attention, the edges of the panel are sharp. |
 | CAUTION: Use only the hob protectors designed by the manufacturer of the appliance or the hob protectors built into the appliance. The use of inadequate protection may cause accidents. |
 | CAUTION: Before carrying out any maintenance or cleaning operation, the appliance must be disconnected from the power supply. |
 | CAUTION: Make sure that the data on the hob nameplate are compatible with the power supply of the house in which it is to be installed, otherwise consult a qualified technician. |
 | CAUTION: Make sure to use the correct cable for connection to the power supply.Make sure that the appliance is installed correctly. If unsuitable power cords or exposed power plugs are used, the connection may overheat.Make sure the power cord is not loose or tangled.Make sure that a guard is installed that prevents direct contact with the cables.Do not use multiple sockets or extension cables.If the power outlet is loose, do not connect the power plug of your appliance.Do not pull the power cord when you want to disconnect the unit from the power supply.Always pull by the plug.Do not damage the power plug (if present) and the power cord. Contact our authorised customer service or a specialised technician to replace the damaged power cord. |
 | CAUTION: Do not insert the plug into the wall socket before installation has been completed. Make sure that the plug of the appliance is still accessible after installation. |
 | CAUTION: The power supply mains must have an earth connection. |
 | CAUTION: When connecting with fixed wiring, a disconnection system (residual current device) complying with current standards must be included. |
 | CAUTION: Only use suitable power supply cut-off devices: overload switches, fuses (screw fuses must be removable from the holder), residual current switches and contactors. |
 | CAUTION: The electrical system must have a disconnecting device through which it must be possible to disconnect the appliance from the power supply on all poles. The disconnecting device must be designed with contacts with a cross section of at least 3 mm. |
 | CAUTION: When connecting the appliance electrically, make sure that the cable and plug do not come into contact with the hot appliance or hot cookware. |
 | CAUTION: All parts protecting against direct contact and insulated parts must be fastened in such a way that they cannot be removed without tools. |
 | CAUTION: Ventilation openings must not be covered or obstructed. |
 | CAUTION: Before making any connections, make sure that the mains voltage corresponds to the voltage shown on the specific label located inside the appliance. |
 | CAUTION: Keep children under 8 years of age away from the unit. Children must be supervised to ensure that they do not misuse the appliance. |
 | CAUTION: Cleaning and maintenance must not be done by children without supervision. |
 | CAUTION: Children must not play with the appliance. |
 | CAUTION: Keep all packing materials out of the reach of children. |
 | CAUTION: Remove all packing material, stickers and protective film (if any) before using the first time. |
 | CAUTION: Keep children and pets away from the appliance during operation or while it cools down. Accessible parts are hot. |
 | CAUTION: Use of the appliance by persons with physical, sensory or mental problems is only permitted under the supervision of persons responsible for their safety. |
 | CAUTION: To clean the appliance, make sure that the unit is switched off. |
 | CAUTION: Do not use a damaged unit. |
 | CAUTION: In case the unit malfunctions, contact customer service. Never try to repair the unit yourself. |
 | CAUTION: Do not place hot cookware on the control panel. |
 | CAUTION: Do not drop heavy objects or cookware onto the appliance. NEVER climb onto the hob: the surface could become damaged. |
 | CAUTION: Never turn on the cooking zones if there are no dishes on them or if the dishes are empty. |
 | CAUTION: Do not put aluminium foil on the appliance. |
 | CAUTION: Cookware made of cast iron, cast aluminium or with damaged bases may scratch the ceramic glass surface. Always lift dishes when you want to move them on the hob. |
 | CAUTION: This appliance is intended exclusively for cooking. Any other use is to be considered misuse, for example heating a room. |
 | CAUTION: Due to the weight of the hob, pay special attention during installation or handling. Always wear safety gloves and safety footwear. |
 | CAUTION: Do not use the unit with wet, damp hands or if you have come into contact with water. |
 | CAUTION: Melted plastic, plastic films must be immediately removed from the hob. |
 | CAUTION: Make sure that there is a space of at least 30 mm left between the worktop and the appliance below for air circulation. Damage caused by lack of ventilation space is excluded from the warranty. |
 | CAUTION: The cooking process must be constantly supervised. |
 | WARNING: Installation and electrical connection must be carried out by a specialised technician according to the manufacturer's instructions and in compliance with the regulations in force. Incorrect installation could invalidate any warranty claim. |
 | WARNING: In case sugar or other heavily sweetened substance is spilled on the hot ceramic glass hotplate, wipe it up immediately and carefully remove the sugar with a scraper while the hotplate is still warm. This prevents possible damage to the ceramic glass surface. |
 | WARNING: Do not use the appliance as a work or storage surface. |
 | WARNING: Switch off the appliance and let it cool down before cleaning it.After the hob has sufficiently cooled down, it is possible to remove limescale, water marks and grease splashes with a damp cloth and a little detergent. After cleaning, dry the hob with a soft cloth. |
 | WARNING: Seal the edges of the hob with sealing tape to prevent swelling due to moisture.Protect the bottom of the unit from steam and moisture. |
 | WARNING: Do not install the appliance near a door or under a window. This will prevent hot cookware from falling off when opening the door or window. |
 | WARNING: Do not leave the appliance unattended when it is in operation. |
 | WARNING: Switch off the cooking zones after each use. |
 | WARNING: Do not put cutlery or cookware lids on the cooking zones, they could heat up. |
 | WARNING: If the appliance is installed above drawers, make sure there is sufficient space between the bottom of the appliance and the top drawer, as this space is essential for air circulation. |
 | WARNING: Once the hob has been removed from the packaging, check its conditions. If the product is damaged, do not use the product and contact the RESPEKTA service network.Do not cook on a broken or cracked hob. If the hob surface is broken or cracked, immediately disconnect the appliance from the mains (wall switch) and contact a qualified technician. |
 | WARNING: The minimum distances from other appliances and kitchen cabinets must be respected. |
 | WARNING: Before installation and use, make sure that the voltage (V) and frequency (Hz) indicated on the hob are exactly the same voltage (V) and frequency (Hz) as the home in which it is to be installed. |
 | WARNING: Clean the appliance regularly to avoid wear of the surface material. |
 | WARNING: Disconnect the appliance from the mains before carrying out maintenance work. |
 | WARNING: The appliance is not intended to be operated via an external timer or a remote control system. |
 | WARNING: Do not clean the unit with a jet of water or steam.Clean the unit with a soft, damp cloth.Only use detergents with a neutral pH to clean the hob surface.Do not use abrasive sponges, solvents or metal objects. |
 | NOTE: Before installing and/or using the hob, read the instructions carefully and store this manual for future reference. |
 | NOTE: Clean the hob after each use. |
 | NOTE: Always make sure that the bottom of the cookware is clean. |
 | NOTE: Scratches or dark spots on the surface do not compromise the functionality of the hob. |
 | NOTE: Use a suitable scraper for cleaning the glass. |
 | NOTE: The hob is for domestic use only.The appliances described in this document are not intended for commercial use. They are designed for domestic use only.Commercial use of any kind is not covered by the manufacturer's warranty. |
 | NOTE: This appliance complies with electromagnetic safety standards. |
 | NOTE: In order to obtain the Warranty, make sure you can provide the warranty card and the purchase receipt, otherwise the Warranty will not be offered. |
2.2 Environmental Protection
2.2.1 Packaging
The packing materials are 100% recyclable. Follow local regulations for their disposal.

WARNING: Packing material (plastic bags, polystyrene parts, etc.) is a source of danger for children. Keep packing material out of the reach of children.
2.2.2 Disposal

WARNING: Dispose of the old appliance in accordance with legal regulations. Before disposal, cut the power cord to make it unusable. For disposal, the appliance must be sent to the collection authorities.
3 : TECHNICAL DATA AND FEATURES
3.1 Technical data
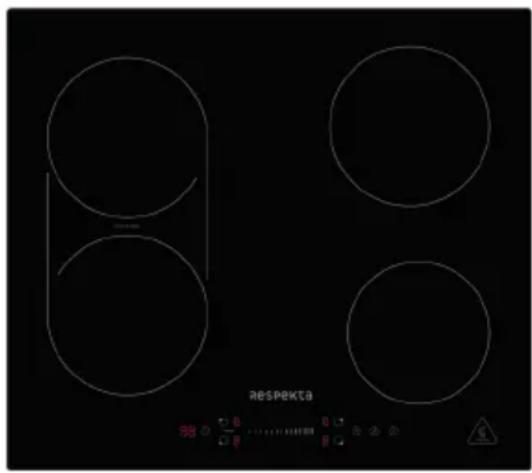
3.1.1 Model KM6600IB-28
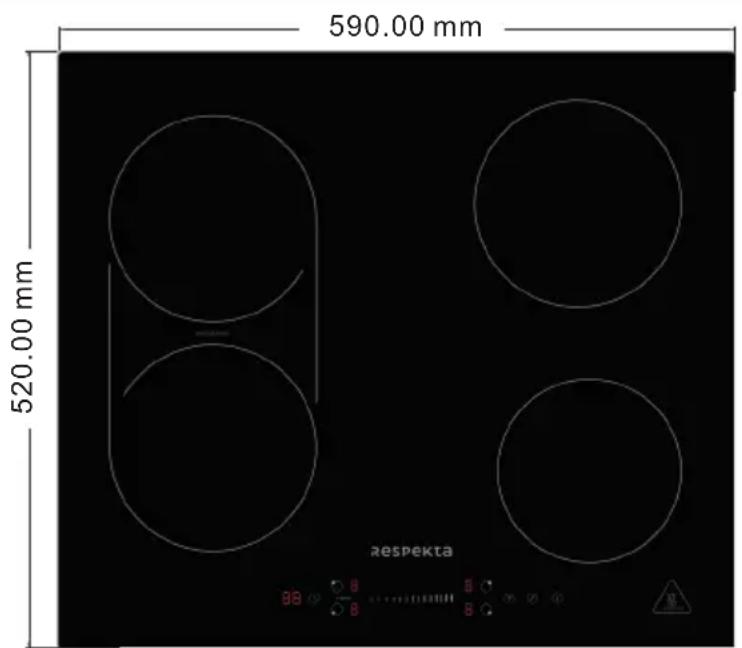
Fig. 3.1
| Model no. KM6600IB-28 | ||
| Product identification / Brand NEG respekta | ||
| Product family Built-in hob | ||
| Product description Induction hob, 60 cm | ||
| Type of hob (electric/gas/ combination) | electric | |
| Type of heating (solid plates/ radiation/induction) | induction | |
| Hob finish (stainless steel/glass/ ceramic glass) | ceramic glass | |
Features
| Model no. KM6600IB-28 | ||
| Voltage / Frequency V/Hz 220-240V | ~/380-415V | ~ 50Hz |
| Nominal power Watt 7200 | ||
| Power cord length cm 120 | ||
| Power cord (with/without) plug without plug | ||
| Hob width cm 60 | ||
| No. heating zones (ceramic glass or induction hobs) | no. 4 | |
| Front heating area (left) Watt 1800W | W/Power Boost 2100W | |
| Rear heating area (left) Watt 1800W | W/Power Boost 2100W | |
| Rear heating area (right) Watt 1800W | W/Power Boost 2100W | |
| Front heating area (right) Watt 1200W | W/Power Boost 1500W | |
| Bridge heating area Watt 3000W | Power Boost 3600W | |
| Flex heating area Watt / | ||
| ECO function | Yes/No | Yes |
| Type of controls (knob/touch/slider) | touch and slider control | |
| Configuration of heating zones | no. 0-9 | |
| Configuration of digital timer | minutes | 0-99 |
| Child safety lock function | Yes/No | Yes |
| Residual heat indicator | Yes/No | Yes |
| Overheating protection | Yes/No | Yes |
| Automatic shutdown | Yes/No | Yes |
| Appliance dimensions (Length-Height-Depth) | mm | 590 x 520 x 60 |
| Net weight | Kg | 7.8 |
| Gross weight (packaging included) | Kg | 9.3 |
| Packaging dimensions (Length-Height-Depth) | mm | 700 x 620 x 120 |
Equipment or accessories
| Model no. | KM6600IB-28 | |
| Fixing brackets (included/not included) | included | |
| Sealing tape (included/not included) | included |
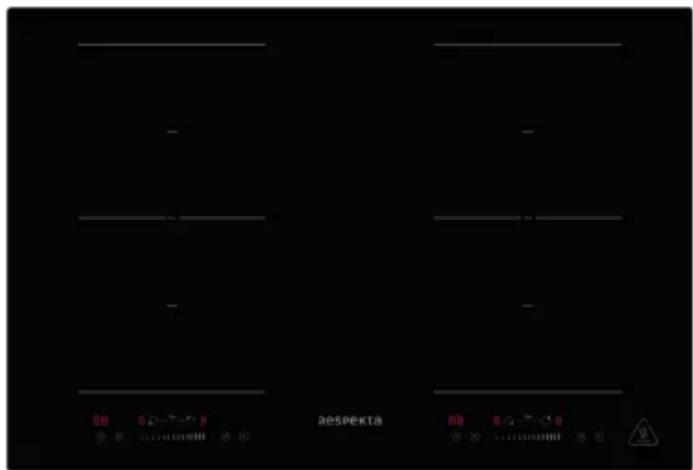
3.1.2 Model KM8800IF-28
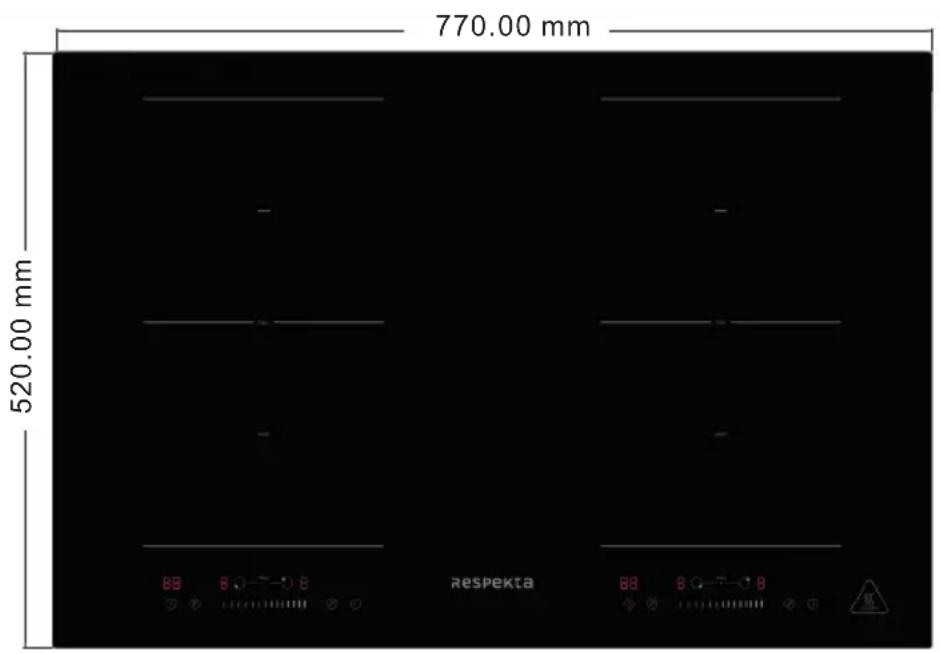
Fig. 3.2
| Model no. KM8800IF-28 | ||
| Product identification / Brand NEG respekta | ||
| Product family Built-in hob | ||
| Product description Induction hob, 80cm | ||
| Type of hob (electric/gas/ combination) | electric | |
| Type of heating (solid plates/ radiation/induction) | induction | |
| Hob finish (stainless steel/glass/ ceramic glass) | ceramic glass | |
Features
| Model no. KM8800IF-28 | ||
| Voltage / Frequency V/Hz 220-240V | ~/380-415V | ~ 50Hz |
| Nominal power Watt 7200 | ||
| Power cord length cm 120 | ||
| Power cord (with/without) plug without plug | ||
| Hob width cm 80 | ||
| No. heating zones (ceramic glass or induction hobs) | no. 4 | |
| Front heating area (left) Watt 1800W | W/Power Boost 2100W | |
| Rear heating area (left) Watt 1800W | W/Power Boost 2100W | |
| Rear heating area (right) Watt 1800W | W/Power Boost 2100W | |
| Front heating area (right) Watt 1800W | W/Power Boost 2100W | |
| Bridge heating area Watt / | ||
| Flex heating area Watt 3000W/Power Boost 3600W | ||
| ECO function | Yes/No | No |
| Type of controls (knob/touch/slider) | touch and slider control | |
| Configuration of heating zones | no. 0-9 | |
| Configuration of digital timer | minutes | 0-99 |
| Child safety lock function | Yes/No | Yes |
| Residual heat indicator | Yes/No | Yes |
| Overheating protection | Yes/No | Yes |
| Automatic shutdown | Yes/No | Yes |
| Appliance dimensions (Length-Height-Depth) | mm | 770 x 520 x 60 |
| Net weight | Kg | 13 |
| Gross weight (packaging included) | Kg | 15.1 |
| Packaging dimensions (Length-Height-Depth) | mm | 845 x 620 x 135 |
Equipment or accessories
| Model no. | KM8800IF-28 | |
| Fixing brackets (included/not included) | included | |
| Sealing tape (included/not included) | included |
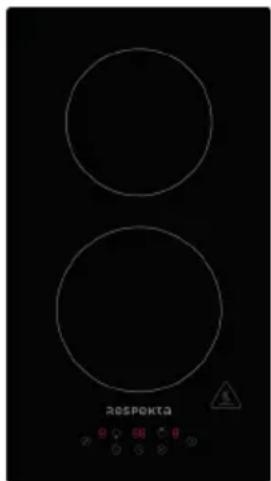
3.1.3 Model KM9140I-28
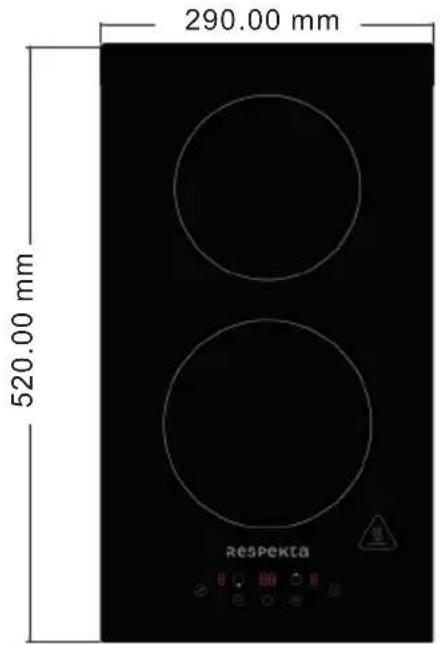
Fig. 3.3
| Model no. KM9140I-28 | ||
| Product identification / Brand NEG respekta | ||
| Product family Built-in hob | ||
| Product description Induction hob, 30cm | ||
| Type of hob (electric/gas/ combination) | electric | |
| Type of heating (solid plates/ radiation/induction) | induction | |
| Hob finish (stainless steel/glass/ ceramic glass) | ceramic glass | |
Features
| Model no. KM9140I-28 | ||
| Voltage / Frequency V/Hz 220-240V~/50Hz | ||
| Nominal power Watt 3400 | ||
| Power cord length cm 167 | ||
| Power cord (with/without) plug with plug | ||
| Hob width cm 30 | ||
| No. heating zones (ceramic glass or induction hobs) | no. 2 | |
| Front heating area Watt 1800W/Power Boost 2100W | ||
| Rear heating area Watt 1200W/Power Boost 1500W | ||
| Bridge heating area Watt / | ||
| Flex heating area Watt / | ||
| ECO function Yes/No No | ||
| Type of controls (knob/touch/slider) | touch | |
| Configuration of heating zones | no. 0-9 | |
| Configuration of digital timer | minutes | 0-99 |
| Child safety lock function | Yes/No | Yes |
| Residual heat indicator | Yes/No | Yes |
| Overheating protection | Yes/No | Yes |
| Automatic shutdown | Yes/No | Yes |
| Appliance dimensions (Length-Height-Depth) | mm | 290 x 520 x 58 |
| Net weight | Kg | 4.1 |
| Gross weight (packaging included) | Kg | 5 |
| Packaging dimensions (Length-Height-Depth) | mm | 375 x 580 x 115 |
Equipment or accessories
| Model no. | KM9140I-28 | |
| Fixing brackets (included/not included) | included | |
| Sealing tape (included/not included) | included |
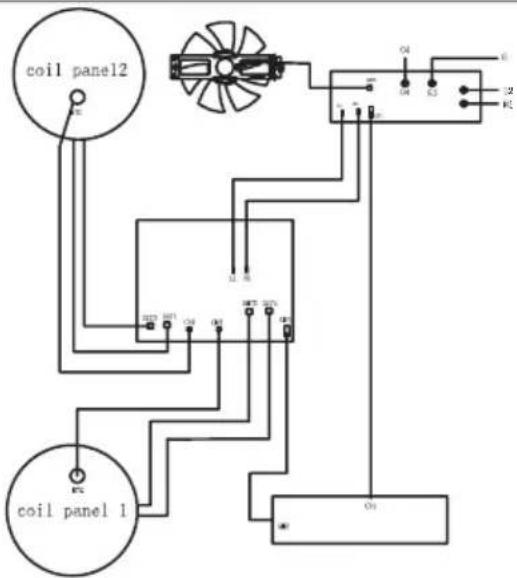
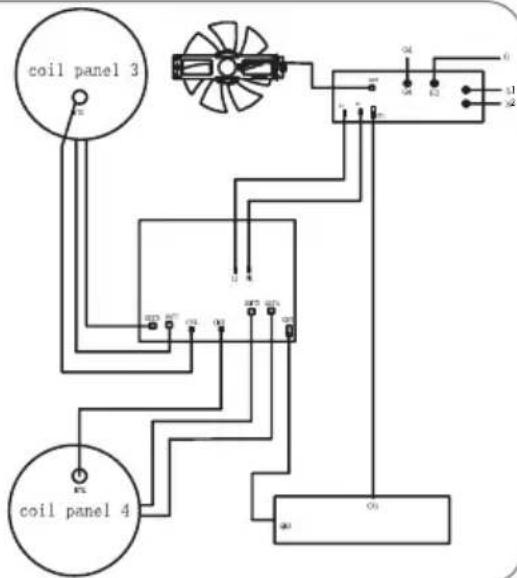
3.2 Wiring diagram
KM6600IB-28
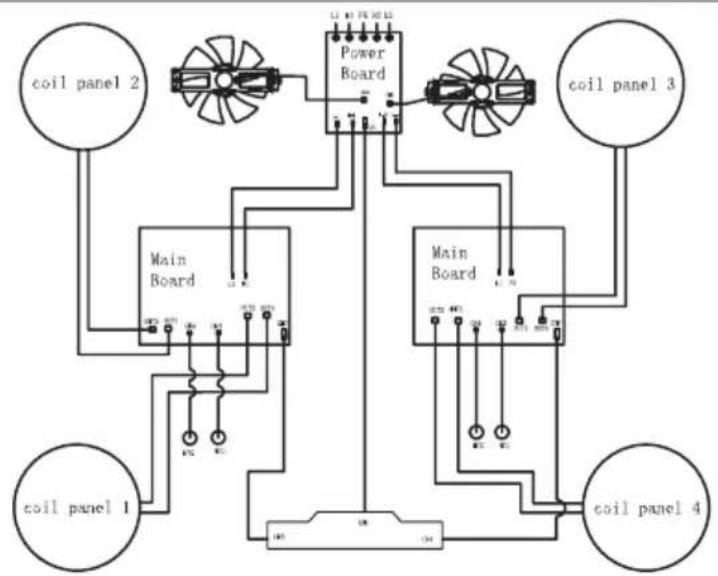
flowchart
graph TD
    A["coil panel 1"] --> B["Main Board"]
    C["coil panel 2"] --> D["Power Board"]
    E["coil panel 3"] --> F["Main Board"]
    G["coil panel 4"] --> H["Main Board"]
    B --> I["Terminal"]
    D --> J["Terminal"]
    F --> K["Terminal"]
    H --> L["Terminal"]
KM8800IF-28
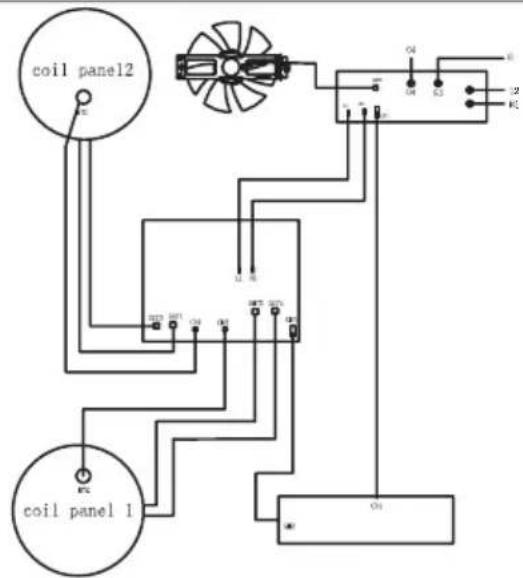
Fig. 3.4
4 : HOW TO USE
4.1 Preliminary advice
 | DANGER: When the hob is in operation, never leave the dish unattended as the fat could catch fire. |
 | DANGER: Persons with a pacemaker should consult their doctor before using this unit. |
 | CAUTION: Before carrying out any maintenance or cleaning operation, the appliance must be disconnected from the power supply. |
 | WARNING: Remove any protective film that may be left on the ceramic glass hob. |
 | WARNING: Ongoing maintenance ensures good operation and optimal performance of the hob. |
 | WARNING: Make sure the room is sufficiently ventilated. |
 | WARNING: Regularly clean encrustations from dirty surfaces. |
 | WARNING: Make sure that the hob has not been damaged during transport. |
 | WARNING: Installation and electrical connection must be carried out by a specialised technician according to the manufacturer's instructions and in compliance with the regulations in force. |
4.1.1 Operation of the induction hotplate
The hob is fitted with induction hotplates. Heat is generated directly at the bottom of the dish, without any losses through the ceramic glass surface. Energy consumption is lower than that of conventional heaters, which operate on the radiation principle.
The ceramic glass hotplate is not heated directly, but only by return heat transmitted by the dish.
The induction hotplate generates heat from the induction coil (shaped like a spiral), installed underneath the ceramic glass surface. The coil creates a magnetic field at the bottom of the dish, which in turn creates whirling flows of current that heat up.
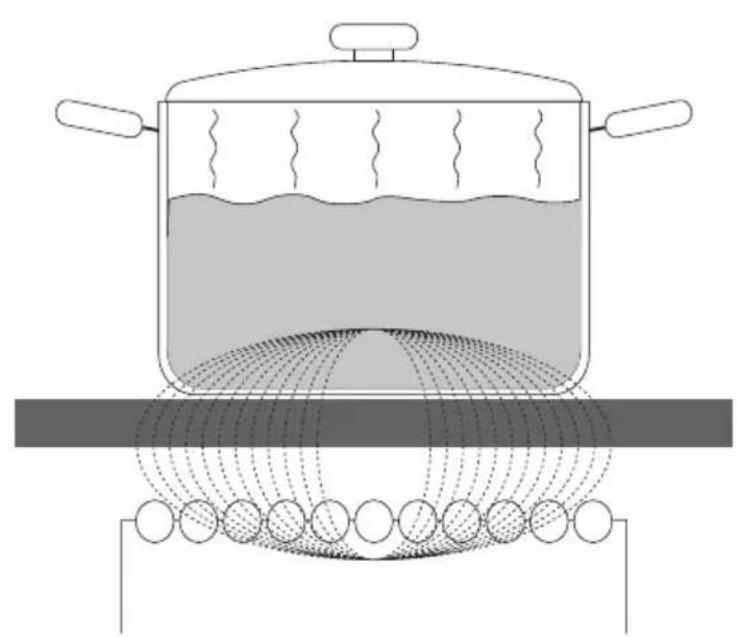
natural_image
Diagram of a cooking pot with liquid and a ball on a surface, showing heat dissipation (no text or symbols)Fig. 4.1

WARNING: In case sugar or other heavily sweetened substance is spilled on the hot ceramic glass hotplate, wipe it up immediately and carefully remove the sugar with a scraper while the hotplate is still warm. This prevents possible damage to the ceramic glass surface.

WARNING: Switch off the appliance and let it cool down before cleaning it. After the hob has sufficiently cooled down, it is possible to remove limescale, water marks and grease splashes with a damp cloth and a little detergent. After cleaning, dry the hob with a soft cloth.
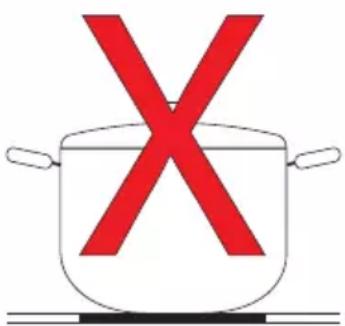
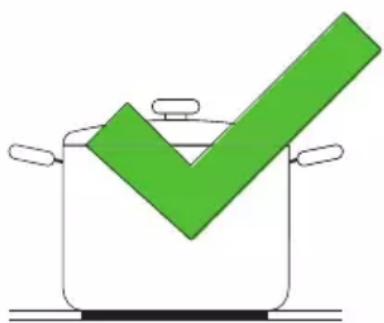
4.1.2 Appropriate cookware for induction hotplates

CAUTION: Only use cookware appropriate for induction hobs. Make sure that the induction symbol is present on the packaging or on the bottom of the dish.
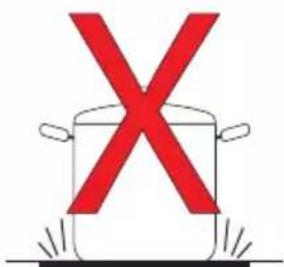
With induction cooking zones, dishes are heated very quickly by a strong magnetic field. The induction hotplate works properly if using appropriate magnetic cookware.
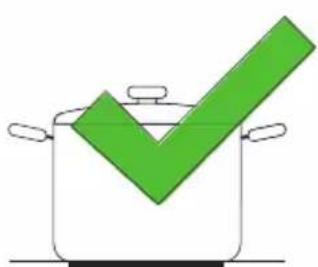
The dish should be in the middle of the hotplate during cooking.
Appropriate cookware:
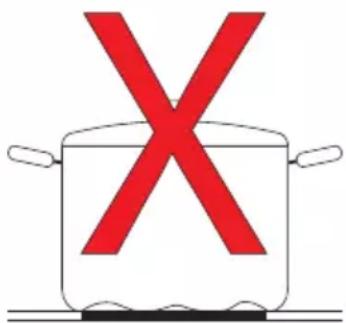
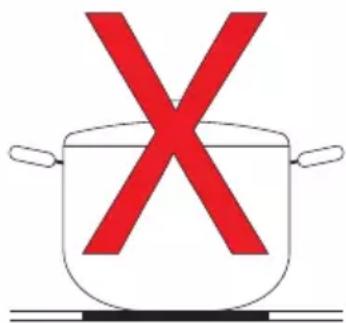
Cookware made of cast iron, steel, enamelled steel, stainless steel, with multilayer bottom (if indicated as suitable by the manufacturer) are suitable.
Inappropriate cookware:
Cookware in copper-clad steel or with aluminium bottom, cookware in glass, wood, ceramic, earthenware or porcelain are NOT appropriate.

NOTE: The bottom of the dish should be flat and smooth. Do not use dishes with a rough bottom or a curved bottom.

NOTE: Some dishes do not have a fully ferromagnetic bottom. In this case, only the magnetic part is heated, the rest of the bottom remains cold.
natural_image
Simple line drawing of a cooking pot with a red 'X' symbol above it, placed on a stove (no text or symbols)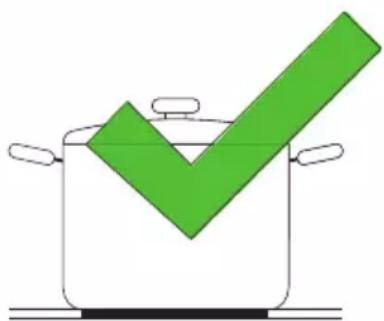
natural_image
Illustration of a cooking pot with a green checkmark inside, no text or symbols presentFig. 4.2
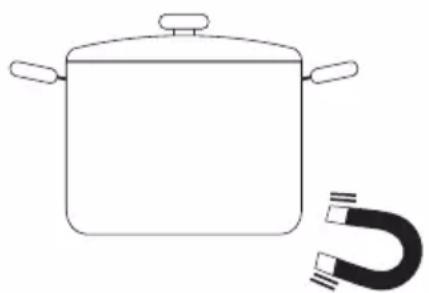
It is possible to check if the dishes are suitable by testing with a magnet. Place a magnet at the bottom of the dish, if it sticks it means that the dish is appropriate for induction. If you don't have a magnet, add some water to the dish you want to check. If the symbol in the control panel does not flash and the water starts to boil, the dish is suitable for induction.
natural_image
Simple line drawing of a cooking pot with a U-shaped magnet attached (no text or symbols)Fig. 4.3
4.1.3 Cookware dimensions
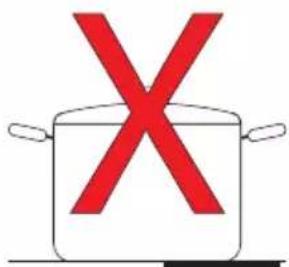
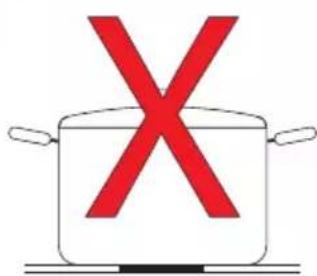
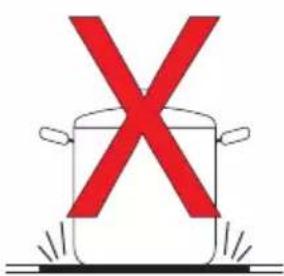
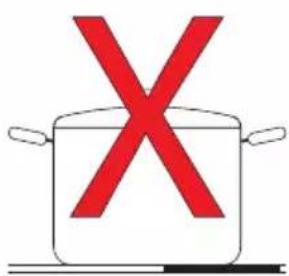
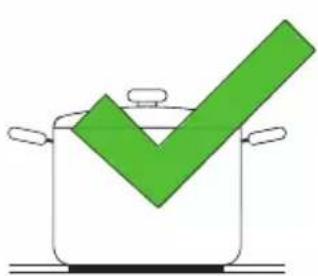
Induction cooking zones automatically adapt to the size of the dish bottom surface within a certain limit. The efficiency of the hotplate depends on the diameter of the bottom of the dish. Dishes with a diameter smaller than the minimum will receive only part of the heat generated by the hotplate.

NOTE: When using a special dish you must follow the manufacturer's instructions.

NOTE: For good cooking results, the ferromagnetic part of the bottom of the dish must match the dimensions of the hotplate. If the hotplate does not detect the dish, try placing it on another hotplate with a smaller diameter. In any case, you must always place the dishes in the centre of the hotplate.
| Hotplate size (mm) Minimum diameter of dish bottom (mm) | |
| 160 120 | |
| 180 140 | |
| 210* 190 160 | |
| Flex Area 250 | |
natural_image
Illustration of a cooking pot with a green checkmark inside, no text or symbols presentFig. 4.4

NOTE: Always lift the cookware and place it gently on the ceramic glass hob. Do not slide them, or they could scratch the glass.
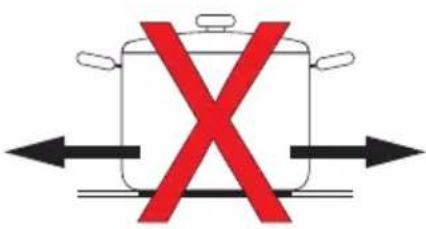
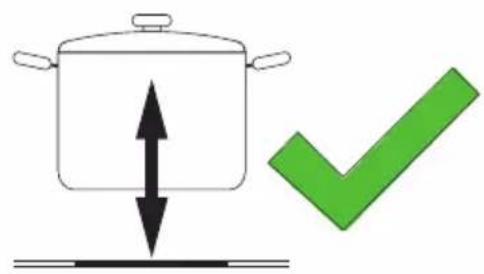
Fig. 4.5
4.1.4 Energy savings
Follow these practical tips to save energy in your cooking activities.
 | WARNING: When preparing dishes with a long cooking time in a pressure cooker, make sure there is always enough liquid in the pot: leaving an empty pot to boil could damage both the hotplate and the pot itself. |
 | NOTE: Place the dishes on the hotplate before switching it on. |
 | NOTE: Place the dishes in the centre of the hotplate. |
 | NOTE: Use residual heat to keep food warm. Cook a new dish on a hotplate that has just been used to take advantage of its residual heat. |
 | NOTE: When heating water, only use the necessary amount. |
 | NOTE: Always cover the pot or pan with an appropriately sized lid. |
 | NOTE: Use a dish size suitable for the amount of food to be prepared. If you use an excessively large pot for a small amount of food, you will unnecessarily consume considerably more energy. |
4.1.5 Using the buttons (touch)
Buttons respond to touch, there is no need to press down.
- Use the whole finger pad, not the tip.
- the acoustic signal indicates that the pressed button is active.
- Make sure that the buttons are always clean and dry and that no object (kitchen utensils or cloth) can cover them. Even a thin layer of water can make the buttons difficult to operate.
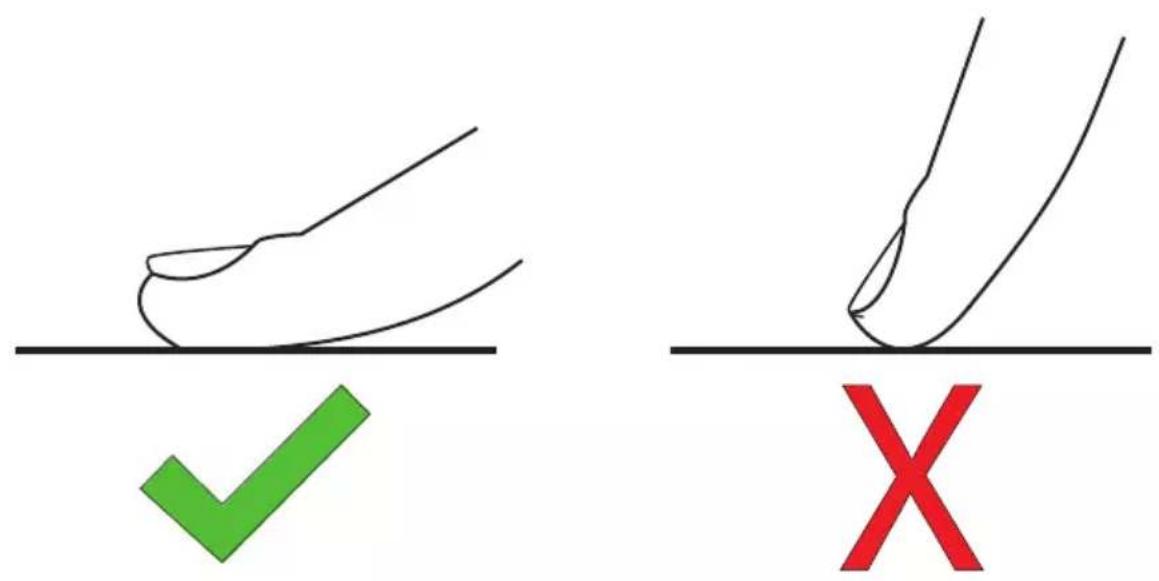
Fig. 4.6
4.2 Using the electric hob
4.2.1 Arrangement of cooking panels
KM6600IB-28
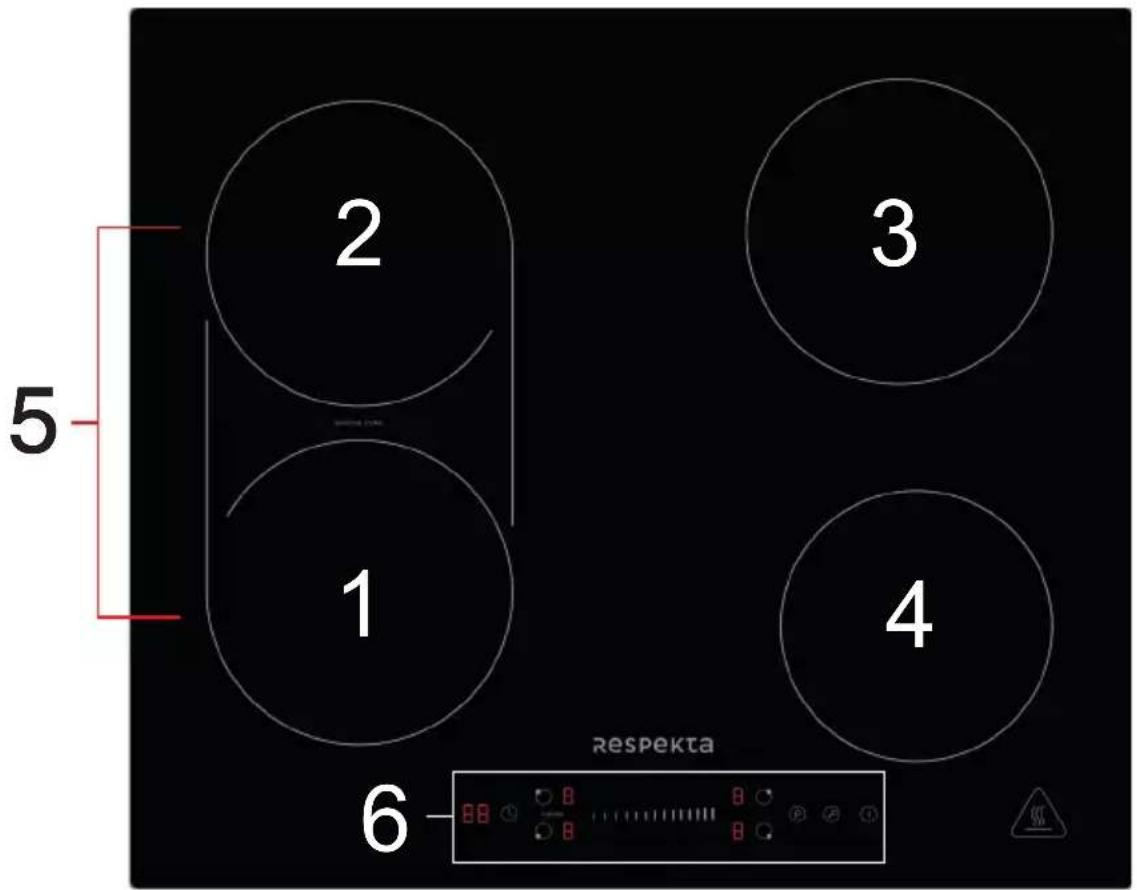
Fig. 4.7
1 - Front left hotplate (1800/2100 W)
2 - Rear left hotplate (1800/2100 W)
3 - Rear right hotplate (1800/2100 W)
4 - Front right hotplate (1200/1500W)
5 - Bridge Area (3000/3600W)
6 - Touch and slider control panel
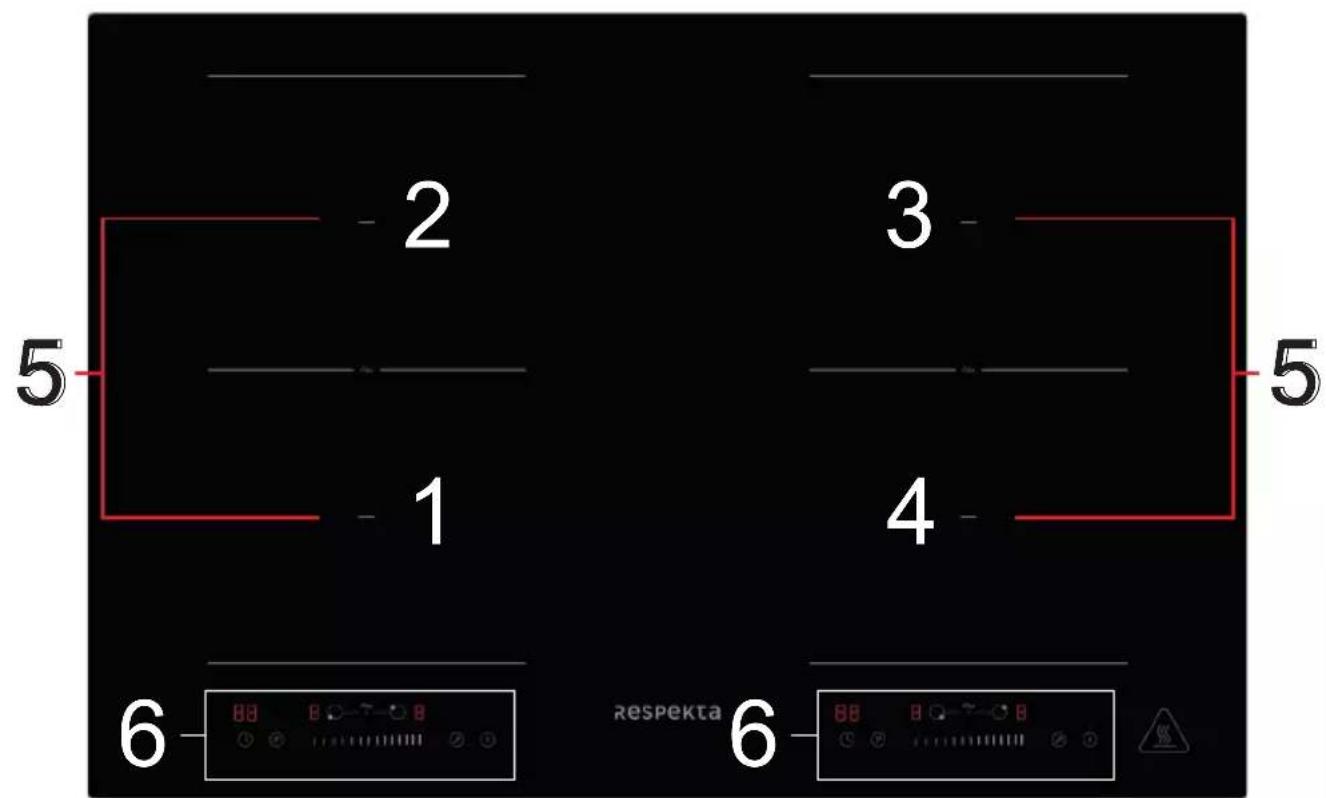
Fig. 4.8
1 - Front left hotplate (1800/2100 W)
2 - Rear left hotplate (1800/2100 W)
3 - Rear right hotplate (1800/2100 W)
4 - Front right hotplate (1800/2100 W)
5 - Flex Area (3000/3600W)
6 - Touch and slider control panel
KM9140I-28
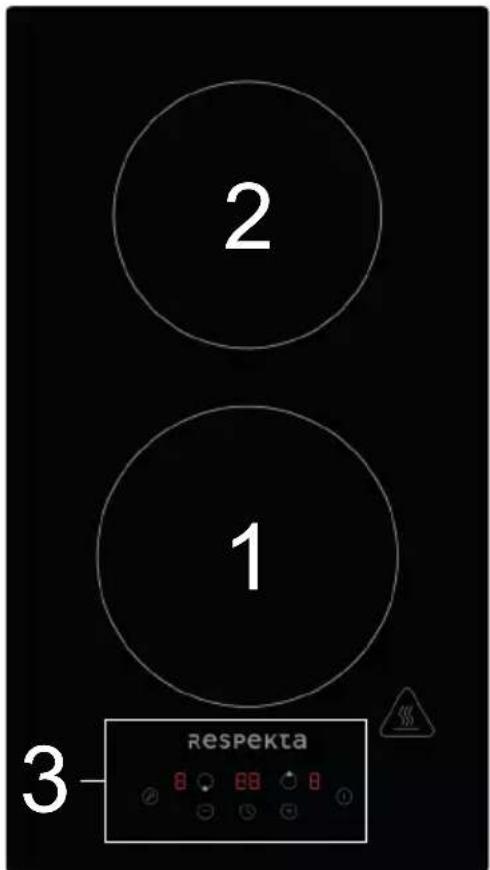
Fig. 4.9
1 - Front hotplate (1800/2100 W)
2 - Rear hotplate (1200/1500 W)
3 - Touch control panel
4.2.2 Control panel
On/off, selection of hotplate and cooking intensity level
1 - ON-OFF button (hob on/off)
2 - Cooking intensity level
3 - Timer button
4 - Control lock button (child safety lock)
5 - Hotplate selection
6 - "Power Boost" button
KM6600IB-28
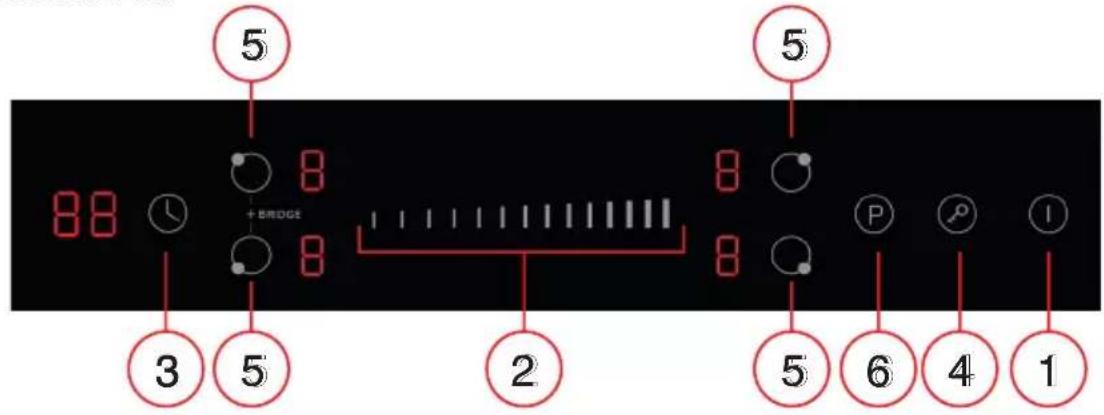
KM8800IF-28
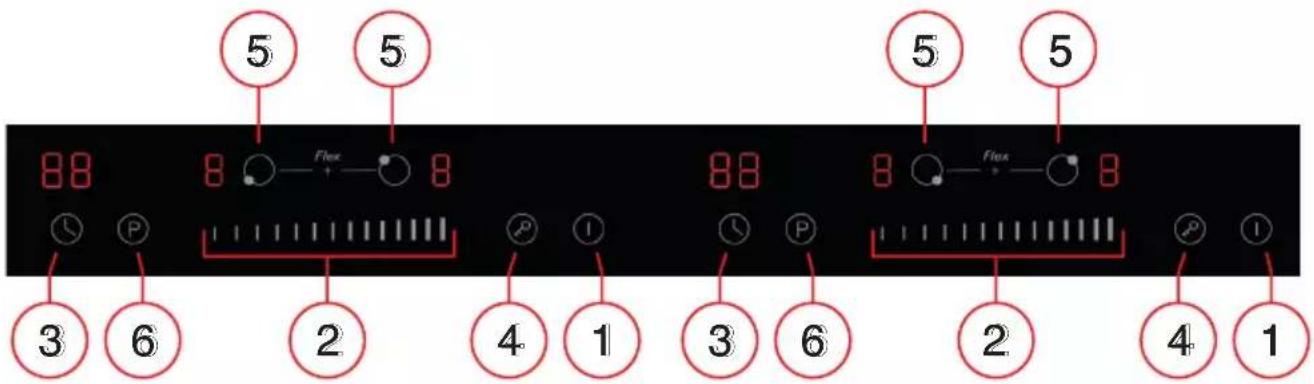
KM9140I-28
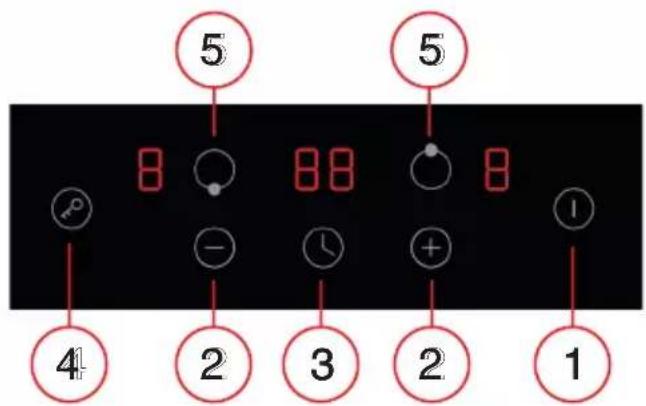
Fig. 4.10
4.2.3 Starting the cooking process
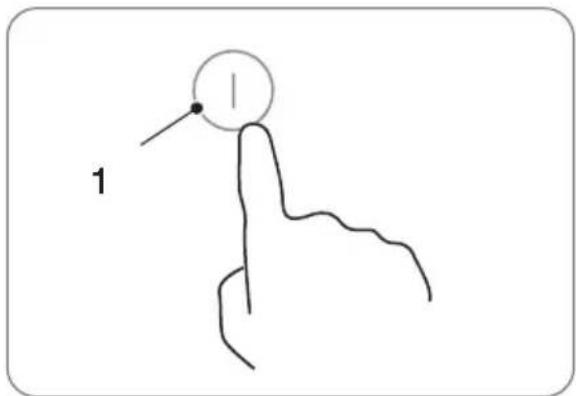
1 - Press the ON/OFF button (1), the control panel indicators show "-". A short beep confirms that the unit is switched on. All control panel elements light up for one second and then go out, indicating that the hob is in stand-by mode.
natural_image
Simple line drawing of a stick figure with a circular head and a wavy tail, labeled '1' (no text or symbols on the figure itself)Fig. 4.11
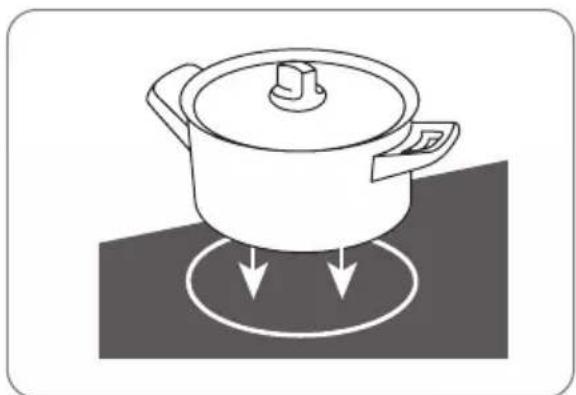
2 - Place the dish on the desired hob.
| WARNING: The base of the dish and the hob must be clean and dry. |
natural_image
Illustration of a cooking pot with three downward arrows indicating heating or cooling process (no text or symbols)Fig. 4.12
3 - By pressing the hotplate selection button (5), an indicator next to it will flash.
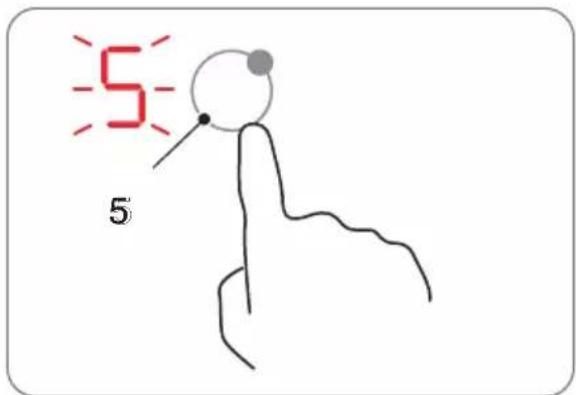
Fig. 4.13
4 - Press the cooking level buttons "+/-" (2) or scroll the slider bar (2) depending on the model to set the desired cooking level. The cooking power/intensity level indicated on the display ranges from 1 to 9 (0 means the hotplate is off). The higher the value, the greater the cooking intensity.

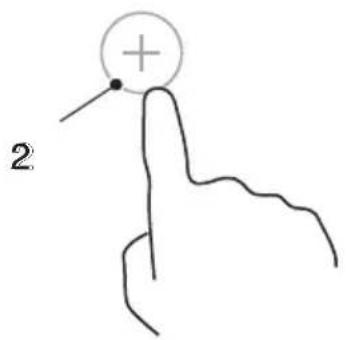
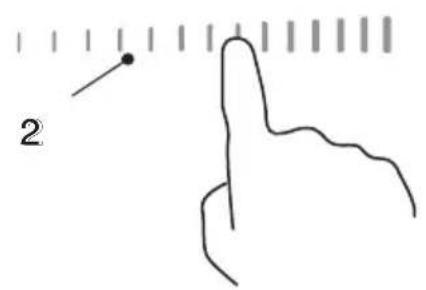
Fig. 4.14

NOTE: If you have not selected a cooking level, the appliance switches off automatically after one minute. You will have to restart from step 1.
The cooking intensity level can be changed at any time during cooking.
The flashing of the symbol

means:
a) - There is no dish on the hotplate for which you are selecting a cooking level.
b) - The dish you are using is not suitable for induction hobs, it may be too small in diameter, or it is not centred correctly on the hotplate. The symbol switches off automatically after 1 minute if no suitable dish is placed on the corresponding hotplate.
4.2.4 Once cooking is done
1 - Press the selection button for the hotplate (5) you wish to switch off.
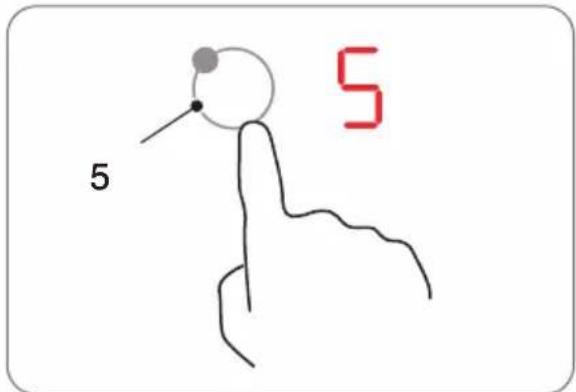
Fig. 4.15
2 - Turn off the hotplate by pressing the "-" button (2) or scroll the slider bar (2) depending on the model until you reach level "0". Make sure the display shows "0".
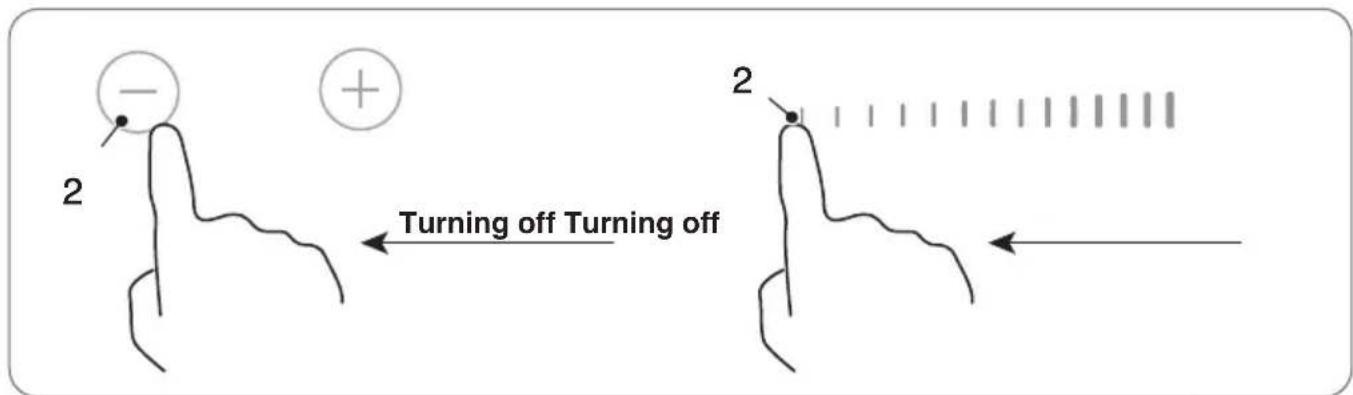
Fig. 4.16
3 - Turn off the entire hob by pressing the ON/OFF button (5).
Fig. 4.17
 | CAUTION: Beware of hot surfaces |
" indicates which hotplate is still hot to the is out as soon as the surface has cooled safe temperature. It can also be used as aving function if you want to heat several se the still hot hotplate for this purpose.

Fig. 4.18
4.2.5 Power Boost
Turn on Power Boost
1 - Select the hotplate you want to heat up quickly (5).
Fig. 4.19

2 - Press the Power Boost button, the cooking intensity level shows "P" and power reaches the maximum level.

NOTE: Only for model KM9140I-28: press the cooking level button "+" (2) multiple times to reach maximum power.
Fig. 4.20
Turn off Power Boost
1 - Select the hotplate button (5) with Power Boost function that you want to switch off.
Fig. 4.21
2 - Press the Power Boost button, to switch off the power function, or press the "+/-" cooking level button (2) to deactivate the power function and set the desired cooking level.

NOTE: In models with slider bar (2), simply set a lower cooking level to deactivate the Power Boost function.
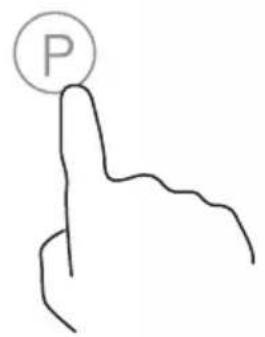
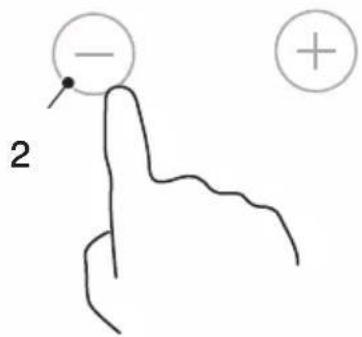
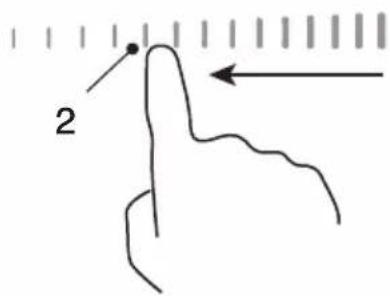
Fig. 4.22

NOTE: The Power Boost function lasts 5 minutes maximum, after which the hotplate in question will automatically switch to level 9.
4.2.6 Bridge heating area function (model KM6600IB-28 only)
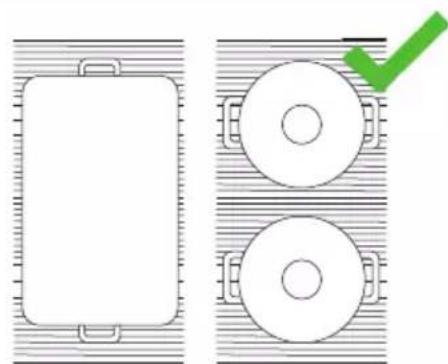
- This area can be activated as a "bridge" zone or as two separate hotplates.
- Position the pans so that they are detected correctly and the heat is distributed evenly.
natural_image
Top-down diagram of a table with two circular objects and a green checkmark (no text or symbols)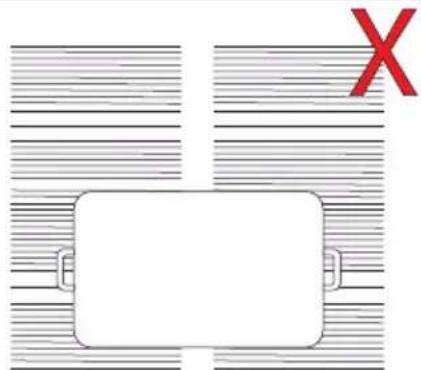
natural_image
Simple diagram with a rectangular shape and a red X mark, no text or symbols presentFig. 4.23
Turn on the Bridge function
1 - Press the hotplate selection buttons (5) simultaneously, the display will show "=" and the power level (e.g., 5).
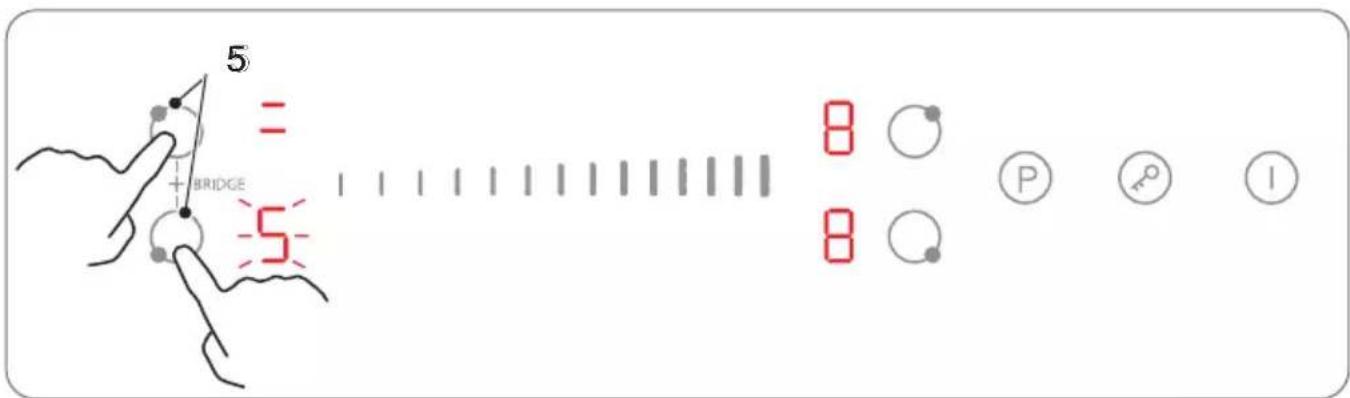
Fig. 4.24
2 - Select and set the desired cooking level (2).
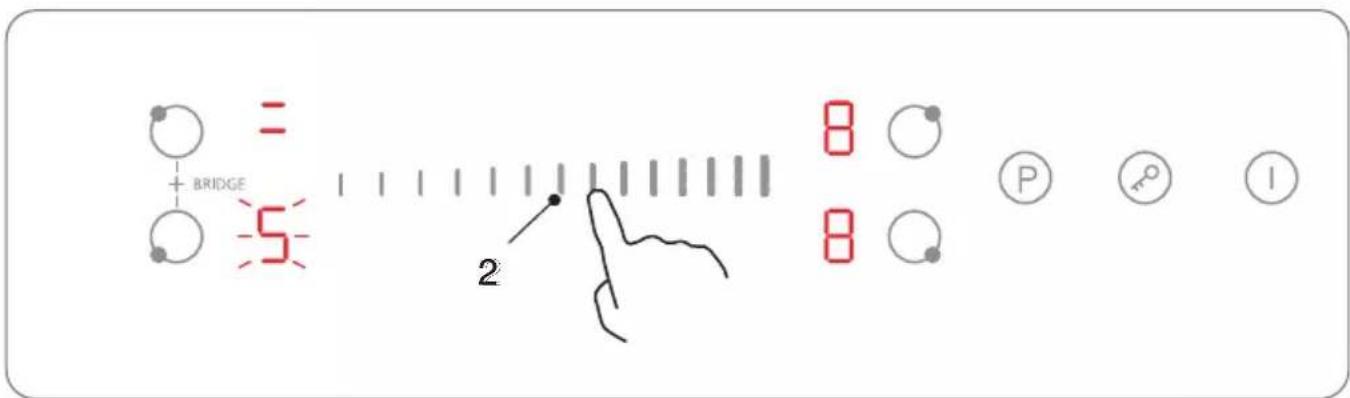
Fig. 4.25
Turn off the Bridge function
1 - Press any hotplate selection button (5) to deactivate the Bridge function. The display shows "-"
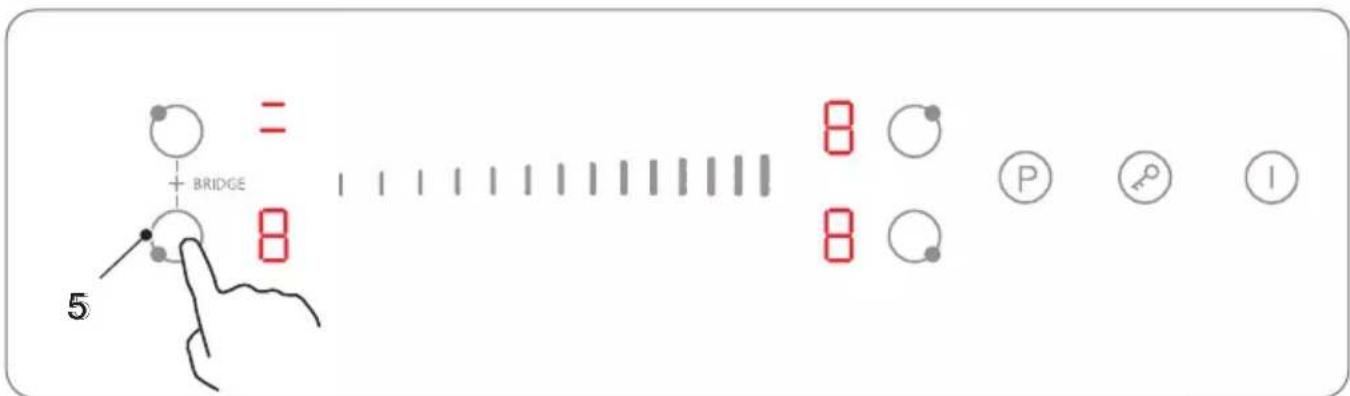
Fig. 4.26
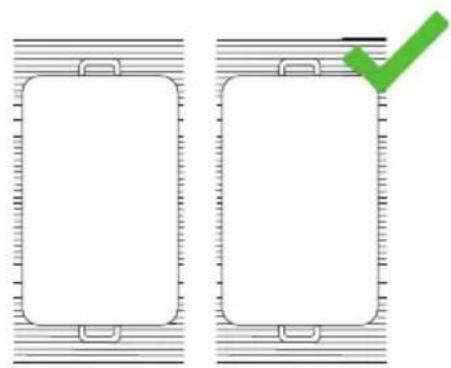
4.2.7 Flex heating area function (model KM8800IF-28 only)
- You can activate these areas as "flex" zones (on one or both sides of the hob) or as individual hotplates.
- Position the pans so that they are detected correctly and the heat is distributed evenly.
natural_image
Two blank rectangular panels with tick marks, one marked with a green checkmark (no text or symbols)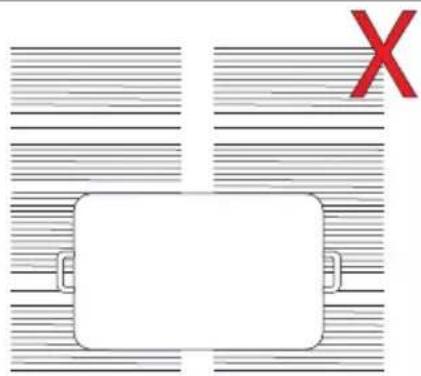
natural_image
Simple diagram with a rectangular box and a red X mark, no text or symbols presentFig. 4.27
Turn on the Flex function
1 - Press the hotplate selection buttons (5) simultaneously to turn on the Flex area. The display will show "=" meaning the Flex area is on. Set the cooking intensity (e.g.) to "8" as shown in the figure.
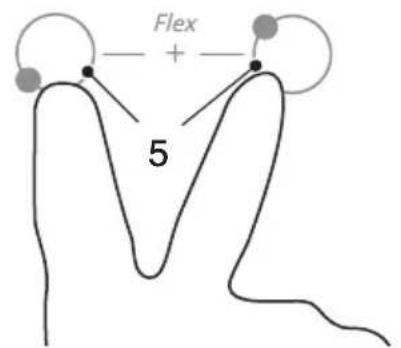
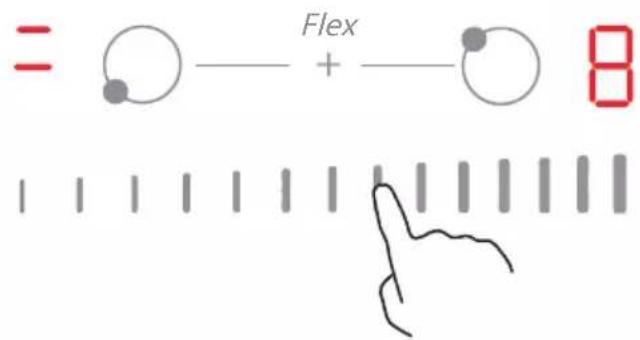
Fig. 4.28
Turn off the Flex function
1 - Press a selection button for the hotplate (5). The indication on the display, changes from "=" to "-" or "0". The Flex area is off.
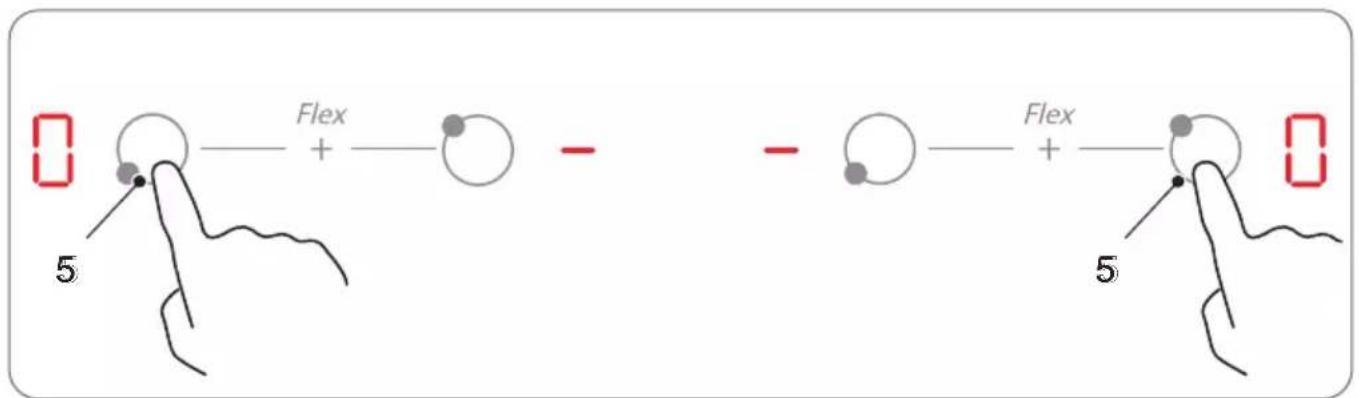
Fig. 4.29
2 - Select and set the desired cooking level.
4.2.8 ECO function (model KM6600IB-28 only)
The total power of the induction hob with ECO function can be limited to 2.8/3.5/6.0/7.2 kW with proper power supply (see "ECO function setting table" after Fig.4.35).
To change the setting of the ECO configuration
1 - Turn off the hob by pressing the ON/OFF button.
2 - Leave the hob off for at least five minutes.
3 - Turn the hob back on by pressing the ON/OFF button.
4 - Follow the instructions below.
Configure the hob in ECO mode
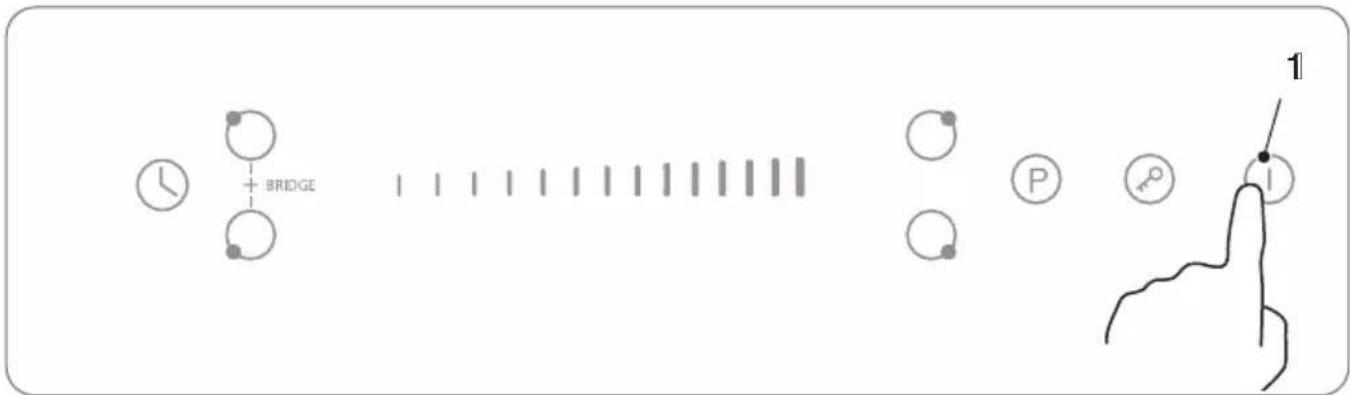
1 - Press the ON/OFF power button (1), the control panel indicators show "-" and "--". A short beep confirms that the unit is switched on.
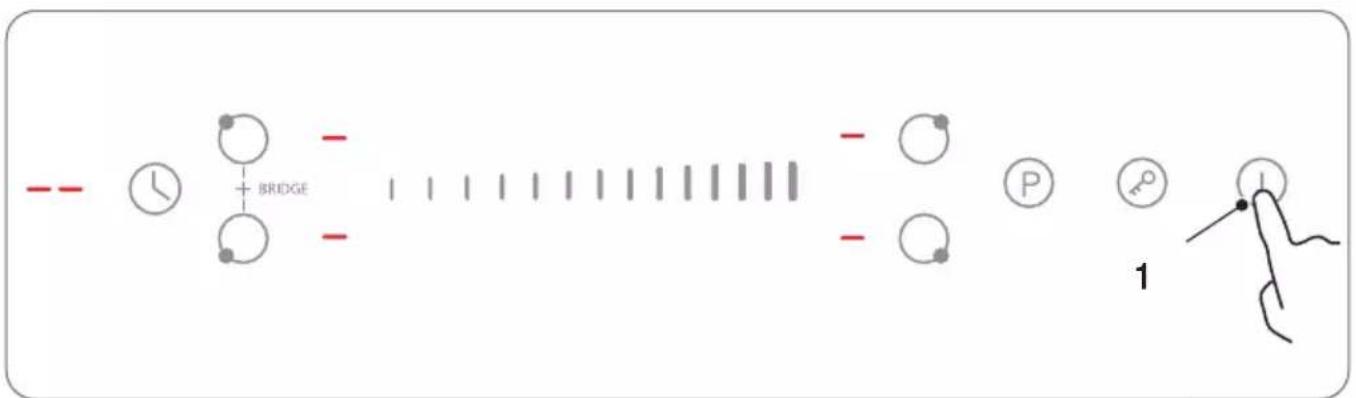
flowchart
graph LR
    A["Start"] --> B["Clock"]
    B --> C["BRIDGE"]
    C --> D["End"]
    D --> E["P Symbol"]
    E --> F["Point 1 Icon"]
    style A fill:#f9f,stroke:#333
    style F fill:#bbf,stroke:#333
Fig. 4.30
2 - Simultaneously press the front right hotplate button (5) and the rear right hotplate button (5) for 3 seconds. A beep will indicate that the induction hob is now in ECO mode.
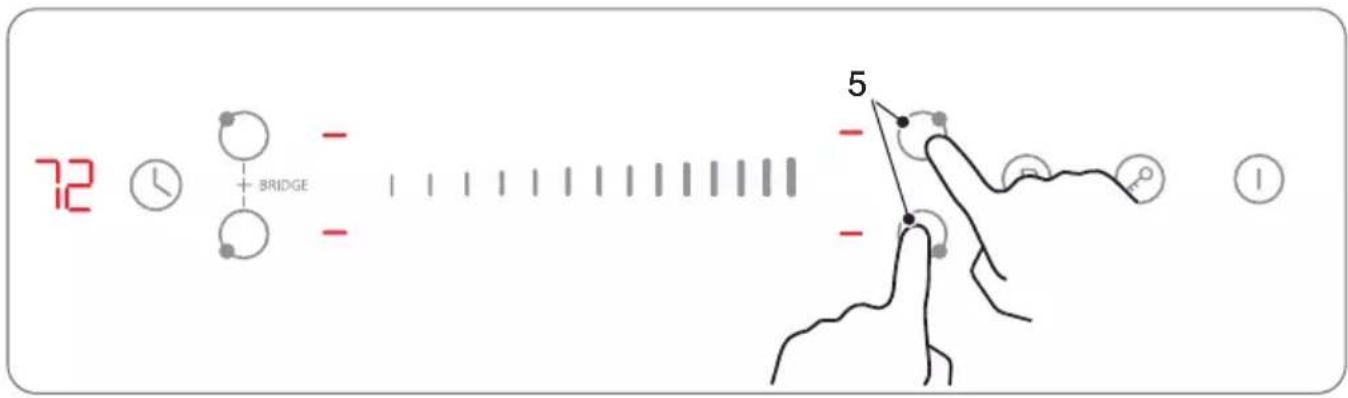
Fig. 4.31
3 - Press the timer button (3), the timer display will begin to flash.
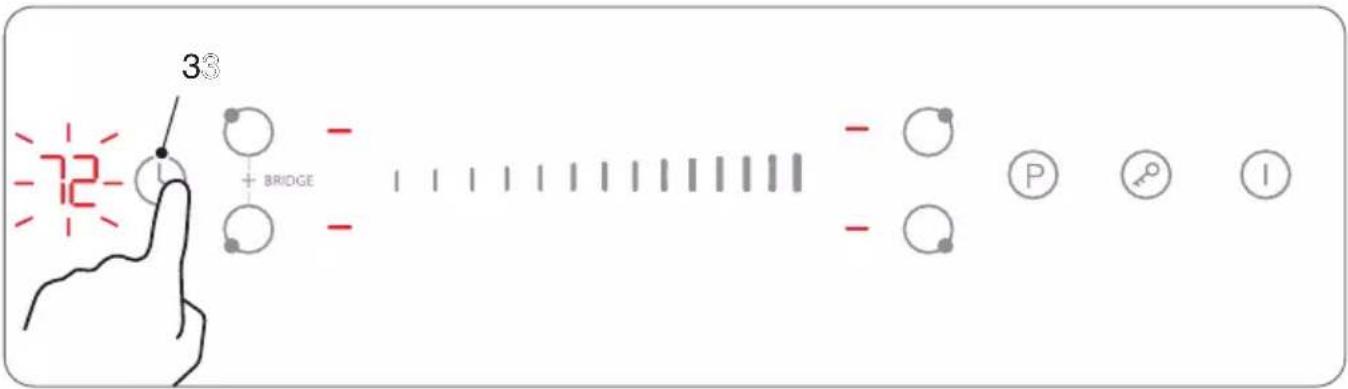
Fig. 4.32
4 - Press the hotplate button (5) in question, the number shown on the display indicates that the total power will be reset to the respective ECO power settings (e.g., the front left area button is associated with the number on the display "28," which corresponds to 2.8kW; see also the "ECO function setting table" after Fig.4.35).
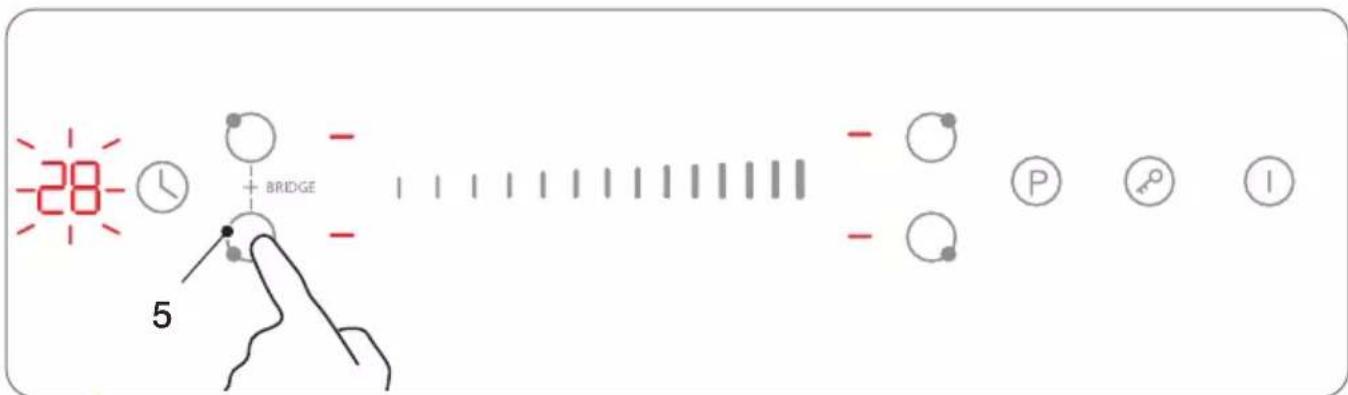
Fig. 4.33
5 - Press the timer button (3) again, the timer display will stop flashing and the display of the previously selected hotplate will show "": this indicates that the setting was successful.
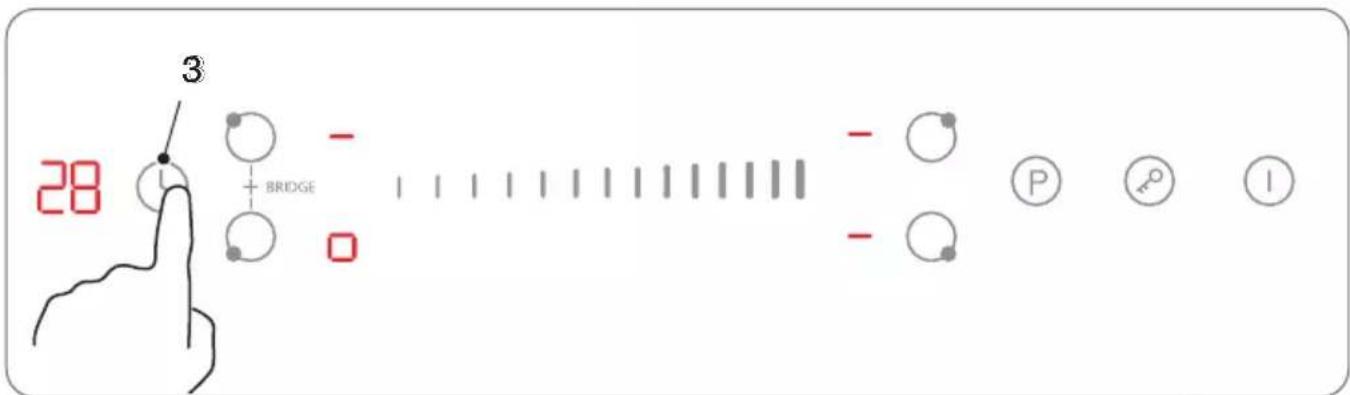
Fig. 4.34
6 - Press the ON/OFF button (1) to turn off the hob. Turn the hob back on, the previously set ECO function setting will be retained.
flowchart
graph LR
    A["BRIDGE"] --> B["1"]
    C["P"] --> D["1"]
    E["I"] --> F["1"]
Fig. 4.35
ECO function setting table
| Hotplate selection button | Timer display ECO power level Power supply (a | protection fuse is required) |
| Front left hotplate button | 28 2.8kW 13A | |
| Rear left hotplate button | 35 3.5kW 16A | |
| Rear right hotplate button | 60 6.0kW 25A | |
| Front right hotplate button | 72 7.2kW* 32A |
* When using for the first time, the default power setting is 7.2 kW.

NOTE: The ECO function configuration can be entered only once, as long as the hob power supply is uninterrupted. It can be entered again by following the procedure described at the start of Sec. "ECO function (model KM6600IB-28 only)"
4.2.9 Control lock button (child safety lock)
The controls can be locked to prevent unwanted use (so that children, for example, cannot accidentally switch on the cooking zones).
When the control buttons are locked, no buttons will be activated except the ON/OFF button.
To lock the controls
Press the control lock button 🔒, "Lo" appears on the timer display.
To unlock the controls
1 - Make sure the ceramic glass hob is switched on.
2 - Press and hold the key lock button for 3 seconds
3 - The hob is now ready for use.

WARNING: When the hob is in lock mode, all controls are disabled except the ON/OFF button. It is always possible to turn off the hob with the ON/OFF button in an emergency, but the hob must first be unlocked for subsequent operations.
4.2.10 Residual heat warning
When the hob has been in operation for some time, some residual heat is generated. The letter "H" (see also Fig.4.18) appears to warn to stay away from the hot surfaces.
4.2.11 Automatic shutdown
Automatic shutdown is a safety protection function for the hob. If you forget to switch off the appliance after cooking, the appliance switches off automatically. The default shutdown times for the various power levels are shown in the table below:
| Power level 1 2 3 4 5 6 7 8 9 | |||||||||
| Default working timer (hours) | 8 8 8 4 | 4 4 2 2 | 2 |
When the dish is removed from the hotplate, the hob will stop generating heat and will automatically switch off after 2 minutes.
4.2.12 Using the timer
You can use the timer in two different ways:
- It can be used as a minute timer. In this case, the timer will not switch off any cooking zone after the set time has elapsed.
- It can be used as an off timer to switch off one or more cooking zones when the time runs out.

NOTE: You can set the timer for up to 99 minutes. You can use the timer even if you do not select a hotplate.
Set the timer to keep time:
1 - Make sure that the hob is switched on and that the hotplate selection button is not activated (the hotplate indication '-' does not flash).

NOTE: You can set the timer before or after you finish setting the hotplate intensity.
Fig. 4.36
2 - Press the timer button, "00" will appear on the timer display and "0" will flash.
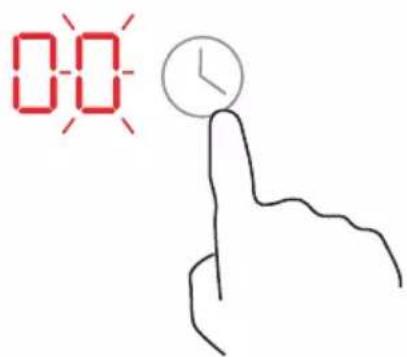
Fig. 4.37
3 - Set the time (e.g., 5) by pressing on the "+" button, or scrolling the slider bar, depending on the model.
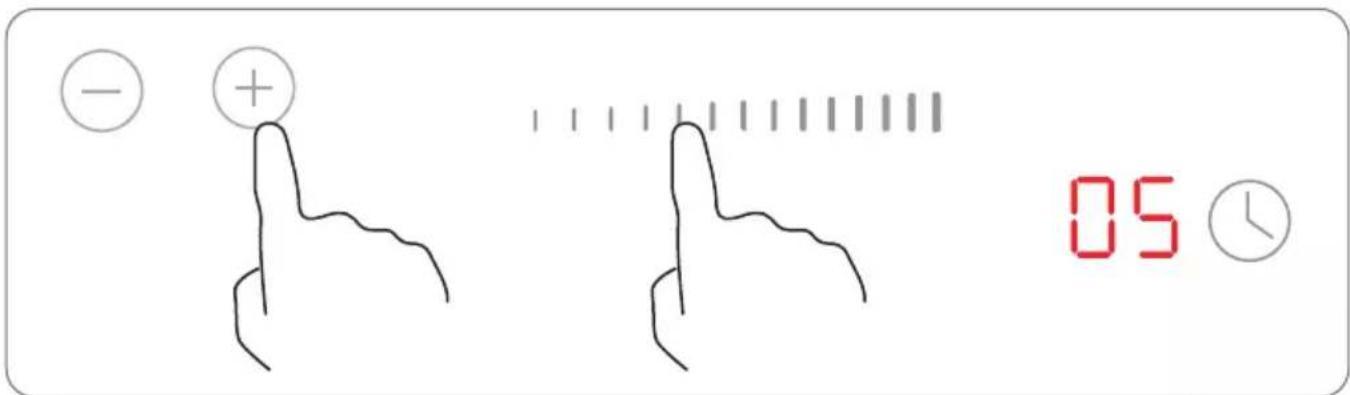
Fig. 4.38
4 - Press the timer button again, then "0" will flash on the display.
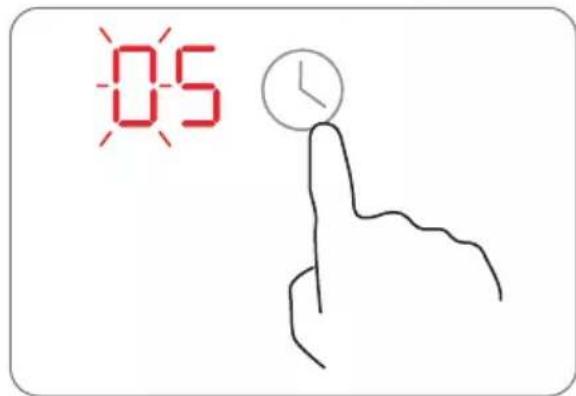
Fig. 4.39
5 - Set the time (e.g., 9) by pressing on the "+" button, or scrolling the slider bar, depending on the model; now the timer setting is 95 minutes.
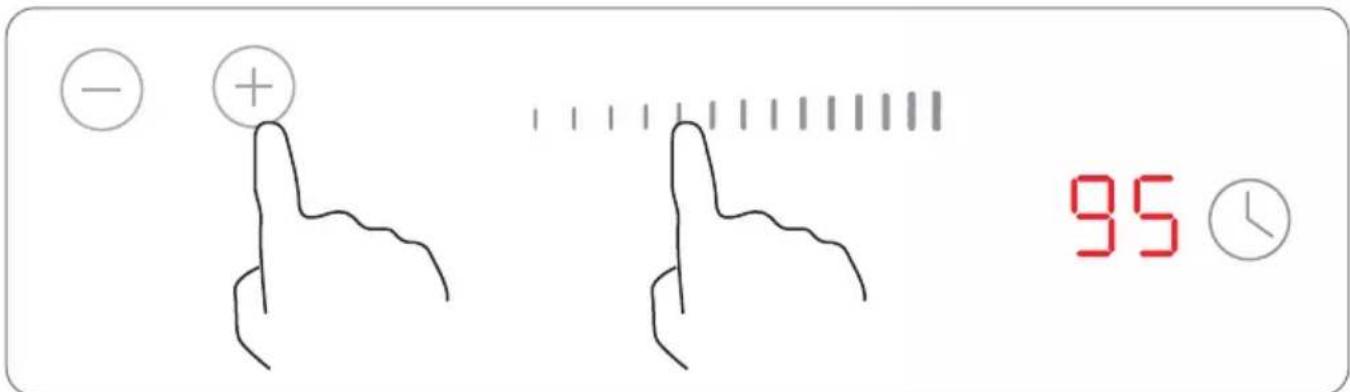
Fig. 4.40
6 - When the time is set, the countdown begins immediately. The display will show the remaining time.
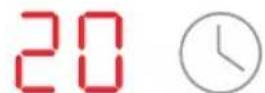
Fig. 4.41
7 - The buzzer sounds for 30 seconds and the timer indicator shows "-" when the set time has elapsed.
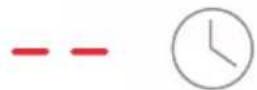
Fig. 4.42
Set the timer to switch off one or more hotplates:
1 - Press the selection button for the hotplate e.g.

for which you wish to set the timer.
2 - Press the timer button, "00" will appear on the timer display and "0" will flash.
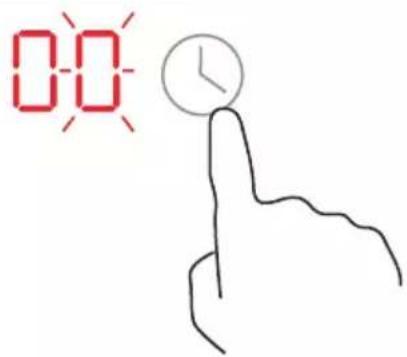
Fig. 4.43
3 - Set the time (e.g., 5) by pressing on the "+" button, or scrolling the slider bar, depending on the model.
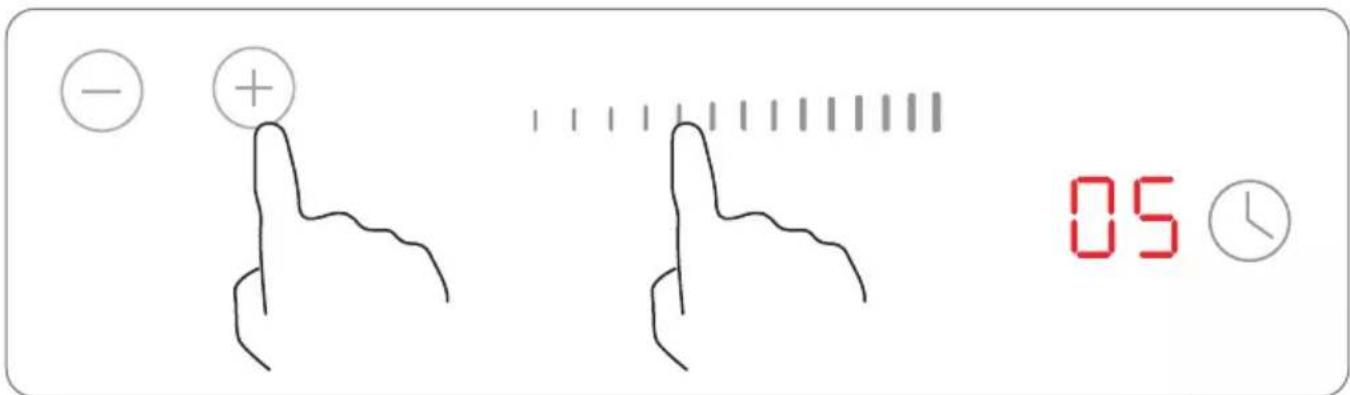
Fig. 4.44
4 - Press the timer control again, then "0" will flash on the display.
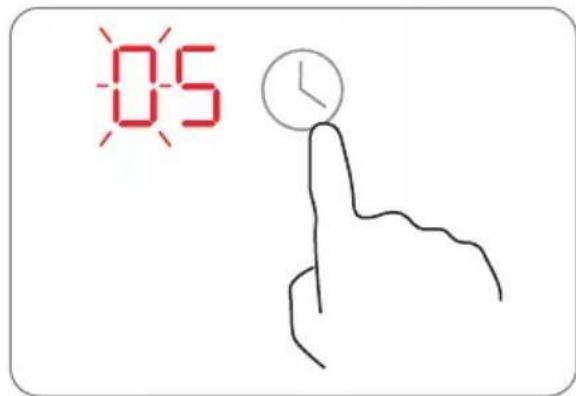
Fig. 4.45
5 - Set the time (e.g., 9) by pressing on the "+" button, or scrolling the slider bar, depending on the model; now the timer setting is 95 minutes.
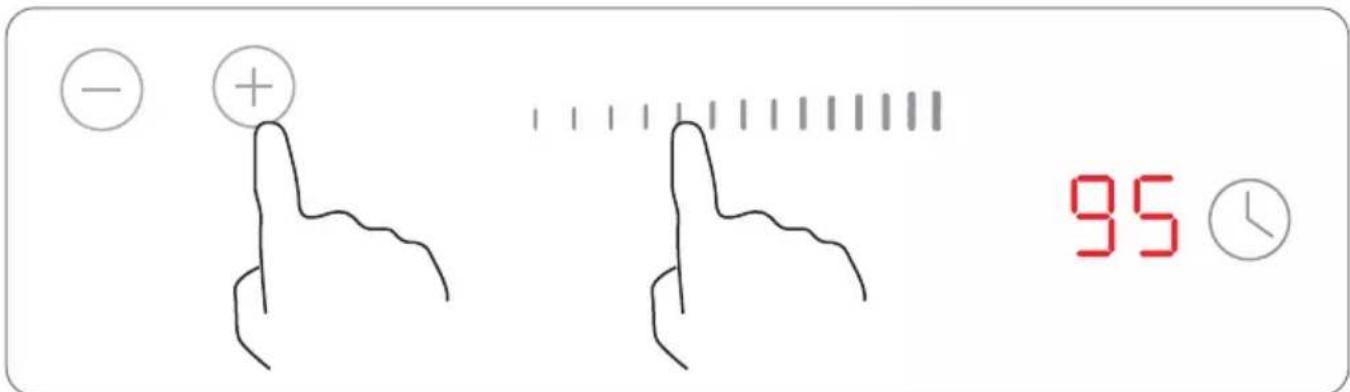
Fig. 4.46
6 - When the time is set, the countdown begins immediately. The display will show the remaining time.
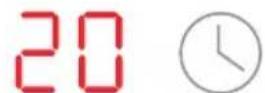
Fig. 4.47

NOTE: The red dot next to the power level indicator lights up to indicate the hotplates selected. The dot of the corresponding plate flashes.
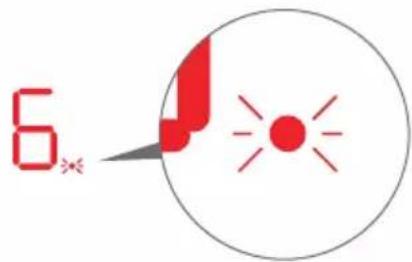
Fig. 4.48
7 - When the time has elapsed, the corresponding hotplate switches off automatically.

NOTE: The other hotplates will continue to operate if previously turned on.
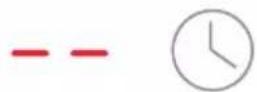
Fig. 4.49
If the timer is set for several hotplates:
1 - When setting the timer for several hotplates, the red dots for the relevant hotplates light up. The display shows the timer that expires first. The dot of the corresponding hotplate flashes.
15


3

(set to 15 minutes)
6.

(set to 45 minutes)
Fig. 4.50
2 - Once the countdown timer has elapsed, the corresponding hotplate switches off. Then the display will show the next expiring timer and the dot for the corresponding plate will flash.
30




Fig. 4.51

NOTE: By pressing the hotplate selection button, the timer corresponding to the plate selected will be shown on the timer display.
Cancelling the timer
1 - Press the selection button for the hotplate (5) for which you wish to cancel the timer.
2 - Press the timer button, the indicator flashes.
3 - Press the "-" button to set the timer to "00": the timer is cancelled.
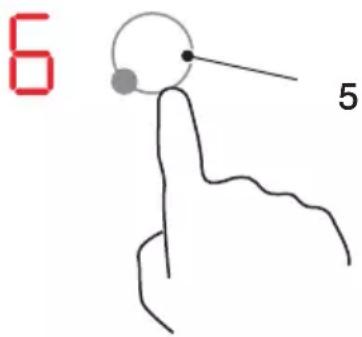
Fig. 4.52
4.2.13 Cooking guidelines
Cooking tips

DANGER: Please pay attention when heating oil and fat very quickly. At very high temperatures, oil and fat can ignite spontaneously; this represents a serious fire hazard
- Using a lid reduces cooking time and saves energy because no heat escapes.
- Use only the necessary amount of oil or fat to reduce cooking time.
- Start cooking by setting a high temperature, reduce the temperature when the food reaches the desired cooking level.
| Heat setting Purpose |
| 0 off, use of residual heat |
| 1 - 2 melt, reheat, maintain heat |
| 3 - 4 slow cooking, defrosting and reheating |
| 5 - 6 stewing, gentle cooking and toasting small quantities |
| 7 - 8 cooking and browning of large quantities |
| 9 frying, cooking until boiling |
5 : INSTALLATION
5.1 List of accessories
| Item Image | |
| Fixing brackets (bag supplied - the shape of the bracket may vary depending on the model).Sealing tape (pre-assembled). | 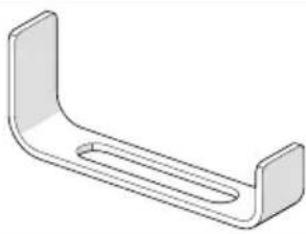 |
5.2 Preliminary operations
5.2.1 Safety instructions for installation
Before installing the hob:
 | WARNING: Install the units only in suitable places. |
 | WARNING: Check that the work surface is flat and level and that there are no structural obstructions within the space required for installation. |
 | WARNING: Make sure the worktop is made of heat-resistant material. |
 | WARNING: If the hob is installed on top of an oven, make sure that the oven has ventilation. |
 | WARNING: Make sure that the installation is carried out in compliance with all safety regulations and standards. |
 | WARNING: Make sure that an appropriate switch that allows total disconnection from the main power supply is incorporated into the wiring and positioned to comply with local regulations on electrical wiring. |
 | WARNING: Make sure the isolation switch is of an approved type and provides 3 mm contact separation in all poles (or all live conductors [phase] if local cabling rules allow for this variation in requirements). |
 | WARNING: The isolation switch must be easily accessible to the user after installing the hob. |
 | WARNING: If in doubt on local regulations, contact the building authorities. |
 | WARNING: Use heat-resistant and easy-to-clean finishes (such as ceramic tiles) for the wall surfaces around the hob. |
 | WARNING: Make sure the power cord does not pass through kitchen cabinet doors or drawers. |
 | WARNING: Make sure there is a constant flow of fresh air from the cabinet opening to the base of the hob. |
 | WARNING: If the hob is installed above a drawer or kitchen cabinet, thermal protection must be installed under the base of the hob. |
 | WARNING: The hob must be installed by qualified personnel or technicians. Never install the hob yourself. |
 | WARNING: The hob should not be installed directly above a dishwasher, refrigerator, freezer, washing machine or dryer, as moisture could damage the hob electronics. |
 | WARNING: The hob must be installed in such a way as to ensure effective heat evacuation to improve its reliability. |
 | WARNING: Do not use a steam cleaner. |
 | WARNING: The ceramic glass hob must be connected to a power supply with a general impedance lower than 0.427 ohm. If necessary, contact the utility service provider for information on impedance. |
Before attaching the mounting brackets
 | WARNING: Before attaching the mounting brackets, the appliance must be placed on a stable and smooth surface (use the packaging). Do not lift or grab by the protruding controls. |
Adjustment of bracket position
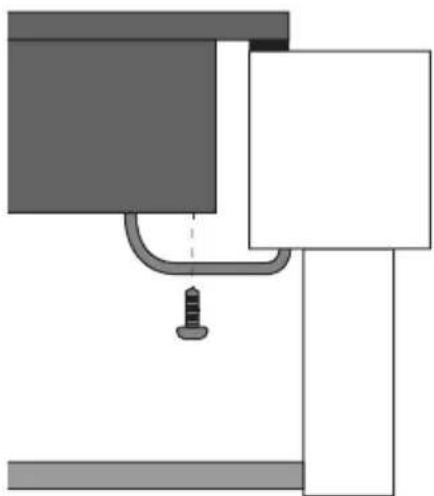
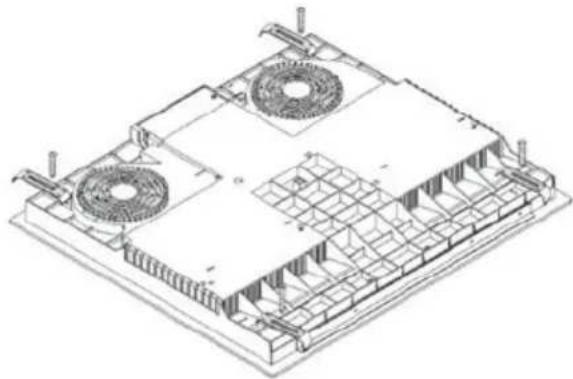
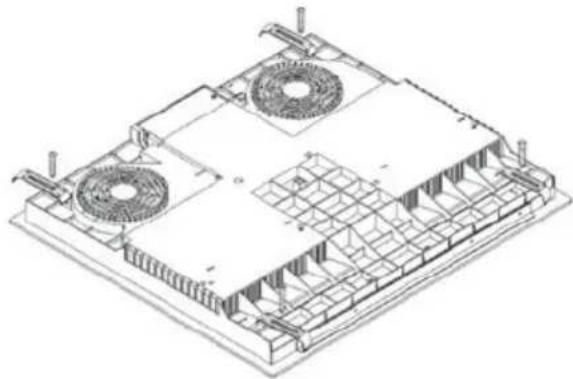
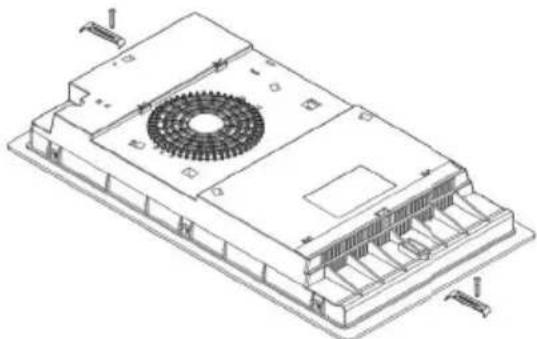
| WARNING: After installation, fasten the hob to the worktop by screwing the four brackets to the bottom of the hob (see photo). |
5.3 Instructions for installation
5.3.1 Size of work surface cutout area
Cut out the work surface according to the dimensions indicated in the drawing. For installation and use, a minimum space of 50mm (X) must be maintained around the cutout as shown in the illustration.
The thickness of the worktop must be at least 30 mm. To avoid deformations of the work surface that could be caused by heat radiating from the hob, use heat-resistant material. Use the sealing tape as shown in the illustration.

WARNING: The work surface material should be made of impregnated wood or other insulating material.
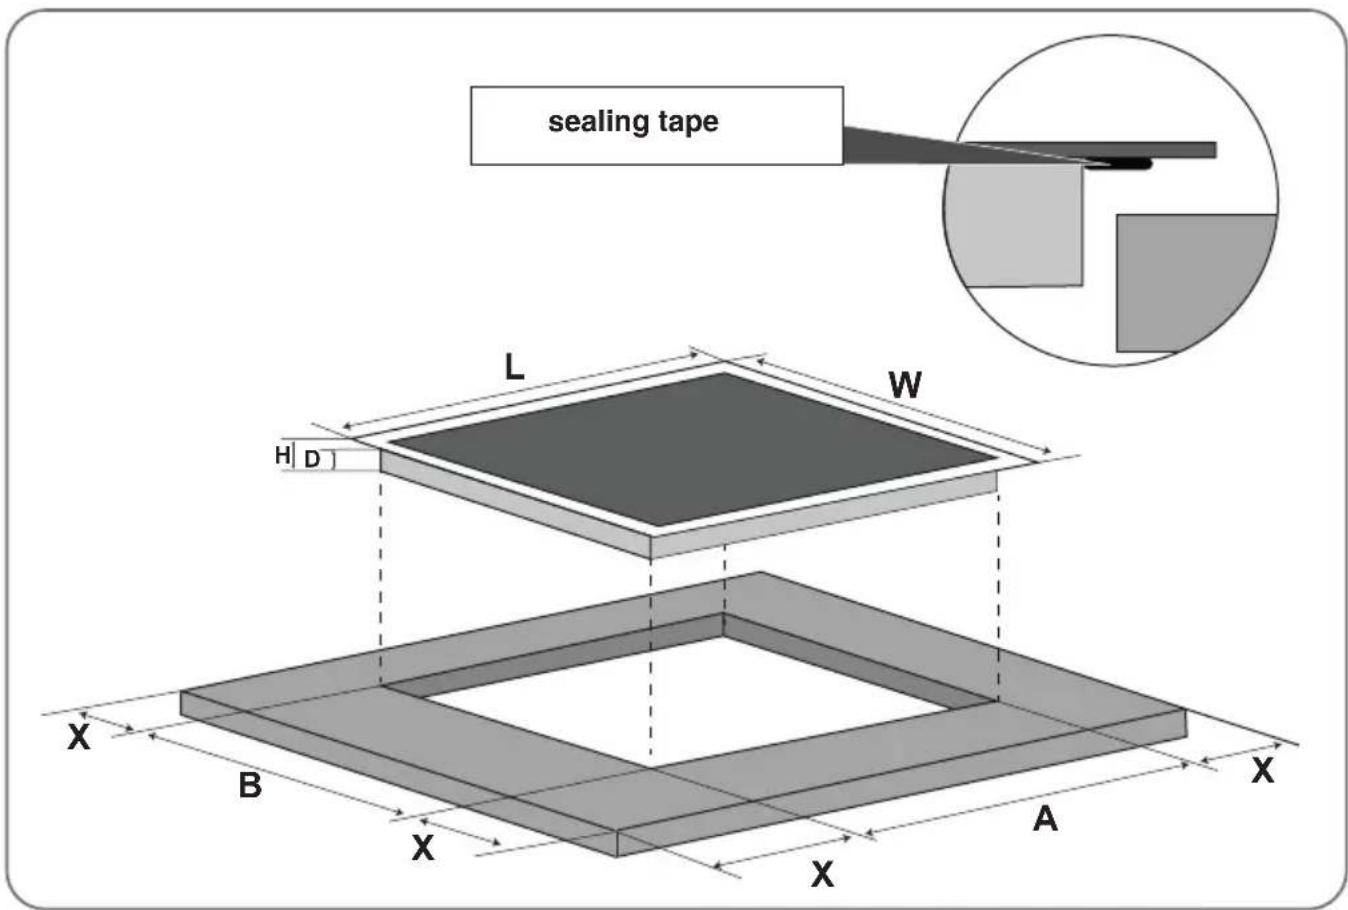
Fig. 5.1
| Model L (mm) W (mm) | H (mm) | D (mm) | A (mm) | B (mm) | X (mm) | ||
| KM6600IB-28 590 520 | 60 54 560 | 490 50 m | nimum | ||||
| KM8800IF-28 770 520 | 60 54 740 | 490 50 m | nimum | ||||
| KM9140I-28 290 520 5 | 8 54 270 | 490 50 min | mum |

WARNING: Make sure that the hob is well ventilated and that the air inlet and outlet are not blocked.
Make sure the hob is always in good condition.
5.3.2 Installation instructions
Important:
The distance between the base of the hob and the upper part of any cabinet or appliance below it (3) must be at least 50 mm.

WARNING: If the hob is installed on top of an oven, make sure that the oven has ventilation.
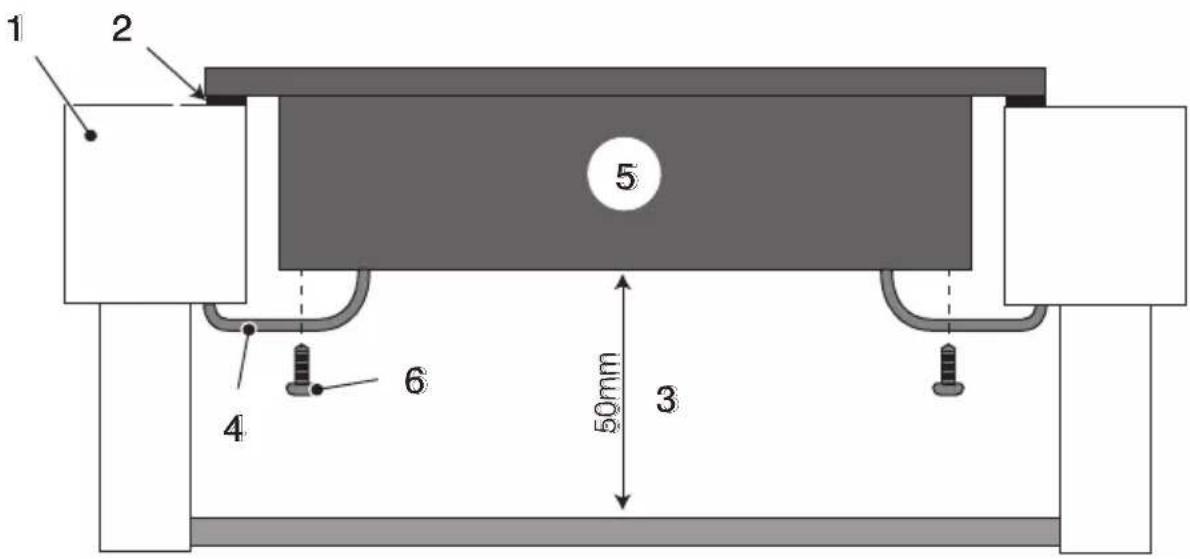
Fig. 5.2
1) - Worktop
2) - Sealing tape
3) - Minimum distance
4) - Brackets (*)
5) - Electric hob
6) - Screws
(*) The shape of the brackets may vary depending on the model.
Installation steps
1) - Remove the protective film from the pre-mounted sealing tape (2).
2) - Bring the hob (5) into the worktop cutout and press gently.
3) - Secure the four mounting brackets (4) to the hob base (5) with the screws (6).

CAUTION: Do not put pressure on the hob to avoid damaging it.
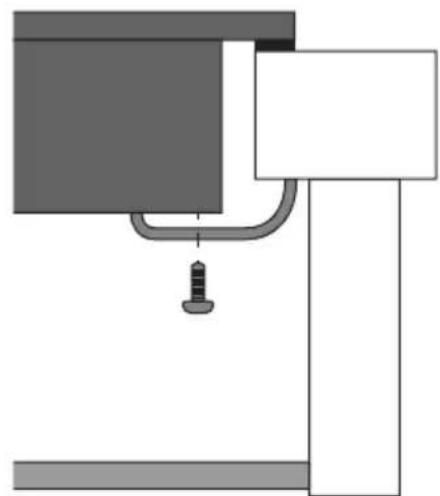
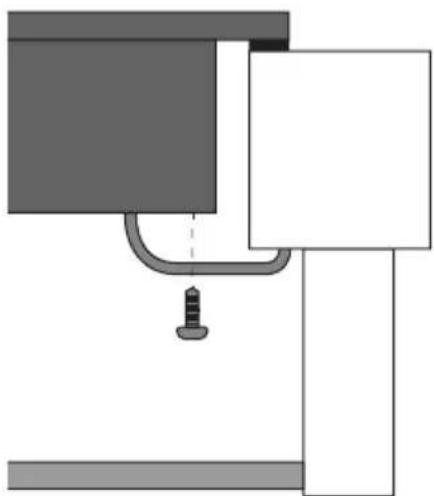
The fixing brackets are inside a bag supplied. Adjust the position of the brackets to suit different thicknesses of the work surface.
a)
natural_image
Pure mechanical diagram showing a lever and shaft assembly without any text, numbers, or symbolsb)
natural_image
Pure mechanical diagram showing a pipe connection with a screw and base plate (no text or symbols)KM6600IB-28KM8800IF-28
natural_image
Isometric technical drawing of a multi-chamber cooling unit with fans and cooling fins (no text or labels)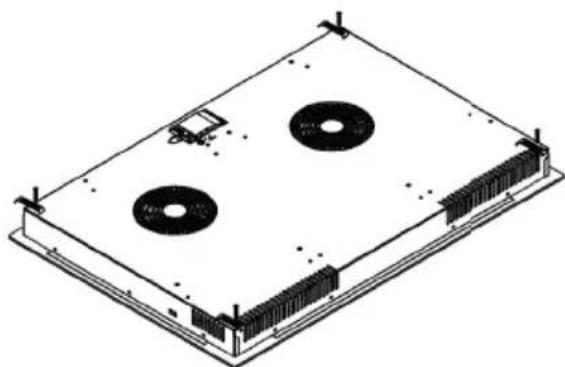
natural_image
Isometric technical drawing of a rectangular electronic device with two circular cutouts and mounting holes (no text or symbols)KM9140I-28
natural_image
Isometric technical drawing of a device casing with a circular vent and cooling fins (no text or symbols)Fig. 5.3
a) - Version 1
b) - Version 2

NOTE: The cut dimensions of the worktop can be found in the previous section "Size of work surface cutout area".
 | WARNING: Make sure that the hob is well ventilated and that the air inlet and outlet are not blocked.Make sure the hob is always in good condition. |
 | WARNING: The safe distance between the hob and any cabinet above it must be at least 760 mm. |
 | WARNING: The safe distance between the hob and a range hood must be at least 650 mm. |
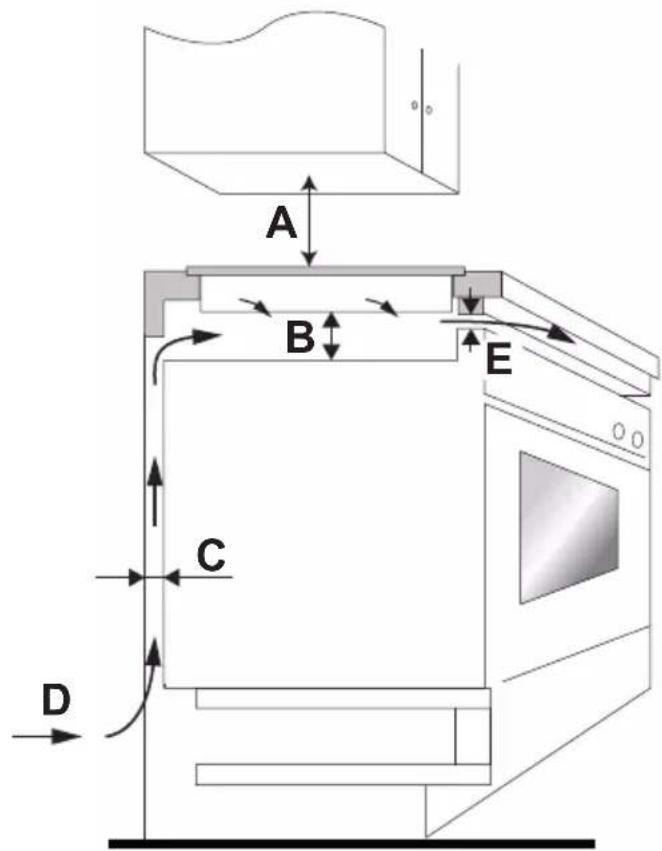
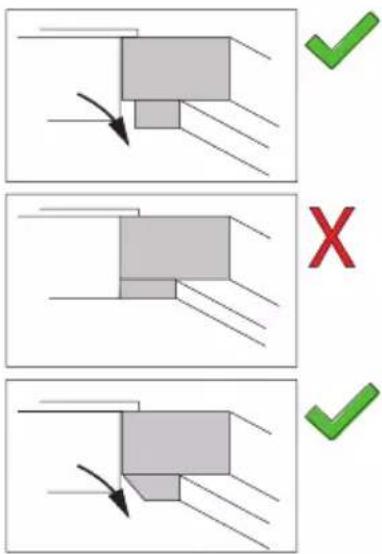
Fig. 5.4
| A (mm) B (mm) C | (mm) D E | |||
| 760 (minimum distance from cabinet)650 (minimum distance from hood) | 50 (minimum) 20 (minimum) Air inlet Air outlet at least | 5 mm |
5.4 Connection of hob to mains
Before connecting the hob to the mains, check the following:
 | DANGER: Do not use adapters, reducers or branches to connect the hob to the mains, as they could cause overheating and fire. The power cord must never touch hot parts and must be arranged in such a way as to not exceed a temperature of 75°C at any point. |
 | CAUTION: Any modification to the electrical system of the house may only be carried out by a specialised technician. |
 | WARNING: Installation and electrical connection must be carried out by a specialised technician according to the manufacturer's instructions and in compliance with the regulations in force. |
 | WARNING: Check with a specialised technician that the electrical system of the house is suitable for the power used by the hob, check the values shown on the appliance nameplate. |
 | WARNING: The appliance power supply must be connected via a single-pole disconnector/contactor, or, in any case, in compliance with current local regulations. |
 | WARNING: The cable must be checked regularly.If the power cord is damaged or needs to be replaced, this can only be done by a specialised technician with suitable equipment to avoid accidents. |
 | WARNING: If the appliance is connected directly to the mains, a single-pole disconnector/contactor must be installed with a minimum distance of 3 mm between the contacts. |
 | WARNING: The installer must ensure that the electrical connection has been made correctly and that it complies with safety standards. |
 | WARNING: The ceramic glass hob must be connected to a power supply with a general impedance lower than 0.427 ohm. If necessary, contact the utility service provider for information on impedance. |
 | WARNING: Do not bend or press on the cable. |
Connection method (for models without plug):
KM6600IB-28
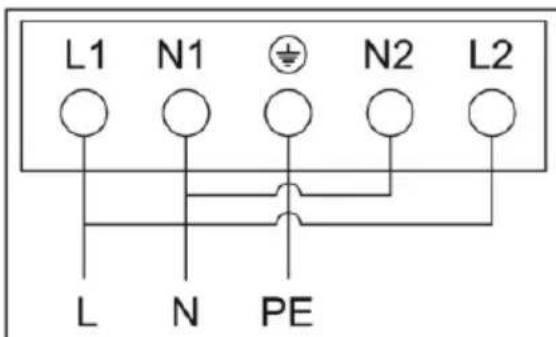
L-N:220-240V\~
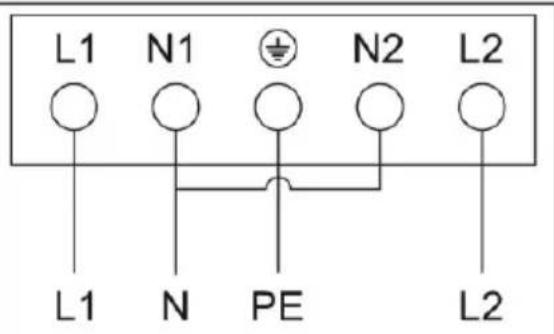
L1-L2:380-415V\~
KM8800IF-28
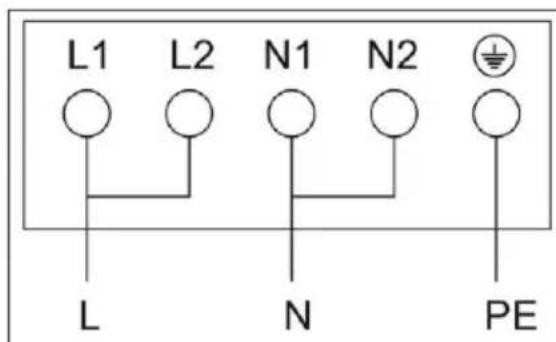
L-N:220-240V\~
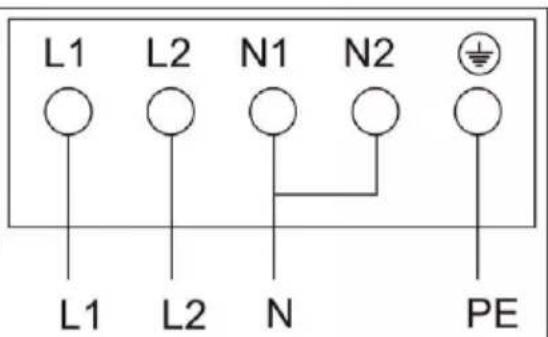
L1-L2:380-415V\~
Fig. 5.5
6 : MAINTENANCE
6.1 Cleaning and care
Before carrying out any maintenance or cleaning work, make sure that the hob is switched off.
| In case of: Method of | intervention: | WARNINGS  |
| Everyday dirt on the ceramic glass hob (fingerprints, marks, food stains or non-sugary spills on the ceramic glass hob) | 1. Turn off power to the hob. • When the hob is switched off, there is no “hot surface” indicator, but the hotplate may still be hot! Therefore, please always be very careful.2. Apply electric hob cleaner to the still warm (not boiling hot!) ceramic glass hob.3. Clean with a damp cloth and dry with a clean cloth or kitchen towel.4. Switch power to the hob back on. | • Avoid using sponges, nylon scrapers and harsh/abrasive detergents as they may scratch the glass panel. Please always check the label of the detergent or abrasive sponge to see if they are suitable.• Never leave detergent residues on the hob, the glass could get stained. |
| Spills of boiling liquids and melted sugar on the ceramic glass hotplate | Please always remove these splashes immediately with a fish knife, spatula or scraper suitable for ceramic glass hobs, but be careful while the cooking zones are still hot:1. Disconnect power supply to the hob by removing the plug from the socket.2. Scrape off impurities or splashes from overcooked food in the cold area of the hob.3. Wipe up any spills or splashes or overcooked food with a dish towel or kitchen towel.4. Follow steps 2 to 4 for the aforementioned “Everyday dirt on the ceramic glass hob”. | Remove stains caused by loose, sugary foods or overcooked foods as soon as possible. If they cool on the ceramic glass hob, they will be difficult to remove or may even cause permanent damage to the hob surface.Danger of cutting: the blade of a scraper is as sharp as a razor, if it does not have safety guards, always keep it in a safe place and out of the reach of children. |
| Splashes/liquids/residues from overcooked food on the touch buttons | Turn off power to the hob. • The hob2. Wipe splashes/liquids/food residues with a wet cloth.3. Clean the area of the touch buttons with a clean, damp sponge or cloth4. Dry the area completely with a kitchen towel.5. Switch power to the hob back on. | may beep and switch off, the touch buttons may not work due to the liquid left on them. Make sure that the area of the touch panel is dry before switching the hob back on. |
7 : TROUBLESHOOTING
7.1 Troubleshooting
| Problem Possible causes Remedy | ||
| The induction hob does not turn on. | No power. Make sure that the induction hob is connected to the mains and that it is switched on. Check the main power switch of your home. If you have checked everything and the problem persists, contact a qualified technician. | |
| The touch buttons do not respond. | The buttons are locked. Unlock the controls. See the “Control lock button (child safety lock)” section and follow the instructions. | |
| The touch buttons are difficult to use. | It is possible that there is a light film of water on the controls, or that you are using your fingertip to press on the buttons. | Make sure the area around the controls is dry, use your finger pads to press the touch buttons. |
| The ceramic glass top is scratched. | Cookware with rough edges. Sponges are too abrasive or cleaning products are unsuitable. | Use cookware with a flat, smooth bottom. See the “Appropriate cookware for induction hotplates” section. |
| Some pots/pans emit crackles or clicks. | This may be due to the cookware type (layers of different metals vibrate differently). | This is normal for cookware and does not indicate a fault. |
| The induction hob emits a low humming noise when used at a high temperature. | This is caused by induction cooking technology. | This is normal, but the noise should subside or completely disappear when the heat setting is reduced. |
| Noise from the induction hob fan. | A fan built into your induction hob activates to protect the electronics from overheating. It may continue to work even after turning off the hob. | This is normal and no action is required. Do not interrupt the power supply of the induction hob while the fan is running. |
| The cookware does not heat up and this symbol flashes on the display: | The induction hob cannot detect the cookware because it is not suitable for induction cooking.The induction hob cannot detect the cookware because it is too small for the hotplate or it is not properly aligned/centred on it. | Use cookware suitable for induction cooking. See the “Appropriate cookware for induction hotplates” section.Make sure the cookware is in the centre of the hotplate.Make sure the bottom of the cookware is as large as the hotplate. |
| The induction hob or hotplate has shut down unexpectedly, an audible signal sounds and an error code is displayed (usually alternating one or two digits in the cooking time timer display). | Technical issue. Please write down | the error code;turn off the induction hob, unplug it, contact a qualified technician. |
7.2 Display of error codes
When a fault occurs, the induction hob automatically enters protection mode and displays the corresponding protection codes:
| Fault code Possible causes Remedy | ||
| E4/E5 Defective temperature sensor. Contact the manufacturer. | ||
| E7/E8 Defective IGBT temperature sensor. Contact the manufacturer. | ||
| E2/E3 Abnormal power supply voltage. Check whether the power supply voltage is normal or if there are any voltage fluctuations.Switch on the hob only after the supply voltage has returned to normal. | ||
| E6/E9 Poor heat from the induction hob. Restart the induction hob after it has cooled down. | ||
The table above shows causes and solutions for the most common problems.

CAUTION: Do not disassemble the appliance yourself in order to avoid danger and damage to the induction hob.
- Respekta
- Inhalt
- : ALLGEMEINE INFORMATIONEN......de-3
- Topfgrößen
- Energieersparnis
- : WARTUNG
- : GENERAL SAFETY RULES......en-7
- 3: TECHNICAL DATA AND FEATURES......en-14
- 4:HOW TO USE......en-21
- 5: INSTALLATION ...... en-49
- 6: MAINTENANCE ...... en-57
- 7: TROUBLESHOOTING ...... en-59
- : GENERAL INFORMATION
- Reading the manual
- Overview
- Manufacturer data
- Assistance service
- Introduction and safety
- Appliance identification
- Location of the nameplate
- CE declaration of conformity
- Warranty conditions
- : GENERAL SAFETY RULES
- Important information
- Environmental Protection
- Packaging
- Disposal
- : TECHNICAL DATA AND FEATURES
- Technical data
- Model KM6600IB-28
- Model KM8800IF-28
- Model KM9140I-28
- Wiring diagram
- : HOW TO USE
- Preliminary advice
- Operation of the induction hotplate
- Appropriate cookware for induction hotplates
- Appropriate cookware:
- Inappropriate cookware:
- Cookware dimensions
- Energy savings
- Using the buttons (touch)
- Using the electric hob
- Arrangement of cooking panels
- Control panel
- Starting the cooking process
- The flashing of the symbol
- means:
- Once cooking is done
- Power Boost
- Turn on Power Boost
- Turn off Power Boost
- Bridge heating area function (model KM6600IB-28 only)
- Turn on the Bridge function
- Turn off the Bridge function
- Flex heating area function (model KM8800IF-28 only)
- Turn on the Flex function
- Turn off the Flex function
- ECO function (model KM6600IB-28 only)
- To change the setting of the ECO configuration
- Configure the hob in ECO mode
- Control lock button (child safety lock)
- To lock the controls
- To unlock the controls
- Residual heat warning
- Automatic shutdown
- Using the timer
- Set the timer to keep time:
- Set the timer to switch off one or more hotplates:
- If the timer is set for several hotplates:
- Cancelling the timer
- Cooking guidelines
- Cooking tips
- : INSTALLATION
- List of accessories
- Preliminary operations
- Safety instructions for installation
- Instructions for installation
- Size of work surface cutout area
- Installation instructions
- Important:
- Installation steps
- Connection of hob to mains
- : MAINTENANCE
- Cleaning and care
- : TROUBLESHOOTING
- Display of error codes
Brand : Respekta
Model : KM9410I-28
Category : Cooker