
DC 1411 - Camera MINOX - Free user manual and instructions
Find the device manual for free DC 1411 MINOX in PDF.


| Product Type | Digital camera |
| Brand | Minox |
| Model | DC 1411 |
| Image Sensor | 1/2.33" CCD, 14.0 megapixels |
| Lens | 4x optical zoom, f=5.0-20.0mm (28-112mm equivalent) |
| LCD Monitor | 2.7" TFT color, 230K pixels |
| Storage Media | 32MB internal (10MB available), SD/SDHC up to 32GB |
| Image Resolution | 14M (4288x3216), 8M, 4M, 2M, VGA |
| Video Resolution | HD 720p/30fps, VGA 640x480/30fps, QVGA 320x240/30fps |
| Power Supply | Rechargeable lithium-ion battery 3.7V |
| Dimensions | 95.3 x 55.7 x 19.5 mm (without protruding parts) |
| Weight | Approx. 112g (without battery and memory card) |
| Interface | USB/AV out (2-in-1 terminal) |
| Battery Charging | Via AC/DC adapter or computer USB |
| Scene Modes | Auto, Program AE, Tv, Av, Intelligent Scene, Smile Detection, Anti-shake, Panorama, Skin Soften, De-blemish, Portrait, Landscape, Sports, Night, Candlelight, Fireworks, Text, Sunset, Sunrise, Splash Water, Flow Water, Snow, Beach, Pets, Natural Green |
| Focus Range | Normal: 0.5m~Inf. (T); Macro: 0.05m~Inf. (W) |
| Shutter Speed | 1~1/2000 sec |
| Digital Zoom | 6x (Capture mode), 4x (Playback mode) |
| ISO Sensitivity | Auto, ISO 100, 200, 400, 800, 1600 |
| White Balance | Auto, Incandescent, Fluorescent 1/2, Daylight, Cloudy, Manual |
| File Format | JPEG (EXIF 2.2), AVI (Motion-JPEG) |
| Self-Timer | 2 sec, 10 sec, 10+2 sec, Self-portrait |
| Connectivity | USB 2.0, AV out |
| System Requirements | Windows 7/XP/Vista, Mac OS 10.3.9 or later |
| Included Accessories | USB cable, AV cable, camera strap, pouch, rechargeable battery, AC/DC adapter, software CD-ROM, instruction manual |
Frequently Asked Questions - DC 1411 MINOX
User questions about DC 1411 MINOX
0 question about this device. Answer the ones you know or ask your own.
Ask a new question about this device
Download the instructions for your Camera in PDF format for free! Find your manual DC 1411 - MINOX and take your electronic device back in hand. On this page are published all the documents necessary for the use of your device. DC 1411 by MINOX.
USER MANUAL DC 1411 MINOX
This device complies with Part 15 of the FCC Rules. Operation is subject to the following two conditions:
(1) This device may not cause harmful interference, and
(2) This device must accept any interference received, including interference that may cause undesired operation.
Note:
This equipment has been tested and found to comply with the limits for Class B digital devices, pursuant to Part 15 of the FCC rules. These limits are designed to provide reasonable protection against harmful interference in a residential installation. This equipment generates uses and can radiate radio frequency energy and, if not installed and used in accordance with the instructions, may cause harmful interference to radio communications. However, there is no guarantee that interference will not occur in a particular installation. If this equipment does cause harmful interference to radio or television reception, which can be determined by turning the equipment off and on, the user is encouraged to try to correct the interference by one or more of the following measures:
■ Reorient or relocate the receiving antenna.
■ Increase the separation between the equipment and receiver.
■ Connect the equipment into an outlet on a circuit different from that to which the receiver is connected.
■ Consult the dealer or an experienced radio/TV technician for help.
Use of shielded cable is required to comply with Class B limits in Subpart B of Part 15 of the FCC rules.
Do not make any changes or modifications to the equipment unless otherwise specified in the manual. If such changes or modifications should be made, you could be required to stop operation of the equipment.
Notice
If static electricity or electromagnetism causes data transfer to discontinue midway (fail), restart the application or disconnect and connect the communication cable (USB, etc.) again.
READ THIS FIRST
Trademark Information
■ Microsoft ^® and Windows ^® are U.S. registered trademarks of Microsoft Corporation.
■ Pentium ^® is a registered trademark of Intel Corporation.
■ Macintosh is a trademark of Apple Inc.
■ SD ^TM is a trademark.
■ SDHC ^TM is a trademark.
■ Other names and products may be trademarks or registered trademarks of their respective owners.
Product Information
■ Product design and specifications are subject to change without notice. This includes primary product specifications, software, software drivers, and user's manual. This User Manual is a general reference guide for the product.
The product and accessories that come with your camera may be different from those described in this manual. This is due to the fact that different retailers often specify slightly different product inclusions and accessories to suit their market requirements, customer demographics, and geographical preferences. Products very often vary between retailers especially with accessories such as batteries, chargers, AC adapters, memory cards, cables, pouches, and language support. Occasionally a retailer will specify a unique product color, appearance, and internal memory capacity. Contact your dealer for precise product definition and included accessories.
■ The illustrations in this manual are for the purpose of explanation and may differ from the actual design of your camera.
■ The manufacturer assumes no liability for any errors or discrepancies in this user manual.
SAFETY INSTRUCTIONS
Read and understand all Warnings and Cautions before using this product.
Warnings
If foreign objects or water have entered the camera, turn the power off and remove the battery.
Continued use might cause fire or electric shock. Consult the store of purchase.
If the camera has fallen or its case has been damaged, turn the power off and remove the battery.
Continued use might cause fire or electric shock. Consult the store of purchase.
Do not disassemble, change or repair the camera.
This might cause fire or electric shock. For repair or internal inspection, ask the store of purchase.
Use the supplied AC adapter only with the indicated power supply voltage.
Use with any other power supply voltage might cause fire or electric shock.
Do not use the camera in areas near water.
This might cause fire or electric shock. Take special care during rain, snow, on the beach, or near the shore.
Do not place the camera on inclined or unstable surfaces.
This might cause the camera to fall or tilt over, causing damage.
Keep the battery out of the reach of children.
Swallowing the battery might cause poisoning. If the battery is accidentally swallowed, immediately consult a physician.
Do not use the camera while you are walking, driving or riding a motorcycle.
This might cause you to fall over or result in traffic accident.
Please use battery with complete external seals.
Do not use battery from which the seals have been damaged or removed.
This may cause leakage, explosion, or injury.


Cautions
Insert the battery paying careful attention to the polarity (+ or −) of the terminals.
Inserting the battery with its polarities inverted might cause fire and injury, or damage to the surrounding areas due to the battery rupturing or leaking.
Do not fire the flash close to anyone's eyes.
This might cause damage to the person's eyesight.
Do not subject the LCD monitor to impact.
This might damage the glass on the screen or cause the internal fluid to leak. If the internal fluid enters your eyes or comes into contact with your body or clothes, rinse with fresh water. If the internal fluid has entered your eyes, consult a physician to receive treatment.
A camera is a precision instrument. Do not drop it, strike it or use excessive force when handling the camera.
This might cause damage to the camera.
Do not use the camera in humid, steamy, smoky, or dusty places.
This might cause fire or electric shock.
Do not remove the battery immediately after long period of continuous use.
The battery becomes hot during use. Touching a hot battery might cause burns.
Do not wrap the camera or place it in cloth or blankets.
This might cause heat to build up and deform the case, resulting in fire. Use the camera in a well-ventilated place.
Do not leave the camera in places where the temperature may rise significantly, such as inside a car.
This might adversely affect the case or the parts inside, resulting in fire.
Before you move the camera, disconnect cords and cables.
Failure to do this might damage cords and cables, resulting in fire and electric shock.


Notes on Battery Usage
When you use the battery, carefully read and strictly observe the Safety Instructions and the notes described below:
■ Use only the specified battery (3.7V).
- Avoid extremely cold environments as low temperatures can shorten the battery life and reduce camera performance.
When you are using a new rechargeable battery or a rechargeable battery that has not been used for an extended period of time (the battery that passed the expiry date is an exception), it may affect the number of images that can be captured. Therefore, to maximize its performance and lifetime, we recommend that you fully charge the battery and discharge it for at least one complete cycle before use.
■ The battery may feel warm after a long period of continuous use of the camera or the flash. This is normal and not a malfunction.
■ The camera may feel warm after a long period of continuous use. This is normal and not a malfunction.
If the battery is not to be used for a long period of time, remove it from the camera to prevent leakage or corrosion and store it after no battery power is left. Stored for a long time in a fully charged condition, its performance may be impaired.
■ Always keep the battery terminals clean.
■ There is a risk of explosion if the battery is replaced by an incorrect type.
■ Dispose of used battery according to the recycle instructions.
- Charge the rechargeable battery fully before using for the first time.
■ To prevent short-circuiting or fire, keep the battery away from other metal objects when carrying or storing.

natural_image
Symbol of a trash bin crossed with a diagonal line, representing no waste or discharge (no text or labels)This symbol mark [crossed-out wheeled bin] indicates separate collection of waste batteries in the EU countries. The batteries provided with this product shall not be treated as household waste. Please use the return and collection systems available in your country for the disposal of the waste batteries.
If a chemical symbol is printed beneath the symbol mark, this chemical symbol means that the batteries contains a heavy metal at a certain concentration. It is indicated as follows:
Hg: mercury, Cd: cadmium, Pb: lead.
CONTENTS
7 INTRODUCTION
7 O v e r v i e w
7 Package Contents
8 GETTING TO KNOW YOUR CAMERA
8 Front View
8 Rear View
9 LCD Monitor Display
11 GETTING STARTED
11 Preparation
11 Charging the Battery
12 Initial Settings
14 CAPTURE MODE
14 Capturing Images
15 Setting the Scene Mode
16 Taking Images with Intelligent Scene mode
17 Taking and Combining Panoramic Pictures
17 Taking Images When the Smile Feature Is On
18 Mode of Skin Soften and De-blemish
18 Recording Shots using Face Detection Technology
19 Self-portrait Function
19 AF Tracking Mode
20 VIDEO MODE
20 Recording Video Clips
20 Playing Back Video Clips
21 PLAYBACK MODE
21 Playing Back Still Images
21 Playback Display
22 Removing Red-eye
22 Dynamic Lighting Feature
23 Attaching Voice Memos
24 Protecting Images
25 DPOF Settings
26 Erasing Images
27 MENU OPTIONS
27 Capture Menu
29 Video Menu
30 Playback Menu
32 Setup Menu
34 TRANSFERRING FILES TO YOUR COMPUTER
34 Downloading Your Files
34 USING THE CAMERA AS A PC CAMERA
35 EDITING SOFTWARE INSTALLATION
36 SPECIFICATIONS
37 APPENDIX
37 Possible Number of Shots
38 Troubleshooting
INTRODUCTION
Overview
Congratulations on your purchase of the new digital camera.
Capturing high-quality digital images is fast and easy with this state-of-the-art smart camera. Equipped with a 14.0-megapixel CCD, this camera is capable of capturing images with a resolution of up to 4288 x 3216 pixels.
Package Contents
Carefully unpack your camera and ensure that you have the following items:
Common Product Components:
■ Digital Camera
■ Instruction manual
■ Software CD-ROM
USB cable
■ AV cable
■ Camera strap
■ Camera pouch
■ Rechargeable lithium-ion battery
■ AC/DC adapter
GETTING TO KNOW YOUR CAMERA
Front View

| 1. | Shutter button |
| 2. | ON/OFF Power button |
| 3. | Flash |
| 4. | Self-timer LED |
| 5. | Microphone |
| 6. | Speaker |
| 7. | Lens |
Rear View

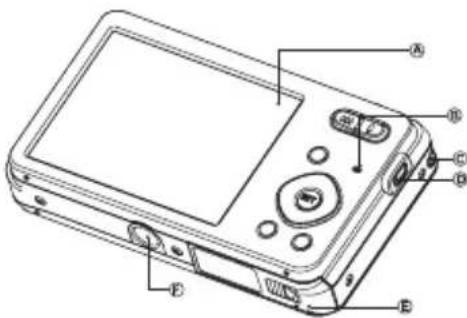
| A. LCD monitor |
| B. Status LED |
| C. Strap holder |
| D. USB and AV OUT terminal |
| E. Battery / Memory card cover |
| F. Tripod socket |
| Item | Function | ||
| Capture Mode Video Mode Playback Mode | |||
| 1. Shutter button Record button Still | image: to capture mode | Video clip: to capture mode | |
| 2. :Zooms out :Zooms in :Zooms out | :Zooms in :Zooms out :Zooms in | ||
| 3. Switches to:Video mode > Capture mode | Switches to:Capture mode > Video mode | Still image: to capture modeVideo clip: to capture mode | |
| 4. Focus Focus Next 10th image | |||
| 5. Compensation ➞ | -- | Previous Image | |
| 6. Flash | -- Next Image | ||
| 7. If any scene mode is set:switches to scene modeselection screen | -- | Still image: to display imageRecords voice memo ( if“Voice Memo” is “Record”).Video clip: to play video clip | |
| 8. Self-timer Self-timer Previous 10th image | |||
| 9. Playback mode Playback mode Still image: to capture modeVideo clip: to capture mode | |||
| 10. Capture menu Video menu Playback menu | |||
LCD Monitor Display
Capture mode
-
Zoom status
-
Available number of shots
-
Storage media

- Battery condition

- Focus setting
![[Auto] A u t o [1] AF Tracking [Face Detect] [√] M a c r o [∞] Infinity](/content/2026/05/892138/images/05d249c8e3c43db5d8abb28f55b28727e79be73c00f3c18b70dcc58b70cf5502.jpg)
- Flash mode
![[A] A u t o [4] Flash On [5] Flash Off [6] R e d - e y e [S l o w S y n [P r e - f l a s](/content/2026/05/892138/images/b8e8bbc4aa87f02473240bf7010bf06152677ebee57ceebd2a2255220c866539.jpg)
- [+] Exposure compensation

- Self-timer & Self-portrait icon
![[OFF] O f f [Self-portrait] [2] 2 s e c . [10] 1 0 s e c . [10+2] 10+2 sec.](/content/2026/05/892138/images/cd1999a2cd8085941ebd4cdd0829bd57ab0b8b4c94bafe4124fad5578261656f.jpg)
-
[ ] Histogram
-
Image size resolution
$$ \begin{array}{rl} & \left[ \begin{array}{l}14\ 5\ 8\ 2\ 4\ 7\ 6\ VGA \end{array} \right]4288\times 3216\ & \left[ \begin{array}{l}1\ 3264\times 2448\ 2304\times 1728\ 1600\times 1200\end{array} \right] \ & \left[ \begin{array}{l}1\ 5\ 7\ 6\ VGA \end{array} \right]640\times 480 \end{array} $$
-
Set key: SCN hint icon
-
Main focus area
-
Date and time
-
Quick shot
-
Capture mode icon
![[Single [Continuous [A] AEB (Auto Exposure Bracketing) [B] Burst [Cont.flash [Pre-shot [C] Coupl.shot [Burst 30fps](/content/2026/05/892138/images/2ddb0053604778bc4f83de2a384daabcdd52c84e2079d6376458a34be333b0d8.jpg)

- White balance
![[AUTO] Auto [♣] Incand. [1] Fluoresc.1 [?] Fluoresc.2 [●] Daylight [♣] Cloudy [●] Manual WB](/content/2026/05/892138/images/fefe5eaeb09ccf5e6c89fcc291ab6a5ddd31ec0eccf6be65a79ffeabcfcb5c72.jpg)
- Image quality

![18. ISO [ISO] A u t o [ISO] ISO 100 [ISO] ISO 200 [ISO] ISO 400 [ISO] ISO 800 [ISO] ISO 1600](/content/2026/05/892138/images/5c0d1408cb9b681eece0fade452b50d7f4c4680239e765896d45151d862c7126.jpg)
-
Slow shutter warning
-
Mode icon / Scene mode
![[ ] Program AE [ ] Auto [ ] Tv [ ] A v [ ] Intelligent Scene [ ] Smile Detection [ ] Anti-shake [ ] Panorama PanCapture [ ] Skin Soften [ ] De-blemish [ ] Portrait Man [ ] Portrait Lady [ ] Landscape [ ] S p o r [ ] Night Portrait [ ] Night Scene [ ] Candlelight [ ] Fireworks [ ] T e x t [ ] Sunset [ ] S u n r [ ] S p l a [ ] F l o w [ ] S n o w [ ] B e a c [ ] P e t s [ ] Natural Green](/content/2026/05/892138/images/5dec6b77e496ef0ab65cde0a59ca8a5d8eb8ef8b21ec88460f6dcfe2e268c450.jpg)
Video mode
- Zoom status
- Storage media
- Battery condition
- Focus setting
- Flash off
- Self-timer icon
- Video resolution
- Elapsed time/Available recording time
- Main focus area
- Date and time
- Video quality
- Audio off
- Mode icon
Playback mode - Still image playback
- Voice memo
- DPOF icon
- Protect icon
- Folder / File number
- Storage media
- Battery condition
- Image size resolution
- Set key: Play hint icon
- Date and time
- Histogram
- Aperture value/Shutter speed
12.Exposure value - Image quality
14.ISO
15.Mode icon
Playback mode - Video playback
- Protect icon
- Folder / File number
- Storage media
- Battery condition
- Volume mode
- Total recorded time
- Video status bar
- Video condition icon
- Elapsed time
- Set key: Play/Pause hint icon
- Down key: Stop hint icon
- Mode icon


GETTING STARTED
Preparation
natural_image
Pure mechanical diagram showing a pipe connection with no text or symbols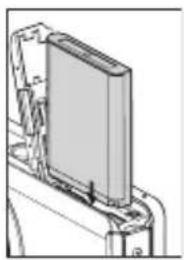
natural_image
Technical line drawing of a mechanical assembly with no visible text or symbols
natural_image
Diagram of a device with a monitor mounted on a base, showing internal components and wiring (no text or symbols)-
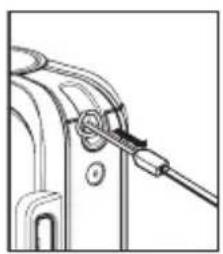
Attach the camera strap.
-
Open the battery/memory card cover.
-
Insert the supplied battery with correct orientation as shown. (label side back)
-
Insert an SD/SDHC memory card (Optional).
The camera has 32MB internal memory(10MB available for image storage), but you can load an SD/SDHC memory card to expand the camera's memory capacity.
■ Be sure to format the memory card with this camera before its initial usage.
- Close the battery/memory card cover and make sure it is locked securely.

To prevent valuable data from being accidentally erased from an SD/SDHC memory card, you can slide the write protect tab (on the side of the SD/SDHC memory card) to "LOCK".
■ To save, edit, or erase data on an SD/SDHC memory card, you must unlock the card.
To prevent damaging of an SD/SDHC memory card, be sure to turn off the power when inserting or removing the SD/SDHC memory card. If inserting or removing the SD/SDHC memory card with the power on, the camera will automatically turn off.

Charging the Battery
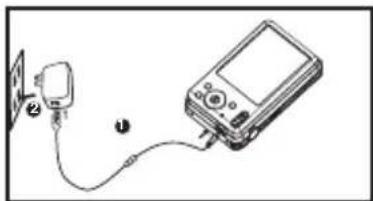
The battery is not fully charged at the time of purchase. Fully charge the battery and discharge it for at least one complete cycle before use to maximize its performance and lifetime.
-
Connect camera to AC/DC adapter with USB cable.
-
Insert the plug into a wall outlet.
| Status LED Description | |
| Orange (blinks slowly) Charging normally | |
| Orange Charging finished | |
| Orange (blinks quickly) Error | |
natural_image
Simple line drawing of a device connected to a battery, showing wiring and a handheld device (no text or symbols)
■ The included AC/DC adapter differs depending on the region where you purchased the camera.
■ User can also charge the battery by connecting camera to computer with USB cable.
■ Charging time varies according to the ambient temperature and the status of battery.
Initial Settings
The language & date/time needs to be set if and when:
■ The camera is turned on for the first time.
■ The camera is turned on after leaving the camera without the battery for an extended period of time.
- Press the ON/OFF button to turn the power on.
- Press any button to enter language setup. Select the displayed language with the ◀ / ▶ / ▲ / ▼ buttons and press the SET button.
- Select the date format with the ▲ / ▼ buttons, and press the SET button.
- Select the item's field with the ◀ / ▶ buttons and adjust the value for the date and time with the ▲ / ▼ buttons.
- After confirming all settings are correct, press the SET button.
■ Half press the shutter button or press the MENU button will enter capture mode without saving the settings.
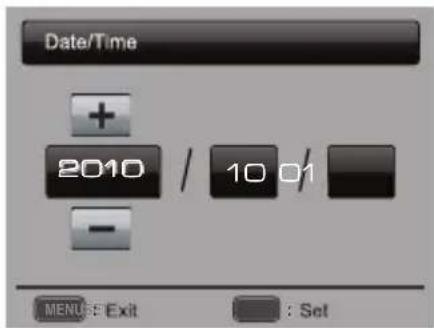
Setting the Date and Time
When the date and time information is not displayed on the LCD monitor, follow these steps to set the correct date and time.
- Press the MODE button, and set the camera mode to [ ] or [ ]; or press the ▶ button.
- Press the MENU button.
- Select the [Setup] at the end of the Menu with the ▲ / ▼ buttons, and press the SET button.
- Select [Date/Time] with the ▲ / ▼ buttons, and press the SET button.
- Select the date format with the ▲ / ▼ buttons, and press the SET button.
■ Select the item's field with the ◀ / ▶ buttons and adjust the value for the date and time with the ▲ / ▼ buttons.
■ The time is displayed in 24-hour format.
■ After confirming all settings are correct, press the SET button.
- To exit from the [Setup] menu, press the MENU button.

Choosing the Language
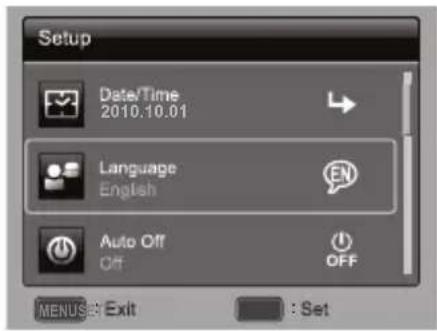
Specify in which language menus and messages are to be displayed on the LCD monitor.
-
Press the MODE button, and set the camera mode to [For []; or press the ▶ button.
-
Press the MENU button.
-
Select the [Setup] at the end of the Menu with the ▲ / ▼ buttons, and press the SET button.
-
Select [Language] with the ▲ / ▼ buttons and press the SET button.
-
Select the displayed language with the ◀ / ▶ / ▲ / ▼ buttons and press the SET button.
■ The setting will be stored.
- To exit from the [Setup] menu, press the MENU button.
Formatting the Memory Card or Internal Memory
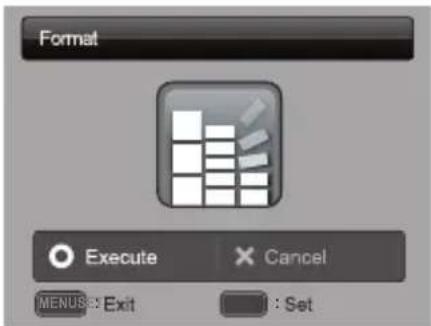
This utility formats the memory card (or internal memory) and erases all stored images and data.
-
Press the MODE button, and set the camera mode to [for []; or press the ▶ button.
-
Press the MENU button.
-
Select the [Setup] at the end of the Menu with the ▲ / ▼ buttons, and press the SET button.
-
Select [Format] with the ▲ / ▼ buttons, then press the SET button.
-
Select [Execute] with the ◀ / ▶ buttons, and press the SET button.
■ To cancel formatting, select [Cancel] and press the SET button.
- To exit from the [Setup] menu, press the MENU button.

CAPTURE MODE
Capturing Images
Your camera is equipped with a 2.7" full color TFT LCD monitor to help you compose images, playback recorded images/video clips or adjust menu settings.
-
Press the ON/OFF button to turn the power on.
-
Press the MODE button, and set the camera mode to [☐].
-
Compose your image in the LCD monitor.
-
Pressing the button zooms in on the subject, and enlarges the subject on the LCD monitor.
-
Pressing the button zooms out on the subject, and provides a wider angle image.
-
Press the shutter button.
-
Pressing the shutter button down halfway automatically focuses and adjusts the exposure, and pressing the shutter button down fully captures the image.
■ The focus area frame turns green when the camera is in focus and the exposure is calculated.
■ When the focus is not suitable, the frame of the focus area turns red.

Setting the Scene Mode
By simply selecting one of the available scene modes, you can capture the image with the most appropriate settings.
-
Press the MODE button, and set the camera mode to [ ] and press the SET button.
-
Select the desired scene mode with the ◀ / ▶ / ▲ / ▼ buttons, and press the SET button.
-
Compose the image and press the shutter button.

The table below will help you choose the appropriate scene mode:
| Scene mode Description | |
| Program AE | Select this mode when you want to set parameters manually other than the shutter speed and the aperture value. |
| Auto Select this | mode when you want to capture images without having to set special functions or manual adjustments. |
| Tv Select this mode | when you want to capture fast moving subjects in fast shutter speed, or capture still subjects in slow shutter speed. |
| Av Select this mode | when you want to capture images with the priority given to aperture. |
| Intelligent Scene | Select this mode when you want the camera to select an ideal shooting mode according to environment automatically. |
| Smile Detection | Select this mode to automatically capture an image when a smiling face is detected. |
| Anti-shake Select | this mode when you want to minimize the influences of hand shaking when capturing an image. |
| Panorama PanCapture | Select this mode when you want the camera to combine pictures in the camera automatically. |
| Skin Soften Select | this mode when you want the camera to reduce artifacts on faces. |
| De-blemish Select | this mode when you want the camera to reduce obvious blemishes and big spots on faces. |
| Portrait Man Select | this mode when you want to capture an image that makes a man stand out against a blurred background. |
| Portrait Lady Select | this mode when you want to capture an image that makes a lady stand out against a blurred background. |
| Scene mode | Description |
| Landscape Select | this mode when you want to capture an image with infinity focus, hard sharpness and high saturation. |
| Sports Select this | mode when you want to capture fast-moving subjects. |
| Night Portrait Select | this mode when you want to capture people with an evening or night scene background. |
| Night Scene Select | this mode when you want to capture dark scenes such as night views. |
| Candlelight Select | this mode when you want to capture photos of candlelight scene, without spoiling the ambience. |
| Fireworks Select | this mode when you want to capture fireworks clearly with optimal exposure. The shutter speed becomes slower, so using a tripod is recommended. |
| Text Select this | mode when you want to capture an image that contains black and white subjects like printed documents. |
| Sunset Select this | is mode when you want to capture a sunset. This mode helps keep the deep hues in the scene. |
| Sunrise Select this | is mode when you want to capture a sunrise. This mode helps keep the deep hues in the scene. |
| Splash Water | Select this mode when you want to capture photos of splashing water. |
| Flow Water | Select this mode when you want to capture the soft flowing water. |
| Snow | Select this mode when you want to capture clear snow scenes without darkened subjects and bluish tint. |
| Beach Select this | mode when you want to capture bright beach scenes and sunlit water surfaces. |
| Pets | Select this mode when you want to capture your pets. Shoot from their eye level. |
| Natural Green | Select this mode when you want to capture the green scenery background such as forest. This mode helps to brighten the colors. |
Taking Images with Intelligent Scene mode
In this Intelligent Scene mode, the camera can sense the ambient conditions and automatically select the ideal shooting mode.
- Press the MODE button, and set the camera mode to [in] and press the SET button.
- Select [Intelligent Scene] with the ◀ / ▶ / ▲ / ▼ buttons, and press the SET button.
■ The camera can automatically select best mode for the shooting scene from [Auto] / [Landscape] / [Backlight] / [Portrait] / [Night] / [Night Portrait] / [Macro].
- Compose the image, and press the shutter button down fully.
Taking and Combining Panoramic Pictures
Pictures are manually shot, and the camera automatically combines pictures in the camera.
- Press the MODE button, and set the camera mode to [ ] and press the SET button.
- Select [Panorama PanCapture] with the ◀ / ▶ / ▲ / ▼ buttons, and press the SET button.
- Select the photographic direction with the ◀ / ▶ buttons.
- Shoot the first image.
■ The next image appears beside the previous image. - Orient the camera so that the second frame overlaps a small portion of the photographic subject of the first image and press the shutter button to capture the next image.
- Follow the same steps to capture subsequent images in the sequence.
- After the third picture is taken, the pictures are automatically combined.
Taking Images When the Smile Feature Is On
With the camera's new "smile detection" function, this camera detects smiles so you do not miss those special moments in life.
- Press the MODE button, and set the camera mode to [ ] and press the SET button.
- Select [Smile Detection] with the ◀ / ▶ / ▲ / ▼ buttons, and press the SET button.
- Compose the image, and press the shutter button down fully.
- Once the camera detects a smile, it will automatically capture 3 images (by default, the flash mode setting is set to Ⓐ).
If the [Capture Md.] is set to [Single], the camera will only capture an image after it detects a smile.
■ When capturing group shots (if the number of people is more than 1), the camera will automatically capture the image(s) when it detects two smiles.
If the camera does not detect a smile within 5 seconds, the camera returns to preview display.
■ Press the shutter button once again to reactivate this function.


Mode of Skin Soften and De-blemish
In order to make face taken look better and younger, mode of Skin Soften is added to reduce artifacts on faces, while the mode of De-blemish is to reduce obvious blemishes and big spots on faces.
- Press the MODE button, and set the camera mode to [☐], and press the SET button.
- Select [Skin Soften] or [De-blemish] with the ◀ / ▶ / ▲ / ▼ buttons, and press the SET button.
- Compose the image, and press the shutter button down fully.
Recording Shots using Face Detection Technology
Face Detection Technology can identify and focus on the human faces in the image.
- Press the MODE button, and set the camera mode to [☐].
- Press the 🔊 button, and select [☐] icon with the ◀ / ▶ buttons. Press the SET button.
■ With Face Detection turned on, the camera identifies main face (white frame) and subsidiary faces (gray frames).
■ If the camera cannot detect and track any faces, there will be no frame shown on the screen.
- Press the shutter button halfway down to lock the focus.
■ When the main face is in focus, the white frame simultaneously turns green. Otherwise, it turns red.
- Press the shutter button down fully to capture your image.

Focus Lock

■ Subjects that are not suitable with this function: a. A person is wearing glasses, sunglasses, or face is covered with hat or hair. b. A person turns sideways.
Self-portrait Function
Use this function to take pictures of yourself or include yourself in pictures.
- Press the MODE button, and set the camera mode to [☐].
- Press the ⏻ button, and select [💡] icon with the ◀ / ▶ buttons. Press the SET button.
- Press the shutter button.
- If the camera detect and track any faces, after twice blinking of the self-timer LED, one image will be captured.
■ Press the shutter button to exit.
If it does not detect any face within 30 seconds, the camera will automatically capture an image and return to preview display.
■ Select [∅] to reactivate this function.
AF Tracking Mode
Use this option to take pictures of moving subject.
- Press the MODE button, and set the camera mode to [☐].
- Press the ⚪ button, and select [ ⓐ ] icon with the ◀ / ▶ buttons. Press the SET button.
- To lock the desired tracking subject, press the ▼ button.
■ The frame automatically tracks the subject movement to focus on it continuously.
- Press the shutter button down fully to capture your image.
■ When the camera fails to recognize or track the subject, the frame will turns red and blinks. After blinking of the red frame, the camera returns to unlock display.
■ Press the ▼ button, to returns to unlock display.
VIDEO MODE
Recording Video Clips
This mode allows you to record video clips at a resolution of 320 x 240 / 640 x 480 / 720p pixels.
- Press the MODE button, and set the camera mode to [☐].
- Compose the image.
- Press the shutter button.
■ The recording of the video clip will start.
- Pressing the shutter button one more time will end the recording of the video clip.
■ The recording time depends on the storage size and the subject of the image to be recorded.
■ The zoom function cannot be used during video recording.


■ When recording a video clip, the flash and "10+2 sec." self-timer function cannot be used.
If the write speed of your SD/SDHC memory card is not fast enough for recording video clips in the currently selected quality, the video recording will stop. In this case, select a video quality lower than the current one.
Playing Back Video Clips
You can play back recorded video clips on the camera. You can also play back sound if recorded with the video.
- Press the ▶ button.
■ The last image appears on the screen.
- Select the desired video clip with the ◀ / ▶ buttons.
- Press the SET button.
■ A press of the ▶ / ◀ buttons during playback allows fast forward play / fast reverse play.
■ To stop video playback, press the ▼ button.
This stops playback and returns to the start of the video clip.
■ To pause video playback, press the SET button.
This pauses video playback.
To cancel pause, press the SET button again.

■ Video clips cannot be displayed rotated or enlarged.
Windows Media player or QuickTime Player is recommended to play back the video clip on your computer.
QuickTime Player is a free media player available at www.apple.com; and compatible with Mac and Windows computers.
For more information about the operation of the media player, refer to its respective help documentation.
PLAYBACK MODE
Playing Back Still Images
You can play back the still images on the LCD monitor.
- Press the ▶ button.
■ The last image appears on the screen.
- The images can be displayed in forward or reverse sequence with the ◀ / ▶ buttons.
■ To view the previous image, press the ◀ button.
■ To view the next image, press the ▶ button.
■ Pressing the 🔊 button enlarges the image.
■ To return to normal magnification, press the button.


natural_image
Black-and-white photo of a young girl outdoors, no visible text or symbolsEntire image Current position of enlargement

■ An icon is displayed with the video data. Video clips cannot be rotated.
■ An [icon] icon is displayed with images which have an audio memo recorded.
Playback Display
This function allows you to search quickly for the image that you want and playback images on the LCD monitor sequentially.
- Press the ▶ button.
■ The last image appears on the screen.
- Press the ▲ button to display the next 10th image.
If the 1st image taken is displayed, press the ▲ button to playback the 11th image taken. Press the ▲ button again to playback the 21th image taken and so forth.
-
Press the ▼ button to display the previous 10th image.
-
Press and hold the ◀ / ▶ buttons to display the previous or next images automatically in sequential order.
■ Release the ◀ / ▶ buttons if you wish to stop the automatic playback.


If the total number of images is less than 10, press the ▼ button jumps to the first image and press the ▲ button jumps to the last image.
■ Video clips will be displayed with an [icon.
Removing Red-eye
You can use this function to remove the red-eye effect after an image is taken.
- Press the ▶ button.
■ The last image appears on the screen.
- Select the image that you want to edit with the
◀ / ▶ buttons.
-
Press the MENU button.
-
Select [Fix Red Eyes] with the ▲ / ▼ buttons, and press the SET button.
-
Select [Execute] with the ◀ / ▶ buttons, and press the SET button.
-
View the changes on the corrected image.
-
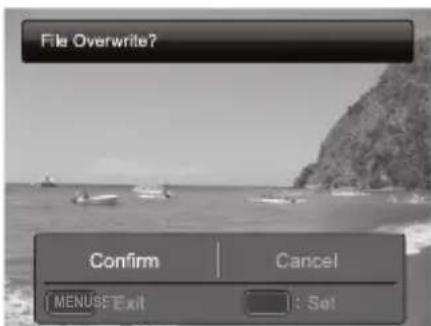
To save your corrected image, select [Confirm] with the ◀ / ▶ buttons, and press the SET button.
■ When this process ends, this replaces the original image with the corrected image.


Dynamic Lighting Feature
This feature compensates for the unfavorable lighting conditions by brightening underexposed areas and balancing overexposed areas.
- Press the ▶ button.
■ The last image appears on the screen.
-
Select the image that you want to edit with the ▶ / ▶ buttons.
-
Press the MENU button.
-
Select [Dynam. Light.] with the ▲ / ▼ buttons, and press the SET button.
-
Select [High] or [Low] with the ◀ / ▶ buttons, and press the SET button.
-
View the changes on the corrected image.
-
To save your corrected image, select [Confirm] with the ◀ / ▶ buttons, and press the SET button.
■ When this process ends, this replaces the original image with the corrected image.

Attaching Voice Memos
A maximum of 30 seconds of audio can be recorded as a memo for captured still images. The voice memo can be recorded only once.
- Press the ▶ button.
■ The last image appears on the screen.
-
Select the image to which you want to attach the voice memo with the ◀ / ▶ buttons.
-
Press the MENU button.
-
Select [Voice Memo] with the ▲ / ▼ buttons, and press the SET button.
-
Press t he SET button.
■ [VOICE RECORDING] is displayed on the screen and recording starts.
- To stop recording a voice memo as it is being recorded, press t he SET button again.
■ [VOICE RECORD END] will be displayed momentarily and the recording will end. An [icon] icon is displayed with images that have been recorded with a voice memo.

■ RE-REC mode can only be used for the recorded and selected file, and it can record voice memo repeatedly to replace the previous recordings.
Playing back voice memo
A press of the SET button displays [VOICE PLAYBACK] and plays back the voice memo.

natural_image
Black-and-white close-up of a flower with visible petals and center, set against a blurred background (no text or symbols)
■ Voice memo is only available for still images.
Protecting Images
Set the data to read-only to prevent images from being erased by mistake.
- Press the ▶ button.
■ The last image appears on the screen.
- Select the image that you want to protect with the
◀ / ▶ buttons.
-
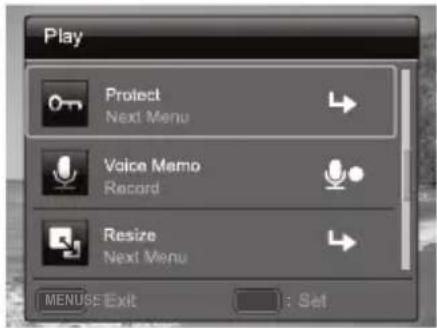
Press the MENU button.
-
Select [Protect] with the ▲ / ▼ buttons, and press the SET button.
-
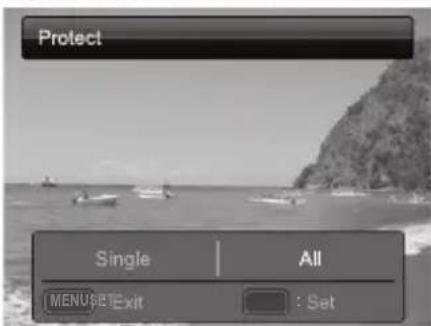
Select [Single] or [All] with the ◀ / ▶ buttons, and press SET button.
-
Select [Set] with the ◀ / ▶ buttons, and press the SET button.
■ Protection is applied to the image and the camera returns to the playback mode.
■ The protect icon [+] is displayed with protected images.
When [All] has been selected, [ ] is displayed with all the images.
Canceling the Protection
To cancel protection for only one image, display the image on which you want to remove the image protection.

- Press the ▶ button.
■ The last image appears on the screen.
- Select the image that you want to cancel protection with the ◀ / ▶ buttons.
- Press the MENU button.
- Select [Protect] with the ▲ / ▼ buttons, and press the SET button.
- Select [Single] or [All] with the ◀ / ▶ buttons, and press the SET button.
- Select [Cancel Protect] with the ◀ / ▶ buttons, and press the SET button.
■ The removal of image protection is executed and the camera returns to the playback mode.

■ Formatting an SD/SDHC memory card overrides protection, and erases all images regardless of their protected status.
DPOF Settings
DPOF is the abbreviation for Digital Print Order Format, which allows you to embed printing information on your memory card. You can select the images to be printed and how many prints to make with the DPOF menu in the camera and insert the memory card to the card compatible printer. When the printer starts printing, it will read the embedded information on the memory card and print the specified images.
- Press the ▶ button.
■ The last image appears on the screen.
-
Select the image that you want to set DPOF with the ◀ / ▶ buttons.
-
Press the MENU button.
-
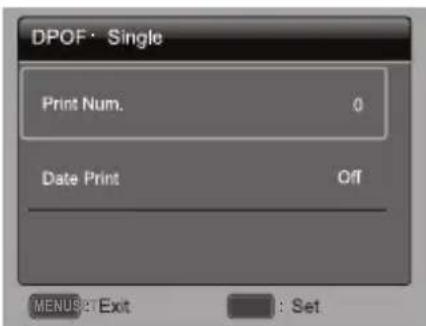
Select [DPOF] with the ▲ / ▼ buttons, and press the SET button.
■ The DPOF setting screen is displayed.
- Select [Single] or [All] with the ◀ / ▶ buttons, and press the SET button.
■ [Single]: Sets DPOF for each individual image.
■ [All]: Sets DPOF for all images at once.
- Select [Print Num.] with the ▲ / ▼ buttons, and press the SET button.
■ This displays the number of prints setting screen.
-
Set the number of prints with the ◀ / ▶ buttons, and press the SET button.
-
Select [Date Print] with the ▲ / ▼ buttons, and press the SET button.
■ The date setting screen appears.
- Select date to [On] or [Off] with the ◀ / ▶ buttons, and press the SET button.
■ [On]: The date of the image will also be printed.
■ [Off]: The date of the image will not be printed.
■ The DPOF icon [💡] is displayed on each image that has set up DPOF settings.



The date that is printed on the image is the date set on the camera. To print the correct date on the image, set the date on the camera before you capture the image. Refer to the section in this manual titled "Setting the Date and Time" for further details.
Erasing Images
Érasing a single image / Érasing all images
- Press the ▶ button.
■ The last image appears on the screen.
-
Select the image you want to erase with the ◀ / ▶ buttons.
-
Press the MENU button.
-
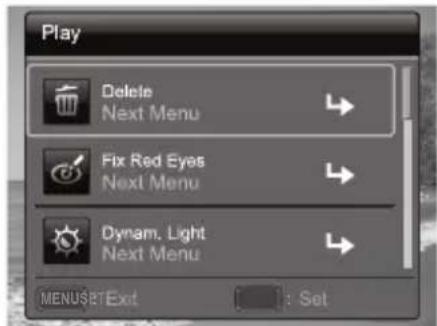
Select [Delete] with the ▲ / ▼ buttons, and press the SET button.
-
Select [Single] or [All] with the ◀ / ▶ buttons, and press the SET button.
■ [Single]: Erases the selected image or the last image.
■ [All]: Erases all of the images except for the protected images.
- Select [Execute] with the ◀ / ▶ buttons, and press the SET button.
■ To not erase, select [Cancel], and press the SET button.
- To exit from the menu, press the MENU button.


■ Deleting an image will not affect sequential image numbering. For example, if you delete image number 240, the next captured image will be numbered 241 even though 240 no longer exists. In other words, an image-number is retired when an image is deleted and will not be reused or reassigned to another subsequently captured image.
MENU OPTIONS
Capture Menu
This menu is for the basic settings to be used when capturing still images.

- Press the ON/OFF button to turn the power on.
- Press the MODE button, and set the camera mode to any scene mode.
- Press the MENU button to enter the [Capture] menu.
- Select the desired option item with the ▲ / ▼ buttons, and press the SET button to enter its respective menu.
■ The selectable items may vary in different capture modes. - Select the desired setting with the ◀ / ▶ buttons, and press the SET button.
- To exit from the menu, press the MENU button.
Size
This sets the size of the image that will be captured.
* 14M / 8M / 4M / 2M / VGA
ISO
This sets the sensitivity for capturing images. When the sensitivity is raised (and the ISO figure is increased), photography will become possible even in dark locations, but the more pixelated (grainier) the image will appear.
* Auto / ISO100 / ISO 200 / ISO 400 / ISO 800 / ISO 1600
Quality
This sets the quality (compression) at which the image is captured.
* Fine / Standard / Economy
W. Balance
This sets the white balance for a variety of lighting conditions and permits images to be captured that approach the conditions that are seen by the human eye.
*Auto / Incand. / Fluoresc.1 / Fluoresc.2 / Daylight / Cloudy / Manual WB
Sharpness
This sets the sharpness of the image that will be captured.
* Hard / Standard / Soft
Color
This sets the color of the image that will be captured.
* Standard / Vivid / Sepia / B&W / Blue / Red / Green / Yellow / Purple
Saturation
This sets the saturation of the image that will be captured.
* High / Standard / Low
Metering
This sets the metering method for calculating the exposure.
* Center: Averages the light metered from the entire frame, but gives greater weight to the subject matter at the center.
* Spot: A very small portion of the center of the screen is measured to calculate the correct exposure.
* Average: The exposure is measured all of the image area.
Capture Md.
This sets the recording method at the time of capturing images.
* Single: Captures one image at a time.
* Continuous: Permits continuous capture of up to 3 images.
* AEB: Permits 3 consecutive images in the order of standard exposure, underexposure and overexposure compensation.
* Burst: Permits continuous photography while pressing and holding the shutter button. As long as you hold the shutter button pressed, images are captured until the memory capacity is exhausted.
* Cont. flash: Permits continuous capture of up to 3 images with flash.
* Pre-shot: Select a background by 1st shot, the image shown on display will be transparent, then take the 2nd shot on the basis of 1st image. Image of 1st shot is only a guiding tool, it won't be saved on SD card. Normally this function is used when taking a portrait picture and the background is selected by the model instead of the photographer.
* Coupl.shot: Uses separate areas to combine two shots. You can include yourself in the shot.
* Burst 30fps Permits continuous capture of up to 30 images in the resolution 640 x480 within 1 second.
Quick Shot
If this function is set to "On", the camera takes a quick shot without focusing.
* On / Off
Digi. Zoom
This sets whether or not to use digital zoom at the time of photography.
* On / Off
Preview
This sets whether or not to display the captured image on the screen immediately after the image is captured.
* On / Off
Date Print
The date of recording can be printed directly on the still images. This function must be activated before the image is captured.
* On / Off
Setup
Refer to the section in this manual titled "Setup Menu" for further details.
Video Menu
This menu is for the basic settings to be used when recording video clips.


- Press the MODE button, and set the camera mode to [☐].
- Press the MENU button to enter the [Video] menu.
- Select the desired option item with the ▲ / ▼ buttons, and press the SET button to enter its respective menu.
- Select the desired setting with the ◀ / ▶ buttons, and press the SET button.
- To exit from the menu, press the MENU button.
Size
This sets the size of the video clip that will be captured.
* VGA / QVGA / HD
Quality
This sets the quality (compression) at which the video clip is captured.
* Fine / Standard
Color
This sets the color of the video clip that will be captured.
* Standard / Vivid / Sepia / B&W / Blue / Red / Green / Yellow / Purple
Audio
This sets whether or not to record audio at the time of video recording.
* On / Off
Digi. Zoom
Refer to the section in this manual titled "Digi. Zoom" in Capture Menu for further details.
Setup
Refer to the section in this manual titled "Setup Menu" for further details.
Playback Menu
In the [▶] mode, choose which settings are to be used for playback.


- Press the ▶ button.
- Press the MENU button.
- Select the desired option item with the ▲ / ▼ buttons, and press the SET button to enter its respective menu.
- Select the desired setting with the ◀ / ▶ buttons, and press the SET button.
- To exit from the menu, press the MENU button.
Delete
Refer to the section in this manual titled "Erasing Images" for further details.
Fix Red Eyes
Refer to the section in this manual titled "Removing Red-eye" for further details.
Dynam. Light.
Refer to the section in this manual titled "Dynamic Lighting Feature" for further details.
Slide Show
This function enables you to play back your still images automatically in order one image at a time.
* 3 Sec. / 5 Sec. / 10 Sec.
Rotate
If you wish to rotate a still image 90 degrees to the right, select +90°; if you wish to rotate it 90 degrees to the left, select -90°. Video clips cannot be rotated.
* +90° / -90°
DPOF
Refer to the section in this manual titled "DPOF Settings" for further details.
Protect
Refer to the section in this manual titled "Protecting Images" for further details.
Voice Memo
Refer to the section in this manual titled "Attaching Voice Memos" for further details.
Resize
Resizes a previously saved image. Resizing replaces the original image with the changed image. It is only possible to resize to a smaller size.
EN-30
Qual. Change
Changes the quality (compression) of a recorded image. Compress images down to half of their size or less, overwrite old size images with newly compressed images. It is only possible to reduce the image quality/size, never to increase it.
Copy to Card
Allows you to copy your files from the camera's internal memory to an SD/SDHC memory card. Of course, you can only do this if you have a memory card installed and some files in internal memory. All files remain in the internal memory, even after copy to the SD/SDHC memory card from the internal memory.
* Cancel / Execute
Setup
Refer to the section in this manual titled "Setup Menu" for further details.
Setup Menu
Set your camera's operating environment.
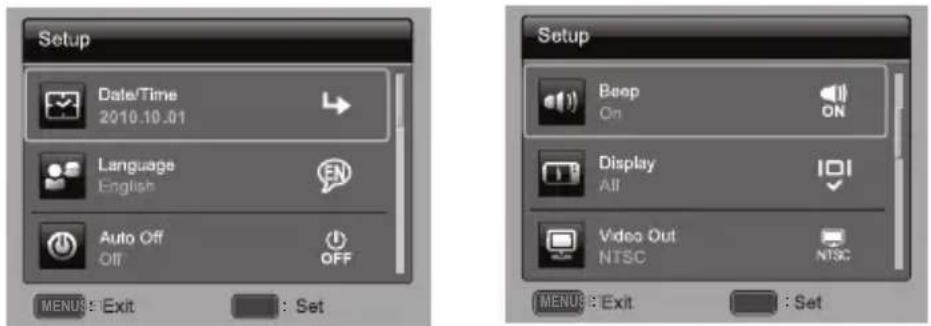
- Press the MODE button, and set the camera mode to [☐] or [☐]; or press the ▶ button.
- Press the MENU button.
- Select the [Setup] at the end of the Menu with the ▲ / ▼ buttons, and press the SET button.
- Select the desired option item with the ▲ / ▼ buttons, and press the SET button to enter its respective menu.
- Select the desired setting with the ◀ / ▶ buttons, and press the SET button.
- To exit from the menu, press the MENU button.
Date/Time
Refer to the section in this manual titled "Setting the Date and Time" for further details.
Language
Refer to the section in this manual titled "Choosing the Language" for further details.
Auto Off
If no operation is performed for a specific period of time, the power to the camera is automatically turned off. This feature is useful for reducing battery usage.
* Off / 1 Min. / 2 Min. / 3 Min.
Beep
This sets whether or not to mute the camera sound each time you press the camera's buttons.
* On / Off
Display
This sets the image information display state.
* Default / All / Off
Video Out
This sets your camera to match the system of the equipment that you are going to connect to the camera.
* NTSC / PAL
Fr. No. Reset
This creates a new folder. The captured images are recorded to the newly created folder from number 0001.
* Cancel / Execute
Light Freq.
This camera supports different lighting frequencies: 50 Hz and 60 Hz. When photographing under fluorescent lighting, select the correct frequency setting depending in your local area's voltage.
* 50 Hz / 60 Hz
LCD Bright.
Select a brightness level for the LCD monitor.
* Standard / Bright
Format
Refer to section in this manual titled "Formatting the Memory Card or Internal Memory" for further details.
Media Info.
This displays the free capacity of the internal memory or the memory card.
Sys. Info.
This displays the firmware version of the camera.
Sys. Reset
This returns all basic settings to the camera's default settings.
* Cancel / Execute
TRANSFERRING FILES TO YOUR COMPUTER
System Requirement
| Windows Macintosh | |
| ■ Pentium III 1GHz or equivalent■ Windows 7/XP/Vista■ 512MB RAM■ 150MB available hard disk space■ CD-ROM drive■ Available USB port | ■ PowerPC G3/G4/G5■ OS 10.3.9 or later■ 256MB RAM (512 MB recommended)■ 128MB available hard disk space■ CD-ROM drive■ Available USB port |
Downloading Your Files
- Turn on your camera.
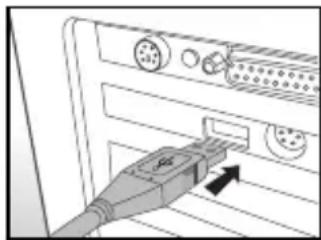
- Connect the camera to your computer with the USB cable.
- Select [PC] using the ▲ / ▼ buttons and press the SET button.
-
From the Windows desktop, double click on "My Computer".
-
Look for a new "removable disk" icon.
-
Double click on the removable disk and locate the DCIM folder.
natural_image
Diagram of an electronic device showing a cable inserted into a panel with ports and connectors (no text or symbols visible)- Your recorded images and video clips will be inside the folders of DCIM folder.
■ Copy&Paste or Drag-N-Drop image and video files to a folder on your computer.
Mac users: Double-click the "untitled" or "unlabeled" disk drive icon on your desktop. iPhoto may automatically launch.
USING THE CAMERA AS A PC CAMERA
Your camera can act as a PC camera, which allows you to videoconference with business associates, or have a real-time conversation with friends or family. Your computer system must include the items, Microphone, Sound card, Speakers or headphones, Network or Internet connection.

■ Using the camera as a PC camera, Service Pack 3 is suggested to the users of Windows XP, Service Pack 3 can be downloaded by visiting http://www.microsoft.com/.
EDITING SOFTWARE INSTALLATION
Software is included on the CD-ROM:
ArcSoft MedialImpression™ - Easily, creatively, and productively manage your multimedia files. Create your own movies or photo slide shows, and share your photo, video and music files easily through simple email attachments or popular photo printing and video sharing websites.
To install software:
- Insert the CD-ROM that came with the camera into your CD-ROM drive.
The welcome screen appears.
- Click the respective software name.
Follow the on-screen instructions to complete the installation.

For more information about the operation of the software, refer to its respective help documentation.
For Windows 7/XP/Vista users, please make sure to install and use the software in "Administrator" mode.
■ The software is not supported by Mac.
SPECIFICATIONS
| Item Description | |
| Image sensor 1/2.33" CCD sensor (14.0 megapixels) | |
| Image resolution | Still image14M(4288 X 3216), 8M(3264 x 2448), 4M(2304 x 1728),2M(1600 x 1200), VGA(640 x 480)Video clipHD(720p)/30fps, VGA(640 x 480)/30fps, QVGA(320 x 240)/30fps |
| LCD monitor 2.7" full color TFT LCD (230K pixels) | |
| Recording media | 32MB internal memory (10MB available for image storage)Supports SD/SDHC memory card (up to 32GB) (optional) |
| File format DCF, JP | EG (EXIF 2.2), DPOF, Motion-JPEG (AVI), HD720p/30fps |
| Lens | 4x optical zoom lensAperture range: 3.0(W) - 5.8(T)Focal length: 5.0mm - 20.0mm (equivalent to 28mm - 112mm on a 35mm camera) |
| Focus Range | Macro: 0.05m~Inf.(W)Normal: 0.5m~Inf.(T) |
| Shutter speed 1~1/2000 Sec. | |
| Digital zoom | 6x (Capture mode)4x (Playback mode) |
| Terminals | USB/AV OUT(2 in 1 terminal) |
| Power supply Rechargeable Lithium-ion battery (3.7V) | |
| Battery Charging environment | Temperature0°C - 40°C(32°F to 104°F)(Charging) |
| Dimensions | Approx. 95.3 x 55.7 x 19.5mm (without protruding parts) |
| Weight Approx.112g (without battery and memory card) | |
* Design and specifications are subject to change without notice.
APPENDIX
Possible Number of Shots
Possible number of shots (still image)
The table shows the approximate shots that you can capture at each setting based on the capacity of the SD/SDHC memory card.
| Size Quality | SD/SDHC memory card capacity | ||||||
| 1GB 2GB | 4GB SDHC | 8GB SDHC | 16GB SDHC | 32GB SDHC | |||
| I_4 MP4288 x 3216 | Fine 147 2 | 86 576 1189 | 2388 4657 | ||||
| Standard 2 | 81 546 1096 | 2264 4544 | 8861 | ||||
| Economy 3 | 49 678 1360 | 2809 5636 | 10991 | ||||
| B MP3264 x 2448 | Fine 264 5 | 14 1031 2130 | 4275 8336 | ||||
| Standard 4 | 67 903 1811 | 3740 7503 | 14632 | ||||
| Economy 5 | 77 1115 2236 | 4616 9261 | 18058 | ||||
| A MP2304 x 1728 | Fine 657 1 | 144 2295 4738 | 9506 18536 | ||||
| Standard 8 | 60 1653 3315 | 6843 | 13729 | 26770 | |||
| Economy | 1042 | 1997 | 4004 | 8266 | 16584 | 32338 | |
| Z MP1600 x 1200 | Fine | 1358 | 2589 | 5189 | 10712 | 21489 | 41902 |
| Standard | 1763 | 3339 | 6693 | 13817 | 27718 | 54047 | |
| Economy | 2188 | 4117 | 8251 | 17032 | 34169 | 66625 | |
| V_GR 640 x 480 | Fine | 5015 | 9750 | 19541 | 40333 | 80911 | 99998 |
| Standard | 5127 | 9927 | 19896 | 41065 | 82380 | 99998 | |
| Economy | 5551 | 9927 | 19896 | 41065 | 82380 | 99998 | |
Possible recording time / sec (video clip)
| Size Quality | SD/SDHC memory card capacity | ||||||
| 1GB 2GB | 4GB SDHC | 8GB SDHC | 16GB SDHC | 32GB SDHC | |||
| HD1280 x 720 | Fine | 00:06:15 | 00:12:10 | 00:24:22 | 00:50:16 | 01:40:50 | 03:16:34 |
| Standard | 00:06:24 | 00:12:28 | 00:24:57 | 00:51:29 | 01:43:15 | 03:21:18 | |
| VGA640 x 480 | Fine | 00:08:59 | 00:17:30 | 00:35:01 | 01:12:15 | 02:24:53 | 04:42:28 |
| Standard | 00:10:46 | 00:20:59 | 00:42:00 | 01:26:39 | 02:53:47 | 05:38:47 | |
| VGA320 x 240 | Fine | 00:28:01 | 00:54:34 | 01:49:12 | 03:45:15 | 07:31:43 | 14:40:37 |
| Standard | 00:32:28 | 01:07:08 | 02:14:23 | 04:37:10 | 09:15:49 | 18:03:35 | |
* The table above shows the approximate maximum recording times. These are the total times for all clips. Continuous shooting is possible for approximately 25 mintuesor 4GB.
* We recommend a memory card of at least 10MB/Sec write speed to prevent auto stop or unexpected results. If you experience an error using a slower SD/SDHC memory card, you can set your camera's video recording to QVGA (320 x 240) and standard quality.
* SDHC Class6 or above is required for HD movie recording.
Troubleshooting
Refer to the symptoms and solutions listed below before sending the camera for repairs. If the problem persists, contact your local reseller or service center.
| Symptom Cause Solutions / | Corrective Actions | ||
| The power does not come on. | The battery is not inserted. Insert the | battery correctly. | |
| The battery is exhausted. Recharge | the battery. | ||
| The battery runs out quickly. The | the battery is not fully charged.The battery is not used for an extended period of time after being charged. | Fully charge the battery and discharge it for at least one complete cycle before use to maximize its performance and lifetime. | |
| The battery or camera feels warm. | Long period of continuous use of the camera or the flash. | ||
| Even if press the shutter button, the camera does not take a picture. | The shutter button is not pressed all the way down. | Press the shutter button all the way down. | |
| The memory card does not have any free capacity. | Insert a new memory card, or delete unwanted files. | ||
| The memory card is write-protected. | Remove the write-protection. | ||
| Images do not appear on the LCD monitor. | LCD monitor is dark. Adjust the brightness of the LCD monitor in the menu. | ||
| Although it is set to auto focus, it does not focus. | The lens is dirty. Wipe clean with a soft, dry cloth or lens paper. | ||
| The distance to the subject is smaller than the effective range. | Get your subject within the effective focus range. | ||
| The contents on the memory card cannot be played back. | You played back a memory card that was not formatted by this camera. | Insert a memory card that was formatted on this camera. | |
| Files cannot be deleted. The file is protected. Cancel protection. | |||
| The memory card is write-protected. | Remove the write-protection. | ||
| Even when the camera's buttons are pressed, it does not operate. | The battery is running low. Recharge the battery. | ||
| The date and time are wrong. | The correct date and time is not set. | Set the correct date and time. | |
| Cannot download images. The | free space on the hard disk in your computer may be insufficient. | Check whether the hard disk has space for running Windows, and if the drive for loading image files has a capacity at least that of the memory card inserted in the camera. | |
| No power supply. | Recharge the battery. | ||

natural_image
Symbol of a trash bin crossed with two crossed lines, representing no waste or discharge (no text or labels)
Attention: Your product is marked with this symbol. It means that used electrical and electronic products should not be mixed with general household waste. There is a separate collection system for these products.
A. Information on Disposal for Users (private households)
1. In the European Union
Attention: If you want to dispose of this equipment, please do not use the ordinary dust bin!
Used electrical and electronic equipment must be treated separately and in accordance with legislation that requires proper treatment, recovery and recycling of used electrical and electronic equipment.
Following the implementation by member states, private households within the EU states may return their used electrical and electronic equipment to designated collection facilities free of charge*. In some countries* your local dealer may also take back your old product free of charge if you purchase a similar new one.
*) Please contact your local authority for further details.
If your used electrical or electronic equipment has batteries or accumulators, please dispose of these separately beforehand according to local requirements.
By disposing of this product correctly you will help ensure that the waste undergoes the necessary treatment, recovery and recycling and thus prevent potential negative effects on the environment and human health which could otherwise arise due to inappropriate waste handling.
2. In other Countries outside the EU
If you wish to discard this product, please contact your local authorities and ask for the correct method of disposal.
For Switzerland: Used electrical or electronic equipment can be returned free of charge to the dealer, even if you don't purchase a new product. Further collection facilities are listed on the homepage of www.swico.ch or www.sens.ch.
B. Information on Disposal for Business Users
1. In the European Union
If the product is used for business purposes and you want to discard it: Please contact your local dealer who will inform you about the take-back of the product. You might be charged for the costs arising from take-back and recycling. Small products (and small amounts) might be taken back by your local collection facilities.
For Spain: Please contact the established collection system or your local authority for take-back of your used products.
2. In other Countries outside the EU
If you wish to discard of this product, please contact your local authorities and ask for the correct method of disposal.

- Note:
- Notice
- READ THIS FIRST
- Trademark Information
- Product Information
- SAFETY INSTRUCTIONS
- Warnings
- Cautions
- Notes on Battery Usage
- CONTENTS
- INTRODUCTION
- GETTING TO KNOW YOUR CAMERA
- GETTING STARTED
- CAPTURE MODE
- VIDEO MODE
- PLAYBACK MODE
- MENU OPTIONS
- TRANSFERRING FILES TO YOUR COMPUTER
- USING THE CAMERA AS A PC CAMERA
- EDITING SOFTWARE INSTALLATION
- SPECIFICATIONS
- APPENDIX
- INTRODUCTION
- Overview
- Package Contents
- Common Product Components:
- GETTING TO KNOW YOUR CAMERA
- Front View
- Rear View
- LCD Monitor Display
- Capture mode
- Video mode
- Playback mode - Still image playback
- Playback mode - Video playback
- GETTING STARTED
- Preparation
- Charging the Battery
- Initial Settings
- Setting the Date and Time
- Choosing the Language
- Formatting the Memory Card or Internal Memory
- Capturing Images
- Setting the Scene Mode
- Taking Images with Intelligent Scene mode
- Taking and Combining Panoramic Pictures
- Taking Images When the Smile Feature Is On
- Mode of Skin Soften and De-blemish
- Recording Shots using Face Detection Technology
- Self-portrait Function
- AF Tracking Mode
- Recording Video Clips
- Playing Back Video Clips
- PLAYBACK MODE
- Playing Back Still Images
- Playback Display
- Removing Red-eye
- Dynamic Lighting Feature
- Attaching Voice Memos
- Playing back voice memo
- Protecting Images
- Canceling the Protection
- DPOF Settings
- Erasing Images
- Érasing a single image / Érasing all images
- MENU OPTIONS
- Capture Menu
- Size
- ISO
- Quality
- Balance
- Sharpness
- Color
- Saturation
- Metering
- Capture Md.
- Quick Shot
- Digi. Zoom
- Preview
- Date Print
- Setup
- Video Menu
- Audio
- Playback Menu
- Delete
- Fix Red Eyes
- Dynam. Light.
- Slide Show
- Rotate
- DPOF
- Protect
- Voice Memo
- Resize
- EN-30
- Qual. Change
- Copy to Card
- Setup Menu
- Date/Time
- Language
- Auto Off
- Beep
- Display
- Video Out
- Fr. No. Reset
- Light Freq.
- LCD Bright.
- Format
- Media Info.
- Sys. Info.
- Sys. Reset
- TRANSFERRING FILES TO YOUR COMPUTER
- System Requirement
- Downloading Your Files
- USING THE CAMERA AS A PC CAMERA
- EDITING SOFTWARE INSTALLATION
- To install software:
- APPENDIX
- Possible Number of Shots
- Possible number of shots (still image)
- Troubleshooting
- Information on Disposal for Users (private households)
- In the European Union
- In other Countries outside the EU
- Information on Disposal for Business Users
Brand : MINOX
Model : DC 1411
Category : Camera