
SP-404MK2 App - DJ Equipment ROLAND - Free user manual and instructions
Find the device manual for free SP-404MK2 App ROLAND in PDF.


| Product Type | DJ Equipment Control Software (App) |
| Model | SP-404MK2 App (Version 4) |
| Brand | Roland |
| Compatible Hardware | Roland SP-404MK2 |
| Operating Systems | Windows 10 or later, macOS 10.15 or later |
| Recommended Screen Resolution | 720 x 860 pixels or higher |
| Main Functions | Sample editing, pattern editing, project management, drag-and-drop import/export, chop point editing, BPM analysis, time stretch, pitch shift, effects assignment (BUS FX, roll, mute groups, pad link) |
| Supported Import Formats | WAV, AIFF, MP3, FLAC, M4A (ALAC, AAC - macOS only) |
| Supported Export Formats | WAV (samples), MID (patterns, SMF format 0), project files (.bin) |
| Key Version 4 Features | Drag-and-drop for samples/patterns, MULTIPAD EXPORT, offline project editing, chop point addition, background image customization, slideshow |
| Connection | USB cable (for hardware connection) |
| User Interface Customization | Color modes (Dark, Light, Redzone, Fuji-san, Orange), custom background images, slideshow, gradient and opacity controls, scale factor (0.5x to 2.0x) |
| Safety Precautions | Do not disconnect USB or turn off power during data transfer ("Working..." indicator); avoid extremely short sample files (< 100 ms); use single-byte characters for filenames |
| Maintenance | Ensure software is up-to-date; restart app and hardware if connection lost; check USB cable integrity |
| Spare Parts / Repairability | Not applicable (software); hardware repairs refer to Roland service centers |
Frequently Asked Questions - SP-404MK2 App ROLAND
User questions about SP-404MK2 App ROLAND
0 question about this device. Answer the ones you know or ask your own.
Ask a new question about this device
Download the instructions for your DJ Equipment in PDF format for free! Find your manual SP-404MK2 App - ROLAND and take your electronic device back in hand. On this page are published all the documents necessary for the use of your device. SP-404MK2 App by ROLAND.
USER MANUAL SP-404MK2 App ROLAND
SP-404MK2 App Version 4
SP-404MK2 App User's Guide
Table of contents
About the SP-404MK2 App....3
Launching the SP-404MK2 App ....4
Basic Configuration of the SP-404MK2 App ....5
Editing a Sample ("Samples" Screen)....7
Setting the Playback and Loop Ranges ("Info" Tab) .... 8
Setting the Effect to Apply to a Pad ("Prms" Tab)..... 10
Setting the Playback Speed and Pitch of a Sample
("TS/PS" Tab)....11
Making Fade-in/Fade-out Settings ("AHR" Tab)...... 12
Editing a Chop Point 13
Importing a Sample....15
Exporting Samples 16
Organizing the Samples....17
Moving the Sample of a Pad....17
Copying/Exchanging Samples Between Pads....18
Deleting a Sample from a Pad....18
Editing a Pattern ("Patterns" Screen)....20
Importing Patterns....21
Exporting Patterns....22
Organizing the Patterns....24
Moving the Pattern of a Pad 24
Copying/Exchanging Patterns Between Pads 24
Deleting the Pattern from a Pad....25
Setting the Tempo and Volume ("Settings" Screen) 27
Importing/Exporting a Project 28
Importing a project 28
Exporting a Project....30
Importing a Project from the SP-404SX/A....33
Deleting a Project....35
Editing the App Settings....36
Error messages 38
About the SP-404MK2 App
With the SP-404MK2 App, you can use your computer to edit the parameters of the SP-404MK2 and to manage your projects.
In addition to SP-404MK2 data, you can use SMF data that was created on the SP-404SX/A or on your DAW.
Version 4 Additional Functions
- Enabled drag and drop operation when exporting samples or patterns.
- Added "MULTIPAD EXPORT" function which converts a phrase recorded in a pattern to audio for individual pads.
- Enabled to edit the project file offline when not connected to the SP-404MK2.
- Enabled the ability to add chop points (markers) in the app.
- You can perform other operations while samples are being imported/exported.
- In pattern mode (while the pattern is stopped), you can now import/export samples via the app.
- Renewed the design of the SP-404MK2 App UI.
System requirements
The SP-404MK2 App can be used on a computer that fulfills the following conditions.
| OS | Windows 10 or later | macOS 10.15 or later |
| Recommended Resolution | 720 × 860 (pixels) or more |
Launching the SP-404MK2 App
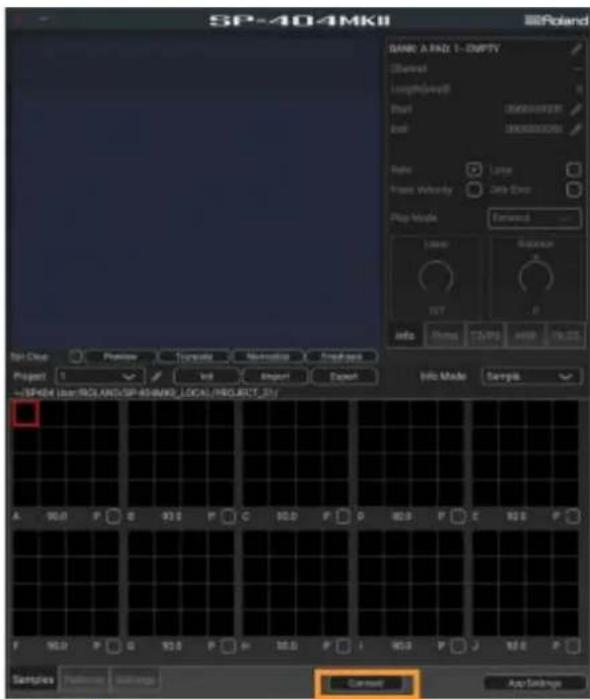
Follow the steps below to connect the SP-404MK2.
- Use a USB cable to connect the SP-404MK2 to your computer, and then turn on the SP-404MK2.
- Launch the SP-404MK2 App.
- Click "Connect."
NOTE
Never turn off the power or disconnect the SP-404MK2 while the screen indicates "Working..." The Samples screen is shown once the connection is made.
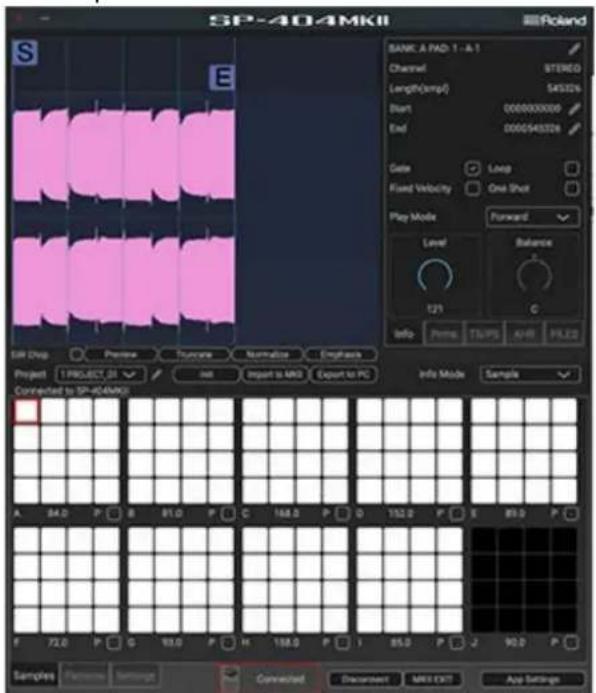
Basic Configuration of the SP-404MK2 App
Using the SP-404MK2 App involves switching between the Samples, Patterns and Settings screens.
Click the tabs at lower left to switch between the screens.
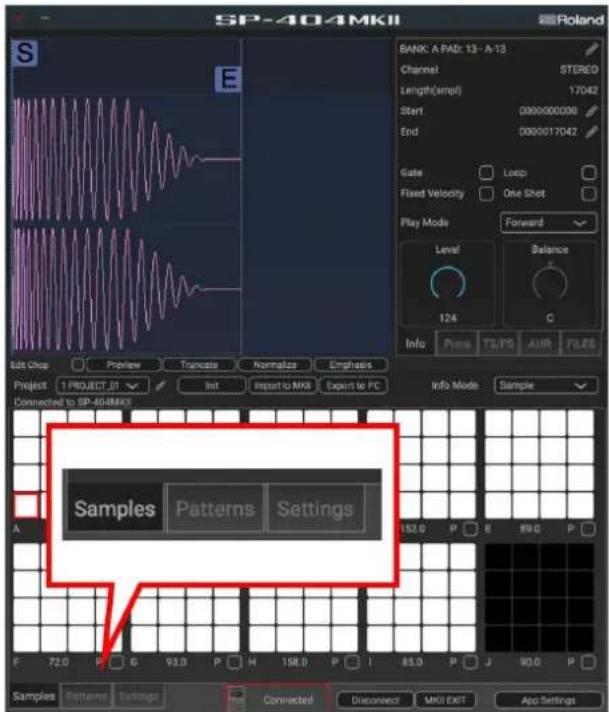
Samples screen
Use this screen to edit sample waveforms, pitches and playback speeds, as well as to organize the pad samples.
This offers convenient features only available with the SP-404MK2 App, like viewing all samples from banks A–J at once, or importing samples from the SP-404SX/A.
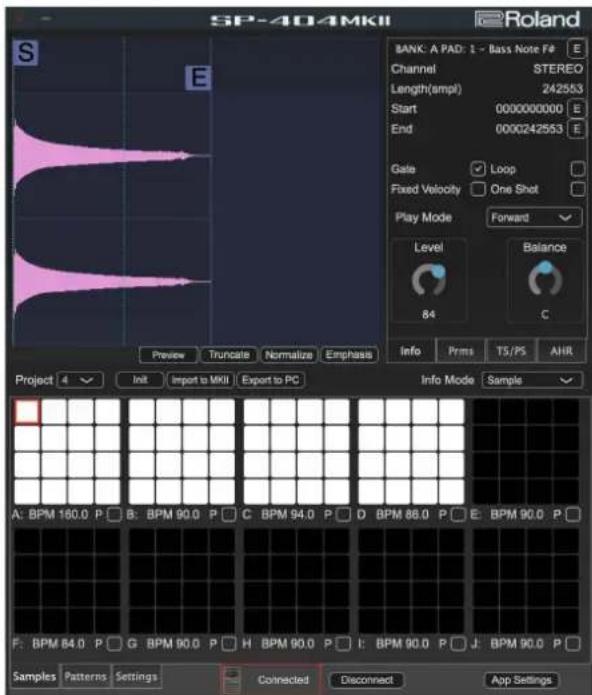
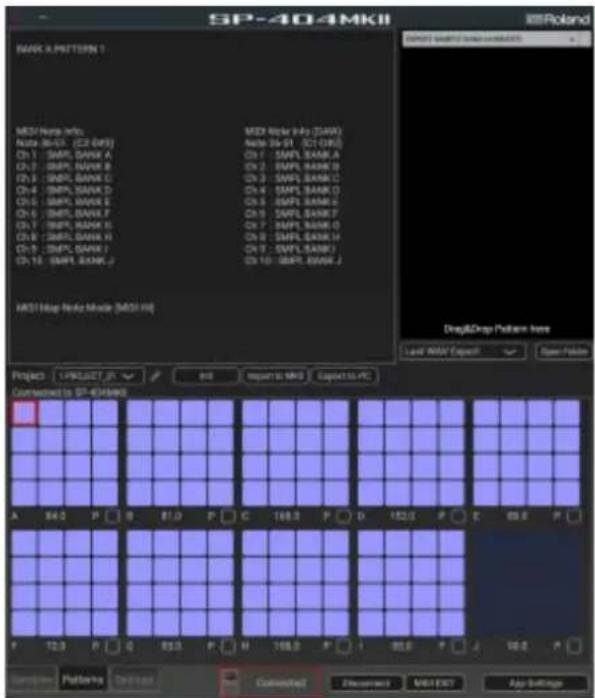
Patterns screen
Use this screen to organize the patterns stored in the pads.
The SP-404MK2 App makes it possible to use the SP-404SX/A pattern data and SMF data (.mid) created on your DAW, as well as pattern data from the SP-404MK2 App.
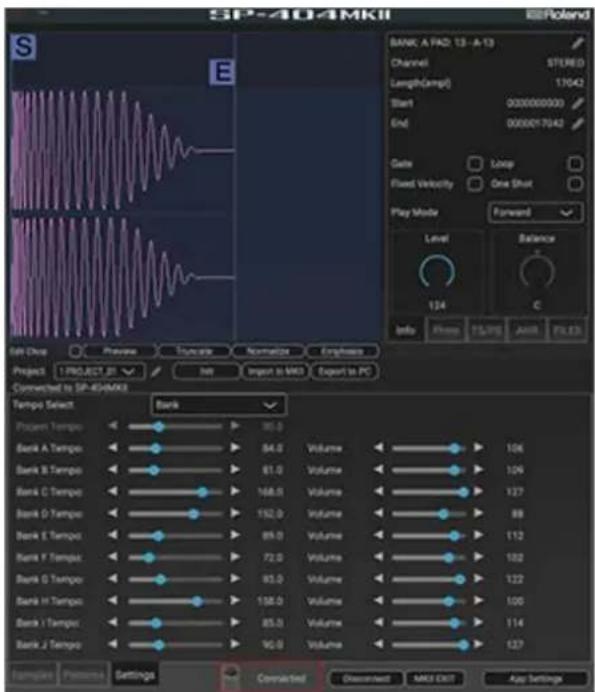
Settings screen
Use this screen to set the common project tempo and the tempo/volume for each bank.
Editing a Sample ("Samples" Screen)
![1. Waveform viewer 2. Sample editor SP-404MKII Roland BANK: B PAD: 13 - B-13 Channel STEREO Length(smpl) 26667 Start 0000000000 End 0000026667 Loop Start 0000000000 Gate Loop Fixed Velocity One Shot Play Mode Forward Level Balance 127 C Info Prms TS/PS AHR FILES 3. [Preview] button 4. [Truncate] button 5. [Normalize] button 6. [Emphasis] button 7. Project selection menu 8. Pad area 9. Screen switcher Sub Plot Truncate Normalize Emphasis Project 1 PROJECT_01 Init Import to MKII Export to PC Info Mode Sample Connected to OR MKII A 84.0 P B 81.0 P C 168.0 P D 152.0 P E 89.0 P F 72.0 P G 93.0 P H 158.0 P I 85.0 P J 90.0 P Samples Patterns Settings Connected Disconnect MKII EXIT App Settings](/content/2026/05/891820/images/ec61c362695121c00135df94f849940a42bf62dd5a0e2c8f28a8da2bf142e363.jpg)
1. Waveform viewer
Displays the waveform of the selected sample.
The "S" icon (S) indicates the playback start position, and the "E" icon (E) indicates the playback end position. The "L" icon (L) is shown when the loop is on. The loop range is from the "L" icon to the "E" icon.
2. Sample editor
Use this to edit the parameters of the selected sample.
You can edit different parameters for each tab.
Setting the Playback and Loop Ranges ("Info" Tab)(P.8)
Setting the Effect to Apply to a Pad ("Prms" Tab)(P.10)
Setting the Playback Speed and Pitch of a Sample ("TS/PS" Tab)(P.11)
Making Fade-in/Fade-out Settings ("AHR" Tab)(P.12)
3. [Preview] button
Press this to play back the selected sample on the SP-404MK2.
You can also use the space bar key on your computer to trigger playback instead of the [Preview] button.
4. [Truncate] button
Trims (deletes) the sample's audio regions before the start point and after the end point.
5. [Normalize] button
Increases the overall volume.
6. [Emphasis] button
Emphasizes the high-frequency sound.
7. Project selection menu
Switches between projects you wish to edit.
8. Pad area
This shows the pads for all banks.
The white pads (☐) already contain an assigned sample, and the black pads (■) are empty.
9. Screen switcher
Switches between screens to edit.
→ "Basic Configuration of the SP-404MK2 App(P.5)"
Setting the Playback and Loop Ranges ("Info" Tab)
Use this screen to edit settings such as sample and loop playback ranges, gate and loop on/off and so forth.
Click the [E] button for each parameter you want to set.
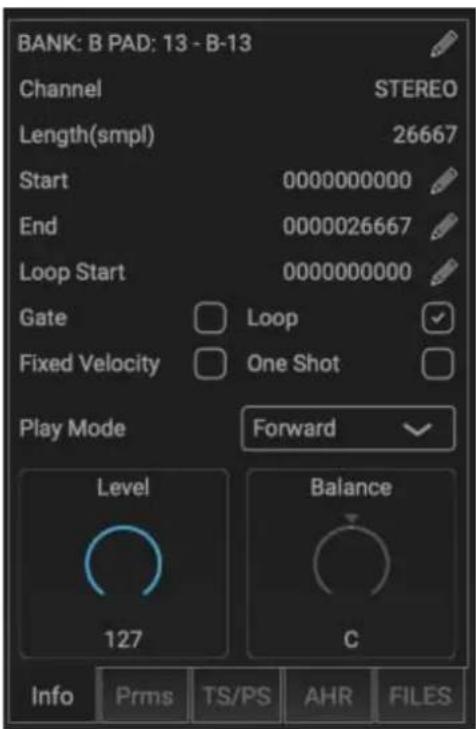
| Parameter | Value | Explanation |
| Channel | STEREO, MONO | Indicates whether the sample is stereo or mono. |
| Length(smpl) | 0–1000000000 | Displays the sample length. |
| Start | 0–1000000000 | Sets the playback start position.To edit, drag the “S” icon ( ) in the waveform viewer. |
| End | 0–1000000000 | Sets the playback end position.To edit, drag the “E” icon ( ) the waveform viewer. |
| Loop Start | 0–1000000000 | Sets the loop range start position.  To edit, drag the “L” icon ( ) in the waveform viewer. To edit, drag the “L” icon ( ) in the waveform viewer. |
| Gate | OFF, ON | Configures the gate. [2XXX]Select the checkbox ( ) to turn this on. |
| Loop | OFF, ON | Configures the loop. [457Z]Select the checkbox ( ) to turn this on. |
| Fixed Velocity | OFF, ON | When this is ON, the velocity of each sample is set to always play back at 127 (the maximum). |
| One Shot | OFF, ON | Configures the One Shot Playback. [467Z]Select the checkbox ( ) to turn this on. |
| Play Mode | Forward, Reverse, Fwd Ping-Pong, Rev Ping-Pong | Switches the sample’s playback direction (“Forward” or “Reverse”). [KDAT] |
| Level | 0–127 | Adjusts the sample volume. |
| Balance | MONO(L), L50–C–R50, MONO(R) | Sets the stereo position of the sample. |
Setting the Effect to Apply to a Pad ("Prms" Tab)
Use this screen to set which other pad plays at the same time that you play a certain pad, as well as the effects to apply to the pad.
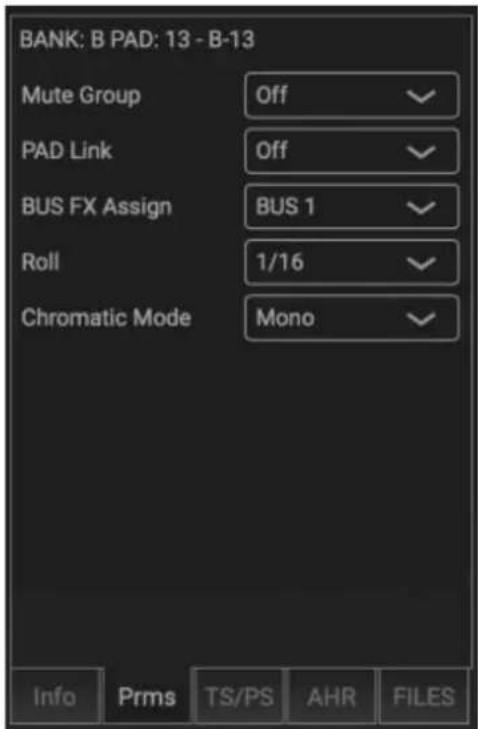
| Parameter | Value | Explanation |
| Mute Group | Off, A-J | Selects the mute group. |
| PAD Link | Off, A-J | Selects the pad link group. |
| BUS FX Assign | DRY, BUS 1, BUS 2 | Selects the bus to which the sample playback sound is sent. |
| Roll | Off, 1/2, 1/4, 1/8, 1/16, 1/32, 1/64 | Sets the roll interval (how quickly the roll repeats). |
| Chromatic Mode | Mono, Legato, Poly | Selects how the samples play (how they sound) in chromatic mode. |
Setting the Playback Speed and Pitch of a Sample ("TS/PS" Tab)
Use this screen to adjust the sample playback speed and pitch (key).
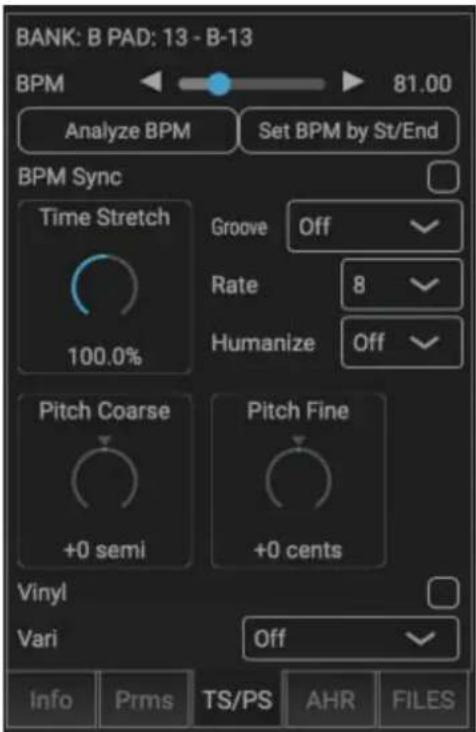
| Parameter | Value | Explanation |
| BPM | 40.0–200.0 | Sets the sample's BPM. |
| Analyze BPM | Analyzes and automatically sets the sample's BPM. | |
| Set BPM by St/End | Automatically sets the BPM to match the playback range. | |
| BPM Sync | ON, OFF | Turns BPM Sync on/off.When you select the checkbox ^[3xT3] turn this on, the unit operates in sync with external clock input. |
| Time Stretch | 50.0–150.0 | Speeds up the sample by making it shorter, or slows it down by making it longer. |
| Pitch Coarse | -12–12 | Sets the sample playback pitch. |
| Pitch Fine | -100–100 | Fine-tunes the sample playback pitch. |
| Vinyl | ON, OFF | Turns vinyl mode on/off.When this is on, the playback speed and pitch can be changed at the same time, like an analog record. |
| VARI MODE | Off | VARI mode is not used. |
| Backing | Processes the sound as appropriate for musical instruments whose sounds have a noticeable decay. | |
| Ensembling | Processes the sound as appropriate for musical instruments that have a sustaining sound. | |
| Groove | Off, 8<, 8<<, 8>, 8>>, 16<, 16<<, 16>, 16>> | Selects the groove template.There are templates for 8-beat and 16-beat grooves, and each template has its own swing strength and timing. |
| Rate | 1–15 | Sets the strength of the effect that shifts the timing to a fixed value.The sound quality may suffer if you raise the rate too high. |
| Humanize | Off, Low, Mid, High | Randomly changes the strength of the effect that shifts the timing. |
Making Fade-in/Fade-out Settings ("AHR" Tab)
You can adjust how the fade-in and fade-out work.
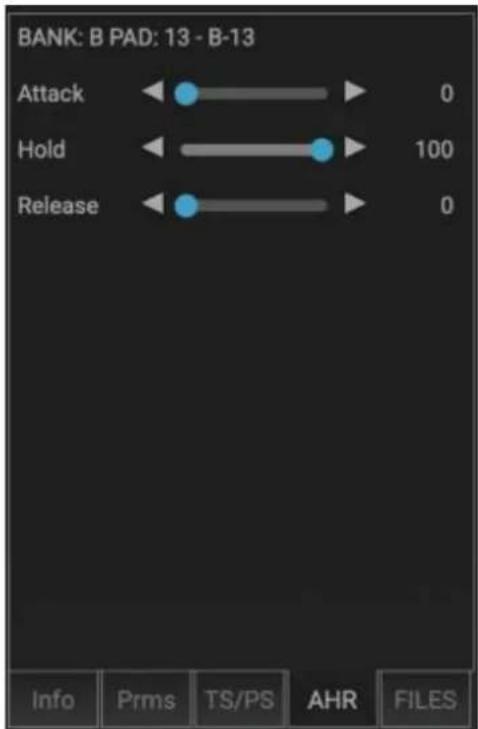
| Parameter | Value | Explanation |
| Attack | 0–127 | Sets the fade-in time. |
| Hold | 1–100 (%) | The time from fade-in to fade-out is determined by its ratio to the overall sample time. |
| Release | 0–127 | Sets the fade-out time. |
Editing a Chop Point
You can split a sample up into multiple smaller samples. To split a sample, you must first mark the locations where the sample is to be split using chop points (markers).
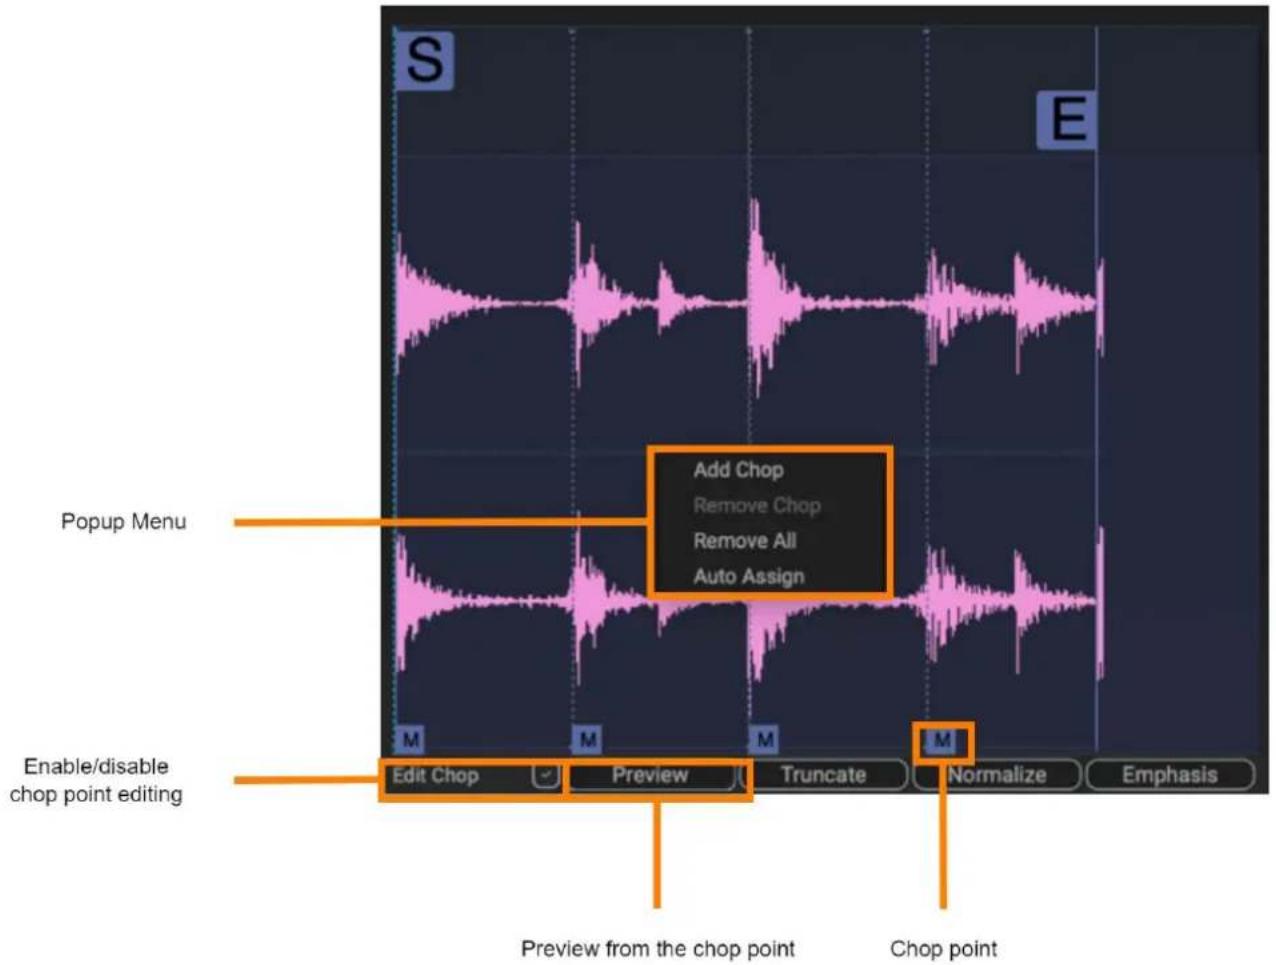
1. Select the Edit Chop checkbox

2. In the waveform viewer, right-click at the position you want to add a chop point.
You can use the followings items in the popup menu to add/delete chop points.
| Item | Explanation |
| Add Chop | Adds a chop point at the cursor location. |
| Remove Chop | Deletes the chop point at the cursor location. |
| Remove All | Deletes all chop points. |
| Auto Assign | Adds chop points based on certain conditions you specify. |
MEMO
- When "Auto Assign" is selected, the popup menu below is shown.
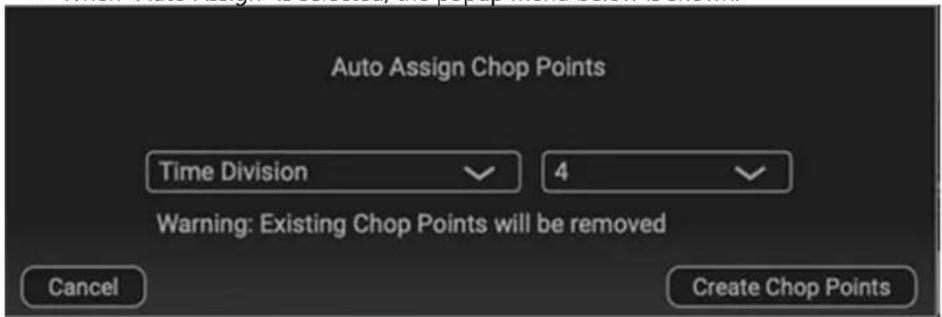
- If you click "Create Chop Points", the chop points are added based on the conditions you specified.
| Parameter | Value | Explanation |
| Time Division | 2–16 | Adds chop points by dividing up the sample equally. |
| Level | 1–10 | Adds a chop point at the location in the sample where the levels exceed a certain value. |
| Transient | HARD, MID, SOFT | Adds a chop point at the location in the sample where there is a large change in volume, such as when a sound with sharp attack plays. |
Importing a Sample
You can import audio data from your computer into the SP-404MK2 as a sample.
MEMO
Audio file formats that can be imported into the SP-404MK2 are as follows.
- When importing from SD card: 16-bit linear; WAV, AIFF, MP3
- When importing with the SP-404MK2 App: WAV, AIFF, MP3, FLAC, M4A (ALAC, AAC)
* Use the macOS version of the SP-404MK2 App to import ALAC or AAC data.
* In some cases, it may not be possible to import files of an extremely short duration (shorter than 100 ms).
* Filenames that contain double-byte characters may not display correctly.
1. Drag and drop the sample files from your computer to an empty pad on the SP-404MK2 App.
The popup message "Working..." is shown. If you decide to cancel the import, click "Cancel."
MEMO
You can also select multiple samples, and drag and drop them to empty pads.
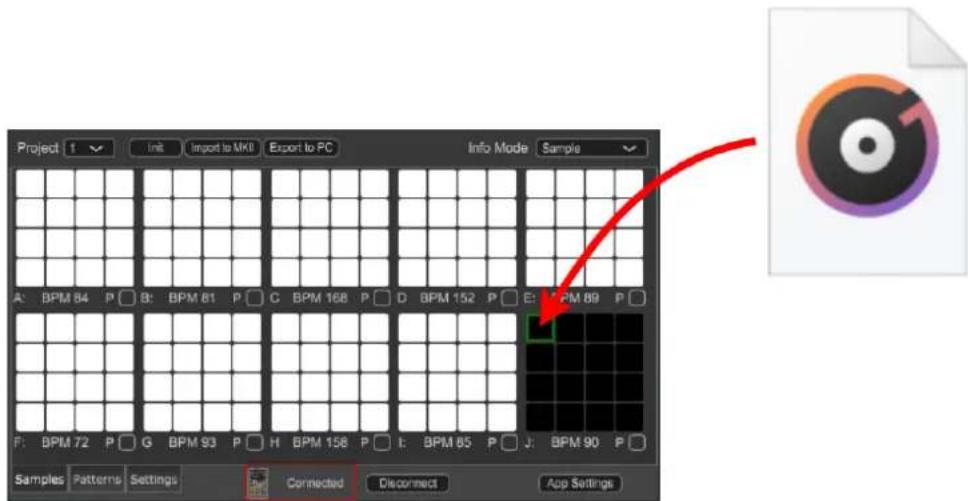
NOTE
Never turn off the power or disconnect the SP-404MK2 while the screen indicates "Working..."
When you drag and drop a sample to a pad that already contains an assigned sample, that pad's sample is overwritten. Use caution, as this deletes the previous sample.
When the import is finished, the pad of the imported sample turns white.
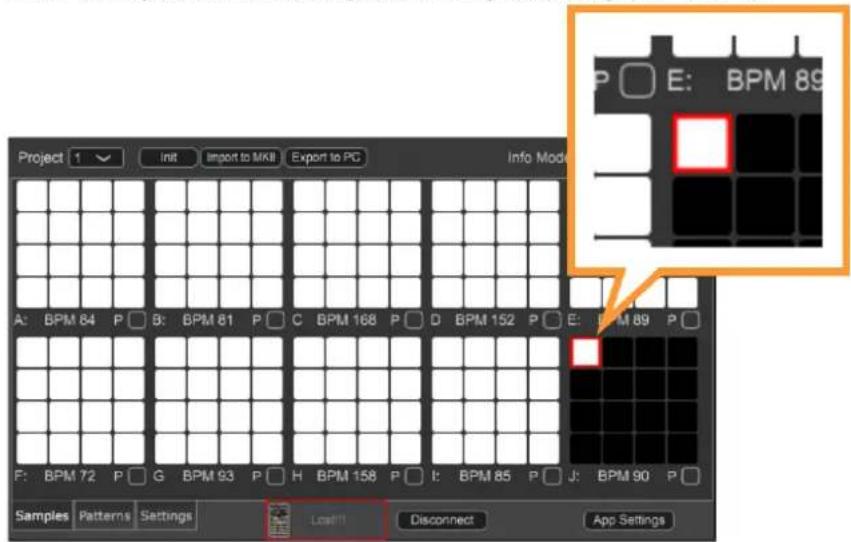
Exporting Samples
Here's how to export a sample that's assigned to a pad to your computer.
- Drag and drop the pad whose sample you want to export to the FILES tab.
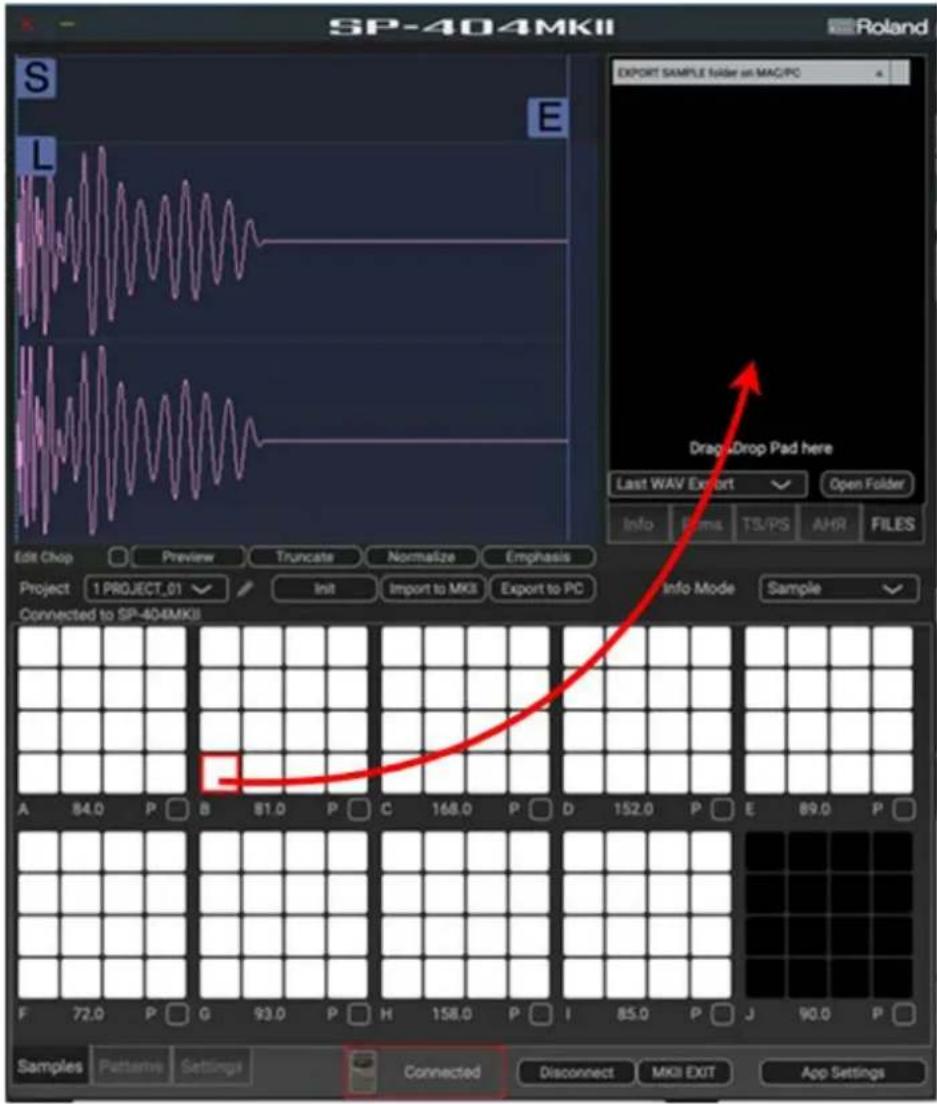
A confirmation message appears.
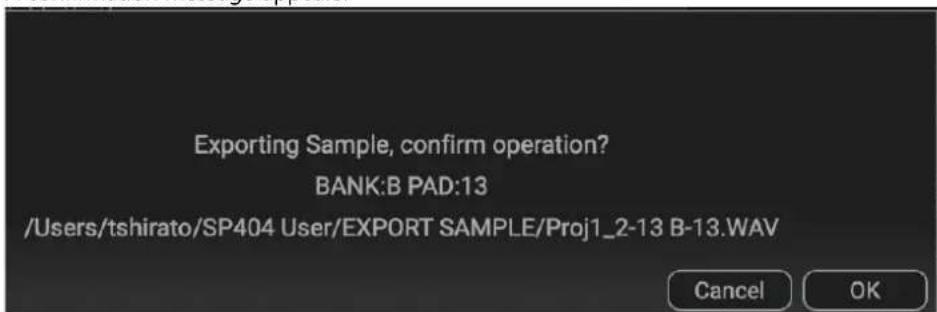
If you decide to cancel, click "Cancel."
- Click "OK."
The selected sample is exported.

Never turn off the power or disconnect the SP-404MK2 while the screen indicates "Working..."
Organizing the Samples
Moving the Sample of a Pad(P.17)
Copying/Exchanging Samples Between Pads(P.18)
Deleting a Sample from a Pad(P.18)
Moving the Sample of a Pad
Here's how to move the sample that's assigned to a pad to a different pad.
- Drag and drop the pad whose sample you want to move to the destination pad.
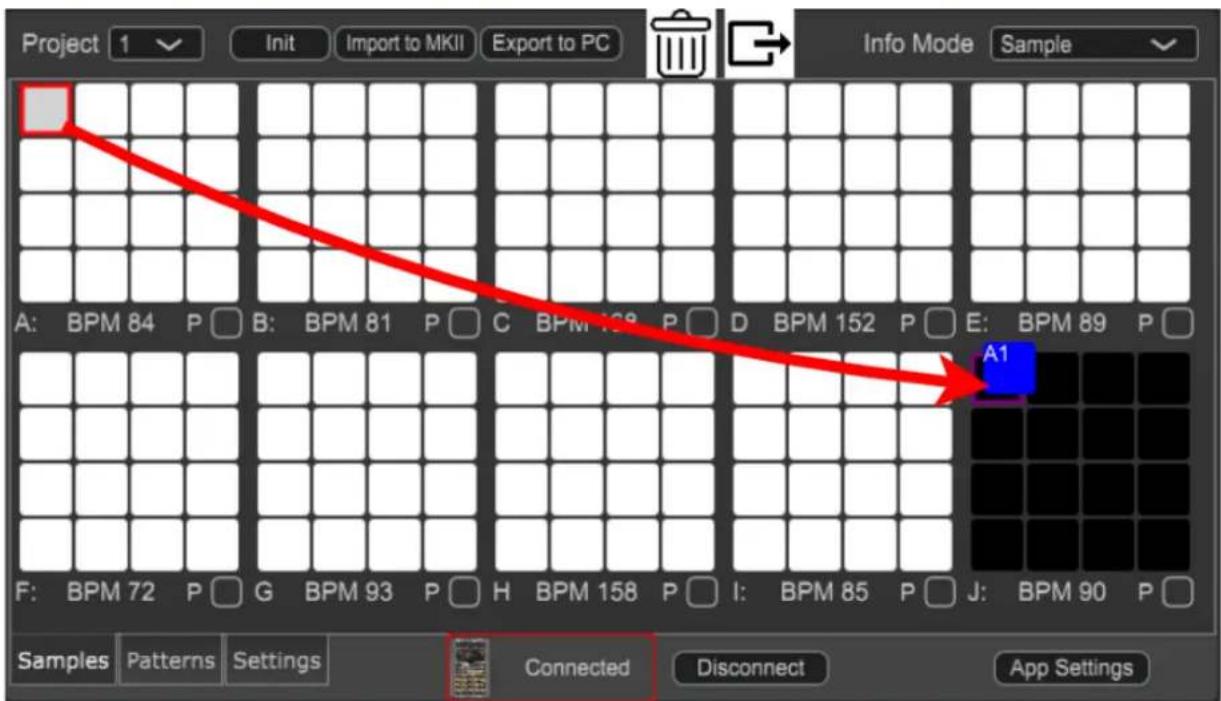
Once the sample is moved, the destination pad turns white, and the source pad turns black (indicating that the pad is empty).
NOTE
Never turn off the power or disconnect the SP-404MK2 while the screen indicates "Working..."
MEMO
When you drag and drop a sample to a pad that already contains an assigned sample, a confirmation message appears.
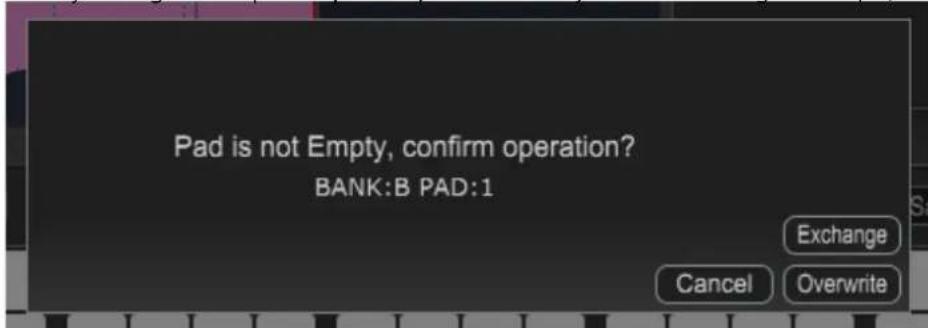
When you click the [Exchange] button, the sample in the destination is exchanged with the sample in the source.
When you click the [Overwrite] button, the sample is overwritten and the previous sample is deleted.
If you decide to cancel, click "Cancel."
Copying/Exchanging Samples Between Pads
Here's how to copy the sample that's assigned to a pad to a different pad, or exchange samples between pads.
- While holding down the [Ctrl] button (PC) or the [Command] button (Mac), drag and drop the pad whose sample you want to copy or exchange to the destination pad.
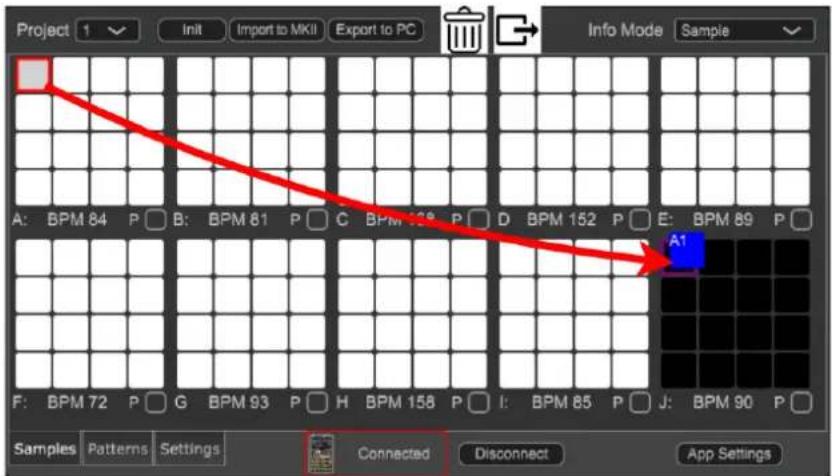
Once the data is copied, the copy destination pad lights up white.
NOTE
Never turn off the power or disconnect the SP-404MK2 while the screen indicates "Working..."
MEMO
When you drag and drop a sample to a pad that already contains an assigned sample, a confirmation message appears.
When you click the [Exchange] button, the sample in the destination is exchanged with the sample in the source. When you click the [Overwrite] button, the sample is overwritten and the previous sample is deleted. If you decide to cancel, click "Cancel."
Deleting a Sample from a Pad
This is how to delete the sample assigned to a pad.
- Drag and drop the pad whose sample you want to delete to the recycle bin (trash) icon.
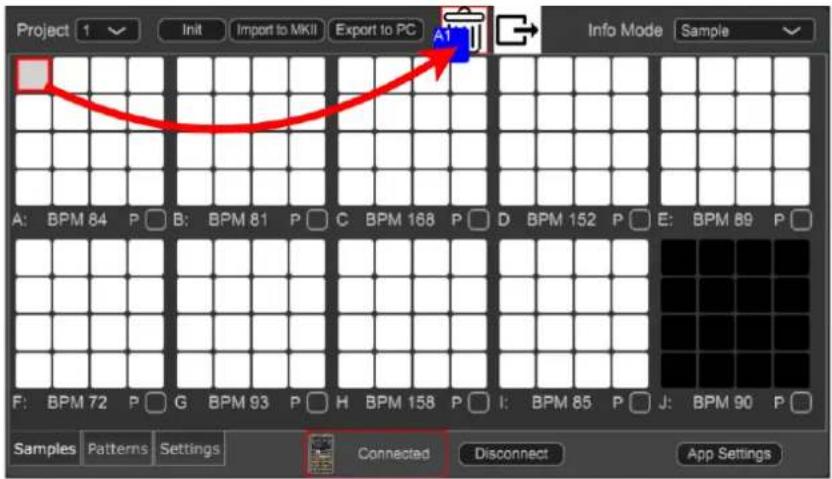
A confirmation message appears.
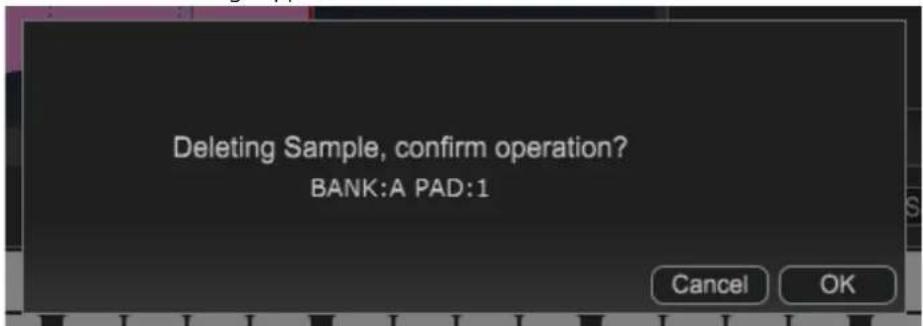
If you decide to cancel, click "Cancel."
2. Click "OK."
When the deletion is finished, the original pad turns black (indicating that the pad is empty).
NOTE
Never turn off the power or disconnect the SP-404MK2 while the screen indicates "Working..."
Editing a Pattern ("Patterns" Screen)
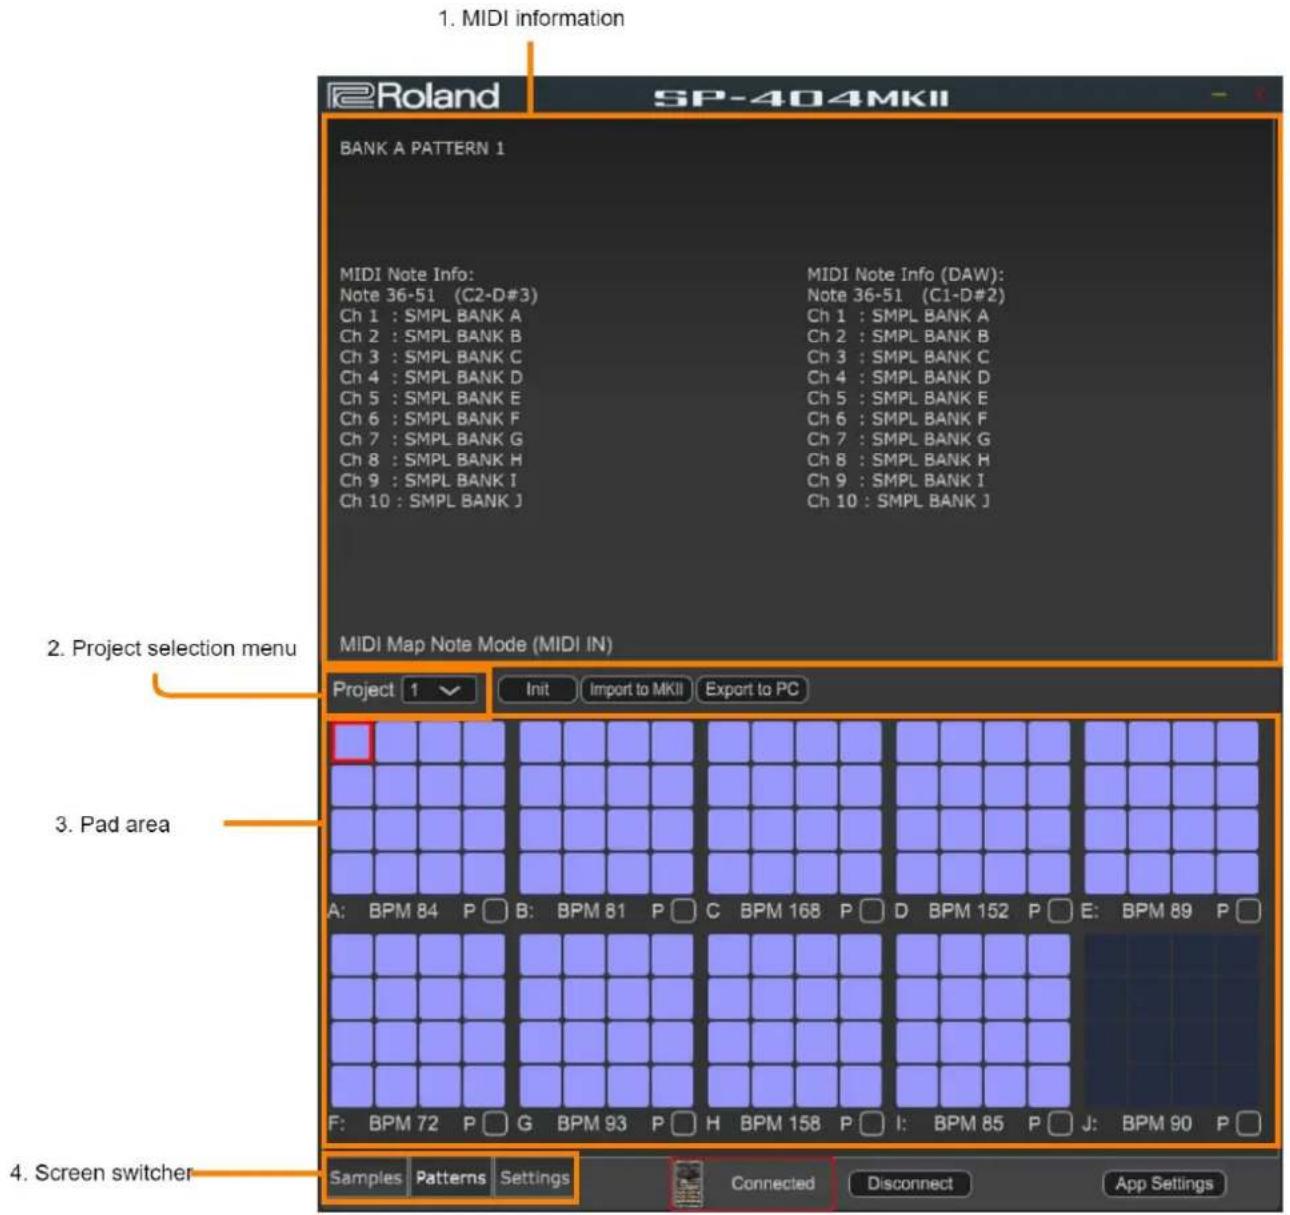
1. MIDI information
Shows MIDI-related information and data. Use this when you're operating the pads via MIDI.
2. Project selection menu
Switches between projects you wish to edit.
3. Pad area
This shows the pads for all banks. The blue pads (pads ( ) are empty.
already contain an assigned pattern, and the indigo
4. Screen switcher
Switches between screens to edit.→ "
Basic Configuration of the SP-404MK2 App(P.5)"
Importing Patterns
You can import pattern data from the SP-404SX/A or SMF data (.mid) from your computer into the SP-404MK2 as pattern data (import).
MEMO
The following file types are supported for import.
- SP-404MK2 pattern data (.bin)
- SP-404SX/A pattern data (.bin) that meets the following conditions
- Length: 1, 2, 4, 8, 16, 32, 64
● SMF data created using a DAW or similar application/tool that meets the following conditions - Format: 0
- TPQN: 480 or less
- Length: 1, 2, 4, 8, 16, 32, 64
- Max recordable note: 24,000
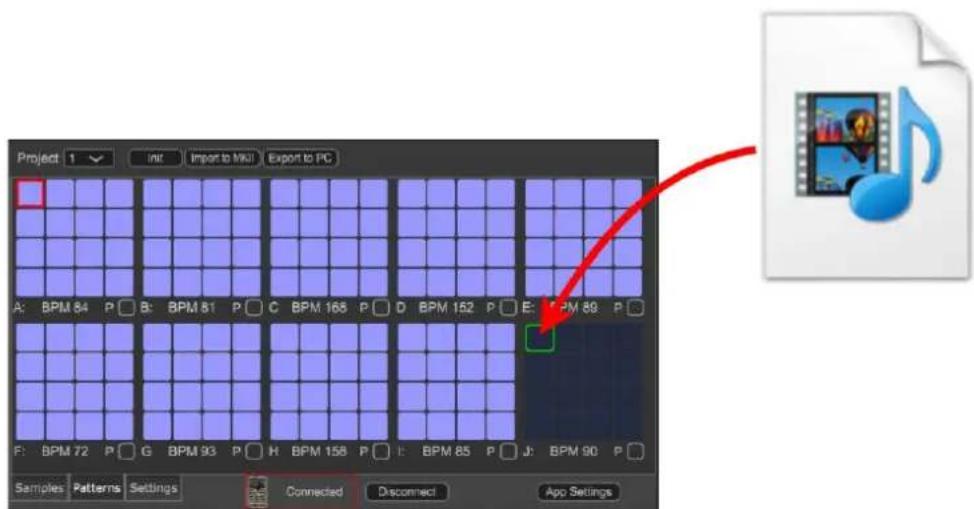
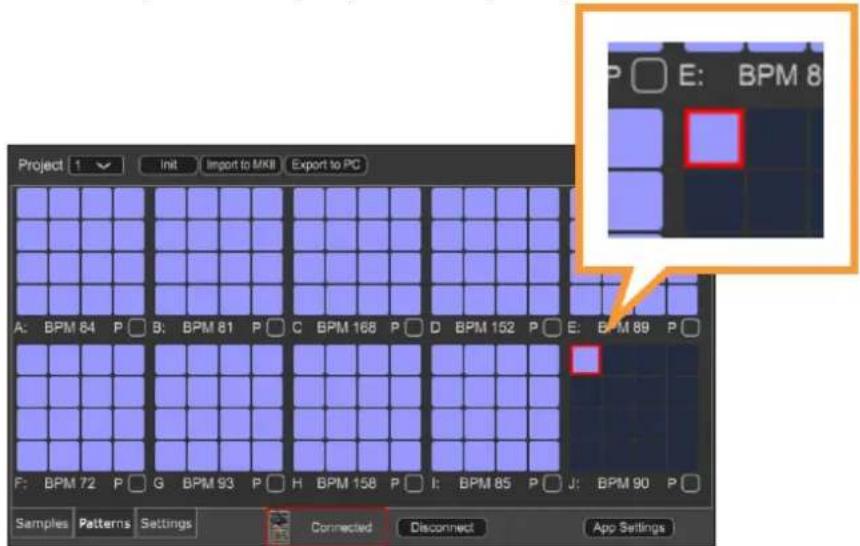
1. Drag and drop the pattern data from your computer to an empty pad on the SP-404MK2 App.
The popup message "Working..." is shown. If you decide to cancel the import, click "Cancel."
NOTE
Never turn off the power or disconnect the SP-404MK2 while the screen indicates "Working..."
When you drag and drop pattern data to a pad that already contains an assigned pattern, the data is overwritten. Use caution, as this deletes the previous pattern.
When the import is finished, the pad of the imported pattern turns blue.
Exporting Patterns
This exports the pattern assigned to a pad to a computer as SMF data (.mid).
- Drag and drop the pad whose pattern you want to export to the FILES tab.
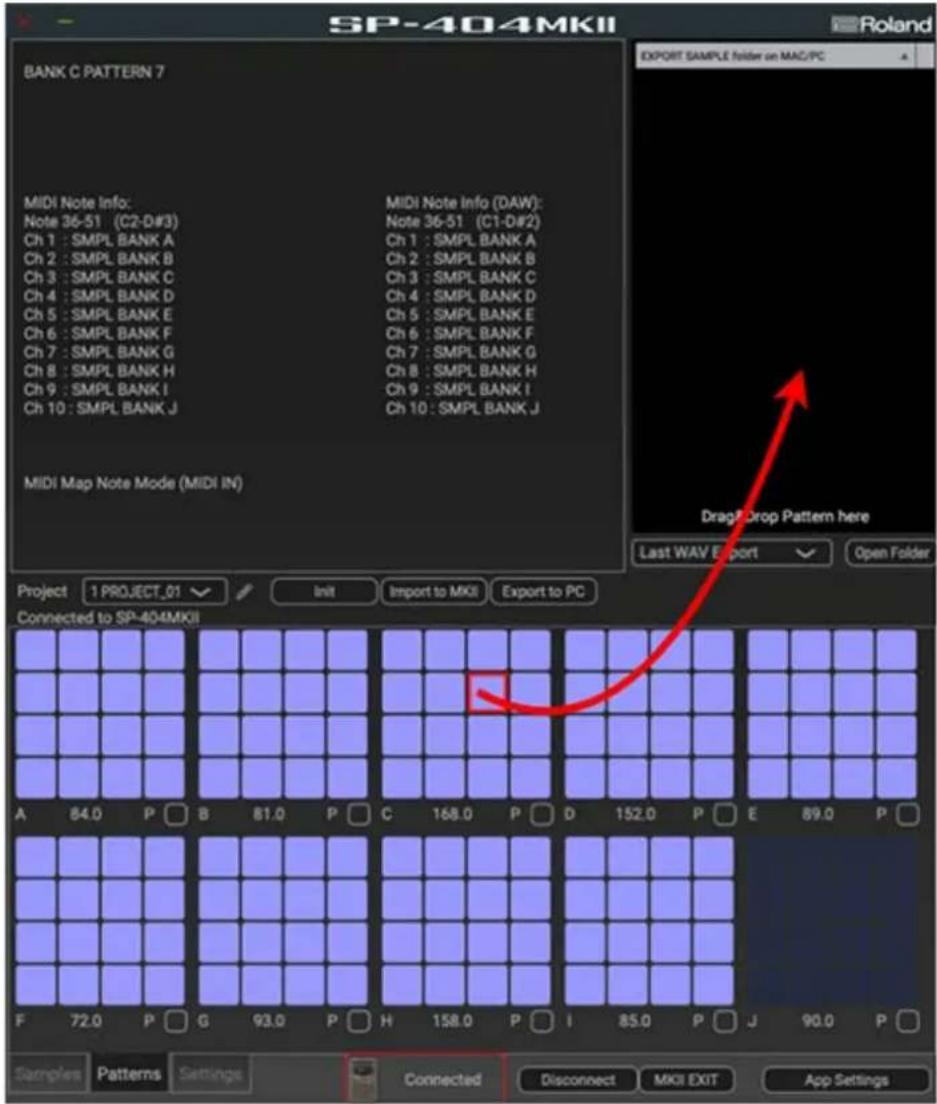
A confirmation message appears.
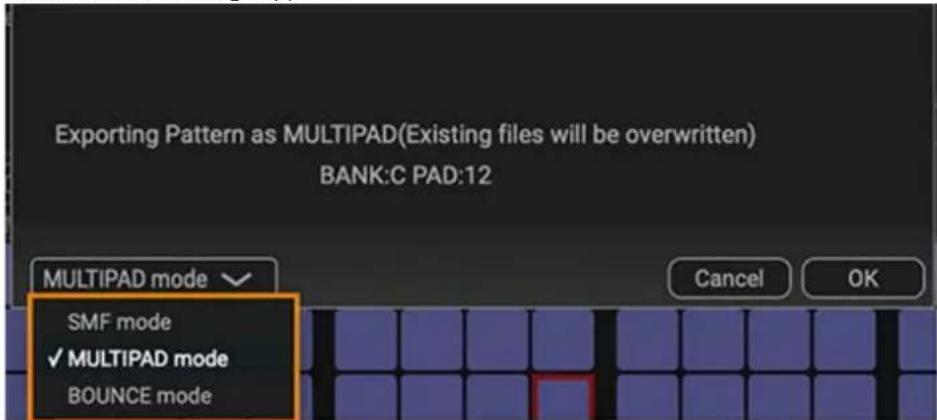
If you decide to cancel, click "Cancel."
2. Select the export mode from the menu and click "OK."
| Export Mode | Explanation |
| SMF mode | The selected pattern is exported to the “EXPORT PATTERN” folder on your computer as SMF data (.mid). |
| MULTIPAD mode | The phrase recorded in a pattern is converted to a sample (.wav) for each pad, and saved to the “EXPORT SAMPLE” folder on your computer. |
| BOUNCE mode | The selected pattern is converted (BOUNCE) to a sample (.wav), and saved to the “EXPORT SAMPLE” folder on your computer. |
NOTE
- The exported pattern data only includes the note messages from within the same bank.
For instance, when you export the pattern data for bank A, only the note messages recorded with bank A (MIDI ch. 1) are exported.
You can't export the note messages recorded with bank B (MIDI ch. 2) with the bank A pattern data. - Never turn off the power or disconnect the SP-404MK2 while the screen indicates "Working..."
Organizing the Patterns
Moving the Pattern of a Pad(P.24)
Copying/Exchanging Patterns Between Pads(P.24)
Deleting the Pattern from a Pad(P.25)
Moving the Pattern of a Pad
Here's how to move the pattern that's assigned to a pad to a different pad.
- Drag and drop the pad whose pattern you want to move to the destination pad.
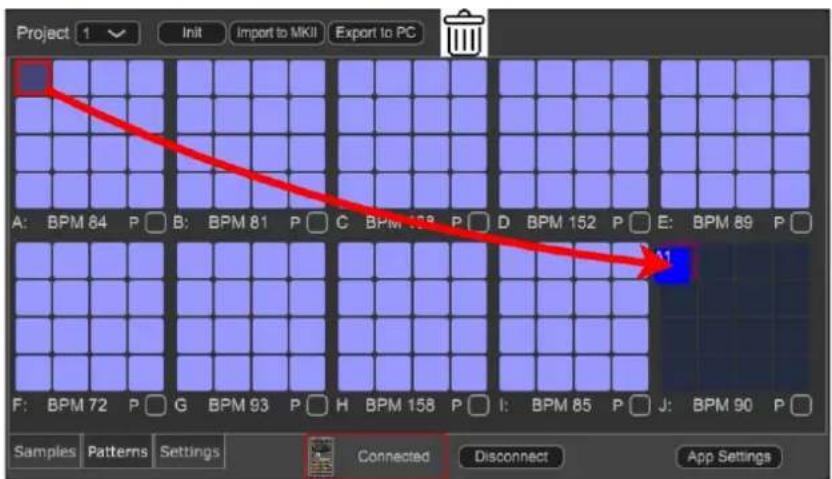
Once the pattern is moved, the destination pad turns blue, and the source pad turns indigo (indicating that the pad is empty).
NOTE
Never turn off the power or disconnect the SP-404MK2 while the screen indicates "Working..."
MEMO
When you drag and drop a pattern to a pad that already contains an assigned pattern, a confirmation message appears.
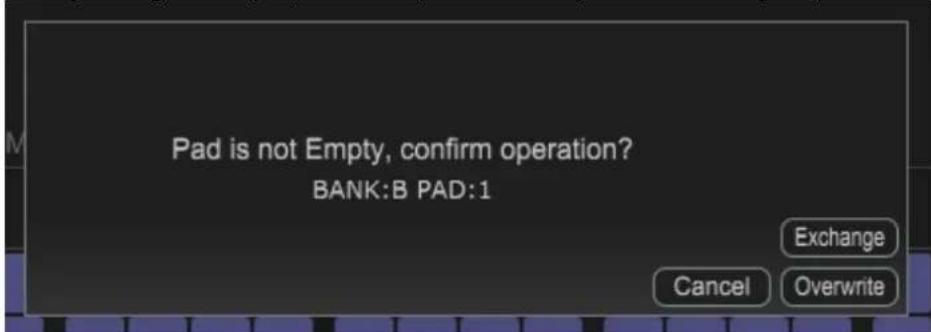
When you click the [Exchange] button, the pattern in the destination is exchanged with the pattern in the source. When you click the [Overwrite] button, the pattern is overwritten and the previous pattern is deleted. If you decide to cancel, click "Cancel."
Copying/Exchanging Patterns Between Pads
Here's how to copy the pattern that's assigned to a pad to a different pad, or exchange patterns between pads.
- While holding down the [Ctrl] button (PC) or the [Command] button (Mac), drag and drop the pad whose pattern you want to copy or exchange to the destination pad.
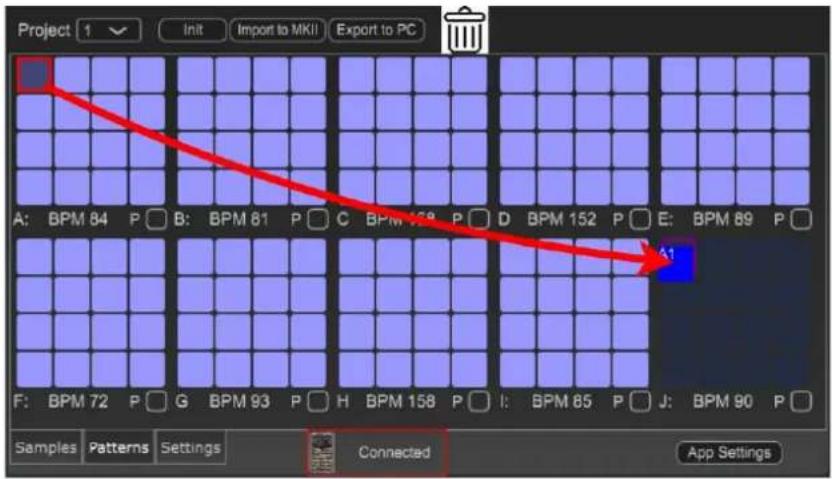
Once the data is copied, the copy destination pad lights up blue.
NOTE
Never turn off the power or disconnect the SP-404MK2 while the screen indicates "Working..."
MEMO
When you drag and drop a pattern to a pad that already contains an assigned pattern, a confirmation message appears.
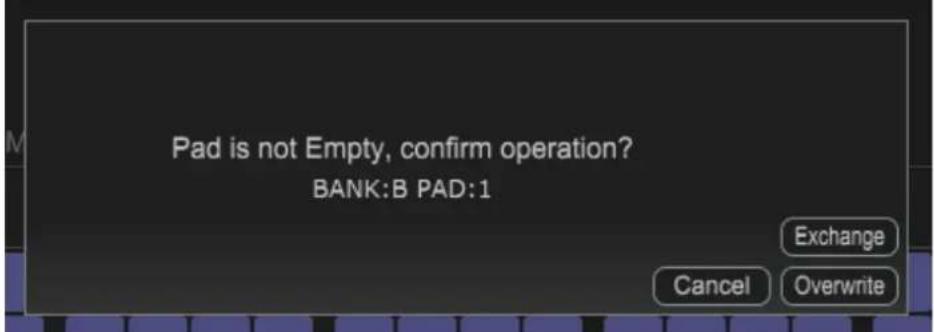
When you click the [Exchange] button, the pattern in the destination is exchanged with the pattern in the source. When you click the [Overwrite] button, the pattern is overwritten and the previous pattern is deleted. If you decide to cancel, click "Cancel."
Deleting the Pattern from a Pad
Here's how to delete the pattern assigned to a pad.
- Drag and drop the pad whose pattern you want to delete to the recycle bin (trash) icon.
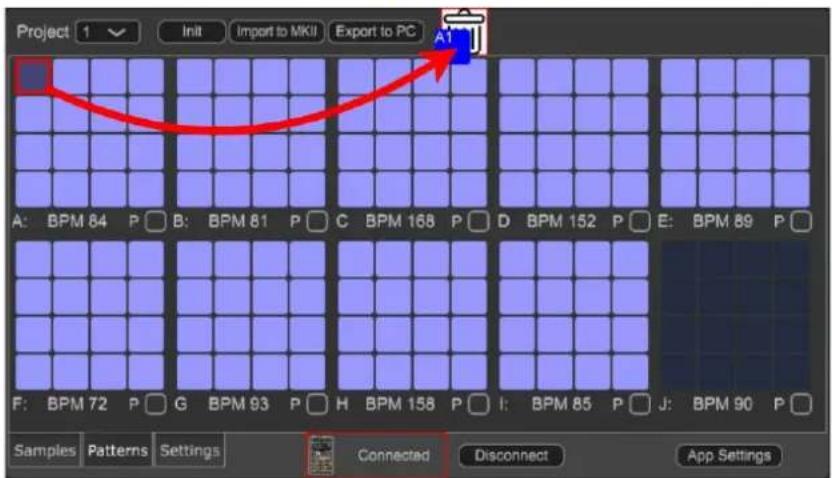
A confirmation message appears.
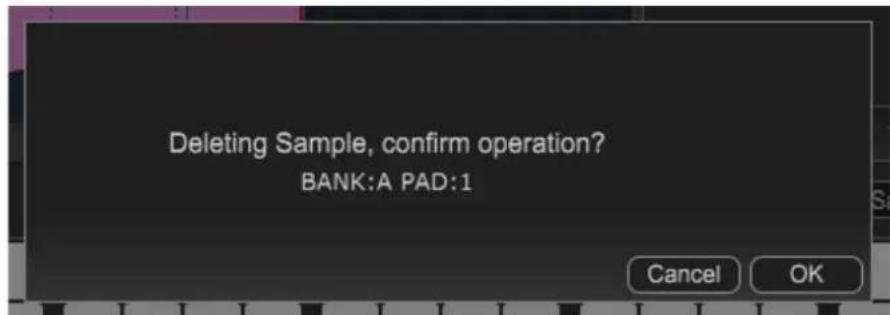
If you decide to cancel, click "Cancel."
2. Click "OK."
When the deletion is finished, the original pad turns indigo (indicating that the pad is empty).
NOTE
Never turn off the power or disconnect the SP-404MK2 while the screen indicates "Working..."
Setting the Tempo and Volume ("Settings" Screen)
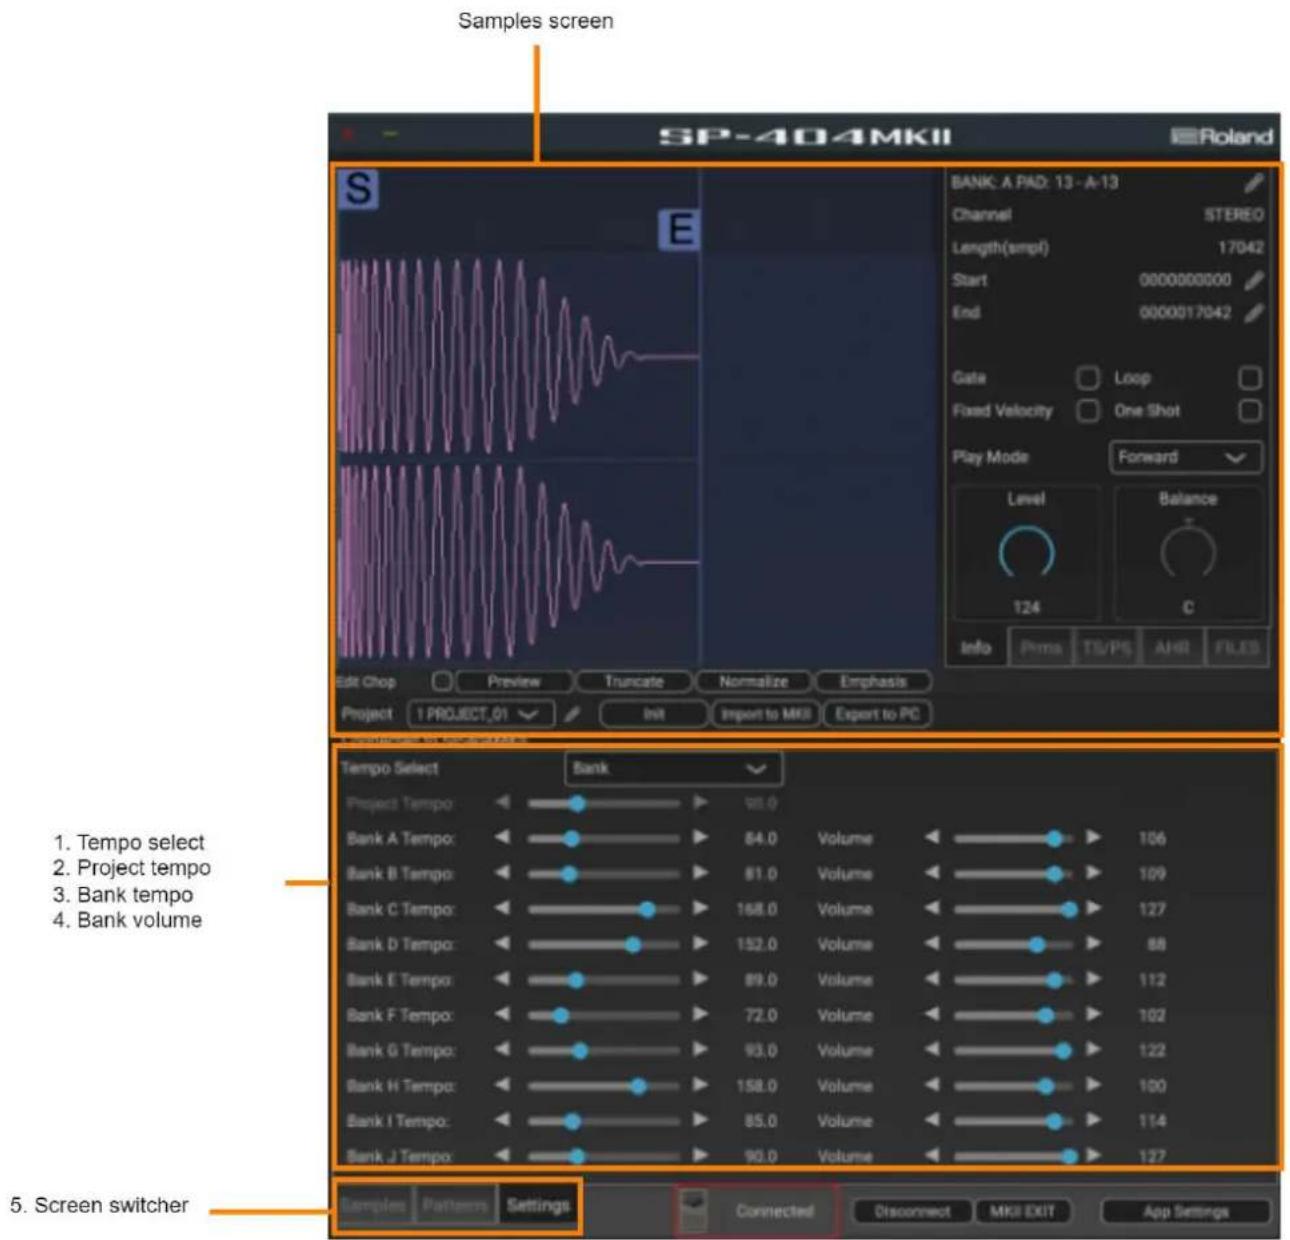
1. Tempo select
Selects whether to use the project tempo settings or the bank tempo settings.
2. Project tempo
Sets the project tempo.
3. Bank tempo
Sets the bank volume.
5. Screen switcher
Switches between screens to edit.→ " Basic Configuration of the SP-404MK2 App(P.5)"
Importing/Exporting a Project
Importing a project(P.30)
Exporting a project(P.30)
Importing a Project from the SP-404SX/A(P.33)
Deleting a Project(P.35)
Importing a project
This shows how to import projects into the SP-404MK2 that are saved on your computer.
- Have the project data that's stored on your computer ready that you want to import.
- Select the import destination (the project where you want to import the data) from the project selection menu, and click the [Import to MKII] button.
![Project selection menu [Import to MKII] button Edit Chop Preview Truncate Normalize Emphasis Project 1 PROJECT_01 Init Import to MKII Export to PC Info Mode Sample Connect to 1 PROJECT_01 2 3 4 5 6 7 8 9 A 8/9 81.0 P C 168.0 P D 152.0 P E 89.0 P 10 11 12 13 14 15 16 F 72.0 P G 93.0 P H 158.0 P I 85.0 P J 90.0 P Samples Patterns Settings Connected Disconnect MKII EXIT App Settings](/content/2026/05/891820/images/93bc4fb8114fa1366247e1de5ef32cb819a45f18f0a51e6281966cfe4d5cfc4f.jpg)
A dialog box for selecting the project to import appears.
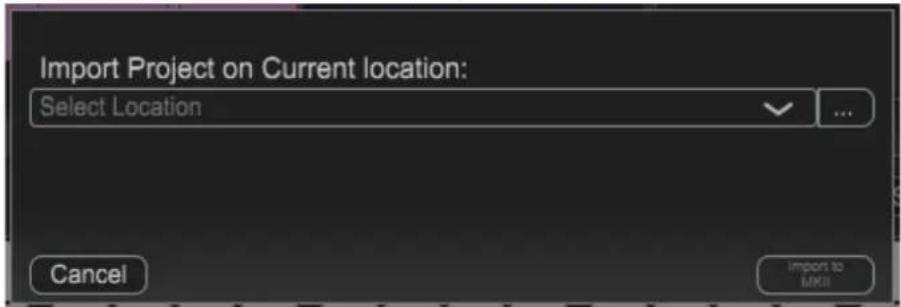
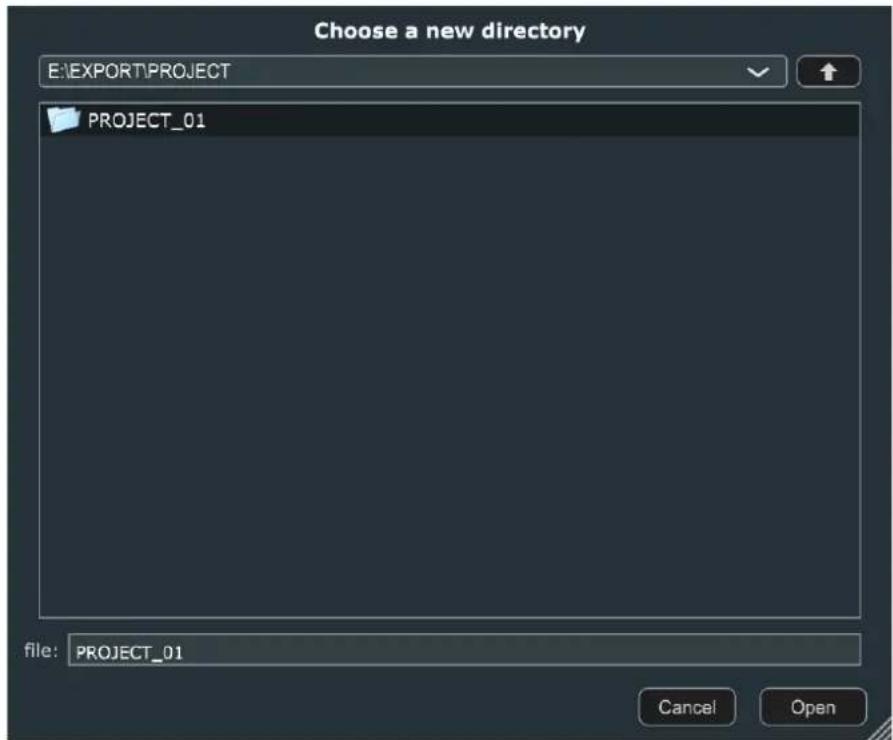
- Click the [...] button, select the project to import and click "Open."
4. Click "Import to MKII."
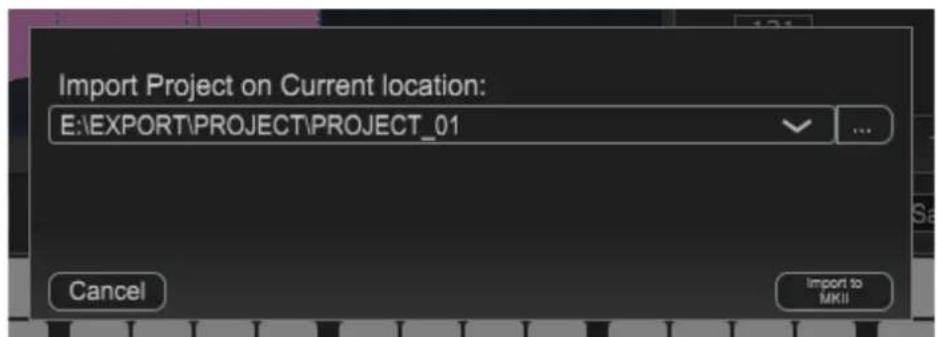
If you decide to import a different project instead, click "Cancel."
A confirmation message appears.
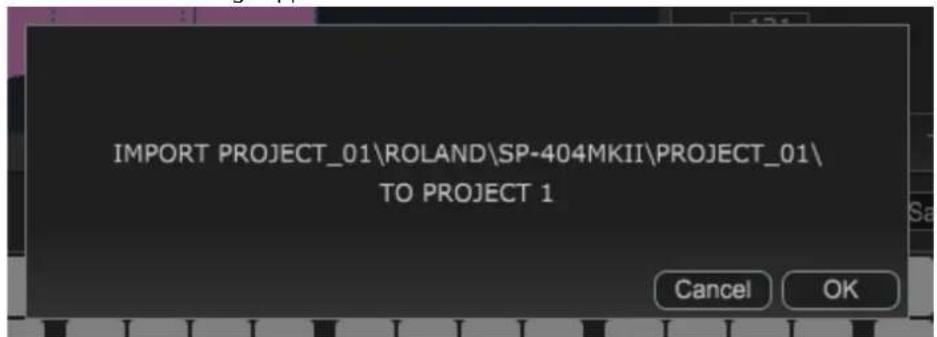
If you decide to cancel, click "Cancel."
NOTE
This erases any data that's already in the import destination project. Use caution.
5. Click "OK."
The selected project is imported.
NOTE
Never turn off the power or disconnect the SP-404MK2 while the screen indicates "Working..."
Exporting a Project
Here's how to save a project from the SP-404MK2 to your computer (export).
- Open the Samples screen or Patterns screen.
- Select the project you wish to export from the project selection menu, and click the [Export to PC] button.
![Project selection menu [Export to PC] button Edit Chop Preview Truncate Normalize Emphasis Project 1 PROJECT_01 Init Import to MKII Export to PC Info Mode Sample Connect √T PROJECT_01 2 3 4 5 6 7 8 9 A 8-9 10 11 12 13 14 15 16 81.0 P C 168.0 P D 152.0 P E 89.0 P Samples Patterns Settings Connected Disconnect MKII EXIT App Settings](/content/2026/05/891820/images/b61d5bf7602ced67dadf43013544ab7dce62836f496e09cc5e9ed530a77709d8.jpg)
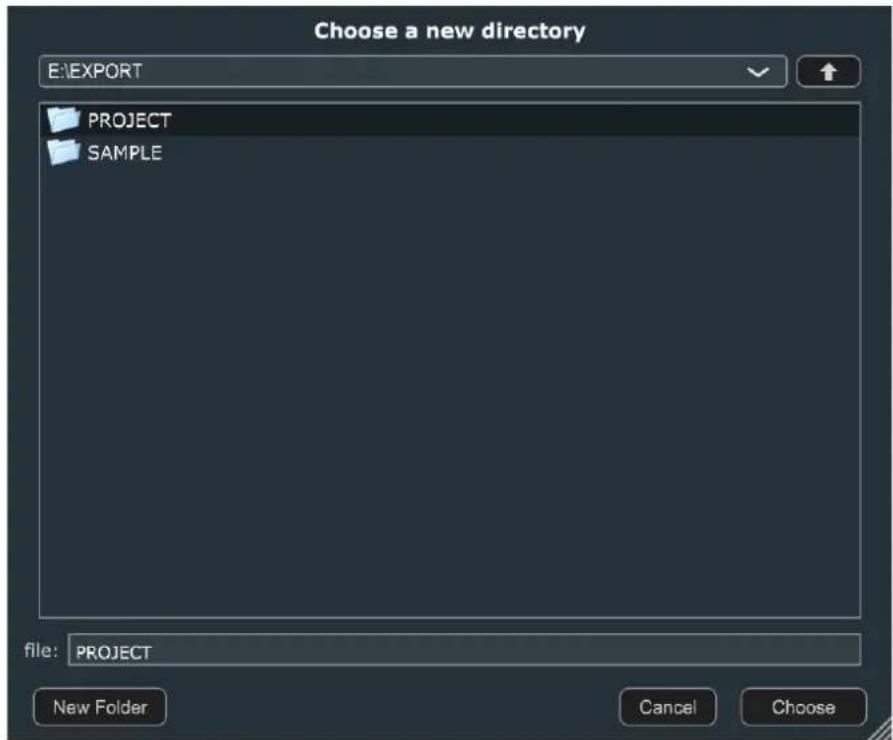
A dialog box appears for selecting the save destination.
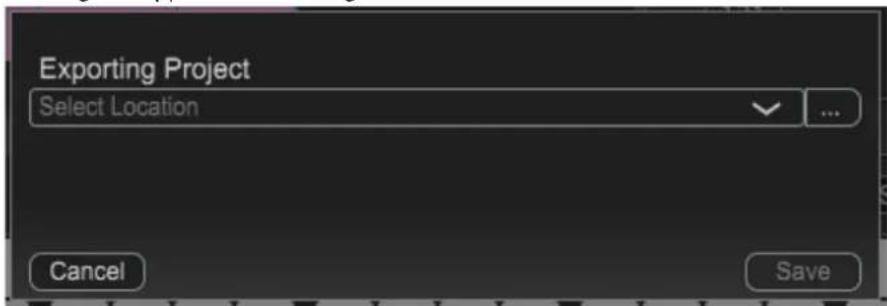
- Click the [...] button, select the location of the save destination and click "Choose."
4. Click "Save."
To edit the save destination, click "Cancel."
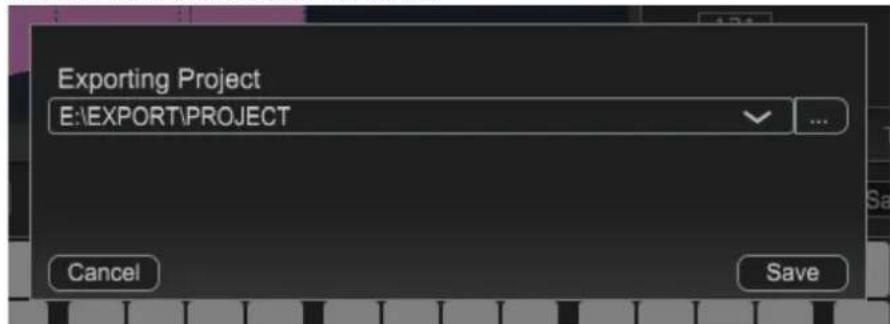
A confirmation message appears.
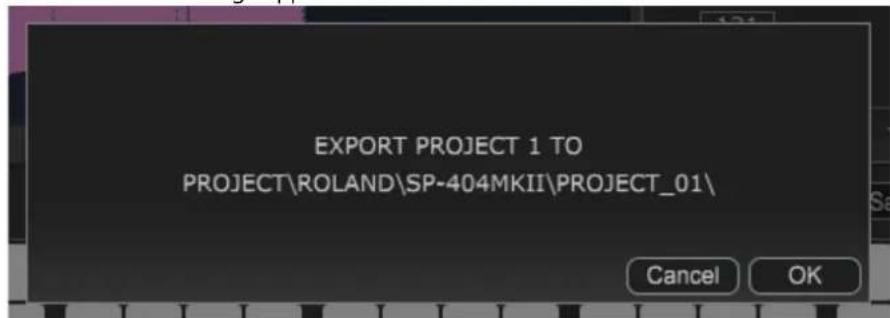
If you decide to cancel, click "Cancel."
NOTE
If there is already data in the save destination, that data is overwritten. Use caution.
5. Click "OK."
The selected project is exported.
NOTE
Never turn off the power or disconnect the SP-404MK2 while the screen indicates "Working..."
MEMO
A subfolder named "ROLAND" is created in the save destination folder you specified.
Exported projects are saved with the filename "PROJECT_**" (the asterisks are replaced with the lowest unused number) in the "SP-404MKII" folder, located within the "ROLAND" folder.
Importing a Project from the SP-404SX/A
You can import and use data from the SP-404SX/A with the SP-404MK2 App.
- Insert the SD card on which the data from the SP-404SX/A is stored into your computer's SD card slot.
- Select the import destination project from the project selection menu, and click the [Import to MKII] button.
![Project selection menu [Import to MKII] button Level Balance 121 C Preview Truncate Normalize Emphasise Info Prms TS/PS AMH Project 1 init Import to MKI Export to PC Info Mode Sample A: BPM 84 P B: BPM 81 P C BPM 168 P D BPM 152 P E: BPM 89 P](/content/2026/05/891820/images/ab7db79b34fbd7ca36dfc8f77e40a0e1f693520314b77cef8ee8d01f4b4721c7.jpg)
A dialog box for selecting the file to import appears.
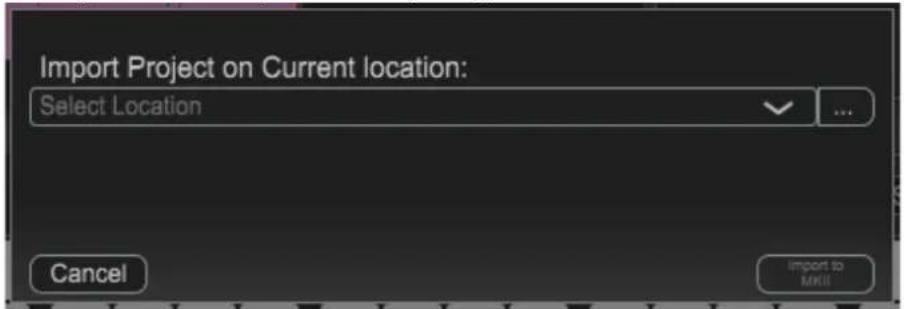
- Click the [...] button, select the SP-404SX/A file to import and click "Open."
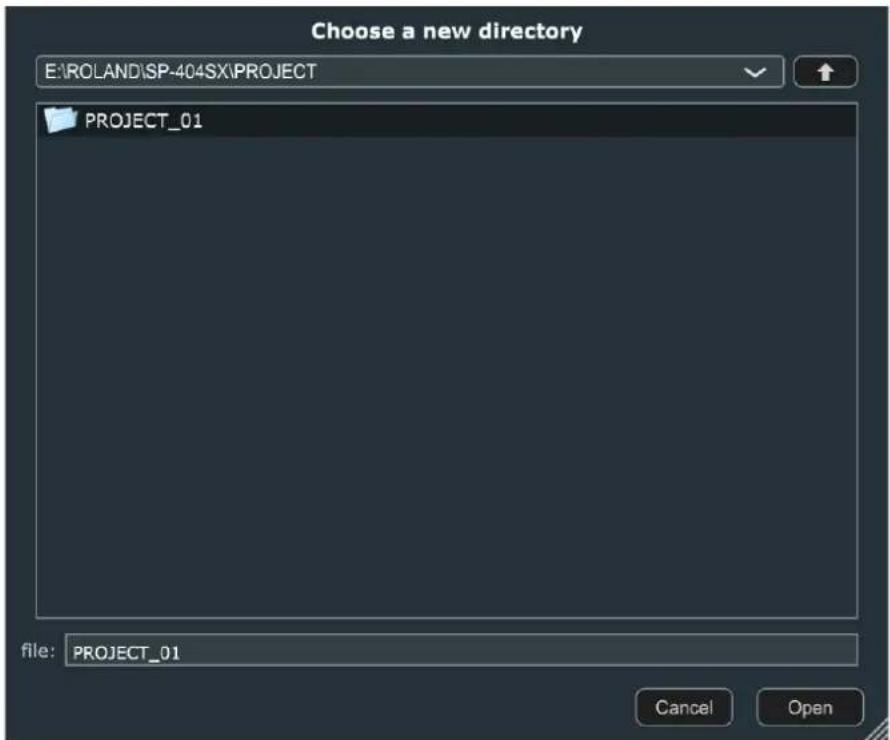
MEMO
The SP-404SX/A data is saved in the SP-404SX/ROLAND/SP-404SX subfolder on the SD card.
4. Click "Import to MKII."
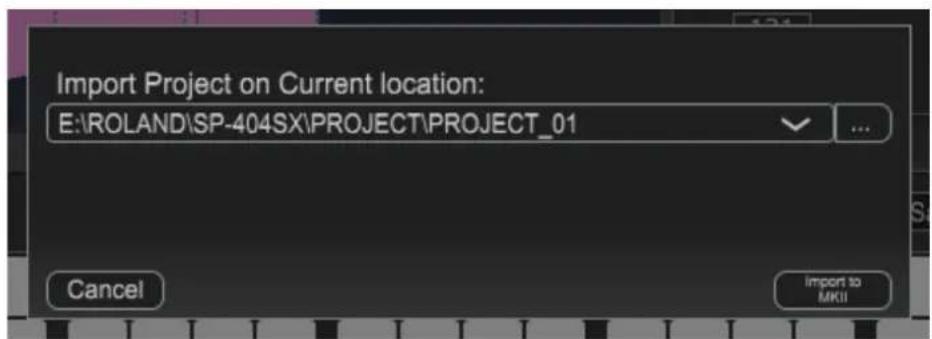
If you decide to import a different project instead, click "Cancel."
A confirmation message appears.
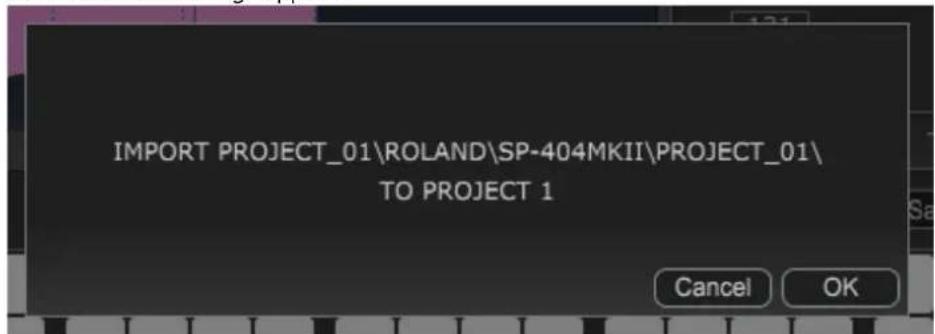
If you decide to cancel, click "Cancel."
NOTE
This erases any data that's already in the import destination project. Use caution.
5. Click "OK."
The selected project is imported.
NOTE
Never turn off the power or disconnect the SP-404MK2 while the screen indicates "Working..."
Deleting a Project
Here's how to delete the data from a selected project.
NOTE
Once a project is deleted, all the data in that project is lost and can't be recovered.
If you want to save the project before deleting it, be sure to follow the steps in "Exporting a Project(P.30)."
1. Click the [Init] button.
A dialog box appears, which confirms the deletion.
2. Select the menu and click the [Init] button.
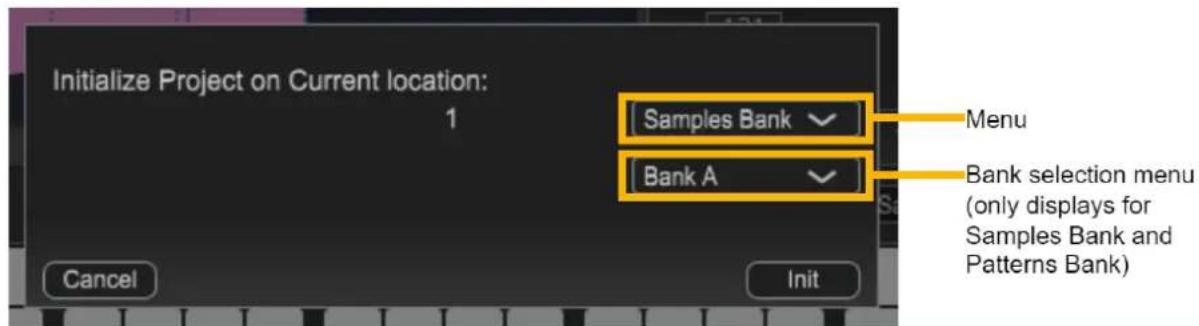
Item
Explanation
| All | All project data is deleted. |
| All Samples | All samples in the project are deleted. |
| Samples Bank | All samples in the bank are deleted. The bank selection menu appears when this is selected. |
| All Patterns | Deletes all patterns in the project. |
| Patterns Bank | Deletes all patterns in the bank. The bank selection menu appears when this is selected. |
NOTE
Never turn off the power or disconnect the SP-404MK2 while the screen indicates "Working..."
Editing the App Settings
You can change the background color of the app, or use the image data file you like as the background image.
- Click the [App Settings] button at the lower right of the screen.
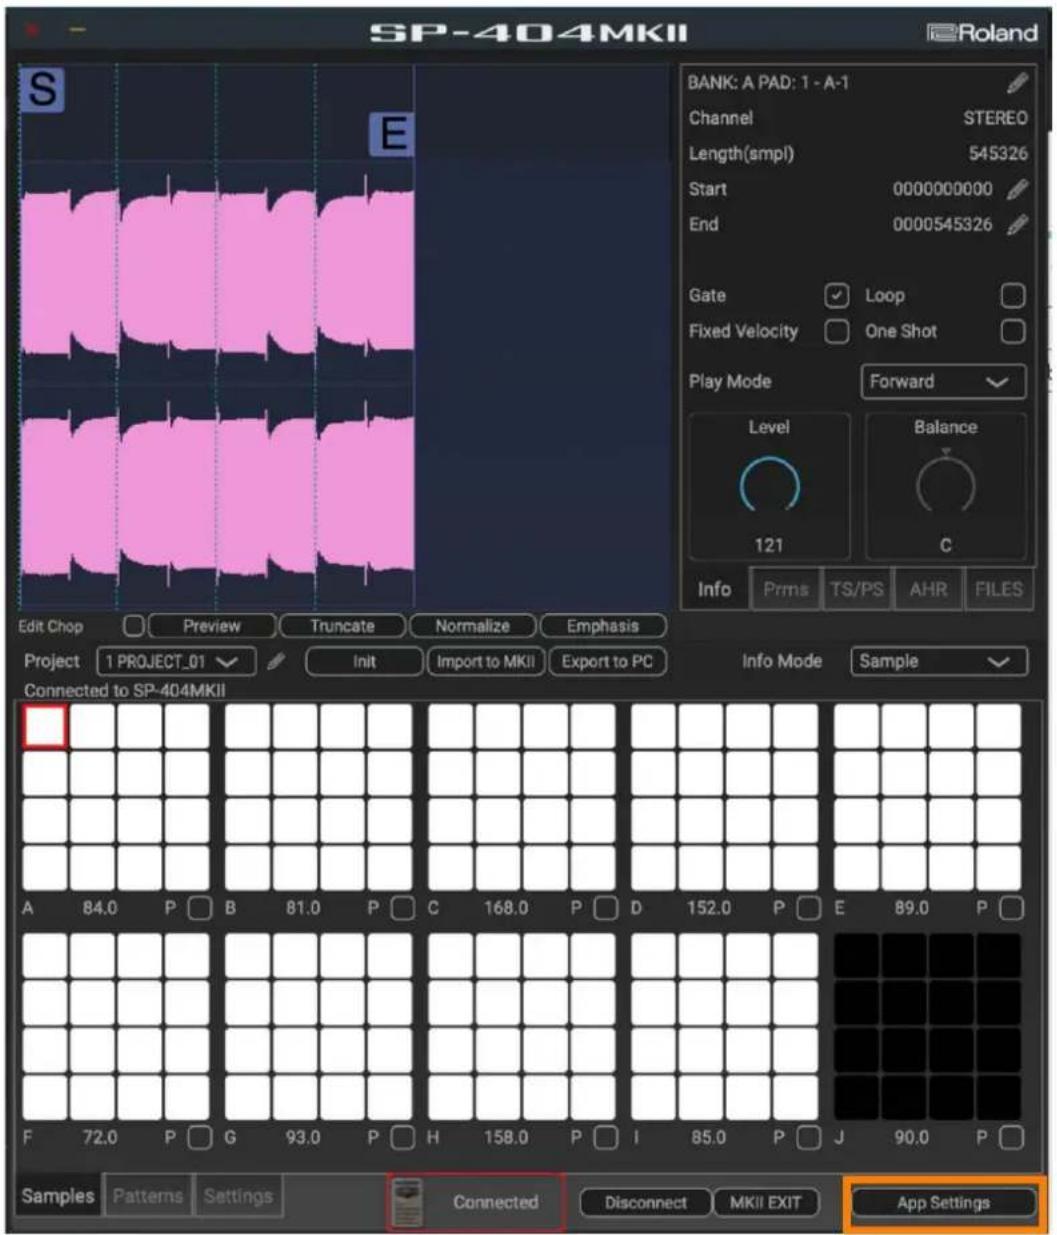
MEMO
You can also access the [App Settings] button by right-clicking the startup screen.
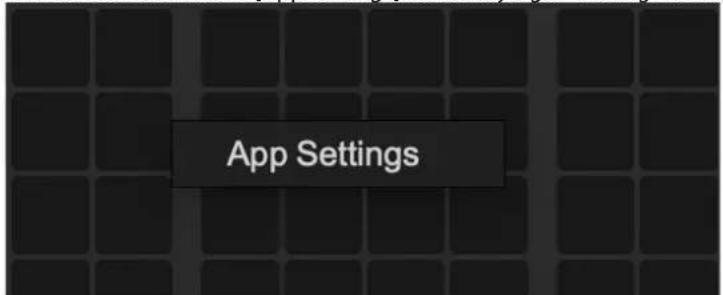
A popup screen appears.
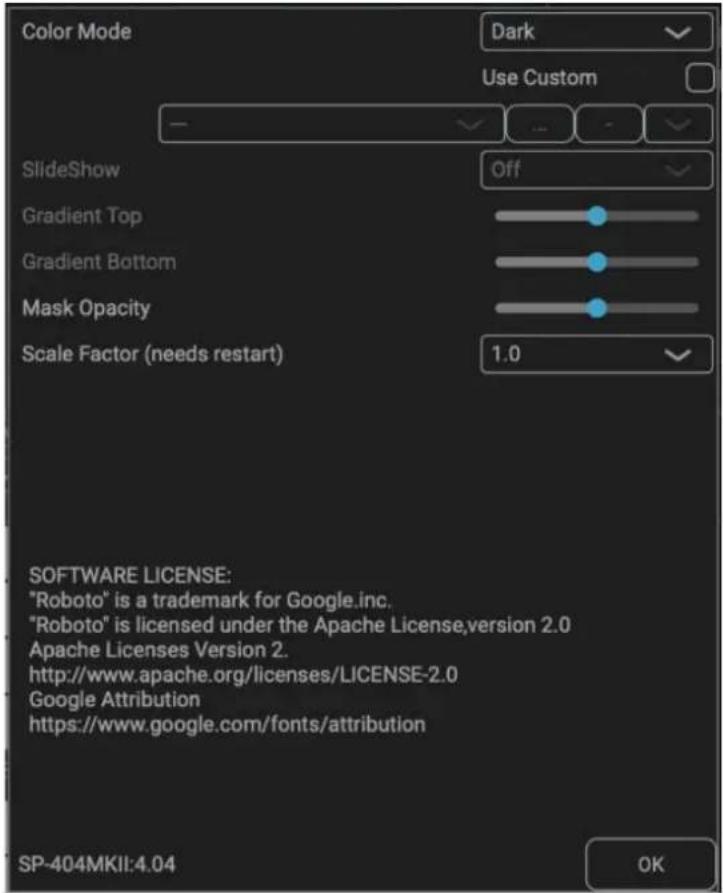
- Configure the background settings.
| Parameter | Value | Explanation |
| Color mode | Dark (Default), Light, Redzone, Fuji-san, Orange | Sets the background color. |
| Use Custom | On/off | Switches the custom settings on/off. To turn this on, click to select the checkbox. |
| Use the [...] button to select the image from the imported images that you want to use as the background. | ||
| “...” | Imports the image you want to use for the background into the app. The standard size for image files you can use is 700 × 800 px. Images that exceed this size are cropped to fit without being compressed. | |
| “-” | Deletes the image file you imported. | |
| Top, Mid, Bottom, Stretch | Sets the position of the image file when used as the background. When set to “Stretch,” small images are stretched to standard size when used. | |
| SlideShow OFF, 5 sec, 10 sec, 30 sec, 60 sec | Displays the images you imported as a slide show. Set this to “OFF” if you wish to disable the feature. | |
| Gradient Top | - | Sets the gradation in the top part of the background. Settings further to the right make the gradation darker, with less variation between light and dark color. |
| Gradient Bottom | - | Sets the gradation in the bottom part of the background. Settings further to the right make the gradation darker, with less variation between light and dark color. |
| Mask Opacity | - | Sets the transparency of the background image you set in “Use Custom.” Settings further to the right make the color darker with less transparency. |
| Scale Factor | 0.5, 0.75, 1.0, 1.5, 2.0 | Changes the display size of the app. |
- To save the settings, click the [OK] button.
Error messages
| Error messages | Explanation | Action |
| Connection is Lost, please Disconnect! | The computer is no longer connected to the SP-404MK2. | 1. Check whether the SP-404MK2 and your computer are properly connected with a USB cable, and try connecting again.2. If this does not resolve the issue, restart both the SP-404MK2 App and the SP-404MK2. |
| Media Error. | The sample data could not be loaded. | ● Only single-byte alphanumeric characters can be used for the file and folder names of the sample data. Check whether any characters that are not single-byte letters or numbers are being used.● You cannot use sample data that's longer than 16 minutes. Check whether the sample data you are trying to load is too long or too short. |
| Error. | An error occurred when trying to open the file or folder. | Do not unplug or plug in a USB cable connecting the SP-404MK2 to your computer while you're using the app. |
| Not Found. | 1. Check whether the SP-404MK2 and your computer are properly connected with a USB cable, and try connecting again. | |
| Open Error. | 2. If this does not resolve the issue, restart both the SP-404MK2 App and the SP-404MK2. | |
| Read Error. | An error occurred when reading the file. | |
| Write Error. | An error occurred when writing the file. | If the above methods do not resolve the issue, the file or folder you're trying to load or save might be corrupted, or the file or folder name might contain characters other than single-byte letters or numbers. Check whether the data has been correctly saved. |
| Media Full Error. | The SP-404MK2 has run out of free space. | Delete any data you don't need on the SP-404MK2 to increase the amount of free storage capacity. |
| BPM Detect Error. | The BPM could not be analyzed. | Try inputting the BPM manually. |
| Protected! | The function can't be executed because bank protect is enabled. | Use a bank for which bank protect is disabled, or disable bank protect on the currently selected bank.→"SP-404MKII Reference Manual" (Web) |
SP-404MK2 App Version 4
SP-404MK2 App User's Guide
03
©2021 Roland Corporation
- SP-404MK2 App Version 4
- Table of contents
- About the SP-404MK2 App
- Version 4 Additional Functions
- System requirements
- Launching the SP-404MK2 App
- NOTE
- Basic Configuration of the SP-404MK2 App
- Samples screen
- Patterns screen
- Settings screen
- Editing a Sample ("Samples" Screen)
- Waveform viewer
- Sample editor
- [Preview] button
- [Truncate] button
- [Normalize] button
- [Emphasis] button
- Project selection menu
- Pad area
- Screen switcher
- Setting the Playback and Loop Ranges ("Info" Tab)
- Setting the Effect to Apply to a Pad ("Prms" Tab)
- Setting the Playback Speed and Pitch of a Sample ("TS/PS" Tab)
- Making Fade-in/Fade-out Settings ("AHR" Tab)
- Editing a Chop Point
- Select the Edit Chop checkbox
- In the waveform viewer, right-click at the position you want to add a chop point.
- MEMO
- Importing a Sample
- Drag and drop the sample files from your computer to an empty pad on the SP-404MK2 App.
- Exporting Samples
- Organizing the Samples
- Moving the Sample of a Pad
- Copying/Exchanging Samples Between Pads
- Deleting a Sample from a Pad
- Click "OK."
- Editing a Pattern ("Patterns" Screen)
- MIDI information
- Project selection menu
- Pad area
- Screen switcher
- Importing Patterns
- Drag and drop the pattern data from your computer to an empty pad on the SP-404MK2 App.
- Exporting Patterns
- Select the export mode from the menu and click "OK."
- Organizing the Patterns
- Moving the Pattern of a Pad
- Copying/Exchanging Patterns Between Pads
- Deleting the Pattern from a Pad
- Setting the Tempo and Volume ("Settings" Screen)
- Tempo select
- Project tempo
- Bank tempo
- Screen switcher
- Importing/Exporting a Project
- Importing a project
- Click "Import to MKII."
- Click "OK."
- Exporting a Project
- Click "Save."
- Importing a Project from the SP-404SX/A
- Deleting a Project
- Click the [Init] button.
- Select the menu and click the [Init] button.
- Editing the App Settings
Brand : ROLAND
Model : SP-404MK2 App
Category : DJ Equipment