
SS-PC1 - DJ Equipment ROLAND - Free user manual and instructions
Find the device manual for free SS-PC1 ROLAND in PDF.


| Product Type | DJ Controller / Sampler |
| Brand | Roland |
| Model | SS-PC1 |
| Dimensions (W x D x H) | 400 x 250 x 60 mm |
| Weight | 1.8 kg |
| Power Supply | USB bus power or AC adapter (9V DC, 500 mA) |
| Connectivity | USB Type-B, 2x RCA audio out, 1/4" headphone jack |
| Pads | 16 velocity-sensitive RGB pads |
| Main Control | Crossfader, channel faders, rotary knobs for EQ and effects |
| Built-in Effects | Reverb, delay, filter, flanger, and more |
| Sample Playback | Supports WAV, AIFF, MP3 files (up to 16-bit/48kHz) |
| MIDI Control | Full MIDI assignable controls over USB |
| Software Compatibility | Works with Serato DJ Pro, Rekordbox, Traktor Pro (requires mapping) |
| Display | OLED display for track info and parameter feedback |
| Headroom | +4 dBu maximum output level |
| Maintenance | Clean with dry cloth; avoid liquids; inspect cables regularly |
| Safety | Use only supplied power adapter; do not expose to moisture |
| Spare Parts & Repairability | Contact Roland support for replacement knobs, faders, and USB port |
| General Information | Manufactured in China; user manual available at Roland.com |
Frequently Asked Questions - SS-PC1 ROLAND
User questions about SS-PC1 ROLAND
0 question about this device. Answer the ones you know or ask your own.
Ask a new question about this device
Download the instructions for your DJ Equipment in PDF format for free! Find your manual SS-PC1 - ROLAND and take your electronic device back in hand. On this page are published all the documents necessary for the use of your device. SS-PC1 by ROLAND.
USER MANUAL SS-PC1 ROLAND
Before using this unit, carefully read the sections entitled: "USING THE UNIT SAFELY" and "IMPORTANT NOTES" (separate document). These sections provide important information concerning the proper operation of the unit. Additionally, in order to feel assured that you have gained a good grasp of every feature provided by your new unit. Owner's Manual should be read in its entirety. The manual should be saved and kept on hand as a convenient reference.
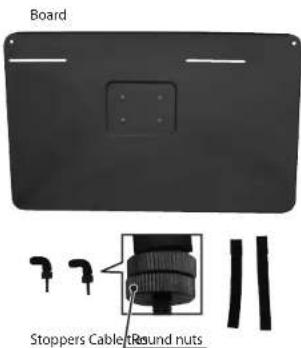
Check the included items
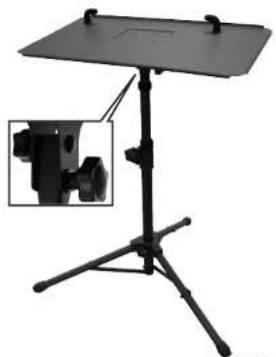
How it should look when assembled
natural_image
Black adjustable table with tripod and stand, showing a small inset image of a camera mounted on the tripod (no text or symbols visible)Assembly
1. Attach the tripod to the board.
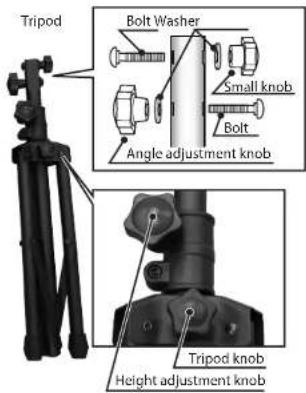
1) Remove the angle adjustment knob, the small knob, and the washers and bolts from the upper portion of the tripod.
* Do not remove the height adjustment knob or the tripod knob.
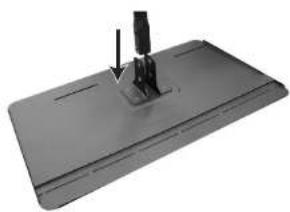
2) Pla-ce the board as shown in the illustration below, and Insert the tripod.
natural_image
Exterior view of a modern office building (no signage)Copyright © 2009 ROLAND CORPORATION
All rights reserved. No part of this publication may be reproduced in any form without the written permission of ROLAND CORPORATION.
Installation
The SS-PC1 can support an item within the following ranges of width, depth, height, and weight.
• Width: 200–390 mm
7-7/8-15-3/8 inches
- Depth up to 300 mm
up to 11-13/16 inches
• Height: 21.41 mm
7/8-1-5/8 inches
• Weight: up to 4 kg
up to 8 lbs 14 oz
* Roland will not be liable for any damage that may occur to an item placed on the stand if the stand falls over, nor for any consequential damage that may occur.
As an example, here's how to attach a notebook computer to the stand.
Attaching a notebook computer
* It may not be possible to mount some designs of notebook computer.
* The location of the CD-ROM drive or other disc insertion slot will depend on the design of your notebook computer. Insert the disc you're using into your computer before attaching the computer to the SS-PC1.
1. Place your notebook computer on the board.
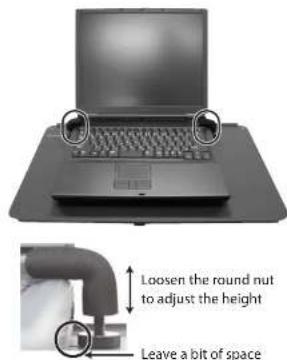
1) Loosen the two stoppers, and place your notebook computer as close to the center as possible.
* If you'll be using a mouse, place the computer as close to the center as possible while still allowing space for yourself to operate the mouse.
2) Open the screen of your notebook computer, adjust the height of each stopper by loosening the round nut appropriately for the thickness of your computer, and then fasten it in place.
* If the height is inappropriate, your notebook computer may slide out from the stoppers, or the portion held by the stoppers may break. Please use caution.
* Depending on the design of your notebook computer, the stoppers may prevent you from inserting the power plug, connectors, or CD-ROM discs. If so, adjust the location at which your computer is fastened.
*If the stopper is too close to your notebook computer, the round nut may scratch your computer. Please use caution.
2. Adjust the angle of the board.
1) Loosen the angle adjustment knob and set the angle as desired.
* You can tilt the board in a range of 1.5 * from the horizontal position.
2) Firmly tighten the angle adjustment knob.
3. Use cable ties to bundle any connected cables and fasten them to the stand.
* To avoid damaging your notebook computer, do not fold down its screen while the computer is still held by the stoppers.

natural_image
Laptop with a prohibition symbol on its side, no text or symbols present* To prevent your notebook computer from falling, do not move it or adjust the height while it is still on the stand.
3) Use two bolts, washers and knobs to attach the tripod as shown in the illustration below. * As shown in the illustration below, insert the bolts in alternate directions, with the small knob below.
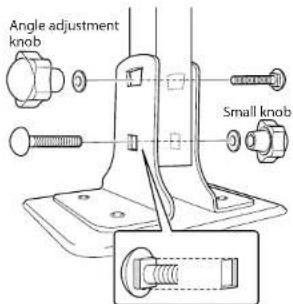
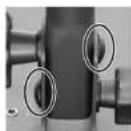
* Make sure that there are no gaps at the locations shown in the illustration below.
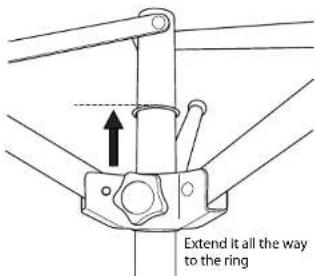
4) Fully extend the tripod, and tighten the tripod knob.
* Be careful not to pinch your fingers when extending the tripod.
* Do not remove the tripod knob.
5) Place the tripod upright.
2. Attach the stoppers to the board.
1) Remove the round nut attached to each stopper, and insert the stoppers into the oblong holes in the board.
* If you'll be mounting a thin notebook computer on the stand, remove the upper round nuts as well.
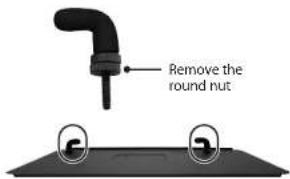
2) Temporarily fasten to the board by lightly tightening the lower round nut that you removed.
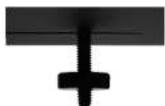
3. Adjust the direction of the legs, and the height and direction of the board.
1) Place the tripod legs so that they will not be in your way.
2) Loosen the height adjustment knob. Set the board at the desired height and direction, and firmly tighten the height adjustment knob.
* If you need to change the height, use your hand to support the board from below so that it does not drop down, and then loosen the height adjustment knob.
Specifications
SS-PC1: SUPPORT STAND FOR PC
Dimensions:
Width: 640 mm 25-1/4 inches
Depth: 555 mm
21-7/8 inches
Height: 600–950 mm 23-5/8–37-7/16 inches (height of mounting surface)
^x Includes the tripod.
Weight:
3.5 kg 7 lbs 12 oz
Size of notebook computers that can be
mounted:
Up to B4 size
Width: 200–390 mm 7-7/8-15-3/8 inches
Depth: up to 300 mm
up to 11-13/16 inches
Height: 21–41 mm 7/8–1-5/8 inches (not including screen)
* It may not be possible to mount some designs of notebook computer.
Weight capacity:
4 kg 8 lbs 14 oz
"In the interest of product improvement, the specifications and/or appearance of this unit are subject to change without prior notice.
Roland SUPPORT STAND FOR PC SS-PC1 取扱説明書
natural_image
Black adjustable table with tripod and stand, showing a small inset image of a camera mounted on the right side (no text or symbols visible)組み立てかた
- ボードに三脚を取り付けます。
natural_image
Metal tray with a small mechanical component inserted, no visible text or symbolsnatural_image
Laptop with a prohibition symbol on its side, no text or symbols present- Assembly
- Attach the tripod to the board.
- Installation
- Attaching a notebook computer
- Place your notebook computer on the board.
- Adjust the angle of the board.
- Use cable ties to bundle any connected cables and fasten them to the stand.
- Attach the stoppers to the board.
- Adjust the direction of the legs, and the height and direction of the board.
- Specifications
- Dimensions:
- Weight:
- Size of notebook computers that can be
- mounted:
- Weight capacity:
- Roland SUPPORT STAND FOR PC SS-PC1 取扱説明書
- 組み立てかた
Brand : ROLAND
Model : SS-PC1
Category : DJ Equipment