
DDJ-SB3 - DJ Equipment ROLAND - Free user manual and instructions
Find the device manual for free DDJ-SB3 ROLAND in PDF.


| Product Type | DJ Controller |
| Brand | Roland |
| Model | DJ-202 (DDJ-SB3) |
| Dimensions | 478 (W) x 297 (D) x 62 (H) mm (18-7/8 x 11-3/4 x 2-1/2 inches) |
| Weight | 2.1 kg (4 lbs 11 oz) |
| Power Supply | USB bus power |
| Current Draw | 500 mA |
| USB Connection | USB Type B port for computer connection |
| Software | Serato DJ Intro (included), upgradeable to Serato DJ |
| Decks | 4-deck control (left decks 1 & 3, right decks 2 & 4) |
| Jog Dial | Capacitive touch top surface with vinyl mode and pitch bend |
| Performance Pads | 8 multi-color RGB pads per deck |
| Pad Modes | Hot Cue, Loop, Sequencer, Pattern, Inst Play, Sampler, Slicer |
| Mixer Section | 4-channel mixer with TRIM, 3-band EQ (HI/MID/LOW), FILTER, crossfader, cue |
| Sequencer | Built-in step sequencer with TR-808/909/707/606 instruments, 16 patterns |
| Effects | 2 effect units (FX1/FX2) with 3 assignable effects, TAP tempo, filter |
| Audio Inputs | MIC IN (1/4-inch phone type) |
| Audio Outputs | MASTER OUT (RCA), PHONES (stereo 1/4-inch), MIDI OUT |
| Accessories | Startup Guide, USB cable |
| Maintenance | Clean with soft, dry cloth; do not use solvents |
Frequently Asked Questions - DDJ-SB3 ROLAND
User questions about DDJ-SB3 ROLAND
0 question about this device. Answer the ones you know or ask your own.
Ask a new question about this device
Download the instructions for your DJ Equipment in PDF format for free! Find your manual DDJ-SB3 - ROLAND and take your electronic device back in hand. On this page are published all the documents necessary for the use of your device. DDJ-SB3 by ROLAND.
USER MANUAL DDJ-SB3 ROLAND
Before using this unit, carefully read "USING THE UNIT SAFELY" and "IMPORTANT NOTES" (Startup Guide). After reading, keep the document(s) where it will be available for immediate reference.
Copyright © 2017 ROLAND CORPORATION
Installing the Software.... 3
System Requirements 3
Downloading the Software 3
Downloading the DJ-202 USB Driver 3
Downloading the Serato DJ Intro Software.... 3
Installing the Software.... 3
Mac OS Users 3
Windows Users.... 3
Panel Descriptions 4
Browser Section 4
Deck Section.... 5
Mixer Section 7
Front Panel 8
Rear Panel (Connecting Your Equipment).... 8
Using Serato DJ Intro.... 9
Starting Serato DJ Intro 9
Basic Operations in Serato DJ Intro....9
Importing a Song....9
Loading a Song 9
Playing a Song 10
Monitoring Through Headphones 10
Closing Serato DJ Intro.... 10
Operating the DJ-202 11
Performance Pad Operations.... 11
Hot Cue Operations (HOT CUE).... 11
Loop Operations (LOOP) 11
Sequencer Operations (SEQUENCER).... 11
Pattern Operations (PATTERN) 11
INST PLAY Operations 11
Sampler Operations (SAMPLER) 12
Effect Operations 12
Changing the Effect Tempo.... 12
Using the Sequencer 13
Selecting, Playing, Copying, or Deleting Patterns ..... 13
Editing a Pattern 13
Synchronizing the Sequencer Tempo with the Serato DJ
Intro Tempo 14
System Settings.... 15
Backing Up or Restoring Sequencer Data.... 16
Returning to the Factory Settings (Factory Reset) 16
Appendix 17
Troubleshooting.... 17
Main Specifications 17
About this owner's manual
This manual explains basic operation when using the DJ-202 together with Serato DJ Intro.
Downloading the Serato DJ Intro owner's manual
- Start a browser and access the following Serato DJ Intro webpage.
https://serato.com/dj/downloads
-
Click "Manuals and Downloads."
-
From "Manuals and Downloads," download the Serato DJ Intro owner's manual.
Upgrading to Serato DJ
You can also upgrade from Serato DJ Intro to Serato DJ and control it from the DJ-202.
System Requirements
Verify that your computer meets the system requirements before you proceed with installing the software.
| Mac OS Windows | ||
| Operating System | macOS 10.12OS X 10.11OS X 10.10 | Windows 10Windows 8.1Windows 7 SP1 |
| CPU/Clock | Intel® CoreTM 17/1.07 GHzIntel® CoreTM 15/1.07 GHzIntel® CoreTM i3/1.07 GHz | |
| Screen Resolution 1280 x 720 | ||
| Memory 4 GB | ||
| Free HDD Space 5 GB | ||
| USB Available USB 2.0 port | ||
* For the latest system requirements, refer to the Serato DJ Intro webpage.
Downloading the Software
The DJ-202 USB driver and Serato DJ Intro are not included in the package. Download them from the Roland or Serato website.
Downloading the DJ-202 USB Driver
The DJ-202 USB driver is software that outputs audio from your computer to the DJ-202.
Mac OS users
- Start a browser and access the following Roland support webpage.
http://www.roland.com/support/
- Search for "DJ-202."
- In downloads, find "DJ-202 Driver for macOS / OS X" and click it.
- Download the driver as directed by the screen.
Windows 10 users
- Connect your internet-connected computer to the DJ-202's USB port.
- Power-on the DJ-202.
- Download the driver as directed by the screen.
Users of other than Windows 10
- Start a browser and access the following Roland support webpage.
http://www.roland.com/support/
- Search for "DJ-202."
- In downloads, find "DJ-202 Driver for Windows **" and click it.
- Download the driver as directed by the screen.
Downloading the Serato DJ Intro Software
- Start a browser and access the following Serato DJ Intro webpage.
https://serato.com/dj/intro/downloads
- Click "DOWNLOAD SERATO DJ INTRO."
- Enter your email address, and click "CONTINUE."
- Enter your password and country, and click "CONTINUE." An email is sent to the address you specified.
- Click "Download Serato DJ Intro" as directed by the email.
- Follow the instructions as directed by the screen, then download the Serato DJ Intro.
Installing the Software
Install the software as follows.
Mac OS Users
- Decompress the DJ-202 USB driver file that you downloaded.
-
Open the decompressed file, and double-click "DJ202_USBDriver.pkg"
The installer starts. -
Install the software as directed by the screen.
- Decompress the Serato DJ Intro software file that you downloaded.
- Double-click the decompressed file. The installer starts.
- Read the license agreement, and if you accept the conditions, click [Agree].
- When the following screen appears, drag and drop the [Serato DJ Intro] icon into the Applications folder.
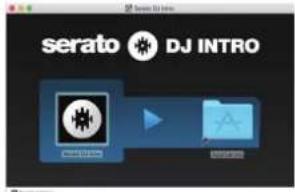
This completes the installation.
Windows Users
- Right-click the DJ-202 USB driver folder that you downloaded, and choose "Extract all." The folder is decompressed.
- Open the decompressed folder, and double-click "Setup.exe." The installer starts.
- Install the software as directed by the screen.
- Right-click the Serato DJ Intro software folder that you downloaded, and choose "Extract all." The folder is decompressed.
- Double-click the decompressed file. The installer starts.
- Read the license agreement, and if you accept the conditions, choose [I agree to the license terms and conditions] and click [Install]. Installation begins.
- When the following screen appears, click [Finish].
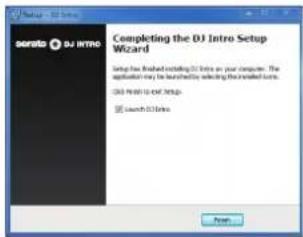
This completes the installation.
Panel Descriptions
The top panel of the DJ-202 is divided into three sections by function: browser, deck, and mixer. Phones jack is located on the front side, and input/output jacks are located on the rear side.
* The serato DJ symbol indicates a function that you can use after upgrading to Serato DJ.
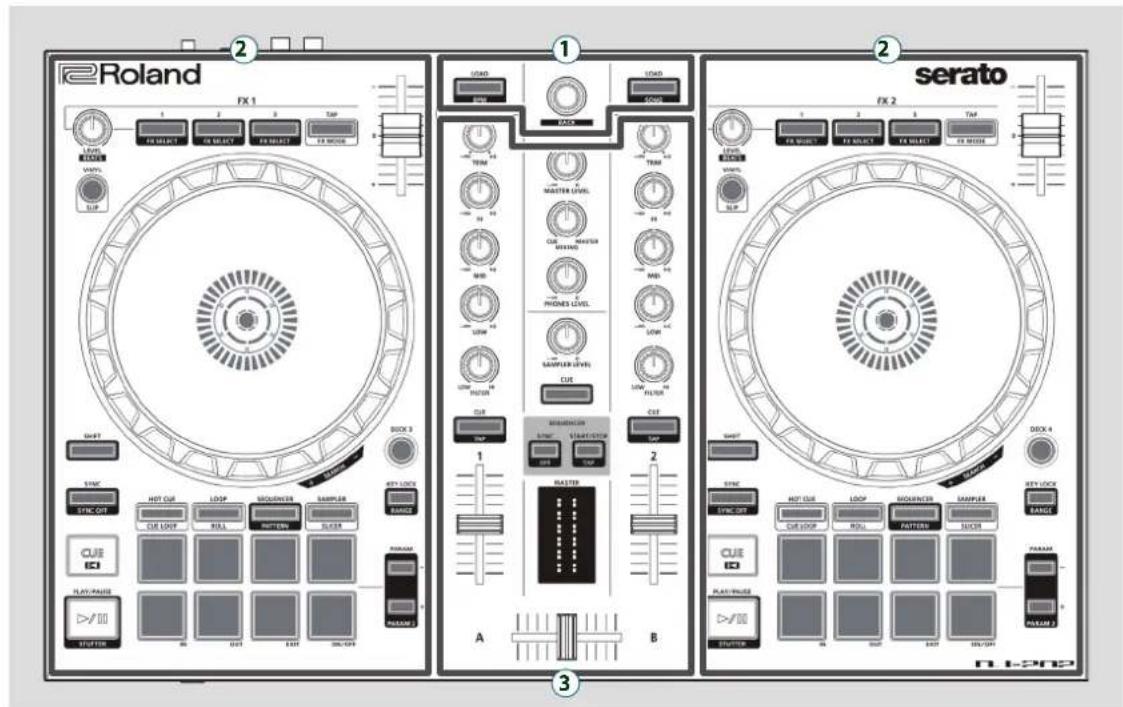
① Browser section
② Deck section
③ Mixer section
Browser Section
Use these controls to operate Serato DJ Intro and load songs.
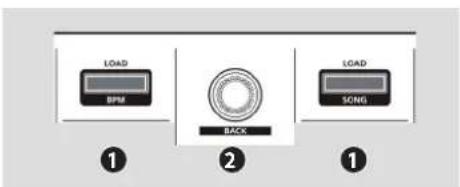
① [LOAD] buttons
Load a song selected on Serato DJ Intro into a deck.
| [SHIFT] + | LOADBFM | Sorts the song library by BPM. |
| [SHIFT] + | LOADSONG | Sorts the song library by SONG. |
② Rotary selector
Turn this knob to move the cursor up/down. Press this knob to move the cursor to a lower level.
[SHIFT] + Press the knob Moves the cursor to a higher level.
Deck Section
The deck sections located at the left and right control four decks (left: decks 1 and 3, right: decks 2 and 4).
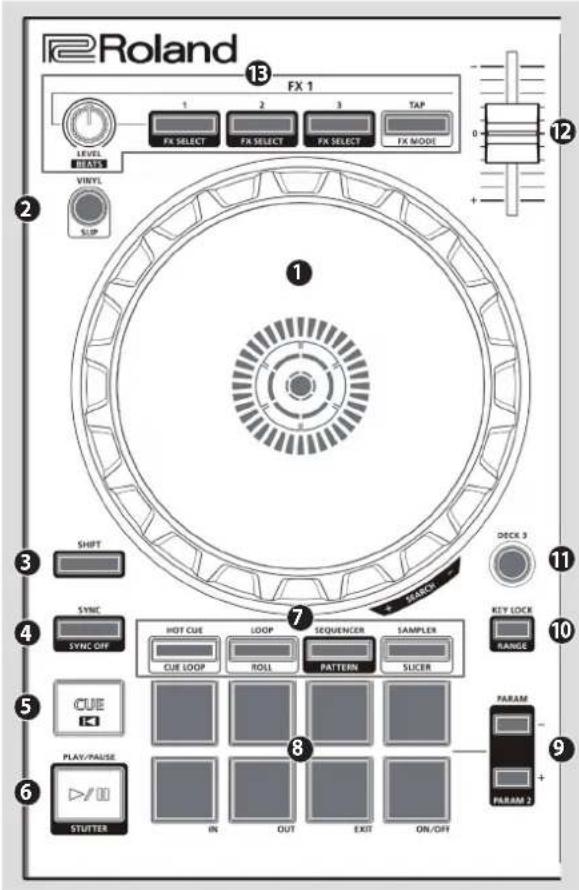
① Jog dial
Controls scratch and pitch bend (playback speed adjustment).
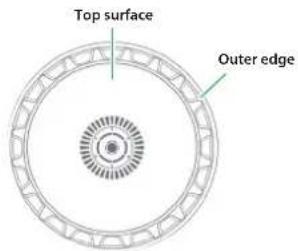
| Rotate the top surface | If VINYL MODE is on:Performs scratch operations.If VINYL MODE is off:Performs pitch bend ( playback speed) operations. |
| Rotate the outer edge Performs pitch bend. | |
| [SHIFT] + rotate the top surface Rapidly moves the playback location. | |
② [VINYL] button
Turns VINYL mode on/off.
![ROLAND DDJ-SB3 - ② [VINYL] button - 1](/content/2026/06/1149804/images/87a3b1feafafa3b6fda4e497bb02aea95203ae4373091198f9a03e367a4fc42a.jpg)
[SHIFT] + [SYNC] Turns slip mode oh/off.
③ [SHIFT] button
You can recall other functions by holding down this button and pressing another button.
④ [SYNC] button
Automatically matches the tempo (pitch) of multiple songs.
* In order to use the SYNC function, the song's tempo must be specified. If a tempo (BPM) has not been specified for the song, you can use the tap tempo function (p. 7) to specify the tempo.
[SHIFT] + [SYNC] Cancels SYNC.
⑤ [CUE◄] button
Specifies, plays, or recalls a temporary cue point.
The first time that you press the [CUE ◀] button after switching the playback song, the cue point is set.
After the cue point has been set, pressing the [CUE ◀] button moves the cue point to the location at which you pressed the button. If playback is in progress, pressing this button moves to the temporary cue point and stops playback.
| [SHIFT] + [CUE ⬆] | If you press the buttons during the song, the location returns to the beginning of the song.If you press the buttons at the beginning of the song, the previous song in the song list is loaded. |
⑥ [▶/II] button
Plays or pauses the song.
[SHIFT] + [▶/II] Returns to the temporary cue point, and plays.
⑦ Pad Mode select
Here you can select the control mode of the performance pads.
[HOT CUE] button
Selects hot cue mode (p. 11).
![ROLAND DDJ-SB3 - [HOT CUE] button - 1](/content/2026/06/1149804/images/105c5d802c4315d8a606f46e1445953e329c219738534bbdf98dc21110979632.jpg)
| Press [HOT CUE] | Button: LitAssigns hot cue to performance pads 1-8. |
| [SHIFT] + [HOT CUE] | Button: Blinking slowlySelects cue loop mode. |
| Press [HOT CUE] twice | Button: Blinking quicklySelects pitch play mode. |
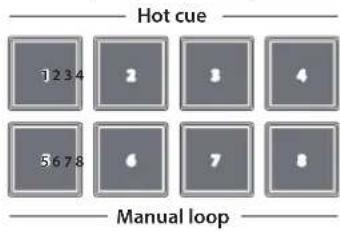
| Press [SHIFT] + [HOT CUE] twice | Button: Blinking at high speedHot cue is assigned to performance pads 1-4, and manual loop is assigned to 5-8. |
[LOOP] button
Selects loop mode (p. 11).
![ROLAND DDJ-SB3 - [LOOP] button - 1](/content/2026/06/1149804/images/9f18e5d770370640c1c6210095733ba1a3b4198cba9ffd1a89547a5c90c29da1.jpg)
| Press [LOOP] | Button: LitAssigns loop to performance pads 1–8. |
| [SHIFT] + [LOOP] | Button: Blinking slowlySelects roll mode. |
| Press [LOOP] twice | Button: Blinking quicklySelects manual loop mode. |
| Press [SHIFT] + [LOOP] twice | Button: Blinking at high speedLoop is assigned to performance pads 1–4, and manual loop is assigned to 5–8. |
[SEQUENCER] button
Selects sequencer mode (p. 11, p. 13). You can use step recording to edit the selected pattern.
Button : Lit
| [SHIFT] + [SEQUENCER] | Button: Blinking slowlySelects pattern mode (p. 11, p. 13).Switches the sequencer's pattern. |
| Press [SEQUENCER] twice | Button: Blinking quicklySelects INST REC mode (p. 14).The instruments you play from the performance pads are recorded in the pattern. The selected pattern can be edited in real time. |
| Press [SHIFT] + [SEQUENCER] twice | Button: Blinking at high speedSelects INST PLAY mode (p. 11).You can use the performance pads to play the instruments. |
Deck section
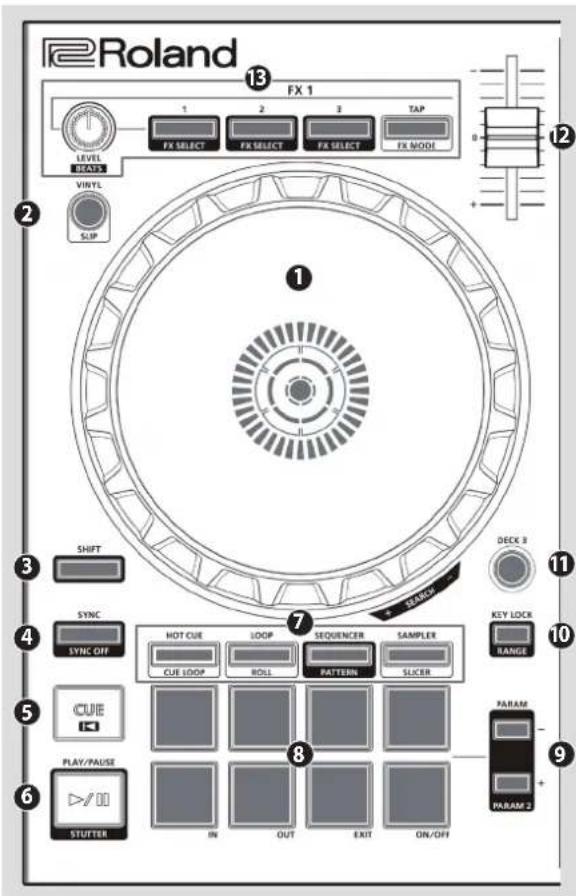
⑦ Pad Mode select
[SAMPLER] button
Selects sampler mode (p. 12).
serato DJ
| Press [SAMPLER] | Button: LitAssigns sampler to performance pads 1-8. |
| [SHIFT] + [SAMPLER] | Button: Blinking slowlySelects slicer mode. |
| Press [SAMPLER] twice | Button: Blinking quicklySelects slicer loop mode. |
| Press [SHIFT] + [SAMPLER] twice | Button: Blinking at high speedSampler is assigned to performance pads 1-4, and manual loop is assigned to 5-8. |
8 Performance pads
Use these pads to perform in the pad mode that you've selected.
⑨ PARAM area
Here you can specify the value of the parameter that's operated by the performance pads.
10 [KEY LOCK] button
Turns the key lock function on/off.
* If the key lock function is on, the pitch does not change even if you use the tempo slider to change the playback speed.
| [SHIFT] + [KEY LOCK] | Specifies the variable range of the Tempo slider.The setting changes in the order of ± 8% 16% 50% . |
11 [DECK 3], [DECK 4] buttons
Switch the deck (left: decks 1 and 3, right: decks 2 and 4) to be operated.
⑫ Tempo slider
Adjusts the playback speed of the song.
If the key lock function is on:
Changes the playback speed.
| “-” side Lowers the playback speed. |
| “+” side Raises the playback speed. |
If the key lock function is off:
Changes the playback speed and pitch.
| “-” side Lowers the playback speed and pitch. |
| “+” side Raises the playback speed and pitch. |
⑬ FX 1, FX 2 area
Here you can adjust the effects (FX 1: deck 1, FX 2: deck 2).
[LEVEL] knob
Adjust the character of the effect.
[SHIFT] + [LEVEL] knob Adjusts the time for which the effect is applied.
Effect buttons [1]–[3]
Turn the effect on/off.
[SHIFT] + Effect button Changes the effect type.
[TAP] button
The interval at which you press this button (tap tempo) specifies the reference tempo of the effect.
If you long-press the button, the specified tempo is reset.
![ROLAND DDJ-SB3 - [TAP] button - 1](/content/2026/06/1149804/images/ebd74a6c8969cc073aae040031bd517b4e674b1a8255ea4f4fbbbfd8eb966084.jpg)
[SHIFT] + [TAP] Switches the effect mode (single FX/multi FX).
Mixer Section
This is a four-channel mixer. Here you can adjust the sound, connect sounds, and turn headphone cue on/off.
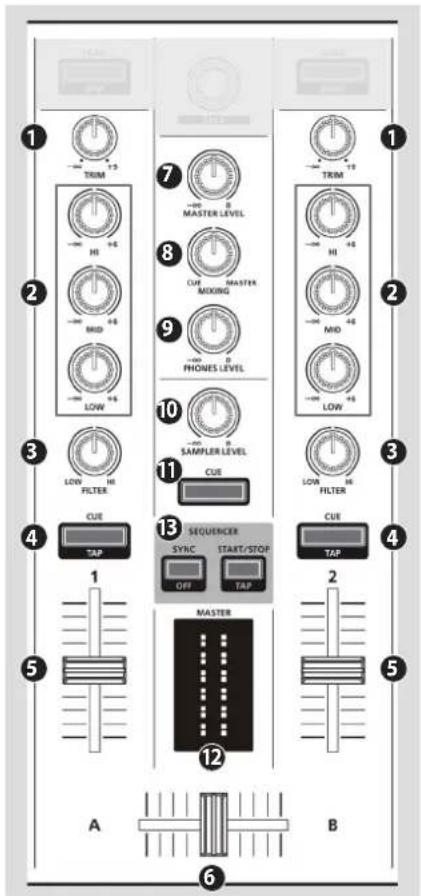
① [TRIM] knobs
Adjust the volume.
② [HI], [MID], [LOW] knobs
Boost/cut the volume of the high-frequency, mid-frequency, and low-frequency regions.
③ [FILTER] knobs
Applies a filter to each channel.
If you turn the [FILTER] knob toward the right, only the high-frequency range is heard.
If you turn the knob toward the left, only the low-frequency range is heard.
④ Channel [CUE] buttons
Turn cue on/off for each channel. The sound of channels whose [CUE] button is lit is output from the headphones.
| [SHIFT] + [CUE] | You can specify the tempo of the track by the interval at which you repeatedly press the [CUE] button (Tap Tempo function). |
⑤ Channel faders
Adjust the output level of each channel.
6 Cross fader
Switches between the audio output of the left and right decks.
⑦ [MASTER LEVEL] knob
Adjusts the master output level.
8 [MIXING] knob
Adjusts the volume balance of the channel whose Channel [CUE] button is lit and the master output for phones output.
⑨ [PHONES LEVEL] knob
Adjusts the volume of the headphones.
10 [SAMPLER LEVEL] knob
Adjusts the sampler and instrument output level.
11 SAMPLER [CUE] button
Turns on/off cue for the sampler and instrument output.
⑫ MASTER level indicator
Indicates the master output level.
⑬ SEQUENCER area
[SYNC] button
Synchronizes the tempo of the sequencer to the tempo of Serato DJ Intro.
[SHIFT] + [SYNC] Disables tempo synchronization.
[START/STOP] button
Plays/stops the pattern.
| [SHIFT] + [START/STOP] | The interval at which you press this button (tap tempo) specifies the tempo of the sequencer. |
Front Panel
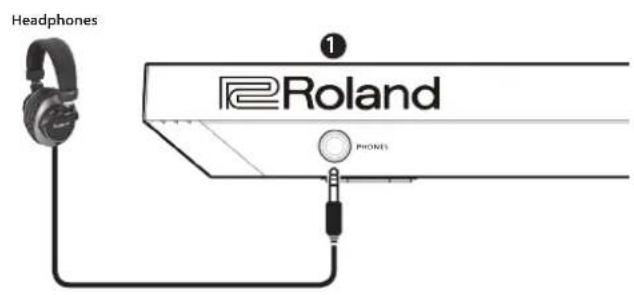
① [PHONES] jacks
Connect headphones here.
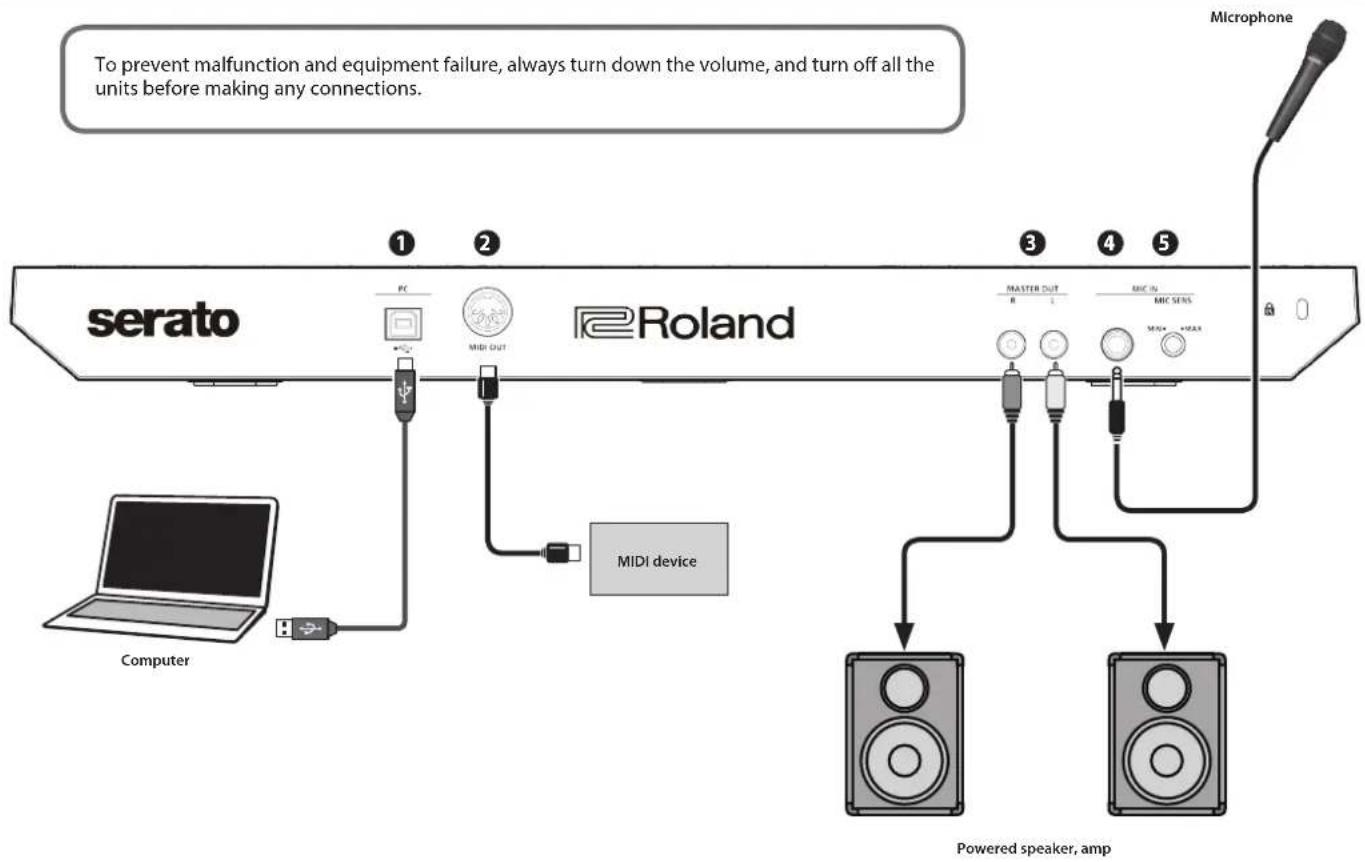
Rear Panel (Connecting Your Equipment)
flowchart
graph TD
    A["serato"] -->|1| B["PC"]
    A -->|2| C["MIDI OUT"]
    A --> D["MIDI device"]
    D --> E["Master OUT"]
    D --> F["MINI SENS"]
    D --> G["SIN4+MAX"]
    H["Computer"] --> I["USB"]
    J["Microphone"] --> K["Powered speaker, amp"]
① PC port
Use the included USB cable to connect this port to your computer. When this is connected, power is supplied from the computer.
To connect this to your computer, you must install the USB driver.
→ "Installing the Software" (p. 3)
② MIDI OUT connector
This outputs MIDI messages such as MIDI clock.
③ MASTER OUT L, R jacks
Connect your powered speakers or power amp here.
4 MIC IN jack
Connect your microphone here.
MEMO
In "System Settings" (p. 15), you can specify dedicated effects (reverb, delay) for the mic input.
⑤ [MIC SENS] knob
Adjusts the mic input sensitivity.
This document explains basic use of Serato DJ Intro. For details on the functions and use of the software, refer to the Serato DJ Intro software manual.
Starting Serato DJ Intro
* Before turning the unit on/off, always be sure to turn the volume down. Even with the volume turned down, you might hear some sound when switching the unit on/off. However, this is normal and does not indicate a malfunction.
-
Turn on the power of the computer.
-
Connect the DJ-202 (USB port) to the computer.
The power of the DJ-202 turns on.
-
Turn on the power of the equipment that's connected to the DJ-202.
-
Start Serato DJ Intro.
Mac OS
In the Finder, open the [Applications] folder and double-click the [Serato DJ Intro] icon.
Windows 7
In the [Start] menu, click [All Programs] → [Serato] → [Serato DJ Intro] → [Serato DJ Intro] icon.
Windows 8.1
In the [App View], click the [Serato DJ Intro] icon.
Windows 10
In the [Start] screen or [App View], click the [Serato DJ Intro] icon.
Basic Operations in Serato DJ Intro
Songs shown in the browser view can be imported into a deck area, and controlled from the DJ-202.
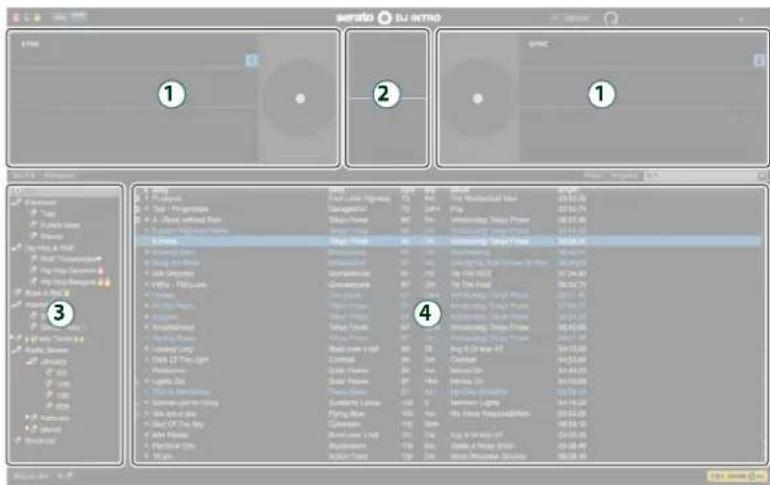
① Deck section
② Waveform panel
③ crate panel
④ Library
Importing a Song
Here we'll explain typical operations for importing a song.
* Serato DJ Intro provides a variety of ways to import songs. For details, refer to the Serato DJ Intro software manual.
* If you're using Serato Corporation's DJ software (Scratch Live, ITCH, Serato DJ) and you have already created a song library, the library you created can be used as-is.
- In Serato DJ Intro, click the [Files] key.
The [Files] panel opens, and the files on your computer and on the peripheral devices connected to your computer are displayed. - In the [Files] panel, click the folder that contains the songs you want to add to the library.
- Drag and drop the selected folder onto the crate panel.
A crate is created, and the songs are added to the library.
Loading a Song
Here's how to load a song so that it can be output.
- On the DJ-202, hold down the [SHIFT] button and press the rotary selector to move the cursor to the crate panel.
- Turn the DJ-202's rotary selector to move to the folder containing the song that you want to load; then press the rotary selector.
The cursor moves to the library. - Turn the rotary selector to move to the song that you want to load.
- On the DJ-202, press the [LOAD] button of the deck into which you want to load the song.
Playing a Song
- Set the DJ-202's knobs and switches as follows.
| [MASTER LEVEL] knob Turned all the way to the left | |
| [TRIM] knobs | Center[HI], [MID], [LOW] knobs |
| [FILTER] knobs | |
| Channel faders Lowest position | |
- Press the ▶/II] button to play back the loaded song.
- Move the channel fader upward and turn the [TRIM] knob toward the right to adjust the volume.
Adjust the volume so that the channel level indicator is lit as far as the orange portion.
- Turn the [MASTER LEVEL] knob toward the right to adjust the level of the speakers.
Monitoring Through Headphones
- Set the DJ-202's knobs as follows.
| [MIXING] knob | Turned all the way to the left |
| [PHONES LEVEL] knob |
- Press the channel [CUE] button of the channel that you want to monitor.
- Turn the [PHONES LEVEL] knob toward the right to adjust the headphone level.
Closing Serato DJ Intro
- Close the Serato DJ Intro screen.
Mac OS
In the upper left of the Serato DJ Intro screen, click the [O] (red: close) button.
Windows
In the upper right of the Serato DJ Intro screen, click the [X] button.
A confirmation screen appears.
- Click [Yes] to close Serato DJ Intro.
- Turn off the power of the equipment that's connected to the DJ-202.
- Disconnect the USB cable to power-off the DJ-202.
Performance Pad Operations
Hot Cue Operations (HOT CUE)
In hot cue mode, you can assign hot cues to performance pads 1–4 and manual loops to performance pads 5–8.
Assigning hot cues
By specifying a hot cue, you can instantly play back from the specified location.
You can specify up to four hot cues for each song.
- Press the [HOT CUE] button to make the button light.
- During playback or while paused, press a performance pad 1–4 that is unlit.
A hot cue is assigned to the performance pad that you pressed. Hot cues (1–4) are assigned to the performance pads as follows.
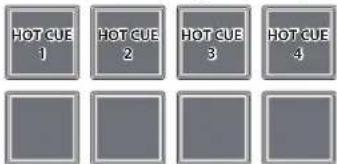
- Press a performance pad that is lit (i.e., a pad to which a hot cue is assigned).
Playback starts from the specified location.
MEMO
If you hold down the [SHIFT] button and press a performance pad, the hot cue of the pad you pressed is cleared.
Assigning manual loops
- Press the [HOT CUE] button to make the button light.
- During playback, press performance pad 5 to specify the loop IN point.
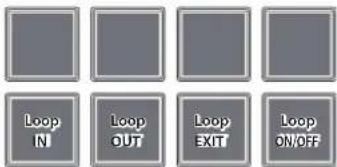
- During playback, press performance pad 6 to specify the loop OUT point.
Loop playback begins between the loop IN point and the loop OUT point. - To exit manual loop, press performance pad 7 during loop playback.
After exiting manual loop, if you press performance pad 7 during playback, you return to the previously-specified loop IN point and loop playback starts.
- To cancel manual loop, press performance pad 8.
If you press performance pad 8 after canceling manual loop, manual loop is re-specified.
Adjusting the length of manual loop
- During playback, you can press performance pad 5 and then use the jog dial to make fine adjustments to the loop IN point. If you once again press performance pad 5, you'll return to loop playback.
- During playback, you can press performance pad 6 and then use the jog dial to make fine adjustments to the loop OUT point. If you once again press performance pad 6, you'll return to loop playback.
Loop Operations (LOOP)
In loop mode, you can assign loops to performance pads 1–4 and manual loops to performance pads 5–8.
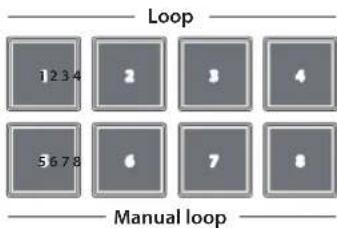
Assigning loops
You can specify a loop of 1, 2, 4, or 8 beats relative to the BPM of the song.
- Press the [LOOP] button to make the button light.
- During playback, press a performance pad 1–4 to turn loop on. The beats of the loop are assigned to the performance pads as follows.
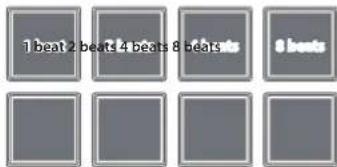
- To turn off the loop, press the same performance pad once again.
Assigning manual loops
The operation is the same as for manual loop of hot cue mode.
Sequencer Operations (SEQUENCER)
Using the sequencer, "patterns" created using drum sounds (instruments) of a Roland TR-909, TR-808, TR-707, or TR-606 rhythm machine, or samples of Serato Sampler, can be edited in either step or realtime recording.
* For details on sequencer operation, refer to "Using the Sequencer" (p. 13).
Pattern Operations (PATTERN)
In pattern mode, you can play back patterns (1–16) that you select by pressing a performance pad.
* For details on selecting and playing back patterns, refer to "Using the Sequencer" (p. 13).
INST PLAY Operations
In INST PLAY mode, you can press performance pads to play instruments (p. 13).
- Hold down the [SHIFT] button and press the [SEQUENCER] button twice to access INST PLAY mode.
In INST PLAY mode, the button blinks at high speed.
The following instruments are assigned to the performance pads.
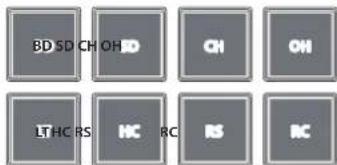
- Press a performance pad.
Changing instruments
You can switch the instrument sounds in units of kits. You can use twelve kits.
1. Hold down the [SHIFT] button and press a performance pad to select a kit.
You can use the PARAM [-] [+] buttons to switch the kit 1-8 and kit 9-12.
• PARAM [−] button is lit
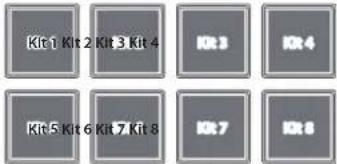
• PARAM [+] button is lit
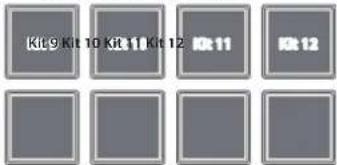
Sampler Operations (SAMPLER)
In sampler mode, you can assign samplers to performance pads 1–4 and manual loops to performance pads 5–8.
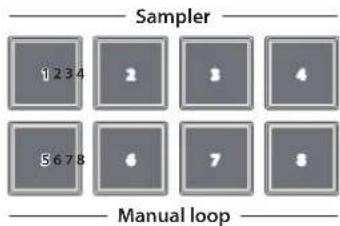
Assigning samplers
You can use the performance pads to play songs (samples) that are loaded into Serato Sampler's sample slots.
-
In Serato DJ Intro, click the [Samples] key to access the Samples panel.
-
Press the [SAMPLER] button to make it light
-
Drag and drop songs into the Sampler panel to load a sample into each slot of the Sampler panel.
The sampler settings and the loaded samples are saved.
- Press a performance pad.
The sample of the slot that's assigned to the pad you pressed is played.
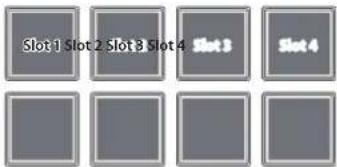
- To stop sample playback, press the same performance pad once again.
Assigning manual loops
The operation is the same as for manual loop of hot cue mode (p. 11).
Effect Operations
Serato DJ Intro has two effect units (FX 1, FX 2); you can use FX 1 for deck 1, and use FX 2 for deck 2.
Click Serato DJ Intro's [DJ-FX] key to open the DJ-FX panel.
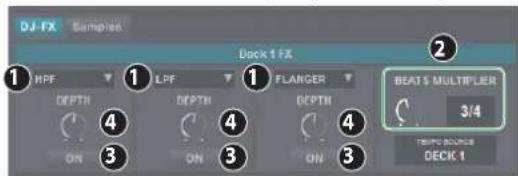
| 1 | Currently selected effect type |
| 2 | Time at which the effect is applied |
| 3 | Effect on/off status (highlighted when on) |
| 4 | Effect depth |
1. To select the effect type, hold down the [SHIFT] button and press an effect button [1]–[3] of the deck that you want to operate.
The effect type changes each time you press the button.
![ROLAND DDJ-SB3 - To select the effect type, hold down the [SHIFT] button and press an effect button [1]–[3] of the deck that you want to operate. - 1](/content/2026/06/1149804/images/36d2972966ef3014d69c0c71c92c6cc48c9872cb1bfd2f4b6083d9a729be48fe.jpg)
![ROLAND DDJ-SB3 - To select the effect type, hold down the [SHIFT] button and press an effect button [1]–[3] of the deck that you want to operate. - 2](/content/2026/06/1149804/images/623d100f243fa68cecd386225da09f7b77f29ccc8bc65e164b11f378138579b3.jpg)
2. Press the effect button [1]–[3] to turn the effect on (button lit).
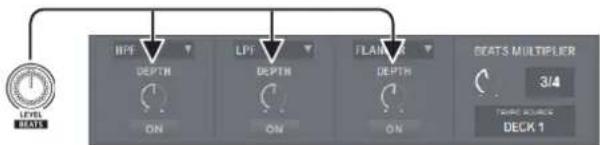
3. Use the [LEVEL] knob to adjust the depth of the effect.
The [LEVEL] knob simultaneously controls the depth of the three effects.
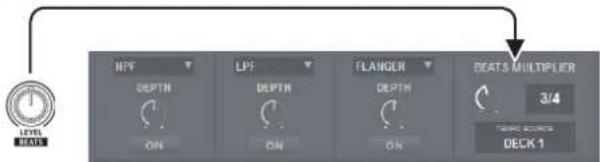
4. Hold down the [SHIFT] button and turn the [LEVEL] knob to adjust the time for which the effect is applied.
MEMO
By tapping the [TAP] button at the desired interval, you can set the value that is the basis for the time at which the effect is applied.
Changing the Effect Tempo
Serato DJ Intro lets you set the tempo of the effect in either of two ways.
Auto tempo mode (default setting)
The effect tempo is determined based on the BPM value of the song.
Manual tempo mode
The basic tempo (BPM value) for the effect is set by the interval at which you tap the [TAP] button.
Switching the tempo mode
- In auto tempo mode, tap the [TAP] button three or more times to switch to manual tempo mode. (button lit)
- In manual tempo mode, long-press the [TAP] button to reset the specified tempo and switch to auto tempo mode. (button unlit)
Using the Sequencer
Using the sequencer, "patterns" created using drum sounds (instruments) of a Roland TR-909, TR-808, TR-707, or TR-606 rhythm machine, or samples of Serato Sampler, can be edited in step recording (sequencer mode) or realtime recording (INST REC mode).
What are instruments?
These are drum sounds handled by the sequencer.
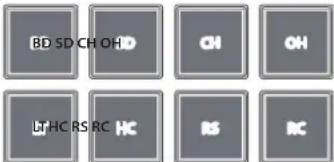
| BD bass Drum SD snare drum | ||
| CH closed Hi-hat OH open hi-hat | ||
| LT low tom HC hand clap | ||
| RS rim shot RC ride cymbal |
What are patterns?
"Patterns" contain performance data for instruments and samples in step recording or realtime recording. You can create and save 16 patterns.
Selecting, Playing, Copying, or Deleting Patterns
Selecting and playing patterns
- Hold down the [SHIFT] button and press the [SEQUENCER] button to access pattern mode.
n pattern mode, the button blinks slowly.
- Press a performance button to select a pattern.
Patterns are assigned to performance pads as follows.
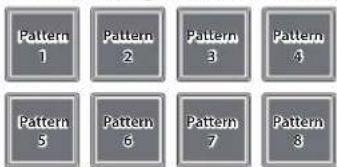
By holding down the [SHIFT] button and pressing a performance pad, you can select patterns 9–16.
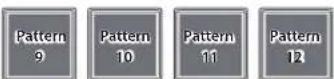
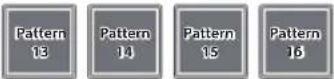
- To play the selected pattern, press the SEQUENCER section's [START/STOP] button.
When you press the button once again, the pattern playback stops.
- By holding down a performance pad and pressing the performance pad of the pattern that you want to play next, you can play back patterns in succession.
Copying a pattern
- Hold down the PARAM [+] button and press the performance pad of the copy-source pattern.
The PARAM [+] button blinks.
- To select a pattern 9–16, hold down the [SHIFT] button and press a performance pad.
- Press the copy-destination performance pad.
The pattern is copied.
Deleting a pattern
- Hold down the PARAM [−] button and press the performance pad of the pattern that you want to delete.
- To select a pattern 9–16, hold down the [SHIFT] button and press a performance pad.
The pattern is deleted.
MEMO
If you copy/delete while a pattern is playing, the copy-destination pattern or the deleted pattern is played.
Editing a Pattern
NOTE
When you edit a pattern, the pattern is updated immediately, so you won't be able to return the pattern to its state prior to editing. If you have favorite patterns that you want to keep, you should copy them or back them up before you edit (p. 16).
Step recording (Sequencer mode)
- Press the [SEQUENCER] button to make the button light.
You're now in sequencer mode.
- Hold down the [SHIFT] button and press a performance pad to select the instrument that you want to record.
You can hold down the [SHIFT] button and use the PARAM [-] [+] buttons to switch instruments and Serato Sampler's samples.
- PARAM [-] button is lit
You can select Serato Sampler's samples.
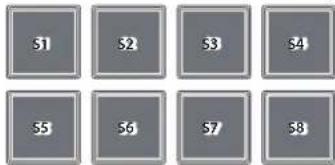
* S5-8 can be selected when using Serato DJ
• PARAM [+] button is lit
You can select instruments.
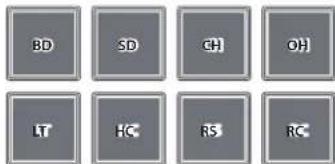
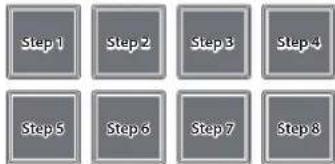
- Press a performance pad to select the step that you want to record.
The performance pad you press is lit.
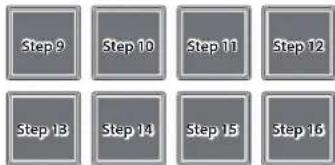
You can use the PARAM [-] [+] buttons to switch the step that will be recorded.
• PARAM [-] button is lit
• PARAM [+] button is lit
Clearing a recorded instrument (sample)
Press a lit performance pad to make it go dark.
- Repeat steps 2–3.
* If you press the PARAM [-] [+] buttons simultaneously while a pattern is playing, the performance pad corresponding to the currently-playing step (indicating pads 1–8 if 1–8 are playing, or pads 9–16 if 9–16 are playing) is lit, allowing you to edit (record or delete) the currently-playing step.
Switching the instrument kit
In INST PLAY mode you can switch kits. For details, refer to "INST PLAY Operations" (p. 11).
Realtime recording (INST REC mode)
- Press the [SEQUENCER] button twice to access INST REC mode. In INST REC mode, the button blinks rapidly.
- Press the SEQUENCER section's [START/STOP] button to play the pattern.
- Strike the performance pads to record instruments.
- If you hold down the [SHIFT] button and press the PARAM [-] button, you'll switch to Serato Sampler's samples.
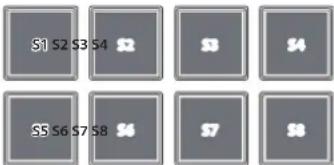
* S5–8 can be selected when using Serato DJ
- If you hold down the [SHIFT] button and press the PARAM [+] button, you'll switch to instruments.
Clearing a recorded instrument (sample)
Hold down the [SHIFT] button and press the performance pad that corresponds to the instrument (sample) that you want to clear.
Switching the instrument kit
In INST PLAY mode you can switch kits. For details, refer to "INST PLAY Operations" (p. 11).
Synchronizing the Sequencer Tempo with the Serato DJ Intro Tempo
By pressing the SEQUENCER section's [SYNC] button, you can synchronize the sequencer's tempo to the tempo of the song that's loaded into the deck.
If you hold down the [SHIFT] button and press the [SYNC] button, synchronization is cancelled.
- While holding down the [LOAD] button at the right side (R channel) of the browser section, use a USB cable to connect the DJ-202 to your computer; continue holding down the [LOAD] button until the SEQUENCER section's [START/STOP] button blinks.
The DJ-202 is in system setting mode.
- Press the performance pad that corresponds with the setting you want to make.
The MASTER level indicator is lit, indicating the current value of the setting.
-
Use the rotary selector to change the value of the setting.
-
When you've finished making settings, press the blinking [START/STOP] button.
All of the MASTER level indicators are lit, and then all buttons and pads blink.
- Disconnect the USB cable to power-off the DJ-202.
| Pad Item Value (Bold: default) Explanation | ||||||
| L channel | [1] Mic audio low cut filter setting | 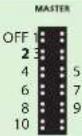 | Adjusts the strength of the low cut filter applied to the mic audio. | |||
| 1-10 Higher values produce a stronger effect. | ||||||
| OFF The low cut filter is not applied. | ||||||
| [2] Mic audio noise gate setting | 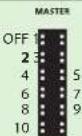 | Specifies the strength of the noise gate applied to the mic audio. | ||||
| 1-10 As the value increases, even higher-level sound will be cut. | ||||||
| OFF The noise gate is not applied. | ||||||
| [3] Mic input effect selection | 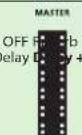 | Reverb | Specifies the effect that is applied to the mic audio. | |||
| Reverb Reverb is applied. | ||||||
| Delay Delay is applied. | ||||||
| Delay + Reverb Delay and reverb are applied simultaneously. | ||||||
| OFF No effect is applied. | ||||||
| [4] Mic input effect setting | 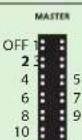 | Adjusts the depth of the effect that is applied to the mic audio. | ||||
| 1-10 Higher values apply the effect more deeply. | ||||||
| OFF No effect is applied. | ||||||
| [5] Master output adjustment | 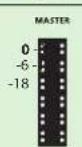 | Adjusts the reference level of the master output. | ||||
| [6] Margin at both ends of cross fader | 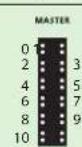 | Specifies the margin at both ends of the cross fader. Higher values increase the margin, providing more play at each end of the cross fader. | ||||
| [7] Demo mode time setting | 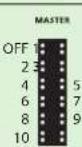 | Specifies the time (minutes) from when the DJ-202 was last operated until it enters demo mode. If this is OFF, demo mode will not operate. | ||||
| [8] LED brightness adjustment | 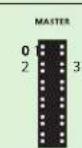 | Adjusts the brightness when a button, pad, or indicator is lit. Higher values decrease the brightness. | ||||
| R channel | [1] USB mode setting | Ger | 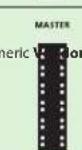 | Set this as appropriate for the USB driver that you're using. | ||
| Generic | Choose this if you want to use the generic USB driver provided by your computer's operating system.* If the USB mode is set to Generic, you can not use Serato DJ Intro / Serato DJ. | |||||
| Vendor | Choose this if you want to use the dedicated DJ-202 USB driver that you downloaded from the Roland website. | |||||
| [2] Jog dial top surface sensitivity adjustment | No Le Le | 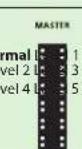 | Adjusts the sensitivity for when you take your hand off of the jog dial. | |||
| Normal Normal sensitivity. | ||||||
| Level 1-5 Higher values improve the response. | ||||||
| Pad Item Value (Bold: default) Explanation | |||
| R channel [3] Backspin length | [IMAGE] | When applying backspin to the jog dial, this setting lets you make backspin continue longer than the distance that the jog dial actually rotated. | |
| OFF Backspin operation occurs according to the actual distance of rotation. | |||
| Short Backspin operation is shorter than with the Normal setting. | |||
| Normal Backspin operation occurs longer than the actual distance of rotation. | |||
| Long Backspin operation is longer than with the Normal setting. | |||
Backing Up or Restoring Sequencer Data
Backup
Here's how to back up patterns 1–16 and kits (instruments).
- While holding down the mixer section's SAMPLER [CUE] button, use a USB cable to connect the DJ-202 to your computer. The SEQUENCER section's [START/STOP] button blinks, and the performance pads blink.
- On your computer, open the "Roland" drive.
- Open the "BACKUP" folder, and copy all files from dj_prm_kit1.prm through dj_prm_kit12.prm and dj_prm_ptn1.prm through dj_prm_ptn16.prm to your computer.
- When copying is completed, operate your computer to eject the "Roland" drive.
- Disconnect the USB cable to power-off the DJ-202.
Restore
Here's how to restore the backed-up sequencer data from your computer to the DJ-202.
- While holding down the mixer section's SAMPLER [CUE] button, use a USB cable to connect the DJ-202 to your computer.
The SEQUENCER section's [START/STOP] button blinks, and the performance pads blink. - On your computer, open the "Roland" drive.
- Copy the backup files into the "Roland" drive's "RESTORE" folder.
- When copying is completed, operate your computer to eject the "Roland" drive.
- Press the SEQUENCER section's [START/STOP] button. The performance pads blink alternately, and then all performance pads blink.
NOTE
Never turn off the power while the performance pads are blinking alternately.
- Disconnect the USB cable to power-off the DJ-202.
MEMO
Sequencer data is compatible between the DJ-202 and the DJ-505. If the DJ-505's sequencer data is restored to the DJ-202, aspects that cannot be reproduced by the DJ-202 are automatically optimized.
Returning to the Factory Settings (Factory Reset)
The system settings and patterns stored in the DJ-202 can be returned to their factory-set state (factory reset).
- While holding down the [LOAD] button in the left side (L channel) of the browser section, use a USB cable to connect the DJ-202 to your computer, and continue holding down the [LOAD] button until the SEQUENCER section's [START/STOP] button blinks.
* If you decide to cancel the operation, turn off the power.
- Press the blinking [START/STOP] button.
Factory reset begins.
The MASTER level indicator blinks, and then all buttons and pads are lit.
NOTE
Never turn off the power while the MASTER level indicator is blinking.
- After the factory reset is complete, disconnect the USB cable to power-off the DJ-202.
Troubleshooting
If the DJ-202 does not function in the way you expect, first check the following points. If this does not resolve the problem, consult your dealer or a nearby Roland service center.
| Problem Items to check Action Page | |||
| The power does not turn on Is the USB cable connected correctly? | Make sure that the USB cable is correctly connected to the computer and to the DJ-202. | p. 8 | |
| Serato DJ does not start | Is Serato DJ Intro installed correctly? Uninstall Serato DJ Intro, and then reinstall it. | p. 3 | |
| If you're using Windows, is the user account specified correctly? | Create a new user account with administrative privileges. After creating the account, install the USB driver and Serato DJ Intro. | ||
| The DJ-202 Is not recognized | Is the USB cable connected correctly? Make sure that the USB cable is connected correctly. | ||
| Could you have connected via a USB hub? | You cannot use a USB hub. Connect the DJ-202 directly to your computer via a USB cable. | ||
| Is the USB driver installed correctly? | Uninstall the USB driver, and then reinstall it. | p. 3 | |
| Are Serato DJ Intro or Serato DJ updated to the most recent version? | Use the most recent version of Serato DJ Intro or Serato DJ. | ||
| Jog dial does not respond Could the jog dial be dirty? | If the top surface of the jog dial is dirty or if your hand is dirty, the jog dial might not respond. Make sure that the jog dial and your hand are clean. | ||
| No sound, or insufficient volume | Are the knobs and faders that adjust the volume set correctly? | Set the [TRIM] knob, channel fader, cross fader, and [MASTER LEVEL] knob to the appropriate positions. | p. 7 |
| Are the powered speakers or amp connected correctly? | Check the connections of the powered speakers or amp. | p. 8 | |
| Are the connected powered speakers or amp set correctly? Check the volume settings of the powered speakers or amp. | |||
| Sound Is distorted | Is the [TRIM] knob set correctly? Set the [TRIM] knob to the appropriate position. | p. 7 | |
| Is the [MASTER LEVEL] knob set correctly? | Set the [MASTER LEVEL] knob so that the red area of the MASTER level indicator does not light. | ||
| Mic sound is not output | Is the [MIC SENS] knob set correctly? | Set the rear panel [MIC SENS] knob to an appropriate position. | p. 8 |
Main Specifications
Roland DJ-202: DJ Controller
| Signal processing | Sampling Frequency = 48 kHz |
| Nominal input level | MIC IN (1/4-inch phone type): -60 dBu |
| Nominal output level | MASTER OUT: 2.0 Vrms |
| Input impedance | MIC IN (Combo type): 7 kΩ or greater |
| Output impedance | MASTER OUT: 1 kΩPHONES: 22 Ω |
| Frequency response | 48.0 kHz: 20 Hz-22 kHz (+0/-2 dB) |
| Connectors | MIC IN jack: 1/4-inch phone typeMASTER OUT jacks: RCA phono typePHONES jacks: stereo 1/4 inch phone typePC port: USB type BMIDI OUT connectorDC IN jack |
| Power supply | USB bus power |
| Current draw | 500 mA |
| Dimensions | 478 (W) x 297 (D) x 62 (H) mm18-7/8 (W) x 11-3/4 (D) x 2-1/2 (H) inches |
| Weight | 2.1 kg4 lbs 11 oz |
| Accessories | Startup GuideUSB cable |
* 0 dBu = 0.775 Vrms
This document explains the specifications of the product at the time that the document was issued. For the latest information, refer to the Roland website.
- Installing the Software.... 3
- Panel Descriptions 4
- Using Serato DJ Intro.... 9
- Operating the DJ-202 11
- System Settings.... 15
- Appendix 17
- About this owner's manual
- Downloading the Serato DJ Intro owner's manual
- Upgrading to Serato DJ
- System Requirements
- Downloading the Software
- Downloading the DJ-202 USB Driver
- Mac OS users
- Windows 10 users
- Users of other than Windows 10
- Downloading the Serato DJ Intro Software
- Installing the Software
- Windows Users
- Panel Descriptions
- Browser Section
- ① [LOAD] buttons
- ② Rotary selector
- Deck Section
- ① Jog dial
- ② [VINYL] button
- ③ [SHIFT] button
- ④ [SYNC] button
- ⑤ [CUE◄] button
- ⑥ [▶/II] button
- ⑦ Pad Mode select
- [HOT CUE] button
- [LOOP] button
- [SEQUENCER] button
- [SAMPLER] button
- Performance pads
- ⑨ PARAM area
- [KEY LOCK] button
- [DECK 3], [DECK 4] buttons
- ⑫ Tempo slider
- If the key lock function is on:
- If the key lock function is off:
- ⑬ FX 1, FX 2 area
- [LEVEL] knob
- Effect buttons [1]–[3]
- [TAP] button
- Mixer Section
- ① PC port
- ② MIDI OUT connector
- ③ MASTER OUT L, R jacks
- MIC IN jack
- MEMO
- ⑤ [MIC SENS] knob
- Starting Serato DJ Intro
- Mac OS
- Windows 7
- Windows 8.1
- Windows 10
- Basic Operations in Serato DJ Intro
- Importing a Song
- Loading a Song
- Playing a Song
- Monitoring Through Headphones
- Closing Serato DJ Intro
- Windows
- Performance Pad Operations
- Hot Cue Operations (HOT CUE)
- Assigning hot cues
- Assigning manual loops
- Adjusting the length of manual loop
- Loop Operations (LOOP)
- Assigning loops
- Sequencer Operations (SEQUENCER)
- Pattern Operations (PATTERN)
- INST PLAY Operations
- Changing instruments
- Hold down the [SHIFT] button and press a performance pad to select a kit.
- Sampler Operations (SAMPLER)
- Assigning samplers
- Effect Operations
- To select the effect type, hold down the [SHIFT] button and press an effect button [1]–[3] of the deck that you want to operate.
- Press the effect button [1]–[3] to turn the effect on (button lit).
- Use the [LEVEL] knob to adjust the depth of the effect.
- Hold down the [SHIFT] button and turn the [LEVEL] knob to adjust the time for which the effect is applied.
- Changing the Effect Tempo
- Auto tempo mode (default setting)
- Manual tempo mode
- Switching the tempo mode
- Using the Sequencer
- What are instruments?
- What are patterns?
- Selecting, Playing, Copying, or Deleting Patterns
- Selecting and playing patterns
- Copying a pattern
- Deleting a pattern
- Editing a Pattern
- NOTE
- Step recording (Sequencer mode)
- Clearing a recorded instrument (sample)
- Switching the instrument kit
- Realtime recording (INST REC mode)
- Synchronizing the Sequencer Tempo with the Serato DJ Intro Tempo
- Backing Up or Restoring Sequencer Data
- Backup
- Restore
- Returning to the Factory Settings (Factory Reset)
- Troubleshooting
- Main Specifications
Brand : ROLAND
Model : DDJ-SB3
Category : DJ Equipment