
KF 2320-00/1 - Fridge GRAM - Free user manual and instructions
Find the device manual for free KF 2320-00/1 GRAM in PDF.

| Product Type | Refrigerator |
| Brand | GRAM |
| Model | KF 2320-00/1 |
| Energy Class | A+ |
| Total Net Capacity | 230 L |
| Refrigerator Net Capacity | 180 L |
| Freezer Net Capacity | 50 L |
| Freezing Star Rating | 4 stars |
| Climate Class | SN-T |
| Noise Level | 39 dB |
| Dimensions (H x W x D) | 1750 x 600 x 650 mm |
| Weight | 55 kg |
| Power Supply | 220-240 V, 50 Hz |
| Annual Energy Consumption | 220 kWh |
| Refrigerant | R600a |
| Adjustable Thermostat | Yes |
| Interior Lighting | LED |
| Door Reversible | Yes |
| Defrost Method | Auto (fridge) / Manual (freezer) |
| Cleaning Recommendation | Wipe with soft cloth and mild detergent |
| Safety Features | Child lock, overheating protection |
| Spare Parts Availability | Available via authorized service |
Frequently Asked Questions - KF 2320-00/1 GRAM
User questions about KF 2320-00/1 GRAM
0 question about this device. Answer the ones you know or ask your own.
Ask a new question about this device
Download the instructions for your Fridge in PDF format for free! Find your manual KF 2320-00/1 - GRAM and take your electronic device back in hand. On this page are published all the documents necessary for the use of your device. KF 2320-00/1 by GRAM.
USER MANUAL KF 2320-00/1 GRAM
In order to ensure a normal operation of your fridge/freezing appliance, which uses a completely environmentally friendly refrigerant the R600a (Flammable only under certain conditions) you must observe the following rules:
- Do not hinder the free circulation of the air around the appliance.
Do not use mechanical devices in order to accelerate the defrosting, other than the ones recommended by the manufacturer. - Do not destroy the refrigerating circuit.
Do not use electric appliances inside the food keeping compartment, other than those that might have been recommended by the manufacturer.
ADVARSEL!
Electrical requirements /2
Transportation instructions /2
Installation instructions /2
Getting to know your appliance /3
Suggested arrangement of food in the appliance /3
Temperature control and adjustment /3
Before operating /4
Storing frozen food /4
Freezing fresh food /4
Making ice cubes /4
Defrosting /4
How to reposition the doors /5
Replacing the interior light bulb /5
Cleaning and care /5
Do's and Don'ts /6
Energy consumption /6
Information concerning the noise /7
Troubleshooting /7
DA Register
1
natural_image
Technical line drawing of a mechanical component with a central cylindrical part and flange (no text or symbols)7
natural_image
Illustration of a hand pouring liquid into a pipe with an upward arrow and a circular hole, over layered ground (no text or symbols)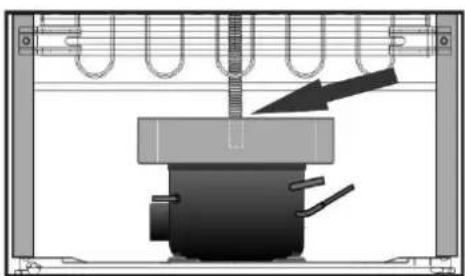
natural_image
Mechanical assembly diagram showing a clamping device with a downward arrow indicating motion (no text or symbols present)8
natural_image
Illustration of a hand cleaning a surface with a cloth (no text or symbols)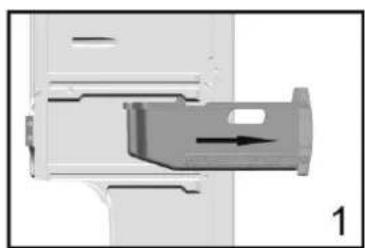
natural_image
Mechanical component diagram showing a piston-like structure with an arrow indicating direction (no text or symbols)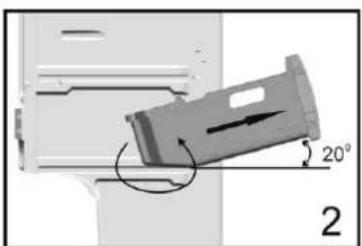
natural_image
Diagram of a mechanical component with angular measurement (20°) and label '2' (no readable text or symbols)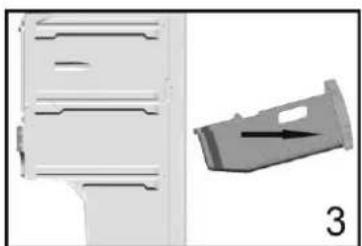
natural_image
Two technical diagrams showing a mechanical component with a highlighted section and an arrow indicating direction (no text or symbols present)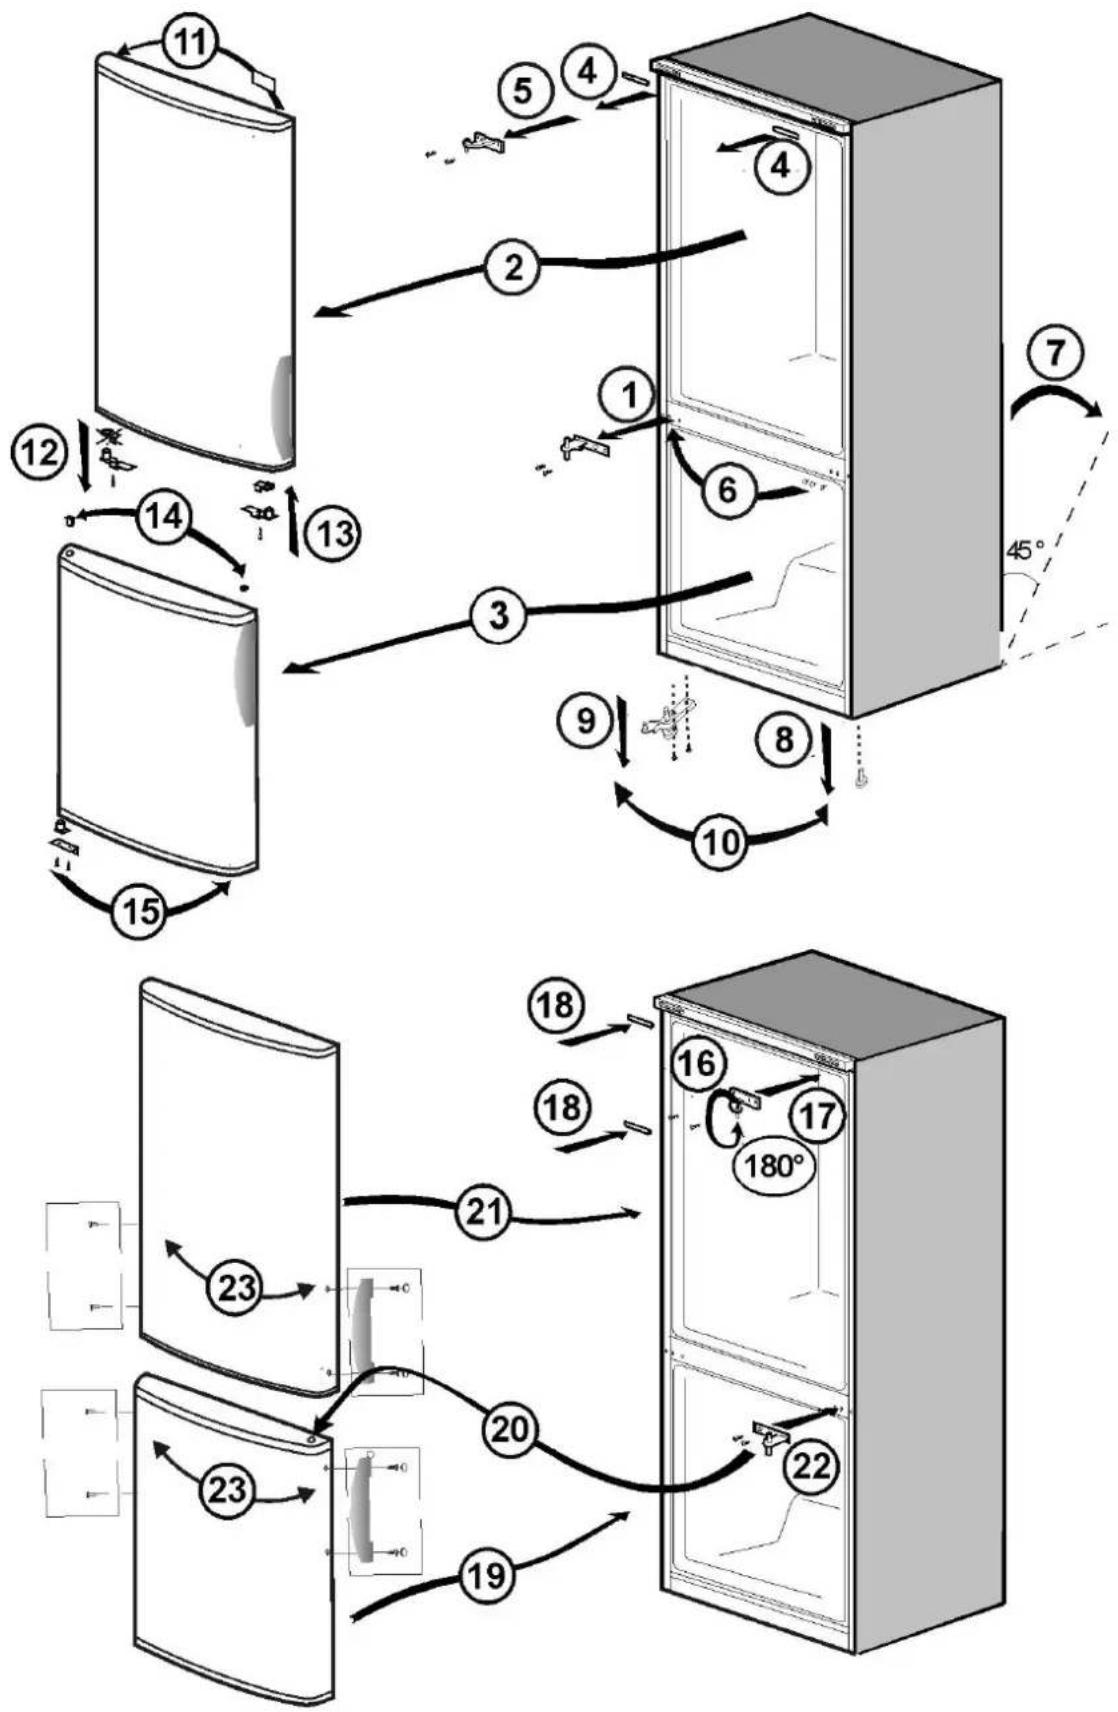
flowchart
graph TD
    A["1"] --> B["2"]
    B --> C["3"]
    C --> D["4"]
    D --> E["5"]
    E --> F["6"]
    F --> G["7"]
    G --> H["8"]
    H --> I["9"]
    I --> J["10"]
    J --> K["11"]
    K --> L["12"]
    L --> M["13"]
    M --> N["14"]
    N --> O["15"]
    O --> P["16"]
    P --> Q["17"]
    Q --> R["180°"]
    R --> S["18"]
    S --> T["19"]
    T --> U["20"]
    U --> V["21"]
    V --> W["22"]
    W --> X["23"]
    X --> Y["23"]
    style A fill:#f9f,stroke:#333
    style B fill:#f9f,stroke:#333
    style C fill:#f9f,stroke:#333
    style D fill:#f9f,stroke:#333
    style E fill:#f9f,stroke:#333
    style F fill:#f9f,stroke:#333
    style G fill:#f9f,stroke:#333
    style H fill:#f9f,stroke:#333
    style I fill:#f9f,stroke:#333
    style J fill:#f9f,stroke:#333
    style K fill:#f9f,stroke:#333
    style L fill:#f9f,stroke:#333
    style M fill:#f9f,stroke:#333
    style N fill:#f9f,stroke:#333
    style O fill:#f9f,stroke:#333
    style P fill:#f9f,stroke:#333
    style Q fill:#f9f,stroke:#333
    style R fill:#f9f,stroke:#333
    style S fill:#f9f,stroke:#333
    style T fill:#f9f,stroke:#333
    style U fill:#f9f,stroke:#333
    style V fill:#f9f,stroke:#333
    style W fill:#f9f,stroke:#333
    style X fill:#f9f,stroke:#333
    style Y fill:#f9f,stroke:#333
Congratulations on your new GRAM fridge/freezer.
Safety first!
Do not connect your appliance to the electricity supply until all packing and transit protectors have been removed.
- Leave to stand for at least 4 hours before switching on, to allow the compressor oil to settle if transported horizontally.
- If you are discarding an old appliance with a lock or a latch fitted to the door, ensure that it is left in a safe condition to prevent the entrapment of children.
- This appliance must only be used for its intended purpose.
- Do not dispose of the appliance on a fire. Your appliance contains non CFC substances in the insulation which are flammable. We suggest that you contact your local authority for information on disposal and available facilities.
- We do not recommend the use of this appliance in an unheated, cold room (e.g. garage, conservatory, annex, shed, out-house etc.).
To obtain the best possible performance and problem-free operation from your appliance it is very important to read the user guide carefully. Failure to observe the user guide may reduce your right to free service during the guarantee period.
Please keep the user guide in a safe place for easy reference.
This appliance is not intended for people with reduced physical, sensory or mental capabilities or lack of experience and knowledge unless they have been supervised or constructed in the use of the appliance by a person responsible for their safety.
Children should be supervised to ensure that they do not play with the appliance.
Electrical requirements
Before inserting the plug into the socket make sure that the voltage and the frequency shown in the rating plate inside the appliance corresponds to your electricity supply.
We recommend that this appliance is connected to the mains supply via a suitably switched and fused socket in a readily accessible position.
The plug has to be accessible after installation in order to allow disconnection of the appliance from the supply.
Warning! This appliance must be earthed.
Repairs to the electrical equipment may only be made by authorised technicians. If the power cable is damaged, the manufacturer or GRAM service must replace it in order to avoid danger.
ATTENTION!
This appliance operates with R600a which is an environmental friendly but flammable gas. During the transportation and fixing of the product, care must be taken not to damage the cooling system. If the cooling system is damaged and there is a gas leakage from the system, keep the product away from open flame sources and ventilate the room for a while.
WARNING - Do not use electrical devices or other means to accelerate the defrosting process, other than those recommended by the manufacturer.
WARNING - Do not damage the refrigerant circuit.
Transportation instructions
- The appliance should only be transported in an upright position. The packaging must be intact during transportation.
-
If the appliance has been positioned horizontally during transportation, it must not be operated for at least 4 hours to allow the system to settle.
-
Failure to comply with the above instructions could result in damage to the appliance for which the manufacturer will not be held liable.
- The appliance must be protected against rain, moisture and other atmospheric influences.
Important!
- Avoid touching the bottom of the condenser metal wires at the back of the appliance while cleaning or carrying the appliance as you may receive injuries to your fingers and hands.
- Do not attempt to sit or stand on top of your appliance as it is not designed for such use. You could be injured or damage the appliance.
- Make sure that the mains cable is not caught under the appliance during and after moving it as this could damage the cable.
- Do not allow children to play with the appliance or tamper with the controls.
Installation instructions
- Do not keep your appliance in a room where the temperature is likely to fall below +10°C (50°F).
- Do not place the appliance near cookers or radiators or in direct sunlight, as this will cause extra strain on the appliance's functions. If installed next to a heat source or freezer, maintain the following minimum side clearances:
30 mm from cookers
300 mm from radiators
- Make sure that sufficient room is provided around the appliance to ensure free air circulation (Fig. 2).
- Place the spacer at the back of your appliance to set the distance between the appliance and the wall (Fig. 3).
-
The appliance should be positioned on a level surface. The two front legs can be adjusted as required. To ensure that your appliance is standing upright adjust the two front legs by turning them either clockwise or anti-clockwise, until firm contact is secured with the floor. Correct adjustment of the feet prevents excessive vibration and noise (Fig. 4)
-
Refer to the "Cleaning and Care" section to prepare your appliance for use.
- If you want to place two products side by side, e.g. a refrigerator and a freezer, as a side by side solution you have to use a decoration kit which contains a small mat and a decoration part. The mat is mounted on the side on one of the products to create a space between the products. The decoration part is placed between the products to hide the gap between the products(Fig. 2). The decoration kit is not a part of the product but can be delivered as an accessory.
Getting to know your appliance (Fig. 1)
1 - Setting knob and interior light
2 - Removable glass shelves
3 - Water collector
4 - Glass shelf
5 - Vegetable drawer
6 - Ice cube tray support & ice cube tray
7 - Compartment for fast freezing
8 - Compartments for frozen foods keeping
9 - Adjustable front legs
10 - Door shelves
11 - Bottle shelf
Suggested arrangement of food in the appliance
Guidelines for obtaining optimum storage:
- The fridge compartment is for the short-term storage of fresh food and drinks.
-
The freezer compartment is ✦ *** rated and suitable for the freezing and storage of pre-frozen food.
The recommendation for ✦*** storage as stated on the food packaging should be observed at all times. -
Dairy products should be stored in the coldest places in the fridge compartment.
-
Cooked dishes should be stored in airtight containers.
-
Fresh wrapped produce can be kept on the shelf. Fresh fruit and vegetables should be stored in the vegetable drawers.
-
Bottles can be kept in the door shelves or on the bottle shelf.
- To store fresh meat, wrap in polythene bags and place on the coldest place in the fridge compartment. Dont let meat juice from fresh meat come into contact with other foods. For safety, only store fresh meat for two to three days.
- For maximum efficiency, the removable shelves should not be covered with paper or ot materials to allow free circulation of cool air.
- Do not keep vegetable oil on the door shelves. Keep the food packed, wrapped or covered. Leftover canned food should not be stored in the can.
- To take out the baskets from the freezer compartment please proceed as in Fig. 9.
Temperature control and adjustment
Operating temperatures are controlled by the setting knob (Fig. 5) and may be set at any position between 1 and 5 (the coldest position).
The average temperature inside the fridge should be around +5°C (+41°F).
Therefore adjust the thermostat control to obtain the desired temperature. Some sections of the fridge may be cooler or warmer (such as vegetable drawer and top part of the cabinet) which is quite normal. We recommend that you check the temperature with an accurate thermometer to ensure that the storage compartments are kept to the desired temperature.
Remember to read off the thermometer very quickly as the temperature on the thermometer will rise very rapidly after you remove it from the freezer.
Please remember that each time the door is opened cold air escapes and the internal temperature rises. Therefore never leave the door open and ensure that it is closed immediately after food is put in or removed.
Before operating
Final Check
Before you start using the appliance check that:
- The feest have been adjusted for perfect levelling.
- The interior is dry and the air can circulate freely at the back of appliance.
- The interior is clean as recommended in the "Cleaning and care" section.
- The plug has been inserted into the wall socket and the electricity is switched on.
Avoid unintentional disconnection by placing sticky tape on the switch.
And note that:
- You will hear a noise as the compressor starts. The liquid and gases sealed within the refrigeration system may also make some noise, whether the compressor is running or not. This is quite normal.
- Slight undulation of the top of the cabinet is quite normal due to the manufacturing process used; it is not a defect.
- We recommend setting the thermostat control midway and monitor that the temperature to ensure the appliance maintains the desired storage temperatures (See section Temperature Control and Adjustment).
- Do not load the appliance immediately it is switched on. Wait until the correct storage temperature has been reached. We recommend checking the temperature with an accurate thermometer (see the "Temperature control and adjustment" section).
- Remember to remove all packing materials - including transportation security in the form of tape, styrofoam, cardboard, etc. within the enclosure. It is also important to remove any styrofoam / cardboard in the evaporator tray on the back of the closet, otherwise there is a risk that water is leaking on the floor.
Storing frozen food
Your freezer is suitable for the long-term storage of commercially frozen foods and also can be used to freeze and store fresh food. If there is an electrical cut, do not open the door. Frozen food should not be affected if the cut lasts for less than 18 hrs. If the cut is longer, then the food should be checked and either eaten immediately or cooked and then re-frozen.
Freezing fresh food
Please observe the following instructions to obtain the best results.
Do not freeze too large a quantity at any one time. The quality of the food is best preserved when it is frozen right through to the core as quickly as possible.
Do not exceed the freezing capacity of your appliance in 24 h.
Placing warm food into the freezer compartment causes the compressor machine to operate continuously until the food is frozen solid. This can temporarily lead to excessive cooling of the fridge compartment.
When freezing fresh food, keep the setting the thermostat control at the medium position.
Small quantities of food up to 12 kg (1 lb) can be frozen without adjusting the temperature control knob.
Making ice cubes
Fill the ice cube tray 3/4 full with water and place it in the freezer. Loosen frozen trays with a spoon handle or a similar implement; never use sharp-edged objects such as knives or forks.
Defrosting
A) Fridge compartment
The fridge compartment defrosts automatically. The thawed water runs to the drain tube via a collection container at the back of the appliance (Fig. 6).
During defrosting, water droplets may form at the back of the fridge compartment where a concealed evaporator is located. Some droplets may remain on the liner and refreeze when defrosting is completed. Do not use pointed or sharp-edged objects such as knives or forks to remove the droplets which have refrozen.
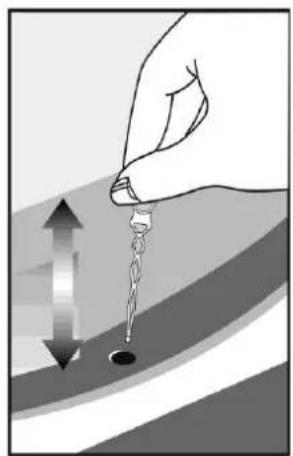
If, at any time, the defrost water does not drain from the collection channel, check that no food particles have blocked the drain tube. The drain tube can be cleaned with a cotton bud or similar instrument.
Check that the tube is permanently placed with its end in the collecting tray on the compressor to prevent the water spilling on the electric installation or on the floor (Fig. 7).
B) Freezer compartment
Defrosting is very straightforward and without mess, thanks to a special defrost collection basin.
Defrost the appliance twice a year or when a frost layer of around 7 (1/4") mm has formed. To start the defrosting procedure, switch off the appliance at the socket outlet and pull out the mains plug.
All food should be wrapped in several layers of newspaper and stored in a cool place (e.g. a fridge or a larder).
Containers of warm water may be placed carefully in the freezer to speed up the defrosting.
Do not use pointed or sharp-edged objects, such as knives or forks to remove the frost.
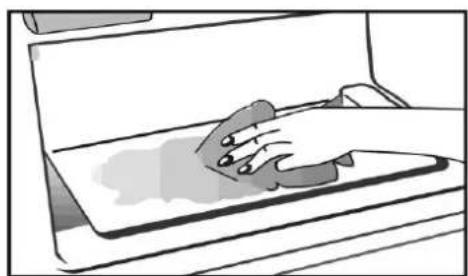
Never use hairdryers, electrical heaters or other such electrical appliances for defrosting. Sponge out the defrost water collected at the bottom of the freezer compartment. After defrosting, dry the interior thoroughly (Fig. 8). Insert the plug into the socket and switch on the electricity supply.
How to reposition the doors
Proceed in numerical order (Fig. 10).
Replacing the interior light bulb
To change the Bulb/LED used for illumination of your refrigerator, call your Authorised Service.
The lamp(s) used in this appliance is not suitable for household room illumination. The intended purpose of this lamp is to assist the user to place foodstuffs in the refrigerator/freezer in a safe and comfortable way.
The lamps used in this appliance have to withstand extreme physical conditions such as temperatures below -20°C.
Cleaning and care
- We recommend that you switch off the appliance at the socket outlet and pull out the mains plug before cleaning.
- Never use any sharp instruments or abrasive substances, soap, household cleaner, detergent or wax polish for cleaning.
- Use luke warm water to clean the cabinet of the appliance and wipe it dry.
- Use a damp cloth wrung out in a solution of one teaspoon of bicarbonate of soda to one pir of water to clean the interior and wipe it dry.
- Make sure that no water enters the temperature control box.
- If the appliance is not going to be used for a long period of time, switch it off, remove all the food, clean it and leave the door ajar.
- We recommend that you polish the metal parts of the product (i.e. door exterior, cabinet sides) with a silicone wax (car polish) to protect the high quality paint finish.
- Any dust that gathers on the condenser, which is located at the back of the appliance, should be removed once a year with a vacuum cleaner.
- Check door seals regularly to ensure that they are clean and free from food particles.
- Never:
- Clean the appliance with unsuitable material such as petroleum based products.
- Subject it to high temperatures in any way,
- Scour, rub etc., with abrasive material.
-
To remove a door tray, remove all the contents and then simply push the door tray upwards from the base.
-
To remove a door tray, remove all the contents and then simply push the door tray upwards from the base.
- Make sure that the special plastic container at the back of the appliance which collects defrost water is clean at all times. If you want to remove the tray to clean it, follow the instructions below:
- Switch off at the socket outlet and pull out the mains plug
- To remove the water collector tray pull and turn (left-right).
- Clean and wipe it dry
- Reassemble the tray by reversing the sequence and operations
- To remove a drawer, pull it as far as possible, tilt it upwards and then pull it out completely.
Do's and don'ts
Do clean your appliance regularly (See "Defrosting")
Do keep food for as short a time as possible and adhere to "Best Before" and "Use by" etc. dates.
Do defrost food in the fridge compartment.
Don't store bananas in your fridge compartment.
Don't cover the shelves with any protective materials which may obstruct air circulation.
Don't store poisonous or any dangerous substances in your appliance. It has been designed for the storage of edible foodstuffs only.
Don't leave the door open for long periods, as this will make the appliance more costly to run and cause excessive ice formation.
Don't use sharp edged objects such as knives or forks to remove the ice.
Don't exceed the maximum freezing loads when freezing fresh food.
Don't try to keep frozen food which has thawed; it should be eaten within 24 hours or cooked and refrozen.
Energy consumption
Maximum frozen food storage volume is achieved without using the middle drawer and the upper shelf cover provided in the freezer compartment. Energy consumption of your appliance is based on the freezer compartment being loaded without the use of the middle drawer and upper shelf cover.
Practical advice concerning the reduction of the electricity consumption
- Make sure that the appliance is located in well-ventilated areas, far from any heat source (cooker, radiator, etc.). At the same time, the appliance should be kept away from sunlight.
- Make sure that the purchased refrigerated/frozen food is placed in the appliance as soon as possible, especially during summertime. It is recommended to use thermal insulated bags to transport the food.
- We advise you to place frozen food in a vessel in the refrigerator compartment when the food has to thaw. In this way you avoid that the water resulting from the thawing leaks into the refrigerator compartment. We recommend you to start the thawing at least 24 hours before the use of the frozen food.
- Do not leave the door of the appliance open more than necessary and make sure to close it properly after use.
Information concerning the noise and the vibrations which might appear during the operation of the appliance
- The operation noise can increase during the operation.
- In order to keep the temperatures at the adjusted temperatures, the compressor of the appliance starts periodically. The noise produced by the compressor becomes stronger when it starts and a click can be heard when it stops.
- The performance and operation features of the appliance can change according to the modifications of the temperature of the ambient environment. They must be considered as normal.
- Noises like liquids flowing or as being sprayed
- These noises are caused by the flow of the refrigerant in the circuit of the appliance and comply with the operation principle of the appliance.
- Other vibrations and noises.
- The level of noise and vibrations can be caused by the type and the aspect of the floor on which the appliance is placed. Make sure that the floor does not have significant level distortions or if it can yield to the weight of the appliance (it is flexible).
- Another source of noise and vibrations is represented by the objects placed on the appliance. These objects must be removed from the appliance
- The bottles and the vessels placed in the refrigerator touching each other. In such cases move the bottles and the vessels so that there is a small distance between them.
Troubleshooting
If the appliance does not operate when switched on then check:
- That the plug is inserted properly in the socket and that the power supply is on. (To check the power supply to the socket, plug in another appliance)
- Whether the fuse has blown, the circuit breaker has tripped or whether the main distribution switch has been turned off.
- That the temperature control has been set correctly.
- That the new plug is wired correctly, if you have changed the fitted, moulded plug. If the appliance is still not operating at all after above checks, contact the GRAM service. Please ensure that above checks have been done, as a charge will be made if no fault is found.

The symbol ■ on the product or on packaging indicates that this product may not be treated as household waste. Instead it has to be handed over to the place of collection for the recycling of electrical and electronic equipment. By ensuring the correct removal of this product you help preventing the potential negative consequences for the environment and human health, which could be caused by inappropriate waste handling of this product. For more detailed information about recycling of this product, please contact your local government offices, your household waste disposal service or the shop where you purchased the product.
- ADVARSEL!
- DA Register
- Safety first!
- Electrical requirements
- Warning! This appliance must be earthed.
- ATTENTION!
- Transportation instructions
- Important!
- Installation instructions
- Getting to know your appliance (Fig. 1)
- Suggested arrangement of food in the appliance
- Temperature control and adjustment
- Before operating
- Final Check
- And note that:
- Storing frozen food
- Freezing fresh food
- Making ice cubes
- Defrosting
- A) Fridge compartment
- B) Freezer compartment
- Do not use pointed or sharp-edged objects, such as knives or forks to remove the frost.
- How to reposition the doors
- Replacing the interior light bulb
- Cleaning and care
- Do's and don'ts
- Energy consumption
- Practical advice concerning the reduction of the electricity consumption
- Information concerning the noise and the vibrations which might appear during the operation of the appliance
- Troubleshooting
Brand : GRAM
Model : KF 2320-00/1
Category : Fridge